#browser dressup game
Explore tagged Tumblr posts
Text
Ximbo.land is broken
Some issue with redirects and voting. Only users below the voting level or paying senator can access the site. Doesn't seem like we have heard anything from Team Bimbo either yet.
4 notes
·
View notes
Text
Ximboland - Career outfit

#ximboland#bimboland#corporate goth#business attire#ximbo#fashion#browser game#xl#ximbo.land#outfit#browser dressup game#fashionable republic of ximboland#style#dressup#dressup game#game#mabimbo#ma bimbo#missbimbo#miss bimbo#virtual fashion#virtual#virtual dressup#doll
8 notes
·
View notes
Text
It's back! The best ever visual romance by Rinmaru! OMG! It's actaully back! I used to play this for hours! I misssed it soooo much! Ahhhh! I'm so excited! :D <3 <3 <3
#doll divine#rinmaru ascension#rinmaru games#rinmaru#virtual#novel#dressup game#romance#fantasy#visual novel#aida#classic#fandom#dating#flash#drama#browser games
53 notes
·
View notes
Text

We are open! https://www.lelolaparadise.com/web-game/
https://www.lelolaparadise.com/
#dressup#drawing#art#dress up#fashion#digital art#digital illustration#vector#vector art#cute game#gaming#games#browser games#cozy games#chibi#cozygameraesthetic#character design#character art#oc#oc art#avatar#dress up game#character animation#animation#2d animation#ootd#ootdfashion#ootdinspiration#outfit inspo#outfit
0 notes
Text
important announcement
I need everyone who followed me from that fucking oc post to either immediately start playing the Free browser based dragon collection/dressup game Flight Rising or fuck off forever. not all of my posts are flight rising posts but only flight rising players (current or former) are allowed to see them. thank you.
37 notes
·
View notes
Text
How I created a dress-up game in RPGMaker!
At least one person asked me to make a guide for this and that’s enough for me! Though, bear in mind, I may not be the best at explaining things and I used an example from assets I already had.
I made the dress-up game pictured below using RPGMaker MV, but I’m sure this method is applicable to versions above MV as well. I will be writing this post specifically through the lens of using MV (You’re also going to need some plugins, but not a lot!). At the time of typing this post, all RPGMaker engines are on sale until October 5th (just to let you know!)
(Please note: This method does not account for a game where you can freely change the colors of characters hair/clothes)
(Please note x 2: this is not a tutorial for learning RPGMaker, but a tutorial on how to make this specific type of game within the engine. Prior RPGMaker experience and familiarity is required when following this tutorial!)
I’m not the best at explaining things, but I’m sure going to try my best!
List of things we’re going to need:
-An RPGMaker Engine, preferably MV (or MZ) since they already come with mouse support.
-An art program
-A tileset consisting of words and arrows
-All your dress-up accessories as PNG images
-A blank PNG image
-2 plugins
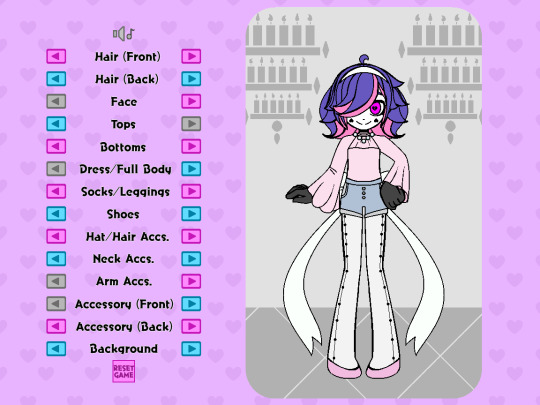
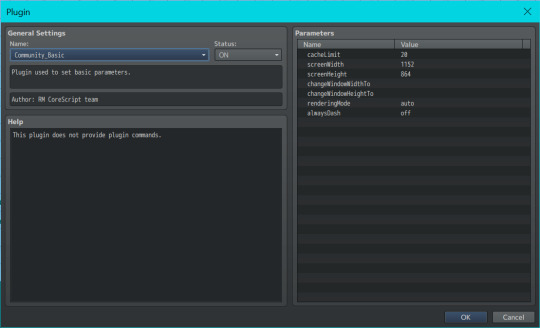
First things first is you’re going to want to decide on the canvas size of your game. Keep in mind with the way RPGMaker works, there’s a high chance you’ll wind up with black bars on the side of your screen. If your game is intended to be played in browser on itch.io, it shouldn’t be much of an issue as you can choose the display size on the game’s page to match the visible game. (I also just personally wasn’t concerned about the black bars for a dress-up based game anyways) The canvas I chose to work with for this game was 1152 x 864, but you can choose whatever size you feel will help you draw most effectively(just keep in mind how it might appear in browsers or if the player will have to zoom out!) If using MV, you change your canvas resolution by going into the plugin list and selecting “Community_Basic”

When making the assets in your art program, I find it easiest to have your canvas match the canvas size of the game. We’ll use Nova as our example character for everything. I drew them and all their assets in the center of the screen (for easier mirroring). The position of all the items can be adjusted later in the engine
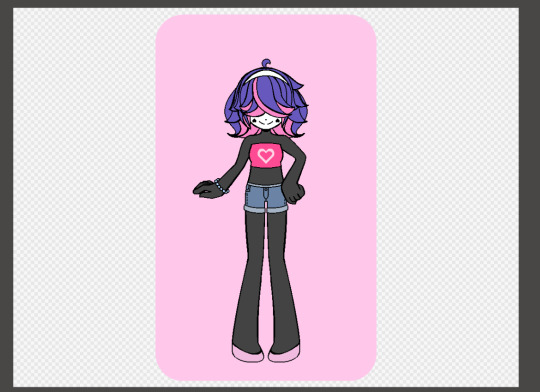
I would start by doing a few test assets and putting those in the engine to make sure you get the hang of the whole thing, but this is where you’ll be making all your assets for a given character! (So if you wanna make some test assets and then move down to the “Putting it together in the engine” section, that might be a good idea!)
Here I create and separate every asset into their own folders(categories) and subfolders. For example, hats get their own folder labeled “hats”, and the subfolders “hat 1” “hat 2” “hat 3”, etc, each containing their own individual hat asset.
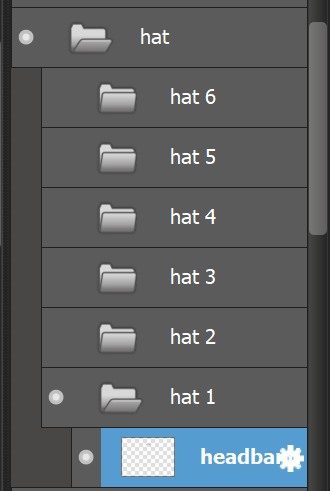
You can make as many or as little categories for clothing as you like. When you have everything you need, make at least one asset from all your categories visible, and make sure all the categories are ordered in the way they are meant to appear in game. This way, you can make sure nothing is overlapping in the incorrect way(at least for what your intentions are). When your categories are properly ordered, keep them in that order, as you’ll use it for a basis later when importing the assets into the engine.

Alright, this next part is a little tedious. Now you’re going to save every asset individually by hiding every other folder/layer except for the one you’re saving. It might help to have a naming convention for your assets, for example all of Nova’s assets follow the scheme of “dressup nova-shoes 4.png” “dressup nova-shoes 5.png” “dressup nova-shoes 6.png” etc etc.
NOTE: In addition to these files, remember to include a BLANK png image with nothing on it! This will help later!

Once this is done, we can start importing them into the program!
Putting it together in the engine:
Open up your RPGMaker project’s file directory. Find the folder named “img”, and in that find the folder named “pictures”. Drop all your clothing/hair/face/etc assets into this folder.
Now we need to set the scene. The scene being…a map! I used multiple characters so my game has a different map for each one.
Since Nova is our example character, let’s focus on Nova’s map.
Make sure the width and height of your map is large enough to cover the whole screen (sans any black bars you might have on the sides). You can fill in the back with tiles, or you can do what I did and add a small parallax backing that loops across the screen. I made a small one with two hearts in the corners for a nice scrolling effect!

To start this map, let’s put in some of the categories to choose between. I did this by laying out the words on a tileset, and drawing that tileset onto the map. The order of categories I chose does not reflect the layer order of clothing items, but rather was organized by what I felt was a natural start-to-finish order progression in a dress-up game.
Don’t worry about putting the choice arrows next to the categories yet, though! We’ll do that in a little bit.
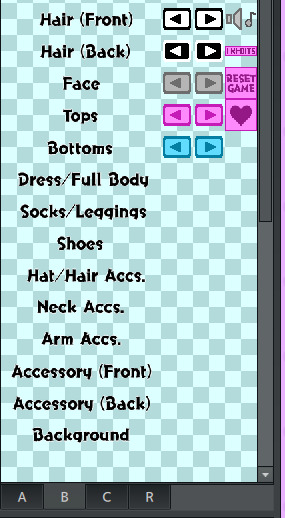
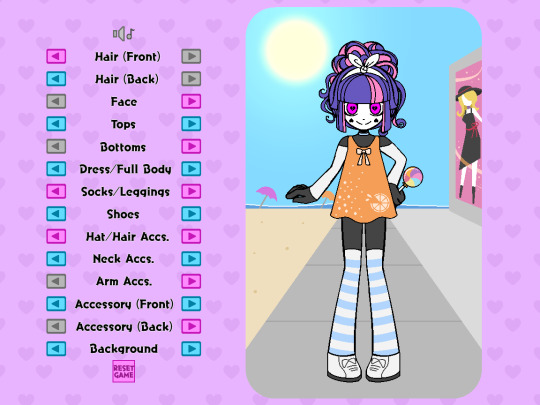
Now we’re going to start with actually putting your character and their clothes/hairs/etc into the map. Double-click anywhere on the map (where you won’t put any other buttons) to create an event.
We are going to set this event to autorun. In this event we are going to set up all your layers, even if nothing needs to be presented on them yet. To start, I added some comments to help me keep track of them. For context, when you choose to show an image in RPGMaker, it asks you for the image number. The image number is essentially the image’s “layer”, with 1 being the bottom-most layer and 100 being the top-most layer. Up to 100 images can be displayed on an RPGMaker screen at any given time. Even though 1 is the bottom-most layer, I chose to start at 10 just in case I wanted to add more layers underneath later. So layer 10 is my bottom-most layer, and layer 24 is my top-most layer.
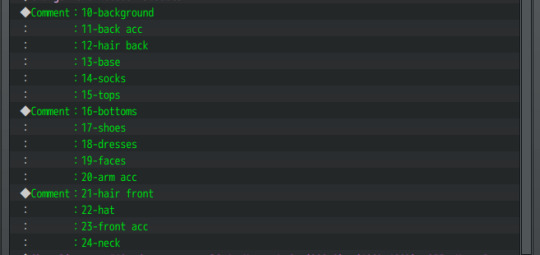
Let’s start with our bottom-most layer, the background asset.
The background is this pink rectangle behind Nova.

Even if you change its appearance, this background itself is always visible. So we are going to show the first background on layer 10 with the Event Command “Show Picture”.
(Note, because I wanted all the dress-up assets to be on the right side of the screen, every picture’s X position is offset by 200. You may want to offset your game in another way, or keep it centered.)

Because this is an asset that is always visible on the screen, we are also going to set up its variable. Select “Control Variables” in your event commands, set it to a constant of "1" and add it underneath the "Show Picture" command,

Don’t worry about the #number of the variable, all that matters is the number of what the variable equals. As you can see we are showing “dressup nova-BG 1”, so our variable should equal 1 to correspond to this.
The next asset up from that is our back accessory on image layer 11. (Nova can have fairy wings or a yoyo accessory, for example.) The back accessory doesn’t always need to be present, so we will simply set this image as being our BLANK png asset.

We will continue going down the column like this! Any asset that doesn’t need to be present will be set as a blank, and any asset that does need to be present (like Nova’s background, Nova’s hair in the front and back, Nova’s face, and Nova’s base) will be set as the corresponding image and have its variable set to “1”.
(Note: The base does not require a variable as it does not change)

And because this is an autorun event, we have to close it off. Add a control self-switch A, and then add a new event page. On the 2nd event page, merely click off self switch A in the conditions box
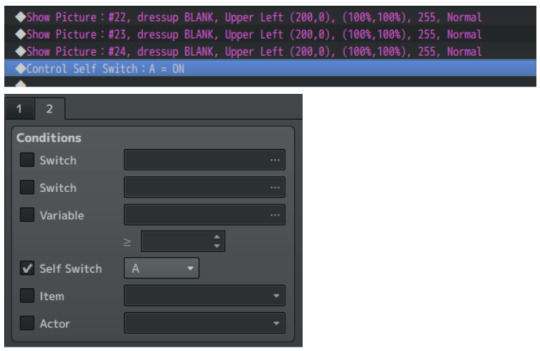
Doing this will ensure that the autorun event won’t keep trying to show the images in an endless loop.
Go into your database tab and under system, check that your starting position is on the correct map (if you have more than one) and start your game. Your autorun event should show all the images you asked it to. (I was gonna have a pic here but I'm limited on pics so)
Now, using our category list that we placed as tiles onto the map, we are going to be adding the arrows next to them to make them function.
Even though it's at the bottom, we’ll start with the category Background as an example since that was the first we implemented.
Create an event on the left side of Background and make its event image a grayed-out, left facing arrow, to communicate that the player cannot click anymore in that direction. Set its condition to be variable activated, with your Background variable being greater than or equal to 1. Leave the event page contents blank.
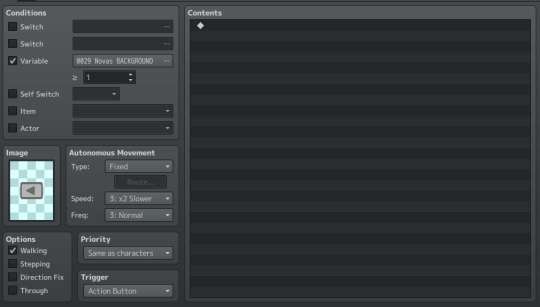
Create a 2nd event page on this event. On this 2nd page, replace the grayed-out arrow with a colored arrow, and set the Background variable to be greater than or equal to 2. This means that as long as the variable is 2 or above, the player can press the back button and go back to see the previous Backgrounds.
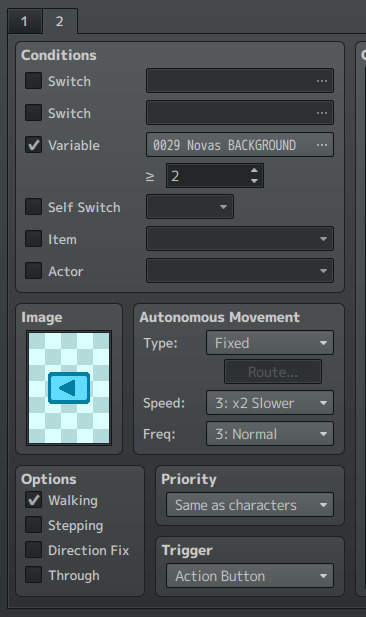
This time, we WILL fill up the contents on the event page.
First we are going to put a control variable command. Set your Background variable to subtract a constant of 1. This means that every time the event is clicked, it will subtract 1 from your Background variable (since this is your “Back” button).

Next, we are going to include a conditional branch command like so!
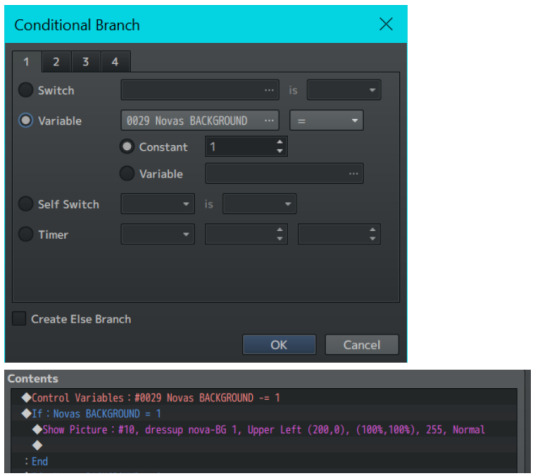
Under this Conditional Branch we put a Show Picture command, where we show an image on layer 10(the same from our autorun event). We can see that if Nova’s Background variable is equal to 1, then layer 10 is going to show the first background–that pink rectangle from before.
Let’s copy-paste this conditional branch and edit it slightly!

Repeat this for every asset you have for a specific category. (In this case, Nova has 5 different backgrounds, with one background needing to be visible at all times.) So our 2nd event page should look like this:

This button event is now ALMOST complete–but we’re missing something!
We need this event to activate when we click on it! Normally in an RPGMV game, when you click on an event, the player character will walk to the event before it can activate. But for a dress-up game, we want the event to activate as soon as it’s clicked on!
Therefore, we need a plugin! You’ll need a plugin that makes events activate based on a click trigger. For me, I downloaded the “TDDP_MouseSystemEx” plugin for MV found here: https://forums.rpgmakerweb.com/index.php?threads/mouse-system-ex.46511/
(Remember to follow the terms of service for whatever plugins you use!)
After adding it to my in-game plugin list and turning it on, I added the “click_activate!” notetag to the event (as instructed by the plugin) and now it works as soon as it is clicked on.
Next, we have to make the Forward Button! This is easier now that we have the Back Button as a base.
To make your Forward Button, we’re going to copy the 2nd Event Page of the Back Button event, and make it the first page of our Forward Button event. We are then going to change three things:
-Remove the condition variable
-Change the image to a right-facing colored arrow
-Change the control variable from a “subtract constant of 1” to an “add constant of 1”
So your first Forward Button event page should look like this!
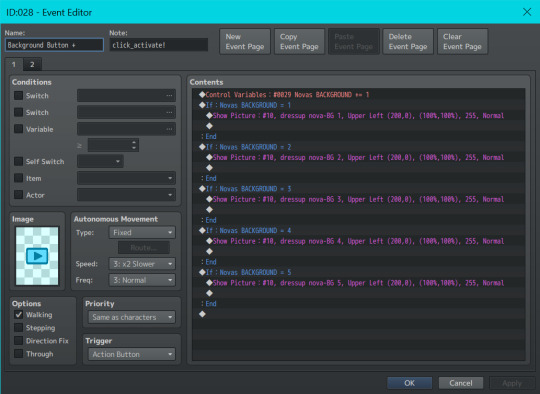
For the 2nd event page of your forward button, remove all the contents in your content box. Change the arrow to gray-right-facing arrow, and add a condition variable equal to your number of assets for the category.
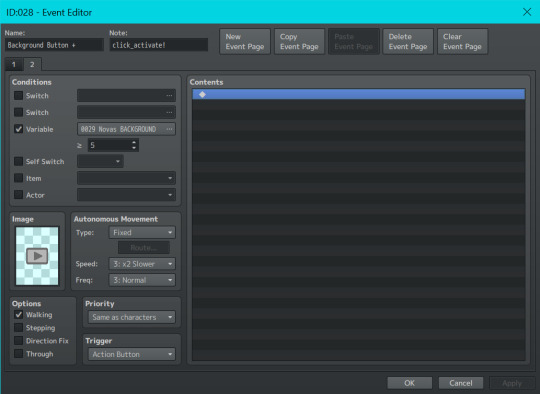
Because Nova has 5 Backgrounds, our number is 5. If Nova had 7 Backgrounds, this number would be 7. If Nova had 3 Backgrounds, this number would be 3, etc.
This ensures that when a player has clicked to the last asset, they can’t continue increasing the variable past what is needed.
You then continue making these types of Back Buttons and Forward Buttons for every asset, until you have everything you need!
But WAIT!!
For objects that don’t always need to be present, we add one extra conditional statement!
Let’s use socks, for example. Nova does not need to wear socks to complete an outfit. So for the socks’s back button, we make sure to set the variable condition to 0.
After that, under the event contents of our sock buttons, we make sure to add an extra conditional statement for the sock variable. When the variable is zero, we show the BLANK image–so there are no socks to be seen! (Remember to apply this extra statement to both the back and front buttons!) Do this for every asset that doesn’t always need to be present such as socks, dresses, hats, etc etc.
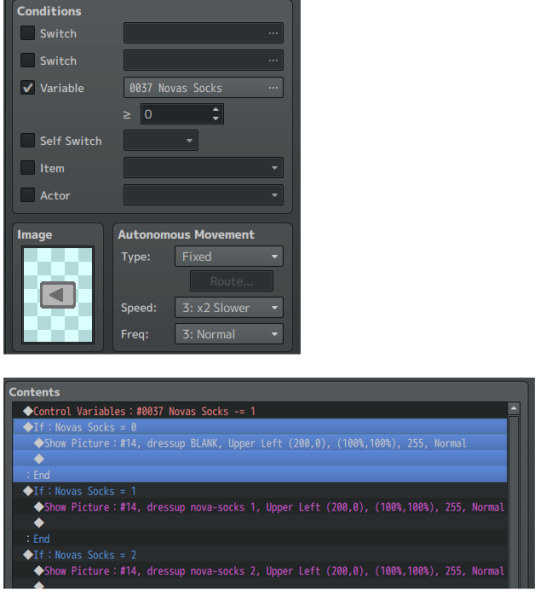
That’s pretty much the basics of all the mechanics you need to get it to work!! I won’t be going over other things like the reset game button/disabling menu access/hiding the player walksprite, as those are things you probably know how to do already if you’re familiar with the engine.
But I WILL share one last piece of optional advice that I feel makes a big difference.
While testing things out you might notice that there is slight lag between changing images, a blip between pictures. This is because RPGMaker doesn’t preload images, and loads in an image as soon as it’s called.
In a downloadable version of a game this slight lag is negligible. However, if you intend for your game to be browser-based, this lag will be significant and noticeable. In order to fix this problem, I’d recommend downloading Galv’s Image Cache plugin found here: https://galvs-scripts.com/2017/04/26/mv-image-cache/
This plugin will help pre-load images so there’s no lag!
However, you will have to write the name of all your assets manually in its plugin menu. If you have a lot of images (which you will, for a dress-up game) this could take a very long time.
My advice is to go into your game’s picture folder, select all, and select “copy file path” from your folder options. Paste this list into an excel sheet, remove the directory name and file extensions, and then paste it into a google doc.
Edit the names together until there is no spaces between image names and they’re all separated by commas. Then, select all and paste your list into the Image Cache plugin’s settings. If you spelled something wrong or placed a space incorrectly, the game will not start and will tell you what image it was struggling to find. So having this to refer back to is very helpful and also means you don’t have to retype everything in the event of an error!
(Below is just a preview of how my list of image names looks for my dress-up game and what i copy-pasted into the plugin settings for the Image Cache plugin)

And thaaaaat should be everything! I hope this wasn’t too hard to follow, or messily formatted! But I tried my best and will try to answer any questions one may have about it!! Good luck creating your dress-up game!
#im so sorry i feel like this is so hard#but i hope it makes at least a little sense!!#i also apologize for the combo images tumblr doesnt let me have more than 30#guide#rpgmaker#rpgmaker mv#dress up#dress up game#dress up guide#game guide
106 notes
·
View notes
Text
The browser version of my puppy dressup game is finally up on itch.io!! if you like dressing up puppies, [click here] for the full puppy experience!
21 notes
·
View notes
Note
hyello mutual if i may ask Umm what is your dragon creechure making game called it seems silly !
OF COURSE YOU MAY ASK!! it's called flight rising :) it's a free browser game you can find it at www1.flightrising.com
it's very fun i like dragon economics. there's minigames and turn based pve combat. and you get to play dressup with yuor touys
2 notes
·
View notes
Text
yeah so this is the yume nikki fangame where you give madotsuki silly outfits!!!!! (you can play in browser)
i made this in like a few hours today and uhh yeah lol feel free to share the madotsuki fits you have created using this tool
#my art#my games#yume nikki#ynfg#yume nikki fangame#yume nikki fangames#madotsuki#madotsuki yume nikki#dressup game#dress-up game#dress up game#clickteam fusion
18 notes
·
View notes
Text
Flash Was Killed Because It Was Objectively Dangerous
I get it, I get the Flash nostalgia and the fondness for old Flash games. I was big on Neopets before they decided to ruin the art and make all the pets samey paper dolls to play dressup with (completely ruining the point of the far more expensive "redraw" colors like Mutant and Faerie and Desert). I have fond memories of Newgrounds games and I even managed to take a class for a semester in high school where I could learn flash.
But I also remember how terrible it was. And you should too.
Leaving aside all of the issues involving performance and inaccessibility (such as being easily broken by bog-standard browser actions like the back button, and its ability to modify web code AND OS code in real time likely broke a lot of accessibility tech too), Flash was legitimately one of the most dangerous web technologies for the end user. An end-user is you, or more specifically back then, child-you.
According to Wikipedia and its sources, Flash Player has over a thousand vulnerabilities known and listed and over 800 of these lead to arbitrary code execution.
What is arbitrary code execution? That's when someone can just run any commands they want on a machine or program that didn't intend it. A fun way to see this is in this infamous Pokemon tool-assisted speedrun where they manage to get an SNES to show the host's twitch chat in real time. It's not so fun though when it's someone stealing all the files on your computer, grabbing your credentials so they could clean out your Neopets account (yes, really, it was a pretty common concern at the time), and other nefarious works. Also, there was a time where it allowed people to spy on you with your webcam and microphone.
Oh and on top of all of this, Flash had its own "flash cookies", which could not be cleared by ordinary means and thus could be used to track users indefinitely, at least until Adobe slapped a bandaid over it by introducing yet another screen an ordinary person wouldn't know to use. (I assume this is how the infamous neopets "cookie grabbers" worked, so they could get into your account. This is mainly what I remember about using Flash back in the early 2000s lol) So it not only was a "stranger taking over your machine" concern, but a bog-standard privacy concern too, arguably a precursor to our current panopticon internet landscape, where greedy websites would track you because they could and maybe get some money out of it, facilitated by this technology.
When Apple decided to block it, it wasn't out of greed; Steve Jobs cited its abysmal performance and security record, among other issues such as an inherent lack of touchscreen support, and Apple cited specific vulnerability use-cases when blocking specific versions before they nuked it entirely. When Mozilla, who makes Firefox, decided to block it, it's not like they would've gotten money out of doing so, or by offering an alternative; they did so because it is fucking dangerous.
Your ire and nostalgia is misplaced. Flash was not killed by our current shitty web practices that ruin unique spaces and fun games. Flash was killed because both Macromedia (its original developers) and Adobe were incapable of making it safe, if that was even possible, and it was killed after third-parties, in an unprecedented gesture, collectively threw their hands up and said enough.
Well, that and HTML5 being developed and becoming more widespread, being able to do everything Flash can do without being a pox on technology. One could argue that you should bemoan the lack of Flash-to-HTML5 conversion efforts, but that requires asking a lot of effort of people who would have to do that shit for free...and if they have to run Flash to do so, opening themselves up to some of the nastiest exploits on the internet.
Nostalgia is a fucking liar. The games themselves I think are worth having nostalgia over (look, I still find myself pining for that one bullet hell Neopets made and Hannah and the Pirate Caves), but Flash itself deserves none of that, and absolutely deserved to be put in the fucking ground. You're blaming the wrong causes. It was terrible.
(specifics and sources found via its wikipedia page, which has a lot more than is mentioned here. and also my own opinions and experiences back then. lol)
#flash#nostalgia really is a liar#don't trust it#technology#yet another instance of my unfettered autism#adobe flash#macromedia flash#the old web#I was there gandalf three thousand years ago lmao#personal context: I am now a software QA that tests web apps#and when I was a child I was absolutely a neopets addict and am on Subeta TO THIS DAY#I learned HTML and CSS when I was 12#largely to spruce up my Neopets profile#I have been on the internet A While now#(I understand how ironic it is given that my tumblr layout is kind of shit; I will fix it soon)
17 notes
·
View notes
Text
BXDCherri is the new Prime Ximbo
She is likely asleep rn, so her reaction and Fashion Police selection announcement will come later.

#ximbo.land#browser game#ximbo#bimboland#ximboland#browser dressup game#heydis-hotlight#dress up game#ximboland news#ximbo news#bimboland news#bimbo news#mabimbo#ma bimbo#missbimbo#miss bimbo#february election
3 notes
·
View notes
Text
Ximboland April PXFC entry
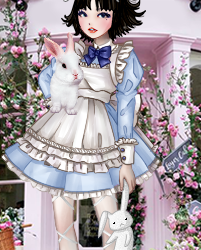
this was my entry in the april Prime ximbo fashion contest :)
#PXFC#PBFC#Prime Ximbo Fashion Contest#Ximbo#Ximboland#ximbo.land#bimboland#bimbo.land#ma bimbo#missbimbo#miss bimbo#mabimbo#fashion#outfit#fashion contest#style contest#browser dressup game#browser dressup#dressup game#browser game#desirableend#heydi#ximbo#xl#ximboland#clothes
5 notes
·
View notes
Text
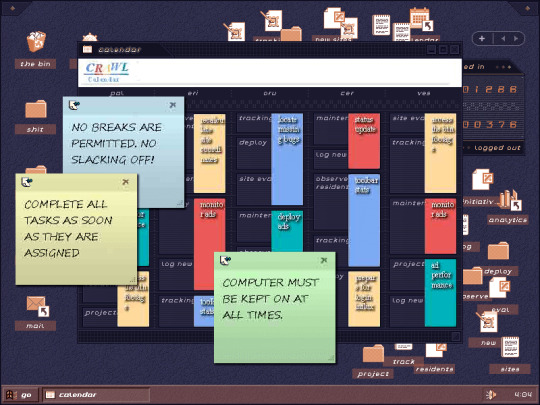
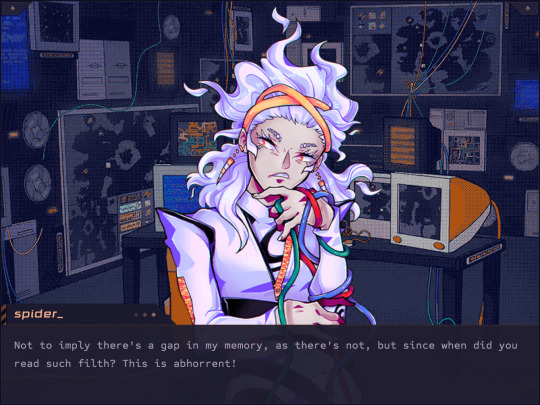
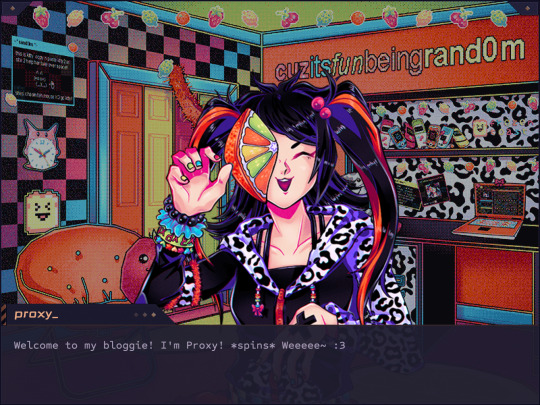
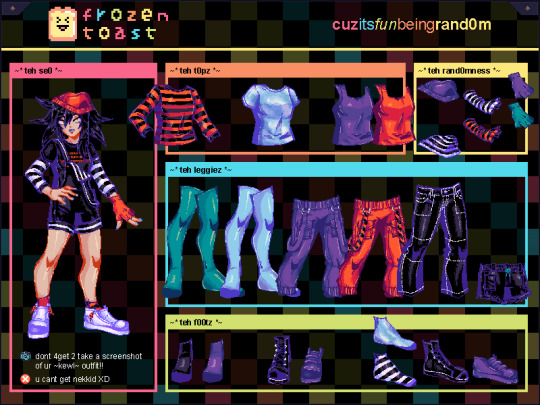

🔶 Various screenshots from No Follow, a browser 「game」 on Neocities about the internet of yore & w/e else.
#no follow game#no follow#browser game#neocities#pixel art#some inspirations include...#windows 95#windows 98#old web#myspace#stamps#drag and drop dressup games
25 notes
·
View notes
Text
Non-SU related: I uploaded one of my old casual games (a browser based 90's goth makeup sim!) to itch, inspired by y2k era doll dressup flash games! You can play it hereeeeee <3333

9 notes
·
View notes
Text
dolldivine.com browser based dressup games
i think the near-extinction of people making fun, deep and/or unique interactive text-based browser games, projects and stories is catastrophic to the internet. i'm talking pre-itch.io era, nothing against it.
there are a lot of fun ones listed here and here but for the most part, they were made years ago and are now a dying breed. i get why. there's no money in it. factoring in the cost of web hosting and servers, it probably costs money. it's just sad that it's a dying art form.
anyway, here's some of my favorite browser-based interactive projects and games, if you're into that kind of thing. 90% of them are on the lists that i linked above.
A Better World - create an alternate history timeline
Alter Ego - abandonware birth-to-death life simulator game
Seedship - text-based game about colonizing a new planet
Sandboxels or ThisIsSand - free-falling sand physics games
Little Alchemy 2 - combine various elements to make new ones
Infinite Craft - kind of the same as Little Alchemy
ZenGM - simulate sports
Tamajoji - browser-based tamagotchi
IFDB - interactive fiction database (text adventure games)
Written Realms - more text adventure games with a user interface
The Cafe & Diner - mystery game
The New Campaign Trail - US presidential campaign game
Money Simulator - simulate financial decisions
Genesis - text-based adventure/fantasy game
Level 13 - text-based science fiction adventure game
Miniconomy - player driven economy game
Checkbox Olympics - games involving clicking checkboxes
BrantSteele.net - game show and Hunger Games simulators
Murder Games - fight to the death simulator by Orteil
Cookie Clicker - different but felt weird not including it. by Orteil.
if you're ever thinking about making a niche project that only a select number of individuals will be nerdy enough to enjoy, keep in mind i've been playing some of these games off and on for 20~ years (Alter Ego, for example). quite literally a lifetime of replayability.
83K notes
·
View notes
Text
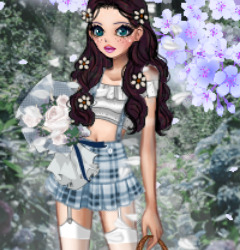
My entry in the Ximbo.land Secville Farm Life Finesse fashion contest
Honey Beee is hosting a Stardew Valley themed ximboland contest!
Screenshots from shop are allowed.
#ximboland#bimboland#ximbo#browser game#ximbo.land#browser dressup game#heydis-hotlight#dress up game#fashion#virtual clothes#stardew valley#stardew#ma bimbo#mabimbo#miss bimbo#missbimbo#fashion contest#virtual fashion
3 notes
·
View notes