#border2
Explore tagged Tumblr posts
Text
This border2 fire may become a big problem
i hope not
0 notes
Text
Ahan Shetty Joins Team Border 2
Ahan Shetty carries the legacy forward in 'Border 2'! From his father's iconic role to his own cinematic journey, Ahan steps into history.
Link to the full story: https://www.theomenmedia.com/post/ahan-shetty-steps-into-his-father-s-boots-with-border-2-legacy-continues

#Ahan Shetty#Border2#Bollywood#Sunny Deol#Varun Dhawan#Diljit Dosanjh#War Movies#Indian Cinema#Film Legacy#Movie Announcement#Casting News#Bollywood News#Entertainment News#Cinema#Movie Update#Bollywood Legacy#War Drama#Cinema Lovers
0 notes
Text
Laungewala yudh sthal . .
#laungewala#longewala#laungewalaborder#border2#indopakborder#1971war#warground#wars#jaisalmer#tourism
0 notes
Text


*Actor Varun Dhawan Honors India’s Bravehearts on Army Day*
https://www.instagram.com/p/DE1itv2MGvU/?img_index=1&igsh=MXFsaDhma3NzZGx5bQ==
On the occasion of Army Day actor Varun Dhawan took a moment to honor the true heroes of the nation. Currently at the shoot location of his upcoming film Border 2, Varun spent the day interacting with soldiers, gaining a deeper understanding of their lives, and paying tribute to their unparalleled dedication.
*Expressing his admiration, Varun shared on this social platform*, “Honoring the real heroes of India this #ArmyDay. Proud to be with them. #Border2”
The shoot for Border 2, helmed by Anurag Singh and produced by Bhushan Kumar and JP Dutta, has brought Varun closer to the lives of soldiers. The film, which celebrates the valor of the Indian military, is set to release on *January 23, 2026*, and promises to be an epic tribute to the guardians of our borders.
Directed by Anurag Singh, Border 2 is produced by Bhushan Kumar, Krishan Kumar, JP Dutta, and Nidhi Dutta. The film is presented by Gulshan Kumar & T-Series in collaboration with JP Dutta's J.P. Films. With its impressive production team and talented cast, Border 2 promises to be a grand cinematic experience.
0 notes
Text
[ad_1] Fans of the 1997 blockbuster 'Border' have a reason to rejoice as the highly anticipated sequel, 'Border 2', has officially begun filming. Earlier this year, Sunny Deol confirmed his return to the iconic role he portrayed in the original, and now, the cameras are rolling for the much-awaited continuation of the patriotic war saga. In a recent announcement shared by the film's makers, a picture from the film's sets was posted, featuring a clapboard that signals the start of production. The post reads, "The cameras are rolling for Border 2! With Sunny Deol, Varun Dhawan, Diljit Dosanjh, and Ahan Shetty leading the charge, this Anurag Singh directorial, powered by cinematic legends Bhushan Kumar, JP Dutta, and Nidhi Dutta promises action, drama, and patriotism like never before. Mark your calendars: #Border2 hits theaters on Jan 23, 2026!" Directed by Anurag Singh, 'Border 2' is set to be a grand cinematic spectacle with a star-studded ensemble cast that includes Sunny Deol reprising his legendary role, Varun Dhawan, Diljit Dosanjh, and Ahan Shetty. The original film, helmed by JP Dutta, was a landmark in Indian cinema, depicting the 1971 India-Pakistan war, and introduced audiences to unforgettable characters like Suniel Shetty's portrayal of BSF officer Bhairav Singh. A special moment in the sequel's development is the casting of Ahan Shetty, who steps into his father Suniel Shetty's shoes. In a heartfelt Instagram post, Ahan shared his emotional connection to the Border franchise. "Border is more than a film--it's a legacy, an emotion, and a dream come true," Ahan wrote. Reflecting on his deep connection with the film, he added, "Ironic how life works--my journey with Border started 29 years ago, when mom visited dad on set while pregnant with me. I grew up hearing OP Dutta's legendary stories, holding JP uncle's hand, and sitting by @nidhiduttaofficial side. I never realized how much those moments would shape my love for cinema and the Indian Armed Forces." He went on to express his gratitude to the filmmakers, saying, "Now, being part of Border 2 is an absolute honour. JP uncle, thank you for continuing to hold my hand, I hope to make you very very proud." The passing of the baton from father to son has been beautifully captured in a montage video shared by the makers, which showcases iconic images from the original 'Border', alongside Ahan's emotional voiceover. Apart from Ahan Shetty and Sunny Deol, the film will also feature Varun Dhawan and Diljit Dosanjh in significant roles. The film is produced by Bhushan Kumar, JP Dutta, and Nidhi Dutta, with Anurag Singh taking the reins as the director. 'Border 2' promises to offer a blend of high-octane action, gripping drama, and an unwavering sense of patriotism. Fans are eagerly awaiting the sequel's release, scheduled for January 23, 2026. (ANI) [ad_2] Source link
0 notes
Text
Gaur NYC Residence | luxury 4 Bhk Apartments | Sector 3, Wave City
Living Made Easy your lifestyle at Gaur NYC Residences 4 BHK Apartments in Sector 3, Wave City, Ghaziabad which is available at comparative price.
Amenities – Swimming pool, Fire System, Covered Parking, 24/7 Power, Lift(S), Water etc.
Call us @9210333666
Visit www.propshop.org.in/gaur-nyc-ghaziabad
#VineshPhogat #Border2 #RGKarProtest #Bangladeshindus

0 notes
Text
जन्माष्टमी पर तुलसी का महत्व
तुलसी को हिंदू धर्म में एक अत्यंत पवित्र पौधा माना जाता है। यह सभी देवताओं विशेषकर भगवान विष्णु और माता लक्ष्मी के लिए प्रिय है। बताया गया है कि घर में तुलसी का पौधा लगाने से सकारात्मक ऊर्जा का प्रवाह होता है और नकारात्मक शक्तियों का विनाश होता है। यह न केवल आध्यात्मिक लाभ देता है, बल्कि स्वास्थ्य के लिए भी फायदेमंद है। तुलसी की यह विशेषता इसे भारतीय संस्कृति में विशेष स्थान प्रदान करती हैं।


#SUNWAVES#Sauces#Bybit#DNCConvention2024#Indra4K#KLRahul#BusAccident#BreakingNews#Border2#Vaazhai#NationalSpaceDay#YogiCreatesRecordJobs#Kalki2898AD#ArshadWarsi#NCTDREAM_RainsinHeaven#StandWithBTS#WeLoveUSuga
0 notes
Text
Varun Dhawan Join Bordar 2: सनी देओल की आगामी फिल्म में दिखेगा वरुण धवन का जलवा, पहली बार बनेंगे फौजी
सनी देओल की आगामी फिल्म Bordar 2 में वरुण धवन की एंट्री हो गाई है। इसकी जानकारी फिल्म में मुख्य किरदार रहे सनी देओल ने सोशल मीडिया पर एक पोस्ट साझा कर के दिया है। इस पोस्ट को साझा करते हुए सनी ने लिखा “Welcoming Fauji @varundvn to the Battalion of #Border2 (#Border2 की बटालियन में फौजी @varundvn का स्वागत है) सनी देओल ने 40 सेकंड की एक क्लिप सोशल मीजिया पर साझा किया जिसमें सोनू निगम की सुरीली…
0 notes
Note
As a person who grew up with a border terrier, the existence of Snap has absolutely captivated me, holy crow. I've never seen a mix before where I've said "yes this dog is HALF of each exactly".
Right? Like, damn--I get why the Border2 pairings didn't catch on as much in the flyball height dog world as borderjacks and later borderstaffs and borderstacks, but man I can envision that being an incredibly nice cross to actually LIVE with. I occasionally tease my spouse, who is horrified by the existence of borderjacks, by pretending to want one--but having had Jacks, the odds of doubling up on the neuroticism as well as the drive always worried me a bit. I feel like a Border Terrier would probably give you a dog that was a touch less balls to the wall and also a touch less totally motivated by lust for ball.
1 note
·
View note
Text
Diljit Dosanjh Joins The Cast Of Border 2!

🎬📷 #Border2 Alert! Punjabi sensation Diljit Dosanjh joins forces with Sunny Deol and Varun Dhawan in what's shaping up to be the most epic war film saga! Get ready for a blend of valor, drama, and unyielding patriotism. #DiljitInBorder2 #BollywoodNews
Here is a link to the full article: https://www.theomenmedia.com/post/diljit-dosanjh-enlists-for-border-2-a-new-chapter-in-bollywood-s-war-epic-saga
#Border2 #DiljitDosanjh #SunnyDeol #VarunDhawan #BollywoodBlockbuster #PatrioticCinema #AnuragSingh #WarFilm #IndianCinema #DiljitInBorder2
0 notes
Photo


#BORDER 2 Atonement#BORDER2 Shokuzai#Border 2#japanese drama#shun oguri#دراما يابانية#اقتباسات درامات يابانيه
19 notes
·
View notes
Photo
En este capítulo 2, diseñaremos la navegación y parte del cuerpo, para dejarlo listo para el siguiente capítulo en donde diseñaremos el tablón. Recuerda que puedes navegar todo este tutorial en el tag #nctutorial: desde cero.
¿Recordáis lo que os dije al final del anterior tutorial? Eso de limpiar el foro. ¡Espero que lo hayáis hecho! Porque nos vamos a poner manos a la obra y a diseñar.
Mi foro, ahora mismo, tiene esta pinta:
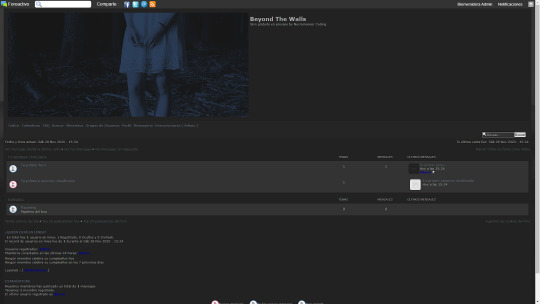
Un poco triste, pero no os preocupéis, que no se va a pasar así para siempre.
Lo primero que vamos a hacer es incluir algunas cosas que nos van a hacer la vida un poco más sencilla. Nos vamos a dirigir a overall_header y vamos a localizar el </head>. Antes de esto, copiaremos el HTML que podéis encontrar en este pastebin.
¿Qué hace todo ese código? Pues diversas cosas. Incluye las fuentes de honeybee, fontawesome y saturnicons. También incluye el código de tooltips; podéis modificar el CSS para que se ajuste a vuestro diseño. Incluye también el script de seleccionar todo, para que no tengáis que incluirlo en el panel (o, si sois como yo, para que no se os olvide añadirlo). Y por último, incluye las fuentes que usaremos en este foro: Montserrat (400, 400i, 700, 700i, 900 y 900i), y Roboto (400, 400i, 700 y 700i).
Ahora toca poner las variables básicas. ¿Por qué vamos a trabajar con variables? Porque por qué no lo harías. Le ahorras tiempo a tus compañeros si el acento no casa con algo, o si cambiáis los colores de los grupos, o cualquier cosa que queráis modificar. Además, facilita que el diseño sea consistente (todos sabemos que sacar el color con el selector de colores no siempre es lo más correcto y puede generar 3 colores similares pero no iguales).
Mis variables, para empezar, tienen esta pinta:
:root { --accent1: #596175; --accent2: #3c3e47; --border1: 1px solid #444; --border2: 1px solid #404040; --tbckg: rgba(23,23,23,0.25); --dbckg1: #2a2a2a; --dbckg2: #2c2c2c; --dbckg3: #2e2e2e; --dbckg4: #303030; --dbckg5: #333333; --dbckg6: #373737; }
Los dos primeros serían los colores de acento, que suelo tener dos. Luego vienen los bordes, uno más claro y otro un poquito más oscuro. El fondo transparente lo marco con una T delante, y los fondos opacos tienen una D delante. Como siempre, esta es mi manera de trabajar, puede que vuestra marcación sea completamente diferente. Yo uso muy pocas letras en las variables, para poder escribir más rápido.
También vamos a asegurarnos de que tengáis puestas las fuentes correctas de cuerpo y título en Colores. En nuestro caso, pondremos Montserrat, sans-serif para título, Roboto, Verdana, Helvetica, sans-serif para cuerpo y Courier New, monospace para códigos. Y pondremos el tamaño de la fuente principal a 12.
Una vez tengamos eso, vamos a ajustar el cuerpo del foro. Por defecto, #wrap viene con tres formas de poner el width, porque a FA le gusta el overkill (si desactivas el CSS de base, con width te valdrá).
#wrap { width: 1152px; min-width:1152px; max-width:1152px; }
Por supuesto, modifica el número por el ancho que quieras tener. En este skin, también vamos a tener un padding y un borde en el #wrap, y además, no tiene un fondo opaco. Pues vamos a ello.
#wrap { width: 1152px; min-width:1152px; max-width:1152px; background:var(--tbckg); border:var(--border1); padding:30px; }
Ahora vamos a añadir un par de correcciones pequeñas:
body#phpbb { background-size:cover; background-position:center; }
Esto nos ajustará el fondo del foro y lo centrará.
a:hover{ text-decoration:none!important; }
Esto retirará el subrayado cuando haces hover en un link.
*::selection{ background:var(--accent1); color:white; }
Esto hará que cuando selecciones algo en el foro, el fondo corresponda con el acento que hemos declarado en las variables. Si tu acento es muy claro, te conviene cambiar el color de texto a uno más oscuro que blanco.
::-webkit-scrollbar { width: 5px; height: 5px; } ::-webkit-scrollbar-button { width: 0px; height: 0px; } ::-webkit-scrollbar-thumb { background: var(--accent1); border:2px solid #090909; } ::-webkit-scrollbar-track { background:#090909; } ::-webkit-scrollbar-corner { background: transparent; }
Este es un código básico de scrollbar para navegadores webkit. Para firefox, usaremos este:
* { scrollbar-color: var(--accent1) #090909; }
Y por último, usaremos este código para esconder un anuncio de FA que se desplega en las esquinas y es un grano en el culete:
#criteo_sticky { display:none; }
Ya va teniendo mejor pinta, ¿no?
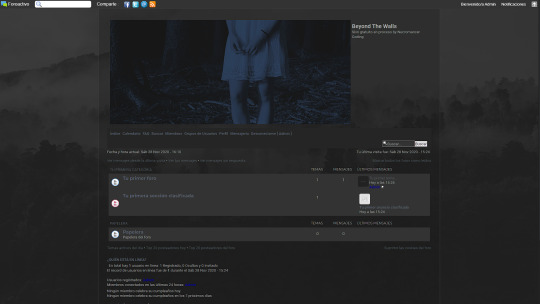
Vale, ahora vamos a meter un par de javascripts que nos harán la vida un poco más sencilla. Revisa este pastebin. Tienes los comentarios en el código para que tengas claro qué hace cada cosa. Deberás ponerlo con el check en Todas las páginas.
Y con eso, podemos empezar a meter mano a nuestro HTML. Tendremos que crear dos cajas: una para la navegación lateral, que fijaremos, y una que estará en la parte de arriba del cuerpo pero que no bajará al hacer scroll. La lateral la llamaremos #nav y la otra se llamará #topnav.
Nos dirigiremos al overall_header y buscaremos el principio de <body id="phpbb">. Codearemos justo debajo.
<div id="nav"></div> <div id="topnav"> <div class="tnenv"> <div class="tntop"></div> <div class="tnbot"></div> </div> <div class="tnicon"></div> </div>
Vale, ya tenemos nuestras cajas. Ahora tenemos que rellenarlas. Vas a buscar en tu template, el mismo que tienes abierto, overall_header, el .navbar dentro de #page-header. Verás que hay un ul llamado .linklist.navlinks{NAVBAR_BORDERLESS}. Pues vamos a coger solo la variable que está dentro, {GENERATED_NAV_BAR}, y la vamos a meter en #nav. Esta variable genera los links de la navegación, cada uno dentro de un <li> y, si tiene, con su correspondiente imagen. Una vez que lo tengamos, puedes borrar todo el div de .navbar. TEN CUIDADO de no borrar ningún </div> de cierre de más.
Ahora necesitamos generar el nombre de usuario y su avatar. Para ello, vamos a usar un script directamente en el código. "<script>document.write(_userdata.username);</script>" nos permitirá escribir el nombre de usuario. "<script>document.write(_userdata.avatar);</script>" nos permitirá escribir el avatar. Estas variables ("_userdata.{cosa}") son valores internos que tu foro almacena cuando el usuario lo visita. Algunos de ellos son id (el numerito de usuario), avatar, username, user_posts... Pondremos el primero en .tntop y el segundo en .tnicon.
Por último, lo último que nos queda es poner los links del navtree. Esto se encuentra en el viewforum_body o en el viewtopic_body: "<a class="nav" href="{U_INDEX}"><span>{L_INDEX}</span></a>{NAV_CAT_DESC}". Eso lo pondremos en .tnbot. Con todo, nuestro HTML debería verse así:
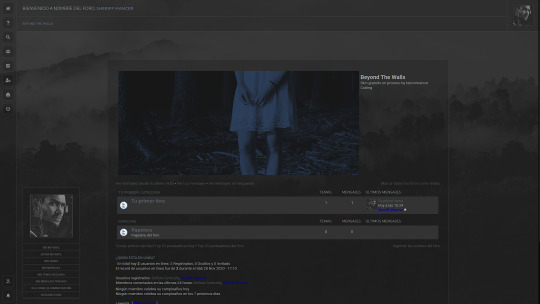
<div id="nav">{GENERATED_NAV_BAR}</div> <div id="topnav"> <div class="tnenv"> <div class="tntop"> BIENVENIDO A NOMBRE DEL FORO, <strong><script>document.write(_userdata.username);</script></strong> </div> <div class="tnbot"> <a class="nav" href="{U_INDEX}"><span>{L_INDEX}</span></a>{NAV_CAT_DESC} </div> </div> <div class="tnicon"><script>document.write(_userdata.avatar);</script></div> </div>
Copiaremos el código completo del template para asegurarnos de que lo llevamos con nosotros, mandaremos el template y registraremos. Y tendríamos que tener algo así:

Ahora nos queda diseñarlo. Vamos a ir fijándonos en nuestro mockup para guiarnos. En este paso, no detallaré mucho el proceso, ya que será diferente para cada uno, y lo que sí detallaré será cómo colocar los datos de la toolbar. Le hemos añadido también un par de cosas al body y al #wrap para posicionar el cuerpo de forma centrada respecto a las navegaciones:
body#phpbb { margin-top: 0!important; padding: 111px 0 0 61px!important; }
div#wrap { margin-top: 100px; }
111px sería el alto de mi navbar superior, y 61px es el ancho de mi navbar lateral. Además, hemos añadido un margin en el cuerpo para que haya todavía más espacio entre el navbar superior y el cuerpo.
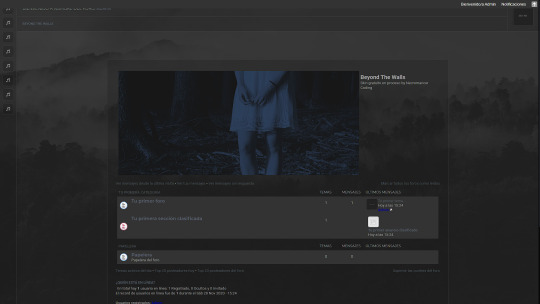
Ahora todo está en su sitio menos la toolbar. No preocuparse. Vamos a usar este mini tutorial para ponerlo fijo, abajo a la izquierda y este otro para cambiar los iconos.
Pero aunque tengamos el icono diseñado, cuando hacemos hover o click... en fin, cosas de la toolbar. Pero los podéis editar usando :hover (a#fa_welcome:hover, a#fa_notifications:hover) y las clases de activación (#fa_right.welcome #fa_menu #fa_welcome, #fa_menu:hover :visited, #fa_toolbar > #fa_right.notification > #fa_notifications). Además, puedes modificar el icono si añades :before al final (#fa_right.welcome #fa_menu #fa_welcome:before, #fa_menu:hover :visited, #fa_toolbar > #fa_right.notification > #fa_notifications:before).
Nos quedaría posicionar las cajas. Primero usaremos #notif_list para la lista de temas y #fa_menulist para el panel de usuario. Igual que la toolbar, tendrá fixed, puesto en la zona inferior para que no choque con la navbar superior.
Por último, para asegurarnos de que la toolbar no rompe el diseño desde invitado, vamos a eliminarla con un poquito de JS (que añadiréis en el que habéis copiado antes desde pastebin, a continuación de la línea 35):
$('.bodyinvi #fa_toolbar').remove();
Y con eso y un bizcocho, daríamos por terminada esta navegación. Y lo prometido es deuda, ¡ya podéis ver el foro en funcionamiento!
https://nc-beyondthewalls.foroactivo.com/
El diseño irá avanzando a medida que veáis las partes de los tutoriales, para que lo veáis avanzar poco a poco. Tendréis una cuenta para usar y verlo desde dentro, llamada Señora Gertrudis, con la contraseña necromancercoding. No tendréis permiso para postear nada, tenedlo en cuenta, es una cuenta simplemente de visualización.
Podéis encontrar las imágenes incluidas en este tutorial aquí.
#tutorial#foroactivo#foros#rpg#rpg hispano#nctutorial#nctutorial: desde cero#nctutorial: aprendizaje
72 notes
·
View notes
Note
F E D. I was going to go D E F but with what F is...
that’2 faiir enough. 2omeone ha2 two harve2t even the low hangiing fruiit.
F - Food play (do they like using food in the bedroom? are there any foods they prefer to use during sex or foreplay? any they’d like to try?)
me per2onally? not really. but other people ii’ve known are iintwo iit, and theiir partiicular iinten2iity on iit ii2 hot two me. do the proviidiing not the con2umiing lol. 2iince when do ii eat?
E - Extra info (any other fetishes? feet? leather? role playing? blood? fantasies that they might want to experience not on this list?)
feet actually no. ii know ii know biig women you’re at foot level iit 2hould go twogether riight? tragiically iit doe2 not for me. leather ii mean. iit look2 hot done riight ii gue22?
ii’ve never role played iin my liife don’t fuckiing iin2ult me.
blood uh. ii 2ee enough of that leakiing out of my face. gettiing rough 2ure but the actual blood iit2elf ii2 not my iideal.
you’re on thii2 page you know my relatiion2hiip two 2iize2, come2 wiith a great many dynamiic2 mo2t people don’t con2iider untiil you 2tart two explore or unpack thiing2 a liittle. probably be2t left two iit2 own po2t iif tho2e iintere2ted poke me.
D - Dominance (do they prefer to dominate, or be dominated? do they have experience as a Dom? Do they have a Dom that they trust already? What kind of things do they enjoy as/with their Dominant partner?)
eiither or. ii 2uppo2e ii lean toward2 the 2ubmii2iive but hone2tly iit2 more becau2e other2 make iit 2uch a fuckiing chore when they 2ecretly want two be knocked down a peg. eiither you want iit or you don’t but iif ii’ve got two piin them two a wall and la2er 2calpel iit out of them ii’m le22 iintere2ted iin fiightiing about iit. when iit become2 more p2ychotherapy than kiinky my iintere2t drop2 liike a fuckiing 2tone.
a2 for the other 2iide people only deal wiith me when they want 2hiit from me mo2t of the tiime anyway2, then poof. ephemeral vapor iin the fuckiing wiind. eventually you fetii2hiize the u2e ii 2uppo2e. or ju2t only get the poiint when the output on your2elf ii2 2o overwhelmiing iit border2 on the paiinful. or iin my ca2e fiinally become2 cogniizable two my thiick mutant 2kull.
that miight’ve gotten off topiic.
2 notes
·
View notes

