#bookbinding tips
Explore tagged Tumblr posts
Visit Tumblr Blog
Explore Tumblr blogs with no restrictions, modern design and the best experience.
Last Seen Tumblr Blogs


Fun Fact
Tumblr was attacked by a cross-site scripting worm deployed by the Internet troll group GNAA on Dec 3, 2012.
Text
here’s my guide to making typesets! I use Word to make my typesets, Canva for designs, and Adobe to insert the majority of my designs.
this is a ton of info and I tried to make it as readable as possible, but plz let me know if u need any clarification!
Word: always use the app, the online program doesn't have all of the options needed
paper size: US Letter Borderless
then i flip it landscape, do custom borders, and select book fold. I do 1 inch on top and bottom, .75 in inside, and .5 in outside. i leave the gutter option alone and leave it set to 0. You can choose how large you want your signatures to be (sheets in booklet option on the margins page): I normally do 40 page signatures, but if it's a smaller text you'll want to go smaller for stability. after that, you should have a half page to start your typeset!
Inserting your fic:
the next thing you’ll do is insert your fic; on ao3 click entire story, CTRL A to select all, CTRL C to copy it all. Paste it into your document. word automatically detects the headings, and you should be able to see all your chapters on the left side bar (if you can’t see it, click the page numbers on the bottom left to open the tab).
Formatting:
you can do the next few steps in any order, but we’re going to fix the formatting now. you’ll want to CTRL A everything, pick a font and a font size. I normally use georgia and size 10, going smaller or larger depending on the file size.
To have an indent on every line: CTRL A your work to select all, right click the “normal” style, on the home tab. go to the bottom left, open the drop-down menu, and select “paragraph”. next to special, hit first line. i like to do .3, you can do whatever you want. i then like to make sure the space after is set to 0, the line spacing to single, and then hit save. it should automatically adjust your lines to start at whatever indent you picked.
To fix the spacing: go into the layout tab, and go to spacing. There'll be a before and after option: write in 0, then click enter for both of them. Word is a little bit bitchy so you have to force it do things sometimes. after this you can choose if you want single spacing, or 1.5, or whatever you want.
*sometimes, the way the fic was formatted when posted to ao3 means that even after setting the line spacing to zero, there will still be a space in between each line. this is where you have to troubleshoot. you can either go line by line to delete the excess space (yes, for real. and yes, it's just as awful as it sounds) or, sometimes, not every-time but sometimes, you can highlight the chapter text, go into the home tab on top, click the A with the purple eraser to erase all formatting, and then do all the beginning steps again, and it will get rid of the extra space.*
Now that your format is mostly fixed, delete the archive of our own beta, and anything else you don't want. I normally delete everything up to the title of the work, and leave that for creating my copyright page. Remember to do the same for the end of the work!
Page Breaks and Section Breaks:
the next part is the most crucial. it's how we format both the chapters, but also how we format the headings and footer. this was the part that took me the longest to figure out: it's the page breaks and section breaks. page breaks mark the place where one page ends, and another begins. section breaks will create a new section in your document, so you can break the beginning few pages from the rest of your textblock. This will allow you to insert page numbers that start on page one, instead of at the first page of the document.
I like to go the end of the description, and then click on the first chapter. then I'll add a section break. you can find this in the layout tab, click breaks, and then click section break. so now our section 2 starts with chapter one. After this, add a blank page after the description and before your new section, and then click on the first chapter. (adding a blank page allows for smoother formatting later with headers and footers)
I then go to each chapter, delete the authors notes at the start and end of each chapter, and add a page break at the start of each chapter. i like to use the heading tab on the left to click each chapter, so I know I'm actually starting the new page right where I need to, and other formatting won't delete the page break.
when I create a compilation fic, where I have muitlple fics in one typeset, I use section breaks at the starts of each new fic. this will allow the page numbers to continue, but I can then edit each sectio to change the fic title and the authors name. if you're really fancy, you can do this for each chapter title as well, you would just hve to use a section break for each chapter instead of page break. *Remember to click link to previous to turn it off, so you are only editing that section, and not all the other sections. this can be found in the heading and footer tab on the top, which will automatically open when you click on the heading or footer.*
Adding page numbers, authors name, text name:
To add a page number, I click the footer, which automatically opens the header/footer tab on top. Then, I click page numbers, add page numbers. I turn on different odd and even pages, which is also found in the header/footer tab. you'll have to insert page numbers on both an even and odd age to get them to show up once you click that option. Page one should be an odd page, page two should be an even page. I like to put the page numbers on the outside of the page. Then you'll click format page numbers, click "start at" instead of "continue from previous section", and write in 1. now your typeset starts at 1 on chapter one instead of the start of your document! you'll need to go back and delete the numbers that showed up on the first section, but remember to deselect link to previous before you do that! or you'll end up deleting your page numbers again.
to add text on page numbers:
click into the header/footer again. double click directly on the page number, then start typing. You ca highlight the whole thing to change the font, font seize, etc. I normally do the same size as my text, and I'll either do georgia font or garamond font. I google "copy paste line for text" to get that line dividing the page number from whatever text I have next to it.
to add graphics on an entire work:
you can go into the header or footer, go to the insert tab, and insert a picture. Doing it in the header or footer will ensure it's on every single page that shares that header or footer. I have done this in the past, and find it's cute, but it's also tricky because it needs to be small enough to fit inside the header or footer, and won't really be able to interact with the text because it's different on each page, while the graphic will stay in the same position regardless.
Blank Pages:
you want blank pages at the start and end of your textblock: this is what you'll be glueing your end papers to. even more, you'll want to ensure your total page number is both divisible by 4 (each page of paper will have four pages of your text on it, two to each side) and fits into your signature count. If you're working with a 40 page signature, and you have 420 pages, that's fine. You'll end up having the last signature only be 5 regular pages instead of 10, which is plenty enough to sew. you really just want to try and avoid only having one of two pages in that last signature, as that won't be very strong in holding up your end page, or be very stable in sewing on to your book block.
to make sure they're blank, with no page numbers, you'll want to insert a section break on the last page of text. Deselect link to previous, delete the page numbers and you should be all good!
Printing/Saving:
I'm on a mac. I don't know how you would do this on anything but a mac. let that be a warning lmao. but I will CTRL A everything, ensure it's US Letter Borderless, and then hit print. if you don't tell the document it's the right size, it'll be funky when you go to print because of the margins. to insert images, i click save as pdf. it'll save it in the correct order to print for your signatures, and then I upload it into adobe to edit further. that'll have to be a different post bc this is entirely too long already.
If you want to print directly from here, ensure it's printing the right size, flip on short edge, double sided. and you're all done!
#tips and tricks#typesetting guide#i woke up at 630 am with a purpose and shat this out#it might not even be legible#apologies in advance#how to typeset#bookbinding#fanfiction#ao3 fanfic#typesetting#microsoft word#adobe#canva#signature#resource
119 notes
·
View notes
Text
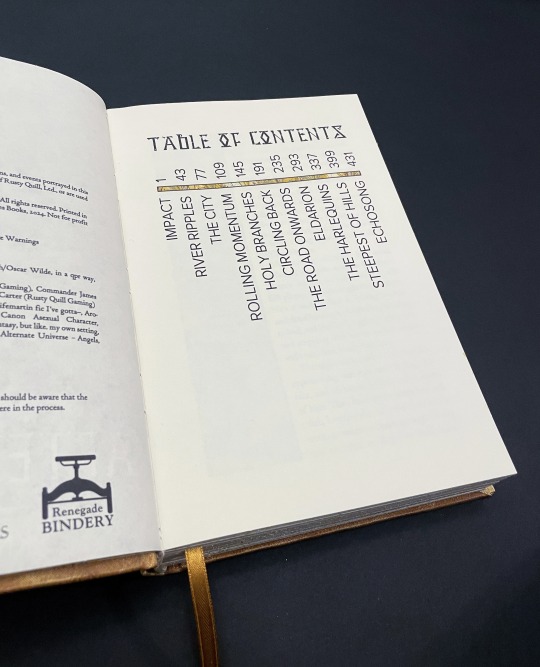
Free Blue Fairy Book (Font Sampler)

Once upon a time, there was a typeset. It was free typeset #45, and it was both a book most fair and a font sampler most helpful... Presenting free typeset #45: The Blue Fairy Book (Font Sampler Edition). It is sized for half letter (letter folio), and contains the complete fairy tale text edited by Andrew Lang, while also showcasing 41 different body fonts. It's available in my public domain books library here, and also in my typesetting resources folder here. There is a black and white alternate version available as well! Each chapter/fairy tale is a different font, and the font names are listed in the table of contents and beneath each chapter heading. This was inspired by something I saw @teleportbooks do with their drabbles (they have so many great ideas). The fonts I used are all serif fonts (thank you again to everyone that voted on the poll!), and each has an italics variant form (an important requisite for most body text). All the fonts except for Californian FB and Georgia can be found on googlefonts for free. Californian FB and Georgia slipped through cuz I just adore them so much, and they're usually found included for free in Office apps.
Also, I had so much fun making the collages for the fairies on the title page! The fairy art is from canva, and I 'colored' them in by adding William Morris patterns underneath (William Morris images from rawpixel).


A bunch of interior pics below the break:


It's a fairy tale book! It's a font book! It's *takes a deep breath* the-Blue-Fairy-Book-parenthesis-Font-Sampler-Edition-end-parenthesis-edited-by-Andrew-Lang-and-typeset-by-me!
#The Blue Fairy Book by Andrew lang#typesets#typesetting#bookbinding#book#free to use#typesetting tips#fonts#font book
18 notes
·
View notes
Text
I put what I hope is the last finishing touch on my copy of Deep Roots tonight - replacing the one chapter frame I somehow forgot to print.
You see, I printed all the text on the laser printer so it would be more crisp and then used the color inkjet to overprint all the colored elements. Which worked shockingly well, the color inkjet is feeds very evenly.
But somehow I forgot the frame on the last chapter of Deep Roots (thankfully my copy and not the author's). Totally fixable...if I had noticed before I folded, sewed, trimmed, marbled and then cased the damn book.
fuck.
theoretically I probably could have trimmed out the offending page, tipped in a replacement, trimmed it perfectly to size & edge painted it to match the rest of the marbling but gods. the effort involved.
Zhalfirin suggested printing on vellum instead and trimming it slightly smaller than the book so it wouldn't show too much against the marbled edges and that was so much easier. In real life you can read through the vellum pretty easily and it's a lovely effect. I love vellum overlays in books.
So now they are actually finally actually fully done. & coincidentally Ealcynn's copy just went out in the mail this afternoon. So I think that's a wrap!
#bookbinding adventures#mine#just imagine a whole book of fixes kludges and mistakes and that's this project#if you pile your mistakes up tall enough nobody can see them anymore pro tip right there
2 notes
·
View notes
Photo
(via 8 Ways to Add Extra Income to Your Bookbinding Business)
10 notes
·
View notes
Text
My own additions:
If you are going to use drawing paper for your book, you can use the hard backing of a sketch pad as part of the book cover. It be some nice, sturdy shit that already fits the dimensions of the paper you're using.
If you want to use leather for your cover, make sure it's thin. Like, 1mm thick thin. Or even thinner. Don't listen to the guy at Tandy Leather; he knows leather stuff for carving, not bookbinding. He admitted that. Don't buy the 3mm he suggested. You will end up with $60 worth of headache as you spend hours trying to shave it down to a thickness that's workable for books. DON'T BE LIKE ME!! Don't end up with flesh shavings all over your floor!
Elmer's glue is a suitable book binding glue because it's acid free. Get some of that white shit that has a thicker consistency though. I decided to try using clear Elmer's glue for my current project and I had to wrap a damn string around the spine to keep my book mark in place as it dried. It didn't want to stay stuck with the clear glue! It was too thin and runny! When I used the thicker white glue though? Book marks stayed in place. It was wonderful. 10/10. Would use again. The clear shit could go fuck itself though.
A water and flour paste mixture is also apparently a decent glue. Haven't tried it myself yet, but if you don't have access to normal glue it could probably do the trick.
Oh my fucking god don't glue your text block to the spine! I did that with my first book because that's what my favorite YouTuber did in her videos, but holy crap I had to fight to keep that damn book open. I had to go in with a knife to separate the spine from the cover to fix it. "But then how am I supposed to attach my text block to the cover if I can't glue down the spine?" You know the cloth you glue to the spine to help strengthen it? A thin fabric you can get anywhere like from torn up t-shirts and shit? Use that. Make it extra wide, glue it to the spine, then glue the remaining flaps to the inside of the front and back covers. Although you can also use these strips of sturdy cloth some book binders use (I think it's called binding tape?) if you prefer that option.
Fuck awls. You have to fight to get them to pierce through the paper. Or at least that's how it was when I used mine. Maybe it was dull, maybe it was not, but I still say save yourself the trouble and use a pushpin or nail with a piece of cork or cardboard under the paper. That is SO much better... Plus I have yet to use my awl for anything else with book binding, so it might not be worth the purchase for you.
Waxed thread. Easy to make. Grab a candle. Grab your string. Pull string across candle. Bang. Wax thread. You're welcome. (Make sure you pick something that smells nice though. I have regrets)
I've found a sharpie pen can make for a decent substitute for a bone folder. It's not as good as a bone folder, and the text on the pen can end up smearing on the material, but it gets the job done. Just sand off all that text before using it and you'll be good to go.
You can use two scrap pieces of wood and some clamps to make a book press. I'm going to try making my own with two cutting boards, some big screws, and a couple of wingnuts soon. You don't need anything fancy to press your paper. Like what OP suggested; a heavy stack of books or whatever else you can find will also do the trick.
Book binding 101: Materials
I’ve decided to do a series of posts on how to book-bind since I talk about it a lot, and I think it’s a really fun process. These posts will include various inexpensive alternatives to “professional” supplies, many of which you will have at home. Not everyone can afford a cricut and that’s ok! I will also be listing more expensive materials for people who want to invest a bit more into the craft, but they absolutely are not a must.
This first post will focus on a list of supplies you can use to make books, but will not yet get into the instructional part of it. That will come later!
Anyway…
Bookbinding Materials: Essentials
These are items you need to bind, but many you can find around your house!
Sewing thread: Any thread will work for bookbinding, though waxed threads can help reduce tangles. You can also double up thread as another way to prevent tangling if you so choose. Waxed thread is definitely more expensive, so it can be good to use what you have starting out. Here’s a link to the waxed thread I used for those that are interested. You can buy it in a lot of different colors! (White is good if want an “invisible” thread).
Sewing needle: A lot of people say to use a curved needle for binding, but I’ve never found it to be much different from using a regular needle. If you have one, I would recommend a larger needle, however, since it’s better for piercing through signatures (aka the stacks of pages you bind together). In other words: there’s no special needle you need to bind books.
Ruler: I’d recommend any metal ruler since it’s better to use as a straight edge for cutting. There’s a good chance you already have one. It’s just used for measuring and being a straight edge. Nothing fancy.
Paper: Any paper will work. What you wanna use depends on your project really: if you’re binding together a work of text you’ll want to use some kind of printer paper (of course). If you’re making a sketchbook, you can fold up some sketching paper. I like to get sketchbooks with perforated edges so I can tear them out easily if I want to use a blank page for bookbinding. You can also buy large sheets of paper made for any medium. For example, if you want a sheet of water color paper, just search “large watercolor paper sheet”.
Awl (or all alternative): An awl is a tool used to poke sewing holes. It’s nice because it’s sharp and ergonomic, but you can totally also use a pushpin or even a sewing needle.
Bone folder (or a bone folder alternative): A bone folder creates sharp creases when you fold your pages, making them lay flatter. It also helps define the hinge gap on finished books, making it open easier. You can use a ruler if you don’t have one.
PVA glue: PVA glue is what to look out for when it comes to binding glue. There are some designed specifically for bookbinding, which spread out a bit faster than ones that aren’t. You can also use tacky glue which IS a PVA glue.
Book board: Also sometimes called chip board, Davey board, or mat board. This is what you’ll use for hard cover books. It is important to use book board specially, as cardboard will warp. You can buy book board directly, or you can cut the covers off of old textbooks or binders, unwrap the paper/plastic around the board, and use that!
Box cutter or utility knife: for cutting the board
Decorative paper and book cloth: For wrapping around cover boards and for endpapers. Book cloth can also be used to cover boards. You can also draw your own designs on Bristol paper if you want (or any paper with a similar thickness/durability). When it comes to decorative paper I like to either get scrapbook paper or rolls of fancy handmade paper (you can get those on Etsy, through paper source, or through bookbinding websites).
Bookbinding materials: Optional (and not crazy expensive)
These are supplies that you don’t need for binding but that can make the process easier and/or help with the decorative elements of your books. I’d recommend these things for when you’ve been binding for a while and feel these things could be helpful!
Paper trimmer: can cut a few sheets of paper evenly—I find it really helpful for endpapers
Stencils: Super helpful if you want to add text on the covers
Stamps: Good for adding text and also great for adding illustrations if you’re not able to draw them on your own. You can buy ink pads for them or use markers by coloring over the stamp lightly and using the stamp immediately so it doesn’t dry (I’ve tested this with alcohol markers and it works very well)
Paint markers: great for drawing directly on the cover. Since they’re opaque they can imitate the look of vinyl. You can also get them super painterly if you want. The internet usually talks about poscas but there are tons of different brands. Do some research, figure out what you like & can afford.
Hot foil pen & heat transfer foil: Perfect if you want to add foil to your covers but don’t want to spend a ton of money on a cricut. A lot of binders uses the foil quill brand, but there are ones that cost less and work the same (I have both a cheaper one & an actual foil quill because I wanted some nib variation. As long as the pen has good reviews that aren’t from bots you should be good). Also remember: don’t use foil designed for going through laminators (I.e. decofoil) . It doesn’t work the same way.
Bookbinding Materials—Expensive
These are materials I’d recommend for people who have been bookbinding for a while & feel that it’s something they really want to invest in. To be fully transparent, I’m a college student and don’t own these and have little personal experience with them. However, I know a lot of binders who love them!
Cricut machine—Cricuts are cutting machines that can make precise cuts into paper, wood, bookboard, or vinyl. A lot of binders will cut designs out of vinyl and apply them to the covers using a heat press.
Book press—What it sounds like. The pressure helps the pages lay flat and stay even. That being said you can stack heavy books on top of your projects, it just may not have the same even pressure. I also know some people will DIY these, so if you’re skilled with power tools you can give it a go!
Paper guillotine—like a paper trimmer but bigger and can cut more sheets of paper at once. I believe really good ones can also be used to cut bookboard!
Those are all the materials I can think of! Hope this can work as a good starting point for those interested in the craft. I’ll definitely be posting more info about bookbinding for people who are interested :)
-Zoë💗
752 notes
·
View notes
Text
ao3 is still lowkey down n ive decided that ima try bookbinding n printing fics after this like i doubt its that hard n i could totally do it hut also i go through like 10-30 fics a week because im mentally ill n its the only thing that makes the world feel a little less bad so idk how thats gonna work out yet
1 note
·
View note
Text
Noice.
how hard do you think bookbinding is? Could I learn how to do it? How much equipment does it take?
#oh yeah the 18+ thing is probably cause several people bind smut and there is also swearing#if you want some tips and stuff I can probably help at least somewhat#also the notes on this post are pretty informative. someone recommended DAS bookbinding on youtube and I absolutely second that. Very good.#tho worth noting that he will teach you how to do all the physical parts of bookbinding and none of the typesetting parts#except I think he touched on imposition briefly
5K notes
·
View notes
Text
so, you wanted to start bookbinding?
so @princetofbone mentioned on my post for "factory settings" about wanting to know more about the binding style that i used for it. so i thought i might make a post about it.
i was as terrible as i always am for taking in progress shots, but i can link you to the resources i used in order to make my book. i would also like to point out that "factory settings" is my 120th bind, and i have been doing bookbinding as a hobby for just over 3 years now. unfortunately this means some of the methods that i used for that bind aren't particularly beginner friendly, just in terms of the tools and methods i have used, but i would love to point you in the right direction when it comes to resources. i dont say this to sound pretentious which i fear i might come across, just so that youre fully informed. getting into this hobby is fun and rewarding, but it can definitely be intimidating.
with that caveat, heres a list of links and resources that i have used for bookbinding in general, with additional links to methods i used specifically in regards to this bind.
ASH's how to make a book document. it gives you a great introduction into typesetting fics (where you format the text of fics to look like a traditionally published books) and then turning them into a case-bound book (the style i used for "factory settings"). it is comprehensive, and explains how to use microsoft word to do your bidding. it was invaluable to me when i was just starting out! currently i use affinity publisher to typeset/format my fics for printing, but i only bought and learned how to use that after i had been binding books for a year and a half. i made some beautiful typesets with word, and some of my close friends use it still and design stuff that i never would be able to in my wildest dreams (basically anything by @no-name-publishing)
DAS Bookbinding's Square Back Bradel Binding. a great style to do your first bind in! this method requires, when making the case, to attach the cover board and the spine board to a connecting piece of paper, which makes it so much easier to match the size of the case to the size of the text block (your printed out and sewn fic). using this method is what allowed me to get much more accurately fitting cases, and made me much more confident with the construction of the books i was making. a well-made book is something that is so wonderful to hold in your hands!
DAS Bookbinding's Rounded and Backed Cased Book. This is the specific method that i used to create my bind for "factory settings"! even before i could back my books, i found that watching DAS's videos in particular helped me see how books were traditionally made, and i was able to see different tips and tricks about how to make nicer books.
Book Edge Trimming Without... i trim the edges of my text block using my finishing press and a chisel i have sharpened using a whetstone and leather strop with buffing compound on it. i follow the method for trimming shown in this video!
Made Endpapers. i follow this method for my endpapers, as i used handmade lokta endpapers, and they can be quite thin, but they look beautiful! i used "tipped on" endpapers (where you have your endpaper and then put a thin strip of glue on the edge and attach it to your text block) i used for a very long time before this, but these feel like they are much more stable, as they are sewn with your text block.
Edge Sprinkling. this is the method that i used for decorating the edges of my text block. but the principle is basically clamping your text block tight and then sprinkling the edges. i do not believe you need to trim the edges in order to do sprinkles on the edges, and that's what makes it accessible! i personally just use really cheap acrylic paint that i water down and then flick it onto the edges with my thumb and a paint brush.
Double-Core Endbands. i sew my own endbands, which i followed this tutorial for. that being said, it's kind of confusing, and this video is a bit easier to follow, but it is a slightly different type of endband.
Case decoration. i used my silhouette cameo 4 to cut out my design for "factory settings" in htv (heat transfer vinyl). i also used my cameo 4 to cut out the oval of marbled paper on the front, as i honestly didn't want to try my hand at cutting an oval lol. i also glued some 300 gsm card with an oval cut out of the centre of it onto the cover before covering it with bookcloth, to get a kind of recess on the cover. i then glued the oval of marbled paper onto the top of the recessed area once it was covered with bookcloth, so that it was protected. the images i used were sourced from a mix of rawpixel, canva and pixabay. a more accessible way to get into cover decoration is by painting on a design for your cover as described in @a-gay-old-time's tutorial just here. or even doing paper labels, which look classy imo.
physical materials. sourcing these will depend on your country. i am located in australia, and have compiled a list with some other aussie bookbinders of places to buy from. here is a great post describing beginning materials for getting started binding.
@renegadepublishing. this tumblr is great! its what got me started bookbinding, and being in the discord has been inspiring, motivating, and honestly just one of the best online experiences i have ever had. it is full of resources, and most people in there are amateur bookbinders, with a couple of professionals thrown in. the discord is 18+, and anyone can join!
i'm sorry this post got so long, but i hope that this has a lot of information for you if you would like to get started bookbinding. its one of the best hobbies ive ever had, and i genuinely believe i will have it for the rest of my life.
3K notes
·
View notes
Text
Book Decoration: AKA All The Ways I Don't Use a Cricut
(this post is for people who don't want to buy an expensive cutting tool, or for those that do have an expensive cutting tool that would like to mix things up a little)
1. Print That Shit
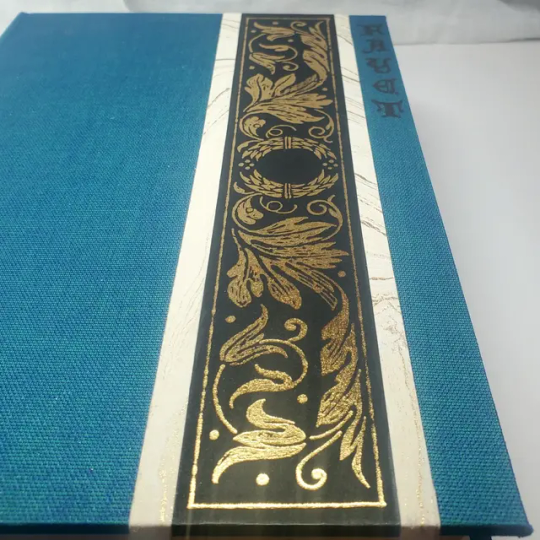
If you're already printing your own textblocks, an easy step for titles is to print them. Above is a title printed onto an "obi" of decorative paper. I measured out where I wanted things on the finished book and laid it out in Affinity, then printed it on a full sheet & trimmed it down to wrap around the book. A more simple method is to print & glue on the label into a slight indent in the cover (to protect it). A third option is to do the spine in bookcloth, while you print on paper for the cover and then glue that paper onto the boards (this usually looks even better when it is a three-piece bradel bind).
2. Foil Quill / Heat Pens
The heat pen is one of my go-to tools, but it can be a bit touchy about materials. The most popular version is the We R Memory Keepers' Foil Quill (which is one of the most ergonomic), but other pens exist that can get you to a higher heat temp, finer lines, or more consistent foil. For example, I have a pen created by a local Japanese bookbinding studio that fares way better on leathers than the WRMK quill & with a finer tip, but it's hell to control. Best results in general are on paper or smooth bookcloth (starched linen, arrestox, colibri - even duo will work but its less solid). The fuzzier a bookcloth is, the less your foil quill wants to deal with it. This means the heat n bond method of making bookcloth does not play nice with a heat pen usually, but there are two solutions: 1) use this tutorial on paste + acrylic medium coated bookcloth instead that will get you a perfect surface for the heat pen, or 2) use the pen on paper & then glue onto the cloth. I did a video tutorial for both foil quill use and this type of homemade bookcloth for @renegadeguild Binderary in 2023.
You get the most consistent results by tracing through a printed template that is taped in place, as I do in the video above.
3. Paint That Shit
Acrylic paints will do you fine! The above is free-handed with a circle template, because I wanted that vibe. If you need straight lines that won't seep, lay them down with tape first & then paint over it first with a clear Acrylic medium, then your color. Same goes for stencils. Two more examples of painted bookcloth:
4. IT'S GOT LAYERS

By using layers of thinner boards, you can create interesting depths & contrasts on your cover. You can also make cutouts that peep through to the decorative paper behind. The most important part to this technique is the order in which each edge is wrapped. To get a good wrapped inside edge, you will split the turn in into tabs to get them to conform to a curve. You can also layer multiple colors of bookcloth without multiple layers of board, as seen below left, so long as you mind your cut edges for fraying.
5. Inlaid... anything
Mirrors! Marbled paper! I saw someone do a pretty metal bookmark once! The key is creating a little home for it to live in, which is pretty similar to the above layering method. On one layer you cut the shape, & glue that layer onto the bottom solid board before covering. You can do the top layer as an entire 1 mm board (like I did for the mirrors) or a sheet of cardstock, like I would use for inlaid paper.
6. Decorative Paper
Decorative paper is always helpful & adds to the paper hoard... & its effects can be layers with other techniques, as below. Marbles, chiyogami, momi, or prints & maps of all kinds can be great additions. Some papers may need a protective coating (such as wax or a sealer).
7. Stamps (with optional linocut)
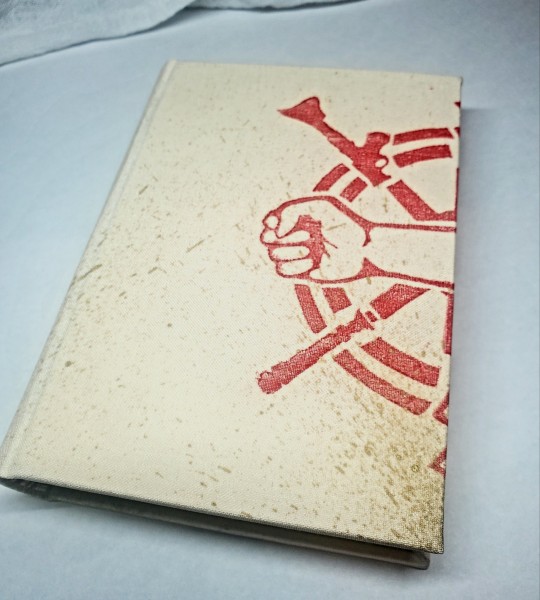
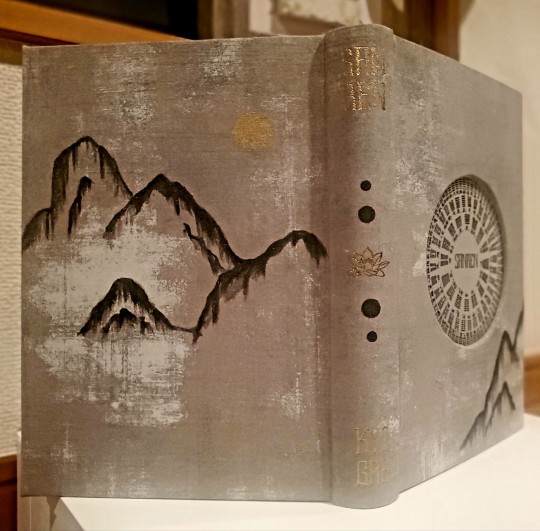
While I've not used many more regular rubber stamps, I do know some who have, successfully! And I've used one once or twice with embossing powder (see photo 3 up, the gold anchor on the little pamphlet bind). What also works is to carve your own linocut or stamp, & then use block printing ink to ink it onto your fabric (as i did above). A bit time intensive, but it was nice how easily reproducible it was, and I liked the effect I got for this particular bind.
These methods are not exhaustive, just ones I've used, and there are of course many others. I haven't gone too into detail on any of these for the sake of length (& post photo limits) but feel free to ask about more specifics. Usually I'm using them in combination with other options.
#fanbinding#bookbinding#celestial sphere press#ficbinding#in progress review#bookbinding how to#i am not particularly anti-cricut or anything#it's just a very expensive tool#and its prevalence sometimes makes new binders think they HAVE to get one#when they absolutely do not#you can make pretty books without it
646 notes
·
View notes
Text
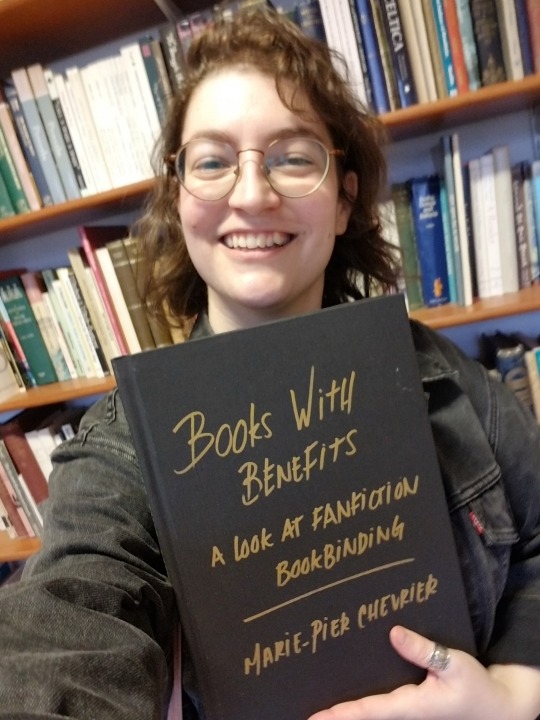
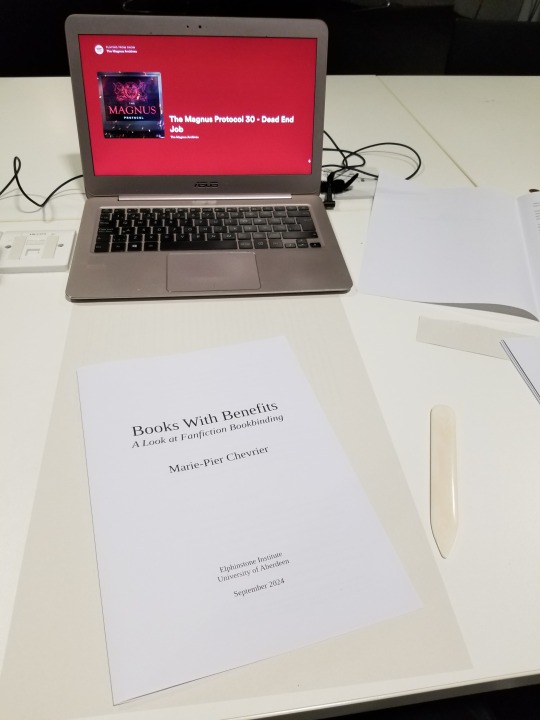
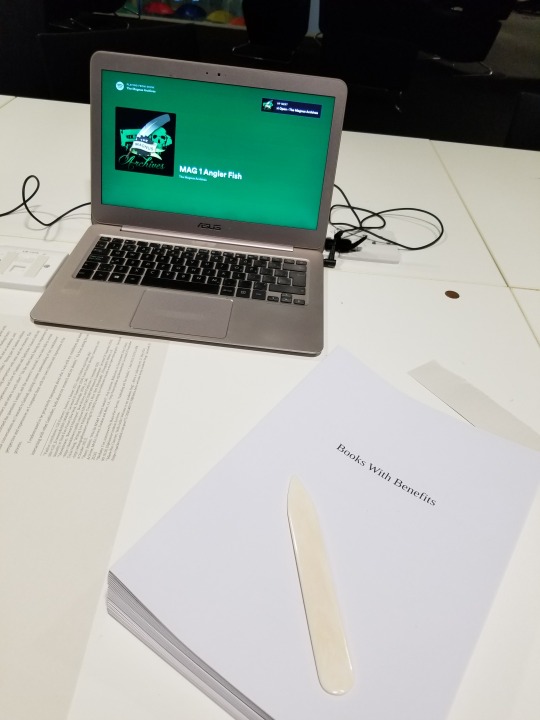
Update on fanbinding dissertation: binding the dissertation itself!
After many days and nights of writing and wrangling footnotes and proofreading (where I couldn't convince my laptop that yes, I meant textualisation, not sexualisation), 'twas time to bind the beasts! In three copies, no less! Which I approached with way too much confidence from my one fanbind experience, and came with many fun little surprises due to the format guidelines I had to follow 🤡
This is going to be a long one, so here's my happy unfocused mug to confirm that it all ends well:
First pickle: The typesetting. I absolutely loved typesetting fanfic, but the dissertation had to be A4 (way less fun, boo-hoo), one-sided, with every page numbered. Did you know that LibreOffice won't let you add blank pages and only number the non-blank ones, without skipping numbers? In order to print signatures I could fold into one-sided pages, only numbered on the right-hand pages, I ended up switching to landscape orientation and including the equivalent of a blank page in the left margin.

Second pickle: The imposing, which I couldn't figure out using the amazing bookbinder with my weird landscape 2-page layout. I finally gave in and rearranged all the pages manually, which looked like p. 1 on the recto / p. 10 on the verso, then p2/p9, p3/p8, p4/p7, p5/p8, p6/p7. And because there was no way I was paying print-in-colour prices for all of this, I further split the manually imposed pages into two files, one for the greyscale printer (cheaper) and one for the colour printer (highway robbery). Still came up to ~£70, just for printing.
Very glad I went in chunks of 10 for the signatures, it made both the math and the folding using sheets from two different piles much easier, highly recommend (if for some absurd reason you also want to bind one-sided numbered pages in folded signatures).
Third pickle: Linear time. Had planned on having so much time to print and bind this thing, but kept writing and rewriting and proofing and oops! It was due in less than 24 hours and it was still not out of the laptop. So.
22/09/24, 6pm: Got to the library, started printing.
6.45pm: Found another printer where all the paper was the same shade of white, started printing again 🤦♂️ (kept the the misprints to use as scrap paper when glueing)
7.30pm: Started folding the 150 sheets of paper (3 x 100-page dissertation, 2 pages per sheet). Went from the last episode of The Magnus Protocol, to an episode of Welcome to Night Vale, to deciding restart The Magnus Archive, which felt almost poetic.
9pm: Headed back home, trimmed the edges (with a borrowed guillotine), folded the endpapers, stabbed everything. Lack of pictures to be blamed on my inability to mess with linear time, and the eventual sleep deprivation.
10.30pm, I think? Started sewing the signatures together, again with Supernatural (which I started rewatching when I submitted my first dissertation assignment in mid-May, and finished 2 days after submitting the dissertation itself, again, such poetry).
2am, probably? Tipped the endpapers and glued cheesecloth over the spines. Somehow figured out where to set the three textblocks to dry (I don't have a press). Sadly gave up on sewing on (or glueing) headbands, because time.
3am-ish: Cut the missing cover pieces out of millboard (had already cut 4 of 6 covers, since I knew it had to be A4), measured the spines of the three textblocks and cut those as well.
???am: Did some math, because sure, that's the right time for that. Cut the bookcloth to size, glued the cover pieces on the bookcloth. Remarkably only messed up the measurements on one of them! That means one of the copies has a millimetre of millboard showing in the inside corners of the back cover, but not enough time/bookcloth/millboard to redo it, onward we go!
Way past dawn: Took a break for food while the covers somewhat dried. Cased the three textblocks in the three covers, with the endpapers bubbling, which took me by surprise since it was the same paper and same glue I had used for the fanbind without any problem. I'm now thinking that bigger book = more time needed to apply the glue = endpapers getting warped, but I was so exhausted by this point that who knows. Again, no time to redo it!
9.30am: Stacked the dissertations under the heavy reference books I used to write the dissertation. Toute est dans toute hein. Went to bed while they (mostly) dried.
2.30pm: Woken up by my neighbour's dj set. Eventually put all that hard work in a tote and walked to school to hand it in at 4.30pm.
Fourth and last pickle: The titling. Couldn't find paper long enough to do a half-dust jacket like I did last time. Had big cutout plans, ran out of time and couldn't finish testing those. Also had some thicker textured paper I thought of cutting and glueing to the cover as a title card, but it turned out too thin and was warping. Finally resigned myself to submitting it with a blank cover, but one of my teachers asked if I would mind adding the title on with metallic markers to make it easier to identify (one copy will eventually be on the shelf at the Institute), and I'm SO HAPPY with how it turned out. Metallic markers. Why didn't I think of that. (I did, however, think about dressing appropriately for the occasion.)

So, is it possible to print and bind 3 books in less than 24 hours? Yes! Am I glad I did it? Also yes, very satisfying, love being extra! Would I do it again? God no, I've been sleeping for two weeks and I still haven't recovered. Can't wait to start binding something else though, so I guess it wasn't that bad.
That's it! That's over! Aaaaaah! Now waiting for the grade and comments, and hopefully soon I'll be able to share the content as well.
I'll also try to post some more about the research/writing process itself, somewhere between the late nights reading international treaties on income tax and the early mornings spent figuring out how to apply for a phd next.
Thank you so much to everyone who followed along, this was way more fun than I ever could have hoped!
#fan studies#fanbinding#bookbinding#research#ficbinding#dissertation#fanbinding dissertation#autoethnography#fanfiction#fandom#fanfic
422 notes
·
View notes
Text
FTH 2024 Creator Signups are OPEN!
The moment you've been waiting for has arrived! But before you rush straight to the signup form, note that a few things are different from last year:
You will not be able to edit your signup immediately, but you will be able to edit it. We're changing some things on the back end so that we can get posts up faster, but that means that when you get your email confirming your signup it won't have an edit link. Once we've processed your signup (which may take several days), we will send you a link to make edits. Please do NOT fill the signup form out again in order to edit a previous entry! Wait to hear from us.
Typesetting is now an option under Fan Labor. Remember that we only allow digital goods in the main auction - we'll be opening signups soon for the Craft Bazaar if you want to offer bookbinding or other physical crafts.
All Marvel-related fandoms are now under the Marvel top-level fandom (instead of MCU) and all DC-related are under DC. This includes comics. This allows us to stop worrying about, for example, whether Deadpool or Venom is MCU or what "DC Extended Universe" does and doesn't include.
Six of Crows and Shadow and Bone are both covered by the new Grishaverse fandom tag, House of the Dragon is part of ASOIAF/GOT, and 9-1-1 Lone Star is grouped with 9-1-1.
You can view this year's full list of fandoms here - remember that if the fandom you want isn't listed, there is a write-in option. However, check all possible names for your fandom before resorting to write-in! If your fandom is a spinoff, choose the fandom it's related to and specify in your auction notes which parts of canon/the universe you're willing to create for. Every fandom with subfandoms also has an "Any" option if you're willing to create for anything within the top-level fandom and an "Other" option to write in subfandoms.
Even if you've signed up before, please re-read the FAQ to re-familiarize yourself with our policies. If you're new to FTH, check out these tips for first-time creators (and also read the FAQ). It might also help to peruse last year's listings to get an idea for what kind of information people include and how we use the information you give us to form our tagging system.
Remember that you can offer up to three auctions, but you will need to fill out a separate signup for each of those. Each auction can only be for one type of fanwork, but can be offered in up to 3 fandoms (and unlimited subfandoms if you choose a fandom with subfandoms) or "Any fandom." Your bidder will get to choose from any of the fandoms in the listing, so please don't offer something you don't want to create just to get more eyes on your auction.
Signups will be open for two weeks, until February 19th, so there's no rush! Take your time and make sure you understand how it all works and what you're committing to. If you have any questions not covered here or in our FAQ, please email us at fandomtrumpshate @ gmail.com!
Ok, did you read all that? You know what's different from last year? You've refreshed your knowledge of our FAQ?
In that case, sign up for FTH 2024 here!
537 notes
·
View notes
Text
Aftershocks | knifemartin
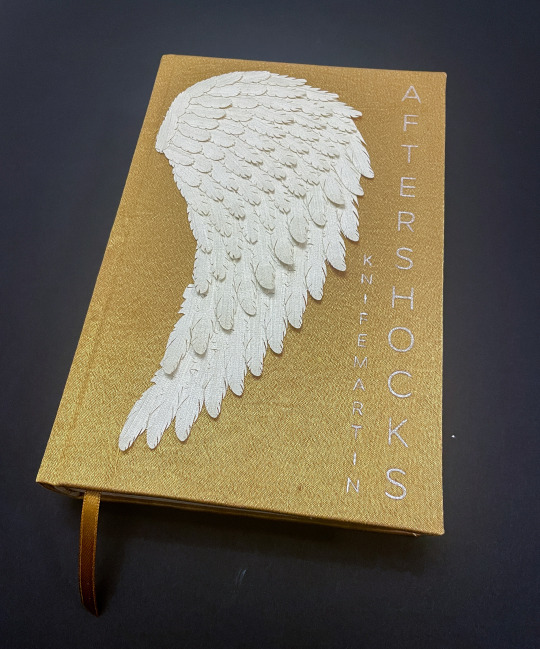
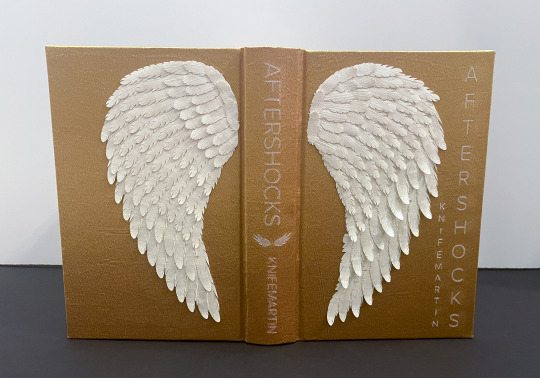


(IDs in alt text)
Another favorite Rusty Quill Gaming fic of mine--Aftershocks by @knifemartin! I was absolutely blown away by the worldbuilding, the varying relationships and their different forms of love and intimacy, and the clear and vivid visuals throughout. I have been craving Zolf, Wilde, and Sasha living together as a happy little family ever since I finished it, and I think often about the scene where Zolf discovers that Wilde is an angel. The various visuals in the story definitely inspired this bind--in particular, the gold and white of Wilde's former and current wings and the wings themselves.
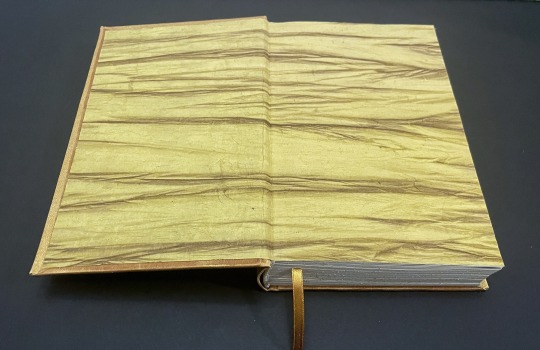
This is another book that makes use of the new things I learned during Renegade's February binderary event. It also uses double-core endbands, has trimmed (and splattered) edges, and uses a chapter header motif that I've seen floating around in bookbinding spaces occasionally and that I've been wanting to implement in some of my own binds! I was also able to finally make use of the white fibrous paper with gold squares stamped onto it (for the half-title page) and the gold fabric-like paper (for the endpapers), both of which I've had in my paper horde for ages.
And, of course, my favorite part of this bind--the wings on the covers! I found a tutorial online for an angel wing wall decoration, scaled it down, and cut out all the feathers using my Silhouette and a white fabric/paper roll I picked up at a used craft store (I think it's wallpaper, but I'm not quite sure!). Then, I glued all the feathers down to a base before gluing the wings themselves to the covers. I really like the 3D effect I got by not gluing down the tips of the feathers, and I think they feel really nice to the touch! I had a very strong vision for this book, and being able to realize it so cleanly was so so much fun.
261 notes
·
View notes
Text
Typesetting Tips 4.5: Graphics/Images
One common question I see popping up for people getting into making books/typesets is 'where do I find graphics/images to decorate my books with?' And of course, that's with the caveat of 'and they're free'.
Thus, this is a continuation of my old post on where to find graphics/images to use for typesetting/book design. Because it's been half a year since then, and while I am very much the same amateur typesetter I was then, I am now a slightly older amateur typesetter---who knows more websites!
(I'm including websites I've listed before so that all the links are in one post)
All these sites have free offerings to varying degrees. Personally, I haven't had to pay anything so far for that I've used. If you see something you like that's locked behind a paywall, try to reverse google search it to see if there's a free version out there! I've seen a lot of these sites upload the same images. Also, be careful of AI!
Graphic/Image Resources:
Archive.org - Internet Archive. Not as easy to download or use images from, but there are a lot of cool resources there if you have the time.
Canva - Easy to use for beginning design work. I recommend taking advantage of their month long free trial (I found it easy to cancel as well when it was over), but do not recommend subscribing.
Creative Fabrica - They send out a lot of free bundle promos in their email subscriptions. I mostly use them for fonts but they do have a lot of free resources for crafting.
Exotic Animal Photo Reference Repository - This is an animal photography database by @why-animals-do-the-thing! They have a lovely growing repository that's both education and free! Just be sure to ask permission and credit and link to them if you to use their work!
Freepik - More free stuff! I haven't used it a lot yet, but I've seen this site recced by others.
Heritage Library - Lot of neat pngs/vectors. Especially great if you're looking for vintage/nature images.
Pixabay - Royalty free and under the Content License
Rawpixel - Probably the site I use the most. I sort to exclude all the AI images and just use the free/public domain stuff.
Noun Project - Lots of icons available. Tend to be more minimalistic and simple. I know a lot of bookbinders use this site, though I haven't explored it much.
Smithsonian - The Smithsonian Open Access is free database from the Smithsonian with millions of images available.
Streamlinehq - Another site with a lot of free icons. Most of their really cool assets cost money, but you can sign up for free with an email address to download 10 free assets if you see something you really like.
Wikiart - Great place to look at public domain artwork.
Wikimedia Commons - (Wikimedia Commons, Wikisource, Wiki Books, etc.) Tons of stuff to sift through.
Last source: FONTS! You can go a long way with dingbat fonts for decorations! Frames, ornaments, etc. can be done with fonts. Check out dafont and other free font sites; fonts can sometimes be a lot easier to use in texts than images.
127 notes
·
View notes
Note
since we’re on the topic of bookbinding, i’ve been wanting to get into it but i haven’t actually done any research (yet) other than vibes, so do u have any tips for complete beginners?? :)
@geminibookbinding is who inspired me to finally look up the whole process and figure out where to start! this is the super helpful tutorial i got from them
i had dabbled with binding before though, using Sea Lemon's tutorials to make blank sketchbooks yearsss ago. i still use her text block and diy hardcover videos as a refresher/reminder while i bind!
the biggest thing that stopped me from learning to bind printed fiction was not understanding how to print the text from home, specifically how to get the pages in the right order for signatures. it's actually so easy with some very simple to use programs: QuantumElephant for PC users (free), and I use BookletCreator on Mac ($20)
i want to go into more detail about my process and supplies from a beginner perspective, i hope this helps:
format the text in a word processor
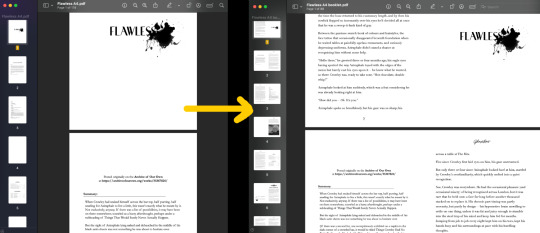
export your document as a single page PDF
enter that PDF file into Quantum Elephant or BookletCreator, to rearrange the pages for your signatures. your program will give you a new PDF file that you can then print.
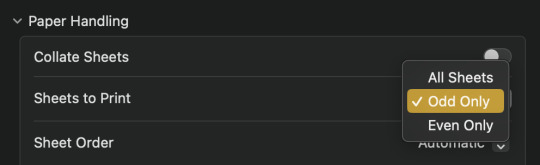
4. double sided printing: i was so so scared of this at first, but it's incredibly simple. no matter what printer you have, somewhere in your print settings will be an option to print even or odd pages.
print all the even pages first, then when the stack is finished printing, flip them over, insert them back into the paper feed, and print the odd pages.
5. fold the signatures together so you have a stack of little booklets, then mark on the spine where your sewing holes need to be. manually punch the holes using an awl, or diy an awl by stuffing a cork on the end of a straight needle.
6. sewing: take regular sewing thread and run it over a block of beeswax. this makes the thread easier to manage and holds it in place better while you sew. a curved needle is also much easier to use than a straight one, especially for a kettle stitch (using Sea Lemon's tutorial)
7. gluing: glue decorative pages (or plain, but thicker paper) to the front and back to create your end pages, then press the book flat to apply PVA glue to the spine. press it overnight so the glue dries flat. (optional: glue a ribbon to the top of the spine, then sew on headbands) finally glue an additional piece of paper (or mull) around the spine to strengthen it.
8. optional: trim the edges of your book down to create a smooth edge. this one's given me the most trouble because it's very hard to get right with a knife, and the proper supplies are expensive. check your local stationery shop (i.e. Officeworks, Staples) for an industrial guillotine service
9. cover: once you have the final measurements of your text block you can start making the cover. this is essentially gluing cardboard, binders board, or plywood etc to a sheet of fabric. the fabric either needs to be bookcloth, or have some kind of non-porous back so the glue doesn't seep through. you can diy bookcloth from any fabric with tissue paper. then glue the decorate end pages to your cover to attach the textblock!
125 notes
·
View notes
Text


Square antiprism box
Part I
(many thanks @queercus-books for finding out what that shape is called XD)
Over a year ago I saw this particular kind of box on the bookbinders fair in Leiden (NL). After having been recently reminded of them, I decided to give it a go and try to reverse engineer them from the pictures I found here (check out her other boxes, they are gorgeous!).
After staring at the original boxes for a bit, it was obvious they were not covered on the inside after gathering them. The pattern was visible in one consecutive pattern. It told me that a) the board was laminate with the patterned paper while still flat and b) the box was made from one piece, not single pieces glued together. For that the corners and edges needed to be scratched, but not cut through.

What stumped me in the beginning was what angle to pick for the walls. Naturally the base of each triangle had to be as long as the sides of the squares it connected to, but a too pointy angle at the tip resulted in long boxes that looked rather twisted than having that bulbous look I was looking for.
The solution (after some more staring and a few more paper models) was 'right angles'! Any square piece of board can be made into this box by marking out the center square and have the walls point away in right angles.

Next I cut away the parts that won't be needed (to make sure I don't cut one of the side walls off, I crossed them out). The net of polyhedrons for this box could look different than this and still give me this shape, but with the way the paper pattern is was not visibly interrupted I'm confident this is the net the Dutch bookbinder has used. (It also wastes the least material)

Now it was scratching the other lines just enough so they would bend nicely, but not get too weak to hold the structure and test assemble. Shallow cuts and test bending every now and then helps to get there (also a metal ruler to keep carving the same line)


Cutting the board half way through ended me up with those gaps though. I''m not sure how much they would show if I dressed them just like that, but I decided to not take the risk and reinforced them with a white paper just in case.


The white paper is really just a white strip of paper long enough to go all around the box and a bit wider than one of the triangles is high so I could have an overlap and reinforcement to the bottom too. Part of why I did this was also to see if covering the body would work as I thought it would. With the angled planes the strip of paper bends up and and down, but in the end it's still one straight strip of paper.
I let it dry a bit before adding another layer, this time with the patterned paper and turn in's on top and bottom. In hindsight I could have cut the turn ins to the inside at an wider angle to avoid them reaching onto the better visible part, but then. this is the first time I made this box so I take that as a lesson learned.


Now all it needs is a base and a lid and I'm done.
59 notes
·
View notes