#bilum bag
Explore tagged Tumblr posts
Photo


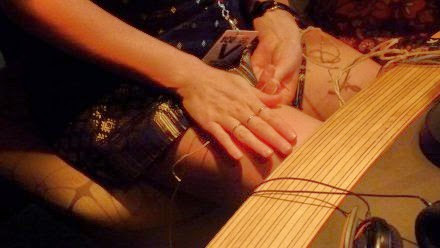


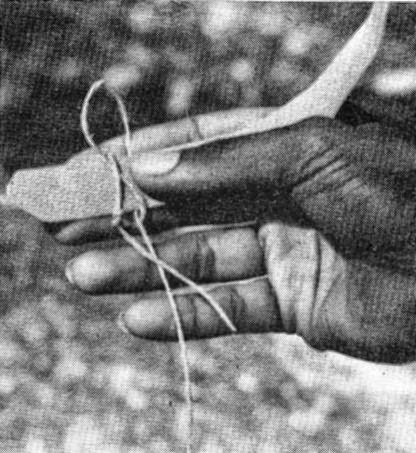
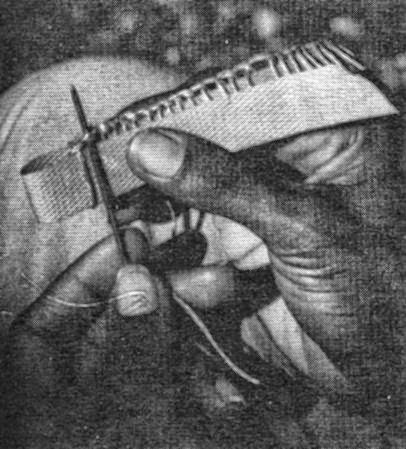
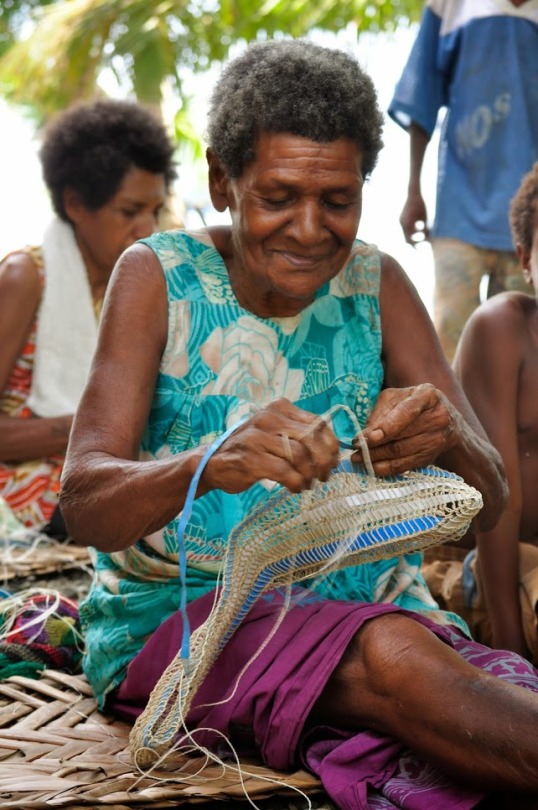
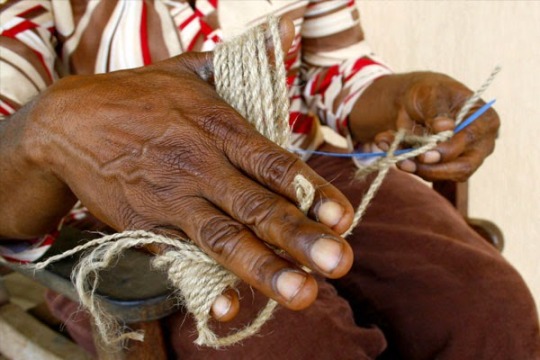
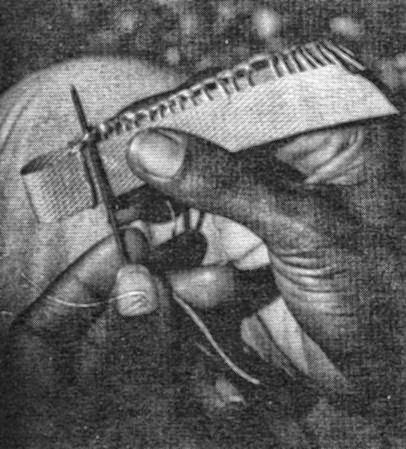
How to Make a Bilum
Step-by-Step-Instructions for GOROKA-Bilums & SIMBU-Bilums:
https://drive.google.com/drive/folders/1qb-VMFC5uDFv3j3_DzUz6c1OxPkbKJSv
[This originally appeared in the Lik Lik Buk, a populist development guide produced in Papua New Guinea in the mid-1980s -A] The bilum is a traditional PNG string bag. Bilums come in a variety of shapes and styles and are made for different purposes. Bilums are made to carry food, to carry babies in and to use for leisure. People can identify a person just by the creative design or style woven on the bilum. Despite the many different aspects and purposes of bilums they all are made from the same basic weaving method. Bilums are worked by forming rows of a special knot around a strip which today is usually made of plastic packing strips but previously people used coconut and pandanus leaves to make these strips. The strips are used to determine the size of the stitches and help to make the job of holding hte stitches easier. The string is owrked in short lengths as all of the string yet to be used is fed into the existing knots. When the string runs out a new length is tied on to the end. You will need (beginner): 1. Some coloured string 2. Cut a piece of plastic strip about 60cm or more to form the base row. 3. Cut the other plastic strips about 30cm long. These should be the same width (about ½-1 cm)as the longer strip. 4. A pair of scissors 5. One or two needles larger and longer than sewing needles (darning needles). Some people use old spokes from an umbrella. (Traditionally: bones of the Flying Foxes ) Method: 1. Make a loop around the plastic strip and tie with a slip knot. Pace one end of string on the front of the plastic strip (that is the side facing you) and hold it down with your thumb at the front and with your forefinger at the back of the plastic strip. 2. Pull the working end over the top and then behind the plastic strip creating a loop at the top of the plastic strip. 3. The working end is brought under the plastic strip and is fed under the other end of the string so that the plastic strip now has a circle of string around it. This mesh must be kept loose enough to be able to feed the subsequent stitches into the loops of the previous ones. 4. The working end goes over the loose end into the top loop from the left side to the right side. It is imortant that the points where the stirng crosses over are kept at the bottom and top of the plastic strip. The working end foes behind the plastic strip and is fed from left to right into the bottom loop. 5. Repeat the procedure until you reach the required length which will be the half the circumference of your bilum. Subsequent Rows Bilums consist of a spiral of rows of meshes. 1. Bend the plastic strip backward (away from yourself) and work the stitch in the normal way but over the two palstic strips instead of one. 2. Turn the pastic strip so that the back is now facing you. Make the next stitch over the one plastic strip in the following manner. 3. Take the working end and go over the plastic strip at the front and into the previous stitch at the back from left to right and then into the loop of hte stitch on the rprevious row. Pull the string behind the front plastic strip. Continue until the second row is the same length as the first row. These two rows mae the base of the blium. (if the plastic strip is short slip another strip in). 4. All subsequent rows are made in the smae manner. 5. Continue the procedure until you have 18-20 rows (medium size bilum). Mouth of the Bilum 1. Get a new piece of string and join it to the ned of the string that you used for making the body of the bilum. 2. Hold the top of the bilum facing you so that you can clearly see the top edge of the stitches forming the top row. 3. Skip the last working stitch of the body of the bilum.Count three loops to the front and feed the string into the thuird loop from left to right. Make a knot. Count three loops and feed the string into the third loop from left to right. From right to left push the string into the knot that you made. Bring the string back towards you forming a circle. 4. Count another three loops in front and feed the string into the third loop. Bring the string back and feed it into the previous circle. Continue around the mouth of the bilum. 5. When the two ends meet feed the last stitch into the first stitch to form a continuous chian. To finish tie a knot and cut the extra string. Handle Bilum handles are sometimes made separately from the bilum and then joined on. Others are made straight from the side of the bilum. There are many styles but the simplest uses the same basic stitch as in the body of the bilum. 1. Use a shorter plastic strip and make about 8-10 sitthces. 2. Use a second plastic strip. Make the next row using the same stitch. 3. Continue making rows until you reach the length of the handle you want. Joining the Handle to the Bilum 1. Hold the Bilum up and from the way it hangs judge where the sides are. The handle must be attached to these points so that the bilum when it is carried will be evenly balanced. 2. The handle and the body of the bilum are joined together by looping stitches. It is important that the joining stitches are made into the first row of the bilum not just into the finishing edge of the mouth of the bilum so that your join is strong. 3. When finished, secure with a knot. Styles and techniques for different patterns are constantly evolving in PNG. This method described above is for a very basic one-colour bilum. Colours can be added by joining different coloured strings to your working string or depending on the complexity of your design are worked in by a method too complicated to explain here. Far better when you have mastered the basics to have someone who know how to show you. Contributor: Joy Sahumlal, ATDI, Unitech, Lae, MP. Url:
http://alex.golub.name/porgera/bilum.html
Step-by-Step-Instructions for GOROKA-Bilums & SIMBU-Bilums:
https://drive.google.com/drive/folders/1qb-VMFC5uDFv3j3_DzUz6c1OxPkbKJSv
#sac de transport#carry bag#carry bags#Tragetaschen#Tragetasche#Bilum#Bilums#Noken#Papua-Neuguinea#Papouasie-Nouvelle Guinée#Papua-NewGuinea#Achterschlung#8er-Schlung#knüpfen#geknüpft#geschlungen#Schlingen#8er-Schlingen#Achter-Schlingen#Achterschlünge#sacs de transport#Tragenetz#Tragenetze#carrying bag#carrying bags#carrying net#carrying nets#carry net#carry nets#Behältnis
3 notes
·
View notes
Photo






How to Make a Bilum
Step-by-Step-Instructions for GOROKA-Bilums & SIMBU-Bilums:
https://drive.google.com/drive/folders/1qb-VMFC5uDFv3j3_DzUz6c1OxPkbKJSv
[This originally appeared in the Lik Lik Buk, a populist development guide produced in Papua New Guinea in the mid-1980s -A]
The bilum is a traditional PNG string bag. Bilums come in a variety of shapes and styles and are made for different purposes. Bilums are made to carry food, to carry babies in and to use for leisure. People can identify a person just by the creative design or style woven on the bilum. Despite the many different aspects and purposes of bilums they all are made from the same basic weaving method. Bilums are worked by forming rows of a special knot around a strip which today is usually made of plastic packing strips but previously people used coconut and pandanus leaves to make these strips. The strips are used to determine the size of the stitches and help to make the job of holding hte stitches easier. The string is owrked in short lengths as all of the string yet to be used is fed into the existing knots. When the string runs out a new length is tied on to the end. You will need (beginner): 1. Some coloured string 2. Cut a piece of plastic strip about 60cm or more to form the base row. 3. Cut the other plastic strips about 30cm long. These should be the same width (about ½-1 cm)as the longer strip. 4. A pair of scissors 5. One or two needles larger and longer than sewing needles (darning needles). Some people use old spokes from an umbrella. (Traditionally: bones of the Flying Foxes ) Method: 1. Make a loop around the plastic strip and tie with a slip knot. Pace one end of string on the front of the plastic strip (that is the side facing you) and hold it down with your thumb at the front and with your forefinger at the back of the plastic strip. 2. Pull the working end over the top and then behind the plastic strip creating a loop at the top of the plastic strip. 3. The working end is brought under the plastic strip and is fed under the other end of the string so that the plastic strip now has a circle of string around it. This mesh must be kept loose enough to be able to feed the subsequent stitches into the loops of the previous ones. 4. The working end goes over the loose end into the top loop from the left side to the right side. It is imortant that the points where the stirng crosses over are kept at the bottom and top of the plastic strip. The working end foes behind the plastic strip and is fed from left to right into the bottom loop. 5. Repeat the procedure until you reach the required length which will be the half the circumference of your bilum. Subsequent Rows Bilums consist of a spiral of rows of meshes. 1. Bend the plastic strip backward (away from yourself) and work the stitch in the normal way but over the two palstic strips instead of one. 2. Turn the pastic strip so that the back is now facing you. Make the next stitch over the one plastic strip in the following manner. 3. Take the working end and go over the plastic strip at the front and into the previous stitch at the back from left to right and then into the loop of hte stitch on the rprevious row. Pull the string behind the front plastic strip. Continue until the second row is the same length as the first row. These two rows mae the base of the blium. (if the plastic strip is short slip another strip in). 4. All subsequent rows are made in the smae manner. 5. Continue the procedure until you have 18-20 rows (medium size bilum). Mouth of the Bilum 1. Get a new piece of string and join it to the ned of the string that you used for making the body of the bilum. 2. Hold the top of the bilum facing you so that you can clearly see the top edge of the stitches forming the top row. 3. Skip the last working stitch of the body of the bilum.Count three loops to the front and feed the string into the thuird loop from left to right. Make a knot. Count three loops and feed the string into the third loop from left to right. From right to left push the string into the knot that you made. Bring the string back towards you forming a circle. 4. Count another three loops in front and feed the string into the third loop. Bring the string back and feed it into the previous circle. Continue around the mouth of the bilum. 5. When the two ends meet feed the last stitch into the first stitch to form a continuous chian. To finish tie a knot and cut the extra string. Handle Bilum handles are sometimes made separately from the bilum and then joined on. Others are made straight from the side of the bilum. There are many styles but the simplest uses the same basic stitch as in the body of the bilum. 1. Use a shorter plastic strip and make about 8-10 sitthces. 2. Use a second plastic strip. Make the next row using the same stitch. 3. Continue making rows until you reach the length of the handle you want. Joining the Handle to the Bilum 1. Hold the Bilum up and from the way it hangs judge where the sides are. The handle must be attached to these points so that the bilum when it is carried will be evenly balanced. 2. The handle and the body of the bilum are joined together by looping stitches. It is important that the joining stitches are made into the first row of the bilum not just into the finishing edge of the mouth of the bilum so that your join is strong. 3. When finished, secure with a knot. Styles and techniques for different patterns are constantly evolving in PNG. This method described above is for a very basic one-colour bilum. Colours can be added by joining different coloured strings to your working string or depending on the complexity of your design are worked in by a method too complicated to explain here. Far better when you have mastered the basics to have someone who know how to show you. Contributor: Joy Sahumlal, ATDI, Unitech, Lae, MP. Url:
http://alex.golub.name/porgera/bilum.html
Step-by-Step-Instructions for GOROKA-Bilums & SIMBU-Bilums:
https://drive.google.com/drive/folders/1qb-VMFC5uDFv3j3_DzUz6c1OxPkbKJSv
#bilum#bilums#noken#Tragenetz#Tragenetze#Tragetasche#Tragetaschen#sac de transport#sacs de transports#carry bag#carry bags#carrying bag#carrying bags#carrying net#carrying nets#Schlünge#8er-Schlünge#8er#Achterschlünge#Papua-Neuguinea#Papouasie-Nouvelle Guinée#Papua-NewGuinea#selbstgemacht#do-it-yourself#diy#handgearbeitet#handgeknüpft#hand-made#handmade#Achterschlingen
0 notes
Text
Experiment

after first experimenting with the larger repurposed work i thouhgt i better transfer the idea onto a new canvas
i stretched the bag seen on the left really tightly, so that the paint could seep through the little openings

after removing the bilum this was what i was left with
detailed pattern that kind of reminds me of fish scales
i liked the process it was fun experimenting with this some what new form of creation. i mean i have used a stencil before but not of a bilum
i like the pattern it creates. i still might do another layer of the pattern in the same colour maybe different orientation to see the effects
i don't know if i will add text to this i kind of like the way it looks
i mean when i look at it i kind of see it as this marking of the past. especially from a traditional standpoint
looking back on it maybe i should've added text first then layer the pattern over it, like wrapping the text sort of
i dont know at this point when i look it i don't really get good enough ideas for incorporating text
i keep getting this thought of "washing of the sins or rather past " when viewing
also this was the idea i had from merging aspects of Hugo Kaagman and Lady Aiko

i then decided to add this sort of form created from the curved part of the bag( the opening)
i don't know i guess i kind of wanted to see what else i could do with this stencil
i wanted to create this effect where the top half is sort of coming out of the bag or is left hanging out while the other is still inside
you can see the curved lip of the bag in the composition
im still unsure on what text to add or even if i will add text

i then took the image to photoshop
i wrote text saying forget - then warped and skewed to make this pattern
i don't know if it works though, is there too much pattern? text readability?
i like it i guess, well more so the forms of the text - this wave like pattern
i think it ties in well ( the text) with the background, kind of sticking away to the title of the work its made from (W.M.P.A) like an ocean theme kind of
i mean with the text i kind of just wrote the first thing to mind, actually no i trialled first with the text the 5 W's all written out then i just choose this
like a washing of the past
0 notes
Text
Bilum,traditional bag in Papua New Guinea.

2 notes
·
View notes
Photo


Brief conclusion of research of the Tribe Huli:
The Huli tribe is the biggest one on the island of Papua New Guinea, with over 250.000 members.
The indigenous groups fight over land, pigs and women. Great effort is made to impress the enemy. The largest indigenous group, the Huli wigmen, paint their faces yellow, red and white and are famous for their tradition of making ornamented wigs from their own hair. An axe with a claw completes the intimidating effect.
Pigs are the most precious asset for Huli. They are used to pay for bride price, death and other ritual payments. Men and women live in separate houses as contacts with women are believed to be harmful. The women, who live with children and piglets, are strictly prohibited from entering the man’s house, and marital relations take place in the gardens.
The Huli men’s traditional decoration consists of a cassowary quill put through the nose, kina shells around the neck, hornbill (kokomo) beak on the back, a knife made from a cassowary bone stuck in the belt, a bend of snakeskin across the forehead, bilum (string bag) over the shoulders, arsegras (or tanket, made from leaves stuck into a belt to cover the bottom), and a belt of dangling pig tails made to attract the women.
They have an obsession with their hair, therefore also called Huli wigmen, and are known for their intricately decorated woven wigs made from their own hair. The wigs represent symbols of their maturity. The wigs are decorated with everlasting daisies, feathers of the bird of paradise and parrots, cuscus fur and other materials.
[more in depth research is accessible on the Google Drive]
1 note
·
View note
Photo

"Berapa lama mama menganyam noken? selama dan sejauh perjalanan kesabaran bumi menumbuhkan keladi." We cannot neglect one of the important issues in Papua: the social injustice and the stereotype that they're likely left behind from some other parts of Indonesia. As so I've seen during my visits and during my encounter with Gody Usnaat at Makassar International Writers Festival @makassarwriters recommended by Mbak @itaibnu Gody-as we call him, rises these issues and shows some resilience through his contemplative poems using the allegories of Noken, a symbol that has become an integral part of the people in Papua. He unveils the socio issues by depicting the real situation there including living in the most remote area, being neglected and alienated, the poverty and the hardships the local people need to face there. The depiction is so real and I have nothing but to say that each line is so simple yet beautifully written. My only highlight is to the editor(s)- as what it's written there - I meant: what's the difference between penyelia naskah dan editor? I think they're just different in names but carry the same job desc-IMO! Anyway, I dunno how they work on Gody's scripts but well- the highlight is not on the poems but on the notes written by two lit-junkie they put at the beginning and the end of the book. For an idiot who cares more into the poems and curious about what those junkies say, I found that the transition of words aren't smooth and seem so rough. The wording is not so flowy and it's like those legal documents I translated - so kaku! An addition... if both editors check on p.71, they should know how to differentiate between mobil and mobile kan yah? So well... kindda rough and the people involved should be more aware and the wording defo need to be more gluey in the transition between paragraphs and weaving its sentences. Ah this editorial job should not be taken lightly lah. Susah ternyata ya... Slide 8-10: Noken Noken in Indonesian Papua or Bilum in Papua New Guinea is a multifunctional knotted or woven bag for the distinctive usage, which involves being hung from the head, is traditionally used to carry various goods, and also children. (at Bangkok Thailand) https://www.instagram.com/p/CaBC4yDvezh/?igshid=NGJjMDIxMWI=
0 notes
Video
Bilum from Ji Yun on Vimeo.
(...) It needed a hole. A large hole through which everything I put in would immediately fall out. Then lines would be free again once the Bilum emancipated from fulfilling the role of a carrier bag. Unraveling the yarn in the middle of the Bilum lets the act of crocheting commence once more.
more about the project: ignored.technology/post/a-hole-story
[1] BILUM In Tok Pisin, a language of Papua New Guinea, bilum means womb. But it also refers to a string bag made by hand using yarn from twisted plant fibres and technology known as looping, knotless netting, or crocheting. Traditionally slung behind from the head, it is capable of carrying both light and heavy loads, including small children.
0 notes
Text
I’m gonna have to make it clear at some point that Valen’s reapers are not a Kuro-type situation: they don’t all wear western-style suits. They don’t all wear sunshades. They don’t all carry attache cases. Almost all of them do have a bag of some sort, but maybe it’s a backpack or a bilum or a Coach Double Swagger purse. There are reapers who wear Stetsons and Lucchese boots. There are reapers who have closets full of kurtis with coordinated dupattas. There are reapers who go out every day in Givenchy ready-to-wear. It depends on the individual, where (and when) they grew up, where they currently live, etc. I will say that in most cases, reapers look (in some way or another) like they have money. Whether it’s reflected in their clothing, accessories, vehicles, whatever; it’s usually obvious that they have money to spend on whatever it is they enjoy.
#reapers#Jean always has this idea that they're all super intense businessy creatures like Valen is#and#it's just not true#never can tell who's going to fit her criteria#and yeah money is like#the least of any reaper's concern#the job is very demanding#and their employer is a hardass#but uh#it does have its perks y'know?#Valen Desavi
1 note
·
View note
Photo


How to Make a Bilum
Step-by-Step-Instructions for GOROKA-Bilums & SIMBU-Bilums:
https://drive.google.com/drive/folders/1qb-VMFC5uDFv3j3_DzUz6c1OxPkbKJSv
[This originally appeared in the Lik Lik Buk, a populist development guide produced in Papua New Guinea in the mid-1980s -A] The bilum is a traditional PNG string bag. Bilums come in a variety of shapes and styles and are made for different purposes. Bilums are made to carry food, to carry babies in and to use for leisure. People can identify a person just by the creative design or style woven on the bilum. Despite the many different aspects and purposes of bilums they all are made from the same basic weaving method. Bilums are worked by forming rows of a special knot around a strip which today is usually made of plastic packing strips but previously people used coconut and pandanus leaves to make these strips. The strips are used to determine the size of the stitches and help to make the job of holding hte stitches easier. The string is owrked in short lengths as all of the string yet to be used is fed into the existing knots. When the string runs out a new length is tied on to the end. You will need (beginner): 1. Some coloured string 2. Cut a piece of plastic strip about 60cm or more to form the base row. 3. Cut the other plastic strips about 30cm long. These should be the same width (about ½-1 cm)as the longer strip. 4. A pair of scissors 5. One or two needles larger and longer than sewing needles (darning needles). Some people use old spokes from an umbrella. (Traditionally: bones of the Flying Foxes ) Method: 1. Make a loop around the plastic strip and tie with a slip knot. Pace one end of string on the front of the plastic strip (that is the side facing you) and hold it down with your thumb at the front and with your forefinger at the back of the plastic strip. 2. Pull the working end over the top and then behind the plastic strip creating a loop at the top of the plastic strip. 3. The working end is brought under the plastic strip and is fed under the other end of the string so that the plastic strip now has a circle of string around it. This mesh must be kept loose enough to be able to feed the subsequent stitches into the loops of the previous ones. 4. The working end goes over the loose end into the top loop from the left side to the right side. It is imortant that the points where the stirng crosses over are kept at the bottom and top of the plastic strip. The working end foes behind the plastic strip and is fed from left to right into the bottom loop. 5. Repeat the procedure until you reach the required length which will be the half the circumference of your bilum. Subsequent Rows Bilums consist of a spiral of rows of meshes. 1. Bend the plastic strip backward (away from yourself) and work the stitch in the normal way but over the two palstic strips instead of one. 2. Turn the pastic strip so that the back is now facing you. Make the next stitch over the one plastic strip in the following manner. 3. Take the working end and go over the plastic strip at the front and into the previous stitch at the back from left to right and then into the loop of hte stitch on the rprevious row. Pull the string behind the front plastic strip. Continue until the second row is the same length as the first row. These two rows mae the base of the blium. (if the plastic strip is short slip another strip in). 4. All subsequent rows are made in the smae manner. 5. Continue the procedure until you have 18-20 rows (medium size bilum). Mouth of the Bilum 1. Get a new piece of string and join it to the ned of the string that you used for making the body of the bilum. 2. Hold the top of the bilum facing you so that you can clearly see the top edge of the stitches forming the top row. 3. Skip the last working stitch of the body of the bilum.Count three loops to the front and feed the string into the thuird loop from left to right. Make a knot. Count three loops and feed the string into the third loop from left to right. From right to left push the string into the knot that you made. Bring the string back towards you forming a circle. 4. Count another three loops in front and feed the string into the third loop. Bring the string back and feed it into the previous circle. Continue around the mouth of the bilum. 5. When the two ends meet feed the last stitch into the first stitch to form a continuous chian. To finish tie a knot and cut the extra string. Handle Bilum handles are sometimes made separately from the bilum and then joined on. Others are made straight from the side of the bilum. There are many styles but the simplest uses the same basic stitch as in the body of the bilum. 1. Use a shorter plastic strip and make about 8-10 sitthces. 2. Use a second plastic strip. Make the next row using the same stitch. 3. Continue making rows until you reach the length of the handle you want. Joining the Handle to the Bilum 1. Hold the Bilum up and from the way it hangs judge where the sides are. The handle must be attached to these points so that the bilum when it is carried will be evenly balanced. 2. The handle and the body of the bilum are joined together by looping stitches. It is important that the joining stitches are made into the first row of the bilum not just into the finishing edge of the mouth of the bilum so that your join is strong. 3. When finished, secure with a knot. Styles and techniques for different patterns are constantly evolving in PNG. This method described above is for a very basic one-colour bilum. Colours can be added by joining different coloured strings to your working string or depending on the complexity of your design are worked in by a method too complicated to explain here. Far better when you have mastered the basics to have someone who know how to show you. Contributor: Joy Sahumlal, ATDI, Unitech, Lae, MP. Url: http://alex.golub.name/porgera/bilum.html
Step-by-Step-Instructions for GOROKA-Bilums & SIMBU-Bilums:
https://drive.google.com/drive/folders/1qb-VMFC5uDFv3j3_DzUz6c1OxPkbKJSv
#bilum#bilums#carry bag#carry bags#Tragetasche#Tragetaschen#8er-Schlung#8er-Schlünge#8er#8#knüpfen#Achterschlünge#Achterschlung#Papua-NewGuinea#Papua-Neuguinea#Papouasie Nouvelle-Guinée#PNG#P.N.G.#Noken#Sylvia Baker#how to make a bilum#make your own bilum#making a bilum carry bag#sac de transport#sacs de transport#Handarbeit#Handarbeiten#weaving#weave#woven
2 notes
·
View notes
Photo


more notes on Judy Millar + development.
Pattern (zig-zaggy one) is from a bilum bag from PNG
0 notes
Text
Experiment


i wanted to repurpose another work so i opted for this one
the underlying text is a poem with like a floral theme
i actually had this idea of stretching a traditional woven bag called a Bilum and using it as a stencil
the idea came from merging aspects of Lady Aiko and Hugo Kraagman
i thought that the paint produced after spraying would create this abundant pattern leading from different directions
i found that the woven material was quite compact so i had to tape and stretch the wool to i guess bring out the pattern or stencil


on the left is the first experiment and the right is when i used a larger piece of the bilum (the rest of the bag apart from the handle)
i like the first one better the pattern creates this 3 dimensional form kind of like a double helix its kind of trippy
on the left i used the rest of the bag to create the larger specs of paint
and still the left still gives of this 3 dimensional feel like a altering of the perspective
i kind of like this warping of perspective look it kind of reminds me of my interest in space and sci-fi stuff
also you can see this crosshatching emerging through the opposing stitching or sides of the bag
look i don't think its the best but i do think it was a good experiment as it led me to another work
0 notes
Photo

I. Bilum Baggage 2017
Pen, pencil, watercolour paint, texta
Perennial Princesses by Freya Flavell at The Corner Store Merchants
She doesn’t carry around much baggage. But the baggage she is yet to process is kept in her favourite bilum bag. In it she has a small purse of guilt, a waterbottle of worries, one trauma tampon and some fearmint chewing gum. Soon the coins will be spent, the worries drunk, the tampon disposed of and the chewy stuck under a chair, so she’s not too bothered!
#doodoodloo#freya flavell#exhibition#perennial princesses#corner store merchants#castlemaine#2017#artists on tumblr#goddess mythology
26 notes
·
View notes
Photo

Bags & Handbag Trends : Sac Bilum Marrakech BOHO Tassel sac main sac hanche par ljcdesignss http://ift.tt/2Dy89Un
0 notes


