#making a bilum carry bag
Explore tagged Tumblr posts
Photo


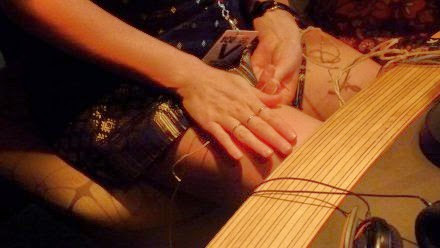


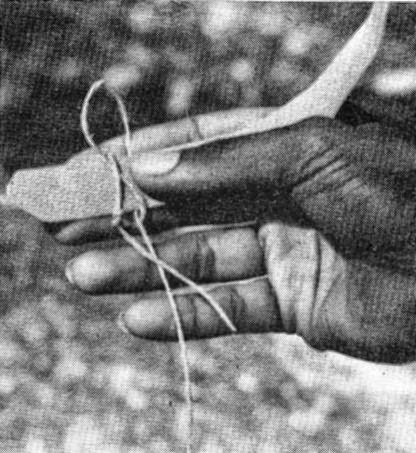
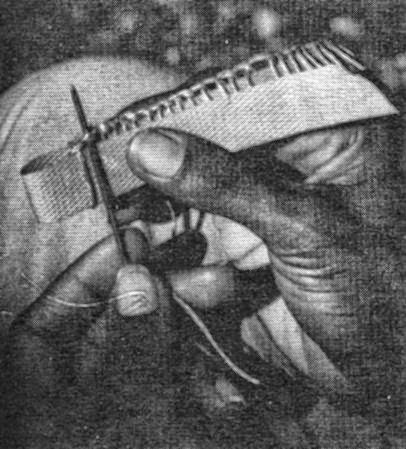
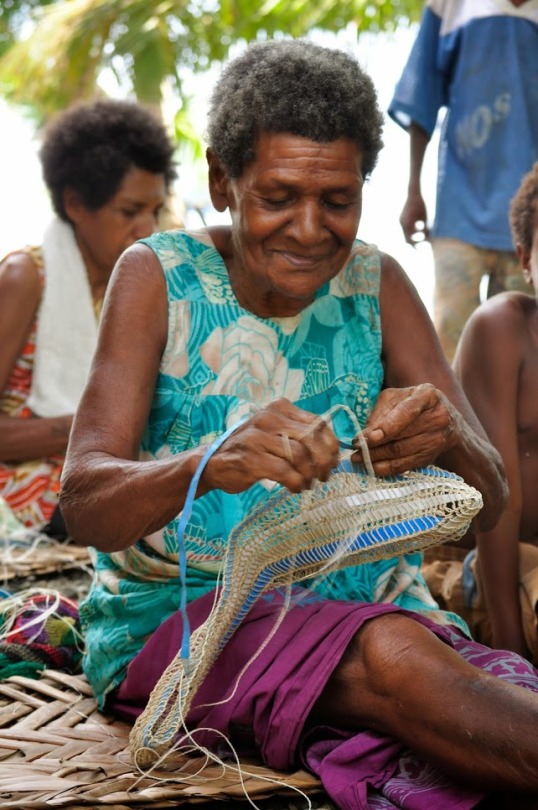
How to Make a Bilum
Step-by-Step-Instructions for GOROKA-Bilums & SIMBU-Bilums:
https://drive.google.com/drive/folders/1qb-VMFC5uDFv3j3_DzUz6c1OxPkbKJSv
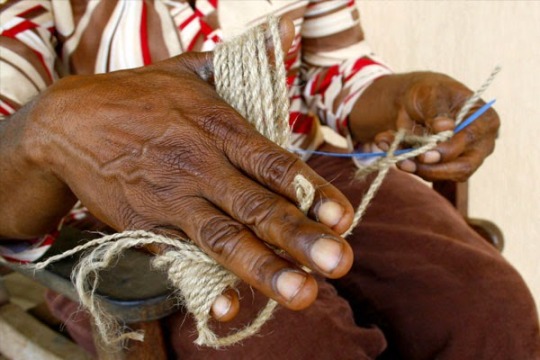
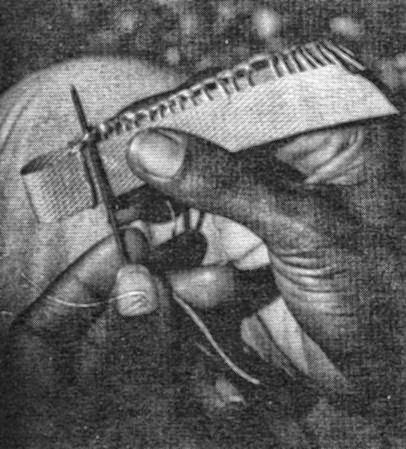
[This originally appeared in the Lik Lik Buk, a populist development guide produced in Papua New Guinea in the mid-1980s -A] The bilum is a traditional PNG string bag. Bilums come in a variety of shapes and styles and are made for different purposes. Bilums are made to carry food, to carry babies in and to use for leisure. People can identify a person just by the creative design or style woven on the bilum. Despite the many different aspects and purposes of bilums they all are made from the same basic weaving method. Bilums are worked by forming rows of a special knot around a strip which today is usually made of plastic packing strips but previously people used coconut and pandanus leaves to make these strips. The strips are used to determine the size of the stitches and help to make the job of holding hte stitches easier. The string is owrked in short lengths as all of the string yet to be used is fed into the existing knots. When the string runs out a new length is tied on to the end. You will need (beginner): 1. Some coloured string 2. Cut a piece of plastic strip about 60cm or more to form the base row. 3. Cut the other plastic strips about 30cm long. These should be the same width (about ½-1 cm)as the longer strip. 4. A pair of scissors 5. One or two needles larger and longer than sewing needles (darning needles). Some people use old spokes from an umbrella. (Traditionally: bones of the Flying Foxes ) Method: 1. Make a loop around the plastic strip and tie with a slip knot. Pace one end of string on the front of the plastic strip (that is the side facing you) and hold it down with your thumb at the front and with your forefinger at the back of the plastic strip. 2. Pull the working end over the top and then behind the plastic strip creating a loop at the top of the plastic strip. 3. The working end is brought under the plastic strip and is fed under the other end of the string so that the plastic strip now has a circle of string around it. This mesh must be kept loose enough to be able to feed the subsequent stitches into the loops of the previous ones. 4. The working end goes over the loose end into the top loop from the left side to the right side. It is imortant that the points where the stirng crosses over are kept at the bottom and top of the plastic strip. The working end foes behind the plastic strip and is fed from left to right into the bottom loop. 5. Repeat the procedure until you reach the required length which will be the half the circumference of your bilum. Subsequent Rows Bilums consist of a spiral of rows of meshes. 1. Bend the plastic strip backward (away from yourself) and work the stitch in the normal way but over the two palstic strips instead of one. 2. Turn the pastic strip so that the back is now facing you. Make the next stitch over the one plastic strip in the following manner. 3. Take the working end and go over the plastic strip at the front and into the previous stitch at the back from left to right and then into the loop of hte stitch on the rprevious row. Pull the string behind the front plastic strip. Continue until the second row is the same length as the first row. These two rows mae the base of the blium. (if the plastic strip is short slip another strip in). 4. All subsequent rows are made in the smae manner. 5. Continue the procedure until you have 18-20 rows (medium size bilum). Mouth of the Bilum 1. Get a new piece of string and join it to the ned of the string that you used for making the body of the bilum. 2. Hold the top of the bilum facing you so that you can clearly see the top edge of the stitches forming the top row. 3. Skip the last working stitch of the body of the bilum.Count three loops to the front and feed the string into the thuird loop from left to right. Make a knot. Count three loops and feed the string into the third loop from left to right. From right to left push the string into the knot that you made. Bring the string back towards you forming a circle. 4. Count another three loops in front and feed the string into the third loop. Bring the string back and feed it into the previous circle. Continue around the mouth of the bilum. 5. When the two ends meet feed the last stitch into the first stitch to form a continuous chian. To finish tie a knot and cut the extra string. Handle Bilum handles are sometimes made separately from the bilum and then joined on. Others are made straight from the side of the bilum. There are many styles but the simplest uses the same basic stitch as in the body of the bilum. 1. Use a shorter plastic strip and make about 8-10 sitthces. 2. Use a second plastic strip. Make the next row using the same stitch. 3. Continue making rows until you reach the length of the handle you want. Joining the Handle to the Bilum 1. Hold the Bilum up and from the way it hangs judge where the sides are. The handle must be attached to these points so that the bilum when it is carried will be evenly balanced. 2. The handle and the body of the bilum are joined together by looping stitches. It is important that the joining stitches are made into the first row of the bilum not just into the finishing edge of the mouth of the bilum so that your join is strong. 3. When finished, secure with a knot. Styles and techniques for different patterns are constantly evolving in PNG. This method described above is for a very basic one-colour bilum. Colours can be added by joining different coloured strings to your working string or depending on the complexity of your design are worked in by a method too complicated to explain here. Far better when you have mastered the basics to have someone who know how to show you. Contributor: Joy Sahumlal, ATDI, Unitech, Lae, MP. Url:
http://alex.golub.name/porgera/bilum.html
Step-by-Step-Instructions for GOROKA-Bilums & SIMBU-Bilums:
https://drive.google.com/drive/folders/1qb-VMFC5uDFv3j3_DzUz6c1OxPkbKJSv
#sac de transport#carry bag#carry bags#Tragetaschen#Tragetasche#Bilum#Bilums#Noken#Papua-Neuguinea#Papouasie-Nouvelle Guinée#Papua-NewGuinea#Achterschlung#8er-Schlung#knüpfen#geknüpft#geschlungen#Schlingen#8er-Schlingen#Achter-Schlingen#Achterschlünge#sacs de transport#Tragenetz#Tragenetze#carrying bag#carrying bags#carrying net#carrying nets#carry net#carry nets#Behältnis
2 notes
·
View notes
Photo






How to Make a Bilum
Step-by-Step-Instructions for GOROKA-Bilums & SIMBU-Bilums:
https://drive.google.com/drive/folders/1qb-VMFC5uDFv3j3_DzUz6c1OxPkbKJSv
[This originally appeared in the Lik Lik Buk, a populist development guide produced in Papua New Guinea in the mid-1980s -A]
The bilum is a traditional PNG string bag. Bilums come in a variety of shapes and styles and are made for different purposes. Bilums are made to carry food, to carry babies in and to use for leisure. People can identify a person just by the creative design or style woven on the bilum. Despite the many different aspects and purposes of bilums they all are made from the same basic weaving method. Bilums are worked by forming rows of a special knot around a strip which today is usually made of plastic packing strips but previously people used coconut and pandanus leaves to make these strips. The strips are used to determine the size of the stitches and help to make the job of holding hte stitches easier. The string is owrked in short lengths as all of the string yet to be used is fed into the existing knots. When the string runs out a new length is tied on to the end. You will need (beginner): 1. Some coloured string 2. Cut a piece of plastic strip about 60cm or more to form the base row. 3. Cut the other plastic strips about 30cm long. These should be the same width (about ½-1 cm)as the longer strip. 4. A pair of scissors 5. One or two needles larger and longer than sewing needles (darning needles). Some people use old spokes from an umbrella. (Traditionally: bones of the Flying Foxes ) Method: 1. Make a loop around the plastic strip and tie with a slip knot. Pace one end of string on the front of the plastic strip (that is the side facing you) and hold it down with your thumb at the front and with your forefinger at the back of the plastic strip. 2. Pull the working end over the top and then behind the plastic strip creating a loop at the top of the plastic strip. 3. The working end is brought under the plastic strip and is fed under the other end of the string so that the plastic strip now has a circle of string around it. This mesh must be kept loose enough to be able to feed the subsequent stitches into the loops of the previous ones. 4. The working end goes over the loose end into the top loop from the left side to the right side. It is imortant that the points where the stirng crosses over are kept at the bottom and top of the plastic strip. The working end foes behind the plastic strip and is fed from left to right into the bottom loop. 5. Repeat the procedure until you reach the required length which will be the half the circumference of your bilum. Subsequent Rows Bilums consist of a spiral of rows of meshes. 1. Bend the plastic strip backward (away from yourself) and work the stitch in the normal way but over the two palstic strips instead of one. 2. Turn the pastic strip so that the back is now facing you. Make the next stitch over the one plastic strip in the following manner. 3. Take the working end and go over the plastic strip at the front and into the previous stitch at the back from left to right and then into the loop of hte stitch on the rprevious row. Pull the string behind the front plastic strip. Continue until the second row is the same length as the first row. These two rows mae the base of the blium. (if the plastic strip is short slip another strip in). 4. All subsequent rows are made in the smae manner. 5. Continue the procedure until you have 18-20 rows (medium size bilum). Mouth of the Bilum 1. Get a new piece of string and join it to the ned of the string that you used for making the body of the bilum. 2. Hold the top of the bilum facing you so that you can clearly see the top edge of the stitches forming the top row. 3. Skip the last working stitch of the body of the bilum.Count three loops to the front and feed the string into the thuird loop from left to right. Make a knot. Count three loops and feed the string into the third loop from left to right. From right to left push the string into the knot that you made. Bring the string back towards you forming a circle. 4. Count another three loops in front and feed the string into the third loop. Bring the string back and feed it into the previous circle. Continue around the mouth of the bilum. 5. When the two ends meet feed the last stitch into the first stitch to form a continuous chian. To finish tie a knot and cut the extra string. Handle Bilum handles are sometimes made separately from the bilum and then joined on. Others are made straight from the side of the bilum. There are many styles but the simplest uses the same basic stitch as in the body of the bilum. 1. Use a shorter plastic strip and make about 8-10 sitthces. 2. Use a second plastic strip. Make the next row using the same stitch. 3. Continue making rows until you reach the length of the handle you want. Joining the Handle to the Bilum 1. Hold the Bilum up and from the way it hangs judge where the sides are. The handle must be attached to these points so that the bilum when it is carried will be evenly balanced. 2. The handle and the body of the bilum are joined together by looping stitches. It is important that the joining stitches are made into the first row of the bilum not just into the finishing edge of the mouth of the bilum so that your join is strong. 3. When finished, secure with a knot. Styles and techniques for different patterns are constantly evolving in PNG. This method described above is for a very basic one-colour bilum. Colours can be added by joining different coloured strings to your working string or depending on the complexity of your design are worked in by a method too complicated to explain here. Far better when you have mastered the basics to have someone who know how to show you. Contributor: Joy Sahumlal, ATDI, Unitech, Lae, MP. Url:
http://alex.golub.name/porgera/bilum.html
Step-by-Step-Instructions for GOROKA-Bilums & SIMBU-Bilums:
https://drive.google.com/drive/folders/1qb-VMFC5uDFv3j3_DzUz6c1OxPkbKJSv
#bilum#bilums#noken#Tragenetz#Tragenetze#Tragetasche#Tragetaschen#sac de transport#sacs de transports#carry bag#carry bags#carrying bag#carrying bags#carrying net#carrying nets#Schlünge#8er-Schlünge#8er#Achterschlünge#Papua-Neuguinea#Papouasie-Nouvelle Guinée#Papua-NewGuinea#selbstgemacht#do-it-yourself#diy#handgearbeitet#handgeknüpft#hand-made#handmade#Achterschlingen
0 notes
Text
I’m gonna have to make it clear at some point that Valen’s reapers are not a Kuro-type situation: they don’t all wear western-style suits. They don’t all wear sunshades. They don’t all carry attache cases. Almost all of them do have a bag of some sort, but maybe it’s a backpack or a bilum or a Coach Double Swagger purse. There are reapers who wear Stetsons and Lucchese boots. There are reapers who have closets full of kurtis with coordinated dupattas. There are reapers who go out every day in Givenchy ready-to-wear. It depends on the individual, where (and when) they grew up, where they currently live, etc. I will say that in most cases, reapers look (in some way or another) like they have money. Whether it’s reflected in their clothing, accessories, vehicles, whatever; it’s usually obvious that they have money to spend on whatever it is they enjoy.
#reapers#Jean always has this idea that they're all super intense businessy creatures like Valen is#and#it's just not true#never can tell who's going to fit her criteria#and yeah money is like#the least of any reaper's concern#the job is very demanding#and their employer is a hardass#but uh#it does have its perks y'know?#Valen Desavi
1 note
·
View note
Text
Port Moresby for Beginners
If you take all the reports at face value, you’re taking your life into your hands if you walk outside in Port Moresby, Papua New Guinea. While it can be a dangerous city, Port Moresby is not nearly as bad as the tabloid media paint it.
If you’re considering a trip to PNG, don’t let Port Moresby’s bad reputation stop you. The country has much to offer, both above and below the water. A modicum of common sense will keep you safe and sound in the capital.
There’s also some remarkably good diving in the Moresby area. While it’s unlikely that you’re in PNG just to dive these sites, a couple of days diving here to break up your journey is an appealing option. With that said, here are a few survival tips gleaned from years of experience in Port Moresby and Papua New Guinea.
Port Moresby Survival Guide
In reality, there are two cities. Expats and wealthy locals live in downtown Port Moresby or in the beach suburbs, where the average three-bedroom house costs over $750,000. Rent for a two-bedroom apartment can easily exceed $2,500 per week. This is expensive by any standards, but utterly out of reach for locals, who earn an average weekly salary of less than $200. Random violent crime is always possible, but it only occurs occasionally in these places and is usually answered with severe (ex-judicial) retribution by the police when the perpetrators are caught.
The locals live in the “other” Port Moresby and violent crime, particularly against women, is often systematic and unfortunately a part of daily life. The situation is worst in the squatter camps like Six Mile, which occupy the edges of Port Moresby.
Where to Stay
If you are just passing through, both the Airways and Gateway Hotels are right by the airport. All the other main hotels are in the downtown area and far from potential danger zones. Each has in-house security and airport shuttles, so you will be met on arrival and transported back to the airport on departure. A few good options are the Crowne Plaza and the Grand Papua.
Logistics in Port Moresby
The Papua New Guinea currency is the Kina and $1 USD will buy you about three of them. You can exchange currency immediately after immigration at the international airport, and there is an ATM after you clear customs. Although there are ATMs downtown, use the one at the airport, as it’s safer than the ones in town. Port Moresby is generally quite expensive, so shop around when booking hotels.
Things to do in Port Moresby
There are several places well worth visiting in Moresby. The best way to do so is by booking a tour with your hotel. The Parliament and the National Museum are both in the Waigani area, while the Botanic Gardens are in nearby Gerehu. All three offer a pleasant way to spend a few hours.
On the way back, stop at one of the local markets. The one at Four Mile is quite safe with a guide. Check out local crafts like the hand-made string bags called bilums. These are one of the most common features of Papua New Guinea. Both men and women use the bags for carrying everything from personal belongings and food to infants.
Visiting markets like Four Mile is also the best way to help the local people directly, as the money you spend on a bilum or other souvenir goes straight to the person selling it, and can make a huge difference. As you will quickly notice, virtually all the vendors at these markets are women. Buying their wares helps them support their families and local crafts at the same time.
Those who want a closer look at how the locals live should visit the Hanuabada stilt village. Hanuabada is one of only two remaining stilt villages in Port Moresby. It has retained much of its traditional and conservative culture. Although residents are friendly and welcoming, don’t just show up uninvited. Hire somebody from the village to guide you; your hotel should be able to help arrange this.
[See image gallery at scubadiverlife.com]
Scuba Diving in Port Moresby
Divers passing through on their way to Milne Bay, New Britain or New Ireland usually overlook the diving in Port Moresby. But contrary to what you might expect so close to a capital city, you’ll find some good diving in the Moresby area. The best dive sites sit along the offshore and sunken barrier reefs, some of which can be stunning in the right conditions.
Until recently, there were two options for diving these sites. The Dive Center, which operates from Tahira Marina just outside Port Moresby, and Loloata Dive Resort in Bootless Bay. In late 2016, however, Loloata was sold and closed for refurbishment and has yet to reopen as of this writing. Rumor has it that the resort will not offer scuba diving when it reopens.
If you can get to them, there are at least 15 sites nearby, several of which offer everything from the elusive rhinopias to schooling barracuda. You could easily spend a few days diving here, but if you can only do a couple of sites make sure that one of them is the wreck of the Pacific Gas, one of the best dive sites in PNG. The local Port Moresby diving community sank the Pacific Gas deliberately in 1986. It sits upright on the slope of the sunken barrier reef, with its stern in 141 feet (43 m) of water.
When to Dive Port Moresby
PNG’s location just south of the Equator means that it is subject to monsoonal weather patterns and seasons. In the Port Moresby area, from May to October, the winds blow from the southeast. From mid-December through March, the predominant winds are from the northwest.
When the south-easterlies are blowing, the morning brings calm conditions, but by around 11:00 am, the winds can produce some heavy swells. Conditions are better during the northwest monsoon season, when the sites on the outer reef are much more accessible. Optimum dive conditions are during the doldrums between the monsoon seasons, with the one in November and early December being particularly good.
By guest author Don Silcock
Don Silcock is an Australian based in Bali and has dived many of the best locations across the Indo-Pacific. If you are interested in learning more about Port Moresby, check out the guide on his website.
The post Port Moresby for Beginners appeared first on Scuba Diver Life.
from Scuba Diver Life http://ift.tt/2lpRr5i
0 notes
Text
Port Moresby for Beginners
If you take all the reports at face value, you’re taking your life into your hands if you walk outside in Port Moresby, Papua New Guinea. While it can be a dangerous city, Port Moresby is not nearly as bad as the tabloid media paint it.
If you’re considering a trip to PNG, don’t let Port Moresby’s bad reputation stop you. The country has much to offer, both above and below the water. A modicum of common sense will keep you safe and sound in the capital.
There’s also some remarkably good diving in the Moresby area. While it’s unlikely that you’re in PNG just to dive these sites, a couple of days diving here to break up your journey is an appealing option. With that said, here are a few survival tips gleaned from years of experience in Port Moresby and Papua New Guinea.
Port Moresby Survival Guide
In reality, there are two cities. Expats and wealthy locals live in downtown Port Moresby or in the beach suburbs, where the average three-bedroom house costs over $750,000. Rent for a two-bedroom apartment can easily exceed $2,500 per week. This is expensive by any standards, but utterly out of reach for locals, who earn an average weekly salary of less than $200. Random violent crime is always possible, but it only occurs occasionally in these places and is usually answered with severe (ex-judicial) retribution by the police when the perpetrators are caught.
The locals live in the “other” Port Moresby and violent crime, particularly against women, is often systematic and unfortunately a part of daily life. The situation is worst in the squatter camps like Six Mile, which occupy the edges of Port Moresby.
Where to Stay
If you are just passing through, both the Airways and Gateway Hotels are right by the airport. All the other main hotels are in the downtown area and far from potential danger zones. Each has in-house security and airport shuttles, so you will be met on arrival and transported back to the airport on departure. A few good options are the Crowne Plaza and the Grand Papua.
Logistics in Port Moresby
The Papua New Guinea currency is the Kina and $1 USD will buy you about three of them. You can exchange currency immediately after immigration at the international airport, and there is an ATM after you clear customs. Although there are ATMs downtown, use the one at the airport, as it’s safer than the ones in town. Port Moresby is generally quite expensive, so shop around when booking hotels.
Things to do in Port Moresby
There are several places well worth visiting in Moresby. The best way to do so is by booking a tour with your hotel. The Parliament and the National Museum are both in the Waigani area, while the Botanic Gardens are in nearby Gerehu. All three offer a pleasant way to spend a few hours.
On the way back, stop at one of the local markets. The one at Four Mile is quite safe with a guide. Check out local crafts like the hand-made string bags called bilums. These are one of the most common features of Papua New Guinea. Both men and women use the bags for carrying everything from personal belongings and food to infants.
Visiting markets like Four Mile is also the best way to help the local people directly, as the money you spend on a bilum or other souvenir goes straight to the person selling it, and can make a huge difference. As you will quickly notice, virtually all the vendors at these markets are women. Buying their wares helps them support their families and local crafts at the same time.
Those who want a closer look at how the locals live should visit the Hanuabada stilt village. Hanuabada is one of only two remaining stilt villages in Port Moresby. It has retained much of its traditional and conservative culture. Although residents are friendly and welcoming, don’t just show up uninvited. Hire somebody from the village to guide you; your hotel should be able to help arrange this.
[See image gallery at scubadiverlife.com]
Scuba Diving in Port Moresby
Divers passing through on their way to Milne Bay, New Britain or New Ireland usually overlook the diving in Port Moresby. But contrary to what you might expect so close to a capital city, you’ll find some good diving in the Moresby area. The best dive sites sit along the offshore and sunken barrier reefs, some of which can be stunning in the right conditions.
Until recently, there were two options for diving these sites. The Dive Center, which operates from Tahira Marina just outside Port Moresby, and Loloata Dive Resort in Bootless Bay. In late 2016, however, Loloata was sold and closed for refurbishment and has yet to reopen as of this writing. Rumor has it that the resort will not offer scuba diving when it reopens.
If you can get to them, there are at least 15 sites nearby, several of which offer everything from the elusive rhinopias to schooling barracuda. You could easily spend a few days diving here, but if you can only do a couple of sites make sure that one of them is the wreck of the Pacific Gas, one of the best dive sites in PNG. The local Port Moresby diving community sank the Pacific Gas deliberately in 1986. It sits upright on the slope of the sunken barrier reef, with its stern in 141 feet (43 m) of water.
When to Dive Port Moresby
PNG’s location just south of the Equator means that it is subject to monsoonal weather patterns and seasons. In the Port Moresby area, from May to October, the winds blow from the southeast. From mid-December through March, the predominant winds are from the northwest.
When the south-easterlies are blowing, the morning brings calm conditions, but by around 11:00 am, the winds can produce some heavy swells. Conditions are better during the northwest monsoon season, when the sites on the outer reef are much more accessible. Optimum dive conditions are during the doldrums between the monsoon seasons, with the one in November and early December being particularly good.
By guest author Don Silcock
Don Silcock is an Australian based in Bali and has dived many of the best locations across the Indo-Pacific. If you are interested in learning more about Port Moresby, check out the guide on his website.
The post Port Moresby for Beginners appeared first on Scuba Diver Life.
from Scuba Diver Life http://ift.tt/2lpRr5i
0 notes
Photo


How to Make a Bilum
Step-by-Step-Instructions for GOROKA-Bilums & SIMBU-Bilums:
https://drive.google.com/drive/folders/1qb-VMFC5uDFv3j3_DzUz6c1OxPkbKJSv
[This originally appeared in the Lik Lik Buk, a populist development guide produced in Papua New Guinea in the mid-1980s -A] The bilum is a traditional PNG string bag. Bilums come in a variety of shapes and styles and are made for different purposes. Bilums are made to carry food, to carry babies in and to use for leisure. People can identify a person just by the creative design or style woven on the bilum. Despite the many different aspects and purposes of bilums they all are made from the same basic weaving method. Bilums are worked by forming rows of a special knot around a strip which today is usually made of plastic packing strips but previously people used coconut and pandanus leaves to make these strips. The strips are used to determine the size of the stitches and help to make the job of holding hte stitches easier. The string is owrked in short lengths as all of the string yet to be used is fed into the existing knots. When the string runs out a new length is tied on to the end. You will need (beginner): 1. Some coloured string 2. Cut a piece of plastic strip about 60cm or more to form the base row. 3. Cut the other plastic strips about 30cm long. These should be the same width (about ½-1 cm)as the longer strip. 4. A pair of scissors 5. One or two needles larger and longer than sewing needles (darning needles). Some people use old spokes from an umbrella. (Traditionally: bones of the Flying Foxes ) Method: 1. Make a loop around the plastic strip and tie with a slip knot. Pace one end of string on the front of the plastic strip (that is the side facing you) and hold it down with your thumb at the front and with your forefinger at the back of the plastic strip. 2. Pull the working end over the top and then behind the plastic strip creating a loop at the top of the plastic strip. 3. The working end is brought under the plastic strip and is fed under the other end of the string so that the plastic strip now has a circle of string around it. This mesh must be kept loose enough to be able to feed the subsequent stitches into the loops of the previous ones. 4. The working end goes over the loose end into the top loop from the left side to the right side. It is imortant that the points where the stirng crosses over are kept at the bottom and top of the plastic strip. The working end foes behind the plastic strip and is fed from left to right into the bottom loop. 5. Repeat the procedure until you reach the required length which will be the half the circumference of your bilum. Subsequent Rows Bilums consist of a spiral of rows of meshes. 1. Bend the plastic strip backward (away from yourself) and work the stitch in the normal way but over the two palstic strips instead of one. 2. Turn the pastic strip so that the back is now facing you. Make the next stitch over the one plastic strip in the following manner. 3. Take the working end and go over the plastic strip at the front and into the previous stitch at the back from left to right and then into the loop of hte stitch on the rprevious row. Pull the string behind the front plastic strip. Continue until the second row is the same length as the first row. These two rows mae the base of the blium. (if the plastic strip is short slip another strip in). 4. All subsequent rows are made in the smae manner. 5. Continue the procedure until you have 18-20 rows (medium size bilum). Mouth of the Bilum 1. Get a new piece of string and join it to the ned of the string that you used for making the body of the bilum. 2. Hold the top of the bilum facing you so that you can clearly see the top edge of the stitches forming the top row. 3. Skip the last working stitch of the body of the bilum.Count three loops to the front and feed the string into the thuird loop from left to right. Make a knot. Count three loops and feed the string into the third loop from left to right. From right to left push the string into the knot that you made. Bring the string back towards you forming a circle. 4. Count another three loops in front and feed the string into the third loop. Bring the string back and feed it into the previous circle. Continue around the mouth of the bilum. 5. When the two ends meet feed the last stitch into the first stitch to form a continuous chian. To finish tie a knot and cut the extra string. Handle Bilum handles are sometimes made separately from the bilum and then joined on. Others are made straight from the side of the bilum. There are many styles but the simplest uses the same basic stitch as in the body of the bilum. 1. Use a shorter plastic strip and make about 8-10 sitthces. 2. Use a second plastic strip. Make the next row using the same stitch. 3. Continue making rows until you reach the length of the handle you want. Joining the Handle to the Bilum 1. Hold the Bilum up and from the way it hangs judge where the sides are. The handle must be attached to these points so that the bilum when it is carried will be evenly balanced. 2. The handle and the body of the bilum are joined together by looping stitches. It is important that the joining stitches are made into the first row of the bilum not just into the finishing edge of the mouth of the bilum so that your join is strong. 3. When finished, secure with a knot. Styles and techniques for different patterns are constantly evolving in PNG. This method described above is for a very basic one-colour bilum. Colours can be added by joining different coloured strings to your working string or depending on the complexity of your design are worked in by a method too complicated to explain here. Far better when you have mastered the basics to have someone who know how to show you. Contributor: Joy Sahumlal, ATDI, Unitech, Lae, MP. Url: http://alex.golub.name/porgera/bilum.html
Step-by-Step-Instructions for GOROKA-Bilums & SIMBU-Bilums:
https://drive.google.com/drive/folders/1qb-VMFC5uDFv3j3_DzUz6c1OxPkbKJSv
#bilum#bilums#carry bag#carry bags#Tragetasche#Tragetaschen#8er-Schlung#8er-Schlünge#8er#8#knüpfen#Achterschlünge#Achterschlung#Papua-NewGuinea#Papua-Neuguinea#Papouasie Nouvelle-Guinée#PNG#P.N.G.#Noken#Sylvia Baker#how to make a bilum#make your own bilum#making a bilum carry bag#sac de transport#sacs de transport#Handarbeit#Handarbeiten#weaving#weave#woven
1 note
·
View note