#bilum
Explore tagged Tumblr posts
Photo


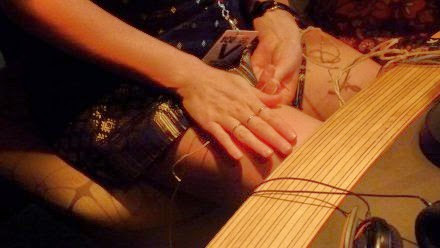


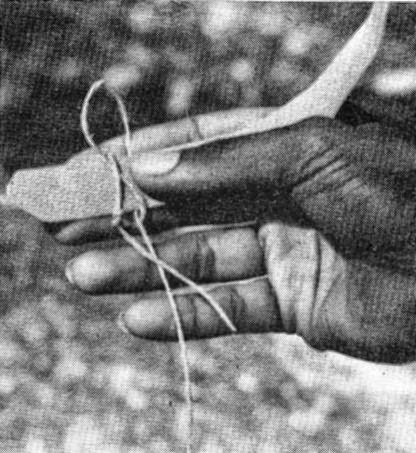
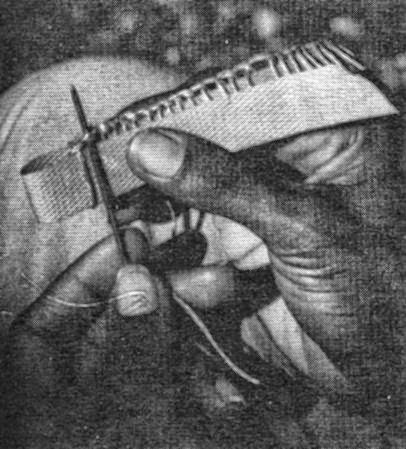
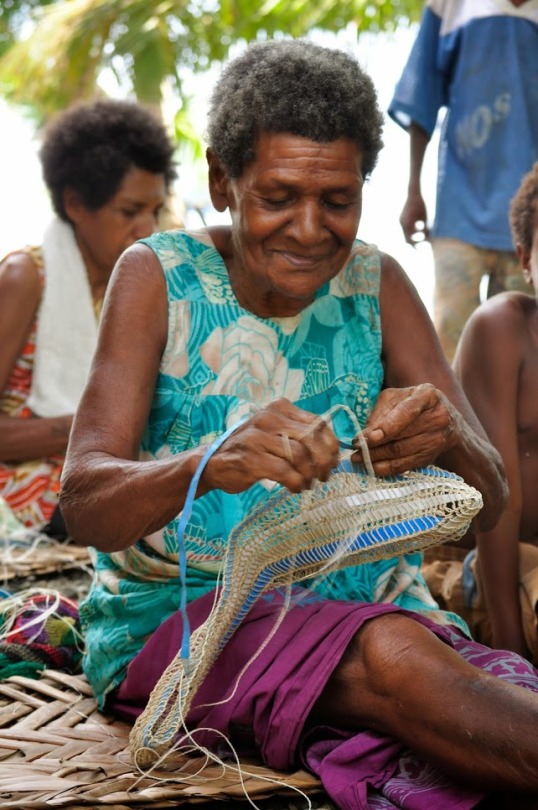
How to Make a Bilum
Step-by-Step-Instructions for GOROKA-Bilums & SIMBU-Bilums:
https://drive.google.com/drive/folders/1qb-VMFC5uDFv3j3_DzUz6c1OxPkbKJSv
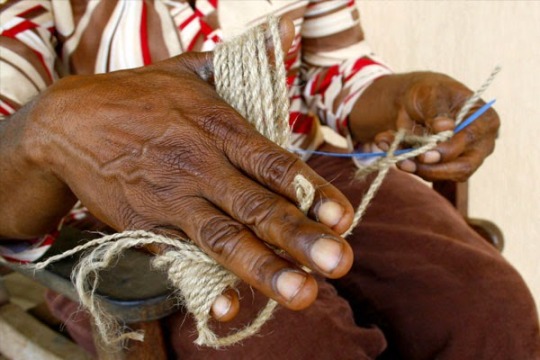
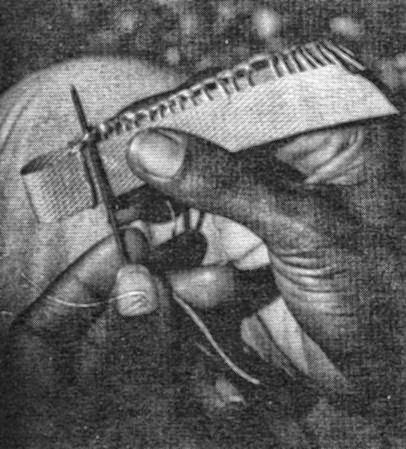
[This originally appeared in the Lik Lik Buk, a populist development guide produced in Papua New Guinea in the mid-1980s -A] The bilum is a traditional PNG string bag. Bilums come in a variety of shapes and styles and are made for different purposes. Bilums are made to carry food, to carry babies in and to use for leisure. People can identify a person just by the creative design or style woven on the bilum. Despite the many different aspects and purposes of bilums they all are made from the same basic weaving method. Bilums are worked by forming rows of a special knot around a strip which today is usually made of plastic packing strips but previously people used coconut and pandanus leaves to make these strips. The strips are used to determine the size of the stitches and help to make the job of holding hte stitches easier. The string is owrked in short lengths as all of the string yet to be used is fed into the existing knots. When the string runs out a new length is tied on to the end. You will need (beginner): 1. Some coloured string 2. Cut a piece of plastic strip about 60cm or more to form the base row. 3. Cut the other plastic strips about 30cm long. These should be the same width (about ½-1 cm)as the longer strip. 4. A pair of scissors 5. One or two needles larger and longer than sewing needles (darning needles). Some people use old spokes from an umbrella. (Traditionally: bones of the Flying Foxes ) Method: 1. Make a loop around the plastic strip and tie with a slip knot. Pace one end of string on the front of the plastic strip (that is the side facing you) and hold it down with your thumb at the front and with your forefinger at the back of the plastic strip. 2. Pull the working end over the top and then behind the plastic strip creating a loop at the top of the plastic strip. 3. The working end is brought under the plastic strip and is fed under the other end of the string so that the plastic strip now has a circle of string around it. This mesh must be kept loose enough to be able to feed the subsequent stitches into the loops of the previous ones. 4. The working end goes over the loose end into the top loop from the left side to the right side. It is imortant that the points where the stirng crosses over are kept at the bottom and top of the plastic strip. The working end foes behind the plastic strip and is fed from left to right into the bottom loop. 5. Repeat the procedure until you reach the required length which will be the half the circumference of your bilum. Subsequent Rows Bilums consist of a spiral of rows of meshes. 1. Bend the plastic strip backward (away from yourself) and work the stitch in the normal way but over the two palstic strips instead of one. 2. Turn the pastic strip so that the back is now facing you. Make the next stitch over the one plastic strip in the following manner. 3. Take the working end and go over the plastic strip at the front and into the previous stitch at the back from left to right and then into the loop of hte stitch on the rprevious row. Pull the string behind the front plastic strip. Continue until the second row is the same length as the first row. These two rows mae the base of the blium. (if the plastic strip is short slip another strip in). 4. All subsequent rows are made in the smae manner. 5. Continue the procedure until you have 18-20 rows (medium size bilum). Mouth of the Bilum 1. Get a new piece of string and join it to the ned of the string that you used for making the body of the bilum. 2. Hold the top of the bilum facing you so that you can clearly see the top edge of the stitches forming the top row. 3. Skip the last working stitch of the body of the bilum.Count three loops to the front and feed the string into the thuird loop from left to right. Make a knot. Count three loops and feed the string into the third loop from left to right. From right to left push the string into the knot that you made. Bring the string back towards you forming a circle. 4. Count another three loops in front and feed the string into the third loop. Bring the string back and feed it into the previous circle. Continue around the mouth of the bilum. 5. When the two ends meet feed the last stitch into the first stitch to form a continuous chian. To finish tie a knot and cut the extra string. Handle Bilum handles are sometimes made separately from the bilum and then joined on. Others are made straight from the side of the bilum. There are many styles but the simplest uses the same basic stitch as in the body of the bilum. 1. Use a shorter plastic strip and make about 8-10 sitthces. 2. Use a second plastic strip. Make the next row using the same stitch. 3. Continue making rows until you reach the length of the handle you want. Joining the Handle to the Bilum 1. Hold the Bilum up and from the way it hangs judge where the sides are. The handle must be attached to these points so that the bilum when it is carried will be evenly balanced. 2. The handle and the body of the bilum are joined together by looping stitches. It is important that the joining stitches are made into the first row of the bilum not just into the finishing edge of the mouth of the bilum so that your join is strong. 3. When finished, secure with a knot. Styles and techniques for different patterns are constantly evolving in PNG. This method described above is for a very basic one-colour bilum. Colours can be added by joining different coloured strings to your working string or depending on the complexity of your design are worked in by a method too complicated to explain here. Far better when you have mastered the basics to have someone who know how to show you. Contributor: Joy Sahumlal, ATDI, Unitech, Lae, MP. Url:
http://alex.golub.name/porgera/bilum.html
Step-by-Step-Instructions for GOROKA-Bilums & SIMBU-Bilums:
https://drive.google.com/drive/folders/1qb-VMFC5uDFv3j3_DzUz6c1OxPkbKJSv
#sac de transport#carry bag#carry bags#Tragetaschen#Tragetasche#Bilum#Bilums#Noken#Papua-Neuguinea#Papouasie-Nouvelle Guinée#Papua-NewGuinea#Achterschlung#8er-Schlung#knüpfen#geknüpft#geschlungen#Schlingen#8er-Schlingen#Achter-Schlingen#Achterschlünge#sacs de transport#Tragenetz#Tragenetze#carrying bag#carrying bags#carrying net#carrying nets#carry net#carry nets#Behältnis
3 notes
·
View notes
Text
nene
Ajim prem
Ji,
narayan moort.
VRN.
VNULL.0.
1.
Act pa
S5.last bat not least .
Ollu gagrtta.
🔫 ASHIKUR.ki.co.
Rodduki iru.maa .emu.hi.
mahisha ra o.
0 notes
Text

Florence Jaukae-Kamel, Kalibobo (2010)
0 notes
Photo






How to Make a Bilum
Step-by-Step-Instructions for GOROKA-Bilums & SIMBU-Bilums:
https://drive.google.com/drive/folders/1qb-VMFC5uDFv3j3_DzUz6c1OxPkbKJSv
[This originally appeared in the Lik Lik Buk, a populist development guide produced in Papua New Guinea in the mid-1980s -A]
The bilum is a traditional PNG string bag. Bilums come in a variety of shapes and styles and are made for different purposes. Bilums are made to carry food, to carry babies in and to use for leisure. People can identify a person just by the creative design or style woven on the bilum. Despite the many different aspects and purposes of bilums they all are made from the same basic weaving method. Bilums are worked by forming rows of a special knot around a strip which today is usually made of plastic packing strips but previously people used coconut and pandanus leaves to make these strips. The strips are used to determine the size of the stitches and help to make the job of holding hte stitches easier. The string is owrked in short lengths as all of the string yet to be used is fed into the existing knots. When the string runs out a new length is tied on to the end. You will need (beginner): 1. Some coloured string 2. Cut a piece of plastic strip about 60cm or more to form the base row. 3. Cut the other plastic strips about 30cm long. These should be the same width (about ½-1 cm)as the longer strip. 4. A pair of scissors 5. One or two needles larger and longer than sewing needles (darning needles). Some people use old spokes from an umbrella. (Traditionally: bones of the Flying Foxes ) Method: 1. Make a loop around the plastic strip and tie with a slip knot. Pace one end of string on the front of the plastic strip (that is the side facing you) and hold it down with your thumb at the front and with your forefinger at the back of the plastic strip. 2. Pull the working end over the top and then behind the plastic strip creating a loop at the top of the plastic strip. 3. The working end is brought under the plastic strip and is fed under the other end of the string so that the plastic strip now has a circle of string around it. This mesh must be kept loose enough to be able to feed the subsequent stitches into the loops of the previous ones. 4. The working end goes over the loose end into the top loop from the left side to the right side. It is imortant that the points where the stirng crosses over are kept at the bottom and top of the plastic strip. The working end foes behind the plastic strip and is fed from left to right into the bottom loop. 5. Repeat the procedure until you reach the required length which will be the half the circumference of your bilum. Subsequent Rows Bilums consist of a spiral of rows of meshes. 1. Bend the plastic strip backward (away from yourself) and work the stitch in the normal way but over the two palstic strips instead of one. 2. Turn the pastic strip so that the back is now facing you. Make the next stitch over the one plastic strip in the following manner. 3. Take the working end and go over the plastic strip at the front and into the previous stitch at the back from left to right and then into the loop of hte stitch on the rprevious row. Pull the string behind the front plastic strip. Continue until the second row is the same length as the first row. These two rows mae the base of the blium. (if the plastic strip is short slip another strip in). 4. All subsequent rows are made in the smae manner. 5. Continue the procedure until you have 18-20 rows (medium size bilum). Mouth of the Bilum 1. Get a new piece of string and join it to the ned of the string that you used for making the body of the bilum. 2. Hold the top of the bilum facing you so that you can clearly see the top edge of the stitches forming the top row. 3. Skip the last working stitch of the body of the bilum.Count three loops to the front and feed the string into the thuird loop from left to right. Make a knot. Count three loops and feed the string into the third loop from left to right. From right to left push the string into the knot that you made. Bring the string back towards you forming a circle. 4. Count another three loops in front and feed the string into the third loop. Bring the string back and feed it into the previous circle. Continue around the mouth of the bilum. 5. When the two ends meet feed the last stitch into the first stitch to form a continuous chian. To finish tie a knot and cut the extra string. Handle Bilum handles are sometimes made separately from the bilum and then joined on. Others are made straight from the side of the bilum. There are many styles but the simplest uses the same basic stitch as in the body of the bilum. 1. Use a shorter plastic strip and make about 8-10 sitthces. 2. Use a second plastic strip. Make the next row using the same stitch. 3. Continue making rows until you reach the length of the handle you want. Joining the Handle to the Bilum 1. Hold the Bilum up and from the way it hangs judge where the sides are. The handle must be attached to these points so that the bilum when it is carried will be evenly balanced. 2. The handle and the body of the bilum are joined together by looping stitches. It is important that the joining stitches are made into the first row of the bilum not just into the finishing edge of the mouth of the bilum so that your join is strong. 3. When finished, secure with a knot. Styles and techniques for different patterns are constantly evolving in PNG. This method described above is for a very basic one-colour bilum. Colours can be added by joining different coloured strings to your working string or depending on the complexity of your design are worked in by a method too complicated to explain here. Far better when you have mastered the basics to have someone who know how to show you. Contributor: Joy Sahumlal, ATDI, Unitech, Lae, MP. Url:
http://alex.golub.name/porgera/bilum.html
Step-by-Step-Instructions for GOROKA-Bilums & SIMBU-Bilums:
https://drive.google.com/drive/folders/1qb-VMFC5uDFv3j3_DzUz6c1OxPkbKJSv
#bilum#bilums#noken#Tragenetz#Tragenetze#Tragetasche#Tragetaschen#sac de transport#sacs de transports#carry bag#carry bags#carrying bag#carrying bags#carrying net#carrying nets#Schlünge#8er-Schlünge#8er#Achterschlünge#Papua-Neuguinea#Papouasie-Nouvelle Guinée#Papua-NewGuinea#selbstgemacht#do-it-yourself#diy#handgearbeitet#handgeknüpft#hand-made#handmade#Achterschlingen
0 notes
Text


stringbags or 'bilum' in arara village, collingwood bay in oro province, papua new guinea. the bilum is one of the most culturally significant objects in papua new guinea. photos taken by a. hermkens between 2001-2004
982 notes
·
View notes
Note
beautiful art <3 I am so enamored by asma’s nose and her carrying safi around in a bilum is so cute!! i can imagine her making it in the months before the baby 💛
Aww thank you so much! I really appreciate it! I actually had to go look up what a bilum is and they're beautiful! I love when cultures have almost identical practices - I hope you don't mind me using this ask to go on a tangent about baby wearing (apologies). Asma's baby sack is called a Marjuha in Palestine, they were mainly worn in al Khalil (Hebron).
When the mother was done carrying the child from her brow, she could use the Marjuha as a hammock to lull the child to sleep or if it was upset - they were mainly used on journeys and made of wool and tassels (I skipped the tassels for this piece) - it wasn't uncommon for a mother to tie the Marjuha between two trees and rock her baby gently in it.
A pic of the Marjuha, sorry about the bad quality:

And some pics of it in action!


(left to right: Jerusalem, Hebron)
36 notes
·
View notes
Text
Articles
i like that the artists alters the audiences perspective through the lens
this alteration in perspective leads to a deeper inquiry into what is actually perceived
additionally the real-time aspect of the process adds more to the meaning and receiving of the work
i dont know the real time shooting of the work allows for the finished piece to carry this undoubtable sense of direction
idk i like that it challenges what you get at face value but the movement and direction seen in the finished works creates this warped, distorted effect
i feel like this could add more depth in my works. i do feel like i my works alter the audiences perspective however i think in this case the effect that these images put off is something i want to achieve.
i think this can be used for example with spray paint i can use more over spray or even drag the stencil when applying to try and recreate this distorted piece without utilising a camera
i also found interesting or rather something new i found was that this artist utilised a white background to add a sense of disorientation as there is no relatable or rather distinctive objects or landscapes that allows for a relationship to be formed through the sense of seeing something familiar or recognisable
id like to explore this further, although i feel like i have done this but the opposite through other works like my work with the balloons (showing something familiar) however on the other hand i have used unrecognisable aspects for the background of a work. Like my work with the bilum textured, stencil piece.
i also think that for a potential experiment i can explore using long horizontal strokes to create this waved but distorted effect
idk maybe im just fascinated by the visual outcome of capturing movement in real time. i think i find that actually seeing the piece makes it feel like its moving. So in saying that i think i would like replicate that but with my own themes and contexts and styles
0 notes
Text
Experiment

after first experimenting with the larger repurposed work i thouhgt i better transfer the idea onto a new canvas
i stretched the bag seen on the left really tightly, so that the paint could seep through the little openings

after removing the bilum this was what i was left with
detailed pattern that kind of reminds me of fish scales
i liked the process it was fun experimenting with this some what new form of creation. i mean i have used a stencil before but not of a bilum
i like the pattern it creates. i still might do another layer of the pattern in the same colour maybe different orientation to see the effects
i don't know if i will add text to this i kind of like the way it looks
i mean when i look at it i kind of see it as this marking of the past. especially from a traditional standpoint
looking back on it maybe i should've added text first then layer the pattern over it, like wrapping the text sort of
i dont know at this point when i look it i don't really get good enough ideas for incorporating text
i keep getting this thought of "washing of the sins or rather past " when viewing
also this was the idea i had from merging aspects of Hugo Kaagman and Lady Aiko

i then decided to add this sort of form created from the curved part of the bag( the opening)
i don't know i guess i kind of wanted to see what else i could do with this stencil
i wanted to create this effect where the top half is sort of coming out of the bag or is left hanging out while the other is still inside
you can see the curved lip of the bag in the composition
im still unsure on what text to add or even if i will add text

i then took the image to photoshop
i wrote text saying forget - then warped and skewed to make this pattern
i don't know if it works though, is there too much pattern? text readability?
i like it i guess, well more so the forms of the text - this wave like pattern
i think it ties in well ( the text) with the background, kind of sticking away to the title of the work its made from (W.M.P.A) like an ocean theme kind of
i mean with the text i kind of just wrote the first thing to mind, actually no i trialled first with the text the 5 W's all written out then i just choose this
like a washing of the past
0 notes
Text
Zenag Packet and Bilum End up in Australian Shore
Kevin Rau, a Papua New Guinean living in Australia, made a striking discovery during the Cape Bedford Camping and Beach Clean-up Expedition: a Zenag chicken packet and a traditional string Bilum. These finds serve as a poignant reminder of the far-reaching effects of marine pollution. Cape Bedford, located north of Queensland on the Coral Sea, is part of the South Pacific Ocean. This region is…

View On WordPress
0 notes
Text

Woven bilums in Papua New Guinea 🇵🇬
1 note
·
View note
Text
Good Men Do Exist in Papua New Guinea
Experience 1. By Andrew Moutu CHANCE & RESPONSIBILITY On the independence weekend in 2017, I went & dropped my brother and musician, David Saun, in his adopted village, Lealea, where his adopted brother, Tau Dikana, owns and runs the Sunset Resort. As I was returning back I spotted what looked like a PNG coloured wool hat on the road in between the entrance into PNG LNG and Edai Taun. I was…

View On WordPress
0 notes
Text
Disneyland Paris X Bilum : une collection écoresponsable collector
La grande toile qui protégeait, cachait la rénovation du château de la belle au bois dormant démarre une seconde vie avec la collection upcycling Disneyland Paris X bilum. Disneyland Paris X bilum : de la bâche aux sacs Depuis le printemps, Disneyland Paris célèbre son 30e Anniversaire avec de nombreuses nouveautés. Spectacles inédits, ouverture de Marvel Avengers Campus et rénovation du…

View On WordPress
#Bilum#Château de la Belle au Bois Dormant#écoresponsable#Main Street U.S.A.#The Storybook Store#upcycling
0 notes


