#bettertouchtool
Explore tagged Tumblr posts
Visit Tumblr Blog
Explore Tumblr blogs with no restrictions, modern design and the best experience.
Last Seen Tumblr Blogs


Fun Fact
Tumblr has 16.74 million mobile monthly users in the US.
Link
BetterTouchTool 4.572 Crack license key is extremely reliable for adding customizable gestures to the Magic Trackpad and Magic Mouse.
0 notes
Text
The Best HIDs for the Mac
HID stands for human interface device. This usually refers to keyboards and mice but can refer to anything that lets you provide inputs to a computing device.
I use the term HID rather than simply saying "keyboard and mouse" because the best HIDs for the Mac aren't a keyboard and mouse: The best HIDs for the Mac are a keyboard and trackpad.
The Mac has evolved a lot over the years, and so has its HIDs. There was a time where mice on the Mac only had a single clickable button in contrast to the PC's two: left mouse button and right mouse button.
I don't know if the Mac did this to differentiate itself from the PC or because Apple had done the hard work of researching to all hell mice and determined that an extra mouse button was superfluous. It might have been both.
While the Mac works very well with a variety of HIDs from third-parties, the best HIDs for the Mac are first-party HIDs, which is to say Apple HIDs.
The Best Keyboard for the Mac
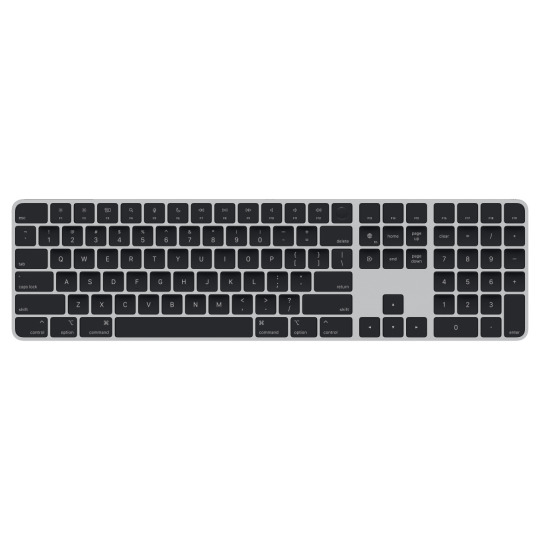
While I enjoy a mechanical keyboard as much as the next nerd, the best keyboard for the Mac is one of the Magic Keyboards with Touch ID. There's a model with a Numeric Keypad and one without. Take your pick. I prefer the one with the Numeric Keypad because it has a Numeric Keypad but also because you can get it with black keys.
You can try to live your life without Touch ID, and while you might be able to accomplish much without it, Touch ID on a purchasable keyboard was a big deal for me when it came out. I had been waiting for Apple to create one for years as a Mac mini user, where BYOK (Bring your own keyboard) was the philosophy. This unlocks Apple Pay directly on your Mac without needing an iPhone or other device with biometrics (Face ID or Touch ID). Additionally and obviously: It lets you unlock your Mac or several applications that would normally require a password. Very cool.
The Best Mouse Trackpad for the Mac
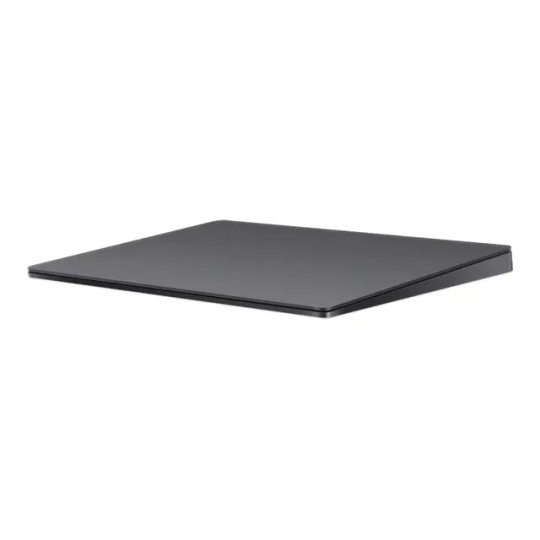
We aren't going to talk about the Magic Mouse 2. And the reason why we aren't going to talk about it is because you can't charge it and use it at the same time, which is a ridiculous and indefensible design decision. Shame on you, Apple.
This leaves us with the Magic Trackpad. In 2024, it's technically the Magic Trackpad 2. The original Magic Trackpad was grey and took 2 x AA batteries and worked great. I liked it a lot; but the Magic Trackpad 2, while being rechargeable, also comes in Black, with a wider surface, feels silky smooth, and comes equipped with Force Touch, giving you more versatility in the input commands you can provide. Plus, as a flex: It has no moving parts. You aren't actually clicking it when you press down, it's just providing force feedback to simulate a click. Groovy.
I find it fascinating that an HID normally designed for laptops would make its way to the desktop and would become the best way to interact with your Mac. I supplement the functionality of the Magic Trackpad with the application BetterTouchTool, which lets you program additional gestures than those available in macOS. With the amount of gestures I can make on the Magic Trackpad, I never once feel like I'm less productive than with a mouse. I say this as someone who rocked a Logitech gaming mouse on the Mac for years specifically because I wanted to be able to do more with my HID. While I won't be gaming with the Magic Trackpad anytime soon (I think Minecraft was vaguely playable with it), I much prefer the touch and feel of the Magic Trackpad.
#post#tech#technology#apple#keyboard#mouse#trackpad#magic keyboard#touch id#magic trackpad#hid#bettertouchtool#mac
0 notes
Text
e435 — Space Junk
#RaspberryPi 5, #Space themes including #Kessler syndrome & #Purrgils, #UX stories about #BetterTouchTool, #CarPlay, #Humane & #Rewind and much more!
Photo by Casey Horner on Unsplash Published 9 October 2023 Back at full co-host strength, Andy, Michael and Michael start off this show with a discussion about Andy’s recent Cybersalon event celebrating the Mosaic web browser’s 30th birthday. After a short conversation about the newly announced Raspberry Pi 5, the team gets down to talking about space! First up, a first for the FCC (Federal…

View On WordPress
#ai#BetterTouchTool#CarPlay#Cyberia Cafe#Cybersalon#Humane#Kessler syndrome#Lego#PowerMate#Purrgil#raspberry pi#Rewind#UX
0 notes
Text
Tại Sao BetterTouchTool Là "Vũ Khí Bí Mật" Giúp Bạn Khai Phá Tối Đa Sức Mạnh Của Mac?
Tại Sao BetterTouchTool Là “Vũ Khí Bí Mật” Giúp Bạn Khai Phá Tối Đa Sức Mạnh Của Mac? Nếu bạn đang sở hữu một chiếc Mac, chắc hẳn bạn đã quen với việc đầu tư vào những công cụ giúp tối ưu hóa trải nghiệm và năng suất. Trong số đó, BetterTouchTool (BTT) nổi bật như một sản phẩm không thể thiếu. Với mức giá chỉ cần mua một lần, BTT không chỉ giúp bạn tiết kiệm chi phí mà còn mang lại hiệu quả vượt…
0 notes
Text
طريقة جدولة إيقاف تشغيل جهاز Mac تلقائيًا دون استخدام Terminal

يمكن ضبط جهاز Mac ليتم إيقاف تشغيله تلقائيًا في وقت محدد دون الحاجة إلى استخدام الأوامر النصية في Terminal. هذه الميزة تساعد في توفير الطاقة، والحفاظ على أداء الجهاز، وتقليل الاستهلاك غير الضروري. باستخدام إعدادات النظام، يمكن جدولة إيقاف التشغيل بسهولة ببضع نقرات فقط. إليك الطريقة الأسرع لضبط هذه الميزة والاستفادة منها بشكل كامل.
ملخص - قم بإنشاء اختصار يستخدم إجراء "إيقاف التشغيل" في تطبيق Shortcuts على جهاز Mac الخاص بك. - استخدم تطبيق Calendar أو تطبيقات مخصصة مثل Shortery لتشغيل الاختصار باستخدام مشغلات تعتمد على الوقت. - يمكن لتطبيقات أخرى مثل BetterTouchTool أيضًا تشغيل اختصارات للإغلاق التلقائي. يمكنك جدولة جهاز Mac الخاص بك للإغلاق باستخدام أوامر Terminal، ولكن قد تكون حذرًا بعض الشيء بشأن استخدام أوامر مثل "pmset" التي لا تفهمها تمامًا. البديل هو استخدام تطبيق Shortcuts ومجموعة متنوعة من المشغلات.
كيفية إنشاء اختصار لإيقاف تشغيل جهاز Mac الخاص بك
إذا كان كتابة أوامر عشوائية لا تفهمها في Terminal لإيقاف تشغيل جهاز Mac الخاص بك تبدو وكأنها سحر، فيمكنك اللجوء إلى تطبيق Shortcuts بدلاً من ذلك. إن إنشاء اختصار لإيقاف تشغيل جهاز Mac الخاص بك بسيط للغاية نظرًا لوجود إجراء مخصص للقيام بذلك بالضبط. كل ما عليك فعله هو إضافة الإجراء إلى الاختصار الخاص بك. عند تشغيل الاختصار، ستظهر رسالة منبثقة تسألك عما إذا كنت متأكدًا من رغبتك في إيقاف تشغيل جهاز Mac الخاص بك. إذا لم تفعل أي شيء خلال 60 ثانية، فسيتم إيقاف تشغيل جهاز Mac الخاص بك. لإنشاء الاختصار، افتح تطبيق Shortcuts على جهاز Mac الخاص بك. انقر فوق الرمز "+" (زائد) في الجزء العلوي من الشاشة لإنشاء اختصار جديد. في شريط البحث على يمين الشاشة، أدخل "إيقاف التشغيل". حدد إجراء "إيقاف التشغيل" من النتائج واسحبه إلى الاختصار الخاص بك. أعط اختصارك اسمًا وأغلق الاختصار لحفظه. يمكنك الآن إيقاف تشغيل جهاز Mac الخاص بك عن طريق تشغيل اختصارك في أي وقت.
كيفية تشغيل اختصارك باستخدام التقويم
هناك فرق كبير بين تطبيق Shortcuts على جهاز Mac وiPhone. على جهاز iPhone الخاص بك، يمكنك إنشاء عمليات أتمتة بمجموعة واسعة من المشغلات المختلفة. من الممكن تشغيل اختصار على جهاز iPhone الخاص بك في وقت محدد، على سبيل المثال. على جهاز Mac، لا توجد مشغلات أتمتة. إذا كنت تريد تشغيل اختصارك في وقت محدد، فيجب عليك إيجاد طرق أخرى لتحقيق ذلك. أحد أبسط الطرق هو تشغيل الاختصار من تطبيق التقويم. يمكن استخدام أي حدث تنشئه في تطبيق التقويم لفتح ملف بدلاً من تشغيل تنبيه. يمكنك استخدام هذه الميزة لتشغيل الاختصار واستخدام أحداث التقويم لإنشاء جدولك لإيقاف تشغيل جهاز Mac الخاص بك. قبل أن تتمكن من تشغيل اختصار من حدث تقويم، تحتاج إلى تحويله إلى تطبيق. افتح تطبيق Shortcuts، وانقر بزر الماوس الأيمن فوق اختصار "إيقاف التشغيل" الذي أنشأته باستخدام الخطوات المذكورة في القسم أعلاه. حدد "إضافة إلى Dock". يؤدي هذا إلى تحويل اختصارك إلى ملف تطبيق يمكنك تشغيله الآن من تطبيق التقويم.

افتح التقويم وانقر على أيقونة "+" (زائد) في الجزء العلوي من الشاشة وانقر على "حدث جديد". أعط الحدث اسمًا وحدد التاريخ والوقت الذي تريد تشغيل الاختصار فيه.

انقر فوق "إضافة تنبيه أو تكرار أو وقت سفر". انقر فوق القائمة المنسدلة "تكرار" وحدد "كل يوم" لجعل الحدث يتكرر يوميًا، أو "مخصص" إذا كنت تريد تعيين جدول زمني أكثر تعقيدًا.

انقر على القائمة المنسدلة "تنبيه" وحدد "مخصص". حدد القائمة المنسدلة "رسالة بصوت" وحدد "فتح ملف". انقر على "تقويم" وحدد "آخر". افتح مجلد "التطبيقات" وحدد الاختصار الخاص بك.

انقر فوق "الدقائق السابقة" وحدد "في وقت الحدث" لتشغيل الاختصار في الوقت المحدد لحدث التقويم الخاص بك. انقر فوق "موافق" لحفظ الحدث.

الآن، عندما يتم الوصول إلى التاريخ والوقت لحدثك أو أحداثك، سيتم تشغيل الاختصار الخاص بك، وسيتم إيقاف تشغيل جهاز Mac الخاص بك. من خلال إنشاء أحداث متكررة، يمكنك إنشاء جدول إيقاف تشغيل لجهاز Mac الخاص بك والذي سيتم تشغيله إلى أجل غير مسمى.
كيفية تشغيل الاختصار الخاص بك باستخدام Shortery
نظرًا لأن Shortcuts على Mac لا يوفر أي طريقة لأتمتة اختصاراتك، فقد ظهرت العديد من التطبيقات لملء الفراغ. أحد هذه التطبيقات هو تطبيق Shortery، الذي يسمح لك بتشغيل اختصاراتك عند حدوث مجموعة واسعة من المشغلات، مثل عند بدء تشغيل تطبيق أو توصيل محول الطاقة أو تغيير محتويات مجلد. يتيح لك أحد المشغلات الأخرى تشغيل اختصاراتك في أوقات محددة، تمامًا كما يمكنك على جهاز iPhone الخاص بك. ومع ذلك، فإن المشغلات المستندة إلى الوقت هي ميزة احترافية، لذلك ستحتاج إلى دفع اشتراك سنوي بقيمة 9.99 دولارًا لاستخدامها. كما ستعمل المشغلات المستندة إلى الوقت فقط عندما يكون جهاز Mac الخاص بك مستيقظًا. قم بتنزيل تطبيق Shortery وتثبيته وقم بالترقية إلى الإصدار الاحترافي لتمكين المشغلات المستندة إلى الوقت. انقر فوق "إضافة اختصار تشغيل" في أسفل الشاشة. في القائمة المنسدلة "نوع الاختصار"، حدد "الوقت". أعط الاختصار اسمًا واستخدم القائمة المنسدلة "اختصار" لتحديد اختصار إيقاف التشغيل.

استخدم القائمة المنسدلة "تكرار" لتحديد الوقت الذي تريد تشغيل الاختصار فيه وأدخل الوقت الذي تريد حدوث ذلك فيه. قم بإلغاء تحديد أي أيام لا تريد تشغيل المشغل فيها. حدد "عدم التخطي" إذا كنت تريد تشغيل الاختصار بمجرد استيقاظ جهاز Mac الخاص بك إذا كان في وضع السكون في الوقت الذي من المفترض أن يتم فيه تشغيل الاختصار. انقر فوق "حفظ".

سيتم تشغيل الاختصار الخاص بك الآن في الوقت المحدد، بشرط أن يكون جهاز Mac الخاص بك مستيقظًا. يمكنك منع جهاز Mac الخاص بك من الدخول في وضع السكون من خلال النقر على أيقونة "الإعدادات" في Shortery وتحديد "منع الدخول في وضع السكون".

كيفية تشغيل الاختصار باستخدام BetterTouchTool
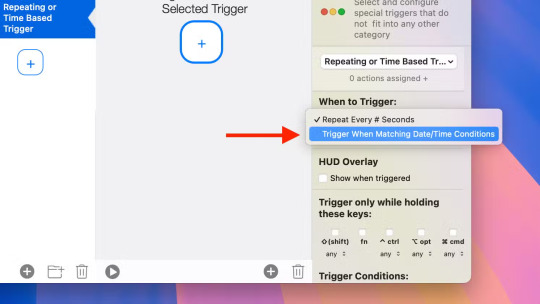
Shortery هو تطبيق مخصص لتشغيل الاختصارات، ولكن يمكن للتطبيقات العامة الأخرى أيضًا القيام بنفس الشيء. مثال آخر هو تطبيق التخصيص BetterTouchTool، والذي يحتوي على ميزات مثل التقاط النوافذ وتغيير حجمها، ومدير الحافظة، وتحرير لقطات الشاشة، وإيماءات لوحة التتبع القابلة للتخصيص، والمزيد. يتضمن BetterTouchTool أيضًا القدرة على تشغيل الاختصارات. إنه تطبيق مدفوع يكلف 12 دولارًا للترخيص القياسي، مع إصدار تجريبي مجاني لمدة 45 يومًا. كما أنه مضمن في اشتراك Setapp إذا كان لديك بالفعل أو تفكر في شرائه. قم بتنزيل BetterTouchTool وتثبيته. افتح التطبيق، وانقر فوق القائمة المنسدلة في الجزء العلوي من الشاشة، وحدد "الأتمتة والمشغلات المسماة والمشغلات الأخرى". انقر فوق الزر "+" (زائد) لإنشاء مشغل جديد. انقر فوق القائمة المنسدلة "تحديد المشغل" وحدد "المشغلات القائمة على الوقت"، ثم "المشغل المتكرر أو القائم على الوقت".

تحت "متى يتم التشغيل"، حدد "التشغيل عند مطابقة شروط التاريخ/الوقت". لتشغيل الاختصار يوميًا، اترك جميع الحقول الأخرى كما هي، وأدخل الساعة التي تريد تشغيل الاختصار فيها في حقل "الساعة". إذا كنت لا تريد تشغيل الاختصار في الساعة بالضبط، فأضف قيمة إلى حقل "الدقيقة". انقر فوق الزر "حفظ".
انقر فوق الزر "تعيين الإجراء الأول للمشغل المحدد". مرر لأسفل وانقر فوق "التحكم في التطبيقات الأخرى". حدد "تشغيل اختصار من تطبيق الاختصارات". انقر فوق القائمة المنسدلة "تحديد اختصار" واختر اختصار إيقاف التشغيل.

تم الآن إنشاء المحفز الخاص بك؛ في الأوقات المحددة، سيطلق BetterTouchTool اختصار إيقاف التشغيل الخاص بك، وسيغلق جهاز Mac الخاص بك. وكما هو الحال مع Shortery، لن يعمل هذا إلا عندما يكون جهاز Mac الخاص بك مستيقظًا. إذا كنت من محبي أتمتة العمليات المتكررة على جهاز Mac الخاص بك، فراجع ما يمكنك فعله باستخدام Automator واكتشف المزيد من إجراءات اختصارات Mac التي ستستخدمها بالفعل. جدولة إيقاف تشغيل جهاز Mac تضمن إدارة أفضل للطاقة وتساعد على إطالة عمر البطارية وتقليل الاستهلاك غير الضروري. باستخدام الإعدادات المدمجة في macOS، يمكن تنفيذ ذلك بسهولة دون الحاجة إلى أي برامج إضافية. إذا كنت قد جربت هذه الميزة، شارك تجربتك وأي نصائح إضافية قد تكون مفيدة! Read the full article
0 notes
Text
맥에서 BTT를 사용할 때 매직 마우스를 클릭한 채 스크롤하기 | Scroll with the Magic Mouse clicked when using BTT on the Mac
맥에서 BTT(BetterTouchTool)를 사용하면 매직 마우스에서 클릭한 채 스크롤하는 동작이 되지 않는다。해당 동작을 사용하기 위해서는 BetterTouchTool의 설정-매직 마우스에서 스��이프 탭의 「2손가락 위/아래 스와이프 사용 시 2손가락 스크롤링 비활성화」를 해제해야 한다。

When using BTT (BetterTouchTool) on Mac, scrolling while clicking the Magic Mouse does not work. To enable this behavior, need to uncheck “Disable two finger scrolling if 2 finger up / down swipes are used” on the Swipe tab in BetterTouchTool's Settings - Magic Mouse.

0 notes
Text
Creating some useful keyboard shortcuts for Sierra’s picture-in-picture mode
I’m not sure about anyone else but I really like the native Mac OS picture-in-picture mode introduced in Sierra OS 10.12. But as seems to be the case for a lot of apple’s new features, there are no keyboard shortcuts and for me that simply won’t do!
So I’ve created three keyboard shortcuts that control the different aspects of the picture-in-picture mode:
One to play/pause videos
One to close the current video
And one to put the current video back
The hard work here is done with applescript and I make use of the System Events’ UI control library to simulate clicks on the buttons in the picture-in-picture window.
(You'll need a keyboard shortcut manager like BetterTouchTool or Alfred's PowerPack to assign the applescript to a shortcut. This tutorial will use BetterTouchTool)
So let’s run through how to make a keyboard shortcut. The shortcut we'll make will pause + unpause the video.
Setting up keyboard shortcuts
Launch BetterTouchTool, navigate to the Keyboard tab and create a new shortcut. Assign a shortcut by clicking the white field at the bottom left which reads "Click to record a shortcut" and pressing the desired shortcut. (I use alt-8 because that's just below the media play/pause key which makes it easy to remember.)
Under the "Trigger predefined action" field, select Controlling other applications > Run Applescript. Now, paste the code below into the text field and click Save:
tell application "System Events" click button 2 of window 1 of process "PIPAgent" end tell
Open a Youtube video in Safari, right click the video twice and select 'Enter Picture-in-Picture'.
Now test out the shortcut you made earlier and it should pause and unpause the video!
(N.B. Make sure to allow BetterTouchTool access privileges under 'Security & Privacy' in System Preferences.)
The rest of the code
For the other two shortcuts, follow the steps as above but use the following code instead.
Closes the current PiP window (I have this mapped to alt-X):
tell application "System Events" click button 1 of window 1 of process "PIPAgent" end tell
Puts the current PiP window back (I have this mapped to alt-M):
tell application "System Events" click button 3 of window 1 of process "PIPAgent" end tell
Wrapping up
I hope you enjoyed this post! Just a couple of notes - I really recommend getting Pipifier for Safari - it injects a little button into Youtube pages to make entering PiP much easier. (It works on hundreds of other video sites too!)
Also, I'll post up a little more info on how the applescript in these shortcuts works, and how you can use Accessibility Inspector to write similar shortcuts of your own. I also have some more complex Picture-in-Picture shortcuts that allow you to change which corner of the screen the window shows in, and to hide/unhide the PiP window, but I'll save those for another post.
That's all for now, thanks for reading! — happyscripter
#macosx#mac#applescript#picture in picture#sierra#video#youtube#keyboard shortcuts#BetterTouchTool#pipifier
1 note
·
View note
Text
Bettertouchtool touch bar music

The touchid is amazing and I wouldn't ever want to go back to a device without it. It's a useless gimmick that removed some major functionality for me (a physical escape key). Bought the 2016 15" and was forced to get the stupid touchbar. My 2012 rMBP was on it's last legs and I really needed something new. Give me a bit more thickness, a regular keyboard, and high repairability. I hate the new MBP, keyboard and touch bar. Well, two weeks later I got the laptop back because their system kept saying it's not ready despite being back at the Apple Store four days after drop off. I spent hours on the phone with Apple explaining what happened. Well, a few days later I am told I need to pay $99 and use an AppleCare+ incident to fix the broken keyboard that the Genius broke. So I took it home, dd'd the disk to another one (use rdisk!) and dropped it off for repair. This final time it was better but still terrible and worse than when I brought it in. At this point the Rep said it had to be sent in for repairs. The second try it was basically entirely broken and only worked with extremely hard presses. The first try it was fixed, but the key cap was only half attached. He did say they could try something to fix it in the back with some special tools. I went to the Genius Bar which told me the keyboard was unrepairable and the only way to fix it was, literally, to replace the entire top case of the computer. I couldn't do anything to get it to go back to normal nor pry the key cap off to see if a bit of dirt had got underneath. Mine recently had its left arrow key become stiff in one corner. I literally stopped using my MBP without an external keyboard and mouse/trackpad at every practical opportunity. I have long ranted here (check my posting profile) about the touch bar.
0 notes
Text
Bettertouchtool touch bar music

#BETTERTOUCHTOOL TOUCH BAR MUSIC MANUAL#
#BETTERTOUCHTOOL TOUCH BAR MUSIC MANUAL#
So this activity usually requires my manual work of going to bluetooth menu and clicking on the desired options. On the other hand, sometimes I’d like to disable Bluetooth altogether. I found myself switching between my wireless headphone and speaker quite often at home or at work. My goal is to transform tasks that require two or more gestures/actions and my attention to only one tap. In this particular article, I’ll discuss the way I incorporate the TouchBar into a better experience for my casual work flow using BTT. Actions can be chained to handle complicated things. You can use any of the supported trigger/input types and choose from a large and always growing list of actions to automate almost any task. It allows me to completely replace pretty much every gesture set by Apple on Trackpads, mouses, keyboards, TouchBar and so on. Luckily, I’ve been using BetterTouchTool, which is probably the best gesture control app on macOS for so long. Since I paid a hefty sum for the machine, so might as well make it more useful. Setting asides all the issues, I thought instead of complaining, it’d be easier to accept what I can’t change and change what I can. As a power user, it is sort of frustrated for me. Some applications has different button patterns than the other, which cause disruption to my workflow, and not many can be configurable extensively. Some simple tasks like brightness adjustment, play/pause music that usually are one tap away, now require my attention, accuracy, and more taps. The Touch Bar has many shortcomings which I can spend a whole day to talk about. Until I got my hands on the new 2018 MBP. The bar even became one of the MacBook Pro’s main selling points. (source: Apple)įirst introduced in 2016, I thought Touch Bar was something really innovative and had a vast potential.
0 notes
Text
Bettertouchtool touch bar music
BETTERTOUCHTOOL TOUCH BAR MUSIC SOFTWARE
With a two finger swipe I control the volume and with a three finger swipe, the brightness.The 6 main buttons allow me to quickly switch between my workspaces, which saves me a lot of three-finger swipes on my touchpad.Not only does it let you build your own static Touch Bar, but you can bind your buttons to pretty much anything you want, including coding your own buttons using AppleScript.Ībove is a screenshot of my setup if you are interested.
BETTERTOUCHTOOL TOUCH BAR MUSIC SOFTWARE
BetterTouchTool, on the other hand, is the only software I’ve seen that allows you to completely replace the original Touch Bar. Many apps let you add custom buttons and integrate them into your Touch Bar, but it forces you to press a button from the control strip in order to see your version of the Touch Bar. This software doesn’t just allow you to change the way your Touch Bar works but it’s also covering pretty much every aspect of your MacBook. There is an absolutely amazing software available online, made by Andreas Hegenberg called BetterTouchTool. What I want to discuss here is what solution I found to actually turn the Touch Bar into a better user experience than the top row of keys on the previous models. There are of course other complaints I have about the Touch Bar, but this is not the subject of this article. This might sound trivial but not only it is longer than just pressing a key on my keyboard, it’s also forcing me to look at my keyboard instead of keeping my eyes on my work. For example, if I am in Photoshop and the bar is letting me change my brushes and colors while I want to mute the sound of my computer, I have to press a button to show the control buttons and then to press the mute button. While all of this might sound good, the main issue I have with this design is that the bar changes between apps, which means I will not always be able to press the same buttons to achieve the same actions.
1 note
·
View note
Link
Bettertouchtool Mac Crack offers many new, completely customizable moves for the Magic Mouse, MacBook Multi-Touch Trackpad, and Magic Trackpad.
0 notes
Link
BetterTouchTool 3.579 Crack Mac offers many new, completely customizable moves for the Magic Mouse, MacBook Multi-Touch Trackpad, and Magic Trackpad.
0 notes
Text
أفضل الحركات على لوحة التتبع لتسريع العمل على Mac وWindows
لوحة التتبع تقدم أكثر من مجرد التنقل بين النوافذ؛ إنها أداة متعددة الاستخدامات يمكنها تحسين إنتاجيتك بشكل كبير. باستخدام حركات مخصصة على لوحة التتبع، يمكنك الوصول إلى ميزات مخفية وتوفير الوقت أثناء التنقل بين التطبيقات وإدارة المهام. في هذا الدليل، سنستعرض أهم الحركات التي تساعدك على الاستفادة القصوى من لوحة التتبع على أنظمة Mac وWindows، مما يجعل عملك أسرع وأكثر سلاسة.
ملخص - تفتقر إيماءات لوحة التتبع في جهاز Mac إلى الكفاءة في المهام المعقدة، ولكن BetterTouchTool يسد الفجوة. - يتيح لك BetterTouchTool إنشاء إيماءات مخصصة للتعامل بشكل أفضل مع إدارة النوافذ وسرعة المؤشر والتقاط النوافذ وأي شيء آخر يمكنك التفكير فيه تقريبًا. - يمكنك الحصول على أي تعقيد تريده، من التبديل البسيط بين سطح المكتب إلى سير العمل متعدد الخطوات، ويمكن أن تساعدك طبقة BTT على التعرف على الإعداد الجديد. إن إيماءات لوحة التتبع المضمنة في جهاز Mac من Apple جيدة للمهام الأساسية، ولكنها لا تفي بالغرض عند التنقل بين تطبيقات أو مساحات متعددة. إليك كيفية جعلها أكثر سهولة في الاستخدام وكفاءة وتوافقًا مع Apple أكثر من كونها جاهزة للاستخدام!
قد يكون جهاز Mac الخاص بك أفضل
أردت أن يكون جهاز Mac الخاص بي بديهيًا مثل جهاز iPhone الخاص بي، حيث تجعل الإيماءات التنقل أمرًا طبيعيًا. تعمل التمرير والضغط والنقر على نظام التشغيل iOS بشكل جيد. أردت نفس سهولة الاستخدام عند إدارة النوافذ وأجهزة سطح المكتب الافتراضية وسير العمل على جهاز Mac الخاص بي. بالإضافة إلى ذلك، فمن المنطقي أن يكون هناك بعض التداخل بين الاثنين في وظيفة اللمس، أليس كذلك؟ وهنا يأتي دور BetterTouchTool. في حين أن الإيماءات مثل التمرير بين التطبيقات التي تعمل على ملء الشاشة أو الضغط للتكبير والتصغير لطيفة، إلا أنها لا تكفي للتعامل مع متطلبات سير العمل المعقدة. على سبيل المثال، يتيح لك Mission Control رؤية جميع النوافذ المفتوحة في لمحة، ولكن عرض سطح المكتب الافتراضي المختلفة يتطلب التمرير إلى أعلى الشاشة. لا يزال تغيير حجم النوافذ يتضمن سحب الحواف باستخدام المؤشر، وهو ما يبدو غير عملي مقارنة بوظيفة الالتقاط بالحافة التي قد تجدها على أجهزة الكمبيوتر التي تعمل بنظام Windows. وفي حين حاولت Apple أخيرًا دمج الالتقاط بالنوافذ بشكل أصلي، إلا أن النتائج كانت باهتة. إن الفجوة بين ما يمكن أن تفعله لوحة التتبع وما يسمح لها به نظام التشغيل macOS محبطة، خاصة عندما تعلم أن الأجهزة قادرة على القيام بالمزيد. ولهذا السبب فإن BetterTouchTool هو أداة تغيير قواعد اللعبة. فهو يسد هذه الفجوة ويمنحك التحكم في جهاز Mac الخاص بك بطريقة بديهية وشخصية. وبصرف النظر عن إدارة النوافذ، فإن إمكانات لوحة التتبع الخاصة بجهاز Mac لتحسين سير العمل هائلة. فكر في عدد المرات التي تكرر فيها المهام البسيطة - التبديل بين أجهزة سطح المكتب، أو فتح علامة تبويب جديدة للمتصفح، أو تغيير حجم أحد التطبيقات. يجبرك النظام الافتراضي على حفظ اختصارات لوحة المفاتيح أو الاعتماد على النقرات اليدوية. باستخدام BetterTouchTool، يمكنك تكثيف هذه الإجراءات في إيماءات بديهية. قارن الصورة أعلاه بالصورة أدناه.
البدء باستخدام BetterTouchTool
BetterTouchTool، أو BTT كما يُطلق عليه غالبًا، هو تطبيق مصمم لإطلاق العنان للإمكانات الكاملة لأجهزة الإدخال الخاصة بجهاز Mac الخاص بك. لا يقتصر الأمر على لوحة التتبع - يمكنك استخدامها لتخصيص الماوس أو لوحة المفاتيح أو حتى شريط اللمس - ولكن اليوم سأركز على كيفية تحويل تجربة لوحة التتبع. للبدء، ستحتاج إلى تنزيل BetterTouchTool من موقعه الرسمي. يقدم التطبيق نسخة تجريبية مجانية، وهي رائعة لاستكشاف ميزاته قبل الالتزام بشراء لمرة واحدة. أحد الأشياء الأولى التي سيفعلها نظام التشغيل macOS عند تثبيت BetterTouchTool هو طلب أذونات إمكانية الوصول. قد يبدو هذا أمرًا مزعجًا، ولكن من الضروري السماح للتطبيق بالتحكم في إيماءاتك وأتمتة المهام. بمجرد منح الأذونات، تكون جاهزًا للبدء. عند فتح BetterTouchTool لأول مرة، قد تشعر بالإرهاق من كثرة الخيارات. هذا أمر طبيعي، ولكن لا تدعه يخيفك. يأتي التطبيق مع تكوينات جاهزة يمكنك استكشافها وتعديلها لتناسب احتياجاتك. بمجرد أن تجربه قليلاً، يصبح إنشاء إيماءاتك الخاصة أمرًا طبيعيًا. إن جمال BetterTouchTool هو مدى مرونته. سواء كنت تبدأ ببضع إيماءات بسيطة أو تتعمق في الأتمتة المتقدمة، يمكنك تنمية إعدادك بمرور الوقت. إذا كنت قلقًا بشأن ارتكاب الأخطاء، فإن BetterTouchTool يتيح لك التراجع عن التغييرات أو إعادة تعيين تكوينات معينة من نسخة احتياطية، لذلك لا يوجد خطر في التجربة.
تحسين إدارة النوافذ باستخدام BetterTouchTool
تتمثل إحدى أكثر الطرق العملية لاستخدام BetterTouchTool في تحسين إدارة النوافذ. لا يجعل نظام التشغيل macOS ترتيب النوافذ أمرًا سهلاً، ولكن باستخدام BetterTouchTool، يمكنك إصلاح كيفية تفاعلك معها تمامًا. أحد التعديلات المفضلة لدي هو تكوين إيماءة لإظهار معاينة سطح المكتب تلقائيًا في Mission Control. عادةً، عند تشغيل Mission Control، يتعين عليك التمرير لأعلى لرؤية سطح المكتب الافتراضي الخاص بك. مع BTT، قمت بتعيين تمرير سريع بأربعة أصابع لأعلى لإظهار سطح المكتب على الفور. قد يبدو هذا تغييرًا صغيرًا، لكنه يوفر قدرًا مفاجئًا من الوقت ويحافظ على سير عملي سلسًا. تعديل آخر قمت به هو زيادة سرعة المؤشر عند الضغط باستمرار على مفتاح معين. إذا كنت تعمل على شاشة كبيرة أو شاشة عريضة للغاية، فقد يبدو تحريك المؤشر عبر الشاشة بطيئًا. مع BTT، قمت بتعيين مفتاح الخيار لزيادة سرعة المؤشر مؤقتًا، مما يجعل التنقل عبر الشاشات الكبيرة أسرع بكثير. يعد تغيير حجم النوافذ مجالًا آخر تتألق فيه BTT. يعد ��حب حواف النافذة باستخدام المؤشر أحد أكثر المهام المملة في macOS، لذلك قمت بتعيين إيماءة سحب بإصبع واحد لتغيير حجم النافذة أسفل المؤشر. يجعل هذا ضبط أحجام النوافذ سريعًا وسهلاً. بالنسبة للمستخدمين الذين يستخدمون إعدادات النوافذ جنبًا إلى جنب بشكل متكرر، يمكن لـ BetterTouchTool تبسيط تثبيت النوافذ في مكانها. بدلاً من الاعتماد على "Split View" المدمج في نظام التشغيل macOS، قمت بتكوين إيماءات لتثبيت نافذة على النصف الأيسر أو الأيمن من الشاشة. يعمل هذا الإعداد بسلاسة لتعدد المهام ويحافظ على تنظيم سطح المكتب. تذكر أن هناك أيضًا تطبيقات مثل Magnet وRectangle التي تبسط إدارة نوافذ نظام التشغيل macOS.
التخصيصات المتقدمة للمستخدمين المحترفين
بمجرد إتقان الأساسيات، تقدم BetterTouchTool الكثير من الفرص للإبداع. تستغرق بعض هذه التكوينات وقتًا أطول قليلاً للإعداد، لكنها يمكن أن تحسن سير عملك بشكل كبير.

أحد أكثر التخصيصات التي أجريتها إرضاءً هو استخدام زوايا لوحة التتبع لتثبيت النوافذ في مكانها. على سبيل المثال، يؤدي الضغط على الزاوية العلوية اليسرى من لوحة التتبع إلى تثبيت النافذة الحالية في الربع العلوي الأيسر من الشاشة. تتوافق كل زاوية من لوحة التتبع مع قسم مختلف من الشاشة، مما يجعل من السهل تنظيم النوافذ دون العبث بحوافها. فكرة متقدمة أخرى هي الجمع بين الإيماءات ومفاتيح التعديل. على سبيل المثال، قمت بتعيين تمريرة بأربعة أصابع للتبديل بين أجهزة سطح المكتب، ولكن إذا ضغطت باستمرار على مفتاح Shift أثناء التمرير، فسيتم تشغيل تطبيق معين. تخلق هذه الطبقات من الإيماءات والمفاتيح نظامًا قويًا ومرنًا يمكنه التكيف مع مهام مختلفة. يتيح لك BetterTouchTool أيضًا دمج الإيماءات مع أجهزة الإدخال الأخرى. إذا كنت تستخدم لوحة مفاتيح أو ماوس إلى جانب لوحة التتبع، فيمكنك إنشاء تدفقات عمل تجمع بينهما. على سبيل المثال، قمت بتعيين إيماءة لوحة التتبع لفتح تطبيق واختصار لوحة مفاتيح لتغيير حجمه ووضعه تلقائيًا. القدرة على ربط الإيماءات بالنصوص أو سير عمل الأتمتة هي ميزة بارزة أخرى. على سبيل المثال، أستخدم النقر بأربعة أصابع لتشغيل نص برمجي يضبط سطح المكتب على "وضع التركيز"، ويخفي التطبيقات والإشعارات المشتتة للانتباه مع إبقاء الأدوات الأساسية في المقدمة والمركز.
أشياء يجب وضعها في الاعتبار
أثناء إنشاء إيماءاتك المخصصة، هناك بعض الأشياء التي تستحق النظر فيها لجعل التجربة أكثر سلاسة وتجنب الإحباطات المحتملة. عند إعداد إيماءاتك لأول مرة، قد يكون من السهل نسيان أي إجراء يؤدي إلى ماذا. يحتوي BetterTouchTool على خيار عرض تراكبات مرئية تعرض بإيجاز الإجراء الذي قمت بتنشيطه. هذا مفيد بشكل خاص عندما تعتاد على إعدادك. بمجرد أن تشعر بالراحة، يمكنك تعطيل التراكبات. لقد قررت ترك إعدادي ممكّنًا بشكل دائم، كما هو موضح في الرسوم المتحركة أدناه. يمكنك أن ترى أنه عندما أقوم بتشغيل التمرير لأعلى عند الحديث عن تكوينات لوح�� التتبع المستوحاة من iPhone، فإن إحدى الطرق التي أستخدمها طوال الوقت هي التمرير لأسفل بإصبعين (بدءًا من خارج الحافة العلوية للوحة التتبع) لفتح مركز التحكم. يتيح لي هذا فتحه بسرعة من أي مكان بشكل أسرع من النقر والنقر وبدون الحاجة إلى تذكر مفتاح التشغيل السريع. هناك اعتبار مهم آخر وهو منع إغلاق التطبيقات عن طريق الخطأ. لا يوجد شيء أسوأ من إغلاق تطبيق مهم عن طريق الخطأ أثناء جلسة عمل مزدحمة. لقد قمت بإعداد خطوة تأكيد لأي إيماءة تؤدي إلى إغلاق التطبيق أو إغلاقه قسرًا. تضمن هذه الطبقة الإضافية من الأمان عدم إغلاق أي شيء مهم عن طريق الخطأ. من الجيد أيضًا عمل نسخة احتياطية لتكوينات BetterTouchTool الخاصة بك. بمجرد استثمار الوقت في إنشاء إعداد مخصص، فلن ترغب في فقده. يتيح لك BTT تصدير إعداداتك، لذا اعتد على حفظها بانتظام. أخيرًا، إذا كنت تشعر بالحيرة أو تبحث عن الإلهام، فإن مجتمع BetterTouchTool يعد موردًا رائعًا. يشارك العديد من المستخدمين تكويناتهم عبر الإنترنت، ويمكن أن يمنحك استكشاف هذه الإعدادات أفكارًا جديدة لتحسين سير عملك.
التوسع خارج لوحة التتبع
بينما تركز هذه المقالة على تكوينات لوحة التتبع، فمن الجدير بالذكر أن BetterTouchTool يدعم أجهزة أخرى أيضًا. إذا كنت تستخدم Magic Mouse، فيمكنك إضافة إيماءات مخصصة لمهام مثل التحكم في تشغيل الوسائط أو التنقل عبر صفحات الويب. كما يمكن إعادة تصميم Touch Bar على طرازات MacBook Pro بالكامل باستخدام BetterTouchTool، مما يتيح لك إنشاء تخطيط مخصص لاحتياجاتك. حتى لوحات المفاتيح يمكن أن تستفيد من BTT. من خلال الجمع بين الضغط على المفاتيح والإيماءات أو أتمتة المهام المتكررة، يمكنك تحويل لوحة المفاتيح إلى أداة إنتاجية قوية.

يحول BetterTouchTool لوحة التتبع الخاصة بجهاز Mac من جهاز إدخال جيد إلى جهاز رائع. من خلال تخصيص الإيماءات وإنشاء الأتمتة، يمكنك تحويل لوحة التتبع الخاصة بك إلى أداة تبدو بديهية وقوية مثل استخدام iPhone. سواء كنت تركز على إدارة النوافذ الأساسية أو تتعمق في التكوينات المتقدمة، فإن الاحتمالات لا حصر لها. خذ بعض الوقت للتجربة وتحسين إعداداتك. لن توفر الوقت فحسب، بل ستجعل جهاز Mac الخاص بك يبدو أكثر شخصية وكفاءة - تمامًا كما ينبغي أن يكون. تعلم حركات لوحة التتبع يمكن أن يُحدث فرقًا كبيرًا في كيفية إنجازك للمهام اليومية. سواء كنت تعمل على Mac أو Windows، فإن استخدام هذه الحركات بفعالية يساعدك على توفير الوقت وزيادة إنتاجيتك. استمر في استكشاف الميزات المتاحة على جهازك وخصص الإعدادات بما يناسب احتياجاتك للحصول على تجربة استخدام أكثر سهولة وكفاءة. Read the full article
0 notes
Link
BetterTouchTool 3.209 For Mac With DMG
0 notes
Link
BetterTouchTool 2.697 For Mac Crack Os With Activation Code
0 notes
Text
BetterTouchTool 3.270 Crack With Free License Key Download For MAC
BetterTouchTool 3.270 Crack With Free License Key Download For MAC
BetterTouchTool 3.270 Crack
BetterTouchTool Serial Key incorporates numerous treats, similar to window snapping or a coordinated window switcher. It should now chip away at OS X Yosemite beta. If you don’t mind re-download if you as of now have the beta introduced.
BetterTouchTool Keygen for Mac is the (totally free) programming for your Mac (running Mac OS X 10.7 or more noteworthy). It has…
View On WordPress
0 notes