#beets storing techniques
Explore tagged Tumblr posts
Visit Tumblr Blog
Explore Tumblr blogs with no restrictions, modern design and the best experience.
Last Seen Tumblr Blogs


Fun Fact
In February 2021, Tumblr had 518.6 million blog accounts.
Text
With our comprehensive guide, learn how to store beets after harvest. Discover methods like refrigeration, root cellar storage, freezing, and canning to keep fresh beets flavorful and nutritious for extended periods.
0 notes
Text
✨ Astro Insights ✨
Astrology can be used to explore ways to identify one's strengths, weaknesses and how to improve your physical and mental health.
Part 1 covers the 1st house, part 2 is about the 6th house and this post which is part 3 will focus on the 8th house.
Please be mindful these are just my own studies and at the end of the day do what is best for your circumstances and what feels good for YOU!
-------------------------------------------------------------------
For physical health houses to study is the 1st, 6th and 8th house:
8th House.
The 8th house is about transformation and regeneration. While the 6th house governs daily health and wellness practices, the 8th house rules chronic health conditions, surgeries, deep healing and the psychological impact on the body.
Analysing the 8th house, including its sign, ruling planet and any planets placed here can give insights into:
Handling deep transformations and health crises.
How your body regenerates and recovers from illness or injury.
Psychological and emotional influences on physical well-being


A few examples below:
Capricorn 8th House
When Capricorn is in the 8th house, it can indicate that the bones, joints, skin or teeth may require extra care. This placement might experience slow recovery from illness or conditions that tend to develop over time (like osteoporosis or arthritis).
With this placement maintaining discipline in health is key and consistent habits like strength training and a mineral-rich diet can support longevity.
Individuals with Capricorn in the 8th house may tend to endure pain or discomfort without seeking assistance. However, it is crucial to pay attention to one's body. Capricorn being an earth sign can exhibit a gradual but steady pace in healing.


Sagittarius 8th House
Sagittarius here can suggest fluctuating health patterns, with energy levels that may be inconsistent (I relate to this as this is my placement). Liver health, hips and thighs could be areas of focus here. This placement also needs to be mindful of excess alcohol, caffeine, or spicy foods and herbal teas can help with digestion.
Activities like hiking, cycling or even boxing can help channel deeper emotions and stress because with Sagittarius in the 8th house movement also helps them release stored emotions. Opt for engaging fitness routines over repetitive workouts.
Sagittarius being a fire sign can have a strong ability to heal. To support liver detoxification, consider eating beets, drinking lemon water and dandelion root tea can help cleanse the liver.


Aries 8th House
Aries here indicates can indicate a strong willpower for recovery and these people can push through health issues with resilience and determination. However, due to Aries being a fire sign their impulsive nature might lead them to ignore symptoms until they become urgent or rush into treatments without considering long-term effects.
The sign of Aries is associated with the head, brain, face and adrenal system. Individuals with this placement may experience migraines, headaches, sinus issues or even a high cortisol levels due to stress.
To mitigate these potential health concerns, it is advisable for individuals to prioritise stress management. Excessive adrenaline can lead to burnout, therefore balancing high-intensity work outs with relaxation techniques could be beneficial.
Also making sure to get adequate rest and recovery after physical activity is important for any placement but especially when Aries is in the 8th house. It is important to protect their head and eyes and maintain proper hydration to prevent headaches.


#All images are from google and pinterest#I do not own them#my own post#astrology#astro insights#astro community#astrology blog#cosmic world#astro observations#workouts#wellbeing#health#8th house astrology#capricorn#sagittarius#aries
42 notes
·
View notes
Text
For centuries, pickled vegetables were staples in the diet of Ashkenazi Jews. But these pickled vegetables — which included cucumbers, carrots, beets and cabbage — were not the kind of pickles we think of today, swimming in a brine of vinegar and spices. Vinegar, which was typically made from wine, would have been too expensive for most people to use as a preservative before the 19th century. Rather, these vegetables were fermented: submerged in a saltwater brine to attract good bacteria that, with time, turned the vegetable’s sugars into lactic acid, which both preserved them and made them delicious. Among the best-known of these traditional Jewish ferments is sauerkraut, or fermented cabbage.
Turks and Tartars traveling along the Silk Road from China introduced the process of lacto-fermentation — so named for the beneficial lactobacillus bacteria — to Russia as early as the Renaissance. From there the technique spread westward. Sauerkraut, or sour cabbage, was among the most popular ferments. From Russia, Jews brought sauerkraut with them to Germany, France and even England, until it became one of the most important dishes in all of northern Europe. Sauerkraut required so little to make — just cabbage and salt — kept for months, and provided an important source of vitamin C. For poor people living in harsh climates, few foods were as beneficial.
In pre-industrial times, Ashkenazi families began fermenting cabbage and other vegetables in large barrels around Sukkot. Once the fermentation process was complete, after two to four weeks, the finished sauerkraut was stored over the winter in a cool spot and appeared frequently at mealtime — on its own served with black bread or mixed in with noodles, potatoes or meat — as a welcome addition to an otherwise bland and monotonous diet.
Immigrants to America brought sauerkraut with them in the 19th century. Indeed, the special kosher dining room at Ellis Island regularly had sauerkraut on its menu. The ubiquitousness of fermented pickles in Jewish delis, where they served to cut through the fattiness of foods like pastrami and corned beef, cemented the association between Jews and pickled vegetables in the public’s eye. Sauerkraut became a staple of Jewish delis as an integral part of the Reuben sandwich — one of the most iconic dishes in the world of American Jewish cuisine.
Today, we are rediscovering the health benefits, and distinctive tangy flavor, of fermented foods and for the past few years, fermentation has been one of the most popular DIY trends. Although it may seem intimidating, fermenting is actually quite easy to do at home and the results are extraordinarily tasty. The flavor and texture of homemade sauerkraut, for example, is vastly superior to store-bought and, unlike commercial sterilized varieties, contains healthy probiotics which contribute to digestive health and boost the immune system.
Sauerkraut is an easy entrée in to the world of lacto-fermentation: Unlike most other vegetables, cabbage ferments in its own juice, so all you need to make sauerkraut is cabbage and salt. Furthermore, you will not need a lot of special equipment: a half-gallon Mason jar is perfect for fermenting your sauerkraut. I recommend investing in a few additional pieces, neither of which are expensive, to facilitate your fermentation experiments: some glass weights to keep the cabbage submerged in the brine and a lid with an airlock to contain any strong odor while still allowing carbon dioxide to escape. Here are some of my favorites:
Brooklyn Brew Shop Kraut Kit
Fermentation Creation Food Fermentation Kit
Fermentation weights
Lids
Note: Once the sauerkraut is finished, store it in the refrigerator, dividing into smaller jars if desired. It will last for several months.
Ready to jump in? Here’s a straightforward recipe for a small-batch sauerkraut using only one head of cabbage.
2 notes
·
View notes
Link
0 notes
Link
0 notes
Link
0 notes
Link
0 notes
Text
Are Bakery Products Nutritious
Bakery products are a staple in many of our diets—from the morning toast to the occasional muffin break or celebratory cake slice. But as more people become health-conscious, there's a growing curiosity: Are bakery products nutritious?
The good news is that bakery products can be nutritious. Like any food category, it all comes down to the ingredients used and how the product is prepared. In recent years, we’ve seen a major shift toward more health-focused baking, giving rise to a whole new wave of nutritious bakery products that taste just as good as they are for you.
Let’s explore how baked goods can support your health and what to look for if you want to make smarter, more nourishing choices.
The Evolution of Bakery Products
Traditionally, many bakery items were made with refined flour, processed sugar, and unhealthy fats—ingredients that offer flavor and texture, but little nutritional value. Cakes, pastries, and cookies, while delicious, often came with high calorie counts and minimal fiber, protein, or vitamins.
However, thanks to growing health awareness and dietary preferences, bakeries have adapted. Today, many bakeries, home bakers, and even large commercial brands are creating nutritious bakery products using better ingredients and smarter techniques. Whole grains, plant-based ingredients, and natural sweeteners are becoming more common.

What Makes Bakery Products Nutritious?
So what transforms a standard loaf or cookie into something nutritious? Here are some key features of truly nutritious bakery products:
1. Whole Grain Flours
Refined flour is stripped of fiber and essential nutrients, while whole grain flours (like whole wheat, spelt, oat, or rye) retain their natural goodness. Whole grains add fiber, protein, B vitamins, and minerals to bakery items—making them more filling and better for your digestive health.
2. Natural Sweeteners
Reducing or replacing refined sugar is a major step toward healthier baking. Natural options like honey, maple syrup, dates, or even mashed bananas can sweeten baked goods while adding nutrients and lowering the glycemic load.
3. Healthy Fats
Traditional bakery products often use butter or hydrogenated oils. In contrast, nutritious bakery products use fats from sources like olive oil, avocado, nuts, seeds, or even coconut. These fats can support heart health and provide essential fatty acids.
4. Functional Add-ins
Chia seeds, flaxseeds, nuts, dried fruits, and even vegetables (think pumpkin bread or beet brownies) enhance the nutritional profile. These ingredients can boost fiber, antioxidants, and healthy fats.
5. Reduced Sodium and No Preservatives
Clean-label baking means fewer additives. Fresh, preservative-free bakery products made in small batches or at home tend to be better for you than mass-produced items filled with shelf-stabilizers and excess salt.

Examples of Nutritious Bakery Products
Not sure where to start? Here are some great examples of healthier baked goods you might find at a local bakery or make at home:
Whole grain sourdough bread – full of fiber, easier to digest, and rich in probiotics.
Oatmeal banana muffins – naturally sweetened and high in fiber.
Almond flour cookies – low in carbs, high in protein, and gluten-free.
Zucchini bread – sneaks in veggies while maintaining a moist, delicious texture.
Chia seed crackers – perfect for snacking, packed with omega-3s and fiber.
These options not only satisfy your cravings but also nourish your body.
How to Choose Nutritious Options
When shopping for nutritious bakery products, whether at a store or a café, check the label or ask a few questions:
Is it made with whole grain flour?
Does it use natural or reduced sugar?
Are there added superfoods or functional ingredients?
Is it made fresh or loaded with preservatives?
What type of fat is used?
Don’t be afraid to ask your local baker or read packaging carefully. The more informed you are, the easier it becomes to choose foods that align with your health goals.
Are All Bakery Products Unhealthy? Not Anymore.
The myth that all baked goods are “bad” for you is outdated. Yes, pastries loaded with processed sugar and trans fats aren’t ideal for everyday consumption. But nutritious bakery products are changing the game.
With the right ingredients, even something as indulgent as a brownie can be a source of fiber and antioxidants. It’s all about balance and making informed choices.
The Role of Moderation
Even with nutritious options, balance is key. A slice of whole grain banana bread or a protein-rich muffin can absolutely be part of a healthy lifestyle—but portion control matters. It’s easy to overeat baked goods, especially when they’re marketed as “healthy.”
Make sure to complement your bakery items with a variety of foods—fresh vegetables, lean proteins, fruits, and healthy fats—to maintain a balanced, nourishing diet.
Final Thoughts: Enjoying Baked Goods, the Healthy Way
So, are bakery products nutritious? The answer is: they absolutely can be.
With the rise of health-conscious baking, we now have more access to nutritious bakery products than ever before. Whether you’re shopping in stores, visiting local bakeries, or baking at home, nutritious choices are out there—and they’re delicious, too.
By paying attention to ingredients, reading labels, and making mindful choices, you don’t have to give up baked goods to stay healthy. Instead, you can enjoy them as part of a well-rounded, nourishing lifestyle.
0 notes
Text
How to Make Gluten-Free Candy Cane Cookies?

Candy cane cookies are a festive favorite during the holiday season, known for their beautiful red-and-white twists and delicious peppermint flavor. However, traditional recipes use wheat flour, which contains gluten—a common trigger for those with celiac disease or gluten sensitivities. Fortunately, you can easily make gluten-free candy cane cookies without compromising on taste or texture. By using the right flour alternatives and baking techniques, you can create a delightful holiday treat that everyone can enjoy.
Choosing the Right Gluten-Free Flour
The key to making perfect gluten-free candy cane cookies is selecting the right flour blend. Since gluten provides structure and elasticity in traditional baking, using a single gluten-free flour may result in cookies that are too crumbly or dense. A high-quality gluten-free flour blend that includes a mix of rice flour, potato starch, and xanthan gum is ideal for achieving a soft, chewy texture.
Some bakers prefer using almond flour or coconut flour for a grain-free option, but these flours absorb moisture differently. If using them, it’s important to adjust the liquid ingredients in the dough to prevent dryness. Store-bought gluten-free baking blends are often the most reliable choice for replacing all-purpose flour in a one-to-one ratio.
Achieving the Perfect Dough Consistency
Gluten-free cookie dough can sometimes be more delicate and prone to crumbling than traditional dough. To prevent this, ensure the dough is properly hydrated by using ingredients like eggs or a small amount of milk to help bind everything together. Since gluten-free flours don’t develop elasticity the way wheat flour does, it’s also important not to overwork the dough. Mixing just until combined will result in cookies that hold their shape without becoming too dense.
For best results, chilling the dough for at least 30 minutes before shaping can help it become more manageable. This step also prevents spreading during baking, allowing the candy cane shape to stay intact.
Shaping and Baking for a Festive Look
Creating the signature twisted look of candy cane cookies requires careful handling of the gluten-free dough. Since it can be more fragile, rolling the dough into ropes should be done gently to avoid cracks. If the dough feels too dry, allowing it to warm up slightly before shaping can make it more pliable.
To form the classic candy cane shape, roll two pieces of dough—one plain and one colored with a natural red tint like beet powder—into equal-length ropes. Carefully twist them together and curve the top to resemble a candy cane. Baking at a slightly lower temperature than traditional cookies, around 325°F (165°C), ensures they don’t overbrown while staying soft inside.
Finding Gluten-Free Candy Cane Cookies from Retailers
If you don’t have time to bake, you can even find these cookies from retailers that specialize in gluten-free baked goods. Many bakeries and online stores now offer delicious gluten-free holiday treats, including candy cane cookies made with high-quality, allergy-friendly ingredients. Checking specialty health stores or browsing online can lead to great options for enjoying these festive cookies without gluten.
A Holiday Tradition for Everyone
With the right flour, careful dough handling, and a little patience, gluten-free candy cane cookies can be just as delightful as the classic version. Whether homemade or store-bought, these cookies bring holiday cheer to those with gluten sensitivities, allowing everyone to indulge in the festive season. By making simple adjustments, you can enjoy a delicious and safe treat that adds joy to your holiday celebrations.
0 notes
Text
How to Store Your Healthy Harvests to Maximize Freshness and Nutrients?

After putting effort into growing or purchasing fresh, seasonal produce, ensuring it stays fresh and nutrient-rich is essential. Proper storage techniques not only extend the shelf life of fruits and vegetables but also help retain their flavor, texture, and nutritional value. Here’s how to store your healthy harvests effectively.
1. Understand the Nature of Your Produce
Different fruits and vegetables have unique storage needs. Some thrive in cool, dark environments, while others require room-temperature conditions. Grouping produce based on their storage needs is a great way to prevent spoilage and maximize freshness.
Ethylene Gas Awareness
Certain fruits, such as apples, bananas, and avocados, emit ethylene gas, a natural ripening agent. This gas can speed up the ripening and spoilage of nearby fruits and vegetables. Store ethylene-producing items separately from those sensitive to the gas, like leafy greens, berries, and carrots.
2. Refrigeration Tips
Refrigeration is essential for many types of produce, but it must be done correctly to avoid moisture loss or premature spoilage.
Leafy Greens: Wrap leafy greens like spinach, lettuce, and kale in a damp paper towel and store them in a perforated bag in the crisper drawer. The moisture helps keep them hydrated, while airflow prevents wilting.
Root Vegetables: Carrots, radishes, and beets should be stored in a bag or container with a lid to prevent them from drying out. Remove greens from root vegetables before storing, as they draw moisture away from the root.
Berries: Wash berries only before eating to avoid excess moisture, which accelerates mold growth. Store them in a breathable container lined with a dry paper towel.
3. Room Temperature Storage
Some produce is best stored at room temperature. Keeping these items out of direct sunlight and away from heat sources ensures they remain fresh.
Tomatoes: Store tomatoes stem-side down at room temperature to preserve their texture and flavor. Refrigerating tomatoes can make them mealy.
Potatoes, Onions, and Garlic: These should be kept in a cool, dark, and well-ventilated space. Avoid storing potatoes and onions together, as gases from onions can cause potatoes to spoil faster.
Citrus Fruits: Oranges, lemons, and limes can last for weeks on the counter. For longer storage, place them in the refrigerator.
4. Freezing for Longevity
Freezing is a great way to preserve surplus produce for months without significant nutrient loss.
Blanching Vegetables: For vegetables like broccoli, beans, and peas, blanching them in boiling water for a few minutes before freezing helps maintain their color, texture, and nutrients.
Fruits: Freeze berries, bananas, or mangoes in a single layer on a baking sheet before transferring them to airtight containers. This prevents clumping and makes them easier to use later.
5. Drying and Canning
Drying and canning are traditional methods of preserving harvests. Drying works well for herbs, fruits, and some vegetables, while canning is ideal for making jams, sauces, or pickled items. Always follow proper canning procedures to prevent spoilage and ensure food safety.
Conclusion
Storing your healthy harvests properly ensures you can enjoy fresh, nutrient-dense foods for longer. By understanding the unique needs of each type of produce and using techniques like refrigeration, freezing, and drying, you can minimize waste, save money, and savor the benefits of seasonal eating.
0 notes
Text
From Garden to Jar: Fresh Pickles for Every Season

Pickles: the tangy, crunchy delight that can transform any meal. While store-bought options are readily available, there's something undeniably satisfying about savoring homemade fresh pickles. And the best part? You can enjoy them year-round! Summer is the peak season for pickling, with an abundance of fresh produce to choose from. Cucumbers, of course, are the classic choice, but don't limit yourself. Experiment with other vegetables like carrots, beets, or even green beans. Create a variety of pickles, from classic dill to spicy jalapeño. When autumn arrives, focus on preserving the season's bounty. Pickle mixed vegetables, including okra, cauliflower, and onions, for a colorful and flavorful medley. Don't forget about seasonal fruits like plums or peaches for unique sweet and tangy pickles. Winter might seem like an off-season for pickling, but it's the perfect time to enjoy your homemade creations. Pair crispy pickles with hearty winter meals or use them as a base for flavorful sauces and dressings. And when spring rolls around, start planning your next batch of pickles. Explore new flavor combinations and experiment with different pickling techniques. If you're short on time or garden space, don't worry! You can still enjoy the taste of homemade pickles by HeartsWithFingers online. HeartsWithFingers offer a wide selection of pickling supplies, from cucumbers and spices to vinegar and jars. Daichi Pickle offers a range of delicious pickles that can be enjoyed directly from the jar. So, whether you're a seasoned pickler or just starting out, embrace the joy of making your own fresh pickles. With a little creativity and experimentation, you'll discover a world of flavor possibilities.
0 notes
Text
The Rise of Veg Meat: A Look at the Latest Trends
Introduction
Veg meat, also known as plant-based meat, is taking the food world by storm. From grocery stores to high-end restaurants, this innovative food is becoming a staple in many diets. But what exactly is veg meat, and why has it become so popular? In this article, we dive deep into the rise of Veg Meat, exploring its history, benefits, challenges, and future trends. Whether you're a curious carnivore or a seasoned vegan, this comprehensive look at veg meat will provide you with all the information you need to understand this exciting food trend.
What is Veg Meat?
Veg meat refers to food products designed to mimic the taste, texture, and appearance of traditional meat but made entirely from plant-based ingredients. Common components include soy, peas, lentils, and various grains. These ingredients are processed and combined with flavorings and binders to create products that closely resemble beef, chicken, pork, and other meats.
Historical Background
The concept of meat substitutes isn't new. Early forms of plant-based proteins can be traced back to ancient China, where tofu and seitan were staples in vegetarian diets. Over the decades, these early forms have evolved, incorporating more sophisticated methods and ingredients to improve their taste and nutritional profile.
The Surge in Popularity
Several factors have contributed to the rise of veg meat. Health consciousness, environmental concerns, and ethical considerations are at the forefront. Additionally, celebrity endorsements and high-profile investments have propelled plant-based meats into the mainstream. Figures like Bill Gates and Leonardo DiCaprio have publicly supported and invested in companies producing veg meat, adding a layer of credibility and allure.
Health Benefits of Veg Meat
Veg meat offers numerous health benefits. It's generally lower in saturated fat and calories compared to traditional meat. Many products are fortified with essential nutrients like B12 and iron, which can be lacking in a plant-based diet. Furthermore, consuming less red meat has been linked to a reduced risk of chronic diseases such as heart disease and cancer.
Environmental Impact
One of the most significant advantages of veg meat is its positive environmental impact. Producing plant-based meat requires significantly less water, land, and energy than conventional meat production. It also results in fewer greenhouse gas emissions. This sustainability aspect is a major driving force behind the growing popularity of veg meat.
Technological Innovations
Advances in food science have been crucial in developing veg meat that closely mimics traditional meat. Companies like Beyond Meat and Impossible Foods use innovative techniques to create products that not only taste like meat but also bleed like real meat, thanks to ingredients like beet juice and soy leghemoglobin.
Market Trends
The plant-based meat market is booming. According to recent reports, sales have surged by over 30% in the past few years. This growth is driven by a diverse consumer base that includes not just vegetarians and vegans but also flexitarians – people who still consume meat but are looking to reduce their intake.
Cultural Shifts
Dietary preferences are shifting worldwide, influenced by a growing awareness of health, environmental, and ethical issues. Social media platforms play a pivotal role in this change, with influencers and food bloggers showcasing plant-based recipes and lifestyle choices that reach millions of people daily.
Challenges Faced by the Industry
Despite its popularity, the veg meat industry faces several challenges. Public perception remains a hurdle, with some consumers skeptical about the taste and nutritional value of plant-based meats. Additionally, regulatory issues and labeling disputes can complicate market entry and growth.
The Future of Veg Meat
The future looks promising for veg meat. Experts predict continued growth and expansion into new markets. Innovations in biotechnology and food science are expected to yield even more realistic and delicious products, broadening their appeal and accessibility.
Recipes and Culinary Uses
Veg meat is incredibly versatile. From burgers and sausages to tacos and stir-fries, the culinary possibilities are endless. Some popular recipes include veg meat lasagna, plant-based meatballs, and vegan chicken nuggets. When cooking with veg meat, it's important to follow specific tips to ensure the best results, such as not overcooking and using the right seasonings.
Veg Meat vs. Traditional Meat
When it comes to taste and texture, many veg meat products have come remarkably close to their traditional counterparts. However, some differences remain. Veg meat is often more expensive due to the complex processing methods and ingredients used. On the other hand, the health and environmental benefits may justify the higher price for many consumers.
Ethical Considerations
Animal welfare is a major factor driving the adoption of veg meat. By choosing plant-based options, consumers can reduce their contribution to animal suffering and support more humane food production practices. This ethical stance aligns with the values of many people who are becoming increasingly conscious of the impact of their dietary choices.
Conclusion
The rise of veg meat represents a significant shift in our food landscape. With its numerous benefits for health, the environment, and animal welfare, it's no wonder that plant-based meats are gaining traction. As technological advancements continue and public awareness grows, the future of veg meat looks brighter than ever. Whether you're a dedicated vegan or simply curious, now is the perfect time to explore the world of veg meat and discover its many advantages. The trend towards veganism has been growing rapidly, with more people recognizing the numerous health benefits of a plant-based diet. Beyond the ethical and environmental reasons, many individuals are turning to veganism for its positive impact on health. Vegan Food Products don't have any ingredients that come from animals. This means no meat, cheese, eggs, or anything else that comes from animals. These goods are made from plant-based ingredients instead of animal-based ones, so they can be eaten by vegans or people who want to eat less animal products.
More information about vezlay foods:
Name: Vezlay Foods
Phone No: 7011736463
Address: A1/1, Nathu Colony Chowk Shahdara, New Delhi - 110093, INDIA
Website: https://vezlay.com/veg-meat/
0 notes
Text
Cutting Board Stain: Proven Solutions

To remove stains from a cutting board, try using a mixture of hydrogen peroxide and baking soda. A stained cutting board can be unsightly and unhygienic, but luckily, there is a simple solution. By combining hydrogen peroxide and baking soda, you can effectively remove stains from your cutting board. This powerful mixture works by breaking down the pigments in the stain and allowing them to be easily lifted away. To use this method, first sprinkle baking soda over the stained area of the cutting board. Then, pour hydrogen peroxide onto the baking soda and let it sit for a few minutes. Finally, scrub the stained area with a brush or sponge, rinse thoroughly, and dry. With this easy and effective technique, your cutting board will be stain-free and ready for use in no time.
Common Causes Of Cutting Board Stains
Stains on cutting boards can arise from various sources and understanding the common culprits is essential to keep your kitchen tools clean and safe. Below are the main categories of cutting board stains: Food-based Stains - Berries, tomatoes, and beets can leave tough stains on cutting boards. - Cutting acidic fruits like lemons can accelerate staining on the board. - Raw meat and poultry juices are notorious for leaving stubborn stains. Mineral Stains - Hard water residue can cause mineral deposits on cutting boards. - Using iron-rich water for cleaning might lead to rust stains. - Mineral oil buildup can result in dark spots on the board surface.
Preventive Measures
When it comes to maintaining the quality and appearance of your cutting board, taking preventive measures is key. By following regular cleaning practices and proper maintenance routines, you can prevent stains from setting in and ensure your cutting board remains hygienic and safe to use. Regular Cleaning Regular cleaning of your cutting board is essential to prevent stains and the growth of harmful bacteria. Here are some tips to keep your cutting board clean: - Wash with hot, soapy water: After each use, wash your cutting board with hot water and mild soap. This helps to remove any food residue and kill bacteria that may be present. - Sanitize with vinegar: To further disinfect your cutting board, use a solution of one part vinegar to four parts water. Spray or wipe this solution onto the surface of the cutting board, let it sit for a few minutes, and then rinse thoroughly with water. - Dry thoroughly: After washing, dry your cutting board completely to prevent the growth of mold and bacteria. Use a clean towel or air dry it on a dish rack. - Avoid dishwasher: While some cutting boards are dishwasher safe, it is generally recommended to hand wash wooden cutting boards as the dishwasher may cause warping or splitting. Proper Maintenance Besides regular cleaning, proper maintenance is crucial to extend the life of your cutting board and prevent stains. Here are some maintenance tips to follow: - Apply mineral oil: Wooden cutting boards should be oiled regularly to keep the wood moisturized and prevent stains. Apply a thin layer of food-grade mineral oil to the surface of the board, let it soak in for a few hours or overnight, and wipe off any excess oil. - Avoid direct sunlight and excessive heat: Exposure to direct sunlight and extreme heat can cause wooden cutting boards to warp or crack. Store your cutting board in a cool and dry place away from heat sources. - Use separate cutting boards: To prevent cross-contamination, have separate cutting boards for different types of food, such as one for meats and another for fruits and vegetables. - Use a cutting board mat: Placing a cutting board mat or silicone mat on top of your cutting board can provide an extra layer of protection against stains and scratches.
Natural Remedies For Cutting Board Stains
Looking for natural remedies to remove stains from your cutting board? Check out these effective solutions that will leave your board looking clean and fresh. Cutting boards are essential kitchen tools, but over time, they can become stained and discolored from regular use. When this happens, it's important to find natural remedies to effectively remove the stains and keep your cutting board clean and safe for use. Fortunately, there are several natural remedies that can help restore your cutting board to its original condition without the use of harsh chemicals. Lemon And Salt Scrub One effective natural remedy for cutting board stains is a lemon and salt scrub. Simply sprinkle some coarse salt onto the stained areas of the cutting board, and then use a halved lemon to scrub the salt into the surface. The natural acidity of the lemon helps to break down the stains, while the abrasive salt works to lift them away. After scrubbing the surface, rinse the cutting board with warm water and dry thoroughly. Baking Soda Paste Another natural remedy for cutting board stains is a baking soda paste. Create a paste by mixing baking soda with a small amount of water until it forms a thick, spreadable consistency. Apply the paste to the stained areas of the cutting board and let it sit for a few minutes to allow the baking soda to absorb the stains. Then, use a damp cloth to scrub the paste into the surface, targeting the stained areas. Once the stains are lifted, rinse the cutting board and dry completely. Using these natural remedies can help remove stains from your cutting board without the need for harsh chemicals, ensuring a clean and safe surface for food preparation. Remember that regular maintenance and cleaning are essential for keeping your cutting board in top condition. Incorporating these natural remedies into your cleaning routine can help prolong the life of your cutting board and ensure a hygienic food preparation surface for years to come.
Chemical Solutions For Stubborn Stains
If you find yourself battling with stubborn stains on your cutting board, chemical solutions can be an effective way to tackle the problem. These solutions are designed to penetrate and break down tough stains, restoring your cutting board to its former glory. Here are a couple of chemical solutions that can help to remove stubborn stains and keep your cutting board looking clean and fresh. Vinegar Solution A vinegar solution is a great way to tackle tough stains on your cutting board. Mix equal parts of white vinegar and water in a spray bottle and spritz the solution onto the stained areas. Let it sit for a few minutes to allow the vinegar to penetrate the stain, then scrub the area with a brush or sponge. Rinse thoroughly and dry the cutting board completely before use. Hydrogen Peroxide Hydrogen peroxide is another powerful solution for removing stubborn stains from cutting boards. Simply pour a small amount of hydrogen peroxide onto the stained area and allow it to fizz and foam as it penetrates the stain. After a few minutes, scrub the area with a brush or sponge and then rinse the cutting board thoroughly. Ensure the board is completely dry before using it again.
Specialized Products For Stain Removal

When it comes to maintaining the cleanliness and appearance of your cutting board, stain removal is an essential task. Over time, cutting boards can develop stubborn stains from various food items, leaving them looking unappealing and unsanitary. Luckily, there are specialized products available that can effectively remove stains and restore the beauty of your cutting board. In this article, we will explore some of these products and how they can help you maintain a stain-free cutting board. Cutting Board Oil One of the most popular products for stain removal on cutting boards is cutting board oil. This specialized oil is specifically designed to penetrate the wood fibers, moisturize the board, and enhance its natural color. By regularly applying cutting board oil to your stained board, you can effectively remove and prevent future stains. Key benefits of using cutting board oil: - Deeply penetrates the wood to remove stains. - Moisturizes and conditions the cutting board, preventing cracks and warping. - Enhances the natural color and beauty of the board. - Creates a protective barrier against moisture and stains. Stain Remover Sprays If the stains on your cutting board are more stubborn and require additional cleaning power, stain remover sprays can be an excellent solution. These sprays are specifically formulated to break down tough stains and food residue, making them easier to scrub away. Stain remover sprays are usually non-toxic and safe to use on wooden cutting boards. Advantages of using stain remover sprays: - Penetrates deep into stains, making them easier to remove. - Effectively breaks down tough food residue. - Safe to use on wooden cutting boards. - Quick and easy to apply. With these specialized stain removal products at your disposal, you can easily restore the cleanliness and beauty of your cutting board. Remember to follow the instructions provided by the manufacturer for optimal results. Regular maintenance and cleaning will ensure your cutting board remains in top condition, providing you with a hygienic and attractive surface for all your food preparation needs.
Keeping Your Cutting Board Stain-free
Proper maintenance is key to keeping your cutting board stain-free. By following best practices for cleaning, drying, and storing your cutting board, you can prevent unsightly stains and odors from developing over time. Here are some helpful tips to ensure your cutting board stays in pristine condition. Proper Drying Techniques - Use a clean, dry cloth to wipe down the cutting board after washing. - Air dry the cutting board in a vertical position to prevent moisture buildup. Storage Tips - Store your cutting board in a cool, dry place away from direct sunlight. - Avoid stacking other items on top of the cutting board to prevent warping. By implementing these drying techniques and storage tips, you can maintain the quality of your cutting board and preserve its appearance for longer. https://www.youtube.com/watch?v=wqPC-fdQUfc
Dealing With Deep-seated Stains
Sanding The Surface When combating deep stains, sanding the cutting board surface can be an effective solution. This process helps to remove the stained layer and reveal a fresh surface beneath. Professional Restoration For stubborn stains that won't go away with DIY methods, consider seeking professional restoration services. Experts can utilize specialized techniques and products to restore the cutting board to its former glory.
Conclusion And Final Tips
To keep your cutting board stain-free, regular maintenance is key. Test new cleaning methods first to ensure they are effective and safe for your cutting board. Here are some final tips to help you maintain a clean and stain-free cutting board. Regular Maintenance Is Key Keep your cutting board clean and dry after each use to prevent stains from setting in. Regularly oiling your cutting board will also help protect it from stains and water damage. Use a food-safe mineral oil or beeswax to keep the wood hydrated and looking its best. Test New Cleaning Methods First Before trying out a new cleaning method, always test it on a small, inconspicuous area of your cutting board. This will help you assess if the method is effective without risking damage to the entire board. Remember that different cutting board materials may respond differently to cleaning methods, so always proceed with caution when trying something new.

Frequently Asked Questions On Cutting Board Stain
How To Remove Stains From A Wooden Cutting Board? To remove stains from a wooden cutting board, scrub the board with a mixture of salt and lemon juice or hydrogen peroxide. Let it sit for a few minutes, then rinse with warm water and dry thoroughly. Regularly oiling the board can also prevent stains. Can I Use Bleach To Clean A Stained Cutting Board? Yes, you can use a solution of 1 tablespoon bleach to 1 gallon of water to clean a stained cutting board. After applying the solution, rinse the board thoroughly and allow it to air dry. Ensure the bleach is fully rinsed off before using the board for food preparation. What Are The Best Oils To Prevent Cutting Board Stains? Mineral oil and food-grade mineral oil are excellent choices for preventing cutting board stains. These oils create a protective barrier that repels moisture and prevents food particles from seeping into the board. Regularly applying a thin layer of oil helps maintain the board's longevity.
Conclusion
Maintaining a clean and stain-free cutting board is essential for maintaining good hygiene in the kitchen. By regularly cleaning and oiling your cutting board, you can prevent stains and prolong its lifespan. Remember to use warm soapy water, vinegar, or lemons for effective cleaning and always dry it thoroughly. Additionally, using a food-safe mineral oil to condition the board can help prevent stains and keep it looking as good as new. So, protect your cutting board and enjoy your cooking with a clean and stain-free surface every time. Read the full article
0 notes
Text
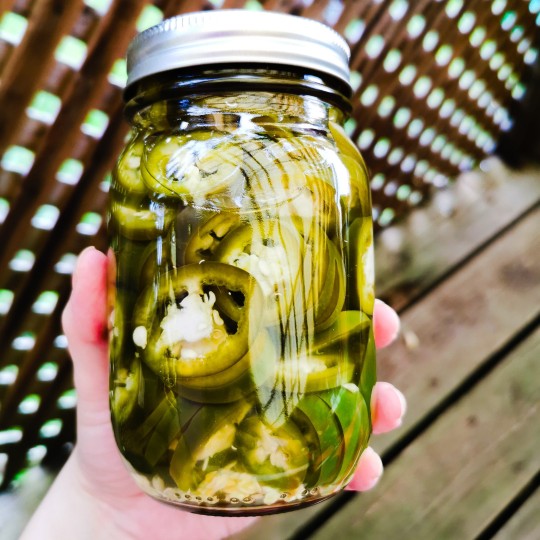
As many of you know, I am a proud homesteader! I farm my land (when I'm not working my other two jobs) and one thing I do every year is find ways to preserve my harvest so I can eat the fruits of my labour when it's -30C outside. So I thought I would share my "lazy" pickling technique with you guys, since many of you may be trying your hand at gardening for the first time!
Step 1: Wash the shit out of your jars. Hot water and soap. Then, boil the jars and the lids for a few minutes in a big saucepan of water.
Step 2: Take the jars out and let them dry on a towel. They're really fucking hot so don't touch them. Use tongs (those pinchy things) and let them cool down.
Step 3: Chop up some veg. Whatever you want, we die like men when it comes to pickles. Carrots, cucumbers, onions, beets, peppers, you do you. I like to pickle green tomatoes with one chile in the jar to make them a lil spicy 🔥🔥🔥. Shove that shit into the jar right to the top and don't be gentle. Jam it in hard and good.
Step 4: Time to make a brine. In my opinion, measuring is for bakers and I don't have the patience for that shit. 1:1 ratio water and vinegar. Put that in a big ass saucepan and set that bitch on high. Add some salt (I add 2 spoonfuls if I'm doing a big batch), peppercorns and mustard seeds. Eyeball it like you don't fear god. And you can add sugar, but I don't eat sugar because I'm a salty hoe.
Step 5: Bring the brine to a boil and then pour the brine into the jars to the top. Cover them with a lid but don't screw it super tight. Then let them cool until room temperature and then tighten the lids.
Step 6: Here's where I'm gonna get controversial. I don't boil the filled jars again. I know, spank me. But I store everything I jar in a cold place and I haven't died yet so I don't bother with the sealing of the jars. Eat your pickles within a year and brag to everyone you know that you make your own pickles like you're Martha fucking Stewart. Make a charcuterie board with your pickles. Instagram that shit.
Bon appetit 🔥
123 notes
·
View notes
Text
How to Preserve and Store Your Healthy Harvest for Longevity?
Preserving and storing freshly harvested produce is crucial not only for extending its shelf life but also for maintaining its nutritional value and flavor. Whether you’ve picked fruits and vegetables from your garden or purchased them from a local farmers’ market, proper storage techniques ensure that you can enjoy them for longer periods. Here’s a comprehensive guide on how to effectively store your healthy harvest.
Proper Handling and Preparation
When harvesting produce, timing is key. Pick fruits and vegetables at their peak ripeness to ensure they are packed with maximum flavor and nutrients. Handle them gently to avoid bruising, which can lead to accelerated spoilage. For leafy greens and delicate items like berries, use soft containers or baskets to prevent damage during transport.
Before storing, it’s essential to clean your produce properly. Rinse fruits and vegetables under cold running water to remove any dirt, pesticides, or residues. Pat them dry with paper towels or a clean cloth to remove excess moisture. Wet produce can quickly develop mold, so ensuring they are dry before storage is crucial.
Storage Tips
1. Root Vegetables: Store root vegetables such as carrots, potatoes, and beets in a cool, dark place with good ventilation. A root cellar or a pantry works well for maintaining optimal storage conditions. Remove any foliage or tops before storage to prevent moisture loss.
2. Leafy Greens: After rinsing and drying thoroughly, wrap leafy greens in paper towels to absorb excess moisture. Place them in a perforated plastic bag or container to allow for airflow and store them in the refrigerator’s crisper drawer. This method helps maintain crispness and freshness.
3. Berries and Soft Fruits: Arrange berries and soft fruits in a single layer on a paper towel-lined tray. Place them in the refrigerator and consume them within a few days for the best flavor and texture. Berries are particularly delicate and prone to mold, so inspect them regularly and discard any spoiled ones to prevent them from affecting others.
Long-Term Preservation Methods
For preserving produce for an extended period:
Freezing: Blanch vegetables like peas, green beans, and corn before freezing to maintain color and texture. Pack them in airtight containers or freezer bags, removing excess air to prevent freezer burn. Berries and fruits can also be frozen for later use in smoothies or baking.
Drying: Dehydrate herbs, peppers, and some fruits using a dehydrator or oven at low temperatures. Dried produce can be stored in airtight containers and used in cooking or as healthy snacks.
Additional Tips for Maintaining Freshness
Regularly inspect stored produce for any signs of spoilage, such as mold or soft spots. Remove any damaged items promptly to prevent them from affecting others. Use ethylene-absorbing products like activated charcoal or ethylene-absorbing sachets in storage areas to prolong freshness.
Conclusion
By following these storage and preservation techniques, you can extend the life of your freshly harvested produce while retaining its nutritional benefits and delicious flavors. Whether you’re storing produce from your garden or supporting local farmers, proper handling and storage ensure that you can enjoy your healthy harvest for weeks or even months after picking or purchasing. Embracing these practices not only reduces food waste but also allows you to savor the natural goodness of homegrown or locally sourced produce year-round.
0 notes
Text
How scientists make plant-based foods taste and look more like meat

- By Mariana Lamas , Northern Alberta Institute of Technology , The Conversation -
In 2019, Burger King Sweden released a plant-based burger, the Rebel Whopper, and the reaction was underwhelming. So, the company challenged its customers to taste the difference.
Burger King Sweden created menu item where customers would have a 50-50 chance of getting a meat burger or a plant-based one. To find out, they had to scan the burger box in Burger King’s app. The results: 44 per cent guessed wrong — customers couldn’t tell the difference.
Plant-based meats are products designed to imitate meat. While earlier products like tofu and seitan were meant to replace meat, newer products are trying to mimic its taste, texture, smell and appearance. Plant-based burgers, ground meat, sausages, nuggets and seafood are now in grocery stores and on restaurant menus. They aim to redefine our understanding of meat.
Achieving such standards is not an easy task. It took Beyond Meat more than six years to develop the Beyond Burger. And since its release in 2015, it has been through three reformulations. The science behind trying to build the perfect plant-based meat is full of trial and error — and involves a multidisciplinary team.
The Maillard reaction
Appearance, texture and flavour are the three main challenges food scientists face when developing a convincing plant-based meat. These are what give meat its characteristics and essence.
When meat cooks, its texture changes. The temperature of the pan or the grill affects protein structures. As proteins begin to break down, coagulate and contract, the meat tenderizes and firms up.
What’s known as the Maillard reaction is responsible for that distinctive “meaty” aroma and savoury flavour. Understanding it helps food research and development teams replicate it in plant-based meat products.
Ingredients also influence appearance, texture and flavour. Soy, wheat, pea and fava proteins, as well as starches, flours, hydrocolloids (non-digestible carbohydrates used as thickeners, stabilizers and emulsifiers, or as water retention and gel-forming agents) and oils, can make a plant-based meat more or less similar to the animal meat it is trying to replicate.
Finally, the processing method influences the product’s final characteristics. “High-moisture extrusion” and “shear-cell” technologies are two of the most common processes used to transform vegetable protein into a layered fibrous structure that closely matches the appearance and texture of meat. High-moisture extrusion is the most used technique and provides a meat-like bite, but shear cell processing is more energy-efficient and has a smaller carbon footprint.
Colour and texture
Food scientists are now able to simulate meat colour before, during and after cooking. Beet extract, pomegranate powder and soy leghemoglobin have been used to mimic the red colour of fresh or rare beef.
Animal protein texture is difficult to copy with plant-based ingredients because plants do not have muscle tissue. Muscles are elastic and flexible, while plant cells are rigid and unbending. Plants do not have the bite and chewiness of meat, which is why veggie burgers can often feel crumbly and mushy.
A key ingredient in any plant-based meat is the plant protein. In addition to being fundamental to the structure, it is also important for product identity and differentiation. A formulation can use one type of protein or a blend of different types.
Soy protein is still the plant protein that delivers the most meat-like taste and texture. Since it has been used for decades now, a lot of research has been done and its texturization process has been further improved.
Pea protein, made popular by Beyond Meat, is the fastest growing segment in the plant-based market because of its complete amino acid profile.
There are nine amino acids that are essential in our diets. Animal-based foods have all of them and are considered complete proteins. Most plant foods are incomplete proteins, meaning certain amino acids are missing, but pea protein contains all nine.
Pea protein also lacks allergens. Rice, fava, chickpea, lentil and mung bean proteins have also generated a lot of interest among food scientists, and more products incorporating these plants are expected to come to market in the future.
Creating flavour
Companies don’t have to disclose flavouring ingredients — only whether they’re natural or artificial — so it’s hard to know what exactly gives plant-based burgers that meat-like flavour.
Fat is a major player in flavour and mouth feel. It provides mouth-coating richness, juiciness and is responsible for flavour release. It activates certain areas of the brain that are responsible for processing taste, aroma and reward mechanisms.
The industry standard has been to use coconut oil to replace animal fat. However, coconut oil melts at much lower temperature than animal fat. In the mouth this translates to bites that start off rich and juicy, but wear off quickly. Some plant-based meats use a combination of plant-based oils, such as canola and sunflower oils, to increase the melting temperature and extend the juiciness.
New replacements for animal fats using sunflower oil and water emulsions and cultivated animal fats (fat cells grown in laboratories) are being developed to solve this problem. But clearly, not all of these would suit a vegetarian or vegan diet.
A plant-based meat formulation can work on paper, have the recommended number of ingredients and hit the nutritional targets to match meat, but it might not taste good or have the right texture or bite. For example, potato protein creates great texture, but it is very bitter. Food scientists must find a balance between the protein content, texture and flavour.
The future of formulated food
Food scientists have only scratched the surface when it comes to unlocking the potential of plant-based meats. There is still a lot to explore and improve.
The current commercially available plant protein ingredients come from two per cent of about 150 plant protein species used for food supply.
There is ongoing research exploring crop optimization via breeding or engineering to increase protein content to support further development and improvement of plant protein isolates and ultimately plant-based meats.
Processing method technologies are still being developed and we are seeing new technologies such as 3D printing and cultured meat being adopted and refined. Expect to see plant-based meat products increase and whole cuts, like beef steaks, to be commercially available soon.

Mariana Lamas, Research assistant, Centre for Culinary Innovation, Northern Alberta Institute of Technology
This article is republished from The Conversation under a Creative Commons license. Read the original article.
--
Read Also
Food allergies: Biotech startup Ukko secures $40M Series B
2 notes
·
View notes