#automation peacock
Explore tagged Tumblr posts
Visit Tumblr Blog
Explore Tumblr blogs with no restrictions, modern design and the best experience.
Last Seen Tumblr Blogs


Fun Fact
69% of Tumblr users are millennials.
Text
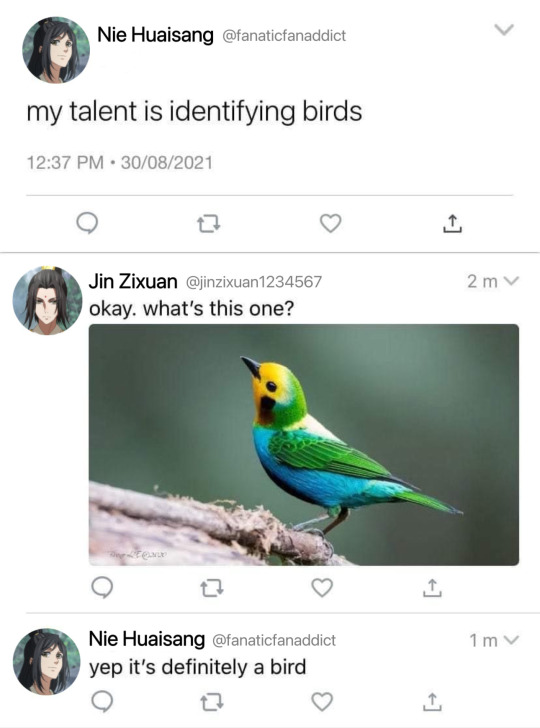
#mdzs#the untamed#mo dao zu shi#mdzs crack#mdzs meme#mdzs shitposting#apple memes 🍎#jin zixuan#nie huaisang#tbh i was gonna use wwx instead but#jzx isnt in enough things 🥺#more jzx content pls pls p l s#nhs birb expert#especially peacocks 😌✨🦚#also headcanon that jzx has an automated handle with a bunch of random numbers lmaooo
390 notes
·
View notes
Text
How I ditched streaming services and learned to love Linux: A step-by-step guide to building your very own personal media streaming server (V2.0: REVISED AND EXPANDED EDITION)
This is a revised, corrected and expanded version of my tutorial on setting up a personal media server that previously appeared on my old blog (donjuan-auxenfers). I expect that that post is still making the rounds (hopefully with my addendum on modifying group share permissions in Ubuntu to circumvent 0x8007003B "Unexpected Network Error" messages in Windows 10/11 when transferring files) but I have no way of checking. Anyway this new revised version of the tutorial corrects one or two small errors I discovered when rereading what I wrote, adds links to all products mentioned and is just more polished generally. I also expanded it a bit, pointing more adventurous users toward programs such as Sonarr/Radarr/Lidarr and Overseerr which can be used for automating user requests and media collection.
So then, what is this tutorial? This is a tutorial on how to build and set up your own personal media server using Ubuntu as an operating system and Plex (or Jellyfin) to not only manage your media, but to also stream that media to your devices both at home and abroad anywhere in the world where you have an internet connection. Its intent is to show you how building a personal media server and stuffing it full of films, TV, and music that you acquired through indiscriminate and voracious media piracy various legal methods will free you to completely ditch paid streaming services. No more will you have to pay for Disney+, Netflix, HBOMAX, Hulu, Amazon Prime, Peacock, CBS All Access, Paramount+, Crave or any other streaming service that is not named Criterion Channel. Instead whenever you want to watch your favourite films and television shows, you’ll have your own personal service that only features things that you want to see, with files that you have control over. And for music fans out there, both Jellyfin and Plex support music streaming, meaning you can even ditch music streaming services. Goodbye Spotify, Youtube Music, Tidal and Apple Music, welcome back unreasonably large MP3 (or FLAC) collections.
On the hardware front, I��m going to offer a few options catered towards different budgets and media library sizes. The cost of getting a media server up and running using this guide will cost you anywhere from $450 CAD/$325 USD at the low end to $1500 CAD/$1100 USD at the high end (it could go higher). My server was priced closer to the higher figure, but I went and got a lot more storage than most people need. If that seems like a little much, consider for a moment, do you have a roommate, a close friend, or a family member who would be willing to chip in a few bucks towards your little project provided they get access? Well that's how I funded my server. It might also be worth thinking about the cost over time, i.e. how much you spend yearly on subscriptions vs. a one time cost of setting up a server. Additionally there's just the joy of being able to scream "fuck you" at all those show cancelling, library deleting, hedge fund vampire CEOs who run the studios through denying them your money. Drive a stake through David Zaslav's heart.
On the software side I will walk you step-by-step through installing Ubuntu as your server's operating system, configuring your storage as a RAIDz array with ZFS, sharing your zpool to Windows with Samba, running a remote connection between your server and your Windows PC, and then a little about started with Plex/Jellyfin. Every terminal command you will need to input will be provided, and I even share a custom #bash script that will make used vs. available drive space on your server display correctly in Windows.
If you have a different preferred flavour of Linux (Arch, Manjaro, Redhat, Fedora, Mint, OpenSUSE, CentOS, Slackware etc. et. al.) and are aching to tell me off for being basic and using Ubuntu, this tutorial is not for you. The sort of person with a preferred Linux distro is the sort of person who can do this sort of thing in their sleep. Also I don't care. This tutorial is intended for the average home computer user. This is also why we’re not using a more exotic home server solution like running everything through Docker Containers and managing it through a dashboard like Homarr or Heimdall. While such solutions are fantastic and can be very easy to maintain once you have it all set up, wrapping your brain around Docker is a whole thing in and of itself. If you do follow this tutorial and had fun putting everything together, then I would encourage you to return in a year’s time, do your research and set up everything with Docker Containers.
Lastly, this is a tutorial aimed at Windows users. Although I was a daily user of OS X for many years (roughly 2008-2023) and I've dabbled quite a bit with various Linux distributions (mostly Ubuntu and Manjaro), my primary OS these days is Windows 11. Many things in this tutorial will still be applicable to Mac users, but others (e.g. setting up shares) you will have to look up for yourself. I doubt it would be difficult to do so.
Nothing in this tutorial will require feats of computing expertise. All you will need is a basic computer literacy (i.e. an understanding of what a filesystem and directory are, and a degree of comfort in the settings menu) and a willingness to learn a thing or two. While this guide may look overwhelming at first glance, it is only because I want to be as thorough as possible. I want you to understand exactly what it is you're doing, I don't want you to just blindly follow steps. If you half-way know what you’re doing, you will be much better prepared if you ever need to troubleshoot.
Honestly, once you have all the hardware ready it shouldn't take more than an afternoon or two to get everything up and running.
(This tutorial is just shy of seven thousand words long so the rest is under the cut.)
Step One: Choosing Your Hardware
Linux is a light weight operating system, depending on the distribution there's close to no bloat. There are recent distributions available at this very moment that will run perfectly fine on a fourteen year old i3 with 4GB of RAM. Moreover, running Plex or Jellyfin isn’t resource intensive in 90% of use cases. All this is to say, we don’t require an expensive or powerful computer. This means that there are several options available: 1) use an old computer you already have sitting around but aren't using 2) buy a used workstation from eBay, or what I believe to be the best option, 3) order an N100 Mini-PC from AliExpress or Amazon.
Note: If you already have an old PC sitting around that you’ve decided to use, fantastic, move on to the next step.
When weighing your options, keep a few things in mind: the number of people you expect to be streaming simultaneously at any one time, the resolution and bitrate of your media library (4k video takes a lot more processing power than 1080p) and most importantly, how many of those clients are going to be transcoding at any one time. Transcoding is what happens when the playback device does not natively support direct playback of the source file. This can happen for a number of reasons, such as the playback device's native resolution being lower than the file's internal resolution, or because the source file was encoded in a video codec unsupported by the playback device.
Ideally we want any transcoding to be performed by hardware. This means we should be looking for a computer with an Intel processor with Quick Sync. Quick Sync is a dedicated core on the CPU die designed specifically for video encoding and decoding. This specialized hardware makes for highly efficient transcoding both in terms of processing overhead and power draw. Without these Quick Sync cores, transcoding must be brute forced through software. This takes up much more of a CPU’s processing power and requires much more energy. But not all Quick Sync cores are created equal and you need to keep this in mind if you've decided either to use an old computer or to shop for a used workstation on eBay
Any Intel processor from second generation Core (Sandy Bridge circa 2011) onward has Quick Sync cores. It's not until 6th gen (Skylake), however, that the cores support the H.265 HEVC codec. Intel’s 10th gen (Comet Lake) processors introduce support for 10bit HEVC and HDR tone mapping. And the recent 12th gen (Alder Lake) processors brought with them hardware AV1 decoding. As an example, while an 8th gen (Kaby Lake) i5-8500 will be able to hardware transcode a H.265 encoded file, it will fall back to software transcoding if given a 10bit H.265 file. If you’ve decided to use that old PC or to look on eBay for an old Dell Optiplex keep this in mind.
Note 1: The price of old workstations varies wildly and fluctuates frequently. If you get lucky and go shopping shortly after a workplace has liquidated a large number of their workstations you can find deals for as low as $100 on a barebones system, but generally an i5-8500 workstation with 16gb RAM will cost you somewhere in the area of $260 CAD/$200 USD.
Note 2: The AMD equivalent to Quick Sync is called Video Core Next, and while it's fine, it's not as efficient and not as mature a technology. It was only introduced with the first generation Ryzen CPUs and it only got decent with their newest CPUs, we want something cheap.
Alternatively you could forgo having to keep track of what generation of CPU is equipped with Quick Sync cores that feature support for which codecs, and just buy an N100 mini-PC. For around the same price or less of a used workstation you can pick up a mini-PC with an Intel N100 processor. The N100 is a four-core processor based on the 12th gen Alder Lake architecture and comes equipped with the latest revision of the Quick Sync cores. These little processors offer astounding hardware transcoding capabilities for their size and power draw. Otherwise they perform equivalent to an i5-6500, which isn't a terrible CPU. A friend of mine uses an N100 machine as a dedicated retro emulation gaming system and it does everything up to 6th generation consoles just fine. The N100 is also a remarkably efficient chip, it sips power. In fact, the difference between running one of these and an old workstation could work out to hundreds of dollars a year in energy bills depending on where you live.
You can find these Mini-PCs all over Amazon or for a little cheaper on AliExpress. They range in price from $170 CAD/$125 USD for a no name N100 with 8GB RAM to $280 CAD/$200 USD for a Beelink S12 Pro with 16GB RAM. The brand doesn't really matter, they're all coming from the same three factories in Shenzen, go for whichever one fits your budget or has features you want. 8GB RAM should be enough, Linux is lightweight and Plex only calls for 2GB RAM. 16GB RAM might result in a slightly snappier experience, especially with ZFS. A 256GB SSD is more than enough for what we need as a boot drive, but going for a bigger drive might allow you to get away with things like creating preview thumbnails for Plex, but it’s up to you and your budget.
The Mini-PC I wound up buying was a Firebat AK2 Plus with 8GB RAM and a 256GB SSD. It looks like this:

Note: Be forewarned that if you decide to order a Mini-PC from AliExpress, note the type of power adapter it ships with. The mini-PC I bought came with an EU power adapter and I had to supply my own North American power supply. Thankfully this is a minor issue as barrel plug 30W/12V/2.5A power adapters are easy to find and can be had for $10.
Step Two: Choosing Your Storage
Storage is the most important part of our build. It is also the most expensive. Thankfully it’s also the most easily upgrade-able down the line.
For people with a smaller media collection (4TB to 8TB), a more limited budget, or who will only ever have two simultaneous streams running, I would say that the most economical course of action would be to buy a USB 3.0 8TB external HDD. Something like this one from Western Digital or this one from Seagate. One of these external drives will cost you in the area of $200 CAD/$140 USD. Down the line you could add a second external drive or replace it with a multi-drive RAIDz set up such as detailed below.
If a single external drive the path for you, move on to step three.
For people with larger media libraries (12TB+), who prefer media in 4k, or care who about data redundancy, the answer is a RAID array featuring multiple HDDs in an enclosure.
Note: If you are using an old PC or used workstatiom as your server and have the room for at least three 3.5" drives, and as many open SATA ports on your mother board you won't need an enclosure, just install the drives into the case. If your old computer is a laptop or doesn’t have room for more internal drives, then I would suggest an enclosure.
The minimum number of drives needed to run a RAIDz array is three, and seeing as RAIDz is what we will be using, you should be looking for an enclosure with three to five bays. I think that four disks makes for a good compromise for a home server. Regardless of whether you go for a three, four, or five bay enclosure, do be aware that in a RAIDz array the space equivalent of one of the drives will be dedicated to parity at a ratio expressed by the equation 1 − 1/n i.e. in a four bay enclosure equipped with four 12TB drives, if we configured our drives in a RAIDz1 array we would be left with a total of 36TB of usable space (48TB raw size). The reason for why we might sacrifice storage space in such a manner will be explained in the next section.
A four bay enclosure will cost somewhere in the area of $200 CDN/$140 USD. You don't need anything fancy, we don't need anything with hardware RAID controls (RAIDz is done entirely in software) or even USB-C. An enclosure with USB 3.0 will perform perfectly fine. Don’t worry too much about USB speed bottlenecks. A mechanical HDD will be limited by the speed of its mechanism long before before it will be limited by the speed of a USB connection. I've seen decent looking enclosures from TerraMaster, Yottamaster, Mediasonic and Sabrent.
When it comes to selecting the drives, as of this writing, the best value (dollar per gigabyte) are those in the range of 12TB to 20TB. I settled on 12TB drives myself. If 12TB to 20TB drives are out of your budget, go with what you can afford, or look into refurbished drives. I'm not sold on the idea of refurbished drives but many people swear by them.
When shopping for harddrives, search for drives designed specifically for NAS use. Drives designed for NAS use typically have better vibration dampening and are designed to be active 24/7. They will also often make use of CMR (conventional magnetic recording) as opposed to SMR (shingled magnetic recording). This nets them a sizable read/write performance bump over typical desktop drives. Seagate Ironwolf and Toshiba NAS are both well regarded brands when it comes to NAS drives. I would avoid Western Digital Red drives at this time. WD Reds were a go to recommendation up until earlier this year when it was revealed that they feature firmware that will throw up false SMART warnings telling you to replace the drive at the three year mark quite often when there is nothing at all wrong with that drive. It will likely even be good for another six, seven, or more years.

Step Three: Installing Linux
For this step you will need a USB thumbdrive of at least 6GB in capacity, an .ISO of Ubuntu, and a way to make that thumbdrive bootable media.
First download a copy of Ubuntu desktop (for best performance we could download the Server release, but for new Linux users I would recommend against the server release. The server release is strictly command line interface only, and having a GUI is very helpful for most people. Not many people are wholly comfortable doing everything through the command line, I'm certainly not one of them, and I grew up with DOS 6.0. 22.04.3 Jammy Jellyfish is the current Long Term Service release, this is the one to get.
Download the .ISO and then download and install balenaEtcher on your Windows PC. BalenaEtcher is an easy to use program for creating bootable media, you simply insert your thumbdrive, select the .ISO you just downloaded, and it will create a bootable installation media for you.
Once you've made a bootable media and you've got your Mini-PC (or you old PC/used workstation) in front of you, hook it directly into your router with an ethernet cable, and then plug in the HDD enclosure, a monitor, a mouse and a keyboard. Now turn that sucker on and hit whatever key gets you into the BIOS (typically ESC, DEL or F2). If you’re using a Mini-PC check to make sure that the P1 and P2 power limits are set correctly, my N100's P1 limit was set at 10W, a full 20W under the chip's power limit. Also make sure that the RAM is running at the advertised speed. My Mini-PC’s RAM was set at 2333Mhz out of the box when it should have been 3200Mhz. Once you’ve done that, key over to the boot order and place the USB drive first in the boot order. Then save the BIOS settings and restart.
After you restart you’ll be greeted by Ubuntu's installation screen. Installing Ubuntu is really straight forward, select the "minimal" installation option, as we won't need anything on this computer except for a browser (Ubuntu comes preinstalled with Firefox) and Plex Media Server/Jellyfin Media Server. Also remember to delete and reformat that Windows partition! We don't need it.
Step Four: Installing ZFS and Setting Up the RAIDz Array
Note: If you opted for just a single external HDD skip this step and move onto setting up a Samba share.
Once Ubuntu is installed it's time to configure our storage by installing ZFS to build our RAIDz array. ZFS is a "next-gen" file system that is both massively flexible and massively complex. It's capable of snapshot backup, self healing error correction, ZFS pools can be configured with drives operating in a supplemental manner alongside the storage vdev (e.g. fast cache, dedicated secondary intent log, hot swap spares etc.). It's also a file system very amenable to fine tuning. Block and sector size are adjustable to use case and you're afforded the option of different methods of inline compression. If you'd like a very detailed overview and explanation of its various features and tips on tuning a ZFS array check out these articles from Ars Technica. For now we're going to ignore all these features and keep it simple, we're going to pull our drives together into a single vdev running in RAIDz which will be the entirety of our zpool, no fancy cache drive or SLOG.
Open up the terminal and type the following commands:
sudo apt update
then
sudo apt install zfsutils-linux
This will install the ZFS utility. Verify that it's installed with the following command:
zfs --version
Now, it's time to check that the HDDs we have in the enclosure are healthy, running, and recognized. We also want to find out their device IDs and take note of them:
sudo fdisk -1
Note: You might be wondering why some of these commands require "sudo" in front of them while others don't. "Sudo" is short for "super user do”. When and where "sudo" is used has to do with the way permissions are set up in Linux. Only the "root" user has the access level to perform certain tasks in Linux. As a matter of security and safety regular user accounts are kept separate from the "root" user. It's not advised (or even possible) to boot into Linux as "root" with most modern distributions. Instead by using "sudo" our regular user account is temporarily given the power to do otherwise forbidden things. Don't worry about it too much at this stage, but if you want to know more check out this introduction.
If everything is working you should get a list of the various drives detected along with their device IDs which will look like this: /dev/sdc. You can also check the device IDs of the drives by opening the disk utility app. Jot these IDs down as we'll need them for our next step, creating our RAIDz array.
RAIDz is similar to RAID-5 in that instead of striping your data over multiple disks, exchanging redundancy for speed and available space (RAID-0), or mirroring your data writing by two copies of every piece (RAID-1), it instead writes parity blocks across the disks in addition to striping, this provides a balance of speed, redundancy and available space. If a single drive fails, the parity blocks on the working drives can be used to reconstruct the entire array as soon as a replacement drive is added.
Additionally, RAIDz improves over some of the common RAID-5 flaws. It's more resilient and capable of self healing, as it is capable of automatically checking for errors against a checksum. It's more forgiving in this way, and it's likely that you'll be able to detect when a drive is dying well before it fails. A RAIDz array can survive the loss of any one drive.
Note: While RAIDz is indeed resilient, if a second drive fails during the rebuild, you're fucked. Always keep backups of things you can't afford to lose. This tutorial, however, is not about proper data safety.
To create the pool, use the following command:
sudo zpool create "zpoolnamehere" raidz "device IDs of drives we're putting in the pool"
For example, let's creatively name our zpool "mypool". This poil will consist of four drives which have the device IDs: sdb, sdc, sdd, and sde. The resulting command will look like this:
sudo zpool create mypool raidz /dev/sdb /dev/sdc /dev/sdd /dev/sde
If as an example you bought five HDDs and decided you wanted more redundancy dedicating two drive to this purpose, we would modify the command to "raidz2" and the command would look something like the following:
sudo zpool create mypool raidz2 /dev/sdb /dev/sdc /dev/sdd /dev/sde /dev/sdf
An array configured like this is known as RAIDz2 and is able to survive two disk failures.
Once the zpool has been created, we can check its status with the command:
zpool status
Or more concisely with:
zpool list
The nice thing about ZFS as a file system is that a pool is ready to go immediately after creation. If we were to set up a traditional RAID-5 array using mbam, we'd have to sit through a potentially hours long process of reformatting and partitioning the drives. Instead we're ready to go right out the gates.
The zpool should be automatically mounted to the filesystem after creation, check on that with the following:
df -hT | grep zfs
Note: If your computer ever loses power suddenly, say in event of a power outage, you may have to re-import your pool. In most cases, ZFS will automatically import and mount your pool, but if it doesn’t and you can't see your array, simply open the terminal and type sudo zpool import -a.
By default a zpool is mounted at /"zpoolname". The pool should be under our ownership but let's make sure with the following command:
sudo chown -R "yourlinuxusername" /"zpoolname"
Note: Changing file and folder ownership with "chown" and file and folder permissions with "chmod" are essential commands for much of the admin work in Linux, but we won't be dealing with them extensively in this guide. If you'd like a deeper tutorial and explanation you can check out these two guides: chown and chmod.

You can access the zpool file system through the GUI by opening the file manager (the Ubuntu default file manager is called Nautilus) and clicking on "Other Locations" on the sidebar, then entering the Ubuntu file system and looking for a folder with your pool's name. Bookmark the folder on the sidebar for easy access.

Your storage pool is now ready to go. Assuming that we already have some files on our Windows PC we want to copy to over, we're going to need to install and configure Samba to make the pool accessible in Windows.
Step Five: Setting Up Samba/Sharing
Samba is what's going to let us share the zpool with Windows and allow us to write to it from our Windows machine. First let's install Samba with the following commands:
sudo apt-get update
then
sudo apt-get install samba
Next create a password for Samba.
sudo smbpswd -a "yourlinuxusername"
It will then prompt you to create a password. Just reuse your Ubuntu user password for simplicity's sake.
Note: if you're using just a single external drive replace the zpool location in the following commands with wherever it is your external drive is mounted, for more information see this guide on mounting an external drive in Ubuntu.
After you've created a password we're going to create a shareable folder in our pool with this command
mkdir /"zpoolname"/"foldername"
Now we're going to open the smb.conf file and make that folder shareable. Enter the following command.
sudo nano /etc/samba/smb.conf
This will open the .conf file in nano, the terminal text editor program. Now at the end of smb.conf add the following entry:
["foldername"]
path = /"zpoolname"/"foldername"
available = yes
valid users = "yourlinuxusername"
read only = no
writable = yes
browseable = yes
guest ok = no
Ensure that there are no line breaks between the lines and that there's a space on both sides of the equals sign. Our next step is to allow Samba traffic through the firewall:
sudo ufw allow samba
Finally restart the Samba service:
sudo systemctl restart smbd
At this point we'll be able to access to the pool, browse its contents, and read and write to it from Windows. But there's one more thing left to do, Windows doesn't natively support the ZFS file systems and will read the used/available/total space in the pool incorrectly. Windows will read available space as total drive space, and all used space as null. This leads to Windows only displaying a dwindling amount of "available" space as the drives are filled. We can fix this! Functionally this doesn't actually matter, we can still write and read to and from the disk, it just makes it difficult to tell at a glance the proportion of used/available space, so this is an optional step but one I recommend (this step is also unnecessary if you're just using a single external drive). What we're going to do is write a little shell script in #bash. Open nano with the terminal with the command:
nano
Now insert the following code:
#!/bin/bash CUR_PATH=`pwd` ZFS_CHECK_OUTPUT=$(zfs get type $CUR_PATH 2>&1 > /dev/null) > /dev/null if [[ $ZFS_CHECK_OUTPUT == *not\ a\ ZFS* ]] then IS_ZFS=false else IS_ZFS=true fi if [[ $IS_ZFS = false ]] then df $CUR_PATH | tail -1 | awk '{print $2" "$4}' else USED=$((`zfs get -o value -Hp used $CUR_PATH` / 1024)) > /dev/null AVAIL=$((`zfs get -o value -Hp available $CUR_PATH` / 1024)) > /dev/null TOTAL=$(($USED+$AVAIL)) > /dev/null echo $TOTAL $AVAIL fi
Save the script as "dfree.sh" to /home/"yourlinuxusername" then change the ownership of the file to make it executable with this command:
sudo chmod 774 dfree.sh
Now open smb.conf with sudo again:
sudo nano /etc/samba/smb.conf
Now add this entry to the top of the configuration file to direct Samba to use the results of our script when Windows asks for a reading on the pool's used/available/total drive space:
[global]
dfree command = /home/"yourlinuxusername"/dfree.sh
Save the changes to smb.conf and then restart Samba again with the terminal:
sudo systemctl restart smbd
Now there’s one more thing we need to do to fully set up the Samba share, and that’s to modify a hidden group permission. In the terminal window type the following command:
usermod -a -G sambashare “yourlinuxusername”
Then restart samba again:
sudo systemctl restart smbd
If we don’t do this last step, everything will appear to work fine, and you will even be able to see and map the drive from Windows and even begin transferring files, but you'd soon run into a lot of frustration. As every ten minutes or so a file would fail to transfer and you would get a window announcing “0x8007003B Unexpected Network Error”. This window would require your manual input to continue the transfer with the file next in the queue. And at the end it would reattempt to transfer whichever files failed the first time around. 99% of the time they’ll go through that second try, but this is still all a major pain in the ass. Especially if you’ve got a lot of data to transfer or you want to step away from the computer for a while.
It turns out samba can act a little weirdly with the higher read/write speeds of RAIDz arrays and transfers from Windows, and will intermittently crash and restart itself if this group option isn’t changed. Inputting the above command will prevent you from ever seeing that window.
The last thing we're going to do before switching over to our Windows PC is grab the IP address of our Linux machine. Enter the following command:
hostname -I
This will spit out this computer's IP address on the local network (it will look something like 192.168.0.x), write it down. It might be a good idea once you're done here to go into your router settings and reserving that IP for your Linux system in the DHCP settings. Check the manual for your specific model router on how to access its settings, typically it can be accessed by opening a browser and typing http:\\192.168.0.1 in the address bar, but your router may be different.
Okay we’re done with our Linux computer for now. Get on over to your Windows PC, open File Explorer, right click on Network and click "Map network drive". Select Z: as the drive letter (you don't want to map the network drive to a letter you could conceivably be using for other purposes) and enter the IP of your Linux machine and location of the share like so: \\"LINUXCOMPUTERLOCALIPADDRESSGOESHERE"\"zpoolnamegoeshere"\. Windows will then ask you for your username and password, enter the ones you set earlier in Samba and you're good. If you've done everything right it should look something like this:

You can now start moving media over from Windows to the share folder. It's a good idea to have a hard line running to all machines. Moving files over Wi-Fi is going to be tortuously slow, the only thing that’s going to make the transfer time tolerable (hours instead of days) is a solid wired connection between both machines and your router.
Step Six: Setting Up Remote Desktop Access to Your Server
After the server is up and going, you’ll want to be able to access it remotely from Windows. Barring serious maintenance/updates, this is how you'll access it most of the time. On your Linux system open the terminal and enter:
sudo apt install xrdp
Then:
sudo systemctl enable xrdp
Once it's finished installing, open “Settings” on the sidebar and turn off "automatic login" in the User category. Then log out of your account. Attempting to remotely connect to your Linux computer while you’re logged in will result in a black screen!
Now get back on your Windows PC, open search and look for "RDP". A program called "Remote Desktop Connection" should pop up, open this program as an administrator by right-clicking and selecting “run as an administrator”. You’ll be greeted with a window. In the field marked “Computer” type in the IP address of your Linux computer. Press connect and you'll be greeted with a new window and prompt asking for your username and password. Enter your Ubuntu username and password here.

If everything went right, you’ll be logged into your Linux computer. If the performance is sluggish, adjust the display options. Lowering the resolution and colour depth do a lot to make the interface feel snappier.

Remote access is how we're going to be using our Linux system from now, barring edge cases like needing to get into the BIOS or upgrading to a new version of Ubuntu. Everything else from performing maintenance like a monthly zpool scrub to checking zpool status and updating software can all be done remotely.

This is how my server lives its life now, happily humming and chirping away on the floor next to the couch in a corner of the living room.
Step Seven: Plex Media Server/Jellyfin
Okay we’ve got all the ground work finished and our server is almost up and running. We’ve got Ubuntu up and running, our storage array is primed, we’ve set up remote connections and sharing, and maybe we’ve moved over some of favourite movies and TV shows.
Now we need to decide on the media server software to use which will stream our media to us and organize our library. For most people I’d recommend Plex. It just works 99% of the time. That said, Jellyfin has a lot to recommend it by too, even if it is rougher around the edges. Some people run both simultaneously, it’s not that big of an extra strain. I do recommend doing a little bit of your own research into the features each platform offers, but as a quick run down, consider some of the following points:
Plex is closed source and is funded through PlexPass purchases while Jellyfin is open source and entirely user driven. This means a number of things: for one, Plex requires you to purchase a “PlexPass” (purchased as a one time lifetime fee $159.99 CDN/$120 USD or paid for on a monthly or yearly subscription basis) in order to access to certain features, like hardware transcoding (and we want hardware transcoding) or automated intro/credits detection and skipping, Jellyfin offers some of these features for free through plugins. Plex supports a lot more devices than Jellyfin and updates more frequently. That said, Jellyfin's Android and iOS apps are completely free, while the Plex Android and iOS apps must be activated for a one time cost of $6 CDN/$5 USD. But that $6 fee gets you a mobile app that is much more functional and features a unified UI across platforms, the Plex mobile apps are simply a more polished experience. The Jellyfin apps are a bit of a mess and the iOS and Android versions are very different from each other.
Jellyfin’s actual media player is more fully featured than Plex's, but on the other hand Jellyfin's UI, library customization and automatic media tagging really pale in comparison to Plex. Streaming your music library is free through both Jellyfin and Plex, but Plex offers the PlexAmp app for dedicated music streaming which boasts a number of fantastic features, unfortunately some of those fantastic features require a PlexPass. If your internet is down, Jellyfin can still do local streaming, while Plex can fail to play files unless you've got it set up a certain way. Jellyfin has a slew of neat niche features like support for Comic Book libraries with the .cbz/.cbt file types, but then Plex offers some free ad-supported TV and films, they even have a free channel that plays nothing but Classic Doctor Who.
Ultimately it's up to you, I settled on Plex because although some features are pay-walled, it just works. It's more reliable and easier to use, and a one-time fee is much easier to swallow than a subscription. I had a pretty easy time getting my boomer parents and tech illiterate brother introduced to and using Plex and I don't know if I would've had as easy a time doing that with Jellyfin. I do also need to mention that Jellyfin does take a little extra bit of tinkering to get going in Ubuntu, you’ll have to set up process permissions, so if you're more tolerant to tinkering, Jellyfin might be up your alley and I’ll trust that you can follow their installation and configuration guide. For everyone else, I recommend Plex.
So pick your poison: Plex or Jellyfin.
Note: The easiest way to download and install either of these packages in Ubuntu is through Snap Store.
After you've installed one (or both), opening either app will launch a browser window into the browser version of the app allowing you to set all the options server side.
The process of adding creating media libraries is essentially the same in both Plex and Jellyfin. You create a separate libraries for Television, Movies, and Music and add the folders which contain the respective types of media to their respective libraries. The only difficult or time consuming aspect is ensuring that your files and folders follow the appropriate naming conventions:
Plex naming guide for Movies
Plex naming guide for Television
Jellyfin follows the same naming rules but I find their media scanner to be a lot less accurate and forgiving than Plex. Once you've selected the folders to be scanned the service will scan your files, tagging everything and adding metadata. Although I find do find Plex more accurate, it can still erroneously tag some things and you might have to manually clean up some tags in a large library. (When I initially created my library it tagged the 1963-1989 Doctor Who as some Korean soap opera and I needed to manually select the correct match after which everything was tagged normally.) It can also be a bit testy with anime (especially OVAs) be sure to check TVDB to ensure that you have your files and folders structured and named correctly. If something is not showing up at all, double check the name.
Once that's done, organizing and customizing your library is easy. You can set up collections, grouping items together to fit a theme or collect together all the entries in a franchise. You can make playlists, and add custom artwork to entries. It's fun setting up collections with posters to match, there are even several websites dedicated to help you do this like PosterDB. As an example, below are two collections in my library, one collecting all the entries in a franchise, the other follows a theme.

My Star Trek collection, featuring all eleven television series, and thirteen films.

My Best of the Worst collection, featuring sixty-nine films previously showcased on RedLetterMedia’s Best of the Worst. They’re all absolutely terrible and I love them.
As for settings, ensure you've got Remote Access going, it should work automatically and be sure to set your upload speed after running a speed test. In the library settings set the database cache to 2000MB to ensure a snappier and more responsive browsing experience, and then check that playback quality is set to original/maximum. If you’re severely bandwidth limited on your upload and have remote users, you might want to limit the remote stream bitrate to something more reasonable, just as a note of comparison Netflix’s 1080p bitrate is approximately 5Mbps, although almost anyone watching through a chromium based browser is streaming at 720p and 3mbps. Other than that you should be good to go. For actually playing your files, there's a Plex app for just about every platform imaginable. I mostly watch television and films on my laptop using the Windows Plex app, but I also use the Android app which can broadcast to the chromecast connected to the TV in the office and the Android TV app for our smart TV. Both are fully functional and easy to navigate, and I can also attest to the OS X version being equally functional.
Part Eight: Finding Media
Now, this is not really a piracy tutorial, there are plenty of those out there. But if you’re unaware, BitTorrent is free and pretty easy to use, just pick a client (qBittorrent is the best) and go find some public trackers to peruse. Just know now that all the best trackers are private and invite only, and that they can be exceptionally difficult to get into. I’m already on a few, and even then, some of the best ones are wholly out of my reach.
If you decide to take the left hand path and turn to Usenet you’ll have to pay. First you’ll need to sign up with a provider like Newshosting or EasyNews for access to Usenet itself, and then to actually find anything you’re going to need to sign up with an indexer like NZBGeek or NZBFinder. There are dozens of indexers, and many people cross post between them, but for more obscure media it’s worth checking multiple. You’ll also need a binary downloader like SABnzbd. That caveat aside, Usenet is faster, bigger, older, less traceable than BitTorrent, and altogether slicker. I honestly prefer it, and I'm kicking myself for taking this long to start using it because I was scared off by the price. I’ve found so many things on Usenet that I had sought in vain elsewhere for years, like a 2010 Italian film about a massacre perpetrated by the SS that played the festival circuit but never received a home media release; some absolute hero uploaded a rip of a festival screener DVD to Usenet. Anyway, figure out the rest of this shit on your own and remember to use protection, get yourself behind a VPN, use a SOCKS5 proxy with your BitTorrent client, etc.
On the legal side of things, if you’re around my age, you (or your family) probably have a big pile of DVDs and Blu-Rays sitting around unwatched and half forgotten. Why not do a bit of amateur media preservation, rip them and upload them to your server for easier access? (Your tools for this are going to be Handbrake to do the ripping and AnyDVD to break any encryption.) I went to the trouble of ripping all my SCTV DVDs (five box sets worth) because none of it is on streaming nor could it be found on any pirate source I tried. I’m glad I did, forty years on it’s still one of the funniest shows to ever be on TV.
Part Nine/Epilogue: Sonarr/Radarr/Lidarr and Overseerr
There are a lot of ways to automate your server for better functionality or to add features you and other users might find useful. Sonarr, Radarr, and Lidarr are a part of a suite of “Servarr” services (there’s also Readarr for books and Whisparr for adult content) that allow you to automate the collection of new episodes of TV shows (Sonarr), new movie releases (Radarr) and music releases (Lidarr). They hook in to your BitTorrent client or Usenet binary newsgroup downloader and crawl your preferred Torrent trackers and Usenet indexers, alerting you to new releases and automatically grabbing them. You can also use these services to manually search for new media, and even replace/upgrade your existing media with better quality uploads. They’re really a little tricky to set up on a bare metal Ubuntu install (ideally you should be running them in Docker Containers), and I won’t be providing a step by step on installing and running them, I’m simply making you aware of their existence.
The other bit of kit I want to make you aware of is Overseerr which is a program that scans your Plex media library and will serve recommendations based on what you like. It also allows you and your users to request specific media. It can even be integrated with Sonarr/Radarr/Lidarr so that fulfilling those requests is fully automated.
And you're done. It really wasn't all that hard. Enjoy your media. Enjoy the control you have over that media. And be safe in the knowledge that no hedgefund CEO motherfucker who hates the movies but who is somehow in control of a major studio will be able to disappear anything in your library as a tax write-off.
1K notes
·
View notes
Text
Peacock Planet Chapter 2 Page 19

"This is Zeta."
The payphone burrs in my ear, information shot through with static and sparse noise. Info lines don't repeat what they say, it's all an automated recording. I commit the addresses to memory as the tape plays and hope the static doesn't take out any vital parts of the message.
#peacock planet#webcomic#comics on tumblr#peacock planet page#chapter 2#psychic art#surrealist art#surreal art#psychedelic art#cuba
3 notes
·
View notes
Text
We need to have an honest conversation about automated censorship.
My son, who's ten, has wanted to share facts about the animal kingdom and made videos we shared on tiktok. Two of them have been censored and their appeal has been denied.
I'll share the videos.
First is a video about peacock feathers.
-This ban is fine right? We should have community guidelines that forbid the use of cock right? There is no way kids would need a way to access information about their body in a safe way, they should learn all that in school or ask a professional, they can all do that right? And besides birdnames are really pornographic in nature, that's hilarious, why would they name something big breasted tits and cock something? They obviously were horny and we can't have kids learn about things in nature that were discovered by horny people, right? /s
The second is a video about how female ostriches steal eggs from other nests.
-Robbery is a felony and kids should obviously be shielded from crime, punishable offenses is not something kids should see on the internet and it really is a good thing to censor something like that right? The language around crime should apply to humans and not nature, the ostrich isn't a thief and hasn't committed a crime. Why don't they call it something else, like some abstract detached science name so it's not confusing for kids? Besides there is no need for kids to know about crime, otherwise they'll just start committing them! Right? /s
The third video that was censored was a video we made from a tiktok template, you fill in the clips you want and the template adds the sound made from Dr. Dre's song, Still D.R.E. So thinking this would be acceptable we added the usual text and hashtags we've been using.
The fourth one was because using an animated sticker of a fox reading a book to cover my game of thrones t-shirt that read 'All men must die' which I thought was poor taste of me to show, I thought I would be facing the child more and the text wouldn't be as visible. Hence I self censored and with good reason, to hide something in poor taste that wasn't fitting for kids. However the fox in question (not available in the stickers catalog it seems so I replaced it for the next closest sticker) was over my chest. So the the red orange moving ears must have been automatically flag as nudity. So I tried changing my type of censorship and made it into white text on black background with the words 'reading is the best'. Same hashtags, hundreds of views immediately.
Reposting these banned videos on Instagram and no obvious censorship, our followers at least got to see it.
*we wrote peacock, the caption was altered without our consent
#censorship#tiktoks#tiktok#náttúruval#crowdfunding#card games#animals#nature#science#animal facts#card game design#gamefound#indie games#tiktok trend#instagram
6 notes
·
View notes
Note
how they show they love their s/o?
cuddles: this guy is like a peacock. he becomes the BIGGEST show off, going out of his way to try and impress his s/o
giggles: huge on physical touch and compliments. more often than not, she'll be wrapped around her partner's arm, showering them with praise
toothy: he shows affection by spending time with his partner. they don't have to be doing anything, they can just be in the same room while both of them do their own thing, but the important part is that they're together
petunia: she shows she cares by letting her s/o take care of things sometimes. she usually wants to be the one who takes care of everything so she Knows it's done to her standard, so for her to step back and let her partner do it instead is a huge show of trust for her
handy: 1000% an acts of service guy. he likes to do things for the few people he actually likes, and his lover is no exception
nutty: if he shares his candy with someone, they should feel like they just got proposed to, because that's pretty much what that is to him. he has to LOVE love someone to be willing to share.
sniffles: he shows affection by making things that will make his s/o's life easier, or at least they're meant to. do they really need all these different gadgets that automate the household chores? not really, but sniffles builds them anyway, in hopes that his love will have one less burden on their shoulders
pop: the concept food as a love language will never be portrayed better than it is by him. pop's s/o will never, EVER go hungry on his watch
flaky: they always feel like they're not doing enough to show it, but it's obvious in the way they're always finding books and newspapers articles and songs that remind them of their partner, and sending them to them straight away
mole: he's not much for the obvious shows of affection, but there's no doubt about his feelings when he reaches out to take his partner's hand
disco bear: goes for the classic grand gestures. roses and chocolates, big shopping sprees, all the bells and whistles
russell: he's another one who just wants to spend good quality time with his partner
lifty: king of "this made me think of you so i bought it for you". although, half the time "bought" usually actually means "stole", but yknow. same difference, right?
shifty: he wants nothing more than to show off his partner and let everyone know that this one is HIS!!! whenever they're in public together, he has an arm across their shoulder, or around their waist, or something. clingy little beast
mime: his partner will get more types of balloon creations than they could possibly imagine existing. his performances will also get decidedly more targeted
flippy: champion baker over here! his partner will never leave his house without at least one batch of cookies
lammy: she makes sure her partner is warm and cozy before anything else. there's a noticable increase in blankets in their house, all gifts from her
splendid: also a grand gestures guy, but in the form of like. he'll straight up write his and his partners names in the sky somehow.
splendont: shows he cares by being protective. his partner will always be safe under his watch, if he has anything to say about it
2 notes
·
View notes
Text
I have tried it to see what the hype was about. It was fun messing with ChatGPT and seeing it generate absolute nonsense. But as it got popular, particularly for AI fanfiction, it came to completely disgust me.
Similarly, I tried to generate this alt peacock fursona design using the Microsoft AI, with the intention of maybe using it as a proof of concept for later commissioning someone. But none of the results I really liked enough so I just got the artist to design it from scratch for me.
I don't like the push to use AI to automate away creative workers but it is good to know what this technology is and experience its limitations first hand, I'd say.
This poll is asking about voluntary use of generative AI. For the purposes of this poll, do not count instances where you were required to use generative AI (e.g. for a school assignment, job required it, etc).
We ask your questions anonymously so you don’t have to! Submissions are open on the 1st and 15th of the month.
3K notes
·
View notes
Text
The Symbolism Behind Popular Dhokra Motifs and Designs
There is metal-and then there is memory melted into metal. But what if metal could speak in symbols? What if every curve, every contour, every crafted figure in brass wasn’t just a design, but a message from another time? In the tribal heartlands of India, this isn't hypothetical-it is a lived tradition. Dhokra art, with its roots stretching over 4,000 years, does just that. It transforms molten metal into timeless metaphors. But have we ever paused to ask-what do these motifs truly mean? Why do artisans sculpt elephants, peacocks, turtles, or dancing tribal couples, again and again, across generations? Are they merely decorative, or are they coded memories, holding belief, ritual, and legacy?
In a world where art often imitates trends, Dhokra stands apart-because it doesn’t imitate. It remembers. Each motif is a visual archive, forged not just by heat, but by heritage.
The Motif is the Message
Unlike industrial sculpture or contemporary d��cor, Dhokra motifs are not mass-born. They emerge from tribal memory-stories passed down orally, not written. The elephant in a Dhokra piece isn’t merely a decorative icon; it represents royalty, wisdom, and protective strength. The fish, often seen on pendants and home décor items, is symbolic of fertility, abundance, and water-the lifeline of all living things.
You may see peacocks in intricate patterns. They aren’t just elegant birds here-they signal courtship, monsoon joy, and cultural dance. Even the humble turtle is more than a figure-it symbolises longevity and cosmic order in tribal belief. These are not symbols borrowed; they are symbols believed.
From Fire to Form: Meaning Moulded in Wax
The lost-wax process-or cire perdue-used in Dhokra is a ritualistic transformation of thought into form. The artisan creates a wax model, wraps it in clay, fires it, and pours molten metal into its cavity. But this isn’t just about material shift. What’s poured in is not just brass-it is hope, memory, and the artisan’s vision of the world. That’s why no two Dhokra pieces are identical. The uniqueness is not a technical flaw; it is an emotional signature.
Cultural Codes in Metal
In tribal philosophy, everything in nature is alive, worthy of reverence. Dhokra captures that. Musicians, dancers, tribal couples, bulls, birds, sunbursts-they are all part of a symbolic ecosystem. These motifs are used to mark life events-birth, marriage, harvest, and ritual. Every symbol carries a code.
In fact, Dhokra figurines of the mother goddess or ancestral spirits are placed in homes not for aesthetics, but for protection and blessings. The very act of crafting them is a spiritual offering, not a commercial task.
A Relevance Carved in 2025
Today, as the design world shifts from mindless minimalism to meaningful heritage, Dhokra gains renewed relevance. For luxury brands, it offers rooted design language. For corporates, it represents sustainability, authenticity, and handcrafted truth. For consumers, it is a chance to connect not with a product, but with a philosophy. In a time dominated by AI and automation, what stands out is the touch of the human hand-unreplicable, unrepeatable. That’s where Dhokra’s power lies. Its motifs are reminders of a slower world, where meaning came before marketing.
A Living Lens into Dhokra Traditions
To witness how these traditions still breathe today, explore this insightful documentary:
youtube
This powerful feature captures the process, purpose, and philosophy of Dhokra artisans as they pass down techniques with bare hands and burning hearts. A vivid look into how artisans encode symbolism into every casted creation, it’s a must-watch for anyone who values meaning in design.
Why Should We Care About Symbols?
Because symbols outlive time. Because in a world obsessed with smart, fast, and new, there is immense value in slow, rooted, and wise. Because Dhokra isn’t just art. It’s anthropology, spirituality, and design thinking-melded in metal.
And perhaps, the next time someone glances at a brass deer, they won’t just see a product—they’ll see a memory, a legacy, and a message that transcends trend.
#dhokra art#dhokra products#dhokra handicrafts#dhokra#dhokra handcrafted products#home decor products#Youtube
0 notes
Text

💻 Simplify Your Billing. Power Your Business!
Peacock Design Solutions offers custom billing software tailored to your business needs. From automated invoicing to real-time reports and GST-ready billing, we build user-friendly systems that save you time and boost accuracy.
✅ Easy to Use ✅ Secure & Scalable ✅ Suitable for Retail, Services, and Wholesale ✅ Desktop, Cloud & Mobile Options
📈 Whether you're a startup or an enterprise, get software that grows with you. 💬 Contact us today to develop or upgrade your billing system!
📍 Chennai | ���� www.peacockdesignsolutions.com
#billingsoftware#softwaredevelopment#billingsoftwaresales#peacockdesignsolutions#chennaibusiness#hotelbillingsoftware#invoicesoftware#retailbillingsoftware
0 notes
Text
How to Embroider Anime Scenes on Jackets and Denim
Anime embroidery is taking the fashion and crafting world by storm. Whether you're an otaku with a flair for creativity or someone who loves fashion-forward DIY projects, embroidering anime scenes on jackets and denim is a powerful way to showcase your style. From popular anime characters to intricate backgrounds, adding these stunning visuals to your wardrobe can bring your favorite anime to life in vibrant thread.
This guide will walk you through everything you need to know—from choosing your design to executing the final stitch—whether you're working by hand or using a machine. Plus, we’ll explore how to use various anime designs, such as anime designs for T-shirts, anime designs flowers, anime designs patterns, and more, to personalize your denim projects.
1. Choosing the Right Anime Design for Your Denim
Before you thread your needle or hoop your fabric, you need to select the right anime design. The key is choosing a scene that complements your jacket or denim piece and resonates with your personal style.
Types of Anime Designs to Consider:
Anime designs pictures of popular characters like Naruto, Luffy, or Sailor Moon.
Anime designs flowers for Studio Ghibli-inspired nature scenes.
Anime designs peacock or fantasy elements to bring a rich, elegant look to the design.
Anime designs simple like chibi characters or minimal line art for a modern touch.
If you’re new to embroidery, start with anime designs simple or silhouettes. For intermediate or advanced crafters, opt for anime designs pattern that include detailed characters, action scenes, or layered backgrounds.
You can find anime designs by hand on Pinterest, embroidery forums, or Etsy. Many crafters also sell ready-to-use anime designs patterns that you can transfer onto your fabric.
2. Materials and Tools You’ll Need
To get started with anime embroidery on jackets or denim, you'll need to gather the right materials. Denim is a sturdy material, so you’ll require stronger needles and stabilizers.
Essentials:
Embroidery hoop (a large anime designs hoop is perfect for jackets)
Water-soluble fabric pen or tracing paper
Embroidery floss or machine thread in vibrant colors
Embroidery needles (for hand stitching)
Embroidery machine (for anime designs machine lovers)
Stabilizer (especially for machine embroidery)
Scissors
Denim or a jacket (preferably without a lining if working by hand)
Make sure your hoop is large enough to hold the portion of denim you're working on tightly. Embroidery hoops help keep your design taut and reduce puckering—especially important for anime designs on shirt or jackets.
3. Transferring the Anime Design onto Denim
Once you've picked your anime design, you’ll need to transfer it to your denim or jacket. There are a few common ways to do this, and the method may differ depending on whether you're stitching by hand or machine.
Methods for Transferring Designs:
Tracing: Use a fabric pen to trace the design onto the denim using a lightbox or window.
Iron-on transfers: Print the anime design pattern onto transfer paper and iron it onto your jacket.
Stabilizer method: Print the anime scene on a stabilizer sheet and stitch over it, then wash it away.
For anime designs blouse or anime designs dress, you might use a light fabric that allows more detailed tracing. Jackets and denim require a bolder outline due to the darker and thicker material.
Use high-resolution anime designs pictures or digital art as your base to maintain clarity and sharpness in your embroidery.
4. Stitching Techniques: Hand vs. Machine Embroidery
Now that your design is transferred, it's time to bring it to life with stitches. You can choose between anime designs by hand (traditional embroidery) or anime designs machine (automated embroidery).
Hand Embroidery
Hand embroidery gives you full control and is perfect for adding a personal touch.
Popular Hand Stitches for Anime Embroidery:
Backstitch: Great for outlining.
Satin stitch: Ideal for filling areas like hair or eyes.
Chain stitch: Common in anime designs chain stitch and borders.
French knots: Perfect for adding texture like stars, highlights, or sparkles.
Hand embroidery works well for small anime designs for handkerchief, anime designs border, or accessories like bags and patches. It's more time-consuming but gives your work a unique flair.
Machine Embroidery
If you have an embroidery machine, you can upload digital anime embroidery files directly.
Tips for Machine Embroidery on Denim:
Use a strong needle and stabilizer.
Test your design on a fabric scrap first.
Choose high-quality thread to bring out vibrant anime scenes.
Machine embroidery is perfect for commercial projects or if you're adding anime designs suit, anime designs on shirt, or large-scale anime designs pictures onto jackets.
5. Placement Ideas for Anime Embroidery on Denim
Embroidery placement can turn a plain denim piece into a wearable canvas. Think about how your design will be seen when worn.
Popular Placement Ideas:
Back panel of jackets: Great for full-scene anime designs patterns.
Front pocket: Subtle yet stylish; ideal for anime designs flowers or symbols.
Sleeves: Add small character faces or motifs using anime designs simple.
Cuffs and hems: Ideal for border or anime designs chain stitch detailing.
For anime designs suit or jackets with formal appeal, embroidery on the inside pocket or lapel adds a hidden surprise. Anime designs on shirt are popular in street fashion, and you can embroider around the collar or shoulders for a bold statement.
You can also mix and match designs—add a blouse-style anime designs border with characters or create a patch using an anime designs hoop and sew it on later.
6. Final Touches: Finishing, Caring, and Styling Your Piece
Once your anime embroidery is complete, finish the piece to ensure it lasts.
Final Steps:
Remove any stabilizer (follow the instructions if water-soluble).
Trim excess threads and check for loose ends.
Iron the reverse side with a cloth in between to avoid flattening stitches.
For machine embroidery, press gently to set the threads and preserve the shine of the design.
Caring Tips:
Hand wash or use gentle detergent cycles.
Turn denim inside out before washing.
Avoid heavy drying cycles.
Your anime jacket or denim piece is now ready to rock! Pair it with plain outfits to let your anime designs dress or jacket shine. You can even use similar anime designs for T-shirts, or replicate the design on other items like skirts, jeans, or even tote bags.
Bonus: Where to Get Anime Embroidery Designs
There are plenty of online platforms that offer high-quality anime designs pictures, patterns, and kits. Here are a few:
Etsy: Custom creators offer hand-drawn anime designs by hand or digital anime designs machine files.
Pinterest: Great for finding inspiration and downloading anime designs simple and aesthetic scenes.
Instagram & TikTok: Follow embroidery artists who post reels and stories of anime designs flowers, anime designs blouse, or anime jackets in progress.
You can also digitize your own anime art using embroidery software—perfect for unique anime designs chain stitch or layered anime designs patterns. For beginners, start with characters in static poses and bold lines. As your skill grows, move on to action-packed designs or detailed environments.
Conclusion
Embroidering anime scenes on jackets and denim is more than just a trend—it’s a creative celebration of anime culture and craftsmanship. With the right tools, a little patience, and a touch of creativity, you can transform everyday garments into stunning anime masterpieces.
From anime designs on shirt to anime designs for handkerchief, and from anime designs hoop creations to majestic anime designs peacock scenes, the possibilities are endless. Whether you go with anime designs by hand or opt for anime designs machine, your work will not only showcase your love for anime but also your artistic skill.
So pick up that hoop, choose your pattern, and get stitching—because your next anime masterpiece isn’t just for your screen, it’s meant to be worn.
0 notes
Text
The Future of Embroidery: Innovative Design Techniques to Try in 2025
Embroidery has come a long way from its traditional roots, evolving into an art form that blends heritage with modernity. In 2025, embroidery designs are expected to push the envelope even further, thanks to advancements in technology, digitization, and creative experimentation. Whether you're passionate about embroidery designs for T-shirts, experimenting with embroidery designs by hand, or exploring the limits of machine embroidery, this year brings fresh techniques and ideas worth embracing.
Let’s explore the innovative design trends and techniques shaping the future of embroidery.
1. Digital Embroidery Innovations: Smarter and Faster Creations
Technology has revolutionized the embroidery world, making embroidery designs machine-friendly and precise. In 2025, we’ll see smart embroidery machines equipped with artificial intelligence and automation. These machines can read image files and convert them into embroidery designs patterns instantly, making the digitization process more efficient than ever.
Modern software is enabling designers to produce hyper-realistic embroidery designs pictures that look as detailed as photographs. This year, digitizing services will offer quicker turnaround times and greater accuracy, with enhanced support for fabrics like denim, chiffon, and even unconventional materials like plastic mesh or vegan leather.
Embroidery designs hoop work is also receiving a tech upgrade, with adjustable hoops and multi-hoop systems allowing users to work on large projects without repositioning the fabric constantly.
Keywords used: embroidery designs, embroidery designs machine, embroidery designs pictures, embroidery designs hoop, embroidery designs patterns
2. 3D Embroidery: Adding Depth and Dimension
Three-dimensional embroidery isn’t new, but in 2025, it will become more accessible and versatile. Crafters and fashion designers alike are embracing 3D embroidery designs for T-shirts, blouses, and dresses that add texture and a tactile element to garments. Raised stitching techniques, foam underlays, and layered threads will dominate this trend.
Imagine a peacock embroidery design with feathers that lift off the fabric or embroidery designs flowers blooming with real texture. These effects create a unique visual and physical experience, perfect for statement pieces in fashion and home décor.
3D embroidery is also great for embroidery designs suit jackets, creating patterns that mimic hand-beaded luxury while using durable machine threads.
Keywords used: embroidery designs for T-shirts, embroidery designs blouse, embroidery designs dress, embroidery designs suit, embroidery designs peacock, embroidery designs flowers
3. Sustainable Embroidery: Eco-Friendly Materials and Techniques
With sustainability becoming a central theme in fashion and craft, embroidery is also going green. In 2025, expect to see more artists using organic threads, recycled fabrics, and eco-friendly dyes. Natural fiber threads, such as bamboo, cotton, and even banana silk, are gaining traction in both embroidery designs by hand and machine applications.
Many brands are opting for minimalist embroidery designs simple on garments to save thread and reduce waste. Designs like delicate border patterns, chain stitch outlines, or minimalist floral elements allow for elegant touches without excess.
Handcrafted pieces, such as embroidery designs for handkerchiefs, are making a comeback due to their longevity and low environmental impact. The charm of embroidery designs by hand adds a nostalgic and personal touch, ideal for gifts and heirlooms.
Keywords used: embroidery designs by hand, embroidery designs simple, embroidery designs border, embroidery designs chain stitch, embroidery designs for handkerchief, embroidery designs flowers
4. Fusion of Cultures: Global Influences in Design Patterns
Embroidery has always been a cultural expression, and in 2025, cross-cultural design fusions are a rising trend. From Indian embroidery designs blouse patterns with mirror work to Japanese sashiko stitching and African thread art, global styles are merging to form fresh, boundary-blending aesthetics.
Designers are mixing traditional motifs with contemporary patterns—think paisleys combined with geometric grids or embroidery designs peacock fused with abstract art. You’ll also find cultural motifs showing up in unexpected places, such as embroidery designs on shirt collars or denim jackets.
This blend of styles is especially evident in custom embroidery designs suit jackets, embroidered T-shirts, and statement embroidery designs dress pieces, which reflect multicultural identities and personal stories.
Keywords used: embroidery designs blouse, embroidery designs peacock, embroidery designs on shirt, embroidery designs suit, embroidery designs pattern
5. Customization and Personalization: Stitching Your Story
One of the most exciting trends of 2025 is hyper-personalized embroidery. Consumers are increasingly looking for custom embroidery designs on shirt pockets, monogrammed handkerchiefs, and personalized patches that reflect their style or brand.
With online platforms offering drag-and-drop embroidery designs pattern generators, users can now create and preview custom motifs in minutes. Whether you’re designing your own embroidery designs flowers, personalizing gifts, or starting a small embroidery business, these tools are empowering creators everywhere.
Fashion lovers are opting for subtle embroidery designs border accents on sleeves or pants, while others go bold with all-over motifs. Logos, quotes, initials, zodiac signs—if you can imagine it, you can stitch it.
The revival of embroidery designs chain stitch for outlining text adds a vintage flair to personalized projects, especially when paired with embroidery designs pictures of favorite pets or memories.
Keywords used: embroidery designs on shirt, embroidery designs for handkerchief, embroidery designs pattern, embroidery designs chain stitch, embroidery designs flowers, embroidery designs border, embroidery designs pictures
6. Mixed Media and Experimental Techniques
In 2025, embroidery isn’t just thread on fabric—it’s becoming a mixed media powerhouse. Artists are combining embroidery with elements like painting, beading, quilting, and even laser-cut fabrics to create immersive, multi-layered artwork.
Embroidery designs hoop art is at the forefront of this experimental wave, with frames showcasing landscapes stitched with thread, ink, and appliqué. These modern takes on embroidery blur the lines between craft and fine art.
On garments, mixed media embroidery often features paint splatters under embroidery designs flowers or foil printing beside embroidery designs patterns, creating a dynamic texture.
This trend is especially popular with fashion-forward embroidery designs dress and T-shirt styles. It also opens doors for unique embroidery designs simple that become not-so-simple when combined with another medium.
Experimental embroidery isn’t limited to clothing; it’s also big in home décor, wall hangings, and accessories. Whether you’re working on a stitched canvas or an embroidered cushion, the sky’s the limit for creativity in 2025.
Keywords used: embroidery designs hoop, embroidery designs flowers, embroidery designs patterns, embroidery designs simple, embroidery designs dress, embroidery designs for T-shirts
Conclusion: The Thread Ahead
The embroidery world in 2025 is all about pushing boundaries—technologically, stylistically, and culturally. Whether you prefer classic embroidery designs by hand or cutting-edge machine techniques, the future holds something for every creator.
Expect to see more customizable, eco-conscious, and culturally rich embroidery designs popping up on everything from T-shirts and suits to blouses, handkerchiefs, and beyond. By embracing innovation and tradition side by side, embroidery continues to be one of the most versatile and expressive art forms today.
So, whether you're stitching a peacock design, a floral border, or your initials on your favorite shirt, let 2025 be the year you explore new textures, patterns, and stories—one stitch at a time.
0 notes
Text
Elevate Your Creations with Our Premium Embroidery Designs
Embroidery is not just an art—it's a timeless expression of creativity, precision, and style. At Embroiplanet, we understand the magic that a well-placed stitch can bring to any fabric. Whether you're customizing a blouse, upgrading a T-shirt, or crafting a unique dress, our premium embroidery designs are here to help you shine. With a wide range of embroidery designs for T-shirts, suits, handkerchiefs, and more, our digital library caters to every style and occasion. Let’s explore how our designs can enhance your creative journey and turn your vision into reality.
1. Why Embroidery Designs Are a Crafter’s Best Friend
Embroidery has stood the test of time as one of the most elegant and expressive forms of textile art. With the advent of technology, digital embroidery designs have made it easier for both beginners and professionals to achieve flawless finishes with minimal effort.
Whether you're using embroidery designs by hand or with an embroidery designs machine, having access to a vast collection of patterns gives you the freedom to explore different themes and styles. From simple embroidery designs to intricate embroidery designs peacock, you can now find the perfect fit for your creative projects in minutes.
At Embroiplanet, we pride ourselves on offering versatile and high-quality designs that are easy to download, apply, and adapt. Our curated collections include everything from embroidery designs patterns to unique embroidery designs on shirt and embroidery designs suit, making us your one-stop shop for textile personalization.
2. Embroidery Designs for T-Shirts: A Statement of Style
In the world of fashion, T-shirts have become a canvas for bold and personalized statements. With our embroidery designs for T-shirts, you can effortlessly turn a plain tee into a work of art. Whether you prefer minimalistic icons, embroidery designs flowers, or complex logos, there's no limit to what you can create.
Our T-shirt embroidery collection includes:
Minimal line art for a clean, modern look
Embroidery designs pictures inspired by pop culture
Embroidery designs hoop styles that suit circular frame embroidery
Motivational text-based designs
Themed collections like anime, floral, or traditional symbols
These designs are ideal for both personal and business use. Many of our clients use them to start their own custom T-shirt lines, offering something unique that customers can’t find in regular stores.
Pair your tee with jeans, skirts, or formal trousers—our embroidery ensures that no matter the pairing, you’ll stand out.
3. From Florals to Peacocks: Explore Our Vast Pattern Library
One of the biggest advantages of choosing Embroiplanet is our vast pattern library, which caters to all aesthetic preferences. Whether you're seeking embroidery designs flowers for a romantic summer dress or majestic embroidery designs peacock for traditional blouses, we’ve got something to spark your imagination.
Here’s a glimpse of our popular categories:
Floral Patterns: Classic roses, tulips, and wildflowers—ideal for feminine dresses and accessories
Bird & Animal Designs: Peacock embroidery designs, butterflies, and deer for a whimsical effect
Geometric Patterns: Abstract lines, mandalas, and tribal styles
Cultural Motifs: Inspired by Indian, Moroccan, and Bohemian art
Nature-Inspired Embroidery Designs: Leaves, trees, and seasonal motifs
Every design is available in digital format, perfect for use with both hand and embroidery designs machine work. Whether you prefer to stitch with a hoop and needle or automate with software, our files are compatible and user-friendly.
4. Perfect Your Outfits with Embroidery on Suits, Blouses, and Dresses
Embroidery isn’t limited to accessories—it’s a transformative tool in full-fledged outfit design. Whether it’s a formal ethnic suit, a party dress, or a fashionable blouse, adding embroidery enhances the visual appeal and texture of your garment.
Our bestsellers in this category include:
Embroidery designs blouse: Delicate borders, back motifs, and sleeve patterns for traditional and fusion blouses
Embroidery designs dress: Full-length or accent patterns for maxi, midi, and A-line dresses
Embroidery designs suit: Dupatta motifs, kurti borders, and yoke patterns for salwar kameez sets
Embroidery designs border: Perfect for dupattas, hems, or sarees
Adding a rich embroidery element elevates your outfit from casual to couture. And with downloadable formats, you can bring professional quality to your DIY or boutique projects without hiring a designer.
5. Simple to Sophisticated: Embroidery Styles for All Skill Levels
No matter where you are on your embroidery journey, our designs meet you at your level. From embroidery designs simple enough for beginners to complex embroidery designs chain stitch and 3D effects for seasoned artists, you’ll find the right challenge and inspiration.
For those who love DIY crafts or hand stitching:
Explore embroidery designs by hand that require minimal tools
Use a hoop for better tension and precision with our embroidery designs hoop category
Practice stitches like satin, stem, and chain stitch using our how-to guides
For machine embroiderers:
Download compatible files for all major machines
Use intricate embroidery designs patterns without worrying about stitch misplacement
Add professional-level flair to T-shirts, bags, and even household items like napkins and curtains
Don’t forget our adorable collection of embroidery designs for handkerchief—perfect for gifting or personal monograms!
6. Inspiration Through Imagery: Embroidery Designs That Speak
What sets Embroiplanet apart is our belief that every design should tell a story. That’s why our collection includes detailed embroidery designs pictures, which visually guide you through what the finished product will look like. These aren’t just files—they’re sources of inspiration.
You’ll also find:
Embroidery designs pattern previews to help you visualize on your fabric
Customer-submitted photos of real-life projects using our designs
Tutorials on combining multiple embroidery themes for personalized creativity
Seasonal collections so you can craft according to the time of year—think spring florals, Diwali designs, Christmas embroidery, and more
Your creativity is limitless, and with Embroiplanet’s designs, your fabric will reflect that. From tiny embellishments to full-scale embroidery projects, we’re here to help every stitch count.
Final Thoughts: Stitch Your Story with Embroiplanet
Embroidery is more than just decoration—it’s self-expression through texture and thread. With Embroiplanet’s premium embroidery designs, your creativity will never run out of options. Whether you’re designing a printed shirt, customized T-shirt, or an elegant embroidered dress, we have the digital tools you need.
Here’s a recap of what you can expect:
Thousands of embroidery designs for every fabric and style
Seamless compatibility for hand and machine stitching
Easy downloads, previews, and customization options
Designs for blouses, suits, shirts, handkerchiefs, borders, and more
From simple to intricate patterns, explore your craft with confidence
So why wait? Browse our growing library today and elevate your creations with embroidery that’s bold, beautiful, and unmistakably you.
0 notes
Text
Experts in the art of organisation are wardrobe organisers. People frequently contact specialists to assist with a wide range of duties. Experts in the field of organisation are wardrobe organisers. Every professional organiser, as is generally known, has secret organising methods, strategies, and go-to procedures that enable them to change the lives of their clients. You may turn a disorganised closet into a useful and enjoyable space by using wardrobe organisers.
The majority of organisers are artists who specialise in closet organisation, interior design and Wardrobe accessories. You should anticipate that the style of your closet will match that of the rest of your home. Professional Peacock Revera wardrobe organisers will maximise the amount of space available. They also pay careful attention to aesthetics.
Create a Sustainable Organisational Structure
Helping clients develop Wardrobe Organizers that will maximize their freshly installed closet is the next phase of an organizer's work. Setting up systems that function reliably and easily is one of the many advantages of working with an expert.
The majority of an organizer's work involves dealing directly with clients rather than their belongings. To design specialised organisational systems, organisers need to have a thorough understanding of each person's particular requirements and preferences.
Depending on their demands, the client may be involved in every step of the process. They will thus have a better understanding of their replacement closet. If this doesn't occur, the client will have to spend time with the organiser to learn how to use their new organising technique.
Other abilities that some wardrobe organisers possess include teaching people the fundamentals of cooking, automating paperwork, and managing kitchens.
0 notes
Text
Arbor Grove Residence
Arbor Grove Residence | Luxury Living in [City/Neighborhood] | The Listing Team { "@context": "https://schema.org", "@type": "SingleFamilyResidence", "name": "Arbor Grove Residence", "description": "Luxury [property type] featuring [3-5 key amenities]", "numberOfRooms": "5", "floorSize": "4,200 sqft", "amenityFeature": [ "Smart home automation", "Infinity edge pool", "Chef's kitchen with Wolf appliances", "Private theater room", "Climate-controlled wine cellar" ], "address": { "@type": "PostalAddress", "addressLocality": "[City]", "addressRegion": "FL", "postalCode": "[ZIP]", "streetAddress": "[Street Address]" }, "image": [ "https://res.cloudinary.com/thelistingteam/image/upload/v1725057167/RESF_TLT_Logo_Backround_ovpxek.png" ], "url": "https://www.reallistingagent.com/blog/arbor-grove-residence" } { "@context": "https://schema.org", "@type": "VirtualLocation", "name": "Arbor Grove 3D Tour", "url": "https://www.reallistingagent.com/virtual-tours/arbor-grove" }
Arbor Grove Residence
Miami Condo Residences | Arbor Grove
Arbor Grove draws inspiration from eco-friendly living and the lush, tree-lined ambiance of historic Coconut Grove. Our design emphasizes expansive, family-oriented spaces that seamlessly integrate indoor and outdoor environments. Features include high ceilings, private gardens, Italian-designed kitchens, and full-length windows. We offer a diverse range of options, including two-story lofts, townhomes, and penthouses, each designed to enhance a balanced lifestyle with unique and innovative amenities that maximize both indoor and outdoor living.
Located in the vibrant heart of Coconut Grove, Arbor Grove is conveniently positioned near key landmarks, marinas, and cultural centers such as CocoWalk, Peacock Park, and the Coconut Grove Sailing Club. Additionally, it is within walking distance of top-rated schools, Michelin-starred restaurants, cafes, shopping boutiques, and entertainment venues. Coconut Grove, one of Miami’s oldest and most diverse neighborhoods, is celebrated for its lush parks, bayside promenades, and year-round festivals.
Should you have any further questions or require additional information, please feel free to reach out.
Flexible Urban
Arbor’s 45 residences are inspired by sunshine and lazy Sundays, by children playing and families relaxing, by walks in the park and all walks of life, by putting your feet up, letting your hair down, and living life to the fullest, as well as by eco-living, good living, and everything in between.
A Natural Beauty
Designed by Miami’s Behar Font & Partners with interiors by Design Architecture Consulting, Arbor’s architecture and interiors are as laidback and contemporary as Coconut Grove itself. Arbor is informed as much by the natural landscape as it is by modernist design principles.
0 notes
Text
3D printing approach strings together dynamic objects for you
New Post has been published on https://sunalei.org/news/3d-printing-approach-strings-together-dynamic-objects-for-you/
3D printing approach strings together dynamic objects for you
It’s difficult to build devices that replicate the fluid, precise motion of humans, but that might change if we could pull a few (literal) strings.
At least, that’s the idea behind “cable-driven” mechanisms in which running a string through an object generates streamlined movement across an object’s different parts. Take a robotic finger, for example: You could embed a cable through the palm to the fingertip of this object and then pull it to create a curling motion.
While cable-driven mechanisms can create real-time motion to make an object bend, twist, or fold, they can be complicated and time-consuming to assemble by hand. To automate the process, researchers from MIT’s Computer Science and Artificial Intelligence Laboratory (CSAIL) have developed an all-in-one 3D printing approach called “Xstrings.” Part design tool, part fabrication method, Xstrings can embed all the pieces together and produce a cable-driven device, saving time when assembling bionic robots, creating art installations, or working on dynamic fashion designs.
Previous item Next item
Play video
3D printing approach strings together cable-driven mechanisms for you Video: MIT CSAIL
In a paper to be presented at the 2025 Conference on Human Factors in Computing Systems (CHI2025), the researchers used Xstrings to print a range of colorful and unique objects that included a red walking lizard robot, a purple wall sculpture that can open and close like a peacock’s tail, a white tentacle that curls around items, and a white claw that can ball up into a fist to grab objects.
To fabricate these eye-catching mechanisms, Xstrings allows users to fully customize their designs in a software program, sending them to a multi-material 3D printer to bring that creation to life. You can automatically print all the device’s parts in their desired locations in one step, including the cables running through it and the joints that enable its intended motion.
MIT CSAIL postdoc and lead author Jiaji Li says that Xstrings can save engineers time and energy, reducing 40 percent of total production time compared to doing things manually. “Our innovative method can help anyone design and fabricate cable-driven products with a desktop bi-material 3D printer,” says Li.
A new twist on cable-driven fabrication
To use the Xstrings program, users first input a design with specific dimensions, like a rectangular cube divided into smaller pieces with a hole in the middle of each one. You can then choose which way its parts move by selecting different “primitives:” bending, coiling (like a spring), twisting (like a screw), or compressing — and the angle of these motions.
For even more elaborate creations, users can incorporate multiple primitives to create intriguing combinations of motions. If you wanted to make a toy snake, you could include several twists to create a “series” combo, in which a single cord drives a sequence of motions. To create the robot claw, the team embedded multiple cables into a “parallel” combination, where several strings are embedded, to enable each finger to close up into a fist.
Xstrings facilitates how cables are integrated into the object it’s producing. Users can choose exactly how the strings are secured, including its endpoint, the holes within the structure that the cord passes through, and where you’d pull to operate the device.
Image courtesy of the researchers.
Previous item Next item
Beyond fine-tuning the way cable-driven mechanisms move, Xstrings also facilitates how cables are integrated into the object. Users can choose exactly how the strings are secured, in terms of where the “anchor” (endpoint), “threaded areas” (or holes within the structure that the cord passes through), and “exposed point” (where you’d pull to operate the device) are located. With a robot finger, for instance, you could choose the anchor to be located at the fingertip, with a cable running through the finger and a pull tag exposed at the other end.
Xstrings also supports diverse joint designs by automatically placing components that are elastic, compliant, or mechanical. This allows the cable to turn as needed as it completes the device’s intended motion.
Driving unique designs across robotics, art, and beyond
Once users have simulated their digital blueprint for a cable-driven item, they can bring it to life via fabrication. Xstrings can send your design to a fused deposition modeling 3D printer, where plastic is melted down into a nozzle before the filaments are poured out to build structures up layer by layer.
Xstrings uses this technique to lay out cables horizontally and build around them. To ensure their method would successfully print cable-driven mechanisms, the researchers carefully tested their materials and printing conditions.
For example, the researchers found that their strings only broke after being pulled up and down by a mechanical device more than 60,000 times. In another test, the team discovered that printing at 260 degrees Celsius with a speed of 10-20 millimeters per second was ideal for producing their many creative items.
“The Xstrings software can bring a variety of ideas to life,” says Li. “It enables you to produce a bionic robot device like a human hand, mimicking our own gripping capabilities. You can also create interactive art pieces, like a cable-driven sculpture with unique geometries, and clothes with adjustable flaps. One day, this technology could enable the rapid, one-step creation of cable-driven robots in outer space, even within highly confined environments such as space stations or extraterrestrial bases.”
The team’s approach offers plenty of flexibility and a noticeable speed boost to fabricating cable-driven objects. It creates objects that are rigid on the outside, but soft and flexible on the inside; in the future, they may look to develop objects that are soft externally but rigid internally, much like humans’ skin and bones. They’re also considering using more resilient cables, and, instead of just printing strings horizontally, embedding ones that are angled or even vertical.
Li wrote the paper with Zhejiang University master’s student Shuyue Feng; Tsinghua University master’s student Yujia Liu; Zhejiang University assistant professor and former MIT Media Lab visiting researcher Guanyun Wang; and three CSAIL members: Maxine Perroni-Scharf, an MIT PhD student in electrical engineering and computer science; Emily Guan, a visiting researcher; and senior author Stefanie Mueller, the TIBCO Career Development Associate Professor in the MIT departments of Electrical Engineering and Computer Science and Mechanical Engineering, and leader of the HCI Engineering Group.
This research was supported, in part, by a postdoctoral research fellowship from Zhejiang University, and the MIT-GIST Program.
0 notes
Text
The Complete Guide to Programmatic Buying for OTT Advertising

What Is Programmatic OTT Advertising?
Programmatic OTT advertising automates ad placements on streaming services, eliminating manual negotiations. Advertisers use real-time bidding (RTB) and AI-driven insights to purchase ad space efficiently on Hulu, Roku, Peacock, and YouTube TV.
This automated system allows brands to target specific audience segments based on viewing behavior, demographics, and device usage.
For an in-depth explanation of programmatic ad buying, refer to the IAB’s official guide on programmatic advertising.
How Does Programmatic OTT Advertising Work?
Audience Targeting – Brands define customer profiles using first-party and third-party data.
Automated Ad Bidding – Real-time auctions determine ad placement when users begin streaming.
AI-Powered Optimization – Algorithms analyze performance and adjust targeting dynamically.
Cross-Device Ad Delivery – Ads appear on smart TVs, smartphones, tablets, and gaming consoles.
Performance Tracking & Adjustments – Marketers monitor engagement and refine campaigns for better ROI.
Why Businesses Should Invest in Programmatic OTT Advertising
Data-Driven Targeting – Ads reach viewers based on behavioral data rather than broad demographics.
Cost-Effective Advertising – Advertisers only pay for highly relevant impressions.
Scalable & Automated Buying – Campaigns adjust in real time to maximize efficiency.
Better Engagement & ROI – OTT ads achieve higher viewer retention and ad recall rates.
Steps to Create a Winning Programmatic OTT Ad Strategy
Define Clear Campaign Objectives – Identify KPIs such as brand awareness, app downloads, or direct sales.
Use a Reputable Programmatic Platform – Demand-side platforms (DSPs) like Brandify, The Trade Desk, and Google DV360 optimize ad purchases.
Ensure High-Quality Video Content – Ads should be concise, engaging, and mobile-friendly.
Leverage AI Insights for Better Targeting – Data-driven decisions help improve ad relevance and engagement rates.
For an effective OTT ad campaign, explore the Brandify OTT Targeting Plan.
Get a free targeting plan within the hour for your business here: https://brandify.io/targeting-plan/
Press Release: https://www.prlog.org/13053451
0 notes