#argb
Explore tagged Tumblr posts
Visit Tumblr Blog
Explore Tumblr blogs with no restrictions, modern design and the best experience.
Last Seen Tumblr Blogs


Fun Fact
Tumblr is used by 21% of adults online aged 18-29 years.
Text
RGB and aRGB neither boosts nor hinders a PC's performance. RGB and aRGB a lot of the times don't even impact a PC's price. If you're a tech dude complaining about RGB ruining computers, Skill Issue.
2 notes
·
View notes
Photo

Antec Vortex 360 ARGB CPU Liquid Cooler The Antec VORTEX 360 is a new liquid cooling solution that provides great performance as well as stunning looks. The suspended spiral pump head, which resembles a vortex, not only provides exceptional cooling but also creates intriguing lighting effects from various perspectives. A very efficient cooling pump at the heart of this cooler provides optimal heat dissipation and the EPDM high-density tube increases durability and reduces liquid loss, resulting in constant performance. The addition of 13 massive fins improves heat dispersion and keeps your system cool. The Vortex 360 ARGB is equipped with the Antec Fusion PWM ARGB Fan, which is distinguished by a unique multilateral-shaped lighting frame outfitted with 16 LEDs. Several LEDs work together to create dazzling lighting effects, while the fan’s powerful cooling capability ensures that your CPU is kept at an optimal temperature. The kit contains an ARGB controller that effortlessly syncs with your motherboard, taking personalization to the next level. This allows you to customise each individual LED by changing the colours and effects to your desire. Enjoy the Antec VORTEX 360 ARGB’s power and enjoy top-tier cooling performance mixed with fascinating lighting aesthetics, bringing your PC experience to new heights. FEATURES: Highly Efficient Cooling Pump Suspended Spiral Pump Head Design EPDM High-Density Tubing Antec Fusion PWM ARGB Fan 2800±10% RPM Fan Speed Included ARGB Controller Working in Sync with the Motherboard SPECIFICATIONS: Intel Socket Compatibility: LGA 115x/1200/20XX/1700 AMD Socket Compatibility: AM3/AM4/TR4 Radiator: Radiator Dimensions: 39.7 x 12 x 2.7 cm Radiator Material: Aluminum Pump: Dimensions: ¢67 x 48.5 mm Rating Voltage: DC 12 V Minimum Startup Voltage: ≥ 5.0 V Fan Speed: 2800±10% RPM Rated Current: 0.25±20% A Consumed Power: 3.0 W Flow rate: ≥ 1300 mL/min Water Pressure: 1.4M Operation Temperature: -10°C ~ +60°C Noise Level: ≤ 28 dB(A) Lifespan: 40,000 hours Connector: PUMP: 3-pin | LED: 3-pin Fan: Model Name Fusion 120 ARGB fan (AH12012FM1) Fan Type: PWM Fan Bearing Type: Hydraulic Bearing LED Type: Addressable RGB Fan Speed: 600±200 ~ 2000±10% RPM Airflow: 57.93 CFM (max.) Air Pressure: 2.11 mm H₂O (max.) Fan Noise Level: 31.24 dB(A) Lifespan: 40,000 hours Connector: FAN: 4-pin PWM | LED: 3-pin Rated Voltage: FAN: DC 12 V | LED: DC 5 V Operation Voltage: FAN: DC 6.0-13.8 V | LED: DC 4.5-5.5 V Rated Current: FAN : ≤ 0.21 A | LED : ≤ 0.58 A Socket Compatibility CPU: Intel: LGA 115X / 1200 / 1700 / 20XX, AMD : AM3/AM4/AM5/TR4 Dimensions: 12 x 12 x 2.5 cm WHAT’S IN THE BOX: Antec VORTEX 360mm ARGB Liquid CPU Cooler x1 CPU Mounting Kit x1 Fan & Radiator Mounting Pack x1 User Manual x1
#LIQUID_COOLING#COMPUTERS#DESKTOPS#DESKTOP_COMPONENTS#360MM#ANTEC#ARGB#BLACK#LIQUID_COOLER#VORTEX#VORTEX_360_ARGB
0 notes
Text
ZEBRONICS New Launch APEX Edge Premium Mesh Gaming Cabinet/Case, Full-Tower, Supports E-ATX | ATX | mATX | ITX, AIO Upto 360mm, 4X Inner Glow ARGB Fans, Tempered Glass, USB 3.0, Magnetic Dust Filter
Price: (as of – Details) ZEB-Apex Edge,AIO cooler support,HD Audio,Top magnetic dust filter,3*120mm front,ARGB fans,Bottom PSU Top magnetic and Bottom dust filterBottom PSU

View On WordPress
#360mm#AIO#ApeX#ARGB#Athena#athena 100#athena 100 bag#athena 100 convertible rolling camera backpack#athena 10ax switch#athena 16a socket#athena 16a switch#athena 3 in 1 bag#athena 4 burner 60 cm#athena 6m plate#athena a line dress#athena ample#athena ample co ords set for women#athena ample dresses for women#athena ample plus size#athena ample plus size dress#athena ample plus size top#athena ample tops for women#athena ample trousers for women#athena aris#athena black dress#athena black dress for women#athena black maxi dress#athena black square neck flutter sleeves ruffled detailed maxi dress#athena black textured midi dress#athena black v neck sheath dress
1 note
·
View note
Text
Well, tonight was a bit of a learning experience; the ARGB controller that I picked up cannot handle more than 48 LEDs per string, which means that the 30 LED fans I have won't work with it at all; the mainboard will, in theory, support all 270 odd lights, but the vendor's software is... well, it's best described as a dumpster filled with fecal matter and on fire.
The only other 'free' applications that can talk to it properly (OpenRGB) does not see the mainboard controller, and does not talk to the ARGB controller I have properly, despite it being on the compatibility list. The only other free application, SImpleRGB, also doesn't cope with the fans correctly (probably due to that 48 LED limit) and also demands internet access on start up, and has a fixed window size of 1440 by 768, which is a bit of a pisser trying to navigate it on a 1280x1024 screen.
So, I guess I get to roll my own. Thankfully, I have just the thing already in house for a hardware controller, in the form of Adafruit's RP2040 SCORPIO Feather micocontroller, which has a theoretical limit of some 16 thousand WS2812 LEDs, across 8 parallel strings.
What I'm not happy about is having to pull the case apart YET AGAIN to extract one of the fans for testing and reverse engineering things as I program the controller; the ARGB "standard" is mostly WS2812 over the same three wire path (+5VDC, Data, and Ground), so even if I end up having to daisy chain all 9 fans into one giant string, I'll be covered, I think.
I just have to figure out what the internal order of the fans are for a given orientation and program the sequencing into the controller, and I can do that while I'm printing a housing for it so I don't have a bare board sitting inside the damn machine. (I'll probably need a SATA to 4 pin power adapter out of one of the other cable boxes in order to tap power for it, but such is life.)
And TBH, I'm probably going to release this setup out into the wild, because I've not found ANY good stand alone controller (or good software) that works on a near universal level.
Stay tuned, it's going to be... interesting.
0 notes
Text
CORSAIR NAUTILUS RS, NAUTILUS RS ARGB Liquid Coolers
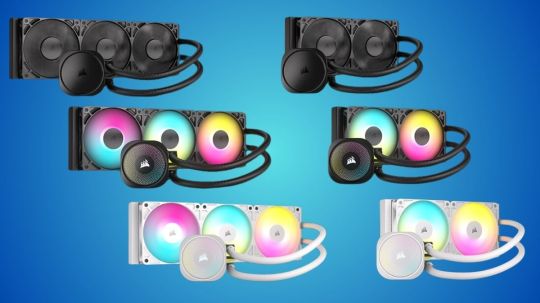
High-performance liquid CPU coolers with broad compatibility, the NAUTILUS RS and NAUTILUS RS ARGB Series, are now available from Corsair with or without lighting.
CORSAIR announces the release of their liquid CPU coolers, the CORSAIR NAUTILUS RS and NAUTILUS RS ARGB families. These cutting-edge coolers provide excellent compatibility with contemporary CPU sockets, simple installation, and high-performance CPU cooling. While the NAUTILUS RS ARGB comes in black and white in the same sizes, with the addition of ARGB lighting to improve your setup, the NAUTILUS RS family comes in black in both 240mm and 360mm diameters.
Use a new Cold Plate To Get Cooler
In order to improve contact with the processor’s inbuilt heat spreader and provide improved thermal transfer, the NAUTILUS RS series has an effective, low-noise pump and a slightly convex cold plate that has been pre-applied with thermal paste in an optimal pattern. With its RS120 fans and 240mm or 360mm radiator diameters, NAUTILUS RS coolers efficiently maintain the ideal temperatures for top-tier CPUs.
RS Fans-With or Without The Lights
Strong airflow at PWM-controlled speeds up to 2,100 RPM is provided by the black CORSAIR RS120 fans that come with NAUTILUS RS coolers. The NAUTILUS RS ARGB models include eight RGB LEDs per fan and ARGB connectors. These fans may be daisy-chained together to simplify wiring and facilitate installation. Connect one fan to the next with ease, then control the speed and lights using a single 4-pin PWM connector and a single 4-pin ARGB header on your motherboard.
The CORSAIR AirGuide technology and magnetic dome bearings improve the RS120 fans’ directed airflow cooling performance and very low noise levels. These fans are designed for radiator application.
Activated Dark Mode
Not everyone is a fan of RGB lighting. The black-on-black design of the NAUTILUS RS could be the ideal choice for a stealth build since sometimes all you want is something powerful and quiet. Even the mounting hardware has a dark, covert finish instead of brilliant chrome or nickel-plated metal.
Enabled ARGB Lighting
Image Credit To CORSAIR
Using the eight RGB LEDs on the pump and each fan of the NAUTILUS RS ARGB models, you can simply manage the lighting display using motherboard ARGB software. Simply connect and begin personalizing with the ARGB software suite on your motherboard.
Modelling and compatibility
All the mounting gear required to install the radiators to any case that accepts a 240mm or 360mm radiator is included with the NAUTILUS RS line of coolers, which are compatible with AMD AM4 and AM5-based systems as well as Intel socket LGA 1700 and LGA 1851.
Interface Thermal Mastery
Additionally, each NAUTILUS RS cooler has pre-applied XTM60 thermal interface material (TIM) for the best cooling results. Effective heat transmission between your CPU and the copper cold plate is guaranteed by XTM60.
Availability
The CORSAIR webstore and its global network of authorized merchants and distributors offer the CORSAIR NAUTILUS RS and NAUTILUS RS ARGB for instant purchase.
Warranty
A six-year guarantee and the global customer care and technical support network of CORSAIR are provided for the NAUTILUS RS Series of coolers.
Pricing
The price of the NAUTILUS RS may vary depending on the size and configuration that it comes in. The cost of NAUTILUS RS versions for high-performance cooling solutions typically ranges from $200 to $500, depending on features like RGB lighting, cooling technology, radiator size, and compatibility with certain cooling systems.
Since prices might change depending on availability, special offers, or geographical variations, it is advised to confirm prices with official suppliers or merchants for the most current information.
Read more on Govindhtech.com
#CORSAIRNAUTILUSRS#NAUTILUSRS#ARGB#ARGBLiquidCoolers#liquidCPUcoolers#RGBLEDs#News#Technews#Technology#Technologynews#Technologytrends#govindhtech
0 notes
Text
Zakupowe inspiracje - 7 wrzesień 2023 - paczka 1
#AliExpress | #ZakupoweInspiracje — 7/09/2023 - paczka 1 #AliExpressPL #Promocja Promocje & Kody na WRZESIEŃ 🖼️🎪🛒 http://januszcebula.pl/AliExpress/AktualnePromocje #JanuszCebula #TanioNaAli Dołącz: #Telegram https://t.me/PlJanuszCebula #WhatsApp https://chat.whatsapp.com/Hc7RuVvpR11KCZ6hQINqes Postaw ☕ #Zrzutka https://zrzutka.pl/z/janusz-cebula-pl
AliExpress – Zakupowe inspiracje – 7 wrzesień 2023 – paczka 1 6-9.09.2023 IIIF150 | Dzień Marki Do 50% taniej AliExpress Aktualne Promocje AliExpress Aktualne Promocje AliExpress Zakupowe inspiracje AliExpress Zakupowe inspiracje #SanMartin 36mm Men Pilot Watch VH3 […] #Baseus 600W Energy Stack Digital P […] #SanMartin Miyota 9120 Multi-functi […] PINZHENG Battery For #iPhone X XR X…

View On WordPress
#Aliexpress#AliExpressPL#Amazfit#Anker#ARGB#Baseus#EDIFIER#Essager#Gorące Przedmioty#GorącePrzedmioty#HOTO#ILIFE#iPhone#Obłędne oferty#ObłędneOferty#Oclean#PlusDay#Promocje#propozycje#Reolink#RGB#Rockbros#Sale#Samsung#SanMartin#Soundcore#Tuya#UGREEN#UMIDIGI#Xiaomi
0 notes
Text
Thermaltake TOUGHPOWER GF3 ARGB 850w Review
The TOUGHPOWER GF3 ARGB 850w power supply from Thermaltake is an 80PLUS Gold unit with the latest Intel ATX 3.0 spec and a 16-pin PCIe Gen 5.0 power connector
Thermaltake is no stranger to the Play3r website, with various products and awards across its ranges. Today’s review sees us look at the TOUGHPOWER GF3 ARGB 850w. We’ve replaced the old GF1 850w we looked at last year with this in our test bench to give it a thorough shakedown; let’s see how it gets on… Thermaltake TOUGHPOWER GF3 ARGB 850w: Specifications Thermaltake TOUGHPOWER GF3 ARGB 850w:…

View On WordPress
0 notes
Text

ONEEE DONT PICK UP THE PHONE
inspo
#posting this and passing out its 5am#dont look too hard mayb .. a#the pose caused me pain idek if it looks right but i hope twice lovers will enjoy this#fairy tail#lucy heartfilia#fairy tail fanart#art#everthing i finish is messy argb
170 notes
·
View notes
Text
everyone. please look at scotty and aldur plleeasee


#wilbur soot#bursonas#i dont fuckin know how to draw humans so i use gl2. but please take them#my ocs#they are based off of simpb*r and argb*r. thats why the first two tags are there#also i just wantpeople to look at them
2 notes
·
View notes
Text
i loev womne i jst wana 😭😭😭
3 notes
·
View notes
Video
youtube
SPIRIT OF GAMER Gamer PC Case ARGB ATX mATX ITX
#youtube#PC case ARGB gaming case SPIRIT OF GAMER ATX case mATX ITX gamer case PC gaming RGB lighting computer case best PC case case gaming mid towe
0 notes
Photo

PCBuilder Hydro Chill 360MM AIO Liquid CPU Cooler ARGB The PCBuilder HYDRO CHILL 360mm ARGB Liquid CPU Cooler was created for its powerful, low-noise cooling for your CPU. This liquid cooler ensures your build stays as cool as you will under pressure on the gaming battlefield. It has everything you’re looking for in a liquid cooler, from quality materials that ensure durability to heat dissipation technologies which means you can game to your heart’s content. Enjoy perks like ARGB lighting and a 270-degree rotating, easy-to-use blockhead. The blockhead also boasts a unique aesthetic that is both stylish and expressive. Every single component of the PCBuilder HYDRO CHILL 360mm ARGB Liquid CPU Cooler is designed with the end goal in mind – to provide effective cooling without any compromise. FEATURES: 3x quality 120mm PWM ARGB fans deliver exceptional, low-noise cooling Operating range of 800-1800RPM for powerful airflow The pump is integrated into the radiator for sound dampening and noise reduction 270-degree rotating cooler pump with multi-colour effect LED Intel LGA 115x/1200/2011/1700 & AMD AM3/AM4/AM5 compatible Sync compatibility with ASUS Aura, MSI Mystic Light, GIGABYTE Fusion, & RAZER Chroma SPECIFICATIONS: Intel Socket Compatibility: LGA 115x/1200/2011/1700 AMD Socket Compatibility: AM3/AM4/AM5 Fan Number: 3x 120mm PWM Fans Fan Dimensions: 12 x 12 x 2.5 cm Fan Operating Range: 800-1800RPM Fan Rated Current: 0.25A Fan Rated Voltage: 12V Fan Bearing: Hydraulic Bearing Fan Air Pressure: 2.2 H20 Fan Noise Level: 31.3dBA Fan Air Flow: 49.4CFM Fan Lighting: ARGB PWM Mode: Yes Radiator Material: Aluminium Radiator Dimensions: 27.6 x 11.9 x 2.7 cm Radiator Water Channel: 14PCS Pump Dimensions: 8.03 x 7.1 x 4.7 cm Pump Material: Copper Pump RPM: 2500RPM Pump Bearing Type: Ceramic Pump Lighting: ARGB Pipe Tubing Length: 380mm Water Pressure: 1.5m Flow Rate: ≥1300 mL/min Product Dimensions: 39.5 x 12 x 5.2 cm Product Weight: 2.55kg WHAT’S IN THE BOX: PCBuilder HYDRO CHILL 360mm ARGB Liquid CPU Cooler x1 CPU Mounting Kit x1 Fan & Radiator Mounting Pack x1 User Manual x1
#LIQUID_COOLING#COMPUTERS#DESKTOPS#DESKTOP_COMPONENTS#360MM#ARGB#BLACK#HYDRO_CHILL#LIQUID_COOLER#PCB_LC_HYDRO_C360#PCBUILDER
0 notes
Text
Today's wins include:
* Getting the screw holes aligned correctly on the enclosure for the custom PCB that will hold an Adafruit Scorpio Feather and ARGB connections.
Today's fails include:
* getting the 2nd rev of PCBs back from the board place only to find that I didn't place two sets of through holes correctly. Can't order new ones 'til friday due to funds. :: sighs heavily ::
1 note
·
View note
Text
MSI EZ DIY With X870E/X870 Motherboards For AMD Ryzen

MSI EZ DIY Features with X870E and X870 Motherboards for AMD Ryzen Processors.
MSI X870E
MSI is known for creating high-quality PC hardware with user-friendly designs and functionality. They introduced the first tool-less M.2 slot in 2022, enabling storage drive installation without a screwdriver. This simple function generated a lot of favorable response, prompting us to add it to other motherboard components.
EZ DIY
MSI’s X870E and X870 Motherboards provide EZ DIY
MSI is introducing additional DIY-friendly capabilities to the 800-series AM5 motherboards to ease constructing, troubleshoot, and modify your PC. They made creating your PC simpler and more fun, whether you’re an expert or a beginner.
One-Hand PC Build
The motherboard might be difficult to install in your PC case due to case stand-offs, I/O backplates, etc. The MSI X870E and X870 motherboards‘ EZ Slide Installation and EZ Mounting ease this procedure and protect your important components.
Pre-installed I/O Shield + Smart Backplate Design=EZ Slide Installation
PC construction may be unpleasant and painful when installing an I/O shield manually. To simplify installation, a pre-installed I/O shield removes this step. They’re pleased to announce that all MSI X870E and X870 motherboards will come with I/O Shields.
The MEG X870E motherboards include a metal backplate to protect the back components and make installation easier.
Easy mounting: Collision Notification, Double ESD Protection, Keep Out Zone
PC builders worry about safety while installing the motherboard in a case. EZ Mounting features ensure component safety and allow for mistakes without catastrophic failure.
MSI X870E Motherboard
Installation with One Finger
MSI invented the tool-less M.2 slot in 2022, and your support has kept us going. The MSI X870E and X870 motherboards now include EZ DIY capabilities that let you install numerous popular PC components with a single finger, making installation and upgrades easy.
Installation: EZ Magnetic M.2 Shield Frozr II + EZ M.2 Clip II
All MEG and MPG X870E motherboards’ EZ Magnetic M.2 Shield Frozr II makes M.2 heatsink installation/removal so easy you’ll forget you required a screwdriver to access your NVMe SSD.
For other MSI 800-series AM5 motherboards, tehir tool-less EZ M.2 Shield Frozr II heatsink will improve installation and removal.
When updating or creating a new PC, the little M.2 drive screws mysteriously disappear, which everyone dislikes. With an easy clip, the EZ M.2 Clip II installs your NVMe SSD in seconds without tools!
EZ GPU Installation: PCIe Release + Clip II
Since SSD installation is tool-less, They focused on simplifying graphics card installation and removal, one of your PC’s most costly components! Beginners find it tough to fiddle with an uncomfortable PCIe latch beneath their graphics card to remove it without hurting it or their motherboard.
All MSI AM5 800-series gaming motherboards include an EZ PCIe Release button to remove your graphics card from its slot with one finger. The EZ PCIe Clip II, available on other 800-series motherboards including MSI’s PRO line, has an expanded latch that makes it simpler to remove your graphics card.
Easy System Command: Buttons and Switches
Whether a BIOS update abruptly ends or a faulty setting causes boot loops or instability, difficulties might arise unexpectedly. The Clear CMOS, Flash BIOS, and Dual BIOS switches help you recover quicker.
Smart Button: You may configure the Smart Button on the rear I/O to initiate a Safe Boot, reboot, maximum fan speed, or toggle your Mystic Light RGB lighting in your BIOS.
Boot and Reset Button: These onboard buttons let users boot or reset their device without the front panel buttons. As a Smart Button, the Reset Button adds functionality.
The Flash BIOS Button lets you update your BIOS without a CPU or memory.
Avoid removing the CMOS battery again using the clear button. This button on the motherboard’s back resets the BIOS to default and boots.
If anything goes wrong, Dual BIOS Switch takes control. Flip the switch to use the second BIOS!
EZ LED Switch: Faster, simpler system lighting control.
Single-Look Identification
Without the necessary features, troubleshooting is unpleasant. That’s why all MSI X870E and X870 gaming motherboards provide debug tools like a 7-segment POST code display!
EZ Digi-Debug, Debug, and Memory Detection LEDs
Startup or boot troubles unrelated to your OS may make even the simplest PC-building experience a misery. MSI’s Gaming Series (MEG, MPG, and MAG) motherboards now include an EZ Digi-Debug LED, a 7-segment display displaying POST codes, to help diagnose boot difficulties.
EZ Debug LEDs on other MSI motherboards help PC builders identify the component causing boot issues.
EZ Memory Detection LEDs solve the age-old tech support question: Is your RAM working? After detecting a memory stick misbehaving or no memory in that slot, these LEDs flash up.
EZ Monitoring: Dynamic Dashboard III
Monitoring CPU/GPU temperatures, clock speeds, and fan speeds may make or break a steady overclock or boot loop.
Dynamic Dashboard III on the MEG X870E GODLIKE makes hardware monitoring easy. Its huge 3.99-inch LCD screen displays CPU/GPU temperatures, fan speeds, clock speeds, and more in real time, helping you maintain system stability and performance.
Lost EZ Identify Manual? Not to worry!
They’ve added a lot of useful information to the motherboard, but consulting your manual is always a smart idea. For instance, legends surrounding M.2 slots now indicate which drives they support (PCIe or SATA). On the back I/O, USB speeds are clearly marked.
Do More in One Step
A few steps might make PC building unpleasant. The MSI X870E and X870 motherboards include several one-step features that make PC construction easier.
EZ Link: GODLIKE Cable Management
The MSI Project Zero motherboard for a clean, cable-free design to produce the MEG X870E GODLIKE motherboard.
EZ Link reduces cable clutter without modifying the motherboard architecture, allowing neater setups with common PC components. With the EZ Bridge and EZ Control Hub, you can route untidy case front panel wires, fan cables, ARGB/RGB connections, and more to the motherboard’s back and side!
Connecting: EZ Conn-Design + Front Panel Cable
Some MSI-exclusive connections decrease PC clutter. First, MSI PRO series X870 motherboards include a 7-pin (4-pin Fan + 3-pin ARGB) header for one-step ARGB fan wiring.
The X870E and X870 gaming series motherboards’ JAF_V2 11-pin (4-pin Fan + 3-pin ARGB + 4-pin USB) connector lets you connect MPG CORELIQUID P-Series Liquid AIO Coolers with a single cable! Even without one, this JAF_V2 header works with the accompanying 1 to 3 EZ Conn-Cable to connect to the ARGB, Fan, and internal USB ports on many AIO Coolers.
Digging into your case to plug in small connections is difficult. The EZ Front Panel cable has an extension to plug in the headers outside the case, making this simpler.
EZ Plug: Slide M.2 + Wi-Fi Antenna
Image Credit To MSI
Installing or replacing an M.2 drive requires opening your PC, which might be difficult. Accessing M.2 SSDs via the rear I/O using MSI’s M.2 XPANDER-Z SLIDER GEN5 in the MEG X870E GODLIKE removes this problem. It supports two M.2 drives at PCIe 5.0 x4, so performance never suffers for convenience.
The EZ Wi-Fi Antenna is another cool addition to their X870E and X870 motherboards. It plugs in one step for fast installation and removal.
MSI X870 Motherboards
Performance Boost in One Click
Even the simplest construction method is useless without top-notch hardware performance. The MSI X870E and X870 motherboards include several EZ DIY features that boost thermal, CPU, and networking performance.
Click BIOS X, MSI newest BIOS interface, streamlines and simplifies the interface for both experienced and novice over clockers on these motherboards.
EZ Overclocking: Game Boost, AI Boost, EXPO with New Click BIOS X
Overclocking improves hardware performance without overheating. When utilizing a suitable RAM kit, enable EXPO with one click to overclock! Memory Try It lets you overclock your memory to higher clock rates or tighter timings! It provides a list of typical memory settings to easily cycle through.
To simplify overclocking, they created Game Boost, a one-click CPU overclock that optimizes CPU performance instantaneously. However, AI Boost is a clever algorithm that boosts NPU performance for optimal AI performance when horsepower is needed.
MSI Center Smart Management: EZ Optimization
Many AI capabilities integrate AI into your computing experience to make better, real-time choices. Manage and customize your PC experience using the MSI Center’s sleek, basic interface. For instance, AI Engine optimizes PC performance depending on applications.
Read more on govindhtech.com
#MSI#EZDIY#X870E#AMDRyzen#Motherboards#MSIX870E#AMDRyzenProcessors#nvm#ssd#AM5motherboards#graphicscard#RGBlighting#gamingmotherboard#meg#mpg#mag#argb#PCcomponents#MSIPROseries#pci50#ai#AIcapabilities#technology#technews#news#govindhtech
0 notes
Text
HIGH STATIC PRESSURE FAN The PWM fan from Galahad AIO is now separately available. Experience extreme cooling with satisfying light effects controlled by one click via the controller or motherboard software.
0 notes
Text
Volted Mods VM120 ARGB MAG - Best Computer/PC Fans | Volted PC
Volted Mods VM120 ARGB MAG Case Fans redefine PC cooling with powerhouse performance, mesmerizing ARGB lighting, optimal airflow, and silent operation. Elevate your PC aesthetics and maintain peak performance with this set of three fans. Easy installation and a 1-year warranty make them a top choice. Upgrade your cooling game with Volted Mods!
0 notes