#aperture priority
Explore tagged Tumblr posts
Visit Tumblr Blog
Explore Tumblr blogs with no restrictions, modern design and the best experience.
Last Seen Tumblr Blogs


Fun Fact
1,644 Tumblr posts in 1 second.
Text
Black (light) box
As noted previously, Swapping out the light colored backgrounds for the black yielded some weird results. With the camera in aperture priority and Auto ISO set to full auto, the ISO skyrocketed with just that change.
Later I realized I was still operating with matrix metering, where the camera takes in the light from the entire frame. That's fine for most instances, but I'm doing this...

The camera wants to account for everything outside of the box as well as Akane here.
So now I've switched to spot metering, where the camera will meter from just a selected spot in the middle of the frame. I've dropped to a strict 100 ISO. D600, 50mm f/1.8D lens at f/8.

Uh huh. The camera wanted to do 1/5 sec. I'm on a tripod, but not on a timer. Thus the shake.
Let's see what happens when I use the shutter speeds *I* want to use. 1/60...

1/100

1/125

1/150

1/200

And finally 1/250

The box is plenty bright with a light colored background, but it's obvious a little help is needed.
I KNOW!

An LED bulb from the studio kit, dangled from the arm of a desk lamp and pointing through the top flap of the box. That gives plenty of light and then some.
Same f/8 and ISO 100, but with the big bulb only, the camera now asks for 1/30 sec.

And for comparison, 1/50

And 1/60.

And now let's turn on the box lights as well. It's powered by a mere 5V via USB, so it's not really a powerhouse. This time the camera recommends 1/40 sec.

And once more at 1/50

And 1/60

I was about ready to give up on the black backdrop, as the results up to now were basically crap. It took some literal outside-the-box thinking to bring it back from the brink.
And boopenings to @sirfrogsworth. I've been busy the last few days, as you can see. The figure family is continuing to grow as I recruit more victims, er, test subjects, I mean models.
#photography#digital photography#nikon d600#d600#nikon#nikon photography#anime figures#figure collecting#figure photography#light box#lightbox photography#anime#Megumin#Konosuba#aperture priority#Auto ISO#lighting
34 notes
·
View notes
Text
Mirrors and Self Portraits
Julie, our #photography blogger, shares a series of self portraits she's been taking since high school and freshman year as a photo major at Marywood. Each set reveals new insights to her identity & evolution as a fine art and professional photographer.

View On WordPress
#aperture priority#Art#composition#hands#hide#Honesdale#light fixtures#Marywood Art#Marywood Art Department#Marywood University#Marywood University Art Department#mirror#mirror self portrait#mirrors#PA#Photography#portrait photography#Portraits#reflecrtions#reflecting#reflection#self portrait#Self Portraits#self reflection#throw back thursday#Where Creativity Works
0 notes
Audio
(Liam Photography Podcast)
0 notes
Text
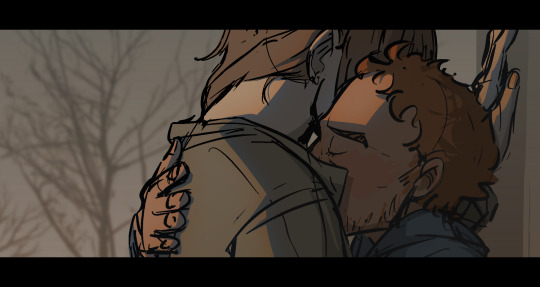
big girl smoochin small guy
what else is there to desire?... NOTHIN‼️‼️‼️
#my art#proj: aperture priority#oc: pavel#oc: ira#oc#art on tumblr#artist on tumblr#original character#oc artwork#krita
7 notes
·
View notes
Text
It’s terrible writing for a character whose hobby is totally confusing to me.
2 notes
·
View notes
Note
hi wife! this is not a prompt lol I just think it’s delightful that you’re teaching students to photograph cause that was actually my major! and I chose it as my career in part because I enjoyed my high school photography class so much
OMG that's amazing! Oh my gosh, my wife chappel roan is a professional photographer... #goals... I'm so lucky... 💖💖💖
I'm having a lot of fun so far, but to be honest photography is not my main area of focus ^^; I'm Doing My Best and drawing on what I learned from my B&W Film photo class in college, and I've picked up a lot from the teacher I replaced, but I'm slightly out of my wheelhouse! It has been wonderful to get access to cameras and a darkroom again so that I can practice 😤
The best part about teaching art is the students, but the second best part about teaching art is getting basically 24/7 access to a funded studio that I am in charge of running aldkcndkskks
#my photo 1 kiddos are just now dipping their toes into aperture priority#and my advanced students are just starting their darkroom unit!! its awesome getting to mess around in the darkroom again OwO#I actually found my old negatives and a forgotten picture of my mom and dad that i will absolutely be making a print of :')#aaaaahhhhhh this is so cool i love learning new things about my friends on tumblr sndndjsn#asked and answered#🍷💥anon#fenris in real life#new tag for when im talking about my IRL self i think lol
4 notes
·
View notes
Text
i. everyone keeps saying it's the hottest summer on record. you have your back pressed flat against the floor and a sweat drip in the crook of your elbow.
ii. generalized anxiety is seen as a disorder during the "ordinary" way of things. if someone were to ask you what specifically is bothering you, the answer is formless and senseless. you have a constant, physical sense of doom. it feels like a hand gripping your ribs. it feels like drowning, always, just-a-little bit. when you complain about it, your mother says - oh, you've been this way since you were a kid.
iii. but nothing is normal right now. what particular thing should you even focus on? your mind is in a terrible aperture, zooming in and out of the small and the large things. in some moments you can't breathe because of your rent bill and a breakup and your dog getting lyme disease. and then an hour later - you are overwhelmed by the shakiness of the whole world, by every person suffering, by the enormity of what is happening.
iv. you googled it. today's high was 94 degrees Fahrenheit (34.4C). it is ten degrees above average. a man on television laughs: but what if i want all of california to be under the sea?
v. how do you do therapy at the end of the world? your video-meet therapist is lovely and sweet and blonde and trying. sometimes you just say, "so... it's kind of just the everything that's happening." and then the two of you sit and stare at each other. more than once she's sighed and said, yeah. it's terrifying.
vi. things move so quickly now. you think about how your local school took six years to approve a new playground. now each day there is a development that makes your heart drop. sure, you can't afford rent this month, but - with everything happening, are you really doing enough?
vii. sometimes it feels like you cannot calculate priority - your body just reacts to each piece of information as an equivalent firecracker. money is tight, you need to get on food stamps, your car needs an inspection. and today another person got abducted. and there aren't any pollinators. and the bill passed the senate. when you try to shove it all into yourself - none of it fucking fits.
viii. you have seen almost no butterflies or bees or dragonflies this year. you go home and try not to overuse your AC. you are watching a debate about AI and water usage. the thousands of gallons wasted just so people can be fed misinformation. the man on television snorts. cry about it.
ix. you are constantly restless, sleepless, pacing. every one problem spirals into another, until they press into your temple and feed from your collarbones. you are trying so fucking hard to balance everything. and still! despite your efforts! it all just happens.
x. you aren't even in the "hot" part of summer yet, and it is ten degrees above average.
@nosebleedclub prompt: sweltering heat
#spilled ink#poetry#nosebleed club#nc#AAAAAAAAAAAAAAAAAAAHHHHHHHHHH#i hope that this makes sense. bc. u know. it's too much !!!!!!!!!!
3K notes
·
View notes
Text


MODULE ONE ASSIGNMENT 3 The Golden Hour, Aperture priority mode, 10 photos
1 note
·
View note
Text
As the adults struggle to find food and keep a roof over everyone’s heads, the children of northern Gaza also have their own struggles. Their mental health is in a horrible state.

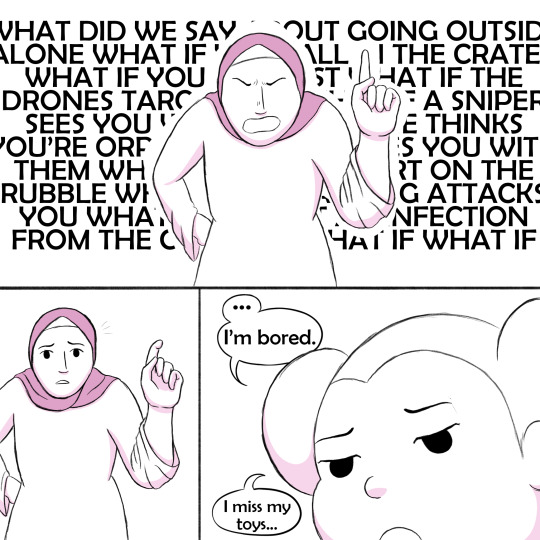
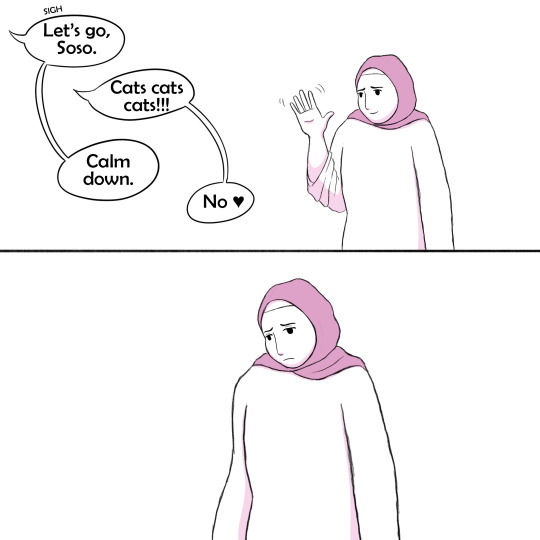
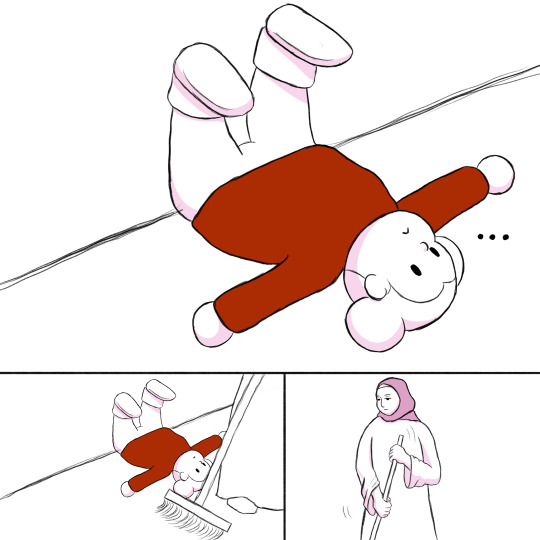
I hesitated to talk about this. I don’t want people to think we have so many donations that we can afford to buy my sister toys. It’s not that we can afford it. It’s just that sometimes we have to skip a meal to buy something for her because the boredom is making her even more depressed. She has severe trauma, she has seen bombs dismember people, she has escaped multiple massacres with us. But now the other kids in the building keep breaking her toys while playing and we can't buy a new one immediately, because there are more urgent things. The cheapest thing in northern Gaza right now is makeup, because no one needs it, so I bought some. I apply it on myself and Soso to make her happy, but I don’t always have the energy or time to play with her. I’m exhausted, sick and malnourished, and I still have to do chores and spend hours at the market looking for the most affordable food, clothes, and hopefully medicine.
We have many expenses that we don’t talk about because people won’t see them as vital. Phone chargers (only used ones that die fast, because new ones are insanely expensive). A fee for the neighbors who have the internet router. Phone bills and data. Toys for the children. School books and private tutors for students.
You’re right, it wouldn’t be vital if the war had only lasted for a week. But it’s been more than a year. Our children’s mental health is destroyed, especially children as young as Soso who is only 4 years old and whose brain is developing in a genocide. Students can’t just stop studying for all this time. My other sister missed her entire last year of high school, but she wants to take university entrance exams. Dropping out of university because of the war has killed everything in me. I can’t let her experience the same kind of loss, so I pay for her books, for paper and printing, for private tutoring classes.
I had to buy three phone chargers in a month. The first one was $70. Days later, it was $100. Two days ago, a neighbor fried the second charger, and the new one was $200. I cried that day, because it wasn't even my fault. The prices of everything keep going up and I feel like I’m going insane. Even our landlord tried to increase the rent. It’s okay if I sacrifice meals. I’m used to hunger. But I have three younger siblings and I can’t watch them lose even more than they already have. I want them to study and play. I want them to eat and stay warm.
Please help me. When all of this is over, I’ll get my degree, find a good job, and I’ll never ask for anything again. But as long as the war keeps going, I need your help. I promise your donations don’t go to waste. Food and rent will always be the priority. Soso and my grandmother are the first beneficiaries. We always think carefully before buying anything. I hope we can reach the final goal soon, and that it will cover all expenses until the war ends, because I’m so tired of relying on strangers. I hate asking for money. I’m eternally grateful to anyone who helps, but the guilt won’t fade, because I wanted to be an independent girl and help my family myself. I'm exhausted and depressed.
My campaign is vetted! ✅️Vetted by @gazavetters, my number verified on the list is ( #347 )✅️
Forgive me, you shared before and it helped a lot so I ask you to please share again @kerosene-saint @andnowanowl @omegasmileyface @4c-aperture @bahrmp3 @dhmiss55-blog @woodesnake @original-character-chaos @revalentinee @rapogirl13 @gorillawithautism @xerxestexastoast @kyoukainokanata @rabiesrabiesdog @rainyrebloggin @ok1237 @isummonedadragon @pro-pin-prinny @boxheadpaint @rukafais @butcklinkle @earlysunsetting @ceeberoni @strangeauthor @the–pony-box @blurrycow @nabulsi @90-ghost
#free gaza#gaza#gaza strip#all eyes on palestine#free palestine#gaza genocide#gazaunderattack#i stand with palestine#mutual aid#gofundme#help gaza#northern gaza#palestine aid#palestinian genocide#save palestine#gaza aid#fundraiser#child mental health#childhood trauma#children#childhood#original comic#web comic#comic art#digital art#artwork#mental health#mental heath support#mental heath awareness#artists on tumblr
1K notes
·
View notes
Text
Several of the things I'm looking at though are upgrading my camera setup again. I've been rather terrifyingly asked to photograph a friend's wedding in January 😯
I do not think I am being paid (I didn't ask and frankly I don't think I have the experience necessary to be paid for this) and they're super chill people so I think it'll be okay. Like they don't even seem to post on social media so I don't think they have super high expectations of it all being perfect. Most of what I've heard about the wedding is quite laidback. I'm mostly worried about messing up a very important event! You can redo a regular photoshoot but if you miss all your shots on someone's wedding day...uh-oh
Anyway, a while back I upgraded my kit telephoto lens to the much better EFS 55-250 mm one. And then that became my favorite one for shooting since it's soooo much better. So I had already been thinking of upgrading the other kit lens too, and now I definitely do since I want something better.
So now I'm looking at Canon's "nifty fifty" lens, the 50 mm f/1.8 STM. I wonder if they'll mark it down in Black Friday. I have never shot on a prime before but I'm really thinking I will need that wider aperture for getting the best quality for portraits in low light (indoor wedding.) Also looking at a used Sigma 17-50 mm f/2.8 as a more general replacement for the 18-55 mm variable aperture kit lens (but I'm worried about a fixed 2.8 aperture for landscapes, since my current kit lens is f/3.5-5.6 and normally you'd want to keep more depth of field for landscapes. I'm trying to find some magical perfect affordable lens that's great for both that doesn't exist.) But overall I need to own at least something that is f/2.8 or f/1.8 I think.
Annnnd I think my camera sensor has dust on it because I noticed spots on my photos back in Iceland, so I want to order a kit to clean it. With the like. Dust blower thingy since you dont want to risk scratching it. And I think I should invest in a new camera bag that is maybe actually waterproof since I pushed my luck in Iceland with my current bag. Much to think about, much to spend.
If I get these lenses, I better play with them a lot in December before I try using them on a wedding
glad i've found that Surprise Cash a few weeks ago because now I've suddenly decided I need a bunch of random stuff. i have like 7 tabs on my computer just monitoring things for black fridady
#i also need to pre-plan poses#and visit the reception site to see it beforehand#and uh. better learn my manual settings#i know them but i dont like know-know them i just kind of fiddle until it looks good#but i want to better understand them for something so important#or perhaps try other stuff like shutter priority or whatever#but if i have a fixed aperture lens then i already dont have to worry about the aperture settings? so that already removes some variables#do any of you understand this or am i speaking tongues
10 notes
·
View notes
Text
a little essay on how i understand photography exposure to work because. like. itll force me to conceptualize more clearly. you get it
three stages: aperture, shutter, sensor
there is an order to how cameras experience light: aperture -> shutter -> sensor. in terms of clarity, each of these settings have settings.
aperture
the aperture controls the clarity of image by controlling the angle of how light enters the lens (measured in "f-stops": low f-stop = wide aperture and vice versa). light entering the lens indirectly (not going straight into the sensor) bounces around, producing what you see as depth of field. restricting the aperture makes the angle of entry for light more acute, and so light cannot enter as indirectly, thus sending more light straight to the sensor without any diffusion. this restriction however literally reduces the amount of light that can enter the lens, and so the tradeoff of full-image clarity is low luminosity.
shutter
the shutter determines the amount of light the sensor is exposed to over time (measured in fractions of a second). mechanical shutters block most of the sensor from light, only allowing a sliver of light between the blades in as the shutter scrolls across sensor; electronic shutters simply turn the sensor on for however long its supposed to. a fast shutter speed only lets a single moment in at the cost of a less light reaching the sensor (darker images), while a slow shutter speed lets many moments and thus much more light in at the potential cost of blurriness. the tradeoff is, again like the aperture, high clarity versus low luminosity.
sensor
sensor... sensitivity... is basically the gain applied to the light which hits the sensor, termed ISO. ISO originally comes from film [emulsion] speed, or how sensitive the camera film is to light (and it's measured in whole numbers from like 200-25600 or something like that, not sure why--definitely something to do with film). a highly sensitive film emulsion needs less time to fully develop, but without control can cause overexposure, and also emphasizes inconsistencies in the texture of the film itself, which is seen as noise or film grain. digital cameras sought to emulate film ISO by giving users control over the gain of the sensor. increasing gain boosts the total light levels of the image at the cost of also boosting the inherent digital noise present in the electronics of the sensor. ISO gives one some final control over the luminosity of the image (and in film the speed of development) at the expense of graininess. once again, in a manner of speaking, high clarity against low luminosity.
exposure triangle or trading off
since each stage of light modification (lens -> aperture -> sensor) controls luminosity for the next stage (as well as the final product), if one wants "clarity" in general, there is almost always a necessary tradeoff between the primary quality (luminosity) and secondary qualities (depth of field, blurriness, grain).
since each stage of photography modifies the total amount of light in the final picture, there is nearly always a tradeoff occurring in the process of photographing. the primary quality, luminosity, must be preserved in order to successfully take a photo (or else you won't have enough light to see it). if you don't have enough light to begin with, some sacrifices must be made at one, two, or all of those stages to have enough light. how you prioritize these settings moves you around the inside of the exposure triangle (google an image of it, you'll understand).
photographing motion clearly
so for photographing runners in an indoor track, for example, you probably don't want a low shutter speed. that makes it impossible to make out the individual forms of the runners. but since you're indoors, you likely don't have enough light to work with. so you give priority to a shutter speed that will give you clarity of the runner's movement. this reduces the total amount of light getting to the sensor, and you're in a relatively dark environment and need to brighten the image up. you can't choose an extremely shallow depth of field because you need to be far enough away to get their full body into the camera, and you can't boost the ISO too high because everyone thinks graininess is unprofessional. so you need to modify both, such that you maximize the depth of field without the runners themselves getting involved in the blurriness, and then kick up the ISO little by little until the image is properly (not underly or overly) exposed without being noticeably grainy. maybe you take a few steps closer to get a higher fstop, too.
photographing stillness clearly
let's say you want to do some nature photography, maybe some plains sitting at the foot of a mountain range at midday. you want everything from the foreground to the clouds in the sky to be clear. so we have to give priority to a high depth of field, which means setting our aperture to be as small as possible. this of course greatly lowers the amount of light making it to the shutter, so you must balance between shutter speed and ISO: if you know there's nothing really moving around, you can choose a lower shutter speed which makes up for the rest of the luminosity and keep our ISO still low. if the clouds are drifting somewhat fast and you have wind blowing across the grasses, however, you're going to need a slightly higher shutter speed so as not to blur these details and then compensate by boosting the ISO until it's either exposed properly or almost unbearably grainy. (it seems like basically every nature photographer is using denoising filters in photoshop anway...)
prioritizing two stages?
in the case you must prioritize two of these stages, there are basically only out-of-camera ways to save the photo. for low ISO + high fstop, you need both a low shutter speed and stillness of subject or tracking equipment (and probably extra lighting). for high shutter speed and low ISO, you'll want a low fstop, and so getting closer to the subject (and probably extra lighting). for a high fstop and high shutter speed, you'll need a very high ISO -- or really, extra lighting. it seems like in any case where you have to prioritize extreme settings for two stages you should really just look into finding better lighting.
conclusion
so in most cases you probably have to sacrifice at least a little clarity in two corners for gaining clarity in one. that's what the exposure triangle symbolizes. that's why it's important to know ahead of time what your subject will be and how you'll photograph it!
of course this is all just for the photographer's ideal of "clarity". there are beautiful photos which are overexposed, underexposed, blurry, grainy, smeared with motion, et cetera. but that doesn't mean you can't ignore the exposure triangle--there are very rarely photos anyone want to see that are just totally black or white. you have to adjust these stages so that you get actual, comprehensible lighting, both light and shadow
53 notes
·
View notes
Text
quick & easy lightroom walkthrough or: shooting through dirty double-paned glass, and other hardships.
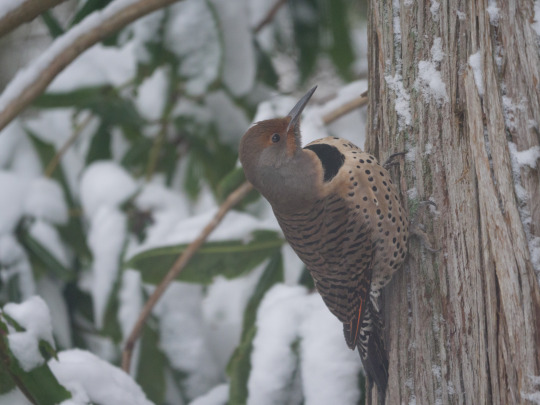
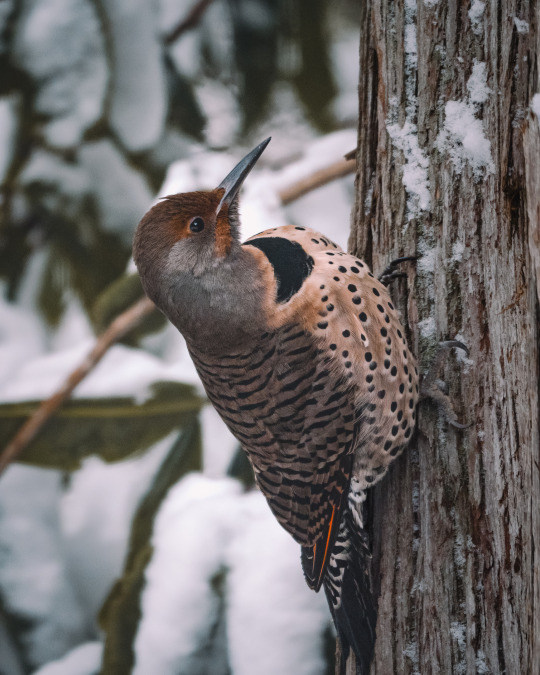

I'll tell you! (Original post here.)
✱ KIT Panasonic GH5 + LEICA DG 100-400 with rubber hood for shooting through windows.* ✱ SHUTTER 1/125 sec ✱ APERTURE f/6.3 ✱ ISO 1600
*I use this one. It works for me, but it's a little tricky. It was a gift, and I think if choosing for myself I'd find something easier to get on and off.
WHAT'S ALL THIS, THEN? It was cold outside, obviously. And the flickers bolt if I try to open the back door, so sometimes I'll post up in front of my dining room window and just get the best shot I can. I do this less and less these days, now that my arthritic hands and I have heated gloves. The 'after' photo is a brand new re-edit using better tools than were available when this was shot. I was never happy with how it looked, before now.
under the cut: EDITS
✱ Detail: Sharpness & Noise Reduction My main problem here is sharpness. The photo is in focus, but because I'm shooting through a thick storm window, I've lost that tack-sharpness I really want, and I have a whole bunch of noise to contend with. This would always be the case, but worse depending on the camera you're using, and in my case this was two generations ago - the GH5. I have tested window shots with the GH7, and they're a lot cleaner.
That being said, the trick is to always, always, always use masking along with sharpening. Like, a lot of masking, just so much masking, so that you avoid sharpening an already-noisy background. In Lightroom, you can hold down down the ALT key while using the masking slider to visualize exactly what is being sharpened.
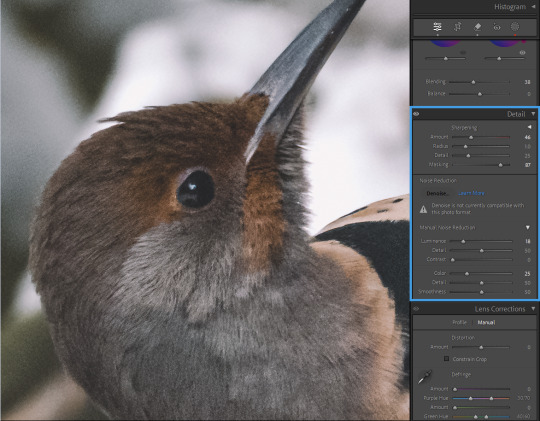
I'm choosing to leave the background noisier than I prefer, because even if I mask out the background, as I increase noise reduction, I lose detail in the edges. Leaving some noise in the feathers also preserves that sense of sharpness, generally.
This is a matter of personal preference and priority in your edits. I've had students absolutely hammer their photos with denoise and like it that way, and that is totally their call. I like it sharp.
Note: you could also do the sharpening/noise reduction at the end, after all your other edits, so that you have a better sense of how much you still need after toning. That's often my preference. I probably went backwards here only because I've edited this image before and had it pre-loaded in my brain.
✱ Tone Dehaze is the real MVP here. You could go even harder than I have on -blacks/+clarity/+dehaze, for a dramatic, crushed look. I decided to strike a balance between the soft darks I prefer but the clarity absolutely needed to make this look less smooshy. And my curve is pretty gentle.
Before toning and after:
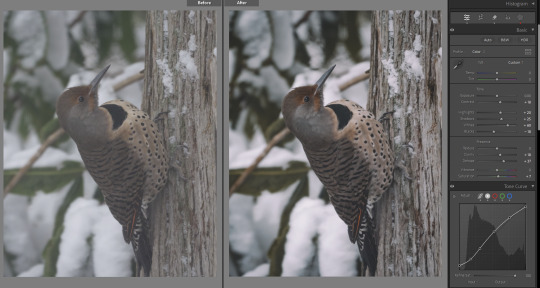
(You can see that I've also done some color grading. But because that part is entirely personal preference, I'm skipping it here.)
✱ Selective Adjustments With a photo as flattened as this one, I always want to add some depth to it with masking. I have just three masks in this case:
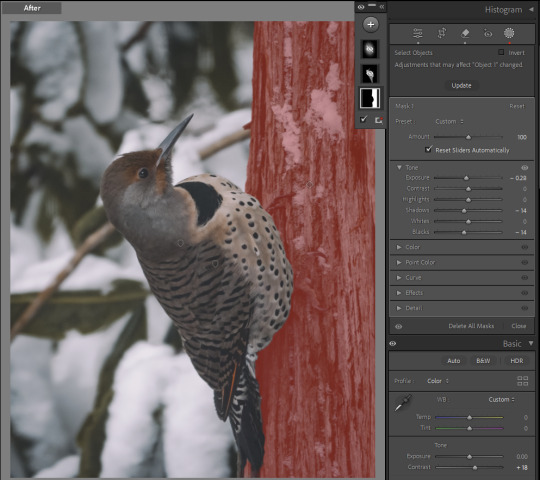
1. The tree was blown out, detracting from my subject and looking, frankly, unrealistic. So I've darkened this on its own, so that my subject will stand out.
2. Contrast, texture, and clarity to bring out the detail in the feathers; a touch of saturation because the global color grading I wanted took away slightly from the bird's natural coloring. I want this on a mask, and not globally, because I do not want to exacerbate the noise in the background, or the texture of the leaves and snow.
And 3., to make the flicker really pop, I've got a 'spotlight' mask
...which is working together with a light vignette to draw the eye to the subject. You could also create an asymmetrical vignette with an inverted -exposure mask, if you needed to.
All together now...
And that's it!
As always, please feel absolutely free to send any questions to my ask box. I try to watch for comments and questions in the tags, but sometimes they get missed. And if there are any other edits you'd like to see, let me know!
Find my other walkthrough here.
#on photography#photography#pnwander edits#lightroom classic#editing tips#photography tips#pacific northwest#pnw#nature photography#wildlife photography#photographers on tumblr#lensblr#how to#lightroom#original photographers#naturecore#photoshop#mine: photos
50 notes
·
View notes
Text
Some lighting shenanigans
When it's too cold to set even a toenail outside, and the rooms you want to photograph for work aren't ready. I paid for this umbrella kit, so I'm going to use it.
For now it's just a trifold posterboard for a backdrop. Using the shoot-through umbrellas tonight. Megumin and Yunyun are our models. Using the 50mm f/1.8D lens at f/5.6 in aperture priority.
First, right LED only.

Adding the overhead desk lamp.

Left LED only

Left plus desk.

Both LEDs

And finally both LEDs plus desk.

As you can see, the addition of the desk light adds a yellowish cast to the image. Almost peach. The LED lights are rated at a color temp of 5700K. The desk lamp is a hotel standard desk lamp that came with the room.
A fellow anime redditor suggested a light box if I was going to continue with figure or product photography. After seeing what they got with a 16x16x16 box, I decided to order one for myself. I wanted to go the next size larger, but after taking measurements of my desk, the 16" box is my better option.
Boopenings to @sirfrogsworth. Hope you're getting to feeling better, and I'd like your thoughts on light boxes. In addition, I have some wide-angle shenanigans planned for the Three Sisters Bridges in the city once the weather breaks.
#photography#digital photography#nikon D600#D600#Nikon#nikon photography#anime figures#konosuba#megumin#Yunyun#figure photography#product photography#light box#shoot-through umbrella#photography lighting#lighting
37 notes
·
View notes
Audio
(Liam Photography Podcast)
#SoundCloud#music#Liam Photography Podcast#Kodak Cracking Down#Aperture Priority Key Caps#Drone Pilot Trial#People's Choice 2024 Awards
0 notes
Text
i didn't post these!!! what!!!
#my art#proj: aperture priority#oc: ira#oc: pavel#krita#art on tumblr#artist on tumblr#oc#original character#oc artwork
4 notes
·
View notes
Note
I just bought my first non-phone camera (Canon PowerShot SX70 HS). I travel a lot and want to take great photos of the landscapes I see. What would you recommend for someone who is essentially a novice? So far I've been afraid to change the settings from "auto" but I want to use the full capabilities of this camera!
I'm really tired and I don't have the energy to explain everything, so I'm going to give you the secret recipe to landscape photos. This works 80-90% of the time unless there are challenging variables to account for.
Put camera on tripod or stable surface. Set timer to a delay of 1 second. Put camera in Av or Aperture Priority Mode. Set f-stop to f/11. Set ISO to lowest setting. (Usually 100.) Let the camera decide the shutter speed automatically. Focus 1/3 of the way into your framing. Press the button, stand back, and let the camera take the shot.
Tripods are a pain in the butt to carry around, but they open up a whole new world of possibilities when it comes to landscape shots. You can also try a little bean bag weight, railings/ledges, or those gorillapod things.
If I am feeling better tomorrow, I will reblog this and explain why these settings usually work and add some additional tips along with settings for when you can't use a tripod or stable surface.
But this should give you something to start with.
223 notes
·
View notes