#any advice for shading would be greatly appreciated
Explore tagged Tumblr posts
Visit Tumblr Blog
Explore Tumblr blogs with no restrictions, modern design and the best experience.
Last Seen Tumblr Blogs


Fun Fact
There are dozens of funny blogs to kill time on Tumblr.
Text

An attempt at a mermaid Kirimi, I thought it'd be funny to give the funny fsih man a fish tail
#marikinonline#marikinonline4#mo4#gou kirimi#kirimi#kirimi mo4#art#mo4 art#mo4fanart#fan art#ik i suck at shading#any advice for shading would be greatly appreciated#background advice too#any other advice really#i just love advice#anyways#he's my cutie patootie#i will deep fry him#he will be made into fish sticks#you cannot stop me#it will be done
12 notes
·
View notes
Note
Your art is amazing in all aspects! It's very inspiring! My sister and I both adore your Morrowind drawings especially.
However one thing about your art which has left me in awe is how 3 dimensional it is. "It's like you can hold them" as my sister says.
I've been trying to improve this aspect of my drawing but it's very overwhelming. I don't know what to do and what to learn. Any tips or advice in this regard would be greatly appreciated. Like what do I even learn? Anatomy? Perspective? Shape design?
Thank you very much💖
AHHHH this is such a kind thing to say, thank you so much ;; ❤️ i don't know what to say,, but i'll try my best to explain how i go about drawing!!
from my perspective, what really helps develop a sense of structure and three-dimensionality is breaking shapes down to simplified forms, take this maav sketch as an example:

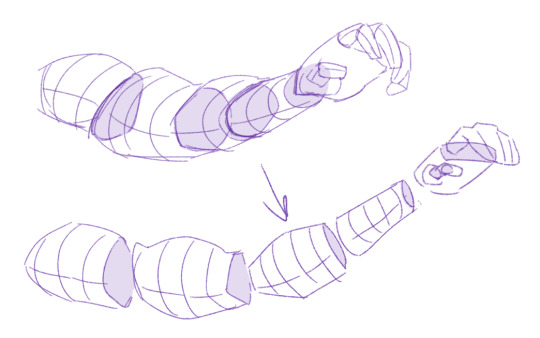
breaking down objects into cylinder-like and rouded shapes provides a good visualization of volume and how an object moves and rotates in a three dimensional space! so yes, you were right!! structurization and perspective are crucial to learn along with anatomy. here's how i like to do it:

making grid-like structure studies like these helps me with shading and rendering later - think of it as some kind of a preview which shows you where exactly will the volumes intersect, curve, bend etc i hope i was able to answer your question and best of luck in your drawing!! much love :) 💖💖
171 notes
·
View notes
Note
Hey millie! Do you have any advice or tips on someone who has no idea where to even begin getting commissions? I love seeing all your stream art on my dash n thought you might have some ideas
Hi! I have a few pointers. And thank you, that is very kind :)
You'll need a payment processor. Paypal is pretty defacto in the art community. I always send invoices and it helps the transaction go smoother and gives you some control over the details and is better for recordkeeping purposes. You'll also need a platform to advertise your commissions on. Ideally this is just the same place you post your art and you have established yourself with a decent amount of art and some time on the platform to build an audience. There are artist-for-hire forums and the like where commissioners can seek out artists but I find the ratio of artists to commissioners tends to be astronomical so getting commissions on there can be difficult (I've never used them for that reason, if anyone has and wants to chime in it'd be appreciated!)
You'll need some way to advertise your commissions and organize the information. I use trello, I love that I can have my prices, TOS, examples, queue and finished pieces all in one spot. When you advertise your commissions an image that leads potential customers to your information helps. Some people make an image sheet with their examples and prices and TOS all included but honestly I've found that's more work than it's worth. The less digging customers have to do to find your commissions, the better.
You'll need to know what sort of commissions you want to offer. I see a lot of artists newer to offering commissions offer options for sketched, lined, colored, and shaded pieces that are also split by headshot, half-body, and full-body, so that's already 12 potential commission options, and then throw on options for backgrounds and props and such... less is more. Excessive options can be overwhelming and generally people will gravitate to one end (sketches if they're low on funds) or the other (fully rendered if they really like your work and have the cash). I try to keep it simple, I had my sketch headshots at $10 and lined fullbodies at $50-$70. Finding a "niche" is great! I did psychedelic portrait commissions and that was my best selling commission option for awhile.
As far as pricing goes that is a personal decision with a lot of variables. With digital art material costs are hardly a consideration but time spent making the piece, your skill level, and demand all are. I always start with an estimation of how long it takes me to complete a piece and go from there, I start at $20 an hour because that's how much I need at a full-time job to get by. If I think something will take me about 3 hours that's a $60 commission. Sometimes that does bite me in the butt and I end up spending something like... 16 hours on what I estimated would take me 8. Personally I always just eat the difference because I care more about providing a good experience for my commissioners than getting every penny :P I also charge up-front so it would feel unprofessional to go back and ask for more. Your commission prices should really be more of a rough estimate than a guaranteed quote, subjects can vary greatly in complexity, you don't want to charge the same $50 for a fullbody if some characters can be drawn in 2 hours and others take 6. Personal advice... if you are struggling to sell your art for say at minimum $10 an hour, it is either your skill level or your marketing / visibility. If it's the former, I really recommend stepping away from taking commissions for the time and spending a couple months or so working on developing your art skills. You will thank yourself later!
It's also important to know where your strengths and weaknesses lie. If you struggle with drawing backgrounds it's better to find that out in practice rather than on a commission while you're suffering through trying to figure out how to make rocks look like rocks or incorporate lighting and that sort of thing not that I would know what that's like, haha no wayyy.
You'll need a terms of service and there's a lot of considerations that go into that:
will draw / won't draw (can you draw xyz species? backgrounds? technology? etc)
turnaround time, queues (how long will it take to finish, a week or two months at most? do you finish commissions in a certain order?)
slot limits (how many outstanding commissions will you take at a time? it's important not to bite off more than you can chew)
payment options (how will they send you the money? also, when? up front, 50 now, 50 later?)
refunds (how will you refund if you can't complete a commission? do you offer refunds if requested by the buyer and at what time? if so, are they partial refunds determined by progress completion?)
work in progress images and revisions (do you offer WIPs? at what stages? how many revisions will you make? do you charge for additional revisions?)
usage rights (what will you do with completed commissions? just use as portfolio pieces? what can the buyer do with commissions? can they draw over them, crop and color filter, use as icons, print off, use commercially? if commercial applications is a considerations you need additional terms on that)
contact methods (email, discord, the same platform as posted, etc. how often will you reach out to them?)
anything else you can think of that would be relevant.
Having a public queue is good so people can see how much work you've done on their commission and/or where in line they are.
When working with commissioners it's important to be clear on what they're looking for. Have a character reference if applicable, know a bit about their personality and maybe how they want them depicted. Also things like time frames and resolution might be important.
And social skills is an obvious one. Be corteous and all that. Not much advice I can offer in that area. Be transparent, don't be rude, and you'll probably be fine lol. Overtime, you get practice with some less obvious things like commissioner personality types and vision and are better able to tailor your approach to what works best for the client. Some people just want to see their character in your style, others have a specific vision in mind, that sort of thing.
There are a few other things I can think of like, I really recommend you give yourself a month minimum turnaround time as breathing room for commissions (and if you finish it faster, hooray!), also I generally recommend charging 100% upfront (or something like 50/50 on larger commissions), I could go off on a few different things but that's more personal advice and opinions and this is getting to be a long post already :)
Also, take a look at a few different artists that offer commissions and what their process looks like and go from there!
If you have any more questions don't hesitate to ask and I'd be happy to help ^^
8 notes
·
View notes
Note
Hi, first of all, I love your art. I really admire your sense of posing and simple but great colour schemes.
I would love to get some advice from you. The light source in your recent Despair Sisters posts is directly above, do you have any tips or advice on shadowing in this light source? I love such impressive lighting, but it's hard to imagine what the shadow will look like. Any advice would be greatly appreciated!
Thanks ❤❤
I don't usually get asked for tips, so I am sorry if my explanations are confusing
the most easiest (for me) way of shading is to do it before doing base colour.
I usually do two layers of shading with the same colour (dark purple) but different opacity (depending on how the result)
and if you are asking specifically on my recent post, I just Fill everything with purple, since it is more shade

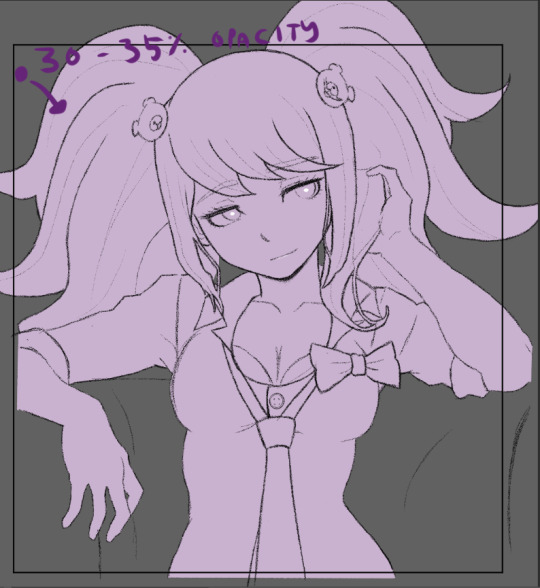
then just erased the part that light should go, starting from the top or where the light source shine. then adjust/erased/add more details


some people use the mask tool for this. I usually use it if I want a more blend effect, but for this one, I don't use it because I am lazy
then add another layer above this shade layer with the same colour and more or less the same opacity with the first one , and add in where shadow can be darker usually where something overlap like skin below hair, or somewhere lower

the layer panels look like this for me (2 different layers of shade inside a layer folder), and set the folder mode to multiply. I am just lazy to name my layers

I don't know why my Junko one had a folder inside a folder, but usually it will look like this

then, hide your shade folder and proceed to do the base colour


For context, I used a white colour to colour Junko first as a guide to clip my other layer so it won't fill outside the guide white colour. and screen is for me to adjust how the colour will look like (sometimes different screen like phone or monitor have different effect on the result, depending on the mode your monitor is in : cool or warm or etc) notice that the shade folder is hidden,
I am so lazy that I don't name my layers which will make it hard to find a specific layer with errors
then unhide the shade folder.

Then just add in a bit of light details depending on your taste
I hope this help you (not to confusing since this is how I find myself comfortable with)
6 notes
·
View notes
Text
you can choose what you are, what you will be. @warbyrds.
ㅤmaria's not quite sure if that's advice, philosophy, a line from a movie, or some mixture of the three. whichever it is, carol's words stir something keen inside maria—something poignant, but falling just short of belief. sorrow digs a small hole inside when she tries to kindle faith in the idea, and the words won't find a spark.
ㅤ" i'm no good at philosophising, you know. you'll need to find someone much more wise than me for that. " her red lips turn crescent, the smile soft, and just a shade rueful. she shrugs, brown eyes parting from carol's face after several beats of lingering there, studying the other woman's features and trying to absorb the thoughts behind them. maria's eyes settle on a candle burning on a nearby table, the flame small but blazing, pale wax dripping down the stick below. " i think you've got a much better chance of changing what you will be, than changing what you are. " maria turns her attention back to carol. she pinches her lips, shrugging again, as though in the handful of moments she'd spent contemplating the idea, she's arrived at some profound conclusion. or maybe, despite her objections, it's an idea she's considered before, and this contrary belief is one already determined, already held.
ㅤ" i struggle with the what you are, though. how'd you choose that? you know, the parts of you that matter—how'd you change those? " she leans in a fraction, her smile losing its sorrow, and gaining some joy. " genuinely asking. any tips would be greatly appreciated. "
2 notes
·
View notes
Note
hi okay i have begun my journey into Painting The Little Guys and it is. Less straightforward than i was expecting for some reason. what is a wash. how do i drybrush. how do i know if i need to use primer or not. you do not have to answer these questions but i would greatly appreciate resources/advice for someone who has not picked up a paintbrush since middle school 🥺😭
Hi!!!
I am sorry if this is insanely long but here we go... The foundations of the little guys is your main thing I think, if you have resin guys you should give them a lil dish soap bath first but if they are plastic ur good. Priming is in my book essential for them, easiest once they are built but if ur a rebel like me I prime when they are still on sprues 😅 any ol primer is fine, you don't need expensive stuff for this, I use an off white or black cheap spray paint, just gets em a nice even base to work with!
Drybrushing! Is super cool to do, you should use a chunky round brush working from your darkest shade to lightest, get a little paint on a palet of anykind (mcdonalds napkin coz they got that shine so the paint just doesnt soak into it, or an actual palet😅) and like circularly work it through the brush so only a little paint is all over the bristles then just gently working it with a tiny bit of paint at a time over the model in circular motion,,, i will say its better for detailed larger models or scenery bits, love it for big walls, and its a little harder on a smaller more figure scale to get into little nooks and things but its a cool effect!
Washes are the best especially for folks newer to model painting, same with contrast paints! once you have ur lil guy painted with all the colours you want, and its all dry, thats when you do the wash, i use a darker wash to add shadow super quickly, just cover the areas wanted, itll be super runny and thin so you just spread it where you want and dont need much, but you can get cool washes i have ones for mud blood and oil haha, easy shadows and effects, but you can get all kinds and glowy ones and things😉!
You can also get effcts paints like that if you wanna go all out, mostly muds and snows and stuff for terrain 🙂
A good miniature brush is worth it i would say too, look after your brush babiez!
Citadel paints are well known for a reason lol but any miniature paints are good!
I absolutely will answer any and all questions if you need anything! I love my lil plastic guys ❤️
3 notes
·
View notes
Text

This was a struggle to draw. I tried making the piece emotional, but the lack of lineart made the shading really difficult. It's supposed to be a sci-fi astronaught that ran out of oxygen, Hahaha. I would greatly appreciate advice and citique of any kind, it always helps me improve.
0 notes
Text
Artists of tumblr, pls help. :]
I am trying to do value studies bc I really suck as shading/lighting. I think I did pretty good on this but idk if I like how blocky it is almost? I did color blocks then used the smudge (? The finger) tool on procreate to try and blend it out after turning on alpha lock for the layer.
I tried changing the opacity and size of the pen but it either made it way too much or not enough.
Should I do it a different way or just keep it and say it’s my art style?
Any help / advice (or anything like that) would be greatly appreciated.
Edit: it does not look that smooth on my iPad?

#I’ve been procrastinating the value studies for months.#artists of tumblr#artists on tumblr#artist advice
3 notes
·
View notes
Text

A redraw of sorts of kaede Akamatsu. as I know I did a bad job last time I drew her so I want to redraw her to see if I can do here any sorts of justice. Any advice to Improve will be greatly appreciated, if there is any character you would like me to try and draw. please feel to suggest. I'll try and get any suggestions done once I got my school work done lol. As the website we used crashed as I was using it so I sort of gave up and continue this.
Note on the art:
I did try and follow both the shading technique and the use of staying away from using black and white as shading. I think I did well , the only expection was on the highlight on the cheeks. as I forgot to do that.
in addition, There were slight edits made to the drawing while editing. Such as colouring bits I missed. plus finding the shading on the chin. cause I lost it in the layers lol.
also my joints are playing up so I had to rely on the reflect tool a little bit more. as it fricking hurts lol
#danganronpa kaede#kaede akamatsu#danganronpa#danganronpa v3 killing harmony#fanart#speedpaint#digital art
1 note
·
View note
Text
🎸::Update on the Hobie Drawing::🎸
tl;dr(full rant below)::
theres things that need to be tweaked/adjusted/added/ changed
i have no idea what to do after a month of not working on it,, and a major style change
i still love how this turned out and im afraid to do anything to it cause its one of my favorite things I've drawn.
I need help/feedback/advice/ideas/criticisms
Now onto the rant:
i have 3 options:
finish the color blocking
tweak everything and adjust colors for later painting
or start over
but i rlly love this still and im so conflicted
i have no clue what to do
theres a lot that needs to be tweaked cause my style changed a phuckton since i started workin on this
also i noticed more from doin further studies on hobie in general::
-his wicks need to be longer/bigger
-there needs to be more variety and interesting texture value between the wicks, as well as smaller ones towards his forhead that i just,, didn't do??
-the way his face is angled makes a lot of the features confusing when you look at actual photos of him from this angle
-his nose isn't the right shape
-his body is...not bodying
-his clothes arent clothe-ing
-the background would be better as a blueish hue or a lighter grey so i can more accurately capture his hues, including the reds, and purples in his skin
[take the concept art from the book or him in the spider citadel thing for examples of blues and greys]
-the pose is a lil stiff and theres not a lot of expression in his face.
{even while hobie wasn't really reacting to things occuring, like walkin with miles n gwen to see miguel, his face was still more expressive and had more of a life to it}
-he needs to be more angular and his face needs to have more tone, which i know would've been solved or seen in shading or coloring but even still
idunno,, im just thinking out loud and have no clue where to go from here
any advice/ideas/feedback/criticisms/etc. are greatly appreciated.
thx
WIP
ive got 13 hours on this drawing and im still not done,, IM BARELY STARTING THE COLOR BLOCKING IM GOING TO FUCKING EXPLODE OOOUUAAAGGHHH
he is pretty and coming along well so i cant rlly complain

#artist#digital art#illustration#lemon#ibispaintx#fanart#art#hobie brown#atsv hobie#hobie spiderverse#atsv#across the spider verse fanart#miguel o'hara#spider man#spiderpunk#marvel#art wip#art help#into the spiderverse#miles molares#peter parker#spiderdads#spiderman fanart#please help me#barbie#genshin impact#fnaf#tumblr fyp#fyp#explore
16 notes
·
View notes
Text
looks like someone put a pause on the grumpiness ; )
(reblogs are greatly appreciated, it helps get my content out there! if you guys like what you see, please reblog it too <:D)
miguel x grumpy reader pt. 2

(part 1)
surprisingly, you were quite calm for the past few days. you seldom got annoyed at everyone, in fact, you seemed a little nicer. everyone was more horrified of you being nicer than usual than the classic, snappy image of you that they were so used to seeing.
you had a smile on more often, it unsettled a lot of people, but when they found out you were genuinely happier, they couldn't have been any more relieved. they didn't know what changed in you that you were suddenly a more friendly, more approachable person than before, but they didn't need to know.
miguel, of course, was very aware of what changed; and he was falling for that version of you as each and every day passed by.
behind closed doors, you were a goofy, beautifully emotional mess in front of miguel. you would change your expression and demeanor on the dime when it was necessary, can't have everyone think you didn't care about work anymore; but you liked letting loose every once in a while, especially when it came to the man who, once feared you greatly, now loves you wholly.
you two tried to keep your little "companionship" under wraps, sometimes some random spider person would catch you two together and think that you two would snap each other's necks off, but no, you two would just talk. and smile at each other. that was a scarier sight, so they'd just walk or swing off and pretend they saw nothing, it wasn't their business, anyway.
"feels good being feared, huh?" miguel asked you with a chuckle as he looked into your eyes, taking in how breathtaking you look, right in front of him; flashing him the sweetest smile he'd ever be treated to in his entire life. "you like being respected like the scary little spider you are?" he teased as he ran a hand through your hair, his smile widening all the while as he heard you giggle.
"it is quite... fun to have them run away or straighten up when i enter the room. it used to be offensive, but i wear the impressions they have of me as badges of honor." you expressed with exaltation, kind of a little too proud that you were well respected, at least in your perspective, at HQ. you loved being a leader, you hated it when others griped or disobeyed your orders, let alone someone else tell you what to do; and you took no nonsense none of the time.
recently, you were more lenient with your leading style--you gave the spider people under your leadership some breathing room, gave them more breaks, you barked less orders at them. you always gave constructive criticism and proper advice on how to wrap up missions neatly; you just always struggled with delivery, you weren't exactly the best people person, but you had a big heart, even if you kept it hidden away from many eyes.
miguel sighed in contentment as he leaned closer towards you, a small pink hue dashing his cheeks. "i do seem to find myself a little attracted to someone who can keep up with my style of leadership. someone who knows what they want and won't back down until they get it just the way they want it." he muttered as you felt his breath hot against your face, your noses nearly brushing over each others, which sent a shock up your spine, causing you to sit up straighter, and to blush a deep red shade.
"i know you're smitten with me, o'hara, i just didn't think you'd be, what was the term? ah, masochi-" you were cut off as he put a finger on your lips, laughing to himself softly. "i'm just simply admiring a strong, capable, scary comrade." he said as he rubbed the tip of his finger over your soft lips.
you chuckled back. "that tickles." you commented as his finger rested on your lower lip. before either of you could do anything else, lyla appeared in between the two of you, looking smug and snarky as usual.
"hey lovebirds, anyway, stop being like a married couple for a minute and check this out." she said as she pulled up a slideshow of pictures of another universe your most recent team was sent to. they were tied up in their own webs and the villain was causing mass destruction, civilians running away every which way, it was utter madness.
miguel sighed and cursed under his breath in spanish as the your bottom eyelid twitched as you continued smiling as if nothing were wrong.
"this is what i get for being too nice, apparently." you grumble as you headed off to get your equipment. but before you could even go, miguel gently grabbed hold of your wrist, looking at you with soft eyes. "regardless of what trouble they get in, or how much destruction is out there... you're always a great leader. it wasn't your fault for being more lenient, they should've been more responsible and organized. okay? you're doing amazing already as you are, querida." he said as he tucked a lock of stray hair behind your ear, caressing your cheek as his palm found its way down your face.
you smiled at his comforting words, it took your anger away by a smidge and reassured you a whole lot more than you expected it to. "okay. thank you, miggy." you thanked him as you gave him a peck on the cheek and grinned as you walked off to get your equipment, leaving in your wake a flustered mess of miguel.
he leaned against his desk and grinned widely, lyla taking pictures of his astonished self as he takes in the softness of your lips, the sweetness and reality of your kiss on his cheek.
you gave your team a stern and firm talking-to about following protocol, the plan, and not straying away from the team to please their own ego. you did some screaming, but they weren't complaining; they didn't do as you said, and they got themselves tangled up in that mess.
but as you were chewing them out, miguel came by and petrified every single one of them with his signature, cold gaze. "think they learned their lesson?" he asked you with his hands on his hips as he peered at you. "i'm hoping they did." you said as you looked at him with your arms crossed on your chest.
after a few seconds of you two playing the angry parents card, you and miguel cracked into smiling faces and laughed a little at how scary you were both being in front of these guys. you dismissed them with a warning, and you sighed.
"you did a great job paralyzing them with your gaze, grumpy mcgrumpface." you teased miguel as he looked at you with a grin. "not as much as how you were raising your voice to get your point across, the scary grumpspider." he retorted playfully as he moved closer to you, facing you and taking in all your beauty.
"i love you." he mutters as you mutter an 'i love you, too' back at him. he closed the distance between you two with a soft kiss, it was simple, it was sweet, it was short; but he told you everything he felt, had ever felt, and will ever feel in that brief kiss he planted on your lovely lips.
"can't believe grumpy mcgrumpface has such good kissing skills." you remarked as you ran your finger over your lips. he chuckled as he cupped your face in his hands. "wanna see how far i can go with those skills, oh scary grumpspider?"
a/n: this was supposed to be angst, but this is your canon event with him <333
tags !! @miguelswifey04
#atsv miguel#miguel o'hara#across the spiderverse#miguel o'hara x you#miguel o’hara x reader#miguel o’hara fanfiction#spiderman 2099#atsv spiderman#atsv#miguel o'hara x reader#miguel o'hara x y/n#atsv imagines#atsv fluff#spiderman across the spiderverse
414 notes
·
View notes
Note
I love your art style!! I just wanted to ask how you go about with using color in your line work. I circled an example of what I’m talking about, how do you figure out what color to use? Any advice would be greatly Appreciated thank you :))

Hi! After I'm done with the shading and stuff, I color pick the base and choose a darker and more saturated color for my lines. You can shift the hue too as you see fit. For darker hair and clothing I'll usually keep it black. Hope this helps :)


272 notes
·
View notes
Note
Hullo! Don’t know if this has been asked/answered before, but if it isn’t a bother how did you get started drawing transformers characters (assuming you remember ofc)? I’ve got a couple that I really want to be able to draw more often but there’s something about mechs that my hands just do not like. Any advice or suggestions would be greatly appreciated!
First off, I'm so sorry about how much time this took to answer. I had some issues figuring out how to go about explaining everything, but hopefully, this helps at least a bit.
I hyperfixated on Optimus Prime when I was like... 8?? I was really young, and that hyperfixation is still with me, so my brain sort of forced me to draw him and burned the process into my memory.
I, of course, started out by just copying other people's art. Very badly, might I add. It looked all fucked up and flat and the shading was off, if there even was any. But it was a start, and that's the important part.
You're gonna improve overtime, you'll figure things out and get to a point where the shapes you draw the most often, no matter how complicated, come naturally to you without much thought. If you draw something enough times, you'll understand how everything is spaced out, how the angles work, they way shadows and perspective mess with it, and you'll be able to draw it without any guidelines. But that's besides the point.
The key thing to remember about anything is that, when you really think about it, it's not much more than a bunch of boxes and spheres. Everything can be broken down into basic shapes, which is especially true for mecha, because they tend to be made up of blocky, symmetrical shapes. Yes, even Bayverse designs.
I'm gonna show you my process through this step-by-step. The way I draw differs greatly depending on whether I'm including line art in the final thing, like in this case. With that being said:
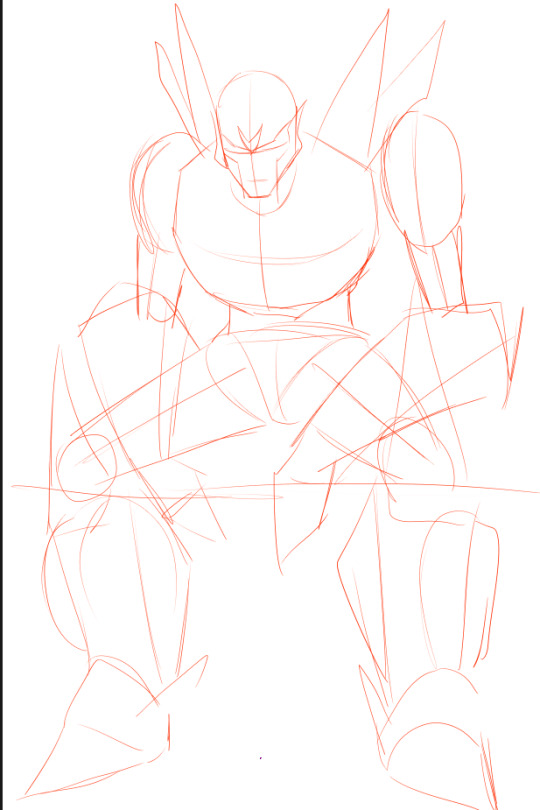
Step 1: basic shapes/sketch.
My slight redesign of TFP Arcee is gonna be helping us here.
I start off by putting down the basic shapes, which usually means boxes and circles. Remember, mecha are 3D objects. So is their armor. It wraps around their bodies while itself also being a three dimensional thing. Try to avoid making it look paper thin. Make it thick.
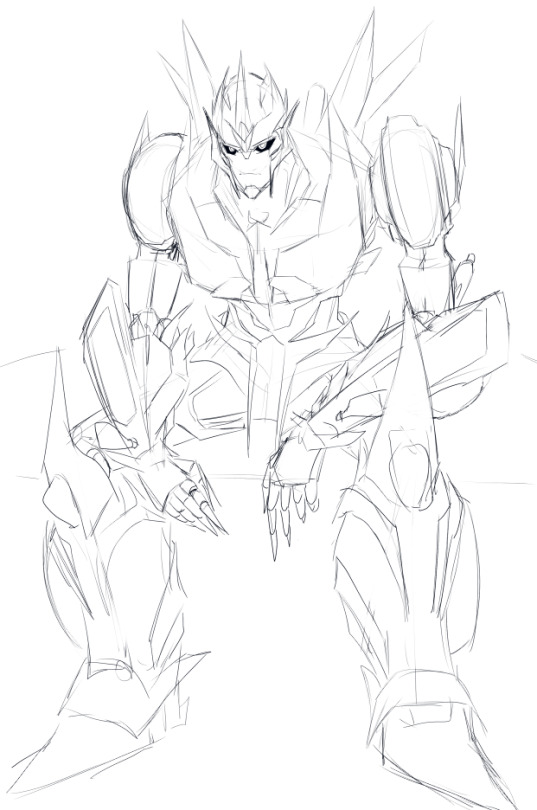
Next, I add in the actual details. The jump from picture 1 to 3 might seem daunting, but it's not. Arcee's forearm is a cuboid with some weird edges. Nothing difficult. The car door sits on the outer side, with its wider side facing outwards and slightly up, and a small ridge curving around the general shape of the arm and angling downwards. You can see this on the opposite arm. Her arms work similarly to Knockout's.

Step 2: Putting down flat colors and basic shading.
Flat colors → an Overlay or Soft Light layer for some nice colors → a Multiply layer with one block of shadow that gradually fades in. The last one helps you start and offers you a direction while you're zoomed in and shading small details.

Step 3: actual shading + light source:
The perfectly drawn and absolutely straight red arrow is the light source. You can see that it's pointing down at the metal, sort of from the side, meaning it's gonna hit the most on the inner side of Arcee's leg. The front part will be darker, but given the angle of the light source, still not completely dark.
I wanted the top half of her body to be really obscured by the shadows, so the legs and arms are lighter in comparison, while her midsection, chest and shoulders are very dark. In the next step, this will make her eyes, and therefore her face, stand out more.

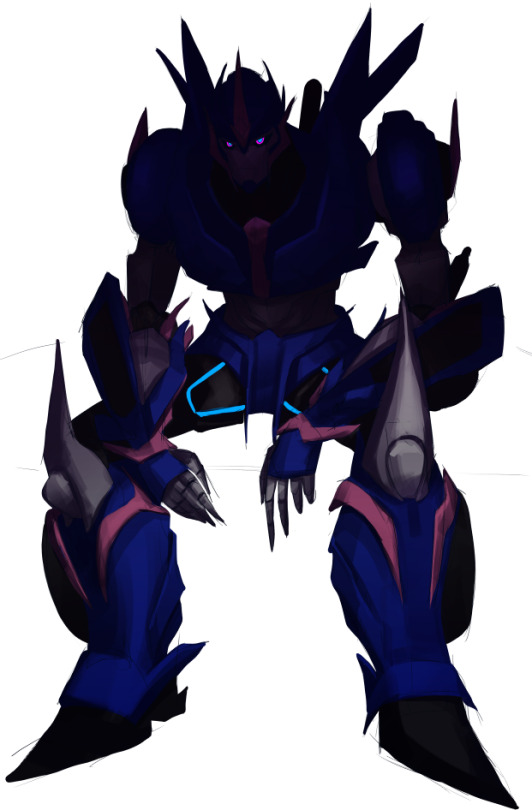
Step 4: Light
I used a Normal layer here with a purple that sat somewhere in the middle of the saturation/brightness levels, meaning it's not bright enough to seem out of place.
Going back to what I said in the first half of Step 3, the brightest spots on Arcee's body will face up and inwards.
After that, I used a Screen layer to 1, add a glow effect around her bio lights, and 2, traced thin lights along the edges of the parts that are being hit by the light source. Also added a darker background, and something for her to sit on.


Please remember that you can start with easier designs. G1, for example, are very boxy and with little details. Great for learning how to work with 3D shapes and perspective.
#asks#drawing tutorials#yeetdraws#the full version of this drawing is coming soon btw!!#transformers#transformers prime#tfp#tfp arcee#arcee
38 notes
·
View notes
Note
Hmm…I don’t know about me doing tutorials 😂 but maybe make Mondays be Makeup Monday’s where people can ask me questions, and I’ll answer? I don’t know, what does everyone think? ///
I would love this! I already have a question in mind 😂 How do you find the perfect colour match for your skin with concealer and foundation? I swear everytime I'm buying something I'll try and match it to the skin on my hand and it looks good in the shop but the moment I'm home it's not my match 😭 I've been struggling with this for 15 years and then there are people out there who look at a bottle of foundation and immediately know if it's a match for them or not 😂
Any advise would be greatly appreciated 🥰
First things first NEVER match to your hand. I’m not sure where that started, but it’s a lie. The skin on your hand is completely different from the skin on your face.
The best way to check is to use by your jaw. You get to check your face and how marches with your neck. Makeup brands are getting better with their shade selections, but unfortunately some are lacking still 🙄 but, most have a cool, neutral, and warm undertones per shade. I’m a MAC girlie so I call yellow undertones warm when most brands call that cool.
There is a reason I do advice high end, and that’s because they have testers. A lot of drugstores don’t offer that. But once you figure out the depth of your skin, and the undertone you prefer (usually it is easier to go neutral with most people unless they’re super cool or warm) it does become easier. Sephoras do tend to be a bit darker, don’t be afraid to ask them if you can take a mirror out of the store and see it in natural light.
3 notes
·
View notes
Note
A neat letter, along with a book of recently copied notes, finds its way onto Conroy's desk:
"Conroy,
I've a quandary for you. While I know your research deals mainly with corrupted aether, I was curious to know if you had any ideas as to what would lead to an overabundance of unaspected aether. I'm sending along a copy of all of my notes thus far to bring you up to speed. Your advice is always greatly appreciated.
Hope Ahavael and Mina are doing well! Feldspar and the children send their well wishes.
-Fennie"
An equally neat letter, together with a thick tome of compiled information, is returned, not two days later.
"Fennie,
While it is true that my speciality is in Aetheric Corruption, part of this field does cover a lot of material into non-corrupted or unaspected aetherial concentrations. Enclosed I have compiled what may potentially be the most relevant, and I will now theorise on what I think the most likely culprits, given what you have described to me.
Option the first: Occasionally, the destruction of a largescale aetheric device, such as an Aetheryte's focus crystal, may scatter a large amount of residual aether around the area for some time to come. It is ultimately harmless and should disperse before long, but if it does not, it may become harmful or have unusual effects upon those who enter the area. These effects are not particularly well-documented, but what reports I have managed to find in my library are included.
Option the second: The death of a creature with a large quantity of aether, under certain circumstances, may cause a confluence of sorts to form and linger. This is much more dangerous, as it may give rise to various forms of shade or fiend, or influence the local flora, fauna, or populace in a dangerous manner. If this happens, various techniques can be employed to try to disperse the aether, but they are themselves fraught with danger (see pages 116-134 of the compiled notes).
Option the third: The aetherosphere of our star shifts like weather patterns, and occasionally, differing fronts or streams of that aether may converge. These are the rarest of phenomena, and even more rarely still, two streams of opposing affinity may converge - which creates a large confluence of unaspected aether, as the opposing charges cancel each other out. If this is indeed the phenomena that you have discovered, you may want to take copious notes - you will be the first Archon to have such a unique opportunity that I am aware of, and I am envious that my duties at the Studium prevent me from joining you.
If you require any further information, please do not hesitate to ask - I cannot justify a trip abroad at this time, but I will aid you however I can from afar.
Mina sends her love, Ahavael is presently taking a holiday, as her Archon studies have been putting her through the wringer, as I'm sure you recall from your own studies.
-Conroy."
5 notes
·
View notes
Photo

This October @snowxstormworld is hosting an event I'm really looking forward to: Jonerys orgasmic october 2k21!
And since @libradoodle1 is the queen of edits, I can't wait to see what she can pull out of a gifset, so here's a little tutorial for doing it in photoshop. Hope you find it helpful, lovely!! ❤️
If anyone has any additions or tips, feel free to add them (even just dropping a link is cool), because I really think this method can be somewhat improved!!
Here are a few more professional toturials:
Blending and gradually appearing text + Background Text Effect by @kiekiecarrera
Handwriting Text Effect by @lilabard
Gif Editing in Photoshop by @yelenabelovvs
And now, without further ado, here are my two cents on the subject:
‘GIF EDITING IN PHOTOSHOP (QUICK AND DIRTY)’
[ under the cut, because otherwise the whole post would have become way too long ]
1. GET YOUR GIF
(If you already have a gif you want to edit, just skip the first step)
I create my gifs with »Giphy« but I'm sure there are many other similar platforms, yet this is what I tried first and it's so easy, so I stuck with it. So, after I logged in, I go to »create« (right upper corner) and place there the URL of the video I want to create a gif from.
[A quick side note on copyright: To be on the safe side I left the HBO watermark in the picture instead of erasing it via PS. But if anyone here knows what the latest state of affairs is regarding this, any legal advice would be greatly appreciated.]
Okay, so after pasting the URL you come to this view, where you define the part of the video from which the gif is to be created and its length (I used a promo video for GoT Season Seven: "Long Walk"). Afterwards you can decorate the whole thing (but we wanna do that in PS so we skip that), generate the gif via »Upload to GIPHY« and then download it.

2. OPEN IN PHOTOSHOP
Open PS and then select Window > Timeline (so that a timeline appears at the bottom of the screen). Then open the gif via »Open File« (my language is set to German, but I'm sure that's how it's named in English). You will now see each frame of the gif as a layer on the right and the duration of how long each frame is displayed in the timeline at the bottom.

3. REDUCE LAYERS
Next, I reduce the layers to a maximum of 50 (by deleting them), because this is something for which I have unfortunately not yet found a good hack: You have to edit each layer individually.
There are good tips to keep the effort to a minimum by using masks, grouping the layers or using shortcuts (here are a few options). Nevertheless, it makes the work easier if you have as few layers as necessary.
4. EDIT LAYERS
Now, this is where the magic happens: The »Camera Raw-Filter« (select at the top via »Filters«). Of course you can apply any kind of editing to all layers, but this is my secret tip, because I love this filter. It opens a new window where you can make many different edits to the image until you get the effect you want (light, balance, tones, shades, etc.).

Then apply the effect to all layers via selecting each layer and click CTRL+CMD+F (here, each layer must be set to »visible«).
5. ADDING TEXT
Create a new layer and place the text there as you want it. The text can also be edited (if you change it into a layer). Once you are happy with the result, duplicate the text [CMD+J] and place it in front of each layer. Then merge the layers (text + image) into one layer [select both layers, click CMD+E].

6. CREATING THE GIF
Next, delete all frames from the timeline (I'm sure there's another way, but I haven't found a good one yet) and then click on the four horizontal stripes at the top right of the timeline »Make Frames From Layers« (credit goes to Adobe here because for whatever reason I couldn't make a screenshot of this).
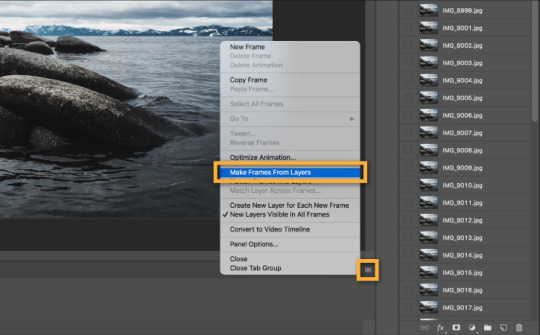
Now all edited layers are at the bottom of the timeline and you can play your gif or still edit the duration of the individual frames. The good thing here is that you can edit all the frames at the same time.
Then go to File > Export > Save for Web and select »Gif« (at »Preset« (Vorgabe) in the upper right corner).

AND THAT'S IT!! :)
#JonerysOrgasmicOctober2k21#jonerys#gif tutorial#photoshop#gif edit#photoshop tutorial#giphy#got edit#game of thrones#jon snow#daenerys targaryen#got fandom event#SnowxStormWorld
83 notes
·
View notes