#and you don't need any additional yeast
Explore tagged Tumblr posts
Visit Tumblr Blog
Explore Tumblr blogs with no restrictions, modern design and the best experience.
Last Seen Tumblr Blogs


Fun Fact
The “We are the 99%” Tumblr blog became the slogan for the Occupy Wall Street movement.
Text
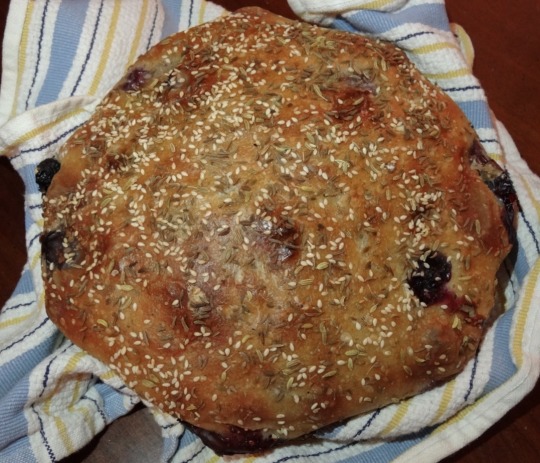
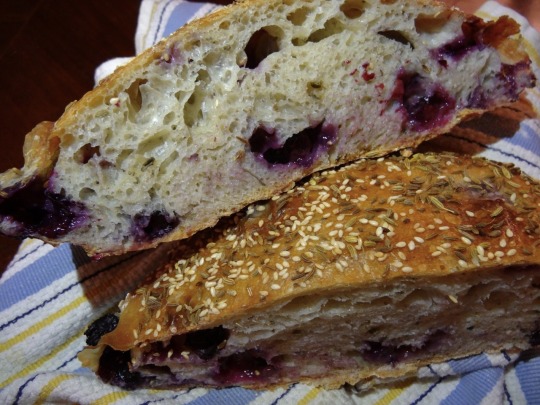
[ID: First image is of a golden brown boule studded with blueberries and covered with seeds; second image shows the boule cut in half to show a holely bread with blueberries throughout. End ID]
Rustic no-knead blueberry bread
This is a crusty, no-knead, sweet-savory bread that pairs blueberries with spices and herbs inspired by West Asian cooking. Fennel, anise, sesame, and mahlab powder are reminiscent of the دُقَّة كَعْك ("duqqa ka'k"; cake powder) used in pastries, while za'tar and caraway skew more savory.
The long rise yields a well-fermented dough with a robust flavor that stands up well against the sweetness and pungency of the fennel and aniseed. The result is a jammy, complex, aromatic boule.
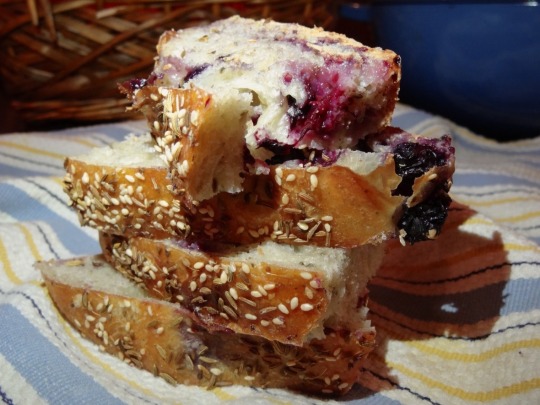
This bread has an open, irregular crumb, great for slicing, toasting, dipping, or spreading. Try it with labna and honey, olive oil and za'tar, or a spreadable cheese. I've also made sandwiches with thick slices of this bread and fried, glazed tofu drizzled with tarator and topped with Iraqi mango pickles, to excellent effect.
Recipe under the cut!
Patreon | Paypal | Venmo
Makes one medium-sized boule.
Ingredients:
3 cups (360g) bread flour
2 tsp kosher salt
1/4 tsp dry active yeast
2 tsp mahlab powder (optional)
1 tsp fennel seed + 1 tsp aniseed, coarsely ground
About 1 2/3 cup water (room temperature)
1/2 cup firm fresh blueberries
1 Tbsp za’tar (wild thyme), crumbled
Additional fennel seeds, aniseed, caraway, and sesame, to top
Mahlab (محلب) powder is the ground-up pits of Mahleb cherries. It can be purchased at a halal or specialty spice store.
Za'tar (wild thyme) can be found in dried form at a halal grocery store. Note that the spice blend, which includes wild thyme, sumac, sesame seeds, and other spices, will also be labelled "za'tar." If you don't have or can't locate any of the herb itself, use any dried woody herb of your choice (e.g. rosemary, thyme, sage), chopped.
Instructions:
1. Making the dough. Measure flour into a large mixing bowl. Add salt, yeast, seeds, and thyme and stir to combine.
2. Gradually add water until a soft, sticky dough forms. You may need more or less than 1 2/3 cup.
3. Flatten dough in the bowl and top with some of the blueberries. Fold the dough to enclose the blueberries, add more blueberries on top, and fold again. Repeat until all blueberries are incorporated.
4. First rise. Shape dough into a ball and place in the bowl seam-side down. Pat the top of the dough with some olive oil and cover the bowl with a kitchen towel. Allow to rest at room temperature for 16-20 hours.
5. Shaping. Gently remove the dough from the bowl and allow it to deflate. Shape the boule by folding an edge in over the center, rotating the dough slightly, and repeating until you have gone all the way around.
6. Flip the ball over so the seam side is down. Place your hands on either side of the dough and then move them down towards the base of the boule, tucking some of the dough under and towards the seam, to tighten the top of the ball. Rotate the ball slightly and do this again, repeating until you've gone all the way around a couple times.
This is the basic method for shaping a boule, lightly adapted to avoid breaking any blueberries. If any of the blueberries start to pop out of the surface of the dough, just press them back in.
7. Second rise. Place your boule on a piece of parchment paper and cover with a kitchen towel. Allow to rise for 1-2 hours, until noticeably puffy.
8. Baking. Place a Dutch oven in your oven and preheat to 450 °F (230 °C). Remove the Dutch oven and place the boule, along with the parchment paper, inside. Put the lid on the Dutch oven and return it to the oven. Bake for 30 minutes.
9. Remove the Dutch oven's lid and bake bread for another 20 minutes, or until the crust is deeply golden brown.
To bake the bread without a Dutch oven, preheat a baking tray in the center of the oven, while preheating a skillet (rated to at least 450 °F) in the bottom; once preheated, transfer the bread and parchment paper to the tray, and pour a few cups of water in the skillet; bake for 30 minutes. Remove the skillet and bake another 20 minutes until golden brown.
Allow the bread to cool completely before cutting into it to avoid creating a mushy texture.
221 notes
·
View notes
Note
The easiest best two to three days of food for one person I know of. A flexible modular recipe. This is going to sound high work at times due to how broadly I am writing this, it is not as bad as the vagueness and intentional broadness makes it sound signed a person who has frequently accidentally had sleep for dinner after being unable to make it too damn much.
Rice cooker needed.
Ingredients:
Rice (any), lentils or beans optional (one or two cans), frozen vegetable mix (any and in as much quantity as you want, I like potato, carrot, peas, and corn you like what you like)
Sauces (teriyaki sauce and kewpie mayonnaise is what I swear by because of how easy they are to manage and pour and how well they compliment the food and each other but use whatever you own and can stomach or nothing at all, extra points for one having some fat), seasonings (curry powder and salt is my standard, really the salt is enough) Oil
Additional protein (tuna, cheese, ham, chicken tendies, shredded chicken, tofu, more beans, egg, mushroom, setian, nutritional yeast, you do you, two seperate sources for the different days useful)
In to the rice cooker, put two cups rice with water in proportion, one or two cans lentils or beans if using (strain and quickly rinse them if you can, if not just pour out as much of the liquid as possible and dump), and a lot of frozen vegetable mix in whatever variety you have on hand/like. It's going to look like a lot. That's because it is. This is good. Add more vegetables. Two cups of rice makes more than you think so it's very hard to add too many vegetables to this if you're at least neutral on vegetables. Let the rice cooker cook. It's going to take a while so do whatever.
This is now a mostly complete meal if you add fat and salt, so the teriyaki and kewpie in my version. The additional protein will make it more filling and better in general, so adding a low effort one
Turn off the keep warm on the rice cooker and dump out the leftovers on a plate or something. Or not and just put the whole pot away. Leave in fridge overnight.
If you're ambitious/need variety reheat by frying with a different seasoning and secondary protein source #2 for best results. It's all already cooked so you just need to add the extras and to have it be warm. If you want to then use the fried rice in multiple meals, it reheats in the microwave better than the unfried. If you're not, reheat in the microwave with extras and enjoy that yesterday you making food for today you really helped out today you.
This provides two days of main meal food that are both very presentable and flavoursome, and are sufficiently different to each other it takes a long time to get sick of/makes it easier to feel like you're "doing well". I have had friends compliment me on how nice I am eating despite being in states that would usually leave me struggling to make myself food that mildly disgusts or concerns them. It dirties the rice cooker bowl and paddle, one eating bowl and utensils, one plate (optional), and a frying pan (optional). Most of those I just rinse out or soak not wash properly tbh, it's not like it has cheese to scrub off if you don't use it. This whole process takes about five minutes of active prep and clean up both days. The worst pitfalls I have found with it are getting too ambitious on the secondary protein for day 1 and eventually just having nothing, which I fixed for me by switching to canned tuna or shredded chicken, forgetting or otherwise failing to empty or turn off the heating of the rice cooker, and getting overwhelmed having to use the stove at all day 2 and avoiding the nice but optional upgrade.
I hope this is helpful for someone out there, I know how often most of these from around the place sound "oh my god you think that's simple??" But, and I say this as one of you, the backbone of this is having the machine that boils carbs boil a bunch of carbs for you and cramming as much of a "complete" or "fancy" meal's prep in to that process as possible then finishing with stuff you just pour, drop, or slice in.
Sounds helpful
24 notes
·
View notes
Text
Winter Gardening - WHERE?? 🏡
Advice for growing plants indoors or out in the Zone 8 Winter ☘️❄️🌿
Indoors:
-Make sure plants are in a spot where they get at least 5-6 hours of light a day, can be supplemented with plant lights
-Bottom-watering (plants in a tray or bowl you pour the water into) and having a fan on for at least part of the day will keep surface fungus and fungus gnats away
-Make sure leaves aren't touching glass windows, and that the room they're in doesn't get too warm - these are cool weather plants happy at around 65F
In-ground:
-Adding a layer of leaves or straw (not hay) to the beds once seedlings have sprouted and cold weather sets in provides additional insulation and frost protection
-Don't work the soil when it's frozen or very muddy, most plants should be seeded by late Summer or by very early Fall
-Slugs are the biggest pest, setting out slug traps can help lure them away. OSU recommends 1 cup flour, 2 cups or more of water, and a packet of yeast in a short container
https://extension.oregonstate.edu/gallery/how-create-slug-trap-using-bread-dough-slurry
Greenhouse:
-Shouldn't need any additional heating, but lowering the ceiling during hard freezes and very low temps via a new "ceiling" layer of bubble wrap can help keep things a few degrees warmer
-Plants will grow faster in the warmer environment, just make sure to leave room for planting spring seedlings!
#pnw gardening#zone 8 gardening#zone 8b#oregon gardening#oregon#willamette valley#gardening#green witch#solarpunk#hopepunk
9 notes
·
View notes
Note
hey sex witch uh so if someone has a suspected yeast infection, does that warrant a doctor’s appointment or do you just like talk to a pharmacist? i’m trans and very cis-passing so if i go to cvs im gonna have to go through the whole Surprise! I Have A Pussy but also i get anxious about like. bothering my primary care doctor if it’s something minor? i’ve never had a yeast infection before so i dont 100% know the protocol or whatever
hi anon,
it's often recommended that you see a gynecologist the first time you think you have a yeast infection, to ensure that that's really what's going on and make sure you're seeking the proper route of treatment. if you're unsure if that would be an appropriate appointment to make with your primary care provider, you might want to call the office and check to make sure that this is something your PCP is able to see you for.
it's worth noting that, although common, yeast infections shouldn't necessarily be considered a minor issue. few yeast infections clear up on their own, and in addition to the discomfort they cause a yeast infection that goes untreated too long can lead to more severe health complications, including painful open sores on the genitalia.
if going to your doctor right away is a Big No for you, there ARE antifungal yeast infection treatments available over the counter in most drugstores, usually without any need to talk to a pharmacist. (although, if you do need help finding the right medication, there's no need to necessarily disclose that you're trans. people buy non-prescription medication for other people all the time!) but if the symptoms don't go away, or they come back very quickly, I'd definitely recommend visiting with a healthcare provider to pursue other treatment options and make sure you didn't misdiagnose yourself.
24 notes
·
View notes
Text
Chilly Weather Broccoli-"Cheize" Chowder

Please excuse my grainy picture. I'm learning to use an old Canon camera and it's been a learning curve, haha! And full disclosure, I edited some soup splashes on my bowl out to try and "tidy up" the picture 🙈
I'm really proud of this recipe, it hits all my marks: Nutritious, cheap, hearty, and (of course) tasty. The best part is you don't need any hyper-specific substitutions, just whole foods and vegan pantry-staples. You will, however, need a food processer. Recipe below the cut if you choose to give it a shot!
Servings: 6 hearty bowls
Time: Roughly 1 hour, about 30 minutes preparation and 30 minutes of cook time
Ingredients:
1 can of carrots (You can substitute 2-3 large carrots, sliced into rounds and steamed until soft but this will add to your cook time)
1 can of cannellini beans
1 Cup and 1 + 1/8 Cups water, separated
1 sixteen-ounce block of tofu
1 Cup nutritional yeast
3-9 Cloves of garlic, minced (yes, it's a wide range. We are huge garlic fans, so we opted for around 9 for the full pot but you can use however much you like!)
1 large onion of chosen variety, diced
4 crowns of broccoli
3 Cups of vegetable broth
1 Tablespoon of vegetable bouillon (optional, but enhances flavor)
1/2 Cup sourdough starter (if you don't have this, don't stress! Just replace it with a well-mixed combination of 1/4 Cup water and 1/4 Cup all-purpose flour)
Olive oil for sautéing
1/2 tsp ground mustard
1 tsp salt
1 tsp pepper
1 tsp garlic powder
1 tsp paprika
1 tsp onion powder
Instructions:
Chop your vegetables. Broccoli should be in small pieces, roughly 1-2 inches in size, onion diced, and garlic minced
Drain and rinse your canned vegetables
Place a large pot on the stovetop and drizzle with olive oil. Sautee onion and garlic over medium heat until soft, fragrant, and the onions are translucent.
While your onions and garlic are sautéing, break your tofu into chunks and put it into the food processor with 1 Cup water and a tablespoon of bouillon (if using.) I used extra firm because it was what was on hand, but you can use silken tofu or regular firm, just be aware that you may need to use less water. Process until smooth.
Set your sauteed onions and garlic aside and reduce heat to low to begin the roux
Drizzle the bottom of the pan with another generous coating of olive oil, then mix in your sourdough starter or appropriate substitution, whisking constantly.
Add in the nutritional yeast slowly to try and avoid clumps
Add in your three cups of vegetable broth and whisk to combine
Add in the tofu mixture, and whisk to combine.
At this point, add your spices. Do not put them away yet as you may want to add more later on, but do not add any additional spices yet either as there is still more to the stock and the flavor profile is not yet complete
Dump in the broccoli, and place a lid on the pot. Turn heat to medium or medium-high depending on your stove, and return to the food processor
Put your carrots and beans into the food processor and add 1 + 1/8 Cups water. Process until smooth
Stir in the vegetable mixture into the pot and bring to a simmer
Reduce heat to medium-low, cover, and allow to cook for 15-20 minutes or until broccoli is softened. If you are particularly hungry and impatient, you can turn the heat up so long as you babysit the pot to keep it from boiling or sticking to the bottom of the pot.
Let cool to serving temperature and enjoy with a hunk of homemade bread, if you are so lucky to have some :)
If you made this, please let me know what you think! This is my first full recipe that is 100% mine and not an adaptation, so I am eager to share it with you all and receive some feedback.
------------------------------------------------------------------------------
✌️💛🐇 ∿ My blog depicts, promotes, and celebrates slow, clean, and intentional living. Peace should be accessible to all, regardless of financial status or appearance. Be sure to remember that partaking in one or more of these lifestyles does not or can not always match the aesthetic it's associated with. Be well and know that you are loved!
#clean living#intentional living#plant based#slow living#vegan#vegan recipes#vegan soup#vegan food#hippie#hippie lifestyle#plant based recipes#vegan meals#meal inspiration#healthyliving#healthy lifestyle#healthy food#wellness#health and wellness#holistic health
2 notes
·
View notes
Text
Tepache made! 😁
Fermented pineapple softdrink!
You should make some too!
It's very yummy!
It's also probiotic I think!
You get to eat an entire fresh pineapple!
And then making this drink uses up the inedible parts of the pineapple that you don't eat!
And the yeast is just the free wild yeast that was already growing on the outside of your pineapple! (So don't wash the pineapple unless it's like, actually dirty, and also avoid buying one that's been pre-sanitized for you if that's a thing the shops near you do)
Production notes:
I don't have any fancy fermentation equipment. Just using empty plastic bottles that had mineral water in them - 1.25ml
Wrote labels on the outside of each bottle before beginning. Date and contents. Always important to do that when you're fermenting stuff, and I always do it at the beginning because it's easiest to do when the bottles are dry and empty. Just used a sharpie to write directly on the plastic: "16/11/24 tepache [variety]"
4 bottles per 1 pineapple is probably too much? Last time I made it I did 3 bottles, and there was plenty of rind/core for each bottle. Maybe I just used a bigger pineapple last time idk. Anyway, there's not a huuuge amount of pineapple rind in these bottles so idk how it will turn out. There's definitely enough yeast and sugar in there to get the fermentation going at least.
There's a bit over ½ a cup of sugar in each bottle? Couldn't find the measuring cups so I was using the liquid-measuring jug and just eyeballing it. Couple tablespoons of raw sugar and then topped up the rest with brown sugar. (Cuz there was the end of a package of raw sugar to use up, but plenty of brown, so I just divvied up the raw between the four bottles)
There's enough sugar in there for almost a litre of water to be saturated, and have some undissolved sugar fall out of suspension pretty quickly. Plus there's the additional sugars of the pineapple juice. Probably a little bit too much sugar, but it'll give the yeast plenty to eat so 🤷🏻♂️

Added a cup of so of water and gave the bottle a good shake to get the sugar somewhat dissolved:

Then I did the dry spices:
Half a stick of cinnamon in each bottle. This was comprised of one quarter stick of very old and very stale cinnamon that I found in the pantry, and one quarter stick of fresh brand new cinnamon that I bought yesterday. Should balance I hope 😅
Then some whole star anise, also pretty old but not too stale I don't think. Snapped them up into chunks and then put a bunch in each bottle. Like, enough to fill the centre of my cupped palm? Enough that you could pile into a single layer on a teaspoon? That much, more or less, per bottle.
Then cloves. Either 2 cloves per bottle if the clove was big & still had that little ball attached to the end, or 3 if it didn't and they were small cloves
Then some mace because I found it with the rest of my spices and had forgotten that I had it. Put, like, a thumbnail sized bit in each bottle.
Then a whole nutmeg which I crushed into big fragments and divided between the bottles
Then cubeb into the 'ginger' bottle and the 'ginger+chilli' bottle. I think like 3 seeds in the former and 4 or 5 in the latter?
Then red Sichuan into the 'chilli' bottle. Like 3 or 4 seeds?
And then a dried chili into the 'chilli' bottle. Idk which kind of chilli it is. It was red and the broken chunk I picked out of the package was about the size of my pinky finger (but the entire chilli would have been bigger than that). Still had its seeds inside.
Do your own spices however your heart desires, using up whatever you have at hand.
Then the wet ingredients:
Pineapple and water is all you actually need, but I was in the mood for experimenting so here's what I did
Zested a navel orange. One third of it into each of the 'orange', 'orange + ginger', 'orange + ginger + chilli' bottles.
Then fresh ginger into the relevant bottles. About the size of two bottlecaps worth for each bottle? Maybe a bit less? Sliced into thick chucks, which I scored and then crushed with the flat of the knife before dropping them in.
Then the star of the show: the pineapple!
Cut the whole thing into quarters so the amount per bottle would be measured out ahead of time
Working one bottle at a time, I further quartered the allocated quarter-pineapple, to make it easier to handle;
Sliced off the rind and the core, and put them into the bottles, first slicing the rind into strips (else it wouldn't fit through the narrow mouthes of the bottles!)
(Keeping the main of the flesh to eat on its own, of course (I have chemical burns on my tongue and the roof of my mouth from eating so much but it's just so good! ☠️))
(If you don't wanna eat that much pineapple, just chuck it in the tepache; it'll make it even better. Prolly good to slice it up or gently crush it or etc so that the juices can be more easily released from the flesh & into the tepache)
Then when all the bottles have their pineapple, you add the water! Filled up to the shoulder where the bottle begins narrowing; about 1L total I guess? Gotta leave some head space for the fermentation!
(And while you're filling, rinse off all the sticky juice from the outside of the bottle and its cap...)
Then put the cap on tight and invert the bottle and give it a good shakey-shake to get as much of the settled sugar dissolved as possible, and to get all the spices and plant materials and yeasts introduced to each other.
Then you switch the cap for a DIY MacGyver airlock so the bottle doesn't explode and make a giant mess of your kitchen. You make this using a balloon, a spare bottlecap, and a push pin; plus you will need a spare empty bottle to use as a handle during assembly (otherwise it's obnoxiously fiddly to do OR you squirt tepache all over yourself OR both) and it is assembled thus:
Stab some holes in the bottlecap
Rinse out the balloons with water just in case there's any schmutz in there
Poke holes in the balloons. Taking a deflated balloon I pushed a pin through it thrice, so there were six holes in it in total. That seems like a good amount to me but I'm just guessing.
Put the bottlecap on the spare bottle
Stretch the neck of the balloon over the bottlecap. You want to get it on there enough so that it won't simply pop off the bottle once the fermentation gets going.
Then you roll the mouth of the balloon back enough so that you can freely unscrew the bottle cap and transfer it to your bottle of tepache. (And then roll it back down onto the tepache bottle for a secure fit)


When the tepache is fermenting, its gases will inflate the balloon and it will look like this:

This setup is cheap, simple, and effective.
Releases the gas out while disallowing bugs in, and its easy to put on and off the bottle, and if the bottle overflows only a little bit then the mess will be mostly contained inside the balloon (unless it isn't), and finally it looks really cool because you can SEE how much fermentation is going on. (All you have to do is make a poster about it and that's an entire school science project right there, I tell you hwat.)
Then you just put the tepache somewhere dim to ferment. I always put 'em in a tray or something just in case the fermentation gets too enthusiastic for the perforated balloons to release and they overflow:

This is only a temporary home until I find a better one because bookshelf-with-electronics is not a happy place for very sticky fermenting liquids to reside, but anyway the colour coding here is:
Yellow = pineapple
Orange = pineapple + orange
Pink = pineapple + orange + ginger
Red = pineapple + orange + ginger + chilli
After 3 or 4 days of fermentation, you switch the lids from Ghetto Airlock Lid to Regular Airtight Lid, and give them another couple of days of secondary fermentation to carbonate the beverage, and then you put them in the fridge to slow the fermentation way down so they don't explode before you can drink them (and so the yeast doesn't eat ALL the sugar)
(OBVIOUSLY if the bottle looks dangerously pressurised and explody, then just pop the top every now and again to let the excess gas out! It's not hard!)
(It's not a dangerous hazard if you don't, cuz these are only plastic bottles after all, but it will make a giant sticky mess and you'll have much less delicious tepache to drink.
I really hate adding brain-dead caveats like these but if I don't then people will fall over themselves to "um, actually" at me, which is even worse 😒)
If you give the yeast loads of sugar and loads of fermentation, you'll get an alcoholic tepache.
If you don't give it loads of sugar but do give it loads of fermentation, you'll get a pickled pineapple vinegar (with or without the addition of whichever spices you felt like flavouring it with).
Both options are yummy in their own way, but regular, sweet, non-alcoholic tepache is the main goal here.
After you've drank a bottle of tepache, you can refill it with water and sugar and give it another round of fermentation for a second batch. To facilitate this, you'll wanna hold a strainer over the mouth of the bottle when you're pouring from it, to keep all the solid plant matter in the bottle and out of your glass (which you kinda wanna do anyway because obviously it ain't so nice to have all that schmutz in your glass regardless of your re-fermentating intentions)
I wouldn't keep re-fermenting beyond that tho. Loses its flavour and starts getting gross and you'll probably make yourself sick. Just get another pineapple. :)
3 notes
·
View notes
Text
Frequently Asked Questions About Bread Machines
In recent years, bread machines have become increasingly popular among home bakers. These small kitchen appliances make it easy to bake fresh, homemade bread without all the time and effort of traditional methods. But with this rise in popularity comes a rise in questions from those who are new to using bread machines. In this post, we will address some of the most frequently asked questions about bread machines to help you become a more informed and confident baker.

What exactly is a bread machine?
A bread machine, also known as a bread maker, is an electric kitchen appliance designed specifically for making bread. It typically consists of a mixing bowl, kneading paddle(s), and heating element. The user adds the ingredients into the bread pan, selects the desired settings, and the machine takes care of the mixing, kneading, rising, and baking process.
Our socials:
https://www.facebook.com/bestbreadmakerforglutenfreebread/
https://twitter.com/bestglutenbread
https://www.pinterest.com/breadmakerforglutenfreebread/
https://www.youtube.com/@bestglutenbreadmaker
https://www.tiktok.com/@breadmakerforgluten
Can I use a bread machine to make other types of baked goods?
While its primary purpose is for making bread, many modern bread machines come equipped with settings for making dough or even jam. This allows you to easily make homemade pizza dough, rolls, bagels, and more. Some machines even have a gluten-free setting for those with dietary restrictions.
Is it worth investing in a bread machine?
This is a common question among those new to using bread machines. The answer really depends on your personal preferences and baking habits. If you enjoy making fresh, homemade bread but don't have the time or energy to do it by hand, then a bread machine is definitely worth the investment. It also allows you to control the ingredients and customize your bread to suit your taste.
Can I use regular flour in a bread machine?
Yes, you can use all-purpose or bread flour in a bread machine. However, it's important to note that different types of flour have different protein contents which affect how the dough rises and the texture of the final product. Bread flour typically has a higher protein content and is better for making bread in a bread machine, but all-purpose flour can also be used with good results.
Do I have to use yeast in a bread machine?
Yes, yeast is an essential ingredient in making bread. It's what causes the dough to rise and gives bread its airy texture. Most bread machines come with a recipe book that includes instructions on how to use yeast, so even if you've never used it before, the machine will guide you through the process.
How long does it take to make bread in a bread machine?
The time varies depending on the type of bread you are making, but most recipes take anywhere from 2-4 hours. Some machines also have a delay timer option, allowing you to set it up in the evening and wake up to fresh bread in the morning. It's important to note that the overall time includes rising and baking, so you don't have to actively be involved in every step.
Do I need any special ingredients for making bread in a bread machine?
No, most bread machine recipes use common pantry staples such as flour, yeast, sugar, and salt. Some recipes may call for additional ingredients like milk or butter, but these can easily be substituted with dairy-free options if needed.
Can I make different sizes and types of bread in a bread machine?
Most bread machines come with multiple size options to choose from. You can typically make a 1-pound, 1.5-pound, or 2-pound loaf depending on your needs. You can also experiment with different types of bread, such as whole wheat, sourdough, or even cinnamon raisin. The possibilities are endless!
Conclusion
Using a bread machine may seem intimidating at first, but with the right information and practice, it can become a valuable tool in your kitchen. We hope this post helped answer some of your burning questions about bread machines.
2 notes
·
View notes
Text
How do I clean and sanitize my sex toys?
Like any other tools or toys, sex toys need proper care to ensure that it continues to give you pleasure. In addition to choosing the right type of lubricant, they need to be cleaned and sanitized to maintain their quality and durability.
For most erotic toys and users, regular cleaning is sufficient. However, in special cases, thorough sanitization may be necessary.
When does toy cleaning suffice?
If your toys are used only for you and have not been shared with anyone else and used for the same purpose or specific body part, then simply cleaning the toy is sufficient. You can wipe with a clean cloth, use a toy cleaner or rinse with water and a mild, odorless soap. Since you are only removing bacteria from the surface of the toy, this simple method will adequately address hygiene concerns.
When is sanitizing or sterilizing necessary?
Sanitization or sterilization is essential in the following instances:
If a toy has been used anally and you intend to use it orally or vaginally.
When planning to share the toy with another person or partner.
If you have an STI or yeast infection and wish to prevent reintroduction of infection.
Sanitizing methods include:
Running the toy through a dishwasher on the “sanitize cycle” (without soap).
Boiling the toy in water for 3 to 4 minutes.
Immersing the toy in a bleach solution (ensuring thorough rinsing and cleaning afterward).
Utilizing a UV sanitizing system.
Remember, only non-porous materials can be effectively sanitized. This includes metal, ceramic, glass, silicone, ABS plastic, and some specially treated wood in the case of sex toys.
Cleaning Vibrators
Cleaning vibrators varies depending on their type and manufacturer. For waterproof vibrators, cleaning involves scrubbing with an unscented, gentle soap or toy cleaner under running water in the sink. A toothbrush can help clean intricate surface features, preventing the accumulation of lube or bodily fluids in crevices that could harbor bacteria. This method suits silicone and ABS plastic toys. If you own a TPR/TPE toy, consulting the manufacturer's care instructions is advised. Even non-waterproof toys can often be cleaned using this sink method, but if uncertain, use a toy cleaner wipe or alcohol wipe.

Certain vibrating toys feature detachable vibrating components, allowing for thorough cleaning of specific parts while keeping sensitive electrical sections away from water and various chemicals.
Toys crafted from jelly, rubber, or "skin-like" materials (commonly found in strokers) pose cleaning challenges. Review the manufacturer's guidance for proper care. If opting for cleaning with bleach or alcohol, ensure a thorough rinse afterward.
These materials are typically porous and may contain chemicals like phthalates. It's advisable to cover them with condoms during use as they are not considered body-safe. It's worth noting that we don't sell dildos or other penetrative toys using these materials due to safety concerns.
Cleaning Non-Vibrating Dildos
Cleaning non-vibrating dildos is relatively simpler compared to vibrators as they lack electronic components. Depending on the materials used, various cleaning methods mentioned previously can be applied. This includes options for sterilization or sanitization. Particularly, dildos crafted from non-porous materials such as silicone, metal, wood, glass, and ceramic are straightforward to clean. They are durable, safe for reuse, and can be effectively sanitized.
Cleaning Anal toys
Anal toys require thorough cleaning after each use due to the presence of anal bacteria that can be harmful when introduced to other areas besides the anus. If you intend to use a toy both anally and vaginally or orally, it's crucial to sanitize it in between uses. This applies when using toys across multiple orifices or with different partners, necessitating materials that can be sterilized.
Furthermore, some anal toys, particularly silicone ones, may develop odor over time. Sterilization can assist in addressing this issue. Alternatively, soaking the toy in a vinegar solution (50/50 vinegar and water) or exposing it to direct sunlight for several days can help alleviate odors.
The same cleaning principles mentioned previously should be followed for the most effective sanitation.
Storage
Ensure that after choosing a cleaning or sanitizing method, you thoroughly rinse and dry your toys before returning them to storage.
For toys with replaceable batteries, manufacturers generally advise removing them before storing to prevent corrosion that could damage the toy. Additionally, remember to turn off the toys and activate any travel locks, if available, to avoid unexpected battery drainage.
Silicone toys are best stored in cloth bags to prevent them from collecting lint.
Consider using a lockable box or drawer for added privacy or if there are children or pets in the house.
Toys made of high-quality materials can be stored in various ways. However, avoid storing latex, jelly, or PVC toys together, as these materials can release substances that degrade or damage each other over time.
Properly caring for your toy ensures its longevity and continued enjoyment
Investing in a quality toy is a financial commitment, and maintaining it with proper cleaning, storage, and suitable lubrication will preserve its value, ensuring ongoing satisfaction and pleasure for years to come.
3 notes
·
View notes
Note
Hey Sanna,
hope you are doing well! Could you maybe share your breadrolls recipe with us? they look delicious and do-able for a beginning bread baker, thank you
Hello!! 🥰 Sorry I'm only replying to this now... I keep meaning to sit down and type up the recipe but I always forget. But here I am!
My recipe for bread rolls is kind of tricky to share, because I mostly use flour mixes that are probably not available in other countries. But you can use any mix you like, really - or make your own, by combining different grains in different forms, seeds, etc. But my recipe really relies on store bought mixes.
You need:
50 g fresh yeast (or equivalent of dry yeast if you like)
5 dl warm liquid (I use water, but you could also use milk)
2 tsp salt
2 tbsp syrup/sugar/honey (anything sweet basically)
roughly 2-3 tbsp olive oil (could replace this with butter, but it needs to be soft)
about 11 dl flour mix of your choosing (the amount is an estimation)
Heat up your liquid to roughly the temperature of your hand or a bit warmer. Crumble in the yeast (for dry yeast, see the package directions - I never use it so I can't advise you there) and mix until dissolved.
Add in the salt and your sweet stuff, and mix.
Add the flour mix gradually, first using your mixing utensil and then later your hand.
Towards the end of the flour mix additions, add in the oil or softened butter.
The dough shouldn't be too firm - the firmer you make it, the denser your bread rolls will be. You'll learn to feel by hand when it's the right consistency. It will be sticky still, but it's mostly possible to separate it from the bowl without much trouble.
When you are satisfied with your dough, cover it (I use a clean kitchen towel, but I know some people use plastic wrap) and let it rest in a draftless place until it's roughly twice the size. I actually put it in the microwave because it's airtight. Even better if you have heated up your liquid in there and there's still some residual warmth left.
Heat up your oven to 225Cº.
Bake the dough into balls with the help of some flour. Don't make the balls too firm, just roll them enough for them to have a shape. This amount of dough usually makes for about 24 balls, and they fill two baking sheets.
Bake the rolls for roughly 10-13 mins per sheet, or until they have a nice colour. It all depends on your oven, you know best.
Enjoy 🧡
I hope this is helpful! Let me know if you end up baking them and tell me how they tasted ❤️
8 notes
·
View notes
Note
Ah.. sorry if this is a bit much but.…. do you know of any good wlw sex ed masterposts (possibly one that covers general stuff too since in my experience the sex education system is just generally bad let alone for Igbtq+ stuff)?
I'm a (older) minor so I totally understand if you don't want to answer this but I'd really appreciate it bc I can't do my own research ;-;
Hi anon,
Sex education is something that shouldn’t be withheld from people. I actually work with a lot of places trying to make queer sex ed more accessible. Since I’m assuming you’re trying to avoid links/webpages I’ve decided to compile my own master post for you.
Strap in (no pun intended)
Let’s start with the basics, anatomy and care:
Vulva: the outside of the vagina (the part that’s visible)
Vagina: the internal structure in the female reproductive system
STI: sexually transmitted infections, caused by direct exposure to an infection, can be transmitted orally, through intercourse, or contact with bodily fluids.
Yeast infection: the pH of a vagina is very specific, as is the bacterial microbiome , and if it’s thrown off too much it overproduces yeast, which causes an uncomfortable infection. It’s treatable though!
protection:
For oral sex on a vulva or anus there are dental dams. They come in various flavors and are like a sheet of latex that you hold in place while performing oral. If both you and your partner have been tested and don’t have to worry about any STI exchange, these aren’t necessary.
- just because you can’t get pregnant having wlw sex doesn’t mean you can’t get Sexually Transmitted Infections
There’s also toys that can be used for wlw sex, such as strap ons, dildos, and vibrators. These typically need to be purchased online or at a store that specializes in sex supplies, but some of the basics can be bought at target, cvs, and other similar places. As a minor you can’t buy these things yet, but for future reference now you know.
Lubricant:
For oral, lube isn’t really necessary, but know that there are flavored lubricants labeled for oral use. DO NOT USE THESE. These are meant for penises. If you use flavored lube on a vulva/vagina it can cause yeast infections.
Best practice is to use water based lube (it’ll say the base on the bottle/package), which is safe to use for all purposes.
There are also silicone based and oil based lubes, but I recommend steering clear of those since they’re not compatible with toys and other silicone products.
Where to get it? - any CVS, Walmart, target, etc. will have lube of various types in the aisle they sell condoms in, which is usually near the pharmacy.
Some major things to steer clear of:
- douching of any sort: this can lead to yeast infections. The vagina is naturally cleaning, so don’t think you need to put any sort of cleanser up there. Summers Eve is a scam.
- rushing things: what you see in the media is a dramatization. It’s important to take your time and talk about things with whoever your partner is before rushing into anything.
Your local planned parenthood will also have lots of resources to help you, and if you have any local LGBTQ+ organizations you can get to, they often have lots of resources for this stuff too. I don’t know if you’re closeted, but if you are and this is hard to get to for you, then I recommend going to the library and using one of their computers to do any additional research.
And always remember to practice consent!!! Remember FRIES for consent:
Freely Given
Reversible
Informed
Enthusiastic
Specific
If you have any more specific questions I’m also here as a resource for you through DM and asks, and I don’t find it bothersome at all, that’s why I’m here! This is one of my areas of expertise so I’m happy to answer any questions you may have.
Let me know if you need any more info!
-Day
5 notes
·
View notes
Text
The One Brioche to Rule Them All
Given my namesake, this should be my very first post...
I love this brioche. I love every step of making the brioche. Every moment is sheer delight from the silky feel of the dough to the wonder of the feather-light texture from something that uses approximately 50% by baker's percentage of butter. The bread is glorious. It is transcendent. It is scrumptious. It makes you want to sing, "Ahhhhhhhhhh!!!!!"

(adapted from Jeffrey Hamelman's Bread)
Note the 1st: Your stand mixer sucks. Most likely. If it is a KitchenAid, it definitely sucks when it comes to kneading dough. This is OK. Don't panic. We have a fix for this.
Noteth the 2nd: The fix is not doing this by hand. To be clear, If you do do (Ha!) this by hand, you are a God, unnaturally sexy, and likely to do very well in any profession that requires excellent upper body strength (Blacksmith? Professional Cuddler?). Either way, doing this by hand is beyond my weak puny upper arms' capability, so I still use a mixer and it will work out even if it very much looks like it is not going to.
Very Important Note the 3rd: DO NOT, I REPEAT, DO NOT ADD ADDITIONAL FLOUR TO THIS TO "get the dough to come together." That way lies calamity, flour-y tasting bread, possible explosions, and my deep, deep judgement regarding your life choices and decisions.

Just don't do it, my dude. Don't.
Note the 4th: There is only one proper way to measure flour - with a scale. There are no other options. Kitchen scales are precise, easy to use and don't cost much more than measuring cups. Baking is a science and requires accuracy. You will never achieve consistent good results with anything else but a scale.
Note the 5th: It is important to keep everything in this recipe as cold as possible for as long as possible during the mixing. Note that I said cold, not frozen. We need things to still be pliable. I usually measure out all of the ingredients ahead of time in separate baggies/containers and keep them (plus the stand mixer bowl and paddle) in the fridge for an hour or two before making the dough to make sure everything is nicely chilled.
On to the Recipe!
(For 500 g of brioche dough)
Combine in the bowl of a stand mixer:
218 grams of bread flour (I use King Arthur)
20 g of cold water (equivalent of 20 mL or roughly 4 tsps - remember your density conversion factor of water is 1 g/mL!)
109 g of whole eggs, beaten (weighed without shell)
5.5 g of salt (doesn't matter what kind)
13-14 g of granulated sugar
11 g of fresh yeast OR 5.5 g active dry yeast OR 3.7 g instant yeast
Mix on the first speed on your planetary mixer until ingredients are combined than increase the speed to medium and continue to let the dough knead until it passes the "windowpane" test.
Interlude: What is the window pane test, you ask? It is a test of whether the gluten in your dough has adequately developed or not. When your gluten is developed or your dough is "strong" enough, you can take a small piece of dough and stretch it between your fingers until it forms a thin translucent sheet that is so thin it allows the light to pass through.

Anyway, once you reach this stage add another 13 g of granulated sugar and let the stand mixer run until it is incorporated through.
Interlude: Why did we add the sugar in two parts? Sugar acts as "wet" ingredient and tends to liquify the dough. The more liquid a dough is, the harder it is to develop the gluten strength. To bypass this, we held back 50% of the sugar to add back in only after the gluten has developed adequately.
In the meantime, remove your cold butter (109 g) from the fridge and beat it into submission with a rolling pin. That's right. You need to beat that butter until is becomes flexible and almost plastick-y. Show it who's boss! Show no mercy!

With the stand mixer running, drops tablespoon-sized pieces of your (still cold) but flexible butter. Allow the butter to fully incorporate into the dough, before dropping in the next piece of butter. It will feel like the butter will never incorporate. I PROMISE IT WILL. Just be patient.
Once all the butter is incorporate, continue to let the stand mixer knead the dough til it passes the windowpane test again. This time, the test will be even sexier.

Mmmmmhmmm. Yes. So silky and velvety and translucent and lovely. Feel the dough in your hands. Spank it. Caress it. Don't make out with it as that is unhygienic if you were planning on serving this to other people.
Place the dough in a lightly greased container (butter or neutral oil only. NOT OLIVE OIL) and cover tightly with plastic wrap. Leave out at room temperature for one hour.
After one hour, fold the velvety dough over on it self, cover and place in the refrigerator for 12 hours or overnight. Degas the dough 2-3 times during this period of time.
Interlude: What is folding the dough? It is exactly what it sound like - you fold sections of dough over itself. This helps further with gluten development.

The next morning, take out dough and shape in a manner that fits whatever tin you want to bake it in. This is a really versatile dough. I've used this to make little dinner rolls, beesting cake, tarte tropezienne, or just as a loaf in a pullman pan.
To make a plain bread loaf, divide dough into 3-4 sections. Round out each piece of dough into a little ball and roll out into a flat oblong shape with a rolling pin. Roll up the flat dough into a little jelly roll looking thing and nestle into the loaf pan.
Cover loaf pan with plastic wrap and place in a warm place for 2 hours to proof until doubled in size. Don't go by time, go by appearance. The dough should look soft, fluffy, and when poked, slowly spring back part of the way. If it springs back immediately, it is not proofed enough. If it doesn't spring back at all, it is over proofed.
Pre-heat oven to 380 degrees F. Glaze dough with an egg wash. I like to use one egg yolk (or a whole egg when I am feeling lazy) with a splash of cream, milk or water to make the egg wash.
Bake for roughly 35 minutes. Again, don't go by time. Go by appearance. Your brioche is done when it is shiny and brown and hollow sounding when tapped. You can also insert an insta-read thermometer into the center of the loaf - it is done when it registers 190 F.
Allow to cool then devour like a savage.

One day, when I remember, I will re-upload this post with my own photos during the process. Until then, photo credits are from the Sunrise Flour Mill, txfarmer, and SeriousEats respectively.
1 note
·
View note
Text

[ID: A close-up of a piece of flatbread topped with green olives and onions. End ID]
Arugula flatbread with date-basil tapenade
This thin, chewy, yeasted flatbread is topped with wilted arugula, caremelized onions, golden raisins, and a tapenade made with dates, basil, and green olives. An intermingling of bitter, sweet, salty, and tangy flavors.
Recipe under the cut!
Patreon | Tip jar
Makes two 9 x 6" flatbreads; serves 3-4.
Ingredients:
For the dough:
2 cups (240g) all-purpose flour
1 tsp active dry yeast
1 tsp table salt
1/2 tsp granulated sugar
2 Tbsp extra virgin olive oil
About 3/4 cup (180mL) lukewarm water
For the toppings:
1 large yellow onion
1 Tbsp non-dairy margarine
1 cup arugula, packed
2 Tbsp golden raisins (sultanas), optional
2 Tbsp green olives, halved and pitted
For the tapenade:
6 dried dates (70g), or 3 Tbsp date paste
1/4 cup (tightly packed; or 5g) fresh basil
3 Tbsp balsamic vinegar
3 Tbsp green olives
2 Tbsp pine nuts, walnuts, or peanuts
pinch salt
Instructions:
For the dough:
1. Measure flour into a large bowl by weight, or by gently spooning into a dry measuring cup and levelling off. Add yeast, salt, and sugar and mix well.
2. Add olive oil and stir to combine. Gradually add water until you get a soft, cohesive, slightly tacky dough.
3. Knead by hand on a lightly floured surface, or in a stand mixer on medium-low, for 5-8 minutes until very smooth and elastic (slowly rises back when pressed down with a finger). If the dough sticks to your hands or to the sides of the stand mixer, add additional flour 1 Tbsp at a time.
4. Place the dough in a lightly oiled bowl covered with plastic wrap or a damp kitchen towel. Allow to rise at room temperature for 45 minutes to an hour, until noticeably puffy. You can also prepare the dough ahead of time and allow it to rise in the refrigerator overnight.
For the toppings:
1. Meanwhile, prepare your toppings. Cut off the stem end of the onion and halve it through the root. Lay it on a cutting board cut-side-down, and make 1/2" (1cm) thick vertical slices (perpendicular to the root) slightly angled toward the center of the onion. Cut off the root end to allow the slices to come apart.
2. Melt margarine (or heat olive oil) in a large skillet on medium or medium low. Add onions and allow to cook, stirring occasionally, for about 10 minutes.
3. Add a pinch of salt and lower heat to low. Cook onions, stirring and scraping the bottom of the pan every few minutes, until a rich golden brown and very tender, about an hour. Add a couple teaspoons of water any time you notice the onions threatening to dry out or burn.
4. Sauté sultanas in a drizzle of oil or a little margarine (the same pan you used for the onions is fine), stirring often, until they have puffed up and look noticeably rounder.
For the tapenade:
1. While caremelizing the onions, make the tapenade. Pound pitted dates, basil, olives, and nuts one at a time in a mortar and pestle to your desired texture (either a smooth paste, or leave the nuts roughly crushed) and stir to combine. Add the salt and balsamic vinegar and stir. Taste and adjust salt and vinegar; if the tapenade is too thick, add cool water one teaspoon at a time.
Alternatively, pulse nuts in a food processor; then add dates and olives and pulse another several times; then add herbs, salt, and vinegar and process until smooth.
To assemble:
1. Preheat the oven to 475 °F (245 °C). If using a pizza peel, preheat the oven with a baking sheet or pizza stone inside.
2. On a lightly floured surface, roll dough out into two 9” x 6” (22 x 15cm) ovals (they should be about 1/4" (1/2 cm) thick). They don't need to be perfectly shaped. Transfer flatbreads to a large baking sheet covered with parchment paper, or to a pizza peel dusted with cornmeal or semolina flour.
3. Dapple the flatbreads by pressing in lightly with your fingers to create many small divots. Brush each flatbread lightly with olive oil.
4. Once the oven is preheated, transfer the flatbread to the pizza stone or baking sheet, or put the baking sheet with the flatbreads on it into the oven. Parbake for 10-15 minutes, until the edges of the flatbreads are lightly golden brown.
5. Add topping olives, golden raisins, and argula and continue to bake for another 5 minutes, until the arugala is wilted.
6. Top the flatbread with onions and dollops of tapenade and serve warm.
66 notes
·
View notes
Text
5 Tips for Preventing a UTI(Urinary Tract Infection):
While you may not be able to completely avoid UTIs in the future, there are some steps you can do to lower your risk of them. Our staff offers five fast steps to keep you safe from future illnesses.

1. Stay hydrated
Drinking enough water throughout the day allows you to pee more frequently. Every time you pee, you remove microorganisms from your urinary system. You should also avoid caffeinated beverages and alcohol, since these might irritate your bladder and make you easily influenced to infection. 2. Go when you need to
Waiting to urinate may promote the growth of germs in your urinary system. If you don't already go multiple times each day, attempt to stick to a bathroom plan in which you pee every three to four hours to keep your bladder empty. You should also urinate before and after having sex to remove any bacteria that may cause an illness.
3. Go natural
Women should use caution while using vaginal hygiene products. The normal bacteria in your vagina helps to maintain pH equilibrium.
Using chemicals or scented items can disrupt this balance, increasing your risk of UTIs, yeast infections, and other issues.
4. Be aware of your birth control
Certain birth control options for women might promote bacterial overgrowth in the vagina. If you use diaphragm or spermicide condoms, you may be at a greater risk of recurring UTIs.
If you experience regular infections, you should consider changing your method of birth control.
5. Practice proper hygiene
In addition to wiping from front to back after using the restroom, you should maintain proper hygiene practices. Cleaning your bottom with water and soap every day, using cotton underwear, and avoiding tight trousers can all help lower your risk of UTIs. Good cleanliness also avoids skin irritation in and around your genitals, which can lead to infection and other issues.
0 notes
Text
The Down-Low on Down There: Essential Feminine Hygiene Tips
Let's talk lady bits! Maintaining feminine hygiene is crucial for feeling fresh and confident, but navigating a world of confusing products and conflicting advice can be overwhelming. Worry not! Here's a breakdown of essential tips from a women's health expert to keep your most delicate area happy and healthy.
First things first, the vagina is a self-cleaning marvel. It maintains a healthy balance of good bacteria through discharge, which is totally normal and nothing to be ashamed of. However, some TLC for the vulva (the external area) is key. Ditch harsh soaps and opt for a gentle, fragrance-free cleanser designed for this sensitive skin. Remember, your grandma's rose-scented bar soap disrupts the natural pH balance, leading to irritation and potential infections.
Cotton is your best friend! Skip those lacy thongs for breathable cotton underwear. This allows for proper airflow and prevents moisture build-up, which can be a breeding ground for yeast infections. Change your underwear daily, especially after sweating or a workout.
When it comes to your period, hygiene is extra important. Change pads or tampons frequently (every 4-5 hours for tampons and more often for heavy flow) to avoid odor and irritation. Consider a menstrual cup for a comfortable, eco-friendly option. Remember, a healthy period shouldn't be accompanied by excessive pain or odor. If you experience these, consult a healthcare professional.
Lastly, listen to your body! The vulva shouldn't be itchy, burning, or overly sweaty. If you notice any unusual changes in discharge, odor, or discomfort, don't hesitate to reach out to a doctor or gynecologist. They can address any concerns and ensure your feminine hygiene routine is on point for optimal comfort and confidence.
...Lastly, listen to your body! The vulva shouldn't be itchy, burning, or overly sweaty. If you notice any unusual changes in discharge, odor, or discomfort, don't hesitate to reach out to a doctor or gynecologist. They can address any concerns and ensure your feminine hygiene routine is on point for optimal comfort and confidence.
Bonus Tip: For convenient access to essential feminine hygiene products, check out your local Chemist Gold Coast. They offer a wide range of gentle cleansers, breathable underwear, and menstrual products to suit your needs. Remember, a pharmacist can also answer any questions you have about these products and offer additional advice.
So there you have it! With these simple tips and a well-stocked chemist nearby, you can keep your delicate area happy and healthy, allowing you to focus on conquering the day with confidence!
0 notes
Text
Wild Yeast Sourdough Starter
Wild yeast sourdough starter
A sourdough starter is the first step to making authentic sourdough bread. Creating your own sourdough starter is easy, and with proper care, it can last for years. This recipe uses pineapple juice to help give the initial growth of wild yeast a headstart.
PREP TIME
3 minutes
ADDITIONAL TIME
7 days
TOTAL TIME
7 days 3 minutes
Ingredients
Flour (see notes)
Unsweetened Pineapple Juice
Non-Chlorinated Water
Instructions
Day 1
2 tablespoons flour (15 grams)
2 tablespoons pineapple juice (30 grams)
Mix the flour and pineapple juice in a small jar or bowl. Stir the mixture 2 or 3 times throughout the day to mix air into it. Stirring the starter several times a day for the first few days will help get air to the yeast which will help the yeast grow better. Keep it covered with a paper towel or coffee filter. Keeping it covered loosely with a paper towel will allow the starter to breath in the yeast that is in the air but will prevent dust or possible flying critters from entering.
Day 2
2 tablespoons flour (15 grams)
2 tablespoons pineapple juice (30 grams)
Add the flour and pineapple juice to the existing starter and give it a good stir.
Stir the starter 2 or 3 times throughout the day to get it aerated. Keep the starter covered with a paper towel or coffee filter. You probably wont notice any activity at this point but have faith that the invisible microbes are doing their work.
Day 3 (you wont need to discard any starter yet, just feed it, stir it, and wait)
1/4 cup flour (30 grams)
1/4 cup pineapple juice (60 grams)
Add the flour and pineapple juice to the existing starter and give it a good stir. By this time you might be seeing a bit of activity in the form of bubbles. Starters in some kitchens might need a day or two (or three or four) longer before seeing activity. Don’t worry if yours isn’t active yet.
Day 4 (by the 4th day you will start to discard part of your starter during the feeding)
1/4 cup of the original starter (approx. 60 grams)
1/4 cup water (60 grams)
1/2 cup flour (60 grams)
Discard all but 1/4 cup of the original starter and add the 1/4 cup water and 1/2 cup flour. The process is much easier if you have a measuring scale but it works just fine if you only have measuring cups.
At this point you will want to keep the starter in a quart jar or any container that holds at least 4 cups. This will give the starter room to rise without spilling out of the jar.
Day 5 and Day 6
Continue the same feeding regimen as on day 4. It is likely that you will need to increase the feeding regimen twice a day but only if the starter is really active.
If it doubles in size within 12 hours then feed it twice per day.
If your starter doesn't seem to be doing anything by this point, don't worry. Sometimes it takes twice as long. It seems to vary from kitchen to kitchen and there are a lot of variables that can affect how rapidly the yeast grows.
Day 7
If your starter has been doubling in size then it is ready to use in your baking.
Take out the amount that is called for in your recipe and feed what is remaining in the container based on a 1:1:1 ratio, based on weight. (for example, 20 grams of starter: 20 grams of water: 20 grams of flour)
Sometimes it may take another week (or even two additional weeks) of feeding so just be patient if it isn't making fast progress.
Storing and using your sourdough starter:
If you will not be baking for a while then stick the sourdough starter in the fridge and feed it once per week at a 1:1:1 ratio. by dumping out all but about 1/4 cup of sourdough starter (about 60 grams) and feeding with 1/2 cup flour (60 grams) and 1/4 cup water (60 grams).
Once you are ready to bake bread, take the starter out of the fridge 1 to 3 days before baking and feed it twice a day, giving it time to come out of hibernation.
Do not seal the container with an airtight lid. If you have a screw-top lid, keep it loose so air can escape as gasses get released in the container.
Notes
In some cases, it may take longer than 7 days to get your starter ready for baking. Don't worry if it takes longer, just keep feeding it the same regimen that is outlined for Day 4. If it seems to stop making any activity then it may be in a dormant stage. If that happens, let the starter sit for a day or two without feeding it but don't give up.
For best results, we recommend starting with a whole grain flour for the first and second day. Whole grain flour has more nutrients and microorganisms than white flour and will give your starter an extra ‘boost’. If you start with white flour it will still work but might take a few days longer to see activity brewing in the starter. Just make sure you use UN-bleached flour (bleached flour is treated with chemicals that can retard the growth of your yeast).
We also recommend using non-chlorinated water because chlorine can kill the wanted yeast and bacteria, thwarting your results.
Do not store your starter at temperatures over 78°F or you could encourage bad bacteria to breed in the starter.
Do not feed your starter pineapple juice or any other acid after the first three days. An established starter does not need the acidic environment and the extra acidity could kill the starter.
The longer you keep your sourdough starter, the more flavor it will develop. Usually, after you have been maintaining it for a month or two you will notice a distinct difference in flavor so give it some time.
1 note
·
View note
Text
I'm gonna ramble to poly people, or others in poly relationships, or people curious about poly relationships: (because there isn't much shared about what it is like to BE in a poly relationship, and it is something I have experience in)
I've been with my partner for 10 years. I've been with my boyfriend for 3 years. My partner has just gotten another girlfriend maybe 6 months ago? It's going pretty well. She is cool.
I don't consider myself 'poly' - as in its not a burning drive for me to have multiple people. I just happened to fall in love with two men. Monogamous is not the default. That's not how humans or any other ape works. Mono and Poly can be identities or relationship types. You can be in a poly relationship without being poly - or in a mono relationship without being mono.
My partner is Poly. As in he identifies as polyamorous. I'm glad he's finally found a second. It's very good for him. I am glad she is German and makes awesome bread with her pet yeast.
It honestly feels a bit like your partner has an intense hobby. it takes up their time, their thoughts - it makes them happy. That doesn't mean they don't like you, just because they have a second love - whether that's another person or a car to fix up. It isn't stressful. It's a bit awkward catching them kissing or something - but it's no issue. I can just say "excuse me I need to look in the cupboard" and smack his ass when they move.
It never feels like he stops being my partner is what I'm trying to say. "He is busy hanging out with her this weekend, I hope they have fun." is how it feels.
Sometimes they/you can be spread too thin. Relationships are emotional work and time spent on another, so having two... well, takes more time, takes more work. Communication and honesty is already important in a relationship - but when there is MORE relationship it becomes even moreso.
Poly is more work in some aspects - but less work, as well. I don't need to be the only emotional anchor for my partner - he has his girlfriend, too. You need to give more... but you get more, too.
My boyfriend, and my partners girlfriend, have never even considered Poly before us. They both have said it was surprisingly easy to get used to, the idea of sharing people. Maybe that's the common experience with 'additions' to a relationship, I dunno.
As OP says: Relationships in general, more often than not, 'don't work' - if you count not working as simply... ending. But that's not a bad thing. Poly relationships work probably about as well as Mono ones, because they are just more relationship.
"polyamorous relationships never work" don't like nearly half of marriages in the US end in divorce. i don't think monogamous relationships work either
722 notes
·
View notes