#and seam allowance added to the fold line
Explore tagged Tumblr posts
Visit Tumblr Blog
Explore Tumblr blogs with no restrictions, modern design and the best experience.
Last Seen Tumblr Blogs


Fun Fact
In Q3 of 2020, 31% of US users access the Tumblr app daily.
Text


Derailing project of the moment, Project "Nephew's Birthday Gift" is... Technically done. Added side seams, because he's turning four, and pockets, because cool rocks exist.

I also kept the promise of it not taking up much space. It's about the size of a T-shirt, and I'm so very very tempted to just... Buy a T-shirt and play an innocent prank on the birthday boy.

And then the fiber craft demons struck, in the shape of a very charming man in the open air museum doing a demonstration with five dozen cards and sewing thread on a +5m inkle loom, and I decided nephew needs a knighty belt. Because that's what kindergartners care about: handmade decorative techniques that were available to people in the era. It's definitely not just that he wants a dress-up outfit to boink his brother on the butt with a toy sword in.
#nephew's birthday#knightcore#pazyryk kurhan phoenix#phoenix#embroidery#tablet weaving#sewing#all of this is technically machine washable at 30°C#my mom took measurements and they were... odd#so I chickened out on self drafting#this is a free children's winter coverall pattern#minus the sleeves#minus the zipper#with the center seam drawn straight down#and seam allowance added to the fold line#and then you just hem the bottom bits arm holes and neckline#leaving slits at the bottom and the neck#and smack a shield shaped applique on there#i reinforced every slit opening too#the mantra is very much that this is for a small active child#it will get played in#have I ever done tablet weaving before?#nope#that's why the start looks like crap#I'm also too pms-y to focus on the pattern so I am going by vibes#heraldry
25 notes
·
View notes
Text
how to grub your karkat
or you can use this for any other plush or if you wanna make a whole new plush entirely or whatever

disclaimer im not a professional in any sense of the word and theres anything technical im doing wrong or you think you can do it better by all means dont hold back
Things you’ll need
sewing machine unless youre really dedicated but doing it by hand is gonna be an agonizing feat i promise. I just used a straight stitch for everything
Fabrics: for the main body i suggest a minky or something soft, for the inner lining something in the same color as the main body and ideally with some stretch, and anything black for the legs. Less than a yard of each will do
if youre using minky or anything furry get a lint roller. Trust me
stuffing, i used polyfil
threads that match your fabrics
good fabric scissors
sewing needle for hand sewing/fixes
karkat plush (optional)

Heres the pattern i came up with! They are numbered for your convenience and pieces with the same numbers are going to be part of the same row of segments. cut everything out on the black lines (Make sure when you’re printing to fit the image to the page size.) on the left we have the belly pieces, the right is the main body, and we have the foot in between
Im using a relatively thin minky fabric, im sure you can use whatever but something with some fluffiness kinda helps to mask any imperfections in the sewing. When drawing out your patterns keep in mind what direction your fibers settle in and try to keep it consistent
On the wrong side of the fabric measure out at least a half inch seam allowance around each piece of the pattern, i used a centimeter and that worked but had me sweatin a bit.

For the main body pieces fold your fabric in half before you cut so you can have 2 of each segment that are mirrored to each other, i also extended all of the #1 pieces an additional centimeter/half inch at the top so we can fold them over at the very end. I highly suggest numbering the insides of all the cut pieces, especially in a way where you will remember what direction they are each meant to sit

After you’ve numbered all your pieces, set them aside and start making your feet!
Each of the 6 legs is made of two pieces, but i because i only had a swatch of the black minky i made up for the rest with some random black scrap fabric from an old project. Try to keep your fabric consistent if you can lol
I didnt give these pieces any more seam allowance on the fabric but i recommend adding a centimeter or half inch to the base of it to extend the length and have some more wiggle room

like so
Instead of cutting out 12 individual pieces and struggling to stitch them all together i started with 6, then pinning each piece real tight with the right/furry side down onto my secondary fabric, and slowly stitching around the shape real close to the edges- DO NOT CLOSE THE FLAT SIDE as we are going to stuff the feet through here

Now cut the shape out of the fabric and repeat till you have 6 feet

Now flip those bad boys inside out, stuff up, and if you wanna you can match them to their best pairs

now grab a pair of feeties and your #1 pieces and line them up, in this picture my belly #1 piece is shorter bc i forgot to add the extra centimeter and i recut that once i realized. Line those sides up with the right/furry parts touching and with the feet in between, flip it around to make sure everything's sitting the way you want it

Note. i didnt realize until later but i sewed my feet in upside down. save yourself the time it takes to fix it and dont make the same mistake
Straight stitch these layers together and repeat with the next two segments our good friends #2 & #3

Repeat this for the #2 and #3 sections but NOT THE #4, that part doesnt need feet! just line those edges up right/furry sides together and sew


the secret to the squish of the suit is making this inner lining from another fabric and stuffing it! I used what i had leftover from a stretchy red fabric for a kanaya skirt. For this we need to make a new pattern for each section, making sure it follows the curve of the round edge but the piece itself is shorter, almost like youre removing the seam allowance you added. Mine is a centimeter shorter on the top and on the bottom and reaches to the middle

Make one of these for each numbered segment,you only need to make half the pattern and you can fold your fabric in half on a crease and you end up with one symmetrical piece (bars)

Now you need to pin these pieces right on top of the wrong side of your numbered furry sections and line up the straight edges like so (disclaimer for LOTS OF SCARY NEEDLES !!)

Admittedly i didnt estimate how long these pieces needed to be very accurately and overshot it a bit, if you start pinning it from the middle and continue outwards on either side thatll ensure its not too lose and you can cut off any excess after
The only exception is piece #1, if you recall we gave this #1 section extra seam allowance. This is so we can sew down that excess at the neck later and hide any of the inside that might show once its all put together. Do not connect the top edge to the inner lining! Since i added an extra centimeter earlier im gonna leave that hanging and pin + sew down the inner lining a centimeter lower than the top edge. LEAVE THE CURVED EDGES OPEN! DONT SEW THEM TOGETHER! those stay open to stuff

Straight stitch the lined up edges together

Now you have all these skinned pieces of little freak and we need to connect all these segments together making sure to sew UNDER the existing stitches so we dont see those on the outside when its all put together


Inside looks like a bit of a mess but thats fine bc its not the part that matters
Now stuff it! you might need a stick or pencil or something long and thin to get stuffing into the middle bits

Now thats its stuffed you can finally close those curved edges. Try not to sew over a thick mound of stuffing, push it in a little further to give yourself some space and you can fluff it back out after everythings closed. I cut off that excess lining fabric after sewing

Ough… they filleted my boy…
Finally, match up all the edges and lines and HAND SEW them right sides together. You will destroy your machine trying to work around that stuffing i promise. You also have an excuse to get up from your work desk and sew on a couch or smth. I used a standard backstitch for a tight finish and again, make sure you sew under any existing stitches so they arent visible on the outside!

Speaking of the outside, once you stitch everything together you can very gently flip this sucker inside out

This is @hatamonu’s cat Cocaina, aka Coco. Her perfectly square figure made it into my grub files somehow so shes essential to the tutorial

Check the fit and all thats left to do is roughly baste stitch down that excess neck fabric onto the stuffed lining and youre set! I gave the thread slight tugs as i went to tighten the opening a bit put dont tighten it too much

tadaaaaa

It fits pretty snug but starts to slip a bit with motion. Heres a bounce test

If you do shake your baby make sure to safety pin the plush to the suit so he doesnt prematurely shed his exosekeleton
Now spread that baby fever and show your baby to the world


pics from the ALA 2025 homestuck meetup and supplied by para.dox.cos
Tysm for coming along this ride with me especially if you followed the prototype journey on twitter, much thanks to my more sewing savvy friend for the solution to my grub dilemma and for helping me design and build my dolorosa cosplay <3 much love and hopefully many more homestuck cosplays and meetups to come in the future!
#homestuck#homestuck cosplay#karkat plush#karkat#karkat vantas#cosplay#tutorial#homestuck grub plush#plush pattern#long post#ALA 2025#anime los angeles#dolorosa#the dolorosa#apologies if this is hard to follow or utterly incomprehensible please note i am making shit up as i go and results may vary#feel free to ask any clarifying questions and ill do my best to answer#no i will not be selling these#technically i have more minky left than i know what to do with but the cost would have to justify the pain in the ass it all was to complet#and i dont think anyone will pay that price#send me suggestions of red characters to make plushes out of
432 notes
·
View notes
Text
Hanfu in Components: Body Elements (pt6)
navigation: hanfu in components 1 2 3.1 3.2 4 5 6 ...
ngl I don't really know how to title this one so I just called it body elements, which is kind of clunky but the best I can come up with right now. This is gonna be on the shorter side; I want to go over some of the more unique features you might find on the main body (身/shen1) of a hanfu top. Many of them are very specific to a certain dynasty or time period.
腰襴/yao1 lan2/Waist 'Lan'

Extremely overused pic of the Yuejiangchen ru, with lan highlighted in green
A 'lan' on a top or robe refers to a rectangular piece of fabric attached to the bottom of a garment to extend its length. They can be of the same fabric as the rest of the garment, or a contrasting color. You can identify them by a horizontal seam running across the waist-ish area of an upper body garment—that’s the seam line where the lan connects to the shen. The action or quality of having a lan connected to the main body is called 接襴/jie1 lan2/attached lan.

前秦紫纈襦甘肃花海毕家滩26号墓出土 Ru relic unearthed from Huahai Bijiatan in Gansu, restored by China Silk Museum
Lan typically appear in pretty specific places: one, on a 襦/ru2 top/tunic; and two, on a 襴衫/lan2 shan1/Lanshan robe. Ru tops are generally found in Wei/Jin styles (they exist in other time periods, it’s just that the way modern hanfu popularity developed led to them being sort of relegated/most commonly seen in Wei/Jin). Most are true cross-collar tops; some have a curved collar (less common). Lanshan robes mostly appear in Tang Dynasty menswear and onward; they are usually round-collared robes and the lan tends to be more trapezoidal in shape.
!注 Terminology Caveat: Majority hanfu enthusiasts agree to define 襦 as a top shorter than knee length that has a 襴, but there is some disagreement over this because 1) the meaning of the word 襦 changed over different time periods in history, and 2) the 2010’s hanfu movement, which was largely still interwoven with guzhuang and also heavily motivated by factories trying to jump on the trend for quick cash grabs, referred to any top as a ru. I personally only use the word ru when referring to a short top with a lan, but there are arguments to be made for either side, so I’ll leave that up to you—as long as we’re all capable of communicating our ideas, there’s not necessarily a right or wrong here.

斜陽 / Xieyang / Vesper by 九雲閣 Cloud9 Hanfu on Etsy (see alt text for photo credits)
Tops extended with lan typically do not have 衩/cha4, or vents/slits, at the sides. Instead, to allow more hip movement, some lan may have inverted box pleats (工字褶/gong1 zi4 zhe23) at the sides and/or center. In these cases the shape of the lan is still a long rectangle, it’s just a little longer to compensate for the extra fabric that gets folded in on itself during the pleat. Given the way that hanfu is constructed you can see how it might be difficult to add a pleat in the garment’s side without a lan—you’d have to have at least side seam in the way. Adding a lan allows you to pleat continuous fabric, and because it’s a narrow rectangle you can cut the whole thing from one piece of fabric with no connecting seams.


Left to right: 剪秋姝品 from 端正记 (Tang Dynasty 圓領襴袍/yuan2 ling3 lan2 pao2), 江城子 from 溪春堂 (Song Dynasty 襴衫/lan2 shan1), and 梅紋暗花紗明制圓領袍襴衫 from 洞庭漢風 (Ming Dynasty 襴衫)
The other place that you’d see a lan is on a 襴衫/lan2 shan1. The name is slightly misleading, because we like think of shan as ‘shirts,’ but it really just means a garment that covers the upper body, so it includes robes as well. Lanshan are usually a type of long round-collared robe, popular among scholars and literati. The Tang, Song and Ming Dynasties all have their own versions of the lanshan (one of the Song versions and the Ming version look very similar), but the Tang and Song versions have a lan extension piece attached approximately at the knee level (afaik the Ming dynasty version just kept the name from the Song dynasty). As a result lanshan tend to be closer to ankle or floor length as opposed to knee or calf length like some other round collar robes. In most cases the lan might be closer to trapezoidal than rectangular, to account for the flaring of the robe's body shape.

Left to right: 剪秋姝品 from 端正记 (Tang Dynasty 圓領襴袍/yuan2 ling3 lan2 pao2), 江城子 from 溪春堂 (Song Dynasty 襴衫/lan2 shan1), marked up to show the center front seam and lan pieces.
衽/ren4/Lapel
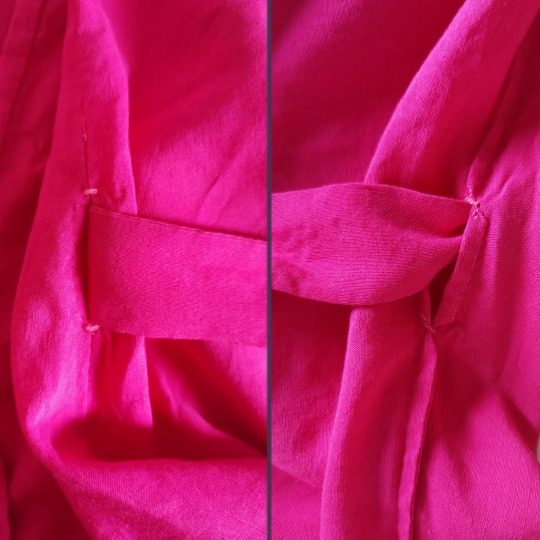
The ren is the part of the 身/shen1/body in 大襟/da4 jin1/Great Lapel garments that bridges each front piece’s gap between the center front seam and the other side of the garment. It typically takes the form of a triangle or a trapezoid, though it might vary a bit based on the collar variety.
Depending on time period, it's possible that one or both sides of the garment incorporates the ren directly into the body without a separate front seam. Ming Dynasty tops specifically have ren on the outer flap, but the inner flap ends at the center front seam—that's why when you put it on you can't make the knot right at the base of the ribbon, you have to let the inside part hang down loosely. (This is 100% the most common mistake I see with people wearing Ming Dynasty tops—it doesn't not fit you you're just not putting it on right!!!)
(ex: round collar, cross collar, standing collar,
擺/bai3/Side Flaps

暮春间 from 执月, Ming Dynasty mens' 圓領袍/yuan2 ling3 pao2/round-collared robe with 平擺/ping2 bai3/flat bai highlighted in green.
Kind of at a loss for how to translate this into English. Not to be confused with the bai of skirts or the 下擺 aka hemline, the bai I'm referring to here is a feature specific to Ming Dynasty menswear—I've had a client refer to them as 'hip wing,' which I think is pretty cute. They're essentially extra pieces that extend out from the side of some Ming Dynasty mens' robes.


Still 暮春间 from 执月, Ming Dynasty mens' 圓領袍/yuan2 ling3 pao2/round-collared robe with 平擺/ping2 bai3/flat bai highlighted in green.
There are a couple different kinds of bai, that have to do with their shapes and placement. Most are 外擺/wai4 bai3/outer bai, meaning that they can be seen from the outside. The top may be flat (平/ping2) or pointed (尖/jian1) in shape. The pointier ones will often extend up to the elbow or further; generally when they're worn they go behind the arms and point backwards. You'll most often find outer bai on more formal garments like 搭護/搭护/da1 hu4, 直身/zhi2 shen1, 野撒/ye3 sa4 and 圓領袍/圆领袍/yuan2 ling3 pao2.
When worn, the bai is usually folded backwards under the sleeves, so they're not actually super visible especially if the sleeves are wide. They're more visible from the back/side and when sitting down.

云意 from 执月, Ming Dynasty 道袍 Tao robe. Purposely chose a version with sheer fabric so you can see the inner rectangular bai showing through the main body.
內擺/nei4 bai3/inner bai fold inwards instead of outwards, so they're not visible from the outside, but they still have essentially the same construction, just in a different direction. Cross-collar robes with inner bai are called 道袍/dao4 pao2/Tao robes. Cross-collar robes with outer bai are called 直身/zhi2 shen1/Zhishen robes.
Utility-wise, bai allow long robes to have very high side slits (for mobility) while obscuring what you're wearing inside of them when you walk around. They're also just kind of a fashion statement though. A lot of Ming Dynasty fashion liked looking Wide and Steady like an equilateral polygon or something.
Ok that's it for now lmao sorry im slow and tired, if I think of any other body elements + if anyone asks for them (pls send asks I'm lonely) then I will add them!
navigation: hanfu in components 1 2 3.1 3.2 4 5 6 ...
#hanfu#chinese fashion#chinese hanfu#hanyuansu#hanfu fashion#hanfu photoshoot#chinese history#chinese#cloud9 hanfu#cloud9hanfu#九雲閣#hanfu in components
90 notes
·
View notes
Note
do u know any good ways to make a garment that no longer fits bigger? I gained some weight recently and now half my clothes don’t fit and I don’t have money for new stuff
hya anon, i am terribly sorry for only answering ur ask now i did not size up my garments until now.
this tutorial is specifically for pants i added width to in the legs but you could apply these basic techniques to anything really
how to make ur pants baggy exactly the way you want them to

!! cw: there are pictures and mentions of sharp objects in this tutorial !!
stuff you'll need:
pants you want to size up
fabric to sacrifice for your pants
scissors
pins (safety or just regular sewing pins)
sewing machine (or needle and thread)
something to mark ur fabric with (i used a pen with heat dissappearing ink)
not necessary but useful:
pants that are the right size to have as "stencil"
seam ripper
-
this tutorial wont be as detailed as the other ones cause i forgot to take a lot of pictures and my explainations dont make sense without them, and also cause some things are hard to explain, you gotta do em to know yk
put the pants that dont fit onto the pants that do

mark where you want to start adding in your panel, you can see i marked mine with safety pins on the side of the pants (dont focus on the ones on the knees they dont matter)

add in your fabric (folded onto itself!! as you can see above) so it is in between the two pairs or pants so you have:
top: pants that dont fit
middle: fabric
bottom: pants that do fit

you can see the fabric is lined up with the pants that do fit, you will draw a line of the fabric where it meets the pants that dont fit
flip the fabric (dont unfold) and do the same on the other side of the pants
cut our your triangle leaving about 2-3cm seam allowance, make other triangle so you have two (for both pantlegs)

you should end up with a triangle looking a bit like this: you can see the safety pin is where the panel stops (the size of your panels ofc depends on what youre going for)

time to rip stuff up! get out scissors or a seamripper and carefull rip the seam on the outside or your pantlegs, until the safetypin, it should look smth like this
turn your pants inside out
now youre going to pin and sew in your panel, make sure your pinning it down with the inside faceing you, otherwise when you flip your garment right side out again you panel will be inside out


in the left picture you can see a thin orange sewing line, this the the seam we ripped, and also the line we will sew on top of when sewing the panel into your pants
under this thin line you can see seam allowance that the pants have themselves, which makes it easy to pin your panel to your pants.

this is how it should look sewn together, you can see how the seam allowances are on one side of the stitching, and the pants on the other.
i also sewed the bottom seam of the panels into the other one, by opening one up, stuffing the other in and sewing over it a few times. you can also just sew them on top of eachother, if your sewing machine can handle that
after doing this on both sides you can flip your garment inside out, and you should be done!

finally you are free of the curse of leg hugging pants. now you can trip over your own pants and get them covered in mud like you always wanted.
#punk diy#diy fashion#diy punk#punk#punk clothes#punk style#my stuff#punk patches#queer punk#punx#tutorial
76 notes
·
View notes
Text

january 3 @ panthers, 3-2 S/O loss
sidney out here doing sidney things.
geno...is not so much doing geno things right now. he's still drawing up plays that make goals happen, because that tying goal doesn't happen without his vision and hockey IQ, but he's in a slump right now. i think i have the answer as to why!
previous soulbond installments: 1 2 3 4 5 6 7 8 9 10 11
As the season wears on, Zhenya makes a decision when it comes to the bond.
The specialists dragging them into meetings every other day, the added scrutiny in a season where they’re already being watched, is fraying Sid at the seams. He still comes to Zhenya’s house in his spare time, but he’s distracted, spending too much time on his phone and spacing out on their conversations.
Zhenya knows why. Neither of them are scoring, and the only time they’re allowed on the ice together is when Sid ignores the call for a change on the power play and stays out for the full two minutes.
The strategy they’ve been forced to adopt isn’t working. Sid’s slowly losing his mind.
So Zhenya changes tacks, all on his own.
Normally when he’s not on the ice he’s only half-paying attention, especially if his line isn’t due out for a shift for a while. He’s always done better when he has time to check out from gameplay and center himself for a few seconds. Now, though, he leans forward and watches when the first line is out, tracking Sid on the ice and watching plays develop.
And he pushes.
It’s not cheating, Zhenya’s pretty sure. Even if it is, he’d like to see someone try and prove it.
Sid was always going to rebound. He’s too good to have a down-stretch that lasts more than a few weeks. Even now, in his 20th year in the league, he has more talent in one hand than the majority of players could ever hope to have.
If Zhenya helps out a little…well, that’s just being a good teammate.
He wasn’t quite prepared for the effect helping Sid out would have on his own play. It’s helping the team win though, or at least stay competitive in games where a few weeks ago they would have folded and gotten blown out. Zhenya can accept his own production suffering, can weather the media criticism and the whispers that he’s washed, if it helps Sid and the team.
He misses scoring real goals, though. Maybe he’ll get the balance figured out with more time; it would be nice to be able to help the top line and get a few goals of his own.
Slowly, Sid calms down. He settles into the team again, laughing with the guys and teasing the kids and getting his swagger back. Zhenya knows he made the right decision when Sid passes Mario for the franchise lead in assists, and Sid drags him into bed that night and proceeds to take him apart so thoroughly that Zhenya cried at one point.
Zhenya thinks he can go through a season like this, even if he doesn’t quite crack 20 goals, if it means he has Sid, and he has the team, and the team starts winning more.
He should have known Sid would figure it out.
He’s not sure what tipped Sid off against Florida. There was that shot on the wide-open net Zhenya missed, and there was the mess in overtime, where he almost had the game-winner and couldn’t even get off the ice.
Sid lets Zhenya linger after he changes, saying hi to his friends who drove up from Miami to watch the game, but once they’re back at the hotel, he follows Zhenya back to his room. Zhenya can feel how irritated he is.
“Before you start, let me put on pajamas,” Zhenya says as Sid shuts the door behind them, interrupting whatever Sid was about to start in with.
Sid deflates, but he nods, crossing his arms and watching as Zhenya digs in his bag for his sweatpants.
He smirks a little when he pulls his pants down and Sid’s interest spikes. He can’t be that mad, then.
“Oh, I am,” Sid answers out loud, and Zhenya sighs gustily as he tosses his suit into his bag and slouches to the bed. “G, what are you thinking? Did you really think I’d never notice that you’re…I don’t know, sacrificing yourself for my play? Did you think I’d want this?”
“No,” Zhenya snaps, rolling his eyes. “Of course I’m not think you’re want me play like shit, like, obviously. But it’s help, yes? We’re win more now, specialists leave us alone when you’re scoring, like, it’s good for team.” He stares Sid down. “I’m wrong? You can’t say, I know I’m right.”
“That doesn’t matter!” Sid explodes, pushing off from the wall and stalking towards the bed. “You’re fucking up your game to…I don’t even know what you’re doing. How the hell are you so good at playing with the bond, first there was that goal you grabbed from me a few months ago now this, and I can’t even…” He takes a deep breath. “It doesn’t matter. You can’t do this, G, you have to stop.”
“Hmm, no,” Zhenya says, smiling when Sid’s eyes practically bug out of his head. “My choice, Sid. Okay, yes, it’s not so good for my game right now, but I practice, it gets better. It’s more important for your line to be best right now.” He holds up his hand before Sid can interrupt. “No, it’s true. You’re captain, like, guys look to you the most. When you’re play best, do crazy things like perfect pass, edgework, it’s make everyone want to try harder for you. Whole team gets…lift? Not sure how to say, but you’re example. It’s not the same if it’s me.”
Sid opens his mouth, but Zhenya can feel when he accepts what Zhenya’s saying as truth. “I still don’t like it,” he mutters, turning to his own bag and tugging out his sweatpants with an unnecessary amount of force. “This wouldn’t be happening if they’d just let us do what feels right. It’s stupid.”
“Yes,” Zhenya agrees, opening his arms so Sid can crawl into his embrace. “They very stupid, we’re say this many times. Can’t change it though, they’re here, they watch. Maybe soon they’re think we adjust like they want, they leave and we do our way, see what happens. But for now, we do this.”
Sid sighs. His thoughts are too fast for Zhenya to pick anything specific out, just a general feeling of unhappiness. “I still don’t like it,” he mutters. “It’s not fair to you. I hear what they’re saying.”
Zhenya shrugs. “They always say about me, every year. What’s new? Maybe you’re give me goal next game, like, shut them up for a while. Maybe I keep not doing media so much and they’re forget if they have fun goals to talk about with you. It doesn’t matter, though. More important that team comes together, like, try hardest every night.”
“I don’t like when you’re this reasonable,” Sid says, turning his head so he can wrinkle his nose up at Zhenya. “And, hey, if you’re so self-sacrificing, why didn’t you do anything during the shootout? We could have used a win tonight.”
Zhenya shakes his head solemnly, pulling a mournful face. “Can’t help your shootout, Sid,” he says. “It’s too late, like, you’re too far gone. So boring, don’t even try, I push and push and nothing. Hey!” He squawks, trying to twist away from where Sid’s digging his fingers into Zhenya’s side.
Their play-wrestling must be loud, because Kris in the room next door bangs on their shared wall after just a few minutes, before it even had a chance to turn into something a little more fun.
40 notes
·
View notes
Text
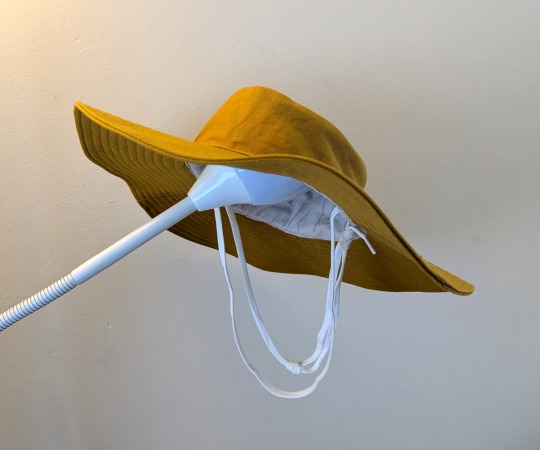
I made a hat!

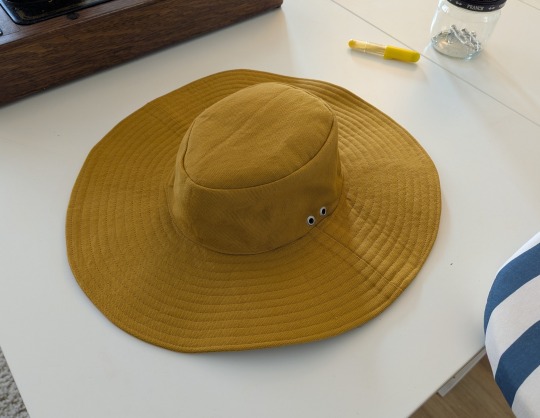
I made the pattern using measurements from two hats that fit me reasonably. I used leftover cotton canvas from my shoes, plus some thin cotton for the lining.
The crown part is just an egg-shaped top and a tapered side band. On some hats the side band seems to have variable height which gives the top a curved shape, but I made mine flat for simplicity.


I added a layer of heavy duty sew-in interfacing in the top piece of the crown outer for structure when I sewed it together.


I also made a matching crown from the lining fabric (I made the side band from three parts because I was using up a small scrap).

I made two matching brim pieces from the canvas (I cut them in four semicircles, because again, using up scrap).


Then sewed them - along with two layers of heavy duty interfacing - together along the outer edge, and inverted through the middle opening. Then a spiral of top stitching all the way from the outside in. That was fun, it was like 20 minutes solid of doing one continuous seam. The stitching keeps all the layers in place and stiffens the brim.


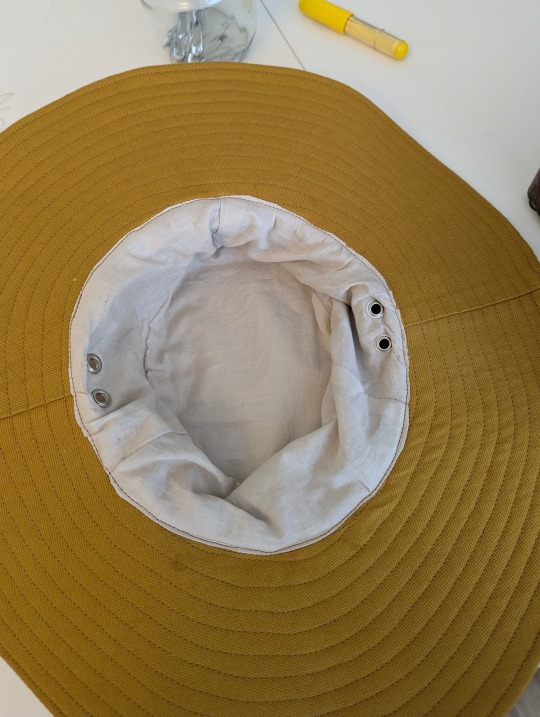
I tucked the lining crown inside the outer crown, and added a few tacking stiches through the seam allowances by hand, just to stop it getting pulled fully inside out when taking the hat off.

Added a pair of eyelets on either side, going all the way through both the outer and lining a couple of cm from the bottom. It was probably unwise to do this while the lining and outer were only flimsily tacked together, but I thought I might not be able to get the pliers around the brim if I'd waited until it was all sewn together. Doing it this way only caused minor problems later on.


Attaching the brim and the crown together was horrendous, one of the most unpleasant seams I've ever sewn - trying to flatten the join between a tapered cylinder edge and the inside of a circle, while folding a reinforced 10cm brim out of the way. I realised in retrospect that it probably would have been slightly easier if I'd sewn it from the inside rather than the outside because the brim would have been less in the way.


At this point I only attached the outer crown to the brim, and left the lining loose.

Then I trimmed down the raw edges at the seam, folded the lining under itself, and topstitched it into place along (approximately) the same line of stitching. It's messy because, again, tring to fold an entire hat and brim out of the way while stitching in the middle of it. Also because I'd placed the eyelets slightly too close to the edge so it was hard to fold over the fabric without covering the eyelets up. I just noticed I should have colour matched the thread to the lining to make the messy stitching slightly less visible from inside, too.
But it's done!
Finished by adding a shoelace through the eyelets as a tie. Modelled very professionally by my standing lamp. It does actually fit me as well, which was a pleasant surprise - I thought with the amount of 3D construction involved, my pattern thrown together by looking at some random hats was sure to end up too big or small.

I learned a lot from this, which is good, because the purpose of this project was to be a test for the hat I want to make next. Top stitching the lining into place after the brim was attached was ridiculous, so next time I'm going to make to complete separate hats first - all outer for one, lining crown and outer brim for the other - and then join them together. I'll still have to stitch around the crown/brim join once everything is but together, but I think (hope) that will be easier to do when the two parts are already secured to each other.
That method would mean having to punch the eyelets in when the brim is already in place, which could be difficult, but my next one is a rain hat so I won't be adding eyelets anyway. I guess I'll stitch the tie in place or maybe sew some ribbon loops on the inside of the lining to thread it through.
The brim is also a bit floppier than I intended. I think it's okay - it doesn't completely droop into my face or anything. But next time I want a flat wide brim I think I'll try a thin foam sheet or something instead of interfacing. The rain hat is going to have a down-angled brim so I think interfacing should be sufficient for that anyway.
7 notes
·
View notes
Note
do you have a pattern for that black edwardian-esque shirtdress you made?
Hey all. So one of my sewing posts has gotten a lot of unexpected traffic in the past day. Whenever this happens, it's usually because the tumblr algorithm is pushing the post onto the dash of anyone who follows the sewing tag. So for everyone who is sick of the dress in question assaulting your dash for absolutely no reason, I am so sorry.
@curiouscalembour
Short answer: yes, scroll down to the photos below
Longer answer: kind of, not really, I mean I have a pattern but it comes with no instructions and you're going to enjoy it about as much as most people enjoy scaling up Patterns of Fashion patterns, maybe even less. Also, this is not a tutorial, just an approximate recounting of what I did. So, uh, good luck.
So here's the thing. I don't use commercial patterns because they often have me finishing seams with a serger which I don't own, or constructing garments with the modern bag-lining method which just breaks my brain. I'm also not a professional pattern maker and have no idea how to digitize patterns, so I do all my drafting with good old-fashioned pen and Christmas wrapping paper. I'm also entirely self-taught and learned everything I know about pattern alterations through osmosis from TheClosetHistorian's videos, so I don't know if anything I'm doing here is industry-standard.
I got the original base pattern by tracing a modern button-down shirt that already fits me, and then converting it to be back-closing, then slashing and spreading the pattern pieces to get the desired style lines and amount of pintuck/floof I wanted, and then adjusting the fit over a series of wearable mockups. (5, to be exact. I now have 5 of these things in my wardrobe, and only 1.5 of them are successful.)

So here's^ the yoke piece. Wait, why are there 3 of them? Why do 2 of the pieces have a weird diagonal line running through them with the grid lines all messed up? Because I suck at this, that's why. I frankensteined this pattern from a previous mockup pattern that had a narrower V-shaped yoke and needed to widen it. If you want to digitize this for yourself and clean it up, you'll have to take one of the faint blue squares (they're 1"x1") and make a grid and then overlay that on top of the photo of the pattern shape. The back yoke piece has 2 different grainlines marked because the fashion fabric has a bias pintucked yoke, so its grainline is going to be different from the lining. The fashion fabric is meant to be pintucked beforehand, and then the pattern pieces traced on top of the pintucked panel and then cut out. Oh, and all of these pieces are drawn net, so you'll need to add seam allowance all around. Except at the center back, apparently, where past-Me already added allowance for a bound edge.

The bodice front and back pieces^ are a little more straightforward. No pintucks needed here. The upper edges ease into the bottom edge of the yoke, and the bottom edges gather/tuck down into the waistband. The center front tucks you'll have to drape on a dress form (or on yourself - I pinned a strip of twill tape which was my skirt waistband around my waist and then pinned the excess front bodice fabric onto the twill tape, then covered the raw edges with a dip-waist belt). The center back is a lot shorter than the rest of the bodice because I have a swayback. I learned from a previous mockup that if I leave the back of the bodice longer, I have to constantly tug my shirttails back down into my skirt because it gradually gets untucked throughout the day. These pieces also need seam allowances added. I assembled my bodice by sandwiching the bodice front and back pieces between the fashion and lining layers of my yoke pieces, but it was a bit bulky dealing with the folded back pintucked parts of the yoke seam allowances, so you can finish your seams however you want.
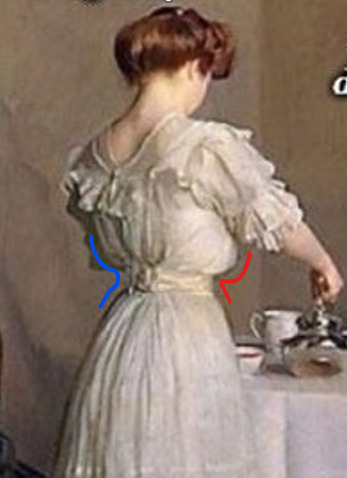
I'm fairly short-waisted, so if you have a longer torso than mine, then you'll want to lengthen the pieces vertically. You want these pieces to be longer than your torso, so that they poof out a little like a subtle muffin top, to get that Edwardian silhouette where the waist looks tiny under the poof:
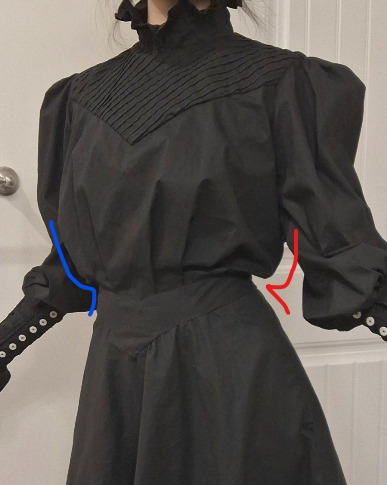

Here's^ part of the sleeve pattern. Again, sorry it's a chaotic mess. I had to use bits of scrap paper and cobble the pattern together. The pattern above is just the upper arm part of the sleeve and ends at the elbow. You'll have to extend about 10" all along the bottom edge to make the smocked part that covers the forearms. I only sewed the sleeve seams closed down to the elbow, then left the seam open from the elbow down to the wrist, so that it closed with rows and rows of buttons and loops. The smocking will give the lower sleeves a bit of stretch, so you might still be able to get your hand through even without the button closure.
This is also a net pattern so you should add seam allowances, but the sleeve is ridiculously puffy already, so forgetting the seam allowances here isn't a big deal.
(I call it my Elphaba shirtdress but it's not an actual replica of anything she wears in the movie. If you want your sleeve to look more like Elphaba's, which is puffy at the shoulders and elbows and fitted around her biceps and forearms, you can change where you add your rows of gathering/shirring.)

And finally, the collar piece. I'm not completely satisfied with how mine gapes at the center front (I think I need to contour/curve it a bit so that the top edge is narrower than the bottom edge), and I think the whole thing could be another inch taller all around, but this is the pattern piece I used to get my finished product. Notice that the back half of the collar slowly curves downward so that the center back is about 1/2" longer than the center front. That's on purpose. If you leave this little detail out, your collar will tilt backwards and make you feel like the front is trying to strangle you.
And because I'm nothing if not inconsistent, this piece features hem allowance already added to the top edge, but no seam allowance pre-added to the bottom edge where it attaches to my bodice yoke, and no allowance for overlap for the center back closure. So be very careful when making and marking your own copy and maybe be a little more consistent than I am?
Speaking of inconsistencies, remember how I drafted my yoke pieces to be cut from an already pre-pintucked panel of fashion fabric? Well, I didn't do that here for the collar. Instead, this collar piece is meant to be cut (on the fold) directly from flat fabric, and THEN pintucked (with lines of vertical pintucking perpendicular to the collar) after cutting. The pintucks are 1/4" deep, spaced 1/4" apart. So the pattern piece you cut out will pleat down to half its original length.
So this:

Becomes this:

Also, note on the pattern piece that I drew a horizontal line across the entire length, running parallel to and about 1.25" below the top edge? That's the point at which your pintucks stop. This gives the collar that ruffle you see at the top.
#sewing#sewing patterns#long post#idk what to tag this as#tricia sews (kind of)#asks#answered#curiouscalembour
13 notes
·
View notes
Text
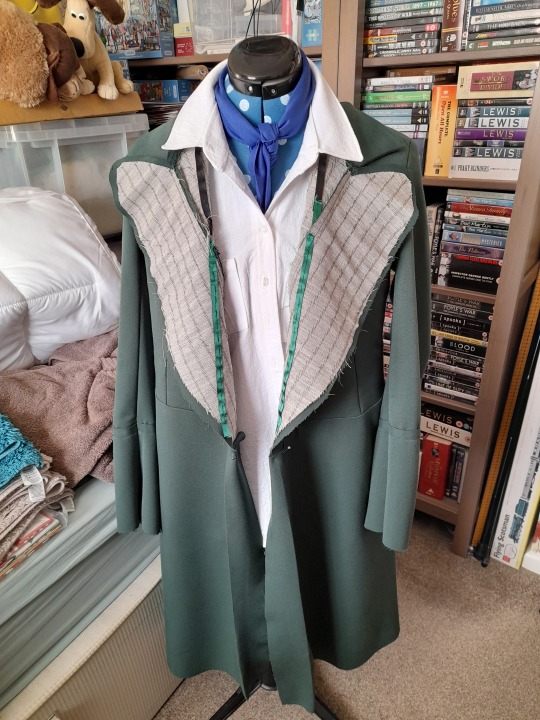
New NotD coat progress report:
Sleeves are trimmed and in (after a fight yesterday; I checked my posts from when I made the original and I evidently had the same problem then but forgot about it), collar is tacked on and the skirts are attached.
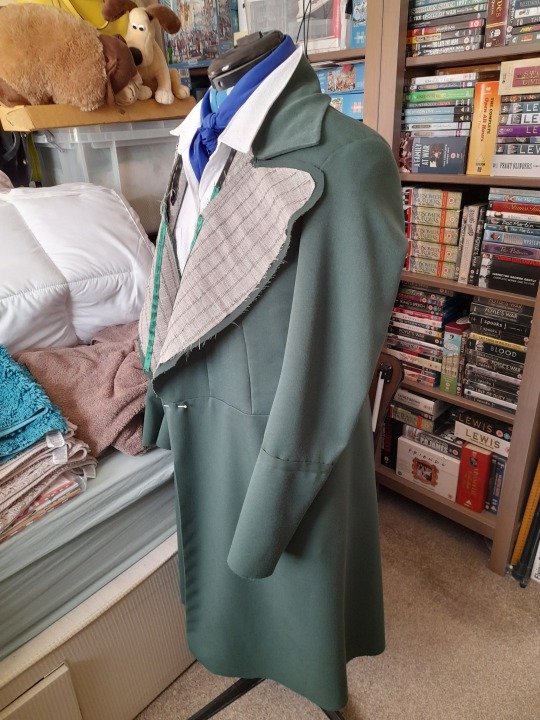

I added a bit extra to the fold on the tails and have stitched down both folds and the back opening as they were sticking out over my bum. This fabric was described as suiting but it doesn’t have much structure; I wanted some drape but it’s probably a bit too thin so I’m glad I interfaced all the top pieces. I wish I’d done the upper sleeve as well as once I put the shoulder pads and sleeve heads in the fabric collapsed at the top which has resulted in my adding some extra wadding to fill them out. I’m going to have to use some firm interfacing on the lapel facings as at the moment they’re just too floppy (they look ridiculously wide because last time I didn’t account for the seam allowance on the binding and they ended up a bit too narrow. This time I’m giving myself plenty to play with.):

I think I’m going to have to interface cuffs and hem as well but we’ll see. I would do the sleeves but it took me so long to get them right that there’s no way I’m taking them out again!
Now I have to repeat the process for the lining…
9 notes
·
View notes
Text
Stylishanacrhonism’s no fuss no waste custom skirt recipe
To be strictly technical, to be no waste this makes a handkerchief hem skirt, but making it a true circle gives you bare scraps leftover. It involves very little math and fits anyone and everyone. For maximum fullness, you don’t want to go much beyond knee length, or you do a smidge more math and add more gores, but it’s really very flexible on all fronts.
You will need two measurements: your waist, or wherever you’re having the skirt sit on your body, and the minimum length of the skirt as a whole.
You will also need to make a few aesthetic decisions, namely, do you want gathers at the waist, do you want ruffles at the hem, and do you want waist ties on the waistband.
For a knee length skirt, you will need approximately three yards of non directional fabric (you’ll need extra for directional), a piece of heavyweight fusible interfacing long enough for your waistband, a zipper, and a hook and eye (or two).
Specific modifications for directional fabric are at the end.
Take your minimum skirt length, and your first decision. If you are adding a ruffle, add an inch to your minimum length. If you aren’t, add an inch and a half. This is your seam allowance and your hem allowance. Cut three panels of fabric at that length, and set aside
Next, take your waist measurement. If it is smaller than your fabric width, add an inch. If it is not, add two. This is your waist measurement.
Cut a strip (or two) of fabric twice as wide plus an inch as you would like your finished waist band to be. If you want waist ties, cut an extra strip. Set aside.
Take your waist measurement again, and divide by six. If you would like gathers at the waist, and therefore a fuller skirt, round up to the nearest inch, and add one more inch. If you would not, divide by two, and then round up and add your inch. This is your panel width.
Congrats! You’re done with the math!
Take your fabric panels and lay them out folded width wise, the way the fabric usually comes off the bolt. Measure your panel width from the fold on one side, and from the selvedge on the other, and fold between those two points. Cut the fold you just made, and repeat for the other two panels. You should have three full trapezoids, and six half trapezoids.
Using a half inch seam throughout, sew four of the half trapezoids together to make two more full trapezoids, then, starting with one of the remaining half trapezoids, sew the panels together, alternating full and pieced trapezoids and ending with the other half trapezoid. This should start to look skirt like at this point.
Install your zipper! Using it as a measuring tool, starting half an inch from the top of the skirt, mark the bottom of the zipper on the remaining open seam, and sew that seam together from the bottom up to that mark, keeping in mind you need to reinforce where this stitching line ends. Turn the skirt inside out and press that seam open, pressing the seam allowance up to the top as well. Then, with the zipper unzipped, carefully sew the first half of the zipper to the pressed seam allowance down to the end, turn the skirt so you can tack across the bottom of the zipper, and sew up the other side. Congrats! The hard part’s done!
If you have more than one waistband strip, sew them together. I like to split the second and/or third strip in half and sew those halves to the ends of the first strip, so that the seams are even, but whatever’s easiest. If you are not adding waist ties, cut your waistband to the waistband measurement we calculated at the beginning. If you are, mark that measurement, so you know where the ties start. I find the easiest way to do this is to divide the measurement by two, fold the waistband in half, and measure from that, since that makes sure all your seams are even, but whatever’s easiest for you!
Using your waistband as a pattern, cut and fuse your interfacing to your waistband (I usually carefully fuse and then cut, but you run the risk of fusing your project to your ironing board). If you have gathers, gather your skirt into your waistband using your favorite method, leaving half an inch of waistband free on both sides of you don’t have waist ties. (If you aren’t gathering, pin the waistband to the skirt normally instead.) Sew the waistband to the skirt, and press the resulting seam up towards the waistband.
Fold the waistband in half, wrong sides together, and sew the ends, making sure that seam ends up level with the back seam of the skirt if you don’t have waist ties. (If you do, sew the bottom of the waistband together until you reach the back seam of the skirt.)
Turn your waistband right side out, turning the waist ties if you have them, and fold the seam allowance up, pinning the inside of the waistband to encase the skirt/waistband seam. Stitch the inside of the waistband down, either by hand or carefully by machine. Press your waistband flat, and sew an interior line a quarter inch away from the edge of the waistband all the way around to tack the layers together. If you have waist ties, attach one hook and eye just above the zipper. If you do not, you’ll need one at the top of the waistband as well, and should use as many as looks and feels good to you between them.
If you are making a true circle skirt, you get to take a break! Hang the skirt by the waistband somewhere out of the way and let it hang out for 24 hours. (Because the side seams are cut on the bias, more or less, they’re going to stretch, and we want to get that out of the way before you level your hem.)
If you have a friend with a steady hand, put the skirt on, and have them cut it level for you. If you do not, lay the skirt flat on the floor and round the corners to the best of your ability. Nobody will notice if they’re a bit wonky, I promise.
If you are adding a ruffle, take the remaining fabric and cut it into as many equal strips as looks good to you, as long as there are at least twelve, and keeping in mind you’ll be losing about an inch off the width because of the hem and seam allowance. Sew the strips together, end to end, and hem using your favorite method. Sew resulting strip into a circle, and gather to the hemline. Finish the seam (I like zigzag and then sewing it down), and you’re done!
If you are not adding a ruffle, hem your skirt using your favorite method. You’re also done!
Enjoy your skirt!
*If you are using directional fabric, you’re going to need twelve panel strips rather than six, and you’ll have twelve half trapezoids left over, which you can use to make another skirt, but reversed, or for something else. You may also, depending on how you cut your panels, need to split one of the trapezoids so you can put the zipper in.
**This a very, very flexible pattern. Want a fuller skirt? Add more panels! Add contrast color gores in the main seams! Make two skirt bodies in contrasting colors and layer them so the handkerchief points alternate! Add casings in the main seams and adjust the hemline on the fly! Patchwork your fabric together before you start to get even wilder with it!
#no pictures because I am not currently making one of these but like let me know if you have questions#I came up with this as a baby seamstress so it *should* be accessible to anyone who can sew a straight line#I’ve made them for people of every size and shape and age and they look good on everybody
6 notes
·
View notes
Note
Hi, so I saw your addition to the "things I wish I knew about sewing" post about interfacing, and was wondering how that applies to smaller scale clothes? Not just 1/16th (even though that's the scale most of what I have are), but like, in general.
I generally do skip interfacing doll clothes. Sometimes I will add some fusible webbing to the upper piece of a collar...sometimes.
But I do use facings on 1:6 necklines made from woven fabric all the time, because it is so much easier, to me, to sew on that extra piece, clip the seam allowances, then turn it to the inside out and flatten with my fingers.
I usually make my facing piece large enough to reach the arm holes, which allows me to also finish the arm holes with that facing piece as well if there are no sleeves, or catch the edges of the facing in the sleeve seams to hold it in place.
...and, honestly, if the bodice of a doll dress is short enough, that facing is almost a lining. I think a lot of people line doll clothes to get the same effect as using facings. (Facings are generally made from the same fabric as the outside of the garment, while lining is generally a different fabric)
Sorry if you were specifically asking about interfacing and not facings--this answer is mostly for people who are still learning the difference between facings (pieces of fabric sewn to an edge, right sides together, then turned to the inside) and interfacing (reinforcing layer added to the inner side of fabric, usually on a facing)
I am so confident that facings are the easiest way to finish a neckline in a garment made from woven fabric that I included a facing in this doll shirt pattern I made and shared a few years ago
The kind of facing that extends to the arm holes is in this pattern
(I keep specifying garments made from woven fabric because the easiest way to finish the edge of a knit fabric garment is to sew a folded piece of knit, slightly stretched, to that edge. I suspect some people new to sewing will find it counterintuitive that it really is easier, in some situations, to finish an edge by cutting and sewing on an entire other piece of fabric...)
And if none of this answers your question, let me know that I got carried away on something else!
29 notes
·
View notes
Note
How do you make stuffed animals? I’ve bought a pattern for less complicated animals, but you made that blorbo and I don’t think there are any templates for that? What should be my next step in developing my animal making skills?
Hey! This answer is probably going to get pretty long, so it's going below a read more
You're right, I did not use a pre-existing pattern for the blorbo plushie. There's a couple different methods people use to create plushie patterns; if you find you don't like the method I use, that doesn't mean you can't make plushies! Keep trying until you find methods that work for you In my experience, the best way to develop skills in plushie pattern making is to sew a bunch of different plushies. While you use patterns, look at how the pieces look in 2D on the paper and how the end up in 3D in the finished plushie, and start to make a note of what it takes to make simple 3D shapes like a sphere (darts or different segments), a cube (six squares), a cylinder (a rectangle with two circles for the end pieces) If creating a new pattern entirely from scratch seems too much to start with, you can repurpose pieces of other patterns*! I've got a fluffy ostrich-y bird pattern that's just a pattern for a round dumpling for the body, a pattern for a...I think it was a snowball for the head, and then some simple rectangles to make the cylinders of the neck and legs. Another thing! A lot of plushie pattern making for simpler plushies made of knit fabric is just drawing. My manta ray patterns are just a drawing of a manta ray, plus a seam allowance added around the outside. Same with my eel pattern (mostly. it has one dart), my fish pattern, my other manta ray pattern...there's a lot of patterns you can make flat when you're starting out and use stuffing and the stretch of the fabric to make 3D. It's still what I use for simple flat pieces of patterns like wings, arms, ears, etc. That reminds me: seam allowances! I use 1/4" seam allowances, because that's what my sewing machine is set up for and it's the most common seam allowance I've seen used for plushies. You can use whatever seam allowance you want, but I have found it's a loooot easier if you have a tool you can use to add your seam allowance once you've drawn your pattern. I use two mechanical pencils taped together whose points are 1/4" apart. I put one pencil on the line I drew for the pattern, and use the other pencil to draw the line of the seam allowance. A few other tips, in no particular order but numbered so I can keep track of them 1. when matching up pieces of a pattern, make sure they match before the seam allowance is added. It'll make your life easier 2. fold paper to get symmetry in your pattern pieces 3. if you need to match a straight line to a curved line, or two curved lines together, you can use a pipe cleaner to measure the length of the curved line and then straighten the pipe cleaner to know how long to make your straight line (like matching the bottom of legs (rectangular pieces) to feet (circular pieces)) 4. If you are creating a pattern to use with a particular fabric, check how much of the fabric you have BEFORE you draw the pattern just like an inch too long to cut out of the fabric (I learned the hard way lol) 5. if you are worried your pattern won't turn out how you want it to, you can always start with monsters. There's no wrong way to make a monster plushie, you can just accidentally make a different monster than the one you intended to make. It's still a monster plushie, and that's not a bad thing to make! :D 6. if you have multiple pattern pieces coming together at the same point, like the top of a beach ball or the top of my octopus pattern, think about what angle you want that junction to form. For the octopus, I wanted the very top of it to be flat, so I made sure the pieces coming together totaled 360 degrees to be a flat circle. If I'd gone for less than 360 degrees, it would be pointed, if I'd gone for more, it would be kind of ruffled? Almost? Point is: divide the angle you want by the number of pieces you want to form that angle to get what the angle should be at the point each piece comes together *don't sell patterns made from pieces of other peoples' patterns though
#ask away!#weasel-the-scout#how to create sewing patterns#sort of. this is very freeform as I thought of it#if you (or anyone else) have more questions please feel free to ask!
30 notes
·
View notes
Text
July, 2024 | Simple Pink Day Dress


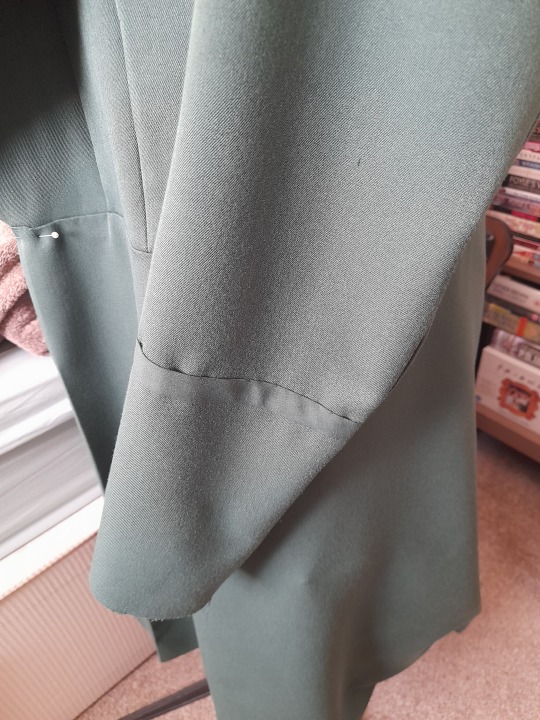
Hey there! It’s been a long time. I have been spending the majority of the spring on academic work, but I did finish a few items and will be making more fibre things over the summer. Today I will be writing about this simple pink dress with just enough details for a clean and high-quality finish.
I should clarify that the design is based on an old Margaret Howell dress—so it is not my own. The original dress was in linen and came in two colours (mid-blue and black), and it looked fabulous on the runway. I wish I could find it, or afford it, or had the body to feel comfortable in it…But I thought it would also be nice to make my own.
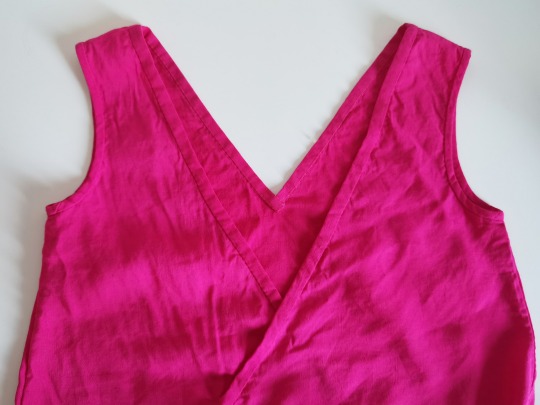
The dress has no waist seam, and the waist shaping relies entirely on the belt. It has a simple V neck in the front and a deeper faux wrapped neckline in the back. The maximum waist measurement is fixed. The front and back necklines are stabilised with bindings cut on straight grain. The armscyes have bias binding. There is an opening on the right side seam to allow the belt to draw through. You may add a button to further close the back neckline if the shoulders tend to slip off (it works for some people; for me it doesn’t.)
Pattern
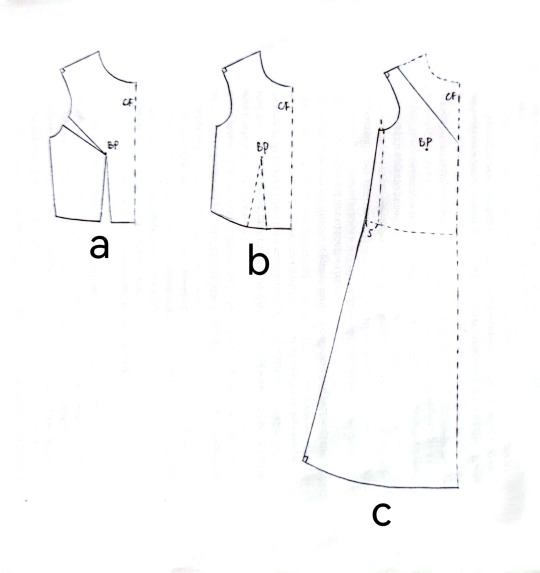
The pattern is easy to draft. We start with a basic bodice block that fits exactly.
Draft the pattern on a folded half of the front:
Rotate all darts towards the waist. Leave the darts ‘open’ i.e. do not add sewing lines here as they will be gathered when you wear a belt.
Add 1cm to the underarm width, i.e. in total 4cm added to the underarm circumference.
Add 5cm to the waist, i.e. in total 20cm added to the waist circumference.
(Adjust Steps 2 and 3 based on your desired positive eases.)
4. Draw the neckline on the front.
5. You might want to adjust the armscye—for many people, fitted bodices with and without sleeves require different armscye shapes. This includes raising/lowering the underarm point and increasing/decreasing the shoulder width.
(By now we have the bodice part of c.)
For the back:
6. Draw the ‘wrapped’ neckline, taking into consideration the width of the belt. Depending on your body shape, you can just ignore the tiny shoulder dart on the basic bodice pattern, or take it into account when you sew the binding.
7. Leave the waist dart ‘open’ and adjust the underarm and waist as in the front. This doesn’t have to be exactly the same as the front, but note that the neckline gap will become harder to control as the width of the bodice increases.
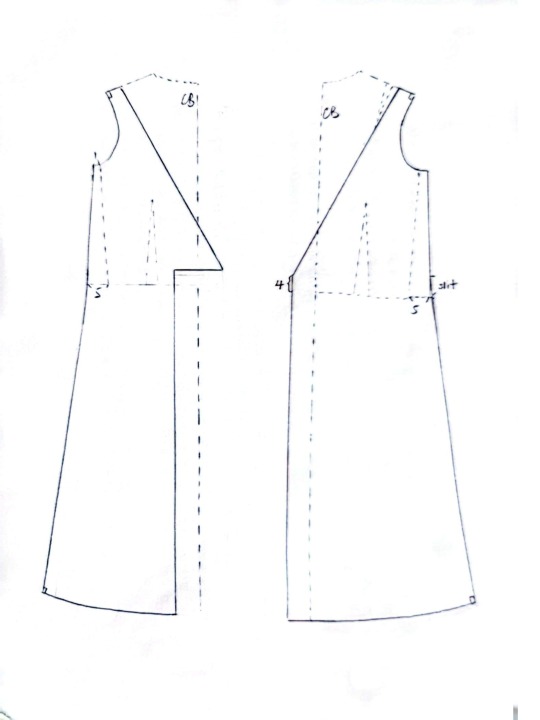
Skirt:
8. Extend the bodice to make the skirt. It is a little tricky for a dress without a waist seam, because the front bodice is often wider than the back to accommodate the chest, whereas the back of the bottom is usually wider than the front for the hips. This can be compensated to some extent by adding waist darts or making the back skirt expand wider than the front (i.e. closer to a quarter circle than a rectangle), but note that neither the back nor the front skirt can be too wide as the waves would not hang in a correct distribution.
9. The lengths of the front and back skirts also depends on your chest and hips.
10. The skirt in the back is divided into two asymmetric panels – see the illustrations.
Belt:
11. The belt is two ribbons of 4*140cm, so cut two rectangles of 10*142cm, with 1cm of allowance.
Fabric
Choose a drapey fabric if making a longer skirt. Soft silk, cotton and viscose would work well. Linen tends to be crisper so I would suggest reducing both the width and length of the skirt if using pure linen. Alternatively, you can reduce the width of the skirt but keep the length by adding a slit.
I cut my patterns along the cross grain, because for some reason this fabric is much stabler on the weft than on the warp. Proof that you don’t always cut along the straight grain!
Making the dress
(All seams unspecified are French seams.)
Finish shoulder seams.
2. Add binding to the front and back necklines. I controlled the neckline gapping by easing the main fabric into a straight-grain ribbon binding. I eased 1cm on each side of the front and 1.5cm on each side of the back.

(Above: the front, seen from the outside.)
(Above: the back, seen from the outside.)
3. Finish the side without the opening. For me, this was the left side.
4. Finish the side with the opening. First, check that the opening is at the correct height. Then just treat it as a skirt side slit from both ends. Add a ‘stopper’ to stabilise the opening.
(Left: the opening seen from the outside. Right: the opening seen from the inside.)
5. Finish the armscyes with narrow bias binding.
6. For the belt, finish the ribbon that goes on the ‘upper’ side. Sandwich it at the waist line between the two back panels and finish the back seam (a French seam). I closed both short ends of this ribbon before attaching it to the body, but, in hindsight, the end that goes in the body doesn’t have to finished.

(Above: where you attach the ribbon, seen from the outside.)
7. Sew the ribbon of the other side, leaving the width of the overlapping part of the bodice open. Finish one short end. Turn it to the right side.
8. Attach the unsewn width of the belt to the bodice piece that goes under. Finish the raw edge of the short edge. If you have left the short end of the other belt open, you will be able to see it here and should encase it as you attach the ‘under’ ribbon.

(Above: ribbon attached to the 'under' half of the bodice and then sewn onto one short end of the other ribbon, seen from the inside.)
9. Check the length and finish the hem. I did a simple twice-folded hem and steam-pressed after each fold, before sewing it down with whip stitches.
There you go😊 This post consists mainly of brief notes; however, if you would like some further explanation, let me know and I’ll try my best!
4 notes
·
View notes
Text
宋抹胸 Song Moxiong Sewing Construction
(not really a tutorial bc I don't go over how to hem/seam stuff together but close enough)
Yesterday @dragonaeve asked about the pattern for the triangle pleat moxiong in the server so I thought I'd just post it in here too lol, it's dead easy to make (coming from the clothing designer who can barely actually sew)
Some data from 花山墓 for your viewing pleasure:


Here, off Twitter but data has been corroborated with at least 3 other sources, shown is 菱形朵花紋絹抹胸, the last one in the table. This one doesn't have a chest band but a lot of people prefer having it these days bc of friction and also wear & tear purposes so I added it
onto the making
Step One: Make Some Wrecked Angles
Cut out 4 rectangles:

1x MAIN BODY: H = however long you want the garment to be (usually 30-60cm), W = your chest circumference * 1.5
1x CHEST BAND: H = chest band width (usually 3-5cm) * 2, L = (chest * 1.5) - (d¹ * 2)
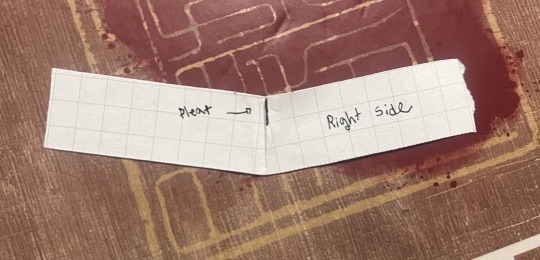
2x RIBBONS: H = ribbon width (2-4cm) * 2, L = ribbon length (usually like 50-150cm, kinda whatever)
¹ d is half the difference value in the top/bottom lengths. You can either do a triangle pleat, inverse box pleat, or no pleat. The bigger the d value is the more pronounced the curvature. See next step for d value.
ALSO ADD SEAM ALLOWANCE AND STUFF
Step Two: Choose Your Fighter
Choice 1: No Pleat
d = 0. You don't have to do anything queen sit back n relax
-
Choice 2: 三角褶 Triangle Pleat (aka dart)
d = 5cm if you're mimicking the Huashan artifact but most people like to go smaller than that so u can adjust if u want

Fold that shit in half (wrong side out)

2. Sew this line to make this triangle in the corner (w = d, h = 2*d)
3. Unfold it (still wrong side out)


4. Either press the triangle thing to one side or squish it flat.
Tada
-
Choice 3: 工字褶 Inverse Box Pleat
d = ~2-5cm ish up to you
Fold that shit in half (wrong side out)

2. Make a W that's d/2 tall

3. Flip it and reverse it


4. Open the book and smush the ears flat
-
Step Three: Make A Sandwich

(You can add interfacing to the chest band first if u want it makes it easier. The ribbons are just tubes)
Obviously hem stuff and sew things together like normal lol otherwise that's it
Optional Toppings:
Make a vertical slit in the chest band at the 1/3 point for the ribbon to pass through when u tie it
If you don't got them Tang Dynasty sized titties, add loops for straps and/or sew straps directly onto the band
Add a lining (literally just another big rectangle that u sew to the main body and then proceed as usual)
Use different fabrics for the band and the body for funsies
Add trim between the band & body for decor
No chest band, sew ribbons directly to main body (more accurate to Huashan moxiong)
Fabric not wide enough for the main body? Sew a bunch of smaller rectangles together to make One Big Wrecked Angle. Make them out of different fabrics if you're feeling adventurous
Use already-made hair ribbons or satin ribbons for ribbons if u don't wanna sew tubes
32 notes
·
View notes
Text
Allura, Part 11
Skirt time! These were actually pretty simple to make.
For the underskirt, I took a measurement of the widest point the skirt will cover and how long I wanted it to be. I then made sure my fabric (the dark blue jersey - very stretchy!) was 1-2 inches larger in both dimensions. One seam up the back later, and it was time for the waistline. I hemmed this with a zigzag stitch, leaving a channel about an inch wide, and didn’t quite meet up the stitching - I left about 2” open. I then measured around my waist where the skirt will sit, and cut a piece of 3/4” elastic to exactly this length. I then threaded it through the channel in the waistband, made sure it was flat all around and not twisted, then sewed the ends together with a 1” overlap. I then pulled this back fully into the waistband, and finished the hem stitching. I then put a vertical line of stitching in next to the seam to hold the elastic in place. I evened out the gathering, and put in another five sets of vertical stitches spaced around the waistband to hold the elastic in place. Then, again with mum’s help, I marked the bottom of the hemline. Using this as a guide, I folded it up and stitched the hem using a short and wide zigzag stitch - this gives the stitching the maximum amount of stretch. Underskirt: complete!
For the overskirt, I needed to have a gap in the front. So, I estimated how big I wanted the gap, and removed that from my hip measurement. I then halved that, added seam allowance, and cut two panels of the length I needed. I then sewed the center back seam, and started the waistband the same way I did the underskirt. This time, I completed the channel stitching, as the ends were remaining open. I used a piece of ribbon to temporarily hold the edges together, and pinned in darts to shape the skirt better, as my waistline is smaller than my hips and I don’t want this one to be gathered. Once I had the darts pinned, I went ahead and sewed them before cutting off the excess fabric. I then took a piece of elastic 1” larger than the gap I want, and tucked one inch at each end into the two sides of the waistband. To hold this in place securely, I stitched a square with an X, covering the two vertical lines twice each. This left me with (unstretched) a gap 1” smaller than what I want - this allows the elastic to hold the skirt up. Then it was time for the trim - this time, before I pinned the unfolded side to the skirt, I folded the top down and stitched that to hide the raw edge. I then repeated the same process as before: unfold one side of the bias tape, pin, sew, fold, pin sew. Once I had the bias tape finished, I hemmed the bottom of the skirt, folding the bias taped corners into a triangle first to, again, hide the raw edges. One last line of stitching, and she’s done!


Of course, I still need to style the wig and make the capelet. I’ll try to do them both in the room tonight before I wear her tomorrow, but I’ll prioritize the wig!
Looking forward to Fantasy Forest - anyone else planning to go?
4 notes
·
View notes
Text
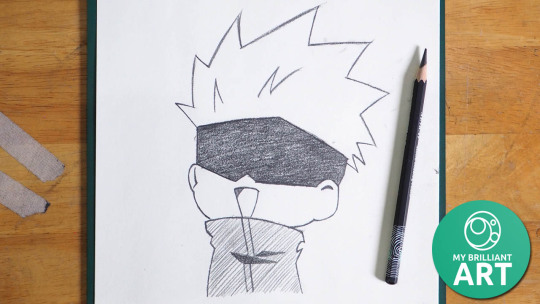
Cute Gojo Satoru - Easy Drawing Tutorial
Gojo Satoru, the charismatic and powerful sorcerer from the hit manga and anime series "Jujutsu Kaisen," is a fan favorite known for his striking appearance and playful personality. Drawing a cute version of Gojo Satoru can be a fun and rewarding experience, even for beginners. This step-by-step guide will help you capture his charm in an easy and approachable way.
Materials Needed:
Pencil
Eraser
Drawing paper
Fine-tip black pen (optional for inking)
Colored pencils or markers (optional for coloring)
Step 1: Basic Head Shape
Start by drawing a simple circle for Gojo's head. This will be the foundation of his cute, chibi-style appearance. Lightly sketch a vertical and horizontal line across the circle to help place the facial features symmetrically.
Step 2: Facial Features
Begin by drawing large, expressive eyes slightly below the horizontal guideline. Chibi characters often have oversized eyes to enhance their cuteness. Draw a small curved line for the nose just below the eyes, and a simple curved line for the mouth to give Gojo a cheerful expression.
Step 3: Hair Outline
Sketch the outline of Gojo's iconic spiky hair. Start by drawing the hairline, which follows the curve of the top of the head. Then, add large, pointed spikes that extend outward. Keep the spikes slightly exaggerated to maintain the chibi style.
Step 4: Body Shape
Draw a small, simple body below the head. Chibi characters have proportionally larger heads and smaller bodies. Use basic shapes like rectangles and ovals to outline the torso, arms, and legs. Position the arms and legs in a relaxed or playful pose to enhance the cute appearance.
Step 5: Clothing Details
Add details to Gojo's outfit. Draw the collar of his high-necked jacket, and add simple lines to indicate the folds and seams. Keep the details minimal to maintain the chibi style. You can add his blindfold or his sunglasses on top of his head for extra character.
Step 6: Hands and Feet
Sketch small, simple hands and feet. Chibi hands can be drawn with just a few curved lines to suggest fingers, and the feet can be simple ovals or rectangles. Keep the proportions small and cute.
Step 7: Finalize the Outline
Go over your sketch, refining the lines and adding any additional details. Make sure the proportions are accurate and the lines are clean. Erase any unnecessary guidelines and adjust any elements to perfect the overall appearance.
Step 8: Inking (Optional)
For a polished look, use a fine-tip black pen to outline your drawing. Carefully trace over the pencil lines, making sure to follow the contours of Gojo's features and clothing. Allow the ink to dry before erasing any remaining pencil marks.
Step 9: Coloring (Optional)
Add color to your drawing using colored pencils or markers. Choose appropriate colors for Gojo's hair, eyes, and outfit. Use light, pastel shades to enhance the cute, chibi appearance. Add shading and highlights to create depth and dimension.
Step 10: Final Touches
Add any final touches, such as additional shading, highlights, or small details, to enhance the overall look of your drawing. Step back and admire your cute version of Gojo Satoru, appreciating the effort you've put into capturing his charm.
Conclusion:
Drawing a cute version of Gojo Satoru from "Jujutsu Kaisen" can be an enjoyable and accessible project for artists of all levels. By following these simple steps and embracing the chibi style, you can capture the playful and endearing side of this beloved character. Remember to practice regularly and have fun expressing your creativity through your artwork!
► Video Drawing Tutorial
► All Video Cute Drawing
► All Video How to Draw Chibi Characters
2 notes
·
View notes
Text
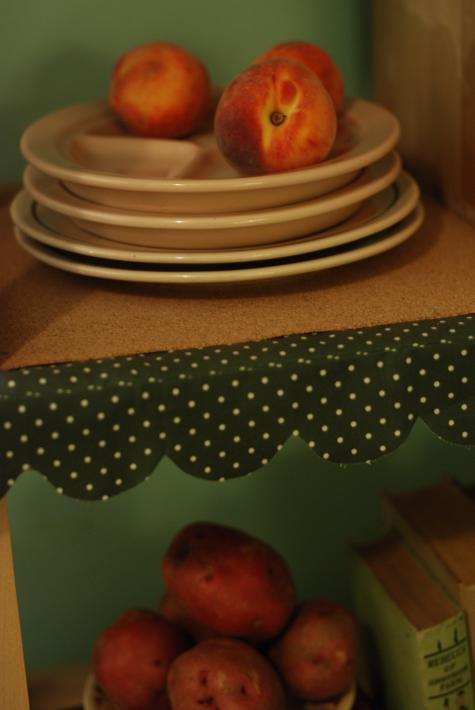
DIY Decorative and Utilitarian Shelf Edging
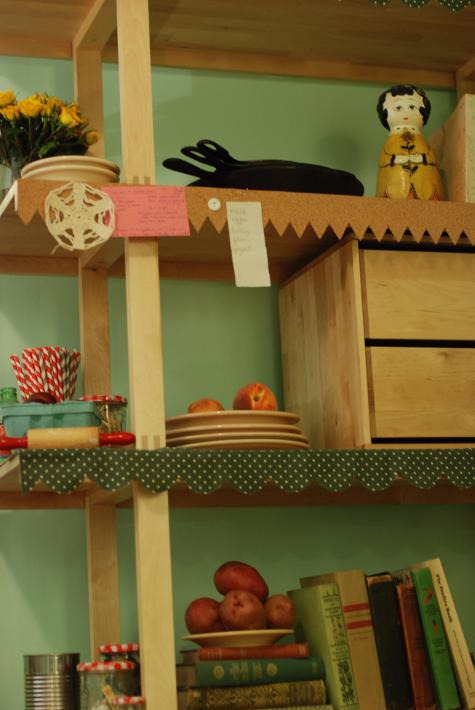
Project by Haylie Waring:
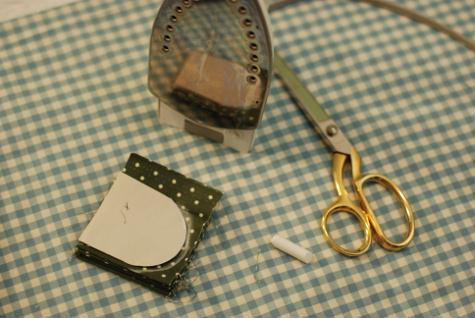
Simple shelf-edging can be a great disguise for unattractive shelving units or it can transform your kitchen and library shelves by creating a more uniform look. Here I have alternated a decorative traditional fabric-edging with a utilitarian cork edge in the kitchen- a great spot for tacking up grocery lists and recipes… I have also included a quick tip on making cute tiny tacks for your cork edging! –haylie
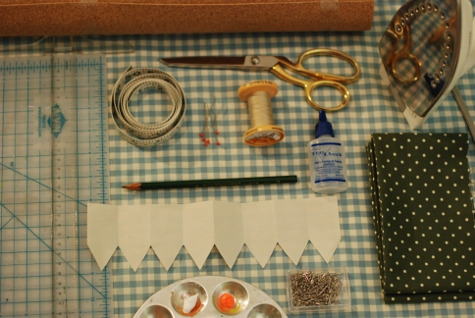
Materials & Tools:
To Make Patterns/ Templates You Will Need:
-paper -pencil -t-square -ruler -small round object (e.g. lid to baby food jar or spice container- depends on size of scallops) -paper scissors
To Make Fabric Edging:
-fabric of your choice (approx. 1/2 YD per 4- 44″ shelves) -thread -iron -sewing machine -scissors (use sharp fabric scissors for precise cutting) -fray-check -straight pins -chalk -measuring tape straight edge ruler
To Make Cork Edging: -cork roll (depending on shelf size, this ikea shelving required a 5″ x 44″ piece per shelf- can be found in 48″ rolls at office supply stores) -t-square -chalk or marker -scissors -double sided adhesive tape- extra strong bond
To Make Tiny Tacks: -acrylic paint -basic applique pins -tweezers
Instructions:
To Make Template:
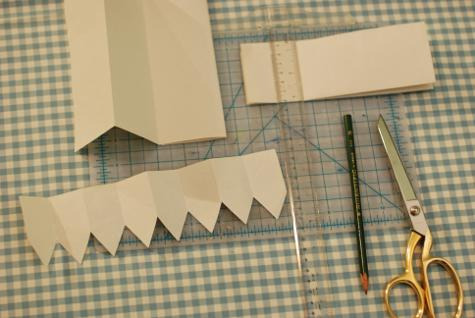
1. Measure the height of your shelf edge. The Ikea shelving pictured here measured 1 3/4″, and I added 1″ for the scallop/ pennant overhang. The pattern should measure 2 3/4″ high (overhang may very according to the height of your shelving edge, and personal preference). 2. From a sheet of 8.5 x 11 paper, i cut two 2 3/4″ strips from the length of the paper, then accordion folded one strip in 2 1/2″ increments and the other in 1 1/4″ increments. 3. While still folded mark your templates 1 3/4″ down from the top, below this line you will form the scallop or pennant point. For a scallop, use a small container lid to trace a semi-circular shape, centering the shape below the line you have marked previously. For a pennant shape, find the center at the bottom edge of the folded piece. Now, using a straight edge draw a line from the center point to the two outer points marked previously. 4. Cut using paper scissors along the semi-circular edge and the pennant shape. Unfold your template and you should have a repeating scalloped/ pennant image. 5. Use these templates to hang on shelving to help you visualize your final product so that you can make changes if necessary.
To Make Fabric Decorative Edge:
1. Measure and cut two strips of fabric, for this particular shelving edge I cut one piece 4″ x 44″ (depending on shelf size) and one piece 3″ x 44″ (2 3/4″ plus 1/4″ for seam allowance). Place the larger piece to the side, the smaller piece will require ironing.
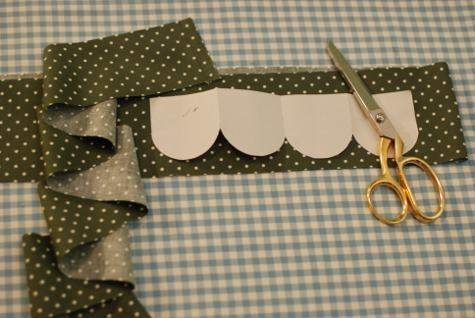
2. Using the iron, make an accordion pleat in the fabric strip, again at 2 1/2″ increments. After pleating all 44″ you should have a small rectangular piece, neatly pressed. 3. Use scalloped template, folded, and trace the rounded end, remember to place template at bottom edge before tracing (leaving 1/4″ at top)
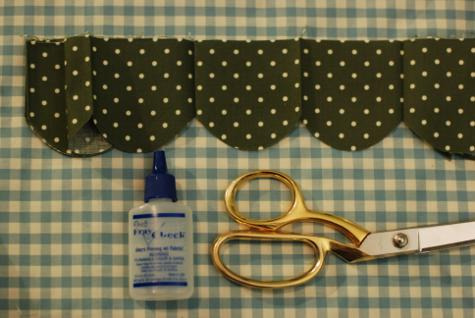
4. Using good fabric scissors and holding pleated fabric firmly in hand, cut along traced edge. 5. Unfold your fabric scallops, and apply a small amount of fray-check to the rounded edges
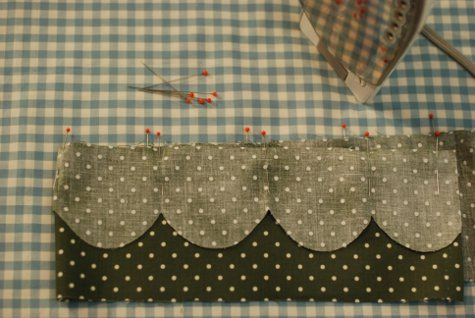
6. Now iron this strip flat again, smoothing out all pleat creases 7. Taking both 4″ strip and scalloped strip, piece together two pieces with straight edges together and right sides facing. Secure with straight pins. 8. Using a straight stitch, sew pieces together with a 1/4″ inseam. The two pieces sewn together will form a crisp right angle on the edge of the shelf.
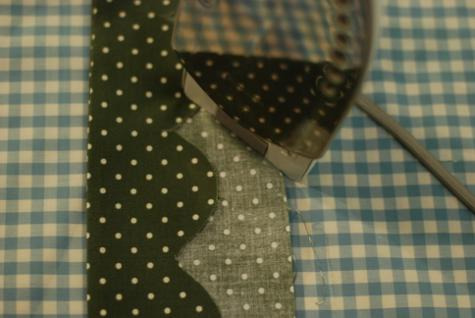
9. Iron seam flat, then fold scallops over and iron flat again, creating a crisp sewn edge. 10. Using a double sided adhesive, apply to shelves under shelf end of edging. Slowly attach fabric, smoothing out wrinkles as you go. Extra Tip: Because in the kitchen I don’t want the shelves lined with fabric, I only used a 4″ top strip- in a library or bedroom you could extend this piece to fit the entire shelf. In a kitchen setting, I would use a shelf liner to overlap this top strip- I have used the rolled cork, cut to size to fit my shelving.
To Make the Cork Utilitarian Edge:
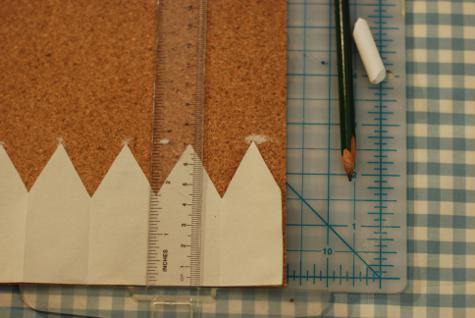
1. Measure and cut two strips from a roll of cork using a t-square. One- 1 3/4″ x 44″ and one- 2 3/4 x 44″. The smaller piece can be applied directly to shelf edge using double sided adhesive tape (preferably extra strength) this first strip is for extra thickness for a tack to penetrate.
2. Trace template onto the larger strip, moving template along the 44″ as you go.
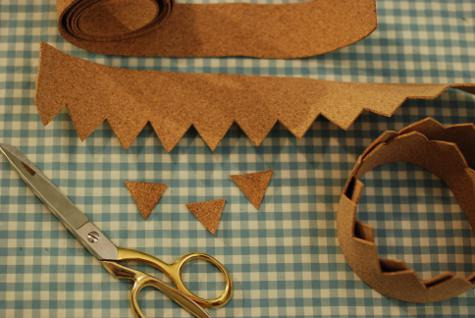
3. Cut out pennant edge carefully using scissors.
4. Again, using double sided tape, attach second strip on top of smaller strip, lining up top edges to be flush.
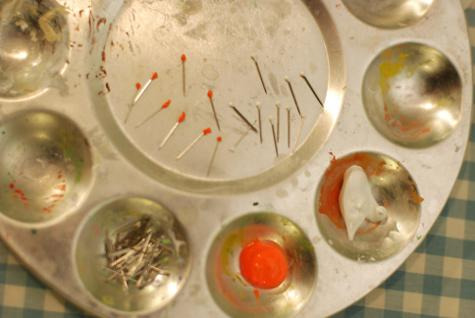
Tiny Tacks:
Using acrylic paint and plain appliqué pins, simply dip the head of each pin into paint, and then leave to dry- may require tweezers for easy handling!
4 notes
·
View notes