#and me not having fancy enough editing software
Text
currently sending buckets of love to my father 🧡💚
#he wasnt able to actually help me right now with figuring out the margins due to it having to be booklet format#and me not having fancy enough editing software#he DID give me advice that absolutely would've worked if it DIDN'T need to be booklet format but unfortunately i did try that already#and it doesn't work :(#BUT he also gave me 2 recommendations for people who i can go ask if they can help me out with it#one of which might even not charge me :'))))#so I'll be trying that later#shh ac#adventures in bookbinding#<- also yes i did only start using this tag literally like today but that's ok
3 notes
·
View notes
Note
I have a question and you might’ve been asked before, but animation, do you have any tips for beginners? Love your content btw 🥰
Even tho my degree is in animation I must be honest…😬 nowadays I very often don’t have the patience for anything more complicated than animatics. So I’m trying to stick to tried and true advice lol…
Probably the biggest tip would be that, yes the beginner exercises may be boring, and not look very cool, but they are essential to getting those skills you need down. The flour sack exercise, the wave principle—doing squash and stretch, and timing studies to really nail the way that movements should “flow” properly. These are absolutely necessary skills to master if you want to make fluid animations.
Planning is also another important, but sometimes overlooked aspect of animation. Some ppl (read:me) wanna just jump straight to animating. But planning in those first simplest stages really helps save you headaches in the later stages, when things are getting more complicated and all over the place. Storyboarding helps you plot your timing, choosing where key shots will go, camera angles, pacing ect.
And speaking of camera angles. STUDY STUDY STUDY cinematography! Something doesn’t have to be animated for it to be applied to animation. Perspective is a massive beast to tackle once you start storyboarding and unless you want boring shots and stagnant compositional framing, you need to learn all the ways you can frame a scene and your characters! Idk if you’re up for watching some horror movies, but those are a great source to pull from, as they tend to always frame, pace and even light their shots in really interesting and dynamic ways!
It’s also great to practice with free programs before you spend money on things like a subscription for photoshop or any other fancy software. Most interfaces are similar enough, that beginning with something free like Rough Animator or Blender can give you some good practice before you commit!
That’s all I can think of right now! And sorry if that wasn’t exactly what you were looking for…if you want me to try to give more specific advice on something just drop me another ask—I’m willing to keep rambling on!
Lastly, just few good videos I have saved!
Good traditional habits for digital animators <- basically Toniko Pantoja’s whole channel is a goldmine of knowledge!
Drawing figures in perspective
Every Frame A Painting is also a great channel for breaking down film/composition/writing—there’s a video for virtually every aspect of cinema
-Chuck Jones -the evolution of an artist
-Akira Kurosawa- composing movement
-Satoshi Kon- editing space and time
185 notes
·
View notes
Note
Hi there! I saw the screen recording you did for the Aemond gifset (superb work, by the way) and I was wondering if you would be open into doing a step-by-step tutorial on how you played with the colors (what was the graph on the right side of the window?) and how you manipulated the color palette when saving the gifs? No pressure! Was just curious :) Thank you!
Hi there, nonny! Step by step below the cut here.
I don't keep the psd files of my gifs, mostly because I don't have the storage space to do that, so I've made a different gifset of the same scene, so it should be much the same, if not better.
I believe this:

is the graph you were asking about? This is the histogram. I don't believe it has any practical usage in gifmaking. If any other gifmaker here has a different opinion, please share it. (I'm doing a photography degree, photoshop is my next unit so I'll know more about it soon)
Right, step by step. Hold your horses, this is long:
Step 1: get the clip. Some gifmakers use screen caps to make gifs. I do not know how to make them or how to use them and I find my own method works. If another gifmaker could add on how you make your screen caps, and if it is better than my own method, please add it. 😊
Where you get the clip from is a question. YouTube, somewhere else... as long as it's saved as a MP4 file on you computer/laptop, it doesn't matter. What does matter is the quality of your clips. A lot of people use 4K (super high quality) clips. I find those to be slow and arduous and may have been responsible for the fall of my old, decrepit laptop. HD or UHD are likely enough for some decent quality.
Step 2: Get the clip in the software (I use Adobe Photoshop. For some softwares, you might have to clip the clip i.e. make it shorter before just dumping it in) In Photoshop go to File > Import > Video Frames to Layers and a window will come up. Move the sliders until you have approximately what you want (don't worry about being exact. Just as long as you have what you need.) (Don't forget to click Limit to every 2 frames)

Step 3: Once the clip has opened and your ready to start, crop out any black/white edges. Then cut out the frames you don't want

Step 4: We are now ready to begin editing!! 🥳🥳🥳 Editing tends to just be a huge pile of trial and error. I have an order to things, but I often have to go back and adjust my first layers later.
I like to start with the Brightness/Contrast, for obvious reasons (I like to SEE what I'm doing *cough cough* HBO *cough cough*
The I adjust the Hue/Saturation, where I reduce the saturation of each individual colour. That reduction tends to be useful when I make further adjustments in effort to 'fix' as much of the shit colour grading as I can.
The next step is a combination of a Photo Filter (set to the default warming filter) and a Vibrance adjustment layer.
Next the where most of the magic happens. The Colour Balance allows me to adjust the colours in the shadows, midtones and highlights. The aim of this is to attempt to restore some colour. It can look a little weird when editing.
Finally is the Levels. This is a final brightness edit where I add most of my contrast.
Video featuring both sets here. Pause as needed to see the adjustments
Then, change the frame delay to 0.1, or whatever suits your fancy, but 0.1 is the most natural. Then, Click the button in the bottom left corner of the timeline which Converts to Video Timeline, then select all the layers, right click and Convert for Smart Filters.
After this is sharpening, cropping and then exporting. Either File > Export > Save for Web (Legacy) or Alt + Shift + Ctrl + S
Here I change the size. (Usually adjust the height to 540px. Width depends on how I've cropped it. I my source clip excluding black edges was in the ratio 16:9, 540px is usually half that)
If you are uploading gifs to Tumblr, keep an eye of the file size. Tumblr doesn't allow for file sizes about 10MB, although for me it's always been more like 9.5MB. If that number is too high and you have made the gif as short as possible (no more the 50 frames if possible) and you have reduced the size (my limit tends to be about 480px height dependant on my crop ratio), then you change the number of the colours from 256 to NO LESS THAN 200. (lower than this may considerably reduce your quality)
Then you press Undo or Ctrl + Z a few times until you have all of your frames again and then repeat.
And all that can take half an hour or more. Hope this answers the question as well.
14 notes
·
View notes
Text
Writeblr positivity tag
Thanks to @ahordeofwasps for the tag!

📝 What motivates you to write?
I don't have a fancy answer for this. I just really enjoy it and can't imagine not doing it. My head is full of stories and they need to come out.
📝 A line/short snippet of your writing that you are most proud/happy of. If not, maybe share a line of someone else's work you love (just please credit them):
The first few sentences of November Breaks always give me "Damn girl, you wrote that? (positive)" feels...
A galaxy of promises is visible on a clear night. Strange how it feels like you’re looking up at something when you’re actually inside it. That’s the vastness of it, though. The illusion. Mine, yours, ours. Distant, but from within.
📝 Which OC makes you smile every time you think/talk about them, and what are they like?
I love all of them and can't choose between my children, but if we're talking actual smiles here, it's probably Rafe from Bridge From Ashes. He veers wildly between hyperfocus and total distraction, and a lot of his little quirks and mannerisms were borrowed from my spouse.
📝 What process of writing do you enjoy the most?
Line editing all the way! The story exists, the heavy lifting is done, and I get to focus on tiny details and vibes. Pure joy.
📝 What part of writing do you think you are the best at? (Yes stroke your own ego it's okay)
I might be cheating here because I'm referring to things other people have said, but I've had some really beautiful compliments on how distinct my characters' voices are. It's something I used to feel a bit twitchy about, like what if I'm not differentiating between them clearly enough, but now I can look at that aspect of my work and feel like yeah, I indeed do not suck at that.
📝 What is something in the writeblr community that is most enjoyable?
The endless support and encouragement. Also the depravity. You're a bunch of weirdos and I adore you.
📝 A writing tool/device you use that helps you with writing? (It could be speech to text, a writing program etc)
Does coffee count? If not, it's got to be Google Docs. I've tried a bunch of different software and I always end up coming back to gDocs.
📝 A piece of worldbuilding that you like in your own story? (It could be the magic system, a particular place in the story, a law, etc)
All the tech in Bridge From Ashes and Project Aria either already exists, is in development, or has a solid theoretical basis for being able to exist. A wild amount of research went into that and I'm still legit horrified by some of the things I discovered.
📝 Tag some people whose works you love/have been your biggest supporters:
I scrolled to the bottom of my following list so I could tag some of my longest-standing mutuals (and their writing is gorgeous). Bless you all for putting up with me for this long...
@thegreatobsesso, @kaiusvnoir, @pertinax--loculos, @indecentpause, @diphthongsfordays, and @drabbleitout
Blank template under the cut 💜
What motivates you to write?
A line/short snippet of your writing that you are most proud/happy of. If not, maybe share a line of someone else's work you love (just please credit them):
Which OC makes you smile every time you think/talk about them, and what are they like?
What process of writing do you enjoy the most?
What part of writing do you think you are the best at? (Yes stroke your own ego it's okay)
What is something in the writeblr community that is most enjoyable?
A writing tool/device you use that helps you with writing? (It could be speech to text, a writing program etc)
A piece of worldbuilding that you like in your own story? (It could be the magic system, a particular place in the story, a law, etc)
Tag some people whose works you love/have been your biggest supporters:
10 notes
·
View notes
Note
Asking this to you because you're an independent filmmaker and writer, and asking this to your followers because they're fandom people of all sorts.
My MacBook is on its last leg, and I got it valued at the Apple Store and I'm gonna get almost 400 US dollars if I trade it in.
So, now I don't know if I should get another MacBook or if I should cave in to my desire of starting to draw again and splurge on an iPad. I'd love to start drawing again, but writing and being able to video edit without issue are the most important things for me.
If it helps, I also use a secondary screen plugged in when I'm at home, and to write I use Scrivener.
Any advice is more than welcome.
--
As far as I know, most video editing software simply won't perform well on an iPad. Or at least not most of the beefy software you want for filmmaking.
I'd try searching for reviews of Resolve on iPad, Premiere on iPad, etc. and see what people who are trying that think. I haven't experimented enough with this to have an authoritative answer, and the tech changes all the time. I know some youtubers who do very basic editing do use an iPad and find it okay.
For Scrivener, it depends how you're using it. An iPad will run the iPad version fine... but it won't have 99% of the features. I do a lot of writing of the actual text on my iPad, but when I do revision and especially when I do fancy export settings, I need to be on my computer.
20 notes
·
View notes
Note
damn ur last fic was so sad... good asf though... can you please say into this microphone that bedman and delilah will be together and happy and safe forever
Alright alright yall have broken me, I try to do edgy stuff with sad endings sometimes but I'm really such a massive softie with a weakness for happy endings and every time it takes so much willpower to not immediately do a happy ending followup (looking at you Starman) but I guess sometimes I am simply not tough enough for downer endings and that is just who I as a person.
So you earned yourself a special little treat this time, anon, a special edition Tumblr exclusive. Obsolescence gets an epilogue. Here's Nostalgia Machine.
(Obviously with the release of Delilah in Strive, this isn't canon-compliant, but neither was the first. Let's just operate under our own little canon situation)
-
“I’m the worst.”
“Aww, come on…” The words came out well-meaning, but half-hearted.
“See? You can’t even pretend like I’m wrong. I can’t believe I just…let this happen.”
“Hey, hey-” A comforting hand placed itself on her shoulder, flinching slightly as it started to shake. “C’mon, kiddo, don’t start cryin’.”
“I could have done something. I just left him, I j-j- ju-”
She was ushered to her feet. “You’re gonna give yourself a panic attack with the way you’re breathin’, let’s just go outside a minute.”
The fresh air evened her breathing, but her lip still trembled and her eyes remained wet.
“Little bit better, Delilah?”
“I don’t want to feel better.” She replied bitterly. “I don’t deserve to feel better. This is all my fault.”
“Well, it ain’t no use beating yourself up. Did’ja come all the way out here just to feel bad about yourself?”
“...”
“...Shit, ‘m sorry, that came out way harder than I meant.”
“...You still won’t tell me. How do you know my brother, Mr. Low?”
“Eh…long story. Important part’s that he ‘n I kinda had the same problem. Neither of us were much help to each other, but part ‘a me’s still glad we were able to talk. Kept taklin’ about you. Sounded like he cared about you a whole lot. Dammit, ‘m not helping, am I?
“No, I get it. And you’re right, just wallowing isn’t helping anything. Even if we grow up and end up going our separate ways, he’s still my brother…I can’t just leave him if I know he needs help.” She swallowed, gazing forlornly at the door. “Come on, let’s get you fixed.”
The two re-entered the small shed. Though the walls were deeply rusted and corners cobweb-ridden, it was entirely empty, aside from a jumble of strewn machine parts that occupied the far wall.
Axl heard the girl’s breathing shift, but she didn’t turn away again. She undid the straps on her pack and swung it around to deposit the contents on the ground. He hadn’t been much of a computer geek way back when, and he imagined things had only gotten more complicated. The best he could venture was some kind of screen that vaguely resembled a laptop, but for all he knew, it was for making bread.
“Which one ‘a these is the fancy toy you were tellin’ me about?”
“I didn’t bring it.” Delilah said. “It’s going to be shipped over. I wanted to make sure nothing would break in transit. Iris is helping me put the finishing touches on the current model. Right now we’re on the P5. Not perfect, but it’s built on a system that we can keep adding new features to as needed. The important part is just that there’s enough storage space to fit an entire consciousness in it without overloading the software.”
“Oh. What’s all this, then?”
“Covering the basics.” Delilah replied. “Repair equipment, spare power supplies, methods of communication. Translators are a pain in the ass, took me forever to make one that should be compatible with this system, but I did a ton of practice runs to make sure ahead of time that it’d work.”
Axl wasn’t sure how to help with the delicate electronics, so he chose to stand back and watch. He knew enough to tell that several of the machine’s parts were rusted to near-uselessness, and he was genuinely surprised when Delilah plugged some blocky-looking piece of machinery into an open port and it actually started to hum.
“I shouldn’t be surprised, but the battery is dead- dead.” She took another cable and connected it to something in the chassis. “It’ll be a little bit before it even has enough power to tell you it needs power.” After a few more keystrokes, Delilah sat back on her haunches and sighed. “I can’t guess when the last time was that it had any kind of maintenance.”
“It’ll get there. Just gonna take a bit.” Replied Axl. He tried to think of how to get her somewhat distracted. “So…that P5 you mentioned, how exactly are you gonna move him from this to that? Call me an idiot, but it doesn’t make much sense. Gonna take the head off this thing and slap it on?”
She didn’t reply at first. “More complicated than that. I’m taking his spirit out of this old heap and putting it into something new.”
His face must have shown his confusion obviously enough, because she continued talking as soon as she saw it. “Soul Grafting’s still a touchy legal mess, but I think someone in Illyria took my proposal and passed over the review process. I’ve heard most people wait years for a response, mine came out in a month. Any kind of magic that uses human souls requires a lot of approvals and equipment. I think Anji pulled some strings.”
“You think he’d do that? For something like this?”
He was left without a response again. This time, it stretched on and on, to the point where he wanted to ask, and then it became long enough that it felt too awkward to do so. They both merely waited in silence, unsubtly trying to not stare at the broken machine.
A little electronic ping finally broke the silence, bouncing off the shed walls. Delilah immediately jerked to attention, dragging the console back into her lap.
“‘s it working now?”
“Mmm.” Already too distracted to reply, she immediately threw herself into whatever work had to be done. Axl peered over her shoulder to watch. Windows popped open and flew by, covered in all kinds of symbols he couldn’t read. It finally settled on a blank box, one that quickly started to fill with strings of numbers.
“Wow.” He said. “I have no idea what any of this means.”
“Hold on, it’s set to binary right now. It’ll take a bit of time to switch modes, but I can read binary pretty well. Make sure the cable over there doesn’t unhook itself.”
“Now that, I can do.” It seemed better to give her some space, anyway. The wire in question hadn’t moved since she’d plugged it in, but he still kept an eye on it. “Figured out what the numbers are?”
“It’s…” She squinted. “Nothing. I thought there was some pattern I was missing, but it’s nothing. Only a stream of numbers and letters. Not a message. Completely incoherent.” He watched her adjust her glasses and squint. “The strings are definitely coming from the bed, it has enough power to send out a reply, but none of it follows any sense. None that I can see, anyway. He just isn’t responding. Is something broken?”
Axl knelt down, thumbing at the metal sphere lying in the dirt. “Sounds like something’s wrong. D’ya see anything busted?”
“No. That’s the part I’m confused about. They’re degraded, but all of the essentials still function well enough. This shouldn’t be a problem. Maybe the binary translation is the problem? Maybe I’m remembering my letters wrong…?”
“If it ain’t a problem with the machine, maybe it’s a problem with his head. How long’s he been alone in here?” The look on Delilah’s face immediately made him regret his words, but he continued anyway. “Don’t think the machine’s broken. I think he’s broken.”
She moved to get up. Axl grabbed her arm. “Nah, nah. Not a lost cause yet. ‘cause it means there’s still something there. Just gotta find it.”
He returned his attention to the machine. “Hey, little- uh, guess you’re a lot bigger now, huh? ‘Bedman,’ that’s whatcha called yourself. That’s who you are. You know that much, yeah?”
Silence. And then, a piston began to hiss. The broken remains of a pair of fingers twitched almost imperceptibly.
“Big guy? Delilah’s here, your sister’s here to help you. Dunno if you remember me, but you gotta remember her, right?”
What remained of an arm shuddered and then went still. A faint light started to shine from the pit of its eye socket. It flickered, almost like a blink, but it was impossible to tell if that was what it was meant to be, or if they were just projecting the idea.
Delilah looked between the frame and her console. Her eyes widened just slightly. “H-hold on. It’s changed. It’s repeating now.” She held it up for him to see.
01001001 01001001 01001001 01001001 01001001 01001001 01001001 01001001 01001001 01001001 01001001 01001001 01001001 01001001 01001001 01001001 01001001 01001001
“What’s that mean?”
“It’s just an ‘I’. He’s just repeating the letter. I don’t know why, is it just some simple string it’s stuck on?”
“Hmm…” Axl pivoted on his knees again. “You hear me in there? ‘I.’ Y’know that much. Who’s ‘you,’ then?”
The eye flickered again, settling on a dim shine.
“Huh? Now it’s coming up different…”
01001001 01000001 01001101
01001001 01000001 01001101
01001001 01000001 01001101
01001001 01000001 01001101
“‘I-A-M’, it’s three letters in a row now. He’s…responding?” A hint of life came back into her voice. “He- you actually got a response? He’s talking to you?”
Axl grinned, giving it a friendly pat. “‘I am,’ ‘I am,’ now we’re getting somewhere. I know you can hear me. Lemme hear you. What do you wanna say?”
01001001 01000001 01001101 01000100 01000101 01000001 01000100 00001010
01001001 01000001 01001101 01000100 01000101 01000001 01000100 00001010
01001001 01000001 01001101 01000100 01000101 01000001 01000100 00001010
The girl suddenly faltered. Axl moved closer, but she turned the screen away from him.
“Delilah. Tell me what it says.”
“...’I AM DEAD.’”
“‘Dead?’” Axl parroted. “C’mon, that’s nonsense! You see Delilah here, right? She’s here, so how can you be dead?”
The bedposts shuddered. The fragmented remains of a hand stuttered across the dirt.
01001110 01001111 01010100 01010010 01000101 01000001 01001100
“‘NOT REAL.’”
“But- but she’s right here!”
Delilah shook her head. “It’s not changing. He’s just repeating those two lines over and over.”
“He thinks he’s dead. And he thinks you’re just something he imagined up…like he’s gone crazy enough he can pretend you’re here.”
He stood up and marched towards the exit. “Wh- wait, where are you going?!” Delilah said, reaching out for him. “Don’t leave me alone!”
“‘m not leaving, I’m making a point.” From his back pocket, Axl pulled out a sickle, twirled it, and sank the sharp end into the wall by the door.
The screech of metal-on-rusted-metal sent her hands clapping over her ears. Delilah looked on in panicked confusion as the man hacked at the wall with reckless abandon. The weapon was not meant for cutting through something so solid, but the walls had rusted to the point where he could saw through with enough pressure. They tore clean through the door hinges and tossed the entire thing into the street, and jagged cuts widened the entrance until nearly the entire wall had been roughly disassembled and scattered along the ground.
“‘Course you can’t convince yourself, nothin’ but a wall to look at.” Axl said, panting from the exertion. “There’s a whole world out there. When’s the last time you got to see it?”
The sun made clouds of dust shine like summer snow. Trees on the other side of the path showed off their vibrant leaves with pride. Distant chatter from further downtown murmured in the wind. When he moved out of the way, Axl watched how the light fell on where Delilah sat, surrounding her in a radiant aura.
“See? There’s the sun, and the trees, and your sister’s right here. It’s all right there. All real.”
The top of the frame craned its neck towards the light. The rest of the body started to teeter as it moved further away
“Shh-shh-shh-” he gave the machine a gentle pat, doubling as a way to keep it from knocking itself over. “It’s alright, big guy. I’ve got you. ‘m not good at this whole ‘comfort’ thing, but I’m here. Delilah ‘n me, we’re here.”
It seemed to turn and face him. Slowly, cautiously, the metal sphere pushed against his hand. Axl let it settle against his arm and slide down into his lap. He pet it again in slow strokes
“See? Just me. You know me. I’ve got you. You’re gonna be alright.”
The bedframe gave a brassy warble. Something opaque and dark oozed from its one eye socket.
Delilah practically threw aside her monitor to scramble over to her brother's side. She scooped up one of his broken hands and held it to her face, which had already become as wet as his.
“Romeo…I’m so, so sorry…”
The three sat in tranquil silence. Abandoned on the ground, Delilah’s computer offered one more reply.
01001001 01000110 01001111 01010010 01000111 01001001 01010110 01000101 01011001 01001111 01010101
28 notes
·
View notes
Note
Happy STS! What are your go-to/preferred writing tools? Favorite pen types, notebooks, keyboards, etc, but it doesn't have to be limited to just those things. Writing programs, favorite reference books, thesauruses, dictionaries, TTS software, whiteboards, corkboards, flash cards, encyclopedias, anything goes!
Nooooooooooo Nopal you don't know what you've done! How could you know I have an actual special interest in this??
So I am obsessed with notebooks but also REALLY picky about them. My handwriting is teeny so I don't like big lines, and I think it looks neater and prettier with smaller lines anyway. The covers can have a cool pattern or be plain if it's a nice color and high-quality enough. I do occasionally make exceptions; my current journal is fairly cheap with large lines, but it's a rare older Batman one in my favorite color with bat-tech designs on all the pages and a light-up bat signal on the color, so it was worth it. My newly discovered favorite notebook aspect is ones that are designed so the pages lay flat and it's easier to write. Oh, and I LOATHE spiral notebooks. The big school-style ones are ok for random notes or anything unimportant, but the smaller little ones that are normal book size are absolutely worthless. The spirals always come undone before I'm done with them.
I'm also picky about writing utensils. I keep a journal strictly in pen so it can't fade and I can't get embarrassed and erase it. I write stories strictly in pencil because I WILL need to erase and try out lines. But, although I'm using one currently for my big-lined Batman journal, in general I can't stand large ballpoints. By which I mean 0.7, which is pretty standard. 0.5 is ok, but I much prefer the rarer smaller pens. I used to have a Japanese friend who I would get to send me 0.35 pens because they are normal there but expensive over here. In pencils anything under 0.5 is impractical, but I like the fancy mechanical pencils with a nice grip and a dent that lets you dig out the eraser even after it's erased down. My current one is teal.
None of that answered your question but it was necessary anyway. And this is getting too long so the actual answer is going under a cut.
We'll see how long I can keep it going, but I like to write my stories on paper. Of course, it's not worth starting a nice new notebook if I'm unlikely to finish it and it's impractical if I don't have a clear idea of the basic story, because jumping around out of order is impossible. I like it though because it forces me to slow down and think about each scene; I can't rush the way I do when typing. It also gives me a built-in edit when I copy it up, so by the time I'm editing a full draft it's already technically a second draft. And it's convenient because I can take it to work and write on my breaks, or if I'm waiting in line at the post office, or anywhere I happen to find myself.
I do still write on the computer, of course, for fanfiction or just-for-fun things I'll never finish or stories I'm still figuring out. When I do truly long-form things I like to use work because I hate the way Google docs looks (controversial, I know). But for short things, or worldbuilding, or fanfic, I like to use Notion. I like that I can nest pages within each other endlessly. It makes my autistic organizing brain buzz.
I recently discovered that I enjoy using actual notecards pinned to a corkboard for initial plot planning. I can't always do this, and I make outlines too for more detail, but being able to physically move stuff around in real space helps my brain focus on what is actually important to include.
Thank you sooooo much for giving me a chance to ramble about this!!
9 notes
·
View notes
Note
hiii do you mind talking about your giffing process? in theory, I know how to make gifs, but recently, my gifs have grainy spots and I can't make them go away and slowly, I go insane 😩 I don't need all the fancy stuff like fonts or stuff and you focus on the important stuff - the scene in the gif - so I decided to ask you 🫣
hey!! i use a video editing software, filmora x, which allows me to not only cut and trim videos, but also do colour correction! so, most of the times, if not all, i'm pretty satisfied with the results, that i don't even use photoshop anymore 🤭
(but yes, photoshop does have a wayyyy wider range of features, so if you're looking to do more, filmora may not be able to provide that. i merely gif football matches and media stuff, so filmora does just enough for me! 😚)
→ if you're looking for a photoshop guide, this post by @jasonkelce is v v comprehensive! it takes you through the editing process and even includes links to other resources. it's very easy to understand, and i'm sure it'll be very helpful, especially for beginners!!
→ if you'd like to see how i create gifs using filmora x, read here!
#sorry this is like a number of days late - i was chasing assignment deadlines 😭#ice talks#ask#answered#anon
3 notes
·
View notes
Text
crowdsourcing question: does anyone know of decent software* (preferable) or a website that is either free or one-time payment that I can use to collage a LOT of photos together? There's a few options I find just by googling but all of them have upper limits of like, twenty at most, and it needs to be more than that (up to 100 should be enough, though if it can go higher, even better). I frankly don't know anymore how to find recommendations for software without already being familiar with the people who would use it and I suspect I'm not finding any of the actually good ones given how shitty google is these days
*Relevant info: Must work on a Mac.** Must be able to arrange the photos myself rather than being forced to use a preset template. Ability to alter photo dimensions by typing width/height numbers—as opposed to just dragging the corner or sides—a huge plus. I do not do visual art or photo editing regularly I just want to put together a fun silly thing so the simpler the program is and the more it just lets me put photos where I want them without trying to give me fancy tools about it, the better
**I have a maybe hacky way to do this with preview but I would love to know if there is an easier one
#collage#photo editing#just let me stick a bunch of photos into a file like i'm pasting them on cardboard#that's all i want#i don't understand why it's a difficult thing to do#but i cannot find a program that will let me do it
5 notes
·
View notes
Text
Flex Clip: Your Secret Weapon in the Book Promo Arms Race
Welcome to the digital age, where your book's success might just hinge on how snazzy your promotional videos are. Enter Flex Clip —the Swiss Army knife of video editing that’s making the old-school book readings in dimly lit rooms a thing of the past. Here's why every author should be waving goodbye to simple text updates and hello to full-blown cinematic trailers for their literary creations.
Talk Nerdy to Me: Text Editing That Gets You
Flex Clip’s online text editor is like having a cool librarian who’s also a tech whiz at your disposal—no software downloads necessary. Choose from a smorgasbord of fonts, whether you’re into the sleek modern look or something that screams “I was handwritten by Edgar Allan Poe.” Fancy your own font? Upload it. Want your text to dance across the screen? Set those words in motion with animations that pop, fade, and typewriter their way into your audience’s hearts. The flexible text editing tools let you adjust everything from font size and color to opacity and alignment, empowering you to create perfectly tailored video content.
Play Everywhere: Be the Social Butterfly of Video Content
Whether your fans hang out on YouTube, TikTok, or still haven't moved on from Facebook, Flex Clip has you covered. This tool doesn’t just flirt with one platform; it plays the field. Create once, tweak to fit anywhere—from Instagram stories that disappear in a day to tweets that hopefully don’t start wars.
Try Before You Buy: The Ultimate Teaser
Flex Clip lets you dip your toes in the video editing waters with a free version. Sure, it’s watermarked, but think of it as a temporary tattoo that says, “I’m just trying this out.” Ready to go full pro? A few clicks and you’re there, no more branding, just your beautiful book trailers, looking like a million bucks.
Template Treasure Trove
Flex Clip’s trailer video maker is particularly noteworthy. Need a book trailer that whispers “bestseller”? Or a horror movie teaser that screams (literally)? Flex Clip’s templates are like those meal kits—everything you need, just add creativity. It comes equipped with ready-made templates, text options, effects, countdowns, and speed controls, simplifying the creation of professional-looking trailers for books, movies, or any product. And for the DIY crowd, there’s plenty of room to mix, match, and mess around until your trailer is uniquely yours.
Real-World Application: Promoting 'Shadowed Realms'
At Horror Tree, we leveraged Flex Clip's capabilities to create a compelling book trailer for our latest anthology, Shadowed Realms. This collection highlights the best dark fiction from semi-pro and token-paying markets, featuring a diverse array of stories published in 2022. The trailer helped us showcase the thematic variety of the anthology—from eerie addictions to cosmic horrors—drawing attention to both renowned and lesser-known authors in the speculative fiction realm.
8 Video Ideas To Use Flex Flip To Promote Your Work:
Backstage Pass to Writing: Ever wondered what authors wear while crafting chilling tales? Spoiler: it’s probably pajamas. Dive into behind-the-scenes videos where authors spill the beans on their inspirations, quirky writing rituals, or how their tenth cup of coffee still isn’t enough.
The Author’s Couch: Forget dry, written interviews. Picture this: an author, a comfy couch, and a camera – it’s real talk time. Dive deep into their character’s psyche, laugh about blooper-worthy plot twists, and get the scoop on what’s next.
Book Parties in Your PJs: Who says you need a fancy launch party? Virtual book readings and launches let fans join in from anywhere—even from under their comforter. Jazz it up with snazzy graphics and interactive elements, making every reader feel like a VIP guest.
Professor Author’s Writing Workshop: Roll up your sleeves and sharpen your pencils. Video tutorials on creating mesmerizing characters
or avoiding plot holes are like mini masterclasses, making every viewer a little wiser and every story a little sharper.
Fan Q&A Sessions: Video responses to fan questions are a great way to engage the community. These can be more dynamic and personable compared to text responses, and with video editing software, authors can add creative touches to make these sessions more entertaining.
Book Reviews and Recommendations: Authors can create videos reviewing other books or sharing their recommendations. This not only helps build community by supporting other authors but also keeps the audience engaged between book releases.
Collaborations with Other Authors: Creating collaborative videos with other authors can help reach different audiences, share fan bases, and discuss common themes or interests. These collaborations can range from discussions and debates to co-authoring a story live.
The Story So Far…: Got a knack for leaving your readers wanting more? Tease them with serialized snippets of your upcoming masterpiece. Each clip ends on a cliffhanger so gripping, even the most patient readers will be marking days off their calendars.
Final Thoughts: Why Flex Clip?
Because in the world of book promotions, being seen is, unfortunately, just as important as being read. Flex Clip turns your promotional efforts into an art form, ensuring your book doesn’t just sit on the shelf—it does the cha-cha across your audience’s screens. It also does so at a price point that most of us can stomach, which is a rarity for video software that is so easy to use. So, gear up, get creative, and let Flex Clip be your guide in the visually-packed journey of book marketing. Your readership awaits, one stunning video at a time.
1 note
·
View note
Text
Introduction to SewArt and digital applique

Digital applique is a fascinating technique that brings together the traditional art of applique with the convenience and precision of digital embroidery. In this article, we will delve into the process of digitizing an applique design using SewArt software. SewArt is a powerful tool that allows you to transform your designs into digital files ready for embroidery. Whether you're a seasoned embroidery enthusiast or a beginner looking to explore the world of digital applique, this article will guide you through the steps involved in digitizing and stitching a beautiful applique design. Get ready to unleash your creativity and embark on a journey to bring your applique designs to life with the help of SewArt!
1. Introduction to SewArt and digital applique
What is SewArt?
SewArt is like the magical wand for transforming your applique designs into digital masterpieces. It's a software program specifically designed for digitizing applique, taking your sewing projects to a whole new level of awesomeness.
The benefits of digital applique
Now, you might be wondering, "Why go digital with my applique?" Well, my friend, digital applique offers a world of advantages. First off, it gives you the flexibility to resize and adjust your designs without losing any of the intricate details. Plus, you can easily replicate your designs and share them with fellow craft enthusiasts. And let's not forget that with digital applique, you can go wild with all sorts of colors and patterns without worrying about running out of fabric. It's like having your own personal rainbow at your fingertips.
2. Gathering the necessary materials and tools
List of materials needed for digitizing applique
Before you embark on your digital applique adventure, make sure you have the following goodies by your side:
- A computer (obviously, we're going digital here)
- SewArt software (you can purchase it online and download it in a jiffy)
- A design or image you want to turn into applique (got something in mind? Great!)
- A USB cable (to connect your sewing machine to the computer)
- Some good ol' patience (because learning new things takes time, my friend)
Overview of the required tools
Now, let's talk about the tools you'll need to conquer this applique digitization mission:
- A computer mouse (to navigate through the SewArt software)
- A cup of tea (or coffee, if you're feeling fancy) for those moments when inspiration strikes
- A notepad and pen (for jotting down any brilliant ideas that may pop into your head)
- A sprinkle of creativity (because that's the secret ingredient to making your applique designs truly unique)
3. Preparing the design for digitization
Selecting the appropriate design for applique
When it comes to choosing a design for your applique, the world is your oyster. You can go for something simple and elegant, or opt for a design that screams "look at me, I'm fabulous!" It's all about finding that perfect design that speaks to your creative soul.
Prepping the design for digitization
Before you dive headfirst into digitizing your applique, it's important to prepare your design. Make sure it's clean and free from any unwanted marks or smudges. You can use image editing software (or good old scissors and tape) to clean up the design if needed. Trust me, a little bit of prep work goes a long way in ensuring a smooth and successful digitization process.
4. Using SewArt to digitize the applique design
Getting familiar with the SewArt software
Alright, it's time to get cozy with SewArt. Open up the software on your computer and take a moment to explore its features. Don't worry if it seems a bit daunting at first, we're in this together. Familiarize yourself with the different menus and options, and soon enough, you'll be navigating through SewArt like a pro.
Step-by-step guide to digitizing the applique
Now, let's get down to business and digitize that applique design of yours. Follow these simple steps:
1. Import your design into SewArt.
2. Use the software's tools to trace and convert the design into stitches.
3. Select the applique style you desire and customize it to your heart's content.
4. Preview and adjust any details that need fine-tuning.
5. Save your digitized applique design to your computer, ready to be unleashed onto your sewing machine.
And voila! You've successfully digitized your applique design using SewArt. Now it's time to let your creativity run wild and bring your digital applique creations to life. Happy stitching!
5. Adjusting and refining the digitized design
Reviewing and editing the digitized design
Once you have digitized your applique design using SewArt, it's time to review and make any necessary edits. Take a close look at the design to ensure that all the elements are captured accurately. Maybe your digitized flower looks more like a blob or your digitized cat resembles a potato. Fear not, my friend! SewArt allows you to easily adjust and refine your design to make it just right. Play around with the different editing tools to resize, rotate, and reshape your applique elements until they look perfect.
Optimizing stitch settings for the applique
Now it's time to get into the nitty-gritty of stitch settings. You want your applique to look sharp and professional, not like a kindergarten art project gone wrong. SewArt gives you the power to optimize your stitch settings to achieve the desired effect. Experiment with stitch lengths and densities to find the perfect balance. Remember, you want your stitches to secure the applique fabric firmly, but not so much that it resembles a tightly woven carpet. It's all about finding that sweet spot, my friend!
6. Transferring the design to the embroidery machine
Preparing the design file for embroidery machine transfer
At this stage, you're almost ready to bring your digitized applique design to life! But first, you need to prepare the design file for transfer to your embroidery machine. Save your design in a format that your machine can understand. Consult your embroidery machine's manual or do a quick online search to find out the compatible file formats. Remember, compatibility is key here. You don't want to show up to the machine with the equivalent of a floppy disk in a USB world.
Using the appropriate file format
Now that you have figured out the correct file format, it's time to transfer the design to your embroidery machine. Connect your machine to your computer using the appropriate cables or transfer methods, depending on the model. Once the connection is established, it's as simple as dragging and dropping the design file from your computer to the machine. Think of it as virtual embroidery teleportation. Just make sure you don't accidentally spill coffee on the machine or confuse it for a toaster. Let's keep things smooth sailing!
7. Stitching and finishing the applique design
Preparing the fabric and stabilizer
Now comes the exciting part—stitching your applique design! But before you jump headfirst into the embroidery adventure, make sure you prepare your fabric and stabilizer properly. Choose a fabric that complements your design and cut it to the appropriate size. Remember, you want your applique to stand out, not disappear into the void. Additionally, select a stabilizer that suits the fabric and design requirements. You don't want your applique to resemble a crumpled-up tissue, do you? Thought not.
Embroidery machine setup and stitching instructions
It's showtime, my friend! Set up your embroidery machine according to the manufacturer's instructions. Ensure that the fabric and stabilizer are securely hooped and positioned correctly. Double-check that your machine is threaded properly, and prepare for the magic to happen. Load the design file onto your machine, select the appropriate thread colors, and let the embroidery machine work its stitching wonders. Sit back, relax, and enjoy the fascinating sight of your digitized design coming to life. It's like watching a masterpiece unfold before your very eyes!
8. Tips and troubleshooting for successful digitization and embroidery
Common challenges in digitizing applique
Digitizing and embroidery may not always be smooth sailing. Don't worry, it's not just you. Many face common challenges when it comes to digitizing applique designs. Some stitches may not align properly, edges may appear jagged, or colors might turn out wonky. Don't let these hurdles discourage you! With a little practice and experimentation, you'll conquer these challenges like a pro. Remember, Rome wasn't built in a day, and neither will your digitizing mastery be.
Troubleshooting tips for embroidery issues
Embroidery mishaps happen to the best of us. If you encounter issues while stitching your digitized applique design, fear not! Troubleshooting is your trusty sidekick in these times of embroidery distress. If the tension is off, try adjusting it. If the fabric puckers, consider using a different stabilizer. If the thread keeps breaking, take a deep breath, check your machine's needle, or even try a different type of thread. Patience and problem-solving skills are the heroes of the embroidery kingdom. Before you know it, you'll be back to smooth stitching and impeccable appliques in no time!In conclusion, digitizing an applique design using SewArt opens up a world of possibilities for embroidery enthusiasts. By following the steps outlined in this article, you can confidently transform your applique designs into digital files and bring them to life through embroidery. Remember to experiment, refine, and troubleshoot as needed to achieve the best results. With SewArt and your creative vision, the opportunities for stunning applique designs are endless. So, grab your materials, fire up your embroidery machine, and let your imagination soar as you embark on this exciting journey of digitizing and stitching beautiful applique designs. Happy stitching!
FAQ
1. Can I use SewArt for digitizing other types of designs besides applique?
Yes, SewArt is a versatile software that allows you to digitize various types of designs, including applique, regular embroidery designs, and even free-motion embroidery patterns. The software provides a range of tools and features to accommodate different design styles and techniques.
2. Do I need prior embroidery or digitizing experience to use SewArt?
While it can be helpful to have some basic knowledge of embroidery and digitizing, SewArt caters to users of all skill levels. The software offers an intuitive interface and user-friendly tools, making it accessible even for beginners. Additionally, SewArt provides detailed tutorials and resources to assist you in learning and mastering the digitizing process.
3. Can I import existing designs into SewArt for digitization?
Yes, SewArt allows you to import existing designs in various file formats, such as JPG, BMP, or PNG. Once imported, you can use the software's tools to digitize and refine the design as per your requirements. This feature is particularly useful if you'd like to digitize a hand-drawn design or work with pre-existing artwork.
4. Can I resize the digitized applique design in SewArt?
Absolutely! SewArt enables you to resize and scale your digitized applique design to fit your desired embroidery area. This flexibility allows you to adapt the design to different projects and garment sizes without compromising the quality or integrity of the applique.
Read the full article
1 note
·
View note
Text
Shouts Outs From Caring is Sharing
Hi Perceptive Readers, for years we have been enjoying caring is sharing Thursdays! How are you enjoying them? Are you still sharing your favorites?
youtube
Honor Resolves This: People learn what a price tag and attribution means.
This could be your case: “You can have the life you want, but the money is not given for it.” The Sage
When attribution is given then this happens; it means you are going beyond lip service or carrot dangling.
And a well earned private celebration begins! Which enhances and branches out to the community. This is what rest and recreation provides even for people who work 7 days a week. – James; (Pen Name) The Sage
Man of Steel - An Ideal of Hope on Guitar
"Merry Christmas and Happy New Year to everyone and hopefully there will many more videos from me in 2016 :)
youtube
With Batman v Superman coming up in March 2016, I went back and rewatched Man of Steel, I personally love the film, I know it has it's fair share of critics but in terms of a standalone Superman film I think it works. I love Ideal of Hope, as everyone knows, Hans Zimmer is one the most famous composers of our time and creates some amazing themes, they're all very simple but when they're layered up with a full orchestra with all of the different voicings then they become extremely powerful.
I'm about 90% happy with the acoustic at the beginning, I don't have a proper microphone so I have to record it though my phone which doesn't handle dynamics very well, so I struggled with stopping the acoustic from clipping, but I think I made it sound as good as I could.
You might have noticed that this is the first 1080p video I've released, that's because I finally have a good camera! I got a Fujifilm X-A2 for Christmas and I love it, the videos come out very clear, the pictures are great and it's simple enough yet in depth enough for someone who has never used a fancy camera before.
If you enjoyed please consider leaving a like, favourite, comment or subscribe! Thanks for watching! :)
Guitars:
Ibanez RG421 MOL (Wood)
Baby Taylor (3/4 Steel)
Yamaha Pacifica PAC112J (Red)
Acoustic Solutions (Black)
Tanglewood TW55 (Steel)
Valencia CG150k (Nylon)
Recording Interface: Line 6 Pod UX1
Recording Software: Mixcraft 6
Editing Software: Adobe Premiere Pro
Camera: Fujifilm X-A2"
Space Vessel The Eagle 1 Job 24 Widows and Orphans MP4
youtube
#Shout outs#Superman#Niall Stenson#Chrissy Costanza#James PoeArtistry#Shoutouts#Against the current#Youtube
0 notes
Text
I Create Magic: The Gathering Cards as a Brainstorming Exercise
Following a recent exchange from my post about how I don't tend to be good at writing pithy one-liners, I had occasion to reflect on how I don't give myself many challenges or exercises to abbreviate or shorten my writing. My fiction writing style and approach toward editing generally eschew the popular paradigm of "Cut! Cut! Cut!"
But there is one exception: Magic: The Gathering cards.
In the 2010s I was quite into the collectible card game of Magic: The Gathering. Don't worry: You don't need to know anything about the game to appreciate what I have prepared for you today! Basically, Magic is a fantasy-inspired game where you use decks of cards to actually play the game. And what I began doing was designing Magic cards for characters, locations, objects, and events in After The Hero: A Curious Tale.
At first this was just for fun: Take the one subject I'm super passionate about and plug it into this other subject I'm passionate about. I fancy myself a game designer and had spent years reading Magic head designer Mark Rosewater's tumblr, which back in the day included a lot of really good information on game design. So it was only natural for me to eventually try my hand at it!
I quickly realized that I had struck pure gold: This exercise of creating cards turned out to be an incredibly powerful brainstorming tool, and helped me immensely to focus the identities of several of my characters, locations, etc. I was also quite proud of the mechanical designs of my cards, i.e. the gameplay effects they would have had if you had played them in your deck. But I'll ignore that here and focus purely on the aspect of helping to define my Curious Tale world better.
And I thought it might be fun to share some of these designs with you. These designs are mostly from the mid-2010s, as I don't design many cards anymore. I've been trying to get back into it recently to tap into that brainstorming potential, but my success has been limited, sadly; it really seems like I captured lightning in a bottle back in the 2010s; that was just a special time for me.
Still, there are lots of old cards to share with you; I actually designed hundreds of them. The well will not run dry anytime soon!
None of the information contained in these cards should be considered canonical, but there is a decent chance that it's mostly accurate.
Here are two cards to get the ball rolling. If it's all a bit overwhelming to look at, I recommend you focus on the card titles at the top left, and the worldbuilding lore (here called "flavor text") in italics at the bottom:
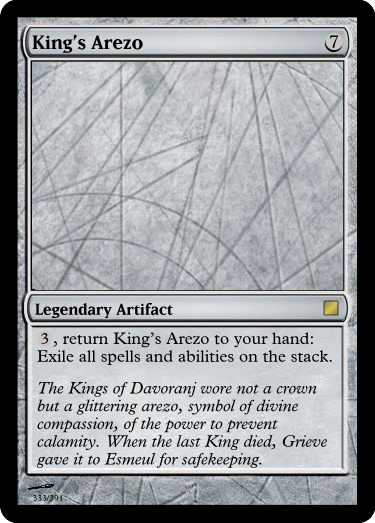

Hopefully these are clickable to view in full size; I do not understand social media anymore, lol!
The first card, King's Arezo, is just some straight-up worldbuilding with a bit of story building for good measure. If there were art for the card, it would be clear that an arezo is worn around the neck, not unlike a collar necklace. We see passing mention of an arezo early in the Prelude to After The Hero; this card is an attempt to expand upon that premise.
The second card, DeLatia's Rear Guard, provides some insight into DeLatia's keen military mind and cocksure personality. On the lips of a lesser mate, such a boast would be hot air, but with DeLatia we can really believe she's capable of arranging for it. (Well, you likely wouldn't know her well enough yet, but I can believe it!)
If you do happen to understand the rules of Magic, you can see from the rules text how on each card how the mechanics of their design support the existing flavor and deepen the worldbuilding / character development. The royal arezo staves off calamity by exiling presumably harmful spells from the stack. DeLatia's card creates excellent defense on the battlefield.
If you want to try making your own Magic cards, the software I use is a VERY outdated version (2.0.0) of Magic Set Editor, which I think is itself outdated by this point. But it doesn't matter so long as you don't want to use the very newest Magic card frames, and for my purposes that's completely irrelevant. Magic Set Editor is wonderful: It's a purely desktop-based application, with no god-forsaken cloud or Internet requirement, and is an incredibly user-friendly, powerful application without being unwieldy or having a steep learning curve. My only complaint about it is that I can't see when I created individual cards in a given set.
Anyway, let me know if Relancii (and potentially Galaxy Federal) Magic cards are something you find interesting and would like to see more of!
#After The Hero#The Curious Tale#Magic: The Gathering#Card design#Game design#Magic: The Relancening#Magic Set Editor#Curious Tale Tumblr Images
0 notes
Text
guys guys guys I DISCOVERED A THING!!!!!
so I was in Israel taking photos (as you do) with my dad's DSLR (basically Fancy Digital Camera™️ for ye non-photography nerds or those without a current photography hyperfixation) and since phone cameras are generally forgiving, you don't have to worry about things like long exposure times and standing as still as a Weeping Angel in a town square during the middle of the day when you're taking a photo at night. So, when you don't, things blur and you have to finagle with editing software to fix it.
Yes, I know that second-to-last sentence was long and oddly specific, but bear with me for a ✨TRIPPY LIGHT BLUR PICTURE TUTORIAL! :D✨ It works marginally better if you sing that part to the tune of Doofenschmirtz Evil Incorporated!
The point here is to use the fact that you need more light to see at night to your advantage. Especially with Fancy Digital Cameras™️.
So, for ye Fancy Digital Camera™️ users:
go outside at night to place with lights
press shutter
move camera a noticeable amount (does not have to be straight)
done!
AND STICK AROUND BELOW THE BREAK FOR MORE, MY PHONE USERS!
So, if you're using a phone because a) you don't own a Fancy Digital Camera™️ or ii) you own a Fancy Digital Camera™️ but don't take it everywhere you go because those things are really fcking expensive y'all, do not fear! I, Reza, shall teach you things you never knew about your phone!
So, I personally have an iPhone, but from what I can tell, Android is the same principle, but different names. If you need someone who actually knows what they're talking about, I'll direct you to this video here: https://www.youtube.com/watch?v=CfC2Paezp8k (may have to copypasta the link)
But for iPhone:
open your camera app (I know there's a few non-default ones that'll do this, but I haven't played around with them enough)
tap the screen where you want the camera to focus
there should be a little slidey thing next to that focus square (it has a sun) and slide it up or down to increase or decrease the exposure time (no idea how it works or which way to go for what, again, I only know Fancy Digital Camera™️ well. Go talk to PhotoTok, they probably have this covered).
Android actually has a setting for this under "advanced settings" (aka COOL TIPS THEY REFUSE TO TELL YOU). It's literally called "shutter time". Slide it to about the longest setting you want. Take photos.
I have no idea if this works with film. I think it does, but I don't own a film camera.
Point-and-shoot people: I have no idea how to help you. Use other photography methods or do a ton of research.
I'm going to post some of the photos I took once I get back (because I don't have to deal with the .heic setting on iPhone which is the bane of my photographic existence). It'll be in a reblog or separate post, so until then, happy photo-taking!
1 note
·
View note
Text
Combine pdfs with preview

#Combine pdfs with preview full version#
#Combine pdfs with preview pdf#
#Combine pdfs with preview software#
#Combine pdfs with preview professional#
#Combine pdfs with preview download#
#Combine pdfs with preview software#
Take a screenshot by pressing PrtScr button or using your screenshot software.
#Combine pdfs with preview pdf#
Open the PDF and zoom until you have one page of the PDF on your screen.
#Combine pdfs with preview professional#
This does have the disadvantage of being less professional and may distort the image in the final document, but here’s how you could do it: Of course, if you don’t have fancy software, or a Mac, or the internet (?! – it is kind of essential for a VA!!) you can do it the DIY way using screenshots. That’s all there is to it! Do it DIY style
#Combine pdfs with preview download#
Click the pop up box to download the result.
Click and drag the thumbnails to reorder your files as required, or click on the thumbnail to see a preview.
Click ‘upload queue’ to start uploading the files to the server.
From the home screen click ‘select files’ or simply drag and drop you files into the centre of the page.
I particularly like PDF Joiner ( – it’s so simple to use and does exactly what it says on the tin
You can then hit save, to save the combined version in place of the first file that you opened, or you can export the whole file as a new PDF.Ī quick online search will bring up a number of options, so you can go wild here, there are various options, some you can download and others are online options.
In the sidebar you can then order your files by moving them up and down as needed until you have them in the right order.
Or, open one file in Preview, then one at a time, click and drag the other files into the sidebar of Preview.
Group all of the file icons in one location, select them all by holding CTRL as you click, then drag them all together on the Preview icon to open them.
Firstly, you need to open all the files in Preview.
If you are lucky enough to have a Mac in your life, this has a handy built in feature that allows you to combine PDFs, although not quite as straightforward. Preview (only for the Mac users I’m afraid)
When you are happy, click ‘ Combine‘ and there you have it!.
You will see a list of your files appear on the screen, and you can order them using the green up and down arrows, remove or delete them from the list.
This way you can select multiple files by holding down CTRL whilst you click and import them all at once. ( Tip: it’s easier if you have all the files saved in one location.
In the resulting dialog box, click ‘ add files‘ and browse to the files that you want to combine.
From the main toolbar click ‘ Create PDF‘ dropdown button then select the option ‘ Merge Files into a Single PDF‘.
However, if you only ever need to do something like this occasionally, you may not see it to be a cost effective solution.
#Combine pdfs with preview full version#
Now, if you are lucky enough to have a full version of Abode Acrobat XI, then this has a handy feature that allows you to combine multiple PDF files into one, as you would well expect from the daddy of all things PDF. Here are the best options: Adobe Acrobat – The Daddy So we had to look for a different solution. However, the forms were saved in PDF format and we didn’t have an original version to copy and paste (that would have been the easy answer!). Microsoft Office, where you can save your documents as a PDF right from the save menu), however, it’s a bit trickier to convert PDFs back into an editable format, or to manipulate, split or combine them.Īs an example, I was recently sent some documents by a client, who wanted me to format a proposal for them before it was being sent out, and then add in some of their forms at the end of the document. There are a number of ways to save your documents in PDF format, and many programs will now come with a PDF printer as part of the package (e.g. It also avoids any potential compatibility issues for the person viewing the file at the other end, which can be the case if they are viewing the document on a mobile or different type of computer, or if they don’t have the right software to open the file. It’s fairly common to share documents as a PDF because it’s such a well supported format, and in my opinion, much more professional than sending letters, invoices and forms in the program they were designed in.Įspecially when used for business, sending files as a PDF makes them less vulnerable to being altered, either deliberately or accidentally.
0 notes
Text
Hollywood hindi dubbed a to z movies

Buttons are large enough to be seen while allowing effective use of the large design window. Hatch Embroidery 2 now supports 4K high resolution monitors. They are easy to use and deliver professional quality results. Whether you are new to machine embroidery or very experienced, Hatch Embroidery has all the creative tools you need. You can resize or recolor a design, create offset outlines, re-sequence the stitch-out and it is ready for your machine. It includes all the features and tools you need to create or edit an embroidery design. Welcome to Hatch Embroidery 2, the best machine embroidery software designed specifically for the hobbyist and home business available today. The samples used to illustrate software features and capabilities may not be exactly duplicable, depending on your product level. The screen illustrations in this publication are intended as representations, not exact duplicates of screen layouts generated by the software. You do not need to have a previous release of Hatch embroidery software installed on your system. This release is a stand-alone installation. Powered by Atlassian Confluence and Scroll Viewport.This document contains notes on Hatch Embroidery 2. To avoid signing in each time, ensure 'Keep me signed in' has been selected. Next time you restart Hatch Embroidery, simply sign into your account and the software will start. Once successful, wait for the activation to complete and Hatch will launch with the product. Once clicked, the browser window will open with the following message.
Check that the email is not caught by a spam filter or placed in the Promotions tab of your Gmail account. If you have not yet activated your product key, you will receive a verification email. If you have already activated your product key on the website, Hatch Embroidery Software will now launch. If you already have a Hatch account, sign in with your registered email address and password.

The link will be similar to This can be done by clicking the download button on the top of the website at The Sign In screen will appear. Click the 'Have a product key? On this page Activate your product from the Hatch website You will receive a unique link from your reseller. Once activated, it is assigned to your email. Once you have input your product key, you never need to input it again. You will only receive a product key if you have purchased the software directly from a reseller at a show, retail shop, or included with your machine. It will automatically be assigned to your email that you used to create your Hatch account. Ok Privacy policy.You may have received a 5-part Hatch product key in the form de-dedca5ecd If you download or purchase directly from the Hatch website, you will not need a product key. If you continue to use this site we will assume that you are fine with it. We use cookies to ensure that we give you the best experience on our website. Like this: Like Loading Leave a Reply Cancel reply You must be logged in to post a comment. Example of Drumsticks lettering.Īpplique Example. Each one of them is progressively more capable than the other but more expensive. To address this Wilcom introduced a new embroidery digitizing software called Wilcom Hatch. Unfortunately it is out of the reach of for many customers since it costs many thousands of dollars. Wilcom is known for EmbroideryStudio e4, a professional embroidery digitizing software. We have everything from fancy scripted lettering to applique lettering sets. Each lettering set is individually tested to stitch out well.īelow are a few examples of our lettering quality. EmbroideryWare has professionally digitized lettering sets that stitch out as well or better than Hatch. EmbroideryWare is not a tiered product like Wilcom Hatch so you get all the features in all versions. Therefore we can offer a much more affordable solution for your embroidery digitizing needs.Īnother resource for comparison is Comparison of embroidery software - Wikipedia. Ebay military medalsĮmbroideryWare was created by a small business that does not have the large overhead of a bigger organization like Wilcom. The table at the end of this article outlines the key features of EmbroideryWare vs. EmbroideryWare has many of the same features as Hatch Digitizer.
0 notes
Last Seen Blogs

alltimefail-sims
Not Another Simblr!

toranorom
虎乃ロム

kadytheme-blog
henlo kady

herosteveart
HerobrinexSteve
Mythical Romance

divinelightbringer
Lightbringer