#and it is looking really good
Explore tagged Tumblr posts
Visit Tumblr Blog
Explore Tumblr blogs with no restrictions, modern design and the best experience.
Last Seen Tumblr Blogs


Fun Fact
When “GIF” was named word of the year in 2012, Oxford Dictionaries U.S.A. credited Tumblr for pushing the word.
Text


Something something, living rent free in my mind and such, anyway I love them.
#deadpool and wolverine#deadpool#wade wilson#wolverine#logan howlett#poolverine#deadclaws#mcu#gosh I really need to find a good style to draw them#I drew wolverine's face FOUR times cuz I hated the way it looked hhhh#this movie took Hugh Jackman out of one of the boxes in my head and put him in a spinning wheel right in the middle of my brain#my art
30K notes
·
View notes
Text
Full of Desires

#dungeon meshi#dungeon meshi fanart#dungeon meshi manga spoilers#dungeon meshi spoilers#its really just cause of the outfit#farcille#marcille donato#im still surprised this came out of my hands tbh#im not normal about her#curse you dunmeshi for making me fall for the white girl#but god#she looked so good in that fit#i dont understand whyvthe other characters shat on it smh#falin wouldve loved it tho#this drawing is for the gays and theys btw#for the sapphics#lets go lesbians#ok ill shut up now#my art
35K notes
·
View notes
Text
Y’all want Taylor Swift to be gay so bad but you won’t even write femslash about her
#I was curious so I looked it up 1038 fics on ao3 tagged Taylor Swift and f/f#like I’m not necessarily encouraging people to go out and write rpf#but it’s wild that arguably the biggest musical artist right now who has a huge community speculating about her sexuality has so little fic#like this isn’t a good or bad thing I just think it’s interesting#idk I’m not actually a swiftie like that#like I listen to her music and keep up generally with what she’s doing but I’m not really in the fandom#so there might be something I’m missing
33K notes
·
View notes
Text


(this one's been getting stolen a lot, so please be aware that if you see this anywhere else (even with credit), it's been reposted against my wishes! please do not use my art in your videos/reupload to pinterest/etc., thanks!)
--
gargoyle Mal is everything I've ever dreamed of and more. his little raincoat! his umbrella! I hope he really does have big ol' stompy rainboots to splash around in puddles in. I hope they have little faces on them.
(Twst please give me Malleus having a rainy day adventure, this is everything I need right now)


#art#twisted wonderland#twisted wonderland spoilers#malleus draconia crown prince of briar valley descendent of the witch of thorns and a mage of frightening power: ooh big splashy#(my brain INSTANTLY to this very day: hit 'em with a splash attack)#honestly though yeah i do just want to see malleus having a really good fun day in the rain looking at some big stone fellas#it's gonna be three solid hours of him lecturing us on the minutiae of stone masonry and i'm gonna be hooked on every second#remember kids: aqueduct means you're in luck#if there's no water spout then get it the heck OUT
11K notes
·
View notes
Text
This is such a good, succinct way of describing the illusion of choice many fundamentalist women and men have when it comes to life paths.
#im making a ballerina farm video too and I've been looking for a way to describe how it's not really a choice for some people#her metaphor was good#trad#ballerina farm#mormon fundamentalism#mormons#tiktok
18K notes
·
View notes
Text
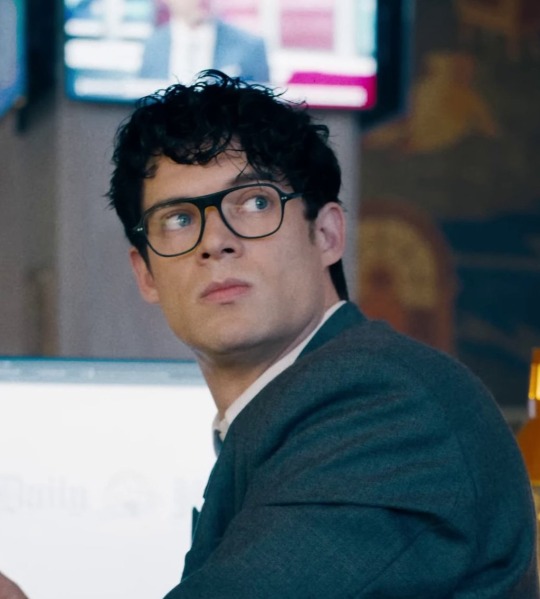

I know the internet is full of hyperbole but I can honestly say that[to me] every Superman production has missed the mark on the Clark/Superman difference until now. I can confidently say that because it’s irked me for years.
This might be the first production to actually really get into the weeds with some simple changes, use lighting, costuming, hair&makeup (peep the contour!)to convey that Clark and Supes look nothing alike. This is so cool to me!!!!! They finally did it.
Shout out to the departments. Shout out to whoever realized they needed way bigger (longer)eyeglass frames with a thick bridge that would alter the appearance of his nose making him unclockable. Whoever you are, I love this work. I love how the base of the cape on the shoulders and the collar work together. It gets the job done but also looks like it was comfortable to wear during hours of shooting. I love that supes has a bit of contouring in the makeup differing from Clark. Shout out to whoever decided to make Clark’s suits oversized and flimsy! It accurately demonstrates Clark’s attempt to look like a little fish in a big pond. He’s not just like that; everything is a choice with him.
Shout out to Peter King and Lindsay McCallister on the hair design/hair story. They did their big one. Clark’s hair is such a big change(so fluffy and undressed!) and accurately shows how someone would manipulate their curly hair to change their appearance. Superman’s hair really works. Honey, that hair is dressed! It is reminiscent enough to please fans but different enough to feel fresh. I like that it’s rounded on top instead of square.
Also I’ve never seen this actor before in my life but he is embodying my man in the trailer so that is also exciting. I don’t even care if the movie is good. I’m a bit over hero movies but I love me some Supes. Everyone seems to really be invested in the visuals of this project. The commitment to color is commendable after years of dark grey low lit mess. Anyway…
I love new faces. I love movies! I love departments! I love unions! I hate David Zaslav!
#like I love Superman so fucking much 😭#look at Martha’s son!#that is really the Kent boy#I don’t even care if the movie is good. it’ll be fine it’s James Gunn#just release the art book so I can put it on my table.#superman 2025
6K notes
·
View notes
Text

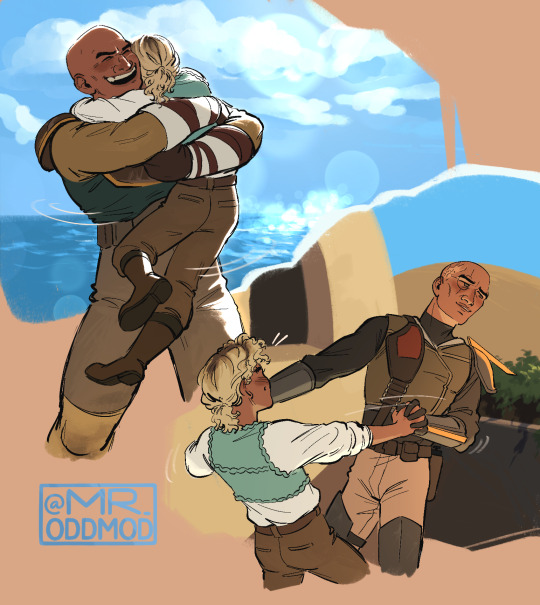
He truly did.
#atla#avatar the last airbender#atla fanart#atla art#the gaang#sokka art#sokka fanart#atla sokka#sokka#sokka avatar the last airbender#sokka of the water tribe#kyoshi warriors#kyoshi warriors au#kyoshi island#kyoshi warrior sokka#atla meme#incorrect quotes#Daniel Radcliffe you looked really nice in Fleur's outfit#As did Sokka in the Kyoshi Warriors uniform#Let him be pretty. He deserves it.#Also that handbag he bought in Gaoling would go really well with the uniform don't you think?#He loves shopping and putting together cute outfits and looking good. That's my boy.#Bi Sokka is my Sokka what are you talking about#He's pretty and he knows it ✨#Also can we all agree that everyone would look awesome as Kyoshi Warriors? Yes????#You know I'm lost when I start using Daniel's quotes for ATLA characters lmao#“And I was crying and I was in the bath” will come eventually. That line screams happy-go-lucky Aang and/or deadpan Zuko#Anyone would do#“We love Daniel but he's useless” is also *chef kiss*#Which character for that one tho?
8K notes
·
View notes
Text
Like we literally have a sliver of a chance at getting Blue Georgia and Blue North Carolina in this years election and genuinely it feels like people are just willing to throw that out. Hell, even Texas over the past 20 years has had a BIG shift in voting habits.
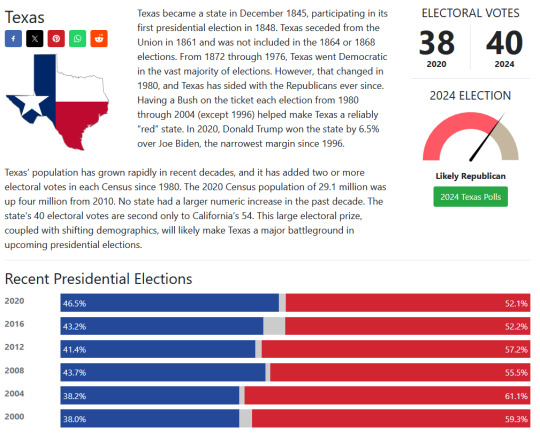
The last 20 years in Texas ^^^
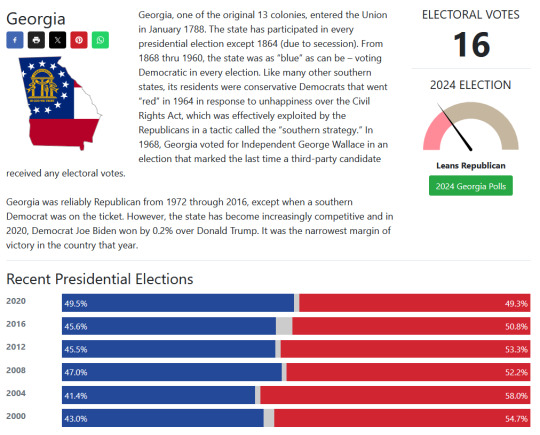
Georgia ^^^
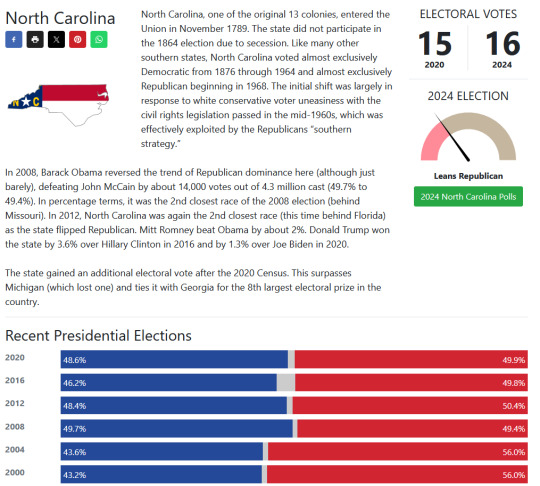
And fucking NORTH CAROLINA. Look at how close this margin is. This is absolutely batshit insane to me. They are now basically swing states.
Please
Register to Vote
#vote blue#north carolina#georgia#joe biden#kamala harris#i really need to like.#canvas this year i think#TAKE A GOOD LONG LOOK AT GEORGIA#.2 PERCENT!!!
11K notes
·
View notes
Text


The Great Mouse Detective screenshot redraws! 🐁🔍🐀
#good omens#go fanart#aziracrow#aziraphale#crowley#ineffable husbands#good omens fanart#angelcake#theres more scenes i wanna redraw but this is it for now i ran out of steam lol#also really wanna draw more rodents gomens but as rat!crowley and hamster!azi aaaa theyre so cute ;;#also i added whiskers so theyd look more mouse-like asahsd should have made the tails visible too but oh well theyre still cute :')
5K notes
·
View notes
Text

everyone be quiet i'm manifesting
#the bad batch#tbb#star wars#star wars the bad batch#sw tbb#tbb omega#tbb wrecker#tbb crosshair#tbb echo#tbb tech#tbb hunter#mods art#mods draws#my art#YAYYYYY ITS DONE#i've been tinkering w this for like a couple weeks now i think#just on and off#whenever i was nervous about their fates or just generally sad about them i would work on this#it was supposed to make me feel better but it would usually just make me more sad 😭😭#but i still really like how it turned out!!! so that's cool#very self indulgent but!!! whatever#i think i'll add this to my inprnt soon too :) so keep a look out for that i guess lol#okay byeeeeee#ALSO THE NEW EP WAS SO GOOD#okay bye fr
12K notes
·
View notes
Text
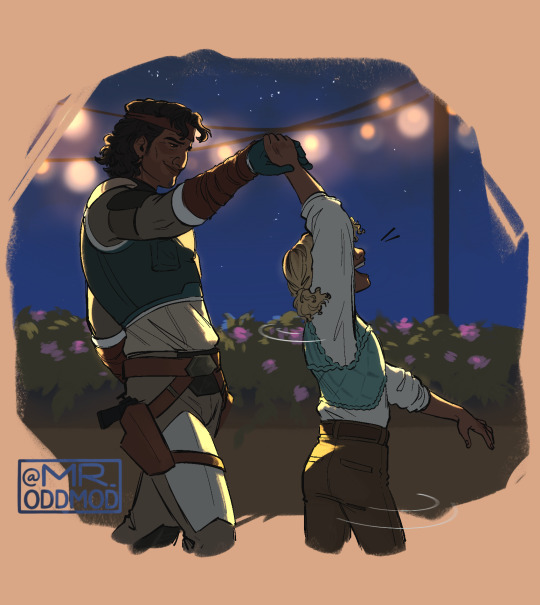
I can't help but wonder ☆

Obligatory outfit change for telemachus 🤺

#odysseus the only father ever#they make me so ill#i wish ichbw was longer#telemachus my beloved fr#also ik theyre supposed to have blood on em because of the fight but i didnt like how it looked#pretend they were really good at dodging the blood splatters#epic the musical#epic the musical fanart#epic the musical telemachus#epic the musical odysseus#odysseus#telemachus#epic telemachus#epic ithaca saga#ithaca saga#i cant help but wonder#my art#artist on tumblr#digital art#epic the ithaca saga#the odyssey
4K notes
·
View notes
Text
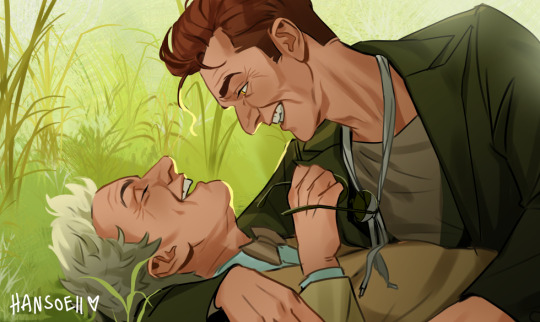
I probably won't finish this piece any time soon, but I wanted to share the unfinished version with you anyways!
#i'm just so busy these days I can't find the time to work on bigger illustrations#:(((#I still really like how this looks tho#So I wanted to show it to you all anyways#this is south downs aziracrow#good omens#good omens fanart#good omens 2#aziraphale#crowley#aziraphale and crowley#ineffable husbands#ineffable husbands fanart#good omens 2 fanart#my art
29K notes
·
View notes
Text
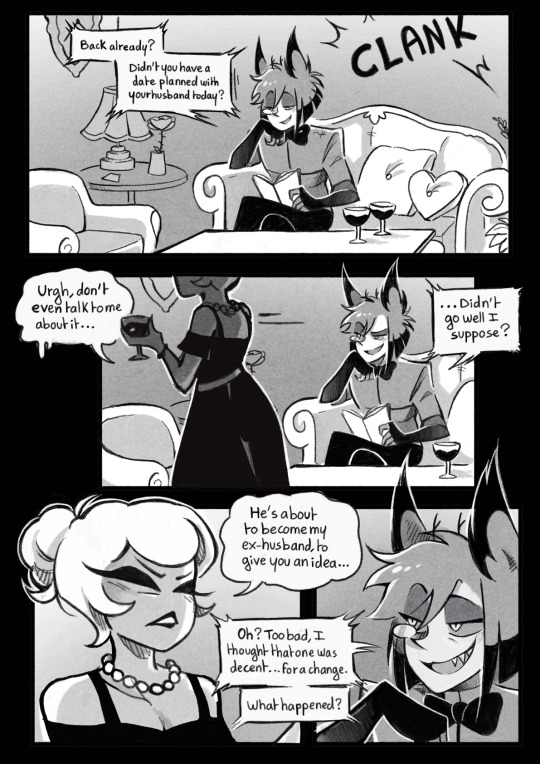
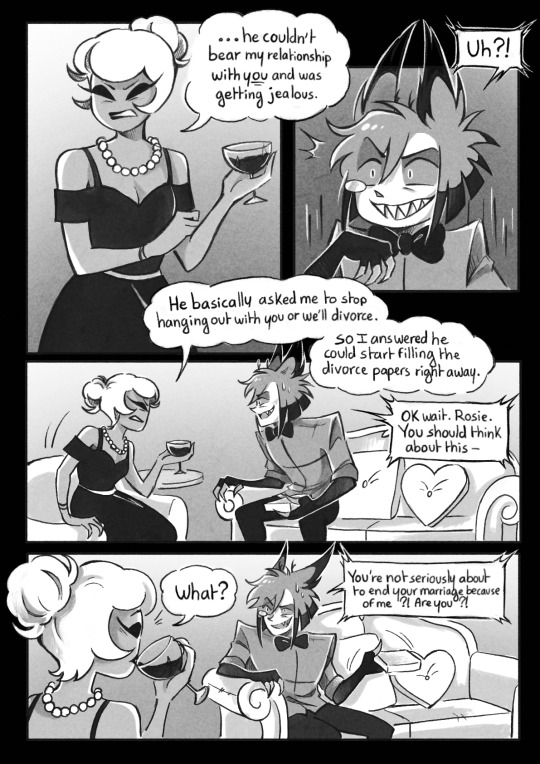
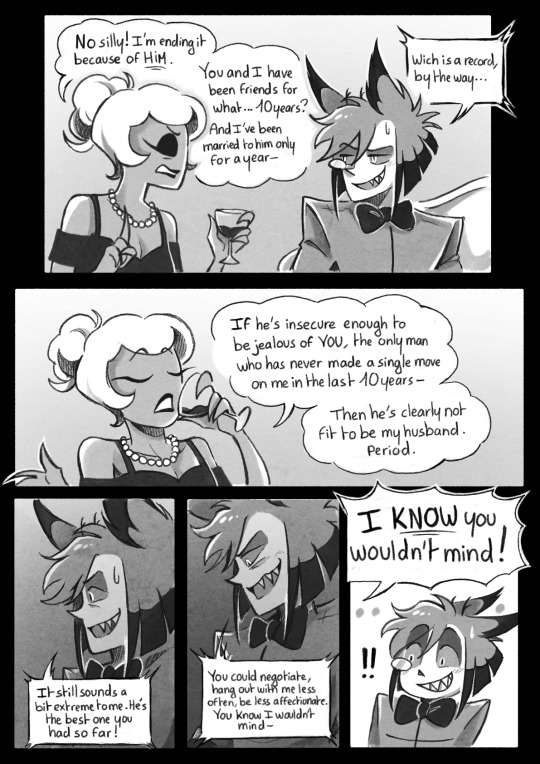
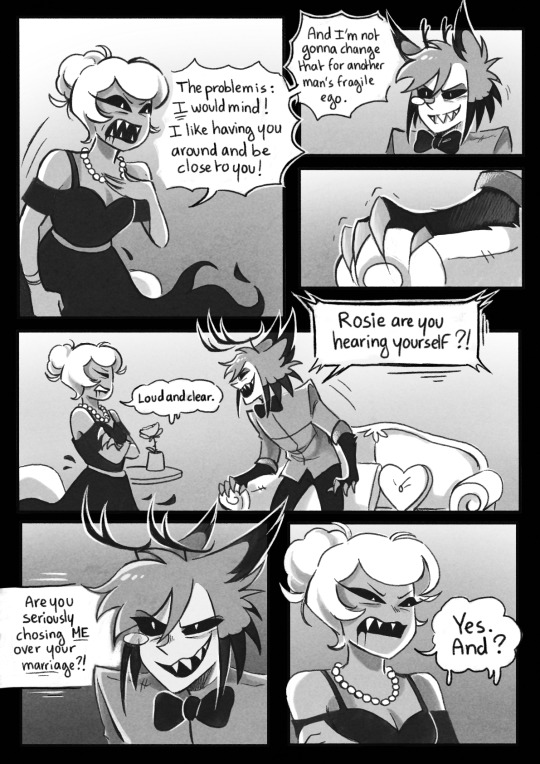
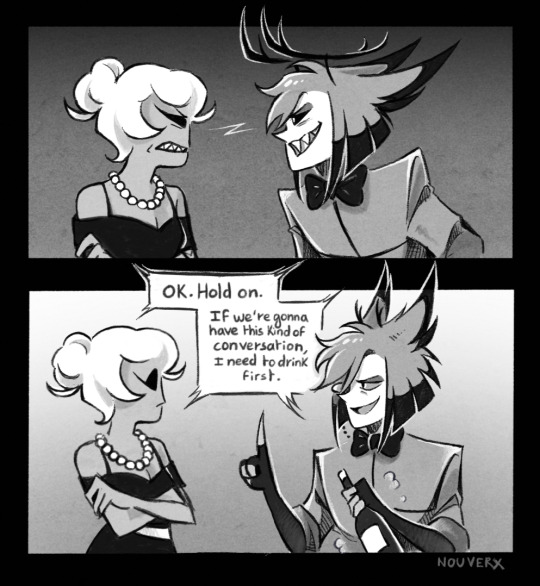
*proceeds to drink the whole bottle*
Yeah Alastor you're gonna be loved and appreciated wether you want it or not :)
#hazbin hotel#hazbin hotel fanart#hazbin alastor#hazbin rosie#radiorose#platonic radiorose#qpr radiorose#even tho they have no idea what label to put on their relationship at this point#hazbin comic#comic#my art#autodesk sketchbook#it probably looks ooc from alastor to react like this but poor man has only learned his whole life that relationships have a hierarchy#“marriage > a simple friendship” in his brain and it's confusing for him that Rosie would put her friendship with him over that#also Rosie was pissed of how terrible her date went and as soon as she comes home Alastor sides with her ex husband#just to explain why she got angry so quickly basically they couldnt really understand each other that's why they got angry#I love cute fluffy radiorose but its good to see them argue sometimes eheh#I needed to get this idea out of my system and made it into a whole comic
8K notes
·
View notes
Text

im already at the south downs cottage guys, catch up
#good omens#ineffable husbands#aziraphale#crowley#they're nb in the flavour of being lesbian gay men bc its such a lesbian move to pine for someone for a few thousands years#and literally not make a move#PLUS u know when they have sex it takes like 9hrs and if you wrote what they did down on paper it really wouldnt look like much#but they still had to take intensity breaks bc they kept getting overwhelmed and then just making out for an hour#thank u for coming to my ted talk#high amounts of gender of all types happening all the time with these two
27K notes
·
View notes
Text

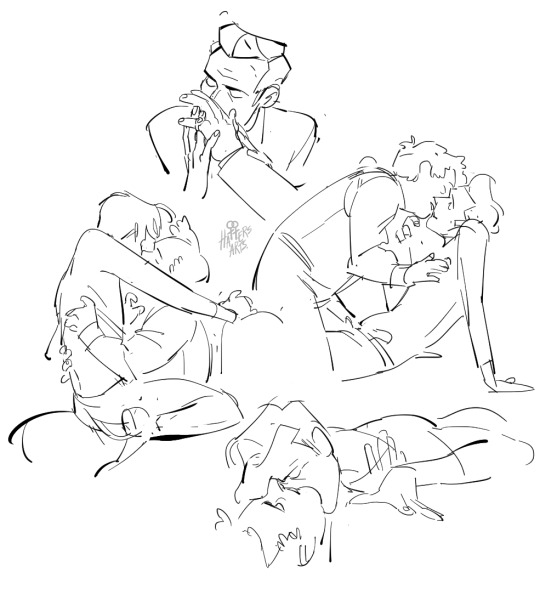
once again, don't think I'm not still obsessing over 7-12
(eventually I will get back to being less scribbly, whoops)
#art#twisted wonderland#twisted wonderland spoilers#twisted wonderland episode 7 spoilers#twisted wonderland book 7 spoilers#twisted wonderland episode 7 part 12 spoilers#twisted wonderland book 7 part 12 spoilers#oh cater. cater cater cater.#i'm so sorry but riddle is the absolute funniest person to look at and be like#'actually yeah i think this is good. let's stick with this one.'#no it's great it's amazing cater is amazing actually#guy who has never had a long-term friendship in his life 🤝 other guy who has never had a long-term friendship in his life#those two guys 🤝 third guy who sees the hollow voids inside them and immediately goes 'i need to fill that with food'#in this house we heart the heart senpais#fucking love how freaked out cater was by punk riddle#who is this. this is not his jousama. :(#(i do think one of the things cater likes about riddle is that he looks like he should act really cute but he is in fact A Bastard)#(a riddle who enthusiastically calls him caykun and is just kinda adorable is wrong on an intrinsic level)#cater once they hit the second level of dreaming: okay he's actively trying to kill us but at least i know how to deal with this#god. the hug. i'm not okay#that said i can't wait until after episode 7 when it finally occurs to riddle to ask what their dreams were#cater: oh uh...you know. :) stuff :)#trey: oh mine was actually -- cater what are you doing. put the teapot down.#(the rest of this scene has been redacted for everyone's benefit)
3K notes
·
View notes
Text


We do not have time to unpack that rn! (X)
#we’re pretending the last slide looks really good okay#my sleep schedule is so fucked from this show oh my god#art#fanart#digital art#fan art#my art#arcane#arcane fanart#vi arcane#viktor arcane#season 2 act 1#arcane spoilers
3K notes
·
View notes