#also i open my tabs and there 4 different tumblr apps opened from every time i clicked anything XD
Explore tagged Tumblr posts
Visit Tumblr Blog
Explore Tumblr blogs with no restrictions, modern design and the best experience.
Last Seen Tumblr Blogs


Fun Fact
If you dial 1-866-584-6757, you can leave an audio post for your followers.
Text
Whoa my tumblr's being funky all of a sudden...
#i think it updated without me saying so i forgot i had to get a new phone i need to change those settings#its kinda flickering everytime i click to go anywhere and 😐 i feel like that could get dangerous very quickly#also i open my tabs and there 4 different tumblr apps opened from every time i clicked anything XD#i think it might just be a glitch#its groovy though but not the good groovy like the weird groovy#virus rambling#tumblr
4 notes
·
View notes
Note
Hey how do you do the color gradient thing for your dialog tags?
Assuming you mean these things, I've actually been meaning to make a guide of my own for a while lol.
For one, you can only do this on computer/the website of Tumblr! There's no option to select this stuff on the app.

STEP 1: CREATE A NEW DOC / GO TO SETTINGS

It opens a dropdown menu/whole screen full of options!
From there, select the "text editor" dropdown, which starts as displaying "rich text".

Select "HTML"

And it should change how the entire post looks!

STEP TWO: CHEAT
Yeeeeeaaaaah, so I use a website for this lol

I inserted my colors for faeries (#30853C) and Cloud (#6DC1B4) for my example of "these things" earlier. To make this easier, I most often have two windows open at a time while working on uploading my scripts to Tumblr.

To get colours to insert into the Text Colorizer website, you can use any kind of hex color picker or even this one website I've used to yoink "thematic" colors from photos!


Personally, I've developed a massive library of colors over time for this exact purpose lol. Using my old colors as a "base", I can change it accordingly to the kind of "new color" that I want for a specific character or thing!


(I'll use the website to also make gradients for "in-between" colors lol)
STEP 3: INSERT TEXT / DESIRED COLORS
To make Nova's gradient, I start with #A600D9, my color for Magic, and end with #F56745—their individual color. However, being as it's short, I'll use a quote from them instead lol.

Once you've inserted your text and colors, you will click in the text box I highlighted in red, ctrl+a and ctrl+c to copy it all, and go back over to your new tumblr post tab!
From there, you'll ctrl+v to paste the entirety into the HTML area, which pastes the code into your post!

AND VOILA!

You have gorgeous gradient text!
However, I want to give a fair warning and a bit of advice! If you didn't notice wayyyyyyy back when...

Tumblr warns that this all can break your formatting!
It doesn't do it too often, but take it from someone who does an obscene amount of formatting... it's 100% true.
STEP 4: CHEAT SOME MORE!
For this reason, I personally have a whole separate draft post full of my characters' colors (and names lol) that I use to copy-paste them in from rather than using the "html" text editor on every post!
I mentioned earlier I often have multiple windows open while editing? Here's what that looks like!

Additionally, I'll use a separate tab off on the left (my "current wip post" side) with the "html editor" enabled for me to copy-paste stuff!
(Also here's yet another example of how many colors I have)

Once again, you can ctrl+c these things to paste them into another tumblr post with the correct colors!
And it's ONLY possible to do on the website!!!
EXTRA INFO!
WARNING:
Tumblr will only allow each "paragraph's html to be so many characters long, so you can't have too big of anything in a gradient!

And by "anything"... I mean you really can't have that big of a gradient in general. RIP lol.
It straight-up won't save the post so long as you have that "overflow" in the character block! MAKE SURE YOU'VE FIXED IT, OR YOU CAN AND WILL LOSE ALL PROGRESS ON YOUR POST!
SINGLE-COLOR TIP:
You don't need the website for a single color! If you'd like, you can just change the "color code" within the html editor to change specific colors!

MAKE SURE COLORS CAN WORK ON DIFFERENT BACKGROUNDS!
On desktop, you can use shift+p while not on any sort of textbox to change the color pallet! I always do tests to see which colors work best before settling on any!

(Tho, the blue background SPECIFICALLY is nightmarish to work around. So if that's the ONLY thing I can't make work, I often ignore it and let you guys who use it suffer lmao)
(Hopefully this'll give you guys some respect for me and how much I do to make my posts aesthetic af lol)
Also hopefully this all helps???
divider by @cafekitsune
55 notes
·
View notes
Text
15 people 15 questions
tagged in this meme a few weeks ago by @isaksbestpillow!! here we go
1. are you named after anyone?
My first name is the name of a specific figure from UK history! someone a lot of uk people have heard of, but it's unusual to actually have this as a name. I get some incredulity and some people who politely ask where i'm from. I have to say i'm not 100% sure what answer they're expecting.
My tumblr url is a B-52s song which seemed somehow relevant back in uhhh 2013 or whenever it was.
2. when was the last time you cried?
I thinkkkk possibly when i was doing my taxes back in january. These days I tend to cry from stress and anger and frustration but it's really bad for me because once I start I find it VERY hard to stop, it makes my emotions spiral, I get more and more upset, so I really have to squash it down. For me crying is not cathartic, it just ruins the day.
3. do you have kids?
No - BUT - I have a lot of much younger cousins - and I babysit them & help with childcare fairly often so I am quite used to kids. Fortunately my cousins think i'm super fun
4. what sports do you play/have you played?
I am extremely noncompetitive! I was terrible at team sports at school and also had terrible hand-eye coordination. I have been at times an OK swimmer and I played a lot of table tennis in my last couple of years of school with the other four or five people who'd been deemed too useless for netball etc. As an adult I do youtube yoga, I periodically do app-based running stuff like Zombies Run or Nike Run Club. Ideally I'd like to go every day on like a 5 mile walk in an interesting location with a reasonable amount of ascent and descent but in a city it's hard to orchestrate that. Also I put my little cousins on my shoulders and get them to direct me where to go so they can learn the difference between left and right
5. do you use sarcasm?
I think I actually don't! Maybe a little bit sometimes. I tend to me more uhhh. pedantic and literal. tend to deconstruct .
6. what’s the first thing you notice about people?
uhhhhh probably skin texture . or haircut . or I look at their clothes. i don't know . sounds creepy. sorry.
7. what’s your eye color??
I think if you average it out it's brownish / greenish . think filippo berio bottle . maybe a bit browner / greyer than that. I tried to take a picture but it only confused me. Also when you look close enough at someone's eyes you might get flecks of like eight different colours.
8. scary movies or happy endings?
I do watch and enjoy scary movies and I have learned that I have a higher tolerance for them than some people BUT if I must pick between the two - I am team happy ending.
9. any talents ?
Little bit doublejointed! Can play a little bit of ukulele. Good memory. Good cook. Can make cocktails .
10. where were you born?
London, UK
11. what are your hobbies?
cooking, language learning, walking. Tumblr . opening new browser tabs . I'm getting some wine qualifications which is partly work related partly hobby.
12. do you have any pets?
no but my sister & her partner just got a dog and I do feel I am now an auntie
13. how tall are you?
167 cm I think? i think that's 5 ft 6? normal amount.
14. favourite subject in school?
probably languages ........... honestly I don't remember. unfortunately I had a thirst for knowledge and enjoyed most subjects.
15. dream job?
What I do now (print media production work, magazine production work) is pretty good for me
I'm going to do what @isaksbestpillow did and tag the last 15 people in my notes, that seems fun. no obligation obviously! @rociopath @fizzbuzzbananagram @magicmarker @autisticmisabel @starburger @the-omnishambles @itsmapes @youvegotaluckyface @misterhaderach @jestershark @lanninglurksnomore @sirquacklesdefoof @tracybaconnnn @321claratin @alien-ally
#deciding this is the year of doing the memes ppl tag me in . 2k24 the year of participation. fuck it we participate#tumblr life#tumblr memes#15 people 15 questions
10 notes
·
View notes
Text
Reminders for the upcoming TS4 update!
Simmers, the new expansion pack For Rent comes out on December 7th and as we all know, big updates can mess with your game especially if you use mods. I've learned my lesson from the last few updates and I'd like to give some suggestions to help!
Note: I use the EA App for Sims 4, on a Windows computer. The methods I describe here will probably not apply to MAC users. I also don't know if these work for pirated games so just be careful!
-BACK UP YOUR SAVES. Just in case your save gets corrupted or the update somehow manages to lose your saves (this has happened to me- after the update, my saves were gone). Here's what I do:
Navigate to your "Sims 4" folder. In my case it's Documents>Electronic Arts>Sims 4.
Find your "saves" folder and right-click to copy it.
Paste your copy of your saves folder to your desktop (some people paste to their external hard drive as well, but I'm not sure how to do this)
Right click on your copy to rename it. It's a good idea to write the date on which you copied your folder. Here's my current backup:

Your saves are now backed up! If you lose your files in the game or they become corrupted, open up your backup folder, then select and copy all the files in the folder and then paste them into your actual saves folder. Your saves will then be restored! You should do this every so often just in case. I try and back up my saves once a month.
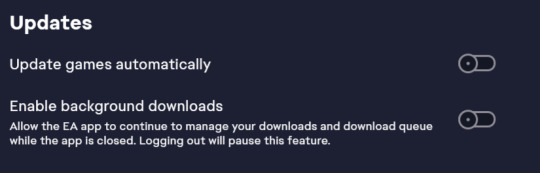
-Turn off automatic updates. This way you can choose when to update your game. I personally wait until mod creators start updating their mods and then update the game.
Open the EA App and head to your settings, then the "downloads" tab.
Turn off the "update games automatically" option.
When you're ready, update the game and enjoy!
-Follow mod creators on social media. If you use mods, it's a good idea to keep up with updates and what the creators are up to. When there's a huge Sims update, many mods (especially script mods) tend to break and need to be updated by the creators. Keeping up with them allows you to see what their plans are for updating the mods. Creators use many different platforms, but from what I've seen most tend to use Tumblr, Patreon, and Twitter/X to post updates. If I find a mod I really like, I always follow the creator. They also deserve tons of support for their amazing work!
-Know which mods are broken and updated. In addition to following mod creators, there are multiple threads that log all mods with each update. They tell us which mods are broken, which are updated, and which were unaffected by the update. If you're experiencing a glitch with a mod, you can report it on these threads. Here are examples of threads from previous updates:
Always check these before writing to an official Sims/EA forum about a glitch. If you use script mods, the bugs you're experiencing will most likely be from these mods. Also, if you use UI mods like UI Cheats, don't freak out if your UI looks like this:
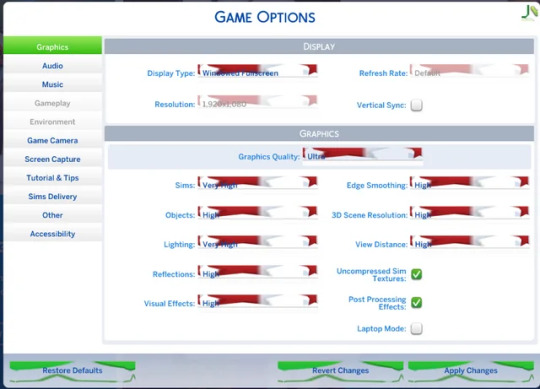
Your game isn't corrupted, the mod is just outdated. UI Cheats almost always breaks after a big update. The creator of UI Cheats updates frequently, so make sure to check up on their Patreon page.
-Check in with the community if you have a bug. The Sims Forums, r/Sims4 on Reddit, and Simblr are good places to go if you have a question about a bug you're having. r/Sims4 was a lifesaver for everyone who had the dreaded tooth glitch in Growing Together. If you're having a non-mod related bug, chances are others are having it too, so don't feel afraid to ask!
I hope this helps some of my fellow simmers. Good luck with the new update and pack, I can't wait to see how my favorite Simblrs use it in their stories and gameplays!💖
#sims 4#ts4#sims 4 info#sims 4 update#sims 4 for rent#sims 4 expansion pack#important#the sims#sims#sims 4 mods#simblr#the sims community
13 notes
·
View notes
Text
Writing rules 101 by Kin
Intro;
Everybody has their own writing style, and you absolutely don't have to listen to me. This is only posted for two reasons, one being that I might not have the mental strenght to post request for 2 or 3 days due to personal reasons, the other one being hey, someone might find this useful.
It's not to nag though, it's more for fun and I am open to respectful critism.
•°•°•°•°•°•°•°•°•°•°•°•°•°•°•°•°•°•°•°•°•°•°
1.
The first one that's the most important one is - In my eyes at least - that you should absolutely never write the character doing absolutely nothing.
Start out sentences with someone being in the middle of something, either something big or something small.
Example;
Not that good; Daniel woke up to the sound at his alarm, at 7:30 am and went to brush his teeth.
Alright!; Daniel shifted his gaze from the window back inside his kitchen. It was raining today, he couldn't help but wonder if it was a bad omen, or if his mind is simply trying to mess with him.
He opened the door to reveal his kitchen shelves, putting away the mug he had gotten from Gun that morning.
ex end.
Not only will it give more depth and possibilities for your story, but it will also keep the reader more entertained and in picture with what's happening.
Also, you are less likely to get a writers block.
2.
Please, if possible, do not write in a big text block.
By that, I mean not possible break in between lines at all.
Please try to make a format you are possible with, of what your gut feeling says feels right.
Example;
You could write like this.
I do not follow a possible format, but in my opinion the best format is one or two sentences starters. The next graph being three to five sentences.
It will not only make you more able to focus, and know where you left off but it is also helpful for the readers.
You can, of course add big paragraphs - if they are called that - but! People with certain disabilities, especially reading ones, will be able to pay attention more and not get overwhelmed if you follow the process of 'small text, big text, small text' or one similar to that made by your own. Also, were you aware that people who don't have English as their first language will be able to follow through more like that?!
Well, now you are!
ex end.
3.
" It is not necessary for you to always add who is talking while two people are having a conversation. " said Mira,
" That's right, but that rule only applies if it's obvious who is talking! " Zoe added to the conversation, with a cheerful smile.
Zack leaned back in his chair, holding a hand in front of his mouth as he yawned,
" If you are going to tell them the obvious anyway, just tell them that a sentence which is followed up by a quote should never have a dot but rather a comma. "
" Zack, don't be silly! Everyone knows that! "
" Actually... Some people might not! Let's not be judgemental everyone. " said the brown haired one.
" Pft, that's for beginners tho! "
" Hey!!! Let's also tell them that they can use differences between the people talking instead of their name too! " said his desk mate, as he looked up from the notes on their desk.
Zack leaned his head on Daniel's shoulder, closing his eyes as he made himself comfortable for a nap,
" Yup, especially if there is a pronoun difference. "
Mira turned to Y/n, holding their shoulder,
" Don't feel stressed please! It's alright to make mistakes, and writing is pretty hard anyway! Just follow your own pace! "
4.
Do not add anything that doesn't have a meaning.
Even if it's taking a sip of drink, it should have a meaning.
It's poisoned, dirty, the first step for someone to be healthy, the first drink someone has for survival, holds a significant meaning or It's to provoke someone.
It doesn't matter, as long as it adds something to the story.
If you do not make everything have a meaning that adds depth to the story or the personality of a character you are wasting the time of your reader and could possibly give them false hope.
Though, you don't immediately have to add the meaning of if in the same scene or even same chapter.
5.
Some sentences have multiple meanings depending on which word is pressed down.
Take an example, the sentence
" I never said she stole my money "
has 7 different meanings depending on the word you press down. Just try it out.
So if you might write a sentence with multiple meanings please write the pressed down word in italics.
If you want to say the person didn't steal the money, but someone else did, you would have to write,
" I never said she stole my money "
I hope it's clear with only one example!
6.
Your work is bad because you have read it at least a thousand times, but the people you will publish it to will read it for the first time and you will always have to remember that.
If you want to improve it though, write down everything in your notes, then fully delete it.
You can then open your post tab on your publishing site - like tumblr or something - and start rewriting it.
You will definitely only remember what's necessary in addition to your story.
I personally don't do this, but a lot of people might find it important.
7.
Always do research please, even if things won't always be accurate.
If you do research, less people will be annoyed by the inaccuracy and you will be able to add a lot of things that you couldn't have without them.
Also, you can avoid appropriating cultures and offending different kind of communities that way.
Along side that, please always state if your work will out of character or inaccurate on purpose.
Plus! Checking your spelling errors with a trusted app of yours will never hurt anybody! ♡
8.
If you have a writers block, please either
1. Change the weather; Opens up different kind of possibilities due to clothing, back ground, objects, air and reactions it brings out of others.
2. Add something dramatic; Only do this if it's absolutely necessary, because it could ruin your work. If everything goes right, add something that goes wrong and vice versa. This is only if you want to add angst in your fluff or wise versa.
3. Change the environments and/or the positions the characters are in; It gives a better perspective of the mood and general idea of the topic on hand that you are writing about.
4. Move on to the next scene; You can either leave the scene at that, or write the scene after that which can give you ideas for the one previous to that.
5. Make sure to clean the room you are in; Distractions and environment factors can change the way you feel about writing. Especially if not everything is clean, even if you don't like the mess. Also, drink water.
9.
Never add the end being a dream in longer works.
I don't mean the middle, a twist or a necessity. I mean the absolute end.
It just disappoints people and wastes their time.
10.
If you are writing anything other than romance such as action, horror, thriller ect I would like to say that, romance is not a necessity.
I beg of you, please don't add it if your main focus isn't romance.
Sure, people can have relationships but unnecessary romance rather drives people away than bring in more readers.
If your main focus is romance, please don't immediately make the people fall for each other.
It doesn't necessary have to be enemies or something you don't enjoy, but please remember that no one loves at first sight, and even people with a lot of chemistry can be shy!
Even if you love someone the first day you meet them due to something, it will definitely take a few hours and naivety.
So unless the main point is love at first sight, it's better to build up a relationship bit by bit.
11.
Be diverse with tension levels in scenes!
If a whole work is simply tense, or simply has a normal tone that can be either overwhelming or underwhelming.
For example, if your work is shorter, you can add a tiny moment where someone pouts yet gets cheered up with kisses a bit after.
If it's longer, you can add for example a race scene, which after ending is followed up with a group of friends smiling and having fun at a dinner table. If would not only give more depth to your story, but it could make viewers think and make their own headcanons of your story.
So, in short, please balance your story out. Readers have an easier time to finish a work that's balanced in the course of the same day over works that are over or underwhelming! ♡
12.
Every writer has a word that they might repeat too often. Mine are pronouns, but for others it might be fangs, headband, no, lenght or even cat.
Please try to recognise yours!
If you feel like you are repeating your key word more often than 3 times please rewrite your sentence(s) in a way it's more pleasant.
You will have an easier time writing and your reader won't feel like you are repeating yourself.
Also, you can improve your speech pattern that way. ♡
°•°•°•°•°•°•°•°•°•°•°•°•°•°•°•°•°•°•°•°•°•°•°
Outro;
Whew, that was a lot. Kinda gave me a headache.
Please remember that these are tips and not to put anyone down. I would have just liked to help and make up for the lack of post. - Ouch, parrot much. - I enjoyed writing these, but if anyone got offended I apologise. Hopefully, this won't get ignored since I put a lot of effort in it. 🥲
Thank you for your time! <3
21 notes
·
View notes
Note
hi- I’m not sure if you’re the right person to ask, but I wanted to know how to start a fanfic writing tumblr- I mean, I’m just not sure how to start since I’ve never posted anything on my account- I’m sorry if this is an inconvenience-
Don’t worry about it. I’m a little offended that you would think you’re coming to the wrong place 😂.
Imma break it down for you.
BTW this post is long bc I wanted to cover all bases
—
First of all, if you’re on tumblr mobile, then that’s fantastic and we’ll start with that first. If you’re on desktop, I would like to suggest getting it on your phone because it’s more accessible and easier to manage than doing it on the computer. The only time I go to the computer is when I’m going to post fics, but we’ll get there.
I know you said you’re wondering how to start posting fics but I gotta give you some advice before that. Because there are just some things I cannot stand when it comes to some fanfic blogs, alright?
Be easy on your color scheme. I wouldn’t put any bright colors because it could hurt someone’s eyes, and sometimes it looks really bad. Going along with that, you should be careful what your second color is on your blog (let’s say that your base color was a maroon, and then you’d choose a color similar to that/darker than that. It’ll be hard to read the things in your bio, and it’s frustrating)
This is obvious, but make sure you have a profile and header picture, it’s more appealing rather than tumblrs default.
Turn ON asks and then proceed to do it for anonymous questions, because that’s the only way you get requests. Some people do it off anon but that’s not as common.
You can do this on desktop and a safari browser. It’s not possible to do on mobile just yet. Open up safari > log in > little person icon in the top right > edit appearance. Scroll until you see “let people as questions” turn that on. Turn on anon, and edit the box to whatever you want. Keep it short
Turn off “share posts you like” and the following one below it. It’s a risky game to play when it comes to what you’re looking at and liking.
No submission posts, normally people don’t submit things anyway. Turn OFF “on blog advertising” and then that’s it. It automatically saves so you can just leave to the next screen imma bout to tell you about
IF you go to my blog on desktop, you’ll see that there’s a theme. My font is different, I have a different set up than most blogs, etc.
If you wanna mess around with that, scroll to the top of page (you should still be on the same page from the anon instructions) and tap “edit theme”
It might take a second to load, but you’ll get there.
THIS SCREEN IS VERY IMPORTANT.
Besides the fact that it lets you edit your theme, this is how you put in a Masterlist, and all other links you might want in your bio.
You said you haven’t written anything yet, so there isn’t a need for a Masterlist just yet. But when you DO start posting, please come back to me and I’ll let you know how to put one in your bio, okay? Nice and shiny for your future followers.
If you wanna change your theme go to browse themes, change it from “all themes” to “free themes”. If you like mine, it’s called “Accesible”. If you just want the font, get out of the theme screen and scroll the screen on the left. Turn ON “open dyslexic
Remember, you can do all of this on desktop too, it doesn’t have to be on safari
—
Now onto posting, I have some opinions that might offend my mutuals (oopsie)
I can’t tell the difference, but PERSONALLY, I think posting fics on tumblr from my phone is gross. But that’s also because I’m writing 1000+ words normally and it gets difficult to post
If you want to post fics with more than 100 paragraphs, then you have to go to desktop or maybe safari tumblr (I don’t post from safari tumblr so idk if it works) because tumblr says NO paragraphs after 100 on mobile. There is no restriction on computer
I write in Google Docs, because it’s neater and I’ve discovered some hate for Word after deleting some of the shit I wrote over and over. Plus it’s an app, and you can open it up on computer. Easy to use.
If you use Notes on your phone, or type directly onto a tumblr post, then that’s fine but you don’t know your word count and it’s a little difficult to navigate.
When it comes to formatting, I used to have it be really long. But I’ve narrowed it down to 3, sometimes 4 things.
Summary: this is where I put the request so the anon/person knows that it’s their request. (I copy n paste the entire request in the summary part, I don’t answer asks (requests) anymore because it’s easier to answer them after I posted).
Warnings: my permanent is swearing, and then I add on (what type) violence, murder, suic*de, gore, etc DEPENDING ON THE REQUEST
Word count: and I do this because I write long imagines sometimes and some people don’t want to sit through 5k words of boring shit
And the optional—Note: I put this if I thank someone for their patience on the request, if I say happy holidays or some shit like that. I don’t have notes on every post anymore because they just turn out being the same every time
Apart from that, give it a title (make it unique but not too long!) who it’s for and then copy and paste the fic in
I’m using my own posts as an example right here, okay. But I have the summary and all of that bolder because it’s easier to see, and I want it to be different from the actual post. Most fanfic writers do this.
I also put 2 —‘s between the authors note at the top and the fic to also make a difference there
Don’t have the entire fic italicized, it takes away the special part of italicizing a word
Finally, it’s tagging.
I cannot stress this enough, DO NOT tag things that have nothing to do with the post. It’s my biggest pet peeve and it’s because I can’t comprehend why people tag (for example) Katrina Stuart when it’s a fic OR A RANDOM POST about someone else
Instead, let’s keep it simple.
🌸 STOP 🌸
I forgot to mention this. But choose your username wisely. You can change it later on, but it’s a goddamn pain in the ass when you have 50+ fanfics you wrote and your Masterlist is nice and clean only to realize that you have to RELINK every post individually
Listen, I changed my username on my old blog, and it took me 8 hours ROUGHLY to relink and fix every individual Masterlist. I had to create new masterlists, with so many tabs open to fix it
Instead, change it before you start fics
If you wanna be a colby brock blog, I have a canon url (which means that it’s so fucking GOOD and I’m angry that i realized it was open only a month ago rather than when I created this account) and it’s colbysbrocks (it’s a plural canon url). And I have colbysecrets too. If you don’t like either of those, I have a couple of other ideas that I wrote down if you want them
🌸 okay continue 🌸
This is how you should tag:
(I’ll give an example after this)
Your username first, the person it’s about, the fandom (if it’s not Colby brock, then something like marvel, etc). Then the persons name, imagine, fanfic, x reader, and oneshot. Then if it was requested
EXAMPLE ONE:
Azurebrock, Colby brock, Colby brock imagine, Colby brock fanfic, Colby brock x reader, Colby brock oneshot, requested
Simple, right? You can even use this method for Wattpad too.
EXAMPLE TWO:
(This is Star Wars, im using my own username again)
Kylorenlovesyou, Kylo ren, Ben solo, kylo ren imagine, kylo ren fanfic, kylo ren x reader, kylo ren oneshot, Ben solo imagine, Ben solo fanfic, Ben solo x reader, Ben solo oneshot, Star Wars
Notice that I tagged both of his names. I do this because it draws more people in, and more people will be attracted to it (however, in the Star Wars fandom there’s a difference between Ben Solo and Kylo-Ren, so you would have to specify in the title Ex. Resistance (Ben Solo) or Struggle (Kylo-Ren). It would depend on which persona you’re using
This works for a couple of fandoms, like twilight and shit like that
EXAMPLE THREE:
(Final one, I just wanted to cover this base just in case)
If it’s a request for more than one person. Let’s say Colby Brock and Sam Golbach (like a Polyamorous relationship, if it’s just about a bunch of people, tag the people in it and don’t put the imagine, fanfic, x reader, oneshot after any of them, it doesn’t apply)
If it’s a poly relationship (or maybe more) then do everything you normally do for one person, and then just add on the second;
Azurebrock, Colby brock, Sam Golbach, Colby brock imagine, Sam Golbach imagine, etc
If you’re on desktop, I would suggest putting in a Read More (this goes BEFORE your fic but after the authors note, below the 2 —‘s). The way you do that is press enter, and hover over the new break in the fic.
Off to the right you’ll see a . . . Click that and then you have the read more. I would only suggest using this if there’s more than 500 words, so that if the fic is super long, it doesn’t take up the entire dash for the follower (it takes forever to scroll and it’s annoying
If you’re on mobile, it isn’t possible. Just post and you can go back and edit later if you have a computer
21 notes
·
View notes
Photo

9k FOLLOWERS CELEBRATION: GIF TUTORIAL by winston-wilson
In this tutorial, I’ll try to show you the basics of making a gif. Of course, there are many ways for this joyful and absolutely not stressful part-time hobby slash addiction, but this is how I’ve been doing it for a couple of months now, and it’s worked out pretty well so far. I’ve learned a couple of tricks, created my own shortcuts, and at this point it’s just something that comes naturally.
I use Photoshop CS5 Portable (you can get it here)
for taking caps, I’m using KMPLayer (get the 4.2.2.22 verison, the .23 one is screwed up - you can get it here)
please, like / reblog if you find this useful
feel free to hit me up with any questions.


1. Don’t beat your laptop with a baseball bat. Yet. Use your chair.
1.1. Videos/clips/movies.
I explained that part in this tutorial. What I want to add is that if you want the highest quality of a trailer, get QuickTime, wait a day or two after it comes out, and get the trailer here.
Find a trailer you’re interested in, play it, choose the highest quality option, press ctrl+shift+i, and you’ll get this:
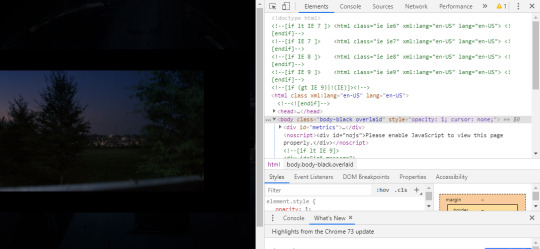
Click anywhere on that html codes and press ctrl+f. This will show up:
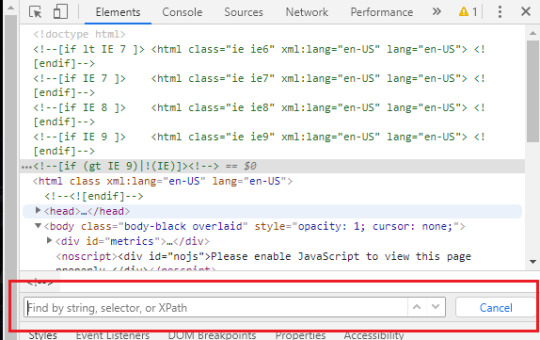
Put that brandy away. Search for ‘source’, find this:
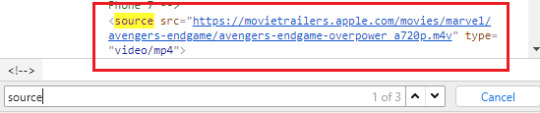
Clink on the blue link using the right-click of your mouse, choose open in new tab, and a download window should show up.
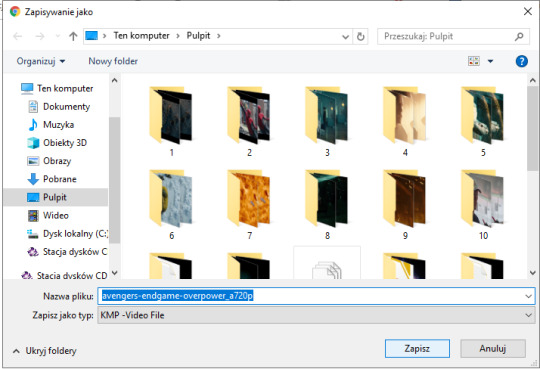
Save the video where you want to.
You can use videos from YT or movies you have on your computer or get those movies. Those movies also should be in the best quality possible. I suggest the ones with quality of 1080p and bit rate at least 6 Mb/s for best gifs.
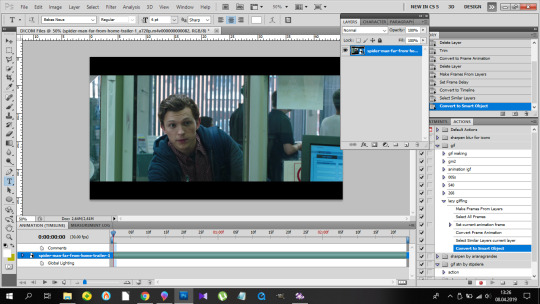
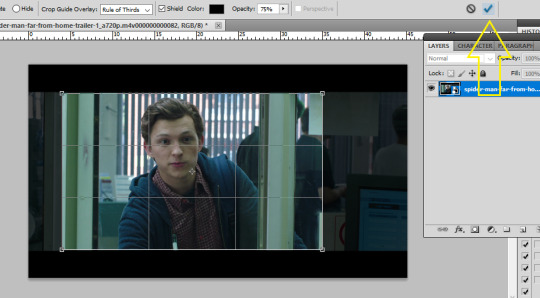
In this tutorial I’ll be using the trailer of Spider-Man: Far From Home. Because all my movies are on another disk and I, uh...
2. KMPlayer + taking caps.
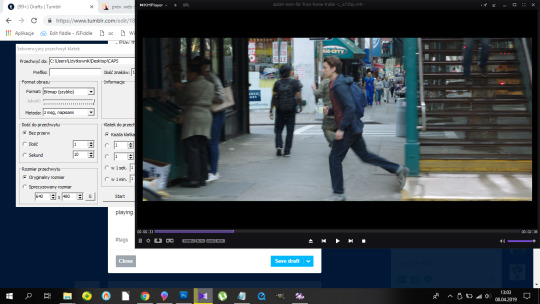
Before you open a video and take caps, I suggest you create a folder that’s easy to find and use on your desktop. I have one called ‘CAPS’.
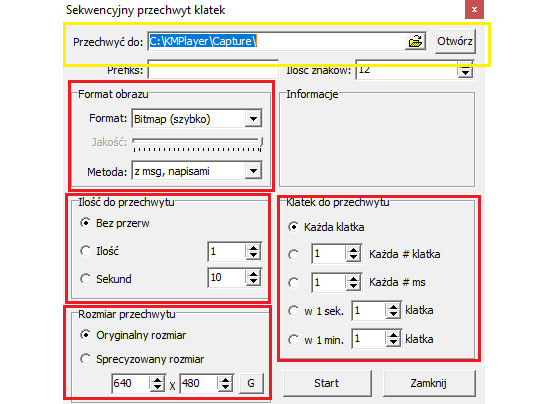
- Open your video in KMPlayer. Pause it because this version of KMPlayer stinks and you have to pause the clip in order to start taking caps. So pause it and press ctrl+g. When the caps window shows up, set it to those (red) options and choose your folder (yellow) where your caps will be stored. You have to choose that one thing every time you open that window. [Sorry for the language, but it doesn’t matter. Just choose them settings.)
- Play the video & make sure your caps window is somewhere on the side like this:
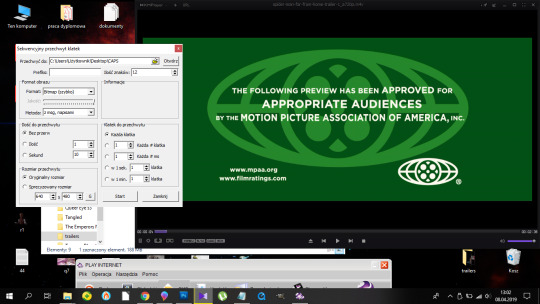
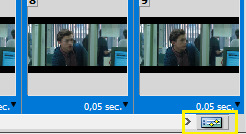
Find the part that you want to gif. You can pause before it, press start on the caps window and then play the video or just start taking caps while the video is playing. I’ll do it using the first way.
pause:
click ‘start’ on the caps:
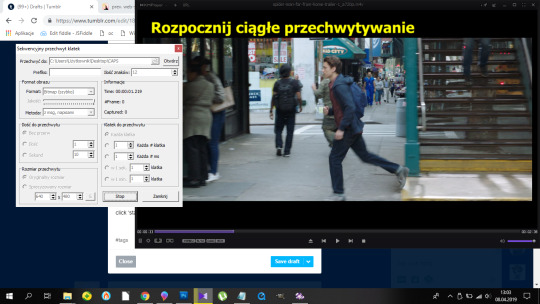
and then play the video until I get the caps I want and click stop on the caps window first, the video second.
Close that thing if you have what you want.
- Open your CAPS folder.
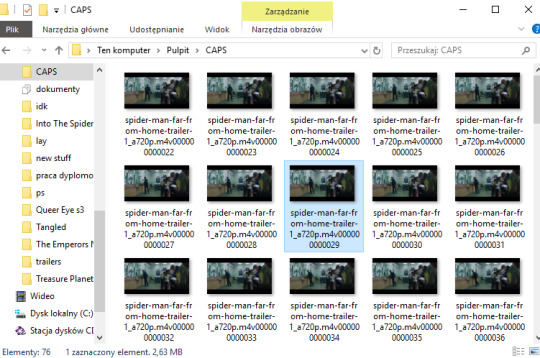
Get rid off the caps you don’t need. They’re trash and should be treated as such.
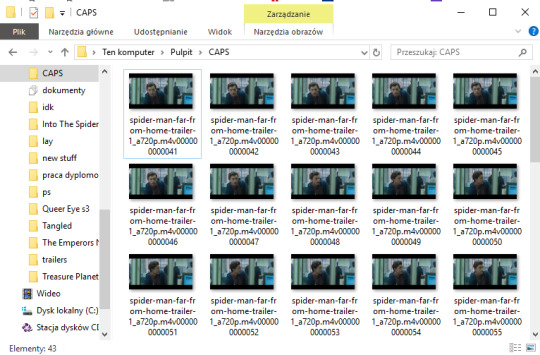
If you’re giffing more than one scene, you can sort them caps to folders. I have 10 folders named from 1 to 10 where I sort mine. And because for now I’m making just one, I’ll move those caps to folder ‘1′ on my desktop.
Time to make a gif. You good out there? If the answer is no, take Vicodin. No worries, when you’re done learning the basics, you’ll make gifs with Britney Spears playing in the background. Now shhh, focus.
3. Photoshop, aka that scary part.
- When you install it, you’ll get a folder, and in that folder there’s the app.
- Open that thing (and maybe copy on your desktop).
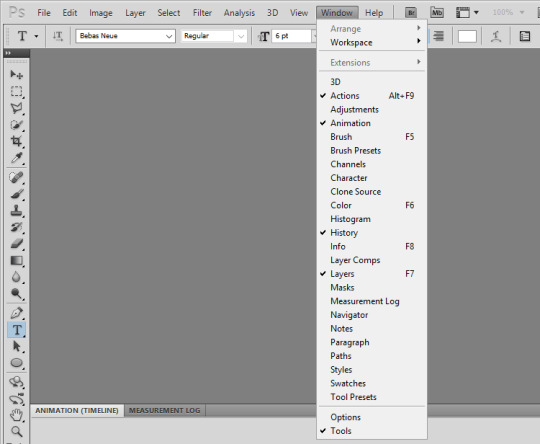
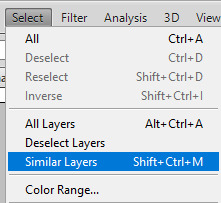
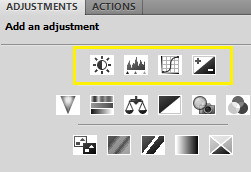
What you need is the layers window, the actions window, the adjustments window, the characters window, the animation window, the paragraph window, the history window... It... It sounds horrifying, I know, but cool your pits. It’s just this:
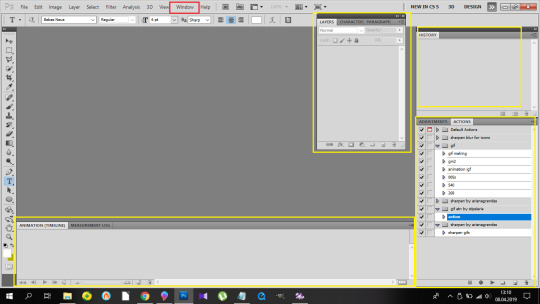
If you’re not laughing, take another Vicodin. Use this if those windows aren’t on display automatically:
And sort them. Now, I use my own keyboard shortcut for gifs. I suggest you do the same. Trust me, you don’t want to do this:
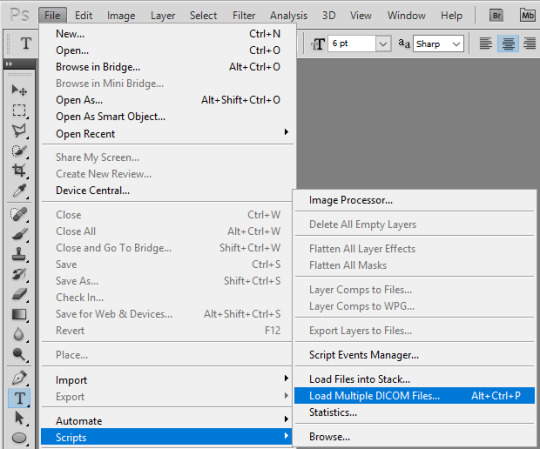
every time you make a gif. As you can see, I use alt+ctrl+p. You can set your shortcuts using the ‘Edit’ window at the bottom of which you’ll find the ‘Keyboard Shortcuts’ thingy. Then it’s a bit of digging but it all makes sense, ok? Ok. Yeah, no, it’s a lot of digging but I believe in you.
So you load them files, and this shows up:
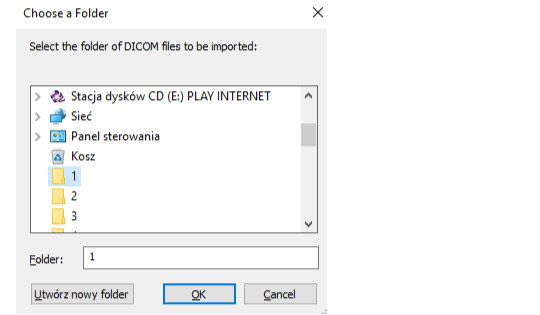
so choose your folder where your caps are, and click OK. Ta-dah:

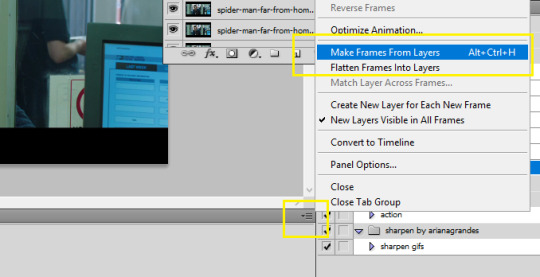
- This is the ‘make gif’ part. Click this:
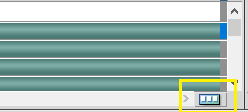
so you can get this

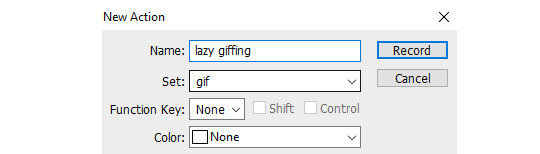
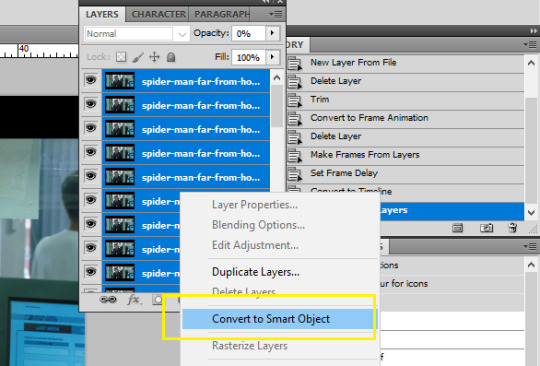
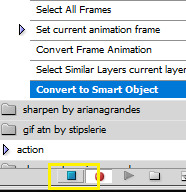
at the bottom. I have this whole process made into an action, and if you want it in an action too, at this point you should click this:
and choose ‘New Action’. Name it. Click record.
and now 1)
2) take Tylenol
2.1.)
3)

4)
5)
(you should be here now:)

6)
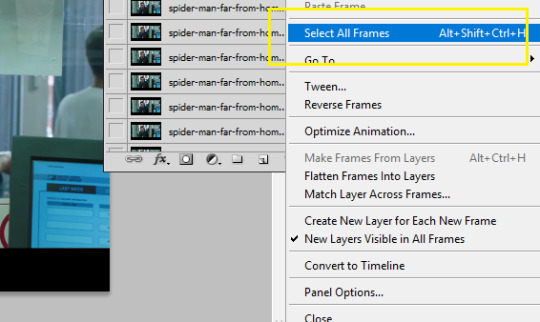
7) (right-click mouse)
8) stop the action recording here:
And this is how you should be looking right now:

Oops, not this. This:
Fine? Fine. Go smoke a cigarette.
You back? K.
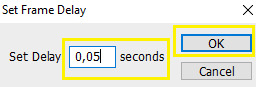
- Dimensions. Very important. Like, 10/10 important. Don’t cross the 3Mb size.
Fitting into the tungler dimensions means your gifs will be posted in the highest quality. This is a visual of those dimensions (depending on how many gifs per row):
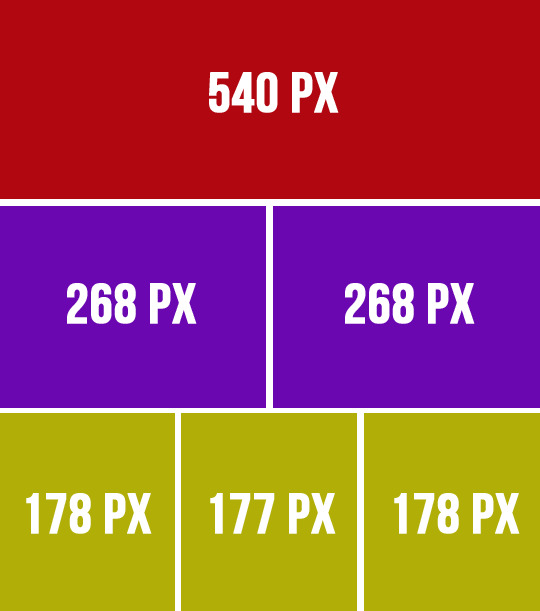
If you don’t do that, your gifs will look like blurred filmography of Zack Snyder’s.
I’m gonna make a 253px gif so it won’t stretch in that post. Gifs over I think 268px stretch on normal posts as in posts and look ugly.
So that brings us to the next steps.
- Cutting, resizing. Easy. Don’t panic.
choose that tool:
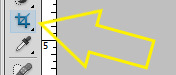
set your... this:
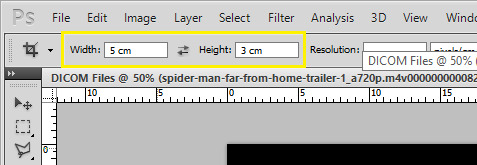
(make sure it’s ‘cm’, otherwise you’re screwed) and crop, baby, crop. I suggest the biggest area you can, of course without the black parts.
Also, depending on gifs, the dimensions can be different. For my 540px gifs I use 5x2 or 2x1 or 16x9. For my 268px gifs I use 11x7, 11x8, 5x3, 1x1. For the 177/8/7px ones, I usually use 3x5 or something. Just make it look nice. Not too thin, not too high.
Ok, so I’m cropping.
And now resizing. Crtl+alt+i.
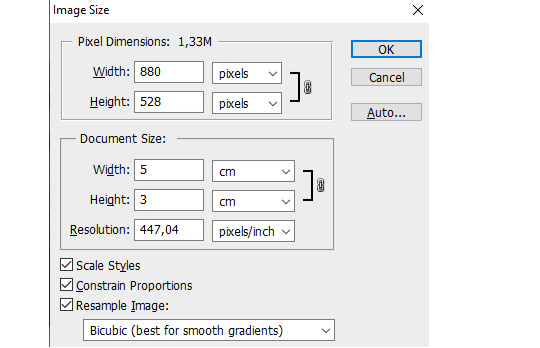
Make sure this thingy looks like that:

My width will be 253px, you make it 268, alright? Or something. Just don’t cross 540px. And put that beer away.
So I have this now:

Doesn’t look appealing, huh? Yeah.
Also click ctrl+’-’/’+’ to zoom in/out the gif.
- Sharpening.
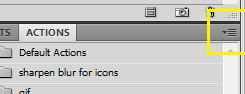
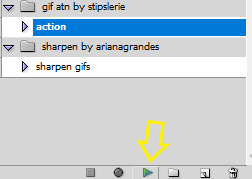
Some people use actions, some do their own thing, I use an action. I’m lazy. And I don’t look forward to just... You know. Clicking a lot. So I use this action. Download it, make sure you like or rb that post, and upload the action using this:
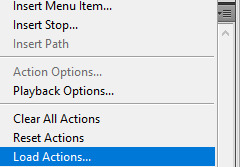
Find your action. Load. Choose it, click play.
So this is how the gif looks without:

and with the sharpening:

Magic, I know. Okay, you can have that beer. Or no, don’t mix alcohol with pills.
- Coloring.
This is the fun part. That’s where vodka comes in. The part with 390248 times you get frustrated and your laptop is in danger because it can never know when it will join the doves behind your window in a short fly. Anyhoo.
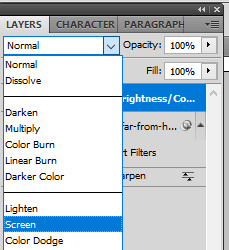
Start from brightness. This is one little trick I learned. You can use these options:
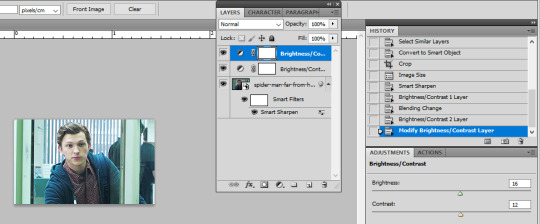
I start off with doing something else. I choose the first option, aka Brightness/Contrast, and when it appears on my layers window, I choose the ‘screen’ option.
So I’ve gone from this

to this

It’s clean. It’s cute. Brightens the whole gif.
Of course, you can do it traditionally and/or adjust the opacity of that ‘screen’ layer. I think I’m gonna brighten it just a tiny bit more and add some contrast.
Now cooolors. I’ll make a standard gif, nothing crazy. You can go crazy if you want to, just don’t make someone’s skin orange. It just... doesn’t look good, kay?
Kay.
Those are my options:
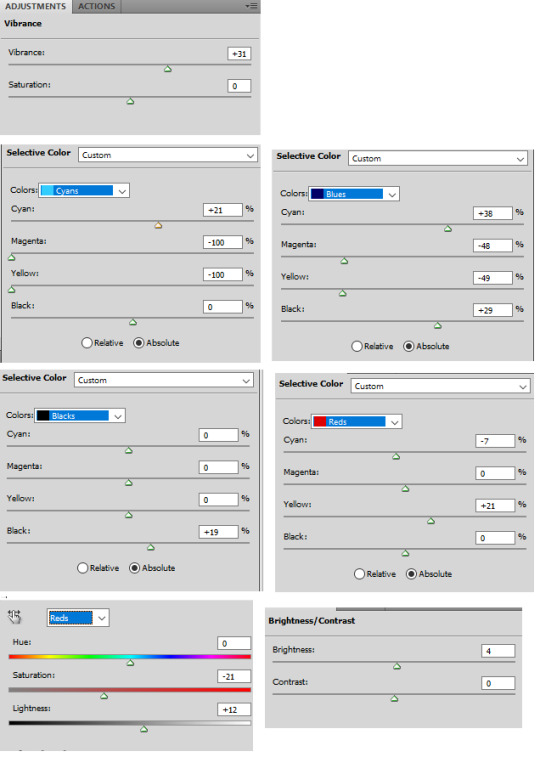
And this is the result:

Save your gif using this (once again you can see my shortcut)
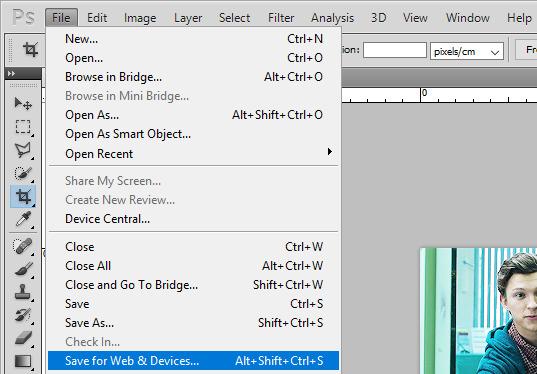
and your settings should look like this:
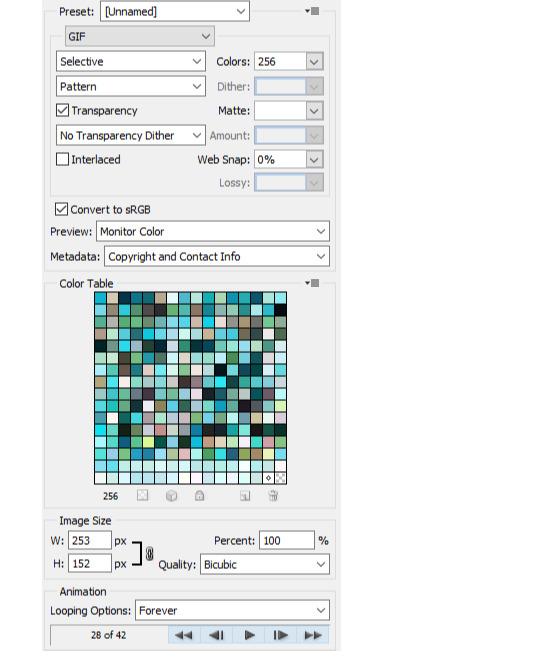
Click save, name the gif, save it wherever you want. And it’s done.
As a bonus we’ll go through...
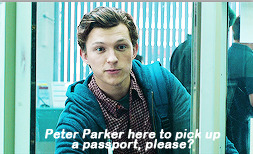
4. Text on gif.
I use Arial Rounded MT Bold. You can use Calibri, it’s the one I used to use.
Choose this:
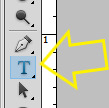
Click on the gif. Write your text. It looks like crap.
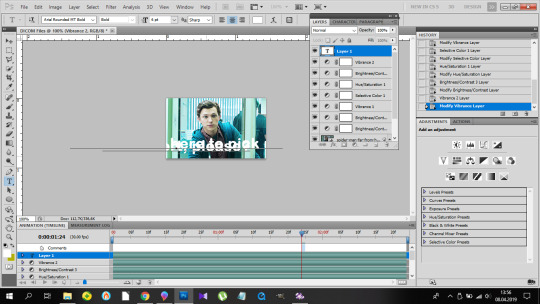
No worries. Choose the text (ctrl+a). Choose your character window. And manipulate until you get the result you’re happy with. Change the size of the font, the distance between letters and paragraphs (and choose the paragraph window to make the text centered).
My options:
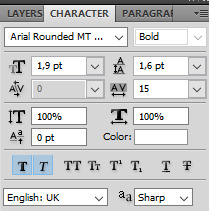
and result:
Doesn’t look nice, we want it nice and clean and all that jazz. So. Back to the layers window. Choose that text layer and find this button
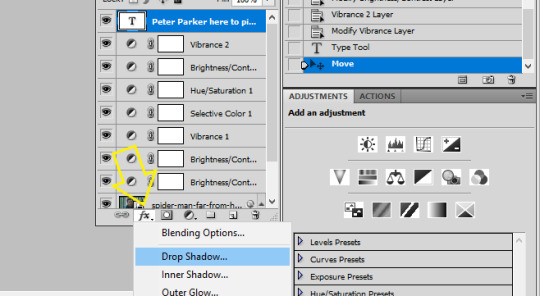
and choose drop shadow. When a window pops up, choose those settings (those are the ones I use:)
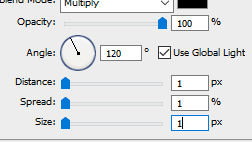
Then go to Stroke on your left and set it like this:
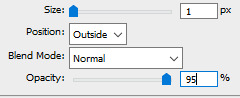
And click ok, and that’s the result:

Tips:
- create shortcuts. saves time, - make gif actions. saves time, - make sure you use the tumblr dimensions, - don’t do orange faces, ok? - when setting the text on your gif, you can do this little trick so it’s in the center:
x if my gif is 253x wide, the center is in 126,5, I make it 126px.
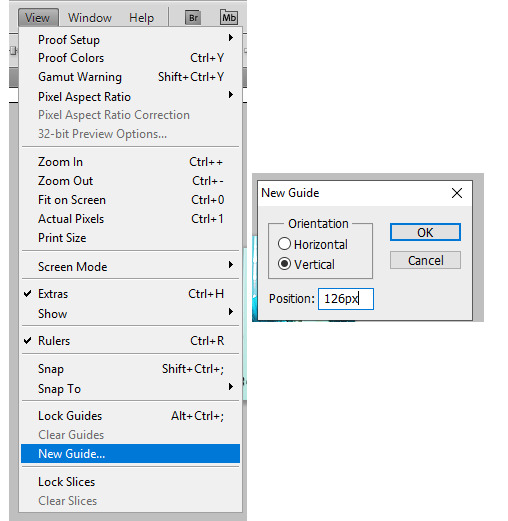
(make sure to write that ‘px’). click twice on your text layer, and this is the middle of that layer:
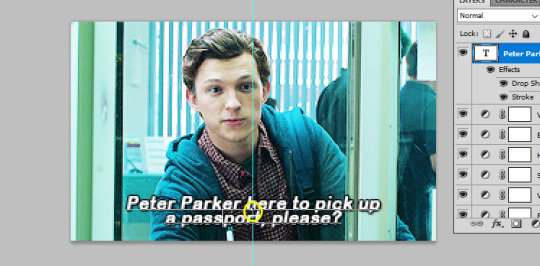
while moving that layer you should be able to see that tiny square and it’s the center of your text. Set it on the guide and you’re done. It’s centered.
- use these


to cut your gif. - play with the opacity and layer settings. for example, if you use color selection or saturation, you can set the layer’s option to ‘color’ and have it 70% opacity. - you can save the text layer only and reuse it by using ctrl+shit+s and saving it as psd

and then just open it again anytime with ctrl+o and duplicate it to the gif. - have fun with it. don’t throw your laptop out of your balcony, they’re expensive.
If you have any questions or want me to make a different tutorial on coloring or something, don’t be scared, I don’t bite (for real, I have braces, biting hurts).
I hope I helped and making gifs doesn’t look like magic to you anymore.
#completeresources#fyeahps#userlance#userjessie#biafrnc#userariella#photoshop help#ps help#making gifs#gif tutorial
391 notes
·
View notes
Text
Sims 4 Tray Importer Mac Issues & How To Solve Them (2019/2020)
For the longest time I not only wanted to sort out my CC because I have a hell lot of it, but I also wanted to upload my Sims & Lots/Rooms here. The problem however was, that I’ve always had issues with the Tray Importer Mod for MacBook & since there is no similar mod that can do such a thing, not even Sims 4 Studio, I couldn’t do what I desired without this lovely creation.
So, if you’re a Mac user like me with problems on how to get S4TI to work, I may be able to help you ...
So far I’ve had two different issues with S4TI that I’ve seen with other people as well & could fix:
The mod couldn’t locate/load my library and/or game folder path
The App itself was not launching/opening
Both of them are now solved for me & the app is woking perfectly fine (although I still am not able to use the “google this” option but whatever).
However, the first problem wasn’t my wrongdoing, but the app itself & so it wasn’t me who solved it but the developer himself with an update. After that, I was able to to download it again & everything was working.
Even so, I still read about Simblrs who encounter this issue so try a few things:
In the Forum, Deevo says: “Take a look at the debug window (S4TI > Debug). No lines should be blank and you should see the word "True" in three locations. If you happen to see the word "False", this is your issue. The application is having difficulty finding the location of an aspect of your game”
Other than that I recommend you read every comment in the forum post and/or reach out to him because he always answers peoples questions about S4TI! This is the installation guide: https://luniversims.com/forums/topic/5945-guide-sims-4-tray-importer-for-macos-sierra/ This is a comment section starting with issues in 2016 but if you jump to the last pages they’re from July 2019: https://luniversims.com/forums/topic/5918-tray-importer-for-mac/#comments
And lastly, if you understand French then read this thread: https://luniversims.com/forums/topic/8040-r%C3%A9solu-je-narrive-plus-%C3%A0-ouvrir-tray-importer/?tab=comments#comment-121090
This whole fiasco for me was a few months ago. A few months of not playing & keeping up with updates on anything.
Today, I came back to playing & updated my Tumblr to finally get to uploading Sims but I thought I should look for an update of S4TI. The latest version was from November so I got the newest Mono Framework version (6.6.0) & then newest Tray Importer version.
Then I got the message that the app could not be launched.
I again searched every corner of the comment section & found the following:
Usually, this is a problem of that typical bullshit security system of MacBook where you have to manually click “open anyways” because the downloaded file is from an unknown source & Mac won’t open it unless you tell it otherwise. However, for me the message I got wasn’t telling me that this was the issue, I even went into my settings/security settings & looked for “open anyways” but it wasn’t showing up so I thought everything was fine. If you have this as well, it’s because of the execution issue as explained here: https://luniversims.com/forums/topic/8040-r%C3%A9solu-je-narrive-plus-%C3%A0-ouvrir-tray-importer/?tab=comments#comment-121090
To put it simply: try to open the app with Terminal. If it doesn’t work, as it didn’t for me, do it manually: 1. Go to your Applications folder 2. right-click/ctrl-click Tray Importer & select “show contents” 3. Click Contents 4. Click MacOS 5. Click the .exe file or drag into the open Terminal app The app should now launch but fail & you should get the security message & the option to choose “open anyways” in the settings.
In conclusion, Sims 4 Tray Importer still works, even on Catalina!
If you still have any troubles please reach out to me & I’d be happy to try & help! I’ve had some more solvable issues with the app even without any game/mod developing knowledge.
This is how the app should look when working:
General menu

Conflict Finder

Preferences / settings

#ts4#sims 4 simblr#simblr#s4ti#tray importer#sims 4 tray importer#s4ti mac#sims 4 tray importer mac#help#tray importer help#tray importer mac#s4ti MacBook help#sims 4#s4 help#help with mods#help with cc
6 notes
·
View notes
Photo

hello everyone!! as a high school junior taking 4 aps, 3 other classes, preparing for the act, trying to do college research, stage managing a musical, and trying not to lose my mind, here are some fun n handy tips for not Dying when ur schedule is hell!
if you found this post helpful maybe give it a like/reblog and check out my other posts here!
01 | PLANNING AND PREPARING
so much of getting and staying organized has to do with organizing your time in advance. there are a million ways to do this--google calendar, a bullet journal, a planner, some post-it notes. my system involves three parts: a google calendar, a planner, and an online to-do list app.
google calendar: this is mostly for events. i can see when i have rehearsals, classes, doctor’s appointments, etc. this helps me see how much available time i have and budgeting it properly.
planner: i take this with me to school, and i use it to right down when i have assignments and tests. i use the ban.do planner, but these are a bit pricey, and really anything will do. just somewhere to put down tasks so you can keep track of them
getplan.co: this app is, honest to god, the only reason i am still alive and breathing. it plugs into your google calendar and then allows you to create and schedule tasks around events. @studycxlture has an amazing post about plan here that i def recommend checking out!
general tips about planning:
plan out the events of your month at least two days before it starts
set aside a night (i like sunday evenings) to set up a system for the upcoming week and go over what you have planned so you don’t forget anything
you are NOT gonna remember that assignment that teacher told you about. write it down.
you do not need a fancy system. it’s okay to try lots of different things until you find what works
never spend more time planning out tasks than completing them. unless you have that much free time, don’t dedicate two hours to making a lovely weekly bullet journal spread.
color codes!!! are a life saver. i have one with a color for each class (red for english, orange for spanish, yellow for history, green for science, blue for math, etc) as well as some for my extracurriculars (pink for the musical, teal for model un, etc).
always have ur planner open when ur working, so that you can make sure u r actually completing all the tasks u said u were gonna complete
02 | STAYING ORGANIZED
oh my god oh my god oh my god staying on top of your work is SO important when you’re busy. being able to find your worksheets and keep track of your homework and your million responsibilities is essential to being successful. to stay organized, i have an expandable file folder with tabs for each class. because i take most of my notes in notebooks instead of binders, this is a good way to keep all of my handouts, worksheets, and syllabi centralized.
also, make sure you have a way to keep your online materials organized. create a folder for each school year, and within that folder, create more folders for each class. from there, it’s up to you about how you’ll organize files. you can create even MORE folders (yeet) for things like homework, notes, study guides, etc, or folders for each unit you study. the possibilities are endless!!!! isn’t technology exciting
here r some pieces of advice for staying organized:
have a series of folders/binder/expandable file folder to hold your worksheets. or one for each class, though i prefer to keep all my papers in one a) to save money and b) to save space.
label your notebooks/binders so that you know which ones to bring home with you
never just shove something into your backpack. never. i’m gonna manifest into ur classroom and FIGHT you if u do that. it’s not good, it’ll end up getting lost or crushed under the weight of all ur textbooks, and you’ll end up panicking when u can’t find it
have ur planner on u at all times
keep a good filing system of ur stuff at home. u don’t need to carry around every single bio assignment you’ve gotten back, but by the time ur final rolls around ur gonna want 2 b able to look at all the materials you’ve gotten during the semester
that being said, throw stuff away when the year is over! i, for one, know i’m never gonna think about calculus after this class is done, so i will be recycling all of my papers (save the earth) and moving tf on
keep a recycling bin in your room! even if it’s just a paper bag, it’ll make throwing paper in the trash way less tempting (save the earth)
u don’t need a ton of pens. i’m being a giant hypocrite saying this but you really don’t need all that stuff. if you want it and you can manage it, great, but if it’s just another thing to keep track of, leave ur staedtlers and ur mujis and ur fineliners and ur calligraphy pens at home, and just take the essentials with u to school
03 | MAKING THE MOST OF UR TIME
in order to succeed, it’s v important to make every second count. this doesn’t mean studying 48 hours straight (pls don’t), but try not to waste time. whether this means you spend fifteen minutes napping, doing some reading for english, or having a quick snack, make sure u are being productive and healthy! i, for one, sometimes have 1-2 hour breaks between school and rehearsal, and i like to use these to walk to the grocery store by my school and get some food and then study in the deli.
some ideas for being productive!
carry a clipboard around everywhere. this way, u don’t need to spend as much time transitioning in and out of tasks, u can just put ur work onto the clipboard, and put it in ur backpack at the end of a break, and then the next chance u have to work on it, just take it back out. easy peasy
work during commutes! nOT if ur the one driving the car though that’s VERY dangerous and distracted driving = bad. but if ur on the bus, or ur mom is driving u to school, that might be a good time to go over some notes you took last night, or some reading you need to catch up on. nothing too insane, please don’t do ur chem labs on the public bus but. u know.
read over the notes you took that day on the ride home. this will help reinforce the information in ur brain, and it’s not super difficult. i go over my apush notes during the 40 minute drive home and sometimes talk about them w my mom, which gives me a much better grasp of the material
don’t waste time on social media. either delete instagram altogether, or log off/mute notifications before u start work. same with tumblr. don’t start scrolling obsessively if u have three tests to study for.
power naps!!!! napping for about 10-20 minutes, maybe on the way home or to practice/rehearsal/whatever u gotta do, can help u feel refreshed! anything longer will make u more tired tho, so be sure to get up when u say ur gonna get up.
study smarter: when ur going over material, u don’t need to handwrite 60 beautiful flashcards. use quizlet instead. don’t revise if it’s not gonna help u. prioritize which assignments r gonna be most impactful over the little ones u can easily make up
take good breaks!! breaks r VERY important and should be utilized properly. here r some good suggestions for things to do:
throw in a load of laundry
empty the dishwasher
stretch/do some jumping jacks
drink some water!
go for a walk
talk to a family member
get a snack!
read some fun novels n such
scream?
!! in case of emergency !! the following tips should only be employed when ur short on time. don’t use these just bc u can, this is just when it’s about getting close enough to grasping material, not actually grasping it
do every other math problem assigned, and either star the ones u didn’t do, or get the answers from the back of the book. this way, u get some practice but u also save time
sparknotes ur reading beforehand. this way, u can recognize what’s going on. it’s not v good for developing ur reading comprehension, but assignments will go by quicker
NEVER google translate ur language homework, but u can use word reference for helping u find the right word and proper conjugations
flagpole it: didn’t study enough for a test? are u guessing on like 10 of the questions? if it’s multiple choice, but the same answer for all the ones u have no clue about, unless that answer choice seems highly unlikely. then pick a different one. this way, ur statistically more likely to get some of the ones you guessed correct.
when u have an online assignment due at midnight and it’s 11:53 and u haven’t started, find another assignment you’ve already completed that has a similar document name. for example, “scarlet letter chapters 9-11″ instead of ur actual assignment “scarlet letter chapters 12-14″. submit the other one, and then when u finish the other assignment (either that night or the next morning) email ur teacher and apologize, say u accidentally submitted the wrong document
if ur parents will let u (if ur in high school) or u can let urself (if ur in uni), it’s okay to skip a day to catch up. just make sure u actually work, get the notes u missed, and talk to ur teachers/professors abt the material u missed.
04 | STAYING HEALTHY
ur health comes before any assignment, test, or extracurricular. i know lots of ppl r probably telling u that and it doesn’t seem like they mean it, but i mean it. no exam is worth sacrificing ur mental, physical, or emotional health for. yeet! so here r some things to keep in mind
eat! ur fuckin! breakfast! whether it’s a smoothie or oatmeal or a cup of orange juice or an apple or an elaborate french toast dish, u need some food in ur stomach so that u have the energy to start ur day
remember to take ur meds if u need to!
drink water! drink! water! have a glass when u wake up, and then at least one with every meal, and one before u go to bed. hydration is v important. if u can, invest in a water bottle and take it with u to class.
pack a lunch! and if ur staying later after school, pack snacks! tech week for me is always hell because i get to school at 7:30 am and don’t usually leave until 11 that night. it’s v important to stay nourished and hydrated so that u don’t get dizzy or faint.
remember! that u are beautiful, and ur body is beautiful, and it deserves 2 b loved! especially by u.
get 6 hours of sleep. aim for 8, but six at the very least. if ur done with ur work, go to bed early! don’t just stay up for no reason.
shower everyday, or every other day at least. give yourself those 15 minutes as a break from work or school or anything else that’s keeping you busy
write down ur thoughts in a journal?
talk to a friend if ur feeling sad, or just feeling things very intensely. share ur joy with other people! vent ur sadness and anger so u aren’t carrying it around everywhere.
make some time to have fun. see a movie w ur friends or ur bf/gf/datefriend or ur family over the weekend. go to a museum. hang out at the mall. sleepover at someone’s house. taking breaks is healthy.
make an effort to have dinner with ur family if u can (also if u like ur family. i know some ppl have bad relationships w them so skip this step if that’s u). it can be nice to reconnect w everyone, even when ur stressed or they’re annoying u, it can be nice.
remember that it’s okay to be imperfect! u don’t need to be good at a lot of things. i got a b for the first time last semester, i just got a c on an apush test, i failed my driver’s test again yesterday. but i also aced my math quiz, i celebrated six months of knowing my best friend, i walked my dog, i helped put a production together. it’s okay to have rough days and bad days and bleh days, as long as you keep pushing through them and working for the days to get better.
i love u!!! stay hydrated and nourished and get enough sleep. put on some lotion if u have it available. brush ur hair. if u ever wanna ask a question, my ask box is always open! <3
#heysareena#studybuzz#masterpost#studyblr#studyspo#studying#organization#notes#motivation#areistotle#hi xuanlin#academla#cmpsbls#gecmetrylook#hellosok#academlets#heyisa#studyplants#kimberlystudies#highschoolering#etudestial#saturdaystudying#hermionegoals#collegiateresource#mp#*
505 notes
·
View notes
Text
More from the #lowkey-grudges archives
From our friend Slack channel, where Ben has coined the terms #aragrudge and #ararage. A batch of these is always an interesting slice of life (this particular slice being primarily concerned with covid/toddlers/whatever the internet is doing wrong now)
Jun 4
Insomnia.
Jun 20
We just went out for a drive, and none of these dillholes are wearing masks.
Jun 25
i dropped my phone off our third story balcony today. it is… very destroyed.
Jul 3
Sneezing while wearing a mask.
Jul 8
It is very hard to find posts in one’s Tumblr feed if it was more than a day or two ago. Says she after spending an hour looking for one gif.
Jul 12
The thumbs-up thingy in iPhone messages. It comes in as a separate ping and I have to open the whole app just to get the notification to go away. Might as well text a picture of a thumbs up! Also it says “So and so likes your message,” so you can’t use it for “OK” which is what people actually mean when they send it. It is dumb and I hates it.
Also: The self-conscious/smug little smile of jerks not wearing masks when they should be.
Jul 18
F*ck potty training.
Jul 24
I never want to type bug. I always want to type big or but. And yet... bug, every time.
[Ben: You like big buts and you cannot lie!]
Feb 8
I’m so &$%#ing sick of online shopping, and dealing with online returns. I don’t think I’ve ordered a single thing since March that I haven’t had to return at least part of. I just ordered pillows, and it turns out they’re THREE FEET WIDE. How is that even a thing, let alone the default option.
Mar 3
Ok, Facebook is evil and destroying the world, sure, but also: Why is their UX so terrible?? And consistently getting worse? How are they so omnipresent when they’re basically unusable at this point?
Mar 4
Why is it never enough to sign up for a mailing list anymore (to get the 10% discount, etc)? Why do they also want you to give your phone number and agree to receive marketing texts? F*ck you, marketing idiots, I will never agree to that. And giving out your # is a security risk!!
March 16
POPUPS ON WEBSITES!!!!!!!!!
I mean, do none of the people who design websites ever actually use the internet??
Who’s like “y’know what people want? When they move their mouse over the navigation links, the whole header should pop out and obscure the entire screen and not disappear unless they hold the mouse perfectly still for 30 seconds”
or
“You know what people don’t want when they look at this page? The information on this page. What they actually want is a pop up so they can sign up for our newsletter, and another pop up telling them about a sale that’s happening, and also another pop up begging them not to leave whenever they move their mouse to a different tab!”
and
“HEY! REMEMBER HOW YOU PUT SOMETHING IN YOUR CART EARLIER? BUT DIDN'T BUY IT YET? THAT MEANS IT’S STILL IN YOUR CART! Don’t worry I’ll keep emailing you about it every day until you self-immolate.”
(I spent a lot of time on the internet today.)
0 notes
Text
Jeremy Renner’s app - why I left and everything wrong with it.
First, I want to start this post making it clear that I will be not exposing names or sending hate towards anyone. I’ll merely talk about the reasons that made me choose to leave the app over the weekend. I will get into the topic of buying stars/boosts but I will NOT condemn people for doing it, as it’s not my problem what anyone does with their own money.
I joined the app on the same day it was released and I subscribed to it ($2,99/month). I was never very active over there, I would simply like the posts, make a comment or two and just watch people interacting and getting a hang of how things worked. And I wasn’t pleased. I will be writing this in topics, to make ir easier to understand. Things that weren’t seen by me or are just rumors will be marked as such.
1. The app itself: What it is and how it works; 2. Thecnical Problems; 3. Starts and Boosting; 4. The super fan label; 5. Bullying; 6. The “Clique“; 7. Contests/Replies ; 8. Favoritism; 9. Reaction from other fans; 10. What I think it should be done.
The app itself: What it is and how it works.
The app was released around March, 2017. Here’s the description of the app at the app store (I’m not an android user, so I’m not sure if it’s the same over there):
Stay connected to Jeremy Renner on his official app.
Do fun things:
- Check out the in-app social feed for live updates and videos.
- Boost your comments with Superstars, become a Top 3 Fan, and be seen by Jeremy Renner.
- Join exciting contests for a chance to win amazing prizes like meeting Jeremy Renner, event tickets, and more…
- Watch cool videos.
- Follow Jeremy Renner on social media.
- Listen to the FREE built-in playlist and add more songs from your personal library, Spotify.
We’ve just launched subscription service! Subscribers will get the exclusive subscriber badge to decorate their avatars and help them be seen, as well as exclusive content just for them. The $2.99/month subscription fee will be charged through your iTunes account as an auto-renewable, recurring transaction unless you cancel your subscription before the end of the current subscription month. You can manage your subscription, cancel it, or turn off auto-renewal at any time by accessing your iTunes account.
Jeremy does post content there. Some pictures, a few videos here and there and he takes a little time to reply to fans when he can. As we all know, he is a very busy man so no one expects him to reply to a lot of comments all the time. We understand and respect that, so this isn’t an issue.
As you can read on the official description, there is a subscribe service. For $2,99 a month, you get access to everything in the app. Some posts are tagged for subscribers only (or “Super Fans” as the app calls us who pay the monthly fee). Sounds good to a certain point, so I joined and started to learn my around the app.
Thecnical Problems From day one, the app had a few issues. Of course we understand that it was recently launched so that is completely normal. I’ve had issues with the app crashing multiple times and the notification tab not working, but tumblr user @Sephirayne had a lot more problems as she stated on this post.
Another user had her account closed for no reason and when she got it back, her stars were gone. Ecapex’ Technical support worked on it and gave her stars back, but it took a little bit.
Hopefully, the notification tab will be improved and fans can have a better experience on the app. Since is still a relatively “new” thing, let’s give them time to work on all the problems and bugs.
Stars and Boosting
The app works with a system of “boosting” comments. To do that, you need “stars”. They can be earned by using the app or they can be bought (when you download the app you get a starter pack of 100 stars). Here are the packs and the prices (iOS version):

Now, like I said in the beggining, I am not against people buying stars. As Jeremy is very busy, boosting comments give fans a better chance to be seen by him and having their comments replied to. This topic is just to explain how this feature works.
Aside from boosting comments, you can boost yourself to get to the much wanted “Top Fan Section.” That means your profile picture will be featured under his post with a “#1 Fan” (or #2 or #3) as seen here:

Clicking on your profile picture will let you know how many starts you need to boost yourself up to that position. For example:

As previously stated, that gives you a chance to be seen by Jeremy, since your post would be on top. A lot of people only use the starts they gain within the app, others buy it and use it to boost themselves or other fans that have good comments.
The super fan label
This is where I started to get a bit uneasy. The app has a badge for people who pay for the monthy fee and they are described as “Super Fans.”
This is the badge:

Bullying
This are RUMORS I’ve heard. I wasn’t online when it happened and any clarification about this is welcome.
There were rumors that a fan was bullyied by the “clique” until she left the app. That same fan talked about this last night on instagram and deleted her fan account because she was extremely disappointed with Jeremy.
I can’t get in touch with her now since I only knew her fan account, but if she wants to come forward (as the person accused of the bullying) they’re welcome to share their thoughts.
The “Clique”
I will NOT be throwing names in this topic. I will call them “Person A”, “Person B” etc if I need to. This is not intend to send hate towards them or anyone, this is simply my view on things and again, I might be wrong.
There is a little “clique” in the app. A group of fans that can afford starts and are always on the top fans section. Nothing wrong with that, people can spend their money however they want, but they monopolize the top fan section and that doesn’t give other fans a chance.
Contests/Replies
I’m not sure how many of those we had, since I’m not willing to download the app again and go through every post. But the ones I remember are:
Video replies: Fans asked questions and Renner posted video replies daily during a month;
Signed photos: Fans answered a question and best answers got signed pictures. I believe there were 10 winners;
Set visit: Fans asnwered three questions for a couple weeks and Renner chose one to visit the Avengers set in Atlanta. Starts bought during this contest had the money from it redirected to Hurricane Harvey Relief (around 14 thousand dollars)
With that being said, let’s move on to the next topic: favoritism.
Favoritism
This came to mind after the results of the last contest on Sunday. Since the app began, I’ve been seeing a pattern being made where the same people were always in the top fan section, which made them get a lot of replies from Jeremy.
A few people of this group also got video replies, the signed pictures and one of them was the winner of the latest contest, the set visit in Atlanta. I will not criticize the money spent on stars on this because it went to a great cause, but the way the contest was handled really set some people off.
Answering questions for a chance to win, doesn’t work for everyone. Being busy as Jeremy is, he can’t possibly read through all the comments, which means that, as we all knew, said person won. Her comments were boosted a lot (which is nice, it generated more money for charity) but that’s making people think that there’s something else to it.
Did he get to read other comments that weren’t on the top section? Did we even had a chance in the first place? Probably not. Fans are hurt from seeing the same people benefiting on every contest/giveaway simply because they have more money. This is not a contest, it’s an auction and Jeremy should have made that clear from the beggining, because other fans have been pouring their hearts out for a chance to win when they never had a chance in the first place.
It’s hard not to think of favoritism when we keep seeing the same names and the same people over and over again. It fells like it’s Jeremy + his super fans and the rest of us are just the rest. And yes, it’s hurtful.
If he can’t give everyone a fair chance, he should think of a different system for these contests.
Reaction from other fans
After the winner of the set visit was announced, a lot of fans expressed how they felt. They were quickly buried by “let’s be positive” comments trying to shut them up and a fan was even banned from the app (I talked to her, if she wants her name here, she knows how to contact me).
People were accused from “stealing the winner’s spotlight” ou being “sore losers” simply because they pointed out that the whole thing wasn’t fair from the beggining. Some people (me included) weren’t surprised at all with the winner because, like I said, there’s a pattern.
I am NOT speaking for everyone (although I saw simmilar reactions) when I say that, as a fan, I am hurt. Deeply. I am hurt because I’ve been a fan for years, I run a big fan account and in that app it’s like I’m nothing because I can’t afford to buy his attention or a chance on those contests.
Fan accounts have been deleted, fans left the app and others say they will only stay there from the friends they’ve made, but that they were equally disappointed. Huge fans are being treated like they’re not worth as much as the other ones simply because they can’t spend as much money on the app. Does Jeremy have an idea of how much this affects people (negatively)? What about his staff? His PR?
He made two instagram posts after the contest announcement. One of them has multiple comments from unhappy fans and they’re all being ignored. There was an open letter I posted and that was shared by another fan account that it was ignored as well. It’s like we don’t have a voice.
What I think it should be done
I’m not asking Renner to change his mind about the contest. She won, let her enjoy it. What I’m asking is for him or his staff to say something about the unhappy fans, to show us that our voices have value and to tell us that the next contests will be fair. I want them to make it clear which is a contest and which is an auction, so fans don’t waste their time on something they won’t have a chance.
I need to be proved wrong when I say that, right now, it feels like money matters more than true fans. Our love CANNOT be measured by the amount of money we spend and people CANNOT feel less of a fan just because they don’t have as much money as the other ones.
Jeremy, BARTON UP.
Clint fucks up all the time, but he always admits what he did and tries to fix it. This is hurting your fans, the people who have been supporting you for years and have helped you get to where you are right now. This is hurting the people who will still be here when shit goes down. You used to call super fans there your “loyal fans”, but we are ALL loyal. We are ALL superfans. I hope you get to see what’s truly happening, because I think the main reason you’re not talking about is because you don’t know.
This app is dividing people instead of creating a community. Everything seems bright and shiny because people ignore what happens out of what? Fear he’ll be mad? This only leads to Renner not knowing what’s truly happening.
This needs to change. He has other social media to interact with fans, the app is NOT the only way. Things need to be fair to EVERY ONE, or people will keep leaving.
#BartonUp #LoyaltyToAll
(The ask box is open to anyone who wants to share their thoughts on this. I will NOT be posting submissions that attack other fans or Jeremy himself. Please, be respectful.)
#jeremy renner#jeremyrennerapp#jeremyrennerfans#jeremyrennersuperfans#bartonup#loyaltytoall#clint barton#hawkeye#avengers#fan#marvel#wind river#cory lambert#william brandt#mission impossible#arrival#ian donnelly#bourne legacy#aaron croos#kill the messenger#gary webb#american hustle#the hurtlocker#sergeant william james#swat#brian gamble#neo ned#12 and holding#gus maitland#the unusuals
74 notes
·
View notes
Photo

my favourite productivity apps!
I don’t pretend to be an expert on productivity because I can definitely procrastinate heaps, but here’s a little list (my first masterpost!) of productivity apps that have helped me just because I have to for today’s March study challenge prompt because I want to share with you guys the things that I’ve found to be useful. So here goes:
Pomodoro (Free): There’s lots of hype around the Pomodoro technique, but I genuinely find it really helpful for maintaining productivity. The technique breaks your study up into 30-minute time periods called “Pomodoros”, with 25 minutes of work and then a 5 minute break; after 4 Pomodoros, you can take a longer break (I usually go for 10-15 minutes). Breaks have actually been proven to be really effective when studying, and it’s a lot better to take frequent short breaks rather than a long break every couple hours. Pomodoro timers can be found online, available for download on desktop or even on your phone. Some of the better quality ones are paid apps, but you only need to fork out a couple of dollars, and my personal favourite is the simplest one - this online website here.
Forest ($2.99): This iPhone/Android app is super cute and gives you a sense of responsibility while studying by allowing you to plant trees during every study period, as long as you don’t touch your phone. However, it also uses your guilty conscience to its advantage by killing the tree every time you pick up your phone before the study period is finished. If you can work hard, you’re rewarded with a beautiful forest of trees that you’ve grown yourself (makes me feel so good when I’ve seen how much I’ve done visually!) and the app also provides some great statistics about your study sessions. The fact that this is a paid app may put you off, but just skip your coffee for a day and you’ve got productivity to last you a lifetime. The link to the iPhone app is here.
Lanes (Free): This is a free online website, but it also comes as a Chrome extension, opening up every time you click “new tab” - which is great if you’re lazy (like me) and can’t be bothered typing in the URL, although it is worth noting that the URL is like 8 characters long (lanes.io). This app is gorgeous and comes with a visual clock (three minimalist circles to represent hours, minutes and seconds) as well as a to-do list and calendar. There are a lot more benefits if you get a paid membership (which isn’t a one-off payment unfortunately) but I find that the clock and the to-do list are just enough for me.
Momentum (Free): A studyblr cult favourite, Momentum is another Chrome extension that has a clock and a to-do list, but is great if triple-circle clocks aren’t really your thing and you prefer your clocks to show the time digitally in tightly kerned Helvetica. The extension manages to feel super personal thanks to the fact that it wishes you a good morning/afternoon/evening/night (depending on the time of day obviously) once you’ve inputted your name, and also gives you daily motivational quotes and a background that changes everyday. Best of all, you can write in your focus for the day and it has a handy to-do list in the corner. If you upgrade to the paid membership, you are able to choose your own background and font and a couple other little features, but like with Lanes, I find that the free version suffices. Download it here.
Cold Turkey (Free): Sometimes I really need to quit websites cold-turkey (like Facebook... or Tumblr!) and this app for your computer is great for that. While many apps employ the guilt-trip tactic, this one just bans the websites you might be tempted by, utilising timed blocks where you need to work and then unblocking all the websites when you’re ready for your break. This works great hand-in-hand with Pomodoro! The free version blocks websites only, but for me that’s the only thing I need as my computer doesn’t really have any applications to distract me. Download it here.
Noisli (Free): This is another website-turned-Chrome-extension (try the site here), but unlike the others, it provides white noise and other peaceful sounds to help you get in the right headspace for studying or winding down - you can literally pick between productivity or relaxation. This is useful for me as I find it difficult to study in silence but sometimes music doesn’t cut it for me, especially songs with lyrics that distract me when I really need to be productive. You can switch between different sounds like rain or fire crackles, or play both together and even adjust the sound level so that you can hear one louder than the other. It’s also available on mobile but costs $2.99 - again, this isn’t too much money, but some similar free mobile apps I’ve tried and enjoyed are Deep Calm and Relaxia.
Tide (Free): I love this app because it combines both the Pomodoro technique and the relaxing sounds - and best of all, it’s free! I don’t need to say much more as I’ve explained both the Pomodoro technique and the relaxing sounds, but it has everything ready to go for you and you can start studying at the press of a button - the 25-minute work session starts, accompanied by the sounds of the sea or just plain white noise, whatever you choose. It also has statistics so you can see how long you’ve been studying for every day! Download it here.
Smiling Mind (Free): This isn’t your typical productivity app, but it’s helped me in times of anxiety, therefore increasing my productivity, so I’m chucking it on this list as a bonus. This is a fantastic app that uses the technique of mindfulness to help you stay grounded whenever you’re feeling stressed or anxious, and has a variety of meditation sessions preparing you for all sorts of things from study to stress to sleep, categorised depending on age so that they are tailored to you, and with lengths ranging from 3-45 minutes depending on what you need. An alternative app is Headspace, which I’ve never used but seems to be just as good - I think the only downside is that there are only 10 meditation sessions you can download for free before you have to start buying them, whereas on Smiling Mind they are all available for free. Download it here.
#ness hits the books#masterpost#study#studyblr#marchstudychallenge#productivity#studylustre#obsidianstudy#studyquill#studyplants#studypetals#einstetic#heyreese#biolcgy#universi-tea
72 notes
·
View notes
Text
The Mail Order American Dream Part II: The Hunt is On! An Extremely In-Depth Guide to Finding That House
Hello Friends! I’ve gotten a number of amazing emails about last week’s post on kit houses, and have decided (after many requests) to write a more in-depth guide to picking out mail order houses in the wild, using a few examples from my own hunt in Greensboro, North Carolina.
THIS IS A LONG ARTICLE. NOW IS THE TIME TO OPEN IN A NEW TAB OR OUTSIDE THE TUMBLR APP.
Preparing for Battle: Gathering Online and Print Resources
Like most obscure things in the world, there are several online communities for kit houses and their identification, and these communities have been very active in putting resources such as old catalogs online.
Here is a brief list of really helpful resources to get you started:
Online
1.) Comprehensive list of mail order home catalogs available online.
2.) Plans from AntiqueHomeStyle.com and AntiqueHome.org (these include some regional companies like Southern Pine Co. as well as materials on interiors and pattern book houses.
3.) The Daily Bungalow on Flickr - a valuable resource for supplemental material. Most (but not all) of the catalogs on this page are listed chronologically in Source 1.
4.) Complete Index of Aladdin Home Catalogs - every Aladdin catalog printed is available here. Totally worth a tab of its own.
5.) Sears’ Master List of Confirmed Sears Houses
Books
1.) Houses By Mail: A Guide to Houses from Sears, Roebuck & Co.
If your interest in mail order houses is more than a passing fancy, I recommend picking this book up, as it’s a handy and comprehensive guide organized by roof shape.
If you don’t feel like purchasing the book, Dale Hynes has put together Pinterest boards organizing the Sears houses in the same way as the book, and has an extra collection of houses not included in the guide.
2.) Houses from Books: Treatises, Pattern Books, and Catalogs in American Architecture, 1738-1950 by Daniel D. Reiff
If you’re serious about getting into the kit house game, this book is for you. It has great historical facts, and most importantly, examples of kit houses from the catalogs and how they’re built in real life. I recommend ordering this book directly from Penn State Press rather than Amazon, as it’ll save you $30 and the shipping is pretty rapid. My book came a mere two days after I ordered it.
Step 1: So You Think You’re Looking at a Kit House - Preliminary Signs
Location
If you remember from last week, kit homes are commonly found in 3 places:
1.) First Generation Suburbs (streetcar and railway)
For the purpose of this article, I’m going to use the neighborhood of College Hill, an early streetcar suburb of Greensboro. College Hill is outlined in red and is the bottom right with an arrow pointing at it saying ‘oldest suburbs’.

2.) Near industrial sites (as company housing)

3.) First Generation Auto Suburbs

BUT this is not always the case! Some kit houses were built as farmhouses on the outskirts of cities or in rural areas. It’s a case by case basis, which is why identifying kit houses is so fun!
Architectural Style
Last week, we went over styles that were common for kit houses, and if there are many houses of these styles grouped together, you might be looking at a kit house community!
You might also be looking at a pattern-book house community, which is more difficult to discern, because the execution of pattern book houses was left to the individual contractors and carpenters, and each local carpenter had their own style and flourishes.
Queen-Anne style houses, for example are more likely to be pattern book houses than kit houses because the height of their popularity was right before the beginning of mail order houses, though certain models ran as late as the 1930s, as we shall see.
Repetition
You might think you’re looking at a kit house neighborhood because you are looking at many houses that appear to be duplicates of each other. Houses that are identical or nearly identical to each other may be the most incriminating sign that you are looking at a kit house community, though pattern books may again be at fault.
Step 2: Pinpointing the House on a Map
1.) The Address
You cannot, I repeat, cannot identify whether or not a house was a kit house unless you have the address. If you are leaving the area where the house was found, write down the street name before you go, and fill out the details later via Google Maps.
For example, I’m going to use the example of 304 Tate Street, a house seen below.

2.) Getting photos at multiple angles
A good idea when looking to identify a house is to get multiple pictures: one from the front, and at least one from the side. This picture suffices because it is at an oblique angle, and details such as window layout can be seen clearly. The more complex a house is, the more angles you should try and capture.
(A good idea is to take screenshots in Google Street View.)
Step 3: Finding Your County’s Public Records
Unfortunately, most counties’ public records websites are difficult to locate, as they are usually pushed way down in search results by for-profit services. Here are some tricks for finding your county’s public records site without having to scour through several unhelpful and poorly-designed government websites.
1. Google the house’s address. If you see a result from Zillow or another real estate aggregator, click on it.
(I recommend Zillow because their layout is a little more detailed.)
Important: check Zillow to see if the house is currently a rental. This is important later on. In this case, it is a rental.
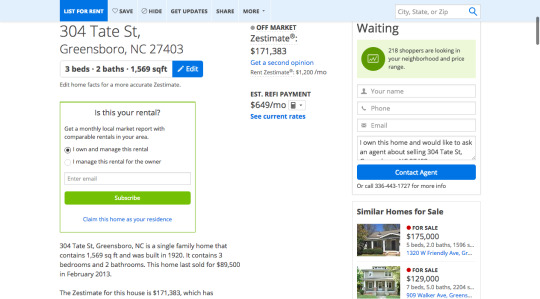
2. Scroll down until you see a little link saying “county website” or something similar. Click on this link.
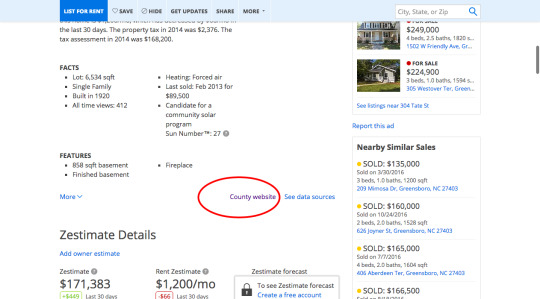
3. A really ugly website will come up looking something like this. You will often see a row of links for different statistics. Click on one that says “Buildings”, “structures” or something similar.
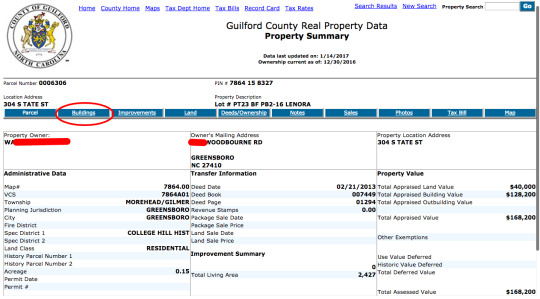
4. Congrats! You’ve found a page just about your house! The best part is, you can find other records much more easily now. Somewhere at the top of your page, you will see something like “New Search.”

Open this link in a new tab, and keep it handy for quickly searching for different addresses. It should look something like this:

Bookmark this page for easy access if you’re searching for more than one kit house.
Step 4: Interpreting Your House’s Public Records
Go back to your house’s Building’s page.
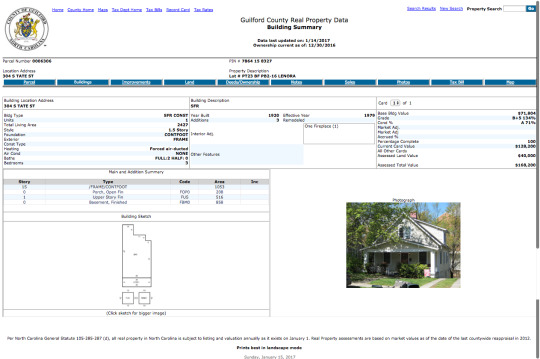
We’re going to go over this page step by step in order to use this resource to the highest of its abilities.
A.) The Year Built
RULE NUMBER 1: HOUSES BUILT BEFORE 1908 ARE NOT MAIL-ORDER HOUSES. They are probably pattern book houses.
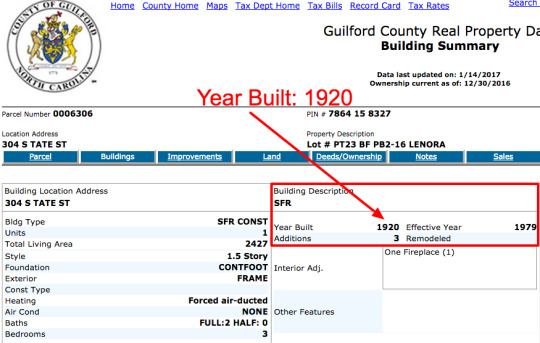
This is literally the most important piece of information in identifying kit houses. Without a date, it’s game over, as architectural styles last a lot longer than individual kit house models. You may be thinking you’re looking at your house, but if you don’t know the date, you could be 10 or 20 years off.
B.) Remodeling and Additions
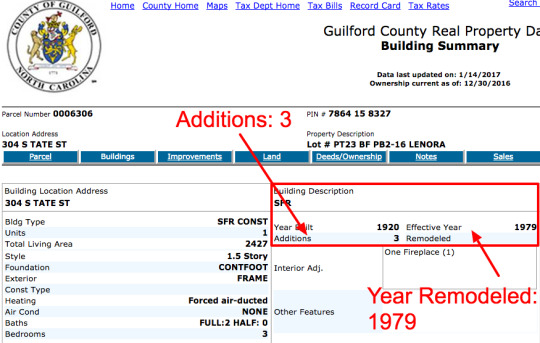
You know what this means: you’re looking at a house that’s not gonna look exactly like it does in the catalog. This is important. A lot of people get caught up in the idea that the kit house should match the catalog perfectly, when this is almost never the case. In this case, the house has 3 additions. Fortunately, additions are often in the back of the house, so the front facade should remain relatively unchanged.
We can reveal a lot from the fact that the renovations were done in 1979. This can mean a number of things:
Many of the renovations were probably upgrades such as central air and heating
Additions dating from an earlier time period (10-20 years after the house was built) are much more dangerous, because these were often aesthetic upgrades made so the house fit in more with the styles of the time. Additions from the 70s and after were most likely mechanical or safety improvements.
If the house is for rent, many of the adjustments may have been for the purpose of subdividing a house into apartments. In this case, the remodeling is interior. Common changes made by landlords when they turn a single family home into a multi-family dwelling include:
Removing fireplaces. In the screenshot, you’ll see a bit that says “Interior Adj.”: One Fireplace (1). This more often refers to removing or sealing off a fireplace than adding one, especially if the place is being rented out to college students.
Adding onto the back of the bottom story of a house. This is common because it’s the easiest way to create more space for less money.
Enclosing all or part of a front or rear porch. Again, this is an easy way to add livable/rentable square-footage.
C. Main and Addition Summary
Scroll down to the bottom of the page, and you should see a bit that looks like this. This is also a very helpful tidbit that will help in your identification:

This image lists the main structure along with all of the additions and their square footage, and their codes.
Here is how to read this image:
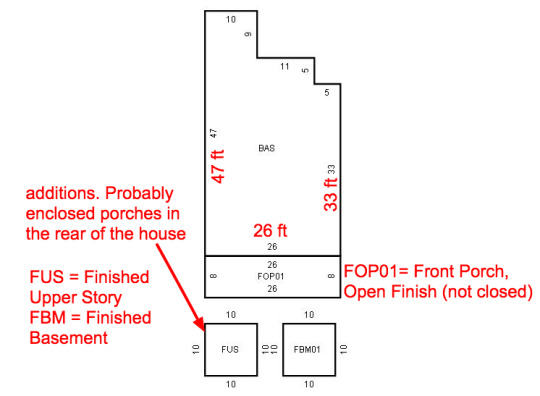
Basically, those little squares represent parcels of square-footage not found in the original blueprints, which helps a lot when looking at the plans in the house catalogs. The original dimensions of the house was 26 feet x 33 feet, as can be gleamed by the table and simple math.
D. Other Info (not as helpful)
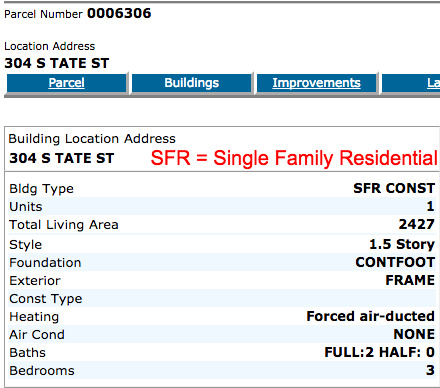
These represent the current stats of the house, and not necessarily the original house plans, so they’re not as useful as the other data available.
Step 5: Finding Your House - Catalog Time!
Okay, here’s the fun part, especially if you like millions of tabs. A good start is opening each of the online sources listed at the beginning of the article, in a new tab. Especially this one.
For SEARS HOUSES:
Have your copy of Houses By Mail or Dale’s Pinterest Page open to make quick work of the Sears catalog houses, which could otherwise take forever. These resources sort the houses by their shape, making comparison easy.
Each house has the catalog dates and model numbers, making elimination a breeze.
A.) For each non-Sears source, open the catalogs corresponding to the date your house was built in new tabs.
For example, my house was built in 1920. I would open each catalog from 1920 in a new tab. If you can’t find a specific catalog for your house year, (e.g. there’s no Montgomery Ward catalog for 1920), a good idea is to use the catalog from 1 or 2 years before the given date.
BUT KATE - Which companies should I include in my Search???? There are so Many! I would start with those whose business extended coast to coast. If you live on the West Coast, there are several resources for West Coast homes from AntiqueHomeStyle.com and AntiqueHome.org. For now, ignore pattern books.
Here are companies who should be included in your table:
Sears
Aladdin
Harris
Wardway (Montgomery Ward)
Lewis
Gordon Van Tine
Sterling
Bennett
Bolded ones are the most common.
B.) Make a Table for easy elimination
A good strategy for quick and easy elimination is to make a table with the following values as columns:
House Year Address Style (e.g. 1 story craftsman; foursquare) (n number of columns for names of companies, so one column for Sears, one for Aladdin, one for Harris, etc.) Once a catalog is exhausted, if the plan was found, write the name in this columns; if not, x it out. Notes
C.) If you have multiple models that look similar (we’ll get to this in a second.)
Either open similar images in new tabs and flip through them, or copy and paste the images (taking screenshots is your friends) into a document along with the pictures of the original house. For example:

Step 6: Confirming Your Identification
Sometimes, it’s really easy to find the house you’re looking for. In the case of 304 Tate Street, a rather unusual house, I found it staring back at me from the pages of a Bennett Homes catalog, virtually untouched.


As we can see, there are some things that are slightly off, such as the windows on the side. The spacing between them is accurate once you take into account the different angles of the pictures. The dimensions match those from the chart earlier, ignoring the additions.
Things that are different: the house on Tate Street was built into a hill, which explains the different foundation. The columns are slightly different, but the placement is correct. The Tate Street house omitted the exposed rafters, a stylistic - not structural - decision.
A.) The Importance of Plans
Here’s an example that isn’t so easy but also isn’t impossible.


Spoilers, it’s this house:
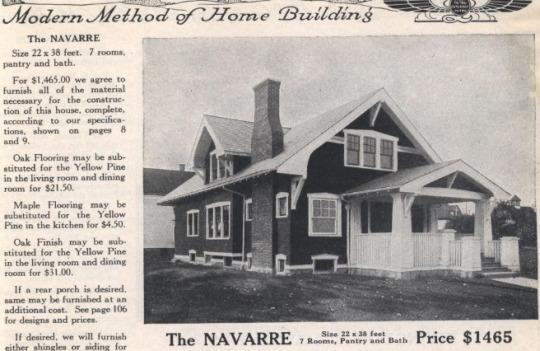
You’re probably saying, “no it’s not, idiot.” It’s true,
This is the difficulty of identifying a kit house that has been heavily modified from the original.
First of all, the plan is mirrored from the original, a common switch at the time of construction. Many catalogs provided mirrored versions of their plans. (Hence why the chimney is on the opposite side.)
The distinctiveness of elements such as the closed eaves and the overall layout of the house (with additions) compared to the plan, makes a confirmed spotting of this mail order house from Lewis Manufacturing, Co, built in 1920.


The entirety of the porch has been closed in and another room has been added to the front of the house.
During reroofing, the roofer chose not include the bit of roof that splits the first and second story of the cross-gable, leaving an indentation on both sides where that strip of roof used to be.
All of the windows have been replaced, leaving no originals. This happens frequently, as windows with the dimensions of the originals became rare, or too expensive to have custom built. The result is remodeling the house around more standard contemporary window shapes. This is how windows with three mullions get split into two, as can be seen on the side of the house.
B.) The Importance of Dates
Here’s another example. This one is recreated from page 276 of Daniel Reiff’s book Houses from Books. The heavily-modified house, a confirmed Sears Modern Home No. 170, built in 1915, is seen here with the original catalog drawing.

The point is, a remodeled kit house can look nothing like the original.
What makes it even more difficult is when the renovations do not change to the square footage or the mechanical systems of a home, leaving them unreported by public records. Often, small changes made to update the exterior of a home to a more popular style (often from newer house catalogs!) are difficult to trace.
Here are a list of things that are the most likely to be different from the catalog picture and the plans:
Building materials and colors.
Front porch layout (e.g. number of columns and their spacing/style)
Window size and style. Most kit house windows are almost never original.
Number of windows and window layout (such as omitting a middle window, or adding sidelights.)
Removal of small windows.
Enclosed porches
Removal of fireplaces (not necessarily chimney)
Chimney that is originally internal is moved to an exterior wall, which was less expensive to build back in the day.
Architectural details. Craftsman columns can now be Tuscan. Exposed rafters can be enclosed.
Plan is mirrored or partially mirrored.
Balconies removed/enclosed.
Carport or port cochere added
Here’s a list of things least likely to be different from the catalog picture and plans:
Removal of dormers
Removal of chimney
Total removal of porches
large changes in rooflines/roof structure
Chances are, if the side windows of the house look totally different from the original drawing, it’s more likely that you have the wrong identification. This is especially the case with Craftsman bungalows.
I leave you with one final example recreated from Reiff (p. 286). This house, built in 1909-10 was remodeled in 1929 to look like the Aladdin Standard.

This is why dates are SO IMPORTANT. House plans cannot travel back in time. If the plan dates after the house was built, the house is not built from that plan.
Well folks, there you have it.
I hope this has helped y’all with your kit house identification, as much as it has helped me streamline my own search.
Stay tuned for Thursday’s house roast FROM ALASKA. Yes, there are McMansions in Alaska. Next very special surprise McMansion Hell post that many of y’all have been asking for for months now.
If you like this post, and want to see more like it (plus get sweet access to behind the scenes stuff), consider supporting me on Patreon! Not into recurring donations? Check out the McMansion Hell Store - 30% goes to charity.
Copyright Disclaimer: unless otherwise, pictures are from the Public Domain.
#architecture#history#kit houses#sears houses#sears modern homes#wardway houses#gordon van tine#mail order houses#houses#1920s houses#victorian houses#house plans
465 notes
·
View notes
Link
TABLEAU
AUSTIN SEO
SERVICES
ABOUT
BLOG
CONTACT
Tableau Consulting
Business Intelligence Consulting
Austin Web Developers
Austin SEO Experts
Clients
Networking
GoPro Testimony
TABLEAUHELP
BUSINESS
DATABASEHELP
WEBSITEHELP
TABLEAU SERVER
TABLEAU DESKTOP
What does a Tableau Consultant do?
Tableau Pricing – The Pricing Offers Everyone Access!
Tableau Logo – Finding the correct Tableau Logo With Ease.
Upgrade Tableau Server, Restore Tableau Server, and Advice.
Tableau Server Automated Dashboard Image or Images
Download Tableau Desktop
Install tableau desktop
6 Easy Steps – Making a Sparkline Chart Tableau Desktop
Optimize Images in Desktop
Copy and Paste Latitude and Longitude in Tableau Desktop
Center buttons in WordPress Visual Composer
Split url to columns with Google Sheets
Learning how to use Google to help start your business!
4 Steps – How to Embed Google Data Studio in iFrame
How to Install WordPress Theme
Split url to columns
Bulk Automate URL Coordinates
MYSQL
MONGODB
Install My SQL Mac – The Guide on How To Install Mysql on Mac
Learn how to Start MySQL on Mac OSX
How to Create a Schema in your MySQL Workbench on Mac OS
A Quick Tutorial – Resetting MySQL Root Password on Mac OS
MongoDB Atlas — Finding the simple in the complex. 1 of X.
MongoDB Atlas — Signup to MongoDB Atlas. 2 of X
MongoDB Atlas — 3 of X. Setup your MongoDB Atlas — Build Your New Cluster.
MongoDB Atlas —Connect an IP, Make it Public, Delete Access — 4 of X.
MongoDB Atlas —Install MongoDB Compass— 5 of X.
MongoDB Atlas — Setting up MongoDB Compass Community — 6 of x.
How to add Google analytics to WordPress Site
What Website Builder Offers a Free Subdomain?
Learn How to Host a Website on Site Ground, Today!
Site Building – What’s Easy to Build Websites?
Free Website Migration
Pick where to buy domain names
Pick a website platform
Pick a domain name
Learn How to Setup Google Analytics Account to Increase Revenue
Dev3lop’s quick centering button demo – Centered button VS Non-centered button!
How to Set Up a Free Chatroom on Your Website.
MongoDB Atlas —Connect an IP, Make it Public, Delete Access — 4 of X.
Home
Business
MongoDB Atlas —Connect an IP, Make it Public, Delete Access — 4 of X.
MongoDB Atlas —Connect an IP, Make it Public, Delete Access — 4 of X.JANUARY 10, 2018|IN
BUSINESS
,
DATABASEHELP
,
MONGODB
,
SOLUTIONS
|BY
TYLER GARRETT
MongoDB at… last… Just kidding. We are not there yet. Soon we should have this up and running in TableauDesktop. We hope. Connecting an IP to MongoDB is our next step.
BTW Bro: Don’t get blown away that you will need to install drivers to connect to MongoDB. I figured I would tell you now that it’s standard practice to download and install drivers to connect to… practically every database under the sun, son.
This demo has two different directions, depending on what you want to do! Are you going to let anyone access your Cluster? Or are you going to just allow one or two IPs to connect to your instance?
Not sure how to get your IP address?
BroTip: Ask your client to use, www.ipchicken.com, it should work. Get that IP, plug it in, and follow these steps!
Is your MongoDB Atlas public facing or not public facing? MongoDB Atlas has a bunch of popups, not exactly user-friendly, and we will just focus on one for this tutorial.
TLDR: You, as a person, only need to focus on one thing at a time to accomplish most things in technology. Today, we will pick the IP Whitelist or Allow all options. Also, in case you’re messing around or accidentally make some clicks — I show how to delete access too. You really can’t go wrong at this point — it’s okay to play around with this software to understand what is happening. You don’t have any proprietary data uploaded at this point, you’re safe to make a mistake and at the end — I’m showing you how to get rid of the mistakes.
See this on the top? It’s talking about your access and connecting your app.
Chances are, you’re not connecting an app because you’re following along to my droning on about this like a super-cool-dude.
Okay, perfect, excellent. Ready to begin?
Giving access to your MongoDB Atlas Clusters.
Giving access is quick and easy, the user experience is a little wonky, but follow along and get through this. It’s the most important step when seeking to generate a cloud data source. Access to your MongoDB Atlas Cluster is necessary to offer end users a reporting data hub.
Go ahead and click show me how, and dive into the next menu. If you lost the popup, you’re clicking too much. Click Connect on the overview tab. And stop clicking so much ;). Mr/Mrs.FastClickerMcClickySon.
Allow access from anywhere on MongoDB?
Are you eager to make this a public data source? Yes or No?
Follow along, depending on your choices, and don’t make your company data public facing.
If you want it public facing, click ALLOW ACCESS FROM ANYWHERE.
Allow access anywhere looks funky after you select this button, it seems as if it’s not going to take. So from me to you. It takes. And they confirm this to you VIA email. For Gmail.com users, check your UPDATE tab.
After you submit it. It looks like 0.0.0.0/0 whatever, you get an email, and that’s all you need to get it public facing. Easy enough, right? You haven’t done any programming and you’ve generated a 3 node cluster.
If you don’t want MongoDB Atlas public facing…
Whitelist — MongoDB Atlas only allows client connections to the cluster from entries in the project’s whitelist. To connect, you must add an entry to the whitelist. To set up the whitelist for the project, see Add Entries to the Whitelist.
To add to the whitelist, click CONNECT, this is also the option to add your personal IP or Allow Access from Anywhere.
If you didn’t mean to add your IP or accidentally did your Allow Access from Anywhere button, you can erase it pretty quickly. Regrettably, you can’t find that from the ‘connect’ button above.
Deleting IP’s or Allow Access from Anywhere from MongoDB Atlas.
You’re probably on the Overview tab. To remove your IP, someone else’s IP, or remove the Allow Access 0.0.0.0 thingy… You need to follow along.
Click Security.
Click IP Whitelist.
Find the IP you wish to DELETE.
Under Actions, click DELETE.
Screenshot walkthrough:
Hopefully, by now you’re comfortable with some of the security functions on your MongoDB Atlas clusters.
To put it simply: Without giving the IP address access, your entire installation is similar to a website without any SEO linkage pointing at it. It’s a cluster of coolness — in the middle of nowhere. Sitting on an AWS instance without any users. So, hopefully, this little paragraph warns you that without ADD IP ADDRESS….
You will not be able to your cluster. TTYL — Mr/Mrs.FastClickerMcClickySon.
Step 1:
MongoDB Atlas — Finding the simple in the complex. 1 of X. Would you like to try MongoDB Atlas for free? For an app developer, MongoDB covers a ton of features that would usually…medium.com
Step 2:
MongoDB Atlas — Signup to MongoDB Atlas. 2 of X Alright, if you’ve read through our first MongoDB read through, hopefully you understand MongoDB is not something to…medium.com
Step 3:
MongoDB Atlas — 3 of X. Setup your MongoDB Atlas — Build Your New Cluster. Now, let’s focus on setting up your MongoDB Atlas to ensure you’re paying zero dollars! Right?medium.com
Step 4:… you’re on step 4. And you’re winning.
Step 5: Next steps! Install MongoDB Compass. Woohoo.
MongoDB Atlas —Install MongoDB Compass— 5 of X. Importing a CSV into MongoDB Atlas… I’m actually getting ahead of myself.medium.com
Want to help bootstrap Dev3lop?
Click to print (Opens in new window)
Click to email this to a friend (Opens in new window)
Click to share on LinkedIn (Opens in new window)
Click to share on Facebook (Opens in new window)
Click to share on Google+ (Opens in new window)
Click to share on Twitter (Opens in new window)
Click to share on Tumblr (Opens in new window)
Click to share on Reddit (Opens in new window)
Click to share on Pinterest (Opens in new window)
More
Like this:
HOW TO GET STARTED WITH MONGODB
INTRODUCTION TO MONGODB TUTORIALS
LEARNING ABOUT MONGODB
UNDERSTANDING THE SIGNUP PROCESS WITH MONGODB
WORKING WITH MONGODB ATLAS
Related
MongoDB Atlas — Setting up MongoDB Compass Community — 6 of x.January 10, 2018In "Business"
MongoDB Atlas — 3 of X. Setup your MongoDB Atlas — Build Your New Cluster.January 10, 2018In "Business"
MongoDB Atlas —Install MongoDB Compass— 5 of X.January 10, 2018In "Business"
ADD COMMENT
sitegroundaskjdl
Log out
Notify me of follow-up comments by email.
Notify me of new posts by email.
DEV3LOP SERVICES--
Austin SEO
--
Tableau Consulting
--
Business Intelligence Consulting
--
Austin Web Developers
GOOGLE TRANSLATE
Select Language▼
DEV3LOP MENU
TABLEAU
AUSTIN SEO
SERVICES
ABOUT
BLOG
CONTACT
TABLEAU CONSULTING
BUSINESS INTELLIGENCE CONSULTING
AUSTIN WEB DEVELOPERS
AUSTIN SEO EXPERTS
CLIENTS
NETWORKING
GOPRO TESTIMONY
TABLEAUHELP
BUSINESS
DATABASEHELP
WEBSITEHELP
TABLEAU SERVER
TABLEAU DESKTOP
WHAT DOES A TABLEAU CONSULTANT DO?
TABLEAU PRICING – THE PRICING OFFERS EVERYONE ACCESS!
TABLEAU LOGO – FINDING THE CORRECT TABLEAU LOGO WITH EASE.
UPGRADE TABLEAU SERVER, RESTORE TABLEAU SERVER, AND ADVICE.
TABLEAU SERVER AUTOMATED DASHBOARD IMAGE OR IMAGES
DOWNLOAD TABLEAU DESKTOP
INSTALL TABLEAU DESKTOP
6 EASY STEPS – MAKING A SPARKLINE CHART TABLEAU DESKTOP
OPTIMIZE IMAGES IN DESKTOP
COPY AND PASTE LATITUDE AND LONGITUDE IN TABLEAU DESKTOP
CENTER BUTTONS IN WORDPRESS VISUAL COMPOSER
SPLIT URL TO COLUMNS WITH GOOGLE SHEETS
LEARNING HOW TO USE GOOGLE TO HELP START YOUR BUSINESS!
4 STEPS – HOW TO EMBED GOOGLE DATA STUDIO IN IFRAME
HOW TO INSTALL WORDPRESS THEME
SPLIT URL TO COLUMNS
BULK AUTOMATE URL COORDINATES
MYSQL
MONGODB
INSTALL MY SQL MAC – THE GUIDE ON HOW TO INSTALL MYSQL ON MAC
LEARN HOW TO START MYSQL ON MAC OSX
HOW TO CREATE A SCHEMA IN YOUR MYSQL WORKBENCH ON MAC OS
A QUICK TUTORIAL – RESETTING MYSQL ROOT PASSWORD ON MAC OS
MONGODB ATLAS — FINDING THE SIMPLE IN THE COMPLEX. 1 OF X.
MONGODB ATLAS — SIGNUP TO MONGODB ATLAS. 2 OF X
MONGODB ATLAS — 3 OF X. SETUP YOUR MONGODB ATLAS — BUILD YOUR NEW CLUSTER.
MONGODB ATLAS —CONNECT AN IP, MAKE IT PUBLIC, DELETE ACCESS — 4 OF X.
MONGODB ATLAS —INSTALL MONGODB COMPASS— 5 OF X.
MONGODB ATLAS — SETTING UP MONGODB COMPASS COMMUNITY — 6 OF X.
HOW TO ADD GOOGLE ANALYTICS TO WORDPRESS SITE
WHAT WEBSITE BUILDER OFFERS A FREE SUBDOMAIN?
LEARN HOW TO HOST A WEBSITE ON SITE GROUND, TODAY!
SITE BUILDING – WHAT’S EASY TO BUILD WEBSITES?
FREE WEBSITE MIGRATION
PICK WHERE TO BUY DOMAIN NAMES
PICK A WEBSITE PLATFORM
PICK A DOMAIN NAME
LEARN HOW TO SETUP GOOGLE ANALYTICS ACCOUNT TO INCREASE REVENUE
DEV3LOP’S QUICK CENTERING BUTTON DEMO – CENTERED BUTTON VS NON-CENTERED BUTTON!
HOW TO SET UP A FREE CHATROOM ON YOUR WEBSITE.
DEV3LOP META CONTENT
Site Admin
Log out
Entries RSS
Comments RSS
WordPress.org
DEV3LOP ARCHIVES
January 2018
December 2017
November 2017
October 2017
September 2017
August 2017
July 2017
June 2017
May 2017
April 2017
March 2017
DEV3LOP RECENT BLOG COMMENTS
Dev3 tutorial – free chatroom on your website. – Dev3lop on What Website Builder Offers a Free Subdomain?
Dev3 tutorial – free chatroom on your website. – Dev3lop on Learn How to Setup Google Analytics Account to Increase Revenue
Dev3 tutorial – free chatroom on your website. – Dev3lop on How to Set Up a Free Chatroom on Your Website.
What is a Tableau consultant? – AirLoveLife on Download Tableau Desktop
What is a Tableau consultant? – AirLoveLife on Tableau Logo – Finding the correct Tableau Logo With Ease.
What is a Tableau consultant? – AirLoveLife on Install tableau desktop
Tableau Software Advice! – DATAvert on Tableau Desktop is your Tableau Data Extract BI Software
Tableau Software Advice! – DATAvert on Our Portfolio
Tableau Software Advice! – DATAvert on What does a Tableau Consultant do?
Tableau Software Advice! – DATAvert on Tableau Server
Tableau Software Advice! – DATAvert on What is a Tableau consultant?
Tableau Software Advice! – DATAvert on Install My SQL Mac – The Guide on How To Install Mysql on Mac
Tableau Software Advice! – DATAvert on Download Tableau Desktop
Tableau Software Advice! – DATAvert on Tableau Pricing – The Pricing Offers Everyone Access!
Aniela on Download Tableau Desktop
SERAFIN on Tableau Server
James V. on Install tableau desktop
Roosevelt on What does a Tableau Consultant do?
Donald on What does a Tableau Consultant do?
How to Install WordPress Theme for he biggest noobie (r3blog) – Dev3lop on Developer live chat
Tableau Pricing – The Pricing Offers Everyone Access! – Dev3lop on Tableau Logo – Finding the correct Tableau Logo With Ease.
Tableau Pricing – The Pricing Offers Everyone Access! – Dev3lop on What is a Tableau consultant?
What does a Tableau Consultant do? – Dev3lop on Tableau Server
James J Wall some Tableau guy on What does a Tableau Consultant do?
A Tableau Bro on 4 Steps – How to Embed Google Data Studio in iFrame
Tableau on Tableau Pricing – The Pricing Offers Everyone Access!
Tableau Consulting Dude on Tableau Pricing – The Pricing Offers Everyone Access!
Tableau Server wizard on Tableau Server
Love Tableau on Tableau Logo – Finding the correct Tableau Logo With Ease.
Some Tableau Consultant on Tableau Pricing – The Pricing Offers Everyone Access!
douglas fabiano specht on 4 Steps – How to Embed Google Data Studio in iFrame
A Tableau Doctor on Tableau Logo – Finding the correct Tableau Logo With Ease.
Mashi on Tableau Logo – Finding the correct Tableau Logo With Ease.
SEO GO FISH on Tableau Logo – Finding the correct Tableau Logo With Ease.
We blogged about how to make an image a link in WordPress! – Tyler's Other Site on How to Make an Image a Link in WordPress
How to do Tableau Server Automated Dashboard Image - A Solution here on Developer live chat
Error 1084 - This Service Cannot Be Started in Safe Mode on Developer live chat
Vaneeza Khan on Awesome dashboard
Learn to Center Buttons in Wordpress Visual Composer with Pictures! on How to Install WordPress Theme
How to Host a Website <4$ monthly - 60% discount link in blog. 24/7 Chat. on Free Website Migration
Awesome dashboard - Dev3lop on Install tableau desktop
How to Install Wordpress Theme - Dev3lop on Developer live chat
Pick a hosting company - Dev3lop on Developer live chat
Ashley Benson on 4 Steps – How to Embed Google Data Studio in iFrame
Split url to columns - Dev3lop on Bulk Automate URL Coordinates
Active Workaround - Embed Google Data Studio - Wordpress Tutorial. on How to Install WordPress Theme
JJ_Pierce on Tableau Logo – Finding the correct Tableau Logo With Ease.
Wordpress Godaddy Plesk - How to force Wordpress On Godaddy on How to Install WordPress Theme
Wordpress Godaddy Plesk - How to force Wordpress On Godaddy on Pick a website platform
Why Outsourced IT to Qualified Experts Beats Peanut Butter on Pancakeson Developer live chat
MONGODB ATLAS — 3 OF X. SETUP YOUR MONGODB ATLAS — BUILD YOUR NEW CLUSTER.
MONGODB ATLAS —INSTALL MONGODB COMPASS— 5 OF X.
Business Intelligence
Austin SEO
Tableau Consulting
Web Dev
Dev3lop https://dev3lop.com (214)971-9869 Austin – Dallas – Fort Worth – Denver 8416 Selway Dr, Austin, TX 78736
Dev3 Working Hours: Mon-Fri 7:00am – 4:00pm Sat Closed Sun Closed
Founded by Tyler Garrett Dev3lop.com | Focus on what’s important Dev3lop is an Austin Texas Tech Company.
SERVICES: Tableau Consulting Business Intelligence Consulting Austin SEO Consultancy Austin Web Developers
Try Safe Austin SEO with Tableau Consultants.
0 notes
Text
127 Time-Saving Keyboard Shortcuts for Social Media Marketers
I used to think the few seconds I save by using keyboard shortcuts are not useful. I mean, what can I do with those few seconds?
A lot, it seems…
A few seconds here and there can add up. And according to Brainscape, you can save up to eight workdays per year! Just by using shortcuts—enough time for a long vacation.
Being a social media marketer, you spend a lot of time on the various social media platforms and your favorite social media tools. Often repeating the same actions: Like, reply, and more.
Let’s help you save your eight precious days every year with these social media keyboard shortcuts.
Top Social Media Keyboard Shortcuts to Save You Time
Here’re all the social media platforms and tools we’ll cover in this blog post. Click on the respective bullet point to jump to the platform or tool you’re interested in:
Social media platforms
Facebook
Messenger
Twitter
LinkedIn
Instagram (mobile app shortcuts)
Pinterest (mobile app shortcuts)
Google+
YouTube
Medium
Tumblr
Tools
Buffer
Respond
Feedly
Pocket
Canva
Trello
One Keyboard Shortcut to Rule Them All
I struggle to remember all the keyboard shortcuts since different platforms and tools tend to have different keyboard shortcuts (even for similar actions such as Liking a post).
Fortunately, many platforms and tools have a keyboard shortcut to show all the keyboard shortcuts! If there’s one to remember, this is it.
“?” or Shift + /
Facebook Keyboard Shortcuts
Facebook keyboard shortcuts differ by computer operating system and by browser:
Chrome for PC: Alt + #
Firefox for PC: Shift + Alt + #
Internet Explorer for PC: Alt + #, then Enter
Chrome, Safari, and Firefox for Mac: Ctrl + Opt + #
Replace # with the following numbers to access the respective features or pages on Facebook. For example, Alt + 1 will bring you to your Facebook home page on Chrome on a PC.
0 – Help
1 – Home
2 – Timeline
3 – Friends
4 – Inbox
5 – Notifications
6 – Settings
7 – Activity Log
8 – About
9 – Terms
Here’re a few more keyboard shortcuts for actions you might regularly take:
j or k – Scroll down or up between News Feed stories
Enter – See more of the selected story
p – Post a new status
l – Like or unlike the selected story
c – Comment on the selected story
s – Share the selected story
o – Open the link or expand the photo from the selected story
/ – Search
To see the full list of keyboard shortcuts, type “?” on any Facebook page.
[Back to navigation]
Messenger Keyboard Shortcuts
Increasingly, more businesses are using Messenger to provide social customer support. Being able to speed up your workflow allows you to reply your customers faster. The only keyboard shortcut for Messenger seems to this:
Opt + Up arrow or Down arrow / Alt + Up arrow or Down arrow – Jump to the conversation above or below
If you want to enhance your Messenger workflow, Allen Guo has developed a Chrome extension and a Firefox add-on, which adds several useful keyboard shortcuts to the Messenger web app (i.e. messenger.com).
Here’re two handy ones to know:
Opt + Shift + (number) / Alt + Shift + (number) – Jump to the X-th conversation from the top (e.g. Opt + Shift + 3 brings you to the third conversation from the top)
Opt + Shift + q / Alt + Shift + q – Search
[Back to navigation]
Twitter Keyboard Shortcuts
Hop to different Twitter pages with these keyboard shortcuts:
g + h – Home
g + n – Notifications
g + r – Mentions
g + p – Profile
g + l – Likes
g + i – Lists
g + m – Messages
g + s – Settings
g + u – Go to user…
Here’re a few more keyboard shortcuts for actions you might regularly take:
n – New tweets
Cmd + Enter / Ctrl + Enter – Send tweets
j or k – Next or previous tweet
l – Like
r – Reply
t – Retweet
m – Direct message
Enter – Open tweet details
o – Expand photo
/ – Search
To see the full list of keyboard shortcuts, type “?” on any Twitter page.
[Back to navigation]
LinkedIn Keyboard Shortcuts
It seems that LinkedIn does not have keyboard shortcuts for navigation and actions. But here’re two browser shortcuts you can use when commenting on a post:
Tab + Enter – Add an image
Tab + Tab + Enter – Post your comment
Do you know of any other handy LinkedIn keyboard shortcuts? Share them in the comments.
[Back to navigation]
Instagram App Shortcuts
While Instagram doesn’t have any keyboard shortcuts, it has some shortcuts for its mobile app.
Tap and hold a post in grid view in Search & Explore or on a profile – Expand the post (then swipe up to like the post, view the profile, or send the post as a message)
Tap and hold a profile or hashtag on your feed – Get a preview of the recent posts (then swipe up to view the profile, turn post notifications on, or send the profile or hashtag as a message)
Give the app icon a firm press – Get shortcuts to create a new post, view activities or direct messages, search, and more (only for iPhone 6s or later)
[Back to navigation]
Pinterest App Shortcuts
Pinterest also doesn’t have any keyboard shortcuts but if you use Pinterest on your mobile phone (iPhone 6s or later, Android 7.1 or higher), give the app icon a firm press and you’ll see four Pinterest shortcuts.
Lens – Find pins related to anything you snap (only available to users with the Lens feature)
Explore – See the trending ideas for the day
Saved – Jump right to the ideas you saved
Search – Search for ideas on Pinterest
For Android users, you can even move the shortcuts onto your home screen by tapping and dragging the shortcut over.
[Back to navigation]
Google+ Keyboard Shortcuts
Google+ uses a few different keyboard shortcuts from most social media platforms for common actions such as comment and +1 (or Like). Just type “?” on most Google+ pages when you want to see the keyboard shortcuts.
j or k – Next or previous post
/ – Search
c – Create a new post
r – Comment on selected post
s – Share selected post
v – View attachment on selected post
+ – Add or remove a +1 on the selected post
Here’s a little bonus: Google+ might be the only major social media platform where you can style your text with markdown.
– (dash before and after the text) – Strikethrough
* (asterisks before and after the text) – Bold
_ (underscore before and after the text) – Italics
[Back to navigation]
YouTube Keyboard Shortcuts
YouTube has over 30 keyboard shortcuts. Here’re the few you might use most often:
k or Spacebar – Play or pause video
Left arrow or j – Go back 5 or 10 seconds
Right arrow or l – Go forward 5 or 10 seconds
1 to 9 – Skip to X0 percent of the video (e.g. 5 skips to 50 percent of the video)
0 – Restart video
> or < – Speed up or slow down the video
Shift + n or p – Next or previous video in the playlist
c – Turn captions on or off
If you would like to learn all the keyboard shortcuts, Hong Kiat has compiled a great list on its site.
[Back to navigation]
Medium Keyboard Shortcuts
Medium does not have keyboard shortcuts for navigation but its keyboard shortcuts for editing and formatting can save you quite some time!
Here’re a few notable ones:
Cmd + k / Ctrl + k – Add a link (works for images, too)
Cmd + Alt + 5 / Ctrl + Alt + 5 – Block quote (press again for a pull quote)
Cmd + Enter / Ctrl + Enter – Add a separator
t + k – Leave a TK reminder
Cmd + Alt + 8 / Ctrl + Alt + 8 / Shift + f – Set image as featured image
Opt + Click / Alt + Click – Set focal point on featured image (which will be taken into account when the image is cropped on the feed)
` + ` + ` – Add a code block
To see the keyboard shortcuts while you are writing your Medium post, hit Cmd + ? or Ctrl + ?.
[Back to navigation]
Tumblr Keyboard Shortcuts
Tumblr has keyboard shortcuts for navigation, posting, and composing (such as inserting a GIF ). Type “?” on your Tumblr dashboard to pull out the list of keyboard shortcuts.
Here’re a few you might use more frequently:
j or k – Next or previous post
l – Like a post
s – Share a post
n – View a post’s notes
Enter – Open a post’s blog
/ – Search
Opt + c / Alt + c – Compose a new post
Opt + r / Alt + r – Reblog a post
Opt + e / Alt + e – Add a post to your queue
Oh, and of course,
Cmd + Shift + g / Ctrl + Shift + g – Insert GIF
Tumblr keyboard shortcuts also work on its mobile app if you have a Bluetooth keyboard connected to your mobile device.
[Back to navigation]
Buffer Keyboard Shortcuts
We also have some nifty keyboard shortcuts for the Buffer app and browser extension to help you speed up your social media sharing and management.
Opt + (number) / Alt + (number) – Switch between your connected profiles in the Buffer dashboard
Opt + b / Alt + b – Open the Buffer browser extension if you have it installed
Cmd + Enter / Ctrl + Enter – Add updates to your Buffer queue
You can customize the keyboard shortcut for opening the browser extension in your browser extension settings. For example, for Chrome, go to Settings > Extensions > Options (under Buffer).
[Back to navigation]
Respond Keyboard Shortcuts
We built Respond to help you engage with your social media fans more effectively. Naturally, we included many keyboard shortcuts to help you zoom through your social media conversations. (This is the secret to our fast responses during #bufferchat!)
Here’re the few shortcuts that I use regularly:
g + o – Go to team inbox
g + m – Go to mine (conversations assigned to you)
f – Like a tweet or Facebook comment
w – Follow user
e – Archive conversation
Enter – Focus on the composer
Cmd + Enter / Ctrl + Enter – Send reply, archive conversation, and move to the next conversation
Cmd + Shift + Enter / Ctrl + Shift + Enter – Send reply and stay in the conversation
: – Insert emoji (e.g. :smile:)
You can see the full list of keyboard shortcuts here or from the app (Help > Keyboard Shortcuts).
[Back to navigation]
Feedly Keyboard Shortcuts
Feedly is my go-to tool for staying up to date with industry news. Learning its keyboard shortcuts allowed me to quickly navigate around my Feedly dashboard and catch up on the blogs I’m following.
Here’re the few I found very useful:
g + g – Search and navigate to a particular feed or source
g + f – Go to Favourites feed
g + l – Go to Read later feed
n or p – Next or previous story
o – Open or close currently selected story
v – Open original in a new tab
x – Mark as read and hide
[Back to navigation]
Pocket Keyboard Shortcuts
Pocket is one of our favorite content curation tools, and I found out that it also has several keyboard shortcuts to help me navigate and find the articles and videos I want quickly.
Here’re the ones I like:
g + l or f or a – Switch to My List, Favorites, or Archive
g + r or v or i – Filter by articles, videos, or images
g + s – Search
j or k – Next or previous item
a – Archive the selected item
f – Favorite the selected item
o – Open the original of selected item in a new tab
[Back to navigation]
Canva Keyboard Shortcuts
We use and recommend Canva regularly because it’s easy and quick for creating social media graphics. With its keyboard shortcuts, you can reduce the time you take to create graphics even further.
Here’re a few handy ones to know:
t – Add a text
Opt + Shift + b / Alt + Shift + b – Add border around your text box
Cmd + Shift + k / Ctrl + Shift + k – Transform your text to uppercase
Cmd + Shift + l or r or c / Ctrl + Shift + l or r or c – Left or right or center align your text
Cmd + g / Ctrl + g – Group elements (Add Shift to ungroup)
Cmd + Click / Ctrl + Click – Select elements behind other elements
Cmd + Up arrow or Down arrow / Ctrl + Up arrow or Down arrow – Move an element in front of or behind other elements
Cmd + ; / Ctrl + ; – Turn grid lines on or off
Canva provides tutorials where you can learn and practice the most useful keyboard shortcuts.
[Back to navigation]
Trello Keyboard Shortcuts
Trello is a great tool for managing your social media schedule (and a tool we heavily rely on in the marketing team). While Trello is already easy to use, knowing the keyboard shortcuts can help you quickly create, change, and archive your cards.
Hover over a card to use the respective shortcuts on the card.
e – Open quick edit mode (for changing the title, labels, members, and more)
l – Open labels option
c – Archive the card
d – Set or change due date
f – Open card filter menu
, or . – Move the card to the bottom of the list on the left or right
< or > – Move the card to the top of the list on the left or right
[Back to navigation]
What are your favorite keyboard shortcuts?
With so many keyboard shortcuts available on all the social media platforms and tools, I’m sure you have found several that you love and use regularly.
Which are the ones that you use most often or the ones that save you the most time?
—
Image credit: Unsplash, Tumblr, MacRumors, and Hong Kiat
127 Time-Saving Keyboard Shortcuts for Social Media Marketers posted first on http://ift.tt/2qbaJ0t
0 notes
Text
127 Time-Saving Keyboard Shortcuts for Social Media Marketers
I used to think the few seconds I save by using keyboard shortcuts are not useful. I mean, what can I do with those few seconds?
A lot, it seems…
A few seconds here and there can add up. And according to Brainscape, you can save up to eight workdays per year! Just by using shortcuts—enough time for a long vacation.
Being a social media marketer, you spend a lot of time on the various social media platforms and your favorite social media tools. Often repeating the same actions: Like, reply, and more.
Let’s help you save your eight precious days every year with these social media keyboard shortcuts.
Top Social Media Keyboard Shortcuts to Save You Time
Here’re all the social media platforms and tools we’ll cover in this blog post. Click on the respective bullet point to jump to the platform or tool you’re interested in:
Social media platforms
Facebook
Messenger
Twitter
LinkedIn
Instagram (mobile app shortcuts)
Pinterest (mobile app shortcuts)
Google+
YouTube
Medium
Tumblr
Tools
Buffer
Respond
Feedly
Pocket
Canva
Trello
One Keyboard Shortcut to Rule Them All
I struggle to remember all the keyboard shortcuts since different platforms and tools tend to have different keyboard shortcuts (even for similar actions such as Liking a post).
Fortunately, many platforms and tools have a keyboard shortcut to show all the keyboard shortcuts! If there’s one to remember, this is it.
“?” or Shift + /
Facebook Keyboard Shortcuts
Facebook keyboard shortcuts differ by computer operating system and by browser:
Chrome for PC: Alt + #
Firefox for PC: Shift + Alt + #
Internet Explorer for PC: Alt + #, then Enter
Chrome, Safari, and Firefox for Mac: Ctrl + Opt + #
Replace # with the following numbers to access the respective features or pages on Facebook. For example, Alt + 1 will bring you to your Facebook home page on Chrome on a PC.
0 – Help
1 – Home
2 – Timeline
3 – Friends
4 – Inbox
5 – Notifications
6 – Settings
7 – Activity Log
8 – About
9 – Terms
Here’re a few more keyboard shortcuts for actions you might regularly take:
j or k – Scroll down or up between News Feed stories
Enter – See more of the selected story
p – Post a new status
l – Like or unlike the selected story
c – Comment on the selected story
s – Share the selected story
o – Open the link or expand the photo from the selected story
/ – Search
To see the full list of keyboard shortcuts, type “?” on any Facebook page.
[Back to navigation]
Messenger Keyboard Shortcuts
Increasingly, more businesses are using Messenger to provide social customer support. Being able to speed up your workflow allows you to reply your customers faster. The only keyboard shortcut for Messenger seems to this:
Opt + Up arrow or Down arrow / Alt + Up arrow or Down arrow – Jump to the conversation above or below
If you want to enhance your Messenger workflow, Allen Guo has developed a Chrome extension and a Firefox add-on, which adds several useful keyboard shortcuts to the Messenger web app (i.e. messenger.com).
Here’re two handy ones to know:
Opt + Shift + (number) / Alt + Shift + (number) – Jump to the X-th conversation from the top (e.g. Opt + Shift + 3 brings you to the third conversation from the top)
Opt + Shift + q / Alt + Shift + q – Search
[Back to navigation]
Twitter Keyboard Shortcuts
Hop to different Twitter pages with these keyboard shortcuts:
g + h – Home
g + n – Notifications
g + r – Mentions
g + p – Profile
g + l – Likes
g + i – Lists
g + m – Messages
g + s – Settings
g + u – Go to user…
Here’re a few more keyboard shortcuts for actions you might regularly take:
n – New tweets
Cmd + Enter / Ctrl + Enter – Send tweets
j or k – Next or previous tweet
l – Like
r – Reply
t – Retweet
m – Direct message
Enter – Open tweet details
o – Expand photo
/ – Search
To see the full list of keyboard shortcuts, type “?” on any Twitter page.
[Back to navigation]
LinkedIn Keyboard Shortcuts
It seems that LinkedIn does not have keyboard shortcuts for navigation and actions. But here’re two browser shortcuts you can use when commenting on a post:
Tab + Enter – Add an image
Tab + Tab + Enter – Post your comment
Do you know of any other handy LinkedIn keyboard shortcuts? Share them in the comments.
[Back to navigation]
Instagram App Shortcuts
While Instagram doesn’t have any keyboard shortcuts, it has some shortcuts for its mobile app.
Tap and hold a post in grid view in Search & Explore or on a profile – Expand the post (then swipe up to like the post, view the profile, or send the post as a message)
Tap and hold a profile or hashtag on your feed – Get a preview of the recent posts (then swipe up to view the profile, turn post notifications on, or send the profile or hashtag as a message)
Give the app icon a firm press – Get shortcuts to create a new post, view activities or direct messages, search, and more (only for iPhone 6s or later)
[Back to navigation]
Pinterest App Shortcuts
Pinterest also doesn’t have any keyboard shortcuts but if you use Pinterest on your mobile phone (iPhone 6s or later, Android 7.1 or higher), give the app icon a firm press and you’ll see four Pinterest shortcuts.
Lens – Find pins related to anything you snap (only available to users with the Lens feature)
Explore – See the trending ideas for the day
Saved – Jump right to the ideas you saved
Search – Search for ideas on Pinterest
For Android users, you can even move the shortcuts onto your home screen by tapping and dragging the shortcut over.
[Back to navigation]
Google+ Keyboard Shortcuts
Google+ uses a few different keyboard shortcuts from most social media platforms for common actions such as comment and +1 (or Like). Just type “?” on most Google+ pages when you want to see the keyboard shortcuts.
j or k – Next or previous post
/ – Search
c – Create a new post
r – Comment on selected post
s – Share selected post
v – View attachment on selected post
+ – Add or remove a +1 on the selected post
Here’s a little bonus: Google+ might be the only major social media platform where you can style your text with markdown.
– (dash before and after the text) – Strikethrough
* (asterisks before and after the text) – Bold
_ (underscore before and after the text) – Italics
[Back to navigation]
YouTube Keyboard Shortcuts
YouTube has over 30 keyboard shortcuts. Here’re the few you might use most often:
k or Spacebar – Play or pause video
Left arrow or j – Go back 5 or 10 seconds
Right arrow or l – Go forward 5 or 10 seconds
1 to 9 – Skip to X0 percent of the video (e.g. 5 skips to 50 percent of the video)
0 – Restart video
> or < – Speed up or slow down the video
Shift + n or p – Next or previous video in the playlist
c – Turn captions on or off
If you would like to learn all the keyboard shortcuts, Hong Kiat has compiled a great list on its site.
[Back to navigation]
Medium Keyboard Shortcuts
Medium does not have keyboard shortcuts for navigation but its keyboard shortcuts for editing and formatting can save you quite some time!
Here’re a few notable ones:
Cmd + k / Ctrl + k – Add a link (works for images, too)
Cmd + Alt + 5 / Ctrl + Alt + 5 – Block quote (press again for a pull quote)
Cmd + Enter / Ctrl + Enter – Add a separator
t + k – Leave a TK reminder
Cmd + Alt + 8 / Ctrl + Alt + 8 / Shift + f – Set image as featured image
Opt + Click / Alt + Click – Set focal point on featured image (which will be taken into account when the image is cropped on the feed)
` + ` + ` – Add a code block
To see the keyboard shortcuts while you are writing your Medium post, hit Cmd + ? or Ctrl + ?.
[Back to navigation]
Tumblr Keyboard Shortcuts
Tumblr has keyboard shortcuts for navigation, posting, and composing (such as inserting a GIF ). Type “?” on your Tumblr dashboard to pull out the list of keyboard shortcuts.
Here’re a few you might use more frequently:
j or k – Next or previous post
l – Like a post
s – Share a post
n – View a post’s notes
Enter – Open a post’s blog
/ – Search
Opt + c / Alt + c – Compose a new post
Opt + r / Alt + r – Reblog a post
Opt + e / Alt + e – Add a post to your queue
Oh, and of course,
Cmd + Shift + g / Ctrl + Shift + g – Insert GIF
Tumblr keyboard shortcuts also work on its mobile app if you have a Bluetooth keyboard connected to your mobile device.
[Back to navigation]
Buffer Keyboard Shortcuts
We also have some nifty keyboard shortcuts for the Buffer app and browser extension to help you speed up your social media sharing and management.
Opt + (number) / Alt + (number) – Switch between your connected profiles in the Buffer dashboard
Opt + b / Alt + b – Open the Buffer browser extension if you have it installed
Cmd + Enter / Ctrl + Enter – Add updates to your Buffer queue
You can customize the keyboard shortcut for opening the browser extension in your browser extension settings. For example, for Chrome, go to Settings > Extensions > Options (under Buffer).
[Back to navigation]
Respond Keyboard Shortcuts
We built Respond to help you engage with your social media fans more effectively. Naturally, we included many keyboard shortcuts to help you zoom through your social media conversations. (This is the secret to our fast responses during #bufferchat!)
Here’re the few shortcuts that I use regularly:
g + o – Go to team inbox
g + m – Go to mine (conversations assigned to you)
f – Like a tweet or Facebook comment
w – Follow user
e – Archive conversation
Enter – Focus on the composer
Cmd + Enter / Ctrl + Enter – Send reply, archive conversation, and move to the next conversation
Cmd + Shift + Enter / Ctrl + Shift + Enter – Send reply and stay in the conversation
: – Insert emoji (e.g. :smile:)
You can see the full list of keyboard shortcuts here or from the app (Help > Keyboard Shortcuts).
[Back to navigation]
Feedly Keyboard Shortcuts
Feedly is my go-to tool for staying up to date with industry news. Learning its keyboard shortcuts allowed me to quickly navigate around my Feedly dashboard and catch up on the blogs I’m following.
Here’re the few I found very useful:
g + g – Search and navigate to a particular feed or source
g + f – Go to Favourites feed
g + l – Go to Read later feed
n or p – Next or previous story
o – Open or close currently selected story
v – Open original in a new tab
x – Mark as read and hide
[Back to navigation]
Pocket Keyboard Shortcuts
Pocket is one of our favorite content curation tools, and I found out that it also has several keyboard shortcuts to help me navigate and find the articles and videos I want quickly.
Here’re the ones I like:
g + l or f or a – Switch to My List, Favorites, or Archive
g + r or v or i – Filter by articles, videos, or images
g + s – Search
j or k – Next or previous item
a – Archive the selected item
f – Favorite the selected item
o – Open the original of selected item in a new tab
[Back to navigation]
Canva Keyboard Shortcuts
We use and recommend Canva regularly because it’s easy and quick for creating social media graphics. With its keyboard shortcuts, you can reduce the time you take to create graphics even further.
Here’re a few handy ones to know:
t – Add a text
Opt + Shift + b / Alt + Shift + b – Add border around your text box
Cmd + Shift + k / Ctrl + Shift + k – Transform your text to uppercase
Cmd + Shift + l or r or c / Ctrl + Shift + l or r or c – Left or right or center align your text
Cmd + g / Ctrl + g – Group elements (Add Shift to ungroup)
Cmd + Click / Ctrl + Click – Select elements behind other elements
Cmd + Up arrow or Down arrow / Ctrl + Up arrow or Down arrow – Move an element in front of or behind other elements
Cmd + ; / Ctrl + ; – Turn grid lines on or off
Canva provides tutorials where you can learn and practice the most useful keyboard shortcuts.
[Back to navigation]
Trello Keyboard Shortcuts
Trello is a great tool for managing your social media schedule (and a tool we heavily rely on in the marketing team). While Trello is already easy to use, knowing the keyboard shortcuts can help you quickly create, change, and archive your cards.
Hover over a card to use the respective shortcuts on the card.
e – Open quick edit mode (for changing the title, labels, members, and more)
l – Open labels option
c – Archive the card
d – Set or change due date
f – Open card filter menu
, or . – Move the card to the bottom of the list on the left or right
< or > – Move the card to the top of the list on the left or right
[Back to navigation]
What are your favorite keyboard shortcuts?
With so many keyboard shortcuts available on all the social media platforms and tools, I’m sure you have found several that you love and use regularly.
Which are the ones that you use most often or the ones that save you the most time?
—
Image credit: Unsplash, Tumblr, MacRumors, and Hong Kiat
Thank 127 Time-Saving Keyboard Shortcuts for Social Media Marketers for first publishing this post.
0 notes