#also feel free to use gifs!
Text
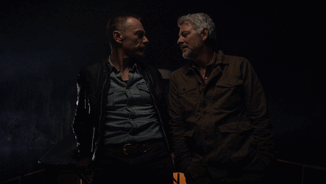
You all have spoken and prince/bard goes first!! I kept the prince design pretty similar but the bard design got some BIG changes
so here, the destruction classes!!
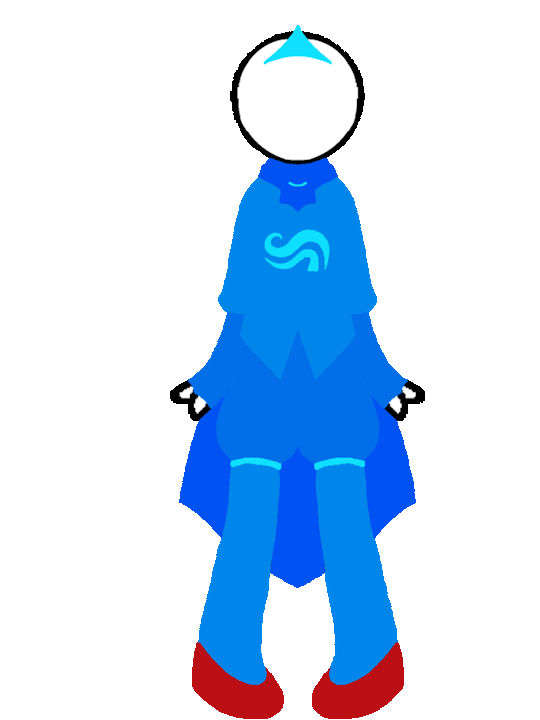
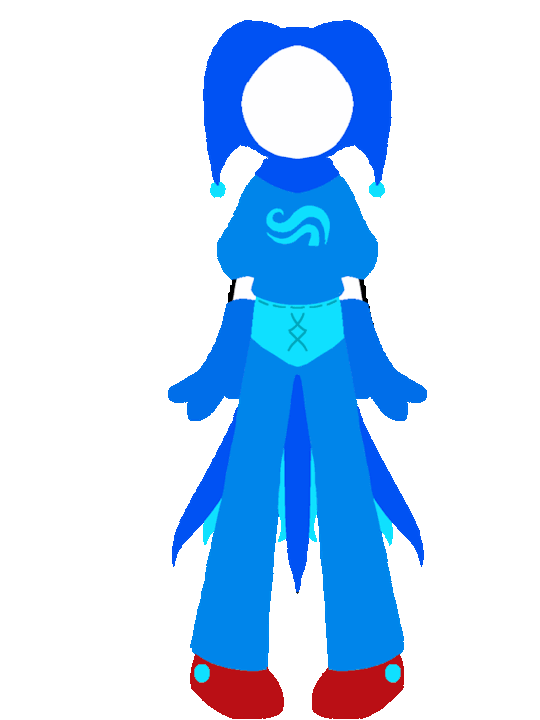
#i can see why yall wanted these first#the old bard outfit is... something#also feel free to use these if youd like#with credit ofc#homestuck#homestuck redesign#classpecting#classpect#god teir redesigns#redesign#my art#homestuck art#artists on tumblr#art#digital art#gif warning
377 notes
·
View notes
Note
Im taking my shot at poking your Mind
Wonderful! Let's see what possible dangers may await *your* roll in th-
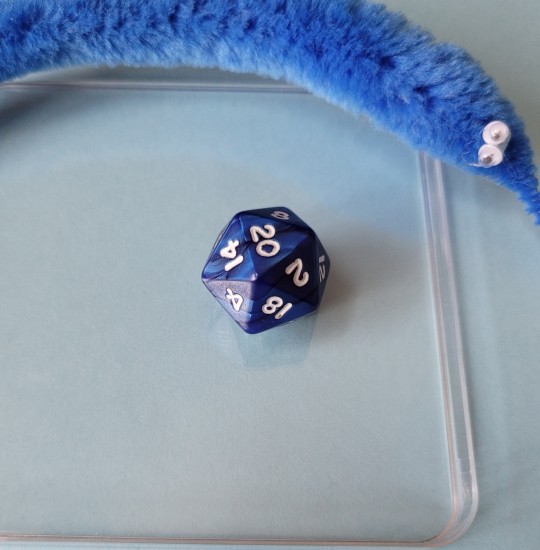
20?!
damn that was fast.. alright, I suppose the die has spoken! What will he do now?


He poked you back! Congratulations![?]
#chonny jash#occuart#cj mind#doodles#asks#you dont wanna know how long it took me to get a confetti gif on this#also idk how ppl draw these things but#I thought using your pfp colors for the player would be fun :]#more rolls are on the way!#feel free to shoot me an ask if you'd like to play#poke game
126 notes
·
View notes
Text

Izzy peeking onto your dash!
#hes transparent!#this probably works best with the themes that change the colour of the post background honestly#if i was Actually good at these id do like. an edit of a gif of this and make him peek#but i am just silly little guy with a lasso tool. nothing more#nyxtalks#ofmd#our flag means death#izzy hands#israel hands#transparent#feel free to use this however u want!#i have more in the pipeline also. i love to point and click
88 notes
·
View notes
Text


#blinkies#f slur#gif warning#300x40px#eyestrain warning#blinkies.cafe#happy pride#swag#feel free to use#I’m also posting some normal sized ones soon#flashing lights#2x2
679 notes
·
View notes
Text

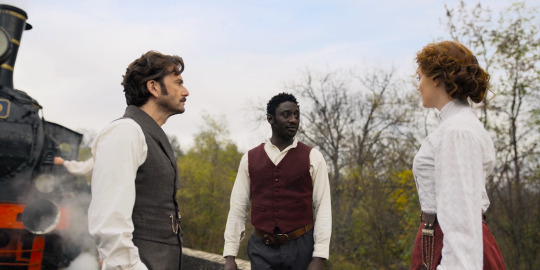
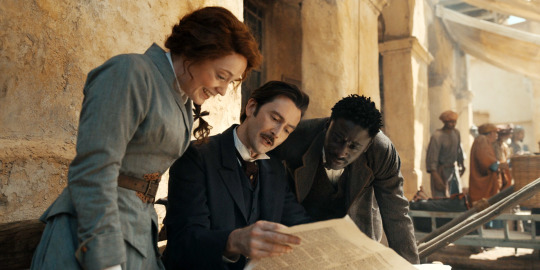
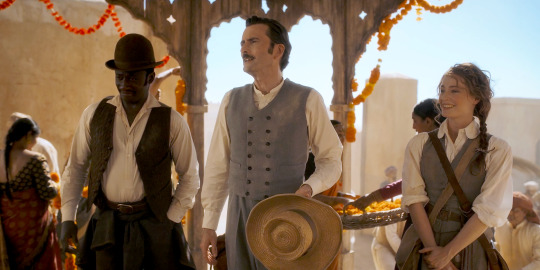
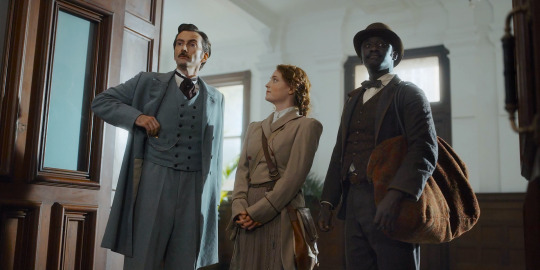

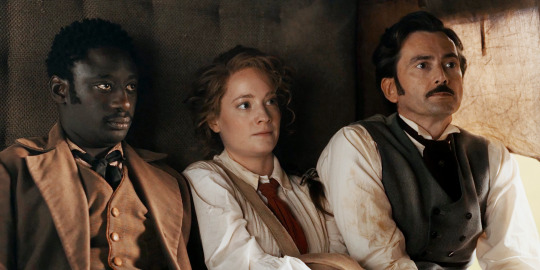
some prettied-up screencaps of my new favorite trio
+ a bonus

#around the world in 80 days#atwi80d#phileas fogg#jean passepartout#abigail fix#very quietly foaming at the mouth over them honestly#send them on more adventures pls#idk if people do stuff with already-touched-up screencaps but feel free to use them for whatever! no credit needed!#haven't had the energy for gifs but i could knock these out easy#(episodes 2 and 4 did not lend themselves to a great shot of all three but i tried. or the one from ep 8 but i wanted to use it)#also helllllp#i'm semi-seriously considering sewing an abigail outfit#...and furthermore this show has reawakened some previously hibernating Steampunk Feelings in me#i made this
215 notes
·
View notes
Text
Turned the Judgemental Cucurucho Stare into a gif because it made me laugh too much.

Bonus version:

#QSMP#Cucurucho#Pactw#Pac#I'm sure I'll get a lot of mileage out of this gif#lemme know if anyone has trouble seeing it#I know Tumblr is weird about gifs sometimes#This looks mid on mobile but I promise it's better on desktop lmao#Also feel free to use it if a funny moment presents itself#just point folks my way if they ask where you got it#👍#Edited
364 notes
·
View notes
Text


Cinema Therapy reacting to TWILIGHT: BREAKING DAWN
#Cinema Therapy#this has now become my favourite thing in the entire universe#BECAUSE MY NAME IS STEFANIE#WHO CARES IF ITS WRITTEN DIFFERENTLY#I FELT SO PERSONALLY ATTACKED#I JUST HAD TO GIF IT#ITS TOO FUNNY NOT TO#Also yall feel free to use the WHAT THE F@CK gif as reaction#ipost#twilight#twilight reaction#Twilight breaking dawn#HIGHLY RECOMMEND THIS CHANNEL ON YOUTUBE#I just found them recently#Breaking Dawn#Stephenie meyer#also: relatable
56 notes
·
View notes
Photo
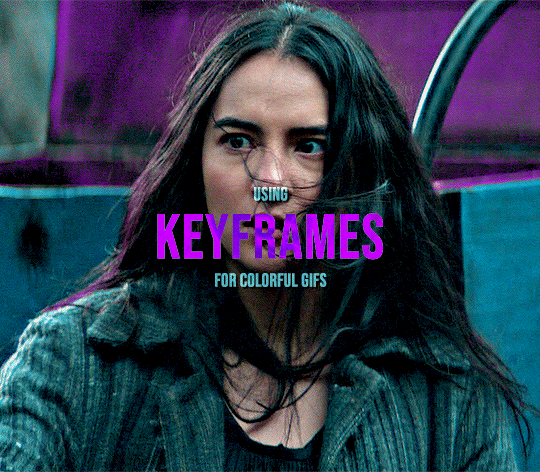
KEYFRAME TUTORIAL FOR THOSE WITH A WORKING KNOWLEDGE OF PHOTOSHOP AND GIFMAKING
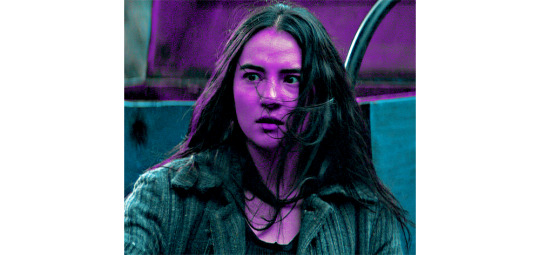
This is my gif with the coloring I want it to have eventually (including the manipulated color). I changed the yellows and reds in the scene to be purple. I want the majority of the gif to be purple and cyan, but do not want it to be on her skin.
First add a layer mask to the adjustments that are creating the color you want to remove. I used several layers to create the purple coloring, so I grouped them together and added the layer mask to the group instead of having to do them individually. In this case, I erased anywhere the purple was on her skin.

She is walking away in this scene, so this layer mask alone is not enough. This is where keyframes come in.
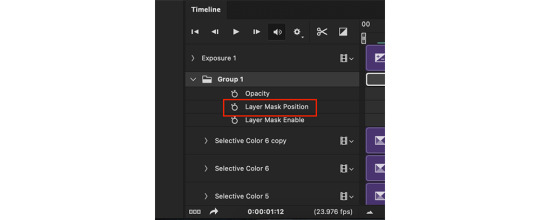
In the timeline window, scroll to the layer that your layer mask is on (or in my case, group). On the far left side, each of the layers should have an arrow which toggles a drop down menu. Click it and it will list options for Opacity, Layer Mask Position, and Layer Mask Enable. Make sure the current time indicator (small blue arrow and red vertical line in the timeline window) is positioned at 00:00:00 and then select the clock icon next to Layer Mask Position. It should place a small yellow diamond at the same place as the indicator. Each successive move of the mask will place a grey diamond at the timestamp that you move it.
CMD+click on the layer mask in the Layers window so that the area of the mask becomes outlined with a dotted line in the main workspace. Click the chain icon next to the layer mask in the Layers window to unlock the mask's movement.


The next steps are the most tedious. You have to manually move the layer mask every few frames to a new position that follows the movement of the gif. I usually zoom the timeline in so that each second is broken into six sections and pick a new layer mask position at approximately each section. If there is more rapid movement in the gif, you may have to pick new positions at more frequent intervals and vice versa.
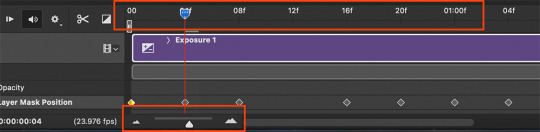
After the initial layer mask is set at the 00:00:00 point in the timeline, select the next interval that you want the layer mask to move to. Do this by moving the time indicator to your chosen point. Now with the move tool, click within the layer mask and drag it to where it needs to be to keep coverage on your desired area. The longer/more frames in the gif, the more keyframe points you will have to select. This gif was about 2.5 seconds long and I used 14 different points.


These are just a few of the keyframes I made on this gif. You can see here that the original area that I erased in the layer mask doesn't quite cover all of her skin throughout the movement. I just erase a bit more until I'm satisfied with the coverage.
Once you have mapped all the points out, deselect the mask area and click the blank space where the chain icon was to make it reappear and return the mask to a locked position.
Scrub through the gif to make sure that the mask covers everything you want and also that the keyframes make it move smoothly. Shorter intervals and minor position changes between keyframes usually keeps choppiness (this normally presents as the mask noticeably jumping to a new position) to a minimum. You should not be able to notice the mask's movement except in the way it removes color from specific areas as intended.
Export and save the gif as normal.
This is my finished result:

#userfanni#omgari#usersunny#userbells#userkraina#tuserabbie#tusergabriela#useroli#userangelic#supervalcsi#userphe#keyframes#*tutorial#tagging a couple of you who have been like ‘how tf did you make this’ on sets that i used this technique hope you dont mind#idk how coherently this reads or if it even explains it well enough but feel free to ask for clarification#there are also other keyframe tutorials on here that are written much better so check those out too if mine doesnt make sense#but yeah this is how i make my vibrant gifs that have movement in them#i'm going to make a tutorial explaining the actual coloring process too eventually#might make a part two of this explaining how to use this method for more complicated movements#like when your subject moves in multiple directions or there are multiple subjects#riah.gif#riah.txt
563 notes
·
View notes
Text
This is what I was talking about in my last post
#there is like a hundred more clips i could use because he acts so David Tennant in every show he is in#feel free to add gifs to prove my point#also any clip of him running or walking is so David Tennant#and when he acts with his eyebrow or the way he waves his hands is also very David Tennant of him#david tennant#tenth doctor#doctor who#good omens#the decoy bride
132 notes
·
View notes
Text
hello! Modzutsune here! i'd just like to say on behalf of the (technically 6, but only 4 of us actually post much... woops) mods:
Thank you for the support on this blog! We've officially hit evil devil number!


I know that our blog is more "low effort monster hunter" than "poorly drawn", but it means a lot that people find our occasional scribbles funny, enjoyable or anything positive! here's to hopefully lasting until Wilds comes out for even more monster scribbles!
Happy hunting!
#i'll post gif by itself for if people want to rb without text! feel free to use it for all your gore magala needs#your asks have also been received! we've been busy with life but we'll get to them soon!#letters from the guild ✉️#modzutsune#gif
40 notes
·
View notes
Photo


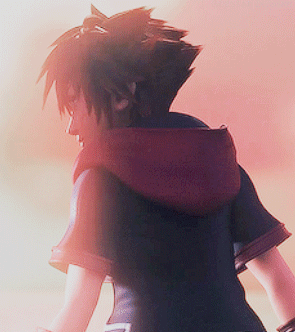
𝐊𝐚𝐢𝐫𝐢, 𝐫𝐞𝐦𝐞𝐦𝐛𝐞𝐫 𝐰𝐡𝐚𝐭 𝐲𝐨𝐮 𝐬𝐚𝐢𝐝 𝐛𝐞𝐟𝐨𝐫𝐞? 𝐈'𝐦 𝐚𝐥𝐰𝐚𝐲𝐬 𝐰𝐢𝐭𝐡 𝐲𝐨𝐮, 𝐭𝐨𝐨. 𝐈'𝐥𝐥 𝐜𝐨𝐦𝐞 𝐛𝐚𝐜𝐤 𝐭𝐨 𝐲𝐨𝐮. 𝐈 𝐩𝐫𝐨𝐦𝐢𝐬𝐞!
#khgraphics#khgifs#khedits#Kingdom Hearts 2#Kingdom Hearts 3#Kingdom Hearts#KH1#KH2#KH3#KH Sora#KH Kairi#Sokai#my gifs#my coloring#not free to use#don't repost#I feel like Sora said He'll come back to her at the ending of kh3 too like it just feels like something he would say before fading away#He always finds his way back despite the odds so..feels like a good call back to 1#also the fact they switch where they are seated by end of kh3 it was also reversed as you can tell by first two sets of gifs#really drives home the fact that it was showing it was Sora who was fading away this time hnng now I cry thinking about that
657 notes
·
View notes
Text
Older/Old Gays = best characters


#the last of us hbo#bill x frank#severance apple tv plus#irving x burt#brooklyn nine nine#holt x kevin#neverafter dimension 20#mother timothy goose#love is strange#when i'm sixty-four#i know these are just guys and just from thing#'s that i've seen#feel free to reblog and add more#the exorcist#marcus x peter#benoit blanc and philip are also on this lsit but they aren't in the same scene as each other so I couldn't include a gif
234 notes
·
View notes
Text
location: beach

when the rain started pouring, most of the people by the beach started to seek shelter. however, eleanor did no such thing as she simply stood from where she was seated on the sand. instead of leaving the shore, she embraced the downpour and began to twirl, her laughter mingling with the rhythm of the falling rain. catching the gaze of an onlooker, she called out to them over the sound of the pouring rain, " you're not scared of a little rain, are you? " // @aurorabaystarter
#aurorabay.starter#i just wanted an excuse to use this gif skfbksdnfs#also pls feel free to assume connections since she's lived here all her life
19 notes
·
View notes
Text
hi besties, what dramas are you watching this season??
#i've been barely active here since april wtf#time sure flies!#but in the meantime i finished my 2nd year of uni!!#i am soo relieved. and proud of myself <3#also i got used to my new job (is it still new if it's been 3 months?) and i really like it here :')#and i was v active as a party member and started rising through the ranks hehe#so i neglected tumblr :( not to mention i haven't watched a single drama episode for like 2 months...#also i forgot how to make gifs asdfghgjs and sweet home s3 is around the corner :/ help#tbh i have no idea where to start watching things again T_T#having free time feels unreal#k.txt
16 notes
·
View notes
Text
This was harder to do than expected (transparent gif longer than 5s)
Only thing I did was 3d Model, I slammed it into an autorigger to make it dance
#feel free to use it but dont see many sittuations where you slam a dancing slugcat tbf#i am not a gif maker so its wonky#rain world#my art#kinda#3d model#im also making something else but take this in the meanwhile
21 notes
·
View notes
Text


sitcom men sharing a kiss in the name of "friendship"
the one with the monkey, 1x10
the kiss hello, 6x16
gay witch hunt, 3x01
eagleton, 3x12
the broath, 7x19
goldmine, 4x07
coral palms pt. 2, 4x02
dee day, 14x03
#please feel free to add more examples#these are all i could think off /find#but there's probably more#what an interesting trope sitcoms have given us#also interpret those quotation marks however you like#friends#seinfeld#the office#parks and rec#himym#new girl#b99#iasip#gif#gifset#godduh speaks
9 notes
·
View notes
Last Seen Blogs

slowthecirclesdown
let's have a jelly in the mix

abrlann
ann

omarvillanuevao
Omar Villanueva O

bamovetz
Движение 22 июня
