#all photoshop is is clicking things and hoping for the best
Explore tagged Tumblr posts
Visit Tumblr Blog
Explore Tumblr blogs with no restrictions, modern design and the best experience.
Last Seen Tumblr Blogs


Fun Fact
1,644 Tumblr posts in 1 second.
Text
Just a bunch of Useful websites - Updated for 2023
Removed/checked all links to make sure everything is working (03/03/23). Hope they help!
Sejda - Free online PDF editor.
Supercook - Have ingredients but no idea what to make? Put them in here and it'll give you recipe ideas.
Still Tasty - Trying the above but unsure about whether that sauce in the fridge is still edible? Check here first.
Archive.ph - Paywall bypass. Like 12ft below but appears to work far better and across more sites in my testing. I'd recommend trying this one first as I had more success with it.
12ft – Hate paywalls? Try this site out.
Where Is This - Want to know where a picture was taken, this site can help.
TOS/DR - Terms of service, didn't read. Gives you a summary of terms of service plus gives each site a privacy rating.
OneLook - Reverse dictionary for when you know the description of the word but can't for the life of you remember the actual word.
My Abandonware - Brilliant site for free, legal games. Has games from 1978 up to present day across pc and console. You'll be surprised by some of the games on there, some absolute gems.
Project Gutenberg – Always ends up on these type of lists and for very good reason. All works that are copyright free in one place.
Ninite – New PC? Install all of your programs in one go with no bloat or unnecessary crap.
PatchMyPC - Alternative to ninite with over 300 app options to keep upto date. Free for home users.
Unchecky – Tired of software trying to install additional unwanted programs? This will stop it completely by unchecking the necessary boxes when you install.
Sci-Hub – Research papers galore! Check here before shelling out money. And if it’s not here, try the next link in our list.
LibGen – Lots of free PDFs relate primarily to the sciences.
Zotero – A free and easy to use program to collect, organize, cite and share research.
Car Complaints – Buying a used car? Check out what other owners of the same model have to say about it first.
CamelCamelCamel – Check the historical prices of items on Amazon and set alerts for when prices drop.
Have I Been Pawned – Still the king when it comes to checking if your online accounts have been released in a data breach. Also able to sign up for email alerts if you’ve ever a victim of a breach.
I Have No TV - A collection of documentaries for you to while away the time. Completely free.
Radio Garden – Think Google Earth but wherever you zoom, you get the radio station of that place.
Just The Recipe – Paste in the url and get just the recipe as a result. No life story or adverts.
Tineye – An Amazing reverse image search tool.
My 90s TV – Simulates 90’s TV using YouTube videos. Also has My80sTV, My70sTV, My60sTV and for the younger ones out there, My00sTV. Lose yourself in nostalgia.
Foto Forensics – Free image analysis tools.
Old Games Download – A repository of games from the 90’s and early 2000’s. Get your fix of nostalgia here.
Online OCR – Convert pictures of text into actual text and output it in the format you need.
Remove Background – An amazingly quick and accurate way to remove backgrounds from your pictures.
Twoseven – Allows you to sync videos from providers such as Netflix, Youtube, Disney+ etc and watch them with your friends. Ad free and also has the ability to do real time video and text chat.
Terms of Service, Didn’t Read – Get a quick summary of Terms of service plus a privacy rating.
Coolors – Struggling to get a good combination of colors? This site will generate color palettes for you.
This To That – Need to glue two things together? This’ll help.
Photopea – A free online alternative to Adobe Photoshop. Does everything in your browser.
BitWarden – Free open source password manager.
Just Beam It - Peer to peer file transfer. Drop the file in on one end, click create link and send to whoever. Leave your pc on that page while they download. Because of how it works there are no file limits. It's genuinely amazing. Best file transfer system I have ever used.
Atlas Obscura – Travelling to a new place? Find out the hidden treasures you should go to with Atlas Obscura.
ID Ransomware – Ever get ransomware on your computer? Use this to see if the virus infecting your pc has been cracked yet or not. Potentially saving you money. You can also sign up for email notifications if your particular problem hasn’t been cracked yet.
Way Back Machine – The Internet Archive is a non-profit library of millions of free books, movies, software, music, websites and loads more.
Rome2Rio – Directions from anywhere to anywhere by bus, train, plane, car and ferry.
Splitter – Seperate different audio tracks audio. Allowing you to split out music from the words for example.
myNoise – Gives you beautiful noises to match your mood. Increase your productivity, calm down and need help sleeping? All here for you.
DeepL – Best language translation tool on the web.
Forvo – Alternatively, if you need to hear a local speaking a word, this is the site for you.
For even more useful sites, there is an expanded list that can be found here.
80K notes
·
View notes
Note
hi sole! your sharpening is always so soft and pretty, i was wondering if you would be open to share it? hope you are having a wonderful november so far <3
Hi, Anon! Thank you so much <3 Yeah, sure, tutorial under the cut:
What you'll need:
Photoshop (I use Photoshop 2023)
Basic knowledge on how to make gifs
Camera Raw filter installed
Okay so, first of all, I use two different methods depending on the size of the gif. Let's start with the one I use for most of my gifsets which are big gifs (examples: x x x x.)
METHOD #1: Smart Sharpen + Camera Raw
I started using the Camera Raw filter last year and let me tell you, I'm obsessed! It completely changes the game of sharpening. I use this method for all gifs with a 540px width.
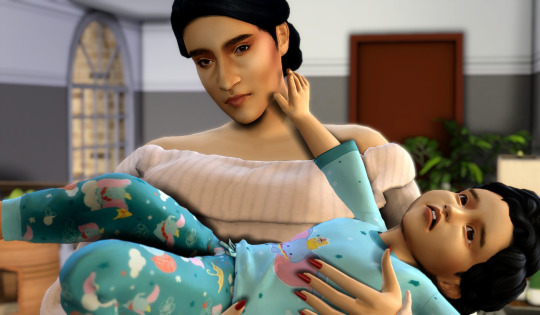
We're going to work on timeline so get your gif ready and convert it for smart filters. I'm using this scene from my last set as a base:

Here's the gif after I color it (I usually sharpen my gifs before I color them but for the sake of the tutorial I'm showing you this so you guys can see the difference):

(1) Smart Sharpen Layer: Let's start by adding a Smart Sharpen layer (Filter > Sharpen > Smart Sharpen) with these settings:
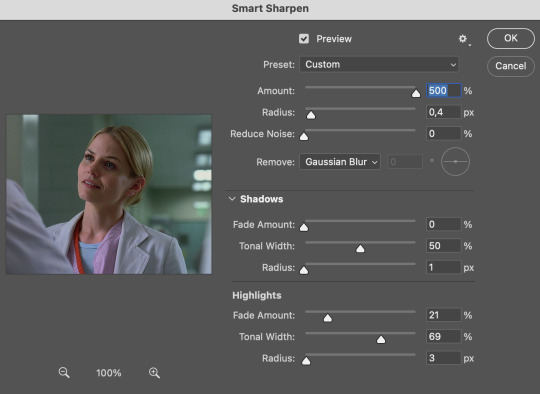
Disclaimer: I didn't come up with these settings myself I got them from these sharpening actions forever ago so I don't know which one it is :/. I also wasn't able to find that person's new blog (if they even have one since they've been inactive since 2021) so if anyone knows please let me know and I'll give them proper credit!
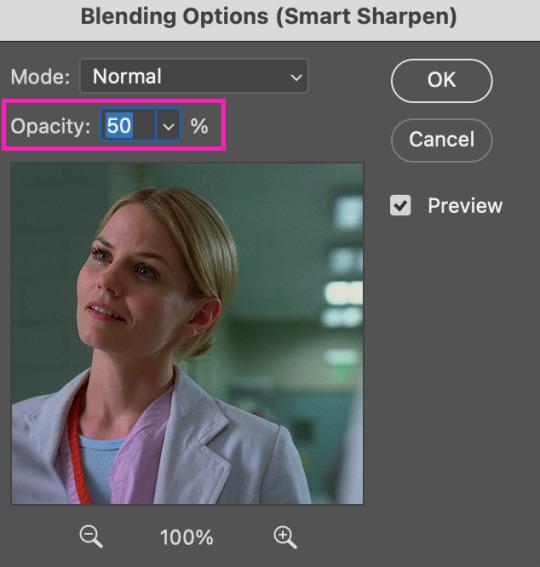
Now we're going to go to the 'Layers' panel and click on this little thingy:

This window will pop up and we are going to change the Opacity to 50%.
(2) Camera Raw Filter: Here's where the fun begins. Go to Filter and click on Camera Raw Filter (you'll need to have the plugin installed for it to show up.) I don't know how the Camera Raw window will look like the first time you open it but good thing you only need to change a couple of things!
If it isn't opened yet click on 'Effects' and we're going to change the Texture and Clarity:
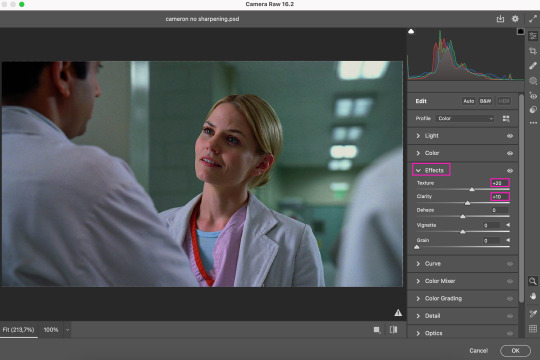
Depending on the scene/show/film I'm giffing, or if I want a stronger or softer sharpening, I'll use two different settings, but 99% of the time they are these:
First setting: Texture (+20) Clarity (+10)
Second setting: Texture (+40) Clarity (+20)


As you can see the difference isn't huge but the first setting gives a "softer" look. As I said I'll use one or the other depending on how I see the scene (it's almost always about the vibes yk.)
Feel free to experiment with these two and see what works best for you (although I wouldn't go higher than 40 on texture because the sharpening will look too fake imo.)
Also this filter is soooo good at making low quality videos look 1080p! Every time I've had to use 720p videos the Camera Raw filter has saved me 🫡
METHOD #2: Smart Sharpen
I use this method for smaller gifs. For example, 8 gifs of 268px x 180px sets (like these) or small-ish gifs in complex sets (like the second gifs in this set.)
This process is much simpler since it's the one I explained before but without adding the Camera Raw filter. That's it that's the method. Just a Smart Sharpen layer with the Opacity turned down to 50%.
As I said this method looks best on smaller gifs but to be honest it looks good on big gifs too? Depends on what you like most!
Anyway I hope this was easy to follow and if anyone has any questions please feel free to dm me or send an ask! ♡
#ask#Anon#ps tag#useraljoscha#usermelone#userchibi#usermagic#uservivaldi#userlorna#tuserhol#usercats#userlix#usersavana
196 notes
·
View notes
Note
Hello ! I saw your fanart, and I absolutely adore it ! Can I ask how you manage to give that rice paper texture to it ? I looked for transparent textures on the internet and I kinda lost my mind doing so haha ;;
Is it a brush maybe...?
Thank you in advance ! 🌸
Hi, I'm so glad you like the art! I've done the rice paper texture a couple different ways, usually involving layers in Photoshop with transparencies applied. Here's what I did for this one:
I used this free rice paper image, which I found online a while ago:

I dropped the rice paper image onto a new layer on top of everything else. Since I wanted the fibers to be smaller (and also wanted the final image to be high resolution), I shrunk the rice paper image down and then duplicated it and made a big patchwork that covered the image.

(I think I made the copies smaller than this originally, but this is just to demonstrate the process I used.)
I flipped the copies around here and there to create more variation in the final texture.
When the patchwork covered the image, I merged all the separate rice paper copies onto one layer.

The patchwork wasn't exactly seamless, which was fine because I wasn't going for uniformity.
I used the spot healing brush tool and clicked and dragged it all over the seams and other parts of the patchwork to smooth it out and randomize the texture.

(What I ended up with was a bit less "bumpy"-looking than this example, probably because I copied the rice paper image at a smaller size.)
I then... pretty much just screwed around with the rice paper layer's darkness, transparency type, and opacity until I found a combination that looked right. No two texture/artwork situations are alike, so I end up experimenting a lot.
In the end, I had two rice paper layers, one with a "soft light" transparency at 85% opacity and one on top of it with a "color burn" transparency at 50%. I put them inside a layer group and then adjusted a little further by bringing the group's opacity down to 55%:

It looks like I also darkened the texture itself at one point, probably by duplicating the original layer, applying a "multiply" transparency to the new one, and then merging them again. In any case, it got darker, and unfortunately I don't recall exactly how. :p
My goal was to make the texture evident but still subtle, and to keep it from interfering too much with the colors underneath it, and I pretty much just kept tweaking things until I had that look.
In short, my best advice is to find an image that looks more or less like the texture you're going for, drop it into Photoshop on top of your artwork, modify it in whatever way will bring it closer to the result you want, and then experiment with layer transparencies until it looks right. I usually end up with one layer that lightens the colors and another layer that darkens them, which helps bring out the fibers without making everything else too dark.
(Another trick that sometimes works is to invert the colors on the texture to make the overall texture darker. This can give you some more cool options for experimenting with transparencies. Here's an inverted version of the texture above, which I've used in a couple other pieces:)

I really hope that's helpful. Have fun! :)
30 notes
·
View notes
Text
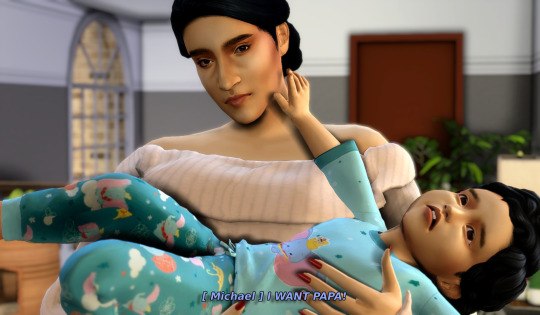
Subtitling Tutorial
This one goes out to you @weirdosalike 🙌🏾
As a disclaimer, my program of choice is Photopea, but this is so simplistic it definitely works for Adobe Photoshop as well. The first thing to do, of course, is find the cap you want to place subtitles on.
My caps are huge, so the size you want your subtitles to be is ultimately dependent on what you think corresponds with your image size the best. However, readability is everything. So, you want them large, but at the same time you don't want them to be overly big especially if you plan to have other characters speaking in the caption. (Enormous text is only what I do when I'm having characters really scream or be in an emotional state, it shows emphasis.)

Generally, my setting for text look like this. The bold thickens the text and the size works well for my images. Usually, I use white and golden colors for my speakers, but if it's a scene with numerous characters I splash color to indicate who is who.
Example:
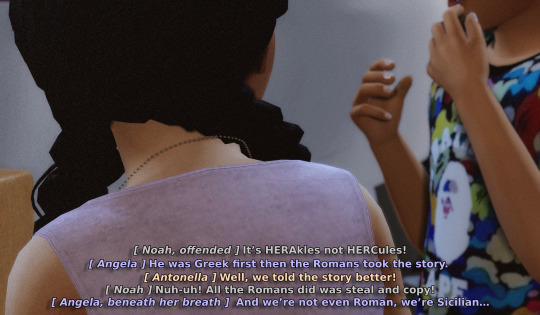
On that note, I try my hardest to choose light colors for my speakers because it can ideally show against the background well opposed to if I used darker hues. Ultimately, I don't think I'm the best at color picking so discovering what works and what doesn't work is like trial and error but for the most part? I believe that light colors are the way to go.
But let's go back to our original cap.
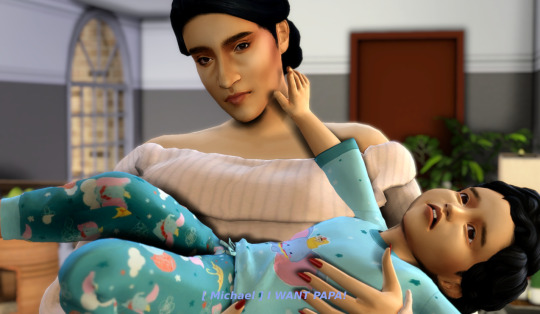
You can't read this at all! So what we're going to do is put an outline around it. By clicking the effects button you'll see this list of options
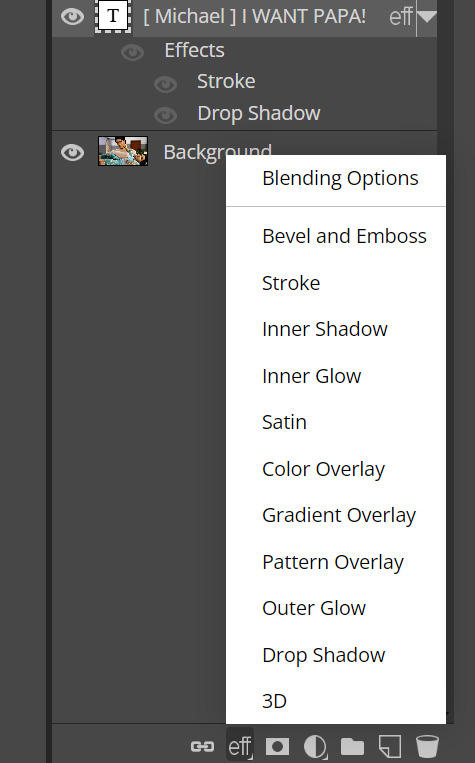
What you want to click is stroke, which will show you these settings.
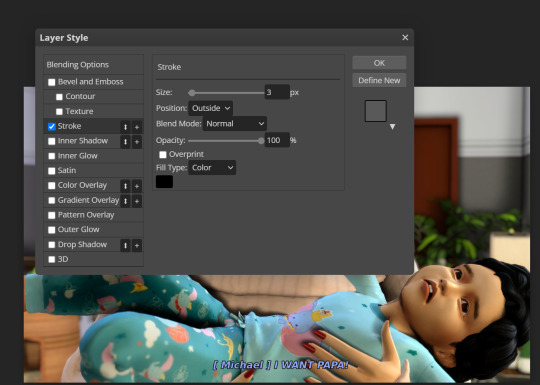
This is how the font now looks with an outline. But it's still not quite readable, so I add a drop shadow to create a contrast.
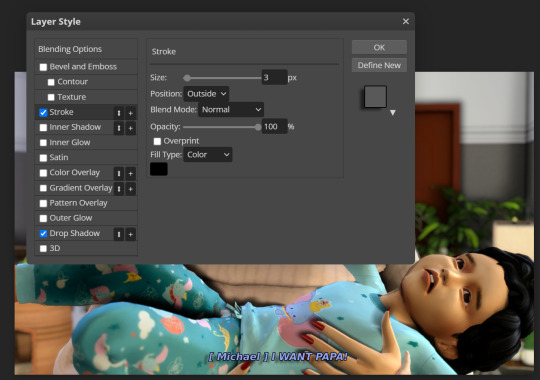
It stands out more prominently, although you may personally want the font to be a bit bigger. And after clicking okay, this is the outcome!
Sometimes I consider new forms of editing like having a faded black box behind the text, but I'm not fully committed to the concept. But this is the fun of editing; figuring out what works and what doesn't work! Hope this is helpful.
42 notes
·
View notes
Note
hi!! feel free to ignore this if you'd rather not answer it but i'm just wondering how you edit your backgrounds because they are breathtaking! there is just so much motion in your edits and i love them so much, you are so skilled <333
hi! i’m sorry it took me a bit to answer this, i kept forgetting 😭 but thank you for the kind words, i adore your editing so it means a lot coming from you! ANYWAY! i’ll get into it the best i can down below
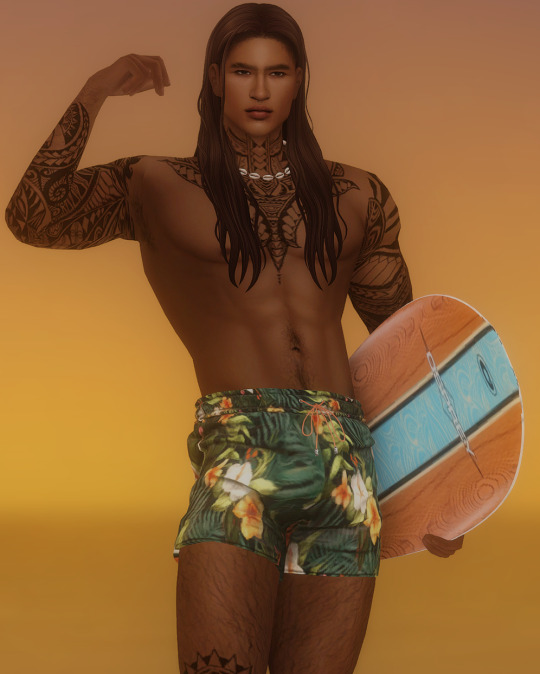
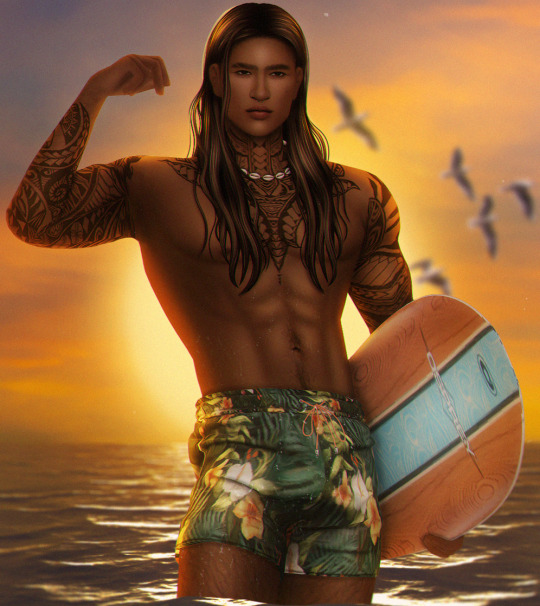
when it comes to my edits, it really depends on the screenshot. but i’ll use my makoa edit for an example!
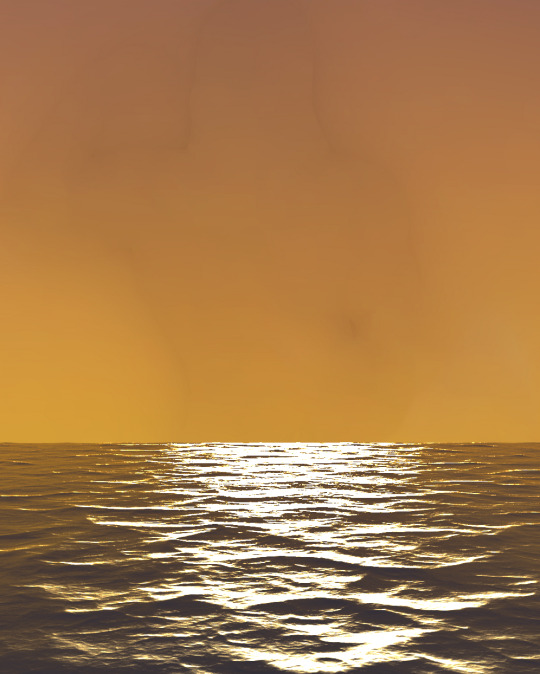
so, this is the original unedited screenshot. i’ll be basing my background off the horizon/ocean behind him. (also keep in mind i do this all with photoshop!)
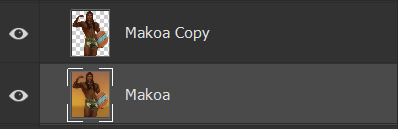
first thing i’ll do is separate makoa from the background. (do this is whatever way works best for you, for me i use quick selection or pen tool depending on my mood) when he is selected, i'll press ctrl+j and he'll appear cut out in a new layer. it should look like this.
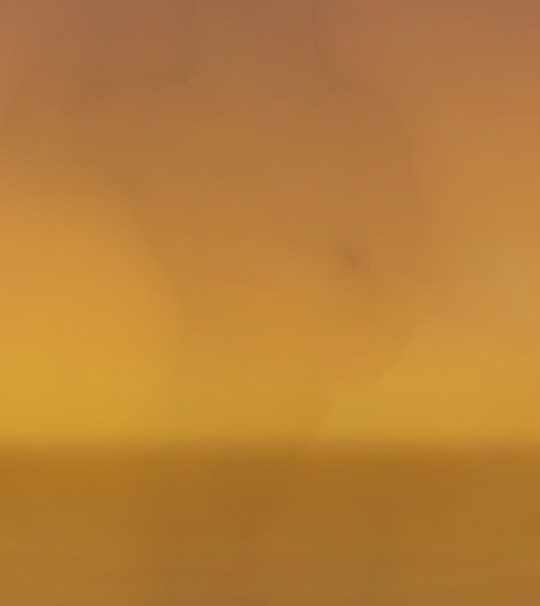
pressing ctrl, hover over your cut out sim layer, and click it. this will active the selection again. now, navigate to your original background layer. with the selection still active, go to select > modify > expand. expand this selection by about 15-20px. press okay! your selection will grow. now go to edit > content aware fill press okay. your original background should be filled now. (hide your cut out sim and wooo there ya go) it'll look something like this.
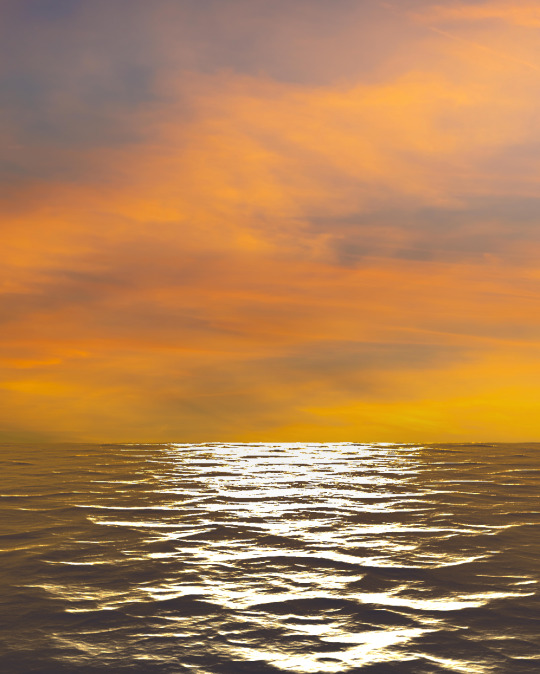
looks a bit funky now, but once we get into laying down the ocean/sky it'll come together in time. SO! first thing i do is grab the ocean texture i've made/edited for personal use. i'll match this the best i can to the in game ocean/adjust it to my liking. it'll look something like this.
now, i use my beloved sky replacement tool in photoshop to add in a sunset! if you don't know where it is just go to edit>sky replacement. choose a sky you like, and mess around with the settings until you get it to your liking. mine looks like this now.
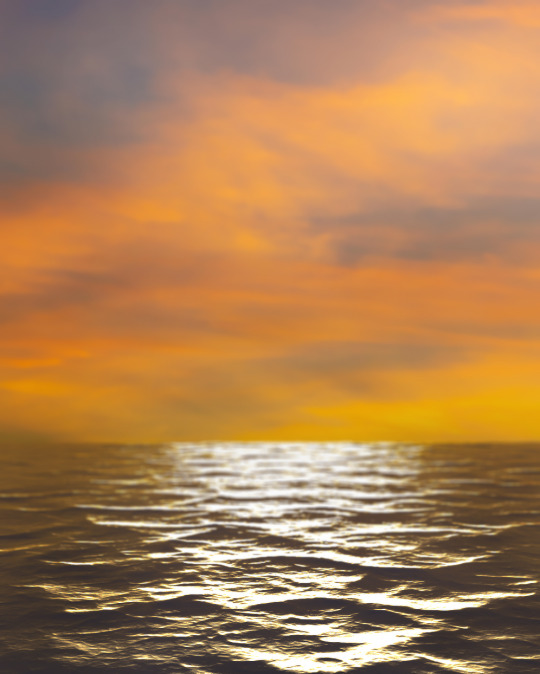
now we've got our almost finished background. here i'll run some topaz/sharpen actions i have, and blur it using tilt shift.
now you can go in and add whatever you'd like. i usually don't finish my background off until i'm almost done editing, since i place everything around my sim. but here i added in the sun, some lighting, birds!
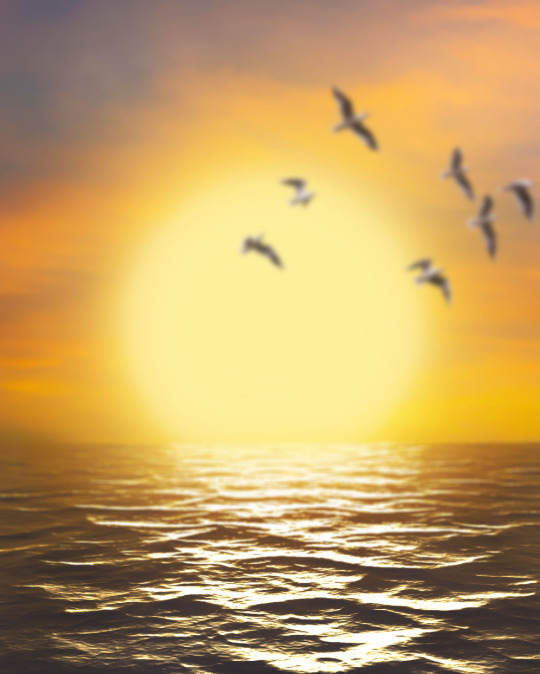
and then it'll come together in the end after shading/highlighting and color adjustments like so.
i really hope this was semi helpful?! i suck so bad at explaining things lol ;-;
30 notes
·
View notes
Text
i finally hit 1k!!! (no thanks to tumblr glitching my follower count) i'm really glad so many people like the little images i make☺️ to say thank you i prepared a little something! i've put together all the overlays i have downloaded that i use in my gfx as well as the fonts i've collected over the past couple years (and an updated giffing "tutorial"!) love u all hope november is kind to you<33
for starters here is the mega folder with all of my fonts and pngs! below is my semi-updated giffing process along with some of my actions<3
my process is pretty much the same as my old tutorial but now i've changed how i export gifs! my basic process is outlined in the gif below and and i've added 3 of my actions i use almost every time i gif in this google drive! (explanations below) :]
so after i know what clip i want, i put it into vapoursynth (download tutorial) and once that's saved i screencap it. what i do for screencapping is open the mov in mplayer osx extended and hold down shift+command+s but i know there's way easier ways to do it that i haven't figured out yet lol (tutorial i just found here)
once the screencaps are all on my desktop i delete any extras on either end of the clip i want and put them in a folder just so it's easier to load them in to photoshop. to do that, on the home page of photoshop go to file -> scripts -> load files into stack, then from that menu browse -> select all the screencaps you want to use for the gif and click open then ok
after they're all loaded into photoshop this is where i use my first action which just shortcuts all the way to the sharpening being done. once that's done i go to image -> mode -> 16 bits/contrast. this can help if the background is super pixely or anything like that. then i mess around with sharpening if i feel like it's too much. usually i'll change the opacity of the second sharpen layer to 50 and/or change the settings of the first sharpen layer like 200 to 150 or 0.3 to 0.2, whatever i feel like looks best. something i've also learned over the years is that sometimes you let noise do the heavy lifting and don't worry about making it look too sharp. if the gif is still a little bit unsharpened (?), the noise will make it look fine
then i do coloring which is the fun part! like i said, my process is more or less the same as my old tutorial so i'll just skip over that part and if you want more details feel free to check that one out. once i'm done with that i combine it all to a smart object, add noise (usually 1-1.5 these days), and then use my second action!
after the second action does its thing, i select all frames and set the rate. i usually set it to 0.04 for youtube videos and 0.02 or 0.03 for ts files. then, because vs leaves me with duplicate frames, i run my action for duplicates which selects all of the unwanted frames and then go to the hamburger menu just above the timeline -> delete frames. then it's ready to be saved!
#i tried to find a tutorial for how to put actions in ps but i couldn't find one sorry ㅠㅠ#pls do send me an ask or tell me in a rb if there's anything unclear or if you have any issues with anything!#*tutorials#resources#gif resources#gfx resources
19 notes
·
View notes
Text

tada! as requested by anon & since this is one my frequently asked questions i thought i'd finally make it a proper post! ദ്ദി(˵ •̀ ᴗ - ˵ ) ✧

first things first, i use photoshop cc 2018 to edit & with just a keyboard n mouse. my editing is HEAVILY inspired by the amazing stellarfalls !! i'm also still experimenting with things so i'll try to keep this up to date ♡


first i use smooth sharp (no topaz) then i will sometimes mess with curves if my photo is too dark to begin with. then i add my lighting which is just drawing on an overlay layer with a round soft brush :3

(sorry for the weird cropping i was recording the wrong window</3) i'm not a pro at lighting LMAO but i'll put it roughly where light would hit from the surroundings so here would be the fireplace, there's also a lamp behind them. i change the opacity so its not as drastic! for this step & the next i usually lean towards very light yellow, orange & pink for my brush colour!
next is the fun yet most tedious part, specific highlights! the most important part here when you're not using a tablet is shape dynamics > fade under brush settings (smoothing is also your friend as well!) this entire part is trial & error, you basically just outline the sim where light would be hitting them! when i'm done i use the blur brush, make it fit the entire image & click twice. i know that's like super specific it's just what i've found looks best so far •ᴗ•

hair strand time hair strand time!! i'm still not really satisfied with them yet (think i'm just being overly picky tbh LMAO) but this is how i do them now. basically following literalite's old hair strands tutorial, fade is once again your friend! i use a clipping mask to change the colours (˶ᵔ ᵕ ᵔ˶) i just use an edited photoshop brush & you can find the settings in literalite's video! but here are some nice hair brushes if you want more variety! x

finishing touches baby! time for some dust & noise ( ˶ˆᗜˆ˵ ) this gif shows a whole lotta nothing but i like consistency! anyways, what i'm doing is just sizing the image to fit then changing the blending mode to screen, i usually change the opacity to about 60% or 80% ++ i add 1% noise to the image!

and tada! we're done~ ദ്ദി(˵ •̀ ᴗ - ˵ ) ✧

but what about my older posts? all i used to do was add the butter action along with smooth sharp still + dust overlays! up until very recently i also added crinkled paper overlays to my photos

for overlays (things like moodlets, pop ups & text) the most common things i use are bunnithechubs' moodlet psd's! & buglaur's tutorial for text, i used this tutorial for pop ups in my older posts as well! other editing things i may use can be found at my resources page ♡
and now we're completely done, i hope that answers everyone's questions but if you still wanna know something or you're confused please feel free to send me an ask! ヾ(˶ᵔ ᗜ ᵔ˶)
#resources#editing tutorial#please forgive the cropping</3#also sorry for any grammar mistakes or anything like that (˶ᵔ ᵕ ᵔ˶)
24 notes
·
View notes
Text
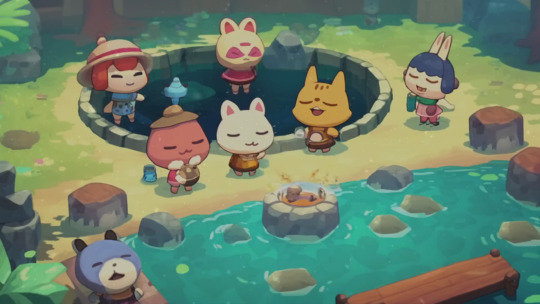
theres a youtube channel profiting off and lying about ai art and it's pissing me off
@/tendofarms on youtube uses ai art in the thumbnails and videos of their animal crossing compilation videos, claims it to be made by them despite also giving credit to a @/lumasi.png on instagram, who claims it's "a comission." this art is also being sold on merch on the channel's etsy account.
They haven't posted a video in 2 months but to see that they've made money through this scheme really pisses me off. Also the fact that they're attempting to decieve people by creating a fake artist on instagram who posts the ai art. They've attempted to say the art is a blend of original art made in photoshop/illustrator as well as the help of ai art. I dont believe this is true and im going to show your asses why
On their first video, they say

"my normal workflow so far has been to paint backgrounds, then get Ai to help with character design, i bring to photoshop to select my favorites, and put together something from my personal painting combined with my favorite Ai characters. Hope this clears things up :D"
The art in question:
and if you have no issues with it, here are MY issues with it

i'll pretend for a second that this person did make the backgroundand ignore the fucking surreal characters. sure. ok so what the fuck are these details. and also how did the ai manage to match your style so well? it doesnt have a backglog of years of YOUR work, does it?
On another video, they say

"a lot of illustrator/photoshop work went into this art. I used Ai to get ideas for composition and generate some character ideas, still some stuff i wish i improved but i think i got it to a decent final stage. Hope you guys enjoy the art and the mix <3333 love!!!"
the art in question with my notes.

The reason this particular post stands out to me is because in the DESCRIPTION of this video, they say the art was made by @lumasi.png on instagram. So when i go to their account and find this art, i see this

so, ok. was it a commission or did tendyfarms make it using a lot of illustrator/photoshop work. and if they ARE two different people.. wow their styles are so similar thats crazy /sarcastic as fuck
I would also like to point out that @/lumasi.png's first post, one that isnt featured in a tendyfarms video, also reeks of ai.

But maybe this isnt a big issue. Their etsy after all only shows that theyve made 16 sales, and their most popular views sit around 100k views, which probably isnt enough to even earn a stable living from, so who cares.
Just. as someone who listens to a lot of music from youtube mixes/compilations, who also makes art, i feel it's really fucking disrespectful to try and claim art as your own in a space where i go to try and relax or find new musical artists. and it's fucking rampant! i have to check each mix to see if using ai for the art, which i can only really see if i click on the video, giving them a small boost in stats. And if they arent using ai art? theyre probably stealing the art directly from an artist and not giving proper credit. Forget about asking the artist for permission, it's not like countless youtubers have explained how thumbnails are The Most important element of a video. Just go ahead and take someone else's work to give yourself some cash.
I know tumblr users hate generative ai already, but i'd just like to give a little attention to what youtube looks like, and to try and ask for more vigilance, more comments calling out the bullshit. I dont see a lot of comments at all on tendofarm's posts! or any mention of ai can be brushed away with "oh i used ai as well as drawing it myself" :/ you didnt buddy. you just didnt do that.
Idk what the right thing to do is, report their etsy? report their youtube? does either company care? maybe you can tell me
but i should probably say dont harass them. as much as i would like to. just try your best not to give retention to videos that shamelessly and ile about ai. Really look at the videos, really scrutinize if you can spare the time to. thanks


also. is it just me or do the cats in lumasi's pfp and this etsy reviewer's photo look the same. not sure what this could mean. up to you
#weasel speaks#ai artwork#call out#i guess. sorry that im making a damn call out post#ai art#controversy#discourse#ai discourse#ai generated#generative ai#lmk more tags in case people want to block seeing this kinda post. i dont usually post discourse
16 notes
·
View notes
Note
Heyy, I’ve been reading your wonderful one piece works for a while — and I couldn’t stop wondering how are you actually doing those magnificent headers?
Like… hello? The great quality, with additional 3D-alike details I could catch by my eyes? I got only Ibis Paint X on mobile, since I’m only a young man that literally two months ago went on a life-time ‘adventure’ of living alone in a small apartment.
In short — I got no money to pay for additional graphics/drawing programs, not yet at least
Hello!
Thank you! I'm glad you enjoy my writing - I'm curious to know what's your favorite piece / part? Also I'm so happy you like my headers? Makes it feel worth it to spend time on them! :D
I have excellent news for you, I used a mix of Canva and Photopea. They're both FREE!
I'll be explaining the process for making these two kinda? The full tutorial is below the cut, to be courteous to the other folks, hope you don't mind?
Though I am hearing that Canva has given people some grief. But Photopea is just *chefs kiss*
If you've ever used photoshop, Photopea is essentially a free photoshop, and it even has the automation tools! An absolute lifesaver when you have multiple layers you want to export (but that's for larger projects not this)
I'm going to assume you have basic knowledge of layers in digital drawing programs for this. If anything isn't clear: ask me, I'll clarify!
//-------------------------------------------------
My General Process is:
Search for official art / images
bring it into canva / photopea
crop / arrange images to match the dimensions
select a thematic color that is associated with the character
separate the foreground from the background
mess around and test things until they work
//--------------------------------------------------
Given "Louder than Words" is the latest one I've made, I'll start with the process for it.
Dimensions: 3000 x 1055 px dpi: 96
//-------------------------------------------
Let's Get Crackin'
Alright let's grab some official art so we're not using any fanart without the artist's permission
I try to pick images that feel relevant enough to what I'm trying to make. For example: the image for the Matching banner shows the ASCE tattoo which is super important in that fic
2. Let's arrange them onto a banner where each individual image has the same/similar dimensions to the rest
That's probably part of why you like these. To a certain extent they have similar dimensions, so they have a uniformity that's pleasing to the eye! (It's not perfect because I threw perfectionism to the wind because this is tumblr not my portfolio) Tip: if you have 3 images and only 2 that have similar dimensions, and the 3rd one can't be cropped logically: but the one that's a different aspect ratio in the middle!
3. lets arrange them in such a way that the borders all feel like they're the same/equal width/thickness
you might find that you have to shrink some images for this, that's fine.
ALTERNATIVELY: if you're going with one image crop it so it's just the relevant info and it matches the dimensions (3000 x 1055 px)
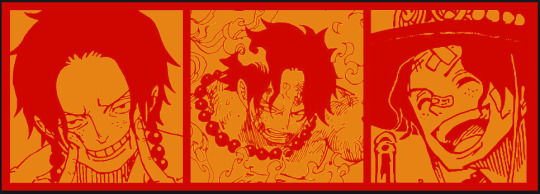
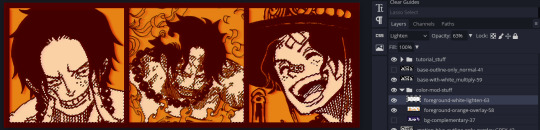
We have our base! Now let's add some color, and direct the viewer's eye together!
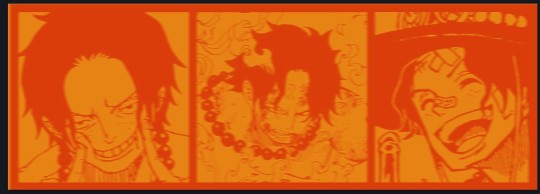
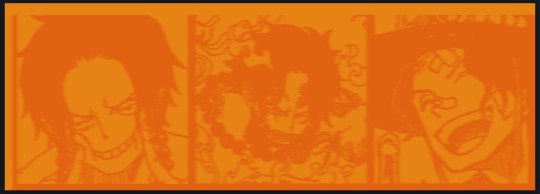
4. pick out a color that you think matches your character / vibe - that color is going to be your background Given I'm making an Ace banner: orange is the color I'm going with
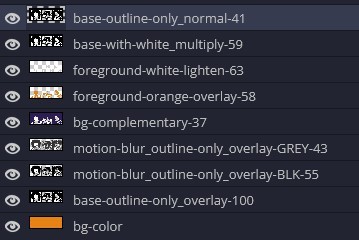
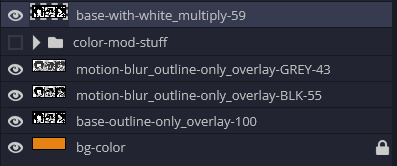
I went and named my layers for this lol. The numbers represent the opacity, and they aren't important. I just kept changing the opacity until I liked the way things looks. But here's the secret to the 3D feel:
Motionblur (+ moving it about)
Separating the foreground and background and dulling out the background.
I'm going to show you my process so you can see the effects, but first let's give you some quick skills:
//------------------------------------
SKILLS / THINGS I THINK ARE HELPFUL
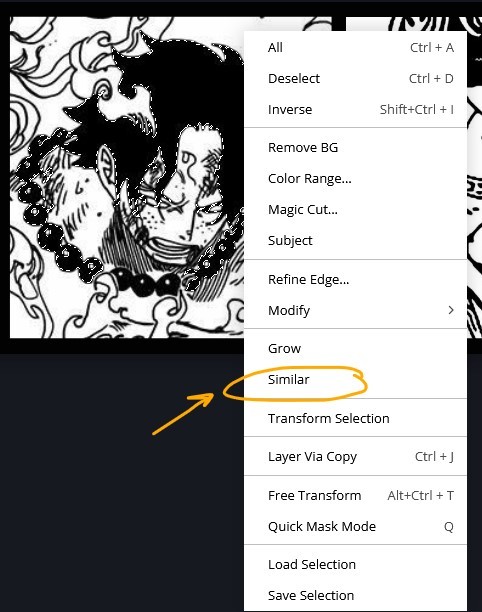
//------- Select Similar
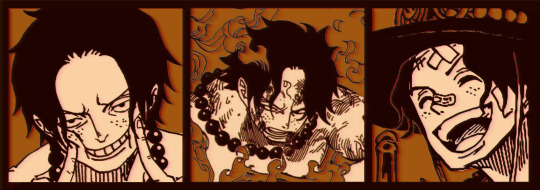
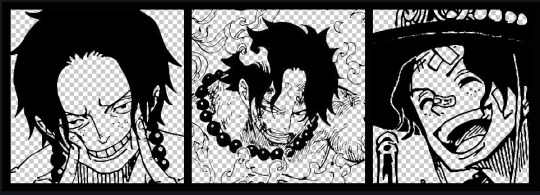
magic wand -> select something -> right-click -> select similar This works best when you have high contrast images (like manga panels that are black and white). You can select the black or the white areas. Depending on what works better for you. TIP! Invert selections with ctrl + i Say you know that you want to select everything but Ace's face in the second panel. Select his face with the magic wand then ctrl + i, and that's the only thing NOT selected


TIP!!!!!!!!!!!!!!! Please, please, please, duplicate your original image and work on the duplicate layer. This helps you SO much. !!!!!!!!!!!!!!!!! TIP! Check your selection tolerance! This could be why too little, or too much is being selected.

//------- The Move Tool
Shortcut key: v While the move tool is active, you can nudge the stuff on whatever layer with your arrow keys Shift + arrow key = 10 px move (generally)
//------- Layer Locking
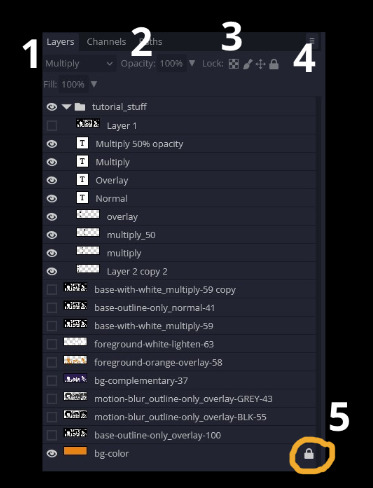
1- Layer Blending Mode (see Overlay vs Multiply vs Normal) for how this can affect results) 2- Opacity: how see through it is / isn't 3- Lock Transparency (it's the little checker board) 4- Lock Layer (looks like a lock) 5- Lock icon that appears when anything on the layer has been locked More on 3 Lock Transparency: You can only paint on / modify what's on that layer. You CANNOT add anything to any area that is already transparent Here's a demo of what you can do with this power:
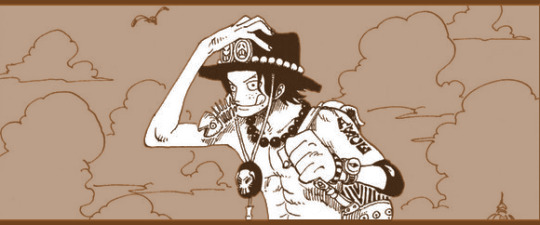
Here's the original Image - notice how it's just the lineart with a transparent background.
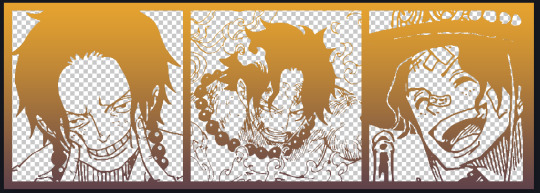

It's powerful: abuse it
//------- Overlay vs Multiply vs Normal
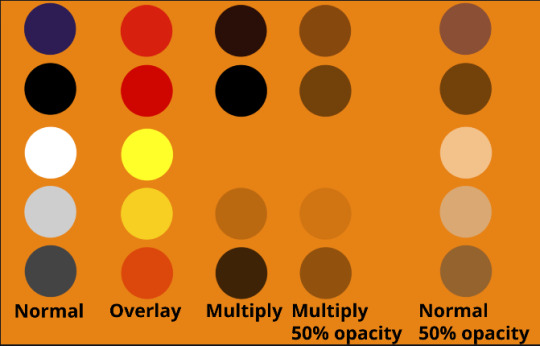
I think seeing this is the best way to visualize how different modes can affect the color.
//--------------------------------
Back to the Tutorial
!!I IMPORTANT NOTE !!
Please play around with the opacity slider to figure out what opacity works best for you on the multiple different layers we're about to make / work with. It's up to your own style to figure this out. Next: please feel free to not follow all of it. Add more layers, add less layers, take the base principles and go wild! :D
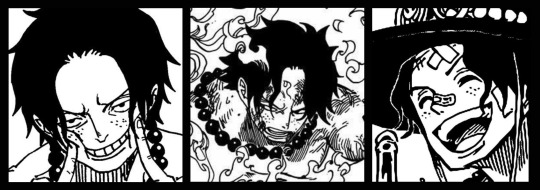
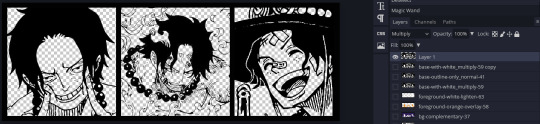
5. Separate the lineart from the background and save it as a new layer 6. Duplicate it and set it to overlay, or set it to overlay immediately
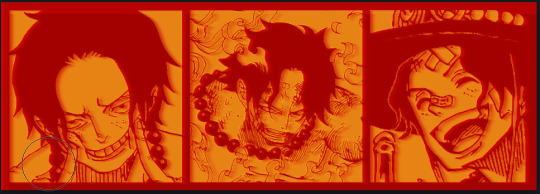
7. Duplicate that lineart layer twice and set the blending mode to overlay 8. lock transparency on the top one and change it to be a dark grey 9. Apply motion blur to both:
Main menu bar -> Filter -> Motion Blur I made it so that the grey layer was blurrier than the black layer
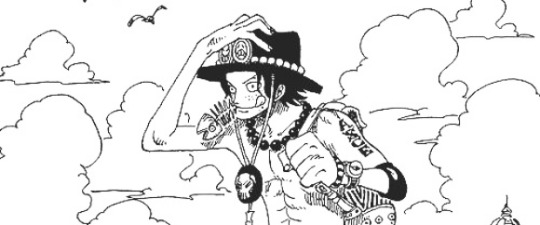
10. More them around a little to give it a "3D effect" as you called it.
It creates shadows under the lines - I was aiming for an effect similar to chromatic aberration (chromatic aberration is a valid way to add punch to your stuff too!)
So this is what things look like now - painful, but let's keep going
11. Duplicate the ORIGINAL / BASE lineart layer, that you DID not apply motion blur to -> set the blend mode to multiply (reduce opacity for it to actually take effect)
okay that's less painful here's what the layers look like right now:
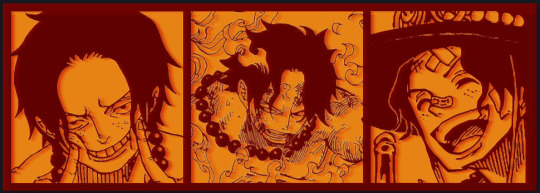
let's bring more focus to Ace's face, and push the background farther away:
12. Use the magic wand tool to quickly select large areas of the faces / focal area / foreground and the lasso tool to refine things
TIP! Hold shift + click -> add to selection Hold Alt + click -> subtract from selection
13. On a new layer with blending mode -> lighten, fill that selection to be white
If you look at it, you'll notice that it is ALREADY starting to draw our attention to his face, but the background is kinda aggressive, so let's dim that down
TIP! Right-click on the gradient tool to find the paint-bucket tool

TIP! Sample All Layers: Turning this option off makes it so that you only work with the content on THAT specific layer. Turning it on makes it so that it is working while taking all other layers into consideration.
14. ctrl + click on the "white foreground" layer to select the contents of that specific layer (pink thing is your mouse)
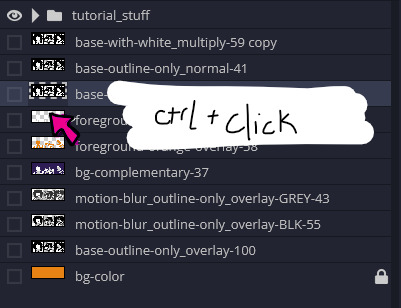
15. ctrl + i to invert selection and ON A NEW LAYER (layer mode -> multiply) fill that with a complementary color

16. I did one last thing where I took the original base (before we separated the lineart) and added it to the very top and played with the opacity to get something less in your face (layer blend mode was set to NORMAL)
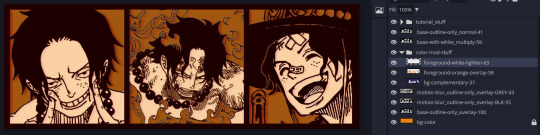
And that's it!
More considerations that I take:
I want the banner to be "thin" or not square, so it doesn't take up too much screen real estate on people's devices
I don't want readers having to scroll too much to get to my writing (which is the whole point of the post, let's not waste their time making them look for things)
I want the banner content to be relevant enough?
ie: with Matching: I wanted the ASCE tattoo to be visible. With matching I wanted Ace to not look too happy in some of them.
I'm also trying to avoid spoilers, I hated getting things spoiled, so I'm trying to be careful that the images I pick don't spoil anything really.
Congrats on starting life on your own! I did that whole living by myself thing too! Tip: keep the pantry stocked with lentils, beans, pastas, baking essentials, rice. They really come in a clutch when you're hungry.
#photopea resources#photopea psd#tutorial#tutorials#tumblr banner#photoshop#photoshop tutorial#digital art#fuck adobe#adobe photoshop
29 notes
·
View notes
Text
These have been sitting in my inbox for a while, and I want to apologize, because I am a world champion at procrastination. I actually have quite a few asks that I’ve never responded to, and I feel like such an asshole. If you sent an ask and I never responded, PLEASE don’t think I’m ignoring you or I don’t care; I just have this thing where I get distracted very easily and it turns into procrastination. I really cherish all the love jam packed into those tiny little asks.
But these are the most recent ones, and they’re kind of in the same vein. I really should make a narrated process video of some sort one day. I do have something like that on patreon right now, but it’s over a year old, and my process has changed since then. But for now, I’ll try to answer these as best I can!
First of all, thank you!! This ain’t a question but I’ll go on a spiel anyway. I use a dark pencil for outlining, and I try to emphasize deeper/darker areas with both pressure (pressing down harder on the pencil), and overall size of the line/mark/whatever. These spots are typically the upper eyelid, nostrils, corners of mouth, inner ear, bottom/roots of pieces of hair, spots where clothing wrinkles originate, that sort of thing. Oftentimes I’ll emphasize the “underside” of objects or shapes too.
As for time for a drawing, it varies a lot. The lengthiest thing I work on is commissions. The initial light sketch for a comm can actually take a while, depending on the drawing. 2 full characters together requires a lot of planning for the poses and stuff. So I might spend an hour, 2 hours if I’m really struggling, just making the sketch for a 2 full body character drawing. Then I’ll take maybe 5 or 7 hours to do the rest? That’s a guess, I don’t really keep track. Usually I’ll do the sketch one day, and the next day I’ll spend all or most of the work day just finishing the drawing. I consider one of those “a days work”. Hopefully that made sense!
The images of my drawings are clean because I scan them! After I scan them, I do a levels adjustment in photoshop. (I struggle taking pics with my phone, even though it has a nice camera 🥲I don’t think I could ever get close to the way they look now without a scanner)
As for how I make them look clean on paper, I think it’s a combination of two things: the pencil I do the initial sketch with is substantially lighter than the one I outline with. So when I’m outlining/rendering out the drawing, the sketch lines sort of fall back and aren't as noticeable. Secondly, I use a click eraser to erase the sketch lines as I go. And I take my time and use a lot of patience and prioritize neatness/details. This is especially the case with comms. With those I give 110%. For my own personal doodles, I don’t focus on making them as neat, and instead scribble around with my pencil to get the values I want, without fretting over each individual shape to make sure it makes sense.
I hope this answers your questions okay! I really should make some sort of video but I don’t have a lot of time right now. Thank you for your asks and kind words!!
62 notes
·
View notes
Note
hi, first of all i want to say how much i love your writing and hiraeth in general. i also want to start a blog but i'm reluctant because one : i suck at making graphics, i don't even know how picsart works and two; i have add, a form of adhd so i'm very scatterbrained and it's hard to organize my ideas. do you have some tips for me? also do you plan your lore and everything else in google docs or do you use something else? where do i start? thank you and keep shining bright 🪽
aaaaa hi friend, i really appreciate ur kind words and u know me... i love sharing tips!!!! but first of all i want to apologize for replying just now, i've just been really busy with real life and work :)
i know graphics are kinda a big deal and a good factor to uhhhh get attention but, in my opinion, as long as the writing hits, it will hit yknow? but if u think it's a necessity to have cute lil graphics in ur posts, i fear that the best thing u could do is to actually start playing around with an editing app :) personally i use photoshop for everything as that's the one program i've been using since forever (and i learned using it all by myself by clicking around and watching tutorials), but i've used apps such as gimp and photopea in the past and i've always found them easy to use :) even canvas could save ur day! and hell im sure picsart could help too if u just fool around until u get a feel of how it works!!!!!!
when it comes to organizing my ideas and the aes lore, yes, i use google docs. and i wouldn't be here without my silly little almost yours, hiraeth docs!!!!!! i have that page structured in various sections (such as: basics, pre-debut, the aengels of the season project, members, endorsements, era tidbits, theories (rl and lore wise), yada yada yada) and i think that the only reason i haven't lost my mind over the mess i have written in there (because i'm also a little scatterbrained) is because it's actually organized. u could dm me if u want to see how it is actually structured in case u need visuals
i usually just info dumped my ideas in said docs (obviously under the correct section) without trying to make it fancy or make it make sense, because i knew that i would eventually go back to it and try to structure it into it making sense. idk if this make sense but what i'm trying to say is "info dump then make it pretty later" because idk i usually got exhausted when i tried to make my lore ideas to make sense in one go lol
and i think that's all! if u ever have another question please let me know bc i really like to help but if this wasnt helpful at all im sorry friend........ i will link u to two other asks i've gotten about ~joining the community~ and ~lore tips~ in case u ever need them. hope to see u soon <3333333
5 notes
·
View notes
Text
Hello @crispyliza !! So I'm replying in a separate post because this is too long for a reply on the post. Hope you don't mind. I also think it might benefit others who have asked me in the past and those wishing to start gif making. Especially with whumptober just around the corner.
So here's a full look at how I make my gifs. This got very long so I put it under a read more
A quick thing before I start: I use windows and google chrome. If you're a mac or firefox user I'm not sure of this will work for you in terms of programs. The techniques I use in photoshop should though.
Okay for this demonstration I'm going to show you how I made the gifs for this gifset
To start we need a video. I don't torrent because my internet connection will cut out a random which makes using vpns rather pointless. I've tried. My internet would cut out halfway through a torrent download and then my internet provider was notified to what I was doing. It was just not great. So I found a new way to download videos off the internet! You can use torrents though. If you've got a vpn, go for it.
There are several streaming sites that I go to to get my videos. 1movies, and bstsrs are my go to right now since soap2day is gone (rip i miss you).
Now there are three ways I can get a video depending on what website I'm using. Bstsrs is the easiest because they have a whole bunch of links available. I always go with mixdrop because it has an easy to use built in download button. Unfortunately this site doesn't have movies. Just tv shows and sometimes it's not the best quality or there aren't links available. That's when I go to 1movies. Once you've found your video I use the chrome extension Cococut to download it. Click the extension button to open, then the download button. Then you just have to wait until the video is rendered. Click save. Wait until its downloaded.
Okay we now have our video! The next step is to turn the scene you want to gif into frames. For this we're gonna need KMPlayer. This video player makes it really easy to turn scenes into frames/screencaps. Open your video. Find the the scene you want and pause the video. Type control-g to open this screen:
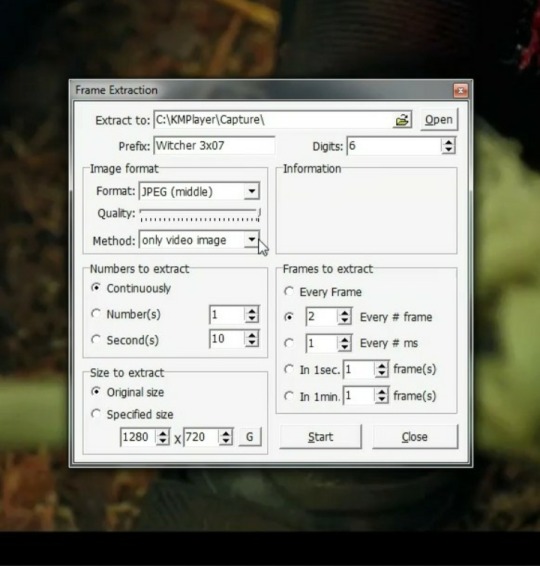
Here you choose the destination you want your frames to be saved. Decide what to name your frames and match up your settings with mine. You want to continuously extract frames, original size, and I stick with every 2 frames. Then, and this is important, choose video images only.
Now click start then start playing your video until the scene you want to gif is done. When you've got everything you wanted, pause the video. Hit ctrl-g again to reopen that screen and click stop. You now have all the frames you need so go ahead and exit out of KMPlayer. You don't need it again unless you need to redo frames or get the dialogue or something.
Next up we are gonna open Photoshop. I use Photoshop CC 2014.
Click on File -> Scripts -> Load files into stack -> Browse.
Go wherever you saved your frames and select the ones you need. Click okay and let the frames load completely before doing any thing else. Depending on how many you've selected this could take a while.
Once all of your frames are loaded, click "Create Frame Animation". Next click the little arrow button on right followed by "Make Frames From Layers" so we have all of our frames laid out. Now we need to reverse the frames because they're backwards so click that little button again and then click "Reverse Frames"

Okay you've got your frames loaded and all set to go. Time for all the cropping, resizing, setting the speed, and editing.
First thing I do is set the speed because otherwise I forget and it's important to do and a pain in the ass to do after all the editing is done. So do it first and get it out of the way. Select all of your frames. Click the little button beneath a frame where it says 0.0 and pick your time. I usually go for .1 seconds but .05 is also a popular speed. Just test one out and see which one you like best for your gif. You can hit the play button at any time to test your gif.
To set speed:
After this I do one of two things. Either I go into cropping and resizing or I separate frames. Depends on how many frames I uploaded. If I uploaded all the frames needed for an entire gifset this is the part where I separate them out onto individual gifs. So let's do that.
Originally I was just gonna do one gif but I have 115 frames uploaded which is waaaay too many for just one gif. I like to keep my gifs between 30 and 80 frames. So I'm going to split this into 3 gifs I think. It'll make a nice balanced gifset.
Select the frames you want for the first gif and copy them using the copy frames option in the same menu as the make frames from layers menu. Open a new document with the same dimensions as your current document. Click "Create Frame Animation" and paste the frames over the selected frame. Make sure that first frame is the same speed as all the other frames. Repeat until you have your desired gifs.
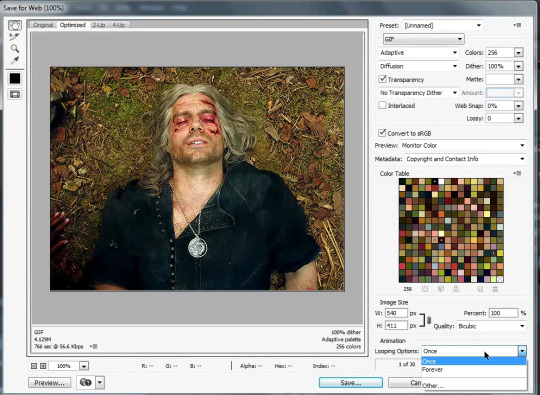
Next up I crop and resize. For this gif I'm going to first crop out the black bars above and below the image because we don't want that in the gif. Use the select tool to pick what you want to keep then "Image" then "Crop".

Now I could leave it as it but I think for this gifset I'm gonna focus more on Geralt so I'm going to crop it in a bit more.
Once cropping is all set i'm going to resize the gif to tumblr dimensions. Click "Image" then "Image Size" and change the width to 540px. The height can be anything and best not to mess with it so your gif keeps it's proportions. 540px is the width of a tumblr post and I plan on making these gifs stacked one on one.
Okay the gifs are all cropped and sized. Now it's time to do some editing. Go back to your first gif. We'll do all the work on this first gif and apply the same things to the other ones later because the scenes are the same. If they were different each gif would be colored and edited individually. First thing to do is turn it from frame animation to timeline. Timeline mode makes applying things like sharpening and brightness much easier and smoother.
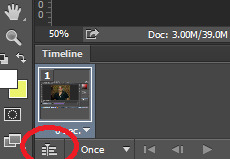
So just click this button in the bottom left corner to go into timeline mode. Next up select all your layers. They're on the right side. Make sure you've selected ALL of them. Then click on "Filter" -> "Convert for Smart Filters" THIS IS AN IMPORTANT STEP! We can't edit until this is done.
This button to switch from frames to timeline:
First thing I do is sharpen. You can use one of the presets or try to do manually do it with smart sharpen. I use the preset labelled "sharpen" because I'm lazy and this one does a fine job for my gifs. I also add a layer of surface blur to smooth things out. Just a small touch. Like barely any blur but I think it smooths noise a bit and makes it look better.
Next up: Editing!! This step is going to be different for each and every gif you make. It all depends on the colors in the scene your giffing so you're gonna have to do a lot of experimenting to get the right look you want. Personally that's what I like about it. Makes it fun.
All your adjustments can be found found on the right side of the screen:
I almost always start with the "Levels" layer to brighten up the image because as we all know, every freaking whump scene is sooo dark. So with levels you just slide the little arrows around until you get a look you like.
Then I add a layer of "Curves". I love curves. With curves you can select the whitest white and the darkest black and the middle tone to change the brightness and colors of your gif. Or you can use this part and just brighten or darken a specific part. It's really versatile and i love it. It does take some practice and experimenting though.
Now a layer of "Contrast" and a layer of "Vibrance".
After this it's all about the selective colors, photo filters, and color balance to work on the colors and brightness. For this gif I'm only doing a tiny bit of editing cause I like the coloring but sometimes I'll have multiple layers of these to create a good coloring.
Once you're satisfied with how your gif looks it's time to save it!
Click "File" -> "Save for Web" and wait until it's all loaded. Important thing too look at here is the size of the gif. You can't upload any gif that is larger than 10mbs so make sure it's under that. Sometimes even 9.8 is too big because tumblr is a butt. I go for anything below 9.8. If your gif is too big try resizing it or removing a few frames. Make sure you gif is set to loop forever. Otherwise it'll just stop after a little bit. Don't forget to change this!
Here are the rest of my settings:
After that you can click save.
And that's it! You've made a gif! Congrats! If you have any questions or want clarification feel free to message me :)
32 notes
·
View notes
Note
hey I love your edits and I was just wondering what you use/do to edit your photos? Not to copy, just in awe!
omggg thank you anon!!! the fact u want to know at all means so much 😭💓 especially when theres so many people posting edits that have a much better understanding of how to edit photos than me!!! (may i direct you to the amazing @yesloulou and her gifs..) ask me anything im happy to share and for u to copy my techniques (??) send me any other questions u have if i dont answer them i cud talk abt this all day .. 🫶🫶
so! i use the mobile version of lightroom when im editing photos quickly e.g. on race day, and tbf, its my main editing app. if that doesnt click with u, theres also snapseed which is a google editing app that i also used for a while until i realised lightroom was free (a blessing 😭). I also sometimes use photopea as a rip-off photoshop if i want to do more crazy stuff 🤪🤪🤪
first thing is crop the image if it needs it. i have a preference for portrait photos, just bc i prefer the way they look when posted. i use all sorts of ratios, but my favourites are 3:4 and 5:4 just bc i think they work best with driver portraits! (hot tip: the rule of thirds is soooo helpful!! find a metaphorical 'line' through the photo and line that up with one of the thirds) (lightroom produces the grid automatically when u crop xxx)
the next thing i do with a photo is correct the lighting and colouring. there are plenty of tutorials online and i can go more indepth if u want, but i tend to favour lower contrast with low highlights (bc i hate when u lose detail in highlights. the bane of my existence). its usually the first thing i try, but if it looks horrible i'll try different things. to correct colouring, i use the tint/temperature sliders (im still learning how to intuitively use these rather than messing around and going hm. too purple right before i post). since most of the photos i edit r taken by super talented F1 photographers i rarely have to use curves, but sometimes i do! so i do that as well before i get into the meat of it if needed 😌
then i adjust the tint/temperature & vibrance and saturation until i'm getting the vibe i want (e.g. i love making max photos cooler toned). then i use colour mix to change anything specific about colours in the image (i most commonly use this to make daniel/charles' skin less yellow and more red toned, to soften any redness or to make max's blush pink). then i colour grade!
after that i decide whether the image needs sharpening, extra texture or dehazing, and then i add grain! i prefer a rough, understated grain so that you dont lose loads of the detail from the photo. here's some examples of before and afters of some of my more complex edits:
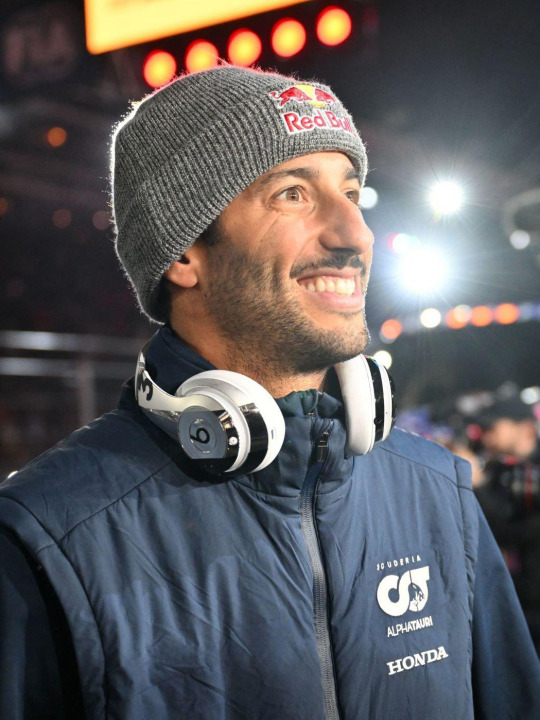
-> this one was lighting correction and colour correction! i also used curves im pretty sure 😭
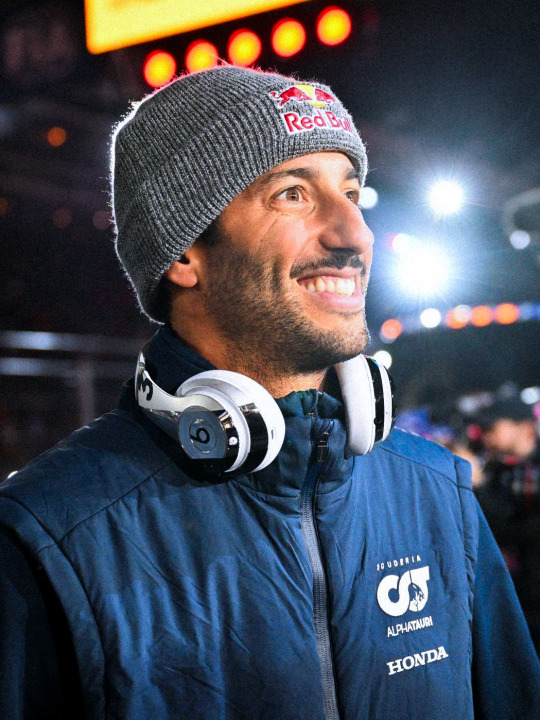
-> exposure and contrast changes and colour changes/grading (can we appreciate this photo.. wow)
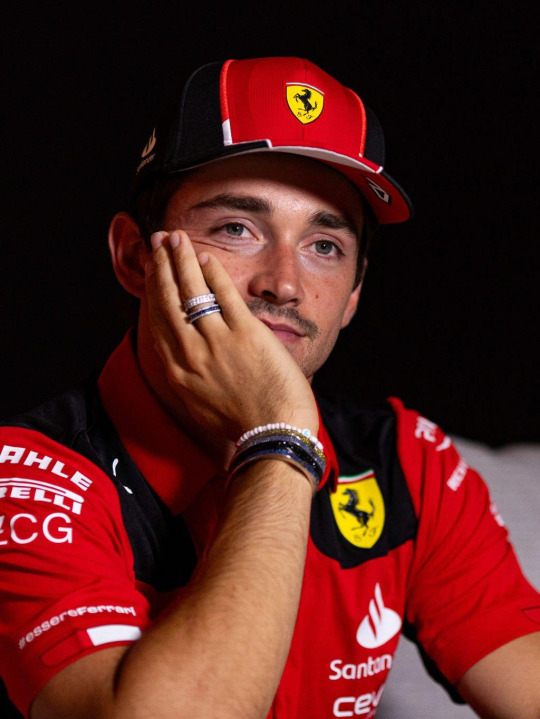
-> made photo brighter (pretty sure i lowered the highlights..) n changed the temperature of the photo
i hope this helps!!!! if anyone wants me to do like a proper adjustment by adjustment type thing send me an ask and i will do!!! thank you so much kind anon 💖🫵
#ahhhhh anon ur so sweet i hope this is comprehensive?? sorry if i went overboard 😔😔😔#beth answers#lovely internet people
14 notes
·
View notes
Text
Fix your wonky sh*t with Windows Paint 3D- no Photoshop necessary!
So if you're like me and refuse to pay for Photoshop... here's a tutorial on how I fix all that weird crap that happens when taking screenshots. In this scenario I will be covering up and replacing a wonky piercing using the base program on most Windows computers. (Expand photos to see better!)
Step 1: Open your file in Paint 3D and select the dropper tool in the bottom right. You're gonna use this for blending.
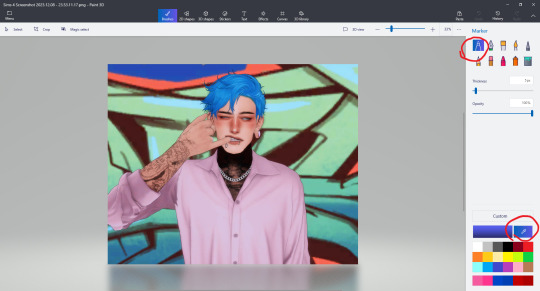
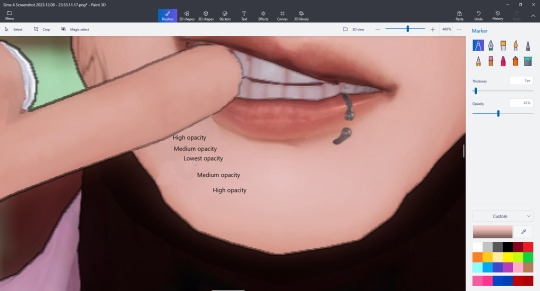
Step 2: Select the color around the object you want to blend/remove and set your dropper to about 75%. Color over the object.

Step 3: Use the dropper to select the different colors around the unwanted object, and adjust opacity to seamlessly blend the colors together. Expand photo for guide.
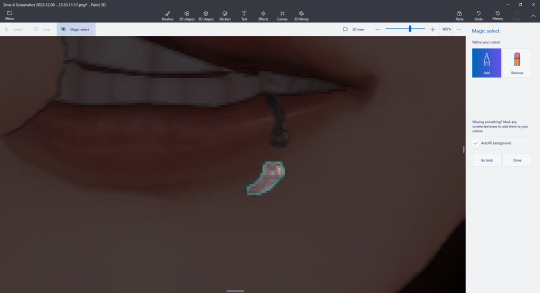
Step 4: Once your colors are blended, click Magic Select at the top left of your screen.

Step 5: Bring the edges of the square as close as possible to the object you need to duplicate and hit next. Add and remove as necessary using the tools to the right and hit done when you are ready.
Step 6: What you have done is basically turned this tiny piece of the photo into a movable sticker. Right click on your sticker and hit copy, then undo. If you don't hit undo it will mess up the original placement.
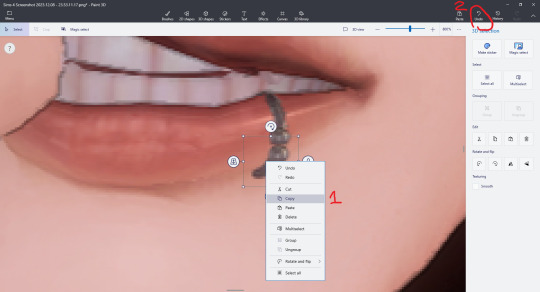
Step 7: Right click to paste your new sticker and use the flip and rotate tools to adjust the placement.

Done!

I'm not the best at explaining things, but I hope this helps! You can do a lot with this simple program, and it'll save you a couple bucks. ;)
8 notes
·
View notes
Note
hi! do you have tips and advice for making gifs? i love your gifs so much!
awww thank you so much, that really means a lot to me as I'm still rusty and a bit insecure because I've learned how to make gifs like 10 years ago? things didn't changed that much in terms of method and yet it's still scary, but at the end people like you make it worth!! 🥺🥺🥺
a little disclaimer: I'm colorblind, I can see colors okay! but I just see them a little bit different than most people so sometimes my edits may seem a little weird and that's the reason
Okay It will definitely be a long answer so I'll put under the cut ☺️
My advices would be:
- Just go for whatever scene you like the most, and try to focus on things you enjoy. I like to gif what I love, things I find beautiful as it gives me so much joy to look at the final result 😌
- Fortunately tumblr is full of people willing to share their knowledge and skills and there is lots and lots of blogs with the main theme being tutorials or even inspo and sources, so I always try to follow them to keep up with whatever is trending and just to learn new tricks and tips, some of my faves are @completeresources @gifmakerresource @allresources and @chaoticresources
- Be patient with yourself, if you are trying a tutorial and it is giving you a hard fight you can always stop and try again another time. It happened to me more than once that a tutorial or a particular idea I was trying gave me such a bad fight that I ended up so frustrated, exhausted, angry and feeling shitty but then I would pick another time to give it try and the thing worked hahahaha, so don't forget to respect your time and wellbeing
In terms of tips and tricks:
- Always use high quality videos, like the best quality available as it really makes a difference in terms of the final result
- Oh always resize your gifs!!! I use the crop tool and then I adjust the image size to keep it high quality, I think this is BY FAR the best tutorial as it explains quite well if you are new to editing
- So far I have tried many many different methods over the years, my fav is to cut the scenes I want to edit and for this use any video editing software really and after choosing a couple of scenes I import all of them to Photoshop (my version is the 2022 edition) and then I use the video timeline method (i don't really remember where I learned it but I found this really good tutorial that might be helpful)
- I slow down the gifs I make (idk how to explain it in english I'm sorry) but I set the speed for something in between 50% to 70%, depending on the scene
- In terms of colouring I don't really have a specific preset or fav PSD, I adjust them one by one just trying to focus on what the scene gives and then I work my way around it depending on what I'm trying to achieve or how do I want my gifset to look like (a good example was the Ron one on my last gifset i didn't wanted to look so yellow as it would be too different from the other gifs, it was a nightmare) BUT I guess I tend to use lots and lots of adjustment layers like I start with brightness/contrast, curves, and levels and then I proceed to selective colors, hue, vibration and saturation, sometimes I even use gradients and/or solid color layers with different blending options like soft light, overlay, opacity and fill settings to correct colors (I always use the color wheel principles of opposites and/or complementaries)
- Use smart sharpening!!! Peopel are so brilliant that they gave us actions, it is literally just a click away from all the trouble to do it manually, and it speeds up my process. Personally I have been using this amazing one I found quite recently, and it's really doing wonders to my edits
anyway thank you so much for being so kind and supportive, my ask box and dm are always open if you have any doubts or just want to exchange ideas. Really hope it helps you ❤️
7 notes
·
View notes
Note
Hi beautiful! I was just wondering if you had any tips or even a tutorial on removing patterns from items you recolour? I've seen you do it a few times now and I've tried to do it myself and ended up nearly bald lmfao. Do you just end up hand painting the whole damn thing? Or is there an easier way? Sorry to bother you! I'm very new to cc creation and just thought I'd ask! Thank you for any help! Have a great day 💖
hey!! it's not a bother at all, i'd be happy to help if i can!! 🤍
so i always remove patterns using photoshop, here are the best tools for the job:
p.s. if you don't have photoshop, check here!
spot healing brush! looks like this:

I just select it and make sure the settings at the top say "content aware", like so:

(you can also try with "proximity match", but i find content aware more reliable). then all you do from here is paint a little blob over the thing you want gone and it pops out of existence!
2. patch tool, under the same menu:

again, make sure the top says content aware:

then with this one you use the tool to draw a little circle around the thing you're trying to remove, and then click and drag your selection to a similar-ish colored area as what you want your result to be and it replaces it!
3. stamp tool:

this one is a bit less "intelligent" if that makes sense, it's like a literal copy and paste brush. once you've selected it you press "alt" and click a spot that isn't what you're trying to remove but what you want to replace it with. then paint over what you don't want and it puts down a copy of the texture from the spot you defined. this one's really helpful for areas with straight lines.
and finally, if the above aren't doing the trick, then I do end up painting some bits in by hand lol. but its a lot faster overall using the tools above and they're usually quite good! i hope this helps !!!!! <3
20 notes
·
View notes