#add user command prompt windows 10
Explore tagged Tumblr posts
Visit Tumblr Blog
Explore Tumblr blogs with no restrictions, modern design and the best experience.
Last Seen Tumblr Blogs


Fun Fact
Tumblr was the first site to host the blog for President Barack Obama in 2011.
Text
youtube
How to Create User Account By CMD | Laptop | Desktop | Windows 10,8,7 | In Hindi | By Sachin Sharma
#change user password cmd#delete user cmd#add user to admin group#add user command prompt windows 10#computer me user account kaise banaye#windows10#windows 8#windows 7#Create a New User#Guest User Account on Windows#new user account#how to create user account in hindi#account create#how to create user account in windows 10#what is a local user account and how to create it?#create an administrator account in windows#how to set up limited user accounts in windows 10#Youtube
0 notes
Text
Alright. I'm making this post because I was unpleasantly surprised to find Microsoft had forcibly downloaded an """"ai assistant"""" onto my computer (called Copilot), and because finding a site that actually told me how to kill it for good -- in clear, truly step-by-step terms -- was way harder than it needed to be.
Preface: this is only relevant if you're running Windows 11.
Here is your target:

If you see this logo on your taskbar -- or... have Edge installed on Windows 11 -- you've got Copilot. You can't delete it on its own, Microsoft has integrated it into the OS as best they can. The most you can do is disable it (instructions for which are at the very end of this post).
So... to REALLY get rid of it you need to uninstall Microsoft Edge, because it's a part of/reliant on Edge. A lot of bells and whistles of Windows are also reliant on Edge, like widgets, but I never use those. I use my PC almost exclusively for gaming, and I don't want this slimy "ai" shit on my computer. I use Firefox anyway. Edge can go die as far as I'm concerned.
Here's the actual steps, copy-pasted from a website that took me way too long to find. It also really makes my browser chug for some reason, which is why I'm copy-pasting the whole thing. If you still want to look at the site itself, put it in reader view as fast as you can (link to site).
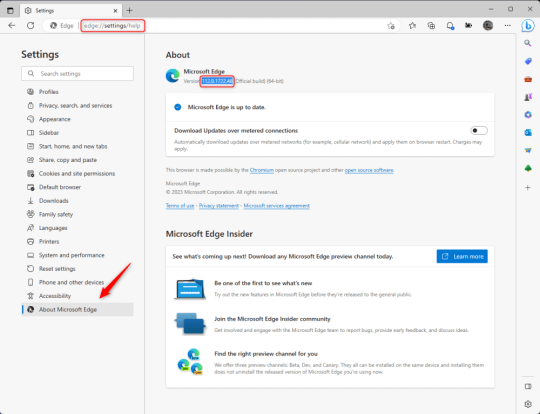
1.) Open Microsoft Edge, type "edge://settings/help" in the address bar, and then press Enter.
2.) Click "About Microsoft Edge" at the bottom of the left-hand pane. Copy the version number at the top of the screen, under Microsoft Edge.
3.) Press Windows Key + S to open Windows Search.
4.) Type "Command Prompt", right-click the result, and then select "Run as Administrator".
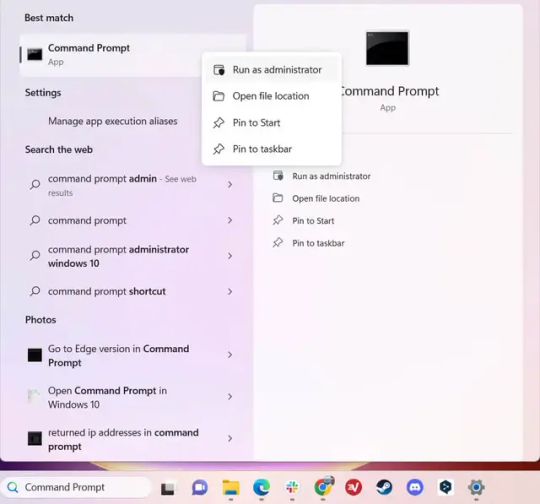
5.) The User Account Control (UAC) prompt will appear. Click "Yes".
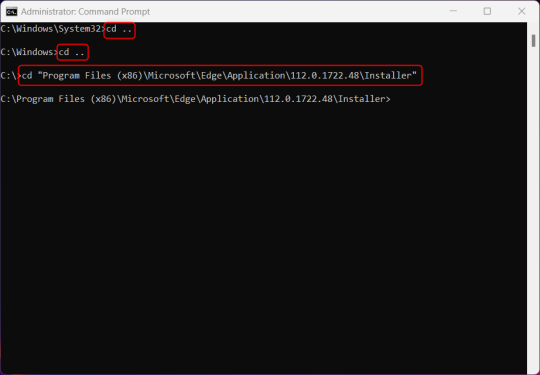
6.) Navigate to Edge’s “Installer” directory by using the cd command. Depending on which directory your Command Prompt opens in by default, you may need to use the "cd .." command to go back a level or two.
Once ready, run this command:
cd “Program Files (x86)\Microsoft\Edge\Application\Version Number\Installer”
Replace "Version Number" with your actual version number copied earlier.
7.) Next, run this command to uninstall Microsoft Edge:
setup –uninstall –force-uninstall –system-level
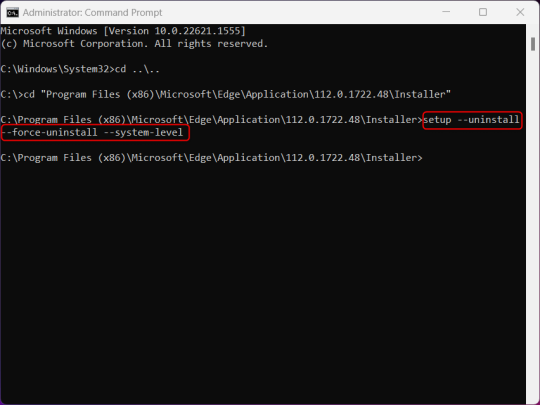
((It will look like nothing happened! Don't worry!))
8.) Restart your PC for the changes to take place.
((HOWEVER, Windows will try to reinstall it the next time your PC updates (or whenever it feels like it lol) so there's a second half to this))
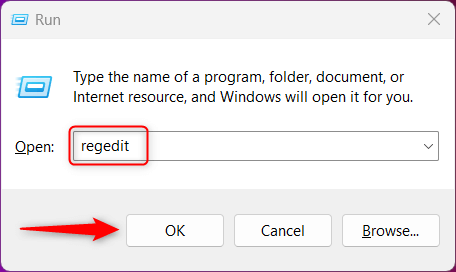
1.) Press Windows Key + R to open Run.
2.) Type "regedit" in the text box and click OK to open the Registry Editor.
3.) The User Account Control (UAC) prompt will appear. Click "Yes".
4.) In the Registry Editor, navigate to HKEY_LOCAL_MACHINES\SOFTWARE\Microsoft.
5.) Right-click the "Microsoft" folder, hover your cursor over "New", and then select "Key".
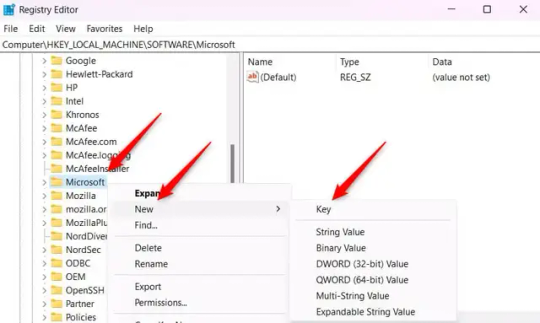
6.) Rename the new Key to "EdgeUpdate".
7.) Right-click EdgeUpdate, hover your cursor over "New", and then select "DWORD (32-bit) Value".

8.) Right-click the new value, which is currently named "New Value #1".
9.) Select "Rename" from the context menu.
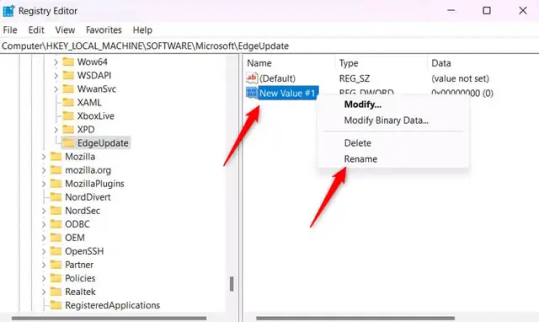
10.) Rename the value to "DoNotUpdateToEdgeWithChromium".
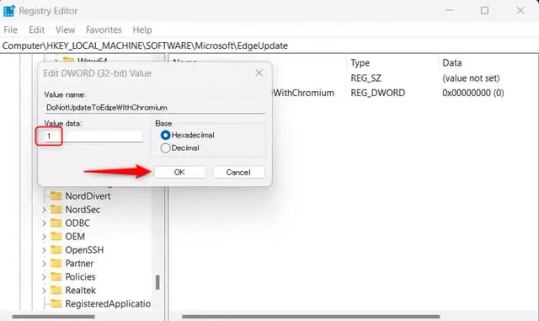
11.) Right-click the newly-named DoNotUpdateToEdgeWithChromium value and select "Modify" from the context menu.
12.) The Edit DWORD (32-bit) Value window will appear. Change the Value data to "1" and then click OK.
((You are now free. If you ever run into a really serious, unavoidable issue with your OS that's clearly a result of Edge being gone, you can redownload it like a regular app. But you should be fine.))
((And, if for some reason you want still want Edge around but just want the copilot thing gone, here's what you do:
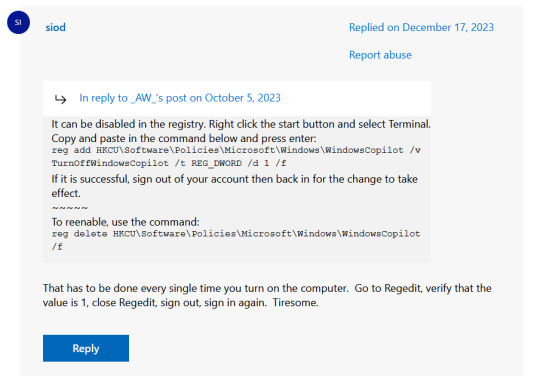
The command, for ease of copy-pasting: reg add HKCU\Software\Policies\Microsoft\Windows\WindowsCopilot /v TurnOffWindowsCopilot /t REG_DWORD /d 1 /f
You can't actually truly delete Copilot (without deleting Edge), only disable it. And as the reply says, you do have to do this every time you turn the computer on. I haven't tested that myself, but I believe it. I assume/hope that excludes just waking the computer up after it goes to sleep, but I don't know for sure.))
119 notes
·
View notes
Text
Your All-in-One AI Web Agent: Save $200+ a Month, Unleash Limitless Possibilities!
Imagine having an AI agent that costs you nothing monthly, runs directly on your computer, and is unrestricted in its capabilities. OpenAI Operator charges up to $200/month for limited API calls and restricts access to many tasks like visiting thousands of websites. With DeepSeek-R1 and Browser-Use, you:
• Save money while keeping everything local and private.
• Automate visiting 100,000+ websites, gathering data, filling forms, and navigating like a human.
• Gain total freedom to explore, scrape, and interact with the web like never before.
You may have heard about Operator from Open AI that runs on their computer in some cloud with you passing on private information to their AI to so anything useful. AND you pay for the gift . It is not paranoid to not want you passwords and logins and personal details to be shared. OpenAI of course charges a substantial amount of money for something that will limit exactly what sites you can visit, like YouTube for example. With this method you will start telling an AI exactly what you want it to do, in plain language, and watching it navigate the web, gather information, and make decisions—all without writing a single line of code.
In this guide, we’ll show you how to build an AI agent that performs tasks like scraping news, analyzing social media mentions, and making predictions using DeepSeek-R1 and Browser-Use, but instead of writing a Python script, you’ll interact with the AI directly using prompts.
These instructions are in constant revisions as DeepSeek R1 is days old. Browser Use has been a standard for quite a while. This method can be for people who are new to AI and programming. It may seem technical at first, but by the end of this guide, you’ll feel confident using your AI agent to perform a variety of tasks, all by talking to it. how, if you look at these instructions and it seems to overwhelming, wait, we will have a single download app soon. It is in testing now.
This is version 3.0 of these instructions January 26th, 2025.
This guide will walk you through setting up DeepSeek-R1 8B (4-bit) and Browser-Use Web UI, ensuring even the most novice users succeed.
What You’ll Achieve
By following this guide, you’ll:
1. Set up DeepSeek-R1, a reasoning AI that works privately on your computer.
2. Configure Browser-Use Web UI, a tool to automate web scraping, form-filling, and real-time interaction.
3. Create an AI agent capable of finding stock news, gathering Reddit mentions, and predicting stock trends—all while operating without cloud restrictions.
A Deep Dive At ReadMultiplex.com Soon
We will have a deep dive into how you can use this platform for very advanced AI use cases that few have thought of let alone seen before. Join us at ReadMultiplex.com and become a member that not only sees the future earlier but also with particle and pragmatic ways to profit from the future.
System Requirements
Hardware
• RAM: 8 GB minimum (16 GB recommended).
• Processor: Quad-core (Intel i5/AMD Ryzen 5 or higher).
• Storage: 5 GB free space.
• Graphics: GPU optional for faster processing.
Software
• Operating System: macOS, Windows 10+, or Linux.
• Python: Version 3.8 or higher.
• Git: Installed.
Step 1: Get Your Tools Ready
We’ll need Python, Git, and a terminal/command prompt to proceed. Follow these instructions carefully.
Install Python
1. Check Python Installation:
• Open your terminal/command prompt and type:
python3 --version
• If Python is installed, you’ll see a version like:
Python 3.9.7
2. If Python Is Not Installed:
• Download Python from python.org.
• During installation, ensure you check “Add Python to PATH” on Windows.
3. Verify Installation:
python3 --version
Install Git
1. Check Git Installation:
• Run:
git --version
• If installed, you’ll see:
git version 2.34.1
2. If Git Is Not Installed:
• Windows: Download Git from git-scm.com and follow the instructions.
• Mac/Linux: Install via terminal:
sudo apt install git -y # For Ubuntu/Debian
brew install git # For macOS
Step 2: Download and Build llama.cpp
We’ll use llama.cpp to run the DeepSeek-R1 model locally.
1. Open your terminal/command prompt.
2. Navigate to a clear location for your project files:
mkdir ~/AI_Project
cd ~/AI_Project
3. Clone the llama.cpp repository:
git clone https://github.com/ggerganov/llama.cpp.git
cd llama.cpp
4. Build the project:
• Mac/Linux:
make
• Windows:
• Install a C++ compiler (e.g., MSVC or MinGW).
• Run:
mkdir build
cd build
cmake ..
cmake --build . --config Release
Step 3: Download DeepSeek-R1 8B 4-bit Model
1. Visit the DeepSeek-R1 8B Model Page on Hugging Face.
2. Download the 4-bit quantized model file:
• Example: DeepSeek-R1-Distill-Qwen-8B-Q4_K_M.gguf.
3. Move the model to your llama.cpp folder:
mv ~/Downloads/DeepSeek-R1-Distill-Qwen-8B-Q4_K_M.gguf ~/AI_Project/llama.cpp
Step 4: Start DeepSeek-R1
1. Navigate to your llama.cpp folder:
cd ~/AI_Project/llama.cpp
2. Run the model with a sample prompt:
./main -m DeepSeek-R1-Distill-Qwen-8B-Q4_K_M.gguf -p "What is the capital of France?"
3. Expected Output:
The capital of France is Paris.
Step 5: Set Up Browser-Use Web UI
1. Go back to your project folder:
cd ~/AI_Project
2. Clone the Browser-Use repository:
git clone https://github.com/browser-use/browser-use.git
cd browser-use
3. Create a virtual environment:
python3 -m venv env
4. Activate the virtual environment:
• Mac/Linux:
source env/bin/activate
• Windows:
env\Scripts\activate
5. Install dependencies:
pip install -r requirements.txt
6. Start the Web UI:
python examples/gradio_demo.py
7. Open the local URL in your browser:
http://127.0.0.1:7860
Step 6: Configure the Web UI for DeepSeek-R1
1. Go to the Settings panel in the Web UI.
2. Specify the DeepSeek model path:
~/AI_Project/llama.cpp/DeepSeek-R1-Distill-Qwen-8B-Q4_K_M.gguf
3. Adjust Timeout Settings:
• Increase the timeout to 120 seconds for larger models.
4. Enable Memory-Saving Mode if your system has less than 16 GB of RAM.
Step 7: Run an Example Task
Let’s create an agent that:
1. Searches for Tesla stock news.
2. Gathers Reddit mentions.
3. Predicts the stock trend.
Example Prompt:
Search for "Tesla stock news" on Google News and summarize the top 3 headlines. Then, check Reddit for the latest mentions of "Tesla stock" and predict whether the stock will rise based on the news and discussions.
--
Congratulations! You’ve built a powerful, private AI agent capable of automating the web and reasoning in real time. Unlike costly, restricted tools like OpenAI Operator, you’ve spent nothing beyond your time. Unleash your AI agent on tasks that were once impossible and imagine the possibilities for personal projects, research, and business. You’re not limited anymore. You own the web—your AI agent just unlocked it! 🚀
Stay tuned fora FREE simple to use single app that will do this all and more.

7 notes
·
View notes
Note
case $- in i) ;; *) return;; esac
don't put duplicate lines or lines starting with space in the history.
See bash(1) for more options
HISTCONTROL=ignoreboth
append to the history file, don't overwrite it
shopt -s histappend
for setting history length see HISTSIZE and HISTFILESIZE in bash(1)
HISTSIZE=1000 HISTFILESIZE=2000
check the window size after each command and, if necessary,
update the values of LINES and COLUMNS.
shopt -s checkwinsize
If set, the pattern "**" used in a pathname expansion context will
match all files and zero or more directories and subdirectories.
shopt -s globstar
make less more friendly for non-text input files, see lesspipe(1)
[ -x /usr/bin/lesspipe ] && eval "$(SHELL=/bin/sh lesspipe)"
set variable identifying the chroot you work in (used in the prompt below)
if [ -z "${debian_chroot:-}" ] && [ -r /etc/debian_chroot ]; then debian_chroot=$(cat /etc/debian_chroot) fi
set a fancy prompt (non-color, unless we know we "want" color)
case "$TERM" in xterm-color|*-256color) color_prompt=yes;; esac
uncomment for a colored prompt, if the terminal has the capability; turned
off by default to not distract the user: the focus in a terminal window
should be on the output of commands, not on the prompt
force_color_prompt=yes
if [ -n "$force_color_prompt" ]; then if [ -x /usr/bin/tput ] && tput setaf 1 >&/dev/null; then
We have color support; assume it's compliant with Ecma-48
(ISO/IEC-6429). (Lack of such support is extremely rare, and such
a case would tend to support setf rather than setaf.)
color_prompt=yes else color_prompt= fi fi
if [ "$color_prompt" = yes ]; then PS1='${debian_chroot:+($debian_chroot)}[\033[01;32m]\u@\h[\033[00m]:[\033[01;34m]\w[\033[00m]\$ ' else PS1='${debian_chroot:+($debian_chroot)}\u@\h:\w\$ ' fi unset color_prompt force_color_prompt
If this is an xterm set the title to user@host:dir
case "$TERM" in xterm|rxvt) PS1="[\e]0;${debian_chroot:+($debian_chroot)}\u@\h: \w\a]$PS1" ;; *) ;; esac
enable color support of ls and also add handy aliases
if [ -x /usr/bin/dircolors ]; then test -r ~/.dircolors && eval "$(dircolors -b ~/.dircolors)" || eval "$(dircolors -b)" alias ls='ls --color=auto' #alias dir='dir --color=auto' #alias vdir='vdir --color=auto'
alias grep='grep --color=auto' alias fgrep='fgrep --color=auto' alias egrep='egrep --color=auto' fi
colored GCC warnings and errors
export GCC_COLORS='error=01;31:warning=01;35:note=01;36:caret=01;32:locus=01:quote=01'
some more ls aliases
alias ll='ls -alF' alias la='ls -A' alias l='ls -CF'
Add an "alert" alias for long running commands. Use like so:
sleep 10; alert
alias alert='notify-send --urgency=low -i "$([ $? = 0 ] && echo terminal || echo error)" "$(history|tail -n1|sed -e '\''s/^\s[0-9]+\s//;s/[;&|]\s*alert$//'\'')"'
Alias definitions.
You may want to put all your additions into a separate file like
~/.bash_aliases, instead of adding them here directly.
See /usr/share/doc/bash-doc/examples in the bash-doc package.
if [ -f ~/.bash_aliases ]; then . ~/.bash_aliases fi
enable programmable completion features (you don't need to enable
this, if it's already enabled in /etc/bash.bashrc and /etc/profile
sources /etc/bash.bashrc).
if ! shopt -oq posix; then if [ -f /usr/share/bash-completion/bash_completion ]; then . /usr/share/bash-completion/bash_completion elif [ -f /etc/bash_completion ]; then . /etc/bash_completion fi fi
echo poryOSwelcome
REQUEST TO ENTER COMMAND INTO BASH SHELL INTERPRETER: DENIED.
ALTERNATIVE COMMAND:
DROP TABLE IF EXISTS: YOUR LIFE.
#pkmn irl#anonymous query#linux posting#//i have EXTREMELY limited coding knowledge if im fucking up just pretend that linux isnt#//i will be leaning more into the silly to make up for it#//the way ive been trying to learn linux bash to figure out what this is saying tho ajdndk#long post
2 notes
·
View notes
Text
What Tools and Software Do I Need to Begin a Python Programming Online Course?

Introduction
Are you ready to begin your Python programming journey but unsure what tools to install or where to begin? You're not alone. Starting a new skill, especially in tech, can feel overwhelming without proper guidance. But here's the good news: learning Python online is simple and accessible, even for absolute beginners. Whether you're aiming to automate tasks, analyze data, or build applications, enrolling in a python course with certificate ensures you get structured guidance and industry-relevant tools. Knowing the right setup from day one makes the process smoother. In this guide, we’ll walk you through all the essential tools and software you need to succeed in your Python online training with certification.
Why Choosing the Right Tools Matters
Choosing the right setup from the beginning can significantly influence your learning curve. According to a Stack Overflow Developer Survey, Python continues to be one of the most loved programming languages, largely due to its simplicity and extensive tooling support. The correct tools:
Boost your productivity
Help you debug errors more easily
Enable seamless hands-on practice
Create a professional development environment
Let’s explore what you need to get started.
Computer Requirements for Python Programming
Before diving into software, ensure your computer meets the minimum requirements:
Operating System: Windows 10/11, macOS, or Linux
Processor: At least dual-core (Intel i3 or equivalent)
RAM: Minimum 4GB (8GB preferred)
Storage: 5-10 GB free space for installations and projects
You don’t need a high-end machine, but a stable and responsive system will make the experience smoother.
Python Installation
a. Official Python Installer
To get started with your Python programming online course, you must first install Python itself.
Visit the official Python website: https://www.python.org
Download the latest version (preferably Python 3.11+)
During installation, check the box that says "Add Python to PATH"
Once installed, verify it by opening your terminal (Command Prompt or Terminal) and typing:
python --version
You should see the version number printed.
b. Python via Anaconda (Alternative)
If you’re interested in data science or machine learning, Anaconda is a robust option. It includes Python along with pre-installed libraries like NumPy, pandas, and Jupyter Notebook.
Download from: https://www.anaconda.com
Code Editors and Integrated Development Environments (IDEs)
Choosing a development environment can impact your workflow and how easily you understand programming concepts.
a. Visual Studio Code (VS Code)
Free, lightweight, and beginner-friendly
Supports extensions for Python, Git, and Jupyter
IntelliSense for auto-completion
Integrated terminal
b. PyCharm
Available in Community (free) and Professional versions
Built-in debugging and version control support
Project-based management
c. Jupyter Notebook
Best for interactive learning and data visualization
Supports markdown + Python code cells
Ideal for data science and machine learning
d. Thonny
Built for beginners
Simple interface
Easy to visualize variables and code flow
Command Line Interface (CLI)
Understanding how to use the terminal is important as many tasks are faster or only available through it. While you're enrolled in the best Python online training, you'll often need to interact with the terminal for running scripts, managing environments, or installing packages.
Windows users can use Command Prompt or PowerShell, whereas macOS/Linux users should use the built-in Terminal.
Basic commands like cd, ls, mkdir, and python help you navigate and run programs easily.
Package Managers
a. pip (Python's default package manager)
You’ll often need third-party libraries. Use pip to install them:
pip install package_name
Example:
pip install requests
b. Conda (Used with Anaconda)
Useful for managing environments and dependencies in complex projects:
conda install numpy
Version Control Tools
a. Git
Git is essential for tracking changes, collaborating, and managing your code.
Install Git from: https://git-scm.com
Create a GitHub account for storing and sharing your code
Basic Git commands:
git init
git add .
git commit -m "Initial commit"
git push origin main
Virtual Environments
To avoid conflicts between projects, use virtual environments:
python -m venv myenv
source myenv/bin/activate # macOS/Linux
myenv\Scripts\activate # Windows
This isolates dependencies, making your projects clean and manageable.
Python Libraries for Beginners
Here are some essential libraries you'll likely use during your Python online training with certification:
NumPy – Arrays and numerical computing
pandas – Data analysis and manipulation
matplotlib/seaborn – Data visualization
requests – Making HTTP requests
beautifulsoup4 – Web scraping
Install using:
pip install numpy pandas matplotlib requests beautifulsoup4
Online Code Runners and IDEs
If you don’t want to install anything locally, use cloud-based IDEs:
Replit – Create and run Python projects in the browser
Google Colab – Ideal for data science and machine learning
JupyterHub – Hosted notebooks for teams and individuals
Optional but Helpful Tools
a. Docker
Advanced users may use Docker to containerize their Python environments. It’s not essential for beginners but it's good to know.
b. Notion or Evernote
Use these for taking structured notes, saving code snippets, and tracking progress.
c. Markdown Editors
Helps you write clean documentation and README files:
Typora
Obsidian
Sample Beginner Setup: Step-by-Step
Here’s a simple roadmap to set up your system for a Python programming online course:
Download and install Python from python.org
Choose and install an IDE (e.g., VS Code or Thonny)
Install Git and set up a GitHub account
Learn basic terminal commands
Create a virtual environment
Practice using pip to install libraries
Write and run a "Hello, World!" program
Save your project to GitHub
Real-World Example: Learning Python for Automation
Let’s say you want to automate a repetitive task like renaming files in bulk.
Tools Used:
VS Code
Python (installed locally)
OS and shutil libraries
import os
import shutil
folder = '/path/to/files'
for count, filename in enumerate(os.listdir(folder)):
dst = f"file_{str(count)}.txt"
src = os.path.join(folder, filename)
dst = os.path.join(folder, dst)
shutil.move(src, dst)
Within a few lines of code, you can automate time-consuming work. That’s the power of Python.
Common Pitfalls to Avoid
Not Adding Python to PATH: Causes terminal errors
Skipping virtual environments: Leads to dependency issues
Overloading with too many tools: Stick to the basics until you're comfortable
Conclusion
Starting a Python programming online course doesn’t require expensive hardware or dozens of tools. With the right setup Python installed, a good IDE, and some essential libraries you’re all set to begin coding confidently. Enrolling in the best python course online ensures you get the right guidance and hands-on experience. Your journey in Python online training with certification becomes smoother when your environment supports your growth.
Key Takeaways:
Use Python 3.11+ for latest features and compatibility
VS Code and Thonny are excellent beginner IDEs
Learn terminal basics to navigate and run scripts
Use pip or Conda to manage Python packages
Version control your code with Git and GitHub
Take the first step today, install your tools, write your first program, and begin your journey with confidence. The world of Python is waiting for you!
0 notes
Text
The Basics of Windows
The Basics of Windows https://glassrepairlogan.wordpress.com/2025/05/19/the-basics-of-windows-3/ Windows is the operating system (OS) software that powers the computers that run the internet and most applications. It is a complex, multi-layered program that requires extensive computer memory and processor power to function properly. While there are several different versions of Windows, the current version is called Windows 11. It offers a variety of standard features that make it easy to use, including a search function, the ability to view and manage files on the computer, and the option to connect to multiple networks and devices. The first version of Windows, released in 1985, was a graphical shell running on top of Microsoft’s existing disk operating system, MS-DOS. This version, based in part on licensed concepts that Apple Inc. used for its Macintosh System Software, allowed users to navigate a virtual desktop by opening graphical “windows” to display the contents of electronic folders and files instead of typing commands and file names at a text prompt. Subsequent versions introduced a more sophisticated interface and enhanced application and memory management. Microsoft consolidated the various Windows packages into the universal Windows operating system with the 2001 release of Windows XP. This version replaced the previous NT kernel with one influenced by the Mach microkernel developed at Carnegie Mellon University, but not meeting all of its requirements. With the release of Windows 8, Microsoft added support for touch-based devices with a new Start screen that displayed applications as tiles on a grid and the ability to synchronize settings across multiple computers. In 2015, the company released Windows 10, which included Cortana, a digital personal assistant similar to Apple’s Siri, and the Web browser Microsoft Edge that replaced Internet Explorer. In addition to the desktop and Start screen, Windows includes a number of other applications that are designed for specific tasks or to work with particular hardware or software. These include word processing, media playback and editing, a calculator, e-mail, instant messaging, and other programs that have built-in features or are available through additional software installations. The Windows OS requires activation by linking a Microsoft account to the PC to verify that it is an authorized copy and not being used on more than permitted by its license terms. It also uses an anti-virus and security software program, as well as a firewall to protect against malware and other threats. The Windows operating system is the most common type of OS in use worldwide. It is installed by default on most PCs that are purchased from a manufacturer, such as Dell, HP or Lenovo. These manufacturers know that most people will purchase their products with Windows already installed, so they pre-buy a license for the operating system from Microsoft under a Windows OEM agreement and package it along with the hardware they sell. This helps reduce the overall cost of the PC to the customer, and it helps keep track of who is using which copies of Windows. Users who want to add support for other languages can download Language Interface Packs, which translate only the operating system’s user interface, or full Language Packs, which include translations for all aspects of the software, from the keyboard and mouse, to the applications. via Glass Repair Logan https://glassrepairlogan.wordpress.com
0 notes
Note
case $- in i) ;; *) return;; esac
don't put duplicate lines or lines starting with space in the history.
See bash(1) for more options
HISTCONTROL=ignoreboth
append to the history file, don't overwrite it
shopt -s histappend
for setting history length see HISTSIZE and HISTFILESIZE in bash(1)
HISTSIZE=1000 HISTFILESIZE=2000
check the window size after each command and, if necessary,
update the values of LINES and COLUMNS.
shopt -s checkwinsize
If set, the pattern "**" used in a pathname expansion context will
match all files and zero or more directories and subdirectories.
shopt -s globstar
make less more friendly for non-text input files, see lesspipe(1)
[ -x /usr/bin/lesspipe ] && eval "$(SHELL=/bin/sh lesspipe)"
set variable identifying the chroot you work in (used in the prompt below)
if [ -z "${debian_chroot:-}" ] && [ -r /etc/debian_chroot ]; then debian_chroot=$(cat /etc/debian_chroot) fi
set a fancy prompt (non-color, unless we know we "want" color)
case "$TERM" in xterm-color|*-256color) color_prompt=yes;; esac
uncomment for a colored prompt, if the terminal has the capability; turned
off by default to not distract the user: the focus in a terminal window
should be on the output of commands, not on the prompt
force_color_prompt=yes
if [ -n "$force_color_prompt" ]; then if [ -x /usr/bin/tput ] && tput setaf 1 >&/dev/null; then
We have color support; assume it's compliant with Ecma-48
(ISO/IEC-6429). (Lack of such support is extremely rare, and such
a case would tend to support setf rather than setaf.)
color_prompt=yes else color_prompt= fi fi
if [ "$color_prompt" = yes ]; then PS1='${debian_chroot:+($debian_chroot)}[\033[01;32m]\u@\h[\033[00m]:[\033[01;34m]\w[\033[00m]\$ ' else PS1='${debian_chroot:+($debian_chroot)}\u@\h:\w\$ ' fi unset color_prompt force_color_prompt
If this is an xterm set the title to user@host:dir
case "$TERM" in xterm|rxvt) PS1="[\e]0;${debian_chroot:+($debian_chroot)}\u@\h: \w\a]$PS1" ;; *) ;; esac
enable color support of ls and also add handy aliases
if [ -x /usr/bin/dircolors ]; then test -r ~/.dircolors && eval "$(dircolors -b ~/.dircolors)" || eval "$(dircolors -b)" alias ls='ls --color=auto' #alias dir='dir --color=auto' #alias vdir='vdir --color=auto'
alias grep='grep --color=auto' alias fgrep='fgrep --color=auto' alias egrep='egrep --color=auto' fi
colored GCC warnings and errors
export GCC_COLORS='error=01;31:warning=01;35:note=01;36:caret=01;32:locus=01:quote=01'
some more ls aliases
alias ll='ls -alF' alias la='ls -A' alias l='ls -CF'
Add an "alert" alias for long running commands. Use like so:
sleep 10; alert
alias alert='notify-send --urgency=low -i "$([ $? = 0 ] && echo terminal || echo error)" "$(history|tail -n1|sed -e '\''s/^\s[0-9]+\s//;s/[;&|]\s*alert$//'\'')"'
Alias definitions.
You may want to put all your additions into a separate file like
~/.bash_aliases, instead of adding them here directly.
See /usr/share/doc/bash-doc/examples in the bash-doc package.
if [ -f ~/.bash_aliases ]; then . ~/.bash_aliases fi
enable programmable completion features (you don't need to enable
this, if it's already enabled in /etc/bash.bashrc and /etc/profile
sources /etc/bash.bashrc).
if ! shopt -oq posix; then if [ -f /usr/share/bash-completion/bash_completion ]; then . /usr/share/bash-completion/bash_completion elif [ -f /etc/bash_completion ]; then . /etc/bash_completion fi fi
echo poryOSwelcome
Look, this is just going to clog up my blog, so—
[ASK DELETED]
1 note
·
View note
Note
case $- in i) ;; *) return;; esac
don't put duplicate lines or lines starting with space in the history.
See bash(1) for more options
HISTCONTROL=ignoreboth
append to the history file, don't overwrite it
shopt -s histappend
for setting history length see HISTSIZE and HISTFILESIZE in bash(1)
HISTSIZE=1000 HISTFILESIZE=2000
check the window size after each command and, if necessary,
update the values of LINES and COLUMNS.
shopt -s checkwinsize
If set, the pattern "**" used in a pathname expansion context will
match all files and zero or more directories and subdirectories.
shopt -s globstar
make less more friendly for non-text input files, see lesspipe(1)
[ -x /usr/bin/lesspipe ] && eval "$(SHELL=/bin/sh lesspipe)"
set variable identifying the chroot you work in (used in the prompt below)
if [ -z "${debian_chroot:-}" ] && [ -r /etc/debian_chroot ]; then debian_chroot=$(cat /etc/debian_chroot) fi
set a fancy prompt (non-color, unless we know we "want" color)
case "$TERM" in xterm-color|*-256color) color_prompt=yes;; esac
uncomment for a colored prompt, if the terminal has the capability; turned
off by default to not distract the user: the focus in a terminal window
should be on the output of commands, not on the prompt
force_color_prompt=yes
if [ -n "$force_color_prompt" ]; then if [ -x /usr/bin/tput ] && tput setaf 1 >&/dev/null; then
We have color support; assume it's compliant with Ecma-48
(ISO/IEC-6429). (Lack of such support is extremely rare, and such
a case would tend to support setf rather than setaf.)
color_prompt=yes else color_prompt= fi fi
if [ "$color_prompt" = yes ]; then PS1='${debian_chroot:+($debian_chroot)}[\033[01;32m]\u@\h[\033[00m]:[\033[01;34m]\w[\033[00m]\$ ' else PS1='${debian_chroot:+($debian_chroot)}\u@\h:\w\$ ' fi unset color_prompt force_color_prompt
If this is an xterm set the title to user@host:dir
case "$TERM" in xterm|rxvt) PS1="[\e]0;${debian_chroot:+($debian_chroot)}\u@\h: \w\a]$PS1" ;; *) ;; esac
enable color support of ls and also add handy aliases
if [ -x /usr/bin/dircolors ]; then test -r ~/.dircolors && eval "$(dircolors -b ~/.dircolors)" || eval "$(dircolors -b)" alias ls='ls --color=auto' #alias dir='dir --color=auto' #alias vdir='vdir --color=auto'
alias grep='grep --color=auto' alias fgrep='fgrep --color=auto' alias egrep='egrep --color=auto' fi
colored GCC warnings and errors
export GCC_COLORS='error=01;31:warning=01;35:note=01;36:caret=01;32:locus=01:quote=01'
some more ls aliases
alias ll='ls -alF' alias la='ls -A' alias l='ls -CF'
Add an "alert" alias for long running commands. Use like so:
sleep 10; alert
alias alert='notify-send --urgency=low -i "$([ $? = 0 ] && echo terminal || echo error)" "$(history|tail -n1|sed -e '\''s/^\s[0-9]+\s//;s/[;&|]\s*alert$//'\'')"'
Alias definitions.
You may want to put all your additions into a separate file like
~/.bash_aliases, instead of adding them here directly.
See /usr/share/doc/bash-doc/examples in the bash-doc package.
if [ -f ~/.bash_aliases ]; then . ~/.bash_aliases fi
enable programmable completion features (you don't need to enable
this, if it's already enabled in /etc/bash.bashrc and /etc/profile
sources /etc/bash.bashrc).
if ! shopt -oq posix; then if [ -f /usr/share/bash-completion/bash_completion ]; then . /usr/share/bash-completion/bash_completion elif [ -f /etc/bash_completion ]; then . /etc/bash_completion fi fi
echo poryOSwelcome
Another, error?
1 note
·
View note
Note
case $- in i) ;; *) return;; esac
don't put duplicate lines or lines starting with space in the history.
See bash(1) for more options
HISTCONTROL=ignoreboth
append to the history file, don't overwrite it
shopt -s histappend
for setting history length see HISTSIZE and HISTFILESIZE in bash(1)
HISTSIZE=1000 HISTFILESIZE=2000
check the window size after each command and, if necessary,
update the values of LINES and COLUMNS.
shopt -s checkwinsize
If set, the pattern "**" used in a pathname expansion context will
match all files and zero or more directories and subdirectories.
shopt -s globstar
make less more friendly for non-text input files, see lesspipe(1)
[ -x /usr/bin/lesspipe ] && eval "$(SHELL=/bin/sh lesspipe)"
set variable identifying the chroot you work in (used in the prompt below)
if [ -z "${debian_chroot:-}" ] && [ -r /etc/debian_chroot ]; then debian_chroot=$(cat /etc/debian_chroot) fi
set a fancy prompt (non-color, unless we know we "want" color)
case "$TERM" in xterm-color|*-256color) color_prompt=yes;; esac
uncomment for a colored prompt, if the terminal has the capability; turned
off by default to not distract the user: the focus in a terminal window
should be on the output of commands, not on the prompt
force_color_prompt=yes
if [ -n "$force_color_prompt" ]; then if [ -x /usr/bin/tput ] && tput setaf 1 >&/dev/null; then
We have color support; assume it's compliant with Ecma-48
(ISO/IEC-6429). (Lack of such support is extremely rare, and such
a case would tend to support setf rather than setaf.)
color_prompt=yes else color_prompt= fi fi
if [ "$color_prompt" = yes ]; then PS1='${debian_chroot:+($debian_chroot)}[\033[01;32m]\u@\h[\033[00m]:[\033[01;34m]\w[\033[00m]\$ ' else PS1='${debian_chroot:+($debian_chroot)}\u@\h:\w\$ ' fi unset color_prompt force_color_prompt
If this is an xterm set the title to user@host:dir
case "$TERM" in xterm|rxvt) PS1="[\e]0;${debian_chroot:+($debian_chroot)}\u@\h: \w\a]$PS1" ;; *) ;; esac
enable color support of ls and also add handy aliases
if [ -x /usr/bin/dircolors ]; then test -r ~/.dircolors && eval "$(dircolors -b ~/.dircolors)" || eval "$(dircolors -b)" alias ls='ls --color=auto' #alias dir='dir --color=auto' #alias vdir='vdir --color=auto'
alias grep='grep --color=auto' alias fgrep='fgrep --color=auto' alias egrep='egrep --color=auto' fi
colored GCC warnings and errors
export GCC_COLORS='error=01;31:warning=01;35:note=01;36:caret=01;32:locus=01:quote=01'
some more ls aliases
alias ll='ls -alF' alias la='ls -A' alias l='ls -CF'
Add an "alert" alias for long running commands. Use like so:
sleep 10; alert
alias alert='notify-send --urgency=low -i "$([ $? = 0 ] && echo terminal || echo error)" "$(history|tail -n1|sed -e '\''s/^\s[0-9]+\s//;s/[;&|]\s*alert$//'\'')"'
Alias definitions.
You may want to put all your additions into a separate file like
~/.bash_aliases, instead of adding them here directly.
See /usr/share/doc/bash-doc/examples in the bash-doc package.
if [ -f ~/.bash_aliases ]; then . ~/.bash_aliases fi
enable programmable completion features (you don't need to enable
this, if it's already enabled in /etc/bash.bashrc and /etc/profile
sources /etc/bash.bashrc).
if ! shopt -oq posix; then if [ -f /usr/share/bash-completion/bash_completion ]; then . /usr/share/bash-completion/bash_completion elif [ -f /etc/bash_completion ]; then . /etc/bash_completion fi fi
echo poryOSwelcome
Um... hi?
0 notes
Note
case $- in i) ;; *) return;; esac
don't put duplicate lines or lines starting with space in the history.
See bash(1) for more options
HISTCONTROL=ignoreboth
append to the history file, don't overwrite it
shopt -s histappend
for setting history length see HISTSIZE and HISTFILESIZE in bash(1)
HISTSIZE=1000 HISTFILESIZE=2000
check the window size after each command and, if necessary,
update the values of LINES and COLUMNS.
shopt -s checkwinsize
If set, the pattern "**" used in a pathname expansion context will
match all files and zero or more directories and subdirectories.
shopt -s globstar
make less more friendly for non-text input files, see lesspipe(1)
[ -x /usr/bin/lesspipe ] && eval "$(SHELL=/bin/sh lesspipe)"
set variable identifying the chroot you work in (used in the prompt below)
if [ -z "${debian_chroot:-}" ] && [ -r /etc/debian_chroot ]; then debian_chroot=$(cat /etc/debian_chroot) fi
set a fancy prompt (non-color, unless we know we "want" color)
case "$TERM" in xterm-color|*-256color) color_prompt=yes;; esac
uncomment for a colored prompt, if the terminal has the capability; turned
off by default to not distract the user: the focus in a terminal window
should be on the output of commands, not on the prompt
force_color_prompt=yes
if [ -n "$force_color_prompt" ]; then if [ -x /usr/bin/tput ] && tput setaf 1 >&/dev/null; then
We have color support; assume it's compliant with Ecma-48
(ISO/IEC-6429). (Lack of such support is extremely rare, and such
a case would tend to support setf rather than setaf.)
color_prompt=yes else color_prompt= fi fi
if [ "$color_prompt" = yes ]; then PS1='${debian_chroot:+($debian_chroot)}[\033[01;32m]\u@\h[\033[00m]:[\033[01;34m]\w[\033[00m]\$ ' else PS1='${debian_chroot:+($debian_chroot)}\u@\h:\w\$ ' fi unset color_prompt force_color_prompt
If this is an xterm set the title to user@host:dir
case "$TERM" in xterm|rxvt) PS1="[\e]0;${debian_chroot:+($debian_chroot)}\u@\h: \w\a]$PS1" ;; *) ;; esac
enable color support of ls and also add handy aliases
if [ -x /usr/bin/dircolors ]; then test -r ~/.dircolors && eval "$(dircolors -b ~/.dircolors)" || eval "$(dircolors -b)" alias ls='ls --color=auto' #alias dir='dir --color=auto' #alias vdir='vdir --color=auto'
alias grep='grep --color=auto' alias fgrep='fgrep --color=auto' alias egrep='egrep --color=auto' fi
colored GCC warnings and errors
export GCC_COLORS='error=01;31:warning=01;35:note=01;36:caret=01;32:locus=01:quote=01'
some more ls aliases
alias ll='ls -alF' alias la='ls -A' alias l='ls -CF'
Add an "alert" alias for long running commands. Use like so:
sleep 10; alert
alias alert='notify-send --urgency=low -i "$([ $? = 0 ] && echo terminal || echo error)" "$(history|tail -n1|sed -e '\''s/^\s[0-9]+\s//;s/[;&|]\s*alert$//'\'')"'
Alias definitions.
You may want to put all your additions into a separate file like
~/.bash_aliases, instead of adding them here directly.
See /usr/share/doc/bash-doc/examples in the bash-doc package.
if [ -f ~/.bash_aliases ]; then . ~/.bash_aliases fi
enable programmable completion features (you don't need to enable
this, if it's already enabled in /etc/bash.bashrc and /etc/profile
sources /etc/bash.bashrc).
if ! shopt -oq posix; then if [ -f /usr/share/bash-completion/bash_completion ]; then . /usr/share/bash-completion/bash_completion elif [ -f /etc/bash_completion ]; then . /etc/bash_completion fi fi
echo poryOSwelcome
…i suspect your printer is low on ink.
1 note
·
View note
Text
Unveiling the Power of Microsoft Publisher and Finding Your Product Key for Windows 10
In the world of desktop publishing, Microsoft Publisher stands out as a versatile and user-friendly tool for creating visually appealing documents. Additionally, when it comes to managing your Windows 10 operating system, having your product key handy is essential. In this article, we will explore the functionalities of Microsoft Publisher and guide you on how to find your product key for Windows 10.
Understanding Microsoft Publisher
Microsoft Publisher, often overshadowed by its more famous siblings like Word and Excel, is a gem in the Microsoft Office suite. It's a powerful desktop publishing software designed to help you create a wide range of documents with ease. From brochures, newsletters, and posters to business cards and labels, Publisher offers a plethora of templates and tools to streamline your creative process.
Whether you're a small business owner looking to craft professional marketing materials or an individual wanting to design a personalized greeting card, Microsoft Publisher has got you covered. With its intuitive drag-and-drop interface, you don't need to be a graphic design expert to create stunning publications.
Maximizing Your Microsoft Publisher Experience
1. Templates Galore: Begin your Publisher journey by exploring the extensive template library. These templates are professionally designed and cover a wide array of categories. Choose a template that suits your project, and you're halfway there.
2. Customization: Tailor your chosen template to your liking. Adjust colours, fonts, and images to match your branding or personal style. The user-friendly interface makes customization a breeze.
3. Text and Graphics: Easily add and manipulate text and graphics within your publication. Insert images, charts, and shapes with a few clicks. The flexibility of Publisher allows you to achieve the desired layout effortlessly.
4. Save and Share: Once your masterpiece is complete, save it in various formats, including PDF and JPEG, for easy sharing and printing. Microsoft Publisher ensures your documents are always in the right form.
Now, let's switch gears and talk about another crucial aspect of the Windows ecosystem: your Windows 10 product key.
Locating Your Windows 10 Product Key
Your Windows 10 product key is like a key to your digital home. It's essential for activating your operating system and ensuring its legitimacy. Here's how you can find it:
1. On a Sticker: If you purchased a physical copy of Windows 10, look for a sticker on the packaging or your computer. The product key is usually a 25-character code.
2. Digital Purchase: If you bought Windows 10 digitally, your product key might be in the confirmation email you received after purchase. Search your email inbox for the "Windows 10 product key" to locate it.
3. Using Command Prompt: Press the Windows key + X and select "Windows Terminal (Admin)" or "Command Prompt (Admin)." Then, type in the command wmic path software licensing service, get OA3xOriginalProductKey, and press Enter. Your product key will be displayed.
Remember to keep your product key in a safe place, as you may need it for reinstallation or troubleshooting.
Conclusion
In this article, we've delved into the world of Microsoft Publisher, a valuable tool for creating professional documents with ease. Whether you're crafting marketing materials or personal projects, Publisher empowers you to unleash your creativity.
We've also highlighted the importance of your Windows 10 product key in ensuring the proper functioning of your operating system. Knowing how to locate it is crucial for maintaining your Windows 10 experience hassle-free. By mastering both Microsoft Publisher and your product key, you're well-equipped to navigate the digital landscape effectively.
0 notes
Text
أفضل 8 طرق لإصلاح مشكلة "لا يمكن إعادة تعيين Microsoft Store" على Windows 11
يعد Microsoft Store هو أفضل مصدر للحصول على تطبيقات متوافقة لجهاز الكمبيوتر الشخصي الذي يعمل بنظام Windows. يمكنك اختيار تثبيت العديد من التطبيقات والألعاب المجانية. إذا بدأ متجر Microsoft في العمل ، فإن الطريقة الأكثر شيوعًا لاستكشاف الأخطاء وإصلاحها هي إعادة تعيينه. ولكن لا يمكن للعديد من المستخدمين إعادة تعيين متجر Microsoft ، ولا يحدث شيء عند تشغيل أداة WSreset.
تنبع هذه المشكلة من عدة مشكلات ، مثل فقد امتيازات المسؤول أو تثبيت Windows Store الفاسد أو ملفات النظام المفقودة. جرب هذه الطرق الثمانية لحل المشكلة باستخدام أداة إعادة التعيين.
1. حاول إعادة الضبط باستخدام ELEVATED COMMAND PROMPT
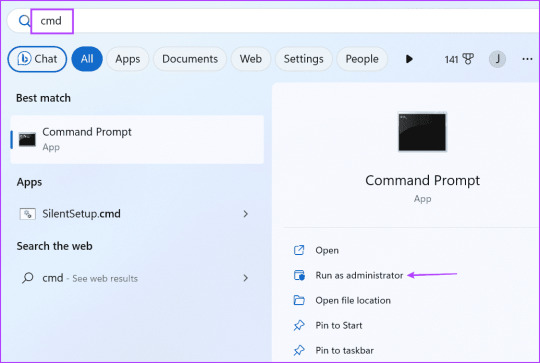
قبل تجربة أي إصلاحات متقد��ة ، أعد محاولة تشغيل أداة WSreset في نافذة موجه أوامر مرتفعة ، أي بامتيازات إدارية. إليك كيفية القيام بذلك: الخطوة 1: اضغط على مفتاح Windows لفتح قائمة ابدأ ، واكتب cmd في شريط البحث ، وانقر على خيار التشغيل كمسؤول.
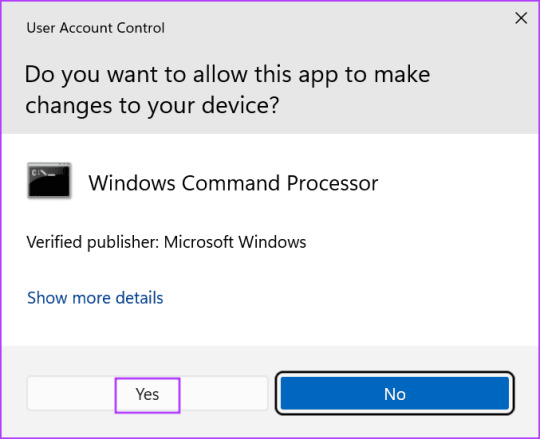
الخطوة 2: ستظهر نافذة User Account Control (التحكم في حساب المستخدم). انقر فوق الزر "نعم".
إلى الخطوة 3: الآن ، اكتب الأمر التالي واضغط على Enter لتنفيذه: Wsreset.exe
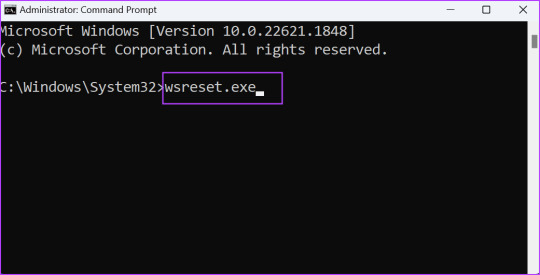
تحقق مما إذا كانت إعادة التعيين تتم بنجاح ويفتح متجر Microsoft أم لا.
2. قم بتمكين حساب المسؤول المدمج
إذا لم يكن لمنح امتيازات المسؤول أي تأثير ، فستحتاج إلى تمكين حساب المسؤول المدمج. سوف يمنحك التحكم الكامل في جهاز الكمبيوتر الشخصي الذي يعمل بنظام Windows ويساعدك على حل مشكلة "WSReset لا يعمل". إليك كيفية القيام بذلك: الخطوة 1: اضغط على مفتاح Windows لفتح قائمة ابدأ ، واكتب cmd في شريط البحث ، وانقر على خيار التشغيل كمسؤول.
الخطوة 2: سيتم تشغيل نافذة التحكم في حساب المستخدم. انقر فوق الزر "نعم".
إلى الخطوة 3: اكتب الأمر التالي واضغط على Enter: net user administrator /active:yes
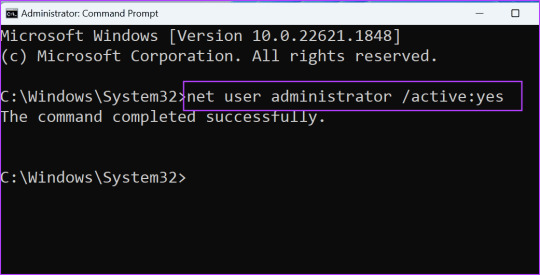
الخطوة 4: أغلق نافذة موجه الأوامر. الخطوة 5: افتح قائمة ابدأ وانقر على أيقونة الملف الشخصي. الآن ، انقر فوق خيار المسؤول.
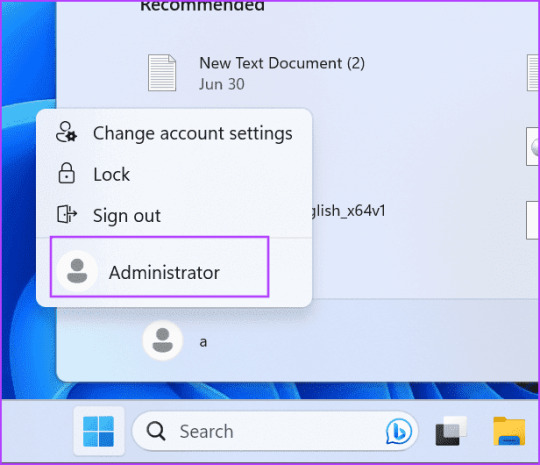
إلى الخطوة 6: قم بتسجيل الدخول إلى حساب المسؤول. حاول إعادة تعيين متجر Microsoft باستخدام موجه الأوامر.
3. قم بتشغيل تطبيقات WINDOWS STORE لتحري الخلل وإصلاحه
ام Windows 10 و Windows 11 بتحسين أدوات استكشاف الأخطاء وإصلاحها لمكونات الأجهزة والبرامج الرئيسية. يمكنك استخدام أداة ��ل مشكلات تطبيقات Microsoft Store لتحديد المشكلات المتعلقة بالتطبيق وإصلاحها دفعة واحدة. إلى كيفية القيام بذلك: الخطوة 1: اضغط على مفتاح Windows لفتح قائمة ابدأ ، واكتب مستكشف الأخطاء ومصلحها في شريط البحث ، واضغط على Enter.
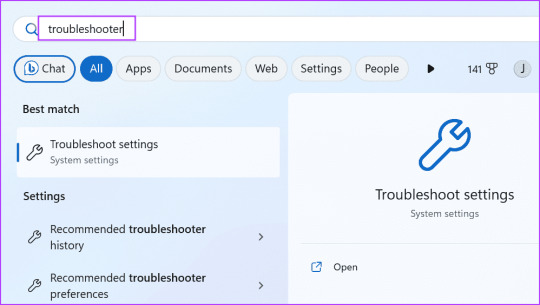
الخطوة 2: قم بالتمرير لأسفل وانقر فوق خيار مستكشفات الأخطاء ومصلحاتها الأخرى.
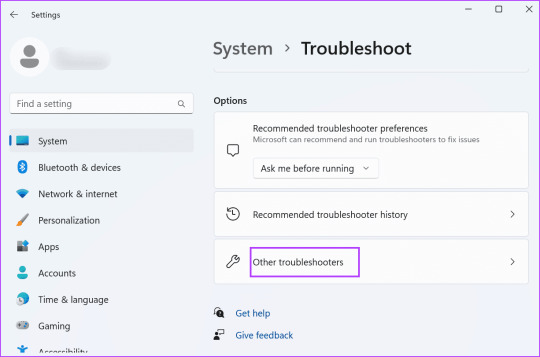
إلى الخطوة 3: انقر فوق الزر "تشغيل" بجوار مستكشف أخطاء تطبيقات متجر Windows.
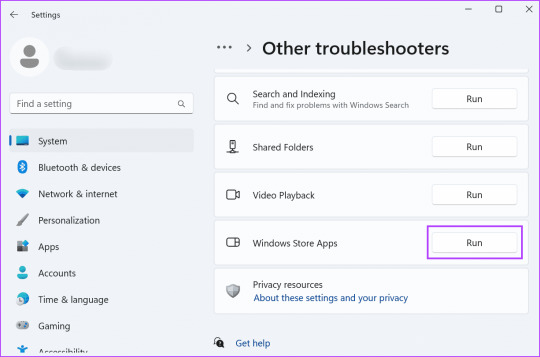
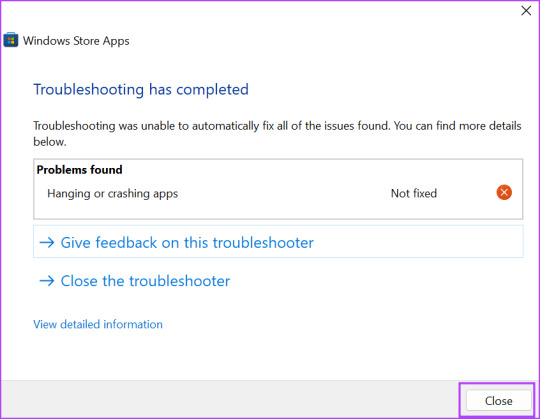
الخطوة 4: سيتم تشغيل مستكشف أخطاء تطبيقات متجر Windows ومصلحها. اتبع التعليمات التي تظهر على الشاشة لتطبيق الإصلاحات المقترحة على جميع المشكلات التي تم تشخيصها. ثم انقر فوق الزر "إغلاق".
4. إصلاح MICROSOFT STORE باستخ��ام الإعدادات المتقدمة
تحتوي تطبيقات Windows على إعدادات متقدمة يمكنك استخدامها لتعديل سلوكها وإصلاحها وإعادة تعيينها وإلغاء تثبيتها إذا لم تعمل بشكل صحيح. قبل ذلك ، أغلق متجر Microsoft تمامًا. استخدم الخطوات التالية: الخطوة 1: اضغط على مفتاح Windows لفتح قائمة ابدأ ، واكتب Microsoft Store في شريط البحث ، وانقر فوق خيار إعدادات التطبيق.
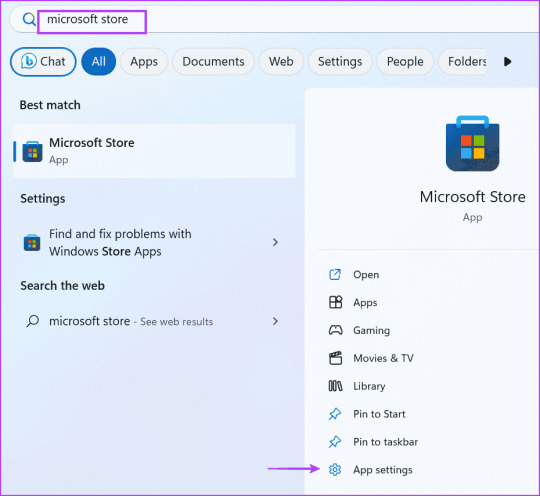
الخطوة 2: قم بالتمرير لأسفل وانقر فوق الزر إصلاح.
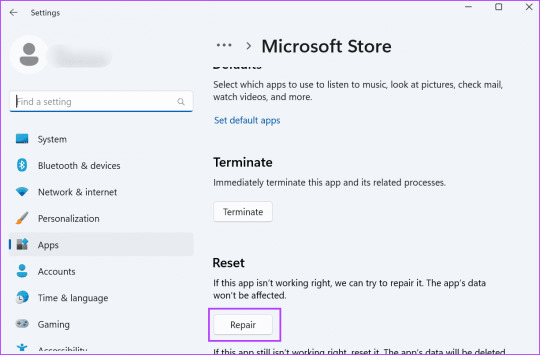
إلى الخطوة 3: انتظر حتى يكتمل الإصلاح ثم أعد محاولة إعادة تعيين التطبيق باستخدام WSreset.
5. إعادة تسجيل MICROSOFT STORE
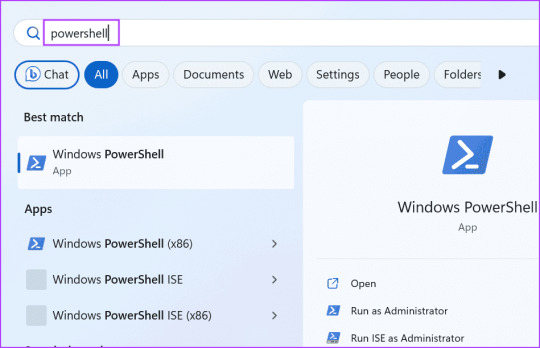
إذا لم يؤد إصلاح التطبيق إلى حل المشكلة ، فيجب إعادة تسجيل Microsoft Store. كرر الخطوات التالية: الخطوة 1: اضغط على مفتاح Windows لفتح قائمة ابدأ ، واكتب PowerShell في شريط البحث ، واضغط على Ctrl + Shift + أدخل اختصار لوحة المفاتيح لفتحه با��تيازات إدارية.
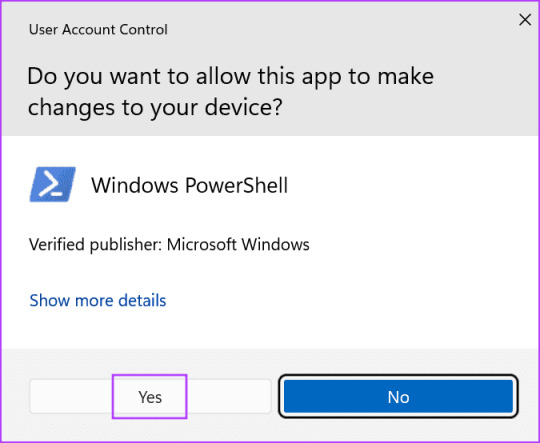
الخطوة 2: سيتم فتح نافذة التحكم في حساب المستخدم. انقر فوق الزر "نعم".
إلى الخطوة 3: انسخ والصق الأمر التالي في نافذة PowerShell واضغط على Enter: Get-AppxPackage -allusers Microsoft.WindowsStore | Foreach {Add-AppxPackage -DisableDevelopmentMode -Register "$($_.InstallLocation)AppXManifest.xml"}
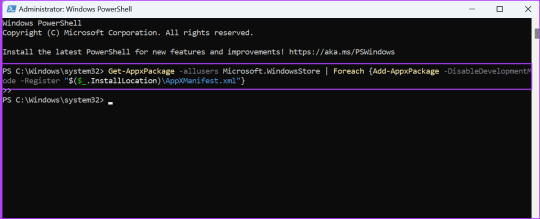
الخطوة 4: أغلق نافذة PowerShell وأعد تشغيل الكمبيوتر.
6. تعديل السجل لمسح ذاكرة التخزين المؤقت لمتجر MICROSOFT
توجد طرق بديلة لتنظيف ذاكرة التخزين المؤقت لـ Microsoft Store عندما يقوم WSReset.exe بإرجاع خطأ. يمكنك إزالة إدخال سجل معين لذلك. لكن أولاً ، قم بإنشاء نسخة احتياطية من السجل الخاص بك وقم بتصديره إلى محرك تخزين خارجي. بعد ذلك اتبع الخطوات التالية: الخطوة 1: اضغط على مفتاح Windows لفتح قائمة ابدأ ، واكتب cmd في شريط البحث ، وانقر على خيار التشغيل كمسؤول.
الخطوة 2: سيتم فتح نافذة التحكم في حساب المستخدم. انقر فوق الزر "نعم".
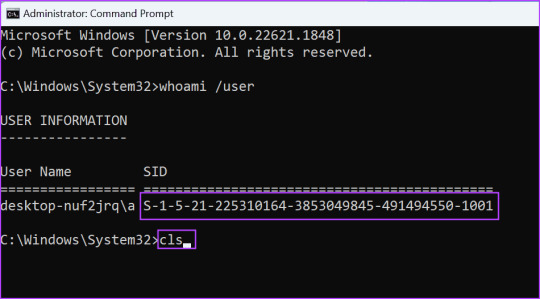
إلى الخطوة 3: اكتب الأمر التالي واضغط على Enter: whoami /user الخطوة 4: سترى الاسم و SID (معرف الأمان) لحساب المستخدم المسجل حاليًا. انسخ SID من نافذة موجه الأوامر والصقه في ملف المفكرة أو الملاحظات اللاصقة. الخطوة 5: اكتب cls في نافذة موجه الأوامر واضغط على Enter.
الخطوة 6: انسخ والصق الأمر التالي لحذف ذاكرة التخزين المؤقت لـ Microsoft Store: reg delete "HKEY_LOCAL_MACHINESOFTWAREMicrosoftWindowsCurrentVersionAppxAppxAllUserStoreSIDMicrosoft.WindowsStore_22305.1401.1.0_neutral_~_8wekyb3d8bbwe" /f لاحظ أنك ستحتاج إلى استبدال جزء SID في الأمر بـ SID الخاص بحسابك على جهاز الكمبيوتر الخاص بك. لذلك سيبدو الأمر كما يلي: reg delete "HKEY_LOCAL_MACHINESOFTWAREMicrosoftWindowsCurrentVersionAppxAppxAllUserStoreS-1-5-21-225310164-3853049845-491494550-1001Microsoft.WindowsStore_22305.1401.1.0_neutral_~_8wekyb3d8bbwe" /f

الخطوة 7: اضغط على Enter لتنفيذ الأمر وإغلاق نافذة موجه الأوامر. بعد ذلك ، ستحتاج إلى إعادة تشغيل جهاز الكمبيوتر الخاص بك.
7. قم بتشغيل SFC و DISM SCAN
يمكن أن تؤدي ملفات النظام التالفة أو المفقودة ومتجر مكونات Windows التالف أيضًا إلى عدم القدرة على إعادة تعيين مشكلة متجر Microsoft. لذلك ، قم بإجراء فحص SFC (مدقق ملفات النظام) متبوعًا بمسح DISM (خدمة نشر الصور وإدارتها) لإصلاح ملفات النظام وخدمة تثبيت Windows. هيريس كيفية القيام بذلك: الخطوة 1: اضغط على مفتاح Windows لفتح قائمة ابدأ ، واكتب cmd في شريط البحث ، وانقر على خيار التشغيل كمسؤول.
الخطوة 2: سيتم فتح نافذة التحكم في حساب المستخدم. انقر فوق الزر "نعم".
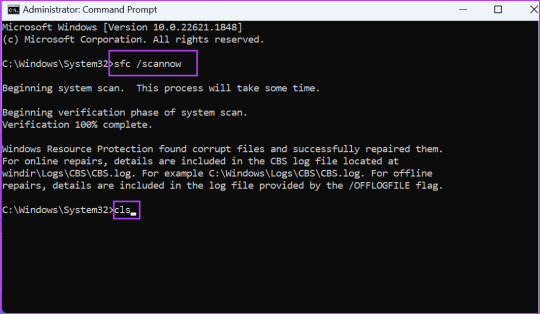
إلى الخطوة 3: اكتب الأمر التالي واضغط على Enter: sfc /scannow الخطوة 4: بعد تنفيذ الأمر ، اكتب cls واضغط على Enter لمسح نافذة موجه الأوامر.
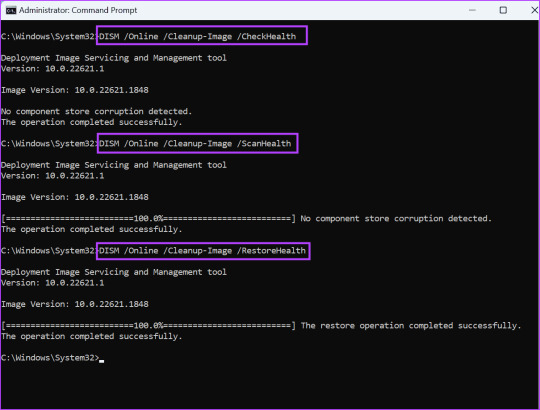
الخطوة 5: اكتب وتنفيذ الأوامر التالية واحدًا تلو الآخر: DISM /Online /Cleanup-Image /CheckHealth DISM /Online /Cleanup-Image /ScanHealth DISM /Online /Cleanup-Image /RestoreHealth
إلى الخطوة 6: أغلق نافذة موجه الأوامر وأعد تشغيل الكمبيوتر.
8. استخدام استعادة النظام
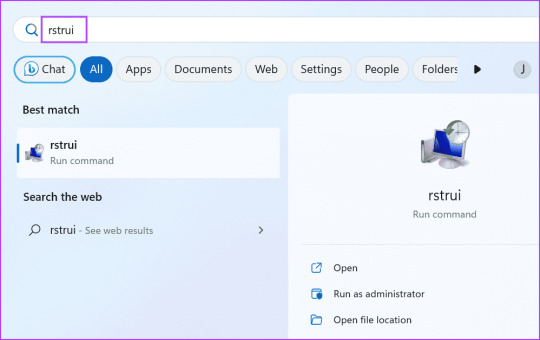
الملاذ الأخير هو استخدام استعادة النظام للعودة إلى حالة سابقة عندما يعمل كل شيء بشكل جيد. ستظل جميع ملفاتك الشخصية غير متأثرة إذا قمت بتطبيق نقطة استعادة على جهاز الكمبيوتر الخاص بك. إليك الطريقة: الخطوة 1: اضغط على مفتاح Windows لفتح قائمة ابدأ ، واكتب rstrui في شريط البحث ، واضغط على Enter.
الخطوة 2: اضغط على زر التالي.
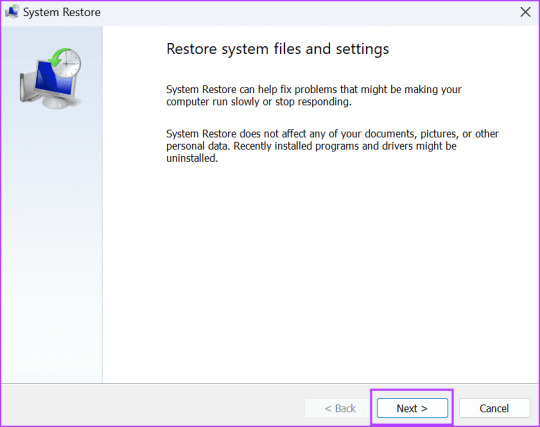
إلى الخطوة 3: حدد نقطة استعادة من القائمة واتبع الإرشادات التي تظهر على الشاشة لتطبيقها على جهاز الكمبيوتر الخاص بك.
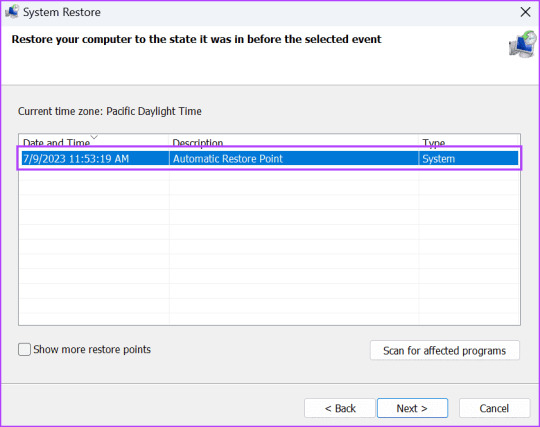
سيتم إعادة تشغيل جهاز الكمبيوتر الخاص بك تلقائيًا لإنهاء تطبيق نقطة الاستعادة والتمهيد على سطح المكتب.
أعد تعيين MICROSOFT STORE بنجاح
تؤدي إعادة تعيين التطبيق إلى مسح ذاكرة التخزين المؤقت الخاصة به وحذف بيانات الحساب في Windows. ولكن عندما لا تتمكن من إعادة تعيين متجر Microsoft ، جرب الإصلاحات المذكورة أعلاه لإعادة تعيين متجر Microsoft باستخدام أداة WSreset. Read the full article
0 notes
Text
A Quick Guide to Using Tweego
Tweego is one of the most important tools I use for creating my game. It allows me to work with multiple, smaller HTML files instead of one gigantic one, and then compile them all into a single game file. This system is incredibly helpful when working with the Twine editor because the editor lags with larger games.
Lag will occur with any story format. It is not affected by word count or character count, but rather by passage count. Because the Twine editor is a visual editor and displays its information as nodes on a grid, lag occurs when there are too many passages for the editor to process and display at once. This usually happens around the 300 to 500 passage mark, although it can change from user to user and their specific version of the editor.
If you are working on a large game and intend to use the Twine editor, you should consider how you can minimize the amount of passages you create (for example, using HiEv’s Combining Story Passages sample code to put linear sections with a Continue/Next prompt into a single passage). You should also have a plan for working around the lag to make your development workflow as smooth as possible.
You can read more about why I compartmentalize and how I structure my game files in this post here. Consider it a Part 1 to this post.
What is Tweego?
Tweego is a command-line interface compiler. It uses the command prompt on your computer to take all of the files necessary for a Twine game and outputs them into a single, playable HTML file. Tweego is often used in conjunction with other workflow methods beyond using the Twine editor, such as using the Twee 3 language in Visual Studio Code or writing passages in plain text files and then compiling them together.
Because I like using the Twine editor for its visual display, this is a tutorial on Tweego’s most basic use: compiling multiple published HTML files created in Twine into a single file.
Installing Tweego
Tweego can get a little complicated to install on its own. The easiest way to install it is to use Chapel’s Tweego Installer for Windows. Read the instructions carefully; if things are not done properly, then the compiler will fail to work.
If you have issues using the installer, questions are best directed to the Twine subreddit. I cannot help troubleshoot the installer.
Checking the Command Prompt
Open your command prompt. On Windows 10, you can search for it in the search bar—it’s the Command Prompt App.
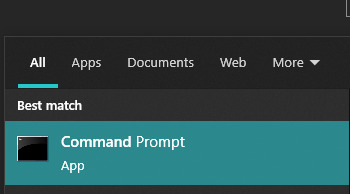
When you open your command prompt, you will get a black box that looks like this:

Command prompts work by inputting the interface’s name and the command or action you want it to take. This will appear like something like this:
tweego -h
tweego is the name of the interface.
-h is the command for what I want it to do.
In this case, -h stands for “help.” Hitting enter will bring up Tweego’s help menu.
So, after the command prompt brings up C:\Users\Anna> (which is the account I am using on my personal computer), I can type in
tweego -h
And it will pull up the help desk. Tweego’s help desk shows the list of commands you can use to achieve different goals.

There are many, many commands in Tweego’s list that can change anything from your game's starting passage to trimming whitespace in your passages, but let's keep this simple. The commands we’re interested are:
--list-formats
-o
Checking Story Formats
The next one you’ll want to test is --list-formats
This will bring up the list of available story formats that Tweego can use.

Story formats are very important. If you are using a story format that is currently not included in Tweego, you will have to add it for the compiler to work.
Check Tweego’s list of story formats against the story format used in your game. If it’s the same, then you’re good to go. If it’s not, you will have to manually add it to Tweego.
For example, when I downloaded and installed Tweego, its version of SugarCube 2 was an early version of the format. It did not match the version of SugarCube 2 I was writing my game in.
You cannot mix versions of story formats. If Tweego’s version of SugarCube is 2.2.1 and the version you’ve written your game in is SugarCube 2.34.1., then you will have to add your game's version of the format to Tweego.
To find Tweego’s files, go to your Local Disk (C:) -> Program Files -> Tweego -> Story Formats
Open the folder containing your story format’s language. In my case, this is sugarcube-2.

Inside, you’ll see three items.

Format – this is the story format’s language.
Icon – an HTML file containing the icon for the format.
LICENSE – a plain text file containing the format’s license.
You need all three files for a story format to work in Tweego.
I’m not sure if there’s a way to extract the necessary files from Twine itself. If you have mismatched story format versions, you may want to update both the Twine editor’s version and Tweego’s version to the latest version.
Updating Story Format for the Twine Editor (SugarCube Only):
You can download the latest version of SugarCube here. See the installation guide here for adding a new story format to the Twine editor.
Updating the Story Format for Tweego (Any Format):
Delete the old version from its folder (leave the folder itself alone) and add in the format, icon and license files for the new version.
Once you have the matching story formats in Twine and Tweego, you can make an output file.
Creating an Output File
“Output” is the command for having Tweego create a compiled HTML file. Output is commanded by using -o (o for output).
Preparing Your Game for Compiling
In the Twine editor, publish your game files to whichever folder you want to story your Twine files in. They will publish as HTML files (some may say CHROME HTML file or Firefox HTML depending on your browser preferences, but this doesn’t matter).
IMPORTANT: In order for your compiled game file to work, you need to be very careful about how you name your passages and make sure you have the appropriate connections. Any passages that move on to a passage in a different story file need to have the exact name of that passage in their link. If you’re using the Twine link markup [[ ]] and the editor automatically creates a new passage, make sure you delete it. This will break the link in your story file, but when your game is compiled, it will move the player onto the next file seamlessly. I explain more about this in this post here, with visuals.
Before we compile our game files, there’s a few important things to keep in mind:
1) Command-line interfaces cannot read spaces in file names. Your HTML files cannot have spaces in their names. If they have a space, replace it with an underscore _. If you include a space, Tweego will fail to locate it.
2) Tweego compiles backwards. Whichever file includes your starting passage must go at the end. It doesn’t matter which order the files go before it, but the one with the first passage of your game has to be at the end.
3) The Story Stylesheet and Story JavaScript of the final file will overwrite the Story Stylesheet and Story JavaScript of any files that come before it.
4) Passages with duplicated titles will be overwritten by any file that comes after it. It’s very important not to duplicate passage titles in your game except in specific cases.
For example, every HTML file of my game has the required StoryInterface and menu passages for its design to work. This is so I don’t have to work with the default SugarCube UI when I'm coding and testing additional story files. When I compile the files in Tweego, duplicates of the StoryInterface passage are overwritten by the file that comes after it, leading back to the starting HTML file of my game.
5) The StoryInit passage of your LAST HTML file will be the StoryInit passage that executes in the compiled file of your game. Make sure that the LAST file has all the code you want to run in your StoryInit passage when players start your game.
Compiling in Tweego
Open the folder where you stored your game’s published HTML files. Go to the location bar and hit backspace. Type in cmd and hit enter. This will open the command prompt with a direct path to the folder you are currently in.

Once the command prompt is open, type in
tweego -o
Next, type in the file name and file type of your output file. In this example, it’s WAYFARER_MASTER.HTML
Then type in the names of all the files you want to compile and their file types. Remember that you cannot have spaces in the file names.
Mine looks like this:

Hit enter and Tweego will compile your files and create a new output file in your folder. This process only takes a couple of seconds.
If you have duplicate passages, Tweego will throw up a warning that it has replaced the existing passage with a duplicate.

And you’re done! Open your newly compiled file and check to make sure everything is working properly. I usually run my game until I hit one of the file breaks and make sure I didn’t mess up on something.
It’s very difficult for Tweego to make a mistake. It will throw up an error if you do something wrong and it will tell you that it is wrong. For example, if you mistype a file name, it will tell you that it cannot find the file and will not include it in the output.

Final Thoughts
I know this is a lot and it can feel overwhelming if you’ve never used the command prompt before. I hope that this write-up helps explain the process. Once you get used to it, it’s a very simple task. While using Tweego is not necessary for small games, if you are working on a very large interactive novel with Twine, you will need to use it at some point.
My own game’s alpha build is over 700k words right now and it will likely be several million words by the time its done. I started to hit lag in the Twine editor when I was only a quarter of the way through my first chapter (around 200k and around 500-ish passages). I spent months trying to work through the lag, but the Twine editor is just not designed to handle that many passages. This may be something they can fix in a future version (Twine 2.4.0 is in beta right now), but there are other benefits to working in smaller pieces.
Using a compiler lets you break your game into smaller pieces, which ultimately makes it easier to code, test, proof, and debug. When there’s an error in a specific part of the game, I no longer have to sift through one very, very large file to find it. I cannot recommend using Tweego enough if you are working on a large game.
If you don’t like working in the Twine editor, you may want to look into using Twee 3 extensions and Visual Studio Code to create your game, particularly if you don't like working in visual grid editors.
Good luck! 💕
235 notes
·
View notes
Text
How Can You Earn Profit with Cryptotab Browser?

The Internet today offers every opportunity to earn online, finding the right one is all we have to do. After native tokens, points, fiat money Earning cryptocurrency is a boom and a number of websites are open for this. Coinpedia earning site reviews will help you understand the complete details of an earning program from a user point of view.
You must be doubtful of this earning Idea, How can a CPU mine Bitcoins without an ASIC? Actually the mining browser mines a very fractional amount of bitcoins, that is in Satoshi. It is also a lightweight browser that doesn’t consume access to electricity or harm your computer performance.
What is a crypto tab?
Crypto tab browser is a Chrome-like browser that Supports surfing, installing extensions, synching accounts, and managing history. The browser is functional to mine bitcoins while you run(use) it and hence get rewarded with the mined bitcoins( Satoshi).
Attention to this! This Platform does not offer any owner information or details of the origin
How to install CryptoTab?
Crypto tab browser is available on the website get.cryptobrowser.site/en.
Step 1- Download the installation file.
Step 2- If prompted, click Run or Save.
Step 3-If you chose Save, double-click download to start installing.
Step 4- Start CryptoTab Browser.
Step 5- Login with your Google account and you also can import all the settings like bookmarks, favourites, history and saved passwords.
How to set the crypto tab browser as the default browser?
Step 1- On your computer, click the start menu
Step 2- Click Settings
Step 3- Open default apps, Original version: Click Default Apps , Creators Update: Click Default Apps
Step 4- At the bottom, under “Web Browser”, click your current browser
Step 5- In the ‘Choose an app’ window, click Crypto Tab Browser
How do I Manage Passwords on Crypttab?
After you log in with your password, Cryptotab Browser will ask to save it. You can either accept it by clicking ‘Save’ or reject it by clicking ‘Cancel’.
However, you can turn off the setting any time by navigating in the Settings option and selecting the Advanced Setting tab.
Crypto Tab Mining
To start mining, first, you need to set up your mining account.
→ Find the crypto Tab icon on the toolbar and click on it
→ Find settings in the right drop-down menu
→ Link your crypto tab account to any of your social network accounts.
Note: Link at least one social network account as a backup to your crypto tab account incase of a system crash or if reinstallation is required.
Crypto tab will start the mining when the browser is open(surfing), no commands or authentication is required. Read the simple mining terms carefully to avoid violating any of them, because if terminated your account can never be recovered.
Crypto tab Withdrawal and Payment The minimum withdrawal amount is 0.00001 BTC, which is $0.065 USD. Crypotab mines BTC and Pays in BTC, Make sure you add your BTC Address to the account for a hassle-free withdrawal process.
To withdraw Bitcoins from your crypto tab account
Step 1:- Find the Crypto Tab icon on the toolbar.
Step 2;- Click on the Menu (three horizontal lines) and click on ‘Withdraw’.
Step 3:- Enter the Bitcoin wallet address and the amount of BTC you want to withdraw.
You can have a track of your withdrawal in the Payment Journal at the button of the Crypto Tab Browser page.
Crypto Tab process payments twice a day in manual mode. However, it has plans to switch to automatic mode soon in the coming days.
Crypto tab Withdrawal and Payments
The minimum withdrawal amount is 0.00001 BTC, which is $0.065 USD. Crypotab mines BTC and Pays in BTC, Make sure you add your BTC Address to the account for a hassle-free withdrawal process.
To withdraw Bitcoins from your crypto tab account
Step 1:- Find the Crypto Tab icon on the toolbar.
Step 2;- Click on the Menu (three horizontal lines) and click on ‘Withdraw’.
Step 3:- Enter the Bitcoin wallet address and the amount of BTC you want to withdraw.
You can have a track of your withdrawal in the Payment Journal at the button of the Crypto Tab Browser page.
Crypto Tab process payments twice a day in manual mode. However, it has plans to switch to automatic mode soon in the coming days.
CryptoTab Features
The website advertises all of the following features:
Extensions: The platform supports Chrome extensions, allowing you to add all of the extensions such as, including an ad blocker, security tools, performance-boosting tools, themes, and more.
Mine Bitcoins: The website claims to constantly mine cryptocurrency through your browser, which means you’re automatically mining whenever you have browser tabs open. However, the mining speed is higher when the browser window is active.
Multi-Browser Support: CryptoTab is available as a free standalone download, but it allows data importing from Chrome, Firefox, Microsoft Edge, Opera, and Safari.
Invite Friends: CryptoTab offers referral awards. You can earn more money by referring friends. Moreover, it has a 10 level referral network.
Payouts: You can withdraw your earnings any time directly to a BTC wallet, although there is a minimum withdrawal amount of 0.00001 BTC.
Is Crypto Tab legit or Scam ?
It’s quite natural that, when cryptos are not treated so friendly in many parts of the world, the deals which involve cryptos are always doubted with their intentions. Crypto tab too was asked by many,-’ Is it a Ponzi scheme?’
As the crypto tab does not charge any amount to register. It’s 100% free of charge with no upgrades available. As long as your browser works, it generates some income for you. Confusing MLM is often mistaken by a Ponzi scheme which is not justified.
So earning money through Crypto Tab Browser is definitely not a scam, but a passive source of income which usually requires a little more time. On the other hand, it’s a better option to earn by referring to your contacts.
Crypto Tab Browser Pros and ConsPros
It has built-in mining features
The interface is user-friendly and customizable
The browser is lightning fast and lightweight
Crypto tab offers users accessibility over mobile phones.
Import data from another browser and sync across multiple devices.
The referral program is attractive
Cons
Overwrites google chrome after sync
Automatically becomes the default browser without permission.
It starts automatically every time you start your system.
The support is not up to the mark
It does not block advertisements and trackers
Concluding Thought
Crypto Tab browser could be proven a good source of income for the crypto lovers and followers. The real potential of Crypto Browser is for those who can recruit others. The more friends on social networking, the more chance of income.
Does it really sound interesting, I would recommend trying it out once.
5 notes
·
View notes
Text
Adobe Flash Player High Cpu Usage

I
Adobe Flash Player High Cpu Usage Low Gpu Usage Fix Pack
Adobe Flash Player High Cpu Usage Windows 10
Adobe Flash Player High Cpu Usage Mean
Adobe Flash Player High Cpu Usage Chromebook
Fixed issue where no warning is shown to user that lightning install cannot work unless user relaxes default security permission under Flash player Plug-in settings. Fixed issue where High CPU and memory usage was observed after Add-in update to 11.2.385.0. Adobe Flash Player 11.4.402.287 Flash Player out of Date! Adobe Reader 10.1.4 Adobe Reader out of Date! Mozilla Firefox (17.0) Google Chrome 23.0.1271.64 Google Chrome 23.0.1271.91 Google Chrome 23.0.1271.95 `````Process Check: objlist.exe by Laurent````` `````System Health check````` Total Fragmentation on Drive C.
f you are using the Adobe product, you may have seen a notification like “the Adobe software you are using is not genuine” or “Non-genuine software pop-up.” The reason may be the incorrect and invalid licenses or tampering of program files. The Adobe Genuine Software Integrity Service periodically validates already installed Adobe software and keep better track of genuine users.
Sometimes, the Adobe software not genuine appears on your screen even though you have bought legitimate copies of Adobe products.
This post will show you how you can disable adobe genuine software integrity service on Windows and Mac.
There are different solutions to fix the issue on different OS, so we are starting from Windows.
Related Articles:
Contents
Top Solutions to Disable Adobe Genuine Software Integrity Service on Windows
Solution 1: Disable Adobe Genuine Software Integrity in Services
Be its Windows 10, 8, or 7; you can try to disable Adobe Genuine Software Integrity in Services.
Here are the steps:
Type “Services” in your Windows Search Box and open it.
A window will open with many services list. In that window, you can see categories – Extended and Standard.
Click on Standard category.
Find Adobe Genuine Software Integrity Service and right-click it to choose Properties.
Under General, you will see the Startup Type option.
Change the Startup Type to Disabled and click the Apply button.
Congratulations! You have successfully fixed the issue. Now, no more popup will disturb you.
In case, the popup still appears, here is another solution.
Solution 2: Disable Adobe Genuine Software Integrity in Task Manager

Follow the steps below:
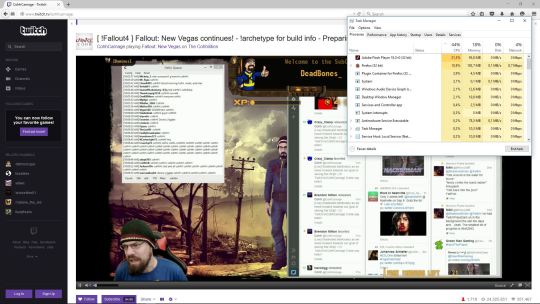
Type “Task Manager” in the Search box to open it.
In the Processes tab, you will find the Adobe Genuine Integrity service.
Right-click it and then click on Open file location.
It should open a folder named AdobeGCClient.
Minimize the file location folder and come to the Task Manager window once again.
Right-click on Adobe Genuine Software Integrity Service, and this time, click on End Task.
After that, delete the AdobeGCClient folder completely opened in the previous step.
Restart your PC to check if the problem is solved.
If the issue still exists and the folder was re-created ever after the restart, try to rename it to something similar. This time, do not delete the folder.
There’s one more way that can do the same thing and also guarantees the complete removal of the Adobe Genuine Software Integrity Service.
Here are the steps:
Type “cmd” in the Windows search box, right-click the result and select Run as administrator.
In the command prompt, type “sc delete AGSService” and hit Enter.
Also, remove the folder. For that, go to “C:Program Files (x86)Common FilesAdobeAdobeGCClient” and delete it.
Above are the solutions for Windows users. Mac users can read from here.
Adobe Flash Player High Cpu Usage Low Gpu Usage Fix Pack
Simple Steps to DisableAdobe Genuine Software Integrity on Mac
To disable on Mac, here are the steps:
Open Finder App.
In the top navigation bar, there’s an option Go. Select it and click on option Go to Folder.
Adobe Flash Player High Cpu Usage Windows 10
You can see a folder AdobeGCClient under Application Support >> Adobe.
Now, delete the folder AdobeGCClient and also delete it from the trash.
Adobe Flash Player High Cpu Usage Mean
Final Words
Adobe Flash Player High Cpu Usage Chromebook
We hope this article helped you. These solutions will help you to disable adobe genuine software integrity on Windows and Mac. Now you can continue your work without any disturbance.
1 note
·
View note
Text
Installing Adobe Acrobat Pro On Terminal Server
Installing Adobe Acrobat Pro 2017 On Terminal Server
Adobe Acrobat Pro. Stay productive by staying connected. Always enjoy the latest technology from the most collaborative, work-from-anywhere-anytime PDF tool available on any device. Start free trial Always get the latest Acrobat features. Your needs are always evolving. And the way you work evolves with it. Msiexec /a C: Adobe AIP AcroRead.msi /p C: Adobe Extract AdbeRdrUpd1014.msp. Install Adobe Customization Wizard This will allow you to make a custom install MST file to control what settings your users have in Adobe Reader. Note; setup.ini was not there when I made the AIP. You may need to modifying the extract folder msi then copy it.
I had an outstanding job to update Adobe Reader 9 on a Windows 2003 Terminal Server.
Here are the steps I took.
1. Apply for a free Adobe Reader distribution license http://www.adobe.com/products/reader/distribution.html?readstep
2. Download the setup file from Adobe http://get.adobe.com/reader/enterprise/ or from ftp://ftp.adobe.com/pub/adobe/reader/win/10.x/
3. Download Adobe Customization Wizard http://www.adobe.com/support/downloads/detail.jsp?ftpID=4950
4. Download the Acrobat Enterprise Administration Guide this will be a reference and explain all the options in detail http://kb2.adobe.com/cps/837/cpsid_83709/attachments/Acrobat_Enterprise_Administration.pdf
5. Extract the redistribution package Open a command prompt and type or paste the below (I saved the download to C:Adobe) The command below will extract all the files to C:AdobeExtract C:Adobe>AdbeRdr1014_en_US.exe -sfx_ne -sfx_o”C:AdobeExtract”

6. Make a AIP (Administrative Installation Point) what is an AIP? uncompressed setup files msiexec /a AcroRead.msi
7. Patch the AIP with the latest update that came with the download package (in the Extract folder). msiexec /a C:AdobeAIPAcroRead.msi /p C:AdobeExtractAdbeRdrUpd1014.msp
8. Install Adobe Customization Wizard This will allow you to make a custom install MST file to control what settings your users have in Adobe Reader.
Note; setup.ini was not there when I made the AIP. You may need to modifying the extract folder msi then copy it.
9. Install with MST

Note; options /i = install /qb = Displays a basic user interface TRANSFORMS= custom settings MST file
E:AdobeExtract>msiexec /i AcroRead.msi TRANSFORMS=AcroRead.mst /qb
Note; Add double quotes if you have problems.

E:AdobeExtract>msiexec /i AcroRead.msi TRANSFORMS=”AcroRead.mst” /qb
Hope it helps someone, let me know if you have any comments or fixes.
Have you tried opening a PDF document when you are using a terminal server, but when it opens in Adobe Acrobat Reader DC it doesn’t seem to display, or it prompts you with “There was an error opening this document. Access denied”?
We have a simple tip that should restore the program and allow you to open those documents again.
Step 1 – Acrobat Reader Preferences

Open the Adobe Acrotbat Reader DC program (you may find this on your desktop, or in your start items).
Please then press Edit and select Preferences.
Step 2 – Navigate to Security (Enhanced)
When you have opened preferences, you will see a settings pane on the left side with a list of options to choose from.
Please select Security (Enhanced). This will prompt you with a page, at the top of which you will see three options. We specifically want to focus on “Enable Protected Mode at Startup”
Step 3 – Untick Enable protectd mode at startup
All you need to do is un-tick the box highlighted below.

If you are prompted with a warning window, please press yes..
Now it should look like this:
Step 4 – Close down adobe Acrobat and open A PDF File
Now that his has been un-ticked, please close the dialogue box, and also close down all instances of Adobe Acrobat Reader DC. You should now be able to open PDF files with no problems.
Take advantage of our expertise
Installing Adobe Acrobat Pro 2017 On Terminal Server
Our team share their how-tos, trouble shooting guides and tips for getting the best from your business connectivity in a monthly email round up.
1 note
·
View note