#add this to the projects that are way too ambitious pile because I doubt I could get anyone to want in on this lmao 😅
Text
Okay so what if I made a RWBY real time fan dub? I would play Ruby Rose 🌹 lmao just need some other friends and people who might be interested!

#I REALLYYY WANNA DO IT BUT I NEED PPL WHO ARE DOWN FOR COLLABING#add this to the projects that are way too ambitious pile because I doubt I could get anyone to want in on this lmao 😅#rwby#rwby abridged#ruby rose#voice acting#voice actor#rwby real time fandub#RWBY RTF#mine#OP
13 notes
·
View notes
Text
Pick a card reading: What makes you so attractive to others + bnha characters who would highkey simp for you
Hiya i am back, this spread basically highlights all of your attractive qualities about yourself (and yes you do have them) with the added additon of a hidden talent and how you can better love yourself.
My favourite part of this reading is at the bottom I have included My hero characters that would very much swoon if you even spoke to them (in other words they have a crush).
I was going to do 4 piles for this reading but everytime i tried to do the 4th one i kept getting really bad headaches so i decided against it.
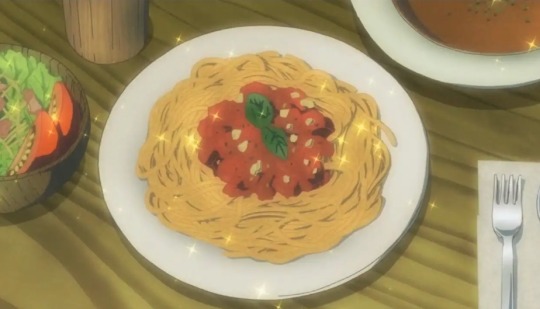
All you need to do is look at the anime food photos infront of you and pick the one you were first drawn to and then scroll below to your reading. I hope you enjoy it and that this reading does reasonate with you.
Stay safe and healthy
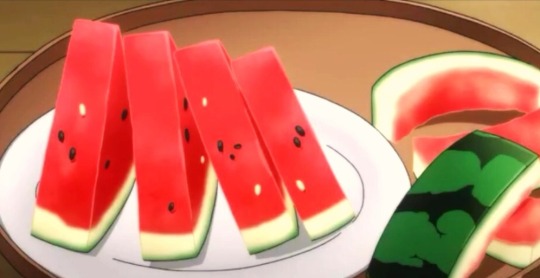

Pile 1 (Watermelon)
Why you are so amazing
The traits and simply make you, you.
The Sun: I literally squealed when this card came out of the deck, like chaotic babies unite. This card represents all things happy, you just have this cheerful personality that brings so much joy to others like even with the doom and gloom around us you still manage to keep on smiling which is honestly a massive talent. For some reason (if there are any MHA fans in the building) I thought of Mirio who is always so upbeat and ready to help others in need, I feel like this is definitely you. To me, the idea of being a really good storyteller came into my mind like the sun represents the performative aspects of life so just naturally grabbing that audience's attention is something you are so good at and I am never ever bored in your company. Looking at the picture of the card there is a little child riding a horse, you have this childlike innocence and curiosity which is the most adorable thing ever but I feel like sometimes people underestimate your intelligence and capabilities. I would like to say that the child on the card is sitting in a very confident manner and is controlling the horse with ease which suggests to me that you do have this deep maturity about you too which people tend to forget, the fact you can go from loud and upbeat to quiet and introspective is so cool and amazing as Hannah Montana says “you got to live the best of both worlds”. One final message is that it is ok to feel sad and that you don’t have to be optimistic all the time, you are not a burden and many people will rush towards you full of love and support.
Page of Swords: seeing this card after drawing the sun made a lot of sense in my mind, the page represents youthful energy and the swords are all to do with our intellect and abstract concepts (like of like air in astrology) so you might be a bit of a bookworm or you like to learn more about things like tarot or astrology. What I can say is that you know a little about a lot which is super amazing because you always have some random fact tucked into your brain, you would be great on a quiz team. You are so witty and funny too like I can imagine people are always bent over laughing whenever they are in your company and if you do not believe me then I can guarantee that is what they say to other people when talking about how cool you are. Quite the chatterbox on your school reports I can imagine the teacher said that you may have “talked a bit too much” but you can’t help it, you do love to socialise. Looking at the picture on the card the page is surrounded with clouds so I can imagine you are a little bit of a daydreamer which is very endearing and sweet you can’t help it physics the last thing on a Friday is just so incredibly boring, you come up with the grandest ideas and no one knows how like why didn’t they think of that you are a natural outside the box thinker. Lastly, I think the Page of Swords is a very good problem solver sure it might not be the most straightforward solution if you solve your problems in a way which works for you, you do not follow convention and are proud to be an innovator and that deserves a reward in itself.
The Lovers: the most romantic card in the whole deck, my goodness you are a hopeless romantic, you love to daydream about all the possibilities and you might also believe in soulmates, personally I think it is very sweet and we need more idealist in this world because sometimes reality can seem so bleak. I just know in my heart that you would be one of the best s/o ‘s ever like you would do all the cute romantic gestures like buying roses and leaving cute notes around their room like I am actually gonna go and squeal in a pillow because of how precious you are. The Lovers also indicate that you know who you are and you know what your morals are, whilst you may be an idealist you don’t let people walk all over you that’s for sure, you stand up for yourselves and for others and are the voice for the people who cannot be heard. You make a very good public speaker too (you should give it a go deffo) and are very clever with your words as the Lovers are ruled by Gemini. A scenario which popped into my head was somebody thinking you flirted with them but in actual fact, you were just being friendly. Looking at the picture of the card the background appears to look like the garden of Eden for some odd reason the first kind of trait is you being able to make yourself at home anywhere. The Garden of Eden represents paradise so like you can naturally find your “paradise” in a different location or with a group of people perhaps the word I am looking for is spontaneous whatever it is I feel like that is something you can do. My last message is that you sometimes doubt yourself and your decision-making skills. What I have to say is that trust your intuition and go for it, don’t get too caught up in your head because you do not need to, you have excellent observation skills already.
Hidden Talent
Perhaps something you might not have been aware of
Knight of Swords: You are very ambitious, I feel like many people do not see that due to your sunny exterior but once you have a goal in mind there is no stopping you. You remind me of the Queen song “Don’t stop me now” like your life is always so fast-paced. When the situation calls for it you can leave that page of sword persona and step up into the role of the knight and take charge of the situation. You are assertive and direct as I think some of you reading this reading today may feel like you are a bit of a doormat but I can confidently say you are not. Also, you are extremely intellectual, you may not be academically intelligent but it’s more that you are very eloquent and can debate with ease, like you can break down someone else’s point and explain how they contradict one another or how they don’t add up. On the card itself, the knight is wearing the colour blue, according to colour theory blue is representative of Logic and wisdom. Another big indicator of how smart you really are not a himbo by any means. You do have a very logical side to yourself that perhaps you don’t even realise you are using like you are very good reasoning out things (sorry that this is so vague my mind had gone all foggy). Blue is also a very calm colour so you are definitely a very tranquil kind of person too, you do not stress out often and you don’t let high-pressure situations get the better of you. You truly are cool as a cucumber. Writing this currently, I feel so peaceful, like you create a sanctuary for people.
How to love yourself
We all have our down days so here are some tips and tricks to make you feel better
2 of Coins: I feel like the universe here has kind of given you two options here. Usually, this card indicates a need to be flexible and have to juggle things around if in this case I do not believe it is your message. I wanted to look at the image, especially the two pictures inside the coins. The first one is the weighing scales which are perfectly balanced which I interpreted as being the symbol of Libra. Being patient with yourself and saying kind words to yourself can be very healing, a tactic could maybe leave post notes in nice places so whenever you walk around the room. Definitely pamper yourself when you deserve it. The message I am getting from this card is that you are too harsh on yourself and never give yourself the self care you deserve, get that face mask and blast a bit of Megan, be the princess/prince you deserve to be. On the other part of the coin is a picture of a big moon with a tiny sun in the middle, my interpretation comes back to the sun card and you feel like you always have to hold this cheery facade. The moon represents our emotions specifically our anxieties and fears with it being bigger so with it being the bigger image I feel like in order to love yourself you are going to need to express your emotions in a healthy way whatever mechanism works best for you, for me ranting to a close friend always helps but other people prefer to journal or use a creative outlet which is fine too. Lastly, as I mentioned at the top the 2 of coins indicates that you have lots of projects in your life so maybe if you immerse yourself in those you can unlock the true path to good self esteem.
Bnha characters who highkey have a crush on you
Bakugou, Jirou, Shindo, Shigaraki and Midnight (maybe sir nighteye)
----------
Pile 2 (Ramen)
Why you are so amazing
The traits that simply make you, you
The Star with the 2 of Swords: these cards both fell out at the exact same time with the star on top and the 2 of swords behind so I decided to use the swords card as a clarifier one. I say this about a lot of the cards but i can tell that the star is one of my faves 100% it represents hope, creativity and calm. The first kind of trait that came into my head when this card popped out is that you always shine wherever you go, you are just gifted at everything, some of you think you may be the burnt out gifted child but you are not, you still glow even if you can’t see it yourself and people are in awe (and somewhat intimidated by you) because of your success and achievements. Looking into the actual meaning you are the type of person to never give up, the star is a sign that your wishes are coming into fruition, if something doesn’t go according to plan you do not dwell on it too much and brush yourself up again and carry on which is amazing considering the circumstances we are in. The word I was looking for is resilient and persistent. You don’t let the haters stop you from doing your thing. You have a calming disposition and I imagine your role is the mediator of the friendship, like you just have the most soothing presence. I want to go into more detail about the fact the star is ruled by Aquarius because that fact seems to keep sticking out for me, I trait we never talk about in regards to aquarius is that they can in fact be great leaders, they are the trendsetters of the zodiac so I feel like you prefer to live life your own way rather than copy others which I admire you for because going against the current is hard. Because of your actions I feel like you inspire others whenever you know this or not (spoiler alert you do). Another thing that has sprung to my mind is that I feel like you can be quite mysterious. Everybody is so intrigued by you wanting to know what is going on in your mind. With the 2 of swords being there too, it usually indicates that a decision needs to be made however looking at the picture the lady is confidently holding the 2 swords which suggests to me that you are a very decisive person and once you set your mind to something there is no stopping you. You are much more talented than you give yourself credit for so never stop shining.
The Hierophant: this made me very intrigued about your reading when this card fell because the star and the hierophant kind of have contrasting energies since the H is ruled by Taurus. The Hierophant stands for knowledge and education, you probably take your studies quite seriously or you naturally maintain good grades throughout the year (which i think is so cool), you are the person who forms a study group to help their dumbass friends so that they don’t fail the finals and honestly as someone who is a member of the dumbass friend squad without people like you in the world I wouldn’t have any educational qualifications. Helping others is second nature to you, always quick to give a helping hand with those in need. The Hierophant is a responsible figure so that in turn means so are you, you always make sure that everything is done on time and that your drunk friends get home safely, others may say you can be a little bit too serious but I have to disagree, your organisation skills are amazing and if I ever met you you will probably be my idol. Looking at this cards ruling sign Taurus, not a lot of people realise how ambitious a taurus can be (most people think quite the latter but remember there is a reason that taurus is an earth sign), you have big plans for yourself and I feel like you definitely prioritise your career over other aspects of yourlife, your drive and commitment to yourself and others is truly amazing and promise me you won’t be too hard on yourself because as some random kardashian once said “you are doing amazing sweetie”.
Knight of Pentacles: this card is the CEO of detail, the knight is a figure who is very happy to serve the king and with it being in the suits of pentacles no detail will be missed out. You are incredibly observant of others one example that popped into my head is that you can tell what others are thinking through either body language or just how they communicate (take this if it resonates with you) or maybe you are simply very organised. Either way your amazing perception is something that goes unnoticed by others so I believe this card fell from the deck as a chance to give you the credit you deserve. You are incredibly hard working, the knight is always alert and on duty so no matter the day of the week you are working, it can be school work or passion projects you are constantly trying to achieve the best version of yourself, make sure you have a break and have a kit kat y’know. The knight is patient who works diligently towards his goals which I think you very much channel, like you are so kind and patient towards anyone, always offering to listen to other people’s problems and offering them first class advice (which is something I am very jelly of in a good way). The message I get from this is that you are so patient with others so please be patient with yourself, don’t push yourself so hard that your self esteem begins to suffer because you do not deserve that.
Hidden Talents
Perhaps something you might not have been aware of
The High Priestess: this card is such a badass card, like the high priestess is the CEO of intuition and all that jazz, your bullshit detector is off the radar and the even cooler thing you don’t even know it. This isn’t to say you should be distrustful of every single person you meet but if you have a gut feeling I say you should stick with it as mother nature has blessed you out of this world intuition. The high priestess represents having inner power, the picture on the card shows her sitting in her chair very assured. To other people you come across as having this quiet confidence, you do not boast about your talents through words however you bring them forward with actions, I feel like people are secretly in awe of you. Coming back to the picture the high priestess is mostly wearing teal (including her dress and her accessories), typically the colour teal represents elegance and politeness which is something you 100% possess ( a true lady/gentlemen) however reading more into the psychology behind this colour one line really stuck out to me - “Teal is a slightly unconventional colour, you value your uniqueness and don’t wish to fit in the crowd”, whilst you may have a serious demeanor it doesn’t me you are boring by any means, it could be the way your express your style via clothing that is unique or perhaps you have a secret niche interest that not many people know about. Whatever it is, you are a very interesting and complex person and you are definitely a lot more than meets the eye.
How to love yourself
We all have our off days, so here is some tips and tricks on how to feel better
The Star: I found it so amazing that this card came out again in a different deck, the message when I saw the 2 star cards just confirmed to me that you don’t realise how amazing you are, like you are constantly downplaying yourself because you are so incredible modest, like you are so much better than you think you are and you deserve all the joy in the world. The star in tarot represents hope and affirmations, somebody praising you definitely makes your day. (this message just came to me when i was writing this), society constantly tells us not to out looking for external praise and to be happy with ourselves it has to come from within but I slightly disagree on this standpoint, I believe you guys lack that external validation in your life, so when someone does praise you it really has a big impact. Getting complimented is a good thing and you deserve every single one of them. Getting back on track, looking closely at the picture the lady is pretty much naked except for a blue ribbon covering her “private parts”, to me this is an indication that you should show off, like put on a pretty dress (or whatever clothing makes you feel the most comfortable) and get some beyonce on and pretend you are a victoria secrets angel, release the inner diva, do something bougie, get your nails done. Honestly you guys deserve the spotlight (if you want that) or either the right to feel confident, like just go dancing and let all that negative energy out through your movements. I wanted to have a look at the blue ribbon in more detail, blue is a colour that represents calmness and tranquility, so any activities that make you in a calm or soothing state will really help you too. It could be the classical calming activities such as guided meditation or a really nice hot bubble bath but my sister says she finds shopping to be very relaxing, so whatever hobby or thing makes you fall into this state could also really help increase the self-esteem here.
Bnha characters who highkey have a crush on you
Monoma, Uraraka, Hawks, Mina and Sero
-----------------
Pile 3 (Pasta)
Why are you so amazing
What traits make you, you
The Emperor: the emperor card represents structure, stability and authority. I feel like a lot of you picking this reading are quite shocked that this card came out, like I feel like you might not think of yourself as the most stable person (especially during these uncertain times) however I do not think you give yourself enough credit. You thrive under following a strict schedule and always follow through on your goals (for some reason I feel like you might have a very extensive writing blog, like your masterlists are all extremely organised). You naturally bring stability to others though, I keep getting the phrase “you are my rock” and you are always there if anyone needs you. Of course this doesn’t make you a doormat by any means in fact quite the latter, the emperor is a man of action and leadership, you are a natural leader and always know the exact action to take in regards to a situation, a problem solver, people come to you for when they need to seek answers and get stuff done. The emperor serves the kingdom fairly thus he facts rationally in regards to making decisions. You are perhaps on the more logical side and are not too rash when it comes to your emotions, an aloof and calculated person, many people are in awe of your authoritative aura you have around you. You are extremely fair and just too, not a cold person at all, if someone wrongs you or your loved ones they are getting the treatment they deserve, we are so blessed to have you as an incredibly loyal person in this world. For some of you I highkey think you are into things that involve strategies or methodical thinking a couple of things that came to mind were Jigsaw puzzles, chess or solving rubik's cubes but sports and other hobbies do use this critical thinking as well, also I feel like you might be extremely passionate about it too. The emperor is ruled by aries so you are a person of action, you hate the idea of sitting around and I feel like you are never afraid to take on a challenge which is extremely admirable because many people are afraid of failure but you don’t see it as that, you see it has another chance to prove yourself and honestly as I am typing this out I am feeling so motivated to do something badass. Best hype man period. (Also i couldn’t help but think of commander erwin smith when i was writing this so maybe you kin this man a little bit)
Seven of Swords: now this card in tarot is basically referring to someone being a backstabbing little shit but actually I think this highkey is a very badass card to come out of the deck in regards to what makes you so amazing. This card indicates scheming and coming up with a strategy which to me empathises how intelligent you are. You have some extremely high IQ or you naturally incredibly street smart either way your intellect is something to be marveled. Unlike pile number 2 I would not say you are studious but are the type of person who can have like 2 hours sleep and come in and do a test and still pass with flying colours. With this card, I feel like you are two steps ahead of everyone else, I can imagine that you sort of go into this mind palace like sherlock holmes where you connect all the loose threads, out of this world deduction skills, like how do you do it I will never know??? Definitely very good actors, like you can turn on the charm if need be and honestly you guys are super badass, you are the one person I believe who could actually survive animes such as Attack on Titan or the promised neverland.
Seven of Pentacles: Whenever I see this card in a personal reading of me it’s the universe’s way of telling me to stop being an impatient bitch and keep working. You sure do put up with a lot of shit, I 100% think that within your friendship you are the voice of reason and honestly you deserve a nobel peace prize. Seven of Pentacles indicates a need for looking more into the future, a long term perspective, you deffo play the long game, thinking before you leap and taking into consideration the consequences of your actions. You know where to invest your time in and make excellent planners, the archetype that has come into my brain is the chess master, you just know how to move each piece or in this instance know exactly what endeavours to pursue in life. The lady on the card looks very at rest despite all the work she has done, to me this indicates that you make a lot of things look really easy, perhaps you have a niche hobby that you have perfected over the years or maybe you are naturally an elegant person. What I can tell you is that whatever sort of work you present is bougie as fuck, wherever it be a writing for tumblr or some artwork it always looks so damn professional (your talent makes me go on all starry eyed). Lastly, I feel like your motto is “slow and steady is the race”, you would rather take slightly longer on a project then finish it quickly with lots of errors, definitely a perfectionist.
Hidden Talent
Perhaps something you might have not been aware of
The Chariot: the first thoughts that came to mind is that you are incredibly hard working and have lots of self discipline, many people believe you were always just naturally good at stuff not seeing the sweat and tears that has got you to your amazing level now, for instance you are extremely charming however this wasn’t a gift you were born with but something you learnt. The lady pictured on the card was wearing gold armour, the colour gold was really standing out to me so I decided to include this within the interpretation. The colour gold means triumph and success, to me this shows that when you put your talents to good use (towards a goal) the world becomes your oyster, the universe has gifted you the resources now you just have to pick up and use them. Also within the picture, there were 2 horses white and black, to me the colours represent divine feminie energy (emotions) and divine masculine energy (logic), the lady has control of the horses which shows that you have good control over both logic and emotions and don’t let one over power the other one. The spiritual guide of the horse shows that you are actually an extremely passionate person, I feel like you may have a slightly apathetic appearance so people can get quite shocked when they see you all fired up and ready to go, but you are. You look towards the future and never let the past hold you back, you are always ready for battle and just like the chariot you charge on ahead never looking back. The chariot card is ruled by Cancer, I feel like you are a very good listener, people are surprised at how comforting you can actually be, you do look out for your friends and just want to make sure they are healthy and well. You truly treasure those close around you and will take the bullet for any of them, I literally feel so emotionally writing this and honestly words cannot describe how amazing you are.
How to love yourself
We all have our down days, so here are some tips and tricks to help us feel better
10 of Cups: this is literally the happy ending card (that's my nickname for it). 10 of cups represents family and emotional fulfilment. The first message that came to mind in regards to loving yourself was listing things that you are grateful for, as someone who has low self esteem issues I know this can be extremely difficult but you need to dig deep. If you have trouble starting off taking personality quizzes can be a good start, my personal faves our the myer briggs (do not take 16personalities it isn’t accurate) and the jungian archetypes (i got the Jester), you can see some good traits from these quiz results which could help you start your list. What was really prominent on this card was the peace sign that was in the background, this could be an indication that may need to find peace with yourself or perhaps try to find peace around you, with the chaos that has been COVID you may have lost your balance in life, the cups aren’t standing up right. Perhaps your sleep schedule has gone out the window or you are skipping lunch most days ( I am guilty of doing this too), try by fixing your daily routine, this could be by going to bed 1 hour earlier or maybe making sure you go outside at least once a day. I definitely think that will increase your overall morale and thus the confidence will make a comeback. Spending time with your family is another theme of this card, I understand that some family members can be a pain however talking to them just having a normal conversation could really help forge better relationships with them. Be happy with the here and now because contentment is right under your nose.
BNHA characters that would highkey have a crush on you
Deku, Toga, Iida, Miriko and Dabi
#tarot#mha x reader#what makes you attractive#tarot reading#anime x tarot#my hero academia#anime#tarot spreads#self care#bnha x reader
99 notes
·
View notes
Text
Analysis: Joe Biden wants to avoid the Obama era's biggest economic mistake. Congress may not let him
New Post has been published on https://appradab.com/analysis-joe-biden-wants-to-avoid-the-obama-eras-biggest-economic-mistake-congress-may-not-let-him/
Analysis: Joe Biden wants to avoid the Obama era's biggest economic mistake. Congress may not let him
“If we look back and think this plan was too big, that would be a regret that would be fine to live with,” Jason Furman, one of the architects of the 2009 stimulus plan, told Appradab Business.
Furman, a former top economic aide to Obama, recalled that the team wanted a $1 trillion stimulus package in 2009 — or roughly 25% bigger than the record-setting legislation that ultimately got through Congress.
“The recovery was slower from the financial crisis because the stimulus wasn’t bigger,” said Furman, who served as one of Obama’s top economic advisers.
By contrast, economists say the Biden plan should help the US economy ride out the next six months or so of the pandemic, which has killed more than 400,000 Americans.
Mark Zandi: 8% GDP growth if enacted
The $1.9 trillion plan includes $1,400 stimulus checks, a $15 federal minimum wage, $350 billion in state and local aid, enhanced unemployment benefits, help for the hungry and $25 billion in rental assistance.
The goal would be to help Americans in need, especially those whose livelihoods are linked to industries crushed by the pandemic like restaurants, hotels, airlines and cruise lines. The United States lost jobs in December for the first time since the spring. The nation is still down 10 million jobs during the pandemic.
Crucially, Biden is proposing spending big, for the first time during this pandemic, on the health crisis itself. His plan calls for $400 billion to keep schools open, speed up vaccinations and improve testing.
“One of the lessons of 2009 was that the argument that you could start modestly and then keep adding if the economy did not improve ran into a political reality,” Austan Goolsbee, a former Obama economic adviser, told Appradab Business. “President-elect Biden was there. You can already see they’re not going to repeat that scenario.”
If enacted — and that’s a huge if — the US economy would grow by a sizzling 8% in 2021 and the job market would return to nearly full employment by the fall of 2022, according to projections by Mark Zandi, chief economists at Moody’s Analytics.
However, Biden’s stimulus plan will face opposition in Congress. Zandi expects Biden’s American Rescue Plan will get whittled down to just $750 billion. That in turn would leave US GDP growth at about 5%.
Goldman Sachs is a bit more optimistic. After Biden released his plan, the Wall Street bank raised its estimate of fiscal relief from $750 billion to $1.1 trillion. And Goldman Sachs now expects US GDP growth of 6.6% this year, up from 5.9% before Democrats took control of the US Senate.
Janet Yellen: Act big now
One vexing problem for Biden is how to convince lawmakers — and the public — to add to America’s $27 trillion pile of debt. Republicans cast aside their debt concerns to pass the Trump tax cuts and bipartisan spending surges, but deficit hawks are going to make their voices heard again — as they did during the Obama era.
There’s no doubt that the United States faces an unsustainable fiscal situation. But the Biden team is arguing now is not the time to worry about the debt.
Janet Yellen, Biden’s nominee for Treasury secretary, also knows the firsthand the risk of Congress failing to forcefully address a crisis. Yellen led the Fed at a time when it was under enormous pressure to boost the sluggish recovery from the Great Recession.
“With interest rates at historic lows, the smartest thing we can do is act big,” Yellen told lawmakers Tuesday. “In the long run, I believe the benefits will far outweigh the costs.”
Yellen also emphasized that inequality is a serious problem that must be addressed by bold government policy.
“Well before Covid-19 infected a single American, we were living in a K-shaped economy,” Yellen said, “one where wealth built on wealth while working families fell further and further behind. This is especially true for people of color.”
Some business leaders agree with the need to think big now.
Asked by Appradab Business about the national debt, Walmart (WMT) CEO Doug McMillon acknowledged Tuesday that politicians must address the budget, but not until the pandemic passes.
“Let’s address the crisis right in front of us. Get growth going in the economy, which is the best way to pay down that debt,” McMillon, chairman of the Business Roundtable, said during a call with reporters.
Biden remembers the last debt debate
Others fear the United States is moving too quickly given that Congress just enacted a $900 billion relief package last month.
“I do think they’re doing too much. At some point, it becomes irresponsible,” said Lindsey Piegza, chief economist at Stifel.
Piegza described the surging US debt-to-GDP as “alarming” and called for a “smaller, more targeted approach.”
Furman, the former Obama adviser, agreed that Biden’s proposed stimulus checks “could be more targeted.” He suggested a lower income cutoff before Americans would receive the full $1,400.
However, Furman dismissed concerns about the US debt because the federal government’s interest payments are low and falling due to historically cheap borrowing costs. Even the International Monetary Fund, which traditionally emphasizes concerns about debt, is telling countries to be ambitious.
Recall that deficit concerns, along with the rise of the Tea Party, caused the United States to cut spending during Obama’s first term, long before the economy had healed from the Great Recession.
At the time, the Tea Party was threatening to make the United States default on its debt. And Biden helped lead those tense budget negotiations with Congress.
“The premature shift to austerity certainly slowed the economic recovery,” Furman said. “For a lot of people, that lesson has been learned.”
0 notes
Text
Last credits Pt. 2
Pt. 1 available here.
A month later, Professor Ackerman told his students to decide on a subject for their final essay.
“Listen up, class. For next week, you should decide on the subject for the final essay. You can choose whatever you want, as long it’s related to the class. The idea it that you work on it for the rest of the semester, so I’ll expect a high quality work. Like Otto Von Bismark said: the main thing is to make history, not to write it, but in this case, you’ll have to write… and do it properly. You cannot make history if you don’t know it.”
That day, Petra felt confused. She didn’t feel confident to pick a subject. She wanted it to be original, but she’d never written an essay like the one Mr. Ackerman was asking for. Suddenly, she remembered the Professor saying they could ask him for academic counseling, so she decided to pay him a visit. Nevertheless, in order to do so, she needed to have at least a few clear ideas, so she hurried to go back home and start with the investigation.
The next day, she went to Professor Ackerman’s office. It was a little troublesome for her to get there, since it was an unknown faculty for her, it took her a while to get to the right building.
His office was on the second floor and Petra looked at the numbers on the wall until she found number 117 and when she was almost in front of the door, she saw two people getting out of there.
“Thank you, Doctor Ackerman. See you later.” a young man with black hair closed the door and looked at the girl.
“Petra, right?”
“Hi, Gunther… Oluo,” she nodded and then looked at the other guy next to him “are you here for counseling too?”
“Yeah, we were a little confused, but the Professor gave us some good ideas to start our essay.” With a lot of discretion, he elbowed his friend and said “Oh, Doctor Zoe!... sorry, I need to talk with the Coordinator.” And then he hurried to the stirs, leaving Petra and Oluo alone.
“Petra…. If… if you need help with your essay, we could Exchange numbers and I can help you. I have great experience with academic writing.”
“Really? Cou…” she was interrupted by a yell coming out from the office.
“Why the hell is there so much noise outside my office, dammit?” the professor opened the door and looked at the students.
“Doctor!... eh, I mean… Professor, I…” Petra tried to explain.
“I’m sorry, I was just telling my classmate that I could help her with his essay and…”
“Oluo… you were just in my office, asking me how to write your freaking essay. Is obvious you don’t have the capacity to help Petra with hers. That’s what I’m here for.”
“Y… yeah, but…”
“Are you going to stay there, Petra? Get inside my office.”
“Yes, thank you.” And after smiling at Oluo, who was pretty much speechless, she went inside.
“Have a seat.”
The professor was right behind her and put a hand on the back of her chair where she was sitting, leaning forward towards her. That took Petra by surprise and she blushed a lot, but she calmed herself after seeing he was just reaching for a folder that was on his desk.
“Sorry, I need to take this to the coordinator. I’ll be right back.” And then he went out, closing the door behind him.
Petra took the opportunity to relax a little, but she had to admit her heart stopped for a moment. Professor Levi had a nice profile, and she saw it closely a moment before, not to mention his cologne… it was fresh and elegant, just like him. The fragrance lingered inside the office and Petra’s nose was delighted with it, while she looked around.
The place was immaculate. Everything was meticulously set on a specific place. There was a tall shelf filled with books and there was a computed on the desk, showing a half written document on the monitor. Behind the desk, there was a table with a small coffee maker that seemed to be brand new.
There were a few noted on the calendar hanged on the wall and even some post-it notes on the monitor, but not a single decoration of personal object… except for a couple medals and a picture of him with her Faculty Coordinator, Erwin Smith and another woman. Petra unconsciously sighed, thinking that woman could be her girlfriend, but abandoned the idea immediately and got distracted with the medals next to the desk.
Levi Ackerman… undoubtedly, the personality and the man himself picked up Petra’s attention. It was incredible; all the things he knew and the way his blue eyes sparkled every time he spoke to the class. Even his acid humor was attractive, but that wasn’t the time to think about those things, and the best way to erase that thought would be to read the inscriptions in those medals next to the desk.
They were all from trail races, and despite being from different years, they were from the same event “the Titan trail”. Petra never imagined the Professor being into sports. He certainly was full of surprises, and then…
“Yeah, I left it in one of my drawers, wait there…” the Professor entered the office and looked for something inside one of the desk drawers. Apparently, he was talking with someone… someone Petra recognized from the photo she had just seen.
“Oh, you’ve got company.” The woman smiled when she saw Petra.
“I told you to wait outside, four eyes. My office is off limits for you. Here’s the USB memory.” Levi gave her the memory stick “Petra… do you know Hanji Zoe? She’s the Social Sciences Faculty Coordinator.”
“Oh, nice to meet you!” she kindly smiled, relieved after concluding she couldn’t be her girlfriend.
“Petra Ral? Wow… I finally meet you. Erwin spoke to me about you.”
“Thank you so much for letting me take a class in your faculty.”
“Oh, it’s nothing. I was once in your situation, so I know how frustrating it could be to not fill the requirements to graduate on time. But tell me, how are you doing on history class?”
“Tsch… of course she’s doing fine. I’m her teacher.” Levi growled “now, if you don’t mind, I was about to speak with Petra.”
“Oh, sure, sure! See you later, then. And don’t forget about this Friday’s dinner with Erwin and me.” Hanji left with a grin on her face and when Levi saw the door closing, she sat on his chair and looked at the girl in front of him.
“She could be a really nuisance…” the girl laughed discreetly “I suppose you are here for your essay.”
“I do. I… have a couple doubts about the topic and, to be honest, I’m not used to academic writing. We are usually evaluated with exams of projects in my major and…”
“I understand… International Commerce is more practical than theoretical. Tel me, what do you have in mind?”
“I was thinking about doing an analysis about the impact of commerce on military conflicts during the XVIII and XIX century.” The Professor’s eyes became brighter and a tiny smiled appeared on his lips. Something rare on him.
“My, my… to be honest, I thought you’d choose something like the evolution of commerce through history, or something about the colonies, but… I’m glad I was wrong.” He leaned back on his chair and looked at the computed monitor for an instant, while he played with a pen on his hand “you never stop amazing me.”
“’I’ll take that as a compliment.”
“It is.” She looked at her for a moment, but he did it in a different way than he did in class. He had a different personality, perhaps because he was inside his office and not surrounded by students, or maybe because he felt comfortable with Petra. Whatever the reason, the change made her smile. “It’s an ambitious topic, and if you don’t have experience on writing essays, it could be troublesome.” She was about to say something, but Levi continued “I’ve noticed you are very interested in the class. You frequently ask smart questions and is obvious you do some research at home, so I’ll give you a choice.”
“Yes?” Petra was expectant.
“I’m willing to provide you academic counseling for the rest of the semester, so your essay would be well done.”
“Really?”
“…But only, if you transcribe my notes to the computer.”
“Your notes?”
“Yes…” he opened one of the drawers and took out a notebook, along with a small box with note cards.” I’m meticulous man and with deep-rooted customs, and that causes me some troubles,” he opened the notebook “when I read a book or an article, I write down the important parts in a note card or in here, with my own handwriting, so I’ve accumulated a big pile of papers that need to be transcribed in the computer, so I can have a decent database.”
“I understand…” she looked at the notebook. His notes, despite of being organized, were done with a pretty messy handwriting; very different from the one he used to write on the board and Petra fund it quite amusing. That organized and strict man did have a defect, after all “deal.” She smiled.
“Alright.” And then he immediately started to look through his computer files and Petra seemed confused after his attitude change “do you have an USB memory?”
“I…” she remembered she left it in her room “No, I didn’t bring it.”
“Damn… this is just as if you were in the battlefield without a weapon…” he opened his drawer again and took a memory stick “I’ll lend you this one. Take care of it, and I expect it back without viruses, ok?” he glared at her for an instant and then looked back at the monitor “I’ll give you a couple PDF books, so you have enough information for your essay. I’ll also add a quoting and referencing manual. I don’t want plagiarism of any sort. Any idea you take out of those books, had to be correctly quoted. Do you require a writing manual as well?” he coldly asked, but the girl found his concern a little funny. It was as if he was thinking about everything in a mechanic way.
“No.” she laughed “I don’t think so.”
“Tsch… I’ll include it anyways. I don’t want to have a big disappointment when I read your progress.” And a moment later, heh handed her the memory stick, along with the notebook on his desk “Today is Wednesday, you can bring me the transcriptions next week, in this same memory. As for your progress on the essay, you have two weeks to write a general outline.”
“Sounds good.”
“I’m usually here after 11 AM and until 5 PM. Not a single minute later. Except for Fridays. I go out at 12 PM.”
“Understood. I’ll see you tomorrow in class.” Petra said goodbye and kindly smiled before going out of his office. He followed her with his gaze.
Once he was alone, Levi leaned back on his chair and looked through the window. When they told him an International Commerce student would take his history class, he expected a completely different girl; someone not interested on the class and who probably would abandon on the first chance, but Petra turned out to be an intelligent, kindhearted and capable girl, and she was also willing to tolerate his attitude. That’s why she picked up his attention. Now he was anxiously expecting her first deadline.”
To be continued…
Author’s notes.
Hi there! This is the second part of this fanfic, based on rivetra week’s history prompt. I really like where this is going, and I hope you too. I certainly can picture Levi as an strict professor, one of those who are the best, but annoying at the same time.
35 notes
·
View notes
Text
Wood Inlay Ornament with German Glass Glitter
Hi friends! And hi to new friends visiting from the #CreativeChristmas Challenge hosted by Remodelaholic!
youtube
To those of you who don’t know me yet: welcome. Everyone else has already started drinking and saying really embarrassing things (about themselves, not you… we’re not a super judgmental bunch). To those of you who already know me: cheers. As always, you rock. And I was just kidding about the drinking thing (unless it’s football season and a Saturday, which yes to both).
Anyway, from time to time, I like to throw my hat in on a DIY challenge or two because nothing excuses buying more power tools like overcommitting to a deadline for fun (like the 2×4 summer challenge and boom: new coffee table!). This time around, the theme was making something for Christmas. I’ve already been finding inspiration for my color scheme this year in the form of acorns, snowflakes, owls, and other wintery-woodland things, so I figured: why not see if I can fill up the inevitable empty parts of my tree with what I have on hand, rather than buying a bunch of new ornaments? I also just happened upon a set of carving bits for my Dremel and have been itching to experiment with epoxy/inlays/resins, so I started playing around until this happened:
And as a fun little bonus: I actually made a video of it too!
Tools and Materials
affiliate links of items I recommend and use are listed in this post, which support this site at no cost to you… thanks!
scrap wood (I had 1″ x 4″ poplar)
scissors
printer paper
inkjet printer
acetone or nail polish remover
Dremel 200
Dremel engraving/carving kit
band saw or scroll saw
random orbit sander
wood stain (I used Minwax Ipswich Pine and washed while it was still wet with Early American… I’ll have to show you guys more about this as I’ve done it a number of times to get the colors I like)
Mod Podge
small detail paint brush
Miss Mustard Seed’s German Glass Glitter in Silver Tiara
Martha Stewart Crafts extra fine glitter in Smoky Quartz
clear spray sealer (gloss)
small drill bit
thread (I used stuff from my cross stitch stash)
First things first: print out the image (mine is available for download near the end of the post) and cut it out. I used a scrap piece of poplar that was bound for the burn pile, so I wasn’t really expecting perfection (in fact as you can see, I first used a different image that was WAY too intricate for a first-time experiment and then decided on the final design).
To transfer the ink from the printer paper, I swabbed the back with an acetone nail polish remover. As you can see, the image didn’t transfer perfectly, but it was good enough (I got the idea from my buddy Brad’s video here — then went with the option that wouldn’t require changing out of my pajama pants or going into the cold garage that morning).
Next, I took out my Dremel and a new engraving/carving set I’d recently purchased for another inlay project. In my opinion, crafting is a good intro before graduating to larger pieces, so I figured this would help me practice with diamond tips, how to control the carve, etc. A good method is to create the hard outline first, then carve out the middle, and continue to make the inlay deeper and deeper until it’s got enough depth to hold the inlay material (glitter, epoxy I assume, whatever).
Next, I sketched out the overall shape (spoiler: it wasn’t at all even, so I highly recommend using the template) and then went to cut out the piece. And this is when it seemed like things were conspiring against me: my new scroll saw was broken… right out of the box. Womp, womp.
To make the situation a little stickier, I was about 5 hours away at this point from needing to head out of town to Raleigh, NC (recap here), and I had no other tools that would give me the right depth and shape. Disappointed but undeterred, I figured the next best thing would be to ask to borrow tools from the person I’d be visiting (thankfully, it was a trip to visit some DIY blogging friends just for fun — my pal Brittany just so happened to have a band saw in her garage). Of course, now I want one of those, too.
Of course, I’d never actually used a band saw before, so despite the general don’t-cut-your-fingers-off rule, the piece still came out a little wonky (mostly due to my non-templating sketch). I was able to shape it a little more with an orbital sander. I also carved the edges out a little more and did a final sanding with high grit sandpaper before stain.
Since the overall concept was to make this look like an inlay, I wanted to use glitter with a little more grit and sparkle: enter, German glass glitter. It’s really amazing stuff in person. To paint it into place, I relied on a small paint brush (tip: if the brush starts to fray a little, spin it as you’re dipping it into the glue to get the point fine again… check out my video to see a demo of that).
You can layer the glitter in, too: after giving it some time to dry, paint another bit of glue on top of the glitter and add more into the recessed areas. It will add depth!
I added extra-fine gold glitter around the edge and sealed the whole thing with a clear gloss spray, then drilled a hole through the top and threaded it so it could hang on the tree.
Caveat: before I sealed with a clear gloss, I actually tried to seal with an old polycrylic which unfortunately made the top and bottom tips look faded/cloudy once it dried. At first I thought I’d lean into the mistake by painting the back and sides with chalk paint and sanding to make it look rustic, but it looked really sad instead and totally detracted from the sparkle on the front. I wanted to get this done in time for the blog hop, so I just continued on with sealing again and adding the glitter around the edge. So, if you try a project like this, don’t make my mistake and you’ll get even better results!
You can also try other inlay methods, other glitter colors, fill in the center vs the outer rings with opposite hues, etc… the possibilities are pretty endless!
All in all, I think it’s going to make a nice addition to my white/gold/chrome/woodland Christmas decor theme this year (and the less I need to spend on ornaments, the more budget I have to make Christmas cocktails, hehe).
Want to try this for yourself? You can download my template here.
To be perfectly frank, I think the photos really don’t do the sparkle on this piece enough justice (in fact, I worried that it was looking too drab in photos). So, I made a video tutorial too (I’d love it if you subscribed if you haven’t already… with what I’ve learned in making this tutorial, there is more to come no doubt!).
youtube
As I mentioned, this DIY was part of a blog hop, with 25 other bloggers participating — aka, enough DIY Christmas ideas to keep you busy right up until the actual holiday (if you were so ambitiously inclined). So, check out a preview of the other projects and bloggers participating in the images below. You can also head over to the Remodelaholic post (who is hosting this hop) to check out other DIYers submitting their inspired ideas (on social media, you can look for #CreativeChristmas to find them all).
DIY Christmas Trees and Ornaments
Wintry Silver Dollar Store Christmas Tree Decor | Remodelaholic
Marbled Christmas Ornaments | Doodlecraft
Scrap Wood Inlay Ornaments | The Ugly Duckling House (you’re here!)
Woodburned Wood Slice Ornaments | Sisters What
Flocked Pine Cones | Practical and Pretty
Abstract Monogram Ornaments | Domicile37
Concrete Christmas Ornaments | The Palette Muse
Wood Slice Deer Ornaments | Our Crafty Mom
Vintage Gumball Machine Ornaments | Beth Watson Design Studio
Etched Glass Ornaments | Just Call Me Homegirl
Unicorn Inspired Christmas Tree | The DIY Mommy
Driftwood Reindeer Ornaments | Sustain My Craft Habit
DIY Christmas Gifts and Decor
Christmas Pine Hoop Wreath | This Mama’s Dance
Gingerbread Man Candles | Nourish and Nestle
Wire and Glass Chandelier | Home with Cupcakes and Crinoline
Christmas Scroll Wall Art | Grace In My Space
Lighted Wood Trees | Frazzled Joy
Crocheted Christmas Hat | Luz Patterns
Christmas Card Photo Display| Hertoolbelt
JOY Porch Sign | Ginger Snap Crafts
Folding Bar Cart Table | Everyday Party Magazine
Wood and Burlap Christmas Sign | Leap of Faith Crafting
Wood Block Snowman | Anika’s DIY Life
Holiday Candle Wrap | Dragonfly & Lily Pads
Christmas Pom Pom Pillow | Small Home Soul
Handlettered Wall Art | Smiling Colors
Those of us who did videos for this hop can be found in the playlist below, so those of you who would rather watch than read (or just want to blow off work for a few more minutes) have something, too! *If you’re having difficulty playing it, you can jump over to the playlist here.*
youtube
There you have it! Hope you’re getting into the holiday spirit just in time. Will you be working on any decor ideas this Christmas? This is going to be a very busy holiday season for me, so be sure to check back in for more DIYs (I’m going to give that epoxy inlay idea a shot, and a few more scrap ideas are just bubbling in the ol’ brain). Have a great weekend!
You'll Also Love
25 Great Gift Ideas for the Craft Beer Lover
DIY Wooden Couch Sleeve
It’s Pronounced “Damn Good Cookie̶...
Lots of Sneak Peeks: Riding the Buildathon Wave
.yuzo_related_post img{width:170px !important; height:170px !important;} .yuzo_related_post .relatedthumb{line-height:14px;background:#ffffff !important;color:#454747!important;} .yuzo_related_post .relatedthumb:hover{background:#ffffff !important; -webkit-transition: background 0.2s linear; -moz-transition: background 0.2s linear; -o-transition: background 0.2s linear; transition: background 0.2s linear;;color:#454747!important;} .yuzo_related_post .relatedthumb a{color:#102a3b!important;} .yuzo_related_post .relatedthumb a:hover{ color:#113f5e}!important;} .yuzo_related_post .relatedthumb:hover a{ color:#113f5e!important;} .yuzo_related_post .relatedthumb:hover .yuzo__text--title{ color:#113f5e!important;} .yuzo_related_post .yuzo_text, .yuzo_related_post .yuzo_views_post {color:#454747!important;} .yuzo_related_post .relatedthumb:hover .yuzo_text, .yuzo_related_post:hover .yuzo_views_post {color:#454747!important;} .yuzo_related_post .relatedthumb{ margin: 0px 6px 0px 6px; padding: 0px 0px 0px 0px; } jQuery(document).ready(function( $ ){ jQuery('.yuzo_related_post .yuzo_wraps').equalizer({ columns : '> div' }); });
The post Wood Inlay Ornament with German Glass Glitter appeared first on The Ugly Duckling House.
Website // Subscribe // Advertise // Twitter // Facebook // Google+
Wood Inlay Ornament with German Glass Glitter published first on http://ift.tt/2qxZz2j
0 notes
Text
Wood Inlay Ornament with German Glass Glitter
Hi friends! And hi to new friends visiting from the #CreativeChristmas Challenge hosted by Remodelaholic!
To those of you who don’t know me yet: welcome. Everyone else has already started drinking and saying really embarrassing things (about themselves, not you… we’re not a super judgmental bunch). To those of you who already know me: cheers. As always, you rock. And I was just kidding about the drinking thing (unless it’s football season and a Saturday, which yes to both).
Anyway, from time to time, I like to throw my hat in on a DIY challenge or two because nothing excuses buying more power tools like overcommitting to a deadline for fun (like the 2×4 summer challenge and boom: new coffee table!). This time around, the theme was making something for Christmas. I’ve already been finding inspiration for my color scheme this year in the form of acorns, snowflakes, owls, and other wintery-woodland things, so I figured: why not see if I can fill up the inevitable empty parts of my tree with what I have on hand, rather than buying a bunch of new ornaments? I also just happened upon a set of carving bits for my Dremel and have been itching to experiment with epoxy/inlays/resins, so I started playing around until this happened:
And as a fun little bonus: I actually made a video of it too!
Tools and Materials
affiliate links of items I recommend and use are listed in this post, which support this site at no cost to you… thanks!
scrap wood (I had 1″ x 4″ poplar)
scissors
printer paper
inkjet printer
acetone or nail polish remover
Dremel 200
Dremel engraving/carving kit
band saw or scroll saw
random orbit sander
wood stain (I used Minwax Ipswich Pine and washed while it was still wet with Early American… I’ll have to show you guys more about this as I’ve done it a number of times to get the colors I like)
Mod Podge
small detail paint brush
Miss Mustard Seed’s German Glass Glitter in Silver Tiara
Martha Stewart Crafts extra fine glitter in Smoky Quartz
clear spray sealer (gloss)
small drill bit
thread (I used stuff from my cross stitch stash)
First things first: print out the image (mine is available for download near the end of the post) and cut it out. I used a scrap piece of poplar that was bound for the burn pile, so I wasn’t really expecting perfection (in fact as you can see, I first used a different image that was WAY too intricate for a first-time experiment and then decided on the final design).
To transfer the ink from the printer paper, I swabbed the back with an acetone nail polish remover. As you can see, the image didn’t transfer perfectly, but it was good enough (I got the idea from my buddy Brad’s video here — then went with the option that wouldn’t require changing out of my pajama pants or going into the cold garage that morning).
Next, I took out my Dremel and a new engraving/carving set I’d recently purchased for another inlay project. In my opinion, crafting is a good intro before graduating to larger pieces, so I figured this would help me practice with diamond tips, how to control the carve, etc. A good method is to create the hard outline first, then carve out the middle, and continue to make the inlay deeper and deeper until it’s got enough depth to hold the inlay material (glitter, epoxy I assume, whatever).
Next, I sketched out the overall shape (spoiler: it wasn’t at all even, so I highly recommend using the template) and then went to cut out the piece. And this is when it seemed like things were conspiring against me: my new scroll saw was broken… right out of the box. Womp, womp.
To make the situation a little stickier, I was about 5 hours away at this point from needing to head out of town to Raleigh, NC (recap here), and I had no other tools that would give me the right depth and shape. Disappointed but undeterred, I figured the next best thing would be to ask to borrow tools from the person I’d be visiting (thankfully, it was a trip to visit some DIY blogging friends just for fun — my pal Brittany just so happened to have a band saw in her garage). Of course, now I want one of those, too.
Of course, I’d never actually used a band saw before, so despite the general don’t-cut-your-fingers-off rule, the piece still came out a little wonky (mostly due to my non-templating sketch). I was able to shape it a little more with an orbital sander. I also carved the edges out a little more and did a final sanding with high grit sandpaper before stain.
Since the overall concept was to make this look like an inlay, I wanted to use glitter with a little more grit and sparkle: enter, German glass glitter. It’s really amazing stuff in person. To paint it into place, I relied on a small paint brush (tip: if the brush starts to fray a little, spin it as you’re dipping it into the glue to get the point fine again… check out my video to see a demo of that).
You can layer the glitter in, too: after giving it some time to dry, paint another bit of glue on top of the glitter and add more into the recessed areas. It will add depth!
I added extra-fine gold glitter around the edge and sealed the whole thing with a clear gloss spray, then drilled a hole through the top and threaded it so it could hang on the tree.
Caveat: before I sealed with a clear gloss, I actually tried to seal with an old polycrylic which unfortunately made the top and bottom tips look faded/cloudy once it dried. At first I thought I’d lean into the mistake by painting the back and sides with chalk paint and sanding to make it look rustic, but it looked really sad instead and totally detracted from the sparkle on the front. I wanted to get this done in time for the blog hop, so I just continued on with sealing again and adding the glitter around the edge. So, if you try a project like this, don’t make my mistake and you’ll get even better results!
You can also try other inlay methods, other glitter colors, fill in the center vs the outer rings with opposite hues, etc… the possibilities are pretty endless!
All in all, I think it’s going to make a nice addition to my white/gold/chrome/woodland Christmas decor theme this year (and the less I need to spend on ornaments, the more budget I have to make Christmas cocktails, hehe).
Want to try this for yourself? You can download my template here.
To be perfectly frank, I think the photos really don’t do the sparkle on this piece enough justice (in fact, I worried that it was looking too drab in photos). So, I made a video tutorial too (I’d love it if you subscribed if you haven’t already… with what I’ve learned in making this tutorial, there is more to come no doubt!).
As I mentioned, this DIY was part of a blog hop, with 25 other bloggers participating — aka, enough DIY Christmas ideas to keep you busy right up until the actual holiday (if you were so ambitiously inclined). So, check out a preview of the other projects and bloggers participating in the images below. You can also head over to the Remodelaholic post (who is hosting this hop) to check out other DIYers submitting their inspired ideas (on social media, you can look for #CreativeChristmas to find them all).
DIY Christmas Trees and Ornaments
Wintry Silver Dollar Store Christmas Tree Decor | Remodelaholic
Marbled Christmas Ornaments | Doodlecraft
Scrap Wood Inlay Ornaments | The Ugly Duckling House (you’re here!)
Woodburned Wood Slice Ornaments | Sisters What
Flocked Pine Cones | Practical and Pretty
Abstract Monogram Ornaments | Domicile37
Concrete Christmas Ornaments | The Palette Muse
Wood Slice Deer Ornaments | Our Crafty Mom
Vintage Gumball Machine Ornaments | Beth Watson Design Studio
Etched Glass Ornaments | Just Call Me Homegirl
Unicorn Inspired Christmas Tree | The DIY Mommy
Driftwood Reindeer Ornaments | Sustain My Craft Habit
DIY Christmas Gifts and Decor
Christmas Pine Hoop Wreath | This Mama’s Dance
Gingerbread Man Candles | Nourish and Nestle
Wire and Glass Chandelier | Home with Cupcakes and Crinoline
Christmas Scroll Wall Art | Grace In My Space
Lighted Wood Trees | Frazzled Joy
Crocheted Christmas Hat | Luz Patterns
Christmas Card Photo Display| Hertoolbelt
JOY Porch Sign | Ginger Snap Crafts
Folding Bar Cart Table | Everyday Party Magazine
Wood and Burlap Christmas Sign | Leap of Faith Crafting
Wood Block Snowman | Anika’s DIY Life
Holiday Candle Wrap | Dragonfly & Lily Pads
Christmas Pom Pom Pillow | Small Home Soul
Handlettered Wall Art | Smiling Colors
Those of us who did videos for this hop can be found in the playlist below, so those of you who would rather watch than read (or just want to blow off work for a few more minutes) have something, too! *If you’re having difficulty playing it, you can jump over to the playlist here.*
There you have it! Hope you’re getting into the holiday spirit just in time. Will you be working on any decor ideas this Christmas? This is going to be a very busy holiday season for me, so be sure to check back in for more DIYs (I’m going to give that epoxy inlay idea a shot, and a few more scrap ideas are just bubbling in the ol’ brain). Have a great weekend!
You'll Also Love
25 Great Gift Ideas for the Craft Beer Lover
DIY Wooden Couch Sleeve
It’s Pronounced “Damn Good Cookie̶...
Lots of Sneak Peeks: Riding the Buildathon Wave
The post Wood Inlay Ornament with German Glass Glitter appeared first on The Ugly Duckling House.
Website // Subscribe // Advertise // Twitter // Facebook // Google+
from mix1 http://ift.tt/2mesqe5 via with this info
0 notes
Text
Wood Inlay Ornament with German Glass Glitter
Hi friends! And hi to new friends visiting from the #CreativeChristmas Challenge hosted by Remodelaholic!
To those of you who don’t know me yet: welcome. Everyone else has already started drinking and saying really embarrassing things (about themselves, not you… we’re not a super judgmental bunch). To those of you who already know me: cheers. As always, you rock. And I was just kidding about the drinking thing (unless it’s football season and a Saturday, which yes to both).
Anyway, from time to time, I like to throw my hat in on a DIY challenge or two because nothing excuses buying more power tools like overcommitting to a deadline for fun (like the 2×4 summer challenge and boom: new coffee table!). This time around, the theme was making something for Christmas. I’ve already been finding inspiration for my color scheme this year in the form of acorns, snowflakes, owls, and other wintery-woodland things, so I figured: why not see if I can fill up the inevitable empty parts of my tree with what I have on hand, rather than buying a bunch of new ornaments? I also just happened upon a set of carving bits for my Dremel and have been itching to experiment with epoxy/inlays/resins, so I started playing around until this happened:
And as a fun little bonus: I actually made a video of it too!
Tools and Materials
affiliate links of items I recommend and use are listed in this post, which support this site at no cost to you… thanks!
scrap wood (I had 1″ x 4″ poplar)
scissors
printer paper
inkjet printer
acetone or nail polish remover
Dremel 200
Dremel engraving/carving kit
band saw or scroll saw
random orbit sander
wood stain (I used Minwax Ipswich Pine and washed while it was still wet with Early American… I’ll have to show you guys more about this as I’ve done it a number of times to get the colors I like)
Mod Podge
small detail paint brush
Miss Mustard Seed’s German Glass Glitter in Silver Tiara
Martha Stewart Crafts extra fine glitter in Smoky Quartz
clear spray sealer (gloss)
small drill bit
thread (I used stuff from my cross stitch stash)
First things first: print out the image (mine is available for download near the end of the post) and cut it out. I used a scrap piece of poplar that was bound for the burn pile, so I wasn’t really expecting perfection (in fact as you can see, I first used a different image that was WAY too intricate for a first-time experiment and then decided on the final design).
To transfer the ink from the printer paper, I swabbed the back with an acetone nail polish remover. As you can see, the image didn’t transfer perfectly, but it was good enough (I got the idea from my buddy Brad’s video here — then went with the option that wouldn’t require changing out of my pajama pants or going into the cold garage that morning).
Next, I took out my Dremel and a new engraving/carving set I’d recently purchased for another inlay project. In my opinion, crafting is a good intro before graduating to larger pieces, so I figured this would help me practice with diamond tips, how to control the carve, etc. A good method is to create the hard outline first, then carve out the middle, and continue to make the inlay deeper and deeper until it’s got enough depth to hold the inlay material (glitter, epoxy I assume, whatever).
Next, I sketched out the overall shape (spoiler: it wasn’t at all even, so I highly recommend using the template) and then went to cut out the piece. And this is when it seemed like things were conspiring against me: my new scroll saw was broken… right out of the box. Womp, womp.
To make the situation a little stickier, I was about 5 hours away at this point from needing to head out of town to Raleigh, NC (recap here), and I had no other tools that would give me the right depth and shape. Disappointed but undeterred, I figured the next best thing would be to ask to borrow tools from the person I’d be visiting (thankfully, it was a trip to visit some DIY blogging friends just for fun — my pal Brittany just so happened to have a band saw in her garage). Of course, now I want one of those, too.
Of course, I’d never actually used a band saw before, so despite the general don’t-cut-your-fingers-off rule, the piece still came out a little wonky (mostly due to my non-templating sketch). I was able to shape it a little more with an orbital sander. I also carved the edges out a little more and did a final sanding with high grit sandpaper before stain.
Since the overall concept was to make this look like an inlay, I wanted to use glitter with a little more grit and sparkle: enter, German glass glitter. It’s really amazing stuff in person. To paint it into place, I relied on a small paint brush (tip: if the brush starts to fray a little, spin it as you’re dipping it into the glue to get the point fine again… check out my video to see a demo of that).
You can layer the glitter in, too: after giving it some time to dry, paint another bit of glue on top of the glitter and add more into the recessed areas. It will add depth!
I added extra-fine gold glitter around the edge and sealed the whole thing with a clear gloss spray, then drilled a hole through the top and threaded it so it could hang on the tree.
Caveat: before I sealed with a clear gloss, I actually tried to seal with an old polycrylic which unfortunately made the top and bottom tips look faded/cloudy once it dried. At first I thought I’d lean into the mistake by painting the back and sides with chalk paint and sanding to make it look rustic, but it looked really sad instead and totally detracted from the sparkle on the front. I wanted to get this done in time for the blog hop, so I just continued on with sealing again and adding the glitter around the edge. So, if you try a project like this, don’t make my mistake and you’ll get even better results!
You can also try other inlay methods, other glitter colors, fill in the center vs the outer rings with opposite hues, etc… the possibilities are pretty endless!
All in all, I think it’s going to make a nice addition to my white/gold/chrome/woodland Christmas decor theme this year (and the less I need to spend on ornaments, the more budget I have to make Christmas cocktails, hehe).
Want to try this for yourself? You can download my template here.
To be perfectly frank, I think the photos really don’t do the sparkle on this piece enough justice (in fact, I worried that it was looking too drab in photos). So, I made a video tutorial too (I’d love it if you subscribed if you haven’t already… with what I’ve learned in making this tutorial, there is more to come no doubt!).
As I mentioned, this DIY was part of a blog hop, with 25 other bloggers participating — aka, enough DIY Christmas ideas to keep you busy right up until the actual holiday (if you were so ambitiously inclined). So, check out a preview of the other projects and bloggers participating in the images below. You can also head over to the Remodelaholic post (who is hosting this hop) to check out other DIYers submitting their inspired ideas (on social media, you can look for #CreativeChristmas to find them all).
DIY Christmas Trees and Ornaments
Wintry Silver Dollar Store Christmas Tree Decor | Remodelaholic
Marbled Christmas Ornaments | Doodlecraft
Scrap Wood Inlay Ornaments | The Ugly Duckling House (you’re here!)
Woodburned Wood Slice Ornaments | Sisters What
Flocked Pine Cones | Practical and Pretty
Abstract Monogram Ornaments | Domicile37
Concrete Christmas Ornaments | The Palette Muse
Wood Slice Deer Ornaments | Our Crafty Mom
Vintage Gumball Machine Ornaments | Beth Watson Design Studio
Etched Glass Ornaments | Just Call Me Homegirl
Unicorn Inspired Christmas Tree | The DIY Mommy
Driftwood Reindeer Ornaments | Sustain My Craft Habit
DIY Christmas Gifts and Decor
Christmas Pine Hoop Wreath | This Mama’s Dance
Gingerbread Man Candles | Nourish and Nestle
Wire and Glass Chandelier | Home with Cupcakes and Crinoline
Christmas Scroll Wall Art | Grace In My Space
Lighted Wood Trees | Frazzled Joy
Crocheted Christmas Hat | Luz Patterns
Christmas Card Photo Display| Hertoolbelt
JOY Porch Sign | Ginger Snap Crafts
Folding Bar Cart Table | Everyday Party Magazine
Wood and Burlap Christmas Sign | Leap of Faith Crafting
Wood Block Snowman | Anika’s DIY Life
Holiday Candle Wrap | Dragonfly & Lily Pads
Christmas Pom Pom Pillow | Small Home Soul
Handlettered Wall Art | Smiling Colors
Those of us who did videos for this hop can be found in the playlist below, so those of you who would rather watch than read (or just want to blow off work for a few more minutes) have something, too! *If you’re having difficulty playing it, you can jump over to the playlist here.*
There you have it! Hope you’re getting into the holiday spirit just in time. Will you be working on any decor ideas this Christmas? This is going to be a very busy holiday season for me, so be sure to check back in for more DIYs (I’m going to give that epoxy inlay idea a shot, and a few more scrap ideas are just bubbling in the ol’ brain). Have a great weekend!
You'll Also Love
25 Great Gift Ideas for the Craft Beer Lover
DIY Wooden Couch Sleeve
It’s Pronounced “Damn Good Cookie̶...
Lots of Sneak Peeks: Riding the Buildathon Wave
The post Wood Inlay Ornament with German Glass Glitter appeared first on The Ugly Duckling House.
Website // Subscribe // Advertise // Twitter // Facebook // Google+
from car2 http://ift.tt/2mesqe5 via as shown a lot
0 notes
Text
Wood Inlay Ornament with German Glass Glitter
Hi friends! And hi to new friends visiting from the #CreativeChristmas Challenge hosted by Remodelaholic!
To those of you who don’t know me yet: welcome. Everyone else has already started drinking and saying really embarrassing things (about themselves, not you… we’re not a super judgmental bunch). To those of you who already know me: cheers. As always, you rock. And I was just kidding about the drinking thing (unless it’s football season and a Saturday, which yes to both).
Anyway, from time to time, I like to throw my hat in on a DIY challenge or two because nothing excuses buying more power tools like overcommitting to a deadline for fun (like the 2×4 summer challenge and boom: new coffee table!). This time around, the theme was making something for Christmas. I’ve already been finding inspiration for my color scheme this year in the form of acorns, snowflakes, owls, and other wintery-woodland things, so I figured: why not see if I can fill up the inevitable empty parts of my tree with what I have on hand, rather than buying a bunch of new ornaments? I also just happened upon a set of carving bits for my Dremel and have been itching to experiment with epoxy/inlays/resins, so I started playing around until this happened:
And as a fun little bonus: I actually made a video of it too!
Tools and Materials
affiliate links of items I recommend and use are listed in this post, which support this site at no cost to you… thanks!
scrap wood (I had 1″ x 4″ poplar)
scissors
printer paper
inkjet printer
acetone or nail polish remover
Dremel 200
Dremel engraving/carving kit
band saw or scroll saw
random orbit sander
wood stain (I used Minwax Ipswich Pine and washed while it was still wet with Early American… I’ll have to show you guys more about this as I’ve done it a number of times to get the colors I like)
Mod Podge
small detail paint brush
Miss Mustard Seed’s German Glass Glitter in Silver Tiara
Martha Stewart Crafts extra fine glitter in Smoky Quartz
clear spray sealer (gloss)
small drill bit
thread (I used stuff from my cross stitch stash)
First things first: print out the image (mine is available for download near the end of the post) and cut it out. I used a scrap piece of poplar that was bound for the burn pile, so I wasn’t really expecting perfection (in fact as you can see, I first used a different image that was WAY too intricate for a first-time experiment and then decided on the final design).
To transfer the ink from the printer paper, I swabbed the back with an acetone nail polish remover. As you can see, the image didn’t transfer perfectly, but it was good enough (I got the idea from my buddy Brad’s video here — then went with the option that wouldn’t require changing out of my pajama pants or going into the cold garage that morning).
Next, I took out my Dremel and a new engraving/carving set I’d recently purchased for another inlay project. In my opinion, crafting is a good intro before graduating to larger pieces, so I figured this would help me practice with diamond tips, how to control the carve, etc. A good method is to create the hard outline first, then carve out the middle, and continue to make the inlay deeper and deeper until it’s got enough depth to hold the inlay material (glitter, epoxy I assume, whatever).
Next, I sketched out the overall shape (spoiler: it wasn’t at all even, so I highly recommend using the template) and then went to cut out the piece. And this is when it seemed like things were conspiring against me: my new scroll saw was broken… right out of the box. Womp, womp.
To make the situation a little stickier, I was about 5 hours away at this point from needing to head out of town to Raleigh, NC (recap here), and I had no other tools that would give me the right depth and shape. Disappointed but undeterred, I figured the next best thing would be to ask to borrow tools from the person I’d be visiting (thankfully, it was a trip to visit some DIY blogging friends just for fun — my pal Brittany just so happened to have a band saw in her garage). Of course, now I want one of those, too.
Of course, I’d never actually used a band saw before, so despite the general don’t-cut-your-fingers-off rule, the piece still came out a little wonky (mostly due to my non-templating sketch). I was able to shape it a little more with an orbital sander. I also carved the edges out a little more and did a final sanding with high grit sandpaper before stain.
Since the overall concept was to make this look like an inlay, I wanted to use glitter with a little more grit and sparkle: enter, German glass glitter. It’s really amazing stuff in person. To paint it into place, I relied on a small paint brush (tip: if the brush starts to fray a little, spin it as you’re dipping it into the glue to get the point fine again… check out my video to see a demo of that).
You can layer the glitter in, too: after giving it some time to dry, paint another bit of glue on top of the glitter and add more into the recessed areas. It will add depth!
I added extra-fine gold glitter around the edge and sealed the whole thing with a clear gloss spray, then drilled a hole through the top and threaded it so it could hang on the tree.
Caveat: before I sealed with a clear gloss, I actually tried to seal with an old polycrylic which unfortunately made the top and bottom tips look faded/cloudy once it dried. At first I thought I’d lean into the mistake by painting the back and sides with chalk paint and sanding to make it look rustic, but it looked really sad instead and totally detracted from the sparkle on the front. I wanted to get this done in time for the blog hop, so I just continued on with sealing again and adding the glitter around the edge. So, if you try a project like this, don’t make my mistake and you’ll get even better results!
You can also try other inlay methods, other glitter colors, fill in the center vs the outer rings with opposite hues, etc… the possibilities are pretty endless!
All in all, I think it’s going to make a nice addition to my white/gold/chrome/woodland Christmas decor theme this year (and the less I need to spend on ornaments, the more budget I have to make Christmas cocktails, hehe).
Want to try this for yourself? You can download my template here.
To be perfectly frank, I think the photos really don’t do the sparkle on this piece enough justice (in fact, I worried that it was looking too drab in photos). So, I made a video tutorial too (I’d love it if you subscribed if you haven’t already… with what I’ve learned in making this tutorial, there is more to come no doubt!).
youtube
As I mentioned, this DIY was part of a blog hop, with 25 other bloggers participating — aka, enough DIY Christmas ideas to keep you busy right up until the actual holiday (if you were so ambitiously inclined). So, check out a preview of the other projects and bloggers participating in the images below. You can also head over to the Remodelaholic post (who is hosting this hop) to check out other DIYers submitting their inspired ideas (on social media, you can look for #CreativeChristmas to find them all).
DIY Christmas Trees and Ornaments
Wintry Silver Dollar Store Christmas Tree Decor | Remodelaholic
Marbled Christmas Ornaments | Doodlecraft
Scrap Wood Inlay Ornaments | The Ugly Duckling House (you’re here!)
Woodburned Wood Slice Ornaments | Sisters What
Flocked Pine Cones | Practical and Pretty
Abstract Monogram Ornaments | Domicile37
Concrete Christmas Ornaments | The Palette Muse
Wood Slice Deer Ornaments | Our Crafty Mom
Vintage Gumball Machine Ornaments | Beth Watson Design Studio
Etched Glass Ornaments | Just Call Me Homegirl
Unicorn Inspired Christmas Tree | The DIY Mommy
Driftwood Reindeer Ornaments | Sustain My Craft Habit
DIY Christmas Gifts and Decor
Christmas Pine Hoop Wreath | This Mama’s Dance
Gingerbread Man Candles | Nourish and Nestle
Wire and Glass Chandelier | Home with Cupcakes and Crinoline
Christmas Scroll Wall Art | Grace In My Space
Lighted Wood Trees | Frazzled Joy
Crocheted Christmas Hat | Luz Patterns
Christmas Card Photo Display| Hertoolbelt
JOY Porch Sign | Ginger Snap Crafts
Folding Bar Cart Table | Everyday Party Magazine
Wood and Burlap Christmas Sign | Leap of Faith Crafting
Wood Block Snowman | Anika’s DIY Life
Holiday Candle Wrap | Dragonfly & Lily Pads
Christmas Pom Pom Pillow | Small Home Soul
Handlettered Wall Art | Smiling Colors
Those of us who did videos for this hop can be found in the playlist below, so those of you who would rather watch than read (or just want to blow off work for a few more minutes) have something, too! *If you’re having difficulty playing it, you can jump over to the playlist here.*
youtube
There you have it! Hope you’re getting into the holiday spirit just in time. Will you be working on any decor ideas this Christmas? This is going to be a very busy holiday season for me, so be sure to check back in for more DIYs (I’m going to give that epoxy inlay idea a shot, and a few more scrap ideas are just bubbling in the ol’ brain). Have a great weekend!
You'll Also Love
25 Great Gift Ideas for the Craft Beer Lover
DIY Wooden Couch Sleeve
It’s Pronounced “Damn Good Cookie̶...
Lots of Sneak Peeks: Riding the Buildathon Wave
.yuzo_related_post img{width:170px !important; height:170px !important;} .yuzo_related_post .relatedthumb{line-height:14px;background:#ffffff !important;color:#454747!important;} .yuzo_related_post .relatedthumb:hover{background:#ffffff !important; -webkit-transition: background 0.2s linear; -moz-transition: background 0.2s linear; -o-transition: background 0.2s linear; transition: background 0.2s linear;;color:#454747!important;} .yuzo_related_post .relatedthumb a{color:#102a3b!important;} .yuzo_related_post .relatedthumb a:hover{ color:#113f5e}!important;} .yuzo_related_post .relatedthumb:hover a{ color:#113f5e!important;} .yuzo_related_post .relatedthumb:hover .yuzo__text--title{ color:#113f5e!important;} .yuzo_related_post .yuzo_text, .yuzo_related_post .yuzo_views_post {color:#454747!important;} .yuzo_related_post .relatedthumb:hover .yuzo_text, .yuzo_related_post:hover .yuzo_views_post {color:#454747!important;} .yuzo_related_post .relatedthumb{ margin: 0px 6px 0px 6px; padding: 0px 0px 0px 0px; } jQuery(document).ready(function( $ ){ jQuery('.yuzo_related_post .yuzo_wraps').equalizer({ columns : '> div' }); });
The post Wood Inlay Ornament with German Glass Glitter appeared first on The Ugly Duckling House.
Website // Subscribe // Advertise // Twitter // Facebook // Google+
Read more http://ift.tt/2mesqe5
Areas served: Winston-Salem, High Point, Yadkinville, Mocksville, Advance, Clemmons, Kernersville, Greensboro, Walnut Cove, Statesville, NC, North Carolina
Services: House painting, roofing, deck building, landscaping, Carpentry, Flooring, tile, hardwood, remodeling, home improvement, interior, exterior
0 notes
Text
Wood Inlay Ornament with German Glass Glitter
Hi friends! And hi to new friends visiting from the #CreativeChristmas Challenge hosted by Remodelaholic!
To those of you who don’t know me yet: welcome. Everyone else has already started drinking and saying really embarrassing things (about themselves, not you… we’re not a super judgmental bunch). To those of you who already know me: cheers. As always, you rock. And I was just kidding about the drinking thing (unless it’s football season and a Saturday, which yes to both).
Anyway, from time to time, I like to throw my hat in on a DIY challenge or two because nothing excuses buying more power tools like overcommitting to a deadline for fun (like the 2×4 summer challenge and boom: new coffee table!). This time around, the theme was making something for Christmas. I’ve already been finding inspiration for my color scheme this year in the form of acorns, snowflakes, owls, and other wintery-woodland things, so I figured: why not see if I can fill up the inevitable empty parts of my tree with what I have on hand, rather than buying a bunch of new ornaments? I also just happened upon a set of carving bits for my Dremel and have been itching to experiment with epoxy/inlays/resins, so I started playing around until this happened:
And as a fun little bonus: I actually made a video of it too!
Tools and Materials
affiliate links of items I recommend and use are listed in this post, which support this site at no cost to you… thanks!
scrap wood (I had 1″ x 4″ poplar)
scissors
printer paper
inkjet printer
acetone or nail polish remover
Dremel 200
Dremel engraving/carving kit
band saw or scroll saw
random orbit sander
wood stain (I used Minwax Ipswich Pine and washed while it was still wet with Early American… I’ll have to show you guys more about this as I’ve done it a number of times to get the colors I like)
Mod Podge
small detail paint brush
Miss Mustard Seed’s German Glass Glitter in Silver Tiara
Martha Stewart Crafts extra fine glitter in Smoky Quartz
clear spray sealer (gloss)
small drill bit
thread (I used stuff from my cross stitch stash)
First things first: print out the image (mine is available for download near the end of the post) and cut it out. I used a scrap piece of poplar that was bound for the burn pile, so I wasn’t really expecting perfection (in fact as you can see, I first used a different image that was WAY too intricate for a first-time experiment and then decided on the final design).
To transfer the ink from the printer paper, I swabbed the back with an acetone nail polish remover. As you can see, the image didn’t transfer perfectly, but it was good enough (I got the idea from my buddy Brad’s video here — then went with the option that wouldn’t require changing out of my pajama pants or going into the cold garage that morning).
Next, I took out my Dremel and a new engraving/carving set I’d recently purchased for another inlay project. In my opinion, crafting is a good intro before graduating to larger pieces, so I figured this would help me practice with diamond tips, how to control the carve, etc. A good method is to create the hard outline first, then carve out the middle, and continue to make the inlay deeper and deeper until it’s got enough depth to hold the inlay material (glitter, epoxy I assume, whatever).
Next, I sketched out the overall shape (spoiler: it wasn’t at all even, so I highly recommend using the template) and then went to cut out the piece. And this is when it seemed like things were conspiring against me: my new scroll saw was broken… right out of the box. Womp, womp.
To make the situation a little stickier, I was about 5 hours away at this point from needing to head out of town to Raleigh, NC (recap here), and I had no other tools that would give me the right depth and shape. Disappointed but undeterred, I figured the next best thing would be to ask to borrow tools from the person I’d be visiting (thankfully, it was a trip to visit some DIY blogging friends just for fun — my pal Brittany just so happened to have a band saw in her garage). Of course, now I want one of those, too.
Of course, I’d never actually used a band saw before, so despite the general don’t-cut-your-fingers-off rule, the piece still came out a little wonky (mostly due to my non-templating sketch). I was able to shape it a little more with an orbital sander. I also carved the edges out a little more and did a final sanding with high grit sandpaper before stain.
Since the overall concept was to make this look like an inlay, I wanted to use glitter with a little more grit and sparkle: enter, German glass glitter. It’s really amazing stuff in person. To paint it into place, I relied on a small paint brush (tip: if the brush starts to fray a little, spin it as you’re dipping it into the glue to get the point fine again… check out my video to see a demo of that).
You can layer the glitter in, too: after giving it some time to dry, paint another bit of glue on top of the glitter and add more into the recessed areas. It will add depth!
I added extra-fine gold glitter around the edge and sealed the whole thing with a clear gloss spray, then drilled a hole through the top and threaded it so it could hang on the tree.
Caveat: before I sealed with a clear gloss, I actually tried to seal with an old polycrylic which unfortunately made the top and bottom tips look faded/cloudy once it dried. At first I thought I’d lean into the mistake by painting the back and sides with chalk paint and sanding to make it look rustic, but it looked really sad instead and totally detracted from the sparkle on the front. I wanted to get this done in time for the blog hop, so I just continued on with sealing again and adding the glitter around the edge. So, if you try a project like this, don’t make my mistake and you’ll get even better results!
You can also try other inlay methods, other glitter colors, fill in the center vs the outer rings with opposite hues, etc… the possibilities are pretty endless!
All in all, I think it’s going to make a nice addition to my white/gold/chrome/woodland Christmas decor theme this year (and the less I need to spend on ornaments, the more budget I have to make Christmas cocktails, hehe).
Want to try this for yourself? You can download my template here.
To be perfectly frank, I think the photos really don’t do the sparkle on this piece enough justice (in fact, I worried that it was looking too drab in photos). So, I made a video tutorial too (I’d love it if you subscribed if you haven’t already… with what I’ve learned in making this tutorial, there is more to come no doubt!).
As I mentioned, this DIY was part of a blog hop, with 25 other bloggers participating — aka, enough DIY Christmas ideas to keep you busy right up until the actual holiday (if you were so ambitiously inclined). So, check out a preview of the other projects and bloggers participating in the images below. You can also head over to the Remodelaholic post (who is hosting this hop) to check out other DIYers submitting their inspired ideas (on social media, you can look for #CreativeChristmas to find them all).
DIY Christmas Trees and Ornaments
Wintry Silver Dollar Store Christmas Tree Decor | Remodelaholic
Marbled Christmas Ornaments | Doodlecraft
Scrap Wood Inlay Ornaments | The Ugly Duckling House (you’re here!)
Woodburned Wood Slice Ornaments | Sisters What
Flocked Pine Cones | Practical and Pretty
Abstract Monogram Ornaments | Domicile37
Concrete Christmas Ornaments | The Palette Muse
Wood Slice Deer Ornaments | Our Crafty Mom
Vintage Gumball Machine Ornaments | Beth Watson Design Studio
Etched Glass Ornaments | Just Call Me Homegirl
Unicorn Inspired Christmas Tree | The DIY Mommy
Driftwood Reindeer Ornaments | Sustain My Craft Habit
DIY Christmas Gifts and Decor
Christmas Pine Hoop Wreath | This Mama’s Dance
Gingerbread Man Candles | Nourish and Nestle
Wire and Glass Chandelier | Home with Cupcakes and Crinoline
Christmas Scroll Wall Art | Grace In My Space
Lighted Wood Trees | Frazzled Joy
Crocheted Christmas Hat | Luz Patterns
Christmas Card Photo Display| Hertoolbelt
JOY Porch Sign | Ginger Snap Crafts
Folding Bar Cart Table | Everyday Party Magazine
Wood and Burlap Christmas Sign | Leap of Faith Crafting
Wood Block Snowman | Anika’s DIY Life
Holiday Candle Wrap | Dragonfly & Lily Pads
Christmas Pom Pom Pillow | Small Home Soul
Handlettered Wall Art | Smiling Colors
Those of us who did videos for this hop can be found in the playlist below, so those of you who would rather watch than read (or just want to blow off work for a few more minutes) have something, too! *If you’re having difficulty playing it, you can jump over to the playlist here.*
youtube
There you have it! Hope you’re getting into the holiday spirit just in time. Will you be working on any decor ideas this Christmas? This is going to be a very busy holiday season for me, so be sure to check back in for more DIYs (I’m going to give that epoxy inlay idea a shot, and a few more scrap ideas are just bubbling in the ol’ brain). Have a great weekend!
You'll Also Love
25 Great Gift Ideas for the Craft Beer Lover
DIY Wooden Couch Sleeve
It’s Pronounced “Damn Good Cookie̶...
Lots of Sneak Peeks: Riding the Buildathon Wave
.yuzo_related_post img{width:170px !important; height:170px !important;} .yuzo_related_post .relatedthumb{line-height:14px;background:#ffffff !important;color:#454747!important;} .yuzo_related_post .relatedthumb:hover{background:#ffffff !important; -webkit-transition: background 0.2s linear; -moz-transition: background 0.2s linear; -o-transition: background 0.2s linear; transition: background 0.2s linear;;color:#454747!important;} .yuzo_related_post .relatedthumb a{color:#102a3b!important;} .yuzo_related_post .relatedthumb a:hover{ color:#113f5e}!important;} .yuzo_related_post .relatedthumb:hover a{ color:#113f5e!important;} .yuzo_related_post .relatedthumb:hover .yuzo__text--title{ color:#113f5e!important;} .yuzo_related_post .yuzo_text, .yuzo_related_post .yuzo_views_post {color:#454747!important;} .yuzo_related_post .relatedthumb:hover .yuzo_text, .yuzo_related_post:hover .yuzo_views_post {color:#454747!important;} .yuzo_related_post .relatedthumb{ margin: 0px 6px 0px 6px; padding: 0px 0px 0px 0px; } jQuery(document).ready(function( $ ){ jQuery('.yuzo_related_post .yuzo_wraps').equalizer({ columns : '> div' }); });
The post Wood Inlay Ornament with German Glass Glitter appeared first on The Ugly Duckling House.
Website // Subscribe // Advertise // Twitter // Facebook // Google+
from Home Improvement https://www.uglyducklinghouse.com/wood-inlay-ornament-german-glass-glitter/
via http://www.rssmix.com/
0 notes
Text
Wood Inlay Ornament with German Glass Glitter
Hi friends! And hi to new friends visiting from the #CreativeChristmas Challenge hosted by Remodelaholic!
To those of you who don’t know me yet: welcome. Everyone else has already started drinking and saying really embarrassing things (about themselves, not you… we’re not a super judgmental bunch). To those of you who already know me: cheers. As always, you rock. And I was just kidding about the drinking thing (unless it’s football season and a Saturday, which yes to both).
Anyway, from time to time, I like to throw my hat in on a DIY challenge or two because nothing excuses buying more power tools like overcommitting to a deadline for fun (like the 2×4 summer challenge and boom: new coffee table!). This time around, the theme was making something for Christmas. I’ve already been finding inspiration for my color scheme this year in the form of acorns, snowflakes, owls, and other wintery-woodland things, so I figured: why not see if I can fill up the inevitable empty parts of my tree with what I have on hand, rather than buying a bunch of new ornaments? I also just happened upon a set of carving bits for my Dremel and have been itching to experiment with epoxy/inlays/resins, so I started playing around until this happened:
And as a fun little bonus: I actually made a video of it too!
Tools and Materials
affiliate links of items I recommend and use are listed in this post, which support this site at no cost to you… thanks!
scrap wood (I had 1″ x 4″ poplar)
scissors
printer paper
inkjet printer
acetone or nail polish remover
Dremel 200
Dremel engraving/carving kit
band saw or scroll saw
random orbit sander
wood stain (I used Minwax Ipswich Pine and washed while it was still wet with Early American… I’ll have to show you guys more about this as I’ve done it a number of times to get the colors I like)
Mod Podge
small detail paint brush
Miss Mustard Seed’s German Glass Glitter in Silver Tiara
Martha Stewart Crafts extra fine glitter in Smoky Quartz
clear spray sealer (gloss)
small drill bit
thread (I used stuff from my cross stitch stash)
First things first: print out the image (mine is available for download near the end of the post) and cut it out. I used a scrap piece of poplar that was bound for the burn pile, so I wasn’t really expecting perfection (in fact as you can see, I first used a different image that was WAY too intricate for a first-time experiment and then decided on the final design).
To transfer the ink from the printer paper, I swabbed the back with an acetone nail polish remover. As you can see, the image didn’t transfer perfectly, but it was good enough (I got the idea from my buddy Brad’s video here — then went with the option that wouldn’t require changing out of my pajama pants or going into the cold garage that morning).
Next, I took out my Dremel and a new engraving/carving set I’d recently purchased for another inlay project. In my opinion, crafting is a good intro before graduating to larger pieces, so I figured this would help me practice with diamond tips, how to control the carve, etc. A good method is to create the hard outline first, then carve out the middle, and continue to make the inlay deeper and deeper until it’s got enough depth to hold the inlay material (glitter, epoxy I assume, whatever).
Next, I sketched out the overall shape (spoiler: it wasn’t at all even, so I highly recommend using the template) and then went to cut out the piece. And this is when it seemed like things were conspiring against me: my new scroll saw was broken… right out of the box. Womp, womp.
To make the situation a little stickier, I was about 5 hours away at this point from needing to head out of town to Raleigh, NC (recap here), and I had no other tools that would give me the right depth and shape. Disappointed but undeterred, I figured the next best thing would be to ask to borrow tools from the person I’d be visiting (thankfully, it was a trip to visit some DIY blogging friends just for fun — my pal Brittany just so happened to have a band saw in her garage). Of course, now I want one of those, too.
Of course, I’d never actually used a band saw before, so despite the general don’t-cut-your-fingers-off rule, the piece still came out a little wonky (mostly due to my non-templating sketch). I was able to shape it a little more with an orbital sander. I also carved the edges out a little more and did a final sanding with high grit sandpaper before stain.
Since the overall concept was to make this look like an inlay, I wanted to use glitter with a little more grit and sparkle: enter, German glass glitter. It’s really amazing stuff in person. To paint it into place, I relied on a small paint brush (tip: if the brush starts to fray a little, spin it as you’re dipping it into the glue to get the point fine again… check out my video to see a demo of that).
You can layer the glitter in, too: after giving it some time to dry, paint another bit of glue on top of the glitter and add more into the recessed areas. It will add depth!
I added extra-fine gold glitter around the edge and sealed the whole thing with a clear gloss spray, then drilled a hole through the top and threaded it so it could hang on the tree.
Caveat: before I sealed with a clear gloss, I actually tried to seal with an old polycrylic which unfortunately made the top and bottom tips look faded/cloudy once it dried. At first I thought I’d lean into the mistake by painting the back and sides with chalk paint and sanding to make it look rustic, but it looked really sad instead and totally detracted from the sparkle on the front. I wanted to get this done in time for the blog hop, so I just continued on with sealing again and adding the glitter around the edge. So, if you try a project like this, don’t make my mistake and you’ll get even better results!
You can also try other inlay methods, other glitter colors, fill in the center vs the outer rings with opposite hues, etc… the possibilities are pretty endless!
All in all, I think it’s going to make a nice addition to my white/gold/chrome/woodland Christmas decor theme this year (and the less I need to spend on ornaments, the more budget I have to make Christmas cocktails, hehe).
Want to try this for yourself? You can download my template here.
To be perfectly frank, I think the photos really don’t do the sparkle on this piece enough justice (in fact, I worried that it was looking too drab in photos). So, I made a video tutorial too (I’d love it if you subscribed if you haven’t already… with what I’ve learned in making this tutorial, there is more to come no doubt!).
As I mentioned, this DIY was part of a blog hop, with 25 other bloggers participating — aka, enough DIY Christmas ideas to keep you busy right up until the actual holiday (if you were so ambitiously inclined). So, check out a preview of the other projects and bloggers participating in the images below. You can also head over to the Remodelaholic post (who is hosting this hop) to check out other DIYers submitting their inspired ideas (on social media, you can look for #CreativeChristmas to find them all).
DIY Christmas Trees and Ornaments
Wintry Silver Dollar Store Christmas Tree Decor | Remodelaholic
Marbled Christmas Ornaments | Doodlecraft
Scrap Wood Inlay Ornaments | The Ugly Duckling House (you’re here!)
Woodburned Wood Slice Ornaments | Sisters What
Flocked Pine Cones | Practical and Pretty
Abstract Monogram Ornaments | Domicile37
Concrete Christmas Ornaments | The Palette Muse
Wood Slice Deer Ornaments | Our Crafty Mom
Vintage Gumball Machine Ornaments | Beth Watson Design Studio
Etched Glass Ornaments | Just Call Me Homegirl
Unicorn Inspired Christmas Tree | The DIY Mommy
Driftwood Reindeer Ornaments | Sustain My Craft Habit
DIY Christmas Gifts and Decor
Christmas Pine Hoop Wreath | This Mama’s Dance
Gingerbread Man Candles | Nourish and Nestle
Wire and Glass Chandelier | Home with Cupcakes and Crinoline
Christmas Scroll Wall Art | Grace In My Space
Lighted Wood Trees | Frazzled Joy
Crocheted Christmas Hat | Luz Patterns
Christmas Card Photo Display| Hertoolbelt
JOY Porch Sign | Ginger Snap Crafts
Folding Bar Cart Table | Everyday Party Magazine
Wood and Burlap Christmas Sign | Leap of Faith Crafting
Wood Block Snowman | Anika’s DIY Life
Holiday Candle Wrap | Dragonfly & Lily Pads
Christmas Pom Pom Pillow | Small Home Soul
Handlettered Wall Art | Smiling Colors
Those of us who did videos for this hop can be found in the playlist below, so those of you who would rather watch than read (or just want to blow off work for a few more minutes) have something, too! *If you’re having difficulty playing it, you can jump over to the playlist here.*
youtube
There you have it! Hope you’re getting into the holiday spirit just in time. Will you be working on any decor ideas this Christmas? This is going to be a very busy holiday season for me, so be sure to check back in for more DIYs (I’m going to give that epoxy inlay idea a shot, and a few more scrap ideas are just bubbling in the ol’ brain). Have a great weekend!
You'll Also Love
25 Great Gift Ideas for the Craft Beer Lover
DIY Wooden Couch Sleeve
It’s Pronounced “Damn Good Cookie̶...
Lots of Sneak Peeks: Riding the Buildathon Wave
.yuzo_related_post img{width:170px !important; height:170px !important;} .yuzo_related_post .relatedthumb{line-height:14px;background:#ffffff !important;color:#454747!important;} .yuzo_related_post .relatedthumb:hover{background:#ffffff !important; -webkit-transition: background 0.2s linear; -moz-transition: background 0.2s linear; -o-transition: background 0.2s linear; transition: background 0.2s linear;;color:#454747!important;} .yuzo_related_post .relatedthumb a{color:#102a3b!important;} .yuzo_related_post .relatedthumb a:hover{ color:#113f5e}!important;} .yuzo_related_post .relatedthumb:hover a{ color:#113f5e!important;} .yuzo_related_post .relatedthumb:hover .yuzo__text--title{ color:#113f5e!important;} .yuzo_related_post .yuzo_text, .yuzo_related_post .yuzo_views_post {color:#454747!important;} .yuzo_related_post .relatedthumb:hover .yuzo_text, .yuzo_related_post:hover .yuzo_views_post {color:#454747!important;} .yuzo_related_post .relatedthumb{ margin: 0px 6px 0px 6px; padding: 0px 0px 0px 0px; } jQuery(document).ready(function( $ ){ jQuery('.yuzo_related_post .yuzo_wraps').equalizer({ columns : '> div' }); });
The post Wood Inlay Ornament with German Glass Glitter appeared first on The Ugly Duckling House.
Website // Subscribe // Advertise // Twitter // Facebook // Google+
from The Ugly Duckling House https://www.uglyducklinghouse.com/wood-inlay-ornament-german-glass-glitter/
0 notes
Text
Wood Inlay Ornament with German Glass Glitter
Hi friends! And hi to new friends visiting from the #CreativeChristmas Challenge hosted by Remodelaholic!
To those of you who don’t know me yet: welcome. Everyone else has already started drinking and saying really embarrassing things (about themselves, not you… we’re not a super judgmental bunch). To those of you who already know me: cheers. As always, you rock. And I was just kidding about the drinking thing (unless it’s football season and a Saturday, which yes to both).
Anyway, from time to time, I like to throw my hat in on a DIY challenge or two because nothing excuses buying more power tools like overcommitting to a deadline for fun (like the 2×4 summer challenge and boom: new coffee table!). This time around, the theme was making something for Christmas. I’ve already been finding inspiration for my color scheme this year in the form of acorns, snowflakes, owls, and other wintery-woodland things, so I figured: why not see if I can fill up the inevitable empty parts of my tree with what I have on hand, rather than buying a bunch of new ornaments? I also just happened upon a set of carving bits for my Dremel and have been itching to experiment with epoxy/inlays/resins, so I started playing around until this happened:
And as a fun little bonus: I actually made a video of it too!
Tools and Materials
affiliate links of items I recommend and use are listed in this post, which support this site at no cost to you… thanks!
scrap wood (I had 1″ x 4″ poplar)
scissors
printer paper
inkjet printer
acetone or nail polish remover
Dremel 200
Dremel engraving/carving kit
band saw or scroll saw
random orbit sander
wood stain (I used Minwax Ipswich Pine and washed while it was still wet with Early American… I’ll have to show you guys more about this as I’ve done it a number of times to get the colors I like)
Mod Podge
small detail paint brush
Miss Mustard Seed’s German Glass Glitter in Silver Tiara
Martha Stewart Crafts extra fine glitter in Smoky Quartz
clear spray sealer (gloss)
small drill bit
thread (I used stuff from my cross stitch stash)
First things first: print out the image (mine is available for download near the end of the post) and cut it out. I used a scrap piece of poplar that was bound for the burn pile, so I wasn’t really expecting perfection (in fact as you can see, I first used a different image that was WAY too intricate for a first-time experiment and then decided on the final design).
To transfer the ink from the printer paper, I swabbed the back with an acetone nail polish remover. As you can see, the image didn’t transfer perfectly, but it was good enough (I got the idea from my buddy Brad’s video here — then went with the option that wouldn’t require changing out of my pajama pants or going into the cold garage that morning).
Next, I took out my Dremel and a new engraving/carving set I’d recently purchased for another inlay project. In my opinion, crafting is a good intro before graduating to larger pieces, so I figured this would help me practice with diamond tips, how to control the carve, etc. A good method is to create the hard outline first, then carve out the middle, and continue to make the inlay deeper and deeper until it’s got enough depth to hold the inlay material (glitter, epoxy I assume, whatever).
Next, I sketched out the overall shape (spoiler: it wasn’t at all even, so I highly recommend using the template) and then went to cut out the piece. And this is when it seemed like things were conspiring against me: my new scroll saw was broken… right out of the box. Womp, womp.
To make the situation a little stickier, I was about 5 hours away at this point from needing to head out of town to Raleigh, NC (recap here), and I had no other tools that would give me the right depth and shape. Disappointed but undeterred, I figured the next best thing would be to ask to borrow tools from the person I’d be visiting (thankfully, it was a trip to visit some DIY blogging friends just for fun — my pal Brittany just so happened to have a band saw in her garage). Of course, now I want one of those, too.
Of course, I’d never actually used a band saw before, so despite the general don’t-cut-your-fingers-off rule, the piece still came out a little wonky (mostly due to my non-templating sketch). I was able to shape it a little more with an orbital sander. I also carved the edges out a little more and did a final sanding with high grit sandpaper before stain.
Since the overall concept was to make this look like an inlay, I wanted to use glitter with a little more grit and sparkle: enter, German glass glitter. It’s really amazing stuff in person. To paint it into place, I relied on a small paint brush (tip: if the brush starts to fray a little, spin it as you’re dipping it into the glue to get the point fine again… check out my video to see a demo of that).
You can layer the glitter in, too: after giving it some time to dry, paint another bit of glue on top of the glitter and add more into the recessed areas. It will add depth!
I added extra-fine gold glitter around the edge and sealed the whole thing with a clear gloss spray, then drilled a hole through the top and threaded it so it could hang on the tree.
Caveat: before I sealed with a clear gloss, I actually tried to seal with an old polycrylic which unfortunately made the top and bottom tips look faded/cloudy once it dried. At first I thought I’d lean into the mistake by painting the back and sides with chalk paint and sanding to make it look rustic, but it looked really sad instead and totally detracted from the sparkle on the front. I wanted to get this done in time for the blog hop, so I just continued on with sealing again and adding the glitter around the edge. So, if you try a project like this, don’t make my mistake and you’ll get even better results!
You can also try other inlay methods, other glitter colors, fill in the center vs the outer rings with opposite hues, etc… the possibilities are pretty endless!
All in all, I think it’s going to make a nice addition to my white/gold/chrome/woodland Christmas decor theme this year (and the less I need to spend on ornaments, the more budget I have to make Christmas cocktails, hehe).
Want to try this for yourself? You can download my template here.
To be perfectly frank, I think the photos really don’t do the sparkle on this piece enough justice (in fact, I worried that it was looking too drab in photos). So, I made a video tutorial too (I’d love it if you subscribed if you haven’t already… with what I’ve learned in making this tutorial, there is more to come no doubt!).
As I mentioned, this DIY was part of a blog hop, with 25 other bloggers participating — aka, enough DIY Christmas ideas to keep you busy right up until the actual holiday (if you were so ambitiously inclined). So, check out a preview of the other projects and bloggers participating in the images below. You can also head over to the Remodelaholic post (who is hosting this hop) to check out other DIYers submitting their inspired ideas (on social media, you can look for #CreativeChristmas to find them all).
DIY Christmas Trees and Ornaments
Wintry Silver Dollar Store Christmas Tree Decor | Remodelaholic
Marbled Christmas Ornaments | Doodlecraft
Scrap Wood Inlay Ornaments | The Ugly Duckling House (you’re here!)
Woodburned Wood Slice Ornaments | Sisters What
Flocked Pine Cones | Practical and Pretty
Abstract Monogram Ornaments | Domicile37
Concrete Christmas Ornaments | The Palette Muse
Wood Slice Deer Ornaments | Our Crafty Mom
Vintage Gumball Machine Ornaments | Beth Watson Design Studio
Etched Glass Ornaments | Just Call Me Homegirl
Unicorn Inspired Christmas Tree | The DIY Mommy
Driftwood Reindeer Ornaments | Sustain My Craft Habit
DIY Christmas Gifts and Decor
Christmas Pine Hoop Wreath | This Mama’s Dance
Gingerbread Man Candles | Nourish and Nestle
Wire and Glass Chandelier | Home with Cupcakes and Crinoline
Christmas Scroll Wall Art | Grace In My Space
Lighted Wood Trees | Frazzled Joy
Crocheted Christmas Hat | Luz Patterns
Christmas Card Photo Display| Hertoolbelt
JOY Porch Sign | Ginger Snap Crafts
Folding Bar Cart Table | Everyday Party Magazine
Wood and Burlap Christmas Sign | Leap of Faith Crafting
Wood Block Snowman | Anika’s DIY Life
Holiday Candle Wrap | Dragonfly & Lily Pads
Christmas Pom Pom Pillow | Small Home Soul
Handlettered Wall Art | Smiling Colors
Those of us who did videos for this hop can be found in the playlist below, so those of you who would rather watch than read (or just want to blow off work for a few more minutes) have something, too! *If you’re having difficulty playing it, you can jump over to the playlist here.*
youtube
There you have it! Hope you’re getting into the holiday spirit just in time. Will you be working on any decor ideas this Christmas? This is going to be a very busy holiday season for me, so be sure to check back in for more DIYs (I’m going to give that epoxy inlay idea a shot, and a few more scrap ideas are just bubbling in the ol’ brain). Have a great weekend!
You'll Also Love
25 Great Gift Ideas for the Craft Beer Lover
DIY Wooden Couch Sleeve
It’s Pronounced “Damn Good Cookie̶...
Lots of Sneak Peeks: Riding the Buildathon Wave
.yuzo_related_post img{width:170px !important; height:170px !important;} .yuzo_related_post .relatedthumb{line-height:14px;background:#ffffff !important;color:#454747!important;} .yuzo_related_post .relatedthumb:hover{background:#ffffff !important; -webkit-transition: background 0.2s linear; -moz-transition: background 0.2s linear; -o-transition: background 0.2s linear; transition: background 0.2s linear;;color:#454747!important;} .yuzo_related_post .relatedthumb a{color:#102a3b!important;} .yuzo_related_post .relatedthumb a:hover{ color:#113f5e}!important;} .yuzo_related_post .relatedthumb:hover a{ color:#113f5e!important;} .yuzo_related_post .relatedthumb:hover .yuzo__text--title{ color:#113f5e!important;} .yuzo_related_post .yuzo_text, .yuzo_related_post .yuzo_views_post {color:#454747!important;} .yuzo_related_post .relatedthumb:hover .yuzo_text, .yuzo_related_post:hover .yuzo_views_post {color:#454747!important;} .yuzo_related_post .relatedthumb{ margin: 0px 6px 0px 6px; padding: 0px 0px 0px 0px; } jQuery(document).ready(function( $ ){ jQuery('.yuzo_related_post .yuzo_wraps').equalizer({ columns : '> div' }); });
The post Wood Inlay Ornament with German Glass Glitter appeared first on The Ugly Duckling House.
Website // Subscribe // Advertise // Twitter // Facebook // Google+
Wood Inlay Ornament with German Glass Glitter published first on http://ift.tt/1kI9W8s
0 notes
Text
Valerian: Luc Besson’s hero drives a Lexus
Valerian, the film, picks the comic series from 1967 and mixes it with a promise of the future: the Skyjet vehicle designed by Lexus for a world set 700 years in the future. Time to look at Luc Besson’s love and a dream which started half a century ago.
The first trailer from Valerian and the City of a Thousand Planets, revealed last November, gave viewers a glimpse of the Skyjet, a single-seat pursuit craft featured in the film. The vehicle is the result of a cooperative work between the team behind Valerian and Lexus, challenged to create a vehicle grounded on reality but existing in the future universe of Valerian.
The creative team met with Lexus’ Chief Engineer, Takeaki Kato and the Lexus design team, to discuss incorporating believable, imaginative technologies and contemporary design cues into the final iteration of the Skyjet. The result is a craft the being futuristic includes an adapted interpretation of Lexus’ signature “spindle” grille, and a similar headlight design to that of the anticipated 2018 Lexus LC coupe, defined by an athletic and aerodynamic shape.
The Skyjet vehicle and the technology that makes the film possible, are the only modern elements of Valerian, because the story is old, a sci-fi saga that started back in 1967, when the first adventure of Valerian and Laureline (yes, because there is a heroine in the series) was published in Europe, in the French magazine Pilote. The comic book series, created by writer Pierre Christin and artist Jean-Claude Mézières, was published until 2010, a total of 21 volumes plus a short story collection and an encyclopedia. The books are being reissued now, in special editions that hope to explore the public’s interest in the film.
In 2012 Luc Besson announced that he wanted to make a film based on a comic book from his youth. The idea of adapting the adventures of Valerian and Laureline to the cinema was not new, though. Since Besson made The Fifth Element (1997), also based on a French comic series, that he wanted to do it, but the director felt the technology available would not allow to reproduce the unique universe of the spatio-temporal agents. It was only after Avatar, from James Cameron, that Luc Besson believed the conditions were met, and started to think of Valerian as a film. Or more, as the director suggested in a recent interview: “I will be the happiest guy in the world if the film works and I can do a second one and a third one.”
Are we about to see another saga like Star Wars?
Valerian, as multiple articles on the Internet have enumerated over and over, is one of the sources for Star Wars. The comparison reveals so many “coincidences” that it is hard to believe it’s just a coincidence. From Princess Leia’s costume worn in Return of the Jedi, very similar to the slave-girl outfit that Laureline wears in The Land Without Stars (1972), to the figure with a burned face present in Empire of a Thousand Planets, from 1971, which is similar to Darth Vader (Anakin Skywalker), going through the Millenium Falcon and Valerian’s spaceship or the way Valerian is frozen in liquid plastic, in the same comic book, and Han Solo is imprisoned in carbonite in The Empire Strikes Back of 1980, nine years later, there are too many coincidences.
An interview with Pierre Christin, by Martin Scholz of the German newspaper Die Welt, (available in English at Europe Comics, under the title Valerian: A Model for Star Wars), touches the subject. The journalist asks if the authors were surprised when they saw, ten years after their first comic book came out, the first episode of Star Wars borrowing heavily from their characters, creatures and design of spaceships and Pierre Christin replies that “Yes, that’s exactly what my colleague Jean-Claude Mézières and I told ourselves when we walked out of the cinema after watching Star Wars for the first time. But my first reaction was not anger.”
In the same interview Pierre Christin comments that “In the ’80s, particularly in France, people were convinced that George Lucas had stolen from Valerian” and adds that “in general, all you hear from the US in reply to such allegations is that French comics are barely known and not successful at all on that side of the Atlantic – which, on the whole, is true. Nevertheless, the few people in the US who do know French comics fairly well are Hollywood’s art directors and storyboard artists. They might not be able to read the magazines, but they still flick through them now and then in search of ideas. That’s what French film-makers who’ve been to Hollywood have told me: They happened to have seen piles of French comics in the creative departments of various film studios.”
One important element that many seem to forget is the influence that, without any doubt, one French magazine had in Hollywood. Metal Hurlant, a comics magazine launched in France in 1975 was renamed and launched in the United States in April 1977 as a monthly magazine, Heavy Metal. The artists published in the magazine included names as Jean Giraud (a.k.a. Moebius), Philippe Druillet or Enki Bilal. Although the first Valerian and Laureline album translated to English was Ambassador of Shadows, published in Heavy Metal in 1981, it’s only natural that Heavy Metal, which is still published today in the United States, attracted the attention of a whole generation of artists when it was launched, and made French and Belgian comics and European comics in general even more popular with a generation after new visions.
The cross-influence from comics to cinema should not come as a surprise and Star Wars is not the only case. In fact, Luc Besson’s film The Fifth Element is said to have “borrowed” the idea from the comic series The Incal, created in 1980 by comics writer Alejandro Jodorowsky and artist Moebius (Jean Henri Gaston Giraud). Moebius did contribute storyboards and concept designs to the movie, but some suggest that Besson used more than just the storyboards. In a 2002 interview published by Danish comic book magazine Strip, Jodorowsky said it was an honour to have his ideas stolen.
Moebius and Jodorowsky are also associated with another project that never saw the light of day, at least as Jodorowsky meant it, but which, apparently, was used in Hollywood as “guide-book” for science-fiction films: Dune. A documentary from 2013, Jodorowsky’s Dune, reveals that the “film notes, Jodorowsky’s script, extensive storyboards and concept art were sent to all major film studios”, and argues that these inspired later film productions, including the Alien, Star Wars and Terminator series.
Still looking at Star Wars and Valerian, it is also interesting to see that Valerian and Han Solo seem to have similar traits, while Laureline is basically Princess Leia. One other element usually not mentioned, but that fascinates me, is that Luke Skywalker lives as a farmer with his adopted family until he starts training to be a Jedi, while Laureline is a 11th century French peasant brought from the past by Valerian and trained to become a space-agent. Both heroes are farmers, both are taken from their element to receive training…
Valerian and the City of a Thousand Planets launches in cinemas around the world starting next week. In the United States it will be available in 2D and 3D beginning 21 July 2017, and it will be interesting to see how the public receives Luc Besson’s adaptation. Featuring an all-star cast including Clive Owen, Ethan Hawke, Rihanna, and Kris W, the project marks Luc Besson’s most ambitious film to date and the largest-budget European motion picture ever produced. The film is produced by Virginie Besson-Silla.
Having collected Valerian and Laureline stories throughout the years, since they first appeared, I must admit I am very curious to see the film, because, as Luc Besson, I always thought the comic deserved to be translated to the cinema. Knowing the series, I also hope this Valerian and Laureline film opens the door for more films, because it would be fantastic to see the evolution of the saga beyond the first books. In fact, while Star Wars became a sterile universe after the first three films, in my opinion, the stories created by Pierre Christin and Jean-Claude Mézières have evolved, from the exciting sci-fi adventure from the initial books to stories touching multiple political and social topics that could just be the base for sequels to the saga.
The film gives us an image of Laureline that corresponds to the image the comic series build of her throughout the different albums. As Gabrielle Bellot wrote recently in The Atlantic, Laureline was, “from the start, a radically impressive figure who set the bar high for women in science fiction. No mere beautiful figure, Laureline has a piercing intellect, a near-indomitable pride in herself, an endearing but acid wit, and formidable fighting skills. And yet she resists being an archetype of female perfection.”
It’s easy to understand why Luc Besson says that he fell in love with Laureline when he first read the comics. It’s a love and adventure that started 50 years ago.
The post Valerian: Luc Besson’s hero drives a Lexus appeared first on ProVideo Coalition.
First Found At: Valerian: Luc Besson’s hero drives a Lexus
0 notes
Text
Wood Inlay Ornament with German Glass Glitter
Hi friends! And hi to new friends visiting from the #CreativeChristmas Challenge hosted by Remodelaholic!
youtube
To those of you who don’t know me yet: welcome. Everyone else has already started drinking and saying really embarrassing things (about themselves, not you… we’re not a super judgmental bunch). To those of you who already know me: cheers. As always, you rock. And I was just kidding about the drinking thing (unless it’s football season and a Saturday, which yes to both).
Anyway, from time to time, I like to throw my hat in on a DIY challenge or two because nothing excuses buying more power tools like overcommitting to a deadline for fun (like the 2×4 summer challenge and boom: new coffee table!). This time around, the theme was making something for Christmas. I’ve already been finding inspiration for my color scheme this year in the form of acorns, snowflakes, owls, and other wintery-woodland things, so I figured: why not see if I can fill up the inevitable empty parts of my tree with what I have on hand, rather than buying a bunch of new ornaments? I also just happened upon a set of carving bits for my Dremel and have been itching to experiment with epoxy/inlays/resins, so I started playing around until this happened:
And as a fun little bonus: I actually made a video of it too!
Tools and Materials
affiliate links of items I recommend and use are listed in this post, which support this site at no cost to you… thanks!
scrap wood (I had 1″ x 4″ poplar)
scissors
printer paper
inkjet printer
acetone or nail polish remover
Dremel 200
Dremel engraving/carving kit
band saw or scroll saw
random orbit sander
wood stain (I used Minwax Ipswich Pine and washed while it was still wet with Early American… I’ll have to show you guys more about this as I’ve done it a number of times to get the colors I like)
Mod Podge
small detail paint brush
Miss Mustard Seed’s German Glass Glitter in Silver Tiara
Martha Stewart Crafts extra fine glitter in Smoky Quartz
clear spray sealer (gloss)
small drill bit
thread (I used stuff from my cross stitch stash)
First things first: print out the image (mine is available for download near the end of the post) and cut it out. I used a scrap piece of poplar that was bound for the burn pile, so I wasn’t really expecting perfection (in fact as you can see, I first used a different image that was WAY too intricate for a first-time experiment and then decided on the final design).
To transfer the ink from the printer paper, I swabbed the back with an acetone nail polish remover. As you can see, the image didn’t transfer perfectly, but it was good enough (I got the idea from my buddy Brad’s video here — then went with the option that wouldn’t require changing out of my pajama pants or going into the cold garage that morning).
Next, I took out my Dremel and a new engraving/carving set I’d recently purchased for another inlay project. In my opinion, crafting is a good intro before graduating to larger pieces, so I figured this would help me practice with diamond tips, how to control the carve, etc. A good method is to create the hard outline first, then carve out the middle, and continue to make the inlay deeper and deeper until it’s got enough depth to hold the inlay material (glitter, epoxy I assume, whatever).
Next, I sketched out the overall shape (spoiler: it wasn’t at all even, so I highly recommend using the template) and then went to cut out the piece. And this is when it seemed like things were conspiring against me: my new scroll saw was broken… right out of the box. Womp, womp.
To make the situation a little stickier, I was about 5 hours away at this point from needing to head out of town to Raleigh, NC (recap here), and I had no other tools that would give me the right depth and shape. Disappointed but undeterred, I figured the next best thing would be to ask to borrow tools from the person I’d be visiting (thankfully, it was a trip to visit some DIY blogging friends just for fun — my pal Brittany just so happened to have a band saw in her garage). Of course, now I want one of those, too.
Of course, I’d never actually used a band saw before, so despite the general don’t-cut-your-fingers-off rule, the piece still came out a little wonky (mostly due to my non-templating sketch). I was able to shape it a little more with an orbital sander. I also carved the edges out a little more and did a final sanding with high grit sandpaper before stain.
Since the overall concept was to make this look like an inlay, I wanted to use glitter with a little more grit and sparkle: enter, German glass glitter. It’s really amazing stuff in person. To paint it into place, I relied on a small paint brush (tip: if the brush starts to fray a little, spin it as you’re dipping it into the glue to get the point fine again… check out my video to see a demo of that).
You can layer the glitter in, too: after giving it some time to dry, paint another bit of glue on top of the glitter and add more into the recessed areas. It will add depth!
I added extra-fine gold glitter around the edge and sealed the whole thing with a clear gloss spray, then drilled a hole through the top and threaded it so it could hang on the tree.
Caveat: before I sealed with a clear gloss, I actually tried to seal with an old polycrylic which unfortunately made the top and bottom tips look faded/cloudy once it dried. At first I thought I’d lean into the mistake by painting the back and sides with chalk paint and sanding to make it look rustic, but it looked really sad instead and totally detracted from the sparkle on the front. I wanted to get this done in time for the blog hop, so I just continued on with sealing again and adding the glitter around the edge. So, if you try a project like this, don’t make my mistake and you’ll get even better results!
You can also try other inlay methods, other glitter colors, fill in the center vs the outer rings with opposite hues, etc… the possibilities are pretty endless!
All in all, I think it’s going to make a nice addition to my white/gold/chrome/woodland Christmas decor theme this year (and the less I need to spend on ornaments, the more budget I have to make Christmas cocktails, hehe).
Want to try this for yourself? You can download my template here.
To be perfectly frank, I think the photos really don’t do the sparkle on this piece enough justice (in fact, I worried that it was looking too drab in photos). So, I made a video tutorial too (I’d love it if you subscribed if you haven’t already… with what I’ve learned in making this tutorial, there is more to come no doubt!).
youtube
As I mentioned, this DIY was part of a blog hop, with 25 other bloggers participating — aka, enough DIY Christmas ideas to keep you busy right up until the actual holiday (if you were so ambitiously inclined). So, check out a preview of the other projects and bloggers participating in the images below. You can also head over to the Remodelaholic post (who is hosting this hop) to check out other DIYers submitting their inspired ideas (on social media, you can look for #CreativeChristmas to find them all).
DIY Christmas Trees and Ornaments
Wintry Silver Dollar Store Christmas Tree Decor | Remodelaholic
Marbled Christmas Ornaments | Doodlecraft
Scrap Wood Inlay Ornaments | The Ugly Duckling House (you’re here!)
Woodburned Wood Slice Ornaments | Sisters What
Flocked Pine Cones | Practical and Pretty
Abstract Monogram Ornaments | Domicile37
Concrete Christmas Ornaments | The Palette Muse
Wood Slice Deer Ornaments | Our Crafty Mom
Vintage Gumball Machine Ornaments | Beth Watson Design Studio
Etched Glass Ornaments | Just Call Me Homegirl
Unicorn Inspired Christmas Tree | The DIY Mommy
Driftwood Reindeer Ornaments | Sustain My Craft Habit
DIY Christmas Gifts and Decor
Christmas Pine Hoop Wreath | This Mama’s Dance
Gingerbread Man Candles | Nourish and Nestle
Wire and Glass Chandelier | Home with Cupcakes and Crinoline
Christmas Scroll Wall Art | Grace In My Space
Lighted Wood Trees | Frazzled Joy
Crocheted Christmas Hat | Luz Patterns
Christmas Card Photo Display| Hertoolbelt
JOY Porch Sign | Ginger Snap Crafts
Folding Bar Cart Table | Everyday Party Magazine
Wood and Burlap Christmas Sign | Leap of Faith Crafting
Wood Block Snowman | Anika’s DIY Life
Holiday Candle Wrap | Dragonfly & Lily Pads
Christmas Pom Pom Pillow | Small Home Soul
Handlettered Wall Art | Smiling Colors
Those of us who did videos for this hop can be found in the playlist below, so those of you who would rather watch than read (or just want to blow off work for a few more minutes) have something, too! *If you’re having difficulty playing it, you can jump over to the playlist here.*
youtube
There you have it! Hope you’re getting into the holiday spirit just in time. Will you be working on any decor ideas this Christmas? This is going to be a very busy holiday season for me, so be sure to check back in for more DIYs (I’m going to give that epoxy inlay idea a shot, and a few more scrap ideas are just bubbling in the ol’ brain). Have a great weekend!
You'll Also Love
25 Great Gift Ideas for the Craft Beer Lover
DIY Wooden Couch Sleeve
It’s Pronounced “Damn Good Cookie̶...
Lots of Sneak Peeks: Riding the Buildathon Wave
.yuzo_related_post img{width:170px !important; height:170px !important;} .yuzo_related_post .relatedthumb{line-height:14px;background:#ffffff !important;color:#454747!important;} .yuzo_related_post .relatedthumb:hover{background:#ffffff !important; -webkit-transition: background 0.2s linear; -moz-transition: background 0.2s linear; -o-transition: background 0.2s linear; transition: background 0.2s linear;;color:#454747!important;} .yuzo_related_post .relatedthumb a{color:#102a3b!important;} .yuzo_related_post .relatedthumb a:hover{ color:#113f5e}!important;} .yuzo_related_post .relatedthumb:hover a{ color:#113f5e!important;} .yuzo_related_post .relatedthumb:hover .yuzo__text--title{ color:#113f5e!important;} .yuzo_related_post .yuzo_text, .yuzo_related_post .yuzo_views_post {color:#454747!important;} .yuzo_related_post .relatedthumb:hover .yuzo_text, .yuzo_related_post:hover .yuzo_views_post {color:#454747!important;} .yuzo_related_post .relatedthumb{ margin: 0px 6px 0px 6px; padding: 0px 0px 0px 0px; } jQuery(document).ready(function( $ ){ jQuery('.yuzo_related_post .yuzo_wraps').equalizer({ columns : '> div' }); });
The post Wood Inlay Ornament with German Glass Glitter appeared first on The Ugly Duckling House.
Website // Subscribe // Advertise // Twitter // Facebook // Google+
Wood Inlay Ornament with German Glass Glitter published first on http://ift.tt/2qxZz2j
0 notes
Text
Wood Inlay Ornament with German Glass Glitter
Hi friends! And hi to new friends visiting from the #CreativeChristmas Challenge hosted by Remodelaholic!
youtube
To those of you who don’t know me yet: welcome. Everyone else has already started drinking and saying really embarrassing things (about themselves, not you… we’re not a super judgmental bunch). To those of you who already know me: cheers. As always, you rock. And I was just kidding about the drinking thing (unless it’s football season and a Saturday, which yes to both).
Anyway, from time to time, I like to throw my hat in on a DIY challenge or two because nothing excuses buying more power tools like overcommitting to a deadline for fun (like the 2×4 summer challenge and boom: new coffee table!). This time around, the theme was making something for Christmas. I’ve already been finding inspiration for my color scheme this year in the form of acorns, snowflakes, owls, and other wintery-woodland things, so I figured: why not see if I can fill up the inevitable empty parts of my tree with what I have on hand, rather than buying a bunch of new ornaments? I also just happened upon a set of carving bits for my Dremel and have been itching to experiment with epoxy/inlays/resins, so I started playing around until this happened:
And as a fun little bonus: I actually made a video of it too!
Tools and Materials
affiliate links of items I recommend and use are listed in this post, which support this site at no cost to you… thanks!
scrap wood (I had 1″ x 4″ poplar)
scissors
printer paper
inkjet printer
acetone or nail polish remover
Dremel 200
Dremel engraving/carving kit
band saw or scroll saw
random orbit sander
wood stain (I used Minwax Ipswich Pine and washed while it was still wet with Early American… I’ll have to show you guys more about this as I’ve done it a number of times to get the colors I like)
Mod Podge
small detail paint brush
Miss Mustard Seed’s German Glass Glitter in Silver Tiara
Martha Stewart Crafts extra fine glitter in Smoky Quartz
clear spray sealer (gloss)
small drill bit
thread (I used stuff from my cross stitch stash)
First things first: print out the image (mine is available for download near the end of the post) and cut it out. I used a scrap piece of poplar that was bound for the burn pile, so I wasn’t really expecting perfection (in fact as you can see, I first used a different image that was WAY too intricate for a first-time experiment and then decided on the final design).
To transfer the ink from the printer paper, I swabbed the back with an acetone nail polish remover. As you can see, the image didn’t transfer perfectly, but it was good enough (I got the idea from my buddy Brad’s video here — then went with the option that wouldn’t require changing out of my pajama pants or going into the cold garage that morning).
Next, I took out my Dremel and a new engraving/carving set I’d recently purchased for another inlay project. In my opinion, crafting is a good intro before graduating to larger pieces, so I figured this would help me practice with diamond tips, how to control the carve, etc. A good method is to create the hard outline first, then carve out the middle, and continue to make the inlay deeper and deeper until it’s got enough depth to hold the inlay material (glitter, epoxy I assume, whatever).
Next, I sketched out the overall shape (spoiler: it wasn’t at all even, so I highly recommend using the template) and then went to cut out the piece. And this is when it seemed like things were conspiring against me: my new scroll saw was broken… right out of the box. Womp, womp.
To make the situation a little stickier, I was about 5 hours away at this point from needing to head out of town to Raleigh, NC (recap here), and I had no other tools that would give me the right depth and shape. Disappointed but undeterred, I figured the next best thing would be to ask to borrow tools from the person I’d be visiting (thankfully, it was a trip to visit some DIY blogging friends just for fun — my pal Brittany just so happened to have a band saw in her garage). Of course, now I want one of those, too.
Of course, I’d never actually used a band saw before, so despite the general don’t-cut-your-fingers-off rule, the piece still came out a little wonky (mostly due to my non-templating sketch). I was able to shape it a little more with an orbital sander. I also carved the edges out a little more and did a final sanding with high grit sandpaper before stain.
Since the overall concept was to make this look like an inlay, I wanted to use glitter with a little more grit and sparkle: enter, German glass glitter. It’s really amazing stuff in person. To paint it into place, I relied on a small paint brush (tip: if the brush starts to fray a little, spin it as you’re dipping it into the glue to get the point fine again… check out my video to see a demo of that).
You can layer the glitter in, too: after giving it some time to dry, paint another bit of glue on top of the glitter and add more into the recessed areas. It will add depth!
I added extra-fine gold glitter around the edge and sealed the whole thing with a clear gloss spray, then drilled a hole through the top and threaded it so it could hang on the tree.
Caveat: before I sealed with a clear gloss, I actually tried to seal with an old polycrylic which unfortunately made the top and bottom tips look faded/cloudy once it dried. At first I thought I’d lean into the mistake by painting the back and sides with chalk paint and sanding to make it look rustic, but it looked really sad instead and totally detracted from the sparkle on the front. I wanted to get this done in time for the blog hop, so I just continued on with sealing again and adding the glitter around the edge. So, if you try a project like this, don’t make my mistake and you’ll get even better results!
You can also try other inlay methods, other glitter colors, fill in the center vs the outer rings with opposite hues, etc… the possibilities are pretty endless!
All in all, I think it’s going to make a nice addition to my white/gold/chrome/woodland Christmas decor theme this year (and the less I need to spend on ornaments, the more budget I have to make Christmas cocktails, hehe).
Want to try this for yourself? You can download my template here.
To be perfectly frank, I think the photos really don’t do the sparkle on this piece enough justice (in fact, I worried that it was looking too drab in photos). So, I made a video tutorial too (I’d love it if you subscribed if you haven’t already… with what I’ve learned in making this tutorial, there is more to come no doubt!).
youtube
As I mentioned, this DIY was part of a blog hop, with 25 other bloggers participating — aka, enough DIY Christmas ideas to keep you busy right up until the actual holiday (if you were so ambitiously inclined). So, check out a preview of the other projects and bloggers participating in the images below. You can also head over to the Remodelaholic post (who is hosting this hop) to check out other DIYers submitting their inspired ideas (on social media, you can look for #CreativeChristmas to find them all).
DIY Christmas Trees and Ornaments
Wintry Silver Dollar Store Christmas Tree Decor | Remodelaholic
Marbled Christmas Ornaments | Doodlecraft
Scrap Wood Inlay Ornaments | The Ugly Duckling House (you’re here!)
Woodburned Wood Slice Ornaments | Sisters What
Flocked Pine Cones | Practical and Pretty
Abstract Monogram Ornaments | Domicile37
Concrete Christmas Ornaments | The Palette Muse
Wood Slice Deer Ornaments | Our Crafty Mom
Vintage Gumball Machine Ornaments | Beth Watson Design Studio
Etched Glass Ornaments | Just Call Me Homegirl
Unicorn Inspired Christmas Tree | The DIY Mommy
Driftwood Reindeer Ornaments | Sustain My Craft Habit
DIY Christmas Gifts and Decor
Christmas Pine Hoop Wreath | This Mama’s Dance
Gingerbread Man Candles | Nourish and Nestle
Wire and Glass Chandelier | Home with Cupcakes and Crinoline
Christmas Scroll Wall Art | Grace In My Space
Lighted Wood Trees | Frazzled Joy
Crocheted Christmas Hat | Luz Patterns
Christmas Card Photo Display| Hertoolbelt
JOY Porch Sign | Ginger Snap Crafts
Folding Bar Cart Table | Everyday Party Magazine
Wood and Burlap Christmas Sign | Leap of Faith Crafting
Wood Block Snowman | Anika’s DIY Life
Holiday Candle Wrap | Dragonfly & Lily Pads
Christmas Pom Pom Pillow | Small Home Soul
Handlettered Wall Art | Smiling Colors
Those of us who did videos for this hop can be found in the playlist below, so those of you who would rather watch than read (or just want to blow off work for a few more minutes) have something, too! *If you’re having difficulty playing it, you can jump over to the playlist here.*
youtube
There you have it! Hope you’re getting into the holiday spirit just in time. Will you be working on any decor ideas this Christmas? This is going to be a very busy holiday season for me, so be sure to check back in for more DIYs (I’m going to give that epoxy inlay idea a shot, and a few more scrap ideas are just bubbling in the ol’ brain). Have a great weekend!
You'll Also Love
25 Great Gift Ideas for the Craft Beer Lover
DIY Wooden Couch Sleeve
It’s Pronounced “Damn Good Cookie̶...
Lots of Sneak Peeks: Riding the Buildathon Wave
.yuzo_related_post img{width:170px !important; height:170px !important;} .yuzo_related_post .relatedthumb{line-height:14px;background:#ffffff !important;color:#454747!important;} .yuzo_related_post .relatedthumb:hover{background:#ffffff !important; -webkit-transition: background 0.2s linear; -moz-transition: background 0.2s linear; -o-transition: background 0.2s linear; transition: background 0.2s linear;;color:#454747!important;} .yuzo_related_post .relatedthumb a{color:#102a3b!important;} .yuzo_related_post .relatedthumb a:hover{ color:#113f5e}!important;} .yuzo_related_post .relatedthumb:hover a{ color:#113f5e!important;} .yuzo_related_post .relatedthumb:hover .yuzo__text--title{ color:#113f5e!important;} .yuzo_related_post .yuzo_text, .yuzo_related_post .yuzo_views_post {color:#454747!important;} .yuzo_related_post .relatedthumb:hover .yuzo_text, .yuzo_related_post:hover .yuzo_views_post {color:#454747!important;} .yuzo_related_post .relatedthumb{ margin: 0px 6px 0px 6px; padding: 0px 0px 0px 0px; } jQuery(document).ready(function( $ ){ jQuery('.yuzo_related_post .yuzo_wraps').equalizer({ columns : '> div' }); });
The post Wood Inlay Ornament with German Glass Glitter appeared first on The Ugly Duckling House.
Website // Subscribe // Advertise // Twitter // Facebook // Google+
Wood Inlay Ornament with German Glass Glitter published first on http://ift.tt/2qxZz2j
0 notes
Last Seen Blogs

lgorithmsolutions
Lgorithm Solutions

carehanisanhealth
Hanisan Healthcare

jennykoons
open.your.eyes

cardboard-david-tennant
DTCCAS

ask-honeyphos
Torches, Jaffas and Flower Crowns