#a4 booklet
Explore tagged Tumblr posts
Visit Tumblr Blog
Explore Tumblr blogs with no restrictions, modern design and the best experience.
Last Seen Tumblr Blogs


Fun Fact
Tumblr has been providing a Korean-language service since 2013.
Text
ive been really obsessed with one sheet 8 page minizines recently. there really is nothing like downloading a pdf and printing it out to get a little cut and fold craft project and Right After u get to read a little booklet........magnificent invention
#my familys printer is a little fucked up and has really bad margin cutoffs#(its supposed to be like a normal 1cm margin all around but in practice always forces like 3/4s of an inch to a full inch 😔)#(probably something to do with software or drivers or something) but i dont even mind im just having fun printing out things#i wish more people would put up pdfs for at home minizine printing its so fun#my favourites ive found so far are little games and rpgs#and also i love a good classic informational or personal essay interspersed with images#a few table based generators ive found have also been fun too#a digital zine is fine but i looooove printing things out on a4 paper on my familys fucked up b&w only printer LOL#its fun to hold a little booklet in ur hands and read it!!! its very fun
6 notes
·
View notes
Text
Bill Books
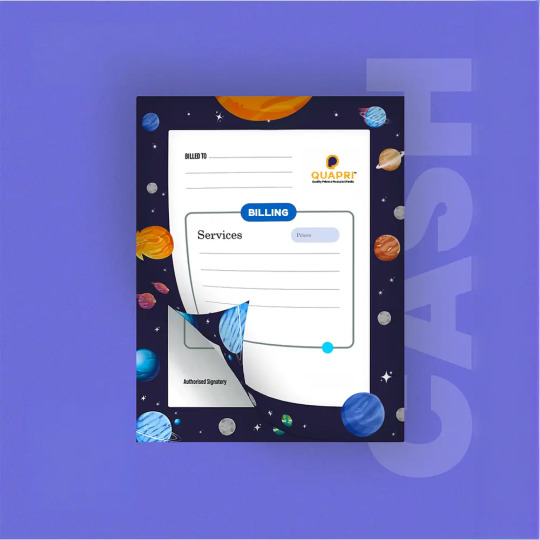
Custom Bill Books Premium Quality for Effective Record-Keeping
Introduction: Streamline Your Business Transactions with Custom Bill
Key Features of Our Custom Bill Books
Customizable Designs
Quapri provides options for customizable design to match your business’s brand. We have different layout, color designs and allow you to put in your logo, so the look will be professional. Custom bill books not only perform well but promote your brand’s visibility too.
Carbonless Copy Technology
Our bill books have advanced carbonless copy technology. This allows you to generate duplicate records of all transactions, which is very important in holding records and delivering readable copies to your customers.
Top Quality Printing
Our bill books are printed with high-quality inks on high-grade paper to ensure crisp text and a highly professional look. Print quality maximizes readability and gives maximum presentation to your documents.
Strong Materials
Our bill books are made of hard-wearing materials that will help you to serve for multiple copings. The hardcover and quality content will ensure you a good and long-lasting performance. They suit for busy business environments.
Ordering in Bulk
For larger organizations that need multiple copies, Quapri offers great bulk orders to meet your budget. Our solitary book or batch services become cost-effective and economical at these prices.
#Custom Bill Books#Personalised Bill Books#Printed Invoice Books#Duplicate Bill Book#Triplicate Bill Book#GST Bill Book Printing#Branded Bill Books#Custom Receipt Books#A5 Bill Books#A4 Invoice Books#Company Bill Book#Invoice Book with Logo#NCR Bill Book#Business Receipt Book#Bill Book for Shop#Restaurant Bill Book#Carbonless Bill Book#Custom Bill Pads#Small Business Bill Book#Professional Invoice Books#Printed Billing Books#Booklet Invoice Custom#Customised Payment Book#Bill Book for Freelancers#Wholesale Bill Books#Bill Book Printing Services#Pre-Printed Invoice Book#Branded Invoice Pads#Personalized Billing Booklet#High-Quality Bill Book
0 notes
Text
a4 booklet printing singapore
a4 booklet printing singapore
Booklet Printing
Print Digital Saddle Stitch Booklets – A5, A4
128gsm Saddle Stitch Booklet:
– Material: 128gsm high-quality paper
– Binding: Saddle-stitched (stapled) for durability
– Pages: Customizable page count
– Size: Various sizes available (A4, A5, etc.)
– Printing: Full-color CMYK printing
Ideal for catalogs, brochures, magazines, and event programs
Are you ready to take your marketing materials to the next level? Our high-quality booklet printing offers a perfect solution for businesses looking to engage their audience and communicate their message effectively. From vibrant colors to stunning finishes, we provide a range of customizable options to suit your brand’s unique style.
Whether you’re promoting a product, sharing your story, or providing valuable information, our booklets are designed to captivate and inform. With fast turnaround times and competitive pricing, you can trust us to deliver exceptional results that make an impact. Click now for more update a5 booklet printing singapore
Let us help you create professional booklets that leave a lasting impression. Contact us today for a quote and watch your ideas come to life!
Saddle Stitch Booklets – Digital Printing
Create professional and high-quality Saddle Stitch Booklets with our premium digital printing service. Ideal for catalogs, brochures, event programs, manuals, and magazines, these booklets feature a sleek, stapled spine for a polished and organized look. Perfect for businesses, schools, and marketing materials, saddle-stitched booklets provide an affordable yet durable binding solution.
0 notes
Text
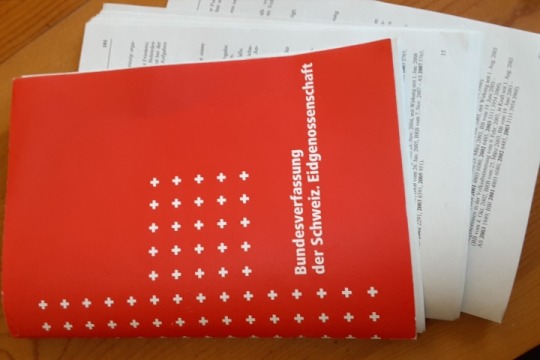
poll time how should i desecrate this excess copy of the swiss constitution i have (i have like 5 other copies in various languages and this one is from january 2021 and thus hopelessly outdated anyway):
1 note
·
View note
Text
A Comprehensive Comparison of A5 and A4 Stapled Booklets
Booklets aren’t new; they have been around since time immemorial. Brands use them for marketing and advertising, disseminating information, outlining event agendas, speaker profiles, and venue maps, for external communication such as employee handbooks and training manuals, or artistic expression. Irrespective of why you are using booklets, selecting the appropriate size and binding method is crucial. Too small booklets aren’t legible for the general audience, whereas the extra big ones are just a waste. Wondering how to select the perfect booklet? We have a breakdown of the nuances of the most popular A4, A5 and stapled booklet printing for you!
A4 Booklets: Spacious and Professional

According to the printers’ handbook, A4 booklet printing is sized at 210 x 297mm. They offer ample space for detailed content, elaborate graphics or large images. This booklet printing method is typically used for reports, catalogues, or portfolios because their relatively larger dimensions exude a professional aesthetic. Professionals or people in the corporate or marketing sphere use these booklets because they can display comprehensive information, but their bulkier nature affects portability, and they aren’t easy to store.
A5 Booklets: Compact and Portable

These booklets measure 148 x 210mm, and they strike the perfect balance between portability and readability. You can pick A5 booklets for brochures, event programs or travel guides because their compact size ensures that they can be handled or distributed easily. However, if you want to print something content-heavy or you need more space for images or intricate designs, the limited space availability on these booklets can be a concern.
Besides, A5 booklets can fit snuggly into pockets, bags or folders, so their compact size and lightweight nature can be a fantastic idea for those who want to distribute booklets at events, conferences, or point-of-sale locations. A5 booklets boast a charmingly petite aesthetic, suitable for conveying concise messages or showcasing minimalist designs. Their smaller format encourages creative experimentation while maintaining visual coherence.
Stapled Booklets: Economical and Functional

Otherwise known as saddle-stitched booklets, stapled booklets use a simple binding method, where folded sheets are secured with staples along the spine. This cost-effective approach makes them suitable for informational pamphlets, event handouts, or instructional guides. While lacking the sophistication of other binding methods, stapled booklets excel in practicality and affordability.
We would say these are the middle ground for those who want to balance space efficiency with functional layout options.
Winding Up!
Whether you want stapled, A4 or A5 booklet printing,the quality of the print decides if your audience will love or hate it. Are you looking for the perfect printing agency to help you create beautiful and durable prints within a cost-effective price range? Reach out to the seasoned printing professionals at Best at Printing today! Their team can help you customise a design, and once your order is complete, they can dispatch it using their tracked courier service without any added delivery fees between 8 am and 6 pm, Monday to Friday!
Original Source:https://bestatprinting.co.uk/blog/a-comprehensive-comparison-of-a5-and-a4-stapled-booklets
0 notes
Text
Fanbinding for absolute beginners - PART 1
There's a fanfic you love so much you'd like to have a physical copy of it? But you don't know how to make it? You've come to the right place! I'm a teacher and I've done this with my pupils (11 year olds), so you can do it, too!

To preface this, obviously this is only one of many methods to bind a book, and it's not perfect, but it's easy enough for my pupils to do it, so I thought I'd share how I do it, to hopefully help people who want to bind fanfics but have never done it before! :)
Here are some examples of what my books look like when done:


Part 1: Preparations on the PC and printing
To start off, a book is made up of several signatures, which is just a bunch of pages folded in the middle. I've found the best signatures for this method are made of four A4 (or letter format) sheets of paper, folded, so it makes 16 pages in total. But signatures of 5 or 6 sheets work well too!
That means you need to prepare your pdf to have a page count that is dividable by 16 (4 sheet signatures), 20 (5 sheet signatures) or 24 (6 sheet signatures). I usually just add blank pages to the front and back of the book until I reach a usable page count. Also check that your chapters start at the page you want (odd pages are on the right, even ones are on the left).
If that is done, you can get to printing. I print signature per signature, and use Adobe Acrobat for that. Apparently, the free trial version can do this too, so no need to pay for it if you don't have it!
The fanfic I'm printing has 320 pages, so I'm gonna print 20 signature made of 4 sheets (16 pages). I write down which pages make the signature so I can them just type them in:
Signature 1 consists of pages 1 - 16
Signature 2: 17 - 32
Signature 3: 33 - 48
Signature 4: 49 - 64
...
Signature 20: 305 - 320
Now, printing works like this:
In Adobe Acrobat, open your pdf and click on print. In the printing options, you first chose the "Booklet" option and then type in the pages for the signature you want to print (e.g. 1-16). Hit print and you'll have your first signature, which you can then fold in the middle! Repeat this step for all the signatures until you've printed the whole book. Done!
If you've got any questions or need clarification an anything, feel free to ask!
(This is just a screenshot from the web, so the numbers don't match, but my Adobe Acrobat is completely in German, so it would probably be even less helpful!)
About the paper: I use normal printing paper in a bit of a yellowish colour (looks better than the sharp white of normal paper). Printing paper has, however, the wrong paper grain, so if you have access to paper with grain in the other direction, take that instead! The results with printing paper are okayish, with maybe a few wrinkles, but nothing too bad (in my opinion, haha).
The parts of this tutorial:
Part 1
Part 2
Part 3
280 notes
·
View notes
Text

FRAGMENT OF US
(Aespa X Male Reader)
Prologue - Into The Unknown
3365 words

------------------------------------------------------------------------------
"Y/n....."
"Y/n please....."
A faint voice rings through your ears.
"Y/n...please..."
But you can't respond. Your body lies heavy, every nerve numb, as if bound by invisible chains.
"Y/N....help us..."
The words are desperate, echoing through your mind. Your vision swims, breath coming in jagged gasps, lungs resisting every inhale.
"Y/n...don't leave us..."
Why can't you move? Why is everything slipping away?
The darkness thickens, swallowing the sounds—until one last plea breaks through.
"Y/N! PLEASE!"
"AHHH!"
.
.
.
You jolt awake, heart racing, drenched in cold sweat.
*Gasp heavily*
You gasp, bolting upright, chest heaving as you gulp in the still air. Darkness fills your room, familiar yet somehow foreign in the lingering haze of the dream.
Raising a hand to your forehead, you wipe away the cold sweat beading on your skin, muttering under your breath, "It's the same dream... again."
A shiver runs down your spine, the words still echoing in your mind, faint but unrelenting. "Who are they?" "And why are they calling me like that?" The questions hang heavy in the silence of inside your head, unanswered and unsettling.
"What is this dream... exactly?" You grip the sheets, frustration edging into your voice, but it's no use. All you're left with is the memory of those voices, pleading, fading into the night.
~~~~~~~~~~~~~~~~~~~~~~~~~~~~~~~~~~~~~~~~~~~~~~~~~~~~~~~~~~~~~~~~~~~~~~~~
The early morning sunlight creeps through the thin curtain, filling your small room with a gentle warmth. The light brushes across your face, and for a moment, it's almost as if it's grounding you, helping you shake off the lingering fog of the dream.
You rub the back of your neck, forcing a few steady breaths to calm your racing heartbeat. "It's just a dream," you remind yourself, though the words echo hollowly in the quiet room. Although that reminder kept short as the dream kept coming back to you again. Now fully awake and freshened up, you stand by the table, carefully arranging your belongings as if to erase any trace of the dream. You mutter to yourself, half-jokingly, like a mad scientist plotting some grand scheme. "Alright... for the tenth time, let's do this again."
Taking a deep breath, you focus on the items laid out before you, one by one.
"Passport... check." You lift the small booklet, making sure it's still valid, a strange comfort in its official feel. "Visa..." you mutter, rifling through a stack of papers, squinting at the print to reassure yourself it's accurate. "Check... according to the staff, anyway," you add, not entirely convinced by your own assurance. You continue down the list, your focus broken only by a smirk as you pick up your passport photo, tilting it like it's a priceless piece of art. "Looks human enough," you say with a quiet chuckle, laying it back down.
Finally, you reach the last item—the one you've worked hardest for, the one that could change your family's fate and reshape your life once and for all. Your fingers linger on a sheet of A4 paper, seemingly ordinary yet carrying the weight of all your effort and ambition. A proud smile tugs at the corners of your mouth as you look it over, feeling a spark of pride.
"I can't believe I actually did it," you murmur, the words colored with the satisfaction of hard work paying off.
As you gather the last of your things, a familiar voice calls from the kitchen, punctuating the silence. "Y/N! Breakfast's ready! Don't tell me you're planning on leaving for Korea on an empty stomach!"
You smile at the sound of your mom's playful tone, the warmth of it a welcome distraction.
You tuck the letter carefully back into the stack of documents. It's your mom's last chance to spoil you before the big leap, and you know it's her way of savoring these last few moments together.
You head to the kitchen, where she's setting the table with a spread of your favorite breakfast dishes. She grins as you walk in, hands on her hips, clearly fighting back a hint of emotion in her eyes. "So," she says with a playful tone, "ready to become one of the Koreans, eh? Or will you miss us so much you'll be back next week?"
You chuckle, sliding into the chair. "I don't know about becoming one of them, but I'm ready to get there, that's for sure."
"Seoul National University," she says, as if testing the name on her tongue. "I still can't believe you got in, and with a full exchange program for your whole degree!" She smiles proudly, shaking her head a little in disbelief. "Who knew my kid would end up at one of the best universities in Korea?" "Oh! maybe he even got the chance to meet-...."
As you listen, the gravity of it all starts to sink in, mingling with excitement. This is it—my chance to change everything. To rewrite my family's fate, to lift us out of the struggles we've known. You glance down at the table, feeling a renewed sense of purpose and determination. "Y/N?" Your mom's voice pulls you back, her tone somewhere between amused and concerned. She waves a hand in front of your face, breaking your deep thoughts. "You've already left for Korea in your head, haven't you?" she teases, shaking her head with a soft laugh.
You blink, shaking yourself back to reality. "Sorry, Mom. I was just... thinking about everything. It's all kind of hitting me now."
"Well, save a little room in that head for breakfast," she says, sliding a plate toward you. "And maybe keep one foot here at home for now, alright?"
Her playful words pull a smile out of you, and you nod, reaching for your fork as you soak in the warmth of the moment—knowing these small scenes are what you'll be carrying with you, no matter how far you go.
Before you can even pick up anything from the plate, your mom's voice, soft and full of motherly warmth, reaches you—a sound you know you'll miss.
"Y/N..." She gently places a hand over yours, her touch both steadying and comforting. "Just remember, no matter how far you go, we're here—always rooting for you."
You nod, her words settling deep inside. "I'll make sure you have every reason to be proud, Mom. No matter what it takes." As you pick up your fork, you glance around the room, letting the details of your little home sink in. Small, worn, its walls painted with years of life, laughter, and quiet struggles—it's a humble place, modest by any standard, but to you, it's nothing short of heaven. Every corner holds a memory: the faded patch in the wall where you practiced kicking a ball, the tiny scuffs on the floor from your father's cane after he first fell ill, the lingering smell of your mom's cooking, which somehow makes you feel like you belong nowhere else.
Then, as if on cue, you hear the soft, uneven shuffling of footsteps. Your father appears at the kitchen entrance, moving with frail, cautious steps. You rise instinctively, a surge of worry tugging at your heart as you watch him steady himself against the doorframe, his face pale and drawn.
He catches your gaze and smiles, a gentle, resilient smile that you know he's wearing just for you. You rush to his side, offering an arm to support him as he slowly lowers himself down onto the thin mat by the table. It feels strange sitting beside him now, knowing that you won't be here to help him to his seat every morning, to lift him up from these quiet moments of shared strength. The old promise you'd made to him springs back in your mind: to always stay, to care for him, no matter what.
But then there was the letter, the chance for something you never thought possible. As your father insisted, the chance to build a future for all of you. And yet, every time you see him like this, weak and worn from his illness, you wonder if this is the right choice after all.
He picks up his chopsticks, starting to eat in slow, measured bites. You sit across from him, unable to bring yourself to take even a single bite, just watching him, searching for something to ease your worries. Your mother tries to lighten the mood with small talk, but her words fall softly between you all, reminders of the weight you'll leave her to carry.
"Is this really what I should be doing?" you wonder, a thousand unspoken questions pressing down on you. But in your father's face, despite the lines of illness and fatigue, there's a quiet pride, an unshakeable certainty that maybe, just maybe, this is the choice that will make a difference. You're pulled out of your thoughts by a soft voice.
"Y/N," your mother murmurs, her gentle tone breaking through the cloud of worry that's settled over you. You look up, meeting her eyes, filled with a quiet understanding, and she gives you a small, knowing nod. She doesn't need to say a word. You've had this conversation more times than you can count, and yet the words rise up again, unspoken but heavy between you both.
"I know you've already told me a hundred times, Mom," you say, voice quiet, "but... I can't shake this feeling." You look down, fists clenched as you try to find the right words, struggling against the ache in your chest. "I can't help but worry. Even if the doctor says Dad's condition won't get worse... it doesn't feel right, leaving like this."
Your mother reaches out, placing a reassuring hand over yours. "Y/N," she says softly, her voice filled with a mixture of pride and love. "This is your chance to change all of this. You're his hope, our hope." Her hand tightens over yours, grounding you. "He wouldn't want you to let this go because of worry. He wants to see you go as much as I do. This dream... it's the future he's held onto, too. For you."
You feel a swell of emotion at her words, a complicated mixture of fear, love, and that same drive you've carried with you since the moment you received the acceptance letter. You glance back at your father, who continues eating, his gaze focused on the meal before him, silent as ever. No words have come from him this morning, only his quiet presence filling the room with a familiar weight. The strength in his silence is both reassuring and heartbreaking.
Turning to your mother, you catch the look in her eyes, filled with both hope and a touch of sorrow. She gives your hand a gentle squeeze, her voice warm and steady. "You're the one who can carry us forward, Y/N," she says softly. Her words are like an anchor, grounding you in the path ahead.
The three of you settle into your last breakfast together, each moment feeling both precious and heavy. Silence wraps around you all, punctuated only by the small clinks of plates and quiet exchanges. Your mother occasionally asks about the flight details, reminding you of the essentials, while your father listens, nodding at times, his gaze far away but intent.
There's a calm to it all—this last morning in the warmth of your small home, your little heaven. This moment is like a pause, a quiet breath before stepping into a new life, carrying each memory of this house and the love within it.
~~~~~~~~~~~~~~~~~~~~~~~~~~~~~~~~~ After breakfast, you head back to his small room, where everything he's packed sits in neat stacks. One last time, you gather each document into the folder, triple-checking that every form, ID, and visa is tucked away, secured. you then pick up your travel bag and the small, well-used suitcase—a gift from your father's friend—before pausing at the threshold of his room. You look back, taking in the faded walls, the chipped paint, the little marks and memories that make this room his. With a deep inhale, you nod to yourself, as if sealing a promise, and step out into the living room.
In the living room, your father's friend—who everyone affectionately calls "Uncle"—is waiting, arms wide, a warm smile on his face. "Well, there he is! The 'Korean boy' himself!" he says with a hearty laugh, pulling you into a hug that's both comforting and lighthearted.
"You don't look ready to conquer another country," he jokes, eyeing your small bag and suitcase with a mock frown. "Going for a semester or just a weekend?"
Y/N shrugs with a sheepish smile. "Just the essentials, Uncle."
"Well," he chuckles, grabbing the suitcase and heading to the door, "let's get this show on the road!"
As you head outside, you glance over to see your father seated by the window, watching the world outside. You approach quietly, kneeling beside him. For a moment, you are struck by the stillness, the quiet strength your father has always carried, even now. You gently place a hand over his father's, breaking the silence. "Dad... it's time for me to go."
Your father doesn't respond right away, just continues gazing out the window, his expression difficult to read. You continue, your voice soft but filled with determination. "Please... take care of yourself, alright? Stay out of trouble." You pause, looking into your father's face. "I'll call every week. We'll catch up, just like always."
As you start to stand, your father reaches out, catching your arm with a surprising strength. He pulls you into an embrace, and you freeze for a moment, completely taken aback. This was no ordinary hug; it felt as if your father was trying to convey a lifetime of love and support in that single gesture, something he rarely expressed with words.
Your heart swells as you instinctively wrap your arms around your father, feeling the warmth and fragility of his embrace. This was a moment you had longed for, yet never expected. Your father's usually stoic expression softens, and in that silence, You can feel the unspoken bond between them—a connection forged through shared struggles, unyielding love, and sacrifices made over the years.
"Take care of yourself, Y/N," your father murmurs, his voice thick with emotion. "You're stepping into a world that's big and sometimes scary, but always remember... you are never alone. We believe in you, no matter how far you go."
You can feel a tear slip down his cheek, a single drop that carries all your fears, hopes, and the bittersweet weight of leaving home. You pull your father in tighter, as if trying to hold onto this moment forever. "I promise, Dad. I'll make you proud."
Your father's grip tightens, as if he's trying to protect you from the uncertainty ahead. "Always be a good person. No matter what happens, keep moving forward and treat everyone with kindness."
Your heart aches at the depth of those words, realizing how much they resonate with his own values. You never see your father so vulnerable, and it fills you with a warmth you've been searching for all your life—a father's love wrapped in a moment of pure, heartfelt connection.
As you slowly pull apart, you hold onto that vision of your father, capturing it in your memory. The warmth of their embrace lingers, an imprint of love you'll carry with you no matter how far you travel. With a silent nod and a shared understanding, you wipe your eyes, ready to take the next step, fueled by the strength of his family behind you.
As you approach your mother, the world around you fades away. This is it—the moment you've been dreading yet anticipating. She stands there, her eyes shimmering with unshed tears, and as both of your gazes lock, an overwhelming wave of emotion washes over you both. Without hesitation, you step forward and envelop her in a warm embrace.
In that instant, the weight of your worries lifts, replaced by the familiar comfort of your mother's love. She wraps her arms around you tightly, as if she's trying to shield him from the uncertainties of the world beyond their small home. You feel her heart beating against you, a steady rhythm that has always been a source of reassurance.
"Oh, my baby," she whispers, her voice trembling slightly. "You've grown up so fast. I can't believe this day has finally come." She pulls back just enough to look into his eyes, her hands gently cradling his face, brushing away a stray tear that has escaped down your cheek. "Take care of yourself out there. Remember, no matter how far you go, you are always my son, and my love will always be with you."
You feel an ache in your chest, a blend of pride and sadness. "I will, Mom. I'll call every week," you promise, but the lump in your throat makes it hard to speak. The love in her eyes shines bright, illuminating the room with warmth and nostalgia.
She leans in, resting her forehead against his, breathing in the scent of his hair, cherishing the moment. "You're going to do great things, Y/N. Just believe in yourself like I believe in you."
In that embrace, time seems to stand still. You can feel her heartbeat, the rhythm of your childhood, the safety of home. You clings to her tightly, pouring all your emotions into that moment, knowing it's the last time you'll be this close to her for a while. The world beyond your home may be daunting, but in her arms, you feel invincible.
When you both finally break apart, you see the glimmer of tears in her eyes, yet her smile is unwavering, filled with hope. You wipe your own eyes, determined to keep this vision of her—this powerful, loving woman who has shaped you—locked safely in his heart. With a final nod of understanding, you take a deep breath, ready to step into the unknown, buoyed by the strength of your mother's love.
With a deep breath, you nod, saying his final goodbyes, and step outside, casting one last glance back at your parents and their small home. 'This is it. No turning back now. I'll come back with something real, something that'll make a difference.'
Uncle waits by the car, grinning as he sees your serious expression. "Ready, kid?"
You nod. "Yeah."
As you both drive off, you gaze out the window, soaking in every last image of your hometown. The familiar streets, the corner stores, the quiet parks—they all pass by, each holding a piece of your life. Your heart beats a little faster with each mile that brings you closer to the airport, a reminder of the journey you are about to undertake.
Uncle glances over, sensing your nerves. "Feeling nervous?"
You nod, managing a small smile. "Yeah... a little."
"Well, don't you worry," Uncle says, his tone steady and reassuring. "I'll be here to help your folks. You focus on making something great out of this. And besides," he adds with a smirk, "it's not like I don't know you're secretly into all this Korean music. All those trips to the music store back in the day? I wasn't born yesterday, you know!"
You face flushes, and you laugh despite yourself. "Uncle! That was ages ago! I... I don't even think about that stuff now."
"Sure, sure," Uncle chuckles, clearly unconvinced, but his teasing lightens the mood, and you both share stories and jokes as they continue toward the airport.
When they arrive, your eyes widen at the sight of the bustling terminal. It's your first time seeing an airport, and you can't help but marvel at the huge glass walls, the steady stream of people, the distant rumble of planes landing and taking off. Uncle chuckles at your wonderment. "You look like a kid on his first trip to the city."
You both make your way to the departure gate, the weight of the moment settling in. Uncle pulls you into a final hug, clapping you on the shoulder. "Remember, life's different over there, but I know you'll do great. Take care of yourself, and come back proud."
With a final nod and a deep breath, you walk through the gates, weaving your way through the bustling crowds. You reach the lounge area, where you find a seat by the large windows overlooking the runway, watching as planes lift off and disappear into the sky. Each one feels like a glimpse into the journey ahead.
When it's finally his turn to board, you take your seat beside the window, gazing out as the plane begins to move. With a quiet whisper, you mutter, "This is it, Y/N. Your real life begins here."
...
To be continued...
#aespa x male reader#aespa x reader#karina x male reader#winter x male reader#ningning x male reader#giselle x male reader#aespa fanfiction
170 notes
·
View notes
Text

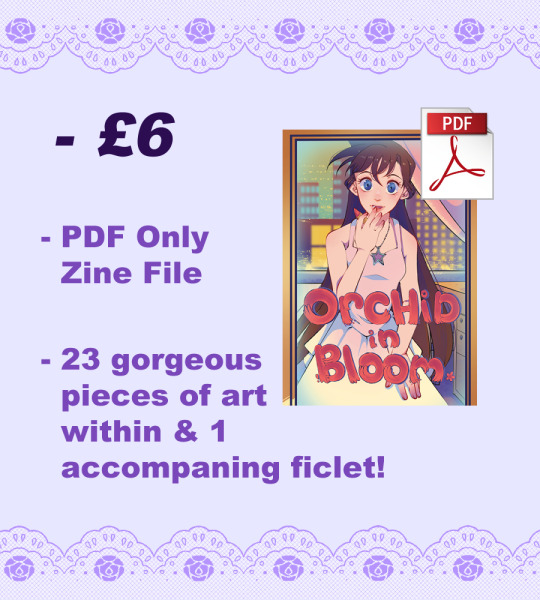
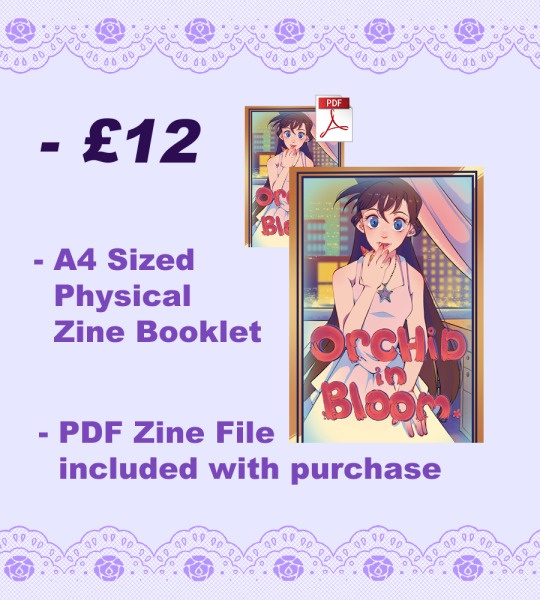
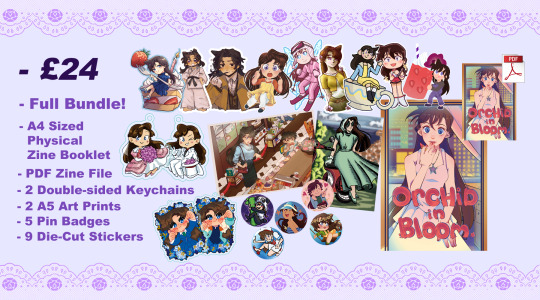
Preorders for Orchid in Bloom are now open!
ORDER HERE!
Preorders are open until the 10th November.
Products will be shipped end of November/Start of December which could make this Zine an excellent Christmas Gift for a Detective Conan fan!
We have 3 options for purchase:
PDF File Only - PDF file of the Zine, sent out the same time as physical production for fairness and containing 23 pieces of art and an accompanying ficlet!
ZINE ONLY - An A4 Zine booklet posted to you and a copy of the PDF File. This tier also receives Stretch Goals!
FULL BUNDLE - The A4 Zine, PDF and all of the amazing merch items! This tier also receives Stretch Goals!
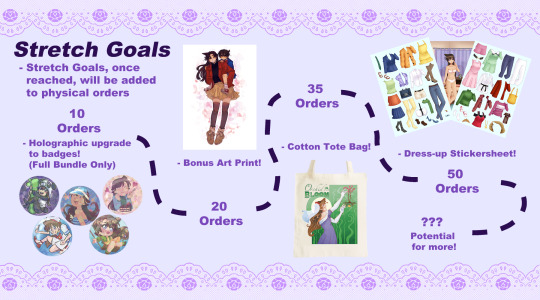
Help us reach our Stretch Goals! We have some amazing bonus merchandise that can be produced if we reach enough sales!

218 notes
·
View notes
Text
How to format, print, and bind a zine

This is a consolidated version of previous posts on zine making, with more detail and screenshots. For a version of this post on gdocs, click here.
This is a step-by-step guide on how to use InDesign (or similar programs) to format and print a zine. This can be used for fanzines, sketchbooks, anything. It’s also only one way to do things - there are as many methods as there are zines under the sun. If you’re interested in other ways, searching for zinemaking on youtube would be a start.
If you are printing your zine, your total page count must be a multiple of 4.
Examples of multiples of 4 ✅
4, 16, 112
Not a multiple of 4 ❌
7, 99, 31
This is because our book will be made of folded A4 sheets (that’s regular printer paper). 1 folded A4 makes 2 A5 pages. Each A5 page has a front and back. Therefore each sheet of paper makes 4 pages.

How to format
Open InDesign. Go to Create New > Print. Choose A5 and tick Facing Pages. Enter your page number (this can be changed later). I’ve put 12. Hit Create.

Locate the Rectangle Frame Tool.

Draw a rectangle over your whole page, or just the part where you want your images to go.

Press Ctrl+D and insert the image you want on that page.

That’s it! Repeat on every page and you’ll have a book. Promise.

Further reading
I need a free alternative to InDesign.
InDesign is free for the savvy but I also recommend Scribus which is free and open source and very lightweight. The method is exactly the same but the Rectangle Frame Tool is called Image Frame and the Ctrl+D shortcut will now be Right click > Get Image instead.
I need help with designing my A5 pages.
For my first sketchbook zines, I arranged several images on an A5 canvas in a program like CSP or Procreate and exported them as a JPG into InDesign or Scribus. You can do this if your images aren’t already A5 size or you don’t want to waste time with InDesign’s formatting tools.
I need to get fancier with it, format text, or export my file as small as possible.
Here are the InDesign tutorials I used and liked:
How to Add Page Numbers
How to keep Page Numbers on Top
How to Create a Table of Contents
What is Overset Text and How to Fix It <- essential for formatting text onto multiple pages
How to Reduce InDesign File Sizes
Formatting best practices
Remember that in addition to your front and back cover you also have an inside front and inside back cover. You can leave these blank or create an endpaper with a pattern or include a short message or something. Look inside any books or zines on your shelf for inspiration. Or don’t listen to me and put your first drawing or poem there. Just be aware printer paper is thin so you might be able to see it through the cover.
Avoid putting anything important in the gutter (inside edge) or outside edges of the page. Also be careful of creating double page spreads that go across the centre of the book. Because of how we will print and fold the pages, each half of your spread might not meet up perfectly.

How to print it out
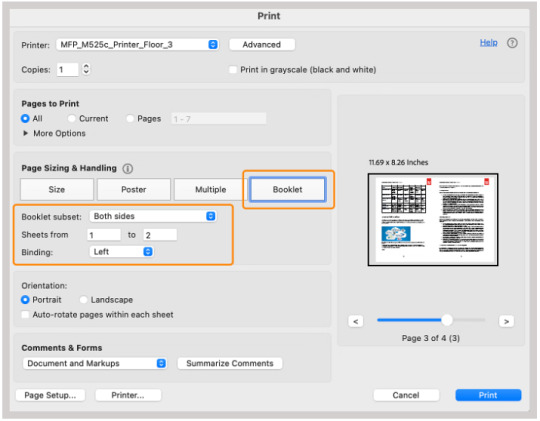
Open your completed book’s PDF file in Acrobat Reader (free download: https://get.adobe.com/reader/)
Print with the following settings: Booklet, and Booklet subset: Both sides.
We can see a preview of our print-out on the window on the right. The pages will look jumbled up, but form the book in order when folded.

Congratulations! Now you’ll have a stack of paper. Once it’s folded it should resemble your (unbound) final book. Use a bulldog clip or similar to keep your pages together neatly.

How to bind (2 methods)
If your book is less than 30 pages, I recommend using a long arm stapler, or a stapler that can open to lay flat. They are cheap.
There are also special book binding staplers or heavy duty staplers, if your book is thicker than 30 pages. Just position your book so the staples are in the middle of the spine (or as close as you can get) and send it. They will be a little wonky… that’s fine.
You can also separate your book into staple-able segments and then join them into 1 big book with tape or thread.
For my 112-page zine, I used thread to bind it.
These instructions are copied from the video ‘How to Print & Bind a Zine’ by LFONinja.
You can watch it here: https://www.youtube.com/watch?v=zKYy6G7lIy8
You will need: Ruler, awl, thread, sewing needle
Make 5 holes in the crease of the pages like so. (½ page, then ½ of that, then ½ of that again)

If the paper is thick, be careful when making the holes. It helps to have a piece of blu tack, putty, or soft eraser underneath the spine of the book as you work for the point of the awl to push into.
I don’t recommend separating the papers into smaller stacks as your measurements will likely vary and the holes won’t align.
Use a needle and thread to go through the holes in the following pattern. At the end, tie a knot with the ends of the thread (1 and 9) in the centre of the book. You’re now done.

About page creep
Because we are using folded pages inserted into each other, they push each other out like so:

From: https://www.greenerprinter.com/ support/page-creep/
You can use a heavy duty or industrial paper cutter/trimmer to remove this edge. This is why we kept any important contents away from the edge of the page during formatting, because we don’t want this process to destroy our book’s contents.
About image edges
Because of how the printer works, the images in the book don’t extend all the way to the very edges of the paper and have a thin white border on all sides. It’s possible to crop these edges from your book with a heavy duty paper cutter. Be careful and start small (3mm or less). Depending on how much your pages move during the printing process, the size of the white edge can be different on different pages. Or you can just leave them in.
To read some of the zines featured in this post, check out naumin.itch.io.
104 notes
·
View notes
Text
DAA 2025: Legacies Product Previews!
It's almost time! Our 2025 shop opens in just five short days on October 1st. Check out the product previews below for a sneak peek at the amazing creations on offer!
All proceeds from 2025 sales will be donated to War Child UK.
👉 Follow us on itch.io to be the first to know when our shop opens 👉 Subscribe to our newsletter for spoiler-free DAA news! 👉 Give back to the Dragon Age community by donating toward a Community Copy! More information coming soon.

Dragon Age Annual 2025: Legacies
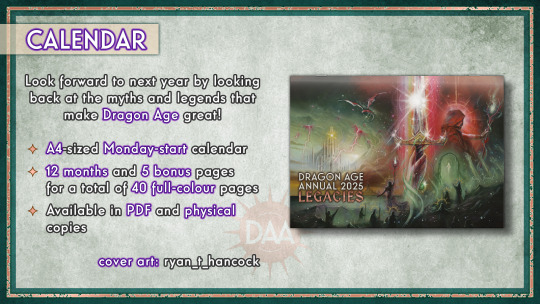
A Dragon Age Annual classic! We're excited to say that this year the calendar comes with a pre-punched hole so that you can easily hang and display the beautiful creative works inside. Our calendar celebrates your favourite characters, stories, and all there is to love about Thedas. With designs that span the entire Dragon Age franchise, there's sure to be something you'll want to see!
Keep reading to see previews for Sagas: A DAA 2025 Zine and our merchandise pack, including art prints, mini tarot cards, stickers & sticker sheets, magnets, and a wooden charm!
Sagas: A DAA 2025 Zine
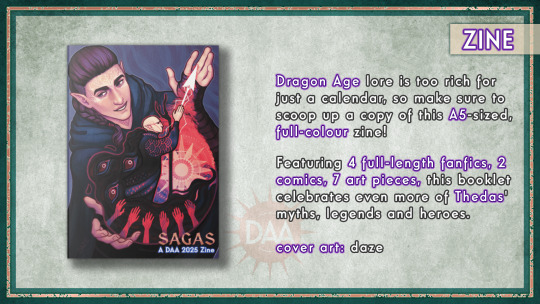
Featuring 4 full-length fanfics, 2 comics, and 7 art pieces, this booklet celebrates even more of Thedas' myths, legends, and heroes. From Grey Wardens to The Qun to ancient and Dalish elves, you won't want to miss out on this one-of-a-kind anthology!
Prints
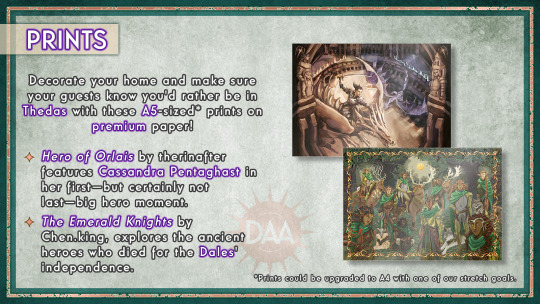
Decorate your home and make sure your guests know you'd rather be in Thedas with these art prints featuring our favorite Seeker, Cassandra Pentaghast, and the fabled Emerald Knights! Keep an eye out for our stretch goals to find out how to get these prints upgraded to A4-sized 👀
Mini Tarot Cards
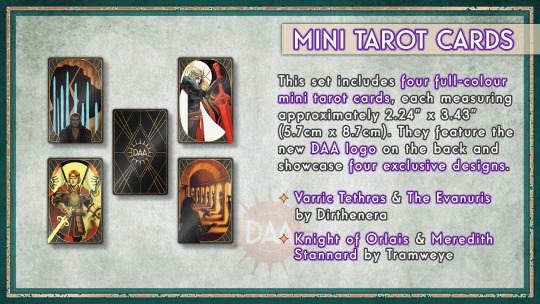
Divine your Dragon Age destiny with our set of four mini tarot cards! Featuring the new DAA logo on the back, flip the cards over to find that your future holds four brand new fanart designs.
Stickers
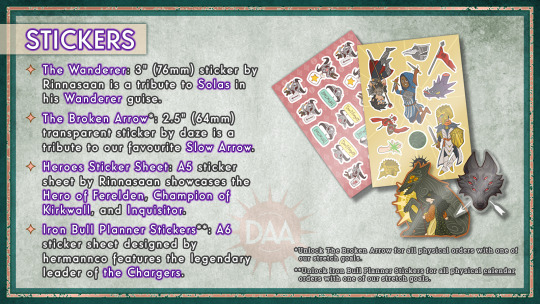
Water bottle looking a little bare? Or maybe you need to decorate your new laptop? Either way, we have a sticker extravaganza to suit your needs! *Unlock The Broken Arrow for all physical orders with one of our stretch goals. **Unlock Iron Bull Planner Stickers for all physical calendar orders with one of our stretch goals.
Magnets
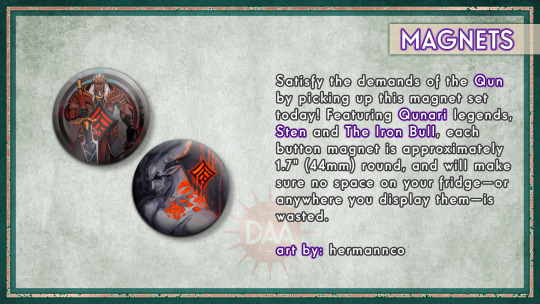
Satisfy the demands of the Qun by picking up this magnet set! Featuring Qunari legends, Sten and The Iron Bull, these button magnets will make sure no space on your fridge—or wherever you display them—is wasted.
Charm
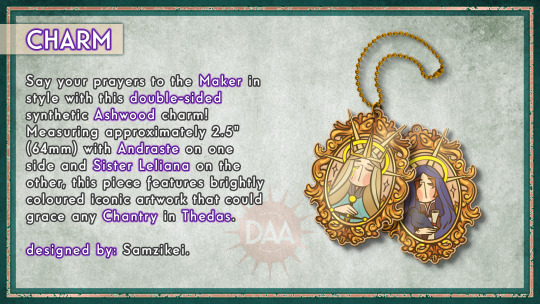
Purchase of this charm includes a golden bead ball-chain, so it can easily be used as a key chain or zipper pull! If a necklace is more your style, simply pair the conveniently sized and lightweight charm with your own chain or cord and wear to show off your Andrastian pride!
#dragon age#dragon age origins#dragon age 2#dragon age inquisition#solas#inquisitor#hawke#iron bull#sten#felassan#meredith stannard#aveline vallen#warden#evanuris#emerald knights#magisters sidereal#dragon age annual#dragon age annual 2025#charity zine#zine#dragon age zine#zine preorders#zine preview
88 notes
·
View notes
Text
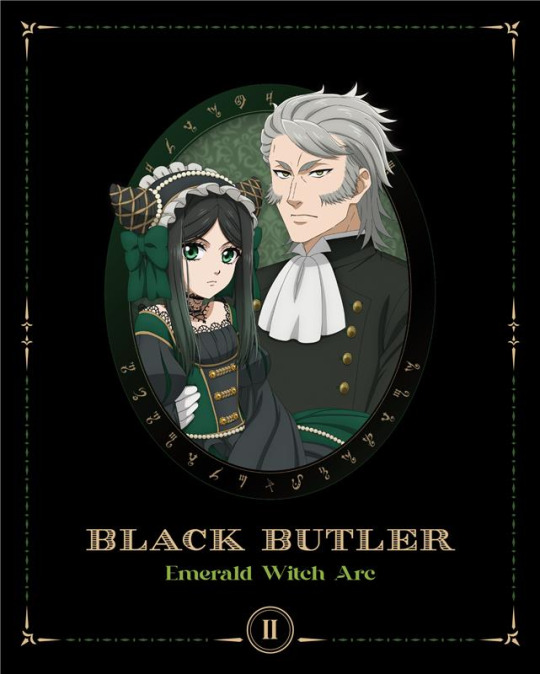
Season 5: Blu-Ray/DVD Volume 2 and store benefits
(Source)
The cover of the second Blu-ray/DVD volume was revealed!
Volume 2 information:
Release date: August 13, 2025 Content: Episodes 4-6 Limited bonus content: Setting Material Collection Vol. 1, Special card with cast talk Vol. 2, Special Event Priority Ticket (Nighttime) Item numbers: ANZB-17844〜17846 (DVD; limited), ANZX-17844〜17846 (Blu-Ray; limited)
The special event will be held on January 17, 2026 at the Makuhari International Training Center's Symposium Hall.
The volume comes in a three-sided box illustrated by Character Designer Yumi Shimizu and with a booklet.
Some of the special store benefits were revealed as well!


Scented illustration card: Available with purchases at Aniplex Online, anime, Amazon ([Amazon.co.jp only] products only), Rakuten Books (only for carts with benefits), Seven Net Shopping, Sofmap anime, amiami (online shop), HMV, and Animaru.
A4 Artboard/Acrylic stand: You can get either the artboard or the acrylic stand when you purchase all volumes at Animate.
A5 Character Fine Graph/Acrylic keychain set: You can get either the fine graph or the keychain set when you purchase all volumes at Rakuten Books (only for carts with benefits).
(Source)


Eco bag: Available when you purchase all volumes at Seven Net Shopping.
2L Character Fine Mat: Available when you purchase all volumes at Amazon.co.jp.
A5 Acrylic Character Plate: Available when you purchase all volumes at amiami (online shop).
(Source)
There will be more store benefits (for Aniplex, Animaru, and another one for Animate), but their designs have not been unveiled yet.
#kuroshitsuji#black butler#kuroshitsuji: emerald witch arc#sebastian michaelis#ciel phantomhive#sieglinde sullivan#wolfram gelzer#kuro news#blu-ray and dvd
25 notes
·
View notes
Text
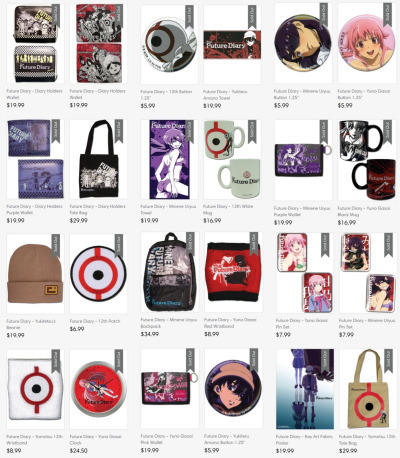
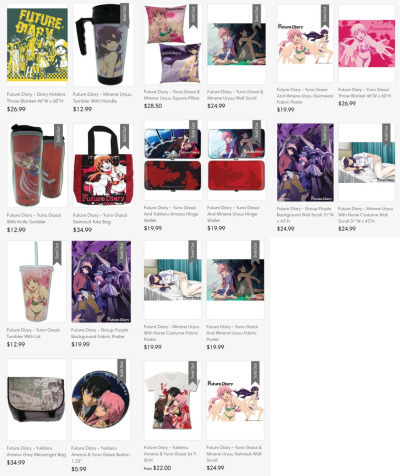
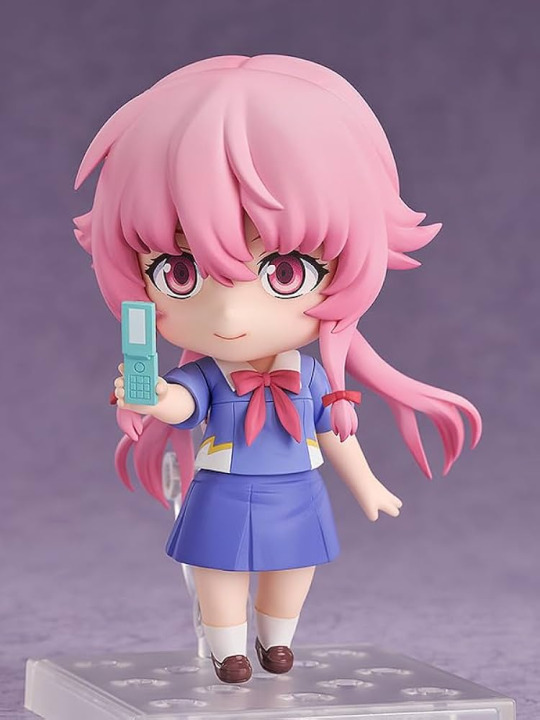
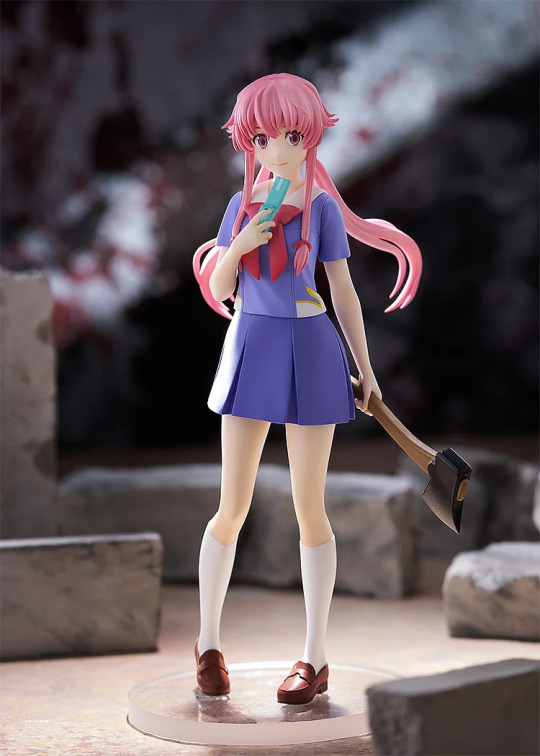
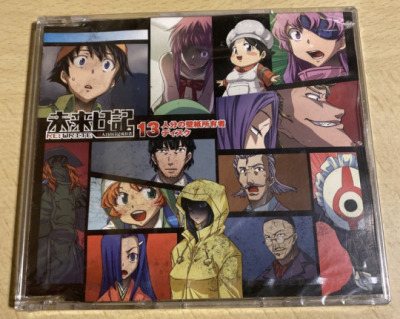
All Future Diary Merch (Part 2)
~~A comprehensive list
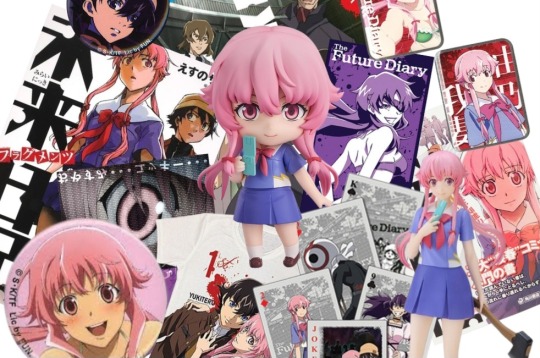

More obscure Future Diary merch below the cut!
~ Animate Products
Animate is the largest retailer of anime, manga and video games in Japan, so it’s only natural that it has created some Future Diary merch over the years.
A Yuno tote bag from the Animate Book Fair, 2008
An A4 clear file with original Future Diary artwork, from their 2011 Anime Adaptation fair.
An A3 clear poster, also with original Future Diary artwork, from the same 2011 fair.


~ SOFT Products
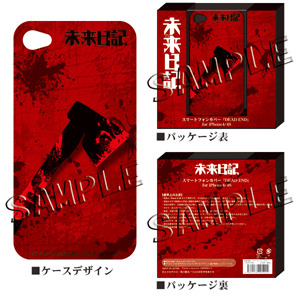
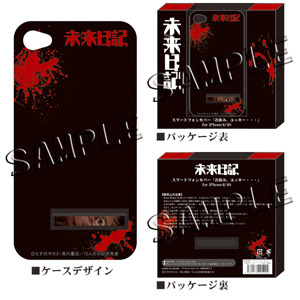
SOFT is another retail company, though unfortunately I can’t seem to find any information about the company itself. Either way, they released a plethora of Future Diary merch back in the day:
Future Diary compact mirrors (released on March 31st, 2012). There were two versions: a “12th” and a “DEAD END” design.
Future Diary iPhone 4/4s phone cases (released on March 3rd, 2012). There were two versions: a “DEAD END” and an “Oyasumi, Yukki” design.
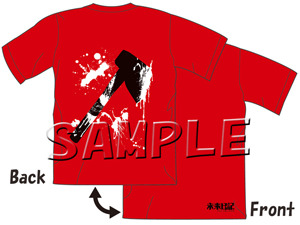
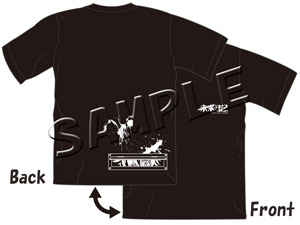
Future Diary t-shirts (also released on March 3rd, 2012). There were two versions: a red/ “DEAD END” and a black/ “Oyasumi, Yukki” design. (source).

~ Victorinox Collaboration
Random collaboration alert! Back in 2012, Victorinox worked together with Kadokawa to release two versions of their Classic SD styled army knife: a “DEAD END” model and a “Yuno (Eye)” model. (source).
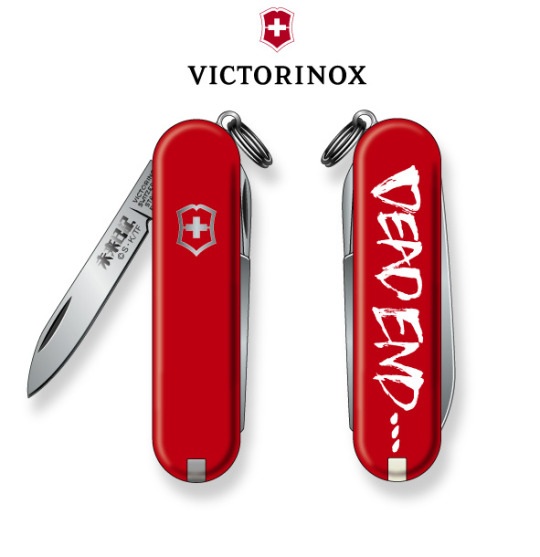
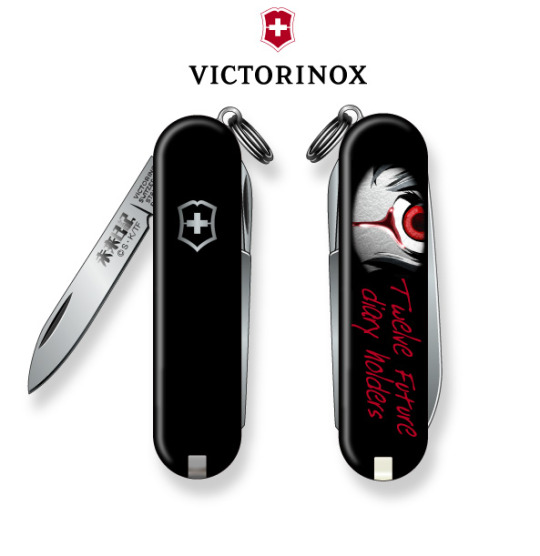
(Fun fact: the name of the latter coincidentally confirms that the eye we see at the beginning of Future Diary’s OP is, in fact, Yuno’s).
~ Great Eastern Entertainment
Great Eastern Entertainment is a famous manufacturer and retailer for officially licensed products here in the west. They’re actually responsible for creating the largest catalog of Future Diary merch from any company in this list. In fact, if you’ve ever seen officially licensed FD products at any western store (such as Hot Topic), it is more than likely from this brand. Sadly though, most of it is currently unavailable. Given how large and varied their catalog is, I’ll provide photos from their product listings instead of naming them one by one. You can browse through all their listings here.
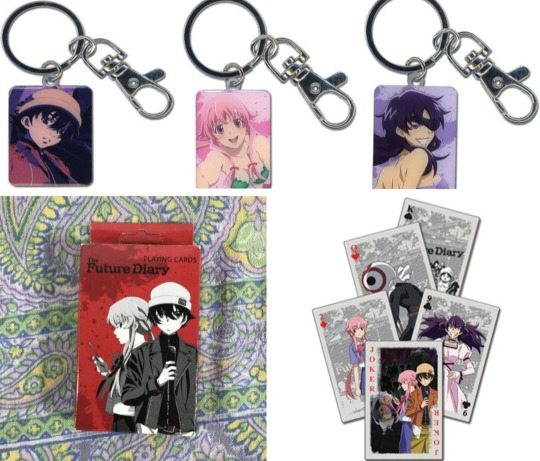
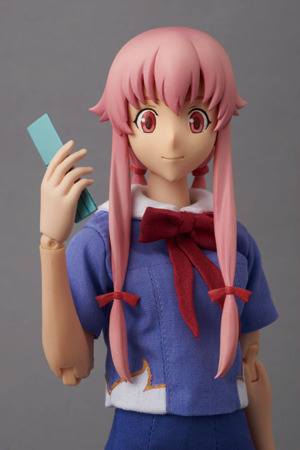
~ Yuno Gasai Figurines
There are currently three Yuno Gasai action figures:
The elusive RAH figure, released by Medicom Toys
The Yuno Nendoroid, released by Good Smile
The POP UP PARADE figure + limited edition version, also by Good Smile

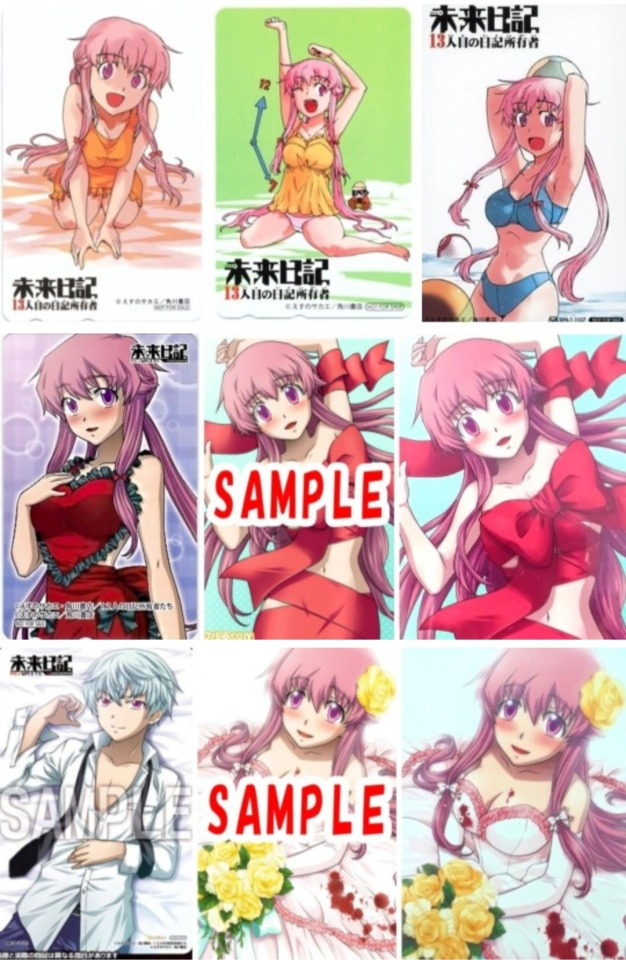
~ PSP Game
This game is an entire rabbit hole of its own, but I’ll try keeping it brief. The PSP game “Future Diary: the 13th Diary Owner” had its original release back in 2010, as well as its re-release titled “Re:Write” in 2012.
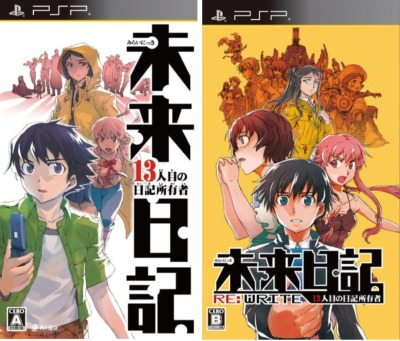
Each release of the game was accompanied by a series of related merchandise, such as telephone and library cards and a Yuno maid poster.

Re:Write also had its own limited edition bundle, which included:
A double-sided pillow case.
The Oyasumi CDs.
A double sided disk sleeve.
A CD with 13 themed PSP wallpapers.
There were two other PSP wallpapers: one which you could download from the official game’s website, and another that you could buy from a company called Happinet.


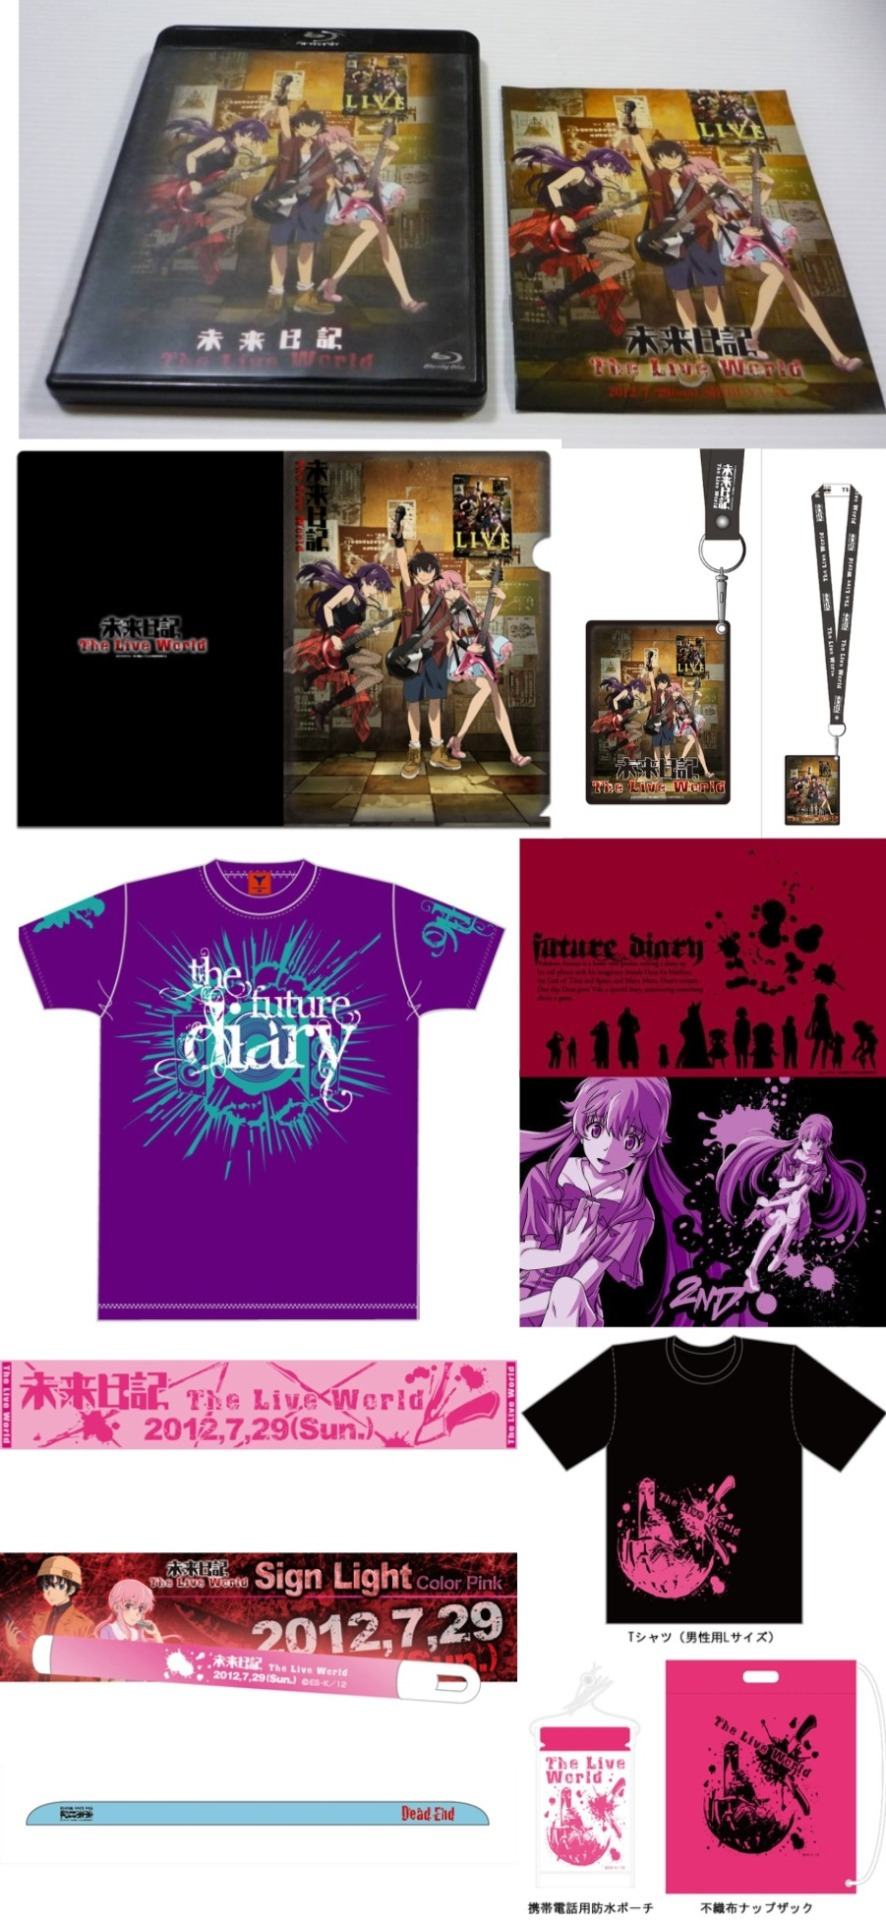
~ The Live World
This was a Future-Diary-themed concert, which featured music and voice actors from the show. I’ve made in-depth posts about it in the past, so check those out for more information. In terms of products related to this concert, we have:
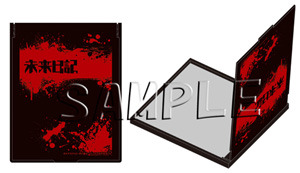
The Blu-Ray disk recordings of the concert (released back in 2013), which included an additional 9-minute recording of the making of the event, as well as an eight-page booklet.
A pamphlet, neck strap and clear file, which all featured the same image from the event poster.
Three t-shirts produced by the company MARS SIXTEEN
An event bundle, which included a t-shirt, waterproof phone pouch and drawstring bag, all with the same graphic.
A pink sign light
A pink towel scarf
A neck cooler
I tried compiling everything as best as I could in one image (curse you, Tumblr's photo limit).
Alas, this part has come to an end. Tune in for part 3!
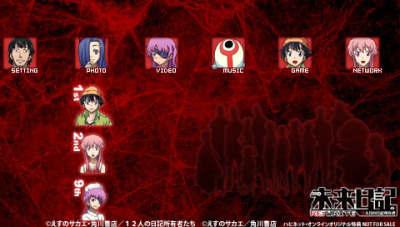
#future diary#mirai nikki#the future diary#yuno gasai#anime#sakae esuno#manga#anime merch#future diary merch#mirai nikki merch
31 notes
·
View notes
Text
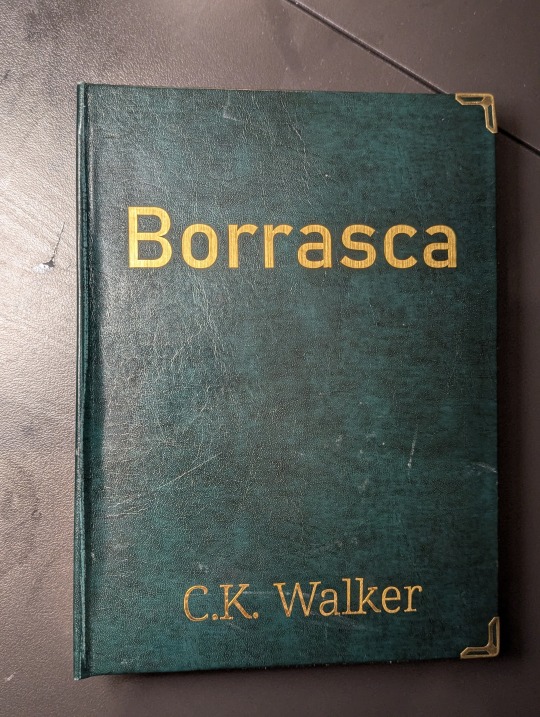
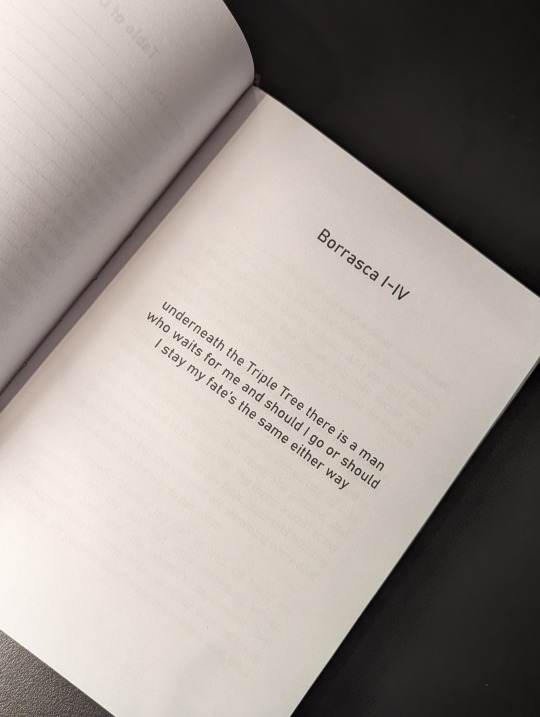
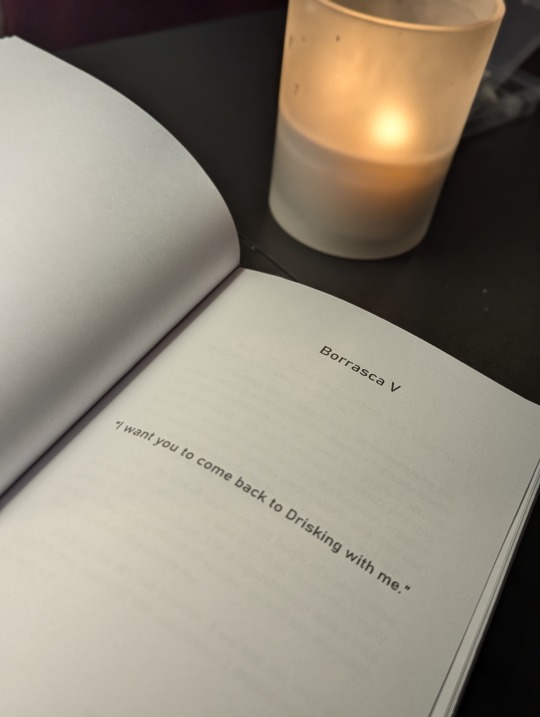
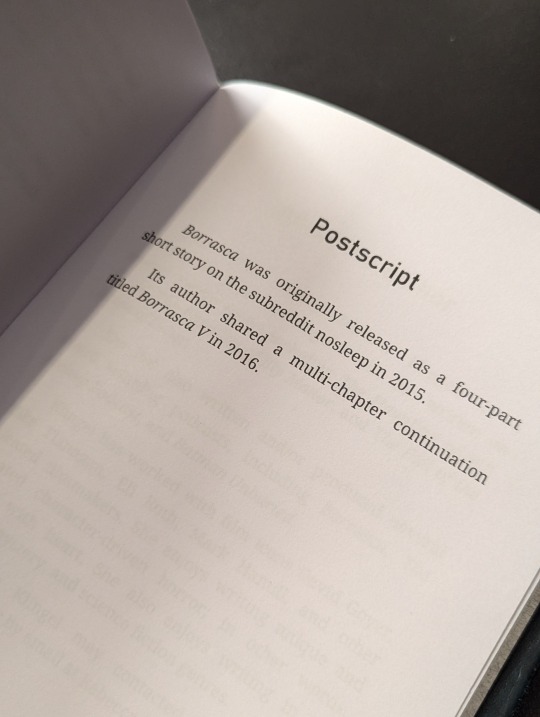
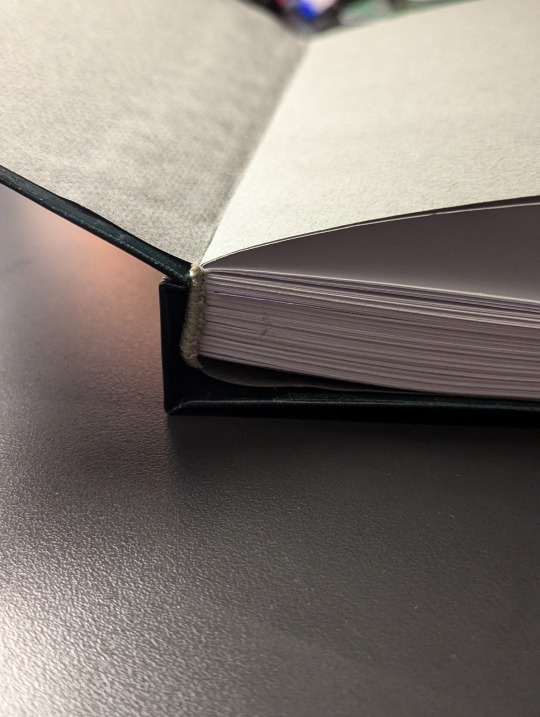
Borrasca - C.K. Walker
This is a /r/nosleep story published in four parts in 2015, with a subsequent fifth part shared by the author on their blog.
Morbid choice for a first bind—it's not dissimilar to Manacled in terms of dark content—but as a tale I read back in my creepypasta phase and recently rediscovered, I thought it'd be fun to have a physical copy for my shelf.

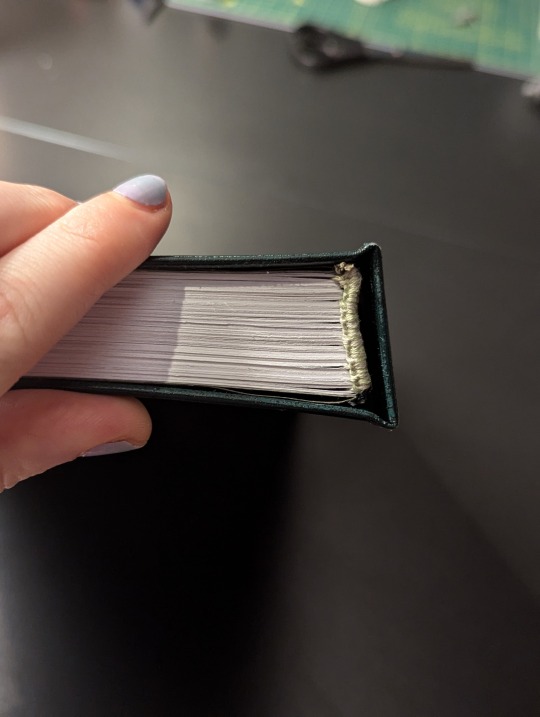
The case is bound in green bonded leather, courtesy of an amazing local store that has a plethora of bookbinding supplies. Gold adhesive backed vinyl for the cover text, while the corner-guards are from a random Amazon seller.
The text block is bog standard A4 printer paper. Body text is in Noto Serif 12pt with titles/headings/pagecount in Bahnschrift. 59,000 words and 387 pages total.
Reflections on mistakes and lessons learned under the cut with more pictures.
I learned a LOT about typesetting, booklet printing and using a Cricut in making this. I still made a few silly mistakes with my next projects, but not so many as I did with Borrasca.
It's a rookie's first bind and it shows—the text block fits rather badly in the casebinding, because I goofed and made the spine support too wide. This doesn't look too bad from the front or the spine, but in opening the book the textblock shifts rather awkwardly.
I also scuffed the leather in parts, and totally misstuck the title on the spine. This is before I realised what transfer tape was for 🫠 Having the title running from bottom to top is novel, but I didn't want to risk gumming up the cover further by fixing it (not to mention my horror at the thought of repositioning everything by hand).
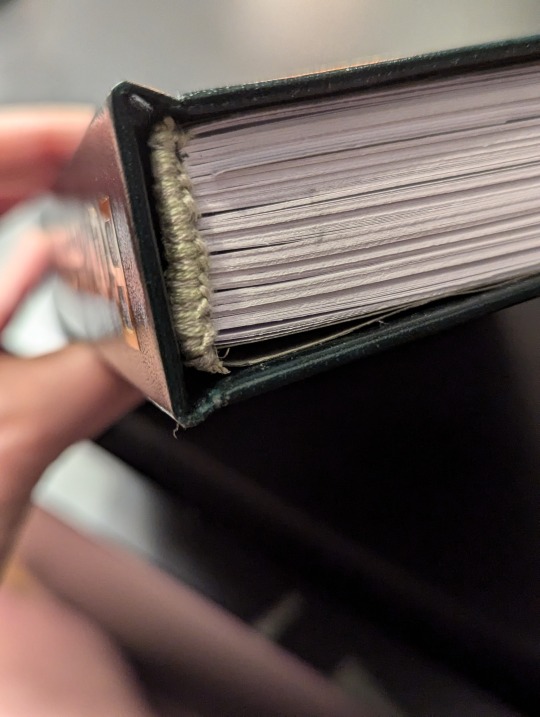
I'm pretty happy with the handsewn headbands though! I followed chezlin's tutorial and used tissue paper to secure the twine to the spine before sewing on embroidery thread. While the thread used was a little too thick, the headbands add a nice touch.
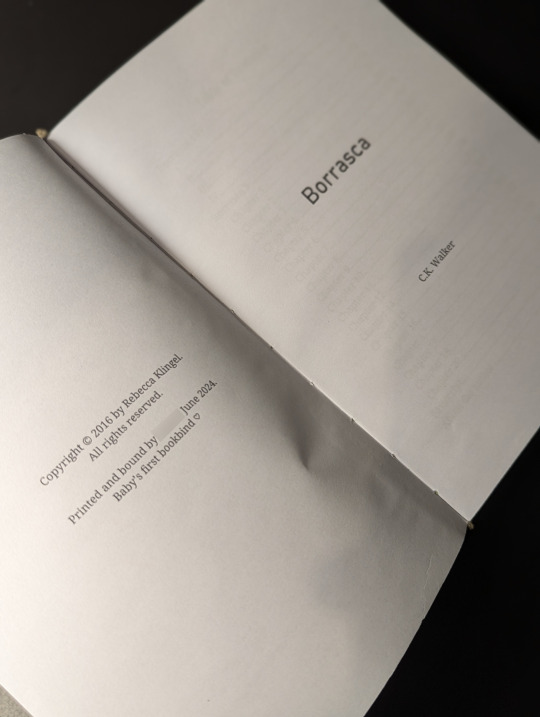
I had no idea what to put in the copyright page, ahaha. I've put a template together now, which does a better job at identifying the resources used and linking to the source material.
79 notes
·
View notes
Text
EEEEEEEEEE I AM AMAZING (said with modesty) AND NO ONE CAN TELL ME OTHERWISE
i bound a book!!! from scratch!!! :DD
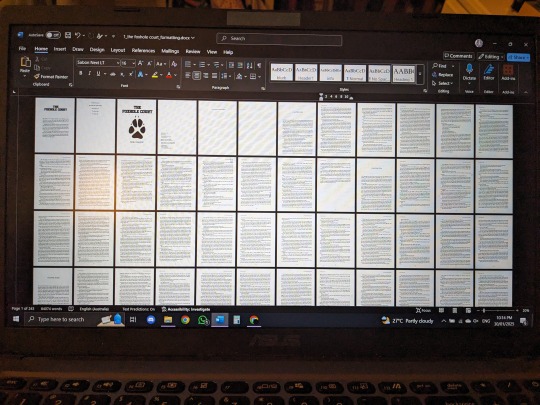
i got sick of the godawful formatting in tfc so i reformatted it and printed it (which i was only able to do bc we finally got a new printer lol)
all those videos on yt and tt use so much equipment but it's all a lie. the only thing i bought was stuff to make the cover (fabric, card, end papers)
im actually so proud of myself tho like i wasn't expecting it to look good- obvi it's not as good as the other ones out there but i reckon it was pretty alright for a first go

progess pics :) + what i did:


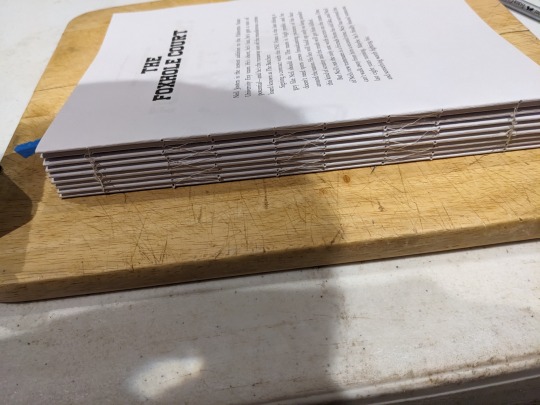


the paper i printed on was 70gsm and 28 sheets per section (7 a4 pages, 14 pages when folded) ALSO do NOT print in booklet formatting from word BC it messes it up (i learnt that the hard way ;-;)
i put holes with a thumbtack at 2cm, 5cm, 7cm, 9.5cm, 11.5cm, 14cm, 16cm, 19cm and used a wool needle to sew them. i probably should've pressed them before sewing them together coz it would've been tighter but oh well. next time.
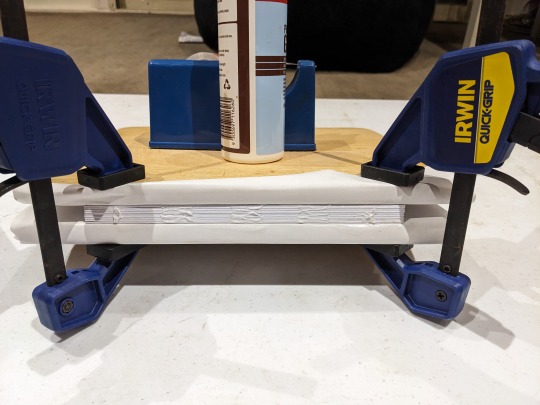
my book press was 2 wooden chopping boards and some clamps. + put paper on the inside so it doesn't stick to the boards. idk if using baking paper wouldve stuck less, but when you take it off, u gotta kinda pull it off from the back.
i couldn't find my spatular so i used my finger to spead the glue which wasn't very efficient but it got the job done
i found some non-stretchy cotten and stuck some kind of iron on back into it to make it thicker.
the little things at the top and bottom of the spine was just a strip of fabric folded over a toothpick and glued together. also i used my ruler to make folds and smooth stuff out
anyway i think it's really cool and i'm definitely gonna do it for the other 2 :D
27 notes
·
View notes
Text
VocaJams: Summertime Roadtrip


VocaJams is a celebration of the European Vocaloid community aimed at promoting illustrators & music producers from every corner of Europe.The theme of this project is summer road trip. Miku & friends will take you on journey across the old continent! Over 50 artists and 14 producers have come together in this stunning book and CD collection. Inside you'll find a message from each artist along with brand new illustrations from the summer road trip. Learn more in the seperate producer booklet which features lyrics, interviews, and behind the scenes content.
Track list:
Warm Sunlight - RineP, Vault Kid feat. GUMI, Hatsune Miku, Kagamine Rin, Kasane Teto SV
Summer Never Ends - SARE feat. Hatsune Miku
There Is Always Next Time, So I'll Hold Off On Becoming Who I Want To Be Untill Then- 3xBlast feat. Hatsune Miku
Lighthouse - Kkiquu feat. GUMI, Kasane Teto SV, Qing Su
Where you at - LAINXOXO feat. ANRI Arcane
Spiagge Vuote - Frale feat. Hatsune Miku V4X, Megurine Luka, Miel, Sekka Yufu
Broken Souls Poem - Rishie-P feat. Hatsune Miku, Megurine Luka
Disco Polo Love Story - Jordan Forester feat. Otomachi Una, Megurine Luka, DEX
I'll be gone for the winter - Uinya feat. Fuiro
Chocolate Sprinkles - Duzzled feat. Hatsune Miku
20120529 (Instrumental) - RineP
New Game Plus - Vault Kid feat. GUMI
Expected release September 2025. Every order includes:
Vocajams 160 page A4 open flat art book.
12 track CD in digipak case with fold out poster.
Vocajams 54 page A4 producer booklet with exclusive behind the scenes content.
Digital Release | Physical Release | Collectors Edition
#Album#Merchandise#ANRI Arcane#DEX#Fuiro#GUMI#Hatsune Miku#Kagamine Rin#Kasane Teto#Megurine Luka#Miel#Otomachi Una#Qing Su#Sekka Yufu#3xBlast#Duzzled#Frale#Jordan Forester#Kkiquu#LAINXOXO#RineP#Rishie-P#SARE#Uinya#Vault Kid
15 notes
·
View notes
Text
some patterns i picked up for free at the dump shop in timaru


they have these big shelves in a half indoor/outdoor section filled with free dvds, books and magazines. and underneath the first level and out of sight, are piles and piles of old craft books and knitting patterns. at least 100+ of them, all from the old nz brands yarn and pattern brands, from the ones that are gone (kaiapoi, aotea, fontana, etc) and brands that are still around (sirdar, crucci, etc). some of them were in black and white, and the oldest i found was in the 1920s.
a lot of them were in bad condition from the wind and outdoor elements which broke my heart. if i had the time and friends down here, i wouldve come down in a car full of A4 clear file books, thrown $100 odd dollars the way of the owners and taken every pattern to file away if only for archival purposes. alas, i cannot. at least i got these 2 booklets and single leaflet. i can take good care of + make good use of them in the future.
#knitting#knitblr#gosh it makes me sad to see bits of knitting history left to yellow and decay and tear :(#im SO amazed by the aotea + fontana collab#ive never seen any brands collaborate like that. normally you just have your normal thorobred leaflet. aotea leaflet. crucci 4 pattern book#etc etc#seeing something like that with such out there patterns is very fun#normally i have to rely on 80s crucci patterns to give me the REAL out there shit plus sometimes fontana (as with that kashmir mohair book)#but yeah. WOW#cant believe all of that i got for free
22 notes
·
View notes