#WinRM configuration
Explore tagged Tumblr posts
Visit Tumblr Blog
Explore Tumblr blogs with no restrictions, modern design and the best experience.
Last Seen Tumblr Blogs


Fun Fact
Average visit duration of Tumblr.com is 10 mins and 25 secs.
Text
Configure WinRM to accept connection from a specific IP Address
In this article, we shall discuss how to enable and Configure WinRM to accept connection from a specific IP Address. Windows Remote Management (WinRM) is a Microsoft implementation of the WS-Management protocol. It is a standard web services protocol used for remote software and hardware management. Please see Enabling and Configuring WinRM via GPO, and how to configure a remote Windows Server to…
#Configure WinRM Listener for a Specific IP Address#Create a New Listener#Firewall exceptions for WinRM#Microsoft Windows#umber: -2144108183 0x80338169#Windows#Windows 10#Windows 11#Windows Server#Windows Server 2012#Windows Server 2016#Windows Server 2019#Windows Server 2022#Windows Server 2025#WinRM#WinRM and PSRemoting#WinRM configuration#WinRM firewall exception will not work#WinRM Listener#WinRM quickconfig#WinRM service
0 notes
Text
Enter-PSsession: Run PowerShell Remote Commands
Enter-PSsession: Run PowerShell Remote Commands @vexpert #vmwarecommunities #100daysofhomelab #homelab #PowerShellRemotingBasics #EnterPSSessionCommands #PowerShellRemoteServer #RemoteSystemManagement #WindowsServerPowerShell #NewPSSessionUsage
Windows PowerShell has changed how we manage our Windows Server environments. One of the powerful features of PowerShell is PowerShell remoting, which enables the execution of PowerShell commands or scripts on a remote computer. The Enter-PSSession command, a core part of PowerShell remoting, allows us to establish an interactive session with a remote system, fundamentally changing how we…
View On WordPress
#Enter-PSSession Commands#Managing Remote Computers#New-PSSession Usage#PowerShell Remote Commands#PowerShell Remote Server#PowerShell Remoting Basics#PowerShell Session Configuration#Remote System Management#Windows Server PowerShell#WinRM Service Guide
0 notes
Text
Building Scalable Infrastructure with Ansible and Terraform

Building Scalable Infrastructure with Ansible and Terraform
Modern cloud environments require scalable, efficient, and automated infrastructure to meet growing business demands. Terraform and Ansible are two powerful tools that, when combined, enable Infrastructure as Code (IaC) and Configuration Management, allowing teams to build, manage, and scale infrastructure seamlessly.
1. Understanding Terraform and Ansible
📌 Terraform: Infrastructure as Code (IaaC)
Terraform is a declarative IaaC tool that enables provisioning and managing infrastructure across multiple cloud providers.
🔹 Key Features: ✅ Automates infrastructure deployment. ✅ Supports multiple cloud providers (AWS, Azure, GCP). ✅ Uses HCL (HashiCorp Configuration Language). ✅ Manages infrastructure as immutable code.
🔹 Use Case: Terraform is used to provision infrastructure — such as setting up VMs, networks, and databases — before configuration.
📌 Ansible: Configuration Management & Automation
Ansible is an agentless configuration management tool that automates software installation, updates, and system configurations.
🔹 Key Features: ✅ Uses YAML-based playbooks. ✅ Agentless architecture (SSH/WinRM-based). ✅ Idempotent (ensures same state on repeated runs). ✅ Supports cloud provisioning and app deployment.
🔹 Use Case: Ansible is used after infrastructure provisioning to configure servers, install applications, and manage deployments.
2. Why Use Terraform and Ansible Together?
Using Terraform + Ansible combines the strengths of both tools:
TerraformAnsibleCreates infrastructure (VMs, networks, databases).Configures and manages infrastructure (installing software, security patches). Declarative approach (desired state definition).Procedural approach (step-by-step execution).Handles infrastructure state via a state file. Doesn’t track state; executes tasks directly. Best for provisioning resources in cloud environments. Best for managing configurations and deployments.
Example Workflow: 1️⃣ Terraform provisions cloud infrastructure (e.g., AWS EC2, Azure VMs). 2️⃣ Ansible configures servers (e.g., installs Docker, Nginx, security patches).
3. Building a Scalable Infrastructure: Step-by-Step
Step 1: Define Infrastructure in Terraform
Example Terraform configuration to provision AWS EC2 instances:hclprovider "aws" { region = "us-east-1" }resource "aws_instance" "web" { ami = "ami-12345678" instance_type = "t2.micro" tags = { Name = "WebServer" } }
Step 2: Configure Servers Using Ansible
Example Ansible Playbook to install Nginx on the provisioned servers:yaml- name: Configure Web Server hosts: web_servers become: yes tasks: - name: Install Nginx apt: name: nginx state: present - name: Start Nginx Service service: name: nginx state: started enabled: yes
Step 3: Automate Deployment with Terraform and Ansible
1️⃣ Use Terraform to create infrastructure:bash terraform init terraform apply -auto-approve
2️⃣ Use Ansible to configure servers:bashansible-playbook -i inventory.ini configure_web.yaml
4. Best Practices for Scalable Infrastructure
✅ Modular Infrastructure — Use Terraform modules for reusable infrastructure components. ✅ State Management — Store Terraform state in remote backends (S3, Terraform Cloud) for team collaboration. ✅ Use Dynamic Inventory in Ansible — Fetch Terraform-managed resources dynamically. ✅ Automate CI/CD Pipelines — Integrate Terraform and Ansible with Jenkins, GitHub Actions, or GitLab CI. ✅ Follow Security Best Practices — Use IAM roles, secrets management, and network security groups.
5. Conclusion
By combining Terraform and Ansible, teams can build scalable, automated, and well-managed cloud infrastructure.
Terraform ensures consistent provisioning across multiple cloud environments, while Ansible simplifies configuration management and application deployment.
WEBSITE: https://www.ficusoft.in/devops-training-in-chennai/
0 notes
Text
Enterprise Linux Automation with Ansible: Streamlining Operations and Boosting Efficiency
In today’s fast-paced IT landscape, businesses are constantly looking for ways to improve efficiency, reduce manual efforts, and ensure consistent performance across their systems. This is where automation tools like Ansible come into play, especially for enterprises running Linux-based systems. Ansible, an open-source automation platform, allows system administrators to automate configuration management, application deployment, and task orchestration in a simple and scalable way. Let’s explore how Ansible can revolutionize enterprise Linux automation.
What is Ansible?
Ansible is an automation tool that is designed to automate tasks across multiple machines or environments. It is agentless, meaning that it does not require any additional software or agents to be installed on the managed nodes. Instead, it uses SSH (for Linux-based systems) or WinRM (for Windows-based systems) to communicate with the remote servers.
One of the reasons Ansible has gained significant popularity is its simplicity and ease of use. With Ansible, system administrators can describe the configuration of systems using easy-to-understand YAML syntax, called Playbooks. These playbooks define the tasks that need to be performed, such as package installation, service management, user creation, and more.
Key Benefits of Ansible for Enterprise Linux Automation
Improved Operational Efficiency By automating repetitive tasks, Ansible helps reduce the time and effort required for system configuration, updates, and maintenance. Tasks that once took hours can now be completed in a matter of minutes, freeing up your IT team to focus on more strategic initiatives.
Consistency Across Environments Whether you're working in a single data center or managing multiple cloud environments, Ansible ensures that your configurations remain consistent. With playbooks, you can define the desired state of your infrastructure and ensure that all systems are aligned with that state, reducing the risk of configuration drift and human error.
Scalability Ansible is built to scale with your business. As your infrastructure grows, you can easily add more nodes (servers, virtual machines, containers) to your Ansible inventory and run automation tasks across all of them simultaneously. This scalability is crucial for large enterprises that manage thousands of systems.
Integration with DevOps Pipelines Ansible integrates seamlessly with DevOps tools like Jenkins, GitLab, and Docker. This integration enables you to automate the entire software development lifecycle, from provisioning and configuration to continuous integration and deployment. With Ansible, you can implement infrastructure as code (IaC) and build a more agile and responsive IT environment.
Security and Compliance Security and compliance are top priorities for enterprise organizations. Ansible helps automate security patch management and ensures that all systems are compliant with industry regulations. By defining security configurations as code, Ansible allows organizations to enforce best practices and continuously monitor systems for compliance.
Use Cases for Ansible in Enterprise Linux Environments
Configuration Management Ansible can automate the configuration of Linux servers, ensuring that each server is configured consistently across the entire organization. Whether you're setting up web servers, databases, or network devices, Ansible playbooks provide a reliable and repeatable process for configuration management.
Software Deployment Installing and updating software across a large number of Linux systems can be a time-consuming and error-prone task. With Ansible, you can automate software deployments, ensuring that the correct versions are installed, configured, and updated across all systems in your environment.
Patch Management Keeping systems up-to-date with the latest security patches is critical for protecting your infrastructure. Ansible makes patch management simple by automating the process of applying patches to Linux systems, reducing the risk of vulnerabilities and ensuring your systems remain secure.
Provisioning Infrastructure Whether you're deploying virtual machines, containers, or cloud instances, Ansible can help you automate the provisioning process. By defining infrastructure as code, you can quickly and consistently spin up new instances or services, reducing the manual effort required for infrastructure management.
Backup and Recovery Automation Ansible can also be used to automate backup and recovery tasks, ensuring that your critical data is consistently backed up and easily recoverable in case of an emergency. Playbooks can be created to run regular backups and even test recovery procedures to ensure that they work as expected.
Best Practices for Using Ansible in Enterprise Linux Automation
Use Version Control for Playbooks To ensure consistency and traceability, store your Ansible playbooks in version control systems such as Git. This allows you to track changes, roll back to previous versions, and collaborate more effectively with your team.
Modularize Playbooks Break down your playbooks into smaller, reusable roles and tasks. This modular approach helps you maintain clean, organized, and reusable code that can be easily shared across different projects and environments.
Use Inventory Files for Dynamic Environments Ansible’s dynamic inventory allows you to automatically pull a list of hosts from cloud providers like AWS, Azure, and Google Cloud. This flexibility ensures that your playbooks are always targeting the right systems, even in dynamic environments.
Implement Error Handling and Logging Incorporate error handling and logging into your playbooks to ensure that issues are caught and logged for troubleshooting. Ansible provides several built-in features for handling errors and capturing logs, helping you quickly identify and resolve problems.
Test Playbooks Before Production Always test your playbooks in a non-production environment before running them on critical systems. Use tools like Ansible’s --check mode to perform a dry run and validate the changes that will be made.
Conclusion
Ansible is a powerful tool for automating and streamlining enterprise Linux environments. Its simplicity, scalability, and ease of integration with other tools make it an ideal choice for organizations looking to improve operational efficiency, reduce errors, and ensure consistency across their systems. By leveraging Ansible for Linux automation, enterprises can stay ahead of the competition and focus on delivering value to their customers.
Ready to start automating your Linux infrastructure? Give Ansible a try and experience the power of automation firsthand!
For more details click www.hawkstack.com
0 notes
Text
Ansible: Automation & DevOps – The Key to Efficient IT Management

In today’s fast-paced world of IT operations, managing infrastructure manually is like using a typewriter in the age of smartphones. The demand for rapid deployments, streamlined operations, and seamless scaling is at an all-time high. That’s where Ansible: Automation & DevOps comes into play.
Ansible is one of the most powerful tools in the DevOps ecosystem, allowing IT professionals to automate their day-to-day tasks efficiently. Whether you’re a system administrator, a DevOps engineer, or someone keen on improving your operational workflows, understanding and mastering Ansible will empower you to streamline operations, reduce errors, and improve overall system reliability.
What is Ansible?
Simply put, Ansible is an open-source IT automation tool. It allows users to automate tasks like configuring systems, managing servers, deploying applications, and orchestrating workflows. It’s popular because it’s simple, agentless, and powerful enough to automate complex multi-tier applications.
The best part? Ansible doesn’t require a lot of coding. This makes it user-friendly for IT professionals who may not be comfortable with scripting but still want to introduce automation into their workflows.
Why is Ansible Important in DevOps?
In DevOps, the goal is to bridge the gap between software development and IT operations. This means faster releases, fewer bugs, and more efficient use of resources. Automation is the backbone of this process, and Ansible is one of the most efficient ways to introduce automation into your environment.
With Ansible: Automation & DevOps, you can:
Automate repetitive tasks, freeing up time for more strategic work.
Deploy applications faster and more consistently.
Ensure that your infrastructure is always in the desired state.
Minimize human errors, which are often the cause of outages and downtime.
For organizations, this translates into cost savings, improved productivity, and better reliability.
How Ansible Works
Unlike some other automation tools, Ansible is agentless. This means that you don’t have to install any additional software on the systems you’re managing. Instead, Ansible communicates with systems over SSH (Linux/Unix) or WinRM (Windows).
Ansible uses playbooks, which are simple YAML files where you describe your automation jobs. These playbooks are human-readable, meaning that even people who aren’t familiar with coding can understand them.
Here’s a simple example of what an Ansible playbook might look like:
yaml
Copy code
- name: Install Apache on web servers
hosts: webservers
tasks:
- name: Install Apache
apt:
name: apache2
state: present
In this example, you’re instructing Ansible to install the Apache web server on all the hosts defined as "webservers."
Key Benefits of Using Ansible in DevOps
1. Simplicity and Ease of Use
The learning curve for Ansible is relatively shallow. Its simple, human-readable syntax (YAML) ensures that even non-programmers can create automation scripts quickly. This makes it accessible to more teams and allows for collaboration between developers and operations teams without needing to dive into complex coding.
2. Agentless Architecture
Unlike other automation tools that require agents to be installed on remote nodes, Ansible is agentless. This not only reduces the overhead but also simplifies the security model since there are fewer moving parts to manage.
3. Scalability
One of the most significant advantages of Ansible is its scalability. Whether you’re managing ten servers or ten thousand, Ansible scales seamlessly. It’s designed to handle large environments and can manage multiple infrastructures simultaneously.
4. Consistency Across Environments
Ensuring that applications and systems are consistent across different environments is a significant challenge for many organizations. Ansible solves this by allowing users to automate everything from development to production in the same way. This reduces the chances of discrepancies between environments and ensures that applications run smoothly, no matter where they’re deployed.
5. Flexibility in Managing Multi-Tier Applications
Ansible excels in managing multi-tier applications. Whether you’re dealing with a simple web server or a complex application with multiple components and dependencies, Ansible can manage it all with ease.
Ansible vs. Other Automation Tools
While Ansible is not the only automation tool out there, it stands out due to its simplicity, agentless nature, and flexibility. Let's compare it with some other popular tools in the DevOps ecosystem:
Chef and Puppet: Both Chef and Puppet require agents on the nodes they manage, which adds complexity. They also have steeper learning curves due to their more complex syntaxes.
SaltStack: SaltStack is also agentless but is often seen as more complex than Ansible in terms of configuration and maintenance.
Terraform: Terraform is primarily used for infrastructure as code (IaC), while Ansible shines in automating configuration management and application deployment.
Integrating Ansible with Other DevOps Tools
In the world of DevOps, no tool exists in isolation. One of the key reasons Ansible is so popular is its ability to integrate seamlessly with other DevOps tools. Whether you’re using Jenkins for continuous integration, Docker for containerization, or Kubernetes for orchestration, Ansible can be the glue that ties everything together.
For example, you can use Ansible to automate the deployment of Docker containers across your infrastructure or manage Kubernetes clusters. This type of integration helps create a fully automated DevOps pipeline, reducing the need for manual intervention and making your processes more efficient.
Use Cases for Ansible in DevOps
1. Continuous Integration and Continuous Deployment (CI/CD)
In modern software development, the goal is to release code as quickly and reliably as possible. By integrating Ansible with CI/CD tools like Jenkins, you can automate the entire deployment process, ensuring that new code is deployed to production environments smoothly and without errors.
2. Infrastructure as Code (IaC)
With Ansible, you can manage infrastructure the same way you manage application code. This is known as Infrastructure as Code (IaC). It allows you to define your infrastructure in code form, ensuring that your environments are reproducible, scalable, and consistent.
3. Cloud Provisioning
Many organizations are moving their infrastructure to the cloud. Ansible supports major cloud providers like AWS, Google Cloud, and Azure, making it easy to provision and manage cloud resources through automation. Whether you're deploying VMs, configuring cloud storage, or managing networks, Ansible can handle it.
4. Security and Compliance Automation
Ensuring that your systems are secure and compliant with industry standards can be a daunting task. Ansible can automate security checks and enforce compliance policies across your infrastructure. Whether you need to apply security patches, manage firewall rules, or ensure that certain services are running, Ansible can do it for you.
The Future of Ansible and DevOps
The future of Ansible: Automation & DevOps looks incredibly promising. As more organizations adopt DevOps practices, the need for automation will only increase. With Ansible, you can ensure that your operations are efficient, scalable, and ready for the future.
Whether you’re just starting out or you’re looking to take your DevOps game to the next level, Ansible is a tool that should be in your arsenal.
Conclusion: Start Your Ansible Journey Today
Mastering Ansible: Automation & DevOps is not just a smart career move; it's essential in today's IT landscape. Whether you're looking to improve operational efficiency, scale your infrastructure, or simply reduce human error, Ansible is your go-to solution.
The best part? You don’t need to be a seasoned developer to start using Ansible. With its simple syntax and powerful capabilities, even beginners can start automating tasks right away. So why wait? Dive into the world of Ansible today, and see how it can revolutionize your DevOps practices.
0 notes
Text
Revolutionizing IT with Ansible Automation
In today's fast-paced IT environment, automation has become essential for efficiency, consistency, and scalability. Ansible, an open-source automation platform, stands out as a powerful tool that simplifies the complexity of managing IT infrastructure and applications. This blog post will explore the key aspects of Ansible automation, its benefits, and how it can transform your IT operations.
What is Ansible?
Ansible is an open-source automation platform used for configuration management, application deployment, and task automation. It allows IT administrators to automate routine tasks and manage complex deployments without the need for complex coding. Ansible uses a simple, human-readable language called YAML (Yet Another Markup Language) to describe automation jobs in the form of playbooks.
Key Features of Ansible
Agentless Architecture: Ansible operates without the need for agents on the managed nodes. It uses SSH for Linux/Unix systems and WinRM for Windows systems, making it easy to set up and maintain.
Declarative Language: Ansible playbooks use a declarative language, making it easy to understand and write automation scripts. This reduces the learning curve and makes the automation process more accessible to a wider audience.
Idempotency: Ansible ensures that repeated executions of a playbook will have the same effect as a single execution, preventing unintended changes and ensuring consistent results.
Extensibility: Ansible's modular architecture allows for easy customization and extension. Users can create custom modules, plugins, and inventories to fit their specific needs.
Benefits of Ansible Automation
Simplifies Complex Tasks: Ansible automates repetitive and complex tasks, freeing up valuable time for IT professionals to focus on more strategic initiatives.
Reduces Errors: Automation minimizes human errors, ensuring that tasks are performed consistently and accurately every time.
Scalability: Ansible scales effortlessly, allowing you to manage thousands of servers and applications with the same simplicity as managing a single server.
Cost-Effective: Being open-source, Ansible provides a cost-effective solution for IT automation, reducing the need for expensive proprietary software.
Advanced Ansible Concepts
Roles: Organize your playbooks into reusable roles. Roles provide a way to structure your playbooks and make them reusable and shareable.
Ansible Tower: A commercial offering from Red Hat, Ansible Tower provides a web-based interface, role-based access control, and powerful scheduling and logging features.
Custom Modules and Plugins: Extend Ansible’s functionality by writing custom modules and plugins to address unique automation requirements.
Real-World Use Cases
Continuous Deployment: Automate the deployment of applications across multiple environments, ensuring consistent and error-free deployments.
Infrastructure as Code: Manage your infrastructure using code, enabling version control, peer reviews, and automated testing.
Configuration Management: Maintain the desired state of your systems by managing configurations and ensuring compliance with corporate policies.
Conclusion
Ansible automation is a game-changer for IT operations, offering a powerful, flexible, and cost-effective solution for managing complex infrastructures. By leveraging Ansible, organizations can achieve greater efficiency, consistency, and scalability, ultimately driving innovation and growth. Whether you are new to automation or looking to enhance your existing processes, Ansible is an invaluable tool that can help you achieve your IT goals.
Ready to start your automation journey with Ansible? Dive into the official Ansible documentation and explore the endless possibilities of IT automation.
For more details click www.qcsdclabs.com
#redhatcourses#information technology#docker#container#linux#kubernetes#containerorchestration#containersecurity#dockerswarm#aws
0 notes
Text
Rundeck is an open source automation service that lets you easily run automation tasks across a set of nodes. It comes with a web console, command line tools, and a WebAPI. In this guide, I’ll take you through the steps to install and configure Rundeck on Ubuntu 18.04 & Debian 9. The same should also work for Ubuntu 16.04 LTS. Features of Rundeck Distributed command execution Workflow (including option passing, conditionals, error handling, and multiple workflow strategies) Pluggable execution system (SSH and WinRM by default; Powershell available) Pluggable resource model (get details of your infrastructure from external systems) On-demand (Web GUI, API or CLI) or scheduled job execution Secure Key store for passwords and keys Role-based access control policy with support for LDAP/ActiveDirectory/SSO Access control policy editing/management tools History and auditing logs Use any scripting language Step 1: Update your system & Set the hostname Start your installation by making sure your packages are updated. sudo apt update sudo apt upgrade -y After update, set server hostname. sudo hostnamectl set-hostname rundeck.example.com Add the hostname and IP address to /etc/hosts echo "192.168.17.50 rundeck.example.com" | tee -a /etc/hosts Step 2: Install Java 8 ( SE or OpenJDK) Rundeck requires Java 8 installed on the host system. You can install Java 8 on your Ubuntu 18.04 / Debian 9 by: 1. Add Java 8 PPA repository sudo add-apt-repository ppa:webupd8team/java Press [ENTER] when prompted to add the repository to your system. 2. Install Java 8 on Ubuntu 18.04 / Debian 9 sudo apt install oracle-java8-installer Press Ok to Agree to Oracle Binary Code License Agreement for the Java SE Platform Products and JavaFX. Next, Accept Oracle Binary Code license terms by selecting Yes After the installation is done, confirm the Java version installed: $ java -version java version "1.8.0_191" Java(TM) SE Runtime Environment (build 1.8.0_191-b12) Java HotSpot(TM) 64-Bit Server VM (build 25.191-b12, mixed mode) To install OpenJDK 8, just run: sudo apt install openjdk-8-jdk-headless Step 3: Install Rundeck on Ubuntu 18.04 / Debian 9 After installing Java 8, proceed to install Rundeck on Ubuntu 18.04 / Debian 9. Check for the latest release of Rundeck before downloading. wget https://dl.bintray.com/rundeck/rundeck-deb/rundeck_3.0.22.20190512-1.201905130100_all.deb Once downloaded, install the package using dpkg command: $ sudo dpkg -i rundeck*.deb Selecting previously unselected package rundeck. (Reading database ... 105814 files and directories currently installed.) Preparing to unpack rundeck_3.0.22.20190512-1.201905130100_all.deb ... Unpacking rundeck (3.0.22.20190512-1.201905130100) ... Setting up rundeck (3.0.22.20190512-1.201905130100) ... Adding group rundeck....done Adding system user rundeck....done Processing triggers for ureadahead (0.100.0-20) ... Processing triggers for systemd (237-3ubuntu10.3) ... Step 4: Configure Rundeck The main configuration file is /etc/rundeck/framework.properties. Edit the file to customize Rundeck I have modified my Rundeck server connection information to be similar to below: framework.server.name = rundeck.example.com framework.server.hostname = rundeck.example.com framework.server.port = 4440 framework.server.url = http://192.168.17.50:4440 Also set correct hostname on /etc/rundeck/rundeck-config.properties $ sudo vim /etc/rundeck/rundeck-config.properties grails.serverURL=http://192.168.17.50:4440 Don’t forget to replace all occurrences of rundeck.example.com & 192.168.17.50 with your correct values for hostname and IP address. When done with the changes, start rundeckd and set it to start on boot: sudo systemctl start rundeckd sudo systemctl enable rundeckd If you have an active ufw firewall, allow port 4440 sudo ufw allow 4440/tcp To check service status, use: $ sudo systemctl status rundeckd
* rundeckd.service - LSB: rundeck job automation console Loaded: loaded (/etc/init.d/rundeckd; generated) Active: active (running) since Wed 2018-11-14 11:24:45 PST; 19s ago Docs: man:systemd-sysv-generator(8) Main PID: 4751 (java) Tasks: 20 (limit: 2319) CGroup: /system.slice/rundeckd.service `-4751 java -Drundeck.jaaslogin=true -Djava.security.auth.login.config=/etc/rundeck/jaas-loginmodule.conf -Dloginmodule.name=RDpropertyfile Nov 14 11:24:45 rundeck.example.com systemd[1]: Starting LSB: rundeck job automation console... Nov 14 11:24:45 rundeck.example.com rundeckd[4726]: * Starting rundeckd Nov 14 11:24:45 rundeck.example.com rundeckd[4726]: ...done. Nov 14 11:24:45 rundeck.example.com systemd[1]: Started LSB: rundeck job automation console. Step 5: Access Rundeck UI Open http://[IP or hostname]:4440/ on your favorite web browser to Login to Rundeck web console. The default logins are: Username: admin Password: admin Changing admin user password by editing the file /etc/rundeck/realm.properties sudo vim /etc/rundeck/realm.properties Set like below: admin:NEW_ADMIN_PASSWORD,user,admin,architect,deploy,build Restart rundeckd service: sudo systemctl restart rundeckd I hope this tutorial was helpful in your journey to install and configure Rundeck on Ubuntu 18.04 / Debian 9.
0 notes
Text
Microsoft remote desktop connection client for mac os x

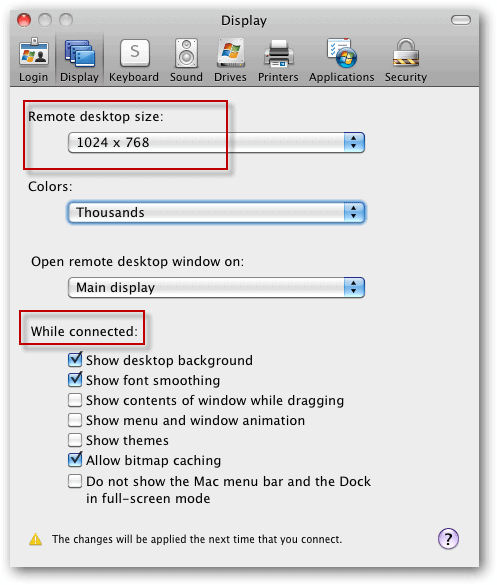
Please contact one of your responsible Windows group administrators. The remote Windows system must be configured to accept remote connections from your user account. Hey, while we are on the subject of Mac/Windows integration, what “pain points” do you have in your environment? I am more than happy to write on particular subjects, specific issues you are experiencing, etc.To access a Windows system from your Mac, we use the Microsoft Remote Desktop Client.ĭownload the Microsoft Remote Desktop client from the Mac App Store. I hope that you found this article useful. Today we learned a couple of different methods for establishing a remote administration session with a Windows-based computer from Mac OS X. Remote Windows Server 2008 session from Mac OS X Conclusion ^ Once you have the software installed, click RDC > Preferences to set preferences, and thereafter use RDC exactly as you would use the Windows version.
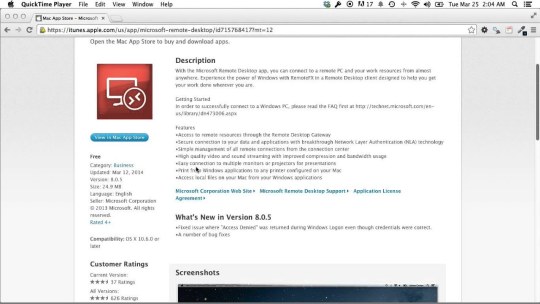
Download the Microsoft Remote Desktop Connection Client for Mac 2.1.1.
The good news here is that Microsoft actually makes their Remote Desktop Connection client available for the Mac: This process is shown in the following screen shot:Ī Windows command prompt from a Mac OS X computer Remote Desktop Access ^Īs far as I am personally concerned, Microsoft’s Remote Desktop Protocol (RDP) is more secure, efficient, and robust than the Remote Frame Buffer (RFB) protocol that is used with Virtual Network Computing (VNC) technology. MAC>ssh we accept the Windows host’s private key and authenticate, we are in business. Thus, we can simply fire up a Terminal session and type our SSH command string.įor instance, to connect to a Windows SSH server at 192.168.1.108 as a user named administrator, we can send the following command:
Remember that Mac OS X includes native support for SSH. If we need to open a Windows Server 2008 or Windows 7 command prompt from a Mac OS X computer, we don’t need to worry about WinRM or all that jazz. Keep this in mind when you are configuring firewall exceptions. NOTE: By default, SSH operates on TCP port 22, and RDP operates on TCP port 3389. Note that FreeSSHd includes secure FTP and Tunneling options as well. In this example, we are enabling the 4Sysopslab domain administrator account to connect to the server by using SSH. The User properties dialog box is shown in the next figure. This is shown in the following screenshot.Īfter you’ve installed FreeSSHd and ensured that the service is running in the Windows Service Control Manager, our next (and final) configuration task is to create an SSH user. Instead, right-click the FreeSSHd system tray icon and select Settings… from the shortcut menu. One point of confusion: after installation you might want to double-click the FreeSSHd desktop icon to open the administration panel. In this exercise I downloaded and installed FreeSSHd.
OpenSSH for Windows (quite tricky to configure).
At any rate, we have some choices in the matter for free SSH server/client packages for Windows: Microsoft includes no built-in support for SSH, unfortunately. Please see the Microsoft documentation if you want more background on Network Level Authentication. Enabling RDP remote connections in Windows Server 2008
0 notes
Text
Enabling and Configuring WinRM via GPO
Microsoft Windows Remote Management (WinRM) is an implementation of the WS-Management protocol, which is a standard Simple Object Access Protocol (SOAP). This is a firewall protocol that allows communication between hardware and operating systems of different vendors. WinRM is part of the Windows operating system but for you to obtain data from a remote computer, you must configure a WinRM…
#Configure WinRM#GPO#GPOs#Microsoft Windows#RestartWinRM service#Windows#Windows 10#Windows 11#Windows Server#Windows Server 2012#Windows Server 2019#Windows Server 2022#WinRM#WinRM and PSRemoting#WinRM Listener#WinRM service
0 notes
Text
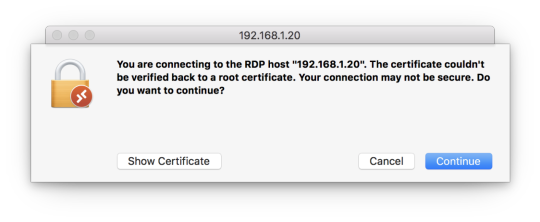
Rdp from mac to windows server 2012 r2

Rdp from mac to windows server 2012 r2 for free#
Rdp from mac to windows server 2012 r2 for mac#
Rdp from mac to windows server 2012 r2 mac os x#
Rdp from mac to windows server 2012 r2 software#
Rdp from mac to windows server 2012 r2 windows 8.1#
You can use a Microsoft Remote Desktop client to connect to a remote PC and your work resources from almost anywhere using just about any device.Īfter some research I thought that Windows 2012 has another level of protection allowed by default when we enable remote desktop, which can be Network Degree Authentication (NLA). Applies to: Windows 10, Windows 8.1, Windows Server 2019, Windows Server 2016, Windows Server 2012 R2. Dynamic resolution updates (Win 8.1/2012 R2+). Built-in SSH tunneling for RDP and VNC connections RDP features.
Rdp from mac to windows server 2012 r2 for mac#
Server 2012 Remote Desktop Configuration Remote Desktop Connection For Mac Reauthentication prompt to Mac pc RDP client The just thing various from usual I had been doing, has been that nowadays I had been using my Mac OS Back button with its Microsoft Remote Desktop.
Rdp from mac to windows server 2012 r2 windows 8.1#
Hey, while we are on the subject of Mac/Windows integration, what “pain points” do you have in your environment? I am more than happy to write on particular subjects, specific issues you are experiencing, etc.General OS Updates 3154184 Explorer.exe crashes repeatedly when you try to log on to a remote desktop in Windows 8.1 or Windows Server 2012 R2 3146978 RDS redirected resources showing degraded performance in Windows 8.1 or Windows Server 2012 R2 3146627 Network drives aren't mapped correctly from DFS namespace in Windows Server 2012 R2-based RDS server. I hope that you found this article useful. Today we learned a couple of different methods for establishing a remote administration session with a Windows-based computer from Mac OS X.
Rdp from mac to windows server 2012 r2 mac os x#
Remote Windows Server 2008 session from Mac OS X Conclusion ^
Rdp from mac to windows server 2012 r2 software#
Once you have the software installed, click RDC > Preferences to set preferences, and thereafter use RDC exactly as you would use the Windows version. Download the Microsoft Remote Desktop Connection Client for Mac 2.1.1.The good news here is that Microsoft actually makes their Remote Desktop Connection client available for the Mac: This process is shown in the following screen shot:Ī Windows command prompt from a Mac OS X computer Remote Desktop Access ^Īs far as I am personally concerned, Microsoft’s Remote Desktop Protocol (RDP) is more secure, efficient, and robust than the Remote Frame Buffer (RFB) protocol that is used with Virtual Network Computing (VNC) technology. MAC>ssh we accept the Windows host’s private key and authenticate, we are in business. Thus, we can simply fire up a Terminal session and type our SSH command string.įor instance, to connect to a Windows SSH server at 192.168.1.108 as a user named administrator, we can send the following command: Remember that Mac OS X includes native support for SSH. If we need to open a Windows Server 2008 or Windows 7 command prompt from a Mac OS X computer, we don’t need to worry about WinRM or all that jazz. Keep this in mind when you are configuring firewall exceptions. NOTE: By default, SSH operates on TCP port 22, and RDP operates on TCP port 3389. Note that FreeSSHd includes secure FTP and Tunneling options as well. In this example, we are enabling the 4Sysopslab domain administrator account to connect to the server by using SSH. The User properties dialog box is shown in the next figure. This is shown in the following screenshot.Īfter you’ve installed FreeSSHd and ensured that the service is running in the Windows Service Control Manager, our next (and final) configuration task is to create an SSH user. Instead, right-click the FreeSSHd system tray icon and select Settings… from the shortcut menu. One point of confusion: after installation you might want to double-click the FreeSSHd desktop icon to open the administration panel. In this exercise I downloaded and installed FreeSSHd. OpenSSH for Windows (quite tricky to configure).
Rdp from mac to windows server 2012 r2 for free#
At any rate, we have some choices in the matter for free SSH server/client packages for Windows: Microsoft includes no built-in support for SSH, unfortunately. Please see the Microsoft documentation if you want more background on Network Level Authentication. Enabling RDP remote connections in Windows Server 2008
0 notes
Text
Microvolts private server 2016

Microvolts private server 2016 professional#
Microvolts private server 2016 windows#
New features in Identity improve the ability for organizations to secure Active Directory environments and help them migrate to cloud-only deployments and hybrid deployments, where some applications and services are hosted in the cloud and others are hosted on premises. Host Guardian Service support for existing safe Active Directory – you can direct the Host Guardian Service to use an existing Active Directory forest as its Active Directory instead of creating its own Active Directory instanceįor more details and instructions for working with shielded virtual machines, see Guarded Fabric and Shielded VMs.
Microvolts private server 2016 windows#
Now you can switch on the fly between the less secure but simpler Active Directory-based attestation and TPM-based attestation.Įnd-to-end diagnostics tooling based on Windows PowerShell that is able to detect misconfigurations or errors in both guarded Hyper-V hosts and the Host Guardian Service.Ī recovery environment that offers a means to securely troubleshoot and repair shielded virtual machines within the fabric in which they normally run while offering the same level of protection as the shielded virtual machine itself. You can switch Attestation modes on a running Host Guardian Service. Hyper-V Virtual Machine Manager can now view the fabrics upon which a shielded virtual is authorized to run, providing a way for the fabric administrator to open a shielded virtual machine's key protector (KP) and view the fabrics it is permitted to run on. Among the features introduced in Windows Server 2016 are the following:Ī new Encryption Supported mode that offers more protections than for an ordinary virtual machine, but less than Shielded mode, while still supporting vTPM, disk encryption, Live Migration traffic encryption, and other features, including direct fabric administration conveniences such as virtual machine console connections and PowerShell Direct.įull support for converting existing non-shielded Generation 2 virtual machines to shielded virtual machines, including automated disk encryption. Windows Server 2016 provides a new Hyper-V-based Shielded Virtual Machine to protect any Generation 2 virtual machine from a compromised fabric. There are also improvements to the Recovery Console, including separation of inbound and outbound firewall rules as well as the ability to repair the configuration of WinRM. Nano Server now has an updated module for building Nano Server images, including more separation of physical host and guest virtual machine functionality as well as support for different Windows Server editions. For some additional information on containers, see Containers: Docker, Windows and Trends. Windows Containers: Windows Server 2016 container support adds performance improvements, simplified network management, and support for Windows containers on Windows 10. This topic explains the new and changed functionality of the Hyper-V role in Windows Server 2016, Client Hyper-V running on Windows 10, and Microsoft Hyper-V Server 2016. What's new in Hyper-V on Windows Server 2016. Windows Server can now host services that are compliant with upcoming regulations that require a 1ms accuracy with regard to UTC. Physical and virtual machines benefit from greater time accuracy due to improvements in the Win32 Time and Hyper-V Time Synchronization Services.
Microvolts private server 2016 professional#
The Virtualization area includes virtualization products and features for the IT professional to design, deploy, and maintain Windows Server. This article describes some of the new features in Windows Server 2016 that are the ones most likely to have the greatest impact as you work with this release.
0 notes
Text
Windows 10 update 1903 how long does it take 無料ダウンロード.Windows 10 の更新プログラム (バージョン 1903): 2019 年 5 月 20 日
Windows 10 update 1903 how long does it take 無料ダウンロード.Download Windows 10

Was this information helpful?.Download Windows 10
Feb 16, · REMINDER Windows 10, version reached end of servicing on December 8, To continue receiving security and quality updates, Microsoft recommends that you update to the latest version of Windows If you want to update to Windows 10, version , you must use the Enablement Package KB (EKB). Using the EKB makes updating faster This troubleshooter assists customers whose machines are not yet updated to the latest release, Windows 10 Version This update will initially be released only to a small set of targeted customers. This set will expand over time. Windows users can start the assistant from this article Windows 10 Version をインストールする際、更新プロセス中にオペレーティング システムの言語を変更したデバイスで、"ERROR_FILE_NOT_FOUND (0x)" によって Windows Sandbox が起動できないことがあります。 この問題は KB で解決されています。
Windows 10 update 1903 how long does it take 無料ダウンロード.Windows 10 Update Assistant
Windows 10 Version をインストールする際、更新プロセス中にオペレーティング システムの言語を変更したデバイスで、"ERROR_FILE_NOT_FOUND (0x)" によって Windows Sandbox が起動できないことがあります。 この問題は KB で解決されています。 This troubleshooter assists customers whose machines are not yet updated to the latest release, Windows 10 Version This update will initially be released only to a small set of targeted customers. This set will expand over time. Windows users can start the assistant from this article To check for updates now, select the Start button, and then go to Settings > Update & Security > Windows Update, and select Check for updates. You may also wish to visit your device manufacturer’s support site for any additional drivers that may be needed
Installing KB will remove Adobe Flash Player permanently from your Windows device. Once installed, you cannot uninstall KB To continue receiving security and quality updates, Microsoft recommends that you update to the latest version of Windows If you want to update to Windows 10, version , you must use the Enablement Package KB EKB.
Using the EKB makes updating faster and easier and requires a single restart. For more information, see Windows 10, version delivery options. To view other notes and messages, see the Windows 10, version update history home page. Note Follow WindowsUpdate to find out when new content is published to the release information dashboard. Updates an issue that sometimes prevents the input of strings into the Input Method Editor IME.
Addresses an issue with a memory leak in Internet Explorer 11 that occurs when you use the Chinese language pack. Addresses an issue that sometimes prevents the input of strings into the Input Method Editor IME. Addresses an issue with the SetWindowRgn API. As a result, users cannot maximize, minimize, or close a window. Addresses an issue that causes the host process of Windows Remote Management WinRM to stop working when it formats messages from a PowerShell plugin.
Addresses an issue in the Windows Management Instrumentation WMI service that causes a heap leak each time security settings are applied to WMI namespace permissions. Addresses an issue with screen rendering after opening games with certain hardware configurations. Improves startup times for applications that have roaming settings when User Experience Virtualization UE-V is turned on. Addresses an issue that prevents the Trusted Platform Module TPM from starting. As a result, TPM-based scenarios do not work.
Addresses an issue in which a principal in a trusted MIT realm fails to obtain a Kerberos service ticket from Active Directory domain controllers DC. This occurs on devices that installed Windows Updates that contain CVE protections and configured PerfromTicketSignature to 1 or higher.
These updates were released between November 10, and December 8, Enhances data loss prevention and insider risk management solution functionalities in Microsoft endpoints. Addresses an issue with the x86 version of Microsoft Excel Version It fails to open if you enable the SimExec feature of Defender Exploit Protection or stops working if you disable the SimExec exploit protection and enable the CallerCheck protection.
Addresses an issue that displays an error when you attempt to open an untrusted webpage using Microsoft Edge or open an untrusted Microsoft Office document. The error is, "WDAG Report - Container: Error: 0x, Ext error: 0x". This issue occurs after installing the. NET update KB Addresses an issue that fails to report an error when the Elliptic Curve Digital Signature Algorithm ECDSA generates invalid keys of bytes instead of bytes.
Adds support for using the new Chromium-based Microsoft Edge as the assigned access single kiosk app. Now, you can also customize a breakout key sequence for single app kiosks. For more information, see Configure Microsoft Edge kiosk mode.
Addresses an issue with User Datagram Protocol UDP broadcast packets that are larger than the maximum transmission unit MTU. Devices that receive these packets discard them because the checksum is not valid. Addresses an issue in which the WinHTTP AutoProxy service does not comply with the value set for the maximum Time To Live TTL on the Proxy Auto-Configuration PAC file. This prevents the cached file from updating dynamically. Improves the ability of the WinHTTP Web Proxy Auto-Discovery Service to ignore invalid Web Proxy Auto-Discovery Protocol WPAD URLs that the Dynamic Host Configuration Protocol DHCP server returns.
Addresses an issue with updating to Windows Server using a. iso image. If you renamed the default administrator account, the Local Security Authority LSA process might stop working. Addresses an issue that might cause stop error 7E in nfssvr. sys on servers running the Network File System NFS service. Addresses an issue that prevents the User Profile Service from detecting a slow or a fast link reliably. Addresses an issue that causes a Work Folder sync to fail with the error code 0xc if you have turned on On-Demand File Access.
Updates the Open Mobile Alliance OMA Device Management DM sync protocol by adding a check-in reason for requests from the client to the server.
The check-in reason will allow the mobile device management MDM service to make better decisions about sync sessions. With this change, the OMA-DM service must negotiate a protocol version of 4. Addresses an issue with failover in an environment that only has IPv6 clusters. If the failover cluster has been running for more than 24 days, attempts to do a failover might not succeed or might be delayed. Addresses an issue that causes Always On VPN AOVPN user tunnels to use an incorrect certificate.
Addresses an issue that causes an increase in network traffic during update detection for Windows Updates. This issue occurs on devices that are configured to use an authenticated user proxy as the fallback method if update detection with a system proxy fails or there is no proxy. If this key does not exist, it will be created automatically. If you installed earlier updates, only the new fixes contained in this package will be downloaded and installed on your device. Microsoft has released an update directly to the Windows Update client to improve reliability.
Any device running Windows 10 configured to receive updates automatically from Windows Update, including Enterprise and Pro editions, will be offered the latest Windows 10 feature update based on device compatibility and Windows Update for Business deferral policy.
This doesn't apply to long-term servicing editions. Microsoft strongly recommends you install the latest servicing stack update SSU for your operating system before installing the latest cumulative update LCU. SSUs improve the reliability of the update process to mitigate potential issues while installing the LCU. For general information about SSUs, see Servicing stack updates and Servicing Stack Updates SSU : Frequently Asked Questions.
If you are using Windows Update, the latest SSU KB will be offered to you automatically. To get the standalone package for the latest SSU, search for it in the Microsoft Update Catalog. To get the standalone package for this update, go to the Microsoft Update Catalog website.
You can import this update into WSUS manually. See the Microsoft Update Catalog for instructions. For a list of the files that are provided in this update, download the file information for cumulative update Table of contents. Windows 10, version 21H2 update history. Windows 10, version 21H1 update history. Windows 10, version 20H2 and Windows Server, version 20H2 update history. Windows 10, version and Windows Server, version update history. Windows 10, version , Windows Server, version , and Windows Server update history.
Windows 10, version update history. Windows 10, version and Windows Server update history. Windows 10 initial version released July update history. Windows Server version Windows 10, version , all editions More Release Date:. OS Build Windows Update Improvements Microsoft has released an update directly to the Windows Update client to improve reliability.
SUBSCRIBE RSS FEEDS. Need more help? Expand your skills. Get new features first. Was this information helpful? Yes No. Thank you! Any more feedback? The more you tell us the more we can help. Can you help us improve? Resolved my issue. Clear instructions. Easy to follow. No jargon. Pictures helped.
Didn't match my screen. Incorrect instructions. Too technical. Not enough information.
0 notes
Text
Enable remote powershell for Windows

PowerShell is a framework from Microsoft. it's heavily used in scripting and task automation. that is to say, PowerShell allows administrators to perform tasks on both local and remote Windows systems as well. hence, This topic aims to enable remote PowerShell execution for Windows by configuring winRM. Check how to configure Ansible to manage windows. Keep. PowerShell is a framework from Microsoft. it’s heavily used in scripting and task automation. that is to say, PowerShell allows administrators to perform tasks on both local and remote Windows systems as well. hence, This topic aims to enable remote PowerShell execution for Windows by configuring winRM. Check how to configure Ansible to manage windows.… #Automation #Windows Read the full article
0 notes
Link
こんにちは。GMOリサーチでインフラを担当しているオカモトです。 コロナの影響で引きこもり生活が続く中、皆様いかがお過ごしでしょうか。 今回、Googleが先日公開した「Tsunami」というオープンソースのセキュリティスキャナーを試してみたのでその内容をご紹介します。 1.Tsunamiって何? Tsunamiは、2020年6月18日木曜日(現地時間)にGoogleがオープンソースのプロジェクトとして公開したセキュリティスキャナーです。 GoogleではGKE(Google Kubernetes Engine)を使ってインターネットからアクセスを受けているシステムの脆弱性診断にTsunamiを使っている��うです。 ・Tsunamiのリリースに関する記事は以下のURLから確認できます。 Google Open Source Blog https://opensource.googleblog.com/2020/06/tsunami-extensible-network-scanning.html Tsunamiは以下の目標・理念を掲げて開発を進めているそうで、超大規模なシステムを高速にスキャンするような用途でも使いやすいソフトウェアを目指しているようです。 Tsunami supports small manually curated set of vulnerabilities(手動でリストアップされた少数の脆弱性に対してのスキャンをサポート)Tsunami detects high severity, RCE-like vulnerabilities, which often actively exploited in the wild(遠隔からのコード実行のような緊急度の高い脆弱性を検知する)Tsunami generates scan results with high confidence and minimal false-positive rate(誤検出率を最小限に抑えた信頼性の高いスキャン結果を生成する)Tsunami detectors are easy to implement.(脆弱性の検知器は簡単に実装できる)Tsunami is easy to scale, executes fast and scans non-intrusively.(簡単にスケールできる。高速に実行され、対象システムに侵入せずにスキャンする)2.Tsunamiの仕組み 公式の資料によるとTsunamiの脆弱性診断の流れは以下のような感じで進むそうです。 出典: Tsunami Scan Orchestration https://github.com/google/tsunami-security-scanner/blob/master/docs/orchestration.md 大きく分けて、Reconnaisance(調査/偵察)とVulnerability Verification(脆弱性の検証)の2つのステップで実行されるそうで、各ステップの役割は以下の通りになります。 Reconnaisance(調査/偵察) Reconnaisance(調査/偵察)のステップでは、ポートスキャンとフィンガープリントの2つのフェーズで対象システムに関する情報を可能な限り収集します。 <ポートスキャン> 対象システムの開いているポート、使われているプロトコル、ネットワークサービスなどを検出するフェーズ。 車輪の再発明をしないために、nmapやmasscanなどの既存のソフトウェアを内部で利用したプラグインを使うことを想定しているようです。 デフォルトではnmapのプラグインが使えます。 <フィンガープリント> 検知したポートで動いているサービスやウェブアプリケーションを検出するフェーズ。 1つのポートで複数のウェブアプリケーションが動いているような場合でも、それぞれのウェブアプリケーションを識別することを目指しているようです。 (例、TCPポートの443でリバースプロキシとしてnginxが動いている状態で、/blogではWordPress、/forumではphpBBが動いているというような構成)。 残念ながら今はまだ実装されてないみたいです。 Vulnerability Verification(脆弱性の検証) Vulnerability Verification(脆弱性の検証)のステップでは、前のステップで収集した情報に基づいて、脆弱性検知のプラグインを並列に実行して対象に脆弱性がないか検証します。 脆弱性検知のプラグイン���、基本的には1つの脆弱性に対して1つのプラグインとして実装されることを想定しているようです。 また将来的な構想として、脆弱性検知のプラグインをJavaで実装するほかにPythonやGoなど別の言語でも実装できるようにしたいそうです。 ※現在公開されているTsunamiは開発者に試してもらうことを目的としたPre-Alpha版なので、将来的に仕様に大きな変更が入る可能性があります。 3.Tsunamiを実際にインストールしてみた 今回は以下の環境のサーバーを使って試してみました。 CentOS Linux release 7.7.1908 (Core) 3.10.0-1062.4.1.el7.x86_64 ① 必要なパッケージのインストール 以下のバージョン以降のnmapとncrackが必要となるので、それぞれ公式サイトよりバイナリ及びソースコードをダウンロードしてインストールします。 nmap = 7.80 ncrack = 0.7 nmapとncrackの最新安定版はこちらからダウンロードできます。 ● nmap(binary/source) https://nmap.org/download.html ● ncrack(source) https://nmap.org/ncrack/ また、今回のテスト環境ではncrackのコンパイルのためopensslのバージョンを上げる必要があったので以下のバージョンのopensslもインストールしています。 お使いの環境によってはその他にも必要なものがあるかもしれません。 # 必要なバイナリ及びソースコードのダウンロード $ sudo su - # cd /usr/local/src/ # wget https://nmap.org/dist/nmap-7.80-1.x86_64.rpm # wget https://nmap.org/ncrack/dist/ncrack-0.7.tar.gz # wget https://www.openssl.org/source/openssl-1.1.1g.tar.gz # nmapのインストール # rpm -vhU nmap-7.80-1.x86_64.rpm # nmap --version Nmap version 7.80 ( https://nmap.org ) Platform: x86_64-redhat-linux-gnu Compiled with: nmap-liblua-5.3.5 openssl-1.0.2s nmap-libssh2-1.8.2 nmap-libz-1.2.11 nmap-libpcre-7.6 nmap-libpcap-1.9.0 nmap-libdnet-1.12 ipv6 Compiled without: Available nsock engines: epoll poll select # # openssl-1.1.1gのインストール # tar xvzf openssl-1.1.1g.tar.gz # cd openssl-1.1.1g/ # ./config --prefix=/usr/local/openssl-1.1.1g shared zlib # make depend # make # make test # make install # cd /etc/ld.so.conf.d/ # vi openssl-1.1.1g.conf # cat openssl-1.1.1g.conf /usr/local/openssl-1.1.1g/lib # # ncrackのインストール # cd /usr/local/src # mv ncrack-0.7 /usr/local/ # cd /usr/local/ncrack-0.7/ # ./configure --with-openssl=/usr/local/openssl-1.1.1g/ # make # make install # ncrack --version Ncrack version 0.7 ( http://ncrack.org ) Modules: SSH, RDP, FTP, Telnet, HTTP(S), Wordpress, POP3(S), IMAP, CVS, SMB, VNC, SIP, Redis, PostgreSQL, MQTT, MySQL, MSSQL, MongoDB, Cassandra, WinRM, OWA, DICOM # ② Tsunamiのインストール 公式に用意されているquick_start.shというスクリプトを使ってTsunamiをインストールします。 このquick_start.shを実行すると、以下の処理を実行してくれます。 ※gitでcloneするのでgitがインストールされている必要があります。 google/tsunami-security-scanner と google/tsunami-security-scanner-plugins の2つのリポジトリを $HOME/tsunami/repos ディレクトリ以下にgit cloneする全ての Google Tsunami plugins をコンパイル、できたjarファイルをすべ�� $HOME/tsunami/plugins ディレクトリへ移動するTsunami scannerをコンパイル、できたJarファイルを $HOME/tsunami ディレクトリへ移動するサンプルの設定ファイルのtsunami.yaml を $HOME/tsunami ディレクトリへ移動するサンプルとして127.0.0.1に対してスキャンを実行するコマンドを表示する ● Tsunamiのインストール $ bash -c "$(curl -sfL https://raw.githubusercontent.com/google/tsunami-security-scanner/master/quick_start.sh)" 実行すると必要なファイルやプログラムのダウンロードやインストール、jarファイルのビルドをしてくれます。すべてのjarファイルのビルドが正常に完了すると最後に以下のようなメッセージが表示されます。 BUILD SUCCESSFUL in 1m 40s 14 actionable tasks: 14 executed Build successful, execute the following command to scan 127.0.0.1: cd /home/okamoto/tsunami && \ java -cp "tsunami-main-0.0.2-SNAPSHOT-cli.jar:/home/okamoto/tsunami/plugins/*" \ -Dtsunami-config.location=/home/okamoto/tsunami/tsunami.yaml \ com.google.tsunami.main.cli.TsunamiCli \ --ip-v4-target=127.0.0.1 \ --scan-results-local-output-format=JSON \ --scan-results-local-output-filename=/tmp/tsunami-output.json Tsunamiのファイル群は$HOME/tsunami/以下にインストールされています。 $ ls -l tsunami/ total 16112 drwxr-xr-x 2 okamoto r_admin 316 Jun 25 17:23 plugins drwxr-xr-x 4 okamoto r_admin 78 Jun 25 17:22 repos -rw-r--r-- 1 okamoto r_admin 16492741 Jun 25 17:25 tsunami-main-0.0.2-SNAPSHOT-cli.jar -rw-r--r-- 1 okamoto r_admin 130 Jun 25 17:25 tsunami.yaml $ プラグインは$HOME/tsunami/pluginsのディレクトリに格納されています。 デフォルトだとポートスキャナーのプラグインが1つ、脆弱性検知のためのプラグインが5つ用意されています。 $ ls -l plugins/ total 148 -rw-r--r-- 1 okamoto r_admin 7156 Jun 25 19:03 exposed_hadoop_yarn_api-0.0.1-SNAPSHOT.jar -rw-r--r-- 1 okamoto r_admin 6194 Jun 25 19:03 exposed_jenkins_ui-0.0.1-SNAPSHOT.jar -rw-r--r-- 1 okamoto r_admin 5899 Jun 25 19:03 exposed_jupyter_notebook-0.0.1-SNAPSHOT.jar -rw-r--r-- 1 okamoto r_admin 39515 Jun 25 19:03 ncrack_weak_credential_detector-0.0.1-SNAPSHOT.jar -rw-r--r-- 1 okamoto r_admin 76185 Jun 25 19:03 nmap_port_scanner-0.0.1-SNAPSHOT.jar -rw-r--r-- 1 okamoto r_admin 6249 Jun 25 19:03 wordpress_exposed_installation_page-0.0.1-SNAPSHOT.jar $ 4.Tsunamiの設定を書いてみる Tsunamiはyaml形式のファイルで設定を読み込むことができます。 初めから用意されているyamlファイルが$HOME/tsunami/tsunami.yamlにあるので、これを編集して設定を記述します。 今回はデフォルトで用意されているnmapを使ったポートスキャナーのプラグインの設定を1-1024番のウェルノウンポートのみスキャンするよう設定してみます。 $ cd tsunami/ $ vi tsunami.yaml $ cat tsunami.yaml plugins: google: port_scanner: nmap: port_targets: "1-1024" $ 5.セキュリティスキャンをやってみよう Tsunamiのビルドが成功した際のメッセージの最後の部分で、以下のようなローカルホスト(127.0.0.1)をスキャンするためのコマンドが表示されます。 cd /home/okamoto/tsunami && \ java -cp "tsunami-main-0.0.2-SNAPSHOT-cli.jar:/home/okamoto/tsunami/plugins/*" \ -Dtsunami-config.location=/home/okamoto/tsunami/tsunami.yaml \ com.google.tsunami.main.cli.TsunamiCli \ --ip-v4-target=127.0.0.1 \ --scan-results-local-output-format=JSON \ --scan-results-local-output-filename=/tmp/tsunami-output.json 今回はこのコマンドを使って試しにローカルホストに対してセキュリティスキャンをしてみます。 1 2 3 4 5 6 7 8 9 10 11 12 13 14 15 16 17 18 19 20 21 22 23 24 25 26 27 28 29 30 $ cd /home/okamoto/tsunami && java -cp "tsunami-main-0.0.2-SNAPSHOT-cli.jar:/home/okamoto/tsunami/plugins/*" -Dtsunami-config.location=/home/okamoto/tsunami/tsunami.yaml com.google.tsunami.main.cli.TsunamiCli --ip-v4-target=127.0.0.1 --scan-results-local-output-format=JSON --scan-results-local-output-filename=/tmp/tsunami-output.json (省略) INFO: Tsunami scanning workflow traces: Port scanning phase (16.74 s) with 1 plugin(s): /Tsunami Dev ([email protected])/PORT_SCAN/NmapPortScanner/0.1 Service fingerprinting phase (296.7 ms) with 0 plugin(s): Vuln detection phase (22.06 ms) with 5 plugin(s): /Tsunami Team ([email protected])/VULN_DETECTION/NcrackWeakCredentialDetectorPlugin/0.1 was selected for the following services: ssh (TCP, port 22), smtp (TCP, port 25), rpcbind (TCP, port 111) /Tsunami Team ([email protected])/VULN_DETECTION/YarnExposedManagerApiDetector/0.1 was selected for the following services: ssh (TCP, port 22), smtp (TCP, port 25), rpcbind (TCP, port 111) /Tsunami Team ([email protected])/VULN_DETECTION/JenkinsExposedUiDetector/0.1 was selected for the following services: ssh (TCP, port 22), smtp (TCP, port 25), rpcbind (TCP, port 111) /Tsunami Team ([email protected])/VULN_DETECTION/JupyterExposedUiDetector/0.1 was selected for the following services: ssh (TCP, port 22), smtp (TCP, port 25), rpcbind (TCP, port 111) /Tsunami Team ([email protected])/VULN_DETECTION/WordPressInstallPageDetector/0.1 was selected for the following services: ssh (TCP, port 22), smtp (TCP, port 25), rpcbind (TCP, port 111) # of detected vulnerability: 0. Jun 25, 2020 7:53:15 PM com.google.tsunami.main.cli.TsunamiCli run INFO: Tsunami scan finished, saving results. Jun 25, 2020 7:53:15 PM com.google.tsunami.common.io.archiving.RawFileArchiver archive INFO: Archiving data to file system with filename '/tmp/tsunami-output.json'. Jun 25, 2020 7:53:15 PM com.google.tsunami.main.cli.TsunamiCli run INFO: TsunamiCli finished... Jun 25, 2020 7:53:15 PM com.google.tsunami.main.cli.TsunamiCli main INFO: Full Tsunami scan took 19.54 s. $ ずらずらと実行時のログが表示された後、最後に上記のようなスキャン結果が表示されます。 ポートスキャンに約17秒、脆弱性の検証に約22マイクロ秒の時間がかかったというような各ステップの実行時間や、ポートスキャンで見つかったサービスに対して各Detectorを実行した結果などを確認できます。 6.まとめ Pre-Alpha版ということでドキュメントもほとんどなく機能的にもまだまだ足りない状態で、全体的にまだまだこれからという印象を受けました。 ですが、Reconnaisanceの結果として見つかったサービスに対して脆弱性検知のプラグインを適用していくというTsunamiの基本的な動作の流れは確認することができました。 新たな脆弱性が見つかったらサクッと脆弱性検知のプラグインを書いて流す、そんな使い方になりそうです。 超大規模環境を迅速に脆弱性診断することを目指しているTsunami、ご興味ある方はGithubなど覗いてみてはいかがでしょうか。 自分も時間があればまた自作のプラグインを組み込んでの脆弱性診断などにチャレンジしてみたいと思います。 最後まで読んでいただきありがとうございました!
0 notes
Text
Unlocking the Power of Ansible Automation: A Comprehensive Guide
In today’s fast-paced technological landscape, automation has become a cornerstone for achieving efficiency and reliability in IT operations. Among the myriad of automation tools available, Ansible stands out for its simplicity, flexibility, and power. This blog post delves into what Ansible is, how it works, and why it’s an essential tool for IT professionals and organizations looking to streamline their workflows.
What is Ansible?
Ansible is an open-source automation tool used for IT tasks such as configuration management, application deployment, and orchestration. Developed by Michael DeHaan and introduced in 2012, Ansible has quickly gained popularity due to its agentless architecture and straightforward approach to automation.
Key Features of Ansible:
Agentless Architecture: Unlike many automation tools, Ansible does not require any agents or additional software on the client systems. It uses SSH for Unix-like systems and WinRM for Windows systems to execute tasks.
Playbooks: Written in YAML, playbooks are the heart of Ansible's automation. They describe the desired state of the system and the steps needed to achieve that state.
Idempotency: Ansible ensures that repeated executions of a playbook will produce the same result, preventing unintended changes.
Extensible: With a robust set of built-in modules and the ability to create custom modules, Ansible can be tailored to meet a wide range of automation needs.
How Ansible Works
Ansible operates by connecting to your nodes and pushing out small programs, called "Ansible modules," to them. These programs are written to be resource models of the desired state of the system. Ansible then executes these modules over SSH (or WinRM for Windows), and once the desired state is achieved, it removes them.
Basic Components:
Control Node: The machine where Ansible is installed and from which tasks are executed.
Managed Nodes: The networked systems that Ansible manages.
Inventory: A list of managed nodes, which can be defined in a simple text file or dynamically generated.
Playbook: A YAML file containing one or more plays, which define the tasks to be executed on the managed nodes.
Why Use Ansible?
Simplified Management
Ansible's simplicity is one of its strongest points. Its agentless nature means less overhead and fewer points of failure. By using straightforward YAML syntax, playbooks are easy to read, write, and understand, making Ansible accessible even to those with minimal coding experience.
Scalability and Flexibility
Whether managing a few servers or thousands, Ansible scales efficiently. It supports complex deployments with multiple environments, ensuring consistent configuration across development, testing, and production.
Enhanced Collaboration
Ansible's human-readable playbooks serve as documentation, making it easier for teams to collaborate. Everyone from developers to operations teams can understand and contribute to the automation process.
Security and Compliance
With Ansible, maintaining security and compliance is streamlined. Automated tasks reduce the risk of human error, and consistent configurations ensure systems adhere to organizational policies.
Ansible Use Cases
Configuration Management
Ansible can manage configurations across diverse environments, ensuring consistency and compliance. From setting up new servers to maintaining existing ones, it handles tasks such as package installation, system updates, and service management.
Application Deployment
Deploying applications can be complex, but Ansible simplifies the process. Whether you’re deploying web applications, databases, or microservices, Ansible automates the entire workflow, from code checkout to configuration and service restart.
Orchestration
Beyond individual configurations and deployments, Ansible excels in orchestrating entire workflows. It can manage complex, multi-tier deployments involving load balancers, databases, and web servers, ensuring each component is configured correctly and deployed in the right order.
Continuous Delivery
Ansible integrates seamlessly with CI/CD pipelines, automating the deployment of applications and updates. This ensures that software changes are consistently tested and deployed, accelerating the delivery process.
Getting Started with Ansible
Install Ansible: Ansible can be installed on various operating systems using package managers like apt, yum, or pip.
Set Up Inventory: Define your managed nodes in a simple text file.
Create Playbooks: Write YAML playbooks to describe your automation tasks.
Execute Playbooks: Run your playbooks using the ansible-playbook command.
Conclusion
Ansible is a powerful automation tool that simplifies IT management and accelerates workflows. Its agentless architecture, ease of use, and flexibility make it an ideal choice for organizations of all sizes. By adopting Ansible, you can enhance efficiency, ensure consistency, and focus on innovation rather than repetitive tasks.
Ready to take your automation to the next level? Start exploring Ansible today and unlock the full potential of your IT infrastructure. For more details click www.qcsdclabs.com
#redhatcourses#information technology#docker#containerorchestration#container#linux#kubernetes#containersecurity#dockerswarm#aws
0 notes