#WinRM quickconfig
Explore tagged Tumblr posts
Visit Tumblr Blog
Explore Tumblr blogs with no restrictions, modern design and the best experience.
Last Seen Tumblr Blogs


Fun Fact
Tumblr has 16.74 million mobile monthly users in the US.
Text
Configure WinRM to accept connection from a specific IP Address
In this article, we shall discuss how to enable and Configure WinRM to accept connection from a specific IP Address. Windows Remote Management (WinRM) is a Microsoft implementation of the WS-Management protocol. It is a standard web services protocol used for remote software and hardware management. Please see Enabling and Configuring WinRM via GPO, and how to configure a remote Windows Server to…
#Configure WinRM Listener for a Specific IP Address#Create a New Listener#Firewall exceptions for WinRM#Microsoft Windows#umber: -2144108183 0x80338169#Windows#Windows 10#Windows 11#Windows Server#Windows Server 2012#Windows Server 2016#Windows Server 2019#Windows Server 2022#Windows Server 2025#WinRM#WinRM and PSRemoting#WinRM configuration#WinRM firewall exception will not work#WinRM Listener#WinRM quickconfig#WinRM service
0 notes
Text
NAS 變身中央網路監控平台、故障發生無所遁形!
小編對網路監控軟體略有研究,之前寫了不少相關的文章,分別有 Network Performance Monitor、Paessler、DataDog、Cacti,這些方案有收費或者免費版本,而 Network Performance Monitor、Paessler、DataDog 是需要收費的,另外 Cacti 是一套開源軟體,因此不需要收費。
在測試了多套方案後發現,大多數監控軟件都會利用 SNMP 協定收集網路裝置數據進行監控,Network Performance Monitor、Paessler、Cacti 這三款軟體基本上都是採用 SNMP 協定。DataDog 有少許不同,因為是以雲端來監控企業內部的網路裝置的,官方稱之為 MaaS (Monitoring as a Service)。它不是利用 SNMP 協定,反而是需要通過安裝 Agent 軟體進行監控,而雲端會將收集到的網路數據即時呈現給客戶,小編應為這種 Agent 方式比較起設定 SNMP 更為簡單。

QNAP 上年研發了一套 APPS 名為 QPluse 作中央網路監控用途,這套軟體正正是以 Agent 方式進行監控,還有如果伺服器背後支援 IPMI 埠口亦可進行監控,若果是 Supermicro 或 IEI 所推出的伺服器的話,其 IPMI 更可於 QPluse 支援 KVM over IP 技術,大家可想像遠端時可於 BIOS 畫面設定和進行系統安裝,之後便可以在 Web 介面使用 KVM over IP、RDP、VNC 和 SSH 進行搖控管理。

因為需要改良其功能,為大家作出更貼心服務,終於在 2017 頭推出新版本,其名稱改為 QRM+ (QNAP Remote Manager Plus) ,小篇於 TDS-16489U 的App Center 安裝即可使用。因為小編沒有 IPMI 的伺服器,所以只能夠教大家以 QRMAgent 作監控。
這次教學先教大家由 QRM+ 遠端安裝 QRMAgent 到 Windows Server 2016,但在還未安裝之前需要於 Windows Server 2016 允許 WinRM (Windows Remote Management) 能夠安裝QRMAgent 才可,小編會分開兩篇教大家如何使用。大家跟著以下步驟便能設定好 WinRM,然後下一篇將會教大家於 QNAP NAS 設定 QRM+ 監控 Windows Server 2016。
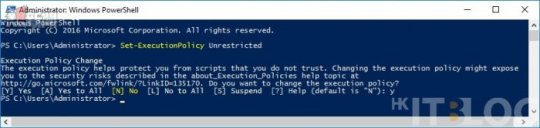
Step 1︰首先以 Run as administrator 開啟 Windows PowerShell 視窗,並且下達【Set-ExecutionPolicy Unrestricted】命令令所有 Windows PowerShell 腳本能運行,然後下達【y】更改 execution policy。
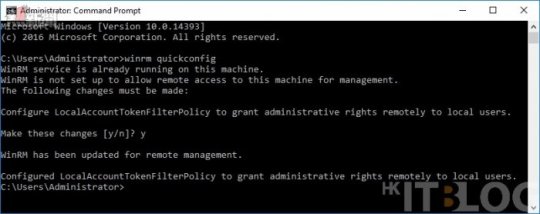
Step 2︰並接著以 Run as administrator 開啟 Command 視窗,首先下達【winrm quickconfig】命令啟動 WinRM 服務及開啟相關的監聽埠口。
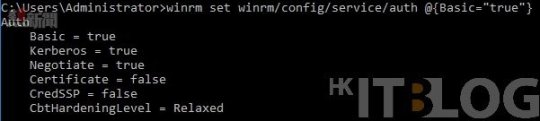
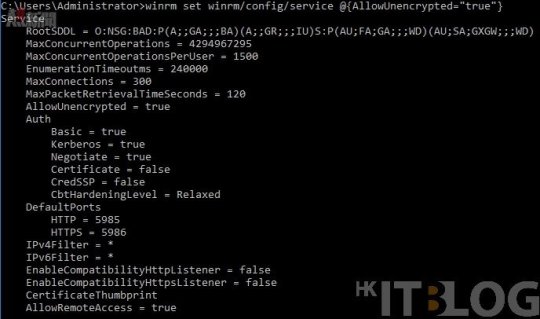
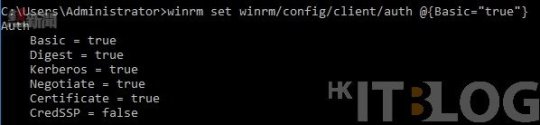
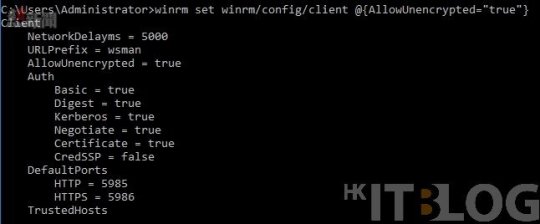
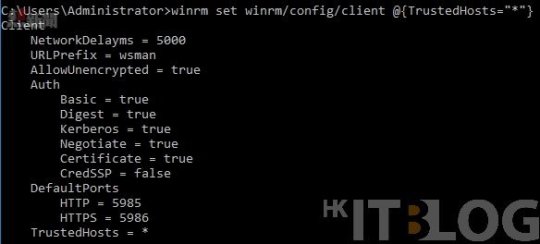
Step 3︰之後下達以下 WinRM 命令以進行相關設定︰
winrm set winrm/config/service/auth @{Basic=”true”}
winrm set winrm/config/service @{AllowUnencrypted=”true”}
winrm set winrm/config/client/auth @{Basic=”true”}
winrm set winrm/config/client @{AllowUnencrypted=”true”}
winrm set winrm/config/client @{TrustedHosts=”*”}
Step 4︰因為小編已經預先安裝好 QRM+,所以可於桌面按【QRM+】圖示打開。
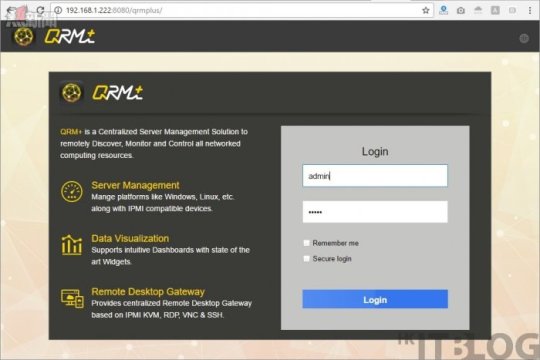
Step 5︰然後會彈出另一網頁【http://192.168.1.222:8080/qrmplus】,這就是 QRM+ 登入畫面,並且以 QNAP 管理員帳號登入。
Step 9︰登入後便可看見 QRM+ Dashboard 首頁,小篇會在下一篇教大家遠端安裝 QRMAgent 及設定警告(Alert)。

科技資訊由熱新聞提供 原文連結: NAS 變身中央網路監控平台、故障發生無所遁形! 更多相關內容

走遍 6 國駭客地下黑市:DDoS、XSS、萬種病毒自由交易!

HKITBLOG 由一班 IT 人編寫的商用 IT 網誌,為您提供最深入、齊全、實用的電腦資訊、軟件網誌、I.T. Blog等。
0 notes