#Where is the nvidia control panel windows 10
Explore tagged Tumblr posts
Text
How to use DXVK with The Sims 3
Have you seen this post about using DXVK by Criisolate? But felt intimidated by the sheer mass of facts and information?
@desiree-uk and I compiled a guide and the configuration file to make your life easier. It focuses on players not using the EA App, but it might work for those just the same. It’s definitely worth a try.
Adding this to your game installation will result in a better RAM usage. So your game is less likely to give you Error 12 or crash due to RAM issues. It does NOT give a huge performance boost, but more stability and allows for higher graphics settings in game.
The full guide behind the cut. Let me know if you also would like it as PDF.
Happy simming!
Disclaimer and Credits
Desiree and I are no tech experts and just wrote down how we did this. Our ability to help if you run into trouble is limited. So use at your own risk and back up your files!
We both are on Windows 10 and start the game via TS3W.exe, not the EA App. So your experience may differ.
This guide is based on our own experiments and of course criisolate’s post on tumblr: https://www.tumblr.com/criisolate/749374223346286592/ill-explain-what-i-did-below-before-making-any
This guide is brought to you by Desiree-UK and Norn.
Compatibility
Note: This will conflict with other programs that “inject” functionality into your game so they may stop working. Notably
Reshade
GShade
Nvidia Experience/Nvidia Inspector/Nvidia Shaders
RivaTuner Statistics Server
It does work seamlessly with LazyDuchess’ Smooth Patch.
LazyDuchess’ Launcher: unknown
Alder Lake patch: does conflict. One user got it working by starting the game by launching TS3.exe (also with admin rights) instead of TS3W.exe. This seemed to create the cache file for DXVK. After that, the game could be started from TS3W.exe again. That might not work for everyone though.
A word on FPS and V-Sync
With such an old game it’s crucial to cap framerate (FPS). This is done in the DXVK.conf file. Same with V-Sync.
You need
a text editor (easiest to use is Windows Notepad)
to download DXVK, version 2.3.1 from here: https://github.com/doitsujin/DXVK/releases/tag/v2.3.1 Extract the archive, you are going to need the file d3d9.dll from the x32 folder
the configuration file DXVK.conf from here: https://github.com/doitsujin/DXVK/blob/master/DXVK.conf. Optional: download the edited version with the required changes here.
administrator rights on your PC
to know your game’s installation path (bin folder) and where to find the user folder
a tiny bit of patience :)
First Step: Backup
Backup your original Bin folder in your Sims 3 installation path! The DXVK file may overwrite some files! The path should be something like this (for retail): \Program Files (x86)\Electronic Arts\The Sims 3\Game\Bin (This is the folder where also GraphicsRule.sgr and the TS3W.exe and TS3.exe are located.)
Backup your options.ini in your game’s user folder! Making the game use the DXVK file will count as a change in GPU driver, so the options.ini will reset once you start your game after installation. The path should be something like this: \Documents\Electronic Arts\The Sims 3 (This is the folder where your Mods folder is located).
Preparations
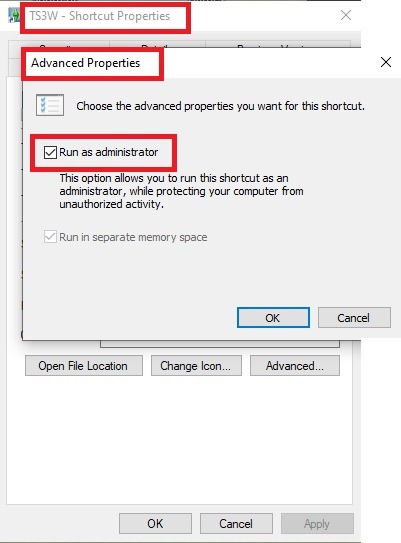
Make sure you run the game as administrator. You can check that by right-clicking on the icon that starts your game. Go to Properties > Advanced and check the box “Run as administrator”. Note: This will result in a prompt each time you start your game, if you want to allow this application to make modifications to your system. Click “Yes” and the game will load.
2. Make sure you have the DEP settings from Windows applied to your game.
Open the Windows Control Panel.
Click System and Security > System > Advanced System Settings.
On the Advanced tab, next to the Performance heading, click Settings.
Click the Data Execution Prevention tab.
Select 'Turn on DEP for all programs and services except these”:
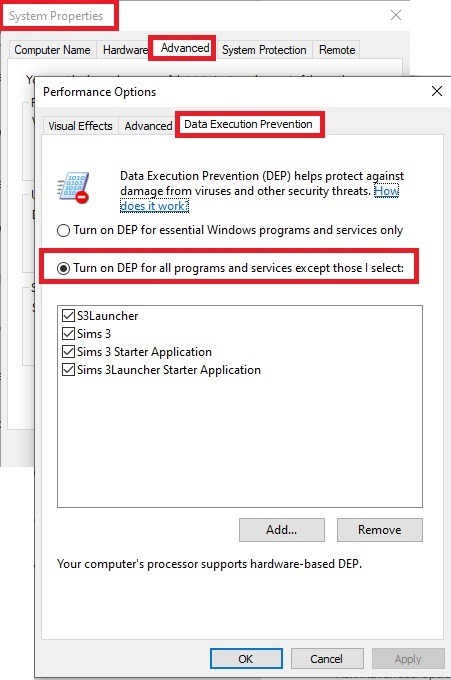
Click the Add button, a window to the file explorer opens. Navigate to your Sims 3 installation folder (the bin folder once again) and add TS3W.exe and TS3.exe.
Click OK. Then you can close all those dialog windows again.
Setting up the DXVK.conf file
Open the file with a text editor and delete everything in it. Then add these values:
d3d9.textureMemory = 1
d3d9.presentInterval = 1
d3d9.maxFrameRate = 60
d3d9.presentInterval enables V-Sync,d3d9.maxFrameRate sets the FrameRate. You can edit those values, but never change the first line (d3d9.textureMemory)!
The original DXVK.conf contains many more options in case you would like to add more settings.

A. no Reshade/GShade
Setting up DXVK
Copy the two files d3d9.dll and DXVK.conf into the Bin folder in your Sims 3 installation path. This is the folder where also GraphicsRule.sgr and the TS3W.exe and TS3.exe are located. If you are prompted to overwrite files, please choose yes (you DID backup your folder, right?)
And that’s basically all that is required to install.
Start your game now and let it run for a short while. Click around, open Buy mode or CAS, move the camera.
Now quit without saving. Once the game is closed fully, open your bin folder again and double check if a file “TS3W.DXVK-cache” was generated. If so – congrats! All done!
Things to note
Heads up, the game options will reset! So it will give you a “vanilla” start screen and options.
Don’t worry if the game seems to be frozen during loading. It may take a few minutes longer to load but it will load eventually.
The TS3W.DXVK-cache file is the actual cache DXVK is using. So don’t delete this! Just ignore it and leave it alone. When someone tells to clear cache files – this is not one of them!
Update Options.ini
Go to your user folder and open the options.ini file with a text editor like Notepad.
Find the line “lastdevice = “. It will have several values, separated by semicolons. Copy the last one, after the last semicolon, the digits only. Close the file.
Now go to your backup version of the Options.ini file, open it and find that line “lastdevice” again. Replace the last value with the one you just copied. Make sure to only replace those digits!
Save and close the file.
Copy this version of the file into your user folder, replacing the one that is there.
Things to note:
If your GPU driver is updated, you might have to do these steps again as it might reset your device ID again. Though it seems that the DXVK ID overrides the GPU ID, so it might not happen.
How do I know it’s working?
Open the task manager and look at RAM usage. Remember the game can only use 4 GB of RAM at maximum and starts crashing when usage goes up to somewhere between 3.2 – 3.8 GB (it’s a bit different for everybody).
So if you see values like 2.1456 for RAM usage in a large world and an ongoing save, it’s working. Generally the lower the value, the better for stability.
Also, DXVK will have generated its cache file called TS3W.DXVK-cache in the bin folder. The file size will grow with time as DXVK is adding stuff to it, e.g. from different worlds or savegames. Initially it might be something like 46 KB or 58 KB, so it’s really small.
Optional: changing MemCacheBudgetValue
MemCacheBudgetValue determines the size of the game's VRAM Cache. You can edit those values but the difference might not be noticeable in game. It also depends on your computer’s hardware how much you can allow here.
The two lines of seti MemCacheBudgetValue correspond to the high RAM level and low RAM level situations. Therefore, theoretically, the first line MemCacheBudgetValue should be set to a larger value, while the second line should be set to a value less than or equal to the first line.
The original values represent 200MB (209715200) and 160MB (167772160) respectively. They are calculated as 200x1024x1024=209175200 and 160x1024x1024=167772160.
Back up your GraphicsRules.sgr file! If you make a mistake here, your game won’t work anymore.
Go to your bin folder and open your GraphicsRules.sgr with a text editor.
Search and find two lines that set the variables for MemCacheBudgetValue.
Modify these two values to larger numbers. Make sure the value in the first line is higher or equals the value in the second line. Examples for values: 1073741824, which means 1GB 2147483648 which means 2 GB. -1 (minus 1) means no limit (but is highly experimental, use at own risk)
Save and close the file. It might prompt you to save the file to a different place and not allow you to save in the Bin folder. Just save it someplace else in this case and copy/paste it to the Bin folder afterwards. If asked to overwrite the existing file, click yes.
Now start your game and see if it makes a difference in smoothness or texture loading. Make sure to check RAM and VRAM usage to see how it works.
You might need to change the values back and forth to find the “sweet spot” for your game. Mine seems to work best with setting the first value to 2147483648 and the second to 1073741824.
Uninstallation
Delete these files from your bin folder (installation path):
d3d9.dll
DXVK.conf
TS3W.DXVK-cache
And if you have it, also TS3W_d3d9.log
if you changed the values in your GraphicsRule.sgr file, too, don’t forget to change them back or to replace the file with your backed up version.
OR
delete the bin folder and add it from your backup again.

B. with Reshade/GShade
Follow the steps from part A. no Reshade/Gshade to set up DXVK.
If you are already using Reshade (RS) or GShade (GS), you will be prompted to overwrite files, so choose YES. RS and GS may stop working, so you will need to reinstall them.
Whatever version you are using, the interface shows similar options of which API you can choose from (these screenshots are from the latest versions of RS and GS).
Please note:
Each time you install and uninstall DXVK, switching the game between Vulkan and d3d9, is essentially changing the graphics card ID again, which results in the settings in your options.ini file being repeatedly reset.
ReShade interface
Choose – Vulcan
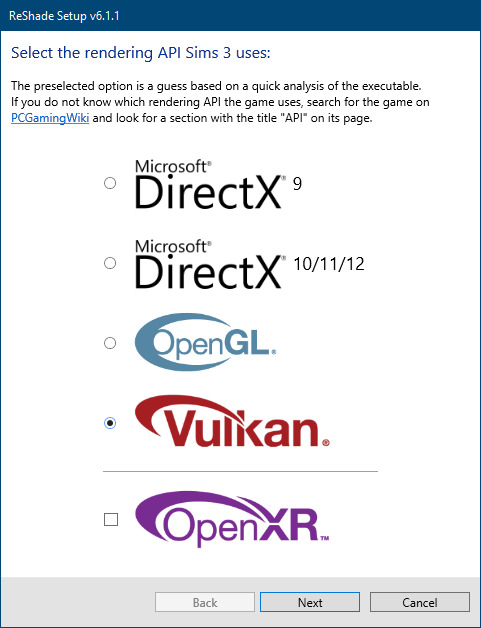
Click next and choose your preferred shaders.
Hopefully this install method works and it won't install its own d3d9.dll file.
If it doesn't work, then choose DirectX9 in RS, but you must make sure to replace the d3d9.dll file with DXVK's d3d9.dll (the one from its 32bit folder, checking its size is 3.86mb.)
GShade interface
Choose –
Executable Architecture: 32bit
Graphics API: DXVK
Hooking: Normal Mode
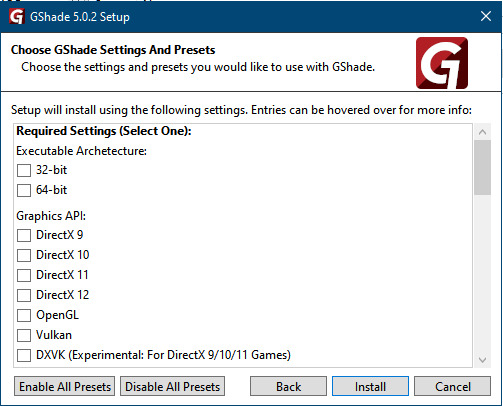
GShade is very problematic, it won't work straight out of the box and the overlay doesn't show up, which defeats the purpose of using it if you can't add or edit the shaders you want to use.
Check the game's bin folder, making sure the d3d9.dll is still there and its size is 3.86mb - that is DXVK's dll file.
If installing using the DXVK method doesn't work, you can choose the DirectX method, but there is no guarantee it works either.
The game will not run with these files in the folder:
d3d10core.dll
d3d11.dll
dxgi.dll
If you delete them, the game will start but you can't access GShade! It might be better to use ReShade.
Some Vulcan and DirectX information, if you’re interested:
Vulcan is for rather high end graphic cards but is backward compatible with some older cards. Try this method with ReShade or GShade first.
DirectX is more stable and works best with older cards and systems. Try this method if Vulcan doesn't work with ReShade/GShade in your game – remember to replace the d3d9.dll with DXVK's d3d9.dll.
For more information on the difference between Vulcan and DirectX, see this article:
https://www.howtogeek.com/884042/vulkan-vs-DirectX-12/
768 notes
·
View notes
Text
Some users on PC have an issue where the Oblivion Remaster shader compilation is not completing.
The game may crash during shader compilation and if you relaunch the game, you can play, but stutters and FPS issues will be worse than if you had successfully compiled shaders. Shader compilation cannot be automatically re-ran so you need to force your PC to restart the compilation.
Here are the steps I took to "fix" this issue:
1. Roll back your Nvidia GPU drivers to 572.83

If you have an AMD GPU, I believe AMD released an updated driver for Oblivion Remastered that should mean no driver rollback is needed.
2. Delete your shader cache via the Disk cleanup windows program


3. Cut/paste this file OUT of this folder path:
steamapps\common\Oblivion Remastered\Engine\Plugins\Marketplace\nvidia\DLSS\Streamline\Binaries\ThirdParty\Win64\sl.pcl.dll

I personally dropped it into a desktop folder so I have it saved somewhere. Just make sure this file is NOT in that folder path anymore.
4. Delete Oblivion.ini from this location:
\steamapps\common\Oblivion Remastered\OblivionRemastered\Content\Dev\ObvData\Oblivion.ini
5. Open Oblivion Remastered and shader compilation should now begin.
If all went well the shader compilation should complete (may take a long time) and you should notice *some* improvements to stuttering as shader are now fully compiled.
Make sure you re select your graphics settings as they will have reverted to default. See below for my personal settings and performance notes. 👇
---
Next part is how I personally went from ~40fps outdoors to a solid 60fps average with occasional dips to 50fps at the lowest.
Caveat I have a high end PC, play on a 4k TV and don't play above 60fps. Your Milage may vary as everyone has their own hardware setup and graphical preferences.
---
1. Make sure your game is installed on SSD. Game just runs alot better on SSD and even warns you to make sure its installed on one.
2. FPS lock/VSync. If you need Vsync to play games like I do. Turn OFF the in-game VSYNC and force VSYNC ON in Nvidia control panel. IDK how AMD gpus work but id imagine you'd use AMDs version of control panel to do the same.
Set the FPS limit to 60fps (or whatever your preference) in the in-game settings. This can also be done instead in the Nvidia control panel so if you set the limit there, be sure to NOT have a limit set in-game settings.
3. DLSS of some kind is a must for most games these days. Especially if playing with Ray Tracing (as you can note below)
Set DLSS to either performance (looks worse, runs better), Quality (looks better, runs a bit worse), or DLAA (looks alot better but most performance hit out of all DLSS settins).
Use FSR if you are on an AMD GPU.
4. DLSS Frame Generation. This literally will give you like 10+ FPS. BUUUTT it gives you CRAZY input lag. Make sure if you use this you also set NVIDIA Reflex to Enabled+Boost. For me this game me the free 10+fps while eliminating the input lag almost entirely.
Note: If you use Frame Generation you will notice the menus in-game have a weird flutter/lag. Beyond this tho the issues are minimal.
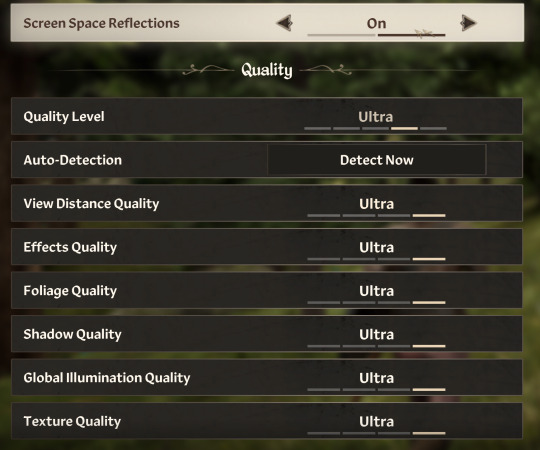
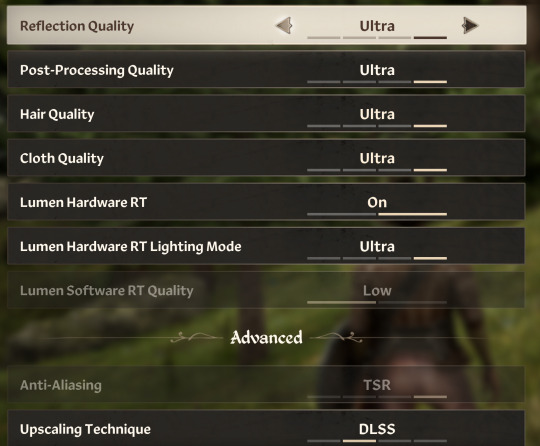
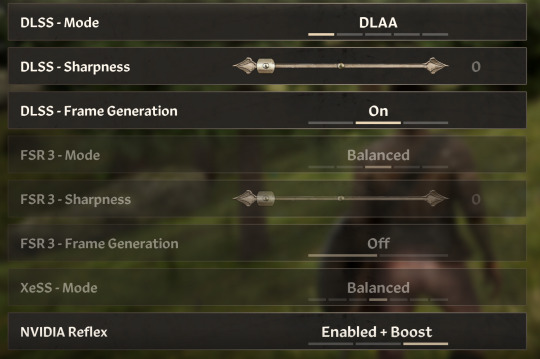
If you use AMD GPUs make sure to use the FSR/FSR Frame Generation/XeSS options as these are AMDs versions of the NVIDIA options i discussed above
I know alot of ppl play on different hardware in general so to summarize the graphics settings:
Turn off VYSNC in game and force it via your GPU control panel. Use frame generation and DLSS/FSR as specified above. If your settings don't give you the performance you want, roll them back bit by bit.
ALSO: This may be relevant but as a precaution, make any major graphics settings changes *FROM THE MAIN MENU* After you make the changes, exit and restart the game. Sometimes the changes don't work if you make them while you have a save loaded + don't restart the game.
Hope this all helps at least somebody out there. Send asks or DM if you need any clarification, and remember, Milage may vary so experiment with your settings as needed.
40 notes
·
View notes
Text
How to get the Steam version of Jedi Knight: Dark Forces II to run properly on Windows 10: A Novel
Hi, i just spent HOURS fixing this game (again), and I am soooooooo frustrated so I wanted to save someone else's life (and probably mine again when I next change computers).
This will fix these issues: -Black screen when enabling 3D acceleration -Mouse sensitivity being too high or too low. -1st person animations being too fast. -Game overall just not working the way it did on Windows XP and Windows 98
Download Jedi Knight "Steam Patch" from here: https://www.moddb.com/games/star-wars-jedi-knight-dark-forces-ii/downloads/steam-patch Alt Download location: (future-proofing): https://drive.google.com/file/d/113Nj_IBlcFLr77Gdi_PSmX6kixB3MYPv/view?usp=sharing
Extract the .zip you just got to the folder where JediKnight.exe is located. To find the folder: Open Steam Library, right click game, Manage>Browse Local Files
Open the file jkgm.json which was just added to the folder. (Open with Notepad). Change "resolution" to whatever resolution you want (I recommend [800,600] because anything above that causes more issues with mouse sensitivity and 1st person animation. There are also fixes for this below). If you want fullscreen back, change "fullscreen" to true
Test the game by running it through Steam. If it's working the way you want it, good. If there are more issues, try these:
• If the mouse and control inputs are now lagging, open jkgm.json again and change these settings: Change "enable_bloom" to false Change "enable_ssao" to false Change "enable_parallax" to false Change "enable_texture_filtering" to false
• If the mouse cursor is slightly off when selecting menu options: use a 4:3 resolution (such as 800x600). Using a 16:9 resolution is what causes the mouse to be off. See step 3.
• If the 1st-person animations are way too fast (noticable when running with a gun in-hand or when swinging the lightsaber): The game's animations are tied to the framerate, but they are also affected by resolution. If you're running at the recommended resolution of 800x600, you should also change the framerate to 30. To change the game's FPS to 30: Right click your desktop, click NVIDIA Control Panel. In the left menu, under 3D Settings, select Manage 3D Settings. Click the Program Settings tab. Click Add. Browse for the game's .exe. Since we used the Steam Patch, the .exe will be called JK-fov95-mipmap.exe If there is an option for "2. Select the preferred graphics processor for this program:" change it to High Performance NVIDIA Processor. Where it says "3. Specify the settings for this program:" Scroll down to find "Max Frame Rate." Set it to 30FPS. Apply. Test the game by running it through Steam.
• If the mouse sensitvity during gameplay is way too high, there are 3 options: -Option 1: In the game's own Setup menu, go to Controls, then Mouse. For the settings of both Mouse X Axis and Mouse Y Axis, turn sensitivity all the way down. Test. -Option 2: In the game's own Setup menu, go to Controls, then Mouse. For the settings of both Mouse X Axis and Mouse Y Axis, uncheck "Map directly to axis value." You may need to turn mouse sensitivity slider all the way up once this has been unchecked. Test. -Option 3: Probably the option you're looking for if the first 2 don't work. Go to the folder where your game .exe is located again. Open player>playername>playername.plr (open with Notepad) Find "bind 1 12 0xd" and change it to 0.1 Find "bind 8 13 0xd" and change it to 0.1 Save. This puts the mouse sensitivity lower than the lowest setting possible through the in-game Setup menu. You can also try 0.15 if 0.1 is too low.
I've had to struggle through making this game work on 3 different operating systems now. This game is very important to me. If you're having trouble feel free to reach out.
1 note
·
View note
Text
DaVinci Resolveのアップデート 原文・Deeplによる一部翻訳
About DaVinci Resolve 18.6
The free version of DaVinci Resolve 18.6 includes all of the same high quality processing as DaVinci Resolve 18.6 Studio and can handle unlimited resolution media files. However it does limit project mastering and output to Ultra HD resolutions or lower. DaVinci Resolve 18.6 only supports a single processing GPU on Windows and Linux and 2 GPUs on the latest Mac Pro.
If you need features such as support for multiple GPUs, 4K output, motion blur effects, temporal and spatial noise reduction, multiple AI-based tools, HDR tools, camera tracker, voice isolation, multiple Resolve FX, 3D stereoscopic tools and remote rendering, please upgrade to DaVinci Resolve 18.6 Studio.
We hope you do decide to upgrade as your facility grows and you do more advanced work!
What's new in DaVinci Resolve 18.6.1
Systems now default to prefer proxy for single and multi user projects.
Addressed a cloud sync issue with projects updated from 18.5.
Addressed delays when performing ripple edits on long timelines.
Addressed issue where editing or moving clips would stop playback.
Addressed issue showing retimed clips with handles on the color page.
Addressed issue navigating clips with show handles enabled.
Addressed issue with grabbing stills after deleting a gallery album.
Addressed issue importing suffixed multi mono files from media storage.
Addressed waveform jump issue when performing multiframe nudges.
Addressed issue navigating powergrades album in certain sort modes.
Improved in or out point behavior in the transcription window.
Dolby Vision 300 nit target display is now available.
Addressed issue with multiple timelines showing as current timeline.
Addressed a crash when using certain fonts on Text3D.
Addressed issue with grid depth occlusion in the USD viewer.
Addressed issue with disappearing key markers in the splines view.
Addressed issue with moving locked point selections in the splines view.
Addressed issue with polyline point scale and twist in the Edit viewer.
General performance and stability improvements.
---------------------
単一ユーザーおよび複数ユーザーのプロジェクトで、システムがデフォルトでプロキシを優先するようになりました。 18.5 から更新されたプロジェクトでのクラウド同期の問題に対処しました。 長いタイムラインでリップル編集を行う際の遅延に対応しました。 クリップを編集または移動すると再生が停止する問題に対応しました。 リタイミングされたクリップがカラーページにハンドル付きで表示される問題に対応しました。 ハンドルの表示を有効にしてクリップをナビゲートする問題に対応しました。 ギャラリーアルバムを削除した後に静止画を取り込む際の問題に対応しました。 メディアストレージからサフィックス付きマルチモノラルファイルをインポートする際の問題に対応しました。 マルチフレームナッジ実行時の波形ジャンプの問題に対応しました。 特定のソートモードでパワーグレードアルバムをナビゲートする問題に対応しました。 トランスクリプションウィンドウのインまたはアウトポイントの動作を改善しました。 Dolby Vision 300 nit のターゲット表示が可能になりました。 複数のタイムラインが現在のタイムラインとして表示される問題に対応しました。 Text3D で特定のフォントを使用するとクラッシュする問題に対応しました。 USD ビューアでグリッドの深度オクルージョンが発生する問題に対応しました。 スプライン ビューでキーマーカーが消える問題に対応しました。 スプラインビューでロックされたポイント選択を移動する際の問題に対処しました。 編集ビューアでのポリラインポイントのスケールとツイストの問題に対処しました。 一般的なパフォーマンスと安定性の改善
---------------------
Minimum system requirements
Windows 10 Creators Update.
16 GB of system memory. 32 GB when using Fusion.
Blackmagic Design Desktop Video 10.4.1 or later.
Integrated GPU or discrete GPU with at least 2 GB of VRAM.
GPU which supports OpenCL 1.2 or CUDA 11.
NVIDIA/AMD/Intel GPU Driver version – as required by your GPU.
Installing DaVinci Resolve software
Double-click the DaVinci Resolve Installer icon and follow the onscreen instructions. To remove DaVinci Resolve from your system, go to the Programs and Features control panel, select DaVinci Resolve, click on Uninstall and follow the onscreen prompts.
Migrating legacy Fairlight projects to DaVinci Resolve
In order to import legacy Fairlight DR2 projects into DaVinci Resolve, download and install the following utility on your Windows system: https://downloads.blackmagicdesign.com/DaVinciResolve/Fairlight-Project-Importer.zip
After installing the utility, you should see an option to "Import Fairlight Project" in the Fairlight menu in DaVinci Resolve.
Additional information
Please refer to the latest DaVinci Resolve configuration guide for details on Windows support, including certified driver versions for third party hardware. It is available from www.blackmagicdesign.com/support/.
You will also need to download and install the latest Blackmagic Design Desktop Video software for monitoring with your Blackmagic Design video hardware. Desktop Video is available from www.blackmagicdesign.com/support/.
© 2001-2023 Blackmagic Design Pty. Ltd. All rights reserved. Blackmagic Design, Blackmagic, DeckLink, Multibridge, Intensity, H.264 Pro Recorder and "Leading the creative video revolution" are trademarks of Blackmagic Design Pty. Ltd., registered in the U.S.A and other countries. Adobe Premiere Pro, Adobe After Effects and Adobe Photoshop are registered trademarks of Adobe Systems. Avid Media Composer and Avid Pro Tools are registered trademarks of Avid. Apple Final Cut Pro, Apple Motion and Apple Soundtrack Pro are registered trademarks of Apple Computer.
Updated October 05, 2023.
0 notes
Text
Where is the nvidia control panel windows 10

WHERE IS THE NVIDIA CONTROL PANEL WINDOWS 10 SOFTWARE
WHERE IS THE NVIDIA CONTROL PANEL WINDOWS 10 PC
The only thing you need to have is a computer or laptop with a NVIDIA graphics card installed.
WHERE IS THE NVIDIA CONTROL PANEL WINDOWS 10 SOFTWARE
Yes, you can download this software package completely free of charge.
Any 3D technology-related options can be found under the 3D Settings section.
In the Set up G-SYNC section you can activate and configure the G-SYNC functionality, which is designed to reduce 'screen tearing' when playing games on your PC.
Under Adjust desktop size and position you have the ability to edit how the image is scaled. By clicking on Change resolution you can choose a desired resolution and the corresponding refresh rate.
From the Display section you can change the parameters referring to the image and resolution on your monitor.
When you launch the application, you can see how all the available settings are clearly arranged in the main menu of the program. Then, you should see the Nvidia Control Panel in your right-click context menu. Close Nvidia Control Panel and restart the machine. In Nvidia Control Panel, click on the Desktop menu and select Add Desktop Context Menu option. NVIDIA Control Panel works as a graphics display and adjustment panel, meaning that you can use it if you want to modify or readjust the behavior of your graphics card. Go to Windows 11 Control Panel to find and open Nvidia Control Panel. © NVIDIA How does NVIDIA Control Panel work?
Get system information: View detailed information about your NVIDIA hardware, your current DirectX version and the operating system you are running.
For example, you can change the resolution, adjust the color settings, reduce the latency or rotate your display.
Tweak your display: NVIDIA Control Panel comes equipped with countless configuration options for your display.
Thanks to the NVIDIA SLI technology, you can bundle the power of two or more NVIDIA GPUs and achieve visual surround effects.
3D settings: Manage the 3D settings of your graphics engine.
What are the key features of NVIDIA Control Panel? A good example of this is the 3D acceleration setting, which optimizes the performance of the computer while you play a video game.
WHERE IS THE NVIDIA CONTROL PANEL WINDOWS 10 PC
Thanks to this software you can easily visualize important information about the graphical performance of your PC or laptop, as well as costumise various parameters. NVIDIA Control Panel is a tool that allows users to access and tweak the core functions of their NVIDIA graphics card.

0 notes
Text
Where is nvidia control panel windows 10

#Where is nvidia control panel windows 10 install
#Where is nvidia control panel windows 10 android
#Where is nvidia control panel windows 10 software
#Where is nvidia control panel windows 10 series
#Where is nvidia control panel windows 10 free
#Where is nvidia control panel windows 10 free
This is a free service we are offering with no strings attached. We will be more than happy to assist you with any concerns that you may have with your device.
#Where is nvidia control panel windows 10 android
If you have any issues with your computer or Android device then feel free to contact us using this form.
#Where is nvidia control panel windows 10 series
In this latest installment of our troubleshooting series we will tackle the Nvidia control panel won’t open issue.
#Where is nvidia control panel windows 10 software
Although this is a solid performing software there are instances when certain issues can occur which we will be addressing today. It is a tool that allows you to make tweaks on your graphics settings to make games look better or run at a much faster frame rate.
#Where is nvidia control panel windows 10 install
Driver Easy will then scan your computer and detect any problem drivers.ģ) Click Update All to automatically download and install the correct version of all the drivers that are missing or out of date on your system (this requires the Pro version – you’ll be prompted to upgrade when you click Update All).The Nvidia control panel is a software that is usually installed when you install the Nvidia graphics driver on your Windows 10 computer. But with the Pro version it takes just 2 clicks:Ģ) Run Driver Easy and click the Scan Now button. You can download and install your graphics driver by using either the Free or the Pro version of Driver Easy. You don’t need to know exactly what system your computer is running, you don’t need to risk downloading and installing the wrong driver, and you don’t need to worry about making a mistake when installing. If you’re not comfortable playing around with drivers manually, you can do it automatically with Driver Easy.ĭriver Easy will automatically recognize your system and find the correct drivers for it. Option 2 – Automatically update your graphics driver Once you’ve downloaded the correct drivers for your system, double-click on the downloaded file and follow the on-screen instructions to install the driver. To get your NVIDIA graphics driver, you need to go to the NVIDIA website, find the driver corresponding with your specific flavor of Windows version (for example, Windows 32 bit) and download the driver manually. Option 1 – Download and install the driver manually It’s all done with just a couple of mouse clicks – easy even if you’re a computer newbie. Option 2 – Automatically (Recommended) – This is the quickest and easiest option. Option 1 – Manually – You’ll need some computer skills and patience to update your drivers this way, because you need to find exactly the right the driver online, download it and install it step by step. There are two ways you can update your graphicsdriver: So you should verify that your graphics adapter has the correct driver, and update it if it doesn’t. In most cases, NVIDIA Control Panel disappears because you are using the wrong graphics driver or it is out of date. If the methods above can’t help you, or you can’t see NVIDIA Control Panel even in Windows Control Panel, you need to update your graphics driver. This will open Control Panel (of Windows).ģ) In Control Panel, under View by, select Large icons.ĥ) In NVIDIA Control Panel, click View or Desktop, and then check Add Desktop Context Menu.Ħ) Right-click your desktop and see if your NVIDIA control panel reappears in the desktop context menu. To do so:ġ) Press the Windows logo key and R on your keyboard to invoke the Run dialog.Ģ) Type “ control” in the Run dialog and press Enter on your keyboard. You can open NVIDIA Control Panel in Windows Control Panel and then show it in your desktop context menu. Your NVIDIA Control Panel may be hidden by Windows during the upgrade from a previous version or by software that has accidentally changed the graphics settings. Method 1: Unhide your NVIDIA Control Panel You may not have to try them all just work your way down the list until you find the one that works for you. You may be very annoyed when you‘re experiencing this issue. But don’t worry. They can’t find the NVIDIA Control Panel on the desktop context menu or in the Windows Control Panel. Many NVIDIA graphics adapter users have reported that their NVIDIA Control Panel is missing on their Windows computer.

0 notes
Text
mutt's guide to using dsr on ts4, with pictures!!!
ok so, dsr is a thing available for nvidia gpus that allows you to take veeery high resolution screenshots of games without much trouble, like this
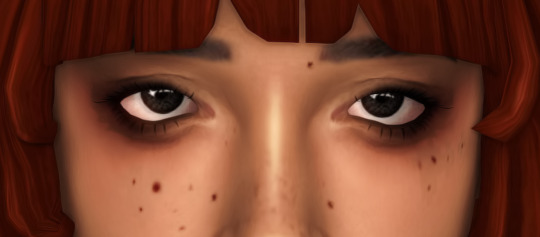
it's an alternative to srwe, as it plays nicer with a lot of reshade shaders and is just, generally more nice to use! let me teach you how to use it - full tutorial with pictures for every step under the cut (im sorry its too long without the cut)
step 1: right click your desktop and open the nvidia control panel
step 2: go here (adjust desktop size and position)
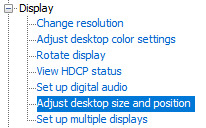
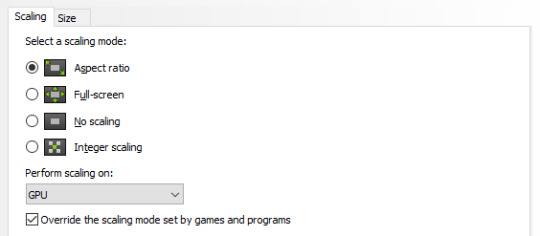
step 3: make sure your settings are set as follows! this is important
step 4: now, go here (change resolution)

step 5: under change resolution, click on this button (highlighted with a red square)
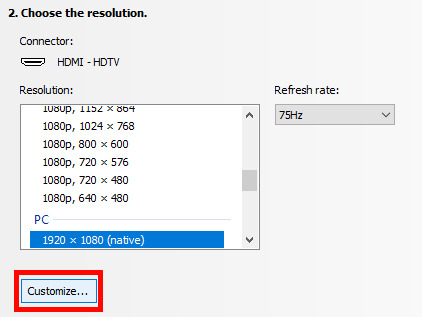
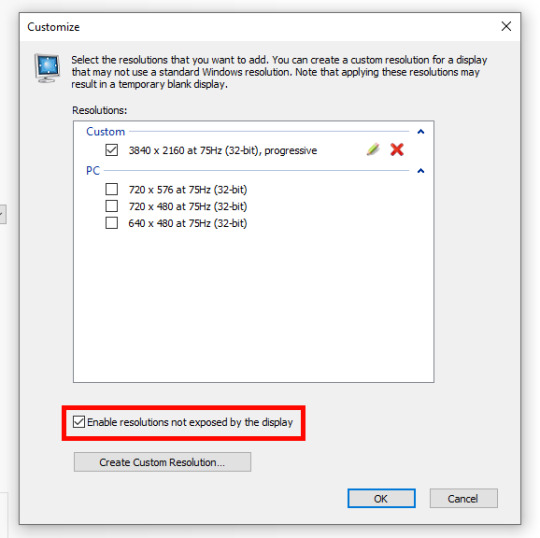
step 6: in the windows that appears, make sure that "enable resolutions not exposed by display" is ticked! this is very important! (again, highlighted in red - it should look like this)
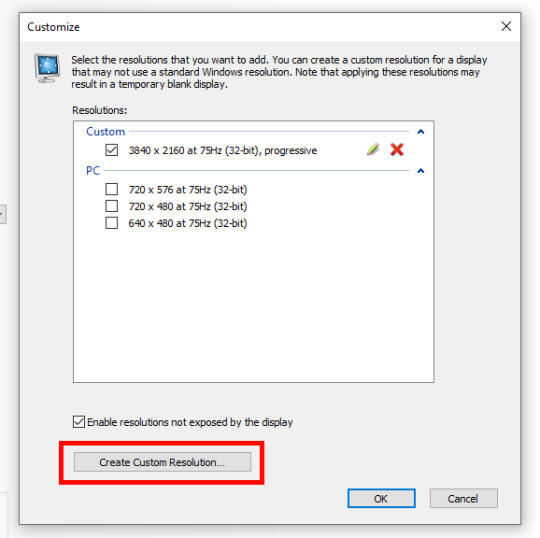
step 7: now, click on "create custom resolution"
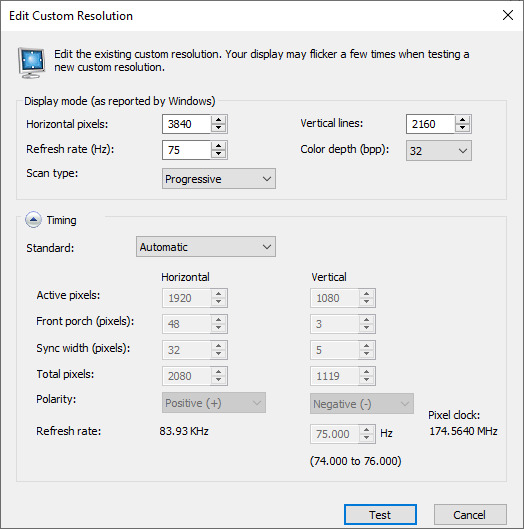
step 8: this is where you set your desired resolution, and where i get a bit rambly; so, in my opinion, there is ZERO reason to go above normal 4K for TS4, as it's generally not a really high-poly game and it has rather simple graphics. you can fuck around a lot here, but if you don't feel like it, here are my settings - this will give you 4K screenshots. NOTE: THE REFRESH RATE DOESN'T NEED TO BE 75! SET IT TO WHATEVER THE REFRESH RATE OF YOUR MONITOR IS!
step 9: now, click on test
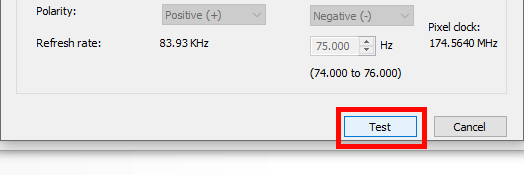
step 10: let the thing load, and after it's done, a window like this should pop up.. but yknow, in your language. click on "yes" (or accept or ok!! idk mine's in russian; basically, the button highlighted here!)
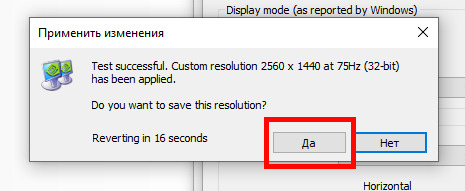
step 11: click "ok" in the window that pops up! like this! afterwards, close the nvidia panel

step 12: open the sims 4 and go into game options, then into graphics
step 13: set your "display type" as "fullscreen", like this

step 14: under "resolution", select whatever resolution you setup earlier; in my case it's 4K, so if you used the same resolution, your settings should look like this

step 15: click on apply changes!
AND UR DONEE!! WAHOOIEE!! now, take your screenshot using reshade, and then go back into sims settings and set it back to what you usually play at, then apply changes!
every time you need to take an HD screenshot, simply open game settings and use your custom resolution! that's it, have fun :3
#sims 4 tutorial#ts4 tutorial#sims 4 screenshots#ts4 screenshots#sims 4 screenshot tutorial#ts4 screenshot tutorial#sims 4 hotsampling#ts4 hotsampling#srwe#nvidia#dsr#tutorials
771 notes
·
View notes
Note
Hi again, I'm the anon who sent you the ask where I asked for advice on how to stop screen tearing and limit FPS and I managed to limit it to 60 with your tips, thank you so much 💕 I still get screen tearing though and I have reinstalled Windows 10 to get rid of possible third party programs, hidden viruses and bugs that could be screwing up my game, I installed all needed programs to run Sims 3, turned Vsync on and limited FPS to 60 for ts3w.exe and ts3.exe in both Intel Graphics Command Center and Nvidia Control Panel, checked that the game actually recognizes and uses the Nvidia GPU instead of integrated graphics while I'm playing Sims 3, I have tried running in compability mode for Windows 7, turning on triple buffering, turning off full screen optimizations and Windows Game Mode, made sure my laptop isn't overheating and the FPS doesn't exceed 60 while playing anymore but SpecialK still says that Vsync is turned off and I get tearing. No tearing in borderless windowed mode but it sucks when you can't use edge scrolling. This is specific for Sims 3, I get no tearing in Sims 2 even in full screen mode. I'm this 👌 close to throwing my laptop out of the window 😄 and if someone sees this ask and has an idea what I could do, all tips are welcome 🙏
oh noo :( that is so frustrating. i haven't had that problem before so i'm really not sure what else could be causing it. i hope other people can comment below!
6 notes
·
View notes
Text
so, you got the steam port of sonic adventure 2, and you noticed its a completely broken mess. yeah, i did too. i spent around an hour yesterday troubleshooting, and ive compiled some bugs and solutions in case it could help anyone. all of this is only tested for windows 10 with an xbox one controller (and a dualsense, in later revisions) and an NVIDIA graphics card
i'll start by saying the pathing to navigate to the sa2 folder because youll need to be in the folder to change a few things. the pathing for me is
This PC > C:// > Program Files (x86) > Steam > SteamApps > Common > Sonic Adventure 2
this may change if youve changed where your steam games install, but this should be the default. ill just be referring to this as "the sa2 folder" from now on
my game freezes on boot:
navigate to the sa2 folder. right click "sonic2app" (you may also want to do this for "Launcher"). click "Troubleshoot Compatibility", then "Try Recommended Settings", this should set the game to windows 7 compatibility. test it, and if it stops crashing, save the settings
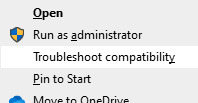
my controller isnt being recognised:
this is something that ive found can only be toggled through the launcher rather than ingame, under the menu Player
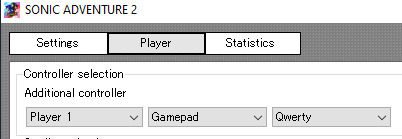
i don't even see gamepad as an option under that menu:
try booting SA2 specifically through steam's client, as opposed to through the modloader or other methods

i cant get past the creating a savefile screen:
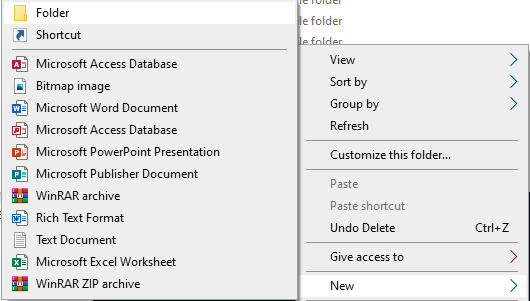
while in the sa2 folder, navigate to Resource > gd_PC folder. right click and hover New, and make a new folder inside gd_PC, and rename the folder as SAVEDATA. relaunch the game and you should be able to save now
my game is going like 120-200fps, oh god
(note: i do not know how to fix this on any graphics card that isnt NVIDIA)
(EDIT: the SA2 modloader features a FPS lock, so this could also be a valid option)
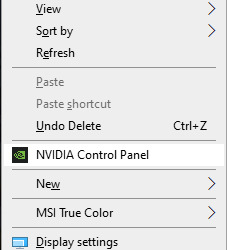
open the nvidia control panel (i can access it via right clicking on my desktop, and it comes up under the dropdown)
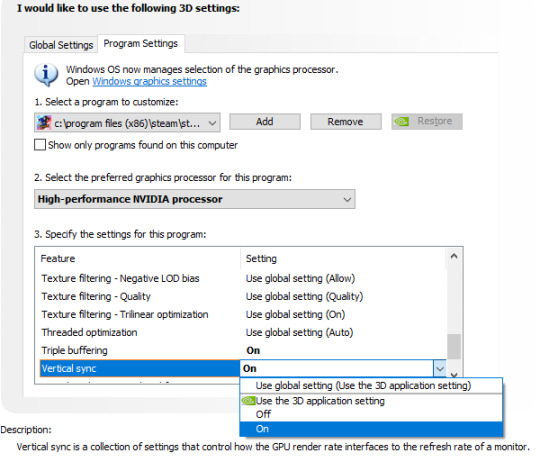
navigate to Program Settings, and under Add, navigate to "sonic2app" (location listed above). to tweak any settings under this, i had to set "Select the preferred graphics driver for this program:" to be "High-performance NVIDIA processor"
under "Specify the specifics for this program:", scroll to Vertical sync and toggle it to on. Max frame rate can also be toggled under the same window, i toggled mine to 60fps
my game keeps freezing
this fix is also under the nvidia control panel. change the toggle for power management mode, i have it set to prefer maximum performance but maybe try adaptive. default seems to be optimal power
wtf is with this trolley in city escape being stuck on my screen?
this is an issue with intel processors. this is another issue that can be fixed with the SA2 modloader
my controls feel extremely sensitive
try this mod
other issues ive had have been mod related. so if anyone has any questions about those or other issues, do feel free to ask and i am willing to assist
#long post#i know some people that follow my twitter that have had issues so i wanted to make a writeup about it#cuz twitter character limit#dethtxt
2 notes
·
View notes
Text
Adobe photoshop 7 setup
Photoshop started the digital image manipulation revolution more than 30 years ago, and Adobe's groundbreaking application continues to be the best photo editing software money can buy (or rent, to be more precise). If you need layered image editing, typography, 3D modeling, drawing, and a multitude of effects, you need Photoshop. Designers and photographers alike find the most—and the most-advanced—tools available for their crafts in this application. Mind-blowing AI-powered neural filters, sky replacement, live shapes, more control over cloud-stored files, and pattern preview all appeared in the major update released at the company’s Max conference. A smaller March update added a Super Resolution raw enlargement tool and support for Apple Silicon-based Macs. Photoshop remains PCMag's undisputed top choice for Adobe Photoshop professional photo editing software.

How Much Does Photoshop Cost?
To get the latest version of Photoshop, you need a Creative Cloud subscription. This means you need to sign in with an existing Adobe ID or create a new one. The Photography plan is $9.99 per month, and that also gets you Photoshop Lightroom, our Editors' Choice winner for photo workflow software, and 10 Adobe Stock images.
You can no longer simply buy a one-payment license for Photoshop, which annoys some users who don't like the software-as-a-service model. Those who feel this way may want to consider options such as Corel's surprisingly capable PaintShop Pro, CyberLink PhotoDirector, or even Adobe's own Photoshop Elements, all of which can be purchased outright. And if you don't want to pay a cent, you can use the free, open-source GIMP software, though doing so can be a painful, counterintuitive experience if you're used to the convenience and polish of Photoshop.
To install the application, you first install the resident Creative Cloud helper program, which handles updates and syncing your files online. This is also where you can find Adobe news, stock images, and the Behance creative social community (more about this later). In the newest update of Photoshop, you also can browse and easily install plug-ins from the Creative Cloud utility.
You should only consider installing Photoshop on a fairly powerful PC or Mac. I tested on a 3.4GHz Core i7 PC running 64-bit Windows 10 with 16GB RAM and an Nvidia GeForce 1650 graphics card. Installation took about 10 minutes. Mac users must be running macOS 10.13 or later. New for the March 2021 update is support for Apple Silicon M1-based Macs. PCMag's Tom Brant ran some tests on that hardware and found it offered some performance advantages.
If you haven't boarded the Creative Cloud train yet and are still clinging to your ancient licensed version of Photoshop, you miss out on other recent features like Content-Aware Crop, Face-Aware Liquify, Artboards, Cloud Documents, touch and stylus input support, the Design Space view, synced libraries, a glyph panel, and lots more. Photographers and photo editors also benefit from tools for haze removal, more navigation options, and new raw camera file support.
1 note
·
View note
Note
Can i ask you which settings you use in the graphic rules makes to make your game work?
Hi there! I assume you mean the settings on my graphics card? I’m such a rookie with this stuff, and I have my computer in Finnish, so I’ll try my best to translate everything.
I know you asked about graphic rules, but I thought I’ll tell about all the problems I’ve had when playing ts2 on win 10 and how I’ve fixed them. I have NVIDIA geforce gtx 960, so if your graphics card is some other brand, you’ll have to apply the first tip to your graphics control panel.
1. First problem I ran into was not being able to turn smooth edges on in my game.
Solution: I opened NVIDIA control panel, went to “Manage 3D settings” > “Program settings” > chose the latest expansion pack > changed the settings so that these settings overrule all game’s own settings of smooth edges.
2. The windowed mode was only 800x600 pixels.
Solution: This tutorial.
3. Indoor shadows are black squares.
Solution: This tutorial.
4. My game would randomly crash or wouldn’t start at all.
Solution: This patch for the crashing. For not starting: Deleting .cache-files in your The sims 2 -folder (the same place where your downloads-folder is).
Treat these tips with caution, since I’m no expert. I mostly just try everything and hope for the best. 😇
10 notes
·
View notes
Note
Hi, I really love Betterfield. It's one of the most beautiful neighborhoods I've ever seen and I love the way you designed it. I especially love these early summer night pics, they're so gorgeous. I'm also very impressed by your graphics. What kind of graphics card or computer setup in general do you have, if I may ask? I'll need to buy a new computer soon and I'd love for my game to look like yours.
Hi dear Anon! :) Thank you very much for your kind words! 💜💜💜 Actually Betterfield is a remake of @ousmeo’s remake of @criquette-was-here‘s Dullfield. When I first saw that neighborhood it was love at first sight, and I wanted that map to be the base of Betterfield (which already existed). I modified and redecorated it many times, this version of Betterfield is the 2020 version, but there were many before. I have to say there’s still a lot of work with this to finally be complete. Anyway I’m thankful for all of the wonderful neighborhood deco creators!
And about my graphics setup... Well, it’s interesting you asked it, because yesterday I was about to write a post dedicated to this theme, I’m just not sure about some things so there’s a lot of testing still waiting for me, but here (after a lot of useless talking) I answer your question. 😁
So, I have a Lenovo Ideapad 520, with Intel i7 7500U, 8gb RAM, and two graphics card, an NVIDIA GeForce 940MX and an integrated one, Intel HD Graphics 620. Oh and I run the sims 2 from an SSD. That’s it in general, but if you interested I explain how I manage to run the game with such a beautiful graphics these days under the cut.
Warning! It’s going to be messy and huge, and more like a long boring story than a tip, but can be useful for someone. (I’ll write it down properly someday)
------cut should be here but tumblr refuses to put it here, and put it at the top of post instead where I can’t delete, sorry------
When I bought my laptop I was really dissapointed, because I was only able to play the game with the integrated card, and it wasn’t bad but kind of annoying when I knew I have better. If I tried to enter Betterfield with nvidia, the game crashed on the neighborhood loading screen. Uptil some point I was like okay, then I’ll play with integrated card, nevermind........ but of course I’m dealing with those problems like almost everyone in the community the random crashes and purple flashing.
I’ve dedicated half of my life to solve these problems. :D Sims 2 really is an annoying game! I’ve tried every possible solution what can be found over the internet, there were always some little trick what helped, but after some time the troubles came back. The last year was intense. There are a lof of clever people out there finding new ways to get rid of the crashing and flashing issues coming with new and new solutions and I couldn’t be more grateful to them. When I say I‘ve tried everything I’m not kidding. And I was like okay, I’m going to pretend my integrated card doesn’t exist and I will fix NVIDIA. However there are those annoying issues with both of them........
I’m trying to mention everything what helps me these days to run a smooth and beautiful sims 2 with a huge CC folder (67k+ file lot of them really high poly). First the 4gb patch and the Graphics Rules Maker. These two are pretty common.
There’s one solution what seems like to help a lot of people but for me it never worked, the DXVK method. It looks really useful, and time to time I give it a shot, but somehow never works out for me, my game crashes whenever I try to use it. But the tip @episims made is one of the most useful things I’ve ever seen, and the one by @dramallamadingdang as well.
Absolutely useful, but somehow never enough. Maybe because of my huge CC folder, or some broken mod, or my computer specs, or just windows 10 or sims 2....... whoever knows....So I was messing around with nvidia profile inspector according to iCad’s tip, trying to reach beautiful garphics with low ingame settings. It was a complete failure. Maybe my expectations are too high but those looked terrible! I decided to turn everything to the best in nvidia control panel (profile inspector seems too complicated for me), and then checked the game again. It was still ugly as hell with low ingame settings. Then I thought what the heck, and I’ve turned every settings to the best and highest, and went on checking Betterfield.
It was something I’ve never seen before. A completely smooth, lag free, purple flashing free, crash free wonderful game, with beautiful textures, smooth edges. With the highest graphics setting in and out of game! I loaded my biggest lots which are always crashing or flashing, none of them did! That was the time when I first posted about Betterfield.
The next day I was really happy, started my game thinking it’s going to work... well, I was wrong, but not too surprised. It crashed when I loaded Betterfield. I took a deep breath and started to think through what have I done yesterday what helped. And after I’ve tried some method I guess I found the little trick what helps me from that day to reach that “dream state of sims 2” again.
So, I have an almost empty neighborhood which I named “stop crashing b**ch”, that I use for testing and etc... I did the graphics tests I mentioned above there as well. So my first thing when my game loads up is to load that neighborhood and a household in there. In the household I set all of the graphics settings to the lowest (expect smooth edges). Then, I load up Betterfield. I have to mention here Betterfield is really a huge city, with tons of decoration, lots, and households (which could be corrupted as well XD). So, at that point Betterfield loads up just fine, but remember the settings are on the lowest. Then I enter one of my biggest lot, which used to be nothing more than a purple flashing. And in the household I turn the garphics settings to the highest again. And that’s it. Ugly textures are refreshing, becoming high res and beautiful, Sims 2 runs like a dream, and beautiful as a blooming flower! At this point I usually test night mood and turn on and off some lights just to see everything is fine for real. After that I can enter to my other big households, lots, without any crashing or flashing. Once I look around everywhere in 360 degree it’s absolutely lag free. Same goes for the neighborhood itself. Beautiful in day and night. :)
The only reason I haven’t share this little discovery of mine, because there’s one lot (Betterfield High School) which is still causing the purple flashing (even if it’s just a huge unfurnished building...), and sometimes there are some objects here and there randomly flashing... but according to the purple game I had before it feels more like a small bug or something :’)....
Okay, what I got is Sims 2 with highest graphics settings in game and in Nvidia control panel (like 8x edge smoothing and stuff...), working beautifully, the only thing I have to do before playing my HUGE neighborhood with my HUGE and high poly CC folder is to load up an empty neighborhood, enter a family, set the graphics to the lowest, then enter my big city, enter a big lot (or whatever, I’m not sure about this part), and set the graphics to the highest again!
I’m not sure if everyone have read this or if it makes any sense (bc of my crappy english), but I promise after some more testing, if I think it’s actually useful, I’m going to share a proper, understandable tip about this. ^^”
2 notes
·
View notes
Text
DOWNLOAD ALIENWARE ETHERNET DRIVER
File Name: alienware ethernet driver Operating Systems: Windows NT/2000/XP/2003/2003/7/8/10 MacOS 10/X Uploader: Suraj File Format: exe File Version: 618131767 Download Type: http File Size: 23 Mb Price: Free Downloads: 1311 Date Added: 18 August, 2019

What's New: - Fixed WiFi scheduler related issues. - F3, G1 and G2 AMD CPUs- Fixed issue with onboard NICIt is highly recommended to always use the most recent driver version available. - Bug - Fixed the bug where the array fails to rebuild when using RAIN 51 or RAID 61 with multiple disks. - Fixes NVIDIA graphic card S3 resume issue. - Fixes(alienware ethernet driver Fixes) a phenomenon where the previous Firmware Version 1.1.0.1.00 offered incorrect color balance. - Fixed the issue that camera cannot reboot after schedule reboot is set. - Fixed : case intrusion function doesn't work properly. - Fixed Sempron 3300 CPU Cool 'n' Quiet function fail issue. - Fixed PCIE recover card (QLI1638IEG) legacy OpROM can't launch. - Fixed issue: System(alienware ethernet driver System) will hang up at beginning of executing “Winflash” when secure boot key is installed. Users content: Audio driver for ROG Xonar Phoebus Solo 1. Dont change your way of life for a computer. - Tools in this component have been updated to include translations for Simplified Chinese. - Update for Dell new LOGOIt is highly recommended to always use the most recent driver version available. Fix ATI chipset with Winbond flash type ROM issueFix system run HCT kit fail issueUpdate VGA RomSupport Athlon64 E6 3000 CPU. When scanning with a Simple mode of Image Capture, the message that an error has been reported from the scanner may be displayed. Quick video upload to YouTube using bundled CrazyTalk Cam Suite PRO. Dell System Software is a utility that provides critical updates and patches for your operating system. Add: Right Click Traicon, ASIO Control panel is selectable. Users may encounter Blu-ray playback issues on PowerDVD after switching to Gaming Mode. Supported OS: Windows XP 64-bit Windows 8 Windows Vista 32-bit Microsoft Windows 8.1 (32-bit) Microsoft Windows 10 (64-bit) Windows Server 2016 Windows Server 2008 R2 Microsoft Windows 8.1 Enterprise (32-bit) Notebook 8.1/8/7 64-bit Windows Server 2008 Windows 2000 Windows XP 32-bit Windows Vista 64-bit Windows 8.1 Windows Server 2012 R2 Notebook 8.1/8/7 32-bit Windows 7 Windows Server 2003 32-bit Windows 10 Windows 7 32-bit Microsoft Windows 8 Pro (32-bit) Windows 8.1/8/7/Vista 64-bit Microsoft Windows 8 (64-bit) Windows 7 64-bit Microsoft Windows 8.1 (64-bit) Microsoft Windows 8 (32-bit) Windows 8.1/8/7/Vista 32-bit Microsoft Windows 8 Pro (64-bit) Microsoft Windows 8.1 Pro (64-bit) Microsoft Windows 10 (32-bit) Windows Server 2012 Microsoft Windows 8.1 Enterprise (64-bit) Windows Server 2003 64-bit Microsoft Windows 8 Enterprise (64-bit) Microsoft Windows 8 Enterprise (32-bit) Microsoft Windows 8.1 Pro (32-bit) Searches: alienware ethernet driver for Microsoft Windows 8.1 Enterprise (64-bit); alienware ethernet R84n; alienware ethernet driver for Microsoft Windows 8 Pro (64-bit); alienware ethernet driver for Windows Server 2003 64-bit; alienware ethernet driver for Windows XP 32-bit; alienware ethernet RPYKF8459; alienware ethernet Rna845-naw; driver alienware ethernet; alienware ethernet R RP845-8; alienware ethernet RP8459; alienware ethernet driver for Notebook 8.1/8/7 64-bit Compatible Devices: Scanner; Keyboards; Wifi adapter; Mouse; Video Projector; Printer To ensure the integrity of your download, please verify the checksum value. MD5: a08c944fd8d6b8731e64f2579694f11b SHA1: 8b74818fecbd27b6d2614ec9493098b6d066818c SHA-256: 00f118321adec090f79eeb71360581c068eec98fe6ad93dafc2b1b518d68154d
1 note
·
View note
Text
Iclone crazytalk animator pro

#Iclone crazytalk animator pro pro
#Iclone crazytalk animator pro software
#Iclone crazytalk animator pro professional
#Iclone crazytalk animator pro series
#Iclone crazytalk animator pro windows
multi-dimensional character and custom character creation via composer, you have the ability to bring your characters to life in almost any way you choose. Powerful tools help you control all of the action and the export process for complete management from start to finish.Ĭharacter creation – With a mix-and-match character system, instant style rendering, single V.S. You can set up your screen any way you choose to make using CrazyTalk Animator 2 that much easier.
#Iclone crazytalk animator pro software
Production environment – Dockable user interfaces, a 3D camera system, motion path and simple animation and the ability to manage your project’s export range all combine for the most flexible, user-friendly software on the market today.
#Iclone crazytalk animator pro series
Recommended requirements (CrazyTalk Animator 2 will have better performance in this environment): Dual core CPU or higher 4 GB RAM or higher recommended 10 GB free hard disk space or higher recommended Display Resolution: 1440 x 900 or higher Graphics Card: Nvidia GeForce 9 Series or higher /ATI HD 3000 Series or higher Video Memory: 1 GB RAM or higher recommended.Īdditional requirements: 3-button mouse DirectX 9 and WMEncoder 9 are required for WMV exporting Internet connection required for online activation Stereo devices and player are required for viewing contents with stereo vision.Īdditional requirements: 3-button mouse or touch panel Internet connection required for online activation Stereo devices and player are required for viewing contents with stereo vision. Minimum requirements: Dual core CPU or higher 2 GB RAM or higher recommended 5 GB free hard disk space or higher recommended Display Resolution: 1024 x 768 or higher Graphics Card: Nvidia GeForce 8 Series or higher /ATI HD 3000 Series or higher Video Memory: 512MB RAM or higher recommended.
#Iclone crazytalk animator pro windows
Windows: Windows 8/7/Vista/XP (with Service Pack 2 or later) compatible support for 32 and 64-bit OS. No matter what your level of experience, you’ll be able to put this amazing program to use and create a wide range of characters, scenes and finished animations that express your creativity.
#Iclone crazytalk animator pro pro
With three different editions, Standard, Pro and Pipeline, anyone can take advantage of CrazyTalk Animator 2’s exciting features.
#Iclone crazytalk animator pro professional
Building on the success of previous versions, CrazyTalk Animator 2 provides the tools you need to apply 3D motions to 2D characters, along with a host of tools that let you customize your animations and control every detail to produce a professional quality product. Providing an exciting new addition to the world of 2D animation, Reallusion has released its CrazyTalk Animator 2 animation software. is a participant in the Amazon Services LLC Associates Program, an affiliate advertising program designed to provide a means for sites to earn advertising fees by advertising and linking to We may get paid if you buy something or take an action after clicking one of these. Ltd. focusing on 3D Visualization, Product Design and Web Development whileĬontinuing to teach as an Adjunct Lecturer at the above-mentioned ADM in Singapore as well as a degree program in NTU’s Electronic Engineering faculty.Disclosure: Some links may be affiliate links. Most recently, he has founded an independent design studio Vithereal Pte. Thames Valley University (now University of West London) in 2002. He has worked as a freelancer, contractor and full-time employee in industry within the fields of new media, designing and development where he created screen-based experiences and content for companies and agencies including Arc Worldwide, Leoīurnett Group, Reuters, McKinsey & Co, and Tidal Wave in England. Sven spent 7 years as Assistant Professor of Interactive Media Nanyang Technological University’s School of Art, Design & Media (ADM) in Singapore and was the area coordinator for Interactive Media for some of this period. Sven J Norris received his BA (Hons) in Interior Architecture at the University of Wales Institute, Cardiff in 2000 and completed his Masters in Computer Arts at Note the minimal class size to start a class is 3 Pax. Note the venue of the training is subject to changes due to class size and availability of the classroom. If the course is cancelled, we will refund 100% to participants. We reserve the right to cancel or re-schedule the course due to unforeseen circumstances. Please email your queries to and we will forward your queries to the subject matter experts and get back to you asap. We provide free consultation related to the subject matter after the course. All courses will be conducted at Woodlands branch. Woodlands Main Branch:12 Woodlands Square #07-85/86/87 Woods Square Tower 1, Singapore 737715. If you don't have laptop, we can provide spare laptop for training use. Additional Note: Please bring your own laptop for hands-on training.

0 notes
Text
Intel 6 series c200 chipset driver windows 10

#INTEL 6 SERIES C200 CHIPSET DRIVER WINDOWS 10 HOW TO#
#INTEL 6 SERIES C200 CHIPSET DRIVER WINDOWS 10 INSTALL#
#INTEL 6 SERIES C200 CHIPSET DRIVER WINDOWS 10 DRIVERS#
#INTEL 6 SERIES C200 CHIPSET DRIVER WINDOWS 10 UPDATE#
#INTEL 6 SERIES C200 CHIPSET DRIVER WINDOWS 10 DRIVER#
I was looking for Intel R 6 Series C200 Series Chipset Family USB Enhanced Host Controller 1C26 for ages.
#INTEL 6 SERIES C200 CHIPSET DRIVER WINDOWS 10 DRIVER#
Intel 6/C200 Series Chipset USB Host Controller Driver 10.1.1.12 for Windows 10 圆4 driverĪSUS Android Bootloader Interface Driver 8.0.0.3 圆4 driverĮLAN SMBus Driver 11.11.19.2 for Windows 10 64-bit 圆4 driverĪMD USB Filter Driver 2.1.11.I use this application and get Intel R 6 Series C200 Series Chipset Family USB Enhanced Host Controller 1C26 drv in the blink of an eye. Intel Extreme Tuning Utility 5.2.0.14 圆4 driverĪSMedia USB Root Hub Driver 1.16.43.1 for Windows 10 圆4 driver
#INTEL 6 SERIES C200 CHIPSET DRIVER WINDOWS 10 UPDATE#
for Windows 10 64-bit 圆4 driverĪSMedia USB Root Hub Driver 1.16.38.1 for Windows 10 Anniversary Update 圆4 driver Intel Management Engine Interface Driver 11. Lenovo B50-70 Intel USB 3.0 Driver 2.5.4.40 for Windows 7 圆4 driverĪMD PCI Bus Driver 15.301.0.0 for Windows 10 64-bit 圆4 driver Nvidia nForce Driver 15.45 WHQL for Vista64/Win7圆4 圆4 driver Moreover, don’t forget to check with our website as often as possible to stay up to date with the latest releases.ĮLAN SMBus Driver 15.7.0.0 for Windows 10 64-bit 圆4 driverĪMD SMBus Driver 5.12.0.38 for Windows 10 64-bit 圆4 driverĪMD SMBus Driver 5.12.0.38 for Windows 10 Creators Update 64-bit 圆4 driver That being said, check the supported platforms, click the download button and apply the chipset driver. Despite the off-chance that other OSes might be compatible, we do not recommend installing any software on platforms other than the highlighted ones. In addition to that, do perform a system restart after you have completely applied the present release so that all changes take effect.
#INTEL 6 SERIES C200 CHIPSET DRIVER WINDOWS 10 DRIVERS#
Bear in mind that installing inappropriate chipset drivers can cause computers to malfunction. To apply this release, simply make sure your system configuration is supported by this package, get the file, run the available setup, and follow the on-screen instructions. Also, this step might improve compatibility and bus transfer speeds, add various changes for sleep state behavior, power saving functionality and others, or include support for new features.
#INTEL 6 SERIES C200 CHIPSET DRIVER WINDOWS 10 INSTALL#
If you install this package, the system will receive related information regarding the chipset. However, to make use of all board components, appropriate chipset drivers must be applied. Windows OS automatically installs a generic driver that allows computers to recognize basic motherboard functions. Browse to the folder where you extracted the driver and click Ok About Chipset Driver: If you already have the driver installed and want to update to a newer version got to "Let me pick from a list of device drivers on my computer"ħ. Intel (R) 6 Series/C200 Series Chipset Family SMBus Controller - 1C22 Windows. Choose to select the location of the new driver manually and browse to the folder where you extracted the driverĥ. Intel (R) 6 Series/C200 Series Chipset Family SMBus Controller - 1C22 Windows Vista 9. But my usb drivers wont work in msi-x mode. Right click on the hardware device you wish to update and choose Update Driver SoftwareĤ. I have still old usb drivers from microsoft from 2006: Intel(R) 7 Series/C216 Chipset Family USB Enhanced Host Controller I read intel 7 gen usb drivers should support msi-x. Go to Device Manager (right click on My Computer, choose Manage and then find Device Manager in the left panel), or right click on Start Menu for Windows 10 and select Device Managerģ. In order to manually update your driver, follow the steps below (the next steps):ġ. Take into consideration that is not recommended to install the driver on Operating Systems other than stated ones. If the driver is already installed on your system, updating (overwrite-installing) may fix various issues, add new functions, or just upgrade to the available version. This and other Motherboards drivers we're hosting are 100 safe. Please note we are carefully scanning all the content on our website for viruses and trojans. The package provides the installation files for Intel 6 Series/C200 Series Chipset Family USB Enhanced Host Controller - 1C26 Driver version 10.1.1.12. This page contains drivers for 6 Series/C200 Series Chipset Family PCI Express Ro manufactured by Intel.
Drone / Helicopter / Multicopter / Controller.
Scanner / Digital Camera / Webcam / Camcorder.
Locate the exact driver you need quickly and easily, just follow these 3 easy steps to update Intel 6 Series/C200 Series Chipset Family USB Enhanced Host Controller - 1C2D drivers now.
#INTEL 6 SERIES C200 CHIPSET DRIVER WINDOWS 10 HOW TO#
Scanner / Digital Camera / Webcam /Camcorder How to update and fix Intel 6 Series/C200 Series Chipset Family USB Enhanced Host Controller - 1C2D driver in 2 minutes.

0 notes
Text
Opengl extensions viewer gdi generic

#Opengl extensions viewer gdi generic install#
#Opengl extensions viewer gdi generic drivers#
#Opengl extensions viewer gdi generic update#
#Opengl extensions viewer gdi generic driver#
He also pointed out under GDI Generic rendering, but it should be ATI. Thedriver setup for windows 7 refuses to run. I downloaded realtech VR OpenGL extensions Viewer, it also reports OpenGL 1.1.
#Opengl extensions viewer gdi generic driver#
Unfortunately, there is no new driver for the 'Mobile Intel 4 Series Express Chipset Family' of my laptop. Seems like I am stuck with Windows' very basic version of OpenGL 1.1.
#Opengl extensions viewer gdi generic drivers#
Try upgrading your graphics drivers and/or your graphics hardware in case of problems. Minimum required OpenGL version (2.0) NOT found! GL: No framebuffers extension is supported GL: available extensions: GL_WIN_swap_hint GL_EXT_bgra GL_EXT_paletted_texture GL: glGenFramebuffers is NULL, try to detect an extension Providers: img_tex, img_dds, img_gif, img_sdl2, img_pil (img_ffpyplayer ignored) That's what it says when I try to start any kivy app (here: touchtracer): This contains the config file for my slicer as well as the STL file I was working with when the problem occurredīuild: PrusaSlicer-2.5.Stupid me updated my perfectly working Windows 7 laptop to Windows 10 - and now kivy fails to work. I have also tried forcing Gephi to use the Geforce in the NVIDIA Control Panel where under 'Manage 3D settings' > 'Global Settings' > 'OpenGL rendering GPU' is set to 'Geforce GT 710'. So I'm posting it here in hopes that either someone else has encountered similar issues, or perhaps it is an issue with PrusaSlicer itself, and maybe this will help in the quest to solve said issue. Regardless, Gephi seems to be falling back to some kind of generic graphics driver. It may be corrupting the driver after being idle for so long, but I'm not sure. I seem to have tamed the beast for now though, as a system reboot and driver reinstall fixes it when it occurs, and the issue only happens when I leave PrusaSlicer open and idle for more than about 10 minutes. However, a few days passed and I encountered the same error message and blue screen. I downloaded it and it seemed worked fine. Seems like I am stuck with Windows very basic version of OpenGL 1.1. I contacted support, and they suggested I try using the 2.5.0 alpha release of PrusaSlicer. Renderer: GDI Generic Try upgrading your graphics drivers and/or your graphics hardware in case of problems. I used NVIDIA Control Panel and the Windows settings to force PrusaSlicer to use my GPU instead of my CPU.
#Opengl extensions viewer gdi generic install#
I did a clean Windows install thinking it was a Windows problem since the install was rather dated. OpenGL falling back to Microsoft Generic GDI instead of Geforce Once its running phpBB Debug PHP Warning : in file ROOT/vendor/twig/twig/lib/Twig/Extension/Core. I updated both the CPU and GPU drivers, and the problem persisted. I guess I'll try to seek non-SSE OpenGL drivers then. The problem originally arose while I was using PrusaSlicer version 2.4.2, and it was seemingly random. Opengl in driver versions Forceware 80+ requires SSE extensions, otherwise they fail to work, Cpus that support this extension are Morgan based Duron cores, and Palomino based AthlonXP cores including all AthlonXP's after this, all Athlon64 and Pentium4 and higher cores support SSE.
#Opengl extensions viewer gdi generic update#
You may need to update your graphics card driver." Then after a few moments, I would get a Windows blue screen with the error code: "VIDEO_DXGKRNL_FATAL_ERROR." I am using a Dell XPS 9560 laptop with an Intel Core i7 7700HQ and an NVIDIA GTX 1050 GPU. However recently within the past couple weeks, I've been getting an error from PrusaSlicer and GCODE viewer that says "PrusaSlicer requires OpenGL 2.0 capable graphics driver to run correctly, while OpenGL version 1.1.0, render GDI Generic, vendor Microsoft Corporation was detected. I've been using PrusaSlicer for about 3 months now as I just recently bought a MK3S+, and I've been loving it.

0 notes