This is where I post Sims 3 related things. Mostly build stuff.
Don't wanna be here? Send us removal request.
Text
Finally some answers to the issues with Reshade when using DXVK! Thank you so much!
How to run The Sims 3 with DXVK & Reshade (Direct3D 9.0c)

Today I am going to show you guys how to install Reshade and use Direct3D 9.0c (D3D9) instead of Vulkan as rendering API.
This tutorial is based on @nornities and @desiree-uk's awesome guide on "How to use DXVK with The Sims 3", with the goal of increasing compatibility between DXVK and Reshade. For users not interested in using Reshade, you may skip this tutorial.
If you followed nornities and desiree-uk's guide, it is strongly recommended that you start from scratch, meaning you should uninstall DXVK AND Reshade completely. Believe me when I say this: it will save you a lot of time, frustration, and make your life so much easier.
For the purpose of this tutorial, I am on patch 1.69.47 and running EA App on Windows 10, but it should work for version 1.67.2 on Steam and discs, too. This tutorial does not cover GShade.
Before we start
Backup your files, even the entire folder (Program Files\EA Games\The Sims 3\Game\Bin) if you want to be extra safe; you will thank yourself later. If you do not wish to backup the entire folder, at least backup the following:
reshade-presets
reshade-shaders
Reshade.ini
Options.ini (Documents\Electronic Arts\The Sims 3)
Keep them somewhere secure, for your peace of mind (and sanity).

Done? Great stuff, let us begin!
Step 1:
If you installed DXVK following nornite and desiree-uk's guide, go to the bin folder and delete the following files to fully uninstall DXVK, we are starting from scratch:
d3d9.dll
TS3.dxvk-cache
dxvk.conf
TS3_d3d9.log (or TS3W_d3d9.log)
Step 2:
If you already have Reshade on your PC, uninstall it using this: https://reshade.me/downloads/ReShade_Setup_X.X.X.exe (replace X.X.X with version number)
Step 3:
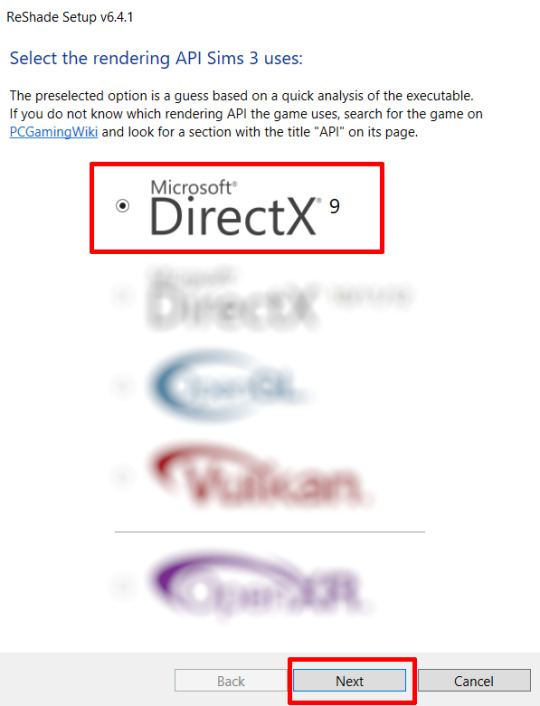
Perform a clean install of Reshade (I am using the latest version - 6.4.1 at the time of writing). Please note that you need a version no older than 4.5.0 or this method will not work. Choose DirectX9, click next.
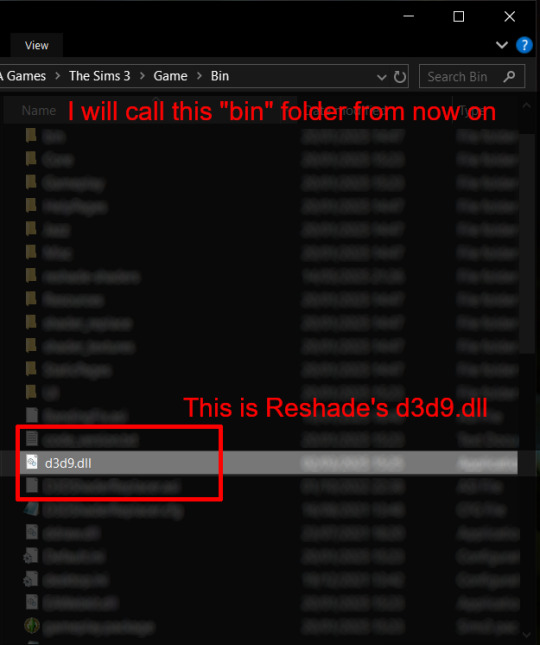
Once the installation is complete, you should see a "d3d9.dll" file inside The Sims 3's bin folder (Program Files\EA Games\The Sims 3\Game\Bin):
It may all seem familiar thus far. Indeed, this is how we installed Reshade in the past before using DXVK, but here comes the tricky part:
Step 4:
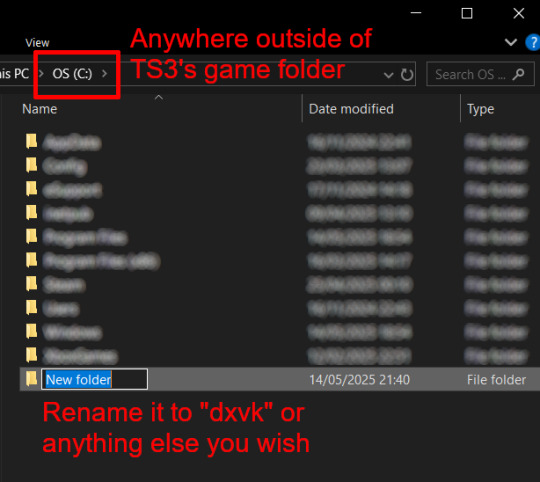
Create a new folder outside of The Sims 3's game folder (I created it on my C drive), name it "dxvk" or whatever else you like. Remember where you saved this folder, we will return to it later.
Step 5:
Now we need Reshade to load the next dll in order to chain Reshade with DXVK. Click on the search bar, and type in "View advanced system settings".
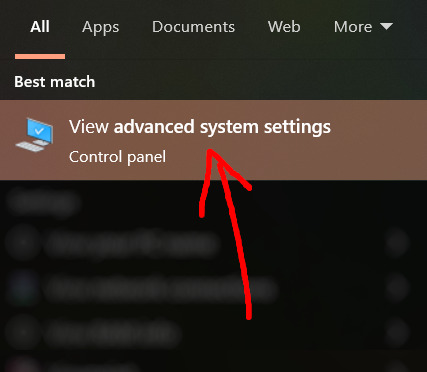
Click on "Environment Variables..."

Under "User variables", click "New..."
In the new pop-up window, find "Variable name:" and type in:
RESHADE_MODULE_PATH_OVERRIDE
for "Variable value:", paste in the directory that leads to the folder we created earlier. Once you are done, hit OK, and then hit OK again to save the changes made.
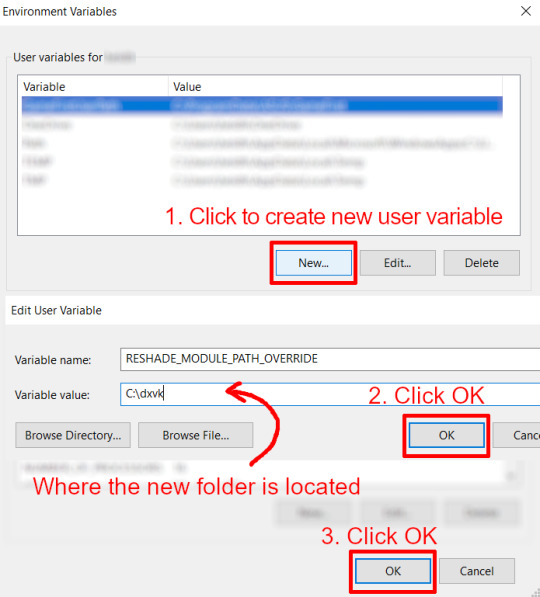
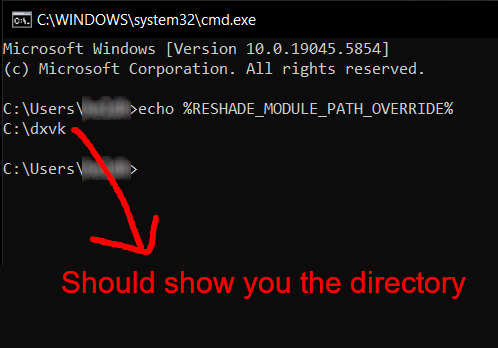
You can use Command Prompt to check if this new environment variable has been registered by entering:
echo %RESHADE_MODULE_PATH_OVERRIDE%
It should return you the folder's location. If not, make sure you have typed in the variable name correctly and confirm the folder's location.
Step 6:
Download DXVK (version 2.3.1) from here: https://github.com/doitsujin/DXVK/releases/tag/v2.3.1 and unzip "dxvk-2.3.1.tar.gz" (I use 7-Zip, but winRAR works, too). Remember to choose x32, and move only "d3d9.dll" to the folder we made earlier.
Now we have two "d3d9.dll" files, one from Reshade (lives in the bin folder), and the other from DXVK (in this new folder, outside of The Sims 3 game folder).

Step 7:
Download "dxvk.conf" here: https://github.com/doitsujin/dxvk/blob/master/dxvk.conf delete everything inside, and enter the following:
d3d9.textureMemory = 1 d3d9.presentInterval = 1 d3d9.maxFrameRate = 60 dxvk.hud = devinfo
Ctrl + S to save the document.
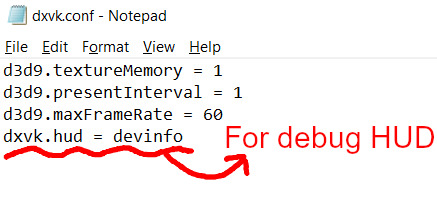
The first 3 lines are taken from @nornities and @desiree-uk's guide.
The last line is only for debugging purposes. Due to the inconvenient location occupied by the HUD (top left corner of your screen), it should be removed once the installation is successful.
Step 8:
Drag "dxvk.conf" into the bin folder, where Reshade's "d3d9.dll", "TS3.exe", and "TS3W.exe" all live.

Step 9:
Now fire up the game and check if both are showing up:

Lastly, check for “TS3.dxvk-cache” in the bin folder:
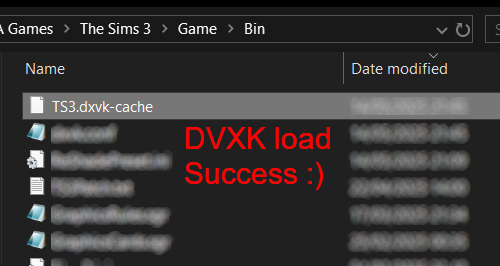
If it is there, congratulations! You have successfully installed DXVK and Reshade utilising D3D9 as API! You can now go to "dxvk.conf" and remove its last line "dxvk.hud = devinfo" and have fun! :)
Hope this tutorial isn't too confusing, the last thing I want is to over-complicate things. If you still need some help, comment down below or send me a DM/ask, I'll try and troubleshoot with you to the best of my ability.
Credits:
@nornities and @desiree-uk for their fantastic guide.
@criisolate for promulgating the usage of DXVK in TS3 community.
reddit user folieadeuxmeharder for helping me troubleshoot and informing me of this workaround.
doitsujin for creating DXVK.
crosire for creating Reshade.
60 notes
·
View notes
Text
🚨 🚨 🚨 🚨 🚨 🚨 🚨 🚨
42K notes
·
View notes
Note
Hey, first of all thank you for your dxvk tutorial <3. I followed it and noticed the biggest difference when it comes to stability, I found another tutorial similar to yours where they did dxvk stuff but instead they edited the EP11 default. ini file for compositercachesize and sim compositercachesize, do you think I could do both, or is it redundant or incopatible? Thank you <3
Hi, short answer: I don't know! Maybe someone reading this can give a more informed reply.
My guess is it only makes sense if you start your game with the EP11.exe/if you play Oasis Landing. I start my game with BG exe so I doubt a change like that would be read by the game.
But you can try and see for yourself if it makes a difference. Just make sure to back up any files you edit so that you can roll back easily!
8 notes
·
View notes
Text

Animal Sanctuary
A home for all those animals no one wants anymore and a family to take care of them.
Lot size: 40x40
Required Expansions: World Adventures, Ambitions, Late Night, Generations, Pets, Showtime, Supernatural, Seasons, University, Island Paradise, Into The Future
Required Stuffpacks: Outdoor Living, Town Life
No CC, no store.
Download at the Simszoo
Please do not re-upload or claim as yours.


178 notes
·
View notes
Text
To all simmers who share freely...
A heartfelt thank you to all of you who share love and amazing content, be it CC, stories, comments, ideas, gameplay or whatever comes to your creative minds - and all for free!
A community thrives from sharing and interacting. You are the ones who turn this into a community and a wonderful place to browse, chat, help, and giggle. You are the reason I am still here and enjoying this special space.
Thank you!

409 notes
·
View notes
Text


All in one post...
Thank you for the tags for doing the 24 pictures for 2024 thingie - sadly I didn't post that often, so there is nothing to see here… I'll just add some screenshots from my hard drive. But this might be something of a resolution for 2025 which I also got tagged for: to post more? To play more? Definitely on my wishlist for the upcoming year.
And it's also more than high time to thank all those lovely people who put nice messages in my inbox in 2024, which each should receive a proper reply, but that's something I am notoriously bad at.
So this maybe is more of an appreciation post for all the kind simmers who thought of me in the past year. Thank you for that and for making my days brighter!
(in no particular order): @nocturnalazure, @camisulsul, @simsync, @thesweetsimmer111, @expirisims, @rachel-homeanddesign-sims, @cocodotgreen, @eizthetics0226, @aisquaredchoco, @kevinvoncrastenburg, @grimfolks, @cas-sims, @bioniczombie, @alaskansims, @drawing-way-outside-the-lines
I won't tag anyone to do anything special as I am way too late to the party as usual. But share away if you feel like it!
80 notes
·
View notes
Text
It is indeed! ❤️
Autumn is magical
106 notes
·
View notes
Note
hello i really liked the method about the DXVK because i wanna fix the lag and memory crash's and freeze in my game, but i have a question when u said about (-1) do i need to put -1 in both like should i write (-1) in first line and the seconed line ?
Hi! Before you try (-1) which means to not limit MemCacheBudget, have you tried (high) values? Like those for 1 or 2 GB? Maybe try those before experimenting.
Also, can't say if you should enter the (-1) in both lines. As far as I know the value in the first line should be higher or equal the value in the second line. I guess that's where the experimenting begins...
Maybe someone who reads this has a more informed reply?
14 notes
·
View notes
Text
It looks so tranquil 😍


The new day was warm, crisp and cloudless. After some more melon slices as breakfast, Captain Beaudard went off for a little exploring of his own. Fallonfuchs had run to the north the day before, he went west.
A cloudless day always held the promise to turn into a cloudless night. His stars might be revealed, and finally offer him a clue of where they had stranded.
He wished he had his looking glass, though. To search the horizon too. But it had to be done with the naked eye, squinting.
The island was beautiful. As was the empty horizon. One steady, calm line.
At camp, Lady Aerdenwald paced the beach. She felt uneasy with the Captain gone. Yet, from the corner of her eye, she could see him run in the distance, and halt, look about him, and run again. He would never leave her view. And somehow, she suspected he did that on purpose. For her. Just like he'd made sure she'd got some rest that night, on the logs, taking turns with the children. In between her naps she had seen some of the men sleep on the beach sand, but he had always sat near her on the cowhide, looking at the clouds high above. He kept watch.
It was as if Captain Beaudard remembered the promise he made to her father, all by himself.

prev < | ◦ beginning
36 notes
·
View notes
Text

Pigeons to Crows - Default Replacement
With Default Replacement:

Without Default Replacement:

NOTE: This is a default replacement! It will affect all pigeon effects in all worlds. If you want to have your pigeons back, simply remove the file.
Download and Details at the Simszoo
199 notes
·
View notes
Text
Thank you for these beautiful pictures!
❤️


Northeney is so pretty
98 notes
·
View notes
Text
I'm happy you enjoy Northeney :)


108 notes
·
View notes
Photo
UPDATE
Reblogging this because I noticed the DL link would give you the world file and nothing else. Not sure when or how that happened, as this has been out for more than 4 years now and no one complained. So I just hope for the best. Anyway.
Tldr: Download link has been updated to include the world as sims3pack, world file, CC and information!

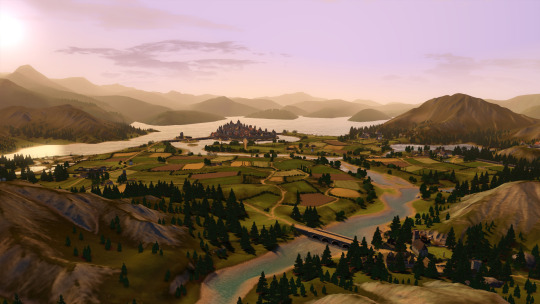

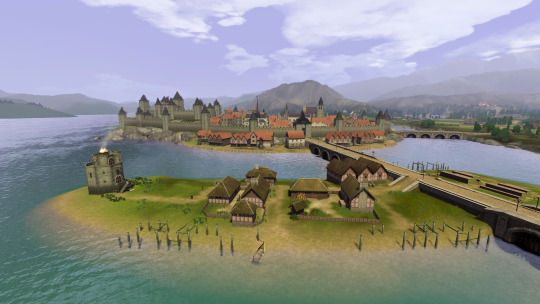

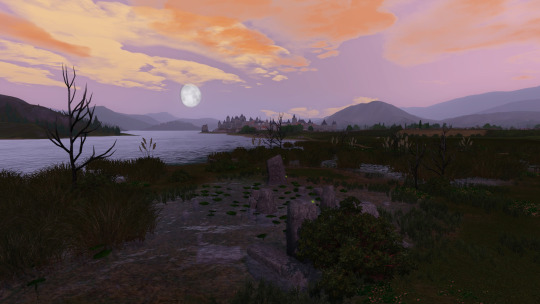
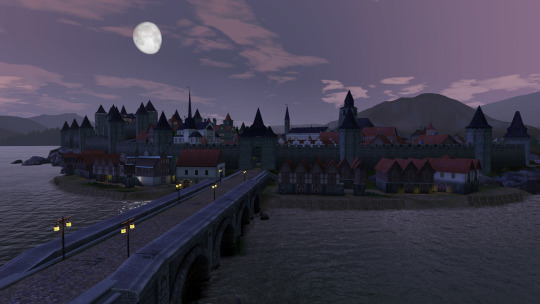
Today I’m happy to release Praaven Reworked, a new version of Praaven by jje1000/potato-ballad-sims, edited by Simsmidgen and me. As usual this project took longer than expected. But with the help of our many fantastic testers all is well that ends well.
Simsmidgen and I tweaked some things more to our liking, replaced broken CC, reduced the overall amount of required CC, recoloured EA objects and/or replaced them, fixed major routing issues, reduced world file size, replaced/fixed all those bloody arches and stacked staircases, thinned spawners, improved terrain painting (at least we think so). We added the two festival lots by lowrisim and tweaked them a bit and also made sure that the tomb can be solved (yes, there is a tomb, go looking for it!). We tried to leave the world as original as possible though (apart from the things that didn’t work well). Public release is with permission of potato-ballad-sims.
Keep reading
#ts3cc#sims3cc#s3cc#sims 3 download#sims 3 custom world#nornities#simsmidgen#Praaven Reworked#mydownloads
1K notes
·
View notes
Text
88 notes
·
View notes
Note
Hello, dear Nornities. I have a question about CAW. If I create a road texture using CC and share it, will the CC texture be reflected? (Sorry if this is a strange sentence)
Hello :)
If you use custom textures for roads in CAW, those will be included in the world you export. It will show up in your world. So no need for a player to download the custom textures separately.
I hope this answers your question! If not, please send me a message :)
22 notes
·
View notes
Photo
Actually not only for Absolute Beginners 😉 And even though it just turned 5 it's still worth a look. If I say so myself. I see many questions asked over and over again when the answers are right here. (And yes, still working on that website. The century isn't over yet, so stay tuned!)

CAW for Absolute Beginners – a guide
It took me long enough, but I made a guide for CAW for those of you who always wanted to try to build your own worlds for Sims 3 but never knew where to start. And for those of you who tried but got frustrated because information is hard to find, outdated or just doesn’t cover what you were looking for.
For now it’s a PDF for you to download. And maybe sometime in this century it will be turned into a website for better navigation. Stay tuned! And don’t hesitate to ask if you have questions!
Download PDF Guide
834 notes
·
View notes
Text
111 notes
·
View notes