#WAXED. TRIMMED. TINTED. LAMINATED.
Explore tagged Tumblr posts
Visit Tumblr Blog
Explore Tumblr blogs with no restrictions, modern design and the best experience.
Last Seen Tumblr Blogs


Fun Fact
Average visit duration of Tumblr.com is 10 mins and 25 secs.
Text
guys who was doing solas' eyebrows in the fade
8 notes
·
View notes
Text
A few DIY beauty secrets I began doing to elevate my "natural" look | IT GIRL DIARIES

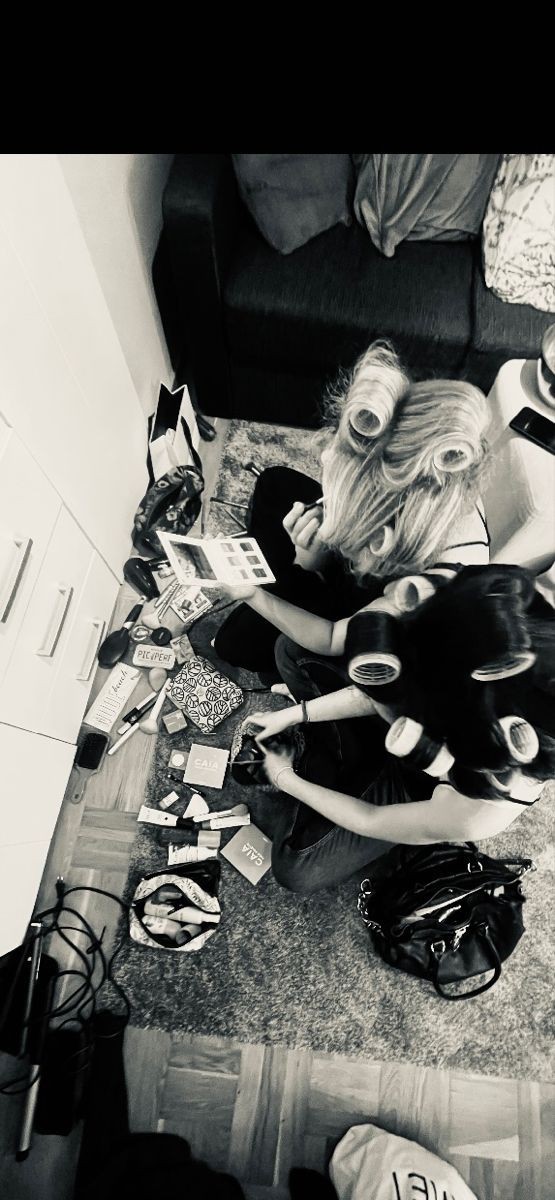
something that I noticed over the years, when looking to enhance your natural beauty, there are 4 main points that build the first impression, hair, eyes, brows and lips..
I have naturally bushy brows that I used to manage with eyebrow gel, but it would start flaking during the day, which gave me the ickk. So, I began laminating them with a kid-friendly relaxer every two weeks (my eyebrows grow pretty fast, which is why I do it so often and i don't get them professionally done because i don't trust people with my brows lol).
I always tweeze my eyebrows instead of waxing them; they seem to grow back slower that way + it's easier to do, just grab a tweezer along with a pocket mirror and you can do it anywhere if you see a hair out of place. ( don't over do it though, i made this mistake and it went horribly, just keep them neat )
Get your lashes laminated !!! Natural lashes are so classy and I don't have to worry about putting on mascara or falsies. This I'd get done professionally though lmao, I would do this myself but I'm way to scared to be messing with anything chemically so close to my eyes, so it isn't necessarily a diy but still, get it done!
ALWAYS make sure your hair, eyes (lashes) and eyebrows are done! You don't have to have a silk press, falsies and freshly waxed brows 24/7 but make sure they're neat. These are the key features that attracts people's attention when youre speaking to them
I have tight 4b type hair, and I used to have to lay my edges with gel or edge control because of how fluffy they'd get when I wore my curls out, but it was super damaging from constantly pulling on them and having them laid down. So, I started relaxing my edges every 3-6 months. Now, all I use is a bit of hairspray to keep them tamed, and now it doesn't puff up even during workouts and it lasts my whole silk press. Yes, my curls are still thriving.
I do weekly deep conditioning, monthly hot oil treatments, routine trims, and always use a heat protectant and frizz control when doing silk presses to stretch them out and minimize heat application. ( my hair has grown so much, leave your hair alone and only feed it when it's hungry! )
you'll hear everyone talking about silk bonnets, but as someone who hates the feeling of having anything on their head or in their face, I always took it off unknowingly throughout the night and it defeated the purpose, so i got silk pillow cases instead, game changer! i don't wrap my hair as often anymore and i don't experience frizz anymore.
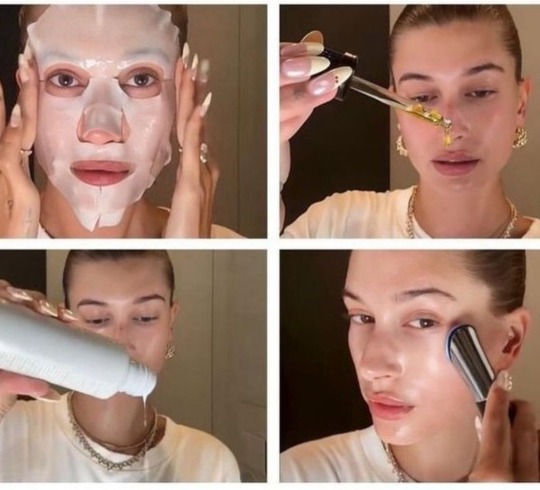
I apply a face mask every week depending on what my skin is lacking, whether it’s moisture or something else. It just keeps my face looking fresh and plump in between professional monthly facials.
I use a lip tint every third day. It makes makeup application easier, and it doesn’t wear off throughout the day so i don't have to re-apply lipstick continuously. It also gives my lips a bit more colour so now I just leave the house with a pretty gloss or plain lip balm.
I take zinc supplements religiously!
Vitamin C everyday, all day. Lemon wedge in my greentea for breakfast, orange for a lunchtime snack and a naartjie for a late night movie. My skin is glowinggg!
hair removal cream! this is so slept on, i no longer shave or wax, both of them have caused ingrowns for me and accentuate my strawberry legs. i use hair removal cream now and i don't think I'll ever go back! i use it probably every week or so depending on how much growth i have, it's so easy and mess free. apply it before you get in the shower and use an exfoliating glove to slide it off gently and continue with your normal wash routine. always apply tissue oil and moisturizer after! baby soft skin all day, everyday!
It's not much, but these small changes have completely transformed my overall look. i do them specifically for those actual no makeup days where i want to give my skin a break from makeup or where im working out but still want to look prettyyy and done up..it's like a wash and go except it's for your face lmao, anyways
mwah! xoxo, colebabey8.88
www.investingforbeginners/gumroad.com

---
#not my pic#it girl journey#becoming the it girl#og it girl#it girl#pink#early 2000s#fashion#pink aesthetic#branding#colebabey888#pink core#dream girl journey#makeup#becoming that girl#girl things#girlhood#im just a girl#pink girl#brown girl luxury#girlblogger#this is a girlblog#girlblog aesthetic#gaslight gatekeep girlblog#girlblogging#just a girlblog#beauty tips
437 notes
·
View notes
Text
Eyebrow Tinting Toowoomba - Lavya Hair Design
Before you book your appointment, be sure to ask your brow expert about the type of dye they use and how they minimize irritation risks (this is near your eyes, after all). Vegetable-based dyes tend to last 4-6 weeks before fading naturally.
It’s great for taming unruly brows and enhancing thin ones. Eyebrow tinting in Toowoomba is a semi-permanent dye that helps your eyebrows look fuller, darker, and more defined.
Book your appointment with Bookwell
Bookwell is an online platform that simplifies booking beauty & wellness appointments. It connects users with reviewed venues in Australia for services like haircuts, waxing, nails, massages, and other wellness experiences. Its platform allows customers to search and compare options, make bookings online, and receive instant confirmation of their appointment.
Perfect for taming unruly brows and enhancing thin ones, a Brow Lamination treatment is an innovative solution that straightens and lifts the brow hairs to give them a beautifully full and defined appearance. This incredibly precise treatment also removes shorter hairs that waxing may miss, leaving you with a clean and polished look. So get started by finding a salon near you and book your appointment today. It’s fast, convenient, and easy. Plus, you’ll be able to check out the latest deals and specials.
Get the best salons in your area
Get the brows of your dreams with our precise brow wax and tint services. Using expert techniques, we shape and define your eyebrows to frame your face perfectly. We offer a range of brow services to ensure your eyebrows are impeccably designed just for you including, a full man brow (measured specifically to your face shape), tweezing and trimming, and a calming brow and temple massage.
Using pure cotton thread, eyebrow threading removes hair from one clean line all at once, making it faster and easier to shape evenly. Suitable for all skin types, it’s an ideal solution for unruly or thin eyebrows.
Henna eyebrow tattoos are semi-permanent makeup that uses all natural plant based dyes. These are applied with a brush or a henna pen and typically fade within two to three weeks.
Brow mapping is the ultimate bespoke service to ensure your brows are perfectly symmetrical and impeccably designed just for you. This service includes a brow map, precision waxing, tweezing and trimming, and an amazing calming brow and temple massage.
Perfect for taming unruly brows or enhancing thin brows, this chemical service is a great alternative to tint and lasts up to 8 weeks. Please note: you must have a 24 hour patch test* before your appointment. This can be done at your nearest Benefit store, no appointment needed.
Book your appointment today
Achieve a more polished look with professionally tinted eyebrows. Eyebrow tinting is a semi-permanent dye that enhances your natural brow hair color, creating a darker, more defined look. It also eliminates the need for makeup, saving you time in your beauty routine and delivering a more polished finish.
The process begins with a consultation, where your technician will discuss your goals and select the right shade of tint to achieve your desired results. The lashes are then cleaned and protected, and the tint is applied to your brow hairs. After the appropriate time, the excess tint is removed and your brows are finished.
Unlike mascara, tint does not run with sweat or water, so it’s ideal for anyone with an active lifestyle. It also lasts for several weeks, eliminating the need for regular touch-ups.
To ensure your eyebrow tint looks its best, avoid using harsh skincare products and limit sun exposure. Also, regularly brush your brows with a spoolie to distribute natural oils and prevent your tint from fading faster. Lastly, make sure to moisturize your brows with a non-oily product that doesn’t contain alcohol or parabens, as these ingredients can cause the tint to fade faster.
#hair color chart#eyebrow waxing toowoomba#hair colouring near me#hair coloring near me#eyebrows toowoomba#eyebrow toowoomba#full head of foils blonde#formal hair and makeup
0 notes
Text
Step-by-Step Guide to Ringwood Eyebrow Shaping: What to Expect
Achieving perfectly shaped eyebrows can transform your look and elevate your overall appearance. Ringwood eyebrow shaping has become a popular choice for those seeking precise, customized brow designs. If you’re new to this service or considering a fresh approach, understanding the step-by-step process can help you know what to expect and ensure a satisfying experience. Here’s a comprehensive guide to Ringwood eyebrow shaping, detailing each stage of the process.
1. Initial Consultation
The journey to perfect brows begins with a thorough consultation. This step is crucial for establishing your goals and understanding your preferences.
Discuss Your Preferences: During the consultation, you’ll discuss your ideal brow shape, style, and any specific concerns or desires you have. Bring reference photos if you have a particular look in mind.
Assess Your Face Shape: The technician will evaluate your face shape, natural brow structure, and hair growth pattern. This assessment helps determine the most flattering brow shape for you.
2. Preparing for Shaping
Preparation is key to ensuring a successful shaping session. The technician will prepare your brows and the surrounding area to achieve the best results.
Cleanse the Area: The technician will clean your brows and the surrounding skin to remove any makeup, oils, or debris. This step ensures that the shaping process is precise and hygienic.
Consult on Products: If you’re undergoing brow tinting or lamination as part of the service, the technician will discuss the products to be used and obtain your approval.
3. Shaping Techniques
Ringwood eyebrow shaping often combines several techniques to achieve the desired result. Here’s what you can expect during this stage:
Tweezing: For precise shaping, the technician will use tweezers to remove stray hairs and refine the brow shape. This method allows for detailed work and adjustments.
Waxing or Threading: Depending on your preference and the technician’s recommendation, waxing or threading may be used to remove multiple hairs at once. These methods help achieve a clean, smooth finish and can be especially effective for larger areas.
Trimming: If necessary, the technician will trim longer brow hairs to ensure an even and well-groomed appearance.
4. Brow Tinting (Optional)
If you’ve opted for brow tinting, this step involves applying a dye to enhance the color and definition of your brows.
Choose the Shade: The technician will select a tint shade that complements your natural hair color and desired look.
Application: The tint is applied to your brows and left on for a specified amount of time to achieve the desired color intensity. Afterward, the tint is removed, revealing enhanced, fuller brows.
5. Brow Lamination (Optional)
Brow lamination is another option that can be included in your Ringwood eyebrow shaping service. This technique helps achieve a fuller, more defined look by setting the brow hairs in place.
Application: A special solution is applied to your brows to lift and set the hairs. This process creates a uniform, brushed-up appearance.
Finishing Touches: After the lamination solution is removed, a nourishing treatment may be applied to condition the brow hairs and ensure they remain healthy and smooth.
6. Final Touches and Aftercare
Once the shaping process is complete, the technician will provide final touches and advice on aftercare to ensure your brows stay looking their best.
Final Adjustments: Any last-minute adjustments are made to perfect the shape and ensure symmetry.
Aftercare Instructions: The technician will provide instructions on how to care for your brows, including tips on avoiding certain products or activities that may affect the results. This might include avoiding excessive moisture or harsh products for a specified period.
7. Follow-Up
To maintain your newly shaped brows, you may need follow-up appointments. The frequency of these appointments will depend on your hair growth and the techniques used.
Maintenance: Regular touch-ups help keep your brows in top shape and ensure they continue to complement your facial features.
Adjustments: If needed, adjustments can be made to refine the shape or address any changes in hair growth.
Conclusion
Ringwood eyebrow shaping is a comprehensive process that combines expert techniques with personalized care to achieve perfect brows. From the initial consultation and shaping techniques to optional treatments like tinting and lamination, each step is designed to enhance your natural beauty and provide a polished, well-groomed look. By understanding what to expect, you can approach your eyebrow shaping appointment with confidence and excitement, knowing that you’re on your way to achieving beautifully shaped eyebrows that elevate your overall appearance.
0 notes
Text
what is brow lamination

Ever dream of perfectly groomed, effortlessly styled brows? Look no further than brow lamination, a revolutionary treatment that can transform your brows from unruly to refined. This semi-permanent solution is perfect for those seeking a low-maintenance way to achieve beautiful, full brows.
What is Brow Lamination?
Think of brow lamination as a perm for your eyebrows. A series of chemical solutions are applied to reshape and restructure your brow hairs, fixing them in a desired direction. The result? Feathery, fluffy brows with a natural yet polished look. Unlike techniques like waxing or threading, lamination doesn't remove hair, but rather manipulates your existing hairs to create a fuller and more defined appearance.
Benefits of Brow Lamination:
Effortless Styling: Say goodbye to daily brow gels and pencils! Lamination keeps brows in place, reducing the need for constant upkeep.
Tames Unruly Brows: If you have stubborn brow hairs that grow in different directions, lamination can smooth them out for a more uniform look.
Fuller Appearance: The process can create the illusion of fuller brows by lifting and volumizing existing hairs.
Long-lasting Results: Enjoy perfectly styled brows for up to 6-8 weeks with proper care.
The Lamination Process:
A brow lamination session typically involves the following steps:
Consultation: A skilled technician will discuss your desired brow shape and assess your natural brows.
Brow Cleansing: The area will be thoroughly cleansed to ensure optimal product adherence.
Shaping and Trimming: The technician will shape and trim your brows to achieve your desired arch and outline.
Chemical Application: A series of solutions will be applied to lift, restructure, and set your brow hairs in place.
Tinting (Optional): For added definition, some technicians offer brow tinting after lamination.
Nourishing Treatment: The session often concludes with a nourishing treatment to keep brows hydrated and healthy.
Ideal Candidates for Lamination:
Brow lamination is a versatile treatment suitable for most people. It's particularly beneficial for those with:
Unruly or frizzy brows
Gaps or sparse brows
Brows that grow in different directions
A Note on Aftercare:
Following your brow lamination appointment, it's crucial to follow specific aftercare instructions provided by your technician. These might include avoiding water or makeup on the brows for a short period and minimizing sun exposure.
Unlock Your Brow Potential:
Brow lamination offers a fantastic way to achieve beautiful, low-maintenance brows. While Jeevi Brow Studio doesn't currently offer brow lamination services, we specialize in eyebrow artistry. Our team is passionate about helping you achieve your perfect brow look. Contact Jeevi Brow Studio today to schedule a consultation and explore our brow shaping and tinting services!
1 note
·
View note
Text
Legs &Co
A well-established beauty, holistic and aesthetics therapy salon in Worrall, Sheffield. Lynne has spent her entire career honing her skills and knowledge in beauty and holistic therapies.
At Legs & Co, Lynne offers a wide range of beauty and holistic therapy treatments to suit the diverse needs and preferences of her clients. Some of her most popular treatments include microneedling, pedicures, manicures, Swedish body massages, holistic therapies, lashes and brows, facials, and waxing.
Pedicures and manicures are treatments that are designed to improve the health and appearance of the hands and feet. During a pedicure, the feet are soaked, exfoliated, and massaged, and the nails are trimmed and polished. Manicures typically involve similar treatments for the hands and nails. Both pedicures and manicures can be customised with different polishes, designs, and finishes to suit the client's preferences.
Swedish body massages are another popular treatment at Legs & Co that can help relieve tension and promote relaxation. This massage technique uses long, flowing strokes, kneading, and circular movements to help improve circulation and reduce muscle stiffness. Swedish massages can be performed on the whole body or specific areas such as the back, neck, and shoulders.
Holistic treatments are a key part of Legs & Co's philosophy, and Lynne offers a variety of therapies that focus on the mind, body, and spirit. Reflexology is a popular treatment that involves applying pressure to specific points on the feet to promote healing and balance in the body. Reiki is another holistic therapy offered at Legs & Co that involves the use of energy healing to promote relaxation and well-being. Hopi ear candles and Indian head massages are also offered.
Lashes and brows treatments are another specialty at Legs & Co. Lash lifting can help lift and curl the lashes for a more youthful appearance. Eyebrow shaping and tinting can help define the brows and create a polished look.
Facials are another popular treatment at Legs & Co that can help improve the appearance and health of the skin. Facials are tailored to the client's specific needs, whether that's targeting acne, fine lines, or hyperpigmentation. Legs & Co uses high-quality skincare products to ensure that the skin is left looking and feeling its best.
Waxing is a popular hair removal treatment offered at Legs & Co. Waxing treatments are performed using high-quality wax and techniques to ensure that the hair is removed effectively and with minimal discomfort.
Lynne Wainwright's business, Legs & Co, offers a wide range of beauty, holistic aesthetic therapy treatments in Worrall, Sheffield. Her personalised approach to beauty and wellness ensures that each treatment is tailored to the client's unique needs and preferences, promoting relaxation, balance, and well-being. With over 20 years of experience in the industry, Lynne provides high-quality treatments using the latest techniques and products to ensure that clients leave feeling refreshed, rejuvenated, and confident.
Contact Info:
Legs &Co
18 Birley View, Worrall, Sheffield, S35 0AL.
0114 2862928
07989 243389
Facebook:
Hours:
Mon 9am – 6pm
Tuesday 9am– 6pm
Wednesday9am – 6pm
Thursday – Closed
Friday 9am – 6pm
Saturday 9am – 1pm
Keywords/Tags
• Pedicures
• Manicures
• Swedish Body Massages
• Holistic Treatments
• Lashes & Brows
• Facials
• Waxing
• Microneedling
• BB Glow
• Microblading
• Brow Lamination
• Lash LiftTint &Curl
• Lash &Brow Tinting
• Hot Stone Massage
• Indian Head Massage
1 note
·
View note
Text
Brows on Fleek: 14 Eyebrow Hacks Every Girl Should Know
Brows on Fleek: 14 Eyebrow Hacks Every Girl Should Know
Want gorgeous, thick, and natural eyebrows your friends will envy? We're sharing 14 eyebrow hacks every girl should know, and you don't want to miss out!

Your Eyes Only Brow Studio

Hey Babe Nice Brows LED Neon Sign, beauty bar decor, beauty salon lightning, browsmaker led signage, make up interior hangings
Hey Babe, Nice Brows LED neon sign, designed special for beauty bar, beauty salon, studio. Must Have for owners of beauty business, brows makers, make up masters, permanent make up, brows tattoo. MATERIALS: + LED neon light: our flexible LED neon tube is a new technology of neon. LED neon light provides a longer lifespan than original glass neon. The neon signs remain cold, silent, safe, and eco-friendly because it is low voltage. + BACKING: Clear (by default) and resistant clearance of 6 mm to support the sign. Made with nonflaming, strong unbreakable materials will serve you a long time, lightning period more than 50000 hours it means 5+ years 24/7 of work. Clear acrylic backing used, cutted around. It is a good invest for your comfort at home) SIze: 20x12 inches 27.5x18 inches 39.5x25.5 inches PROCESSING: + Production time is 3-5 business days, but due to the war in my country the production time may increase. + If you want to change something, please, send me a message. SHIPPING: + Free worldwide shipping within 30-50 days. + Possibility of express shipping 10-20 days for the extra cost. INSTALLATION: + Easy to install. Hang your neon sign, plug it to an outlet, and your new bespoke neon light is ready to shine! WHAT'S INCLUDED: +Neon Sign Customized to Your Specifications +Power Supply and Adaptor +Dimmer Switch +1-year International Manufacturer Warranty +Predrilled holes for installation All of neon signs support customize. You could change color, size and backing as you like. Just contact me!

At-Home Brow Maintenance? You Can Do It; Jimena Garcia Can Help
Chanel brow artist Jimena Garcia’s guide to tinting, tweezing, and trimming your brows at home.

The Satisfaction 🤤 [Video] | Brow lamination, Eyelash lift and tint, Eyebrow enhancer

MAQUILLAJE PARA CLASES PRESENCIALES
Blog de moda e inspiración para adolescentes como tú

Microshading Is The New Microblading For Brows — & It Looks So Natural
Microshading is the new technique for perfect eyebrows that last months. We asked a brow expert how it's different from microblading.

Щеточки для бровей | Названия салонов красоты, Большие ресницы, Названия салона

Editor's Pick #1 Brow Product 2023!

What Happens to Henna Brows After 2 Weeks? Hint - It Still Looks Good
Your brows will look great right after this semi-permanent brow enhancement treatment, but let's see what happens to henna brows after 2 weeks.

Pin on Enregistrements rapides

Good eyebrows are always in style. Eyebrow trends change from year to year, but lately, the bigger and more lush, the better. This doesn’t mean you should let your brows get unruly- we’ve uncovered some tips and tricks to keep your brows on fleek! And when it comes to growing your brows? There are a few key eyebrow hacks you definitely need to know! Read on if you want the best brows of your life.How to Grow Eyebrows1. Leave Your Brows AloneIt can be tough not to pluck, wax or thread your eyebrows, especially if you feel like you’ve been doing it your whole life, but if you want your eyebrows to grow, you have to leave them alone. Don’t perform any type of grooming for at least 12 weeks – it can take up to a year for your brows to grow in fully, so you have to do your part in allowing them to flourish!2. Comb Your BrowsDid you know combing your brows stimulates growth? Pick up some spoolie brushes and run them through your brows on the daily. It will help them grow lush and also ensures you keep them tamed.3. ExfoliateJust like brushing them, exfoliating your eyebrows also stimulates hair growth. After cleansing your face, apply an exfoliator to your brows and the skin around them (I love La Roche-Posay Ultra-Fine Face Scrub for Sensitive Skin as it gets the job done without being too harsh). Massage your brows in circles, then rinse the product off. Exfoliate your brow area three times a week for best results!4. Try VaselineYour skin needs to be hydrated and nourished if the hair on top of it is going to grow. Vaseline creates a sealing barrier and helps lock moisture to speed up your skin’s natural recovery process. Clean and dry your brow area, and apply vaseline 3 to 4 times per week.5. Use an Eyebrow Growth SerumApply an eyebrow growth serum to your brows daily. Many growth serums out there work by conditioning your hair and renewing its natural renewal cycle. You’ll notice a difference in the amount and strength of your eyebrow hair due to nourishing ingredients that will restore and repair your brows.6. Use an OilOils like castor oil, coconut oil and jojoba oil promote brow growth similar to vaseline, by creating a barrier that locks in moisture. Oil also goes one step further, increasing circulation and stimulating cellular metabolism. Apply your oil of choice to your brows before heading to bed and leave it on overnight.How to Shape EyebrowsOnce you’ve grown your eyebrows to their desired length, it’s time to shape them! Here are 4 steps to shape perfect brows.Step 1: Figure out the best eyebrow shape for your faceEvery face will look better with a certain eyebrow shape. Just because a brow shape looks good on your friend or favourite celebrity, doesn’t necessarily mean it will suit you.For example, round faces tend to look best with structured brows that have angled arches and longer ends, while heart-shaped faces often look best with soft, rounded arches that complement your sharp angles. Finding the shape that works best for you is a key first step!Step 2: Time to trimUse eyebrow scissors to trim down your long hairs – just don’t snip them too much. To ensure you don’t crop them too much, brush your hair up with a spoolie and only trim the long hairs, one hair at a time.Step 3: Use a facial oilYou want to make this process as pain-free as possible, so use a facial oil to lubricate your skin and hair follicles. Gently massage a generous amount of oil to your brow bone to get the area prepped for what’s to come. This will prevent the hair from breaking and make it easier to tweeze without pain.Step 4: Pluck awayUse a set of tweezers to pluck any unruly hairs. Make sure not to over pluck, and tweeze the hairs in the direction of hair growth, while holding your skin taut. Look for stray hairs between the two dots at the beginning of your brows, as well as beneath your arch and beyond the end of the tail.How to Draw in EyebrowsIf you want to get thicker eyebrows using makeup, follow these 4 steps.Step 1: OutlineUsing an eyebrow pencil, create an outline by drawing a line underneath your brow. Using the same pencil, create hair-like flicks to fill in sparse areas.Step 2: DefineUse an angled brush and a coloured pressed powder in the same or a similar shade to your brows and the eyebrow pencil. Define the shape of your brows, but don’t fill the inside corners of your brows too much. Also stay away from making the end points too harsh so it’s not obvious they’re drawn in.Step 3: Clean it upUse a spoolie brush to brush through your brows, picking up any excess powder. Use the brush to blend lines and create a natural brow look.Step 4: Conceal the dealTo really get definition for your brows, apply concealer underneath your arch using a flat-tipped concealer brush. This will wipe away any excess brow product and have your brows looking natural and gorgeous.5 Best Eyebrow Products to Invest In1. Anastasia Beverly Hills Brow Powder DuoLooking for a natural, textured finish for your brows? This brow powder is the one for you. With two shades to create multidimensional colour, your brows will have never looked better!2. Maybelline Total Temptation Eyebrow Definer PencilThis brow pencil features a teardrop tip and spoolie brush so you can achieve a soft, natural looking brow! Frame your eyes and fill in your brows easily with this awesome eyebrow pencil!3. Tweezerman TweezersIf you want to create the perfect brows, you need the perfect tweezers. These ones feature perfect precision tips for grabbing hairs so you can rest easy about your plucking parties.4. Queen of the Fill Tinted Eyebrow Makeup GelThis eyebrow makeup gel gives you hair-like texture without looking painted on. It coats each hair, filling in sparse brows, with quick application that delivers just the right amount of product!5. NYX Eyebrow Cake PowderIf you want spot-on brows, this compact includes two shades of powder to fill and define your brows just the way you like. Blend the shades for a natural brow look, customizing them to create your perfect shade!Ready to get your perfect brows? These tips and products will ensure your brows are always on fleek!This post contains affiliate links.Did you love this post on our favourite eyebrow hacks? We’d love if you shared it on Pinterest!If you want more brow tips and tricks, make sure to follow our Beauty Board on Pinterest! 50.4K shares Share Tweet
0 notes
Photo

Best Eyebrow Treatment: Which One Will Work Best For You?
Eyebrow Threading
Eyebrow threading is one of the time tested methods that have been there for centuries. It finds its root in South Asia and the Middle East. This is an art and cannot be performed at home because it requires expert hands to get the desired brow shape. One of the best things about this technique is that it does not involve using any type of chemicals or molten wax (used in eyebrow waxing). Threading is the most precise hair removal technique for removing unwanted hairs from the body or the eyebrows. An organic thread and expert hands are all that are required to get perfectly shaped eyebrows. So, if your skin is a bit sensitive, it is best to look for an eyebrow threading shop near me. Eyebrow threading is the safest way and helps you get the best results.
Cost: $10 to $20
Eyebrow Trimming and Tweezing
Tweezing is one of the methods in which the unwanted hairs are removed either before waxing or in between the waxing process. Although, it can also also be done directly. In tweezing, the hair is removed right from the root, and thereafter trimming is done after brushing up to give your brow shape a new makeover. It is not a good idea to try it out at home and the best way to do it is to reach out to a professional, a nearby eyebrow shop, to get the perfect eyebrow shape. With a professional eyebrow grooming expert, you don’t risk removing too many eyebrow hairs. Unlike some of the other eyebrow treatments, there is no risk of burning, stretching, or damaging the eyebrow skin.
Cost: $10 to $40
Eyebrow Tinting
If you have light transparent and fine hairs, then your final aim is not to remove the extra hairs from the brows but to give them a perfect and fuller look. If you are tired of filling your brows every now and then, eyebrow tinting is a good option. In this method, your brows are colored with some organic dye with a small amount of peroxide. It is a great method for those looking to darken the hairs of their brows and create stylish and perfectly shaped eyebrows. This method lasts for anywhere between one to three months depending upon the ingredients used to make the dye and some other factors.
Cost: $15 to $30
Eyebrow Waxing
Eyebrow waxing involves applying a thin layer of molten wax or resin on those areas around your brow where unwanted hairs are to be removed. A fabric strip is placed over the wax or the resin and is then pulled off to remove the underlying areas.
This method is efficient in removing those soft hairs that are not normally visible to the eyes. The molten wax helps soften the skin so that the hairs can be removed without any breakage than other eyebrow shaping methods. An eyebrow threading process generally lasts for 3-4 weeks, although it greatly depends upon the rate at which your hair grows back. This method can be done at home easily, but an expert hand is always better to do it. So, it is good that you look for a good eyebrow threading salon near me to get those perfectly arched brows.
Cost: $15 to $100
Microblading
Microblading, also called the modern form of tattooing, is a semi-permanent form of makeup used to fill eyebrows to make them look fuller, stylish, and perfect in shape. The process involves creating hair-like strokes in the brows using brow pigment ink with the help of a fine needle. Here the pigments are inserted into the upper layers of the eyebrow skin to alter their shape and make them look thicker and perfectly arched.
This eyebrow treatment is perfect for those with thin, sparse, or patchy eyebrows. To neutralize any pain that may occur during the process, a numbing solution is applied on those areas where the piercing is to be done to insert the pigments. After the procedure is over, a final touchup is generally required after 4-5 weeks. The results of the process generally last for up to 12 months as the pigment generally fades during this period.
Cost: $250 to $800
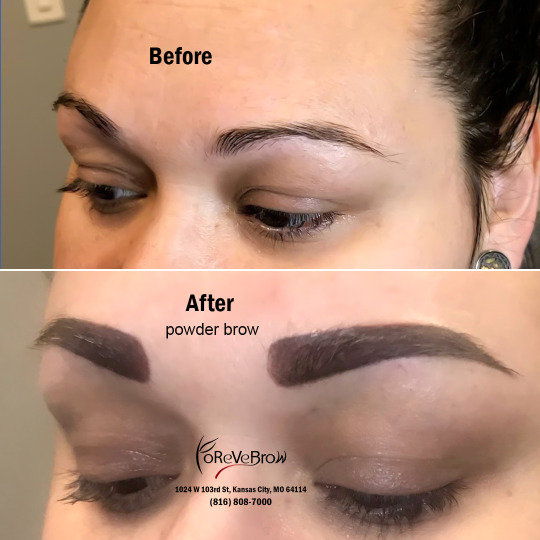
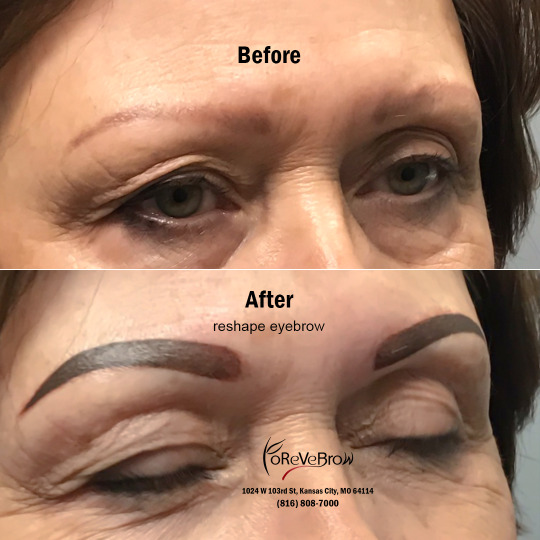
Brow Lamination
Brow lamination is another method that is becoming popular for eyebrow shaping. This treatment straightens the unevenly shaped eyebrows. The brows can be adapted to different styles, such as sleek, arched, straight, or fluffy. Surprisingly, the process can be customized according to the customer’s needs as those with sparser and lesser brow hairs can achieve fuller-looking brows and those with thick or bushy eyebrows can get perfectly arched brows that go well with their face.
Brow lamination does not require any chemicals or pigments to be injected into the skin. It is a non-invasive process and shows good results that may last up to eight weeks. It can be complemented with other eyebrow treatment methods like tinting and henna to get the best results.
Cost: $100 to $250
Brow Henna
Brow henna is somewhat similar to brow tinting. In this method, the brows are first shaped using waxing or tweezing, then a henna paste is made by mixing henna with water. This paste is then applied to those areas where the brow hairs are to be groomed and styled.
Henna is perfectly safe as it is a natural dye that is derived from plants and activated with rose water. The process takes time as the henna dye requires time to dry up and give the desired results. The results of this process last up to 10 days on the body skin and 5-6 weeks on the brow hairs. Henna can easily be applied at home, or you may find the best henna eyebrow shop near me.
Cost: $40 to $80
#tumblrr#tmblr#tumblrgram#tumblrs#tumblraesthetic#tumblr👽#tumblrposts#tumblrfeed#tamblr#eyebrows#threading#beauty#salon#makeup
0 notes
Link
Best Laminate Flooring Repair Service Wichita KS | Handyman Services Of Wichita
More information is at: https://handymanserviceswichitakansas.com/laminate-flooring-repair-near-me/
Looking for Laminate Flooring Repair Service near Wichita KS? Handyman Services Of Wichita is the premier Laminate Flooring Repair Service in the Wichita KS.Best Laminate Flooring Repair Service in Wichita KS. Cost? Free estimates! Call now or Send a quick message for an estimate. REQUEST A FREE QUOTE NOW
LAMINATE FLOORING REPAIR SERVICE IN WICHITA KS The Laminate Flooring Repair will At Handyman Services Of Wichita, our experienced flooring experts can provide the best Laminate Flooring Repair in Wichita KS at a very reasonable price.We take pride in offering the best Laminate Flooring Repair.Laminate flooring has been taking the home decor market by storm for over two decades now. And no wonder, with all it has to offer -durability, low maintenance, and glowing good looks, for a modest outlay of cash. laminate floor is not indestructible. Especially if you have children and/or animals in your home, laminate is subject to both normal wear and tear and occasional damage. Our Handyman Services Of Wichita experts take pride in providing the best service in the Wichita KS area. An advantage of this type of flooring, however, is that it is installed as a "floating floor," rather than being nailed in place. This means that in case of damage, a small section can be fixed -you do not have to replace the whole floor. Find out the facts about laminate flooring repair. DAMAGE PREVENTION To minimize the possibility of scratches to your flooring, cushion the feet of your furniture with felt floor protectors. And speaking of feet, keep your pet's claws trimmed too. Doormats at each entrance to your house will avoid the tracking in of potentially harmful sand and debris, as well as moisture. Wipe up any spilled liquids - even plain water- promptly to avoid staining and/or bubbling of the laminate floors. REPAIR PREPARATION Clean the floor with a microfiber mop before attempting any repair. Many of the fixes listed below will work best if no one walks on the floor for a period of up to 24 hours afterwards. In case of major damage or stubborn stains, consult your flooring contractor; repair may be covered by your purchase warranty. COVER-UPS AND FILLERS 1. Touch-up Pen or Filler Stick To tackle minor scuffs, scratches, or nicks, try inexpensive, easy-to-use touch-up pens or filler sticks (similar to wax crayons). Pens may be bought individually, but for the most successful color match, it's best to purchase a set. This will include several wood tones varied from light to dark, such as oak, maple, walnut, mahogany, and so on, to blend as appropriate. The pens cost about $10 per set and dry completely in 5 minutes. They may be utilized for touch-ups on furniture, in addition to laminate flooring, but are only for indoor use. Filler stick sets are higher priced, but can fill small scratches and don't require any drying time. 2. Laminate Floor Repair Kit A laminate floor repair kit is the most costly fix in the "cover-up and filler" category. However, in addition to giving a more precise color match, it can fill in somewhat larger gouges and holes. The kit may contain wax, paste, or putty, with a variety of tints that you custom blend to the shade you want. The tools you will need to prepare and apply the compound, such as a spatula and brush, are normally included. BOARD REPLACEMENT 3. Remove and Replace In case of more serious damage to your laminate floor, repair will involve replacing the damaged board(s). For the neatest results, carefully remove the baseboard closest to the area of laminate flooring which you need repaired. Then disassemble the floor, unlocking board after board from its tongue-and-groove arrangement, until you are able to take out the damaged one. Attach your replacement and work backwards to put the floor back together. 4. Cut and Glue If floor disassembly proves to be too difficult, you can slice out the blemished area only and then carefully cut a laminate "patch," measured to fit the empty spot. After gluing the patch in place, put a heavy weight on top and leave it to dry undisturbed for 24 hours. NOTE: The assumption here is that you have a few extra boards left over from your laminate floor installation. If this is not the case, take the damaged piece to your supplier to find the best match. How can repair a damaged laminate board? Light damage to your laminate floor can be easily repaired with the repair kit. Sometimes, however, a board is damaged so badly that you’ll have to replace it. Removing a board from the floor isn’t the easiest task, but we’ll show you how you can go about it, one step at a time. You’ll need a couple of tools to replace the broken board: some tape, a knife, a pencil, a plunge saw with rail, a chisel, a hammer, a crowbar and a tapping block. ● Make sure you clearly mark the broken board with your pencil or a pen. Tape off the contours of the damaged floorboard so that it stands out. ● Take a new board and draw a sawing line on the click side of the new plank. Mark the underside of the board so that you know where exactly the edge comes. We’ll glue this part later on. ● Saw off the grooves of the new board with your plunge saw. ● Using the same circular saw, saw two parallel grooves in the middle of the damaged board, lengthwise. Bring the grooves as close to the edges as possible. ● At the end of the broken plank, make incisions at an angle with your saw. Let the incisions cross the grooves you made earlier. This will make it easier to remove the board. ● Remove the beat-up board with a chisel. ● Apply glue to one of the short and one of the long sides of the surrounding boards. ● Grab the replacement board and click it together with the part you didn’t saw off, into the sides you didn’t glue. ● Using a hammer, a crowbar and a tapping block, carefully tap the new board into its place and press well ● Spread about 40 kilos of weight over the board and let the glue dry for a few hours. Afterwards, you’ll have a floor that’s as good as new. To obtain a free quote for Laminate flooring Repair in Wichita KS, please don’t hesitate to contact at Handyman Services Of Wichita Floor Services. Call us for : �� Laminate Flooring Repair Filler • Laminate Flooring Repair Kit • How To Repair Laminate Flooring • How To Repair Laminate Flooring That Is Separating • How To Repair Laminate Flooring Water Damage • Laminate Flooring Repair Near Wichita KS • Laminate Floor Repair • How To Fix Laminate Flooring That Is Buckling
BEST LAMINATE FLOORING REPAIR SERVICE IN WICHITA KS HANDYMAN SERVICES OF WICHITA REQUEST MORE INFORMATION. CONTACT US!
CONTACT US: Handyman Services Of Wichita Best commercial residential handyman maintenance professionals in Wichita KS (316) 448-3974 HANDYMAN (316) 500-7551 CLEANING (316) 448-5733 JUNK REMOVAL Location: Wichita KS Timing: 7 AM – 11 PM Websites: handymanserviceswichitakansas.com bestcleaningserviceswichita.com/ junkremovalhaulerwichita.org/ Service area: 55 Cities within 30 miles of Wichita, KS: Andale, KS | Andover, KS | Argonia, KS | Augusta, KS | Belle Plaine, KS | Bentley, KS | Benton, KS | Buhler, KS | Burns, KS | Burrton, KS | Cheney, KS | Clearwater, KS Colwich, KS | Conway Springs, KS | Danville, KS | Derby, KS | Douglass, KS | Elbing, KS | Garden Plain, KS Goddard, KS | Greenwich, KS | Halstead, KS | Harper, KS | Haven, KS | Haysville, KS | Hesston, KS | Hutchinson, KS | Kechi, KS | Maize, KS | Mayfield, KS | Mcconnell AFB, KS | Milan, KS | Milton, KS Mount Hope, KS | Mulvane, KS | Murdock, KS | Newton, KS | North Newton, KS | Norwich, KS | Peck, KS Potwin, KS | Pretty Prairie, KS | Rock, KS | Rose Hill, KS | Sedgwick, KS | South Hutchinson, KS Towanda, KS | Udall, KS | Valley Center, KS | Viola, KS | Walton, KS | Wellington, KS | Whitewater, KS Winfield, KS | Yoder, KS ZIP CODES: 67001 – Andale | 67016 – Bentley | 67017 – Benton | 67020 – Burrton | 67025 – Cheney | 67026 – Clearwater | 67030 – Colwich | 67031 – Conway Springs | 67037 – Derby | 67039 – Douglass | 67050 – Garden Plain | 67052 – Goddard | 67055 – Greenwich | 67060 – Haysville | 67067 – Kechi | 67101 – Maize | 67106 – Milton | 67108 – Mt Hope | 67110 – Mulvane | 67118 – Norwich | 67120 – Peck | 67133 – Rose Hill | 67135 – Sedgwick | 67147 – Valley Center | 67149 – Viola | 672xx – Wichita | 67204 – Park City or Wichita | 67219 – Park City or Wichita | 67220 – Bel Aire or Wichita | 67221 – McConnell AFB | 67226 – Bel Aire or Wichita | 67543 – Haven #Wichita #kanas #handyman #commercialhandyman #residencialhandyman #moving #junkremoval #cleaning
0 notes
Link
Best Laminate Flooring Repair Service McAllen TX | Handyman McAllen
More information is at: http://handymanmcallen.org/laminate-flooring-repair-near-me/
Looking for Laminate Flooring Repair Service near McAllen TX? Handyman McAllen is the premier Laminate Flooring Repair Service in the McAllen TX. Best Laminate Flooring Repair Service in McAllen TX. Cost? Free estimates! Call now or Send a quick message for an estimate. REQUEST A FREE QUOTE NOW
LAMINATE FLOORING REPAIR SERVICE IN MCALLEN TX The Laminate Flooring Repair will At Handyman McAllen, our experienced flooring experts can provide the best Laminate Flooring Repair in McAllen TX at a very reasonable price. We take pride in offering the best Laminate Flooring Repair. Laminate flooring has been taking the home decor market by storm for over two decades now. And no wonder, with all it has to offer -durability, low maintenance, and glowing good looks, for a modest outlay of cash. laminate floor is not indestructible. Especially if you have children and/or animals in your home, laminate is subject to both normal wear and tear and occasional damage. Our Handyman McAllen experts take pride in providing the best service in the McAllen TX area. An advantage of this type of flooring, however, is that it is installed as a "floating floor," rather than being nailed in place. This means that in case of damage, a small section can be fixed -you do not have to replace the whole floor. Find out the facts about laminate flooring repair. DAMAGE PREVENTION To minimize the possibility of scratches to your flooring, cushion the feet of your furniture with felt floor protectors. And speaking of feet, keep your pet's claws trimmed too. Doormats at each entrance to your house will avoid the tracking in of potentially harmful sand and debris, as well as moisture. Wipe up any spilled liquids - even plain water- promptly to avoid staining and/or bubbling of the laminate floors. REPAIR PREPARATION Clean the floor with a microfiber mop before attempting any repair. Many of the fixes listed below will work best if no one walks on the floor for a period of up to 24 hours afterwards. In case of major damage or stubborn stains, consult your flooring contractor; repair may be covered by your purchase warranty. COVER-UPS AND FILLERS 1. Touch-up Pen or Filler Stick To tackle minor scuffs, scratches, or nicks, try inexpensive, easy-to-use touch-up pens or filler sticks (similar to wax crayons). Pens may be bought individually, but for the most successful color match, it's best to purchase a set. This will include several wood tones varied from light to dark, such as oak, maple, walnut, mahogany, and so on, to blend as appropriate. The pens cost about $10 per set and dry completely in 5 minutes. They may be utilized for touch-ups on furniture, in addition to laminate flooring, but are only for indoor use. Filler stick sets are higher priced, but can fill small scratches and don't require any drying time. 2. Laminate Floor Repair Kit A laminate floor repair kit is the most costly fix in the "cover-up and filler" category. However, in addition to giving a more precise color match, it can fill in somewhat larger gouges and holes. The kit may contain wax, paste, or putty, with a variety of tints that you custom blend to the shade you want. The tools you will need to prepare and apply the compound, such as a spatula and brush, are normally included. BOARD REPLACEMENT 3. Remove and Replace In case of more serious damage to your laminate floor, repair will involve replacing the damaged board(s). For the neatest results, carefully remove the baseboard closest to the area of laminate flooring which you need repaired. Then disassemble the floor, unlocking board after board from its tongue-and-groove arrangement, until you are able to take out the damaged one. Attach your replacement and work backwards to put the floor back together. 4. Cut and Glue If floor disassembly proves to be too difficult, you can slice out the blemished area only and then carefully cut a laminate "patch," measured to fit the empty spot. After gluing the patch in place, put a heavy weight on top and leave it to dry undisturbed for 24 hours. NOTE: The assumption here is that you have a few extra boards left over from your laminate floor installation. If this is not the case, take the damaged piece to your supplier to find the best match. How can repair a damaged laminate board? Light damage to your laminate floor can be easily repaired with the repair kit. Sometimes, however, a board is damaged so badly that you’ll have to replace it. Removing a board from the floor isn’t the easiest task, but we’ll show you how you can go about it, one step at a time. You’ll need a couple of tools to replace the broken board: some tape, a knife, a pencil, a plunge saw with rail, a chisel, a hammer, a crowbar and a tapping block. ● Make sure you clearly mark the broken board with your pencil or a pen. Tape off the contours of the damaged floorboard so that it stands out. ● Take a new board and draw a sawing line on the click side of the new plank. Mark the underside of the board so that you know where exactly the edge comes. We’ll glue this part later on. ● Saw off the grooves of the new board with your plunge saw. ● Using the same circular saw, saw two parallel grooves in the middle of the damaged board, lengthwise. Bring the grooves as close to the edges as possible. ● At the end of the broken plank, make incisions at an angle with your saw. Let the incisions cross the grooves you made earlier. This will make it easier to remove the board. ● Remove the beat-up board with a chisel. ● Apply glue to one of the short and one of the long sides of the surrounding boards. ● Grab the replacement board and click it together with the part you didn’t saw off, into the sides you didn’t glue. ● Using a hammer, a crowbar and a tapping block, carefully tap the new board into its place and press well ● Spread about 40 kilos of weight over the board and let the glue dry for a few hours. Afterwards, you’ll have a floor that’s as good as new. To obtain a free quote for Laminate flooring Repair in McAllen TX, please don’t hesitate to contact at Handyman McAllen Floor Services. Call us for : • Laminate Flooring Repair Filler • Laminate Flooring Repair Kit • How To Repair Laminate Flooring • How To Repair Laminate Flooring That Is Separating • How To Repair Laminate Flooring Water Damage • Laminate Flooring Repair Near McAllen TX • Laminate Floor Repair • How To Fix Laminate Flooring That Is Buckling
BEST LAMINATE FLOORING REPAIR SERVICE IN MCALLEN TX HANDYMAN MCALLEN REQUEST MORE INFORMATION. CONTACT US!
CONTACT: Handyman McAllen Best commercial residential handyman maintenance renovation professionals in McAllen, TX CALL (956) 587-3488 HANDYMAN 1 CALL (956) 587-3484 HANDYMAN 2 CALL (956) 587-3486 CLEANING CALL (956) 587-3487 MOVING CALL (956) 587-3003 JUNK REMOVAL Located in McAllen, TX WEBSITE: www.handymanmcallen.org http://www.handymanservicesofmcallen.com/ http://www.rgvhouseholdservices.com/ SERVICE AREA: 33 Cities within 30 miles of McAllen, TX Alamo, TX | Combes, TX | Delmita, TX | Donna, TX | Edcouch, TX | Edinburg, TX | Elsa, TX | Garciasville, TX | Grulla, TX | Hargill, TX | Harlingen, TX | Hidalgo, TX | La Blanca, TX | La Feria, TX | La Joya, TX | La Villa, TX | Lasara, TX | Linn, TX | Los Ebanos, TX | Los Indios, TX | Lyford, TX | Mercedes, TX | Mission, TX | Penitas, TX | Pharr, TX | Progreso, TX | Raymondville, TX | Rio Grande City, TX | San Juan, TX | Santa Maria, TX | Santa Rosa, TX | Sullivan City, TX | Weslaco, TX Starr County | Hidalgo County | Willacy County | Cameron County | 78504 | 78539 | 78540 | 78541 | 78542 | 78501 | 78503| 78505 | 78557 | 88540 |78502 | 78504 | 78539 | 78572\
#handyman #commercialhandyman #residencialhandyman #moving #junk #cleaning #maintenance #renovation #mcAllen #Texas
0 notes
Photo
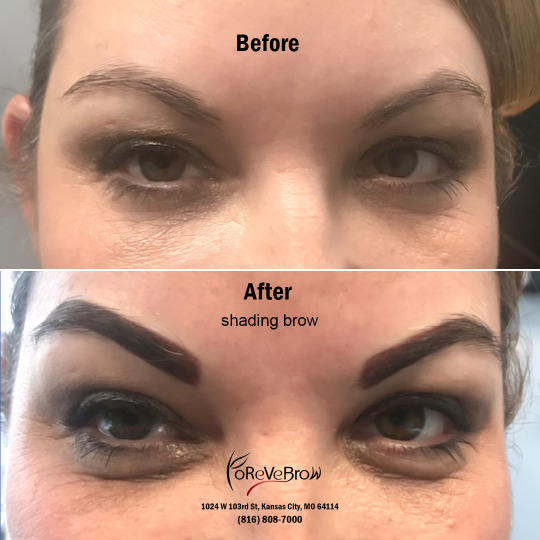
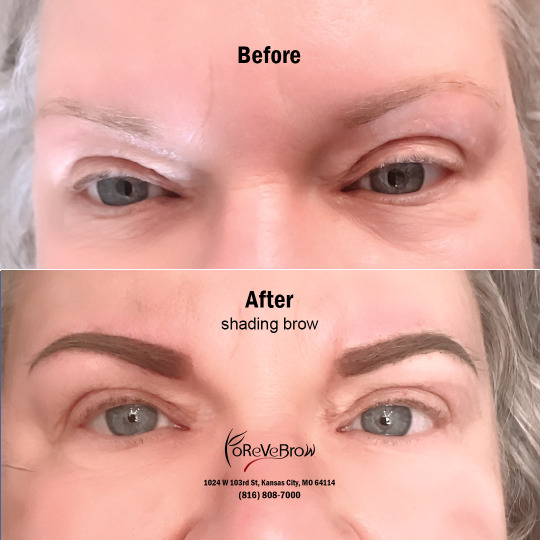
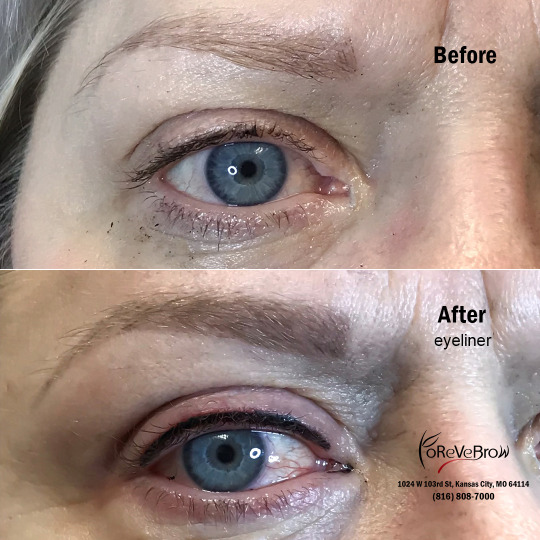
FLAWLESS EYEBROWS IN 4 EASY STEPS | EYEBROW 64114
It’s the 21st century and I don’t think I have to explain so much about the importance of eyebrows to your appearance. Take a look at any red carpet and you will see hundreds of celebrities who had their eyebrows either microbladed or tattooed. Our brows have an unmatched ability to bring proportion to our face, highlight our overall facial structures and frame our eyes beautifully. Unfortunately, not everyone is blessed with luscious brow hair to enhance their natural features and balance them out. If you weren’t born with beautiful eyebrows, makeup can transform the look of even the sparsest set into thicker looking, bolder looking beauties. But with busy mornings and long days leaving no time for touch-ups, wouldn’t it be great if there was a more permanent solution? You’re at the right place! The steps to incredible brows are now revealed in this article.
HOW ARE EYEBROWS DEFINED TO BE PERFECT?
The best eyebrows should be the ones that suit your face the most! You have to consider the shape, thickness, definition, length, and color when it comes to brows. Just surfing the internet to find those tips, or consulting with an expert for advice. Nowadays, most nail salons provide eyebrow services from simple to complex, such as threading, waxing, tinting, microblading, etc. Filling in your brows is the quickest and easiest way to instantly make you look more polished and put together. Before going to a permanent makeup clinic, conducting an investigation on the top-reviewed beauty salons near you is recommended. With the help of a specialist, your eyebrows will always be on point. Take a deep look at these guidelines to find out how brows can flatter your face and make your selfies pop!
STEP 1: EYEBROW HAIR REMOVAL
Permanent hair-free solutions these days are tweezing, waxing, threading, and laser hair removal technology. Each comes with its own set of pros and cons.
Threading allows for a detailed definition of the brow shape. If you're looking to add an arch or let your brows grow wild for a bit, threading can be a fast way to amp up your shape. The technique requires a threading expert to roll two cotton pieces of thread over the surface of the skin, driving unwanted hair out of the follicle. Sadly, threading breaks the hair, which could cause it to grow in different directions. The hair will grow back in faster, because hair is broken instead of fully removed.
Preparation: Be sure to call your threading salon ahead of time and inquire about their practice before making your appointment.
For those who favor efficiency, waxing might be for you. Waxing, if performed correctly, is much more gentle on hair follicles and skin. Waxing eyebrows is a longer-lasting method of brow shaping in-salon hair removal technique. Waxing pulls off the waxed strips in the direction of hair growth, but the biggest downside of this process is the pain. If you have thicker, coarser hair that grows back quickly, waxing is the best option for shaping. It also encourages thinner, softer regrowth.
Preparation: Before waxing, it is important to review the different types of wax available and investigate their ingredients for potential allergic reactions. With the proper product, waxing can be easy, but it is also vital to use the proper method to avoid catastrophic results.
Tweezing removes hair from the root and trimming is done after brushing through the brow thoroughly. With tweezing, you can pencil your eyebrows in their desired shape, and then tweeze around that, using it as a guideline. This method has an edge in that it appears to be the easiest one to do it yourself. If you don't trust yourself with a tweezer and scissors, visit a professional for a brow-shaping session every four to six weeks.
Preparation: A good pair of tweezers is a solid investment. And say no to magnifying mirrors–you will be more prone to over-plucking or messing up your arch.
If you're not happy with shaving, tweezing, or waxing to remove unwanted hair, laser treatment may be worth considering. It beams highly concentrated light into hair follicles. Pigment in the follicles absorb the light. That destroys the hair. While lasers are becoming more common and effective as technology advances, they're not exactly sensible for all types of hair removal.
Preparation: Make sure your skin is clean before every treatment. One more thing, trends come and go, and we recommend proceeding with true caution if you are planning on taking a permanent laser to your eyebrows.
Now before you go reaching for the best way to change the shape of your eyebrows, it would be best to seek the help of a brow expert. The method means a lot, but it’s really about the person doing your brows. You need to make sure that person understands the shape, and that comes from experience. The specialists are able to map out the shape that you want and can help you identify areas you may need to thicken up or grow in in order to achieve the desired shape. A good brow stylist doesn’t only shape but can lighten, darken, shape and even lift your brows.
STEP 2: EYEBROW SHAPING
When it comes to achieving the perfect brow shape, it is not as easy as it looks. Well-sculpted eyebrows complement your face and help you look younger. But, like everything in life, one size doesn’t fit all, and it’s insane how finding the right brow shape to flatter your face can improve symmetry and even knock years off. Just continue reading below to see how to take your brow game to the next level, and make sure you take what I shared with you to your next appointment
Your perfect brows depend on your unique face shape and dimensions. Firstly you need to establish which face shape you have. This will help you start to identify what eyebrow shape suits you best.
Heart faces: Try rounded brows to soften your face shape.
Square faces: Try thick, flat brows with a soft arch to soften the angles of your face and add depth.
Rectangular faces: Try slightly curved brows
Round faces: Try high arched brows to lengthen your face.
Oval faces: Try soft, angled brows to help balance your facial features.
Long faces: Try straight brows to add width to your face.
Diamond faces: Try curved brows to shorten your face.
Shaping your eyebrows is a major skill: it’s kinda like art and geometry combined because to find the perfect arch, it’s all about the angles and proportions of your face shape. When you shape your brows, they should be balanced and as symmetrical as possible. Find your ideal brow shape, accentuate your best features, and minimize makeup use. Eyebrows can be hard to get right, and figuring out the best look definitely isn’t easy, but don’t worry, the expert technicians will consult with you and offer their advice if needed.
STEP 3: PERMANENT EYEBROWS
Over a decade ago, tattooed eyebrows brought the pretty and natural looking result. However, the “tattoos” of today are a whole different game than the aforementioned brow pigmentation. Over the last few years, since bold, full brows have come back into fashion and microblading has exploded in popularity, a number of new tools and techniques have been introduced to the market offering polished-looking brows on a semi-permanent and short-term basis. From tinting and threading to microblading and lamination, the beauty industry has caught up with the demand for contemporary eyebrow treatments. It’s a lot easier now for both men and women to get the look of fuller, or more defined brows every day without having to fuss with eye pencils, gels and powders.
Nowadays, permanent brow makeup focuses on mimicking real brow hairs. That’s why microblading technique (also known as 3D eyebrow embroidery) has completely revolutionized eyebrow tattooing, and this trend shows no signs of slowing down. Unlike traditional tattoos that last forever, microblading gives you semi permanent eyebrows and helps to add the appearance of hairs to create a natural-looking, fuller brow effect. Microblading uses a pen-like hand tool with a blade made up of needles to etch hair strokes into the skin. Needles are drug across the skin, creating a fine cut where pigment can be placed in the skin. You draw the outline with a brow pencil, and then you use a specialized needle tool to fill inside the shape with strokes. The brow effect is comprised of many thin, crisp lines that are meant to mimic the natural look and texture of hair. It won't have any borders. A unique combination of dye is mixed to closely mimic the natural brow color of each client. Though the procedure sounds a bit uncomfortable, a numbing solution is applied beforehand to minimize any pain. Once done, the outcome will last up to 18 months. To prevent pigment wearing off, a retouching of the eyebrows is suggested once a year, to keep the color and shape of brows.
Someone who likes dark, full brows, and fills them in everyday, probably won’t be satisfied by microblading. Ahead, there is another brow technique which is usually a good idea if you want to create fullness and thickness in the middle of your brow.
A popular eyebrow system from ancient days is eyebrow tattooing. The most traditional tattooing methods involve the insertion of a needle or needles into the skin in a tapping motion. Tattooed brows are usually done by a handpiece machine, with much greater injury to the skin. This movement forces a lot of pigment into the skin, causing the tattoo to last. Eyebrow tattoo offers a permanent makeup solution for those who want stunning brows. This form of cosmetic tattooing, known also as derma-pigmentation or micro-pigmentation. With brow pigmentation, a regular tattoo needle is used, meaning the final product is composed of many tiny dots of pigments that create the illusion of a completely filled-in brow. Because of this, the finished tattoo is pretty much permanent, like a regular tattoo, with only a few touch-ups needed to maintain it, which saves many people money in the long run, and makes the maintenance of brows so much easier. Tattoo artists use ink while they are performing eyebrow tattoo procedure. With brow tattooing, the range of shades is limited to normal tattoo inks, whereas in the microblading technique, a blend of red, green, and other dye pigments are used to create an infinite variety of shades based on the client’s preference. There are a wide variety of eyebrows that can be produced with traditional tattooing, the most common being the following: Hair-Stroke or Feathered Brows, Soft or Powdered Eyebrow, Hard or Crisp Eyebrow.
Eyebrow tattoos are permanent. Once the ink is tattooed onto the skin it is there for life unless you go for removal procedures which can be costly. The semi-permanent nature of microblading allows patients the ability to alter the shape, color, and the size of their brows depending on what they desire. With microbladed brows, clients can change the appearance of their brow as trends change. Beauty trends aren't for women only, men can follow the trends too. Men traditionally don't get eyebrow tattooing, but men do get microblading.
Preparation: Listen up because if you decide to get your brows done, this part is very important:
Two weeks prior to your appointment stop using any skin thinners (vitamin A, glycolic acids, exfoliation) on the brow area.
Try not to take fish oil for a few days prior as it thins your blood which can tend to push out the pigment.
If you tint your eyebrows, tint it at least one week prior to the procedure.
Don't drink the night before, your pain threshold will be low if you are hungover. It’s not fun having your brows tattooed with a pounding headache.
Brow tattoo specialists will not be able to tattoo over any blemishes, sores, and moles in or around the brow area.
Getting a tattoo can be relatively painful, especially if they are placed in a sensitive area like the face. The microblading technique involves much less discomfort, especially if the brow area is numbed with lidocaine prior to treatment.
Besides the possible injuries, it is also very important to set your budget and to know your preference.
STEP 4: AFTERCARE FOR EYEBROW TREATMENT
It is normal for your eyebrows to appear very dark after the procedure. They will fade 10-50% in the first 1-3 weeks following.
Do not touch the tattooed area with your fingers right after your treatment at the salon. This increases your risk of infection. Cosmetic tattoos take between 4-6 weeks to fully heal. At this time you may receive your touch-up if any color has faded, or if you would simply like to add more definition to your tattoo.
Depending on your skin type, you may need to apply a protective and soothing balm across the brows when dry or itchy.
If you have oily skin, the wound will “self-heal” and not require any further nourishment. I suggest avoiding creamy moisturisers, serums with active ingredients and oils near the brow line as the more dry the skin is kept, the better the retention of the pigment in the skin. Anything oily will blur the crisp lines which were created during the procedure.
It’s best to avoid vigorous sports or exposure to moisture, which means protection in the shower is vital for roughly five to seven days. You should also stay out of direct sunlight. Do not scrub or pick at the tattooed area. Doing so can cause the pigment underneath to be pulled out. Allow the epithelial skin to flake off by itself. Stay away from dying or bleaching eyebrows, the chemicals could cause damage to face skin too.
Remember to schedule a touch up appointment within 2-3 months. Permanent makeup is an art and not a science. Everyone’s results will vary and you may still need to use pencil or powder.
CONCLUSION:
Eyebrows play a vital role in everyone’s faces so do not mess them up. An eyebrow studio is rated as good when it meets these requirements: certified technicians, hygienic conditions, authentic products, and smooth performances. Any tattoo, whether artistic or cosmetic, requires skill with the needles in use. Poor ability to use these tools increases the risk of scarring, migration of the tattoo, and excessive trauma to the skin. Because of the nature of the technique, microblading has a higher risk of negative side effects in the hands of an inexperienced technician. When done correctly, a permanent cosmetic treatment can be a safe and wonderful option to ease your daily make-up routine. Don’t hesitate to make an appointment with a professional beauty spa that offers high-quality permanent makeup procedures.
---------------
FOREVER BROW | EYEBROW 64114
1024 W 103rd St Kansas City, MO 64114
816-808-7000
0 notes
Link
Best Laminate Flooring Repair Service Las Vegas Nevada | McCarran Handyman Services
More information is at: http://www.handymanlasvegasnv.com/linoleum-flooring-installation-near-me.html
Youtube link: https://youtu.be/QhwVg2E88Ho
Facebook link: https://www.facebook.com/292645991337522/videos/523976734849821/
Looking for Laminate Flooring Repair Service near Las Vegas Nevada? McCarran Handyman Services is the premier Laminate Flooring Repair Service in the Las Vegas Nevada. Best Laminate Flooring Repair Service in Las Vegas Nevada. Cost? Free estimates! Call now or Send a quick message for an estimate.
REQUEST A FREE QUOTE NOW
LAMINATE FLOORING REPAIR SERVICE IN LAS VEGAS NEVADA
The Laminate Flooring Repair will At McCarran Handyman Services, our experienced flooring experts can provide the best Laminate Flooring Repair in Las Vegas Nevada at a very reasonable price. We take pride in offering the best Laminate Flooring Repair. Laminate flooring has been taking the home decor market by storm for over two decades now. And no wonder, with all it has to offer -durability, low maintenance, and glowing good looks, for a modest outlay of cash. laminate floor is not indestructible. Especially if you have children and/or animals in your home, laminate is subject to both normal wear and tear and occasional damage. Our McCarran Handyman Services experts take pride in providing the best service in the Las Vegas Nevada area.
An advantage of this type of flooring, however, is that it is installed as a "floating floor," rather than being nailed in place. This means that in case of damage, a small section can be fixed -you do not have to replace the whole floor. Find out the facts about laminate flooring repair.
DAMAGE PREVENTION
To minimize the possibility of scratches to your flooring, cushion the feet of your furniture with felt floor protectors. And speaking of feet, keep your pet's claws trimmed too. Doormats at each entrance to your house will avoid the tracking in of potentially harmful sand and debris, as well as moisture.
Wipe up any spilled liquids - even plain water- promptly to avoid staining and/or bubbling of the laminate floors.
REPAIR PREPARATION
Clean the floor with a microfiber mop before attempting any repair. Many of the fixes listed below will work best if no one walks on the floor for a period of up to 24 hours afterwards. In case of major damage or stubborn stains, consult your flooring contractor; repair may be covered by your purchase warranty.
COVER-UPS AND FILLERS
1. Touch-up Pen or Filler Stick
To tackle minor scuffs, scratches, or nicks, try inexpensive, easy-to-use touch-up pens or filler sticks (similar to wax crayons). Pens may be bought individually, but for the most successful color match, it's best to purchase a set. This will include several wood tones varied from light to dark, such as oak, maple, walnut, mahogany, and so on, to blend as appropriate. The pens cost about $10 per set and dry completely in 5 minutes. They may be utilized for touch-ups on furniture, in addition to laminate flooring, but are only for indoor use. Filler stick sets are higher priced, but can fill small scratches and don't require any drying time.
2. Laminate Floor Repair Kit
A laminate floor repair kit is the most costly fix in the "cover-up and filler" category. However, in addition to giving a more precise color match, it can fill in somewhat larger gouges and holes. The kit may contain wax, paste, or putty, with a variety of tints that you custom blend to the shade you want. The tools you will need to prepare and apply the compound, such as a spatula and brush, are normally included.
BOARD REPLACEMENT
3. Remove and Replace
In case of more serious damage to your laminate floor, repair will involve replacing the damaged board(s). For the neatest results, carefully remove the baseboard closest to the area of laminate flooring which you need repaired. Then disassemble the floor, unlocking board after board from its tongue-and-groove arrangement, until you are able to take out the damaged one. Attach your replacement and work backwards to put the floor back together.
4. Cut and Glue
If floor disassembly proves to be too difficult, you can slice out the blemished area only and then carefully cut a laminate "patch," measured to fit the empty spot. After gluing the patch in place, put a heavy weight on top and leave it to dry undisturbed for 24 hours.
NOTE: The assumption here is that you have a few extra boards left over from your laminate floor installation. If this is not the case, take the damaged piece to your supplier to find the best match.
How can repair a damaged laminate board?
Light damage to your laminate floor can be easily repaired with the repair kit. Sometimes, however, a board is damaged so badly that you’ll have to replace it. Removing a board from the floor isn’t the easiest task, but we’ll show you how you can go about it, one step at a time.
You’ll need a couple of tools to replace the broken board: some tape, a knife, a pencil, a plunge saw with rail, a chisel, a hammer, a crowbar and a tapping block.
● Make sure you clearly mark the broken board with your pencil or a pen. Tape off the contours of the damaged floorboard so that it stands out.
● Take a new board and draw a sawing line on the click side of the new plank. Mark the underside of the board so that you know where exactly the edge comes. We’ll glue this part later on.
● Saw off the grooves of the new board with your plunge saw.
● Using the same circular saw, saw two parallel grooves in the middle of the damaged board, lengthwise. Bring the grooves as close to the edges as possible.
● At the end of the broken plank, make incisions at an angle with your saw. Let the incisions cross the grooves you made earlier. This will make it easier to remove the board.
● Remove the beat-up board with a chisel.
● Apply glue to one of the short and one of the long sides of the surrounding boards.
● Grab the replacement board and click it together with the part you didn’t saw off, into the sides you didn’t glue.
● Using a hammer, a crowbar and a tapping block, carefully tap the new board into its place and press well
● Spread about 40 kilos of weight over the board and let the glue dry for a few hours. Afterwards, you’ll have a floor that’s as good as new.
To obtain a free quote for Laminate flooring Repair in Las Vegas Nevada, please don’t hesitate to contact at McCarran Handyman Services Floor Services.
Call us for :
· Laminate Flooring Repair Filler
· Laminate Flooring Repair Kit
· How To Repair Laminate Flooring
· How To Repair Laminate Flooring That Is Separating
· How To Repair Laminate Flooring Water Damage
· Laminate Flooring Repair Near Las Vegas Nevada
· Laminate Floor Repair
· How To Fix Laminate Flooring That Is Buckling
BEST LAMINATE FLOORING REPAIR SERVICE IN LAS VEGAS NEVADA
MCCARRAN HANDYMAN SERVICES
REQUEST MORE INFORMATION. CONTACT US!
CONTACT:
McCarran Handyman Services
#1 Handyman Service in Las Vegas Henderson Nevada!
CALL (702) 570-4279 HANDYMAN 1, http://www.handymanlasvegasnv.com/
CALL (702) 514-3052 HANDYMAN 2, http://www.service-vegas.com/
CALL (702) 530-7597 CLEANING 1, http://www.mgmhouseholdservices.com/
CALL (702) 551-2023 CLEANING 2, http://www.cleaningserviceslasvegasnv.com/
CALL (702) 329-9729 JUNK REMOVAL, http://www.mgmjunkremoval.com/
Located in Las Vegas Nevada
Monday to Sunday 6:00 am – 11:00 pm
WEB: www.handymanlasvegasnv.com
EMAIL:[email protected]
http://www.handymanlasvegasnv.com/
HANDYMAN SERVICES:
· Bathroom Kitchen Basement Remodeling, Interior and Exterior Painting
· Cabinetry and Carpentry, Commercial Residential Painting
· Concrete & Masonry, Damage Restoration
· Decks & Railing, Demolition Services, Deck Staining
· Door Repair Installation Services, Drywall Repair and Installer
· Fences & Gates, Flooring and Foundation Services
· Gutter Cleaning Services
· Heating & Air Conditioning/HVAC
· Landscaping Services, Lawn Care, Hardscaping Services
· Painting, Plaster & Drywall Services
· Plumbing Services, Roofing and Room Additions and Siding
· Swimming Pool Maintenance and Cleaning
· Waterproofing, Windows Repair Installation Services
· Home Building and Home Remodeling
· General Contracting, Hauling and Property Management
· Solar Panel Services, Assembly and Installation Services
· House Office Building Cleaning, Maintenance and Junk Removal
SERVICE AREA: Las Vegas NV, Boulder City NV, Enterprise, Henderson, North Las Vegas, Paradise, Spring Valley, Summerlin, Sunrise Manor Nevada.
Las Vegas Neighborhoods:Aliante, Anthem/Anthem Country Club, Chinatown, Downtown Las Vegas, Green Valley, Lake Las Vegas, Las Vegas Country Club, MacDonald Highlands, Mountain's Edge, Paradise Palms, Queensridge & One Queensridge Place, Seven Hills, Southern Highlands, Summerlin, Summerlin South, The Lakes, The Ridges, West Las Vegas Nevada.
Service Area Zip Codes: 88901, 88905, 89101, 89102, 89104, 89106, 89107, 89108, 89109, 89110, 89116, 89117, 89124, 89125, 89126, 89127, 89128, 89129, 89130, 89131, 89133, 89134, 89136, 89137, 89138, 89143, 89144, 89145, 89146, 89147, 89149, 89151, 89152, 89153, 89154, 89155, 89157, 89158, 89161, 89162, 89163, 89164, 89166, 89185.
0 notes
Photo

BREAKING NEWS! Brow Lamination hits Hyndland! We have just finished training in the new “Brow Lamination” Treatment. This is basically a brow perm, which breaks down the brow hairs and allows the brows to be brushed and placed in the required position. Brows can be left in either a “fluffy look” or trimmed/waxed to get them shaped and tinted into the final look. Lamination takes place to secure them in position for up to 3-5 weeks. Amazing results. #browlamination #glasgowbeauty #beautifulbrows #visithyndland #perfectbrows #echbeauty (at Ellen Conlin Hair & Beauty) https://www.instagram.com/p/B1MYLhSF3Aa/?igshid=o4kebgxupi4e
0 notes
Link
Best Laminate Flooring Repair Service Edinburg Mission McAllen TX | Handyman Services of McAllen
More information - http://www.handymanservicesofmcallen.com/laminate--flooring-repair-service.html
Looking for Laminate Flooring Repair Service near Edinburg Mission McAllen TX? Handyman Services of McAllen is the premier Laminate Flooring Repair Service in the Edinburg Mission McAllen TX.Best Laminate Flooring Repair Service in Edinburg Mission McAllen TX. Cost? Free estimates! Call now or Send a quick message for an estimate.
REQUEST A FREE QUOTE NOW
LAMINATE FLOORING REPAIR SERVICE IN EDINBURG MISSION MCALLEN TX
The Laminate Flooring Repair will At Handyman Services of McAllen, our experienced flooring experts can provide the best Laminate Flooring Repair in Edinburg Mission McAllen TX at a very reasonable price.We take pride in offering the best Laminate Flooring Repair.Laminate flooring has been taking the home decor market by storm for over two decades now. And no wonder, with all it has to offer -durability, low maintenance, and glowing good looks, for a modest outlay of cash. laminate floor is not indestructible. Especially if you have children and/or animals in your home, laminate is subject to both normal wear and tear and occasional damage.Our Handyman Services of McAllen experts take pride in providing the best service in the Edinburg Mission McAllen area.
An advantage of this type of flooring, however, is that it is installed as a "floating floor," rather than being nailed in place. This means that in case of damage, a small section can be fixed -you do not have to replace the whole floor. Find out the facts about laminate flooring repair.
DAMAGE PREVENTION
To minimize the possibility of scratches to your flooring, cushion the feet of your furniture with felt floor protectors. And speaking of feet, keep your pet's claws trimmed too. Doormats at each entrance to your house will avoid the tracking in of potentially harmful sand and debris, as well as moisture.
Wipe up any spilled liquids - even plain water- promptly to avoid staining and/or bubbling of the laminate floors.
REPAIR PREPARATION
Clean the floor with a microfiber mop before attempting any repair. Many of the fixes listed below will work best if no one walks on the floor for a period of up to 24 hours afterwards. In case of major damage or stubborn stains, consult your flooring contractor; repair may be covered by your purchase warranty.
COVER-UPS AND FILLERS
1. Touch-up Pen or Filler Stick
To tackle minor scuffs, scratches, or nicks, try inexpensive, easy-to-use touch-up pens or filler sticks (similar to wax crayons). Pens may be bought individually, but for the most successful color match, it's best to purchase a set. This will include several wood tones varied from light to dark, such as oak, maple, walnut, mahogany, and so on, to blend as appropriate. The pens cost about $10 per set and dry completely in 5 minutes. They may be utilized for touch-ups on furniture, in addition to laminate flooring, but are only for indoor use. Filler stick sets are higher priced, but can fill small scratches and don't require any drying time.
2. Laminate Floor Repair Kit
A laminate floor repair kit is the most costly fix in the "cover-up and filler" category. However, in addition to giving a more precise color match, it can fill in somewhat larger gouges and holes. The kit may contain wax, paste, or putty, with a variety of tints that you custom blend to the shade you want. The tools you will need to prepare and apply the compound, such as a spatula and brush, are normally included.
BOARD REPLACEMENT
3. Remove and Replace
In case of more serious damage to your laminate floor, repair will involve replacing the damaged board(s). For the neatest results, carefully remove the baseboard closest to the area of laminate flooring which you need repaired. Then disassemble the floor, unlocking board after board from its tongue-and-groove arrangement, until you are able to take out the damaged one. Attach your replacement and work backwards to put the floor back together.
4. Cut and Glue
If floor disassembly proves to be too difficult, you can slice out the blemished area only and then carefully cut a laminate "patch," measured to fit the empty spot. After gluing the patch in place, put a heavy weight on top and leave it to dry undisturbed for 24 hours.
NOTE: The assumption here is that you have a few extra boards left over from your laminate floor installation. If this is not the case, take the damaged piece to your supplier to find the best match.
How can repair a damaged laminate board?
Light damage to your laminate floor can be easily repaired with the repair kit. Sometimes, however, a board is damaged so badly that you’ll have to replace it. Removing a board from the floor isn’t the easiest task, but we’ll show you how you can go about it, one step at a time.
You’ll need a couple of tools to replace the broken board: some tape, a knife, a pencil, a plunge saw with rail, a chisel, a hammer, a crowbar and a tapping block.
● Make sure you clearly mark the broken board with your pencil or a pen. Tape off the contours of the damaged floorboard so that it stands out.
● Take a new board and draw a sawing line on the click side of the new plank. Mark the underside of the board so that you know where exactly the edge comes. We’ll glue this part later on.
● Saw off the grooves of the new board with your plunge saw.
● Using the same circular saw, saw two parallel grooves in the middle of the damaged board, lengthwise. Bring the grooves as close to the edges as possible.
● At the end of the broken plank, make incisions at an angle with your saw. Let the incisions cross the grooves you made earlier. This will make it easier to remove the board.
● Remove the beat-up board with a chisel.
● Apply glue to one of the short and one of the long sides of the surrounding boards.
● Grab the replacement board and click it together with the part you didn’t saw off, into the sides you didn’t glue.
● Using a hammer, a crowbar and a tapping block, carefully tap the new board into its place and press well
● Spread about 40 kilos of weight over the board and let the glue dry for a few hours. Afterwards, you’ll have a floor that’s as good as new.
To obtain a free quote for Laminate flooring Repair in Edinburg Mission McAllen TX, please don’t hesitate to contact at Handyman Services of McAllen Floor Services.
Call us for :
· Laminate Flooring Repair Filler
· Laminate Flooring Repair Kit
· How To Repair Laminate Flooring
· How To Repair Laminate Flooring That Is Separating
· How To Repair Laminate Flooring Water Damage
· Laminate Flooring Repair Near Edinburg Mission McAllen
· Laminate Floor Repair
· How To Fix Laminate Flooring That Is Buckling
BEST LAMINATE FLOORING REPAIR SERVICE IN EDINBURG MISSION MCALLEN TX
HANDYMAN SERVICES OF MCALLEN
REQUEST MORE INFORMATION. CONTACT US! CONTACT:
Handyman Services of McAllen
#1 Handyman Service in Edinburg Mission McAllen TX
CALL (956) 587 3484 HANDYMAN, http://www.handymanservicesofmcallen.com/
CALL (956) 587 3486 CLEANING, http://www.rgvjanitorialservices.com/
CALL (956) 587 3003 JUNK REMOVAL, http://www.rgvhouseholdservices.com/
CALL (956) 587 4487 MOVING, http://www.rgvhouseholdservices.com/
Located in McAllen TX
Open Monday to Sunday 6:00 am – 11:30 pm
WEB: www.handymanservicesofmcallen.com
EMAIL: [email protected]
http://www.handymanservicesofmcallen.com/
SERVICE AREA:
Alamo TX | Alton TX | Brownsville TX | Donna TX | Edcouch TX | Edinburg TX | Elsa TX | Granjeno TX | Harlingen TX | Hidalgo TX | La Joya TX | La Villa TX | McAllen TX | Mercedes TX | Mission TX | Rio Grande City TX | Raymondville TX | Palmhurst TX | Palmview TX | Penitas TX | Pharr TX | Progreso TX | Progreso Lakes TX | San Juan TX | Sullivan City TX | Weslaco TX | Starr County | Hidalgo County | Willacy County | Cameron County | 78504 | 78539 | 78540 | 78541 | 78542 | 78501 | 78503| 78505 | 78557 | 88540 |78502 | 78504 | 78539 | 78572
0 notes
Link
Best Laminate Flooring Repair Service Omaha Lincoln NE Council Bluffs IA | Eppley Handyman Services
More Information is at: http://www.handymanomahane.com/laminate-flooring-repair.html
Youtube: https://youtu.be/v1eL2lkEess
Facebook: https://www.facebook.com/1953961368162102/videos/298202471131999/
Looking for Laminate Flooring Repair Service near Omaha Lincoln NE Council Bluffs IA? Eppley Handyman Servicesis the premier Laminate Flooring Repair Service in the Omaha Lincoln NE Council Bluffs IA.Best Laminate Flooring Repair Service in Omaha Lincoln NE Council Bluffs IA. Cost? Free estimates! Call now or Send a quick message for an estimate.
REQUEST A FREE QUOTE NOW
LAMINATE FLOORING REPAIR SERVICE IN OMAHA LINCOLN NE COUNCIL BLUFFS IA
The Laminate Flooring Repair will At Eppley Handyman Services, our experienced flooring experts can provide the best Laminate Flooring Repair in Omaha Lincoln NE Council Bluffs IA at a very reasonable price.We take pride in offering the best Laminate Flooring Repair.Laminate flooring has been taking the home decor market by storm for over two decades now. And no wonder, with all it has to offer -durability, low maintenance, and glowing good looks, for a modest outlay of cash. laminate floor is not indestructible. Especially if you have children and/or animals in your home, laminate is subject to both normal wear and tear and occasional damage.Our Eppley Handyman Services experts take pride in providing the best service in the Omaha Lincoln NE Council Bluffs area.
An advantage of this type of flooring, however, is that it is installed as a "floating floor," rather than being nailed in place. This means that in case of damage, a small section can be fixed -you do not have to replace the whole floor. Find out the facts about laminate flooring repair.
DAMAGE PREVENTION
To minimize the possibility of scratches to your flooring, cushion the feet of your furniture with felt floor protectors. And speaking of feet, keep your pet's claws trimmed too. Doormats at each entrance to your house will avoid the tracking in of potentially harmful sand and debris, as well as moisture.
Wipe up any spilled liquids - even plain water- promptly to avoid staining and/or bubbling of the laminate floors.
REPAIR PREPARATION
Clean the floor with a microfiber mop before attempting any repair. Many of the fixes listed below will work best if no one walks on the floor for a period of up to 24 hours afterwards. In case of major damage or stubborn stains, consult your flooring contractor; repair may be covered by your purchase warranty.
COVER-UPS AND FILLERS
1. Touch-up Pen or Filler Stick
To tackle minor scuffs, scratches, or nicks, try inexpensive, easy-to-use touch-up pens or filler sticks (similar to wax crayons). Pens may be bought individually, but for the most successful color match, it's best to purchase a set. This will include several wood tones varied from light to dark, such as oak, maple, walnut, mahogany, and so on, to blend as appropriate. The pens cost about $10 per set and dry completely in 5 minutes. They may be utilized for touch-ups on furniture, in addition to laminate flooring, but are only for indoor use. Filler stick sets are higher priced, but can fill small scratches and don't require any drying time.
2. Laminate Floor Repair Kit
A laminate floor repair kit is the most costly fix in the "cover-up and filler" category. However, in addition to giving a more precise color match, it can fill in somewhat larger gouges and holes. The kit may contain wax, paste, or putty, with a variety of tints that you custom blend to the shade you want. The tools you will need to prepare and apply the compound, such as a spatula and brush, are normally included.
BOARD REPLACEMENT
3. Remove and Replace
In case of more serious damage to your laminate floor, repair will involve replacing the damaged board(s). For the neatest results, carefully remove the baseboard closest to the area of laminate flooring which you need repaired. Then disassemble the floor, unlocking board after board from its tongue-and-groove arrangement, until you are able to take out the damaged one. Attach your replacement and work backwards to put the floor back together.
4. Cut and Glue
If floor disassembly proves to be too difficult, you can slice out the blemished area only and then carefully cut a laminate "patch," measured to fit the empty spot. After gluing the patch in place, put a heavy weight on top and leave it to dry undisturbed for 24 hours.
NOTE: The assumption here is that you have a few extra boards left over from your laminate floor installation. If this is not the case, take the damaged piece to your supplier to find the best match.
How can repair a damaged laminate board?
Light damage to your laminate floor can be easily repaired with the repair kit. Sometimes, however, a board is damaged so badly that you’ll have to replace it. Removing a board from the floor isn’t the easiest task, but we’ll show you how you can go about it, one step at a time.
You’ll need a couple of tools to replace the broken board: some tape, a knife, a pencil, a plunge saw with rail, a chisel, a hammer, a crowbar and a tapping block.
● Make sure you clearly mark the broken board with your pencil or a pen. Tape off the contours of the damaged floorboard so that it stands out.
● Take a new board and draw a sawing line on the click side of the new plank. Mark the underside of the board so that you know where exactly the edge comes. We’ll glue this part later on.
● Saw off the grooves of the new board with your plunge saw.
● Using the same circular saw, saw two parallel grooves in the middle of the damaged board, lengthwise. Bring the grooves as close to the edges as possible.
● At the end of the broken plank, make incisions at an angle with your saw. Let the incisions cross the grooves you made earlier. This will make it easier to remove the board.
● Remove the beat-up board with a chisel.
● Apply glue to one of the short and one of the long sides of the surrounding boards.
● Grab the replacement board and click it together with the part you didn’t saw off, into the sides you didn’t glue.
● Using a hammer, a crowbar and a tapping block, carefully tap the new board into its place and press well
● Spread about 40 kilos of weight over the board and let the glue dry for a few hours. Afterwards, you’ll have a floor that’s as good as new.
To obtain a free quote for Laminate flooring Repair in Omaha Lincoln NE Council Bluffs IA, please don’t hesitate to contact at Eppley Handyman Floor Services.
Call us for :
· Laminate Flooring Repair Filler
· Laminate Flooring Repair Kit
· How To Repair Laminate Flooring
· How To Repair Laminate Flooring That Is Separating
· How To Repair Laminate Flooring Water Damage
· Laminate Flooring Repair Near Omaha Lincoln NE Council Bluffs
· Laminate Floor Repair
· How To Fix Laminate Flooring That Is Buckling
BEST LAMINATE FLOORING REPAIR SERVICE IN OMAHA LINCOLN NE COUNCIL BLUFFS IA
EPPLEY HANDYMAN SERVICES
REQUEST MORE INFORMATION. CONTACT US!
CONTACT:
Eppley Handyman Services
#1 Handyman Service in Omaha NE Council Bluffs IA!
CALL 402-614-0895 HANDYMAN 1, http://www.handymanomahane.com/
CALL 402-401-7562 HANDYMAN 2, http://www.omahahouseholdservices.com/
CALL 402-875-7305 HANDYMAN 3,http://www.handymanlincolne.com/
CALL 402-590-8092 JUNK REMOVAL, http://www.omahajunkdisposal.com/
CALL 402-486-3717 MOVING, http://www.moversinomaha.com/
CALL 402-575-9272 CLEANING 1, http://www.maidserviceomaha.com/
CALL 402-810-6320 CLEANING 2, http://www.greencleaningomaha.com/
CALL 402-881-3135 CLEANING 3, http://www.servicelincoln.com/
Located in Omaha NE 68105
Open Monday to Sunday 7:00 am – 11:00 pm
WEB: www.handymanomahane.com
http://www.handymanomahane.com/
SERVICES:
· Handyman Services
· Painting
· Drywall Repair
· Doors and Windows Repair Replacement
· House Renovation
· Bathroom Remodeling
· Kitchen Remodeling
· Sink Installation
· Cabinet Installation
· Air Conditioner Installation
· Flat Screen / Tv Mount Installment
· Furniture and Custom Shelves Assembly
· Bathroom and Kitchen Redesign
· Cleaning Services Indoor or Outdoor
· Concrete / Masonry
· Junk Removal
· Furniture Removal and Hauling
SERVICE AREA:
Downtown Omaha, Central Omaha, Southwest Omaha and Sarpy County (La Vista, Bellevue, Omaha, Papillion, Gretna, Offutt AFB, Springfield) Douglass County (Omaha, Bennington, Elkhorn, Boys Town, Valley, Waterloo), Pottawattamie County (Council Bluffs, Avoca, Carson, Carter Lake), Cass County (Weeping Water, Alvo, Avoca, Cedar Creek, Eagle, Elmwood, Greenwood, Louisville, Manley, Murdock, Murray, Nehawka, Plattsmouth, South Bend, Union) including the communities of Bellevue, Blair, Carter Lake, Elkhorn, Fort Calhoun, Gretna, LaVista, Millard, Omaha, Papillion, Ceresco NE, Ralston, Springfield and Waterloo, NE, Lincoln Nebraska and Council Bluffs, IA. Zip codes: 68007, 68010, 68017, 68022, 68102, 68104, 68105, 68106, 68107, 68108, 68110, 68111, 68112, 68114, 68116, 68117, 68118, 68122, 68124, 68127,
68130, 68131, 68132, 68134, 68135, 68137, 68142, 68144, 68147, 68152, 68154, 68157, 68164, 68178, 68073.
0 notes
Text
10 Tips For Beautiful Brows
March 11, 2020
If the eyes are the window to the soul, then eyebrows are the window frame that will make those peepers pop!
If you’re looking for ways to better define your brows, fill in sparse brows or just want to change up your brow, here are 10 brow tips to consider.
*this post contains affiliate links*
1. Create The Right Shape
Unless you were born with perfectly shaped brows, you will most likely need to do some brow shaping to achieve the look you want. To slow down re-growth and reduce stubble, eyebrow hair should be removed from the root, either by threading, plucking or waxing (lasering brows is a no no!).
I shaped my own brows using tweezers years ago, but I highly recommend going to a professional who can determine what the best brow shape is for you based on your face and current brow situation.
If you are an over-plucker, hide the tweezers and let your brows grow out thoroughly before having them shaped. For super sparse brows that don’t grow back, you may want to consider microblading (tip #6 in this post).
Be sure to do your research and look up reviews and/or get referrals before having someone touch your brows!
Ask to review pictures of their previous work on actual clients and get them to draw out what they plan to do to your brows before they remove any hair so you can decide if you like the shape.
Once you’ve achieved your preferred brow shape, be sure to maintain any stray hairs that grow back regularly – either yourself or by having your brows professionally maintained.
2. Trim Your Brows
Trimming your brows regularly is a great way to keep unruly brows in line. Brow trimming can also make applying brow pencils and pomades easier, because it can cut out any excess thickness or unwanted hairs that can get in the way.
Every couple of weeks, I like to clip my brows to clean up my brow shape. I do this in a couple steps:
1 -I brush my brow hairs upwards with a spoolie brush and then use tapered nail scissors to cut along the top edge of my brows to get any hairs that extend too far above the brow line, following the shape of the brow.
2- (optional step for thicker brows) To thin-out the thicker parts of my brows, I use my spoolie brush and brush the hairs downward and then use my nail scissors to clip any hairs that fall below the underside of the brow, following the shape. This extra trim has really helped thin out my brows in the middle where they grow like thick weeds.
Below is a video clip of how to trim your brows!
youtube
3. Shape Or Fill Brows Using A Pencil or Pomade
If you have parts of your brows that are a little sparse or sections of your brows that need a bit more shaping, consider using a brow pencil or a brow pomade to fill in the gaps.
Brow pencils are a great way to fill brows quickly and are fairly easy to use; I recommend using a brow pencil with a fine tip so you have more control over how and where the pencil applies.
Fine-tip brow pencils (like the L’Oreal Brow Stylist Definer pencil, which I love!) are also great for creating thin, hair-like strokes that can look more natural.
Brow pomades are another great eyebrow defining option and can sometimes be easier to use than a brow pencil. I enjoy using the Anastasia Beverly Hills’ Dip Brow Pomade.
To apply a brow pomade, you will need a sharp, angled eyebrow brush (I use the Anastasia Beverly Hills #7B brow brush).
Similar to a brow pencil, pomades can be used to fill in sparse brows or applied using light strokes to simulate the look of individual hairs.
Below, you can see both a brow pencil and a brow pomade in action by the queen of brows herself, Miss Desi Perkins:
youtube
Shop Brow Pomades and Brow Pencils:
4. Use A Concealer For An Extra-Defined Brow
If you’re looking for that super-sharp, “brows on fleek” look commonly seen on Instagram, consider using a concealer to clean things up.
Apply a touch of concealer onto the end of a small, flat concealer brush and run the brush underneath and above the brows along the edges to clean up any rough bits and create a perfectly smooth brow line.
You can see this concealer technique in action below:
youtube
5. Apply A Brow Gel
Brow gels are a great finishing touch, as they work to hold unruly brow hairs in place.
Some of these gels are tinted to give brows an extra hit of colour, while others can actually make brow hairs appear thicker (like Glossier’s Boy Brow).
If you already have well-shaped, full brows, consider skipping the filling/defining step and simply apply a brow gel to enhance your natural brow shape and texture.
RELATED READING: Glossier Haul ft. Brow Flick, Boy Brow + Cloud Paint
Shop Brow Gels:
6. Microblading
Microblading is a great semi-permanent option for anyone looking to further define their brows or fill in sparse areas that refuse to grow back.
Microblading is a process whereby a skilled professional defines and fills eyebrows by tattooing the area, creating individual hairs onto the brow area to create the perfectly filled eyebrow. While this may sound terrifying, when done by a skilled hand, microbladed brows can totally transform your brow shape and give your perfect, natural looking brows.
Since microbladed eyebrows are tattooed on, you don’t have to worry about washing your brows off each night and having to re-do them each morning – bonus!
Microbladed brows tend to fade over a period of 1-2 years, so maintenance is necessary if you want to maintain this look.
Be sure to find a qualified professional to perform the microblading and take the time to review their work and obtain references!
You can see a sample of microbladed brows before and after below:
7. Brow Lamination
No, this does not involve encasing your brows in plastic!
Brow lamination is the newest trend in brow styling and it involves using a chemical solution to help your brows stay straight up for fuller looking brows – kind of like a perm for your brows.
Basically, your brows are brushed upwards and then a chemical solution is applied on top. A piece of thin, Saran wrap plastic is then placed on top of your brows to hold the hairs upright while the solution works its magic.
When it’s done, you have brows that reach for the sky!
Here is a before and after pic of the difference brow lamination can make (before pic is on the bottom):
Photo from totalbeauty.com
8. Brow Tinting
Brow tints are dyes that you apply to your brows to temporarily tint (dye) them a different colour.
Brow tinting is super easy and a great way to enhance the colour of your brows or change things up a bit on a temporary basis.
Be sure to use a proper brow tint to dye your brows!
DO NOT USE BOXED HAIR DYE to tint your brows – ever! Boxed hair dyes are not safe for use near the eyes and can cause blindness.
9. Shape + Hold Brows With Bar Soap
A really fun way to get your brows to stay up straight, without lamination, is by dipping a spoolie brush into a bar of soap – yes, soap – to lock in that lift.
What the hell am I talking about? You can see this soap bar brow hack in action here:
youtube
10. Condition Your Brows
Applying lubricants like castor oil, jojoba oil, coconut oil or Vaseline create a moisture barrier on the skin to keep it moist, which helps promote brow hair growth.
Apply your oil of choice to your brows before heading to bed and leave it on overnight.
pin me for later!
How do you get beautiful brows?
Source link
The post 10 Tips For Beautiful Brows appeared first on Trends Dress.
from Trends Dress https://trendsdress.com/10-tips-for-beautiful-brows/ from Trends Dress https://trendsdresscom.tumblr.com/post/613753577843900416
0 notes