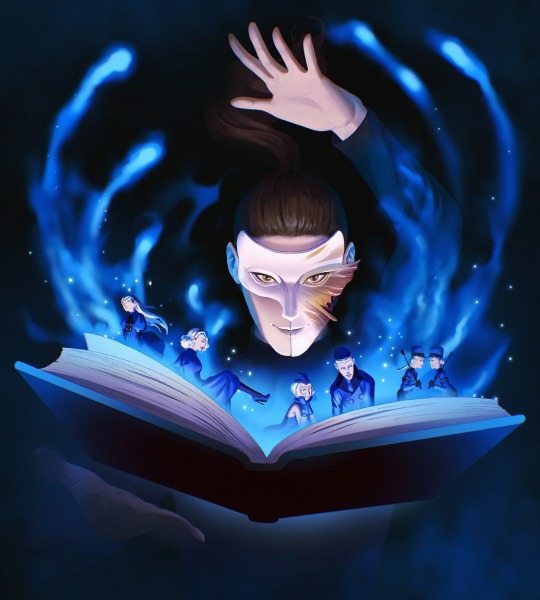
#Velvet Attendant: Elizabeth
Explore tagged Tumblr posts
Visit Tumblr Blog
Explore Tumblr blogs with no restrictions, modern design and the best experience.
Last Seen Tumblr Blogs


Fun Fact
Tumblr is available in 18 languages.
Note
Pelipper mail: for everyone. Cards that when touched, download a game called Fate Grand Order on your phone, though with all the gambling removed by making all the gencha parts free. The gameplay loop is a bit boring, but the story is good. Who knows, maybe it will be needed one day
I…
Um…
Uhh….
Thank you, I suppose?
I can’t complain knowing what Anons have done in the past.
HELL YEAH!
#pokeblogging#rotomblr#burning dread: kotone#seeker of truth: yu#butterfly man: naoya#cubone-powered redemption arc: akechi#Velvet Attendant: Elizabeth#The Person. Not The Axe: Labrys
7 notes
·
View notes
Text
Kill them
ELIZABETH NO
What? You were saying that earlier
NOT SERIOUSLY!
I’m so sorry, Emu, those guys are jerks.
Everyone is whispering about my accent :(
12 notes
·
View notes
Text

the velvet room attendants playing uno...?
128 notes
·
View notes
Text
Elizabeth silently watching Makoto destroy all the shadows resulting in him having to sacrifice his life to stop the Fall: 🧍♀️
Lavenza any time Joker has to make a decision:

#makoto was just rawdogging the supernatural events with no explanation#obviously not Liz's fault he died but the difference in these velvet room attendants makes me giggle#lavenza was fighting for her LIFE to make sure joker didnt do dumb shit#tho i did appreciate them showing that elizabeth DID feel sad about makoto dying post-canon in The Answer#my post#persona 3#persona 3 reload#persona 5#persona 5 royal#p3#p5#p5r#makoto yuki#akira kurusu#p3 elizabeth#p5r akira#p5r lavenza#p3 makoto#p3 memes#p5r memes
87 notes
·
View notes
Text
I don’t know the other attendants past p5’s (obviously)
well but this is their vibes

#Persona 3#persona 4#persona 5#p3#p4#p5#persona 3 portable#theodore#elizabeth#margaret#Velvet attendants
68 notes
·
View notes
Note
Well, now! Color me intrigued! I would love to see how far that strength can carry you in a match against me.
Elizabeth. You are in 1800s Sinnoh.
... I didn't say that I was going to just walk down to her region and fight her, I just said I'd be interested if it came up.
Hmm... I don't know why, but I feel a certain power emanating off of you, even just over the internet. Are you skilled in combat, by any chance?
[ @ziodyne-amax's Elizabeth, here to say hi!]
I like to consider myself skilled in combat, at least. I've worked hard to get to where I am skill wise, and if I was unskilled I definitely wouldn't have made it nearly as far.
Demi kicks ass.
Thank you, Pixie, for the vote of confidence.
#pokeblogging#rotomblr#burning dread: kotone#Velvet Attendant: Elizabeth#[Howdy howdy! I haven't played SMT3 yet but it's on the list once I finish Unicorn Overlord and P3R!]
5 notes
·
View notes
Text
#女神転生#atlus#shin megami tensei#smt#megaten#persona#philemon#lavenza#margaret#elizabeth#theodore#justine#caroline#velvet room#velvet room attendants
175 notes
·
View notes
Text

Was watching Persona let's plays and this popped in my head
#Persona#Persona 3#Elizabeth Persona 3#Velvet Room#Velvet Room Attendant#Atlus Games#art#fan art#video game
524 notes
·
View notes
Text
Crazy how the "Minato and Kotone are twins but one of them dies in the car crash depending on who you choose" theory implies that the Velvet Attendants are created/assigned to the future Wild Cards the moment they're born (or at least very young)
#both elizabeth and theodore exist in the main timeline regardless of who you choose#but if you choose minato why is theodore still recognized as an attendant in the velvet room#who did he attend?#persona 3#elizabeth#theodore#minato arisato#makoto yuki#kotone shiomi#minako arisato#hamuko arisato#i have connected the dots
61 notes
·
View notes
Text
Oh, they were talking to you about that being as well?
The Diamond Clan and Pearl Clan seem to have extremely differing beliefs about Sinnoh’s true nature. It will be quite interesting to see how their tales were formed.
As for their veracity… I can only say that I have personally seen many beings humans would consider deities. It isn’t impossible to say that they are at least somewhat accurate.
...What's an Almighty Sinnoh.
17 notes
·
View notes
Text

*Igor voice* welcome... to the cunting room
#persona 3#persona 3 fes#persona 3 portable#p3fes#p3p#persona 3 reload#persona#elizabeth#elizabeth persona 3#j's art#best velvet attendant don't @ me#argue with the wall#she SERVED
351 notes
·
View notes
Note
the demifiend isn't THAT bad of a demon to make friends with, to be fair! as long as you aren't planning to destroy and remake the universe to some insane philosophical idea you have AND you're not another demon summoner you should be totally fine! she's got a liiiiitle bit of a reputation for killing the former and fighting the latter, from what i hear, but! no reputation for anything else specifically!
Her? Really?
What, you know her Toudou-san?
Not personally, but Tamaki mentioned her once or twice in the meetings.
You have. Some explaining to do on that.
Suffice it to say that this is a very powerful person here. As in, "I don't know if Elizabeth would win unless she went at full power" levels of strong.
All I'm hearing is "Decent challenge."
7 notes
·
View notes
Note
velvet room attendant for P3 NBMC? I assume they'll also be NB & named after Frankenstein like their siblings (I reccomend "Lacey" from the character "De Lacey", it's a derivative of the gender neutral "Lacy").
(context)
Yeah, a non-binary Velvet Room attendant was my first thought as well, but I couldn't think of a design or personality, so I just pushed the idea aside... until now.

I actually really like the name Lacey, so thank you for that! As for Lacey's personality, the only thing I came up with is that they're somewhat shy and anxious (compared to the work-serious Theodore and the free-spirited Elizabeth), but they open up more as they go out with the protagonist.
I pulled from this interview with the directors of Persona 3 Portable, where they discussed how they came up with Theodore's character.
Azusa Kido: "We really only had the basic concept [for Theo's character] at the very start, and we were essentially just talking in circles about what kind of character he should be, so we ended up with quite the variety of potential candidates for his voice. As the role was for Igor’s assistant, we were thinking of a male character who was wholeheartedly devoted to his job – unlike Elizabeth, who’s a more of a free spirit."
I still think Lacey's design needs work, but I'm getting somewhere!
#ask#anon ask#art#my art#persona series#smt persona#persona 3#persona 3 portable#p3#p3p#original character#p3 nbmc#nonbinary#velvet room#velvet room attendant#p3 elizabeth#p3 theodore
13 notes
·
View notes
Text


And more
First post below read more!

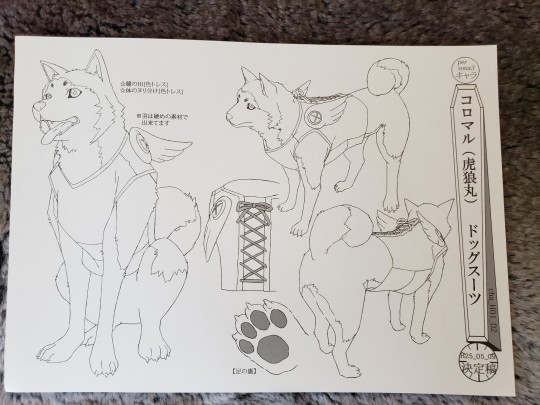
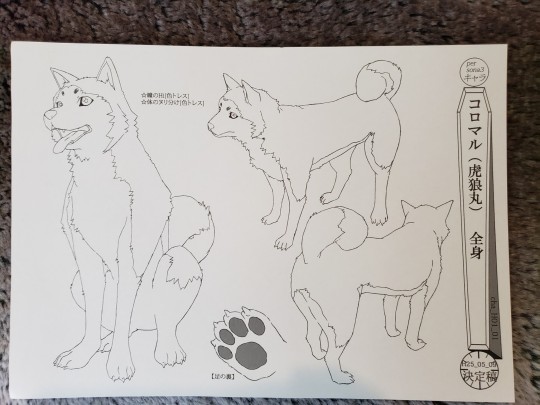


#persona 3#p3#persona 3 shinjiro#shinjiro aragaki#shinjiro#persona 3 movies#persona 3 movie#koro#koromaru#koromaru persona 3#p3 shinjiro#p3 koromaru#persona 3 movies character references#persona 3 character sheets#animation reference#animation character sheets#lmao sorry about the tags#persona#persona 3 elizabeth#velvet attendant#elizabeth p3#elizabeth persona 3#persona shadows#shadows
43 notes
·
View notes
Note
hellloo im quite sure you've mentioned this before but i'd like to know your favorite persona characters!
now thats a question! yukino, tatsuya, jun, eikichi, mitsuru, the p3 protag, femc too, KOROMARU, elizabeth, akihiko, the p4 protag <3333, NANAKO, rise, ..................................yosuke 😭, 🗣️RYUJI🗣️, ann, joker (iconic og trio btw)
#asks#the it is my favorite overall team like i like them all a lot and i love their group bond#controversial but my fave part of p5 is when its joker ann ryuji and yusuke#best team chemistry there#no one person getting all the ribbing#i like sees a LOT too even tho everyone in that team pissed me off at least once#not aigis or mitsuru tho#and godddddd i love elizabeth the best velvet room attendant in the series everyone else can argue w the wall!#and nanako.......my best girl
2 notes
·
View notes
Text
i decided to fight Margaret for the hell of it and wasnt expecting to actually win.
#Shitpost#ive tried elizabeth/theodore but their fight is stupid#imo p5 twins is dumb too#i dont like the fights that are forced to be scripted#My pq2 attempt on the velvet room gauntlet was close but i needed a little more levelling#so was gonna do that on new game plus#but ive never actually defeated a velvet room attendant before because its stupid#i like smt challenge bosses and not persona ones generally lol
2 notes
·
View notes