#Seed starter Tray
Explore tagged Tumblr posts
Visit Tumblr Blog
Explore Tumblr blogs with no restrictions, modern design and the best experience.
Last Seen Tumblr Blogs


Fun Fact
Tumblr.com is the 103rd most visited website in the world.
Note
Saw your tags on that post about swamp milkweed about having trouble getting it started--you may already know this, but milkweed seeds need light to germinate! They only need a light dusting of soil on top of them (and putting them somewhere with a lot of light helps!); if you can't see the seed through the soil, it's buried a little too deep. They basically want to be laying flat on the surface of the soil rather than poked down into it, with just enough soil on top to help them retain moisture. Yes this does make it kind of annoying to manage moisture because you don't really want them drying out either (sorry 😭) but I hope this helps!! I mention it because this is the most common issue I see with people trying to grow milkweeds from seed. They also want 4 weeks of cold stratification (cool temperatures like in a fridge while also being in contact with moist soil; you can plant your seeds, pop the whole pot in a ziplock/cover it with cling wrap, and just refrigerate it for a few weeks) so don't forget to do that!
You know
it's really funny
because i like to call myself the self-proclaimed milkweed queen of tumblr (at least on my gardening blog but still)
And yet
I
constantly fucking forget about the light thing
IDK if that'll fix all my problems (the soil at my house is pretty sandy so I think that's the problem when it comes to transplanting at least) but regarding getting those little shits to germinate??? that might be the ticket
(one of the other problems I face sometimes is the seeds deciding to mold when they're in the fridge cold stratifying, i lost a good chunk of seeds to that last year but i don't see any signs of it happening yet this year so fingers crossed everyone)
#out of queue#ani rambles#bootesstar#answered asks#me: im the self proclaimed milkweed queen of tumblr i love milkweed i know so much about it#also me at least twice a year: WHAT DO YOU MEAN YOU AREN'T SUPPOSED TO BURY THEM HOWD I FORGET THAT#*proceeds to immediately forget that*#its never too late to learn homies#its just a little embarassing to need to learn it like 7 times now#im planting my milkweed tomorrow and no one will stop me (my neighbor might stop me if she needs help but AFTER THAT)#im gonna use my brand new 36 cell seed starter#its the same make as my 16 cell one but with smaller/more cells#for anyone curious/because i dont know how to shut up in the tags#my favorite seed starting trays are the burpee superseed popout reusable ones#they have silicone bottoms so you can just go BOOP when its time to take the seedlings out and it comes with a little tray to hold water to#they're also top shelf dishwasher safe. a fact i keep forgetting.#AND they have marked rows and columns so you can write down whats in what cell#so i can be like 'rows a and b are swamp milkweed' or 'cells 1a and 1b are sweet peppers cells 1c and 1d are bell' or whatever#listen. its nice. for me at least.#they used to only be at home depot in my area but I found this one at (vine ref incoming) t t t t t t t t TAAAAARGEEEEEEET
6 notes
·
View notes
Text
જ⁀✦ you don't need to save me (but would you run away with me?)
( umemiya hajime x fem! reader )


♡ a/n — thinking abt him 24/7 actually ( this was supposed to be a longer fic but i lost the plot and just went with this drabble )
♡ word count — 482
♡ content — hajime umemiya x fem! reader, reader could be gn! but just in case, talk of gardening ( i know nothing abt gardening ), pining, hajime is a sap, not proofread, prob ooc
♡ synopsis — Hajime Umemiya's infatuation with you started with tomatoes. He just didn't want it to end there.
── .✦ not because he owns me, but cause he really knows me

It started with tomatoes.
He’d wandered into the garden section like he always did, hoping to snag a few starter plants and maybe catch a conversation with the store owner—someone who now waved him in like family ever since that late-night break-in he'd stopped cold.
But that day, it wasn’t the owner who greeted him.
“Do you need help?”
He’d turned, a packet of seeds dangling loosely in one hand, and there you were.
Wearing the store apron like it was made for you, sleeves pushed up, hair slightly frizzed from the humidity, and the brightest eyes he’d ever seen looking right at him.
“Oh, I—uh—”
Hajime never stuttered. Ever.
And yet, suddenly, words were strangers.
“Tomato. Starters.”
Your laugh had been warm. Not mocking. Just easy.
“They’re over here,” you said, motioning for him to follow.
He did. Like a moth to a gentle sun.
And after that… he just kept coming back.
At first, it was genuine.
He needed basil, then more soil, then stakes for the tomatoes you helped him find. But soon he was running out of reasons.
Or rather, he was making them.
“Do you carry moonflower seeds?”
He didn’t even grow flowers.
You smiled. “Not until late summer, sorry.”
“What do you think of corn? Rooftop-friendly?”
“Not really, but I love the ambition.”
He bought a small bag of lavender seeds—off-season and definitely useless—just to linger by your register and ask how your day was.
And he did this again.
And again.
Some days he only caught a glimpse of you—rushed, helping someone carry mulch out the door. Other days you’d stop beside him and comment on his latest pick.
“You’re here a lot,” you’d say once, nudging him lightly with your elbow as he stood reading the back of a spinach packet.
“Got a garden with too much space,” he replied. “Feels wrong to leave it empty.”
But it was less about the garden now, and more about you.
And finally, one warm afternoon—when the sky was clear and the scent of lemon balm clung to the air—he stood at the counter with a small tray of entirely impractical seeds and cleared his throat.
“Hey,” he started, voice still calm but with something more beneath it this time. “I was wondering—if you’re free sometime—maybe we could get coffee? Or tea, or, I don’t know… something not related to plants.”
You looked up, hands pausing over the register. And then you smiled.
A sigh escaped your lips—not of annoyance, but something softer. More amused.
“Good. I was wondering how many seeds you were going to buy before you asked.”
Hajime blinked, and then laughed, head ducking slightly, one hand rubbing the back of his neck.
“Yeah?” he asked, hopeful.
“Yeah,” you grinned. “I was starting to worry you'd buy out our whole inventory.”
“Worth it,” he said, his smile brightening to something unmistakable. “Every last one.”
love him so much it's actually criminal
likes, comments, and reblogs are appreciated!
✦ tags ✦ @irethepotato ✦ join the taglist here !
⋆.˚✮ 2025 ©airybcby ✮˚.⋆
#★ · airybcbyy#airy posts#airy writes for wind breaker#windbreaker x reader#wind breaker x reader#wind breaker x you#hajime umemiya x reader#hajime umemiya x you#umemiya fluff#umemiya hajime x reader#umemiya x reader#windbreaker drabble#wind breaker#wbk#wbk x reader#hajime umemiya#umemiya hajime
277 notes
·
View notes
Text
Speaking of indoor gardening, here are some things I've been recycling for my garden. I love garbage <3
(I started collecting most of these things after I started my garden. A lot of the pots actively in use are reused as well. The hydroponic jars I did have to buy specifically for gardening purposes because hydroponic supplies are a little more specific and a bit pricier but in my opinion it's totally worth it. Though you can use any large mouth glass jars you have and use coffee filters with cut out holes for the roots. Hydroponic gardening is my absolute favorite method of gardening and much more disability-friendly in my experience)

1. Coffee tins. I just need to drill a few holes in the bottom and I've got myself a tomato planter. My mom used to bring these home from work when her coworkers were done with them so I have a few more. Also I recommend looking into your local plant nurseries and looking for recycled pots, my local nursery has an area dedicated to plant pot recycling and you can probably get some for cheap. But you can always get creative and use all kinds of things so long as they've got drainage holes
[Image ID: a large red coffee can with black illustrations and big white text on it that says "classic roast coffee 100% Arabica ground colombian. My hand is in the photo because I'm holding it up and the gray wood floors are in the background. End ID]
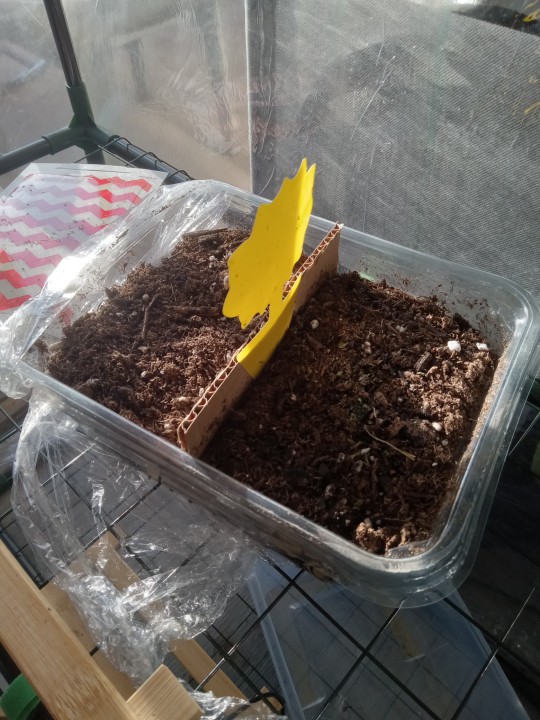
2. Plastic spinach and muffin containers. As well as those plastic strawberry containers! You just need to poke holes in the bottom with an awl (if there are no holes already) and widen them a bit, and if it's got a lid that's perfect for germination! The bigger containers are perfect for seedling starter planters as well.
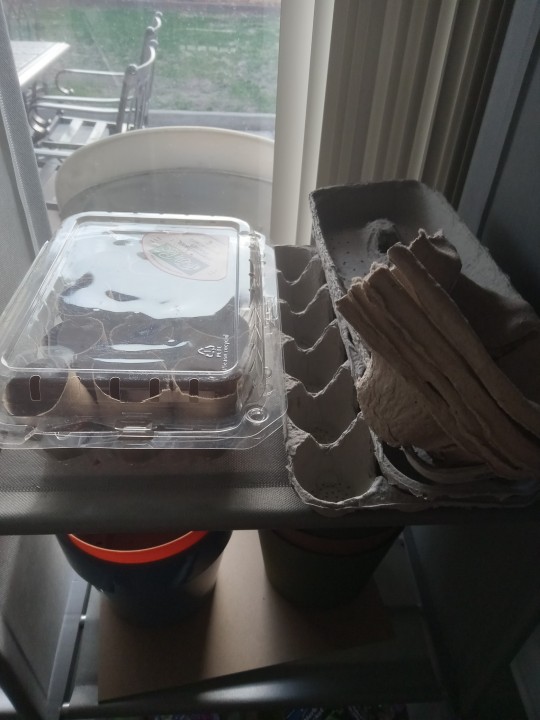
2.5. Egg cartons can be cut up and used for seed pots too, as well as those paper drink holders. Just make sure you poke holes
[Image ID: a plastic spinach container full of soil. There's a brown cardboard divider in the middle and a yellow gnat trap against the divider, sticking out of he soil. The container is on a metal shelf in my greenhouse tent. The next image shows a large plastic muffin container with cardboard toilet paper tubes inside. Next to it is a stack of egg cartons with the lids missing and a stack of drink holder cups cut in quarters so the cups are separate. These things are on a gray shelf next to the tent up against a window. End ID]
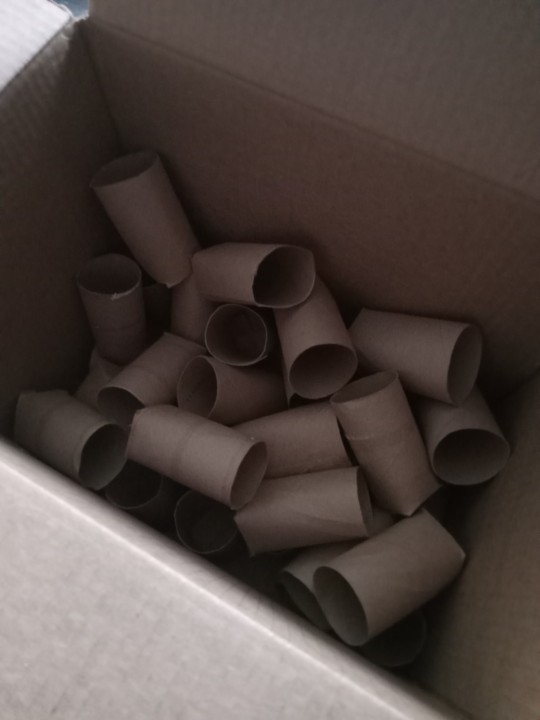
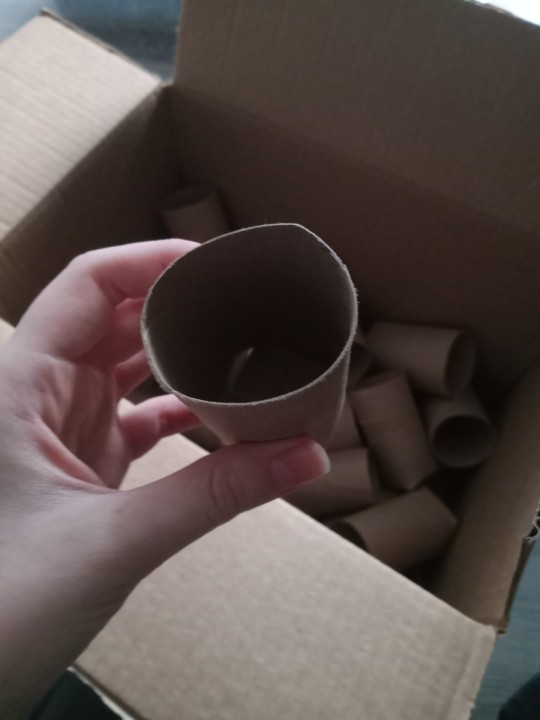

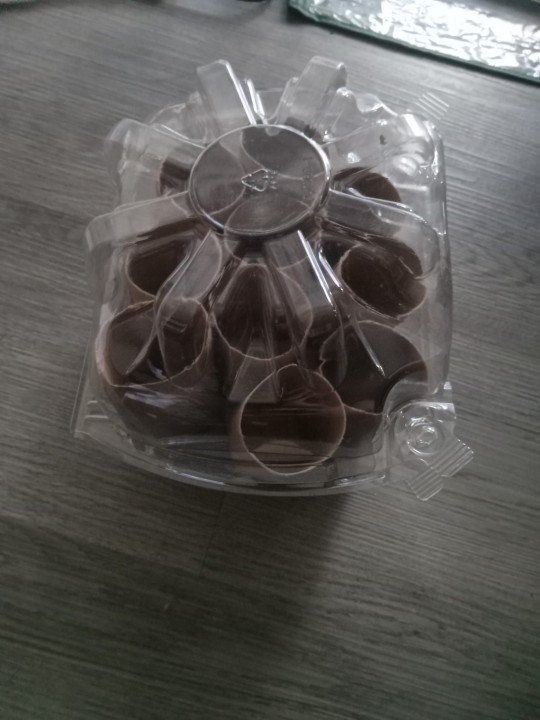
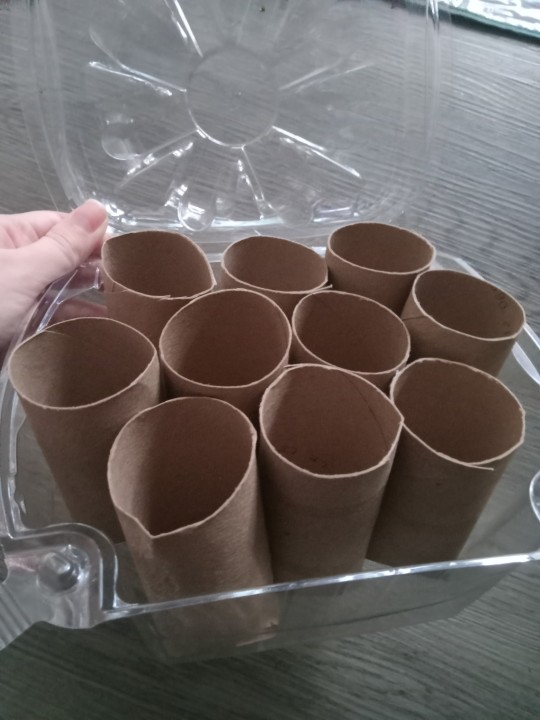
3. Toilet paper/paper towel tubes. If you cut four slits at the bottom and fold them in on each other, you can close the bottom and make them into seedling starter pots. I put a few in a lettuce container (pictured above) and I plan to use it for veggie sprouts <3 these are fun to make too, just make sure you widen the hole at the bottom of each one for drainage. I still gotta do that. But those seedling starter trays online can be expensive so this is a way you can make one for way cheaper. It's not perfect but it'll get the job done :)
[Image ID: three images of a cardboard box full of toilet paper tubes and two images of a plastic lettuce container full of seedling starter pots i made from those tubes. All the tubes are cut at the bottom to make flaps and those flaps are folded in on each other to make a bottom for the pot. In to of the images my hand is visible because im holding one tube up to the camera to show how I folded it. The gray floors are visible in the images in the background. End ID]
#hatchet grows things#gardening#garden#indoor gardening#indoor garden#recycling#sustainability#solarpunk#punk#solarpunk aesthetic#diy#solarpunk diy#hopepunk#ecopunk#solarpunk gardening#described
20 notes
·
View notes
Text
Witchy Things Update
So despite all the doom and gloom and Soldiering On that's become routine of late, I've actually managed to get some things Accomplished on a witchcraft front.
I've been chipping away at a cleanout project in my office/workspace that's really beginning to show results. It's been a lot of decluttering and reorganizing, but every time I take out another bag of trash or break down a stack of boxes, the space feels a little brighter. It's also making it much easier to work on my projects, pack orders, and make stuff for the shop. There's even a hanging rack with the storage jars for the various powders, which is VERY satisfying to look at. (And lots better than trying to keep them all under my desk.)
I also cleaned out the corner of the living room where my altar lives and WOW, the difference in energy in the space was immediate. Like unplugging a clogged drain and suddenly there's an empty sink where there was grungy water. I still need to clean and reorganize the altar itself and the bookcase it sits on. That's a project for another day, but progress is progress.
Our yard has started producing early wildflowers thanks to a couple of warm days here and there. I picked a big bucket of purple deadnettle, corn speedwell, and chickweed and laying it all out in a drying tray was VERY satisfying. I also chopped down the hardened basil twigs I'd been wintering since last year - they'll make GREAT cauldron kindling!
I'm looking forward to getting a seed starter tray and starting my garden next month. I found a LOT of seed packets while I was cleaning, enough that I'm not allowed to buy seeds for a good long while (unless it's something I know for certain we don't have and will be planting immediately). I also finally found my old gardening box, which I thought had somehow been lost in the move, so I have all my tools back and the packages of heirloom seeds that I'd been saving for when we bought a house.
And yes, this means I'm making plans for the side yard as well. Husband wants to pick out some kind of flowering bush for the corner where we removed an overgrown arbor vitae, and he's been making good progress with the repairs to our fence and siding. (Neighborhood kids just will not get it through their heads that our house and fence are not a backstop for their baseball/football/soccer games.)
In the words of Audrey Hepburn, who famously spoke out about her experiences during the Nazi occupation of the Netherlands, "To plant a garden is to believe in tomorrow."
And I believe.
26 notes
·
View notes
Note
❤️🩹 - For my TFP Soundwave from Knockout?
❤️🩹 for an angst starter
Soundwave and Knockout
Knockout had never been one to be sentimental. At least, not openly. He would show affections and favor someone over the other with clear preferences. But sentiment was reserved for those who could afford it, and in war time very few found themselves wealthy.
Knockout had never been one to be sentimental.
But standing now, at the berth side of his lost love, the lifeless frame of Breakdown, he found the last few dregs of sentiment in his spark and they spilled from his optics, streaking down his faceplate.
Breakdown had always been there for him, in his times of need, both in battle and in the small hours of the cycle when stasis evaded him. He had always felt safe with Breakdown. Even now as he placed a shaky servo over the fizzled spark of his Conjunx, he felt safe. As if the other would spring to life if the mere mention of danger arose.
Knockout knew that wouldn’t be the case. After all his love’s frame had been through, the desecration by a filthy organic no less. He knew there would be no Primus given miracles. Not for mechs like them anyway.
The doctor slid to his knees next to the medical berth, his servo refusing to lift from Breakdown’s icy frame as he lowered himself to the floor. He gripped Breakdown’s stiff servo and simply sobbed with his helm slumped forward. He pulled Breakdown’s cold, lifeless hand over to cup his tear stained cheek plating, wordlessly begging for Breakdown to wake up and hold him, to comfort him how he used to.
No matter how he cried or grieved, Primus didn’t play favorites with the likes of them. He would not see his love rise the way the leader of the Autobots so often did. And that thought planted a bitter seed in his own spark.
Just as he thought things couldn’t get worse, he heard the doors to the medical bay hiss open. Without much thought, or care really, of who was at the door, he grabbed the nearest object which was a tray of autopsy tools he had used to inspect his Conjunx’s frame for research. With all his strength he threw it at whoever had entered, the tools smashing against the wall next to them. Rage and anguish filled his intake and he screamed, not saying anything, but roaring in agony, in anger. Because how dare someone interrupt his mourning?
He screamed so hard his vox glitched and he nearly broke it. Then he fell silent once more, resting his helm against the side of the berth as another pitiful sob shook his frame. He was resigned to whatever reprimand he would receive for acting so unbecoming of the Decepticon CMO title. He couldn’t care, not when his Conjunx’s lifeless frame rusted next to him.
Even if it was the chief of security who had entered the medical bay.
#spilled energon#muse >knockout#transformers#maccadam#tfp#tfp soundwave#tfp knockout#tfp spoilers#transformers roleplay#transformers rp#tf rp#askbox meme#ask box meme#rp inbox prompt#rp inbox prompts#rp inbox meme#inbox prompt
18 notes
·
View notes
Text
Been making no roll sourdough crackers lately, it's doable even when I'm sick if someone sets it up for me. I've got two trays in the oven right now, one with everything bagel and one with za'artar. Never cooked with za'artar before but it smells SO good.
Resippy:
If I've been neglecting my sourdough starter (usually) and she's sour as fuck, I just add a feeding to the bowl and double the oil. One major change i made for the better is adding my own mix of seeds and grains to it, about 1/3 cup. Everything bagel seasoning makes a great flavor for it too.
19 notes
·
View notes
Text


My Lupine started sprouting in the fridge during cold stratification so the seedlings have been transferred to starter trays!
As you can probably tell from the saprophytic fungus, I haven't checked on my seeds in a while.
For anyone who doesn't know, saprophytic fungus isn't harmful, so don’t worry if you see a little bit on your plants. This organism occurs naturally in soil and helps break down decaying material. Though too much of it can start competing with seedlings for nutrients. The above photo shows an example of a stratification container with way too much fungi.
Usually I just remove the excess manually, but some people like to treat with 3% hydrogen peroxide in a spray bottle.
8 notes
·
View notes
Text
i have compiled some native plant gardening tips for those of whom are new to it based on my own experiences and trials and errors, so here goes:
if you're germinating seeds, dont use coco coir. it sucks. ignore anyone who tells you to use it. it doesnt hold moisture well at all and doesnt decompose well. look for a "seed starter" soil instead, it will have a bunch of beneficial nutrients n such to get the seeds and their roots going. if you're concerned about peat, there are plenty out there that don't have any, coast of maine comes to mind. I used to think I needed to grow them in a sterile env, mostly to prevent mold, but I find that nearly impossible to avoid, so on to my next tip:
you're better off trying to start your native seeds outside. even if you wanna use cell trays, thats fine (bring them in when it freezes though), but preventing mold when germinating inside, especially in your fridge with all your food you sometimes forget is there and gets moldy, i've found to be nearly impossible. granted, mold isnt always a bad thing, it can help eat the seed coating so the roots can grow, but this obviously isnt true for all seeds and especially not small seeds. outside is your best bet, I just find less mold grows out there. might be good to make a mini green house of sorts to keep your seed trays in, obviously thats unnecessary if you're growing them in the ground.
if you're like me and have no real ground space and only have a patio or balcony and have to grow everything in pots, I have a couple tips for you actually, but for now lets focus on winter protecting your plants. most suggest burying them under ground... im assuming like me that isn't really an option for you, so we're gonna come up with another solution. you're probably going to need to invest a good amount of money into this, depending on if you have the material around or not. but to start off:
huddle all your pots together. they can help insulate eachother better and keep eachother warm. i try to put the least cold hardy ones in the center, if you can, put them all together in a larger container like a bucket or something and cover it with lots of mulch. water sparingly and lightly, enough to wet the soil but not enough to drip through the bottom of the pot. you should be sparingly watering anyways in winter, but especially so here since they'll probably be in a container that doesnt drain unless you want to drill in holes on the bottom. try to make sure the pots dont touch the sides of the containers if they're plastic and fill in the gaps with mulch or something, plastic isnt the best material to use for pots regardless, unfortunately its the cheapest and most readily available and comes in varying sizes so I cant get mad at you for using it.
heavily mulch your plants. maybe put some straw on top of the mulch too if you have any. I used to think leaves were enough but there's too much airy space between them, you want to make the insulation as compact as possible. if you're wanting to make a place for bumblebees to hibernate i'd suggest making an entirely different leaf pile or something unrelated to your plants. (obv doesnt apply to ppl growing stuff in the ground bc you have the privilege of being able to sprinkle leaves wherever you want. bastard.)
invest in some burlap fabric and some cheap towels or blankets for even more insulation, the fuzzier the blanket the better imo, but it should be fine whatever you choose, just try not to get too thin of a fabric. the burlap and blanket/towel might not be necessary to use every day but definitely on days where its below freezing. these also will last you every year, assuming you take care of them right. cover the tops of pots but also wrap around the sides of them and maybe put a layer or two of burlap down on the ground under them, esp if they're on cold hard concrete.
if you have any plants with tuberous roots, they are more vulnerable to freezing if they're in a pot and will need extra protection or to be brought inside during a freeze, to not shock it with a temperature shift try putting the pot in the fridge if you can, otherwise again it might be good to try to make a mini green house of sorts, maybe turn one of those plastic window well covers into one? or put it in a garage if you have something like that. they also, maybe obviously but just in case, dont need to be watered as often since they have lots of water stored in themselves.
putting your pots really close to the walls of your house can also help keep them warm. not sure if its enough to prevent them from freezing but combined with everything else? well, it's survived many of my plants over the last couple years (though i didnt know about the tuber thing until recently and it explains so much why certain plants didnt make it >_>)
ok moving on from winter. lets go back to talking about pots, bc seriously if you can get your hands on ANYTHING besides a plastic pot, jump on it. they suck universally. they suck in winter and in summer. their only benefit is providing some humidity but that's not really something I personally need as someone in a temperate climate. also, the lighter the pot the better. dark plastic pots can cook the roots of your plants in the sun in summer so you have to be extra careful. also, the deeper the pot the better for native plants.
because you're growing native plants in pots, they're going to need a lot more extra care. native plants in the ground can pretty much be neglected since nature takes care of it all, but you have to provide the water, soil, fertilizer, etc. so lets talk about that:
you dont need to water every day necessarily, the old trick of watering when the top 1-2 inches is dry is your best method to go by. if you live in the midwest or northeast or anywhere it gets heavy rain, it would be good to give them a deep watering every now and then, I try to follow what the rain does and water at the same frequency as it. it would be good to water daily (maybe only a small amount if the soil is still somehow wet) on really hot days even though you dont have to water every day, like on days above 90 degrees. also the best time to water, especially in summer, is early in the morning, ideally some time before 8, 9 is ok but 8 is better imo bc it gives the roots more time to absorb the water before the sun evaporates it, and around 10 is when that starts happening. if you have to water at night, water early at night and try to avoid watering the leaves if you can as water left over on them overnight can cause mold, mildew or other diseases. if you have to water mid day, at least wait until the sun isnt directly on the plants so they can actually absorb some of the water.
since you have to provide your own water and cant rely on rain, you also have to provide your own fertilizer. I mean you already did before, but I mean liquid fertilizer. rain transfers all kinds of vitamins and minerals to the plants that receive it, but you're likely not getting nearly as much in your tap, and since your pots likely aren't being shat in by various woodland creatures, they're getting even less fertilizer. so you have to provide the fertilizers, both slow and liquid. I thought I could just get by with slow release but the plants seem to do better with liquid too, especially when in bloom. if you use slow release you dont need to use the liquid fertilizer as often, and you also likely dont have to use the liquid as frequently as it says on the bottle, since native plants generally require less nutrients to begin with, but of course this is something you'll probably have to test on your own to see how much your plants want and tolerate. I have a whole feeding schedule I can share if you want. some brands I've been using for liquid fertilizer are foxfarm (they have good soil too), microlife, and maxsea (technically a powder but you mix it with water) and for slow release is foxfarm again, jobe's organics, and lilly miller's. I'm trying to use as organic of materials as I can since I'm growing the plants for native wildlife and pollinators and I dont want to negatively effect them as much as possible. if anyone wants to know what products I use specifically hmu or leave a reply.
I trust you're able to figure out your soil situation on your own, but here's some tips just in case: try to avoid brands like miracle grow since I'm pretty sure it has inorganic materials in it, generally I'd aim for the most organic thing you can find, assuming you're growing native plants for the same reason I am, for nature. also, take those messages about well-draining soil seriously, you can use perlite but also some soils are just lighter than others, I find foxfarms is pretty light and drains well.
during winter, leave the plants as they are, dont cut them down. lots of bugs and animals have made nests or homes or have cocoons n such in there. you can cut it down in the spring when frost is nor longer a concern, but dont throw it in the trash either bc the bugs might still be sleeping in them but will be less vulnerable now that winter is gone.
ok that's all I can think of for now, I'll add on to this if I think of anything else, but hopefully this is helpful for someone out there :]
#gardening#native plant gardening#gardening tips#germinating#stratification#pollinator garden#patio garden#balcony garden
13 notes
·
View notes
Text
"Polyploid" and Regular Daisy Fleabane 28(58) days later


That single suspected polyploid (left) that sprouted is double the size and doing much better than the regular seedlings (right), which have gone from many to uh not so many.
It seems like the single big sprout likes the heat mat and the tinier variety did not, I have more seeds of both to test out if this crop fails.
I suspect more of the "polyploid" variety will sprout if I stratify it longer and more of the regular variety will live if I take them off the heat mat after they germinate.
I also called time-of-death on the Sulfur Cinquefoil and the Bladder Campion, both got replanted and put in cold stratification on the 15th.
I don't think the Bladder Campion needs cold stratification per se given how many sprouted last time so those will be coming out in a month.
I'm going to stratify the Sulfur Cinquefoil for 2 months as only one sprouted and see if it does better. Both are coming off the heat mat once they germinate.
I replaced them in the starter tray with Rough Cinquefoil (what I misID'd as mock strawberry last year), which did get 2 months to stratify, and some catnip.
I'm going to call TOD on the Queen Anne's Lace and start more when I pull the second round of trefoils out in a few days, a lot of these don't seem to benefit from the heat mat.
So far just the Rose Milkweed, the Buckwheat, and the one odd Daisy Fleabane liked the heat.
#Daisy Fleabane#polyploid#seed starting#germination#cold stratification#experiment#native plants#michigan#pure michigan#gardenblr#heat mat#Sulfur Cinquefoil#Bladder Campion#Rough Cinquefoil#Catnip#wildflowers
3 notes
·
View notes
Text
Closed Halloween starter for @ordoniia!

"Well, that's all the seeds from the pumpkins...!" Sifting through the 'pumpkin guts' as he called them, the seeds were taken out and arranged on a small tray, staring down at the tray with a furrowed brow.
"Y'know...I've heard some people roast pumpkin seeds - have 'em as a snack,"
3 notes
·
View notes
Text
There’s something so awfully sad to me about the people who say human nature is to be violent, greedy, selfish, snapping and snarling at shadows; who think that man’s only role in nature is to destroy it or subjugate it.
Because yes, we can be violent and destructive, selfish conquerors fighting over scraps of power. So much of history is soaked in blood, so much of our lives marked by suffering.
And yet. And yet.
And yet there is humility, generosity, kindness, gentleness, love.
There are parents who vow to make their children feel safe, to never make them fear the raised voices and hands that still make them flinch.
There are children who sneak food into their bags or pockets for the friend too overworked to eat sometimes, who ask nothing in return because the act is enough.
There are friends who send you things because “it reminded me of you!”
There are people who help turtles across the street.
There are people who smile and make faces at babies on the bus.
There are people who buy you lunch and tell you not to worry about paying them back.
Do you see?
There are people finding ways to clean the trash out of the ocean.
There are people turning water bottles into plant starters, containers into storage trays.
There are people banding together to protect their rivers, their lakes, the birds and the fish and the water in the pipes.
There are people doing something, anything they can, even if it’s small, because it matters.
Do you see?
We are not a perfect species; nothing is. All of nature kills and creates. We’re not special. We’re a collection of overdeveloped mammals that hit the evolutionary jackpot.
I think, in the purest sense, human nature is to care.
We care about each other, we care about ourselves, we care about our fellow creatures, we care so much that we pack bond with machines built by our hands and celebrate their birthdays.
Know this, that those who say we can never be more than beasts are lying. Hatred is taught. So is love. A human can never survive in isolation.
As they say, it takes a village.
Those who claim all are selfish seek to deny the truth: that they could have been kinder, better. They chose this path, this destruction, and to acknowledge that is to blame themselves. They can’t accept that. They can’t accept that it was, and is, a CHOICE.
Let them wallow in their own darkness. You are better than that.
You are part of this planet. You are not the wrench in the gears but a gear yourself, another node in this vast network of life. You are also an animal, no more and no less.
Humans are not a plague on this world, we are a species that neglected our niche. We are farmers, herders, seed-savers, builders. There are cultures that have lived for thousands of years this way, working with nature instead of against it.
Do not let despair swallow you. There is a way, and we will walk it together.
11 notes
·
View notes
Text
Every day was the same. Wake with the dawn, wash, dress, help make the breakfast, then off across a small patch of grassy land to tend to the Seeds. Fox knew when to keep her mouth shut, knew when to forget the secrets she heard, because of this, she was trusted. Perhaps more than some. Not that she thought much of it. How could she be special when it was the brothers who brought about the new word, when it was Faith who helped the most beautiful flowers bloom, and when the Father had what he called Visions. She, however, was only another member in the great project. A sheep in need of shepherding.
Entering the building where Joseph Seed was housed, Fox dipped her head toward the members who stood in the main rooms, a content smile on her lips, and a tray of tea in her hands. She walked calmly to the door to Joseph's room, sat the tray on the table in the hall, and poured the crushed powder into the still steaming cup. Jacob had told her it was medicine, that it was something Joseph needed, and she did not question it. Doing exactly as he said, every day.
"Good Morning, Joseph," she greeted softly as she opened the now unlocked slot in the door. Carefully placing the tray with the tea and his meager breakfast on the shelf protruding. Aside from glimpses through the small rectangular slot, she had never seen him fully. Not up close, anyway, or in person. Sometimes, she thought about bending down to level her eyes with it, but it felt too sinful to give into her curiosities, to invade his space.
"There was marmalade today, I put some extra by your plate." Technically, she wasn't supposed to talk to him, but, truth be told, she was lonely. She imagined he might be, too. "And--" Looking quickly up and down the hall, Fox carefully pushed her hand into the opening in the door. Her closed fist opening to reveal a rather battered looking, tiny blue flower. It had lived in her pocket since yesterday, and the petals hung limp and wilted against her palm. As if he was a wild animal, a tiger stalking around in a cage, Fox dropped the flower onto the shelf and pulled her hand back quickly.
"There's a grove on the edge of the forest filled with the start of all these blue flowers. It is the first sign of spring, I think." She smiled to herself. "I thought you might enjoy seeing something from the garden."
@general-kalani starter
#general-kalani#[ ok no icon rn bc i got over excited and did this on mobile lol ]#[ i literally cannot wait and yes i had to start with reminding him how he can't get outside lol ]#x | tbt.#x | mobile.#drug mention tw
3 notes
·
View notes
Text
We’re Thinking of Starting a Blog on Easy-to-Grow Herbs (And Here’s What We’ve Learned So Far)
So… we’ve been having one of those conversations. You know the kind—where one innocent question over a cup of tea spirals into a full-blown life plan. It started with a passing comment:
“Wouldn’t it be lovely to grow our own herbs?”
And before we knew it, we were Googling basil varieties at 1AM, following rosemary influencers on Instagram (yes, they exist), and wondering:
Should we just start a blog about this?
Spoiler: We probably will.
But before we dive headfirst into the herbaceous deep end, we wanted to share a few beginner-friendly thoughts—specifically, what’s the best way to start growing herbs? Should you go all-in from seed, cheat a little with plug plants, or try your hand at cuttings from your mate’s mint patch?
Let’s break it down.
🌱 Option 1: Growing Herbs from Seed
Pros:
Cheap as chips (and perfect to sprinkle on chips too, hello chives!)
Massive variety. Want purple basil, lemon thyme, or chocolate mint? Seeds have your back.
Satisfying. Nothing beats seeing that first little green sprout pop up.
Cons:
Time. Seeds need patience. Some herbs (looking at you, parsley) can take weeks to germinate.
Fussiness. You’ll need to keep them warm and moist—like a baby in a spa.
Fragility. Seedlings can be drama queens. A missed watering and poof, they're gone.
Best for:
Curious gardeners with time, a sunny windowsill, and no fear of plant heartbreak.
🌿 Option 2: Plug Plants (aka Baby Plants in Little Pots)
Pros:
Instant gratification. They’re halfway grown already!
Less mess. No trays of compost falling all over your kitchen floor.
Less stress. These babies are stronger and more likely to survive.
Cons:
More expensive than seeds.
Less variety—you're limited to what your garden centre or online shop offers.
Best for:
Busy herb-lovers who want results yesterday. Also great if you're prone to forgetting watering schedules (no judgment).
✂️ Option 3: Cuttings (aka Stealing From Your Friend’s Herb Pot)
Pros:
Free! (Assuming your friend doesn’t mind.)
Fast turnaround—mint and basil especially root like champs in water.
Super satisfying. It’s like cloning your favourite herb.
Cons:
Not all herbs work this way. Woody herbs like rosemary or lavender can be trickier to root.
Risk of failure if cuttings aren’t healthy or handled right.
Best for:
Experimental types who love a challenge, or anyone trying to recreate grandma’s legendary oregano.
So… What’s Actually Easiest?
Here’s the tea:
If you’re just dipping your toes into the herb garden lifestyle, plug plants are the easiest and fastest way to get growing. No germination worries, no mystery – just pop them in a pot, water them, and you’re good to go.
But if you want a challenge and the smugness of “I grew this from scratch,” seeds are a joy (and a test of character). And for the adventurous and budget-savvy, cuttings offer a fun, slightly magical experience—especially if you love propagating plants in jars on your windowsill.
And What Are the Easiest Herbs to Start With?
We’re thinking of starting our blog with these absolute legends:
Basil – Quick to grow, smells amazing, and essential for pizza nights.
Mint – Practically unkillable. Great for tea, mojitos, and confusing your cat.
Chives – Like tiny green onions but cuter.
Thyme – Hardy and low maintenance. Also makes you sound like a culinary genius.
Parsley – A slow starter, but so versatile you won’t mind the wait.
Rosemary – A bit tougher, but beautiful and delicious once established.
Coming Soon: Our Herb-Growing Adventures 🌿
We’re genuinely excited to get this blog going—filled with easy herb-growing tips, honest plant fails (we’ll show our withered coriander too, promise), and maybe even a few pesto experiments.
If you’re curious about how to grow herbs without turning your kitchen into a compost heap—or you just want to see if we can keep mint alive longer than a week—stick around.
And hey—do you grow herbs already? What’s your favourite one to grow? Got any secrets we should know before we take the plunge? Tell us everything.
We’re just getting started… and we’re already a little bit obsessed.

#EasyHerbsGrowYourOwnHerbBlogKitchenGardenBeginnerGardeningPlugPlantsHerbsFromSeedHerbCuttings#food#foodblogger#dinner#foodporn#healthy food#foodpics
0 notes
Photo

Grow lights don’t have to be an expensive, fancy thing you splurge on as a gardener. You can really up your gardening game by making your own inexpensive DIY grow light shelf set-up. I’ll take you step-by-step into how I made my plant shelf with grow lights. Grow lights for seed starting is my favourite way to utilize the lights, especially living in a colder climate. Grow lights are one of the most useful tools for gardeners who grow lots of vegetables or who are starting a garden from scratch. You can jumpstart the gardening season by starting the seedlings indoors and using grow lights to help give them a boost when the sunlight is still returning to us. If you’re starting seeds this year, your seeds will have been planted in homemade starters or store bought containers and germinated. Those baby plants may not be ready to hit the harsh outdoors yet, but they need enough light to grow. This DIY plant shelf with grow lights will help you fashion your very own indoor grow op by using an inexpensive Ikea shelving unit and some utility lighting. This post will cover… Plastic domes on top of seedlings also help seedlings when they’re first starting out. Store-Bought Mini Greenhouses In past years I have used a 4-tier wire shelf which allows me to grow eight trays of seedlings into large plants. I can continuously move the shelves to make more room for taller plants. It comes with a greenhouse cover that makes the perfect transition to the outdoors to harden off seedlings. I use this 4-tier wire shelf as an outdoor greenhouse when potting the seedlings into larger pots. I decided to make something a little neater for the starts as the shelf was in a prominent place in my office. It’s quite easy to make your own grow light shelf set-up at a fraction of the price. Plus, I needed more room indoors for my air plants, terrariums, and all my other plant babies. Window space is a hot commodity! I’ve seen many inexpensive shelving units from Ikea get used for a few projects by fabulously stylish gardeners, and I gave it a try myself. Putting this shelf by the window alongside the grow lights allows the seedlings to get as much light as possible. Designing a Plant Shelf With Grow Lights Carrie from Read Between the Limes’s $29.99 IKEA Seed Starting Rack inspired this project. Her shelf has fewer lights and adorable seed and soil supply labels. Make sure you check out Carrie’s blog for the instructions on how she set up her shelf and lots of great ideas on gardening with kids. The original shelf used for this project, the IKEA GORM, is no longer available. However, many of IKEA’s other shelving units would work. Alternatively, look online on Facebook Marketplace or in groups to see second-hand shelves you can turn into your grow light shelf. I added to Carrie’s setup by using six lights on the top three shelves, which was the perfect amount of light to prevent the seedlings from becoming too leggy. Each tray will have two lights shining directly on it. All the lights are on chains and have hooks, so I can adjust the light position as the plants grow. For the seedlings, I also included a heat mat underneath. There, I rest the new seedlings on the heat mat with a plastic cover to keep the heat in. The lights remain OFF until I see signs of germination, then I turn the lights on. This tall grow light shelf gives me plenty of room for seedlings and storage. How to Avoid Leggy Seedlings Under Grow Lights Tall, spindly (aka leggy) seedlings do not give your plants a great start. It’s not the end of the world, but it indicates that the plants are not getting enough light which is stressful for them. Growing tall and skinny can cause the plants to flop over and break or be damaged. The best remedy for leggyness is to provide enough light and the right kind of light. For most home growers wanting to start a few seedlings, standard fluorescent utility lights work just fine. If you can find inexpensive lights specifically made for growing plants, they may have a high colour temperature that more closely mimics the sun (and they are pink!). These can be very expensive, and for the price, the results are not that much different than standard fluorescent bulbs, so save your bucks and buy a “daylight” bulb instead. Grow lights should be placed just above the plants. This is why you want your grow light shelf to have adjustable lights. As the plants grow, you slowly raise the light. When the grow light reaches the top, the plants should be planted or potted outside. Grow lights have to be very close to the plants for them to work well. Make sure they’re adjustable! If you have leggy plants, re-pot them in deeper pots with the soil line all the way up to the seed leaves (the first leaves that appeared when they sprouted). All that extra stem can be tucked under the soil for protection, and the leaves will have a fresh start. These tomato seedlings didn’t get enough light from the grow lights and became leggy. DIY Plant Shelf With Grow Lights If you want to mimic my grow light shelf set-up, here’s exactly how to do it. It truly isn’t a difficult project, and for the size of it, is much cheaper than anything else you could buy. Materials With a little DIY work, it’s not difficult to make your own grow light shelf setup. Make It! 1. Assemble the shelving unit as per instructions. Space top 3 shelves 15” apart; these will be your growing shelves. Space the remaining 2 shelves as you desire from the bottom; these will be supply shelves. 2. Screw 2 hooks to the underside on both the front and back board, spaced 2” in from the width of the lights. 3. Tie wire or string around the light and affix the end of a length of chain to each side. Simply hang the other end of the wires on the hooks at about 1” above the seedlings. Continue to raise the lights as the seedlings grow. 4. I plug all the lights into a power bar to easily turn them on or off the whole thing with one switch. You can also use an affordable Christmas light timer to turn the light on automatically. Start by giving your seedlings 8 hours of light daily and slowly increasing to 12 hours. This mimics the increase in light the plants get as the seasons change and the days get longer. The grow light shelf with the lights off. I place the lights so it’s just barely touching the plastic covers or plants. Raise them as the plants grow. The grow light shelf with the lights on. Other Grow Light Shelf Options Now don’t think you must have a dedicated area specifically for seed starting indoors. My friend Sam sent me some great photos of the Victory Garden’s office where they have seeds growing all over the place. I particularly love them growing under the desk–what a smart use of space! I also have a grow light countertop set-up. This is a much smaller operation that grows food indoors year-round, primarily microgreens and lettuce. A countertop garden works great for someone who wants access to fresh, homegrown greens no matter the time of year. This is a grow light set-up you can purchase, or you can easily mimic it using a singular shelf and light. Frequently Asked Questions About Grow Light Shelves How many grow lights per shelf? I fit one standard tray on each shelf and placed two grow lights above. Having two grow lights ensures there is enough light to cover all the seedlings inside the tray. If you only place one light in the middle, the seedlings on the outer edge will reach for the light and become leggy. How far from grow lights should plants be? Different grow lights will have varying intensities. For my fluorescent light set-up, place the grow lights about 2” above the plants. The grow lights must be as close as possible to prevent the plants from becoming leggy. As the plants grow, slowly lift the lights to go with them. If you have a plastic dome (greenhouse) over the seedlings, place the grow light 2” above the plastic. How many grow lights do I need? This depends on how many seeds you want to grow. Aim to have two lights for each 11” x 22” tray, which can hold six plastic six-cell packs. I have a total of six lights for three trays, and I find this to be enough to start all my seedlings. More About Seed Starting A city girl who learned to garden and it changed everything. Author, artist, Master Gardener. Better living through plants. Source link
#OUTDOOR_LIGHTING#DIY#GIVE#GROW#LIGHTS#MONTH_MARCH_WEEK_3#PLANT#PROJECT#SEED_STARTING_SERIES#SEEDS#SHELF#START#WEEKEND_PROJECTS
0 notes