#Sealant cutting blades
Explore tagged Tumblr posts
Visit Tumblr Blog
Explore Tumblr blogs with no restrictions, modern design and the best experience.
Last Seen Tumblr Blogs


Fun Fact
Tumblr has been banned in Indonesia for providing people with access to pornographic content.
Text
Titanium Blade at Multi Fit Blades

Don't miss out on the 1-3/4" Wide Titanium Bi-Metal Universal Quick Release Saw Blade by Multi fit blades available at just US $10.99.
This titanium blade is perfect for cutting wood, sheet metal, screws, nails, plastic, drywall, fiberglass, acrylics, laminates, and more.
With its titanium coating, this saw blade offers an extra layer of cutting tooth protection, making it ideal for demolition and deep plunge cutting of wood with embedded nails or screws.
Also, now buy 3 for US $8.99 each and save 19%.
0 notes
Note
Hey! I'm making a F!Leo cosplay and I was wondering if you have any advice for how to do the shell? The plastron, specifically. Yours was amazing! Ty xx
Yeah of course!!! Luckily the rise plastrons are very geometric so its pretty easy to make a pattern from it! I dont have pictures of early steps so pls bear with me <3 info n pictures below the cut
First thing i did was make a pattern of my torso with plastic wrap and tape so i could see the curve of my stomach and chest. Cant say this helped a TON, but i cant imagine things in my head, so it helped me conceptualize the size and dimensions i would need the front panels to be to cover my torso.
Next i started sketching small patterns for what the cut outs may look like. DEFINITELY make a paper pattern, this took a lot of trial and error and you dont want to waste too much foam. I cannot for the life of me find my paper patterns unfortunately, but hopefully you can see part of where im coming from with the detailed pictures of the plastron!! I made patters for 1/2 of the plastron, and flipped the patters over to make the other half mirrored and symetrical.
Now the cutting. I used .7mm foam (i think?? I got it from micheals. Joann fabrics has some but only small sheets. If you want less seams you should get the bigger ones, or buy massive sheets online. EVA foam isnt too hard to find, but make sure your density and width is appropriate for what youre making. When actually cutting the pieces out, some cuts will be flat while others may work best at an angle. I used mostly 90* and 45* angles to make clean edges and corners.

Bear with me bc the pictures in this next part are kinda uglie </3 ill explain why later.
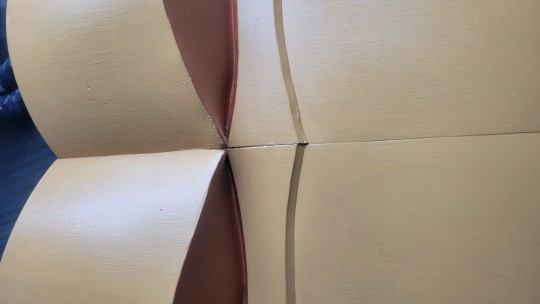
For matching the curve of the body, i used a fresh blade and made shallow triangle cuts on the backside of the foam as can be seen here:

It would have worked better if the chest pieces were also vurved by i was on a time crunch and didnt have the time to make a 3rd or fourth plastron (yes this was a second fully completed attempt orz). Im also a bigger dude so it may be easier if your torso is smaller. I also had the benefit of making my pants from scratch (using a demon slayer uniform pattern that i altered) so i made the waistband big enough to tuck the shell into, which helped with keeping it curved around my body.
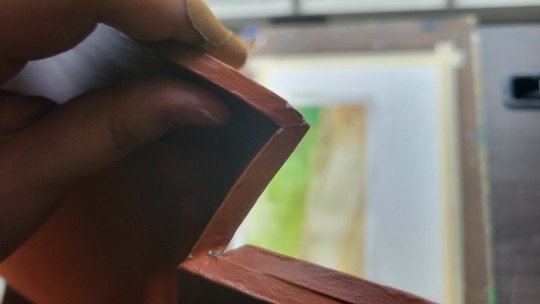
(This but only applies to future leo and i did post gluing the pieces together, but for his Top Surgery Scars™️ i cut into the chest at a 45*angle, then glued those pieces back onto the back side to seal the cut)

For gluing, i tried a whole lot of types but jothing worked as well as cement glue. It is toxic tho so make sure you do it outside or with good ventilation, and wear gloves/a mask. I did two layers on each edge then stuck the edges together, 3 if i noticed the foam absorbing it to much. Make sure you take the gluing slow and really put pressure on the pieces to lock them together. Follow the instructions and youll do fine.
For painting, i did 2 layers of modge podge, 1-2 priming layers (depends on if foam is white or black to start), and then whatever layers you need for a smooth coat of color. I topped it off with modgepodge again to seal it, but that may not have been the best idea for the following reasons....
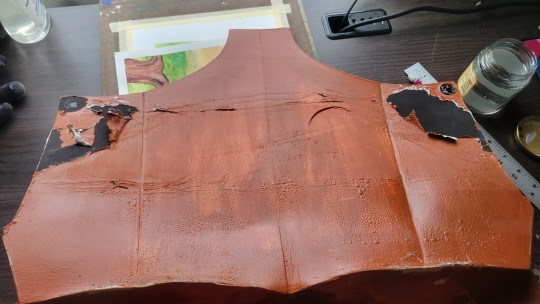
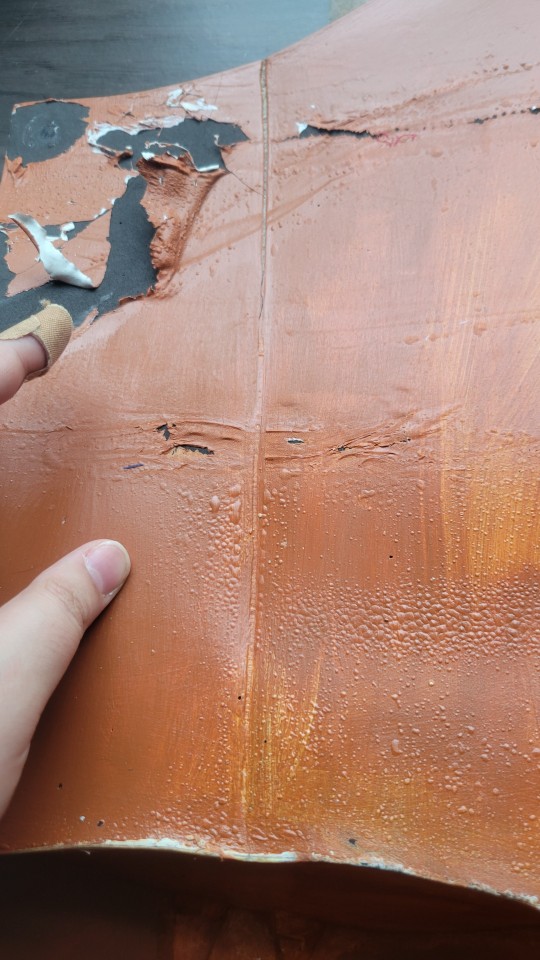
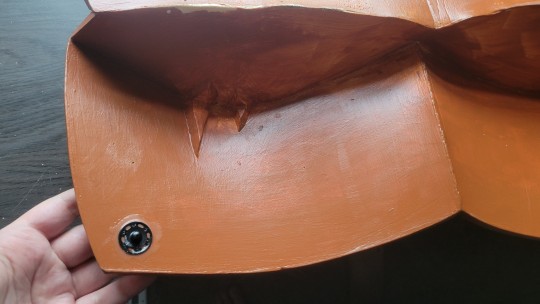
EW YUCK. WHY IT LOOK LIKE THAT.
Well. It didnt always. Turns out when youre wearing approx 3 laters in the summer then cover your body with insulating foam, the heat and moisture makes the modgepodge MELT. and like i said before, this bottom portion was tucked into my pants so it did not breathe. I have yet to even try to find a solution but just keep it in mind when making your cosplay (and if you find a solution PLEASE LET ME KNOW! My one idea was tryna find a sealant that wont melt (obv) but idk what that would be)
And FINALLY. how to secure it to the body suit!! I used snaps!! So easy and nice (besides the melting issue but thats a different thing entirely.) They never came off or gave me problems (minus the melting) and made the shells easy to transfer/travel with and put on.
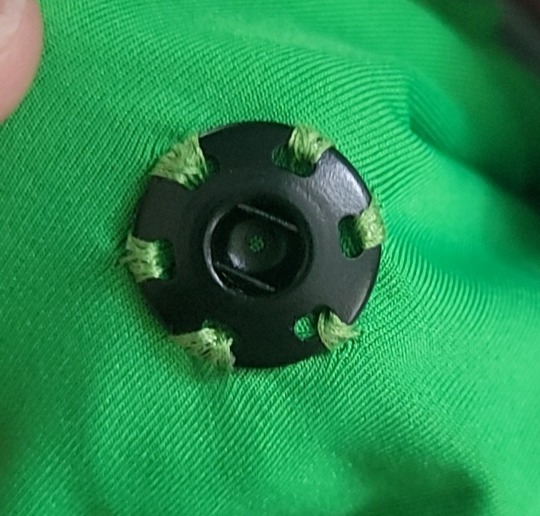
(Heres a pic of them on the suit sewn in by hand, and above you can see them on the shell itself.)
All in all, The plastron was so so hard and im honestly still not happy with it, planning to remake it before i wear him again. Please show me your cosplay when you finish it, id love to see!! Please lemme know if you have any other questions!! 🐢💙
#ask#askfish#did-i-mention-the-shirt#cosplay#rise future leo#future leo#leonardo hamato#rottmnt#tmnt#rise leo#art#fanart
21 notes
·
View notes
Text

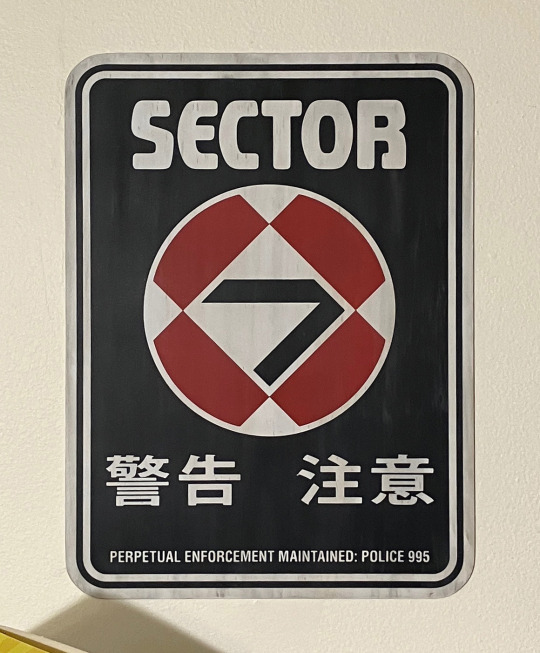
I'm declaring these finished. Forgot to drill some holes in the Sector 7 sign, but no big deal. Replica Blade Runner license plate & street sign. Cut vinyl on black plastic for the license plate, spraypaint on white plastic for the street sign. Plus multiple rounds of hand-applied acrylic paint washes for weathering. Very pleased with how dirty they look. Not perfect, but maybe that just adds to their charm. Not shown is the parking meter sign, which needs another good coat of matte clear sealant, and then sanding the corners, and then the painted weathering : / Waiting for the weather to cooperate on that one.
#set dressing#and related material#replicas#plastic#signs#signage#blade runner#movies#sci-fi#diy#arts & crafts#vinyl#etc#tom southwell#sinister graphic design#the cyberpunk dystopia you always wanted outdoors is now indoors
22 notes
·
View notes
Text
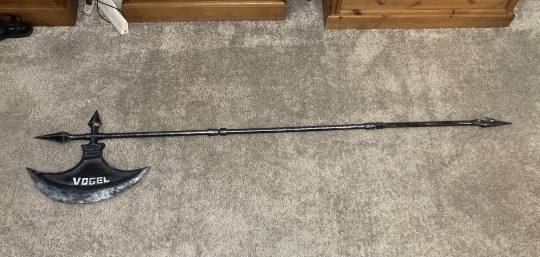
AAAAAAAAA ITS DONEEE
I measured it and this thing is fucking 6’6-
(materials and process underneath vv)
Materials used:
-3 pvc pipe segments with the screw adapters
-Eva foam : 2mm, 5mm, 10mm
-Foam clay
-Thermoplastic beads
-Metal wire
-Various superglues
-Spray paint
-Acrylic paint
~~ The Pvc Segments:
I started off with three 2ft pvc segments and glued the cross adaptor on the top, then proceeded to hack off and move around pieces as I saw fit. For the top segment I believe I cut off 5in, then glued 3 to the top of the cross pipe and tossed the remaining 2in. I also cut off 8in on the bottom to make way for the spike which is around 5.5in.
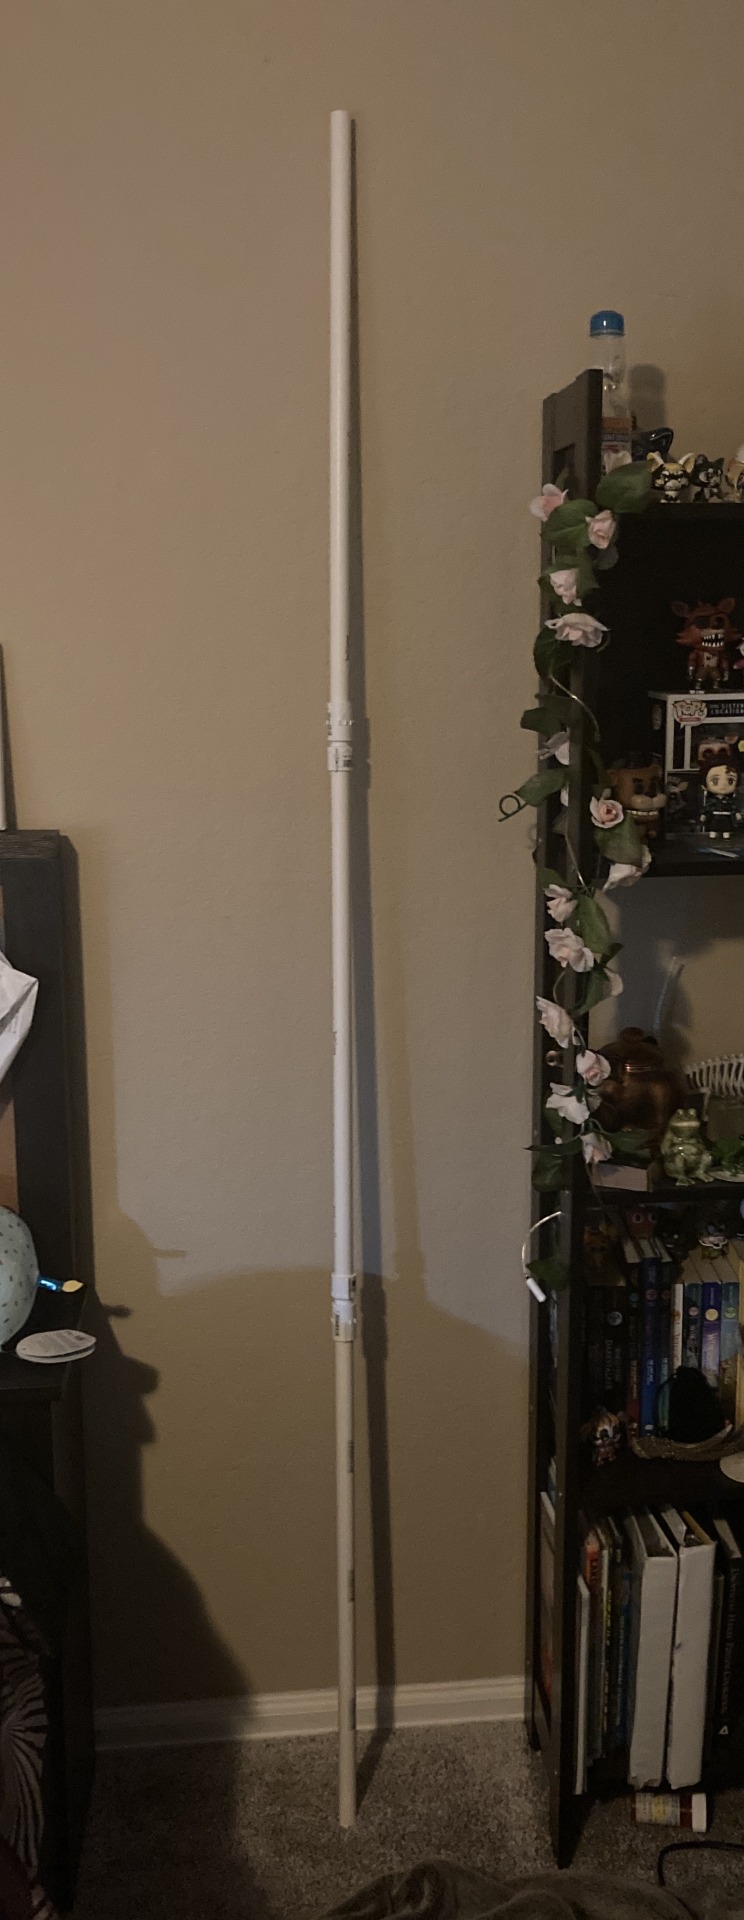
(The original pipes, I didn’t really have any other progress pics of this part)
~~ The Main Blade:
I started by going into FireAlpaca and separating the halberd from Sinclair’s sprite, then broke it up into various pieces and used Rasterbator to size up the blade. After that I printed it out, assembled it, and transferred it to freezer paper to adjust it as I saw fit.
After that I cut out two pieces of 10mm foam and glued them together as the main blade, then added the details with some 2mm foam I got from Walmart I think? I proceeded to hack away chunks of foam with Eva foam with a box cutter (and almost sliced my hand open in the process) before sanding the absolute crap out of it)
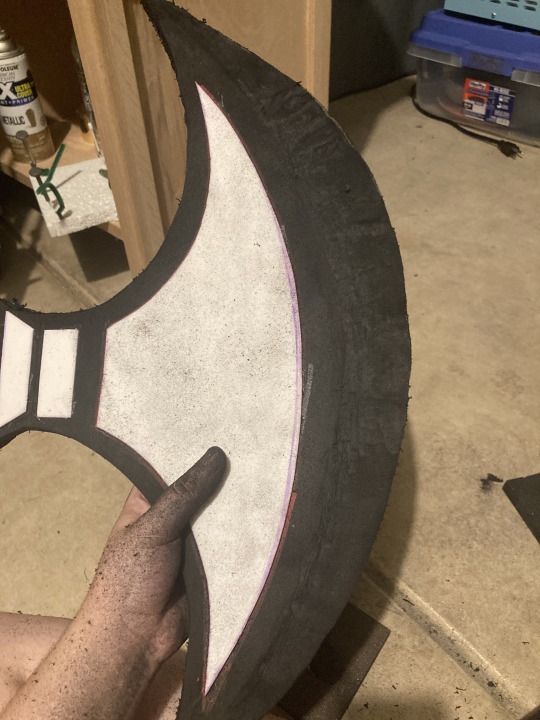
Once it was all sanded and I was content with it I took my heat gun and sealed all the foam and got rid of the fluffy texture created by the sanding and filled some of the gaps with foam clay.
After the blade I was done I stuck some wire into it, then shoved that wire through some thermoplastic beads I had melted and put in the pipe, and superglued it. It really wasn’t wanting to stay so I added more thermoplastic around the outside and proceeded to add more superglue (Gorilla and Flex Seal glue if I recall correctly) which has seemed to help it stay on. It’s not 100% stable but as long as I’m careful with it I’m ok.
~~
The Spikes:
Just like the blade, I made the pattern based the sprite itself. Using the line tool in FireAlpaca I traced over the top spike and the side spike and got the pattern from that. I resized and reshaped them in a Google doc before printing them out. After that I traced two of the spike pieces, cut one in half vertically and glued them together. After that I used small triangular pieces of foam to connect the corners and with that the skeleton was done (I added wire into the bottom spike for support as it is going to be bashing the floor a lot). i then filled the skeletons with foam clay, making sure to get all the sides even and filled completely.
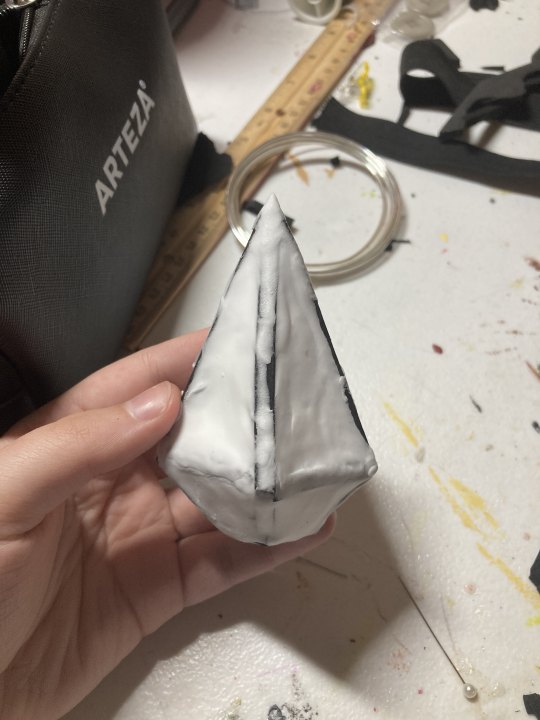
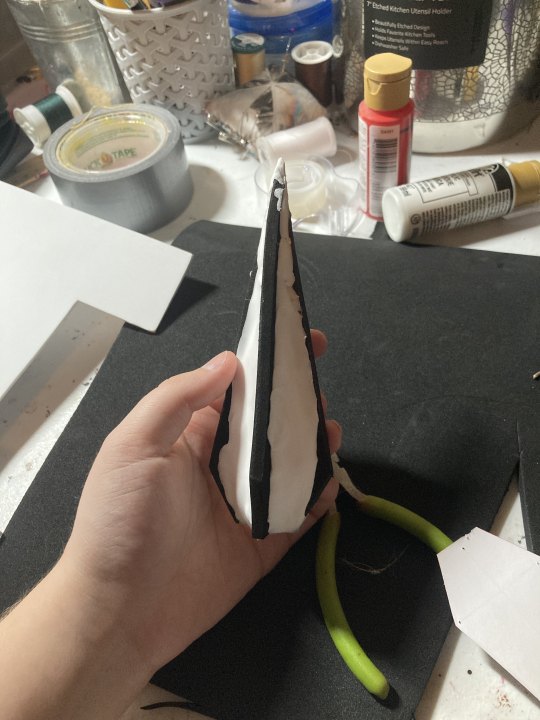
(I forgot to add the triangle pieces in the bottom spike until later)
Once I sanded them and attacked them with the same method as the blade the base was done!
~~ Painting:
In order to create a stable base to paint on I shoved three wooden dowels into a fertilizer box and hot glued them down. I then broke the halberd down and put each piece on the spike before spraying it with multiple coats of plastidip.

(Note- I taped off the parts that would be screwed down as I was afraid that the paint would interfere with the threading. I don’t know if it would actually cause any problems but I didn’t feel like risking it)
Once that was completely dry I sprayed it with three coats of Rustolem Black High Gloss paint.
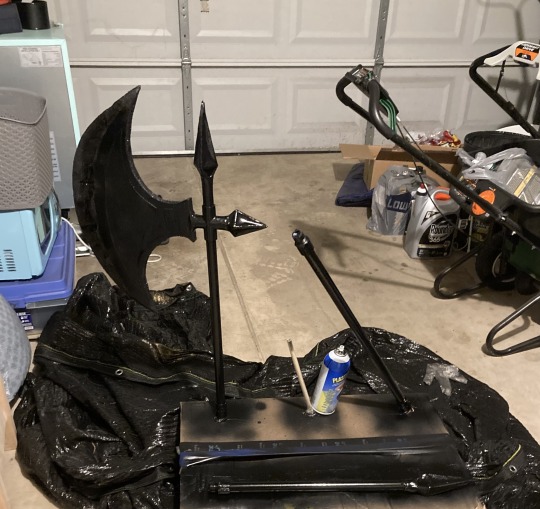
Finally, I dry brushed everything with silver paint and added the lettering, using some black paint to mimic the paint chipping.
Once I added two coats of Rustolem clear sealant it was done!! The overall process took about two weeks and I’m quite happy with how it turned out! I may or may not have injured myself a lot during the process because I’m stupid but it was quite a fun project, and I do have more Project Moon props planned for the future such as Don’s lance and Argalia’s scythe. Once I finish my full cosplay I’ll make a post similar to this one :)
40 notes
·
View notes
Text
SWORDTEMBER '24, DAY 10: SPACEFARING
{Late cuz I was sick again yesterday} Item ID: TP-2410 Item Name: Unlicensed Starblade Category: B-2 Origin Point: Telloran, Katal Owner: BigTime Coldwave Productions (Manufacturer) Description: An unofficial replica of the main character’s weapon in the original Celestial Conquests movies. The main portion of the item is the hilt and beam emitter, a combined length of 22 cm. Intended to mimic fictional materials, the item is a mix of metal and printed plastic, coated in paint and sealant. On the bottom section of the handle is a battery compartment. A switch by the guard activates the laser blade, while a slide-switch can be locked into several different intensity settings (the lowest prevents the item from causing anything more than mild skin irritation, while the highest can potentially cause serious burns and cut through weak materials, but is advertised as being for a [quote]: novelty camping experience). By default the blade is purple, and although modifications for other colors were produced, issues with licensing prevented them from ever reaching the market. Cataloger’s Notes: There are currently 10k (plus or minus a few) units of these damn things hanging out in the loading bay. Chances are, if the lawsuit pans out, they’ll all be either incinerated or recycled. Maybe�� Maybe nobody would mind if I took one for myself. It’s not like our boss has never done it, and I’ve got dirt on him anyway. Besides, Naomi says Celestial Conquests is her brother’s favorite multimedia franchise… he’d probably love one of these, even if it’s not officially licensed.
-----
This day can’t get any better. First, Cynthia had spent the morning with her girlfriend, before they came into town together (bypassing the terrible public transit outside her apartment). Then, she arrived at work just in time to watch her less-than-beloved boss get yelled at by an angry executive over his last-minute confiscation of a huge shipment of goods. Not just any goods, but a bunch of replicas from one of the galaxy’s most popular media franchises. Apparently the licensing deal fell through… after the product had already been manufactured.
Cynthia doesn’t even bother pretending to understand how exactly that works.
All she knows is that now she gets to catalog one of the replicas, and although that doesn’t mean playing with it, she does get to admire the craftsmanship, as well as test the claimed functionality. Hence why she’s in the office kitchen, two of her coworkers watching, attempting to use the laser sword to make toast. Thus far, it had worked surprisingly well at cutting the loaf of bread.
“I already told you a thousand times- no, don’t you dare interrupt me!” A voice shouts from a few rooms away, the sound carrying through the vents. Quite the design flaw, for employees in the lounge to be able to hear the boss in his office, especially now that he’s handling a sensitive call. That’s exactly why they’re here, though, instead of trying this in the room meant for testing. Everybody wants to hear their boss getting chewed out by one of the only people who’s a bigger asshole than him. “Yes, yes, I… I understand. But there are certain procedures that need to be followed. If you would just listen to me for five seconds, I could explain-”
As the bossman continues to get yelled at, Cynthia’s coworkers start getting out the other sandwich ingredients. Today they would get lunch and a show.
4 notes
·
View notes
Note
Trick or treat :)
Happy Halloween! You get ... How To Make A Decorative Tea Cannister! (Done on metal with paper, but the method should also work with fabric and/or on a glass container.)
Materials
1 tea metal canister (or more) (glass should also be fine)
12x12 piece of lightweight decorative paper per canister
cardstock and scrapbook sheets probably too heavy
1 piece paper covers 1 7" tall canister
A fat quarter of quilting cotton should also do the trick
E6000 spray adhesive
4 wide rubber bands
Spray sealant
Pencil
Scissors and/or rotary cutter
Newspaper or large scrap paper to protect work surface
(Consider coating any decorative details like label holders etc in petroleum or similar to prevent the glue from sticking.)
Lie the canister (with lid on) on the decorative paper and mark the canisters height across the width of the paper. Label this part the base in pencil on the reverse side and cut.
Remove the canister lid. On the remnant piece of decorative paper, trace the lid. Leave at least 1/4" extra space all the way around (sketch it in if you like). Cut this out, including the extra space. Snip through the extra space to but not though the lid trace, so that the extra space forms flaps that can be folded in.
On the protective paper, spray the lid paper generously with spray adhesive and smooth it onto the lid. Fold the flaps over the edge of the lid. Once it's all smoothed out, secure the paper in place with a rubber band. Let th lid sit for a while until partially dry, or until you can remove the rubber band without wrinkles or peeling.
Once the lid is partially dry, remove the rubber band and put the lid securely back on the canister. The next steps will treat the canister as one piece.
Lay the base piece of decorative paper on the protective paper and spray liberally with e6000. (It will take longer to dry, but it's easier to smooth out air bubbles if damp.) Wrap the paper around the canister, from base to lid, and smooth out. Secure with rubber bands to dry. The seam where the lid meets the base should be fully covered, and the flaps from the lid piece should be covered.
Before the paper dries, trace the seam where the lid meets the base with you thumbnail or a pencil so that the seam is visible.Do not try to cut free the lid or any other details until the paper is fully dried. It will not cut cleanly.
Let dry overnight.
Slice open the seam between the lid and base with a craft blade or box cutter.
Coat the dried paper exterior with the spray sealant and let dry, per sealant instructions.


3 notes
·
View notes
Text
Common Mistakes to Avoid When Working with Plywood
One of the most adaptable materials in construction, plywood is used in building, making furniture, and interior decoration. However, working with plywood can be tough if you are unaware of some of the great mistakes that can make high-quality results take an exit. One must identify all these mistakes and effectively prevent them from leading to poor results in any project. If you are with the best plywood manufacturers in Kerala, like Suntree Plywood, it is always easy to avoid these errors for better output in your projects.
1. Choosing the Wrong Type of Plywood
One of the most horrible mistakes is to select the wrong type of plywood. Each of them has its own purpose.
BWP (Boiling Water Proof) Plywood: It is the best for moist areas like bathroom and kitchen.
Commercial Plywood: Most suited for dry areas such as for interior furniture.
Hardwood Plywood: Used for applications where high strengths and high durability are key factors, such as cabinetry and flooring.
2. Avoiding Moisture Protection
Generally speaking, moisture can cause plywood walls or delaminates if that plywood is not water-resistant plywood. Most DIYers and professionals forget to seal it along the edges and the surfaces causing damages over a period.
The solution: Use waterproof coatings, edge banding, or sealants to plywood element exposure, particularly for outdoor or moisture-prone applications.
3. Poor Cutting Methods
Incorrect cuts splinter edges and waste material, not to mention using the wrong blade or not supporting the plywood properly for cutting and then ruining what could have been a great piece.
Best: Fine-tooth blade and support the plywood on both sides when cutting. Buy quality plywood from good manufacturers, especially the one in Kerala; they have good standards on minimizing splintering.
4. Not Paying Attention to Grain Direction
Plywood will generally come with grain directions apparent on its surface veneer. A misalignment could affect both the look and strength of the project in question.
Expert Insight: Cutting and assembling with plywood grain direction always gives that professional look and enhanced strength.
5. Cutting Corners with Sanding/Finishing
Most people fail to sand or directly apply finishes onto surfaces leading to a rough, uneven surface affecting aesthetics and durability of a plywood project.
Solution: Sand the plywood using fine-grain sandpaper and apply primer, paint, or varnish afterward. Good quality plywood from the reliable trusted manufacturer makes finishing work easier.
6. Going for Poor Quality Plywood
Going for inferior plywood quality could simply mean poor durability, warping, or the most catastrophic case-structural failures. Low-quality plywood would show up in the shapes of voids, weak glue bonds, and uneven veneers.
Recommendation: Always buy plywood only from the best plywood manufacturers like Suntree Plywood of Kerala and avoid plywood from other manufacturers in Kerala.
7. Not Pre-Drilling Holes for Screws
When screws are driven into plywood without pre-drilled holes, they will cause the de-lamination or splitting of ply sheets, rendering them structurally weak.
Fix: Always pre-drill a hole that has an internal diameter slightly smaller than that of its screw to prevent splitting and secure fit.
8. Not Considering Expansion and Contraction
All wood products will expand and contract with changes in humidity. An absence of allowance for movement could create distortion in the form of buckling or gaps.
Advice: Leave an allowance of about 1-2 mm between plywood panels to allow for expansion and contraction.
Conclusion
The working of plywood gives excellent finishes if one avoids these wrong practices. Right plywood selection in combination with correct procedures and quality raw materials from the best plywood manufacturers in Kerala will guarantee that the projects are tough and attractive.
Manufacturers like Suntree Plywood offer a product line wide enough to ensure that you can always find the kind of plywood that you need. With the right armamentarium your projects will be perfect then!
0 notes
Text
The Versatility of Cutter Knives: Essential Tools for Various Applications
Cutter knives, also known as utility knives or box cutters, are indispensable tools found in homes, workplaces, and industries. Their versatility, ease of use, and precision make them suitable for a wide range of tasks. This article explores the various uses of cutter knives and why they are considered essential tools.
1. Packaging and Shipping
One of the most common uses of cutter knives is in packaging and shipping. They are perfect for:
Opening Boxes: Cutter knives make it easy to open cardboard boxes without damaging the contents.
Cutting Packaging Tape: They swiftly cut through packaging tape, making the unboxing process quick and efficient.
Trimming Bubble Wrap and Foam: Cutter knives help in precisely cutting protective materials used in packaging.
2. Crafts and Hobbies
Cutter knives are a favorite among artists and hobbyists for their precision and control. They are used for:
Cutting Paper and Cardstock: Ideal for scrapbooking, card making, and other paper crafts.
Model Making: Useful for cutting and shaping materials like plastic, foam board, and balsa wood.
Leather Crafting: Cutter knives provide clean cuts in leather, essential for making belts, wallets, and other leather goods.
3. Construction and Renovation
In the construction industry, cutter knives are essential tools for various tasks, including:
Cutting Drywall and Insulation: They are used to make precise cuts in drywall sheets and insulation materials.
Carpeting and Flooring: Cutter knives help in cutting carpet, vinyl, and linoleum for installation.
Trimming Materials: They are used for trimming excess materials, such as shingles and wallpaper.
4. Gardening and Landscaping
Cutter knives play a significant role in gardening and landscaping by:
Cutting Plant Ties: They help in cutting plant ties, ropes, and strings used for supporting plants.
Trimming Garden Mats: Cutter knives are used to trim landscape fabric and garden mats to fit specific areas.
Pruning Plants: They can be used for light pruning and trimming of small branches and leaves.
5. Automotive and Mechanical Work
Mechanics and automotive enthusiasts rely on cutter knives for:
Cutting Hoses and Belts: They are used to cut rubber hoses, belts, and gaskets to the required lengths.
Stripping Wires: Cutter knives assist in stripping insulation from wires for electrical work.
Removing Adhesives: They help in scraping off old adhesives and sealants from surfaces.
6. Home Improvement and DIY Projects
For homeowners and DIY enthusiasts, cutter knives are essential for:
Wallpapering: They are used to trim wallpaper edges for a neat finish.
Cutting Foam and Insulation: Cutter knives make it easy to cut foam boards and insulation materials for various projects.
Opening Paint Cans: They can be used to cut through the seal of paint cans.
7. Office and School Use
In office and school settings, cutter knives are practical for:
Opening Mail and Packages: They are perfect for quickly and safely opening envelopes and packages.
Craft Projects: Students and teachers use cutter knives for cutting paper, cardboard, and other materials for projects.
Cutting Binding and Covers: Cutter knives help in trimming binding materials and covers for reports and presentations.
Safety Considerations
While cutter knives are versatile and useful, safety should always be a priority. Here are some safety tips:
Use a Sharp Blade: A dull blade requires more force and increases the risk of slipping.
Cut Away from Your Body: Always cut away from your body to avoid accidental injuries.
Use a Cutting Surface: Use a cutting mat or board to protect surfaces and prevent blade damage.
Store Safely: When not in use, retract the blade or use a protective sheath to prevent accidental cuts.
0 notes
Text
How to Maintain Marble Countertops?
Marble countertops are elegant and luxurious, making them a popular choice for kitchens and baths. Marble, on the other hand, is a natural stone that must be treated with care to retain its beauty and longevity. With the proper care plan, you can ensure that your marble countertops look great for years.

Here are some important recommendations for keeping marble surfaces.
Regular Cleaning:
Begin by cleaning off your marble countertops every day with a soft cloth or sponge and a moderate, pH-neutral cleanser. Avoid harsh or acidic cleansers, since these can etch or harm the marble surface over time. To remove surface debris or spills, simply use warm water and mild soap.
Avoid Acidic Substances:
Marble is susceptible to acidic chemicals like vinegar, citrus drinks, and wine. These acidic solutions can etch and dull marble surfaces. If spills occur, wipe them quickly with a soft towel and rinse with water to avoid damage.
Use Cutting Boards:
Always chop or slice food on cutting boards or mats to avoid scratching or ruining the marble surface. Avoid cutting directly on the marble countertop since sharp blades might leave lasting damage.
Protect from Heat:
While marble is heat resistant, it is preferable to put trivets or hot pads beneath hot pots, pans, or cooking appliances to avoid potential damage. Direct contact with heat can create thermal shock, resulting in cracks or discoloration in the marble.
Timely Sealing: Marble, unlike quartz countertops, is a porous stone that will absorb liquids if not properly sealed. To protect your marble countertops from stains and moisture intrusion, seal the surface on a timely basis. Use a high-quality marble sealant every six to twelve months, or as directed by the manufacturer.
Handle with Care: Marble is a somewhat soft stone compared to granite or quartz, thus it must be handled cautiously. Avoid dropping large objects on the countertop, which might result in chips or cracks. Be careful while moving appliances or furniture to avoid scratching or ruining the marble.
Routine Maintenance: In addition to everyday cleaning, polish your marble countertops regularly to keep them shiny and lustrous. To remove any dull spots or watermarks, lightly buff with a marble-specific polish or a mixture of baking soda and water.
Professional Restoration: If your marble countertops get excessively soiled, scratched, or damaged over time, consider having a professional stone restoration specialist repair and refinish the surface. They can carefully clean, polish, and seal your marble countertops to restore their natural luster.
Following these maintenance guidelines and best practices will allow you to enjoy the timeless beauty of marble countertops in your house for many years to come. With regular care and attention, your marble surfaces will remain a gorgeous focus point in any kitchen or bathroom. Source link
0 notes
Text
Oscillating Tool Blades & Accessories by Multi Fit Blades

Get your hands on professional-grade blades at the best cost!
Multi Fit Blades offers quality cutting blades crafted from the finest materials. From metal to wood, our blades will help you get any job done quickly and with superior accuracy. Benefit from superior durability, performance, and affordability — get your hands on top-grade blades without breaking the bank!
Get your next set of cutting blades from Multi Fit Blades at unbeatable prices for unbeatable results. Don’t compromise on quality, get the performance you need with our selection of quality blades.
Start saving money on top-grade blades today — check out Multi Fit Blades today!
1 note
·
View note
Text
How to Install HPL Cladding for Maximum Durability
High-Pressure Laminate (HPL) cladding is a popular choice for exterior and interior wall cladding due to its durability, aesthetic appeal, and low maintenance requirements. Proper installation is crucial to ensure the maximum durability and longevity of HPL cladding. Here's a step-by-step guide on how to install HPL cladding effectively:

Prepare the Surface:
Ensure that the surface where the HPL panels will be installed is clean, smooth, dry, and free from dust, dirt, grease, and other contaminants.
Repair any cracks, uneven surfaces, or structural issues in the substrate before proceeding with the installation.
Measure and Cut the Panels:
Measure the dimensions of the area where the HPL panels will be installed, accounting for overlaps, corners, and edges.
Use a circular saw or a jigsaw with a fine-toothed blade to cut the HPL panels to the required size and shape, following the manufacturer's guidelines for cutting HPL.
Apply Adhesive:
Apply a high-quality adhesive recommended by the HPL manufacturer evenly on the backside of the HPL panels using a trowel or roller.
Ensure that the adhesive covers the entire surface area of the panel, especially the edges and corners, to achieve a strong bond with the substrate.
Position and Install the Panels:
Carefully position the HPL panels onto the prepared surface, starting from one corner or edge and working systematically across the area.
Use spacers or temporary supports to maintain consistent gaps and alignments between panels for a uniform appearance.
Press firmly on the panels to ensure proper adhesion and remove any air bubbles or excess adhesive using a rubber mallet or roller.
Secure the Panels:
Once the panels are in place, secure them further by using mechanical fixings such as screws or rivets at regular intervals along the edges and corners.
Ensure that the fixings penetrate both the HPL panel and the substrate adequately to provide strong support and prevent panel movement or detachment.
Finish the Edges:
Use edge trims, profiles, or corner pieces specifically designed for HPL cladding to finish the exposed edges and corners neatly and protect them from moisture and damage.
Secure the edge trims or profiles using appropriate adhesives or mechanical fixings as per the manufacturer's instructions.
Seal Joints and Gaps:
Seal any joints, gaps, or seams between HPL panels using a high-quality silicone sealant recommended for exterior applications.
Apply the sealant along the edges, corners, and intersections to prevent water ingress, moisture buildup, and air leakage.
Inspect and Maintain:
After installation, inspect the HPL cladding carefully for any defects, damages, or areas that require touch-ups.
Regularly clean the HPL panels using mild detergent and water, and avoid abrasive cleaners or harsh chemicals that may damage the surface finish.
By following these steps and adhering to the manufacturer's guidelines and best practices, you can install HPL cladding effectively to achieve maximum durability, weather resistance, and aesthetic appeal for your building's exterior or interior walls.
0 notes
Text
Removing and replacing the shower valve

A defective shower valve can be removed and replaced in a short time and with only a few tools. The shower valve controls the flow and temperature of the water that flows through the shower head. You can recognise a problem with the shower valve if the shower head leaks and drips, but the bath spout does not. The knob may also tighten and be difficult to turn.
Turn off the water supply
Turn off the water supply in the bathroom only or throughout the house, as needed.
Remove the shower/tub control fitting
Slide the blade of the slotted screwdriver under the edge of the plastic base for the control knob. Turn the shower/tub control knob clockwise to remove it. Loosen the large metal cover plate for the tap by loosening the screws with the Phillips screwdriver. Use the needle-nose pliers to pull the retaining clip off the front of the valve body.
Remove the shower valve cartridge
Screw the control knob back into the housing and pull it straight out of the wall to pull out the shower valve cartridge.
Replace the shower valve cartridge
Unscrew the control knob from the housing and pull out the shower valve cartridge. Fit the new shower valve cartridge and reinsert the cartridge and control knob housing into the wall.
Refit the shower/tub fitting
Clean the tiles and the back of the cover plate from accumulated limescale. Line the cover plate with the new liner. Make a new liner from self-adhesive sealing tape by measuring the depth of the cover plate edge and cutting the strip to the correct width and length.
Remove the back coating and press the sealing tape onto the back of the cover plate. Allow the strip to seal briefly and then reattach the cover plate to the control valve body. Refit the control knob and the base.
Test the new shower valve
Restore the water supply to the bathroom and turn on the tap to check if it is leaking.
Seal the cover plate of the tap
To minimise damage to the tiles from future leaks, place a thin strip of silicone sealant around the tap cover plate.
Call the Emergency Plumber in Leeds. We are your right contact partner. Furthermore, we are 24 hours available. Call us now, 01134900384.
#plumber in Leeds#plumber near me#need a plumber#find me a plumber#professioinal plumber#bathtub replace#shower replace#leak detection
0 notes
Text
Why Need To You Think About Foam Roofing Repair
Foam roof covering repair work becomes a necessity when there is damage triggered to the foam when things driven by the wind autumn onto the surface. These items can trigger cracks and pits in the top layer. What are foam roofing systems? These are smooth roofing systems made from polyol as well as isocyanate in a combination.
The polyurethane is sprayed on the roofing from the combination. If you intend to keep the stability of the roof as well as prevent penetration of water into the foam, it is required that splashed polyurethane foam is fixed. Regular checking and also regular maintenance will assist in very early detection of damage and also you would certainly likewise have the ability to conserve cash on the more comprehensive fixings. The repairs can be done successfully by using polyurethane caulking sealant and disposable spray foam sets.
The roof troubles that you encounter will certainly enhance if you carry out meaningless improvements. If guarantee has actually been supplied with spray roof, it would be best to leave the renovations to the specialist suppliers who would certainly remodel the roofing perfectly. You can do the fixings by yourself by making use of the repair tools properly when it comes to dilemma where you do not wish to squander whenever.
The only suggestions that you require to find out about foam roofing repair work
The areas that need repair service needs to be free from all particles and any items or walls that would be coated in the overspray requirement to be taped off. Scrub with a blend of 1 part chlorine bleach to 1 part water to kill any kind of moss or mold. Let the areas that need foam roof covering repair work completely dry after washing it with clear water. Use a 80 grit sandpaper to roughen up areas like flashing before the roof repair service item can be splashed on them, Отидете на този сайт and also this process will certainly make them receptive to sealer.
Till you come down to dry foam you will require to remove as well as throw out all damp and also damaged locations of the foam roofing. Before continuing with the foam roof covering repair you must guarantee that the roof covering is entirely dry. For a smooth union of the old foam and the new repair you can make use of a grinding wheel, saw or razor blade to bevel the cut side at a 45-degree angle away from the damaged or wet location.
Foam roofing repair facilitated
Once the old foam is gotten rid of the harmed underlying deck will come to be visible and you must proper repairs and also patches to it. Prior to using brand-new foam, you have to make sure that the fixings are clean.
By adhering to the direction you ought to re-foam the area with a high-density foam repair service kit (2.5 to 4 lb. density). Apply foam after placing on some non reusable handwear covers and also affixing the hose to foam container and also the applicator. The applicator will alter depending on the package. The shutoff can be switched on hereafter. As the foam will certainly dry promptly in just a few mins you will need to function rapidly. The excess foam can be rubbed out with cloths.
Load to the degree of the foam roofing system surface area by spraying the non reusable polyurethane foam right into the repair. Enable the foam roofing system fixing to cure for a minimum of 15 minutes. Utilize a roofing blade to trim any kind of overspill of foam to the major foam roof covering surface area. This will complete the procedure of foam roofing repair.
0 notes
Text
Pool coping stone maintenance: tips and tricks
Pool coping stones are normally produced using regular stone materials, for example, travertine, limestone, or rock. They can be cut into various shapes and sizes to fit any pool plan, and can be done with different surfaces to give a non-slip surface to swimmers. While picking pool coping stones, it is critical to consider factors like tone, surface, and sturdiness. Lighter shaded stones, for example, travertine or limestone can assist with keeping the pool deck cool in blistering climate, while hazier stones, for example, rock or basalt can give an emotional difference against the water. It is additionally critical to appropriately keep up with pool coping stones by routinely cleaning and fixing them to forestall staining and harm. An expert installer can give direction on the best materials and establishment strategies for your particular pool plan. Pool coping stone is a significant piece of any pool, as it gives a utilitarian and tasteful completion to the pool's edges. Keeping up with your pool coping stone is fundamental to guarantee its life span and to forestall harm that could think twice about pool's trustworthiness. Here are a few hints and deceives for pool coping stone support: Normal cleaning: Consistently cleaning your pool coping stone is fundamental to forestall the development of soil, grime, and other trash that can cause staining and staining. Utilize a delicate seethed brush and a gentle cleanser to tenderly scour the outer layer of the stone, and wash completely with clean water. Fixing: Pool coping stone is permeable and can assimilate water, which can make it decay over the long run. Applying a sealant to the outer layer of the stone can assist with forestalling water harm and drag out its life expectancy. Make certain to pick a sealant that is explicitly intended for use on regular stone, and adhere to the producer's directions for application. Fixing breaks: Over the long haul, pool coping stone can foster breaks because of openness to climate and other natural variables. On the off chance that you notice any breaks in your adapting stone, it's vital to address them immediately to forestall further harm. Utilize a stone filler or epoxy to fill in the breaks, and smooth the surface with a clay blade. Keeping away from cruel synthetics: Unforgiving synthetic substances, for example, chlorine and corrosive can make harm pool coping stone, so trying not to utilize them close to the stone is significant. In the event that you want to involve these synthetics in your pool, make certain to wash the coping stone completely to clean water a while later. Customary examinations: Consistently assessing your pool coping stone for indications of harm or wear can assist you with resolving any issues before they become serious issues. Search for indications of breaking, chipping, or staining, and address any issues instantly. In outline, keeping up with your pool coping stone is fundamental to guarantee its life span and to forestall harm that could think twice about pool's honesty. Customary cleaning, fixing, fixing breaks, staying away from brutal synthetics, and standard investigations are extremely significant parts of pool coping stone support. By following these tips and deceives, you can assist with guaranteeing that your pool coping stone stays in top condition for quite a long time into the future.
1 note
·
View note
Text
What Makes Tile Cleaning And Sealing The Ultimate Home Refresh?
Are you looking to refresh your home? Do you want to make it look brand new again? Then, the right thing to do is tile cleaning and sealing. Tile cleaning and sealing will help to remove all the stains and dirt from your tiles so that they can look as good as new.
In fact, if you don’t clean up your tiles then they may start chipping away over time which can cause a lot of damage to your house.
When you hire professionals for tile cleaning and sealing Sydney, they will also apply a sealant on top so that it stays stain-free for longer periods of time without any problems whatsoever!
Restores Appearance
Tile cleaning and sealing Sydney is the ultimate home refresh. It removes dirt, grime and stains from your tile flooring. It also restores the appearance of your tiles by removing mildew, algae and mild from them as well.
It even removes grease build-up that is caused by cooking oils being left on the floors over time - something you don't want in your kitchen! And wax build-up is another thing that happens when you use a lot of furniture polish; this can be removed with our professional service too!
Promotes Hygiene
Cleaning and sealing your tile are an essential part of creating a safe, healthy space. In addition to removing dirt and grime, it can also help prevent bacteria build up on your flooring.

This can be especially useful if you have young children or pets who may be more prone to getting sick due to exposure to germs in the home.
If you do notice any discoloration developing under the surface of your sealant (such as greenish-black spots), this means that moisture may have gotten into cracks or crevices where mild could grow undetected by homeowners before now--so make sure these areas are thoroughly cleaned out before attempting another application!
Improves Safety
Tile cleaning and sealing is a great way to help keep your home safe. By reducing the risk of slips and falls, you can avoid injury or even death. Additionally, it will also help prevent cuts and scrapes that can lead to infection.
This in turn can reduce the risk of contracting diseases such as tetanus or even hepatitis if you were to get injured while working with tools like saws or blades.
Increases Longevity
Tile cleaning and sealing is a great way to increase the longevity of your tile flooring.
This process protects against stains, water damage, mild and mildew as well. It can also reduce the effects of wear and tear by creating a protective barrier around each individual tile. This prevents dirt from getting in between them so you don't have to worry about it being ground into the surface over time!
Conclusion
If you're looking for a way to freshen up your home and give it a new look, tile cleaning and sealing Sydney is definitely the way to go.
Not only does it make your floors look brand new again, but it also protects them from dirt and stains so they last longer!
If you have any questions about our services or want more information on how we can help with your next project then contact professionals today!
Source : https://tilerescuecleanning.blogspot.com/2023/04/what-makes-tile-cleaning-and-sealing.html
0 notes
Text
Say Goodbye to Bubbles: A Step-by-Step Guide on How to Fix Bubbles in Your RV Roof
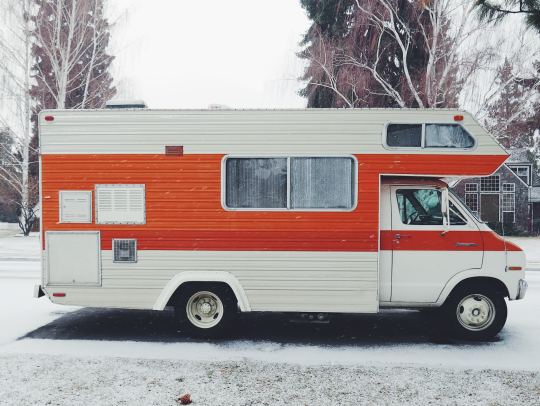
As an RV owner, there's nothing more frustrating than discovering bubbles on your RV roof, especially knowing how much it costs to replace it. These bubbles are not only unsightly, but they can also lead to more serious problems if left unattended. Fortunately, fixing bubbles in your RV roof is not as difficult as you might think. Here’s what you need to know.
Why do bubbles form in an RV roof?
Before we dive into the process of fixing bubbles in your RV roof, it's essential to understand why they form in the first place. Bubbles usually form when the adhesive bond between the roof membrane and the substrate fails, causing air to become trapped between the two layers. This can be caused by a variety of factors, including poor installation, aging and weathering.
How to know when it's time for a repair
The first step in fixing bubbles in your RV roof is to determine when it's time for a repair on the roof seam. If you notice bubbles on your RV roof, it's essential to act quickly to prevent further damage. The longer you wait, the more difficult and costly the repair will be. Some signs that it's time for a repair include:
Bubbles on the roof
Soft spots on the roof
Cracks or tears in the roof membrane
Water leaks inside the RV
How to fix bubbles in your RV roof
Now that you know why bubbles form and when it's time for a repair, let's dive into the step-by-step process of fixing bubbles in your RV roof.
Step 1: Clean the Roof
The first step in fixing bubbles in your RV roof is to clean the roof thoroughly. Begin by removing any debris or loose material from the roof. Next, wash the roof with a mixture of warm water and soap. Rinse the roof thoroughly with clean water and allow it to dry completely before moving on to the next step.
Step 2: Remove the Bubbles
Once the roof is clean and dry, it's time to remove the bubbles. To do this, use a utility knife or razor blade to cut an X-shaped slit in the center of each bubble. Be careful not to cut through the roof membrane. Use your hands to peel back the edges of the cut and remove the trapped air.
Step 3: Repair the Roof
With the bubbles removed, it's time to repair the roof. Apply a thin layer of RV roof sealant to the area where the bubble was located. Smooth the sealant out with a putty knife or roller. Allow the sealant to dry completely before moving on to the next step.
Step 4: Apply a Protective Coating
Once the sealant has dried, it's time to apply a protective coating to the roof. There are many different types of coatings available, but Liquid Rubber is an excellent choice for RV roofs. Liquid Rubber is easy to apply, long-lasting, and provides excellent protection against the elements.
How to prevent them from coming back
Now that you've fixed the bubbles in your RV roof, it's essential to take steps to prevent them from coming back. Here are some tips to help you prevent bubbles from forming in the future:
Have your RV roof inspected regularly by a professional
Avoid parking under trees or other objects that can fall on the roof
Keep your RV roof clean and free of debris
Avoid using harsh chemicals or cleaners on the roof
Use a protective coating, such as Liquid Rubber, to prevent damage from the elements
Why Liquid Rubber is the answer
As mentioned earlier, Liquid Rubber is an excellent choice for protecting your RV roof. Liquid Rubber is a thick, rubberized coating that provides excellent protection against the elements. It's easy to apply, long-lasting, and can be used on a variety of surfaces.
Here are some of the benefits of using Liquid Rubber on your RV roof:
Provides excellent protection against the elements
Easy to apply
Long-lasting
Can be used on a variety of surfaces
Resistant to UV rays and extreme temperatures
Helps prevent bubbles from forming
By using Liquid Rubber on your RV roof, you can help prevent bubbles from forming and protect your roof from the elements.
By following the step-by-step process outlined in this guide, you can fix bubbles in your RV roof and prevent them from coming back. Remember to have your RV roof inspected regularly, keep it clean and free of debris, and use a protective coating like Liquid Rubber to protect against the elements. With these tips, you can keep your RV roof in excellent condition for years to come.
#fix bubbles in your RV roof#RV roof inspected#protecting your RV roof#liquid rubber#RV roof sealant
0 notes