#Proxmox VE
Explore tagged Tumblr posts
Visit Tumblr Blog
Explore Tumblr blogs with no restrictions, modern design and the best experience.
Last Seen Tumblr Blogs


Fun Fact
Post activity is at the highest at 4:00 pm EDT; notes peak at 10:00 pm EDT.
Text
Proxmox VE 8.4 Released New Features and Download! #proxmox #homelab
0 notes
Text
Create a bootable USB on Mac: Proxmox VE Setup
#bootable#Bootable USB drive#Burn ISO#Create a Bootable WinPE Media#Create Bootable USB#Create Proxmox VE Cluster#FLASH#Flash ISO to USB#Install Proxmox#proxmox#Proxmox Server#Proxmox VE#Proxmox VE kernel#Proxmox Virtual Environment
1 note
·
View note
Link
看看網頁版全文 ⇨ 雜談:總算把架設了Stable Diffusion WebUI Forge / TALK: Finally Set Up Stable Diffusion WebUI Forge https://blog.pulipuli.info/2025/01/talkfinally-set-up-stable-diffusion-webui-forge.html 由於之前硬碟毀損,導致我用來做AI繪圖的Stable Diffusion環境全部消失。 這次乾脆全部重來,用Stable Diffusion WebUI Forge重建整個繪圖環境吧。 ---- # Stable Diffusion環境與Docker / Stable Diffusion Environment and Docker。 大家會把Stable Diffusion的環境架設在哪裡呢?。 網路上大部分的教學都是基於Windows的環境。 一方面是因為使用者眾多、為Windows環境開發的懶人工具也很多;二來是Windows環境也相對單純,WSL2穩定的表現讓人印象深刻。 不過這些都跟我這個Linux使用者沒有關係。 Linux使用者常常會受到發佈版和套件相依之苦,安裝系統和轉換的時候往往會遭遇很多困難。 現在有許多方案都在嘗試解決跨平臺(Linux自己的平臺)的各種問題,有針對套件管理的AppImage、snap、Flatpak、有針對運作環境的distrobox、也有強調Windows相容的PlayOnLinux、Bottles。 不過在伺服器的情境下,Docker應該還是目前最多人選擇的虛擬化方案。 在使用Linux電腦的這三年之間,我認知到這電腦就是註定常常損壞的設備。 因此我所建立的系統環境首要目的就是容易管理、容易遷移,而這也是我選擇Docker的原因。 https://github.com/AbdBarho/stable-diffusion-webui-docker/blob/master/README.md。 因此,一開始我的Stable Diffusion環境是基於AdbBarho所建立的stable-diffusion-webui-docker來架設。 當時AdbBarho很用心地將Stable Diffusion主流的創作環境AUTOMATIC1111、ComfyUI、Sygil-webui、InvokeAI都整合了進來。 我們在啟動Docker的時候可以自由切換需要的環境。 而各個環境背後使用的模型,則在Docker巧妙的設定中能夠共享。 ---- 繼續閱讀 ⇨ 雜談:總算把架設了Stable Diffusion WebUI Forge / TALK: Finally Set Up Stable Diffusion WebUI Forge https://blog.pulipuli.info/2025/01/talkfinally-set-up-stable-diffusion-webui-forge.html
0 notes
Text
Proxmox Backup Server (PBS) Upgrade: Eine Aktualisierung von 2.4 auf 3.0 durchführen
Vor wenigen Tagen, am 28. Juni 2023, ist die Version 3.0 vom Proxmox Backup Server (PBS) veröffentlicht worden. In dieser Anleitung zeige ich euch, wie sich der Server auf die neue Version upgraden lässt. Ein Tutorial darüber, wie ihr in wenigen Schritten einen Server mit Proxmox-VE...[Weiterlesen]
0 notes
Text
Proxmox VE 8.2: Lanzamiento con Herramientas de Migración Mejoradas
Proxmox Virtual Environment 8.2 se lanza con QEMU 8.1.5, LXC 6.0.0, ZFS 2.2.3, actualizaciones de Ceph y más. Después de cinco meses desde su anterior lanzamiento 8.1, Proxmox, una plataforma completa de virtualización de servidores diseñada para manejar tanto tecnología basada en contenedores como en máquinas virtuales utilizando herramientas como QEMU para la virtualización y LXC para los…

View On WordPress
0 notes
Text
If It's a Hack and It Works, Is It Really a Hack?
I have a couple servers at home — one running Proxmox VE and one running Proxmox Backup. I use the VM server when I need to spin up a development environment, for running the odd game server, serving files locally, running Home Assistant, etc. I also like to donate spare cycles to Folding@Home. The backup server of course is in case I do something stupid on the VM server.
There's just one problem with that. My second-hand 8-year-old dual-Xeon server runs hot.
It was too much to keep running in my home office. Between the two servers, my desktop, and my work laptop, I was regularly seeing ambient temperatures around 26°C. It was just too warm for comfort.
Last summer I moved my network gear and the two servers into the front coat closet. This was great for me working in my home office, but not so great for my servers. Despite adding a passthrough vent to the closet door and a vent fan to the ceiling, the closet was still consistently in the 26°-30°C range.
The ideal solution would probably be to use an enclosed server rack and run an exhaust vent up from the top. Unfortunately, rack-mount server cases are expensive, enclosed racks are very expensive, and my closet is too small for that anyway.
So I hacked together a solution.

I built a frame out of some cheap 1x2 lumber and wrapped a piece of thin sheet steel around the sides to make a crude plenum. On top, I added a 10x6 register box with a semirigid vent hose coming out of it. This gives me a guide for drawing air out of the servers and guiding it up to the vent fan in the ceiling.
To help things along, I added a 120mm fan inside the register box. But not some whisper-quiet Noctua. This is (if the Amazon listing is to be believed) a 5000 RPM, 210 CFM monster of a fan. It's loud, but moves a lot of air.
Too loud in fact. Its droning could not be silenced by any mere closet door. I had to add a PWM fan speed controller to calm it down. It's a cheap unit from Amazon, but it came with a temperature probe and it has a configurable operating range.
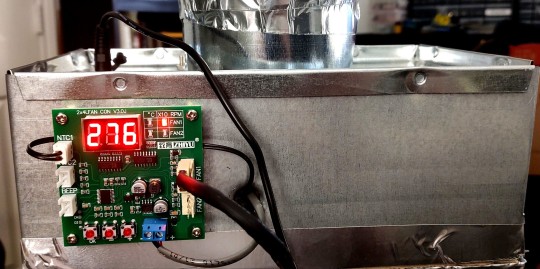
The result? Where previously the entire closet was consistently above 26°C, now it's staying around 23°. There is a difference of 5°C between ambient in the closet and the air inside the exhaust duct, so it is doing its job of redirecting the hot air from the servers.
I call that a successful hack.
18 notes
·
View notes
Text

You’re standing at the edge of a cliff.
In your arms, you’re clutching the valuable Proxmox VE data that keeps your business running.
⛰️ One step back, and you would fall into the data loss abyss… Do you have what it takes to save your data?
Take this Proxmox VE data defender quiz to test your knowledge of backup and anti-ransomware strategies. Challenge colleagues and friends to take the quiz and see if they can make it to safety!
🧩 Take the quiz now: https://www.proprofs.com/quiz-school/ugc/story.php?title=proxmox-ve-data-protection-cybersecurity-best-practices-in-action-with-nakivoaq
1 note
·
View note
Text
First steps after installing Proxmox
I recently installed a fresh instance of Proxmox VE on my Beelink S12 Mini home server. These are the first steps I take whenever I set up a new machine or server. Set up SSH key authentication It can be cumbersome to remember the password for multiple server, and using an SSH key for authentication also offers better security. I sent the SSH public key to the server, which is as easy…

View On WordPress
0 notes
Text
BDRSuite 7.1 New Features with Proxmox Agentless Backup
BDRSuite 7.1 New Features with Proxmox Agentless Backup - Vembu has added agentless backups for Proxmox for VM backups @vembutech #proxmox #proxmoxve #bdrsuite #proxmoxbackups #proxmoxvebackups #vmwarealternatives
We are starting to see most of the enterprise backup vendors giving attention to Proxmox VE Server since the shakeup with pricing and other details following the Broadcom buyout of VMware. BDRSuite is a backup solution I have been testing and using for years now and is a great solution that offers one of the most fully featured solutions out there and can back up just about anything you want it…

View On WordPress
0 notes
Text
Install Proxmox VE on a Bare-metal [Beelink EQ12]

View On WordPress
#Beelink#Beelink EQ12#Beelinks#Install Proxmox#Open-source Server Virtualization Platform#proxmox#Proxmox VE kernel#Proxmox Virtual Environment
0 notes
Link
看看網頁版全文 ⇨ 如何讓Proxmox VE排程關機 / How to Make Proxmox VE Schedule Shutdown https://blog.pulipuli.info/2023/06/blog-post_176.html 做了很多次了,赫然發現我還沒有好好記錄at的用法。 ---- # 環境 / Environment 我是用的是Proxmox VE 7.2-3,並不是最新版本。 但舊版的Proxmox VE操作起來也差不多。 假設我們即將要在8月6日(星期日)的早上8點到下午5點之間停電的話,那我們要記得在之前先讓Proxmox VE關機才行。 那要怎麼設定呢? # 關機排程指令 / Command to scheduled shutdown。 要在特定時候進行關機,我們會用到關機指令「shutdown -h now」跟排程指令「at」。 以8月6日早上8點停電來說,我們需要提早一段時間執行關機指令,讓Proxmox VE在關機的時候也逐台關閉虛擬機器。 如果我們打算要在8月6日早上6點執行關機指令,那麼at指令的寫法如下:。 [Code...] 當然,你可以更換上述紅字的時間,調整成你合適的時間即可。 # 為每個節點排程 / Set crontab on each node。 再來我們要為Proxmox VE每一個節點輸入上述指令。 必須要注意的是,是每一個節點都要進行下面的設定喔。 請在左邊Server View的地方選擇節點(node)。 這個節點的意思是實體的機器。 上圖的例子中,我只有一臺實體機器,不過裡面還運作很多虛擬機器就是了。 千萬不要把兩者搞錯了喔。 再來是點選右上角的「Shell」,開啟指令介面。 如果你已經是root身份了,請執行以下指令來安裝at。 [Code...] 將剛剛設定好的at排程指令貼上,並且執行。 看到「warning: commands will be executed」這樣的訊息,表示at排程完成。 # 管理at排程的工作 / Manage scheduled jobs。 接著我們可以用「atq」指令查看已經排程的工作。 上圖可以看到目前已經有一個排程的工作,編號是1。 如果要取消已排程的工作,可以使用atrm指令。 以下指令將取消編號1的已排程工作:。 [Code...] 再用atq查詢的時候,已經看不到剛剛排程的工作囉。 # 確認是否有關機 / Shutdown monitoring。 https://uptimerobot.com/。 如果你想確認伺服器有正常關機的話,可以搭配UptimeRobot一起使用。 ---- 繼續閱讀 ⇨ 如何讓Proxmox VE排程關機 / How to Make Proxmox VE Schedule Shutdown https://blog.pulipuli.info/2023/06/blog-post_176.html
0 notes
Text
Proxmox VE 8 Upgrade: Eine Aktualisierung von v7.4 auf v8.0 durchführen
Vor wenigen Tagen wurde Proxmox VE 8.0 veröffentlicht. Die neue Version basiert jetzt auf Debian 12 (Bookworm) und bringt eine ganze Menge neuer Features und Funktionen mit. In dieser Anleitung möchte ich euch dabei unterstützen, euren bestehenden Proxmox-VE-Server von Version 7.4 auf die aktuellste Versionsnummer 8.0 zu aktualisieren (Upgrade)...[Weiterlesen]
0 notes
Text
Proxmox VE 8.1 Introduce Compatibilidad con Secure Boot
Proxmox VE 8.1 Introduce Compatibilidad con Secure Boot
Proxmox VE 8.1 debuta con base Debian 12.2, kernel Linux 6.5, QEMU 8.1.2 y LXC 5.0.2, mejorando entornos virtuales. Proxmox VE (Entorno Virtual) es una plataforma de virtualización de código abierto para gestionar máquinas virtuales y contenedores. Ofrece una solución integral tanto para centros de datos virtualizados como para infraestructuras en la nube. Construido sobre Debian, integra…

View On WordPress
0 notes
Link
0 notes
Text
Backup Proxmox VE VMs Quickly and Easily https://www.servethehome.com/backup-proxmox-ve-vms-quickly-and-easily/
0 notes
Text
How to Back Up Proxmox Virtual Machines
Proxmox VE is an open-source virtualization solution that combines two technologies: KVM and LXC. This provides virtualization and containerization capabilities for Windows and Linux-based servers.
You can perform Proxmox VM and data backups using different methods. Read here to check these methods.
0 notes