#Princess maker
Explore tagged Tumblr posts
Text


Oh hey! the new PM2 edition's gallery mode has some decent quality versions of older box art that I don't know I've seen in this quality before. that's neat.
300 notes
·
View notes
Text


A funny Technopolis feature in which they pretend new dad Adol Christin from Ys is playing Princess Maker I to raise a female adventurer named Feena. They made it! Source.
46 notes
·
View notes
Text


Princess Maker 2 Regeneration🍒
Coming to Switch/Steam Today!(^^)🍾✨✨
54 notes
·
View notes
Text
Korean studio D-ZARD developing new Princess Maker game starring Karen
Gematsu Source

Korean studio D-ZARD is currently developing a new entry in the Princess Maker series under a licensing agreement with intellectual property owner YONAGO GAINAX, the company announced. Platforms and a release date were not announced.
The new title will incorporate Live2D animation and aims to be a project that appeals to both long-time Princess Maker fans and newcomers alike.
Get the first details below.
About the Series
The Princess Maker series, which was wildly popular in the 90s, helped define and popularize the raising simulation genre. The first game in the series was released by GAINAX on PC in 1991 and was a global hit, eventually spawning four sequels.
Meet Karen, the Daughter
The main character of the new game is Karen, whom many fans have rooted for to get her own game. Players will be able to see her appearance change as she grows up.
—Daughter’s Room
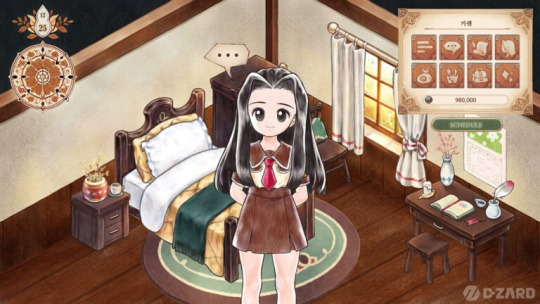
—Karen, Age 10

—Karen, Age 11

—Karen, Age 12

—Karen, Age 17

New and Returning Characters
The popular Butler character Cube will also make a return, assisting the player in managing the daughter’s schedule and raising her.
—Returning Character Cube: “You seem to be in a good mood today, milady.”
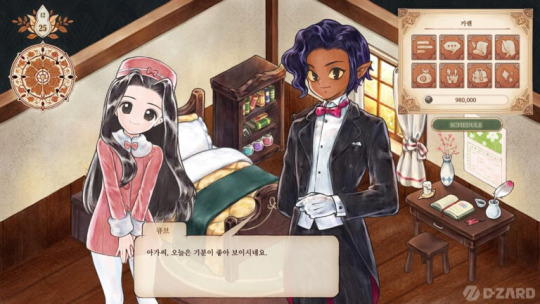
In addition to these returning characters, the game will also feature charming new NPCs designed by D-ZARD, who will play various roles in the daughter’s growth.
—New NPC Chef: “There’s a dish I want to make for you, before the season changes.”
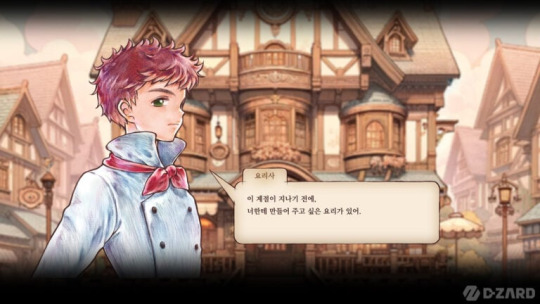
For Long-Time Fans and Newcomers Alike
The new game is being developed to be faithful to the series’ roots, with a fairytale-like atmosphere and various raising simulation elements. In particular, the game will maintain the tradition of the daughter’s appearance changing as she ages, while adding Live2D animation to the character’s poses to raise the bar even further.
—Vacation Scene

“We want to make a game that can meet the expectations of the fans who have been waiting a long time for a new Princess Maker game. We are doing our best to make a quality game that will appeal to both long-time fans and newcomers alike,” said D-ZARD CEO Dong-hyun Kim.
—Possibly an Ending Illustration?

View the first images at the gallery.
#Princess Maker 6#Princess Maker#D-ZARD#Gainax#YONAGO GAINAX#simulation game#Gematsu#Was not expecting to see a new Princess Maker game in the works#gif
121 notes
·
View notes
Text

29 notes
·
View notes
Text

Requested by anon
33 notes
·
View notes
Text
okay so for context I was looking up Princess maker games because that’s the origin of stat-building games and I wanted to talk about that for an explanation of some of the niche game genres I think are neat (it’s for an academic thing unfortunately) and I can’t stop thinking about this. Ah yes. My favourite original stat builder, Metal Gear.

#princess maker#metal gear solid#mgs#this pic is going in the pp whether my teachers appreciate it or not
16 notes
·
View notes
Text


Princess Maker ~Jecki ver.~ OshaJecki
daughter - Jecki 🐥
father (player role) - Master Sol 🌞
dating character - Osha 🤖
butler (Cube role) - Yord 🍍
Plz understand that I'm not fluent in English and I'm using a translator, so I apologize for any awkwardness in the sentences. 🥺✨🙇♀️
#the acolyte#osha x jecki#oshecki#osha aniseya#jecki lon#sol#yord fandar#drawing#fanart#my fanart#princess maker#parody#game#oshajecki
22 notes
·
View notes
Text

Hello, again! Welcome back to Petite Princesses! With Princess Maker 2 Regeneration out (except for the PlayStation), I decided it’d be polite of me to create a basic guide to some of the simple parts! This one will be about everything from the starting menu!
Bear in mind that due to the change in localization (bless the Translators), I’ll refer to each stat by all 3 English names on first mention, but I’ll default to the latest translation from then on. As well, I’ll be using Centimeters and Kilometers for ease of reference. Furthermore, I’ll be using Refine for screenshots.

Here’s our basic screen, of which you can see many different things. I’ve labeled them accordingly, and I’ll speak of each tab in detail!
I☆I
CURRENT DATE: A Box where you can tell the day— the year is on top (1210), with the month (April 4) and the day of the week (Sunday) on the left, with the day of the month (the Fourth) on the right. The game starts on your daughters 10th birthday, and ends on her 18th (in our case, April 4th 1218)
I☆I
STAR: I didn’t label this myself, but the “Star” section on the right side info box is pretty important. Here, our daughter’s sign is Aries (Mars), and her blood type is B. Your star sign determines starting statistics and a +100 bonus from slaying a certain foe that I’ll mention later, while type influences passive stat increases. I’ll explain the exacts in another post someday, but for the impatient, googling Patrons on the Princess Maker Fandom Wiki should do the trick!
I☆I
ARM/WPN: This is her equipment! You can set it in the menu marked ITEM (the box with the sword, shield, and scroll). All equipment can be equipped at any point, and your armor is even visible during (non errantry) battles!
I☆I
STATUS: Here she will have her statuses— there are 3 in the game. Sick (Stress > Constitution/Stamina, represented by a Skull) lowers her HP in combat and can lead to her demise, Degrade (Stress > Morality or Faith, whatever is higher, represented by blue lightning) makes her less likely to work properly and risks being arrested (lowering your reputations) / wasting your money (happens mostly during free time but can occur during working hours), and Love (Triggered by an event when she’s 14 that requires her Charisma/Glamour stat to be the highest, represented by a Pink Heart) that lasts 3 months, makes her less likely to work, and lowers 3 of her hidden stats (Relationship with Father, Cube, and Prince— the last of which could be troublesome for getting the ending).
I☆I
HER MEASUREMENTS: This ones pretty simple— it’s her Height, Weight, and Three Sizes (Bust/Waist/Hips). In modern releases, it uses Centimeter/Kilograms, but in the original DOS en leak, its Inches and Pound. If she’s overweight, then she cannot wear certain clothes (all that aren’t the Siren Robes, Cotton Dress, or seasonal outfits). You can tell her weight by her sprite. As well, you can calculate her threshold by .95[height]-[Age + 87]. To get a rough idea, let’s punch in our daughter from earlier, Alice. At 146 centimeters, .95 x 146 is 138.7. Now, she’s 10, so 10 + 87 is 97. 138.7 - 97 is 41.7. Behold, she’ll turn overweight the second the “weight” bar is “41.70”, but if she’s at “41.69”, it’s fine. Though I am to assume rounding is in play!

(Do mind the different stats of her three sizes— I don’t have the original file, so I had to make a replacement with the necessary stats!)
I☆I
STATS: Brings up a Menu. For Clarity, below is the side bar from Regeneration. I will list the stats in order, with every name applicable in the order of DOS/Refine/Regen.

Constitution/Stamina: Determines your daughter’s HP. Needs at least 50 to be good at most jobs. Also determines your daughter’s health. Most easily raised by Farming. Likely to be Lowered by Dieting
Strength: A bonus to Attack: 8 points of Strength is equivalent to 1 attack point. Most easily raised by Farming. Likely to be Lowered by Salon.
Intelligence: Essentially, her MP. Needs at least 10 to cast a magic attack. Most easily raised by Science. Likely to be Lowered by Bar work
Refinement/Elegance: Not particularly important unless you’re doing a Ruling Queen run— in which case it needs to be 800. You may need this to get random proposals (which means money!) Most easily raised by Decorum, or if you’re cheap, Lucifon in the Desert. Likely to be Lowered by Farming, so it’ll be zero for a while
Charisma/Glamour: Usually important for special marriage endings. Can cause a few problems such as Attempted Sexual Assault, becoming someone’s Mistress (if it’s her highest stat, indicated by her different facial expression), and generally being asked out. Easily raised by Dance, if you’re cheap (again) Lucifon in the Desert, or the Sleazy/Illegal Bar if you’re willing to tank the stress.
Morality: Need at least 30 for a basic marriage ending. Can also play a part in rejecting the more gross offers she may encounter, as well as being able to stave off delinquency if it’s higher than Faith. If it’s your highest stat, you may encounter a deal that will sell all of it for Equivocal Gold. Easily raised by Church Work, or simply being born with Type A blood. Likely to be Lowered by the aforementioned demonic deals.
Faith: Staves off Delinquency if higher than Morality. It’s definitely a stat that exists. Easily raised by Church, which can also prevent the demon from showing up to eat her morals. Likely to be Lowered by Science.
Sin/Karma: If it’s over 100/250, she will get a Sin ending. If it’s 500 (along with some decent fighter/magic reputation), she will instantly become the Queen of Darkness by the end. You’ll likely get this by killing anything in Errantry, but other “Sinful” acts like the illegal bar and hunting animals will raise it too. Can be sold off for 100g per 10 points, or simply going to Church for work normally.
Sensitivity: It’ll let her see what’s usually “mythical”, such as Fairies and the such if she goes where they hang out. If it’s the highest, she’ll run away, lowering her reputations. Easily raised by Salon work, but can be raised in a multitude of fun ways.
Stress: This is mostly a problem early game. So long as it doesn’t exceed her Morality/Faith or stamina stats, she’s in the clear. It can go to Zero in certain events, such as witnessing Fairies, so if you plan right, Free Time doesn’t have to happen.
Combat Skill: Essentially, your Hit/Dodge rate. Essential for any adventurer, otherwise you’re unable to do ANYTHING! Easily raised by Fighting/Kung-fu classes, but the tempting Restaurant and Inn can lower it.
Attack: Exactly what it says. It determines your daughter’s attack stat. Separate from your strength, but both will result in your “total” attack. Easily raised by Fencing and most Swords. Difficult to lose.
Defense: A difficult stat to raise terribly high. Also exactly what it says on the tin. Can be gained consistently by second level Kung-Fu classes, but not terribly fast. Also, most armor increases it.
All of these skills will be boosted by the spirit Valkyria, first Skill, then Attack, then Defense. When you get to 400 Fighters Reputation, as well as 40 instances of Fencing, Kung-Fu, or Errantry, you’ll receive the Valkyria Sword— which is the second best sword in the game, with 25 attack, 10 defense, and 18 skill.
Magic Skill: Like Combat Skill, but for Magic. Easily raised by Magic Classes. Impossible to lose.
Magic Attack: Much like Attack, but for Magic. Unlike Attack, there isn’t another stat that also functions as an attack bonus, but Magic tends to be what most of the tougher bosses are weak to. Easily raised by Magic Classes.
Magic Defense: It’s like Defense, but easier to raise! In fact, there’s a few ways to raise it! Unfortunately, most things that can do Magic can’t hit you once you’re skilled enough, so this is mainly for Wendy. Can be raised by Theology or working at the Graveyard. Likely to be lowered at Science (but slowly)
All of these skills will be boosted by the sorceress Fay, first Magic Skill, then Magic Attack, then Magic Defense. When you get to 400 Magic Reputation, you’ll receive the Power Ring/Unrivaled Ring, letting you cast Magic without needing 11+ Intelligence. Unfortunately, you’ll have to waste a ton of money as this also requires 32 magic classes- which become Useless very fast. More importantly than that, if you do only Magic classes for a mont, she’ll come raise one of the Magic stats by 5. The stat she raises is of your choosing, so my recommendation Magic Attack.
Decorum: You need decorum to be able to speak to people at the palace. Easily(and for the most part, Only) raised by doing Decorum classes. Impossible to lose.
Art/Art Skill/Artistry: Impacts her Dance Contest score and determines what painting she’ll create in Art Class. For the record, if it’s the highest of the Housework/Social stats, the daughter will be locked into an Art based ending. Easily raised by… Painting Classes. Cannot be Lowered below 100 once you reach 100.
Conversation/Speech/Eloquence: Really only used for two characters at the castle. Only raised by Bar work. Impossible to lose.
All of these skills will be boosted by the demon Paimon, first Decorum, then Artistry, then Eloquence. When you get to 400 Social Reputation, as well as 64 instances of Painting, Dance, or Protocol, you’ll receive Perfume— which… attracts suitors. Which at the point you get it, you’ll already attract anyways.
Cooking: Very important for the Cooking contest. You will need at least 90+ to win, alongside high sensitivity.
Cleaning: An entirely useless stat. It only impacts your Housekeeping reputation.
Temperament/Personal/Temper: Solely important for the Queen. Likely to be lowered by Sinful Work.
All of these skills will be boosted by the spirit Domovoi, first Cooking, then Cleaning, then Temper. When you get to 400 House Reputation, as well as 120 instances of Housework, Bar work, or Restaurant work, you’ll receive the Perfect Flour— it guarantees a Cooking victory, but by the time you get it, you’ll be guaranteed to win anyways.
Fight Repuation: Derives from your “Combat” oriented stats. Can be raised further by winning fights with the sword, or a Dragon Fang. Serves as Morale if higher than Magic. Can be uniquely lowered by selling the “Royal Sword” I allude to.
Magic Repuation: Derives from your “Magic” oriented stats. Can be raised further by winning fights with Magic. Serves as Morale if higher than Fight.
Social Reputation: Derives from your “Social” oriented stats. Can be raised further by winning the Dance/Art contests. Can be uniquely lowered by talking to the Clown.
House Reputation: Derives from your “Housework” oriented stats. Can be raised further by winning the Cooking contest.
All reputations will be lowered by being arrested or running away from home.
But wait! There’s more!! Let’s bring up the Four Hidden stats!
Relationship with Father (called Father_love by Mad Eddy) is rather relevant- you can use it to scold her and dissuade her from things like delinquency and being a mistress. Easily raised by Vacations and just. Talking to her. Most likely to be lowered by Free Time (regardless of pocket money) and resting for the Harvest Festival. Needs to be 100 (along with some stats) to Marry Her.
Relationship with Cube (called Cube_love by Mad Eddy) is rather less relevant. Pretty much is only for the ending, where it needs to be 100. Can be conveniently raised by changing equipment on errantry- you can essentially spam it if you’re really into that.
Relationship with Prince (called Prince_love by Mad Eddy) is mostly just for the Ending, but this time it needs to be 96. Raised by 12 each time you meet him, so every January 31st must be spent with him.
All of them are subject to lower by 6 if she falls In Love.
Maternal Instinct is exactly what it says, Important for some endings (like Princess of Darkness for some reason). Raised by Babysitting and Tutoring. Lowered by Hunting (for. Some reason?)
I☆I
TALK: Lets you talk to your daughter. The Three option are Father-Daughter Chat/Father-Daughter talk, Pocket Money, and Scold/Lecture.
When you click Father-Daughter talk, you get 3 more options. How she is doing/Recent matters will prompt her to speak about, well, whatever she wants. Usually, it is about herself, such as her (in)ability to do art, or how she worries about her childrearing skills. After that is Her studies/About study, which is related to what you’ve been making her study— be it how she appreciates how Art brings people together, or how she’s the best magician ever. As for Other topics/Another topic, it’s known to have some weird conversations, usually relating to her body, sometimes relating to other things. As well, picking any option here will raise your internal “Relationship with Father” stat by 1– this is important for two things down the line.
Pocket Money is a lot less complicated, as it’s pretty straightforward. Essentially, you give your daughter 20 + 10x gold, with “X” being the second digit of her age. So, if your daughter is 10, that’s 20 + (10 x 0), which would just be 20. If she’s 18, that’s 20 + (10 x 8), which would be 100. However, while the price increases, the benefits do not— she will lose 20 stress when used, regardless of age. This option does not raise the internal stat mentioned above. As well, if sick, she will not accept your money, and if “Degrade”, she will take it, and it will not impact her stress.
Scold/Lecture is pretty useless… it doesn’t do anything but make your daughter look a little confused. If she’s sick, she’ll wonder if she’s doing something wrong— which will lower her stress by 5, for whatever reason, at least in the refine version. But what you’d actually want to use this feature for is when she’s being rowdy, indicated by the “DEGRADE” marker— it’ll lower her stress by her relationship with her father, (up to a 100 point stress loss!!), and then raise it by 5. If you’ve been playing up a daddy’s girl, this could be of great use.
I☆I
DIET: Now, this one’s a little interesting. You have the choice of 4 options, which tie to her weight and stamina! By selecting the Normal/Standard diet, you’ll have a daughter that gains roughly .20 kilograms per month. This is the default, and is also standard, costing 30g. By picking the Robust/Hearty diet, you’ll gain a little over .30 kilograms, but you’ll also gain 10 stamina at the end of every month. It costs 80g, but can be good if you’ve been neglecting your stamina intakes— or if you really want to bulk up early game with the right set up. Then there is the Slim down/Refined diet— In addition to lowering your weight gain to around .15 kilograms, it also lowers your Stamina by 5. It costs 10g, so it’s not really recommended, unless you’re about to cross the threshold. Finally is the Slim Down/Intensive diet. Here, you’ll lose a hefty 20 stamina, but in return you’ll lose around .50 kilograms, and it costs 5g. This is only worth it if you have stamina (and kilos!) to burn. It’s worth noting that if your daughter is getting a little too weak (low stamina), then Cube will swap to the Hearty diet, but you can simply change back to whatever diet you’d like.
I☆I
INFO: You’ll find personal information here, such as your daughters birth and her star sign. You’ll also find connections (Raised by talking to Palace Staff) and Sick/Delinquency percentages. One percent is equal to one point of stress over the stat mentioned in “Status”— you’ll need 90% Sickness (Critical) to become Bedridden (Which will kill you if it lasts at least 2 months, ending the game), and 90% Delinquency (A hooligan) to become a Gang Member (Which will get you arrested— a harsh penalty to your reputation stats).
I☆I
SHOP: Another doozy, but we’ll simplify, simplify, simplify!
The Armorer/Armoury is ran by Armorer Zeno/Zen, with Anita as a Part Time worker. Here you can buy equipment, which goes in the Armor/Weapon slots. You’re free to buy anything here, but I highly recommend buying a Dagger and Leather armor, especially if you’re not confident in “Rushing” strategies. Don’t worry! I’ll cover adventuring as a whole in a future post, maybe multiple
The Tailor is run by Maura, who sells clothes. The variety isn’t particularly extravagant, but this is where you’ll find the seasonal clothes. As well, the Cotton Dress is only 500g: you’ll always be able to afford it for the harvest festival if you’re not in debt. Otherwise, there’s not many tips I can give here, other than pick the clothes you find cute— though you can wear most of these only when you’re at least 13, sometimes older.
The Restaurant is ran by one Chef Balbon, and sometimes his part timer Marcia/Marthia. Here, you’ll find food that’ll lower your stress (or raise Stamina!) and raise your weight. Here’s a fun fact! The food is free if you don’t have the money— you’ll just have to spend your first month block working at the kitchen for free. Regardless of if you pay or not, you can only eat here once per month.
The Item/Pawn Shop is run by Shalom alongside his part time assistant Wendy. Here you can buy a few so-so items (which also serve as birthday gifts for when the day comes: you’ll have to buy from the first four items on the list), as well as a Healing Pill and Grenade for errantry. Unique to this shop, you’re able to sell items, though I’d be wary on selling anything that’s “Royal”.
The Church may ring some bells to history buffs— Sister Lee will ask you to donate 100g. Accept, and you’ll lose 10 sin! That’s its entire purpose. This can be used should you rack up far too many on a murder spree and not want to dedicate the time to church work, though it does feel rather humorous in its execution.
Lastly, is the Hospital/Clinic, with Doctor Lombardini asking if you’re sick, and if you are, charging a fee for an examination. When you pay the fee, you’ll lose stress up to one less than your stamina— which means if you don’t gain any more stress (ie- resting), you’ll recover by next month. Really unnecessary unless you’re high up on stress.
I☆I
CASTLE: Basically, a way to gain reputation, a lot of it if you know how to work it. First of all, the key stat here is Decorum, raised by Protocol Classes. Let’s get started, rapid fire motion!!
The Palace Guard/Gatekeeper will be your first stop, needing 10 decorum to speak properly (almost every birthday will start you with 10 decorum). His preferred stat is Refinement. Every 5 points in refinement is worth one point for Personal Connections (hereinafter referred to as just “Connections”). You can gain up to 15 points per visit this way, and 40 total.
Next is the Royal Knight/Imperial Guard Knight, who needs 30 decorum. His preferred stat is Refinement. Every 8 points of Refinement is worth one point for your connections. You can get up to 25 points per visit this way, and 50 total. Did you notice the text was identical? This guy isn’t very special. But since you’re raising elegance anyways, it’s worth a visit.
After that comes the General, who needs 50 decorum. His preferred stat is Glamour. And every 5 points of Glamour will be worth a point for your connection stat. You can max out your visit at 50 points for connection, and 120 total for the guy overall. If you’re raising Glamour, which you likely are if you’re raising your decorum, it’s worth checking him out, at least until you max at 50.
Making it to 70 Decorum lets you speak with the Minister of State. His preferred stat is Intelligence. Aside from the usual, that being that every 10 points is worth a connection point, up to 60 a visit for a maximum of 100, your connection to him specifically can net you bonuses at the Dance Party— specifically, a score boost. This is fun if you are a dirty cheater!
If you’re still raising your decorum, at 80 you’ll have the manners to speak to the Archbishop. His preferred stat is Faith. Like the Minister of State, 10 points is one connection point, and a visit will max at 60, but his overall max is 120. You’ll want to raise Faith anyways, so it won’t hurt to visit the old man.
Getting tired? Great! So is our next stop— at 85 decorum, you’ll speak to the King’s favorite #2, the Royal Concubine/Favorite Mistress. Her preferred stat is Conversation/Speech/Eloquence. Yes, that’s right! A stat with three names!! Eloquence is the Regeneration name. Anyways, every 10 points of Eloquence will equate to 1 point for connections, up to a maximum of… 10 per visit. Her total maximum is 120, but considering you only get this stat at the Bar, I wouldn’t bother.
Now to the King’s favorite #1, the Queen! She’d love to invite you for tea if you have 90 decorum. Her preferred stat is Temperament/Personal./Temper. Much like #2, the same rules apply, 10 points = 1 point, 10 maximum per visit. She’ll raise your connections by 160 points total. This one is even more worthless, as it’s gained by doing housework (arguably easier), but there’s no other reason to raise Temper. What a fraud.
At 95 decorum, we’ll have the Bowing Skills to bow our way to the King. You may think otherwise, but his preferred stat is, strangely enough, Fight Rep. Every 10 points will go to your connection stat, but here’s where it gets interesting— the King has no limit per visit! For the crazies who raise it up to a maximum, the King will gladly give 99 points to your connections. His true maximum is 300, but Fighters Reputation is fairly easy to raise, and you’ll definitely be able to make use of his benefits.
So, what do connections do? Why, palace discounts of course! If you raise them high enough, you’ll get marked down prices! These apply even if she’s buying rogue, so it’s nice to have. Personal connections don’t go away, either! Well, unless you happen to sell that “Royal” thing.
Now, the Jester/Clown is unique— he doesn’t really care for decorum, and speaking to him will lower your social reputation by 15. What he does want is someone to talk to, and that Eloquence stat will come in handy. He’ll also raise your sensitivity by 15. If you keep talking to him, you may even be on the path for that 4th Art-based Ending. If you, of course, are feeling whimsical.
And to defy all odds, the Young Military Officer does… well, nothing. He doesn’t have any preference, he doesn’t require decorum, and he doesn’t impact your stats in any way. Well, not any way that you can see. He’s only available on January 31st, and if you keep your promises, he’s the ticket to becoming a Princess.
I☆I
ITEM: A screen where you can see your inventory. Many items in this game are passive, they’ll have their effect when just held in your inventory. Exceptions include clothes (which are to be clicked on to be worn- then granting their bonuses), Equipment (can be clicked to add to weapon/armor slot, then their effects are in, uh, effect), and consumables (like the Ancient Milk and the Breast Pill). Some items are to be traded away, however. Usually, they are to be traded in errantry.
I☆I
SYS: The save menu. You save your game. You load your game. You leave your game. That is. Uhm. All.
I☆I
SCHEDULE: Leads to the scheduling screen, of which, we’ll talk about… next time!! I’d like you tune in for that, ok?
28 notes
·
View notes
Text
Fandom so small i gotta draw all the blorbo fanart 💔

Close up ⬇️


Got some inspiration from these PM5 screenshot 👉👈


#Cube#princess maker#princess maker 2#princess maker 5#petite princess yucie#canon x self insert#thats literally me making him feel awkward 🩵#naren
9 notes
·
View notes
Photo

Princess Maker 2
290 notes
·
View notes
Text

I drew the character from the game series with only like 4 fans
13 notes
·
View notes
Text


Today is My Birthday🧁🧁 I draw my favorite couple as usual.
Almost with Shinn x Lunamaria😊 This couple is so cute!!!
(I always draw Princess Maker before period of time.)
#gundam seed freedom#gundam seed#gundam seed destiny#shinn asuka#lunamaria hawke#princess maker#princess maker 3#my art
25 notes
·
View notes


