#Painting plaster walls
Explore tagged Tumblr posts
Visit Tumblr Blog
Explore Tumblr blogs with no restrictions, modern design and the best experience.
Last Seen Tumblr Blogs


Fun Fact
Tumblr’s reach among the 26-to-35-year-olds in the US is 11%.
Text
A Step-by-Step Guide to Painting Plaster Walls with Toskie.

Painting plaster walls can be a rewarding home improvement project, but it requires careful preparation and the right technique to achieve a smooth, professional finish. Whether you're renovating an old room, refreshing your home, or preparing a new space, the process can feel overwhelming if you’re unsure where to start. Fortunately, Toskie is here to provide expert tips and a comprehensive guide to painting plaster walls with ease. Follow these detailed steps to ensure your plaster walls look flawless and last for years to come.
Step 1: Preparing the Surface
Proper surface preparation is the key to a long-lasting paint job on plaster walls. Plaster can absorb moisture and dirt over time, so cleaning the surface thoroughly is essential before you begin. Additionally, any cracks or holes should be patched to ensure a smooth, even finish.
1.1 Cleaning the Walls
The first step in preparing your plaster walls for painting is cleaning. Over time, dust, grime, and grease can build up on the surface, making it harder for paint to adhere. Cleaning is especially important for older plaster surfaces that may have collected dirt over the years.
· Use mild detergent: Start by using a mild detergent mixed with warm water. A soft sponge or cloth can help remove dirt and grime from the walls. Avoid using harsh chemicals, as they may damage the plaster or leave residues that affect the paint's adhesion.
· Rinse with clean water: After cleaning with soapy water, rinse the walls with clean water to remove any remaining detergent. Allow the surface to dry completely before moving to the next step.
Pro Tip: If your walls have accumulated a significant amount of dust, use a vacuum with a brush attachment to gently remove dust and cobwebs before cleaning.
1.2 Inspecting and Repairing Cracks or Holes
Plaster walls are prone to cracking, especially in older homes. These cracks can cause the paint to peel or leave an uneven surface. Therefore, repairing these imperfections is a vital part of the preparation process.
· Fill cracks and holes: Use a plaster patching compound to fill in any cracks or holes in the plaster. Apply the compound with a putty knife, smoothing it out to create a level surface. For larger cracks, you may need to apply the compound in layers, allowing each layer to dry before adding the next.
· Allow it to dry and sand smooth: After the patching compound has dried, lightly sand the area using fine-grit sandpaper. Sanding ensures a smooth, even surface and removes any ridges left by the compound. Pay extra attention to areas around patched cracks to ensure they blend seamlessly with the rest of the wall.
1.3 Checking for Moisture
Plaster walls can sometimes suffer from dampness or moisture damage. If there’s any sign of moisture—whether it’s mold, mildew, or damp patches—address the issue before proceeding. Moisture can prevent paint from adhering correctly and lead to long-term issues such as peeling or mold growth.
Check for mold or mildew: If you see mold or mildew on your plaster walls, treat the affected areas with a cleaning solution made of water and bleach (1 part bleach to 3 parts water) to kill any spores. After treatment, let the wall dry completely before moving forward with painting.
Pro Tip: If the moisture problem is severe, it’s advisable to consult a professional to fix the issue before continuing with the painting process.
Step 2: Sanding the Walls
Once the surface is clean and repairs are complete, it’s time to sand the walls. Sanding helps create a smooth texture that will allow the paint to adhere better and ensures a uniform finish.
2.1 Why Sanding is Important
Plaster walls, especially older ones, tend to be rough and uneven. Sanding helps to smooth out these imperfections and creates a better surface for the paint to cling to. If the plaster has any bumps or rough patches, sanding will ensure that the paint goes on evenly, without any texture or inconsistencies.
2.2 How to Sand Plaster Walls
· Use fine-grit sandpaper: Use a fine-grit sandpaper, preferably 220-grit, for sanding plaster walls. This will ensure that the surface is smooth but not overly scratched, which could affect the final paint finish.
· Sand gently: Sand the entire wall with light, even pressure, moving in circular motions. Focus on areas where repairs have been made, ensuring that patched areas blend seamlessly with the surrounding plaster.
· Clean up the dust: After sanding, use a vacuum or a damp cloth to remove all the dust and debris from the wall. Dust can interfere with paint adhesion, so it's important to ensure the wall is free of sanding residue before continuing.
Pro Tip: Toskie recommends using a sanding pole for high walls to avoid unnecessary strain, as it helps reach the top portions of the wall more easily.
Step 3: Priming the Walls
Priming is an essential step when painting plaster walls, especially if the walls haven’t been painted recently or if you’re covering a darker color with a lighter one. A good primer ensures better paint adhesion, promotes even coverage, and helps prevent peeling or cracking in the future.
3.1 Choosing the Right Primer
Selecting the right primer is crucial to achieving the desired results. For plaster walls, choose a high-quality bonding primer designed specifically for porous surfaces. Bonding primers are ideal because they create a strong bond between the plaster and the paint, ensuring a smooth and durable finish.
· Use a water-based primer: Water-based primers are best suited for plaster, as they allow the surface to breathe and prevent moisture buildup that can lead to peeling. They also dry faster, making them more convenient for a multi-step painting process.
· Consider a mildew-resistant primer: If you’re painting in a damp area, like a bathroom or basement, consider using a mildew-resistant primer to prevent mold and mildew growth.
3.2 Applying the Primer
· Use a roller and brush: Start by applying the primer with a roller for larger areas and use a brush for corners, edges, and trim. Make sure to apply a thin, even coat of primer over the entire surface.
· Allow to dry: Let the primer dry completely before proceeding with painting. Drying time will vary depending on the product used, so refer to the manufacturer’s instructions for specific guidance.
Pro Tip: If your plaster walls are particularly porous or if you’re covering a strong color, you may need to apply a second coat of primer to ensure full coverage.
Step 4: Choosing the Right Paint
Now that your plaster walls are prepped and primed, it's time to choose the paint. Selecting the right paint is essential to achieving the finish you want and ensuring the longevity of your paint job.
4.1 What Type of Paint to Use
· Latex paint: Latex-based paints are the best choice for plaster walls, as they allow moisture to evaporate, preventing the paint from peeling. These paints also dry quickly, which is ideal for a multi-coat job.
· Matte or eggshell finish: A matte or eggshell finish is ideal for plaster walls, as they help conceal imperfections. Glossy finishes may highlight any unevenness in the surface, which is why it’s best to avoid them on plaster.
· Choose high-quality paint: Opt for high-quality paint to achieve a smooth, lasting finish. A well-pigmented paint will provide better coverage and require fewer coats.
4.2 Testing the Paint
Before applying the paint to the entire wall, it’s a good idea to test a small area to ensure you like the color and finish. This will give you a better idea of how the paint looks on the plaster and whether it provides the coverage you desire.
Step 5: Painting the Walls
Now that the wall is prepped and the paint is selected, it’s time to begin painting your plaster walls.
5.1 How to Apply the Paint
Use a roller for large areas: Begin by using a roller to apply the paint to large sections of the wall. Work in small sections, blending the edges as you go to avoid noticeable lines or streaks.
· Use a brush for edges and corners: A paintbrush will help you reach the edges, corners, and areas near trim. Use a small brush for precision and apply paint in thin layers to avoid drips and streaks.
· Apply multiple coats: Depending on the paint color and finish, you may need to apply two or more coats of paint. Be sure to let each coat dry completely before applying the next one.
Pro Tip: Toskie suggests using a “cutting-in” technique to create clean lines around edges and corners. This technique involves using a brush to paint the edges first, followed by a roller for the larger areas.
5.2 Drying Time
Allow each coat of paint to dry thoroughly before applying the next one. Depending on the type of paint and the room’s humidity, each coat may take several hours to dry. Ensure proper ventilation to speed up the drying process.
Step 6: Final Touches and Clean-Up
After applying the final coat of paint and allowing it to dry, it’s time to inspect the walls for any imperfections and finish the job.
6.1 Inspect for Imperfections
Carefully inspect the painted surface for any areas that may require touch-ups. If you notice any streaks, missed spots, or drips, touch them up with a small brush. Once the paint is dry, your plaster walls should have a smooth, even finish.
6.2 Clean Up
Once the paint is dry and you’re satisfied with the results, clean your brushes, rollers, and other painting tools. Properly dispose of any used painter’s tape and clean any drop cloths or protective coverings.
Pro Tip: Toskie recommends keeping a small amount of leftover paint for future touch-ups. Store it in a cool, dry place for easy access if needed.
Conclusion
Painting plaster walls requires time, effort, and attention to detail, but the results are worth it. By following this comprehensive, step-by-step guide, you can achieve a beautiful, smooth finish that will last for years. Whether you’re refreshing a single room or renovating your entire home, proper preparation, the right tools, and the right paint can make all the difference.
If you find the process overwhelming or time-consuming, consider hiring professional painters through Toskie. Our platform connects you with top-rated, experienced professionals who can ensure that your plaster walls are painted to perfection. With Toskie, you can relax and enjoy a hassle-free painting experience.
For expert painters in Hyderabad, visit Connect With the Right Service Experts at Near You - Toskie.Com or call 08069179999. Let Toskie help bring your vision to life, one coat at a time!
#Painting plaster walls#Toskie#Plaster walls preparation#Surface preparation#Painting in Hyderabad#Home renovation#Sanding plaster walls
2 notes
·
View notes
Text
Hey, this is your sign to go out and find somewhere local/in your state a place that is a beautiful piece of preserved history and enjoy it. It can be a small museum, a big museum, an ancient landmark or just really really old parts of town. Go out and find and appreciate something someone obviously put a lot of time, and effort, and care into creating.
Look to see how far civilization has not only progressed since the beginning of history, but also how much of modern stuff is so sterile and manufactured and plain. In the process of progress, and much needed advancement to better civilization as a whole, we've discarded too often the beauty of unique pieces in favor of having everything be exactly the same, easy to make, and only functional.
#I went to a house museum today and it was absolutely stunning all the pieces within.#The wallpaper on the walls was a type where they made it a part of the wall itself#it made it textured and was inset into the plaster#then painted over in a gold colored paint. the detail on the doorframes and archways were simple but at the same time a necessary part#it elevated the whole room because it worked in conjunction with everything else it was surrounded by.#i want my future home to be unique like it was. something that spells out me and me alone#but at the same time can be appreciated for what it is#even if it's not everyone's own personal tastes.
17 notes
·
View notes
Text

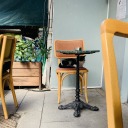
A Mano Studio
5 notes
·
View notes
Text
the way you're watching a video of two women talking about interior design, and the way they judge some spaces seems kind of judgemental to you, but it's all in good fun, right?
Only for them to show a picture of the home of one of the women- and she cannot even hang up her pictures on the wall and made midcentury look like High End IKEA via the vice of minimalism and cowardice in regard to colour and décor- which would explain why she couldn't hang up her picture, if she's so afraid to make a fucking statement.
#not to be a hater but COME ON#i hate unhung pictures /so much/#it's my absolute worst pet peeve it looks so unfinished and lacks commitment#like if you like in a flat where you cant put holes in the wall for some reason just stick it on#there's powerful adhesives and white paint and lil tubes of plaster in case the picture takes some paint with it after being unhung#but honestly#and the nerve to then complain about /boho chic/ of all things#like is it my fave?#NO#but i can appreciate that it wants to give a cozy vibe and it's a fun aesthetic!#god i should've known this was the wrong video for me when that cursed woman pointed out the /basic white tv stand/#as the one thing she enjoyed in one such boho chic house#like give me a break#when will well-off white women that clearly come from some sort of wealth and assume everyone should just Buy Real Persian Rugs stop#esp like- where i live i can easily get an og persian rug for even under 100 bucks if you're lucky#but im living in europe and these women are in the us#where (judging by the comments) you are way less likely to be so lucky!#so yeah the privilege is on show#alongside the bad taste#god im so peeved by this#okay i will rest now#and stop ranting abt random youtubers#thank you and good bye
4 notes
·
View notes
Text
they should make a therapy waiting room that doesn’t make your heart turn to liquid
#Or any kind of waiting room#If I had a limbo it would be a waiting room#One of those with the dry ass crusty plaster walls that smell like fresh paint and dry out the air#And fluorescent lights#And a screen that plays boring shows that you have to uncomfortably crane your neck to even see#And chairs that are uncomfortable#And people that are so quiet that they’ll immediately stare if you so much as SNIFF#The paint fumes makes your nose run btw#There are some tissues but they are rough and scratchy and there’s no trash can#So you have to put the tissues in your pockets and feel gross about it. Or not blow your nose at all#Anyway there’s my idea of hell
3 notes
·
View notes
Text
I know everyone thinks that they're the only competent person at their job . . . but genuinely am I the ONLY person at this jobsite with functioning brain cells
#the ceiling guys have been hounding us for WEEKS about our cable tray being too low#my coworker has re-worked it 3 times. they went to put the ceiling up today and it's STILL too low#so i had to fix it because apparently SOMEONE can't read a fucking tape measure#the drywallers also had to cut apart a bunch of drywall so my coworker could fix some switches that got fucked up#the drywallers are fucking PISSED and frankly they have the right to be. the wall was plastered and painted ffs#and then my foreman discovered that a place where he put a bunch of boxes was going to inaccessible so the boxes need to be moved#and then he didn't relay that information to anyone else so i caught two other coworkers trying to add boxes to that area#two apprentices tried coring through a wall without a bucket to catch the water from the cooling system and almost flooded the floor#that's not their fault. they should have had a fucking journeyman with them but my company is too cheap to hire enough journeymen#the lack of apprentice supervision is becoming a SERIOUS problem at this job site#i've always liked working at this company but i am beginning to consider jumping ship when i make journeyman this spring
14 notes
·
View notes
Text
kinda funny how it’s been three days since i finished my last exam and i’m already barely holding on. my psyche depends on the structure provided by the looming spectre of academic obligations
#ppl are saying to me oh you can finally relax now#babes im actually so incredibly stressed out rn#i was so bored today i started renovating the kitchen. along with the stairwell and my bedroom bc i was waiting for the plaster to dry#and now i have three open construction sites in the house and im more stressed than ever#but fine by monday i should have every wall sanded out and painted and if its not gonna rain i can start digging holes in the garden and#be stressed about that instead#but im not letting this depression or schizo episode or whatever this is get to me. im gonna have a nice autumn 🧠🔫#and im gonna have it with my nice new wallpaper on straight holeless walls!!!!!#and perhaps a gentle lilac paint in the bedroom. i saw this lavanda sample the other day and its been seducing me
3 notes
·
View notes
Text
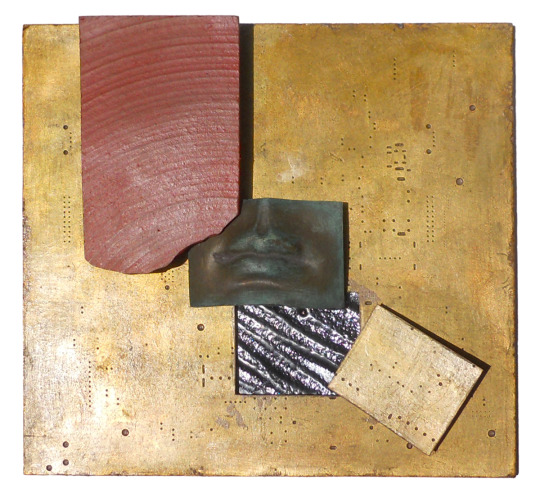
Cry a River - work-in-progress
cast plaster with bronze powder & wash, dyed found stoneware, schlag-metal leafed & lacquered found object (circuit-board drilling backer), slumped iridescent black glass - 9¼"x 10"x 1½" (as is)
This will be mounted within a shadowbox frame and probably have further elements added. This piece began about ten years ago when I discovered the masonite-like circuit-board drilling backer while dismantling a decorative cloth-wrapped oriental-style box which had been discarded. After stripping the cloth off the board and removing all the adhesive residue it was leafed and sealed with tinted lacquer. A Another inch-wide strip of this box-backer was used in another piece, GOLDEN DREAM: PERFORATIONS (see below), but this larger salvaged piece sat unused in the studio, and though it was considered as a possible element in any number compositions over the years it was always shelved again as being not-quite-right. Finding the stoneware fragment with the concentric circular pattern (a bottom-side-up fragment of a large broken hand-thrown platter) and retrieving the old lip demo (which had been fitted with a magnet and sat attached onto various computers as a 'mascot' for many years), and then after doing some texture test-slumps of various iridescent glass pieces these all just came-together. Gotta make the shadowbox frame to fit next.
GOLDEN DREAM: PERFORATIONS

plywood cradle, gold-painted joint cement, paint-wiped Virginia slate, blued steel found object, dyed maple burl, schlag-metal leafed found object (circuit-board drilling backer), dichroic glass - 13¾"x 13"x 2½" - 2016 - sculptural painting exhibited once, in 2022
#sculpture#wall sculpture#my artwork#art by me#Don Dougan#circuit-board drilling backer#found object#schlag metal leaf#lips#glass#ceramic#plaster#bronze powder#verdigris patina#w.i.p.#dyed maple burl#joint cement#paint-wiped slate#wood cradle#dichroic glass rod#blued steel#lacquer
5 notes
·
View notes
Text
ive finished the laundry and cleaned the kitchen and bathroom and even swapped my mattress with the spare (my bed is now noticeably higher foam mattresses are crazy im in like a princess and the pea situation with my stack of foam mattresses) and im quickly running out of tasks and there's still hours left in the day and i don't have work until monday idk guys
#im actually going to have to DO all these hobbies ive been fantasing about doing all month🙄#but ACTUALLY theres a space in our conservatory where there used to be a window into the garage#and it got removed and plastered over and that means theres like a wall space rectangle thats randomly smooth next to the rest#of the conservatory's rough textured walls and like.... mural 👀 mural space perhaps 👀#i want to start thinking about designs to paint there but idk what my mom would like and she'll say Oh Whatever#she likes paintings of blurry out of focus people that feel like memories ..#tad talks
2 notes
·
View notes
Text

Andrea del Castagno, The Last Supper, 1445-1450, fresco, 453 x 975 cm, Museo del Cenacolo di Sant'Apollonia, Florence
Source: Wikimedia Commons
#love how the painted marble panels in the background look like abstract artworks#according to the article they're inspired by Roman wall painting of the so called First Style#which appearantly consisted in imitating the colouring and texture of stone#and was usually used on plaster sqares to give them the effect of actual wall panels made of stone#these ones looks so fancy!!#painting#fresco painting#fresco#andrea del castagno#15th century#1440s#renaissance#renaissance painting#the last supper#religious art#15th century painting
4 notes
·
View notes
Text
i made a star shelf for the little stuffs in my room that had no where to go 💫


#its made of cardboard tape glue and plaster. also paint and sealant and i did a little sanding but not enough to get rid of all texture#i like my room but it has gaps of boring wall space that need something so im trying to slowly fill it up with thing i make
2 notes
·
View notes
Text
my legs hurt from crouching down so much 😭
#i spent quite a lot of time doing stuff at my parents' house these last few days and i'm feeling it#today i put some plaster on the wall and sanded irregularities down#tomorrow we're sanding the doors and the door frames#kill me i hate touching dusty things#my mom wants us to paint THE ENTIRE HOUSE this weekend#she went to the hardware store and bought 5 rolls one for each of us 😭😭😭😭
2 notes
·
View notes
Text
Humans are so cool just making shit
Arte alucinante
52K notes
·
View notes
Text
What is textured wall paint?
Textured wall paint is a highly popular type of paint used to cover drywall. The paint has a thick consistency and is made up of grains of sand and gypsum bound by a water-diluted base. Using textured paint for interior walls creates a visually appealing effect on your walls. These wall surfaces are typically used to finish interior walls, covering taped drywall seams and other imperfections. At the same time, these surfaces transform flat walls into a finish that reflects light and adds interest to any room.
#Texture Wall Paint Services Pune#Textured Wall Painting Pune#Wall Texture Painting Services Pune#Decorative Wall Painting Pune#Interior Wall Texture Pune#Exterior Wall Texture Pune#Royal Finish Wall Painting Pune#Venetian Plaster Pune
0 notes
Text
usually i work Monday-thursday but this week i have to work Monday - Saturday and im so fucking tired <////3 ive been in awful pain since Tuesday my normal 3 day weekend i use every second of to recharge to get through another week has turned into one day 😭
#m talks#all bc some hotel wants to rush everything and have it painted by Monday#its not even close to ready for paint !!#its going to look like garbage because the walls arent finished properly with plaster#but yeah lets rush and get the shit done so we can come back later and fix it because it looks like shit from rushing the process
0 notes
Text
me and my mother were in my brother’s new house all day scraping & sandpapering the walls/skirtings, sweeping it all up, bagging it. the dust in my lungs right now would make even a miner weep
#we listened to oasis the entire time & sometimes I think I still hear his (darling boy Liam’s) voice#spent a whole hour trying to scrape the wallpaper off without steaming it since the sockets were all loose for plastering this weekend#and well live wires. and brother there were like twenty walls on his walls I would think I’ve reached the wall only for it to come loose#and reveal patterned wallpaper beneath. they wallpapered then painted the wallpaper then wallpapered then plastered then wallpapered then#it was so crazy. if it were me moving in I would just adapt to the age old tradition and paper upon paper. so beautiful#also he’s making his house all-greytone. how clinical how typical of a jordan petersonian psychology student#I got so close to a post mentioning my brother without badmouthing him but alas. I am his sister#although there was something nice: we steamed a room and started tearing off its paper so quickly and easily and me and him started#treating the half-stripped walls like rorscharch tests and saying what we saw#also got five new (second-hand) books. might share#log
0 notes