#PPE Guide
Explore tagged Tumblr posts
Visit Tumblr Blog
Explore Tumblr blogs with no restrictions, modern design and the best experience.
Last Seen Tumblr Blogs


Fun Fact
Tumblr has 4 main sources of revenue.
Text
How to Choose the Right Personal Protective Equipment (PPE) for Your Industry
When it comes to workplace safety, there’s no room for shortcuts. Whether you're managing a construction site, a manufacturing unit, or a chemical lab, Personal Protective Equipment (PPE) is your first line of defense against hazards. But with so many options available, how do you choose the right PPE for your industry?
Here’s a practical guide to help you make the right decision.
🔍 1. Start by Identifying the Hazards Before you even think about what equipment to buy, take a step back and assess the risks.
Construction sites face dangers like falling objects, sharp materials, and dust.
Chemical industries deal with hazardous substances, fumes, and potential splashes.
Manufacturing units may have risks from machinery, heat, or flying debris.
Conduct a hazard assessment for each job role. This gives you a clear idea of what kind of protection is required—be it for the head, eyes, hands, or entire body.
🧤 2. Match the PPE to the Hazard Type Once you've identified the risks, choose PPE designed to handle them. Here’s a breakdown:
Head Protection: Safety helmets are crucial where there’s a risk of falling objects or bumping into overhead hazards.
Eye & Face Protection: Use safety goggles or face shields in environments with dust, chemicals, or flying particles.
Hand Protection: Nitrile, latex, rubber, or leather gloves—each serves a different purpose. Nitrile is great for chemical resistance, while leather is ideal for handling sharp or hot materials.
Body Protection: Coveralls, aprons, and high-visibility vests help in environments that require complete body coverage or visibility.
Foot Protection: Safety shoes with steel toes or anti-slip soles are a must in areas where heavy equipment is used.
✅ 3. Always Check for Standards and Certifications Make sure your PPE complies with national and international safety standards. Look for ISI-marked products (in India), CE certified (Europe), or OSHA-compliant gear (U.S.).
Using certified equipment isn’t just about safety—it also protects your company from legal liability.
👷 4. Prioritize Comfort and Fit Even the best safety gear is useless if workers don’t wear it. Choose PPE that fits well, is adjustable, breathable, and doesn’t restrict movement. If the gear is uncomfortable, your team is less likely to use it consistently.
Consider PPE that suits your local climate too. In hot and humid environments, lightweight and sweat-resistant materials are a big plus.
🧑🏫 5. Train Your Team to Use It Properly Buying the right PPE is only half the job. Train your workers to wear, maintain, and store their equipment properly. Regular training ensures that safety gear is used correctly, and also builds a culture of safety in your workplace.
🛠️ 6. Work with a Trusted Supplier Finally, always choose a reliable safety equipment provider. At R.C. Krama Enterprises, we help businesses across industries find the right protective gear, tailored to their specific needs.
We don’t just sell products—we help you build safer work environments.
🔚 Conclusion Choosing the right PPE is not just a purchase—it’s a long-term investment in your team’s well-being and your company’s reputation. Take the time to assess, select, and educate. Your workers will thank you—and so will your safety record.
#Personal Protective Equipment#PPE Guide#Industrial Safety#Workplace Safety#Construction Safety#Factory Safety Tips
0 notes
Text
Best Welding Helmets for Weld and Safety in Australian Workshops
When Protection Fails: The Real Cost of Inadequate Safety Equipment After inspecting over 200 Australian fabrication workshops last quarter, I can report firsthand that the numbers reflect what I’m seeing on shop floors. In 2023, SafeWork NSW documented 127 serious eye injuries related to welding activities, with 43% directly attributed to inadequate or damaged protective equipment. One…
#auto-darkening welding masks#fabrication shop safety#Speedglas Welding Helmets#weld and safety#welding eye protection#welding helmet accessories#welding helmet selection guide#welding helmets Australia#welding PPE#workshop safety
0 notes
Text
SHP Publish First of its Kind Guide to Procuring Inclusive PPE in the Workplace
The e-book, Putting the ‘Personal’ into PPE Written by Dr. Debbie Janson from the University of Bath, aims to guide the reader through the challenges, pitfalls, and also opportunities of providing inclusive PPE in the workplace. The guide also incorporates a practical toolkit of resources including self-assessment forms, email templates, and a workforce PPE satisfaction survey, enabling users to…
0 notes
Text


Download for free here. Physical copies are also available.
Resource links below the cut!
ACLU’s Know Your Rights for Protesters
ACLU Protest training
Guide to protest personal protective equipment (PPE) (updated)
If you’re arrested while protesting
207 notes
·
View notes
Text

Summary: On your fifth birthday, the world fell apart, and survival became the only thing that mattered. That day, your dad saved you from more than just the chaos outside—he protected you from a truth you weren’t ready to face, even as it shattered the life you once knew.
warnings: parent death
It’s funny–even now, after all this time, you can still remember that day vividly. The day fungus infiltrated every corner of your life. But you do still have faint memories of before, too. Like static while turning for a radio station. They came and went as time passed, flickers of things, but never as vivid as the life after the outbreak. Memories of the TV blaring Sunday football, cookouts with the neighbors, your mom brushing your hair before school were the most foggy, but they were still there. Back then, you never realized how much you’d taken those things for granted. But how could you know? You were only a kid.
It was your fifth birthday when everything changed. That’s the day you found your mom too—the same day the military rolled into your small town, scooping up survivors and making promises of safety in quarantine zones, military aid, and FEDRA housing. News had been broadcasting for weeks about these safety zones, but even at five years old, you didn’t buy it. Maybe you were too much like your dad even then. Luckily, you’d been at his house that weekend–mom and dad had been divorced for years by then, though she still lived nearby. You were out back, dad grilling burgers just for the two of you, with ice cream cake waiting in the fridge. You can still smell those burgers—he had this way of getting the perfect char, never overdone but always juicy and mouthwatering.
There had been a lot of sirens that day, but if your dad was worried, he didn’t show it. He was tough as nails—always had been. When the military trucks started rolling through the neighborhood, though, he scooped you up and hurried you into the bunker beneath the house. The blue emergency lights flickered on, casting everything—the wall of guns, the bookshelves of survival guides, pickling recipes, and how-to’s—in cold, sterile light.
“Daddy, what’s—” you’d started to ask, but he pressed a finger to his lips, guiding you further into the cellar. He settled into his big, well-worn security chair, just as the sound of boots thundered above you. He watched the security footage from the cameras that could see the perimeter of your home, his eyes casting around at the screens, watching the men in uniform enter the house. You held your breath as his hand tightened around yours. Then, for a moment, he stared up at the ceiling as if he could see through it, tracking their movements as they stomped room to room.
Little did they know about the underground bunker your dad had built years before you were even born. Deep, below the basement, where no one would think to check. Your mom used to say he’d done it because you were born, that he became obsessed with the end of the world, and he’d needed a plan to protect you when it all inevitably went to hell.
She called him crazy for it.
But that day, his paranoia saved you.
As the boots overhead began to fade, he finally muttered, “Not today, you New World Order jackboot fucks.”
“Daddy!” you giggled, both at the words and the fire in his voice.
He turned to you, smiling faintly as he grabbed a shotgun off the wall. Strapping on a PPE helmet with a face shield, he knelt down and said, “Don’t you worry, honey, I’ve been expectin’ this for a long damn time.” his voice echoed on the plastic between you, “Daddy’s got ya. Stay here for a minute, alright?”
When you nodded, he made his way up to the basement floor, and you could hear his quiet footsteps through the house, tiptoeing around. When you’re young, seconds felt like an eternity, and minutes were like a lifetime. The sound of his steps disappeared altogether and you sat there, fidgeting, your heart pounding in your chest. The flickering blue emergency lights painted eerie shadows across the bunker walls.
You tried to wait like he’d told you, gripping your knees and staring at the screens showing the empty house above. But the silence was unbearable. What if something happened to him? What if the men in uniforms came back?
Your eyes darted to the wall of guns. They looked huge, intimidating—and heavy. But your dad always said you had to be ready when the world went to hell, didn’t he? You stood up, wobbling a little as your nerves got the better of you, and reached for the smallest gun you could see. Even that one felt like a boulder in your hands, but you managed to yank it off its hooks.
The weight made you stumble backward, but you caught yourself, clutching the weapon tightly. "Okay," you whispered to yourself, channeling every ounce of courage you could muster. "Be brave.”
You pushed open the heavy bunker door, the cold metal scraping against the concrete floor. Step by step, you climbed the narrow staircase, the gun heavier with each step. By the time you reached the top, your arms were shaking, but you didn’t stop.
The house was eerily quiet, every sound amplified—the creak of the floorboards under your feet, your heavy, nervous breathing. You crept through the kitchen, gripping the gun like you’d seen in the movies.
When you turned the corner into the living room, you froze. Your dad was standing there, his face a mix of surprise and anger as he stared at you.
"What the hell’re you doin’, girl?" he asked harshly, crossing the room in two quick strides. His voice wasn’t loud, but the tension in it was impossible to miss.
“I—I came to help,” you stammered, holding up the gun like it was a trophy. Your arms trembled under its weight.
He let out a long sigh, pinching the bridge of his nose. “Help? Jesus, kid. That thing isn’t even loaded,” he said, taking the gun from your hands with ease. “You could’ve hurt yourself, lugging this around.”
“But I was scared!” you blurted, tears welling up in your eyes.
His shoulders softened, and he crouched down to your level, setting the gun aside. His neat beard ticked as he lowered his voice to be gentle, “I know, hunny. I get it. But I told you to stay put, didn’t I?”
You nodded, sniffling.
“I can’t keep you safe if you don’t listen to me. You’re all I got left right now, understand?”
You nodded again, biting your lip to keep from crying harder.
His hands found your arms, giving you a quick squeeze in his large hands, then stood up, grabbing the gun he’d set down. “C’mon, then. We’re gonna go see if your mom’s still home or if she went with those government assholes. She knew about the bunker, so maybe she waited me out. But you stay right next to me, ya hear? No runnin’ off, no playin’ hero. Deal?”
“Deal,” you whispered.
“Good. Now let’s get movin’.” He cocked the gun and tipped his head toward the door, his tone firm but not unkind. “Stay close, and don’t make a sound.”
You followed him out of the house, your little hand clutching his shirt as tightly as you could, determined not to let go this time.

The neighborhood was unnervingly quiet as you and your dad climbed into his old blue truck. The engine rumbled to life, a low growl that seemed too loud for the silence surrounding you. You clutched the seatbelt across your chest, staring out the window as the houses you knew so well rolled past, each one darker and emptier than you remembered.
Your dad didn’t say much, his hands gripping the steering wheel tight enough to turn his knuckles white. Every so often, his eyes flicked to the rearview mirror or the road behind, as if he expected someone—or something—to follow.
The air felt heavy, and the only sound besides the truck was the faint hum of distant sirens, carried on the wind moving further and further away. You wanted to ask if he really thought your mom would be okay, but the words kept getting caught in your throat.
When you finally reached her street, it looked exactly the same, like any other day. But knowing the houses sat there, just hollow shells with neatly trimmed lawns still pristine with blossoming gardens was enough to bring goosebumps to your skin. The truck slowed to a crawl, your dad squinting out the window as if he was searching for something—anything.
He pulled into the driveway, and you could see the front door was open, the storm door the only barrier of the threshold. So maybe she was still home. You rolled down your window, leaning out as far as your little body allowed, hands gripping the edge of the glass.
“Mommy!” you shouted, excitement bubbling in your voice.
But just as the word left your lips, you felt a hand clamp down on the back of your shirt, yanking you back into the truck. You suddenly heard your dad screaming your name: “Get down, dammit!”
“But if she’s—”
“We don’t know if she’s in there. We need to stay quiet, and you’re going to stay here,” he said firmly, his voice low but sharp as he turned to you, a finger pointed harshly at the seat next to him.
“But—”
“No buts,” he cut you off, his tone furious and unyielding, but then he lowered his voice, “I mean it this time. You don’t move from this seat. Understand?”
You nodded reluctantly, your stomach churning with unease.
The thing was, he hadn’t even needed to get out of the vehicle to see if she was home. Because from inside the house, someone—or rather, something —had heard you.
Your mother…what was your mother, now twisted into something monstrous, burst out of the storm door. She was covered in grotesque, swollen fungal growths that bulged from her face and arms like spongy mushrooms trying to break free. Her screams—god, it was still her voice—pierced the air, raw and filled with pain.
“Mommy?” you whispered, frozen in disbelief.
You watched as she barreled to the front door, her movements jerky and unnatural, as though her body no longer obeyed her. When her wild eyes spotted you and your dad in the truck, she charged. The storm door flew off its hinges as she hurled herself into the front yard, her body slamming against the passenger-side window of the truck.
You screamed as her twisted, red and yellow fungus-covered face pressed up against the glass, her hands clawing and smearing bloody streaks. The sickening sound of her infected screeches filled your ears, and you fell back into your dad’s lap, trembling and sobbing.
At the suddenness of your fall, he snapped out of his horrified trance, slamming the truck into reverse. The tires screeched as the truck lurched backward, your mother’s hands scraping against the doorframe until she lost her grip and tumbled to the ground.
He slammed the brakes, grabbed his shotgun, and rolled down the driver’s window.
“Daddy, no!” you screamed, trying to climb over him to stop him. “Don’t hurt her! DON’T HURT MOMMY! ”
“That’s not mommy anymore,” he said quietly, his voice trembling but firm.
She rose to her feet with inhuman speed, her limbs flailing wildly as she lunged down the driveway toward the truck. His hands steadied the shotgun, his jaw clenched.
“ No! ” you wailed, clawing at his arm, but he didn’t flinch.
As she reached the edge of the driveway, he pulled the trigger. The shotgun roared, and the recoil sent you sprawling back onto the bench seat.
You sat there, your breath coming in ragged gasps as you stared out the window. The world seemed to tilt sideways as you took in the sight. Your mom— your mom —lay crumpled on the pavement, blood pooling around her still body. The red stain trickled down toward the sewer drain at the bottom of the driveway.
Before he could stop you, you shoved the door open and bolted from the truck. You heard him yell your name, felt his hand swipe at your arm, but you were too quick.
“Get back here!”
You dropped to your knees beside her, your little hands reaching out hesitantly. Her eyes stared blankly up at the sky, her body still twitching slightly as the fungal infection spasmed through her.
“She’s… she’s still moving,” you whimpered, tears streaking your face.
Your dad was there in an instant, pulling you back roughly. “Don’t touch her!”
“But—”
“No!” he snapped, grabbing you by the shoulders and shaking you lightly to snap you out of it. His voice softened, but the edge of urgency remained. “She’s gone, kid. That wasn’t her. You hear me? That wasn’t your mom anymore.”
You sobbed, shaking your head, but he pulled you into his arms, holding you tight as you cried into his chest.
When you finally pulled away, his face was pale but resolute. “We have to be strong now,” he said, his voice low and steady. “These things—they’re not people anymore. They’re dangerous. And if we’re gonna live here, we need to keep this place safe. For us. That’s what she would’ve wanted.”
You sniffled, your chest heaving as you tried to catch your breath. He wiped a tear from your cheek with his thumb.
“Okay?” he asked, his eyes searching yours for some kind of understanding.
You nodded slowly, though the ache in your heart didn’t lessen.
“Good,” he said, standing and adjusting the shotgun over his shoulder. “C’mon. We’ve got work to do.”
As he led you back to the truck, you glanced over your shoulder one last time, your mom’s lifeless body a haunting picture of the world you now lived in.
#all that remains#the last of us#the last of us fic#the last of us fanfiction#Joel miller tlou#Joel miller#joel miller fanfiction#joel miller x you#joel miller and reader#tlou joel#joel tlou#joel x reader#tlou hbo#the last of us hbo
161 notes
·
View notes
Text
✩ wips/sneak peeks for silent hill and devil may cry ✩
cw: wip list contains some dark/dddne content, please proceed with caution!
as these are wips, they may be altered/changed and tags will be updated upon posting the full ver.
─── ⋆⋅☆⋅⋆ ──
𝑺𝒊𝒍𝒆𝒏𝒕 𝑯𝒊𝒍𝒍
CW: Real!dadJames Sunderland x reader: dddne/dark content, incest, guilt, smut, loss of virginity, more tags may be added later.
James had been incredibly distant with you growing up, being little more than a provider—A stark contrast to the way he treated your sister, Laura. After leaving for college, you didn't think you'd ever come back, but with nowhere else to go on summer break, you are forced to return. James does his best to show you just how much he cares and how much he missed you.
It's just not in the way a father should...
Maybe if you weren't so deprived of a proper father's love through your teenage years, you'd stop him... but you don't because you are a starved thing, and any little touch or praise from your father is nourishment. His fingers slip beneath the waistband of your pants and into your underwear, middle finger dipping down and pressing featherlight over the start of your slit, surely getting a feel of the slick that has gathered. It would be impossible not to, not with the way your underwear had started to cling to you.
"Oh, honey," James breathes hotly against your ear, full of relief and awe with that undercurrent of lust that is new and dizzyingly pleasant to the ears. "You're so messy."
𝑫𝒆𝒗𝒊𝒍 𝑴𝒂𝒚 𝑪𝒓𝒚
CW: Owner!Vergil x Cat!hybrid reader, pt 1: ppe(partial power exchange), hybrids, gen owner/pet dynamic, misunderstandings, abandonment issues, spanking, slight ddlg because papa is used once or twice, angst/comfort, additional tags may be added later
"Tell me, pet," Vergil begins as he closes the distance between the two of you in a few smooth strides, elegant as ever. He gently guides your chin up with his index finger and thumb. It's unfair how gentle and soft he looks in his concern. Betrayal surges up your spine to wiggle its way into your throat, forming a lump.
"What has caused this behavior?" He asks. Hurt, betrayal, and abandonment tangle up within you, turning your tongue into a useless, paralyzed muscle in your mouth, heavy and thick.
"If you will not tell me what is wrong, how am I to fix this?"
It should be easy to tell him, you tell him everything... but if you do, it will only cement it all. Dread and heavy sadness threaten to bloom into nausea. Vergil's eyes narrow, a soft crease forms between his brows and he moves his hand to grip your jaw, causing you to gasp in surprise.
"Very well, I'll have to force it out of you."
─── ⋆⋅☆⋅⋆ ──
#daisythroat.txt#daisy throat petals#james sunderland x reader#james sunderland x you#james sunderland smut#silent hill x you#vergil sparda x reader#vergil sparda x you#dead dove do not eat#dark content
69 notes
·
View notes
Note
Hi there, hope this is okay to ask advice on. I'm poor but I want to upgrade to better masks. Disabled so I've got some issues, I have to find the "best" mask for me, but I don't have the resources to just test out a bunch of stuff. I tried contacting all of my local mask blocs, but it's been two months and multiple reach outs and I still just haven't heard back from anybody. I tried reaching out just like to the mask blocs in states touching my state. They all get back to me fast but basically with "We've got no money so we really can't support anybody outside of our range, we also have no advice for you". It's like I understand there's a lack of support which is why these things are so local but at the same time wtf am I supposed to do? I feel just stuck with wearing masks that I know don't protect me or others as well, but they're seemingly the only things I can get...
Scary as it is, you're gonna have to take some risks to get what you need. There is a lot of information on various sites about the size of masks and what face shapes they fit. Measure your own features and see how they compare before you buy.
Purchase the smallest batches you can at first. The ones that don't fit, save for hand outs and friends. There are three sizes of 3M auras and Redimask adhesive masks, and this seller does small "try out" packs for both. Start there.
You can also find a bunch of PPE sellers on this board on the archive
Seatle Mask Bloc has a resource that may help you with fitting
And Aaron Collins (AKA Mask Nerd) does mask reviews and can help you find masks that may fit your face
#mask up#public health#wear a mask#wear a respirator#still coviding#pandemic#covid#covid 19#coronavirus#sars cov 2
51 notes
·
View notes
Text
Drabble about Tango, Pearl, and redstone PPE while I try to be creative again. In which I make up facts about redstone because I love nothing more than over explaining Minecraft mechanics.
——————————————————————————
You would think that working with redstone dust as much as Tango did would make him more lax on the rules but if anything it was the opposite. The stuff was a fine powder that both created and transported electrical signals, and was mildly corrosive on the skin. Redstoner’s Lung was something no one wanted to deal with, and it could cause permanent damage if it got in your eyes. It was his favorite thing in the world and he respected it the same way a sailor can love the sea and know to fear it. When working with any amount of redstone dust, Tango kitted himself out with goggles, a respirator, and gloves. He covered as much skin as possible, pushed the flames that constituted his hair out of the way with a headband, and wore closed toed shoes (not that he really owned much in the way of open toed). And all of this, he felt, was completely necessary.
Not everyone was as cautious as he was. Doc, for one, insisted he didn’t need goggles because of his eyes was bionic, which Tango thought was silly but Doc was too stubborn to convince. X claimed his helmet functioned as a respirator on its own, which to be fair it might. He’d never actually allowed Tango to study its mechanisms despite years of begging. And Etho said his mask did enough filtering that a real respirator wasn’t necessary, which Tango often poked him about. Impulse and Mumbo, at least, shared his same level of care.
Of course, every Hermit needed to do a bit of redstone sometimes. But when they did, they had heard Tango lecturing enough that they knew to gear up lest they face his wrath. Skizz had learned that lesson with a swift “Don’t be that guy” in his first week.
And so, Tango was confused about how this had happened. When guiding Pearl through some basic redstone, a few months ago, he had not thought to ask about whether she had PPE. He gave every Hermit a kit at the start of each season, at least to prevent himself from having to scold people about it. He had seen her using it during his tutorials.
Tango also knew Pearl had worked with redstone a little last season, and most people had seen redstoners work before, Pearl included. She had based right next to Mumbo a couple of servers ago, she had spent tons of time in Decked Out 2 and seen him do maintenance, surely she knew she was meant to be wearing protection when working with redstone dust, right?
So imagine his surprise when he met up with her for a few rounds at Hungry Hermits after she had been “busy” for a few days and noticed that her hands were stained red. A familiar bright red that seemed to glow on skin and was currently coating her fingers and speckled all the way up to her elbows and on her face. To top it all off, she kept coughing into her elbow, a cough he knew wasn’t from a cold.
“Pearl, you haven’t been working on anything recently have you?” She flushed at the question. Ever a poor liar, she stuttered through a response.
“Wha- no! Definitely not!” She began fidgeting with her hair (which he just noticed was also stained red at the ends) in a way that definitely wasn’t suspicious, “No secret projects here!”
Tango tilted his head and sent her a disapproving glare. He crossed his arms over his chest and looked pointedly at her hands.
“Uh huh, but if you were you would be wearing the PPE I gave you, right?” He felt a mix of concern and annoyance at the way she hung her head a little at the question.
“Well, I just,” Pearl was cut off by a cough that made Tango wince. It sounded like it hurt. “I get so caught up sometimes when I realize something is going to work, I just forget!”
“Pearl! That’s super dangerous! You could do real damage if you’re not careful!” All thoughts of playing Hungry Hermits were gone at this point. Did she not realize how serious this could be?
“It’s not that bad! It came off after a few days when I finished Dye-Duction, and the burns healed pretty quickly. I’m sure it’ll be fine this time too,” She sounded defensive, almost offended.
And she had spent weeks in and out of the wires for Dye-Duction, if she had been skimping on the PPE during it then he would have noticed it. Sure, she kept weird hours, but he thought he had run into her while she was working on it at least once. Right? Apparently not.
“That is so not okay, dude. You can do permanent damage if you’re not careful! And don’t think I haven’t noticed your coughing,” As if on cue, Pearl once again let out the kind of painful, throat tearing cough that came with breathing in a mildly corrosive dust. Tango had the passing thought that he should really grab her a water bottle. Her voice was raspier when she spoke next.
“I know that, it’s just that when inspiration strikes you have to chase it, yeah? And sometimes when inspiration strikes, my PPE kit happens to be put away in my farm house when I’m working on the other side of the base. So I just… didn’t wear it,”
Her eyes were shining in the way they did when she got ultra invested in something, the way he had seen her do with both Decked Out 2 and now Hungry Hermits. That made it click for him. It wasn’t that she was being reckless, just that she had probably genuinely forgotten. Pearl, he had learned in the years he’d known her, had a tendency to get obsessed with whatever she was working on. It wasn’t enough for her to casually work on a project. When she got really into something, whether it be a game or a build, she would drop everything to perfect it. Sleep, food, and even other projects tended to fall to the side. He had had to walk her back to her base himself sometimes when she ran Decked Out 2 too many times in a row. Apparently whatever this was had captured that same fervor.
He ran a hand through his hair, exasperated.
“You are so sitting through my power point. This is not okay, Pearl,”
She looked up finally and crossed her arms.
“Fine,” She agreed reluctantly, before titling her head to the side slightly and smiling at him, “but can we at least play one round of Hungry Hermits first?”
47 notes
·
View notes
Text
to everyone protesting today at no kings or otherwise, here are a few tips to stay safe. (links to more resources below).
prepare, prepare, prepare
stay hydrated (make sure any water you bring is not in glass bottles & is not frozen. metal bottles may vary in acceptability by state, but glass bottles & frozen water are being listed as weapons by law enforcement).
bring essential supplies (small first aid kit, chemical irritant removers, flashlight for night protests, cash, etc.)
don’t bring valuables.
keep your cell fully charged, bring a portable charger, & turn off bluetooth/wifi/location services. (or get a burner & either memorise or write on your body the most important phone numbers. if you’re not bringing your cell, consider bringing a digital camera & a gps or map. additionally, if you will be filming, do so in landscape as much as possible so the footage is usable in court if needed).
wear “ppe” (whatever goggles you can get your hands on - especially if you wear contacts, masks, extra padding over your vital organs, etc.)
know where you are
make sure you have access to an offline map of the venue/surrounding areas.
park far from the protest area & walk. (take a bike if you can, but make a note of where you leave it or where you parked).
plan multiple in to & out of routes.
choose an emergency meeting point with your group or, if you’re alone, make sure someone not attending the protest knows where you are.
keep yourself & others safe
maintain 360° situational awareness.
should you find yourself in harm’s way, remember that the best thing to do is remove yourself from the situation as quickly & calmly as possible. if that isn’t a viable option, protect your vital organs.
be on alert for suspicious activity & if you see something, say something.
if you’re going to a protest alone, especially as a woman, try to find a group to stay close to.
ooda stays on loop (observe crowd movements, police presence, escalation, etc.; orient yourself with past experience or research you’ve done to plan your next steps; decide to stay, reposition, or leave; act quickly & reassess immediately).
be prepared to de-escalate (stay calm, keep a steady voice, avoid provocative behaviour, don’t engage agitators, walk away if you can).
if confronted or detained
don’t resist arrest or escalate the situation.
clearly state that you wish to remain silent & request a lawyer.
don’t try to explain yourself or negotiate with law enforcement.
if safe, document everything you can. share this with legal counsel or advocacy groups. use discernment when posting to social media. we want to get the word out, but we also want to respect privacy & protect identities.
know what legal resources can aid you in any number of potential outcomes.
after the protest
contact friends &/or family to let them know you’re safe, if you are.
debrief with your group about the experience & report to legal aid groups, as necessary.
take care of yourself.
links
human rights campaign - tips for preparedness, peaceful protesting, & safety
aclu - protesters’ rights
ipmba - activists’ guide to police chemical weapons
#sluglife#no kings#no kings protest#no kings protests#la protests#los angeles protests#fuck ice#free palestine#politics#us politics#stay safe
14 notes
·
View notes
Text
God Spelled Backwards is D-O-C-T-O-R GLOSSARY FOR NERDS

Chapter 1 (pending)
EP! Law is a cardiac electrophysiologist. This is a very specialized field that involves understanding and manipulating the body's electrical system to diagnose and treat heart rhythm disorders!
Echocardiographer! Echo! You are an echo tech, a medical professional who uses ultrasound equipment to examine the heart and greater cardiovascular system!
Baby doctor! I didn't realize this was a Canadian term, but this describes a new doctor working their first year as a doctor. These new doctors often order unnecessary work or make other mistakes due to a lack of experience/wisdom.
Chapter 2
Reader's Diagnosis during cath lab! Translation to English: the blood flowing out of the heart is blocked, but the blockage isn't permanent-- it moves with each beat. So it's not a heart attack, it's the mitral valve being pulled into the wrong place.
Cath Lab! a specialized medical facility equipped for performing cardiac catheterization procedures. These procedures involve inserting a thin, flexible tube (catheter) into a blood vessel, usually in the groin, neck, or wrist, and guiding it to the heart to diagnose and treat various heart conditions
Scrubbing in! Thoroughly disinfecting the hands and forearms in preparation for surgery. Scrubbing in is more than just washing hands, it's a process of sterile surgical scrub and other sterile PPE. Once scrubbed in, you cannot touch anything non-sterile.
Don't fight the blue! The sterile field (where the catheter is inserted via the groin) is draped with a sterile blanket. Don't go into the sterile field because you're not scrubbed in!
Septum puncture with ICE guidance! Law needs to get from one side of the heart (the right atrium) to the other (left atrium). To do that, he has to make a puncture through just the right spot or else no bueno for the patient's heart. Your scan acts as his eyes as he does this delicate procedure, so he really needs your help to get it right!
Formaldehyde munchies! the superstition that formaldehyde, a preservative used in cadaver labs, can induce hunger. Sanji is making a joke that you're in such a rush to get food because you've just been in a cadaver lab. i personally developed an insatiable hunger during/after my first cadaver lab. good times.
Sanji is a Physician Nutrition Specialist (PNS). He has a DO is is credentialed through the NBPNS, which allows him to to diagnose, prescribe, and manage patient treatments!
Chapter 3
Orders!
Pended!
CRP! A super niche joke for my medical folks out there.
DICOM!
10 notes
·
View notes
Text
Troodon Society Headcannons
General headcannons:
Sophontry first evolved in troodons in nothernmost Larimidia in what is now Alaska, but quickly spread southward
Population density in the southern part of their range stayed low for much of troodon history, however this is changing with the advent of time travel
Livestock Management:
Troodons managed to domesticate a species of ceratopsian very similar to Spinops. This practice originated in what is modern day Montana
Those people who raised ceratopsians most frequently would follow their animals as the migrated east-west from the coasts to the highlands of the burgeoning Rocky Mountains, or sometimes as parts of minor north-south migrations to avoid winter in their northernmost range
As troodon technology improved to the point of career specialization many nomadic groups switched to relying on forming trade networks rather than strictly following livestock
Most people living in more southern Larimidia tended form more permanent settlements, and these people tended to various arthropods for food and textiles.
Common livestock bugs include silkworms, spiders, and ticks. They eat the ticks like gushers
In the relatively more modern period some tick keepers found that ceratopsians with ticks who were exposed to a certain virus would be way more docile and seemed to understand verbal commands and training much more quickly than usual.
The young of these ceratopsians seemed to inherit the tick traits from their parents, and these traits were exacerbated when the young were also exposed to the ticks
Over many generations the ticks and their virus act as a sort of Hitchhiker’s Guide babelfish, allowing exposed animals to commincate with troodons, revolutionizing research into animal behaivior.
This development was deeply unpopular amongst nomads, and settled foodies alike. For obvious reasons. The ticks are very carefully managed so that they do not feed from dedicated food animals.
Fortunatley for the nomads, the vast majority of tick-exposed animals stay fairly close to towns and train stations.
Translator-ticked animals, especially those who are descendants of livestock are stuck in a sort of grey area in terms of their legal personhood. They are at least allowed to take part in zoological research on the trains.
Textiles and Clothing:
Bug silks are a major export from the settled people, valued for their strength and beauty.
Nomads tend to use more leather and plant-based fibers
Being feathered creatures, Troodons don’t tend to use clothing for modesty reasons the way humans do. Clothes tends to be used more as social signalling or for PPE purposes.
Feather structure tends to be pretty easily damaged by frequent clothing use, there fore the wealthy and important use it to signal ‘hey look at me. I can afford to spend all this extra time tending to feathers’ Being birdy animals this can lead to some pretty ostentatious outfits.
Of course, those using PPE tend to be more worried about Not Dying than they are about damaging feathers
The uniforms worn by rail workers are essentially meant to signify that they know what they are doing. This does occaionally lead un-associated troodons having ‘red shirt at Target’ moments, especially with other species of dinosaurs.
Trains and Time Travel:
Steam power was invented in Troodon Town ~250 years before the events of the show. It was initially used to aid mining operations. It wasn’t long before steam power was used to transport ores and such to their destinations.
Most of the original rail lines built before the advent of time travel followed the historical trade routes used by nomadic peoples.
This does mean that the railway did ruin the livelihoods of most dedicated traders, and frequently disturbed the migrations of more generalist nomads. There is still much animosity held by the nomads
Time travel was invented accidentally during an attempt to develop a more efficient method of drilling tunnels
This resulted in the crew and train being stuck in the ocean approximately ten million years before their own time, almost getting Trevor’d in the process
This was a deeply contriversial event, and it would be some time before trime travel efforts began in ernest.
However, the development of the translation ticks and an improved understanding of plate techtonics left the nerdier of troodon society with only one thing to do.
Development of the time tunnels began when Tabitha and Trevor would’ve been young children and allowed them to grow up into very influential figures in the field
Up until fairly recently most time tunnels were only meant to go back in time, and this policy became all but official after Trevor’s stranding
However, drill train improvements have lead to many stations being established in the very latest Cretaceous. And now Troodon society has to live with the knowledge that their natural predators got Even Bigger. ( there is about four million years difference Troodon/Stenonychosaurus and T. rex)
Mr. Conductor’s mission to rescue his father would not have happened if people found out about it before he left. He looked at the pteranodon family and said “no witnesses” and thats why he brought them along
Conductor Family:
Tabitha was born into a nomadic family who tended to be Quite Skeptical of all these newfangled contraptions. Much to their frustration Tabitha was absolutely fascinated.
Trevor was born to a family that ran a rather successful business raising silkworms, who were subsequently able to afford to send him to receive schooling in Troodon Town
When he was grown Trevor found work scouting and surveying for new tracks and tunnels which provided a convenient outlet for his adventurous streak.
He met Tabitha while investigating land that was a little too close to crucial nesting grounds for her family’s herd.
In spite of initial tensions, Trevor and Tabitha got on like a house on fire and Trevor ended up lying to his superiors about the site’s usefulness ( it was SO perfect for a time tunnel you have no idea)
Tabitha’s parents were less than thrilled about the relationship, however the lack of train fucking up their way of life was enough that they did not fight when Tabitha left to live in Troodon Town. The rest of her family grew to like Trevor just fine, in time.
Tabitha took to the railway like a fish to water and was promoted to conductor status in just a few years.
Tabitha and Trevor had three children together. Two daughters named Hilda and Dani, and one son named Sonny. They fell back on the Pteranodon family philosophy of child naming for their youngest
Sonny would have been about four years old when Trevor disappeared. Young enough that he would forget the details over time but would be able to recall them with some prompting. Dani was seven and Hilda was eleven.
Hilda was the closest with Trevor, and was also affected the most by his disappearance out of the kids. It bothers her a little bit that Sonny did not bring her along to rescue their father.
Troodon society is primarily nocturnal, Tabitha only started working the day shift out of necessity when Trevor disappeared. The grief and the adjustment period exacerbated some of her more zany personality traits and she has never really been able to go back to being awake at night time.
The kids spent a lot of time with Trevor’s side of the family growing up, as well as Tabitha’s family whenever the herd traveled into the area.
Hilda had a bit of a horse girl movie montage with Tabitha’ family’s herd that first summer after the accident
Hilda grew up to stay with her mother’s side of the family. She met a guy on her travels and is now Gilbert’s mother. Unfortunately Gilbert got pretty sick as a little kid and was sent to Troodon Town to receive better healthcare. By the time he was well he had become very close with his grandmother and uncle, developing a desire to follow in their legacy.
Dani has gone to work with her father’s side of the family, focusing on the sales of the assorted bug silks. She is currently courting, but is not in any particular hurry to settle down.
3 notes
·
View notes
Text

i wanna gab about preshading and how ive been doing it lately. trying to type longer guides on patreon and HV but let's try a quick and dirty version here and see if that helps me get those posts together better. as far as tools used for this, i use an iwata hp-cs and hp-ch (which are .3 and .2mm nozzle airbrushes respectively) along with gaianotes paints for painting gunpla. proper ppe (nitrile gloves, a well fitting respirator and a spraybooth that moves enough air) are a must when working with lacquers. dont give yourself lung or liver cancer for plamo plskthx. pics are from a mixture of the mg sazabi's WIP and some test junk i was doing with the hguc sinanju.
step 1: primer yer part i like to use colored primers cause it really ups the saturation on the paint you use on it. pink for reds/oranges/yellows, blue for purple/blues, grey or white for whites/greys
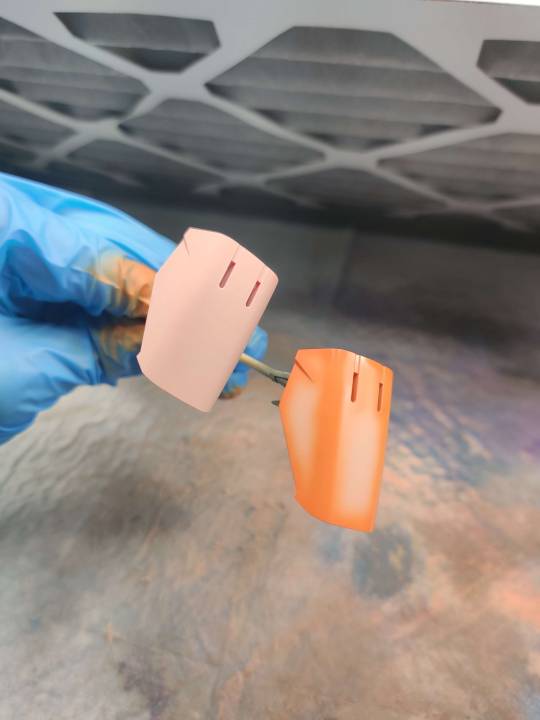
step 2: mix your preshade color ymmv on these but personally i like using a darker shade of the main color to do the shading by adding a complimentary color to it. for example, for these parts i mixed brown in to the custom orange color i made. you can use whatever you want though. some folks like using black as a preshade and that's ok! i preshade my orange-yellow paints with pure orange, and blues with either a darker blue or blue with some purple/black mixed in. to goal is to compliment/blend a bit with the color that's going on top.
step 3: go around the edges and panel lines with your dark color, leaving room to fill in with your main paint. hope your hand is steady and your paints are mixed/thinned well! very carefully, go around the part and darken up the edges/panel lines/underside of your parts. i shade anywhere where the "light" might darken up on a real world object but i can't speak to how accurate of a sentiment that is, if that makes sense? it's just what looks 'right' to my eye to do it this way. but the part that's shaded above should serve as a good indicator. here are a few other parts pre-filling in:


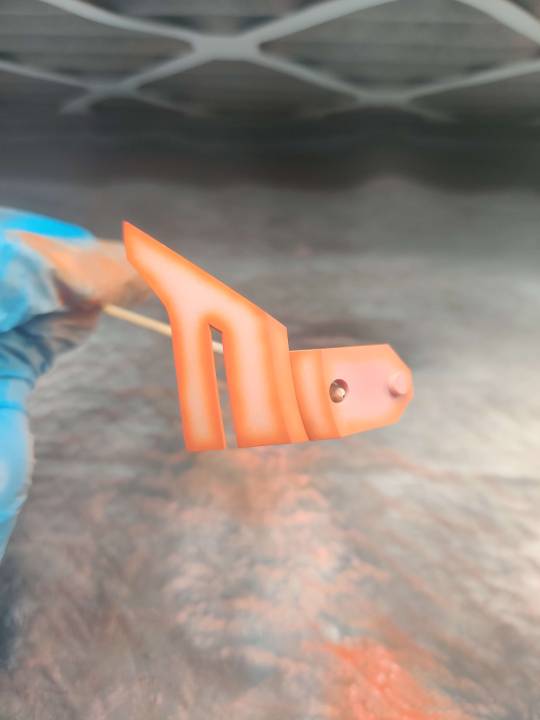


i do this this way for three reasons: first and second, im lazy and cheap. i don't want to waste time and paint coating the entire part when i'm just gonna cover it up anyway. third, if i coat the entire part in the preshade color that's going to have an effect on the main color that's going on top. mainly, it's going to make it darker. i don't want that so i landed on shading stuff this way.
step 4: fill in your main color okay so i always do a shitty job taking pictures of this step (that's why there are no sazabi pictures here) but once you have the edges and stuff painted now it's time to take your main color and fill in the primer-spaces. don't go over your preshade lines, just get as close as you can to that line. it's fine if you hit the edge a little, after all this is the topmost layer of color. even if it doesn't turn out perfect, just work with the wabisabi of the whole thing. embrace the shading not being perfectly uniform. after all, things in real life have degrees of variance.


take your time, work with a psi around ~12-15, thin your paints well, and be very gentle on the trigger. i work really really close to the part for this step and have to be very careful to avoid splattering or overspraying. this is probably???? one of the trickier parts of this??? i don't know. when you've been doing this for so long your definition of that sorta changes. if you need extra help, look in to something to help steady your arm/hand while doing this part.
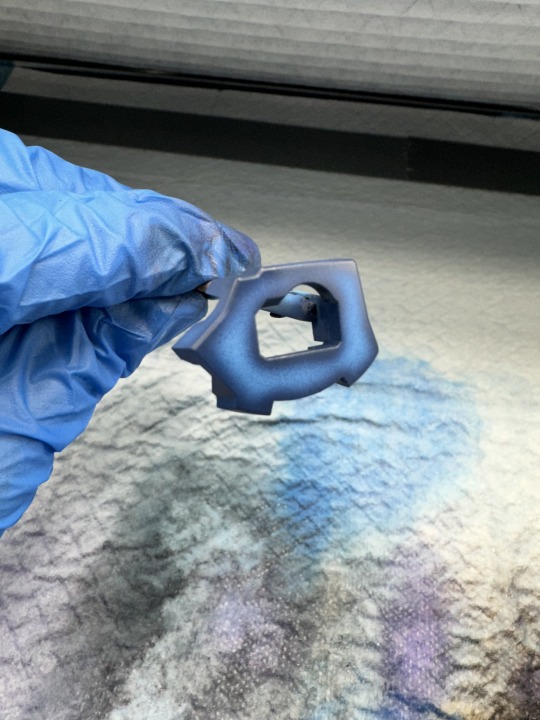
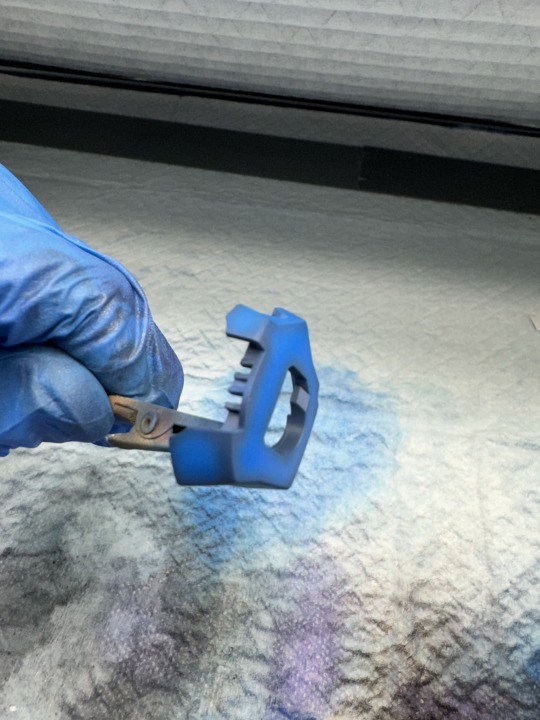
step 5: blending okay, so you've got your shading down, you filled in the rest of the space with the main color and it's feelin pretty good. but. there's one more step. get a little distance from your part and give the whole thing the lightest coat you can manage. the goal is to blend the primary color and shading layer together with one or two very light coats of paint. i'm not trying to cover up the preshading, i just want a very thin layer of the main color to harmonize everything.


see how the preshading isn't so stark now that we've given it those final two coats? i think this is the key to bringing the shading and main layers together. everything feels nice and "finished" now. from here, gloss coat the parts for panel lining and decals or flat coat (or whatever finish you wanna use) it if it's not getting any of those.
and...that's pretty much it. as an aside, glossy finishes tend to make the colors appear darker and flatcoats tend to look lighter but that could just be my eyes being weird.
and uhh....yeah. thanks for coming to my gunpla talk.
22 notes
·
View notes
Text
Understanding NFPA 70B: A Comprehensive Guide to Electrical Maintenance

Electrical systems are integral to the smooth operation of any facility, and maintaining them is crucial for safety and efficiency. In this context, NFPA 70B PDF provides essential guidelines for the maintenance of electrical equipment to prevent failures and hazards. Understanding these guidelines is key for building owners, electrical contractors, and safety professionals alike.
The Importance of Electrical Maintenance
Maintaining electrical systems is not just about preventing downtime; it’s about ensuring the safety of the individuals who operate, maintain, and interact with these systems. Without proper maintenance, electrical equipment can malfunction, leading to fires, electrical shocks, or even loss of life. The National Fire Protection Association 70B PDF outlines a comprehensive strategy for the upkeep of electrical systems, recommending periodic inspections, testing, and proper procedures for repairs.
The document provides specific recommendations for various types of equipment, ranging from motors and transformers to distribution panels and circuit breakers. It stresses the importance of creating a maintenance schedule tailored to the specific needs of a facility and its equipment.
Key Elements in the NFPA 70B Guidelines
Inspection and Testing: Regular inspections help identify potential issues before they cause damage. The National Fire Protection Association 70B PDF provides detailed procedures for testing electrical systems to assess their condition, ensuring they meet the necessary operational standards.
Preventive Maintenance: One of the primary focuses of the National Fire Protection Association 70B is preventive maintenance. By performing routine checks, electrical systems can be kept in optimal condition, reducing the likelihood of unexpected breakdowns and expensive repairs.
Condition-Based Monitoring: In addition to routine maintenance, the document emphasizes the importance of condition-based monitoring. This involves using advanced techniques such as thermal imaging and vibration analysis to assess the health of equipment in real-time, allowing for more precise maintenance planning.
Safety Protocols: The safety of workers and building occupants is paramount. NFPA 70B provides guidelines on the safe handling of electrical systems during maintenance, ensuring that workers are protected from electrical hazards. Personal protective equipment (PPE) and lockout/tagout procedures are essential components of these guidelines.
Record Keeping: Proper documentation is a critical part of the maintenance process. The guidelines stress the importance of keeping detailed records of inspections, tests, repairs, and replacements. These records not only help with compliance but also offer insights into the long-term performance of the system.
Integrating NFPA 70B Into Your Maintenance Plan
Creating an effective electrical maintenance plan based on the NFPA 70B guidelines involves several key steps. First, it is essential to assess the current state of your electrical systems. This means reviewing the age, condition, and previous maintenance history of the equipment. Once this assessment is complete, a detailed maintenance schedule should be created, taking into account the specific needs of each piece of equipment.
Next, ongoing monitoring should be incorporated into the plan. This ensures that any changes in the condition of the equipment are promptly identified and addressed. Regular training for maintenance personnel is also necessary to keep them updated on best practices and safety protocols outlined in the guidelines.
The Role of Compliance and Regulations
Compliance with the National Fire Protection Association 70B is not just a recommendation but, in many cases, a requirement. Local and national electrical codes often reference these guidelines, and non-compliance can lead to legal consequences or increased risk. For example, if an electrical failure occurs and it is discovered that proper maintenance protocols were not followed, the responsible parties could face fines or liability for damages.
Building owners and managers should be proactive about ensuring that their electrical systems adhere to the latest standards outlined in the NFPA 70B PDF. This includes staying updated on revisions to the document, which are typically released every few years to address emerging technologies and new safety challenges.
Training and Education
To implement the guidelines effectively, it is crucial to provide training for all personnel involved in electrical system maintenance. Workers need to be familiar with the standards outlined in the National Fire Protection Association 70B PDF to understand what is required for compliance and how to perform maintenance tasks safely and efficiently. Regular training sessions should focus on the latest techniques, tools, and safety protocols.
Benefits of Following NFPA 70B Guidelines
Enhanced Safety: The primary benefit of following the National Fire Protection Association 70B guidelines is improved safety. Proper maintenance minimizes the risk of electrical failures, which could result in fires, electrocution, or other hazards.
Reduced Downtime: A well-maintained electrical system is less likely to experience unexpected breakdowns, leading to reduced downtime and increased productivity.
Cost Savings: Regular inspections and maintenance can extend the life of equipment, preventing costly emergency repairs or replacements. Additionally, by identifying issues early, you can avoid expensive damage to your systems.
Regulatory Compliance: Adhering to the National Fire Protection Association ensures that you remain compliant with local, state, and federal electrical safety regulations, avoiding potential legal issues. For more info Click here
By following the guidelines laid out in the National Fire Protection Association 70B PDF, facilities can ensure the longevity, safety, and efficiency of their electrical systems. Regular maintenance and adherence to safety protocols not only protect workers but also save costs in the long run by preventing costly repairs and legal issues. Understanding and integrating these best practices into your facility’s maintenance plan is key to maintaining a safe and functional electrical system.
2 notes
·
View notes
Text
What PPE is Required for Roofing?
When it comes to roofing, safety should always be a top priority. Roofers face a range of hazards while working at heights and handling materials, making proper Personal Protective Equipment (PPE) essential. At Lastime Exteriors, we prioritize our team's and clients' well-being, ensuring every roofing project is completed safely and professionally. This article will guide you through the types of PPE required for roofing and why each piece is important.
Understanding the Importance of PPE in Roofing
Before we dive into the specifics, it’s important to understand why PPE is critical in roofing. Roofing work involves numerous hazards, including falls from heights, falling objects, and exposure to harmful materials. PPE helps to minimize these risks, ensuring that roofing projects are completed efficiently and with the safety of all involved as the foremost concern.
Essential PPE for Roofing
When working on a roof, every roofer should have several key pieces of PPE. Let’s examine each one.
1. Hard Hats
Hard hats are one of the most recognizable pieces of PPE. They protect workers from head injuries caused by falling tools, materials, or debris. Given the nature of roofing work, having a hard hat that is well-fitted and freely adjustable is essential for both comfort and safety.
2. Safety Harnesses
Falls are one of the leading causes of injuries in roofing. A safety harness is an essential piece of equipment to mitigate this risk. Harnesses should be worn on steep roofs and correctly secured to a safety anchor point to prevent falls.
3. Non-Slip Footwear
A roofer’s choice of footwear significantly impacts safety while on the job. Non-slip, sturdy boots with good grip are vital to prevent slips and falls on sloped surfaces. Look for roofing-specific boots that provide ankle support and water resistance.
4. Gloves
Gloves should be worn to protect the hands from cuts and abrasions while handling sharp roofing materials. Additionally, gloves can enhance grip when working with tools and other equipment, reducing the likelihood of accidents.
5. Eye Protection
Falling debris and exposure to hazardous materials make it necessary for roofers to have proper eye protection. Safety glasses or goggles should be worn to shield the eyes from dust, debris, and any harmful materials that may arise during roofing.
6. Hearing Protection
Hearing protection is important if your roofing project involves power tools like nail guns or saws. Prolonged exposure to loud noises can cause irreversible hearing loss. Opt for earplugs or earmuffs designed for use in construction settings.
7. Respirators or Masks
Dust and fumes can pose serious health risks. Whether you’re working with asphalt shingles or other materials, a respirator or appropriate mask can help reduce your exposure to harmful substances. Choose a mask that fits well and provides the appropriate level of filtration for the materials you’re handling.
8. High-Visibility Clothing
When on the job site, high-visibility clothing ensures that those around you can see you. Bright colors and reflective strips can significantly prevent accidents, especially when working near vehicle traffic or in low-light conditions.
Additional Considerations for Roofing PPE
While the above list covers the essentials, it’s important for people working in roofing to remain vigilant about their safety. Here are some additional pointers to consider:
Regular Inspections: All PPE should be regularly inspected for wear and tear. Damaged gear should be replaced immediately to ensure ongoing safety.
Proper Training: PPE is only effective when people are trained to use it correctly. Ensure that all team members have received adequate training on using PPE correctly.
Weather Considerations: Weather can impact the effectiveness of certain PPE. For instance, heat can make some gear uncomfortable. Consider lightweight, breathable options for hot weather while ensuring warmth and waterproofing in colder, wet conditions.
Prioritizing Safety with Lastime Exteriors
Choosing the right roofing contractor is as important as having the proper PPE. At Lastime Exteriors, we take pride in providing safe working conditions while delivering high-quality roofing services. Our team is equipped with the necessary PPE to ensure every project is completed without compromising safety.
When you hire Lastime Exteriors, you are choosing skilled roofing professionals and a team that values the safety of everyone on the job site. Our commitment to safety means you can trust us with your project, knowing we take the necessary precautions seriously.
Protect Your Home and Stay Safe with Lastime Exteriors – Contact Us Today!
Safety and quality go hand in hand when it comes to roofing. Don’t settle for less when it comes to your home.
3 notes
·
View notes
Text
Genecine - UK Pharmaceutical & Healthcare Wholesalers & Supplier

At Genecine, we are committed to making healthcare both accessible and affordable. Our Competitive pricing guarantees exceptional value while maintaining the highest standards of product integrity. We are dedicated to providing essential healthcare items to our wholesale customers in the UK.
Dive into our collection of informative blogs to gain a deeper understanding of who we are, our journey, and the wide range of high-quality pharma and healthcare products we proudly export to the UK and across the globe. Each blog is crafted to provide valuable insights into our commitment to excellence, innovation, and international trade.
Beyond Borders: Natural Healing Arrives in London and Beyond
The Legacy of Bell’s Healthcare
The Best Healthcare Wholesaler in UK
Wholesale Beauty Supply Products in the UK
Dietary Supplements: A Comprehensive Guide to Health and Wellness
Best Natural Remedies for Muscle & Joint Pain Relief – A Complete Guide
Where to Buy Cetaphil Products Online in the UK – Best Deals for Dry & Sensitive Skin
Promensil Menopause Tablets UK – Buy Online for Natural Menopause Relief & Hormonal Balance
Buy Centrum Multivitamins Online in the UK – Best Supplements for Daily Health
Top Vitamins & Minerals Every Woman Needs After 50 in the UK
Where to Buy Aveeno Lotion & Body Wash Online – Affordable & Authentic!
Best Beauty Supplements for Hair, Skin & Nails – What to Buy Online
Aptamil Milk: Is It the Best Formula for Your Baby?
Best Aussie and Aveeno Products for Hair and Baby Care
A Guide to Choosing the Perfect Supplements for Your Unique Lifestyle
How to Build an Effective Skincare Routine with Natural Products
9 Best Sustainable Beauty Products to Try This Year (2025)
The Smart Guide to Buying Wholesale Vitamins and Supplements in the UK
The Ultimate Guide to Face Masks and Personal Protective Equipment (PPE) in the UK
Essential Pregnancy Supplements, Prenatal Care, and Skincare Tips for UK Moms-to-Be
How to Build the Perfect Skincare Routine: 10 Tips for Flawless Products
How to Pick the Best Cleanser for Your Unique Skin Type in 2024-25
Essential Pregnancy Supplements, Prenatal Care, and Skincare Tips for UK Moms-to-Be
The Ultimate Guide to Face Masks and Personal Protective Equipment (PPE) in the UK
Buy Energy Supplements and Mind Enhancement Products for Sale
Top Hair Loss Treatments for Sale: How to Buy the Best Hair Regrowth Products
How To Get Glowing Skin With The Best Skin Care Products
Are You Using the Right Toothpaste? Choose the Best Products for Your Dental Needs
Buy Skincare Products for a Radiant Complexion: Top Facial Care Items You Need
The Ultimate Guide to Choosing and Buying the Best Insect Repellent Spray
How to Find the Perfect Hair Conditioner Online
How to Choose the Best Shampoo for Your Hair Type: Top Hair Cleansing Products Available Online
Are You Prepared to Handle Your Child’s Health Needs? Here’s How You Can Find Kids’ Health Products and Medicine Online
Why Should You Have a Topical Antiseptic on Hand? Find the Best Antiseptic Creams and Topical Solutions for Sale
How Can You Naturally Support Your Immune System? Explore Immune Support Supplements
Struggling with Stress and Anxiety? Find Natural Remedies and Stress Relief Products That Work
Pain Relief Topical GSL: Buy Pain Relief Creams and Topical Analgesics for Sale
Homoeopathic Remedies Available and Where to Buy Natural Treatments Online
1 note
·
View note
Text
@solarpunk-0possum asked for a guide on solar yarn dyeing and I wrote this up because I’m a nutcase. It’s long but hopefully informative.
Its actually really easy and there’s cool things you can do with it. Chemknits on YouTube has some fun projects too, their channel is the ultimate dye channel imo. But I’m going to give you a crash course here because I like doing that.
Let’s start with fiber.
For acid dyes it needs to be a protein based fiber, it can be a blend, so wool and nylon for example but depending on the fiber it may look slightly different. I almost exclusively use Wool2Dye4 platinum sock for my yarn base which is 75% super wash merino wool and 25% nylon but for more environmentally friendly dyeing, as super washing isn’t great, you can go non super wash wool or other natural protein based fiber. Paradise Fibers and KnitPicks also have white yarn bases. There are other companies but most won’t let you buy single skeins as they are geared toward commercial dyers. I buy in bulk cause I do a lot of dyeing.
If you get a non super wash wool yarn it can felt but this process minimizes that risk significantly. Handling it a lot, stirring or squeezing and temp changes are what cause wool to felt. I also dye 100% wool top and roving in many varieties with this same method. This technique is great for that because your felting risk is super low since you aren’t stirring or changing temps until you rinse and even then the temp change is a lot less and your fiber stays together.
If you do a fiber like silk it is going to react a lot differently so you want to play around to get the hue you want. Silk is notoriously tricky but gorgeous.
Plant based fibers need a different totally different dye and mordant though, I’ll get into that later but if you have a hemp, linen, bamboo or viscose or something you can still do this. Even synthetic fibers like white acrylic or nylon can be dyed just needs a different dye and I can’t speak to the efficacy of solar as I’ve never dyed them but nylon blend works so I don’t see why not.
Now to the dyes.
Acid reactive dyes are dyes that react and bind to fiber once acid is introduced to the party. I use white vinegar or citric acid. You can buy acid dyes from companies like Jacquard or Dharma Trading, there are several companies but these are my personal favs. Jacquard has a red, blue and yellow set that is great to start with as you mix your own colors using basic color wheel principles.
You don’t have to buy special dye though!!
You can dye with Kool Aid or Easter egg dyeing pellets or food coloring (gel or liquid), cake sprays, bath bomb colors etc. It just won’t be as color and light fast. But if you are just playing around it’s super fun and safe and I have skeins that kept their colors for years no issue. Also using those food based dyes can be done with children where I wouldn’t with acid dyes.
For acid dyes you want to use equipment that won’t ever touch food again, so you need specific jars and spoons and such that are just for dyeing. I have dedicated dyeing equipment (stock pot, crock pot, tongs, spoons, etc) but I purchased all of it at thrift shops for super cheap.
I also use a N95 mask or respirator whenever I open my dye powder jars to not breath in particulates. I also wear glasses or safety goggles. I wear a mask for ANY powder even Kool Aid. It’s just good PPE. I am bad about wearing gloves though….I should be better. Wear gloves.
For this project as far as equipment all you need are glass mason jars. I used 2quart so the yarn could move freely but 1quart or smaller will work too you just might need to put in less yarn. You also need plastic or paper cups to mix dye in if you are mixing. If you are using an acid dye or even a Kool Aid you need gloves, and a mask.
I do recommend a scale but it is not necessary, 1 tsp of acid dye is usually = 1 gram but check the manufacturer documentation. If you are using food coloring or Kool Aid you don’t need special dedicated stuff at all.
You will also need an acid like white vinegar or citric acid. Kool Aid, and PAS easter pellets or other powdered drink mixes usually have an acid in them so you can use them as is but I always add a little extra acid for better color adhesion.
For plant based fibers you need a fiber reactive dye and a mordant like soda ash or alum . Procion has a Pro MX line. You can also dye with natural materials like indigo, madder, onion skins, marigold, avocado etc. Some people recommend soaking or boiling your fiber in your chosen mordant but tbh I’ve done it just throwing everything in the jar and had good results so 🤷♀️. You can get soda ash and alum on Amazon or other sources like Dharma Trading. For plant based dyeing you just put the leaves or roots depending on the material in the jar with everything. Natural dyeing takes A LOT longer than acid or fiber reactive dyes for solar dyeing but it’s still fun and MUCH better for environment.
For synthetic fibers like acrylic you have to use something like Rit. I don’t do this very often (or at all really) and have never solar dyed acrylic as I just buy acrylic yarn in the color I want when I use it, but I assume it would work the same? I cannot guarantee it though. I’ve also seen people use acrylic paint mixed with water to dye yarn, it just changes the texture slightly so your mileage may vary with synthetics. I don’t recommend using them though. You can get 100% wool, linen, bamboo etc at craft stores pretty easily now a days.
So now that you have your dye and your fiber let’s get dyeing!
Prepping the Fiber
Weigh your yarn. You can use a kitchen scale. This will help you figure out how much dye to use to get the shade you want. This calculator for acid dyes is great for figuring out how much dye stock solution you need. For Kool Aid or Food Coloring it’s just vibes based for me but someone has probably figured out the amounts. We’ll get there.
To prevent tangling I recommend tying your yarn off in the skein at regular intervals. You can see my purple yarn ties in the pic below. I also use reusable zip ties. If you buy yarn the skeins usually come pre-tied but I skein up my own yarn so yeah. I also will put a zip tie or large piece of yarn at either end to keep it orderly. You can also just put entire cakes wound up from a ball winder, or an entire skein from the store in the jar too though, you’ll get different effects from the natural resist of it being wound up but it’s super fun to see what happens.
Soak your yarn, if you want more color variation you can do it dry, that’s often how tonals and semi solids are dyed as the dye binds or “strikes” to the fiber at different rates so feel free to experiment. You can also presoak your yarn in an acid and water mixture for different effects as well. It’s all about experimentation! Even your dye can do things differently depending on if the dye “breaks”, that’s where different pigments make up the dye and will strike at different temps, the Purple Pop I used in this example is a dye that will break into blues and reds or different purples if I do different things with the heat. For natural you can soak in your mordant like alum or soda ash. You probably want to get more detailed instructions on amounts though, I just look it up when I do it as I never remember and it takes me forever to gather enough plant material so it’s only a once or twice a year thing.
In this example I soaked my yarn in plain water for about 30 minutes before I added any dye as I was going for a solid.

While your yarn is soaking you can mix your dyes!
Mixing Dye:
If you are using acid dyes you can add your dye powder directly to the water you are dying in until it looks like you want. I dip pieces of paper towel into it to get an idea of what it looks like color wise, or what I do for greater precision with different color saturations and to not waste dye is mix a dye stock solution.
It sounds scarier than it is. A dye stock solution is suspending the dye molecules in water to make a concentration of dye. My dye stocks are 1 part to 100 for a 1% solution. So for Dharma dyes I mix 1 gram (1 part) to 100ml hot water (100 parts). Once I have my dye stock mixed I can use that to determine how many milliliters of dye I want to introduce to my yarn. The calculator I linked can tell you how much for the depth of shade you want but for an example if I want a mid saturation at 2% for a 50g skein I would use 100ml of dye stock. If I want a much lighter shade at .5% I would only use 25ml. If I want just the regular color at 1% I use whatever the fiber weighs in ml, so 50ml for a 50g skein. The skeins above are 2% of Sour Apple and Purple Pop except for the lighter green which was .5% of Sour Apple. If I wanted pastels I usually do like .025%.
The calculation is Weight of Fiber x Depth of Shade for a 1% dye stock solution. You can make stronger dye stocks like 2 grams per 100ml for a 2% but I find just using 1% much easier cause math is annoying but the calculator will let you do that too.
For Kool Aid or Food Coloring just mix your color in water and dip in pieces of paper towel until it’s approximately the shade you want. It’s not 100 accurate as paper towel is different than your fiber but is pretty close, or at least gives you an idea if you have a deep shade or a pastel shade. If it’s too dark add more water, too light add more dye.
For natural dye you can’t really determine what shade you’ll get as plants have too many variables, there are some general guidelines for most common dye materials that can give you an idea though and generally less material is lighter and more material is darker.
The Full Process:
Weigh your yarn if you are trying to get a more precise depth of shade. Then you can use the calculations above to determine how much dye. If you are just playing you can skip this. If you bought skeins they usually tell you if it’s 100g or 25g etc so no need to weigh.
I filled my jars with plain water and put the yarn in (make sure it’s loose, I made the mistake with my first batch last weekend of accidentally leaving it twisted in the skein and it formed a resist, I just overdyed and still got some pretty skeins so nothing lost but if you want white spots or different depts of shade throughout feel free to add some resist by leaving it skeined or tying off sections like tie dye!).
When filling your jars remember we need room at the top to add dye and acid so just fill until the yarn moves freely, you can always top it off after. Can you tell I’ve made this mistake?
I let it soak for about 30 minutes while I prepared my dye stock.
Once my dye was mixed and my yarn had soaked I determined how much dye I wanted to use. Then just add the dye into the jar. I let my yarn sit in the dye without acid for another 30 minutes. I put the lid on and shook it up to make sure it penetrated all the yarn. Again, if you want different effects you can add the acid in now, don’t mix it, etc but for a solid you want as even coverage as possible.
Then I added the acid. I used 1/4 cup acid cause that’s what I always use for some reason but you can add just 1 or 2 tablespoons. I used white vinegar. I usually use a citric acid mix with water but I ran out. It doesn’t matter the vinegar smell fades.
I put my lid on, gave it a good mix and I was done. Now for the sun part.

What makes the dye bond to fiber is a proportion of acid, heat and time. With kettle dyeing in a pot on the stove or similar you introduce heat rapidly but in this case it’s not so much about the temp as it is the UV and time. You don’t have to put your jars in direct sunlight outside, a sun facing window is fine too. Your jars do need to be clear though.
I put mine outside. You can still solar dye if it’s overcast or even if it’s kinda cold it just might take more time.
Then just leave it! You’ll know it’s done when the water is clear, the yarn can make it appear like it’s not clear but pool it at the top of the jar to check on it.
This is called exhausting the dye, all the dye molecules have found a friend in the fiber and adhered to it. Some dyes do not exhaust completely, either because there is too much dye for the weight of fiber and all the molecules have already found their friend, or because of the dye itself. The Purple Pop is really bad about exhausting. If it’s been several days and you aren’t seeing a change it may be done, in that case just take your yarn out but add another skein in with some more acid, no need to waste it, you’ll get a lighter shade. I usually have a yarn mop for collecting non-exhausted dye. I just throw it in and see what happens, sometimes with many different colors.
The length of time you leave it out depends on a lot of factors, natural plant based dyes can take months, these acid based dyes took two days in Central FL but honestly the greens were exhausted in like 18 hours and the purple I didn’t see any change so I just took it out and put another skein in, its cooking now. I usually give my acid or Kool Aid dye projects no more than a week cause I’m impatient and always have had good results. Plant based I’ll leave for months.
After you remove your yarn you can dump the water. If I dump it outside I add a little baking soda to neutralize the acid, or just let it sit for awhile. I don’t like to dump it near water sources like wells or any food based gardens but have used it to water flowers and stuff. If using Kool Aid or food coloring you can do whatever. I’ve also reused my water for another dye if it’s totally clear or if I don’t care if there’s a bit leftover.
Then wash and rinse your yarn! I use Kookabura Wool Wash but you can use anything like Dawn dish soap. You may have a bit of bleeding depending on the color or none at all, just rinse and repeat until the water runs clear. If it’s a lot of bleeding and you are washing and rinsing and it just won’t run clear you can steam set it by wrapping it in plastic wrap while still wet and microwaving it or steaming it in a steamer basket like you would a vegetable. If you microwave just don’t burn your yarn! I do like 30 second intervals in the microwave until it’s hot to the touch but I rarely have to do this.
For non super wash wool or wool top/rocing that will felt you need to do this gently. Don’t run water directly on the fiber, handle it as little as possible, don’t introduce extreme temperature changes etc. The temp is less of a concern for solar though, that mostly applies to kettle where you go from hot to cold.
Then hang to dry! If you tied off your skein it should be tangle free, but you may need to shake or comb it a bit to get rid of curly bits. I use a dedicated salad spinner to really get it dry first then hang and it’s usually totally dry in a few hours.
And that’s it! Hope this helped, sorry it’s so long.
6 notes
·
View notes