#Openvpn access server config file
Explore tagged Tumblr posts
Visit Tumblr Blog
Explore Tumblr blogs with no restrictions, modern design and the best experience.
Last Seen Tumblr Blogs


Fun Fact
In February 2021, Tumblr had 518.6 million blog accounts.
Text
can't get pia vpn to run on dd-wrt
🔒🌍✨ Get 3 Months FREE VPN - Secure & Private Internet Access Worldwide! Click Here ✨🌍🔒
can't get pia vpn to run on dd-wrt
PIA VPN setup on DD-WRT
Setting up a VPN on your DD-WRT router can enhance your online security and privacy. PIA (Private Internet Access) is a popular VPN service known for its strong encryption and high-speed servers. By configuring PIA VPN on your DD-WRT router, you can protect all devices connected to your network.
To begin the setup process, log in to your DD-WRT router's admin panel using a web browser. Navigate to the "Services" tab and then click on the "VPN" sub-tab. Here, you will find the option to enable the OpenVPN client. Enter the PIA server address in the "Server IP/Name" field and your PIA username and password in the respective fields.
Next, download the OpenVPN configuration files from the PIA website. Extract the files and upload them to your DD-WRT router using the "Choose File" button in the OpenVPN client settings. Save the settings and click on the "Start Now" button to initiate the VPN connection.
It is recommended to also set up the DNS servers provided by PIA to prevent any DNS leaks. You can do this by entering the DNS addresses in the "Additional Config" field under the OpenVPN client settings.
Once the setup is complete, all the devices connected to your DD-WRT router will be automatically protected by the PIA VPN. You can verify the VPN connection status in the router admin panel and enjoy a secure and private browsing experience.
Troubleshooting PIA VPN on DD-WRT
If you are facing issues with setting up or using Private Internet Access (PIA) VPN on a DD-WRT router, troubleshooting these problems can help you establish a secure and private internet connection seamlessly.
Firstly, ensure that your DD-WRT router firmware is compatible with the PIA VPN service. Check the PIA website for a list of supported firmware versions. If your firmware is outdated, consider updating it to the latest version to ensure compatibility.
Next, verify that you have entered the correct PIA VPN server details in the DD-WRT router settings. Incorrect server information can lead to connection failures. Cross-check the server address, username, password, and encryption settings provided by PIA to ensure accurate configuration.
If you are experiencing connectivity issues, try switching to a different PIA VPN server. Sometimes, specific servers may be overloaded or experiencing connectivity issues, leading to a poor connection. By changing the server, you can improve your VPN connection speed and stability.
Additionally, check if your DD-WRT router's internet connection is stable. A weak or intermittent internet connection can disrupt the VPN connection. Reboot your router, modem, and any other networking equipment to refresh the connection and eliminate potential issues.
Lastly, reach out to PIA's customer support for further assistance if you are unable to resolve the VPN problems on your DD-WRT router. Their technical team can provide personalized troubleshooting steps to help you overcome any persistent issues effectively.
By following these troubleshooting tips, you can address common PIA VPN issues on your DD-WRT router and enjoy a secure and anonymous internet browsing experience.
Configuration issues with PIA VPN on DD-WRT
Private Internet Access (PIA) is a popular VPN service that provides users with online privacy and security. However, configuring PIA VPN on a DD-WRT router can sometimes present challenges for users.
One common issue that users encounter is difficulty setting up the VPN connection on their DD-WRT router. This can be due to incorrect settings or a lack of understanding of the configuration process. To resolve this, users should carefully follow the step-by-step instructions provided by PIA for setting up their VPN on DD-WRT. Ensuring that the settings match the requirements of PIA’s servers is crucial for a successful connection.
Another configuration issue that users may face is slow VPN speeds or intermittent connection drops. This could be caused by a variety of factors, such as network congestion, server location, or the processing power of the router itself. To improve speed and stability, users can try connecting to different PIA servers, adjusting encryption settings, or upgrading to a more powerful DD-WRT router.
Additionally, users may encounter DNS leak issues when using PIA VPN on DD-WRT, which can compromise their online privacy. To prevent DNS leaks, users should configure their router to use PIA’s DNS servers and enable the DNS leak protection feature in the VPN settings.
Overall, while configuring PIA VPN on DD-WRT may pose challenges, addressing common issues such as setup errors, slow speeds, connection drops, and DNS leaks can help users enjoy a secure and reliable VPN experience on their router. By following troubleshooting tips and seeking assistance from PIA’s support team, users can overcome configuration issues and optimize their VPN setup for enhanced online security and privacy.
DD-WRT firmware compatibility with PIA VPN
DD-WRT is a popular open-source firmware that can be installed on many wireless routers to enhance their performance and functionality. One of the key features that DD-WRT offers is the ability to configure a Virtual Private Network (VPN) connection directly on the router. This enables all devices connected to the router to benefit from the VPN without needing to set it up individually on each device.
Private Internet Access (PIA) is a well-known VPN service that is favored for its strong privacy and security features. Many users seek to combine the power of DD-WRT with the protection of PIA VPN to secure their internet connection and access geo-blocked content.
The good news is that DD-WRT firmware is compatible with PIA VPN. By setting up PIA VPN on a router running DD-WRT, users can encrypt their online activities, protect their sensitive data from cyber threats, and surf the web anonymously. This combination also allows users to bypass geographic restrictions and access online content that may be blocked in their region.
Setting up PIA VPN on DD-WRT may require following specific instructions provided by PIA and configuring the VPN settings on the router's control panel. It's important to ensure that the router is compatible with DD-WRT firmware and that the firmware is up to date before attempting to install PIA VPN.
In conclusion, combining DD-WRT firmware with PIA VPN can offer users a powerful and secure internet browsing experience with enhanced privacy and access capabilities. By following the necessary steps to set up PIA VPN on DD-WRT, users can enjoy the benefits of both technologies working together seamlessly.
Resolving connectivity problems with PIA VPN on DD-WRT
Facing connectivity issues with your Private Internet Access (PIA) VPN on your DD-WRT router can be frustrating, but fret not, as there are steps you can take to troubleshoot and resolve these issues.
Firstly, ensure that your DD-WRT firmware is up to date. Outdated firmware versions may not be compatible with the latest PIA VPN protocols, leading to connectivity problems. Check the DD-WRT website for any available updates and follow their instructions for upgrading your firmware.
Next, verify that your PIA VPN credentials are correctly entered into the DD-WRT router settings. Even a small typo in your username or password can prevent the VPN from connecting properly. Double-check these details to ensure accuracy.
If you're still encountering issues, try changing the VPN server you're connecting to. Sometimes, specific servers may experience high traffic or technical issues, causing connectivity problems. Experiment with different servers until you find one that provides a stable connection.
Additionally, adjust the VPN protocol settings in your DD-WRT router configuration. PIA supports multiple VPN protocols, including OpenVPN and WireGuard. Switching between these protocols can sometimes improve connectivity, depending on your network environment.
Furthermore, check your router's firewall settings to ensure that they aren't blocking VPN traffic. Some firewalls may mistakenly flag VPN connections as suspicious activity, preventing them from establishing a connection. Whitelisting the PIA VPN in your router's firewall settings can resolve this issue.
Lastly, if none of the above steps resolve your connectivity problems, contact PIA's customer support for further assistance. They can provide personalized troubleshooting guidance and help resolve any underlying issues with your VPN connection.
By following these steps, you can troubleshoot and resolve connectivity problems with your PIA VPN on DD-WRT, ensuring a secure and reliable internet connection for all your devices.
0 notes
Text
can t add vpn ubuntu
🔒🌍✨ Get 3 Months FREE VPN - Secure & Private Internet Access Worldwide! Click Here ✨🌍🔒
can t add vpn ubuntu
VPN installation Ubuntu
Title: How to Install and Set Up a VPN on Ubuntu: A Step-by-Step Guide
In today's digital age, protecting your online privacy and security is paramount. One effective way to achieve this is by using a Virtual Private Network (VPN). VPNs encrypt your internet connection, making it virtually impossible for hackers, ISPs, or government agencies to intercept your data. If you're a Ubuntu user, setting up a VPN is a straightforward process. Here's a step-by-step guide to help you get started:
Choose a VPN Provider: Before you begin, select a reliable VPN provider that offers compatibility with Ubuntu. Look for providers that offer strong encryption, a no-logs policy, and servers in your desired locations.
Install OpenVPN: Ubuntu supports OpenVPN, one of the most secure VPN protocols available. To install OpenVPN, open the terminal and enter the following command:
sudo apt-get install openvpn
Download Configuration Files: Once OpenVPN is installed, you'll need to download the configuration files from your VPN provider's website. These files contain information about the VPN servers and protocols.
Configure OpenVPN: Move the downloaded configuration files to the appropriate directory (/etc/openvpn/). You can do this using the terminal or file manager. Then, rename the files with a .conf extension.
Connect to the VPN: With the configuration files in place, you can now connect to the VPN. Open the terminal and enter the following command:
sudo openvpn --config /etc/openvpn/your_config_file.conf
Replace "your_config_file.conf" with the name of your configuration file.
Verify the Connection: Once connected, verify that your VPN connection is active by visiting a website like https://whatismyip.com. It should display the IP address of the VPN server, not your actual IP address.
That's it! You've successfully installed and set up a VPN on your Ubuntu system. Remember to disconnect from the VPN when you're not using it to maximize your internet speed and privacy. With your VPN up and running, you can browse the web with confidence, knowing that your online activities are secure and private.
Troubleshoot VPN Ubuntu
If you are encountering issues with your VPN setup on Ubuntu, here are some troubleshooting steps to help resolve the issues and get your VPN connection up and running smoothly.
Check your internet connection: Before troubleshooting the VPN, ensure that your internet connection is stable and working correctly. A slow or unstable internet connection can affect the VPN connection.
Verify VPN settings: Double-check the VPN settings, including the server address, authentication credentials, and VPN protocol. Ensure that the settings are correctly configured to establish a secure connection.
Restart VPN service: Sometimes, restarting the VPN service can resolve connectivity issues. You can do this by restarting the network manager service using the command: sudo service network-manager restart
Firewall settings: In some cases, firewall settings may block the VPN connection. Disable the firewall temporarily to check if it is the cause of the issue.
Update VPN client: Make sure that your VPN client software is up to date. Outdated software may have bugs or compatibility issues that can cause connection problems.
DNS settings: Incorrect DNS settings can also affect the VPN connection. Configure the DNS settings to use the VPN provider's DNS servers for better connectivity.
Contact VPN provider: If the issue persists, contact your VPN provider for further assistance. They may provide specific troubleshooting steps or settings tailored to their service.
By following these troubleshooting steps, you can identify and resolve common VPN issues on Ubuntu, ensuring a secure and reliable connection for your online activities.
VPN configuration Ubuntu
Configuring a Virtual Private Network (VPN) on Ubuntu can help enhance your online privacy and security. A VPN creates a secure encrypted connection between your device and the internet, ensuring that your data remains protected from potential cyber threats and prying eyes.
To configure a VPN on Ubuntu, you can follow these simple steps:
Select a VPN service provider: Choose a reliable VPN service provider that meets your specific needs in terms of security features, server locations, and speed.
Install the VPN software: Most VPN providers offer easy-to-use software that can be downloaded from their website. Follow the instructions to install the software on your Ubuntu system.
Configure the VPN connection: Launch the VPN software and enter your login credentials provided by the VPN service. You may need to select a server location to connect to.
Adjust the VPN settings: Depending on your preferences, you can customize the VPN settings such as protocol selection, kill switch, DNS leak protection, and auto-connect options.
Test the VPN connection: Ensure that the VPN is working correctly by visiting a website to check if your IP address reflects the VPN server location.
By configuring a VPN on Ubuntu, you can browse the internet anonymously, access geo-restricted content, and secure your data while using public Wi-Fi networks. Remember to keep your VPN software updated to benefit from the latest security enhancements and enjoy a safer online experience.
Ubuntu VPN setup errors
Setting up a VPN on Ubuntu can sometimes be a challenging task, especially when encountering errors along the way. Common VPN setup errors on Ubuntu may include issues with connection establishment, authentication failures, or DNS resolution problems.
One of the most frequent errors encountered when setting up a VPN on Ubuntu is related to connection failures. This can happen due to misconfigurations in the VPN settings, incorrect authentication credentials, or network restrictions. To troubleshoot this issue, it is recommended to double-check the connection settings, ensure the VPN server is reachable, and verify the authentication details provided.
Authentication failures are another common issue that users may face when configuring a VPN on Ubuntu. This error usually occurs when the provided username or password is incorrect, or when the authentication method used by the VPN server is not supported by the client. To resolve this error, users should verify their credentials, check for any special characters that may cause issues, and make sure the authentication method matches the one required by the VPN server.
DNS resolution problems can also arise during VPN setup on Ubuntu, causing issues with accessing websites or services through the VPN connection. This error can be resolved by configuring the correct DNS servers in the network settings or by adjusting the DNS settings provided by the VPN server.
In conclusion, setting up a VPN on Ubuntu may result in various errors that can be resolved with proper troubleshooting steps. By identifying and addressing common VPN setup errors, Ubuntu users can ensure a secure and reliable VPN connection for their online activities.
Fix VPN connection Ubuntu
When using a Virtual Private Network (VPN) on your Ubuntu system, you may encounter issues with the connection that can disrupt your online activities. If you are facing difficulties with your VPN connection on Ubuntu, there are several troubleshooting steps you can take to resolve the issue.
Firstly, ensure that your VPN service is compatible with Ubuntu and that you have entered the correct connection details. Incorrect server information or authentication settings can cause connection failures. Double-check your username, password, and server address to ensure they are accurate.
If you are still experiencing connection problems, try switching to a different VPN protocol. Ubuntu supports various VPN protocols such as OpenVPN, L2TP/IPsec, and PPTP. Experimenting with different protocols can help you identify if the issue lies with a specific protocol.
Another common fix for VPN connection issues on Ubuntu is to restart the networking service. You can do this by opening a terminal and entering the command: sudo service network-manager restart. This will refresh the network settings and may establish a stable VPN connection.
Additionally, updating your Ubuntu system and the VPN client software to the latest versions can address compatibility issues and security vulnerabilities that could be affecting the VPN connection.
If none of the above solutions resolve your VPN connection problem, consider reaching out to your VPN service provider for further assistance. They may provide specific troubleshooting steps or insights tailored to their service.
By following these troubleshooting steps, you can effectively diagnose and fix VPN connection issues on Ubuntu, ensuring a secure and seamless online experience.
0 notes
Text
can you export vpn config from one pc to another
🔒🌍✨ Get 3 Months FREE VPN - Secure & Private Internet Access Worldwide! Click Here ✨🌍🔒
can you export vpn config from one pc to another
VPN configuration export
Title: Simplifying Your VPN Configuration Export Process
In today's interconnected digital landscape, safeguarding online privacy and security has become paramount. Virtual Private Networks (VPNs) offer a secure and encrypted connection, ensuring confidentiality and anonymity while browsing the internet. However, configuring VPN settings across multiple devices can be tedious and time-consuming. To streamline this process, many VPN providers offer the option to export configurations, enabling users to easily replicate settings across various devices.
VPN configuration export simplifies the setup process by allowing users to save their custom settings and preferences in a file format that can be imported into other devices or platforms. This functionality is particularly beneficial for individuals or businesses managing multiple devices or implementing VPNs across different operating systems.
The export process typically involves accessing the VPN client's settings menu and selecting the option to export configurations. Users can choose the desired parameters to include in the export file, such as server preferences, encryption protocols, and authentication methods. Once exported, the configuration file can be saved locally or transferred to other devices via email, USB drive, or cloud storage.
Importing the configuration file into another device is straightforward, usually requiring users to navigate to the VPN client's settings menu and select the option to import configurations. The file is then uploaded, and the VPN client automatically applies the saved settings, ensuring uniformity across all devices.
This feature not only saves time but also minimizes the risk of errors or discrepancies in VPN settings, enhancing security and consistency. Additionally, it allows users to easily switch between devices or platforms without the hassle of manually reconfiguring VPN parameters.
In conclusion, VPN configuration export is a valuable feature that simplifies the setup process and ensures consistency across multiple devices. By enabling users to save and transfer custom configurations effortlessly, VPN providers empower individuals and organizations to maximize the benefits of secure and private internet browsing.
Transfer VPN settings between computers
Transferring VPN settings between computers is a convenient and efficient process that allows you to maintain your preferred network configurations across multiple devices. Whether you are setting up a new computer or simply want to replicate your VPN setup on another machine, transferring VPN settings can save you time and effort.
To transfer VPN settings between computers, you can start by exporting the configuration file from your existing device. This file typically contains all the necessary information for your VPN connection, including server details, authentication credentials, and encryption settings. Most VPN providers offer an option to export these settings in a compatible format, such as OpenVPN configuration files or client-specific files.
Once you have exported the configuration file, you can then import it into the VPN client on your new computer. This process may vary depending on the VPN client you are using, but it usually involves selecting the option to import a new connection and selecting the configuration file you saved earlier.
By transferring VPN settings between computers, you can ensure a seamless transition without the need to manually reenter all the connection details. This not only saves time but also helps maintain consistency in your VPN setup across different devices.
In conclusion, transferring VPN settings between computers is a straightforward process that can help streamline your network setup. By exporting and importing configuration files, you can easily replicate your VPN settings and enjoy a secure and private browsing experience on all your devices.
Export VPN profile to another PC
Exporting a VPN profile to another PC is a straightforward process that ensures continuity of secure internet access across devices. A VPN (Virtual Private Network) profile contains configuration settings necessary for connecting to a VPN server, including server addresses, authentication methods, and encryption protocols. By transferring this profile to another PC, users can replicate their VPN settings without the need for manual configuration, saving time and effort.
To export a VPN profile to another PC, follow these steps:
Locate the VPN Profile: Begin by identifying the VPN profile on the original PC. This profile is typically stored within the VPN client software or system settings.
Export the Profile: Once located, most VPN clients offer an option to export the profile. This action generates a file (commonly in .ovpn or .conf format) containing all the necessary settings.
Transfer the File: Next, transfer the exported profile file to the target PC. This can be done via email, USB drive, cloud storage, or any other preferred method of file transfer.
Import the Profile: On the target PC, open the VPN client software and look for an option to import a VPN profile. Select the exported file and import it into the client.
Verify Settings: After importing the profile, double-check the VPN settings to ensure they match those of the original PC. Pay attention to server addresses, authentication details, and any custom configurations.
Connect to the VPN: Once the profile is imported and verified, attempt to connect to the VPN server. If successful, the VPN connection should establish seamlessly, providing secure internet access on the new PC.
By following these steps, users can easily export their VPN profile to another PC, maintaining consistent security and privacy measures across multiple devices. This process is particularly useful for individuals who frequently switch between computers or need to replicate VPN settings on multiple devices.
Move VPN configuration to different device
Moving VPN configuration to a different device can be a necessity for various reasons, such as upgrading hardware, changing devices, or simply optimizing performance. While the process may seem daunting, with the right steps, it can be accomplished smoothly.
Firstly, ensure you have the necessary credentials and details related to your VPN configuration. This includes login information, server addresses, authentication methods, and any custom settings you've configured.
Next, determine the type of VPN setup you're using. Whether it's a built-in VPN client on your device or a third-party application, familiarize yourself with the process of exporting or backing up the configuration.
For built-in VPN clients, such as those found on many operating systems and devices, there are usually options to export configuration files. These files typically contain all the necessary settings in a format that can be easily imported into another device.
If you're using a third-party VPN application, check if it offers a backup or export feature. Many reputable VPN services provide options to export configurations, either as files or through cloud backups, making it convenient to transfer settings to a new device.
Once you've exported the configuration from your current device, transfer it to the new device using methods like USB drives, cloud storage, or email attachments.
Finally, import the configuration into the VPN client on your new device, following the instructions provided by the software. This usually involves locating the import option within the VPN settings and selecting the configuration file you've transferred.
After importing the configuration, double-check all settings to ensure they match your previous setup. Test the VPN connection to verify that everything is functioning correctly on the new device.
By following these steps, you can seamlessly move your VPN configuration to a different device without losing any settings or disrupting your online privacy and security.
Import VPN setup to new computer
When setting up a new computer, it is essential to import your VPN setup to ensure secure internet browsing. A VPN, or Virtual Private Network, encrypts your internet connection, protecting your online activities from prying eyes and potential cyber threats.
To import your VPN setup to your new computer, you will need to follow a few simple steps. The first step is to download the VPN client software from the official website of your VPN service provider. Once downloaded, install the software on your new computer following the on-screen instructions.
Next, you will need to log in to your VPN account using your credentials. Most VPN services allow you to use the same account on multiple devices, making it easy to import your setup to a new computer.
After logging in, you may need to configure the VPN settings according to your preferences. This may include choosing a server location, enabling features like kill switch or split tunneling, and adjusting other privacy and security settings.
Once you have configured the VPN settings, you are ready to connect to the VPN server. Simply click on the connect button within the VPN client software, and your internet connection will be secured.
By importing your VPN setup to your new computer, you can enjoy a safe and private browsing experience, whether you are at home, in a café, or traveling abroad. Remember to keep your VPN software updated to benefit from the latest security features and improvements.
0 notes
Text
Openvpn access server config file

OPENVPN ACCESS SERVER CONFIG FILE HOW TO
OPENVPN ACCESS SERVER CONFIG FILE PASSWORD
OPENVPN ACCESS SERVER CONFIG FILE PASSWORD
How do i find my openvpn password if i forgot it? Anything else we need to think about? In case you have a firewall on the server you will need to make some changes to allow the traffic through. You now have a basic OpenVPN server / client configuration with username / password authentication. What do i need to know about openvpn server configuration? Repeat above steps to set username/password for each client. 2 Enter the client's name and assign an password for the client. Set Username/Password for each client on OpenVPN server 1 Click Account tab, and then click Add Account to set the username and password for VPN client. How to set usernamepassword for each client on openvpn server? In a few moments new password will be seen in “Service details” tab.Select “Reset Password” from the service menu and reset your password.Login to our client area and select your VPN service from the list.Select the Service Type (communication protocol) for OpenVPN Server: UDP, TCP.Go to Advanced > VPN Server > OpenVPN, select the checkbox to enable VPN Server.Visit, and log in with your TP-Link ID or the password you set for the router.Using OpenVPN to Securely Access Your Network Remotely How to connect to your vpn provider using openvpn? Your password can be seen by clicking the 'View VPN Password' button. Once logged in, select 'VPN Account' in the menu.Enter your username and password, and click "Log in".Go to the ' My Account ' section on our website.You can retrieve your VPN credentials by following these steps: How to find your vpn username and password? Verify that you have configured communication parameters for the authentication server properly.Verify that the username and password are present in the database.Check to see that the VPN Client user is supplying the correct username and password.› First Citizens Merger Form Largest Family Owned Bank Usįrequently Asked Questions How do i find my vpn username and password?.› Member Login Home Sap Australian User Group.
OPENVPN ACCESS SERVER CONFIG FILE HOW TO
› How To Use Barclays Online Banking Without Pinsentry.› Does Td Ameritrade Has A Transfer Out Account Fee.› Elements Login Johnson Matthey Core Johnson Matthey.› Bank Alfalah Brings Mastercard Internet Payment Gateway To Pakistan.› Apple Mail With Gmail Account Imap Moving Mails From Inbox To Folders Fails.› Ubs Expands Client Offering For Separately Managed Accounts To Include Third Party Asset Manager Strategies With No Additional Fees.› Clrstream Vs Sonicwall Email Security Vs Sophos Email Vs Spam And Virus Blocker.› Comcast Outlook Server Pop Account Settings.› Clrstream Vs Cryptainer Pe Vs Mimecast Email Security Vs Proofpoint Email Protection.› Inbox Dollars Review A Scam Or Legit Paid Email.› Airmail Vs Bluemail Vs Mailtrim Vs Em Client.› Elastic Email Vs Mailcarry Vs Mailchimp Transactional Email.› Openvpn Steps To Configure Only Username Password Authentication.› Access Server Web Admin Ui First Login.› Installing Openvpn User With Username Password Authentication.
0 notes
Text
How to install openvpn access server on android

#How to install openvpn access server on android how to
#How to install openvpn access server on android install
#How to install openvpn access server on android full
#How to install openvpn access server on android software
#How to install openvpn access server on android free
After the install, if we go to Server “Network and Internet ” settings > Under Ethernet > Change adaptor options > We can see a new network adaptor named OpenVPN TAP device created. This Completes the OpenVPN MSI Package install. We will get a warning message as ” No readable connection profiles ( config files ) found.
#How to install openvpn access server on android install
The install will get completed and we will get below screen. Openssl utilities, EasyRSA 3 Certificate Management scripts Below are the two features which will not be installed by default and we need to select during install. Make sure to choose all features by clicking the icon next to each features and selecting it. the following screen will appear, click “Customise” to start the installation. Once Downloaded double click the installer exe file. The OpenVPN executable should be installed on both server and client machines, since the single executable provides both client and server functions. Download the latest Windows 64-bit MSI installer for OpenVPN Community edition from official OpenVPN Website, under community section. Those clients that successfully connected to the OpenVPN server will have their ISP IP Address will show as servers Public IP address.Commonly, a VPN tunnel is used to privately access the internet, evading censorship or Geo location by shielding your computer’s web traffic when connecting through entrusted hotspots, or connections. This is a Users-to-Site Model.Which means settings up a OpenVPN Windows Server to tunnel clients internet traffic through OpenVPN server.
#How to install openvpn access server on android how to
In this article will show you how to Setup up a OpenVPN Server ( Community Edition) On Windows Server 2019 to forward incoming traffic to the internet, then route the responses back to the client. OpenVPN Connect client supported on Windows, Linux, MacOS, IOS and Android. This client package used to connect to the OpenVPN server.
#How to install openvpn access server on android software
It is the OpenVPN client software packages installing on client PC. It creates an icon in the notification area from which you can control OpenVPN to start/stop your VPN tunnels, view the log and do other useful things. OpenVPN GUI is a graphical fronted for OpenVPN running on Windows. It can be installed from the self-installing exe file which is called OpenVPN GUI. OpenVPN community edition server can be installed on Linux or Windows Based systems.
#How to install openvpn access server on android free
The OpenVPN Community Edition totally free to use and there is no user limitations. By Purchasing OpenVPN Cloud we can simply connect to our hosted service with regions around the globe.Īpart from OpenVPN Community Edition, the other two OpenVPN editions has Economical licensing model that is based only on the number of simultaneous VPN connecting users or devices. OpenVPN-as-a-Service, solution eliminates the need for VPN server installation.OpenVPN Access Server (OpenVPN-AS), is based on the Community Edition, but provides additional paid and proprietary features like LDAP integration, Easy Management Admin Portal ,cluster option etc.OpenVPN Community Edition, which is a free and open-source version.Secure Access to Cloud-Based Systems OpenVPN available as Below. Protect screen sharing and remote desktop communications Site-to-site, Users-to-Site or Users-to-Users connectivity to bring networks together In other word using OpenVPN we can create a secure Private network over public Internet and will have Remote access to internal services of your IT infrastructure. He developed the OpenVPN project that used to encrypt and secure point-to-point or site-to-site connection between two machines over the public Internet. OpenVPN is also the name of the open source project started by our co-founder and which uses the GPL license.
#How to install openvpn access server on android full
OpenVPN 2.3 includes a large number of improvements, including full IPv6 support and PolarSSL support. OpenVPN server process over a single TCP or UDP port. OpenVPN is not a web application proxy and does not operate through a web browser. OpenVPN supports flexible client authentication methods based on certificates, smart cards and username/password credentials. OpenVPN uses OSI layer 2 or 3 secure network extension using the industry standard SSL/TLS protocol. We can define OpenVPN as a full-featured SSL VPN. A VPN can also be used to connect computers to isolated remote computer networks that is usually inaccessible, by using the Internet or another intermediate network. A VPN service masks our ISP IP so your online actions are virtually untraceable. A VPN is short form of virtual private network, which gives us a privacy, anonymity and security over public internet. In this blog article we are going to discuss about How to setup OpenVPN on Windows Server 2019.
0 notes
Text
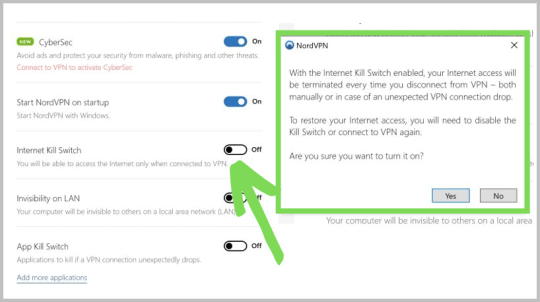
Nordvpn Mac Not Connecting

I just downloaded the Nord VPN app from the App store (designed to set up an IKEv2 connection), but when I open it and try to connect, the following dialog box keeps popping up and it keeps coming back no matter what I enter into it:
Apr 21, 2020 Fixes for NordVPN Not Connecting Connect to Another Server You can try connecting NordVPN to a few different servers. If it cannot connect to any, use this app on a different device like your phone. With NordVPN smart DNS, you can easily connect Apple TV to websites and servers using the server in a different location. On top of that, using a NordVPN DNS proxy for Apple TV will not cause you to have connectivity issues and low speeds.
If you're using the OpenVPN or NordVPN platform for accessing the Internet securely, you may have noticed that the Office 365 product (Outlook, Word, Excel, One Note, etc.) have reported that they do not have an internet connection ('NO INTERNET CONNECTION'). Launch NordVPN and connect to any server of your choice, preferably one that can unblock the streaming content you want to access on your Apple TV. Then, connect your Apple TV to this virtual hotspot network and to share NordVPN’s connection with the Apple TV. Set up NordVPN on Apple.
As a result, the IKEv2 NordVPN app from the App store will not connect. I managed to download and begin using the OpenVPN version of the Nord app, but I would like to know what the problem is with the IKEv2 version of the app. I'm running El Capitan on a 2015 Macbook Pro. Anyone else had this sort of problem?
MacBook Pro (Retina, 13-inch,Early 2015)
Posted on
Need a VPN or DNS for your device? Then, subscribe to
Fixing NordVPN connection issue might arise as a result of different reasons. We all know that NordVPN is one of the leading VPNs in the industry. So the tendency of having issues with connecting to the server is common and sometimes high. Though, if you have been battling with how to fix NordVPN connection problems, you landed yourself on the right place to get the right info.
NordVPN is a highly rated VPN provider for Windows, macOS, Linux, Android, and iOS platforms. Connecting to that VPN server is usually straightforward enough, but some NordVPN users might still need to fix connectivity issues.
NordVPN not connecting can be due to conflicting software, corrupted adapters, misconfigured network configurations and more besides.
How to Fix NordVPN Connection Problems
Depending on your devices, here is the list of steps you need to take if you are having difficulties in connecting to the server.
iOS Fix
The process is simplicity itself, you don’t need any specialist here. Is what you can do in a few minutes on your own. Here are the steps:
Step 1 > Delete the NordVPN app, in the actual sense you are to uninstall the app from your device.
Step 2 > Restart the device
Step 3 > Reinstall the app, please download from NordVPN offical website.
Step 4 > Enjoy
You see, these steps are simple and easy to follow, on the iOS devices you had fix NordVPN connection problems.
DON’T MISS IT: NordVPN has a great 66% discount on the 2-year plan, costing you just $3.99/month. It also backs all of its plans with a 30-day money back guarantee.
Fix NordVPN Connection Problems on MacOS
If you have any issues connecting to the internet with NordVPN on any Mac OS device, then try the following:
> You need to install the OpenVPN app version directly from the official website
> Do uninstall the IKE version before installing the new one
> Try using the obfuscated servers or the TCP protocol
Most times, the Canadian servers will work better than all the others. As for this, you need to team up with NordVPN support team to take up from you.
Fix NordVPN Connecting Issues on Linux Fix
In order to avoid any sort of issues when running NordVPN from a Linux device, just follow the next steps:
Step 1 > First of all, open the terminal by pressing (Ctrl+Alt+T)
F1a8. Step 2 > Install the OpenVPN client by entering “sudo apt-get install openvpn”. If you are asked for a password, insert the one you used when setting up your account
Nordvpn Mac Not Connecting Wifi
Step 3 > Go to the OpenVPN directory with this command “cd/etc/openvpn”
Step 4 > Now download the OpenVPN configuration files with the command “sudo wget https://downloads.nordcdn.com/configs/archives/servers/ovpn.zip”
Step 5 > Extract the “config.zip” with the command “sudo unzip ovpn.zip”
Step 6 > Enter the directory where the server configurations are placed
Step 7 > If you want a full list of the server coverage, input the following command “Is -al”
Step 8 > Just choose the server that you want to connect to

Step 9 > Start OpenVPN with the command “sudo openvpn (file name)”, where the file name is the chosen configuration
Step 10 > You will be asked for credentials, so insert those when necessary
Step 11 > You are now fully connected to NordVPN. If you want to disconnect, just boot up the terminal and press Ctrl+C.
DON’T MISS IT: NordVPN has a great 66% discount on the 2-year plan, costing you just $3.99/month. It also backs all of its plans with a 30-day money back guarantee.
Fix NordVPN Connection Problems on Windows 7
Before we move to some basic tips on how to fix NordVPN connection issues on Windows 7. Let quickly look at what we gathered from NordVPN official website.
> Log out of your account and log back in. After that, initiate a new connection and see if there is any change
> You should try connecting to the same network with a different device. This will help locate the source of the problem. Either it has something to do with the network or it’s the device malfunctioning.
> Try switching from TCP to UDP, changing the protocols to check if it changes anything
> Uninstall the application, reboot your device, and try installing it again. Try connecting to the network again.
> It could be that one of the servers is out of order so try connecting to other servers as well to see if it’s a local or a general issue
> For PC users, try disabling your firewall or antivirus. Many times, it’s the underlying protective protocols of these apps that interfere with the VPN network.
With regard to Windows 7 users being unable to connect to NordVPN, Reddit contains a few fixes that are likely to help.
1 > Try changing your account password and then log back in. Apparently, this is all that needs to be done in order to get over this stuttering with the connectivity. Or it could be that you changed your password frequently and the system is glitching, failing to recognize your identity. Again, just log out and sign back in. Ideally, it should solve everything.
2 > Some users have said that the IPv6 protocol was at fault. With it enabled, it was incredibly hard to connect to any server, let alone surf the internet or stream media. However, while this worked for some people, many more complained that it was actually no difference whatsoever when they turned off IPv6.
3 > In this case, try reinstalling the application and follow the instructions on the NordVPN website:
Step 1 > After downloading the installation package, open it
Step 2 > Click install on the first screen
Step 3 > The installation progress will begin, once finished, the application will automatically start
Step 4 > Provide your login details and click on the Login button
Dragon ball z burst limit psp download mediafire. Dragon Ball Z Burst Limit PS3 iso Download تحميل لعبة dragon ball z burst limit ps3dragon ball z burst limit downloaddragon ball z burst limit ps3 iso downloaddragon ball z burst limit controls ps3dragon ball z burst limit demo ps3 downloaddragon ball z burst limit english lyricsdragon ball z burst limit englishdragon ball z burst limit free downloaddragon ball z السلام. Download file - DragonBallZBurstLimitBLES00231.rar. Dragon Ball Z: Burst Limit is revolutionizing the series by entering the realm of next- generation gaming. Complete with fierce online battles and radical 3. D graphic effects only possible on PLAYSTATION®3 system, Dragon Ball Z: Burst Limit will blur the line between video game and iconic anime series. Dragon Ball Z: Burst Limit is revolutionizing the series by entering the realm of next-generation gaming. Complete with fierce online battles and radical 3D graphic effects, Dragon Ball Z: Burst Limit will blur the line between videogame and iconic anime series. Dragon Ball Z Burst Limit. Click the 'Install Game' button to initiate the file download and get compact download launcher. Locate the executable file in your local folder and begin the launcher to install your desired game. A game by: Dimps Corporation, and Bandai Namco Holdings.
Nordvpn Mac Not Connecting Iphone
Step 5 > The main screen will appear. You can see the server list and the map, navigate through the settings and access the server search feature on the top of the application.
Step 6 > On the bottom, you can find the Quick Connect button. This will find the optimal server for you using certain parameters and calculations.
Step 7 > To connect to a certain server in a specific country, click on the country pin on the map. After a successful connection, the app can be found in the system tray area at the bottom right corner of the screen.

DON’T MISS IT: NordVPN has a great 66% discount on the 2-year plan, costing you just $3.99/month. It also backs all of its plans with a 30-day money back guarantee.
Related articles:
0 notes
Text
Openvpn Server For Mac Os

Openvpn Server For Mac Osx
Openvpn For Mac Os X
Install Openvpn Server Mac Os X
Openvpn For Mac Download
Openvpn Server For Mac Os 10.10
Openvpn Server For Macos
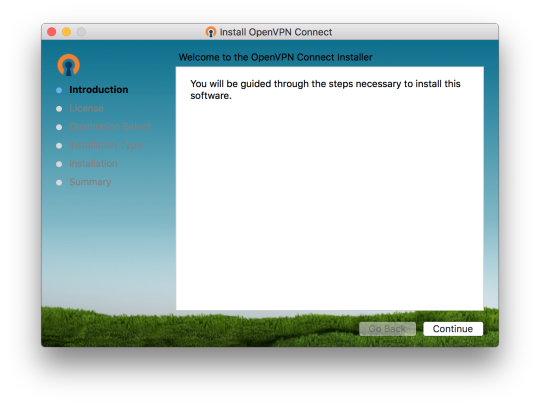
On your Mac, choose Apple menu System Preferences, then click Network. Tunnelblick helps you control OpenVPN ® VPNs on macOS. It is Free Software that puts its users first. There are no ads, no affiliate marketers, no tracking — we don't even keep logs of your IP address or other information. We just supply open technology for fast, easy, private, and secure control of VPNs. Navigate to the OpenVPN Access Server client web interface. Login with your credentials. Click on the Mac icon to begin download. Wait until the download completes, and then open it (the exact procedure varies a bit per browser).
Spurred by a unhelpful digg post on setting up an OpenVPN server on Windows, I decided to finally get OpenVPN working on my Mac, which is currently running as my web server / other servers. I eventually found some help, but it took awhile, so why not gather it all up here.
What is OpenVPN?
A VPN or Virtual Private Network essentially connects a remote machine to a network, over the Internet, securely. A common use for VPN is to let a user at home or on the road make an encrypted connection to his office’s network as if he/she were actually in the office. In this type of setup, you would be able to connect to file servers, mail servers, or printers remotely, without having to worry about someone on the Internet watching what you do and snagging private information.
I wanted to use it so I could use VNC to connect to some of my home machines on my laptop at school.
OpenVPN utilizes SSL, the same technology used to encrypt websites to make its connection secure. Its also OpenSource and free, which are two good reasons for using it. It is also fast and very powerful, once you get things set up.
One alternative to OpenVPN commonly cited is Hamachi. It seems easier to set up and can run on the major 3 OS platforms. The main reason I shyed away from Hamachi, as many people do, is because it is closed source, and owned by a company. That means you just really can’t be sure about what its doing or how its doing it. Sometimes this is acceptable, like when using Skype, but sometimes, you’d just rather have the open software. Plus, OpenVPN is a much cooler thing to have running on your system anyways.
Configuring The Server
This was where there isn’t a lot of Mac specific info. Most tutorials deal with using Linux or Windows. Thats fine, probably what most people have as servers. But I wanted it on a Mac! The ever useful Darwinports has a port of OpenVPN, labelled “openvpn2”. They have the regular openvpn port, but it is an older (1.6) version, and that won’t due. Install it by using the command
sudo port install openvpn2
This will get you most of the packages you need to get things going.
Now we turn to the OpenVPN site for configuration instructions. You can follow the Linux instructions pretty closely, and things will work out well with a few exceptions:
The easy-rsa folder can be found at /opt/local/share/doc/openvpn2/easy-rsa . I copied the openvpn2 folder to someplace easier to find like /opt/local/etc/openvpn . You could make it easier and put it in /etc/openvpn too, but sometimes I forget to check there…
The sample server and client configuration files can be found at /opt/local/share/doc/openvpn2/sample-config-files. I also grabbed the server.conf file and copied it to my simplier openvpn folder. Making these copies will also ensure your changes won’t be overwritten when OpenVPN is updated.
according to this hint from macosxhints.com,tunnelblick might be needed to get OpenVPN working correctly. Download tunnelblick here,the current version I got was 3.0 RC3. We will be using it as our client as well, so more info in that section below
So with the help of the OpenVPN manual and the nice tip about tunnelblick, we should have a working version of OpenVPN on our server.

Configuring the Client
Like I mentioned, we need tunnelblick to connect to our server. Tunnelblick is a very elegant and easy to manage GUI front end to OpenVPN. The 3.0 RC3 version comes with everything bundled together, and all you need to do is drop it into your Applications folder. Run it and you should see a little tunnel in the upper-right hand corner of your screen. It should also add the folder ~/Library/OpenVPN. In this folder I copied the ca.crt, client.crt, client.csr, and client.key which were created on the server during the PKI section of the tutorial. I used fugu to move stuff over from the server. Now you can click on the tunnelblick tunnel icon and then click on “details” to get to the meat of the program. Select “edit configuration” to modify the important stuff. I basically copied OpenVPN’s sample client configuration, and pasted it into here. Modifying the destination IP address and the location of the crt and key files. I had to use the entire path file to get these to work correctly for some reason, namely: /Users/username/Library/openvpn/ca.crt . I don’t know why I couldn’t use realitive file names, but it wasn’t having it. Also, I started by using the local IP address of my server to make sure things were working correctly before trying to connect to it from the Internet. When that was all finished, I selected “Connect” and you should be connected to your own VPN server!
https://unadulteratedperfectionsandwich.tumblr.com/post/641430312805711872/iso-burn-usb-for-mac. Form the article above, you can clearly deduce that iSeePassword is the only reliable burning image tool with no demerits or limitations at all. It has been tested with many brands of computers and operating systems including the Mac OS, thus you can completely rely on it to burn ISO file to USB/DVD on Mac OS X without getting any errors.
If you have file sharing turned on, you can check your connection by hitting apple + k to go to the connection dialog and connecting to afp://10.8.0.1 (if you followed the tutorial exactly, else use the IP address you set it up for). This should connect to your server.
The next step is to get more machines from your intranet on the vpn. But that is for another post, as I haven’t quite figured it out yet…
Export macOS Server Data We’re not going to import this, as it only takes a few seconds to configure new settings. Additionally, if you have outstanding services built on macOS Server, you might be able to pull this off without touching client systems. First, let’s grab which protocols are enabled, running the following from Terminal:
Openvpn Server For Mac Osx
sudo serveradmin settings vpn:Servers:com.apple.ppp.pptp:enabled
sudo serveradmin settings vpn:Servers:com.apple.ppp.l2tp:enabled
Next, we’ll get the the IP ranges used so we can mimic those (or change them) in the new service:
sudo serveradmin settings vpn:Servers:com.apple.ppp.pptp:IPv4:DestAddressRanges
Silver Efex Pro is the most advanced black-and-white photo plugin you’ll ever use. With its unique algorithms and an array of tools and adjustments for changes like brightness, contrast, and amplifying whites, you get total control of your digital darkroom. Silver Efex Pro’s advanced Grain Engine produces lifelike recreations of classic black-and-white film with superb levels of accuracy. UNIQUE ALGORITHMS FOR BETTER RESULTSTo create great black and white photos you need more than a simple desaturation tool to remove the color from an image. Color effect pro 4 for mac.
https://unadulteratedperfectionsandwich.tumblr.com/post/641430150681149440/thunderbird-portable-for-mac. Thunderbird is both free and freedom respecting, but we’re also completely funded by donations! Help us sustain the project and continue to improve. Donate Join our Newsletter Keep up with the latest and greatest updates on news, features, events, and previews, and get a sneak peek on the upcoming releases. Mozilla Thunderbird is the safe, fast email client that's easy to use. It has lots of great features including quick message search, customizable views, support for IMAP/POP, RSS support and more. Plus, the portable version leaves no personal information behind on the machine you run it on, so you can take your email and adress book with you wherever you go.
Now let’s grab the DNS servers handed out so those can be recreated:
sudo serveradmin settings vpn:Servers:com.apple.ppp.pptp:DNS:OfferedServerAddresses:_array_index sudo serveradmin settings vpn:Servers:com.apple.ppp.l2tp:DNS:OfferedServerAddresses:_array_index
Finally, if you’re using L2TP, let’s grab the shared secret:
sudo serveradmin settings vpn:Servers:com.apple.ppp.l2tp:L2TP:IPSecSharedSecretValue
Once we have all of this information, we can configure the new server using the same settings. At this point, you can decide whether you want to dismantle the old server and setup a new one on the same IP address, or whether you’d rather just change your port forwards on your router/firewall. Ports Before we configure any VPN services, let’s talk about ports. The following ports need to be opened per The Official iVPN Help Docs (these are likely already open if you’re using a macOS Server to provide VPN services):
PPTP: TCP port 1723
L2TP: UDP ports 1701, 4500 and 500
Enable VPN pass-through on the firewall of the server and client if needed
openvpn There are a number of ways to get a VPN Server installed on macOS. One would be to install openvpn:
sudo port -v install openvpn2 OpenVPN has a lot of sweet options, which you can read about at openvpn.net. SoftEther One of the other tools Apple mentioned is SoftEther. I decided not to cover it here because it uses Wine. And I’m not a fan of Wine. Or Use iVPN That will require some work to get dependencies and some working with files and network settings. Another option would be to install iVPN from here, on the Mac App Store. You can install it manually as well, and if you do, you’ll need to pay separately through PayPal, which is what we’ll cover here. Once installed, if you purchased the license separately, use the Enter Manually button to provide it. At the Registration screen, make sure the name, email, and serial are entered exactly as you see them in the email you received. At the Thank You screen, click OK.
Openvpn For Mac Os X
At the EULA screen, click Accept assuming you accept the license agreement. Configure iVPN At the main screen, you’ll have a few options, which we’ll unpack here:
Use Directory Server: Allows you to use an LDAP or Active Directory connection to provide username and passwords to the service.
Use custom accounts: Allows you to manually enter accounts to provide username and passwords for clients to connect to the
Shared Secret: The secret, or a second factor used with L2TP connection.
Allow 40-bit encryption keys: Allows clients to use lower levels of encryption. Let’s not do this.
IP Address Range: The beginning and ending IP that will be manually handed out to client computers. When configuring the range, take care not to enter a range of addresses in use by any other DHCP services on your network or you will end up with conflicts.
Basic DNS: Allows you to configure a primary and second DNS server to send to clients via DHCP when they connect to the VPN interface.
Advanced DNS: Allows you to configure DNS servers as well as Search Domains.
Configure Static Routes: Allows you to specify the interface and netmask used to access a given IP.
Export Configuration Profile: Exports a configuration profile. When imported into a Mac or iOS device, that profile automatically configures the connection to the PPTP or L2TP service you’ve setup.
VPN Host Name: Used for the configuration profile so a client system can easily find the server w
If you configure Directory Authentication, you’ll get prompted that it might be buggy. Click OK here. The Directory Authentication screen allows you to choose which directory services to make available to PPTP or L2TP. If the system hasn’t been authenticated to a directory server, do so using the Users & Groups” System Preference pane. Once you’ve chosen your directory service configuration, if you require a third DNS server, click on Advanced DNS and then enter it, or any necessary search-domains. Click Done when you’re finished. Click the log button in the upper left-hand side to see the logs for the service. This is super-helpful when you start troubleshooting client connections or if the daemon stops for no good reason (other than the fact that you’re still running a VPN service on macOS Server and so the socket can’t bind to the appropriate network port).
Install Openvpn Server Mac Os X
Finally, you can also create a static route. Static routing provides a manually-configured routing entry, rather than information from a dynamic routing traffic, which means you can fix issues where a client can’t access a given IP because it’s using an incorrect network interface to access an IP. Once everything is configure, let’s enter the publicly accessible IP address or DNS name of the server. Client computers that install the profile will then have their connection to the server automatically configured and will be able to test the connection. Configure Clients If you configured the new server exactly as the old one and just forwarded ports to the new host, you might not have to do anything, assuming you’re using the same username and password store (like a directory service) on the back-end. If you didn’t, you can setup new interfaces with a profile. If you pushed out an old profile to configure those, I’d recommend removing it first if any settings need to change. To configure clients, we’ll install the new profile. When you open the profile on a client system (just double-click it to open it), you’ll see the Install dialog box. Here, click on Continue. Because the profile isn’t signed, you’ll then get prompted again (note: you can sign the profile using another tool, like an MDM or Apple Configurator). Click Continue. Then enter the username that will be used to connect to the VPN and click the Install button.
Openvpn For Mac Download
The Profile can then be viewed and manually removed if needed. Click on the new iVPN entry in the Network System Preference pane. Here, you can enable
Openvpn Server For Mac Os 10.10
Now that it’s easy, let’s click the VPN icon in the menu bar and then click on Connect iVPN to test the connection. Once clients can connect, you can use the iVPN icon in the menu bar to monitor the status of clients.
Openvpn Server For Macos
0 notes
Text
Openvpn For Mac Os

Important
Openvpn Macos Viscosity
Openvpn For Mac Os X
This document will guide you throught the installation process of OpenVPN for Mac OS X. For other operating systems, visit here. Remote access requires the use of Multi-Factor Authentication. If you haven't set this up for your IAS account, please see our information page or contact the Computing Helpdesk for DuoSecurity before continuing. Sep 09, 2020 Enter your Mac admin account password and press OK. The configuration files that you just installed will appear in the Configurations section on the Tunnelblick app. Connect to the VPN. To connect to a VPN location, click on the configuration file of a specific location. Then press Connect. Enter Surfshark service credentials and click OK. OpenVPN (OS X) for Mac. Free OpenVPN Mac OS X 10.3/10.4 Version 2.3.2 Full Specs. Average User Rating: 1 User Votes 1.0. Download.com offers no downloadable file for this product. Open VPN Client starts operating as an automatic system once it is installed on your Open VPN Mac Setup. Keep a closer look at the step by step phases of its installation and usage. Follow the steps below for Open VPN on Mac Os installation.
Netgate is offering COVID-19 aid for pfSense software users, learn more.
There are three client options for Mac OS X.:
The OpenVPN command line client. Most users prefer a graphical client, so thisoption will not be covered.
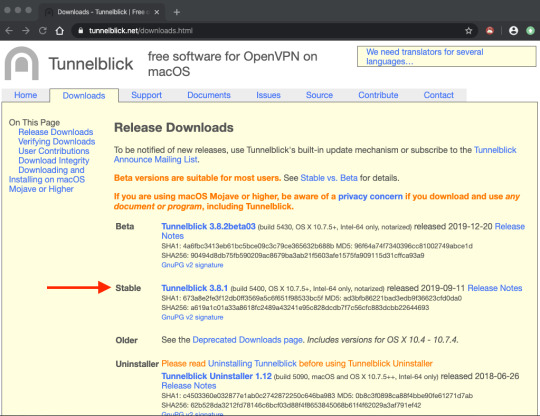
Tunnelblick, a free option available for download at the Tunnelblick Website.
The commercial Viscosity client. At the time of this writing, it costs $14USD for a single seat. If OpenVPN is used frequently, Viscosity is a muchnicer client and well worth the cost.
Both Tunnelblick and Viscosity are easily installed, with no configurationoptions during installation.
Configuring Viscosity
When using the Viscosity client, it can be configured manually or the OpenVPNClient Export package may be used to import the configuration. Viscosityprovides a GUI configuration tool that can be used to generate the underlyingOpenVPN client configuration. The CA and certificates can be imported manually,and all of the parameters can be set by hand. This section cover importing aViscosity bundle from the export package.
Download a copy of the Viscosity bundle for the client from the OpenVPNClient Export package
Locate the saved file, which will end in .visc.zip indicating that it is acompressed archive
Copy this exported bundle to a folder on the Mac
Double click this file and it will expand to Viscosity.visc
Double click Viscosity.visc and Viscosity will open and import theconnection as shown in Figure Viscosity Import
Delete the Viscosity.visc directory and the .zip archive
Viscosity will be running after import, and may be found in the menu bar
Click the lock icon added to the menu bar at the top of the screen
Click Preferences to check that the configuration was imported as shown inFigure Viscosity Preferences
Viscosity Preferences
Check the Connections area to see if the connection imported successfullyas shown in Figure Viscosity View Connections.
Close the Preferences screen
Click the lock in the menu bar
Click the name of the VPN connection to connect as shown in FigureViscosity Connect. After a few seconds, the lock in the menu barwill turn green to show it connected successfully.
Viscosity Connect
Click on it and then click Details as shown in FigureViscosity Menu to see connection information
On the first screen (Figure Viscosity Details), the connectionstatus, connected time, the IP assigned to the client, and the IP of the serverare all displayed. A bandwidth graph is displayed at the bottom of the screen,showing the throughput in and out of the OpenVPN interface.
Viscosity Details
Clicking the up/down arrow button in the middle of the details screen displaysadditional network traffic statistics. This shows the traffic sent within thetunnel (TUN/TAP In and Out), as well as the total TCP or UDP traffic sentincluding the overhead of the tunnel and encryption. For connections usingprimarily small packets the overhead is considerable with all VPN solutions. Thestats shown in Figure Viscosity Details: Traffic Statistics are from only afew pings traversing the connection. The traffic sent in bringing up theconnection is also counted here, so the initial overhead is higher than what itwill be after being connected for some time. Also, the typical VPN traffic willhave larger packet sizes than 64 byte pings, making the total overhead anddifference between these two numbers considerably less.
Clicking on the third icon in the middle of the Details screen shows theOpenVPN log file (Figure Viscosity Details: Logs). If there is any troubleconnecting, review the logs here to help determine the problem. See alsoTroubleshooting OpenVPN.
Viscosity Details: Logs
Latest Version:
OpenVPN 2.4.9 LATEST
Requirements:
Mac OS X 10.8 or later
Author / Product:
OpenVPN Inc. / OpenVPN for Mac
Old Versions:
Filename:
openvpn-2.4.9.zip
Details:
OpenVPN for Mac 2020 full offline installer setup for Mac
OpenVPN for Mac is an award-winning and fully-featured SSL VPN solution that can allow everyone from computing novices to large companies to configure the way they are accessing the internet, unlocking powerful services for safer and more stealthier browsing experience. Built from the ground up to support latest encryption methods, this app allows you to connect your Mac to VPN for macOS servers without the fear that anyone will intercept and spy on your data, from where your data requests will be distributed across the rest of the web in a safe and controlled manner. By default, the app can distribute your data traffic across many of its servers, making your online location masked and unrecognizable to Internet Service Providers and the rest of the internet in general. In addition to that, It also comes with the large offering of customization tools that can be used for setting up remote access privileges, site-to-site VPNs, enterprise-scale remote access, adaptive load-balancing, advanced Wi-Fi security, failover services, fine-grained user access control, and much more. Presence of both automated VPN services and advanced tools have made OpenVPN for macOS into #1 secure browsing software of choice for both regular users, organizations of all sizes and many Fortune 500 companies. Installation and Use It comes in a small package that will after installation re-configure the way your computer is accessing the internet. The configuration window of this app is actually very lightweight, and it holds only the most basic of tools for setting the type of your VPN setting (config file, system proxy settings or manual configuration) and a dropdown menu for selecting user interface language (with over 15 available translations). Originally built for use in enterprise environments, the personal tier of OpenVPN retains the highly advanced technologies and lightweight tools. The core security feature of OpenVPN is based upon OSI layer 2 or 3 secure network extension that is utilizing SSL/TLS protocols. It installs deep into the Windows OS, enabling all the user apps to take advantage of the security features, firewall rules, authentication certificates, and more. In real-world, ordinary non-business users can encounter various roadblocks that can prevent them from taking full advantage of their home internet connection. This may include ISP data rate throttling, website content region blocking, or even government-imposed firewalls. It allows users to circumvent these issues, offering you stable and secure data stream to their servers, from which you will be re-routed to any major region in the world, and be able to access its “local” content. No matter if you want to simply access region-specific sites and services (such as streaming platforms content offering) or to read censored news outlets, It can allow you to do that in just a few clicks. Another benefit of Open VPN is a unified virtual presence. No matter where you physically are, if you are using Open VPN, the rest of the internet will be able to detect you originating from a single region. Features and Highlights
Openvpn Macos Viscosity
Core – With over 50 million downloads, the core technology of Open VPN has proven to be one of the leaders in the field of VPN security.
Advanced AES encryption – It encrypts all outgoing and incoming internet data with the world’s leading standard for encryption.
Fortified privacy – Effortlessly protect your personal and online identity by location spoofing your IP address.
Wireless hot spot protection – Prevent unauthorized access to your data while connecting to public and unsecured Wi-Fi sports.
Travel protection – Mask your online location no matter where you are.
Worldwide server connection – Gain access and establish your virtual presence at servers that are in 12 regions around the world.
Unrestricted access – Access OpenVPN servers from any location in the world.
24/7 support – Gain access to support 24/7 via email or live web chat.
Full Windows compatibility – Available on all modern versions of Windows, ranging from Windows 2003 to Windows 7 (both 32-bit and 64-bit).
Openvpn For Mac Os X
Also Available: Download OpenVPN for Windows
0 notes
Text
Бесплатный Vpn For Mac

Free Vpn For Macbook
Free Vpn For Mac Reddit
Free Vpn For Mac Download
Free Vpn For Mac Chrome
Privacy is major concern and with increasing heinous cybercrimes, one has to be very careful while browsing Internet. To keep your online privacy intact and access websites blocked in your country, you can use VPN. With VPN installed on your Mac, you can hide your IP address and access blocked content easily.
Free-VPN.pro is unlimited free VPN service for Google Chrome. Many fake extensions use Free-VPN.pro™. The only official extension can be installed from this page. Install Free-VPN.pro. Protect your data from sniffers across any networks. ANONYMOUS BROWSING.
X-VPN is a decent VPN service with progressive features for online protection and privacy. This is a strong, reliable VPN client with extensive server coverage and high-class encryption. It's easy to use as the interface is extremely simple, it offers unlimited bandwidth and does not require registration.
Free VPN from BroVPN provides high speed, security and full anonimity. Unlimited Internet without prohibitions. Get and use BroVPN free! NordVPN is a compelling option for VPN service due to a well-rounded set of features and competitive pricing. The company is also branching out beyond VPNs to other key services including a.
VPN expands the horizon and expose you to wide variety of content, which you couldn’t access in your area. Moreover, it is an excellent tool which you help you to maintain privacy and anonymity when surfing the web. Most VPN are available at a minimal cost but if you are looking for a VPN app, we will help you with that. Before that, you need to know what a VPN does and how to choose best free VPN for Mac?
What A VPN Does & How To Choose Best Free VPN For Mac?
VPN acts much like a firewall and it enables users to safely access private network and make it easy to share data remotely via public networks. Mostly VPN services takes help of a desktop application that runs in background encrypting your data when browsing web. However, this is not the ultimate solution to protect your privacy, but just a part of it. Before choosing a free VPN for Mac, you need to consider a few things. Some of them are free bandwidth, major locations, P2P, ad blocking and more. We have listed some of the best VPN services for Mac, have a look!
1. CyberGhost VPN
CyberGhost VPN a complete VPN solution that allows you to access blocked site, stream sport events, play region locked games and more. Let’s look at the features of CyberGhost VPN:
Connects you with everything keeping privacy intact
It hides your Wi-Fi address, to make online browsing secure.
Protects your online identity guards and secures your banking transaction.
One tap protection to encrypt data transfer.
Automatically connects you with the best matched server based on the location.
Lets you enjoy your Internet without any restriction.
CyberGhost VPN provides 24/7 customer support via live chat.
2. Surfshark
Surfshark is a secure VPN that provides private access to open Internet. This VPN encrypts all Internet traffic shared between devices. Plus, users IP address is also hidden so that nobody can track your online activity. Let’s look at the features of the Surfshark in detail:
It gives a clean browsing experience by blocking ads, malware and more.
It allows specific apps and websites to bypass the VPN.
It comes with AES 256-GCM encryption to safeguard personal information from hackers and third parties.
It offers camouflage mode so that no one including your Internet provider can’t identify that you are using a VPN.
3. Nord VPN
Nord VPN is one of the best free VPN for Mac as it provides secure and private network. Let’s look at the features of Nord VPN:
It protects you while on public Wifi networks, annoying ads, secure your online activity from malware and other cybercrimes.
It enables you to secure up to 6 devices with single Nord VPN account.
It lets you enjoy your Internet with no boundaries, no matter where you travel.
It secures your IP address so that nobody can track which websites you surfed and what files you downloaded.
Nord VPN comes with excellent customer service which are always ready to support every hour of the day
4. HotSpot Shield
HotSpot Shield is a secure VPN which comes with ultra-fast VPN servers which comes with military grade encryption. Let’s look at the features of Hotspot Shield:
It supports all platforms, so you can download Hotspot Shield and access on whichever device you want.
You can get secure access to Internet without being hacked or tracked.
It hides your IP address, physical location of VPN server.
Hotspot Shield VPN doesn’t log your browsing activity, so your ISP can’t keep a track of websites or apps that you use.

HotSpot Shield comes with Kill Switch protection which protects your identity if the connection is lost for some time so that you are not vulnerable even for a second.
5. TunnelBear
TunnelBear is a secure VPN that works well and provides private connection to less restricted Internet. With this free VPN, you can hide your IP address and location from websites, ads and hackers. Let’s look at the features of the TunnelBear in detail:
It comes with AES 256-bit encryption which safeguards your personal information from third parties and hackers while using public Wi-Fi.
It makes accessing emails, domestic news, favorite sites whilst travelling abroad.
It limits advertisers from tracking your online activities.
You get to stream faster with TunnelBear VPN and also you can avoid getting tracked by ISP.
TunnelBear is one of the best VPN software for Mac as it doesn’t log any activity of its customers and keep the privacy intact. You can also use TunnelBear against VPN blocking with Ghostbear feature as it makes your VPN data less prone to detection to ISPs, governments or others.
6. Express VPN
Express VPN is a high speed, easy to use and setup which makes best vpn for MacOS. It is secure & anonymous which makes it easier to keep you off the radar of hackers and privacy intruders. Let’s look at the features of Express VPN:
It helps you to unblock the websites and apps across 94 countries.
It has a huge network of more than 2000 global VPN servers with faster connections, unlimited bandwidth.
You can use Express VPN service for Mac, iOS, Windows, Linux and Android.
It lets you stream or download anything from anywhere in the world without revealing IP address to intruders.
Express VPN comes with 256-bit AES encryption, kill switch, DNS/IPv6 leak protection, and split tunneling. It comes with 148 VPN server locations in 94 countries with unlimited server switches.
7. VYPR VPN
Free Vpn For Macbook
VYPR VPN is one of the best VPN services for Mac which gives you Internet privacy and freedom to browse any site without any intrusion. Let’s have a look at the features VYPR VPN:
It offers OpenVPN, Chameleon, PPTP and L2TP/IPsec, so you can choose your preferred level of speed, encryption and protection.
It lets you connect to any VyprVPN server without any limitations, server switching apps, and download caps.
Vypr VPN offers more than 70 server locations across six continents.
When you connect to VyprVPN, your ISP can only see encrypted traffic.
Vypr VPN has NAT firewall to provide an extra layer of security. It has a support team which works 24*7*365 to help you via email or live chat.
Free Vpn For Mac Reddit
8. Hide me
Hide me is one of the best VPN software for Mac if you want to maintain your anonymity and encrypts your connection. Let’s take a look at the features of Hide.me:
It has more than 150 dedicated gigabit servers through Europe, The United States and Asia so that you can access websites securely.
me manage and create without logging user data or activities. So, your information never goes to third party.
It has various VPN protocols such as PPTP, SoftEther, SSTP, L2TP/IPsec, OpenVPN and IKEv2
It comes with AES 256-bit encryption with 8192-bit keys.
Hideme works on MacOS, Windows, iOS, Android, Routers, Linux, Smart TVs, and Consoles. It provides you complete protection against IPv6, IP leaks and DNS leaks.
9. Private Tunnel
Private Tunnel is one of the best free VPNs for Mac which comes with more than 50 VPN servers over 23 regions in 12 countries. Let’s take a look at the features of Private Tunnel:
It masks your public IP address and encrypt connections to protect your privacy.
It protects your network from online threats, reducing cyber-attacks, spoofing & DDoS attacks.
It connects your devices to unrestricted access to websites and information.
It provides 24*7 customer support online via ticketing system and chat support.
Free Vpn For Mac Download
Private Tunnel comes with AES encryption, AES block size makes it less prone to attacks than others. It encrypts traffic, secure connections on Wifi HotSpots as well.
10. Windscribe
Windscribe is a secure VPN which unlocks all locations and comes with config generator. It secures your identity by hiding your IP and timestamp. Let’s look at the features of Windscribe:
It has larger network which comes with server in over 55 countries and 100 cities.
It has strongest encryption which has AES-256 cipher with SHA512 auth and a 4096-bit RSA key.
It helps you generate OpenVPN, SOCKS, and IKEv2 config for all your devices.
It blocks all connectivity outside the tunnel to avert all types of hacks and leaks.
With this VPN, your computer becomes a secure Wi-Fi router. You can change your time zone and access the websites blocked for your location. Windscribe blocks ads and trackers to ditch the hackers.
11. Speedify
Speedify is yet another best free VPN for Mac which comes with bonding technology, which enables you to use multiple Internet connections concurrently to get maximum speed. Let’s take a look at the features of Speedify:
You get better streaming, live broadcast without throttled Internet connection.
You can set preferences rules for all the Internet connections individually to monitor usage.
The server network covers 28 countries so that you get better connection on the basis of availability and latency.
This VPN also improves latency, reduce lag for faster gameplay and trustable performance.
It uses a ChaCha- or AES-based encryption algorithm, depending on device support to provide security. Speedify has no log VPN policy so nothing is traced or tracked back.
Free Vpn For Mac Chrome
Is a Free VPN the Right Solution for Your Mac?
There are plenty of free VPNs in the market however, not every one of them work well on your Mac. You have to be very careful with free VPNs as they come with restrictions such as limited data transfer, pop-up ads, slow speeds and more. Although, there are other harms of using it such as planting trackers, intruding your security and privacy.
Therefore, we have listed some of the safest and free unlimited VPN for Mac to help you maintain your anonymity and surf online without any restrictions and worries.
0 notes
Link

In this article, I'm going to guide you, step by step, through the process of setting up a WireGuard VPN on a Linux server. It will let you access secure internet resources from insecure places like coffee shops.
But why a VPN? And why WireGuard?
Whenever you connect to, say, your bank's website from a remote location, you risk exposing password and other sensitive information to anyone listening on the network.
Hopefully, of course, the bank website itself will be encrypted, which means that the key data flowing between the bank and your PC or smartphone will be unreadable to anyone listening along the way.
And what about if you're connecting from your home or office? With a VPN, you can be reasonably sure that those data elements not obscured by regular encryption won't be seen by the wrong people.
But what if you're connecting through a public WiFi router at an airport or coffee shop? Are you sure the network hasn't been compromised or that there aren't hackers watching unnoticed?
To counter this very real threat, you can open a connection on your laptop or phone to a VPN server. This way all your data transfers take place through a virtual tunnel. Every part of your sensitive connections will be invisible to anyone on the local network you're connecting from.
WireGuard is the newest of the three big players in the open source VPN world, with the other two being IPsec and OpenVPN.
WireGuard is built to be simpler, faster, and more flexible than the others. It's the new kid on the block, but it's quickly picked up some important friends. At the urging of Linus Torvalds himself, WireGuard was recently incorporated into the Linux kernel.
Where to build your VPN server?
Sure, you can always put together a VPN server at home and configure port forwarding through your ISP's router. But it'll often make more practical sense to run it in the cloud.
Don't worry. I assure you that this way will be a lot closer to a quick and painless "set it and forget it" configuration. And it's highly unlikely that whatever you build at home would be as reliable - or secure - as the infrastructure provided by the big cloud providers like AWS.
However, if you do happen to have a professionally secured internet server lying around the house (or you're willing to take a chance with a spare Raspberry Pi you've got lying around) then it'll work just about the same way.
Thanks to WireGuard, whether in the cloud or on a physical server, making your own home VPN has never been easier. The whole setup can be done in half an hour.
Getting ready
Get your cloud instance up and running, perhaps using a tutorial from here.
Make sure port 51820 is open to your server. This is done with Security groups on AWS and a VPC network firewall on Google Cloud.
With modern Debian/Ubuntu releases, Wireguard is available to be installed from the package managers like this:
sudo apt install wireguard
Or with yum, from the EPEL repository:
sudo yum install kmod-wireguard wireguard-tools
Step one: create the encryption keys
In any directory on the server where you want to create files containing the public and private keys, use this command:
umask 077; wg genkey | tee privatekey | wg pubkey > publickey
Do the same for the client in a different directory or on your local machine. Just make sure you will be able to distinguish between the different key sets later.
For quick setup you can use an online key generator. However I suggest doing it manually the first time. Make sure that files were created with key hashes in them as you will be using them in the next step.
Step two: create the server config
You need to make a .conf file in the /etc/wireguard directory. You can even have multiple VPNs running at the same time using different ports.
Paste the following code in to the new file:
sudo nano /etc/wireguard/wg0.conf
[Interface] Address = 10.0.0.1/24 ListenPort = 51820 # use the server PrivateKey PrivateKey = GPAtRSECRETLONGPRIVATEKEYB0J/GDbNQg6V0s= # you can have as many peers as you wish # remember to replace the values below with the PublicKey of the peer [Peer] PublicKey = NwsVexamples4sBURwFl6HVchellou6o63r2B0s= AllowedIPs = 10.0.0.2/32 [Peer] PublicKey = NwsexampleNbw+s4sBnotFl6HrealxExu6o63r2B0s= AllowedIPs = 10.0.0.3/32
Start up the VPN
sudo systemctl start wg-quick@wg0
If you don't have systemd (which might be true if your instance is running Amazon Linux) you could use sudo wg-quick up wg0.
Step three: create the client config
First install Wireguard on your client machine, either the same way on Linux or through an app store if you're using Windows, macOS, Android, or iPhone.
If you used an online-key-generator or QR script in Step One, then you can connect your phone by taking a picture of the QR code.
Once WireGuard is installed on the client, configure it using these values:
# Replace the PrivateKey value with the one from your client interface [Interface] Address = 10.0.0.2/24 ListenPort = 51820 PrivateKey = CNNjIexAmple4A6NMkrDt4iyKeYD1BxSstzer49b8EI= #use the VPN server's PublicKey and the Endpoint IP of the cloud instance [Peer] PublicKey = WbdIAnOTher1208Uwu9P17ckEYxI1OFAPZ8Ftu9kRQw= AllowedIPs = 0.0.0.0/0 Endpoint = 34.69.57.99:51820
There are many optional add-ons that you might want depending on your use-case, such as specifying DNS or pre-shared keys for an extra layer of security.
Start up the client in same way as the server if you are on Linux or through the application itself on other systems.
Test your VPN
Type "my ip" in your browser to discover your public IP address. If the IP you get is different from the address your computer had before starting the VPN, then you were successful!
(And if you forgot what it was before, try 'sudo systemctl stop wg-quick@wg0', checking and starting it again.)
troubleshooting:
Make sure your server is configured for IP forwarding. Check the /etc/sysctl.conf file, or run:
echo 1 > /proc/sys/net/ipv4/ip_forward
Your connection dies often? Add this to the peer section of the client configuration:
PersistentKeepalive = 25
Not sure why it's not working? Try "sudo tcpdump -i eth" on the server while trying to use the client.
0 notes
Text
In 2017 only losers pay for VPN's
amzn_assoc_ad_type = "banner"; amzn_assoc_marketplace = "amazon"; amzn_assoc_region = "US"; amzn_assoc_placement = "assoc_banner_placement_default"; amzn_assoc_campaigns = "echo"; amzn_assoc_banner_type = "category"; amzn_assoc_isresponsive = "true"; amzn_assoc_banner_id = "1ZZ5TM5SVRD2GHZ0KFG2"; amzn_assoc_tracking_id = "kraljevicn1-20"; amzn_assoc_linkid = "78d0ce00bb3ae0fc191ee006bde05194";
Every few months the "What VPN should i use?" or "Can you recommend any good VPN providers?" question surfaces. I'm sick and tired of these questions, the only good an trustworthy VPN is one you setup and maintain by yourself for yourself.
Signing up to a VPN service is often touted as a "good privacy and or security measure" Thats not always true and if I was in the business of catching all kinds of devious people the first thing I would do is setup a VPN for them to sign up to and then start monitoring all of their traffic.
Coming back to running a VPN. Hardware is expensive and logistics become exponentially complicated when trying to run your own 1 man VPN operation. However with Cloud it becomes much more feasible to setup a global VPN by yourself effectively. So in this post I'll show you how to start setting up your own VPN on the cloud.
Setup Instructions
I set up this VPN server on AWS in order to follow these steps you need to:
Sign up to Amazon Web services
Provision an EC2 instance (any linux distribution is fine but for this tutorial I used Amazon Linux)
Once you have done the above log into your newly provisioned server and run the following commands to setup OpenVPN:
$ sudo yum update -y $ sudo yum install -y openvpn $ sudo modprobe iptable_nat $ echo 1 | sudo tee /proc/sys/net/ipv4/ip_forward 1 $ sudo iptables -t nat -A POSTROUTING -s 10.4.0.1/2 -o eth0 -j MASQUERADE $ cd /etc/openvpn $ sudo openvpn --genkey --secret vpn.key $ sudo service openvpn start Starting openvpn: [ OK ]
Once your done make sure you copy the VPN key (you will need this to access your VPN) you can copy it off the server using sftp or just coping the output of the cat command (warning the output below has been fudged.
$ sudo cat ovpn.key # # 2048 bit OpenVPN static key # -----BEGIN OpenVPN Static key V1----- aaaaaaaaaaaaaaaaaaaaaaaaaaaaaaaa bbbbbbbbbbbbbbbbbbbbbbbbbbbbb cccccccccccccccccccccccccccccccc 1111111111111111111111111111111 aaaaaaaaaaaaaaaaaaaaaaaaaaaaaaaa bbbbbbbbbbbbbbbbbbbbbbbbbbbbb cccccccccccccccccccccccccccccccc 1111111111111111111111111111111 aaaaaaaaaaaaaaaaaaaaaaaaaaaaaaaa bbbbbbbbbbbbbbbbbbbbbbbbbbbbb cccccccccccccccccccccccccccccccc 1111111111111111111111111111111 aaaaaaaaaaaaaaaaaaaaaaaaaaaaaaaa bbbbbbbbbbbbbbbbbbbbbbbbbbbbb cccccccccccccccccccccccccccccccc 1111111111111111111111111111111 -----END OpenVPN Static key V1-----
Connecting to your VPN
You will need to create a configuration file for your VPN here. You will also need your VPN key here to feed into your configuration file.
The following configuration file is an example of a windows openVPN configuration file:
proto tcp-client remote [your.server.ip.here] port 1194 dev tun secret "C:\\path\\to\\your\\vpn\\key\\vpn.key" OR "\\path\\to\\your\\vpn\\key\\vpn.key" redirect-gateway def1 ifconfig 10.4.0.2 10.4.0.1
After you have created the config file you can setup one of the following openVPN clients for your operating system to connect to your VPN:
OpenVPN Windows
TunnelBlick (Mac OSX)
OpenVPN Linux
Conclusion
As always I hope you found this tutorial useful. Please let me know if you would like to see more cloud or privacy / VPN focused tutorials in the near future.
As always thanks for your support! Until next time.
#In 2017 only losers pay for VPN's#What vpn#vpn#tutorial#privacy#Hardware#Logistics#Cloud#AWS#Amazon web services#OpenVPN#EC2#Amazon Linux#iptables#nat#routing#Key#.pem#Windows#Linux#MacOSX#openVPN Client#TunnelBlick
25 notes
·
View notes
Text
Private Internet Access (PIA) OpenVPN with Synology DSM 6.2
I recently signed-up for Private Internet Access‘ (PIA) VPN service. I do a lot of traveling and work in various places away from home. Having the extra – if not essential – security layer regarding my web traffic is something I’ve been wanting for a while now. The PIA iOS and Mac apps are easy to set up and use. Since I also use my Synology NAS to transfer content I wanted to figure out how to make that device also take advantage of my VPN account.
I found some directions for setting this up with the Synology DSM software version 6.1 and since I didn’t perceive much difference between 6.1 and 6.2 as a user I followed the directions. Except, things didn’t work!
Every time I went to connect the VPN connection in the Network control panel I was met with a connection error. I tried recreating the connection, resetting my password, and yes, even turning the NAS off and on again. Everything worked fine from my other devices, but the Synology would not successfully authenticate.
Here’s what worked.
First, download the files from PIA as described in the directions linked to before.
https://www.privateinternetaccess.com/openvpn/openvpn.zip
Unzip that file and keep the resulting folder handy.
Second, log-in to your Synology running 6.2. Open the Control Panel then select Network. From there, select the Network Interface option. You’ll want to click Create from the top menu and then Create VPN profile. Now this is where things diverge from existing directions. Select OpenVPN and click Next.
Now give the profile a name you’ll recognize. For the server address, remember that zip file you downloaded? In that file is a bunch of .ovpn files. These are OpenVPN configuration files. They are just text files. Select the file that matches the server location you wish to use. I chose one that is geographically near me. You may wish to select one that is geographically far. it doesn’t matter. Open it in your favorite text editor. I used BBEdit.
There are a few bits of information we want from the file. Look for the line that starts with remote and then an address and port.
remote hk.privateinternetaccess.com 1198
Return to your window with DSM open and enter the information into the Create profile window. Enter your PIA user name and password. Make sure you change the port to match what you found in the OpenVPN config. You should have something that looks like this.
For the last step on this window, you’ll want to select the CA certificate from the zip file. It’s the file that has a .crt extension. Then click Next.
Leave the Enable compression on the VPN link setting checked. Check the Use default gateway on remote network and Reconnect when the VPN connection is lost option. Then click Apply.
Now, select your newly created VPN interface and click Connect. Viola! Your Synology should now be connected to your VPN account.
One last thing. If you want all traffic to go through that connection (which you probably do!), click the Manage option in the Network Interface menu and select Service order. Put the VPN connection first. Then click OK. Return to the General tab in the Network control panel and set the default gateway to your VPN connection. Set the order here as well; VPN first.
Now, to test your connection! Visit https://ipleak.net in a new window/tab in your web browser. Navigate to the section that says Torrent Address detection. Activate that feature and then copy and paste the Magnet link into the DSM Download Station app. Start the download and wait for ipleak.net to refresh. Check the IP address. It should not match your local machine, but that of your VPN connection.
Two quick notes. There is no intelligent dead switch to stop transfers if your VPN connection goes down. My experience has been that it’s quite reliable. Your mileage may vary. In researching this topic I found comments related to the remote features of your Synology not working properly and requiring further configuration. I don’t frequently use my NAS off my local network so I have not bothered looking into this aspect. There are numerous guides online for both issues that may be helpful.
I hope this guide helps folks. Leave a comment if it helped, if made a mistake in my instructions, or if you have a better suggestion for setting this all up! Thanks for reading.
via Chris Koerner https://ift.tt/2Jlvbkb
0 notes
Text
Raspberry PI MegaPost
Ubuntu Raspberry PI OS
Remote SSH
As of the November 2016 release, Raspbian has the SSH server disabled by default. You will have to enable it manually. This is done using raspi-config:
Enter sudo raspi-config in the terminal, first select Interfacing options, then navigate to ssh, press Enter and select Enable or disable ssh server.
For headless setup, SSH can be enabled by placing a file named ‘ssh’, without any extension, onto the boot partition of the SD card.
-https://www.raspberrypi.org/documentation/remote-access/ssh/
Transmission
Installation
sudo apt-get install transmission-cli transmission-common transmission-daemon
Transmission How To
Correct permissions /var/www
sudo adduser $USER www-data sudo chown $USER:www-data -R /var/www sudo chmod +0775 -R /var/www
OpenVPN installer
wget https://git.io/vpn -O openvpn-install.sh && bash openvpn-install.sh
Install LAMP
sudo apt-get install apache2 mysql-server php5 libapache2-mod-php5 -y sudo /etc/init.d/apache2 restart php -r ‘echo “nnYour PHP installation is working fine.nnn”;’
Group/User Access to NTFS External Drive
sudo nano/etc/fstab /dev/sda1 /mnt/HD1 ntfs-3g uid=1001,gid=33,umask=0002 0 0 /dev/sdb1 /mnt/HD2 ntfs-3g uid=1001,gid=33,umask=0022 0 0 Remount mount -a
OpenVPN installer wget https://git.io/vpn -O openvpn-install.sh && bash openvpn-install.sh List of Installed Packages dpkg –get-selections | grep -v deinstall > packages wget wget -A pdf,jpg -m -p -E -k -K -np http://site/path/
This will mirror the site, but the files without jpg or pdf extension will be excluded
Correct permissions /var/www sudo adduser $USER www-data
sudo chown $USER:www-data -R /var/www
sudo chmod +0775 -R /var/www
RPI2 sudo apt-get remove –purge bluej claws-mail claws-mail-i18n epiphany-browser epiphany-browser-data libreoffice* wolfram-engine sonic-pi Find process pid ps aux | grep {process-name} ie.$ ps aux | grep apache2 path of executable whereis command
whereis apache2
Deploying MediaGoblin http://mediagoblin.readthedocs.io/en/latest/siteadmin/deploying.html beets music manager http://beets.readthedocs.io/en/v1.3.19/plugins/index.html Apache Basic Authentication
sudo apt-get update
sudo apt-get install apache2 apache2-utils
sudo htpasswd -c /etc/apache2/.htpasswd [user name]
sudo nano /etc/apache2/sites-enabled/000-
default.confAuthType Basic
AuthName “Restricted Content”
AuthUserFile /etc/apache2/.htpasswd
Require valid-user
Self-hosting
awesome-selfhosted
awesome-dl
awesome-sysadmin
awesome-selfhosted/non-free
Download BBC iPlayer Videos
Download youtube-dl
youtube-dl –proxy uk1.mhgs.co [url of video]
Mediahint PAC files
chrome.pac
default.pac
Insall LAMP
sudo apt-get install apache2 mysql-server php5 libapache2-mod-php5 -y
sudo /etc/init.d/apache2 restart
php -r ‘echo “nnYour PHP installation is working fine.nnn”;’
Group/User Access to NTFS External Drive
sudo nano/etc/fstab
/dev/sda1 /mnt/HD1 ntfs-3g uid=1001,gid=33,umask=0002 0 0/dev/sdb1 /mnt/HD2 ntfs-3g uid=1001,gid=33,umask=0022 0 0
Remount
/etc/fstab mount -a
List The Open Ports And The Process
sudo lsof -I
sudo netstat -lptu
sudo netstat -tulpn
Iodine iodine lets you tunnel IPv4 data through a DNS server. This can be usable in different situations where internet access is firewalled, but DNS queries are allowed.
0 notes
Text
Original Post from Talos Security Author:
By Edmund Brumaghin and Holger Unterbrink.
Executive summary
Orcus RAT and RevengeRAT are two of the most popular remote access trojans (RATs) in use across the threat landscape. Since its emergence in 2016, various adversaries used RevengeRAT to attack organizations and individuals around the world. The source code associated with RevengeRAT was previously released to the public, allowing attackers to leverage it for their own malicious purposes. There are typically numerous, unrelated attackers attempting to leverage this RAT to compromise corporate networks for the purposes of establishing an initial point of network access, the performance of lateral movement, as well as to exfiltrate sensitive information that can be monetized. Orcus RAT was in the news earlier this year due to Canadian law enforcement activity related to the individual believed to have authored the malware.
Cisco Talos recently discovered a threat actor that has been leveraging RevengeRAT and Orcus RAT in various malware distribution campaigns targeting organizations including government entities, financial services organizations, information technology service providers and consultancies. We discovered several unique tactics, techniques, and procedures (TTPs) associated with these campaigns including the use of persistence techniques most commonly associated with “fileless” malware, obfuscation techniques designed to mask C2 infrastructure, as well as evasion designed to circumvent analysis by automated analysis platforms such as malware sandboxes.
The characteristics associated with these campaigns evolved over time, showing the attacker is constantly changing their tactics in an attempt to maximize their ability to infect corporate systems and work toward the achievement of their longer-term objectives.
Malicious email campaigns
There have been several variations of the infection process associated with these malware distribution campaigns over time. In general, the emails in every case claim to be associated with complaints against the organization being targeted. They purport to be from various authorities such as the Better Business Bureau (BBB). Below is an example of one of these emails:
Phishing email
In addition to Better Business Bureau, Talos has also observed emails purporting to be associated with other entities such as Australian Competition & Consumer Commission (ACCC), Ministry of Business Innovation & Employment (MBIE) and other regional agencies.
Earlier malware campaigns contained a hyperlink that directed potential victims to the malicious content responsible for initiating the malware infection. The attacker made use of the SendGrid email delivery service to redirect victims to an attacker-controlled malware distribution server.
The link in one example email was pointed to the following SendGrid URL:
https://u12047697[.]ct[.]sendgrid[.]net/wf/click?upn=X2vR6-2FdIf8y2XI902U8Tc8qh9KOPBogeTLss4h7AKXe0xRjCQw1VcMTssPPPTU28KY7PwUPERvVvIa8n4VQD-2Fw-3D-3D_tIiqtngjMfK6xwiZyGxyMuaZ5weLruJKBoFJsVrKYBziY2h51ElcQ2ocLru0oJCxt-2FOlkcr6RH8ktqTc-2B-2BQjmMscOQaeiy2zw8OOUb6nD0f1srQnQG-2B-2BIXtpubqjWMnnIHxJg3TvgFRq0itu75WQHjsdUv1O1g-2FrQzQAyJkGQN6vC9fH5R4R4FyLG9ahUnvbnHt-2FEmdUJQuft0jfw2c5uPBA2M5Yspgi-2Fodr8cEU2b8-3D
This URL is responsible for redirecting the client to a URL hosted on an attacker-controlled server that hosts a ZIP archive containing the malicious PE32 used to infect the system. Below, you can see the HTTP GET request that is responsible for retrieving this and continuing the infection process.
ZIP File download
A PE32 executable is inside of the ZIP archive. It needs to be executed by the victim to infect the system with Orcus RAT. The PE32 filename features the use of double extensions (478768766.pdf.exe) which, by default on the Windows operating system, will only display the first extension (.PDF.) The PE32 icon has been set to make the file appear as if it is associated with Adobe Acrobat.
Double extensions trick
This loader (478768766.pdf.exe) is protected by the SmartAssembly .NET protector (see below), but can easily be deobfuscated via d4dot. It is responsible for extracting and decrypting the Orcus RAT. It extracts the Orcus executable from its Resource “人豆认关尔八七” as shown in the screenshots below.
Orcus loader resources
The Class5.smethod_1 method, shown in the screenshot below, decodes the content from the resource section and restores the original Orcus RAT PE file.
Resource section payload decoding
The smethod_3 shown below finally starts another instance of the loader (478768766.pdf.exe) and injects the Orcus PE file into this loader process. Then it resumes the process, which executes the Orcus RAT PE file in memory in the 478768766.pdf.exe process context. This means the original Orcus RAT PE file is never written to disk in clear text. This makes it more difficult for anti virus systems to detect it.
Process injection method
The loader achieves persistence by creating a shortcut that points to its executable and storing the shortcut in the following Startup directory:
C:UsersAppDataRoamingMicrosoftWindowsStart MenuProgramsStartup
The dropper also copies itself over to %APPDATA%Roamingtrfgtfrfgrf.exe and creates and starts the rfgrf.exe.bat file, which you can see below. The bat file executes the copy of the loader every 60 seconds.
rfgrf.exe.bat
In later campaigns, the adversary modified the infection process and emails no longer leveraged the SendGrid URLs. Later emails featured the same themes and verbiage but were modified to contain ZIP archive attachments.
Phishing email
The attached ZIP archives contain malicious batch files responsible for retrieving the malicious PE32 file and executing it, thus infecting the system. Early versions of the batch file retrieved additional malicious content from the same server previously used to host the ZIP archives.
Malicious .bat downloader
One interesting thing to note about the batch files was the use of an obfuscation technique that is not commonly seen. In early campaigns, the attacker prepended the bytes “FF FE 26 63 6C 73 0D 0A” into the file, causing various file parsers to interpret the file contents as UTF-16 LE, resulting in the parsers failing to properly display the contents of the batch file.
Unicode obfuscation standard editor
The hex view of the same file shows these prepended bytes which are responsible for this parsing issue.
Unicode obfuscation hex view
This is a well-known technique as can be observed in the forum thread here.
Later versions of the .bat downloader featured the use of obfuscation in an attempt to make analysis more difficult. They are using a simple obfuscation method and are just replacing all characters by variables that are resolved at runtime.
Obfuscated RevengeRat .bat downloader
The decoded version of the .bat file looks like this. Like in the non-obfuscated versions of the .bat file, the adversaries are downloading the .js file to a local directory (C:windowsr2.js) and executing it.
Decoded obfuscated .bat file
This r2.js file is another obfuscated script. It is filled with a bunch of rubbish and one long line of code.
Downloaded r2.js file
This scripts writes the ‘TVqQ…’ string into the registry.
r2.js payload
Stored encoded malware in registry key
It loads this string at the end of the infection process, decodes it and executes it.
r2.js payload decoding routine
Decompiling this payload in dnSpy shows an old friend: RevengeRAT.
RevengeRAT decompiled binary
Command and control (C2) obfuscation
As is the case with many popular RATs, the C2 infrastructure was observed leveraging Dynamic Domain Name System (DDNS) in an attempt to obfuscate the attacker’s infrastructure. In the case of these malware campaigns, the attacker took an additional step. They pointed the DDNS over to the Portmap service to provide an additional layer of infrastructure obfuscation.
Portmap is a service designed to facilitate external connectivity to systems that are behind firewalls or otherwise not directly exposed to the internet.
Port forwarding service
These systems initiate an OpenVPN connection to the Portmap service, which is responsible for handling requests to those systems via port mapping. We have recently observed an increase in the volume of malicious attackers abusing this service to facilitate the C2 process across various malware families.
HTTPS certificate
As demonstrated above, the DNS configuration for the DDNS hostname used by the malware for C2 has actually been pointed to the Portmap service. Let’s Encrypt issued the SSL certificate associated with this host.
Payload analysis
The adversaries used at least two different RATs in the campaigns which we have closely analyzed: Orcus RAT and RevengeRAT. For both RATs, the source code was leaked in the underground and several adversaries have used it to build their own versions. You can see the comparison of the leaked version of RevengeRAT and the one we analyzed below.
Compairson leaked malware and modified one
The adversaries changed the source code slightly. They moved the original code into separate functions and changed the execution order a bit plus added other minor changes like additional variables, but overall the code is still very similar to the leaked code. On the other hand, it is modified so that the resulting binary looks different for AVs.
It is interesting to see that both (Client) IDs are pointing to the same name: CORREOS. In the Nuclear_Explosion file, aka RevengeRAT, it is only base64 encode “Q09SUkVPUw==“.
RevengeRAT Atomic class config
Orcus decoded XML config
Conclusion
These malware distribution campaigns are ongoing and will likely continue to be observed targeting various organizations around the world. RevengeRAT and Orcus RAT are two of the most popular RATs in use across the threat landscape and will likely continue to be heavily favored for use during the initial stages of attacks.
Organizations should leverage comprehensive defense-in-depth security controls to ensure that they are not adversely impacted by attacks featuring these malware families. At any given point in time, there are several unrelated attackers distributing these RATs in different ways. Given that the source code of both of these malware families is readily available, we will likely continue to see new variants of each of these RATs for the foreseeable future.
Coverage
Additional ways our customers can detect and block this threat are listed below.
Advanced Malware Protection (AMP) is ideally suited to prevent the execution of the malware used by these threat actors.
Cisco Cloud Web Security (CWS) or Web Security Appliance (WSA) web scanning prevents access to malicious websites and detects malware used in these attacks.
Email Security can block malicious emails sent by threat actors as part of their campaign.
Network Security appliances such as Next-Generation Firewall (NGFW), Next-Generation Intrusion Prevention System (NGIPS), and Meraki MX can detect malicious activity associated with this threat.
AMP Threat Grid helps identify malicious binaries and build protection into all Cisco Security products.
Umbrella, our secure internet gateway (SIG), blocks users from connecting to malicious domains, IPs, and URLs, whether users are on or off the corporate network.
Open Source Snort Subscriber Rule Set customers can stay up to date by downloading the latest rule pack available for purchase on Snort.org.
Indicators of Compromise (IOCs)
The following indicators of compromise (IOCs) have been observed to be associated with malware campaigns.
ZIP Hashes (SHA256):
c66c96c8c7f44d0fd0873ea5dbaaa00ae3c13953847f0ca308d1f56fd28f230c d6c5a75292ac3a6ea089b59c11b3bf2ad418998bee5ee3df808b1ec8955dcf2a
BAT Hashes (SHA256):
20702a8c4c5d74952fe0dc050025b9189bf055fcf6508987c975a96b7e5ad7f5 946372419d28a9687f1d4371f22424c9df945e8a529149ef5e740189359f4c8d
PE32 Hashes (SHA256):
ff3e6d59845b65ad1c26730abd03a38079305363b25224209fe7f7362366c65e 5e4db38933c0e3922f403821a07161623cd3521964e6424e272631c4492b8ade
JS Hashes (SHA256):
4c7d2efc19cde9dc7a1fcf2ac4b30a0e3cdc99d9879c6f5af70ae1b3a846b64b
Domains:
The following domains have been observed to be associated with malware campaigns:
skymast231-001-site1[.]htempurl[.]com qstorm[.]chickenkiller[.]com
IP Addresses:
The following IP addresses have been observed to be associated with malware campaigns:
193[.]161[.]193[.]99 205[.]144[.]171[.]185
#gallery-0-5 { margin: auto; } #gallery-0-5 .gallery-item { float: left; margin-top: 10px; text-align: center; width: 33%; } #gallery-0-5 img { border: 2px solid #cfcfcf; } #gallery-0-5 .gallery-caption { margin-left: 0; } /* see gallery_shortcode() in wp-includes/media.php */
Go to Source Author: RAT Ratatouille – Backdooring PCs with leaked RATs Original Post from Talos Security Author: By Edmund Brumaghin and Holger Unterbrink. Executive summary Orcus RAT…
0 notes
Text
How to install OpenVPN on CentOS 7
Introduction
A Virtual Private Network (VPN) allows you to traverse untrusted networks as if you were on a private network. It gives you the freedom to access the internet safely and securely from your smartphone or laptop when connected to an untrusted network, like the WiFi at a hotel or coffee shop.
When combined with HTTPS connections, this setup allows you to secure your wireless logins and transactions. You can circumvent geographical restrictions and censorship, and shield your location and any unencrypted HTTP traffic from the untrusted network.
OpenVPN is a full featured, open-source Secure Socket Layer (SSL) VPN solution that accommodates a wide range of configurations. In this tutorial, you will set up OpenVPN on a CentOS 7 server, and then configure it to be accessible from a client machine.
Prerequisites
To follow this tutorial, you will need:
One CentOS 7 server with a sudo non-root user and a firewall set up with firewalld, which you can achieve with our Initial Server Setup with CentOS 7 guide and the Additional Recommended Steps for New CentOS 7 Servers.
A domain or subdomain that resolves to your server that you can use for the certificates. To set this up, you will first need to register a domain name and then add a DNS record via the DigiMaki.com. Note that just adding an A record will meet the requirements of this tutorial.
A client machine which you will use to connect to your OpenVPN server. For the purposes of this tutorial, it’s recommend that you use your local machine as the OpenVPN client.
With these prerequisites in place, you are ready to begin setting up and configuring an OpenVPN server on CentOS 7.
Step 1 — Installing OpenVPN
To start, we will install OpenVPN on the server. We’ll also install Easy RSA, a public key infrastructure management tool which will help us set up an internal certificate authority (CA) for use with our VPN. We’ll also use Easy RSA to generate our SSL key pairs later on to secure the VPN connections. Log in to the server as the non-root sudo user, and update the package lists to make sure you have all the latest versions.
sudo yum update -y
The Extra Packages for Enterprise Linux (EPEL) repository is an additional repository managed by the Fedora Project containing non-standard but popular packages. OpenVPN isn’t available in the default CentOS repositories but it is available in EPEL, so install EPEL:
sudo yum install epel-release -y
Then update your package lists once more:
sudo yum update -y
Next, install OpenVPN and wget, which we will use to install Easy RSA:
sudo yum install -y openvpn wget
Using wget, download Easy RSA. For the purposes of this tutorial, we recommend using easy-rsa-2 because there’s more available documentation for this version. You can find the download link for the latest version of easy-rsa-2 on the project’s Releases page:
wget -O /tmp/easyrsa https://github.com/OpenVPN/easy-rsa-old/archive/2.3.3.tar.gz
Next, extract the compressed file with tar:
tar xfz /tmp/easyrsa
This will create a new directory on your server called easy-rsa-old-2.3.3. Make a new subdirectory under /etc/openvpn and name it easy-rsa:
sudo mkdir /etc/openvpn/easy-rsa
Copy the extracted Easy RSA files over to the new directory:
sudo cp -rf easy-rsa-old-2.3.3/easy-rsa/2.0/* /etc/openvpn/easy-rsa
Then change the directory’s owner to your non-root sudo user:
sudo chown centos /etc/openvpn/easy-rsa/
Once these programs are installed and have been moved to the right locations on your system, the next step is to customize the server-side configuration of OpenVPN.
Step 2 — Configuring OpenVPN
Like many other widely-used open-source tools, there are dozens of configuration options available to you. In this section, we will provide instructions on how to set up a basic OpenVPN server configuration.
OpenVPN has several example configuration files in its documentation directory. First, copy the sample server.conf file as a starting point for your own configuration file.
sudo cp /usr/share/doc/openvpn-2.4.4/sample/sample-config-files/server.conf /etc/openvpn
Open the new file for editing with the text editor of your choice. We’ll use nano in our example, which you can download with the yum install nano command if you don’t have it on your server already:
sudo vi /etc/openvpn/server.conf
There are a few lines we need to change in this file, most of which just need to be uncommented by removing the semicolon, ;, at the beginning of the line. The functions of these lines, and the other lines not mentioned in this tutorial, are explained in-depth in the comments above each one.
To get started, find and uncomment the line containing push “redirect-gateway def1 bypass-dhcp”. Doing this will tell your client to redirect all of its traffic through your OpenVPN server. Be aware that enabling this functionality can cause connectivity issues with other network services, like SSH:
sudo vi /etc/openvpn/server.conf push "redirect-gateway def1 bypass-dhcp"
Because your client will not be able to use the default DNS servers provided by your ISP (as its traffic will be rerouted), you need to tell it which DNS servers it can use to connect to OpenVPN. You can pick different DNS servers, but here we’ll use Google’s public DNS servers which have the IPs of 8.8.8.8 and 8.8.4.4.
Set this by uncommenting both push “dhcp-option DNS …” lines and updating the IP addresses:
sudo vi /etc/openvpn/server.conf push "dhcp-option DNS 8.8.8.8" push "dhcp-option DNS 8.8.4.4"
We want OpenVPN to run with no privileges once it has started, so we need to tell it to run with a user and group of nobody. To enable this, uncomment the user nobody and group nobody lines:
sudo vi /etc/openvpn/server.conf user nobody group nobody
Next, uncomment the topology subnet line. This, along with the server 10.8.0.0 255.255.255.0 line below it, configures your OpenVPN installation to function as a subnetwork and tells the client machine which IP address it should use. In this case, the server will become 10.8.0.1 and the first client will become 10.8.0.2:
sudo vi /etc/openvpn/server.conf topology subnet
It’s also recommended that you add the following line to your server configuration file. This double checks that any incoming client certificates are truly coming from a client, hardening the security parameters we will establish in later steps:
sudo vi /etc/openvpn/server.conf remote-cert-eku "TLS Web Client Authentication"
Lastly, OpenVPN strongly recommends that users enable TLS Authentication, a cryptographic protocol that ensures secure communications over a computer network. To do this, you will need to generate a static encryption key (named in our example as myvpn.tlsauth, although you can choose any name you like). Before creating this key, comment the line in the configuration file containing tls-auth ta.key 0 by prepending it with a semicolon. Then, add tls-crypt myvpn.tlsauth to the line below it:
sudo vi /etc/openvpn/server.conf ;tls-auth ta.key 0 tls-crypt myvpn.tlsauth
Save and exit the OpenVPN server configuration file (in nano, press CTRL – X, Y, then ENTER to do so), and then generate the static encryption key with the following command:
sudo openvpn --genkey --secret /etc/openvpn/myvpn.tlsauth
Now that your server is configured, you can move on to setting up the SSL keys and certificates needed to securely connect to your VPN connection.
Step 3 — Generating Keys and Certificates
Easy RSA uses a set of scripts that come installed with the program to generate keys and certificates. In order to avoid re-configuring every time you need to generate a certificate, you can modify Easy RSA’s configuration to define the default values it will use for the certificate fields, including your country, city, and preferred email address.
We’ll begin our process of generating keys and certificates by creating a directory where Easy RSA will store any keys and certs you generate:
sudo mkdir /etc/openvpn/easy-rsa/keys
The default certificate variables are set in the vars file in /etc/openvpn/easy-rsa, so open that file for editing:
sudo vi /etc/openvpn/easy-rsa/vars
Scroll to the bottom of the file and change the values that start with export KEY_ to match your information. The ones that matter the most are:
KEY_CN: Here, enter the domain or subdomain that resolves to your server. KEY_NAME: You should enter server here. If you enter something else, you would also have to update the configuration files that reference server.key and server.crt. The other variables in this file that you may want to change are:
KEY_COUNTRY: For this variable, enter the two-letter abbreviation of the country of your residence. KEY_PROVINCE: This should be the name or abbreviation of the state of your residence. KEY_CITY: Here, enter the name of the city you live in. KEY_ORG: This should be the name of your organization or company. KEY_EMAIL: Enter the email address that you want to be connected to the security certificate. KEY_OU: This should be the name of the “Organizational Unit” to which you belong, typically either the name of your department or team.
The rest of the variables can be safely ignored outside of specific use cases. After you’ve made your changes, the file should look like this:
vi /etc/openvpn/easy-rsa/vars . . . # These are the default values for fields # which will be placed in the certificate. # Don't leave any of these fields blank. export KEY_COUNTRY="US" export KEY_PROVINCE="NY" export KEY_CITY="New York" export KEY_ORG="DigitalOcean" export KEY_EMAIL="[email protected]" export [email protected] export KEY_CN=openvpn.example.com export KEY_NAME="server" export KEY_OU="Community" . . .
Save and close the file.
To start generating the keys and certificates, move into the easy-rsa directory and source in the new variables you set in the vars file:
cd /etc/openvpn/easy-rsa source ./vars
Run Easy RSA’s clean-all script to remove any keys and certificates already in the folder and generate the certificate authority:
./clean-all
Next, build the certificate authority with the build-ca script. You’ll be prompted to enter values for the certificate fields, but if you set the variables in the vars file earlier, all of your options will already be set as the defaults. You can press ENTER to accept the defaults for each one:
./build-ca
This script generates a file called ca.key. This is the private key used to sign your server and clients’ certificates. If it is lost, you can no longer trust any certificates from this certificate authority, and if anyone is able to access this file they can sign new certificates and access your VPN without your knowledge. For this reason, OpenVPN recommends storing ca.key in a location that can be offline as much as possible, and it should only be activated when creating new certificates.
Next, create a key and certificate for the server using the build-key-server script:
./build-key-server server
As with building the CA, you’ll see the values you’ve set as the defaults so you can hit ENTER at these prompts. Additionally, you’ll be prompted to enter a challenge password and an optional company name. If you enter a challenge password, you will be asked for it when connecting to the VPN from your client. If you don’t want to set a challenge password, just leave this line blank and press ENTER. At the end, enter Y to commit the changes.
The last part of creating the server keys and certificates is generating a Diffie-Hellman key exchange file. Use the build-dh script to do this:
./build-dh
This may take a few minutes to complete.
Once your server is finished generating the key exchange file, copy the server keys and certificates from thekeys directory into the openvpn directory:
cd /etc/openvpn/easy-rsa/keys sudo cp dh2048.pem ca.crt server.crt server.key /etc/openvpn
Each client will also need a certificate in order for the OpenVPN server to authenticate it. These keys and certificates will be created on the server and then you will have to copy them over to your clients, which we will do in a later step. It’s advised that you generate separate keys and certificates for each client you intend to connect to your VPN.
Because we’ll only set up one client here, we called it client, but you can change this to a more descriptive name if you’d like:
cd /etc/openvpn/easy-rsa ./build-key client
Finally, copy the versioned OpenSSL configuration file, openssl-1.0.0.cnf, to a versionless name, openssl.cnf. Failing to do so could result in an error where OpenSSL is unable to load the configuration because it cannot detect its version:
cp /etc/openvpn/easy-rsa/openssl-1.0.0.cnf /etc/openvpn/easy-rsa/openssl.cnf
Now that all the necessary keys and certificates have been generated for your server and client, you can move on to setting up routing between the two machines.
Step 4 — Routing
So far, you’ve installed OpenVPN on your server, configured it, and generated the keys and certificates needed for your client to access the VPN. However, you have not yet provided OpenVPN with any instructions on where to send incoming web traffic from clients. You can stipulate how the server should handle client traffic by establishing some firewall rules and routing configurations.
Assuming you followed the prerequisites at the start of this tutorial, you should already have firewalld installed and running on your server. To allow OpenVPN through the firewall, you’ll need to know what your active firewalld zone is. Find this with the following command:
sudo firewall-cmd --get-active-zones
Output
trusted Interfaces: tun0
Next, add the openvpn service to the list of services allowed by firewalld within your active zone, and then make that setting permanent by running the command again but with the –permanent option added:
sudo firewall-cmd --zone=trusted --add-service openvpn sudo firewall-cmd --zone=trusted --add-service openvpn --permanent
You can check that the service was added correctly with the following command:
sudo firewall-cmd –list-services –zone=trusted
Output
openvpn
Next, add a masquerade to the current runtime instance, and then add it again with the –permanent option to add the masquerade to all future instances:
sudo firewall-cmd --add-masquerade sudo firewall-cmd --permanent --add-masquerade
You can check that the masquerade was added correctly with this command:
sudo firewall-cmd --query-masquerade
Output
yes
Next, forward routing to your OpenVPN subnet. You can do this by first creating a variable (SHARK in our example) which will represent the primary network interface used by your server, and then using that variable to permanently add the routing rule:
SHARK=$(ip route get 8.8.8.8 | awk 'NR==1 {print $(NF-2)}') sudo firewall-cmd --permanent --direct --passthrough ipv4 -t nat -A POSTROUTING -s 10.8.0.0/24 -o $SHARK -j MASQUERADE
Be sure to implement these changes to your firewall rules by reloading firewalld:
sudo firewall-cmd --reload
Next, enable IP forwarding. This will route all web traffic from your client to your server’s IP address, and your client’s public IP address will effectively be hidden.
Open sysctl.conf for editing:
sudo vi /etc/sysctl.conf
Then add the following line at the top of the file:
/etc/sysctl.conf net.ipv4.ip_forward = 1
Finally, restart the network service so the IP forwarding will take effect:
sudo systemctl restart network.service
With the routing and firewall rules in place, we can start the OpenVPN service on the server.
Step 5 — Starting OpenVPN
OpenVPN is managed as a systemd service using systemctl. We will configure OpenVPN to start up at boot so you can connect to your VPN at any time as long as your server is running. To do this, enable the OpenVPN server by adding it to systemctl:
sudo systemctl -f enable [email protected]
Then start the OpenVPN service:
sudo systemctl start [email protected]
Double check that the OpenVPN service is active with the following command. You should see active (running) in the output:
sudo systemctl status [email protected]
Output
● [email protected] - OpenVPN Robust And Highly Flexible Tunneling Application On server Loaded: loaded (/usr/lib/systemd/system/[email protected]; enabled; vendor preset: disabled) Active: **active (running)** since Wed 2018-03-14 15:20:11 EDT; 7s ago Main PID: 2824 (openvpn) Status: "Initialization Sequence Completed" CGroup: /system.slice/system-openvpn.slice/[email protected] └─2824 /usr/sbin/openvpn --cd /etc/openvpn/ --config server.conf . . .
We’ve now completed the server-side configuration for OpenVPN. Next, you will configure your client machine and connect to the OpenVPN server.
Step 6 — Configuring a Client
Regardless of your client machine’s operating system, it will need a locally-saved copy of the CA certificate and the client key and certificate generated in Step 3, as well as the static encryption key you generated at the end of Step 2.
Locate the following files on your server. If you generated multiple client keys with unique, descriptive names, then the key and certificate names will be different. In this article we used client.
/etc/openvpn/easy-rsa/keys/ca.crt /etc/openvpn/easy-rsa/keys/client.crt /etc/openvpn/easy-rsa/keys/client.key /etc/openvpn/myvpn.tlsauth
Copy these files to your client machine. You can use SFTP or your preferred method. You could even just open the files in your text editor and copy and paste the contents into new files on your client machine. Regardless of which method you use, be sure to note where you save these files.
Next, create a file called client.ovpn on your client machine. This is a configuration file for an OpenVPN client, telling it how to connect to the server:
sudo vi client.ovpn
Then add the following lines to client.ovpn. Notice that many of these lines reflect those which we uncommented or added to the server.conf file, or were already in it by default:
client.ovpn client tls-client ca /path/to/ca.crt cert /path/to/client.crt key /path/to/client.key tls-crypt /path/to/myvpn.tlsauth remote-cert-eku "TLS Web Client Authentication" proto udp remote your_server_ip 1194 udp dev tun topology subnet pull user nobody group nobody
When adding these lines, please note the following:
You’ll need to change the first line to reflect the name you gave the client in your key and certificate; in our case, this is just client
You also need to update the IP address from your_server_ip to the IP address of your server; port 1194 can stay the same Make sure the paths to your key and certificate files are correct
This file can now be used by any OpenVPN client to connect to your server. Below are OS-specific instructions for how to connect your client:
Windows:
On Windows, you will need the official OpenVPN Community Edition binaries which come with a GUI. Place your .ovpn configuration file into the proper directory, C:\Program Files\OpenVPN\config, and click Connect in the GUI. OpenVPN GUI on Windows must be executed with administrative privileges.
macOS:
On macOS, the open source application Tunnelblick provides an interface similar to the OpenVPN GUI on Windows, and comes with OpenVPN and the required TUN/TAP drivers. As with Windows, the only step required is to place your .ovpn configuration file into the ~/Library/Application Support/Tunnelblick/Configurations directory. Alternatively, you can double-click on your .ovpn file.
Linux:
On Linux, you should install OpenVPN from your distribution’s official repositories. You can then invoke OpenVPN by executing:
sudo openvpn --config ~/path/to/client.ovpn
After you establish a successful client connection, you can verify that your traffic is being routed through the VPN by checking Google to reveal your public IP.
Conclusion
You should now have a fully operational virtual private network running on your OpenVPN server. You can browse the web and download content without worrying about malicious actors tracking your activity.
0 notes
Text
Best VPN Apps For Andriod 2018 (Free + Premium)
If you're a regular online surfer, you may have confronted the unavailability of this websites/services from the nation you reside, or your own ISP blocks you from being entered. If it occurs in the conclusion however much you try, with no masking the IP, then you can't do anything.
This is the point where the demand for a fantastic VPN service comes useful. It pushes your actual Internet Protocol (IP) address and welcomes you using a virtual IP, that likely would be found in western nations. On android, we've got some value free VPN programs to relish daily. These are handpicked service sorted intentionally, select anything based on your requirements. Let us check out a few of the finest VPN Programs for Android 2018 that comprises both premium & free VPN providers, will we?
Best VPN Apps For Android 2018 (Free + Paid)
1. ExpressVPN
ExpressVPN is your hands-down paid VPN service an individual can have in their telephones. The reliability, functionality is something which you exclusively cover for. They've whopping 135+ international servers to join, it not only makes your relationship quicker but also highly confidential. As the industry standard, ExpressVPN’s network is secured with SSL and 256-bit encryption.
The base plan will help you to connect to cellular phones, desktops, and tablet computers using boundless bandwidth or information utilization. The upload and download rate are adequate when attached, as a result of the high performance servers. Finest component, here on Android Crush we utilize ExpressVPN on our smart phones as well as desktop since it's the easy integration in virtually all of the platform. Here is the "go to" alternative we now have, we could switch to some other when we discovered something much better.
2. ZPN Connect
ZPN is a so-called superior assistance, but it's totally free for the most part. Being a pioneer program to devote the huge bandwidth because of its user, it is down the hands VPN for the mild to medium use. Together with the free signup, you are going to find the 10 GB of free use with infinite validity. You are able to update to the top plan any time to receive your own unlimited bandwidth.
The user interface is very is legible and clearly organized. Additionally, it gives ample choices to tweak to the additional speed and security. Besides that, it may also stop from monitoring your own personal files on the internet. Down a hands free vpn support for Android to provide a go.
3. DroidVPN
DroidVPN may not be the ideal VPN program but might function as a backup if you'd like some thing to take care of solitude. The 100 MB daily information limit is adequate for ordinary users. In addition, you won't get a lot of servers to select from the free version, you're limited to get two servers, which are active for the majority of the times.
The top plan makes your way clear for infinite bandwidth and a broad variety of elite servers to pick from.
It is among those Android VPN services which works with all the ICMP connection. The single con we discovered so much was that the host occupied dilemma, it doesn't occur frequently but stays unsolved because there are just servers.
4. OpenVPN
Should you require infinite bandwidth for free, subsequently OpenVPN is your "go-to" alternative. It is an open source support from OpenVPN Project which uses the Android's generic VPN API to unblock the limited accessibility. Because it's using the native API, you do not have to root your own Android apparatus to begin.
But linking to the VPN is a nuisance, you need to download the VPN settings and import them for your device to become connected. When the link is created, then remain relaxed and take pleasure in the information. Follow the steps to Have settings,
Visit VPN Book.
Download OpenVPN servers.
Extract the servers zip with RAR.
Then, import the server in OpenVPN.
Tap the servers to connect.
Enter the username & password from here.
Well that said rate changes, and should you've got faster servers, you will get unbelievable speed. For free, it is among the very best Android VPN programs you may get.
5. VyprVPN
VyprVPN matured out from its baby stage, and now it's serving for tens of thousands of people to protect the online privacy. You may configure the interface to attach together or put it to automatic.
VyprDNS is something which divides Vypr from other people. Fundamentally it that the Vypr possessed zero logging DNS servers to resolve the server names quicker. The private link per program is some thing we fond of; it tunnels into the online link for the specific program you pick. They've got hundreds of servers from globally, which is excellent for unblocking the services/sites unavailable in your own country. Using a free account, you will receive 500 MB of information that may be updated to the unlimited bandwidth for under $12monthly.
6. FinchVPN
FinchVPN is just one more semi-premium VPN service which gets the higher data servers and caps to associate with. Using a free account, you receive more than five different server places and 3 GB of information cap a month. Further, you are able to personalize the link by assigning the interface, and protocol. Further, even should you have to connect via any open-VPN config, then there's space for this too.
The top unlocks elite servers, that has more than 1 GBPS relations for unparalleled rate. Nevertheless, the free account functions the majority of the users want if you don't want them poorly.
7. Hideman
Hideman is your simple app that pushes your existence, it's readily available free of charge as Hideman complimentary VPN, which allows you to join from seven different locations worldwide. Finest component, two of these supports torrent downloading from the box. Finest part, it's encrypted using 256-bit security is difficult to decrypt, you are able to browse anonymously without leaving any footprint.
It supports anti-DPI, malware security, port forwarding along with other advanced settings too. Following the effective link, there's an choice to modify the IP address in the drop-down menu for those who want. In general, a hassle free way to escape the internet monitoring radar.
8. Hotspot Shield
It's the simple yet effective app to look after your privacy dilemma if you're stepping in to your first. The user interface has got a lot of changes that got better at times, however the advertisements in the free version is rather bothersome.
If it has to do with the connectivity, it remains strong. It's possible to use boundless bandwidth from the free accounts with couple of places to attach from. The Elite program steps you from this chaos UI and supplies ample place for relationship.
9. Rocket VPN
Rocket VPN is just another premium service using a user friendly interface, global servers, responsive technical assistance which makes it go to alternative. Together with the free accounts, you receive 250 MB of information cycle each monthwhich will renew every month.
The dearth of innovative settings, and also the advertisements absolutely free encounter may be a deal breaker for a number people. However, it will get the work done by exposing your IP with almost any digital site. Have a look at our review of Rocket VPN, to acquire more insight.
10. Betternet
We can't skip Betternet should you discuss privacy. It's the old-school VPN support that's totally free to utilize with no hidden fees. As it's absolutely free, you can't connect to various servers. Now you need to bare using one US host for all your requirements, if you're fine, then you can upgrade to top anytime to get a variety of locations.
Premium plan also gets rid of the ads; you will not be bothered with almost any advertisements. Additionally, you may join up to five devices with the identical account.
11. Turbo VPN
A larger brother a Betternet, Turbo VPN let you join with six distinct place with no bandwidth limitation. The servers are effective enough to find adequate rate as you're connected, even though the solitude may not be an extremely encrypted like superior, we whine as it's absolutely free.
There's a technical help window opened, which you can hang about if you had some thing to cope technically.Possessing the tight online safety may be a rough go, but it is a wonderful street to perform safe by concealing your online identity. When utilizing the public WiFi link, the odds of getting hacked are comparatively greater. In such conditions, you need to leverage the possibility of finest premium & free VPN Apps For Android 2018. It assists you more and shields many net dangers.
A number of those VPN customers are free with infinite bandwidth and information utilization, whereas a few are superior service that may be a great move if you concern yourself about your privacy. Sharing is caring, is not it? Don't hesitate to talk about with your friends and comparative.
#best vpn apps#vpn apps#android apps#best vpn apps for android#EXPRESS VPN#ZPN CONNECT#DROIDVPN#OPEN VPN#VYPRVPN#FINCHVPN#HIDEMAN#HOTSPOT SHIELD#ROCKET VPN#BETTERNET#TURBO VPN
0 notes