#NeedToPass
Explore tagged Tumblr posts
Photo

Today looks like... EXCEPT I finished Psych & Soc last night. The last chapter was super annoying!
Struggling because I feel like I can skip certain chapters, but I’m super paranoid that I will miss one tiny crucial detail that will help me get at least one more question right.
#Studying#Personal#Me#Life#MCAT#College#Student#MedicalSchool#Medical#Med#Doctor#Physician#ERMedicine#EmergencyMedicine#Goals#LifeGoal#FamilyMedicine#NeedToPass#520#ScoreHigh#PleaseHelp
8 notes
·
View notes
Photo

°loveyourself°
1 note
·
View note
Text
All About Template In Angular By Sagar Jaybhay
New Post has been published on https://is.gd/dlHxRJ
All About Template In Angular By Sagar Jaybhay

Template In Details In Angular By Sagar Jaybhay
In angular component we have 2 ways to add a template, here template means the Html code which required for component.
In AngularJS, the view is a projection of the model through the HTML template. This means that whenever the model changes, AngularJS refreshes the appropriate binding points, which updates the view.
If you see below code we use inline template property in the component class.
import Component, Input, OnInit, Output,EventEmitter from "@angular/core"; @Component( selector:'rating', template:` <span>I m in rating Component</span> <div class="container"> <button (click)="onClickStar()"> <span> <i class="isClicked==true?'fa fa-star':'fa fa-star-o'"></i> </span> </button> </div> ` ) export class Rating implements OnInit ngOnInit(): void console.log('i m in OnInit => '+this.isClicked); cssClass="fa fa-star-o"; @Input('is-Favourite') isClicked:boolean; @Output('change') click=new EventEmitter(); onClickStar() this.isClicked=!this.isClicked; var newObject= needtopass:"demo string", numb:12, boolval:false this.click.emit((newObject));

Another way is that use of templateUrl property.

import Component, Input, OnInit, Output,EventEmitter from "@angular/core"; @Component( selector:'rating', templateUrl:'./rating.component.html' ) export class Rating implements OnInit ngOnInit(): void console.log('i m in OnInit => '+this.isClicked); cssClass="fa fa-star-o"; @Input('is-Favourite') isClicked:boolean; @Output('change') click=new EventEmitter(); onClickStar() this.isClicked=!this.isClicked; var newObject= needtopass:"demo string", numb:12, boolval:false this.click.emit((newObject));
Below is external Html file present in app folder.
<h1>I am In rating</h1> <span>I m in rating Component</span> <div class="container"> <button (click)="onClickStar()"> <span> <i class="isClicked==true?'fa fa-star':'fa fa-star-o'"></i> </span> </button> </div>
Now the question comes in your mind which one is better template or templateUrl?
First if you have small component and which required hardly 3 to 4 lines of small Html you can use template property which is inline code in that file itself.
When you need a big Html code then go to external Html file which is referred by templateUrl property.
If you use external Html you will get intellisense for Html but if you use inline template property intellisense is not present.
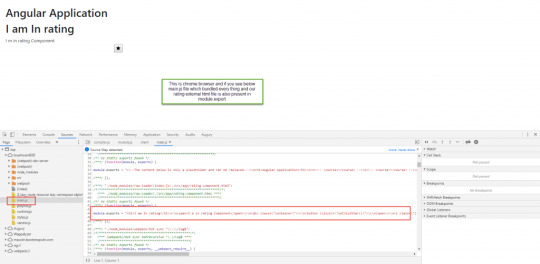
If you use templateUrl property it will not make another call to render Html when webpack is applied it bundled everything and Html is present in main.js file in module.export. below is the image

How to apply the style to Component?
In angular component decorator we have 2 ways to apply styles.
styleUrls
styles
In these both are the arrays but you can use only one. Also if you use both the who ever is last that CSS is applied on your component Html.
So the styles which we apply here are scoped to that component only these are not applied outside of that component.
import Component, Input, OnInit, Output,EventEmitter from "@angular/core"; @Component( selector:'rating', templateUrl:'./rating.component.html', styleUrls:['./rating.component.css'], styles:[` .fa-star color: green; `] ) export class Rating implements OnInit ngOnInit(): void console.log('i m in OnInit => '+this.isClicked); cssClass="fa fa-star-o"; @Input('is-Favourite') isClicked:boolean; @Output('change') click=new EventEmitter(); onClickStar() this.isClicked=!this.isClicked; var newObject= needtopass:"demo string", numb:12, boolval:false this.click.emit((newObject));

Now the question is how angular decide to apply CSS only that Html element or scoped to that element only?
First need to understand Shadow Dom.
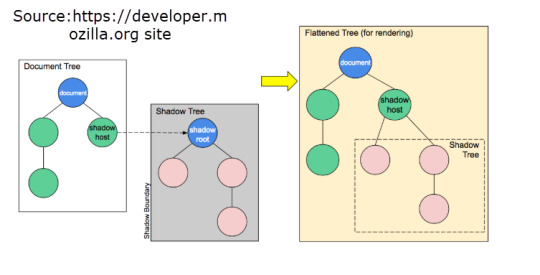
Shadow DOM allows hidden DOM trees to be attached to elements in the regular DOM tree — this shadow DOM tree starts with a shadow root, underneath which can be attached to any elements you want, in the same way as the normal DOM.
For more information visit link:- https://developer.mozilla.org/en-US/docs/Web/Web_Components/Using_shadow_DOM

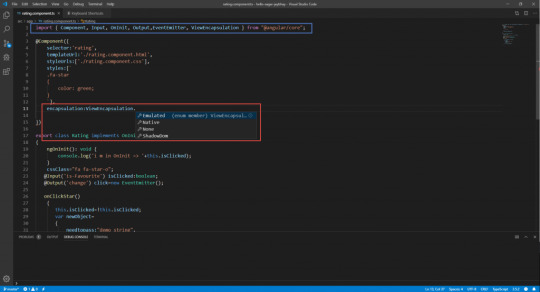
ViewEncapsulation in Angular:
Defines template and style encapsulation options available for Component’s Component.
enum ViewEncapsulation Emulated: 0 Native: 1 None: 2 ShadowDom: 3
It is used to encapsulate the view and in simple term shadow dom methods are applied by using simple hack by angular team. In this shadow dom is not supported by many old browsers and supported by some of safari which one is latest and chrome version 50 onwards so to compatible all angular use viewEncapsulation property. And in this Emulated is default one.
MemberDescriptionEmulated: 0Emulate Native scoping of styles by adding an attribute containing surrogate id to the Host Element and pre-processing the style rules provided via styles or styleUrls, and adding the new Host Element attribute to all selectors.This is the default option.Native: 1None: 2Don’t provide any template or style encapsulation.ShadowDom: 3Use Shadow DOM to encapsulate styles.For the DOM this means using modern Shadow DOM and creating a ShadowRoot for Component’s Host Element.

In this below image you can see angular by default generate some Id’s to identify the element and apply the CSS on that element only.

Ng-Content:
Now suppose I want to create one panel which is reusable and wants to plug different content on-demand so how I went do that in simple way. For that angular provide ng-content which is used for dynamic content placement.
In below code is our panel component class in which we push dynamic content.
If we add the tag <ng-content></ng-content> anywhere in our template HTML for our component. The inner content of the tags that define our component is then projected into this space.
Content projection is an Angular concept that helps developers build reusable components. It allows you to pass data from a parent component to a template of a child component.
import Component from '@angular/core'; @Component( selector:'custom-panel', templateUrl:'./panelDemo.component.html', styleUrls:['./panelDemo.component.css'] ) export class panelDemo
Below is the code for html of that panel
div class="panel panel-default"> <div class="panel-heading"> <ng-content select=".heading"></ng-content> </div> <div class="panel-body"> <ng-content select=".body"></ng-content> </div> </div>
In above you can see that we add <ng-content></ng-content> in 2 places in panel heading and in panel body.
But here is the catch that in single Html I m using 2 <ng-content> so I need to identify them anyhow so I use select attribute where I give .class name by using this we can identify them.
Now below is the code for app.component.html where we push dynamic content.
<custom-panel> <div class="heading"> My heading is here </div> <div class="body"> my body is here </div> </custom-panel>
Now we use to identify by class name so we use
<div class="heading">
To select <ng-content> and push the content only in that div.
If your Html page contains only <ng-content> element then no need to selector of that <ng-content>
Now the output looks like this.

Ng-Container:-
In angular you cant use more than one template binding on single element.
<!-- Can't do this --> <div *ngIf="todos" *ngFor="let todo of todos"> todo.content </div> To achive the same functionality we need to do following modification. <div *ngIf="todos"> <div *ngFor="let todo of todos"> todo.content </div> </div>
Angular This solution perfectly fine but it adds extra div element in dom. So at this place ng-container comes in a picture.
<ng-container *ngIf="todos"> <div *ngFor="let todo of todos"> todo.content </div> </ng-container>
Angular the following code behaves same but without adding extra div to our dom element.
0 notes
Photo

Doing some math work this stuff is annoying but I gotta get it done #school #collegelife #tiredofthis #needtopass #needavacation
0 notes
Photo

This represents my life this weekend... Finals will be the death of me.😒😒😒😒😒😒😒😒😒😒 #finals #college #spongebob #plankton #studying #needtopass #survive #trichotillomania #flashcards
2 notes
·
View notes
Photo

Brain food! 🍏❤️🐶📚Plus it's chocolately yumminess helps stress too! #stayontrack #needtopass
0 notes
Photo

My final japanese exam is today, im so afraid of i may not pass... #japanese#japan#exam#exams#finals#today#afraid#needtopass#learning#difficult#hard#hiragana#katakana#kanji#diary#helpme
#afraid#exam#helpme#needtopass#hard#kanji#japanese#hiragana#diary#exams#learning#japan#katakana#finals#today#difficult
0 notes
Text
How To Build Re-Usable Component In Angular With component Interaction-Sagar-Jaybhay
New Post has been published on https://is.gd/K4a7FQ
How To Build Re-Usable Component In Angular With component Interaction-Sagar-Jaybhay

How to build re-usable component with Interaction in angular by sagar jaybhay
In order to make component re-usable, you need to add input and output properties. We use input properties to pass a state or give the input to component and use output properties to raise the event.
So because of input and output properties, our component becomes a public API.
Input Properties:
How to make the property as Input Property?
@Input Is decorator for marking field and properties as input properties.
@Input() is clicked:boolean;
This is code for making the property as input field and when it is used refer to referring component you need to use below code we use this app component.
import Component from '@angular/core'; @Component( selector: 'app-root', templateUrl: './app.component.html', styleUrls: ['./app.component.css'] ) export class AppComponent title = 'hello-sagar-jaybhay'; post= isClicked:true
Now we use this as reusable component of favorites and in app.component.html template write below code.
<rating [isClicked]="post.isClicked"></rating>
Now we will see the Favorite component itself.
import Component, Input, OnInit from "@angular/core"; @Component( selector:'rating', template:` <span>I m in rating Component</span> <div class="container"> <button (click)="onClickStar()"> <span> <i class="isClicked==true?'fa fa-star':'fa fa-star-o'"></i> </span> </button> </div> ` ) export class Rating implements OnInit ngOnInit(): void console.log('i m in OnInit => '+this.isClicked); cssClass="fa fa-star-o"; @Input() isClicked:boolean; onClickStar() this.isClicked=!this.isClicked;

By marking property or field in class it will make our property input property.
Second Way to make the property as Input property:
import Component, OnInit from "@angular/core"; @Component( selector:'rating', template:` <span>I m in rating Component</span> <div class="container"> <button (click)="onClickStar()"> <span> <i class="isClicked==true?'fa fa-star':'fa fa-star-o'"></i> </span> </button> </div> `, inputs:['isClicked'] ) export class Rating implements OnInit ngOnInit(): void console.log('i m in OnInit => '+this.isClicked); cssClass="fa fa-star-o"; isClicked:boolean; onClickStar() this.isClicked=!this.isClicked;

In the above approach, we don’t Import Input decorator from the angular core rather than in Component decorator inbuild field input we use that but there is one drawback in this if we somehow our name is changed then the application fails.
How to alias to input property or nickname?
@Input('is-Favourite') isClicked:boolean;
And in-app component where we refer this component use below code.
<rating [is-Favourite]="post.isClicked"></rating>
In this approach, one benefit is that If somehow name changes or we change our naming convention by the use of alias our application will work.
Output Properties:
In this main thing is that we handle the reusable component event in the host component and how to handle this is by using the Output properties in angular which is also kind of decorator.
Now in our application rating component, we have added in app.component which is our host component.

import Component, Input, OnInit, Output,EventEmitter from "@angular/core"; @Component( selector:'rating', template:` <span>I m in rating Component</span> <div class="container"> <button (click)="onClickStar()"> <span> <i class="isClicked==true?'fa fa-star':'fa fa-star-o'"></i> </span> </button> </div> ` ) export class Rating implements OnInit ngOnInit(): void console.log('i m in OnInit => '+this.isClicked); cssClass="fa fa-star-o"; @Input('is-Favourite') isClicked:boolean; @Output() change=new EventEmitter(); onClickStar() this.isClicked=!this.isClicked; this.change.emit();
This is our rating component which we make re-usable.
Below code is in the app component.
<rating [is-Favourite]="post.isClicked" (change)="onRatingChanged()"></rating>
In the above example, you will see that we use change is Output property and which we initialized to EventEmitter and this is used to emit the event. In this we handle click event in rating means self component also but when we want to handle outside that component we use emit() method. The name of Output property we need to use same in app.component.html as you can see in above code where we add onRatingChanged event added.
Below is the code in app.component.html
import Component from '@angular/core'; @Component( selector: 'app-root', templateUrl: './app.component.html', styleUrls: ['./app.component.css'] ) export class AppComponent title = 'hello-sagar-jaybhay'; post= isClicked:true onRatingChanged() console.log('i am in app component event emitter function');

In this case, we have app component is our subscriber of that event.
So Next question is How I pass data when raising that event?
In the emit method we can pass anything means from simple datatype to complex object. Below is the example of a simple Boolean value.

Now we want to pass a complex object

For rating component code is below
import Component, Input, OnInit, Output,EventEmitter from "@angular/core"; @Component( selector:'rating', template:` <span>I m in rating Component</span> <div class="container"> <button (click)="onClickStar()"> <span> <i class="isClicked==true?'fa fa-star':'fa fa-star-o'"></i> </span> </button> </div> ` ) export class Rating implements OnInit ngOnInit(): void console.log('i m in OnInit => '+this.isClicked); cssClass="fa fa-star-o"; @Input('is-Favourite') isClicked:boolean; @Output() change=new EventEmitter(); onClickStar() this.isClicked=!this.isClicked; var newObject= needtopass:"demo string", numb:12, boolval:false this.change.emit(JSON.stringify(newObject));
For Host, UI template code is below
<!--The content below is only a placeholder and can be replaced.--> <h1>Angular Application</h1> <!-- <course></course> --> <!-- <course></course> --> <!-- <myImage></myImage> --> <!-- <blog></blog> --> <rating [is-Favourite]="post.isClicked" (change)="onRatingChanged($event)"></rating> <router-outlet></router-outlet>
And for the host class file where we write the code for this
import Component from '@angular/core'; @Component( selector: 'app-root', templateUrl: './app.component.html', styleUrls: ['./app.component.css'] ) export class AppComponent title = 'hello-sagar-jaybhay'; post= isClicked:true onRatingChanged(object) console.log("i am in app "+ +"component event emitter function "+ " ==> "+object);
But in the above case we didn’t get intellisense so for that we need to declare one interface and pass the data with that.

Code for that where we pass the declared interface and function parameter as interface type and we check the type of that in app.component. For demo purpose, I have added the interface in app.component.ts file but it will be declared in another file and we need to import this.
import Component from '@angular/core'; interface PassedData needtopass:string, numb:number, boolval:boolean; @Component( selector: 'app-root', templateUrl: './app.component.html', styleUrls: ['./app.component.css'] ) export class AppComponent title = 'hello-sagar-jaybhay'; post= isClicked:true onRatingChanged(object:PassedData) console.log("i am in app "+ +"component event emitter function "+ " ==> "+object.boolval+" "+object. );
In output property, we also use an alias for being the contract stable.

0 notes
Photo

#exammood #exams #studying #dying #summer_is_coming #eksetasiki #nohope #needtopass #instamood #engineeringproblems #engineering_student
#summer_is_coming#dying#eksetasiki#studying#needtopass#exammood#exams#nohope#engineeringproblems#instamood#engineering_student
1 note
·
View note
Photo

Good studying to you students. Hopefully your tears and fuck school shouts will be worth it after #finals. #graduation #fuckit #fuckschool #not #notreally #needtopass #needtograduate #tears #study
1 note
·
View note
Photo

#truth #tumblr #NeedtoPass #NoCs #school #stressful #finals #pleasepassme
0 notes
Photo

Still at it at 5am and barely tired #firstallnighterofthesemester #allnighter #nosleep #needmotivation #needtopass #finals #college #8amclass #lastdayofclass #needsomuchluck #almost24hoursawake #gonnabealongday
#lastdayofclass#almost24hoursawake#needtopass#firstallnighterofthesemester#needmotivation#nosleep#allnighter#college#needsomuchluck#gonnabealongday#finals#8amclass
0 notes
Text
analytical chemistry is killing me. srsly
0 notes
Photo

I hate it when I lose stuff at school, like my pencils and papers and my life ambitions 😩📝 #school #boredasf #needtopass #bc #needalife
0 notes
Photo

My Current Situation!! #StudyingForMyStatisticsFinal #IRatherBeSleeping #IHateMath #NeedToPass #GradSchoolProblems #LastMatnClassEver #Ughh #StallingWithTheseHashTagsSoIDontStudy 😔😔😔🙈🙈🙈🙍🔫
#stallingwiththesehashtagssoidontstudy#lastmatnclassever#iratherbesleeping#needtopass#ughh#ihatemath#gradschoolproblems#studyingformystatisticsfinal
0 notes
