Text
What plywood is strongest?
When undertaking construction or woodworking projects, choosing a plywood in 2024 that offers the right strength is crucial. With numerous options available, making an informed decision can be a challenge. In this blog, we'll delve into the world of plywood, exploring the strongest types, highlighting Sylvan Ply as a leading choice, and answering those frequently asked questions.
Finding the strongest plywood requires consideration of your project's specific needs. Sylvan Ply stands as a reliable choice, offering top-tier options like marine-grade plywood alongside a wide range of strong, versatile products. With this knowledge, you're empowered to select plywood stronger than the rest! Contact Sylvan Ply and designed your Customized requirements.

#Durable plywood#Marine plywood uses#Strongest plywood#Best Ply#Best Ply in India#Best Plywood in India
0 notes
Text
#best quality plywood manufacturers in india#calibrated plywood in india#best marine plywood in india#plywood manufacturers in india#plywood suppliers in india#film face shuttering plywood in india#best plantation timber plywood in india#chequered plywood suppliers in india#best plywood used in government tenders in india
0 notes
Text
Bite the Hand / Phillip Graves
⋆★⋆ ════ ⋆★⋆ ════ ⋆★⋆ ════ ⋆★⋆ ════ ⋆★⋆ ════ ⋆★⋆ ════ ⋆★⋆
part three - the hunt ⋆★⋆ the masterlist ⋆★⋆ previous ⋆★⋆ next
summary as frost continues to train, her views towards lycanthropy shift. and graves steps in to help her train
werewolf!au / pairing phillip graves x female!reader / callsign frost / wc 1671 / warnings swearing, mentions of alcohol and blood
notes good god, i struggled to write this chapter. so, hopefully, it's not a doozy for ya'll. i tried, i did. the next two chapters are going to be where it's at. the taglist is still open

Coming out in a jagged spray, the water beat against her skin like ice, hard and cold, shivering under it. She worked her hands over the sore, tight muscles, scrubbing clean the grime and dirt from her training. Like a plug had been pulled, she was drained, aching, and exhausted. It felt like basic training all over again. Her tailbone throbbed, her cuticles were a mess, and she felt like a wreck. The Shadow Company was making sure that she was efficient, shifting fluidly, honing her senses that she’d neglected over the years. Lerch wanted to make her into a well-oiled machine.
Eventually, she turned off the water, drying her skin to the bone and trying to ignore the outside noises, the howling and screeching. It was a full moon, and most of the Shadow Company were out in the woods, hunting, running, trying to dispel the antsy feeling that settled over her kind on nights like those. And even though Vance had invited her to join him and the others, she’d declined. Frost needed to rest, even her body seemed to pulse with energy, an itch to shift she couldn’t scratch away. An instinct she couldn’t ebb away, even if her father had raised her to do so.
⋆★⋆ ════ ⋆★⋆ ════ ⋆★⋆ ════ ⋆★⋆ ════ ⋆★⋆ ════ ⋆★⋆ ════ ⋆★⋆
To say her teammates looked like shit would’ve been an understatement. Vance laid his head against the plywood desk, attempting to catch up on lost sleep, and Erikson had resorted to caffeine pills as Lerch barked at them to work as usual. Frost felt pity along with amusement towards them and Dipaolo, wherever he was. A moon hangover was the term she’d heard before, and watching the two now, she considered it painfully accurate.
“My head’s fucking killing me,” Vance complained loudly the second Frost gave him attention and asked about his night. “I can't even think straight. All I remember is fighting a bear.
“You didn’t fight a bear, Vance. You’re so dramatic.” Erikson groaned, rubbing his forehead. “The most you did was chase a squirrel.”
“I did more than that!”
Frost shook her head, rolling her eyes at Vance’s behavior; she'd come to learn that he tended to exaggerate about most things. “There’s no point in lying, Vance. No need to be ashamed, I’m sure the squirrel put up quite the fight.” She laughed in response to him, leaning back in her office chair.
“Piss off, Frost!” He scowled, annoyed by Erikson and her laughing at him as the door opened and Dipaolo dragged himself into the room, a large bruise swelling on his face. He blinked, his eyes still adjusting to the harsh fluorescent lights as he turned to Frost.
“Commander wants to see you in his office,” Diapolo told her, rubbing his eyes. Her focus sharpened, wondering what she’d done to warrant a visit to Graves’ office. Since Frost had arrived and he’d introduced her to Lerch, they’d only spoken to each other in passing.
“Did he tell you why?” Frost asked, hoping she hadn’t managed to end up in trouble with the man.
“No, he didn’t.” Dipaolo groaned, settling down in his swivel chair. “And before you say even ask Frost– I don’t want to talk about how I got this bruise.”
“Wasn’t going to ask.” She assured him, getting up from her chair and moving to the door. Racking her brain, she couldn’t think of a reason that would’ve caused Graves to be mad at her. But her commander was unpredictable, and Frost decided to prepare herself for the worst like she used to do in the Marines when her commanding officer asked for her.
Reaching his office, she knocked and a muffled reply told her to come in. From behind a mountain of papers, Graves looked up at her, a crinkle near his eyes as he smiled. “There you are, take a seat.”
“Am I in trouble?” Frost quickly asked, settling in the faux leather chair that sat in front of his desk. He laughed at her question, moving the papers aside to look at her and survey the subtle changes in her features from all the shifting she’d done.
“No, not at all. I just wanted to speak to you about your training and hear about it from you personally. Lerch’s reports have been nothing short of impressive, he said you’ve been adjusting accordingly.” Graves admitted, bringing his hands together, and flexing the knuckles. “So?”
“It’s been fine,” Frost replied plainly, the toe of her boot lightly taping against the wooden floor.
“I thought we’d moved past the stiffness, Frost. We’re a pack, remember?” Frost sighed, knowing Graves would weed the truth out of her, not stopping his questioning until he was satisfied. “Come on now, don’t be shy. If Lerch is doing somethin’ wrong, you can tell me.” “It’s not that.”
“Then what is it? You gotta give me some sense of what’s going on, Frost. I can’t help you if you don’t tell me what’s wrong.” He reminded her, unfolding his hands and running one along the sculpt of his jaw.
“The training as Lerch has told you, it’s been fine. I can see, smell, and hear better than before. Shifting and its pain is manageable for me now, but I feel like nothing’s changed for me. I don’t know, I guess I expected myself to feel a little more whole now that I don’t resent what I am anymore. But something still feels wrong to me.” Graves nods along as she speaks, listening intently to her problems like they were his own. So caring and attentive towards his men, he was the idealized version of a pack leader.
“You been hunting recently?” He asked, still pondering what she said.
“I don’t hunt,” Frost mumbled, causing Graves to cock an eyebrow at her. “No one ever taught me how to.”
“Well, that might be some of your problem, Frost.” He chuckles, standing from his chair. “You’re depriving yourself of the necessary proteins to keep yourself sustained, and I’ve found that a good hunt always eases my mind.”
“If it’s so important, sir, I’ll just ask Erikson or one of the others to teach me.” She promises him, watching as he moves to the door.
“Frost, I’ve neglected to help with your training. It’s my job as your commander and pack leader to ensure you’re being taken care of. And knowing that you can’t hunt game, that’s my responsibility to fix.” Graves insists, motioning for her to get up and follow him. “I prefer to hunt at night, but we can’t be wasting time.”
⋆★⋆ ════ ⋆★⋆ ════ ⋆★⋆ ════ ⋆★⋆ ════ ⋆★⋆ ════ ⋆★⋆ ════ ⋆★⋆
Soon, hunting would become a thrill for Frost, Graves would take her out in the evening and set her loose, teaching her all he knew about hunting. In time, it became second nature, along with communicating with him while they were phased, learning the language throughout their hunts. And when she wasn’t going after game meat, they’d run. Running until Graves begged her to stop because she was easily faster than him.
“Like a fucking gazelle.” He muttered, leaning against a tree, swallowing the water from his canteen fast. Frost laughed from where she sat on top of the underbrush. "Goddamn, woman."
“Isn’t this what you wanted?” She asked, unscrewing the lid, knowing she could’ve gone another mile out.
“Yeah, but I’m not as young as you. Can’t keep up with you. I mean? Where do you get all the damn energy?” Graves asked, turning to look at her as he continued to breathe hard.
“I don’t know, I just have it.” Frost stretched out her legs, observing how lean they’d become in the few weeks.
“Your father wasn’t a chaser, was he?”
His question settles in her stomach bitterly. She’d only mentioned her father in the past when answering questions about her lycanthropy lineage. The man had been bitten and passed his resentment and rage towards it down to her. Phasing received punishment, and nights out in the cold. Years later, she could still remember the sting of his hand.
“I can't tell you, I only saw him phase once before I left home.” The memory was ingrained in her head like a repeating nightmare, the loud scrapping of teeth and claws, rancid whiskey in his breath, eyes on fire, and her body in pain. "I learned quickly it was better not to speak to him about it."
Graves nodded, he’d assumed the man was neglectful towards Frost seeing the relationship she’d had towards werewolves before he came into her life. But it still rubbed him wrong, especially when Graves thought of his upbringing.
“My father wasn’t exactly a loving man, there was a lot he did wrong when it came to me and my brothers. But what he did do right, was instill pride in us about being werewolves, and I’ll forever be grateful for that. Because I see those like you or Vance whose parents shamed you for your birthright, and it makes me see red. You deserved better than that as a child.” Graves said, looking up through the pine trees at the twilight sky, the shades of orange, purple, and blue.
“You know, I don’t think I ever thanked you for giving me this chance.” Frost pointed out, looking up at him.
“Thanking me? I’m the one who got one hell of a soldier under my wing.” He told her, sitting down next to her, brushing fallen pine needles aside. "I'm grateful you took a chance on me and the Shadow Company."
"Well, you were a very convincing salesmen." She looked over at him, offering him a small smile, his eyes crinkle as he smiled back. There was a warm understanding between them, a mixture of scent and white noise of the forest as they observed each other in silence.
Finally, Graves spoke, his voice clear in her ears. "Well, I tried my best to get the best."
taglist @delusionally-loveless-by-choice / @bacon-sandwich-of-dionysus / @iamcautiouslyoptimistic / @anna-banana27 / @unicorngirly1
#call of duty#call of duty mw2#fanfic#phillip graves cod#phillip graves#call of duty!werewolf au#shadow company werewolf!au am#shadow company#werewolf!phillip graves#werewolf au#phillip graves x reader#phillip graves x you#the shadow company#bite the hand series
68 notes
·
View notes
Text
The Solar Saga
So….. This post has been a long time coming.
NO, IT'S NOT BAD, I SWEAR!
This is the final post of the Solar Panel Saga, a grueling process which took far longer than it should.
SO.
Let us.
BEGIN!
For those of you that do not know, I'm homeless, living in a van. Not by choice, but hey, what can you do?
As a normal adult in the 21st century, I need power.
As a normal adult in a van from 1998, I can't rely on the engine to do it. So I had been thinking of something like this even since I first ended up homeless. but I believed all the solutions for this were impossibly expensive.
then, in February 2024, I found the BOX!
for just ten dollars plus shipping, I could control a solar panel. it seemed like magic! like a Sign! so I purchased it. Along with what proved to me a dramatically inadaquate solar panel, although I didn't know that at the time.
this led eventually to the search for a batter system that would work, and I already had the perfect idea in mind.
in my local (unnamed for legal reasons) big box store, in the marine section, was a battery box with a built-in system of outlets. TWO 12v DC automotive ports! TWO USB Connections! one USB-C and one USB-A! a BREAKER! and a HIGH-POWER EXTERNAL WING NUT CONNECTION DIRECTLY TO THE BATTERY!!!
It was perfect. and only 30ish bucks. the problem, was the battery.
Batteries are expensive. the battery I needed was a Deep Cycle battery, a type of lead-acid battery designed for long charge and discharge cycles. such a battery is a fairly niche item. I didn't and in fact couldn't find one in my big box store. so. I waited for my next paycheck, and went in search of a battery.
turns out ten seconds of googling found a battery store, like, a half mile from my usual parking spot. lol.
with much consternation and a great deal of money ($160is all told) I had my battery. Extensive testing would confirm its functioning in the box.
Now, a PANEL!
In days of Old, when Men were Bold, and whiskey was far, FAR cheaper: solar panels sucked. and were really expensive. when last I had looked into the idea a decade or more before, the best panels were hundreds to thousands of dollars and, while they generated useful power, were finicky about light conditions. then I discovered Mono-Crystal panels, and was amazed. 50 watts for 64 dollars. just over a dollar a watt. larger panels were even cheaper: 1000w of panels came to barely $800! incredible! said I, this would be no problem at all! Until i membered. I'm homeless.
Fuck.
While technically I have a mailing address, that address is at a homeless support place (where you can shower, and do laundry, and get meals, rather than sleep), which is infamous for questionable support staff, long wait times, and not the best service in the world. so.
Shipping a large, expensive, fragile piece of equipment there was a no-go.
then I saw the hardware store I was buying it from had ship to store.
YAY, COVID! (bout the only good thing to come from the Plague. or maybe before? idk.)

So I shipped it there, picked it up, and now was the time to Mount it to the roof!
And this, is where my troubles Truly Began.
At first, I thought to magnet the thing to the roof, so I bought some magnets.
NOPE!
Fiberglass
Then I thought to screw it in.
NOPE!
Couldn't get a drill in the panel
Suction cup?
NOPE!
not strong enough
Glue?
NOPE!
Wasteful, infective, and long cure time
fuck the whole business?
NOPE!
Still need power!
So. after weeks of waiting for money and days off to try shit, I decided on a plan:
Get some Plywood Glue it to the roof get some metal glue it to the board magnet panel to metal.
easy, simple, I need a stepladder, but I can just go to the hardware store, buy then return one. so I got to work.
the glue didn't hold the metal. or the wood very well, for that mater.
so, I relented, bought some screws, a drill, and some drill bits, and on the evening of May 28, 2024, finally saw my dream of solar power through.
it's the end of June now, and my little panel has done well. the metal is rusted orange, the wood is curved and warped, the magnets hold steady, and duct tape keeps the wires out of the doors.
But.
I'm typing this on a laptop powered by solar. and that's Damn Good.

The Panel, Herself.
I’m poor, Homeless, and jobless, please give me money, so I don't starve!
#weird#homeless#solar#panel#solar panel#The Solar Panel Saga#van#vanlife#powe#power#electrical#battery#lead-acid#way harder than it should be#thank fuck its over#begging#money pls#signal boost
6 notes
·
View notes
Text

Can Okoume Face Veneer Be Used for Both Interior and Exterior Applications?
When it comes to choosing the right wood veneer for projects, few options are as versatile and visually appealing as Okoume face veneer. Known for its unique blend of strength, beauty, and flexibility, Okoume is a popular choice for a range of applications. But one question often comes up: can Okoume face veneer be used for both interior and exterior applications? Let’s dive in and explore everything you need to know about this unique veneer, how it can fit into different spaces, and whether it’s suitable for outdoor use.
Understanding Okoume Face Veneer: A Unique Choice
Okoume veneer, sourced primarily from Gabon, is cherished worldwide for its distinctive look and adaptability. Known for its light pinkish-brown hue, fine grain, and smooth texture, Okoume can add an elegant touch to furniture, cabinetry, walls, and more. Its appeal doesn’t stop at aesthetics. Okoume is also prized for its:
Lightweight nature – It’s much lighter than other hardwoods, making it easy to work with.
Durability – Okoume face veneer is highly durable, which is why it’s often used in marine plywood and exterior-grade products.
Flexibility – Because it’s easy to manipulate, it’s often used in furniture making and construction projects that require intricate designs.
The question remains: can this beautiful veneer withstand both interior and exterior environments? The answer isn’t black and white, so let’s look at the factors that come into play.
Is Okoume Face Veneer Suitable for Interior Use?
For interior applications, Okoume veneer is a top choice. Its visual appeal alone is enough to make it desirable for indoor furniture and decorative projects. The light color and fine grain bring a touch of elegance to any space, whether it’s a cozy living room, a sleek kitchen, or a luxurious office.
Benefits of Using Okoume Veneer Indoors
Aesthetically Versatile: Its warm tones and soft grain pattern make it versatile for various design styles, from traditional to contemporary.
Moisture Control: When used indoors, Okoume face veneer is shielded from constant exposure to moisture, which keeps it from warping, swelling, or cracking over time.
Long-lasting Durability: Indoors, Okoume veneer can easily maintain its appearance for years with minimal upkeep, especially if it’s properly sealed and polished.
Ease of Application: Okoume veneer is easy to cut, shape, and finish, making it ideal for designers, woodworkers, and homeowners who want to create unique pieces with a soft yet luxurious finish.
Cost-Effective and Eco-Friendly: Compared to solid wood options, veneer provides a sustainable and cost-effective choice. Since veneer is a thin layer of wood, it uses less timber, reducing environmental impact without compromising quality.
Given these benefits, it’s no wonder that Okoume veneer is widely used for interior elements like furniture, wall panels, cabinets, and ceilings. Its versatility and light color make it easy to match with other materials, from metals to darker woods. But what happens when Okoume veneer is taken outdoors?
Okoume Face Veneer in Exterior Applications: What to Consider
Okoume face veneer can, in certain situations, be used for exterior applications. However, using it outside requires a bit more planning, care, and protection due to its natural properties. Here’s what to consider if you’re thinking about using Okoume veneer for outdoor projects.
Why Okoume Veneer Needs Extra Protection Outdoors
While Okoume veneer is durable, it’s still a natural wood product, and wood is prone to weathering from moisture, sunlight, and temperature fluctuations. Okoume doesn’t have the same level of natural resistance to the elements as some other hardwoods, like teak or ipe, which means it needs to be treated and maintained to stand up to the outdoors.
Tips for Using Okoume Veneer Outdoors
If you’re set on using Okoume face veneer in an outdoor project, there are ways to make it work effectively:
Choose High-Quality Marine-Grade Okoume Plywood: For exterior applications, Okoume plywood is a better choice than standard veneer. Marine-grade Okoume plywood is made specifically for outdoor use and can handle more moisture and temperature changes than untreated veneer alone. It’s often used in boat building for this very reason.
Apply a High-Quality Sealant: Coating Okoume veneer with a top-grade sealant is essential. This helps shield it from moisture and UV rays, reducing the risk of warping, cracking, or discoloration. Some sealants also offer UV protection, which will slow down the color fading and keep the veneer looking fresh.
Routine Maintenance: Unlike interior wood, outdoor Okoume veneer needs regular maintenance. Reapplying the sealant every year or two can extend its life and keep it looking its best.
Consider Shaded Areas: If you’re using Okoume veneer in an area that’s exposed to direct sunlight, expect some color fading over time. Placing the veneer in a shaded or covered area can help preserve its natural color longer and reduce wear from sun exposure.
Opt for a Protective Finish: Adding a protective finish over the veneer not only adds an extra layer of defense but can also bring out its natural beauty. Certain finishes can enhance the wood’s grain and color, giving it a polished look suitable for outdoor décor and even outdoor furniture.
Ideal Exterior Uses for Okoume Veneer
With the right precautions, Okoume veneer can work for certain outdoor applications, such as:
Patio and Garden Furniture: Okoume veneer can add an elegant touch to patio furniture. Just ensure it’s sealed properly, and it’s in a shaded spot.
Covered Pergolas or Gazebos: These covered structures offer some natural protection from the elements, making them ideal for Okoume veneer. It can be used to create decorative wall panels, cabinets, or seating elements.
Decorative Fascia: Using Okoume veneer for decorative exterior elements, like fascia or trim, can add a touch of sophistication to the outdoor look without exposing it to high amounts of moisture or sunlight.
Okoume Veneer: A Flexible and Elegant Choice for Both Indoors and Outdoors
So, can Okoume face veneer be used for both interior and exterior applications? The answer is yes—with some preparation. It’s a versatile and beautiful material that brings elegance to indoor spaces and, with the right treatment, can handle certain outdoor applications too. For those who value aesthetic appeal and are willing to take extra precautions for exterior use, Okoume veneer is a worthy choice.
When used indoors, Okoume face veneer shines as a beautiful, low-maintenance material. Its warm color and fine grain make it a favorite among interior designers, homeowners, and craftsmen. Outdoors, it requires a bit more attention to maintain its beauty, but the effort can be worth it if you’re looking for a wood product that brings style to your exterior.
Making the Right Choice with Gabon Timber Industry
At Gabon Timber Industry, we understand the unique properties of Okoume and other African woods, and we’re here to help you make the right choice for your projects. Whether you’re building stunning interiors or want to add a unique touch to your outdoor space, our team can guide you on selecting, treating, and maintaining Okoume veneer to get the best results. Quality, sustainability, and customer satisfaction are at the core of what we do.
So, if you’re considering Okoume face veneer for your next project, reach out to us! Whether it’s for interiors or for exterior elements, we have the expertise and products to help bring your vision to life with Gabon’s finest timber.
#GabonTimberIndustry#OkoumeFaceVeneer#RotaryCutFaceVeneer#AfricanFaceVeneer#InteriorDesign#ExteriorWood#SustainableWood#TimberSolutions#WoodVeneer#HomeDecor#OutdoorWood#EcoFriendlyMaterials#NaturalWoodFinish#FurnitureDesign#WoodworkingCommunity#MarineGradeWood#QualityCraftsmanship
2 notes
·
View notes
Text
How to Choose the Right Plywood for Your Project
Selecting the right plywood for your project can make a significant difference in the outcome. With a variety of types, grades, and sizes available, it’s essential to understand what to look for to ensure you get the best results. In this blog, we’ll guide you through the process of choosing the right plywood for your needs. Plus, we’ll show you why Bhawani Plywood is your go-to source for top-quality plywood.
Understanding Plywood Grades
Plywood is graded based on its quality and waterproof level , and knowing these grades can help you make an informed decision.
BWP-Grade Plywood : This is the highest quality plywood, Which is boiling water proof best for places like chennai which are near sea . It’s ideal for projects requiring a long life, such as cabinetry and furniture.
BWR-Grade Plywood : Slightly lower in quality than BWP-grade, BWR-grade plywood has a little less life than BWP . But can be used for furniture which are not often in contact with water.
COMMERCIAL-Grade Plywood : The lowest grade, with several imperfections and lowest level of water that is moisture resistence . It’s best used for structural purposes where appearance isn’t a priority or temporary furnitures. It is also called as MR grade
Types of Plywood
Different types of plywood are designed for specific applications. Here are some common types:
1. Softwood Plywood : Made from softwood species like pine, fir, or spruce, this type is often used for construction and industrial purposes. 2. Hardwood Plywood : Made from hardwood species like oak, maple, or birch, this type is ideal for furniture, cabinetry, and high-quality interior finishes. 3. Marine Plywood : Specially treated to resist moisture, marine plywood is perfect for outdoor projects, boat building, and areas exposed to high humidity.
Key Factors to Consider
When choosing the right plywood for your project, consider the following factors:
1. Application : Determine where and how the plywood will be used. Structural applications require strong, thick plywood, while decorative uses benefit from high-quality veneers. 2. Exposure to Elements : For outdoor or high-moisture areas, choose BWP or marine-grade plywood to prevent damage. 3. Budget : Higher-grade plywood costs more but provides a better finish and longevity. Balance your budget with the quality required for your project. 4. Thickness : The thickness of plywood affects its strength and stability. Ensure you select a thickness appropriate for the load and stress it will endure.
Tips for Selecting Plywood
Here are some expert tips to help you select the right plywood:
1. Inspect the quality : Look for smooth, even surfaces with minimal defects. High-quality face ensures a better finish. 2. Check the Core: The core layers should be consistent and free from gaps. This affects the strength and durability of the plywood. 3. Consider the Weight : Heavier plywood indicates a higher density, which can be beneficial for structural applications but might be overkill for decorative uses.
Why Buy Plywood from Bhawani Plywoods
At Bhawani Plywood, we are committed to providing the highest quality plywood for all your project needs. Here’s why you should choose us:
- Quality : We offer plywood of kitply which is our most trusted partner for plywood with good support for any issue. - Expert Advice : Our knowledge and experience can help you select the best plywood for your specific needs. - Competitive Prices : We provide top-quality plywood at competitive prices to fit your budget. - Convenience : Shop online at Bhawani Plywood or visit our store for a hassle-free shopping experience.
Conclusion
Choosing the right plywood is crucial for the success of your project. By understanding plywood grades, types, and key factors to consider, you can make an informed decision that ensures the best results.
Ready to get started on your next project? Visit Bhawani Plywood for the best selection of high-quality plywood. Our team is here to help you find exactly what you need to bring your project to life. Shop with us today and see the difference quality plywood can make!
2 notes
·
View notes
Text
PROJECT PICS!!!!!
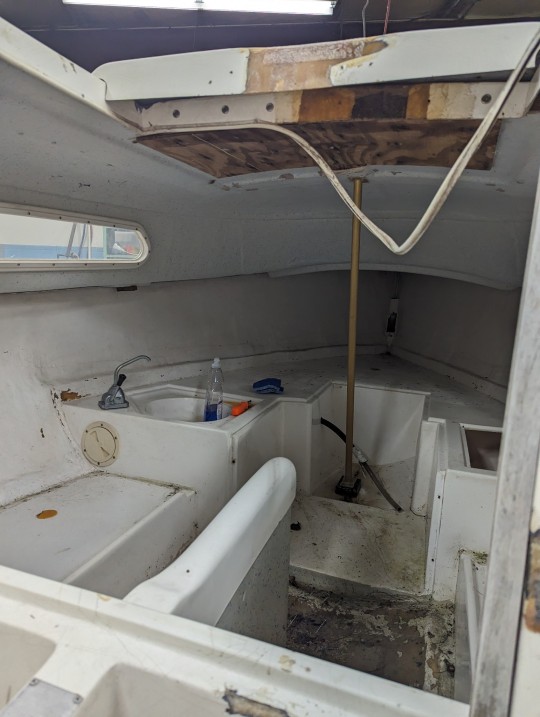
Two years past originally purchasing her, My Sun, AKA "Sunny" is finally getting the TLC she needs to get out on the water this spring. Those who remember when we first got her will recall that she was a bit of a mess! This has not changed.
Sunny is a 1969 O'Day Mariner 19 2+2 with some bad patch ups, dingy sails, and a leak in the centerboard throughbolt. Hopefully with some sanding, painting, sail tape, and a new rubber gasket, she won't be necessarily pretty, but she'll at the very least be ready to sail by the time it starts getting warm.

She does make a lovely silhouette :) But before we do anything, she's going to need a good pressure wash up top.

The patch job on top of the cabin :(( The previous owner has also drilled holes into the top of the hatch cover for some unknown reason. If anyone has any idea I'd love to know lol.
For the patch itself, I'm going to assume that someone's foot cracked the top while trying to step the mast, and that's the reason for the shoddy plywood "support beam" as well. Getting rid of that or replacing it will be a job for next year. The edging along the hatchway needs to be replaced as well, but luckily we have some on hand. I don't have pictures of the wooden slats for the hatchway so you'll have to believe me when I say it's the worst vanish job you'll ever see.
Anyways, the tracks need to be taken off to remove the hatch. After that it's patching up those holes, painting, and giving her a good wax. If you have a keen eye as well you'll notice here that the jib sheets are run to the front of the cabin. If I don't end up selling her, in future years I might replace those cleats and move them further down the cockpit for easier single-handing. Nice!
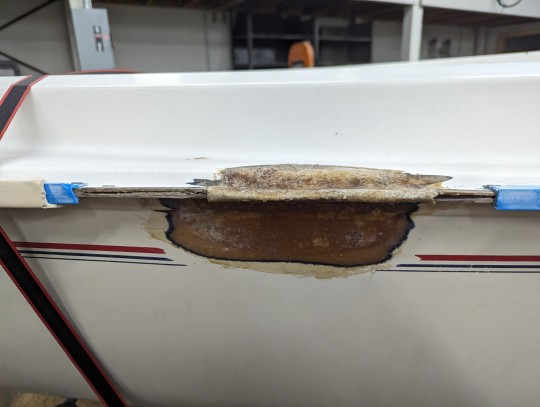
Nasty patch on the rubrail 🤢 The fiberglass patch will need to be completely sanded down if we want to fit a new piece of rubrail on there. Not replacing the whole rubrail this year, so the patch will undoubtedly look different from the rest of the rubrail. Once again, not pretty, just sailable.


O'Day emblem completely broken :((( They don't sell anywhere that I can find, and forumgoers have apparently been making cast molds to create their own replacements as opposed to using vinyl. I might try to make one with 3D printing. There's the port side one there too, for an unbroken reference.
You'll notice a lot of small cracks in this photo. They're all over the rest of the boat, too. These aren't structural, and are simply stress cracks in the gelcoat that are a product of the boat's age. They aren't a necessary fix to get her in the water though, so they're staying untouched this year.
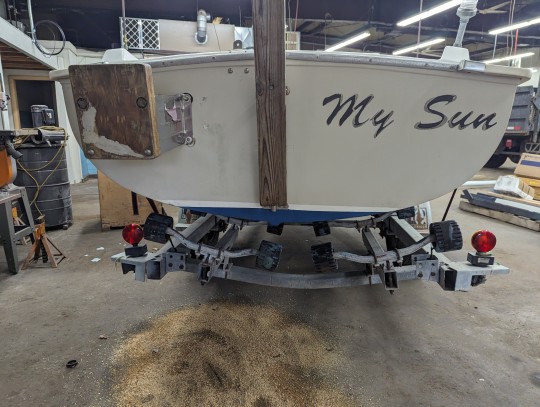
A mount for a motor, vinyl lettering that needs to be replaced, and that plank of wood in the middle there is for supporting the mast during transit. The mount isn't pretty, but there's no reason to replace it- it should work fine. With the name being removed, we need to think of whether we should change the name. Changing the name of a boat is bad luck, but shifting it to Sunny Days would be a huge improvement.
I don't have any photos right now of the mast, sails, or lines, but the mast needs to be buffed, the sails need to be patched, and the halyards and sheets need to be replaced. The centerboard uphaul needs a replacement too.
I'll try to remember to post updates as I make progress 🌄 !
6 notes
·
View notes
Text
The East Sun Building – Karen Taylor

▲ Sun Myung Moon and Kamiyama with a fishing boat in production
_________________________________
March 19, 2001
The East Sun Building was my prison for nearly two years. Not only did I work there in building the Good Go sports fishing boats, but I also lived there, as did all the Master Marine members. I believe that it was considered cheap and convenient to keep us in that huge, cold and dark hulk of a place. Eventually we were moved to the New Yorker Hotel due to Fire Department inspections. Of course, it was completely illegal and hazardous for us to live in the building, but like the Blues Brothers, we were on a mission for God!
The East Sun Building was located directly across from a large housing project. It was a very dangerous area with the predominant occupants being black and Hispanic Americans. To venture out at night was to tempt fate, but I have walked to the East Sun Building from the Long Island City subway station quite often during daylight hours without incident.
I felt like a prisoner in the place and I refer to my time there as “repaying my debt to society” or “my Danbury sentence”. We were never taken anywhere for Sunday outings while living in the place and the brothers had awful living conditions. Their living quarters were an enormous windowless dark room on the 2nd floor with a bed platform built of plywood that ran the entire length of the room. It had been promised by Mr. Kamiyama that the platform would be carpeted, but that never occurred.
The handful of sisters that were sent to work in the place had much better living conditions, but we all felt trapped and there was a heavy atmosphere of unhappiness in the building. Many members who were considered problematic were sent there from different church departments, particularly CARP. The East Sun Building effectively became a dumping ground.
One CARP member was sent to work in Master Marine who had been discovered during an aggressive witnessing campaign. Bobby was a 16 year old runaway. This boy eventually broke into the Master Marine office one night, stole about $12,000, and vanished into New York City. He knew that he would not be pursued since he left a note clearly indicating that he would contact the Dept. of Immigration and reveal how many illegal immigrants were working for Master Marine if we pressed charges. Smart kid.
I loved Mr. Kamiyama’s (TK) explanation to Master Marine members that this was indemnity to prevent a serious injury to one of the boat builders. The truth is, TK had already been instructed by Rev. Moon that the boy should go home, but nobody took action, even after I spoke to the production supervisor about Bobby’s bad behavior. This theft was preventable. I would call this “indumbnity”!
We were visited by Rev. Moon fairly regularly and I have had a unique experience or two with him while working there.
http://www.tparents.org/Library/Unification/Talks/Taylor/Taylor-EastSun.htm
4 notes
·
View notes
Text
L2 Certification Attempt
After obtaining my L1 attempt, I had originally planned to fly for an L2 attempt on the same rocket. However, I attended a VRA club night where a swap meet was being held and ended up with a Rocketry Warehouse (now Madcow) Broken Arrow 54. Sometimes a great deal is a great deal.

This was a pretty big step up from the cardboard and plywood construction I was used to, being entirely filament-wound fibreglass. Its large diameter/length ratio combined with its small split fins also made it intimidating. This kit is also intended only for dual-deploy, which is something I had never done before. I decided it was a good opportunity to challenge myself.
Build
The kit was pretty bare-bones, meaning I had to source a retainer and much of the hardware for it. I ordered a 38mm Aeropack retainer, and then I began the build.

The process was relatively simple, with through-the-wall fins like all my previous builds. However, this time they did not fit into divots in the centering rings, so I 3D printed a fin jig to hold them in place while the epoxy cured.
Speaking of epoxy, I moved away from the 5-minute Araldite I had used for previous builds in favour of a more serious adhesive. I used JB Weld for anything motor-adjacent because of its thermal tolerance, and Epiglue for all other structural attachments and fin fillets. This was recommended to me by a friend in Perth who flies truly ridiculous rockets and has used it on flights of up to Mach 2. It is also available from a local marine supplier, meaning I didn't have to pay through my nose to get hold of Rocketpoxy or West Systems. I was very pleased with how nicely it went on and how strong it was.

By this time I'd also nailed down my epoxy application and filleting methods - I use cheap silicone sculpting and grouting tools which can simply be cleaned with acetone after I'm done. For filleting, I also found that mixing the epoxy in a ziploc bag and piping it on like icing worked a treat.
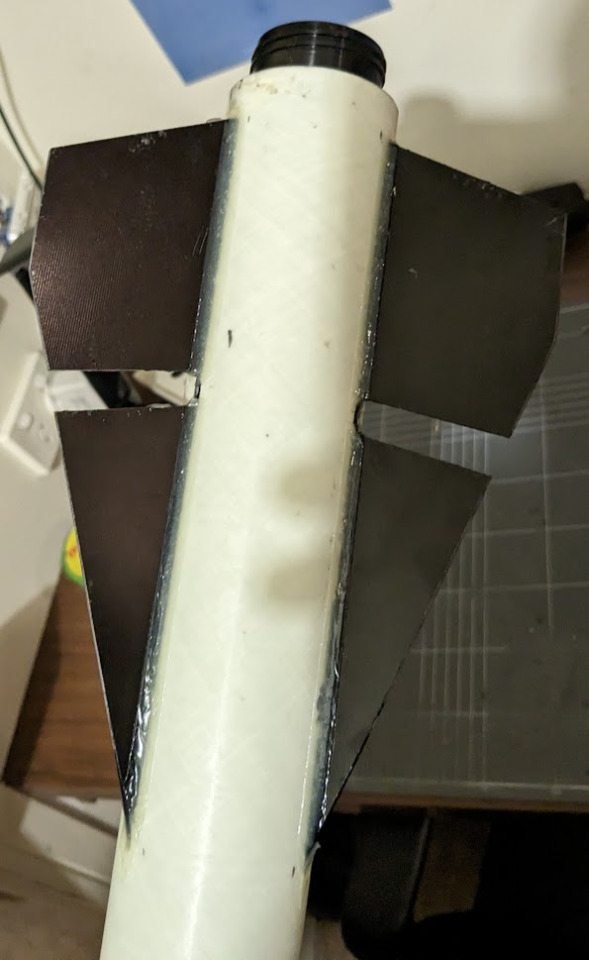
My work gets cleaner with every set of fillets I lay down. These ones don't look fantastic, and the split fins were something I had never dealt with before, but that didn't matter for reasons that became apparent shortly after the epoxy had set.
The morning after I applied these fillets, I got up to continue working on the rocket when I noticed that something had shifted overnight. The motor mount tube was somehow at an angle, as shown in the image above. I know I installed it perfectly level, but I didn't secure it while it set so I think it slipped as it cured. In my defense, I was quite sick and not firing on all cylinders when I had completed all the work up until now, but the realisation of what I'd managed to do was pretty disappointing and a bit of a knock to my confidence. Some measurements and a bit of trig suggested that the offset was only a degree or two, but the image suggests otherwise. I consulted some friends who are far more experienced flyers than I, and the consensus was a mix between 'send it' and Do Not Fly That Rocket, with more in favour of flying it than not. I looked at my OpenRocket sim for stability characteristics, and read some old Rocketry Forum posts about this model, all which pointed to it being rather squirrelly. In hindsight, I feel like I made the right decision, as I just couldn't ignore my gut feeling. I decided to rip it apart and rebuild it completely.
I did not take photos during this phase due to being completely covered with fibreglass dust, but I ended up using a diamond Dremel cutting wheel to first cut the fin can off, then cleanly slice the fins out of the body. I cannibalised a small section of the avionics bay tube to use as a coupler to reattach the aft section. I was then able to epoxy the whole thing back together, sand it all down, and it looked no different - apart from the motor mount being at the correct angle of zero degrees. I re-filleted the fins with a larger radius than before, as I wasn't happy with how they looked initially. I was very pleased with this effort, and confident to a) present this rocket to an RSO and b) fly it safely.
I also took the opportunity during this rebuild to modify the rocket to be motor-eject capable, by removing the bulkhead to which the recovery harnessing would be attached. I cut a small divot in the forward centering ring and attached a looped piece of kevlar around the motor tube before reinstalling it. This 'leash' provides the anchor point for a longer recovery harness to be attached to. I am very glad I did this, as not long after I was informed that my university club possessed a grand total of two (2) grams of black powder. Traditional dual-deploy would no longer be an option. More on that later.
To finish off the construction, I 3D printed rail guides from ABS and bolted them to the body, with a bit of JB Weld in there for good measure. I drilled pressure relief holes in the forward and aft sections of the body, and another in the avionics bay for altimeter readings. I then drilled a more smaller holes and installed screws to pin the nosecone to the forward section, and the forward section to the avionics bay. Since the flight would no longer be traditional dual-deploy, the rocket would not need to separate at these points. Finally, I gave it a purple paintjob and the name of CRUNCHWRAP 3.
At some point, Taco Bell might see these and send me a cease and desist. I am going to keep building and flying them until they do.
Recovery
With a proper dual-deploy ejection now out of the question, I turned to my backup plan. My team calls it the 'poor-man's dual deploy', even though it's arguably actually more expensive than using black powder. This involves deploying a drogue with the motor charge, then using a JollyLogic chute release device to deploy the main at whatever altitude you have chosen. There is a substantial risk of the harnessing becoming tangled using this method, but I didn't really have a choice. I used a 4.5m nylon shock cord, tied to the anchored kevlar leash. I divided the cord into thirds, tying a loop at each third. I attached the drogue to the forward-most loop, and the main to the aft loop. Both chutes were on quick links and swivels to reduce the risk of tangling as much as possible. Each of these chutes were wrapped in their own nomex protector, and then placed in the aft section of the rocket with their harness. I used a 36' (91-ish cm) main chute from Loc Precision, and a 40cm 4-gore drogue which I sewed using Scott Bryce's fantastic Spherical Parachute Pattern Generator.


Avionics
Although it ended up not being needed, I decided to send the flight computer I got hold of along for the ride. I thought it would be cool to get an altitude reading to compare with the simulated apogee. A buddy of mine in the US was getting rid of a few bits and pieces, so I bought his RRC2+ off him with the intent of flying it for my L2 attempt. First, though, it needed somewhere to live.
I found the supplied parts for the av-bay were a little lacking, so I added some modifications - the main one being drilled holes for two threaded rods to pass through. I used two for redundancy, since the idea of a single rod made me a little uneasy. I used wingnuts on these so I could fasten them nice and tight without the need for a spanner. It was also missing enough eye bolts, so I grabbed some from Bunnings.

I then designed and 3D printed a sled to fit onto the threaded rods and provide a mount for the battery and the flight computer. A very simple setup. The sled looks objectively awful since the printer was having a bit of a sook at the time, but the actual functionality was not affected and it serves its purpose just fine.
Motor
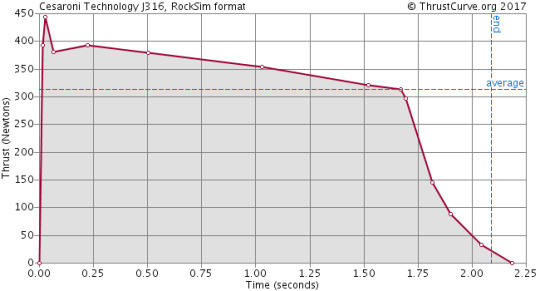
With an unbelievably limited amount of motors available in Australia at the time of writing, I had to work with what I could get hold of. I was lucky enough to snag was a CTI J-316 (pink!!) through my university team, which is a 38mm 5 grain reloadable motor with an adjustable delay of up to 17 seconds. Unfortunately, we didn't have a 5-grain case so I made do with a 6-grain case and a spacer. I only became aware of that the night before the launch, so I had to very quickly revise my recovery packing technique to account for the now limited real estate inside the body.

It provided an average thrust of roughly 316N, with a max of 450N, over a burn time of about 2.1sec, for a total impulse of roughly 650Ns. A pretty tame J motor, but still far more powerful than anything I'd ever flown before.
Simulation
After carefully weighing every single component of the rocket and entering them into OpenRocket, I simulated the flight on the motor above. The entire vehicle weighed 2.7kg, with a length of 1.41m. It was simulated to hit Mach 0.77, and fly to an apogee of 5191ft.
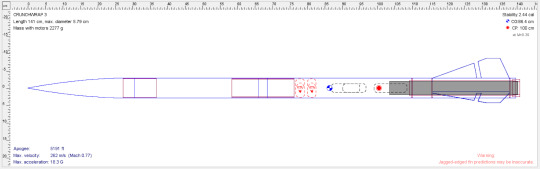
Theoretically, the centre of pressure and centre of gravity would be 0.86m and 1m respectively from the tip of the nose cone. This would give a stability calibre of 2.44 at Mach 0.3 - however, this rocket is quite a bit faster than that. Also, the 'rule of thumb' which says a rocket's CG should be roughly 1.5 body diameters in front of the CP is not as helpful on rockets with a length/diameter ratio of over 10, such as this one (which is 24). Here, the CG should be roughly 10% of the overall length in front of the CP, which it was, almost (9.6%). The stability calibre off the rod was predicted to be only a little over 1.5 (6%), but given that it would be going 31m/s I was confident this would be fine as long as it didn't launch into a strong wind gust. At motor burnout, stability would be up near 3.8 (15%), which I was happy with.
I set the motor delay to the full 17 seconds for the simulations, as anything shorter would have the recovery devices deployed before apogee. This would a) cut the flight short and more importantly b) place a huge amount of strain on the harnessing and chutes due to a very high deployment speed. With the full delay, deployment would be at 11.3m/s, which the harness and drogue could handle easily. Ground hit was simulated to be a brisk but not destructive 6.8m/s.
As an aside, OpenRocket includes a little disclaimer about 'jagged edge fin predictions may not be accurate'. I bore this in mind through the whole process, but based on others I'd seen fly and forum posts I'd read online, I was comfortable with what I was doing.

Flight
L2 certifications require passing a written exam with two sections - technical knowledge and the Tripoli safety code. I had already passed the exam (100%, don't mind if I do) at a previous date, so all I had to do was install my motor, altimeter, and recovery gear. I didn't even have to drill out a delay. After a quick field CG test and a visit to the RSO tent, I was ready to rack up.

A few new recruits to our team came out to the launch day, so I enjoyed an opportunity to show them how to set up for flight, install an igniter, and test for continuity.

After a small delay to clear the range and ensure the skies were clear overhead, the LCO hit the button.

The rocket flew straight and fast on a frankly gorgeous purple flame, and almost instantly got high enough that we struggled to keep a visual on it. A puff of smoke indicated the ejection charge had blown, and then I was able to see the fluoro yellow gores of the drogue as it opened. The rocket began to drift slowly as it came down, as there was a fairly stiff breeze blowing at the time. I had programmed my chute release to 500ft, and it performed as intended. The main chute deployed and thankfully none of the recovery gear got tangled. I watched it gently descend, albeit with a decent drift going on, and set itself down in a field about 800m away. After a gentle stroll (read: powerwalk to warm up, it was freezing), we arrived at the rocket. It had been dragged a little and the chute had become tangled on the ground, but all was intact. One quick pitstop at the RSO tent later, I had my L2!

Upon reflection....
Things to improve
Use a much smaller drogue. The one I flew was about twice as big as it needed to be, and it was far too windy for such a chute. I simply didn't have a smaller one, although making one would have only taken about an hour.
I didn't get any useful readings from my altimeter. I don't believe I set it up properly, so I need to make sure I learn to do that and fly it as a passenger on at least one more flight before I use it as a deployment computer. I am disappointed that I couldn't get a figure to compare with the simulation.
Use a proper stand to rest the rocket on, perfectly horizontally, during construction. This would have avoided the whole debacle of the motor mount slipping and me consequentially having to rip it apart and rebuild.
Things that went well:
Being absolutely prepared and packing my car the night before, and bringing spares of most components, made launch prep a breeze
That was the first flight of my homemade drogue, and upon inspection afterwards there was no damage. I can now be confident that others of the same design and similar construction that I have planned for bigger rockets will perform in a similar way.
The recovery technique worked as intended, with no tangling. This is probably not a viable option for rockets going any higher, but it's nice to have in the back pocket for projects of this scale if black powder and/or avionics access might be an issue
I am also extremely relieved that this certification only took me one shot, rather than the three that my L1 took. I think it reflects well on my progress.
Next:
Fly it again with proper dual deploy, if I can get my hands on some black powder
Scratch build of a rocket of similar scale
...... L3?
2 notes
·
View notes
Text
Indonesian gurjan face veneer
High-Quality Keruing Plywood from Indonesia | Athexporthouse.com
Indonesia is known for its rich forest resources and premium plywood exports, and keruing plywood from Indonesia is one of the most sought-after options in the construction and furniture industries. Athexporthouse.com is a leading supplier of keruing plywood, providing exceptional quality wood products suitable for both domestic and international markets. Gurjan Face Traders in Indonesia
What Makes Keruing Plywood Unique?
Keruing plywood is crafted from the Dipterocarpus species, which is renowned for its durability and stability. This hardwood is naturally resistant to wear, moisture, and warping, making it an ideal choice for various applications. The strength of keruing plywood makes it suitable for heavy-duty uses such as flooring, decking, and outdoor furniture. The wood's natural oils also provide it with resistance to insect damage, extending its lifespan and reducing the need for treatments or chemical preservatives.
Uses and Applications
Keruing plywood from Athexporthouse.com is versatile, meeting the demands of multiple industries, including construction, furniture making, and packaging. Its high density and strength make it an ideal choice for:
Heavy-Duty Flooring: Keruing plywood is robust enough to support heavy loads, making it ideal for flooring in commercial spaces and industrial setups.
Outdoor Furniture: Its natural resistance to moisture and insect infestation ensures durability and longevity in outdoor furniture pieces.
Marine and Exterior Uses: With its water-resistant properties, keruing plywood is used in applications that require exposure to the elements, such as marine decking and outdoor walls.
Packaging and Pallet Making: This durable plywood is also ideal for packaging crates and pallets that need to withstand rough handling and transportation.
Why Choose Athexporthouse.com for Keruing Plywood?
Athexporthouse.com is committed to delivering high-quality keruing plywood from Indonesia, with a focus on sustainable sourcing and production. They work closely with certified suppliers to ensure that every piece of plywood meets international quality standards and is responsibly harvested. The company’s advanced processing techniques help retain the natural properties of keruing wood, providing customers with long-lasting, reliable products. keruing face veneer factory in Indonesia
Order Your Keruing Plywood Today
For businesses looking to source strong, moisture-resistant plywood that maintains its integrity even under extreme conditions, keruing plywood from Athexporthouse.com is the ideal solution. The company offers competitive pricing, flexible shipping options, and responsive customer service to meet the needs of global clients. Contact Athexporthouse.com today to place an order or to learn more about their extensive range of plywood products.
0 notes
Text
What plywood is strongest?
When undertaking construction or woodworking projects, choosing a plywood in 2024 that offers the right strength is crucial. With numerous options available, making an informed decision can be a challenge. In this blog, we'll delve into the world of plywood, exploring the strongest types, highlighting Sylvan Ply as a leading choice, and answering those frequently asked questions.
Finding the strongest plywood requires consideration of your project's specific needs. Sylvan Ply stands as a reliable choice, offering top-tier options like marine-grade plywood alongside a wide range of strong, versatile products. With this knowledge, you're empowered to select plywood stronger than the rest! Contact Sylvan Ply and designed your Customized requirements.

0 notes
Text
#best quality plywood manufacturers in india#calibrated plywood in india#best marine plywood in india#plywood manufacturers in india#chequered plywood suppliers in india#best plantation timber plywood in india#film face shuttering plywood in india#best plywood used in government tenders in india#plywood suppliers in india
0 notes
Text
Important Features of the Perfect Modular Kitchen Design
Source of Info: https://www.regalokitchens.com/important-features-of-the-perfect-modular-kitchen-design.php
Introduction
Your cooking space can be made into a stylish, functional, and effective environment with a carefully planned modular kitchen design. Features that optimize space, improve performance, and improve overall looks are all included in a perfect adjustable kitchen design. Every component is necessary for creating a seamless kitchen experience, from modern appliances to smart storage options. With unique and stylish modular kitchen layouts, Regalo Kitchens—the best kitchen brand in India—can meet your individual needs and tastes. Find out which features are necessary for a modular kitchen design to be perfect in your house.
1. Optimized Space Utilization
The capacity of modular kitchen design to optimize space use is one of its main benefits. The kitchen is carefully planned in every inch, making even the smallest spaces useful. Whatever your kitchen size, kitchen modules are designed to fit without sacrificing style or functionality. You will find space-efficient designs from Regalo Kitchens, which feature advanced storage options including wall-mounted shelves, pull-out cabinets, and corner units.
2. Customizability
Homeowners can choose layouts, materials, colors, and finishes that best suit their requirements with a fully customizable functional kitchen design. A modular kitchen can be customized to fit your preference, whether it's for a traditional design with hardwood finishes or a clean, modern appearance. Regalo Kitchens is an example in offering solutions that are easily customized, making each kitchen unique and a reflection of the homeowner's style.
3. Quality Materials and Finishes
The quality of materials chosen has an important effect on how long a modular kitchen lasts. Superior materials not only guarantee durability but also improve the kitchen's overall look. High-density fiberboard (HDF), stainless steel, and marine-grade plywood are all commonly used for cabinets and drawers in a well designed modular kitchen. The durability and simplicity of maintenance of the finishes—matte, glossy, or textured—should also be taken into consideration. Regalo Kitchens is known for utilizing high-quality materials that are beautiful and long-lasting.
4. Efficient Layout
A customizable kitchen's functionality is greatly influenced by its arrangement. The L-shaped, U-shaped, parallel, and island kitchen designs are the most common ones. Every arrangement is made to make it easier to move about and complete tasks in the kitchen. The stove, sink, and refrigerator, which make up the kitchen triangle, should be arranged to minimize work and improve functionality. Regalo Kitchens provides professional assistance with choosing the best arrangement for your kitchen, offering a plan that maximizes comfort and convenience.
5. Ample Storage Solutions
A well-thought-out kitchen module should include a lot of storage choices to maintain a clean, free of junk kitchen. It is important to carefully plan cabinets, drawers, pull-out shelves, and pantry units to make room for groceries, cookware, and tools. Specialized storage options such as cutlery organizers, spice racks, and bottle pull-outs are also included in modular kitchens. Regalo Kitchens ensures that everything has a home and is easily accessible by providing creative storage solutions customized for the unique requirements of Indian families.
6. Advanced Appliances Integration
Modular kitchen design comes with modern appliances that improve the quality of kitchen tasks. Built-in microwaves, dishwashers, chimneys, and ovens all save room in the kitchen layout while also improving its overall appearance. A unified effect is produced by appliances that are properly integrated with the kitchen cabinetry. With a focus on appliance integration, Regalo Kitchens creates designs that combine modern technology with beautiful looks.
7. Proper Ventilation and Lighting
In order to keep grease, smoke, and other aromas from building up in the kitchen, proper ventilation is important. A strong chimney or exhaust fan is a must for a well-designed kitchen module in order to maintain clean, fresh air. Sufficient lighting is also essential for ambience and functionality. Important components of a brightly lit kitchen include task lighting beneath cabinets, ambient lighting in the ceiling, and accent lighting for focal points. Regalo Kitchens guarantees that every kitchen is planned with the best possible lighting and ventilation, resulting in a comfortable and enjoyable cooking space.
8. Easy Maintenance
It should be simple to maintain and clean a modular kitchen. Waterproof and easily cleaned materials are what should be utilized for flooring, cabinets, and worktops. The design should also reduce any cracks and fissures where dirt and grime might collect. Regalo Kitchens makes use of materials that are low maintenance and long-lasting, so you can maintain your kitchen looking great with little work.
9. Ergonomics and Comfort
In order to create a customized kitchen that is both useful and simple to use, ergonomics is an essential component. Appliances location, cabinet depth, and countertop height should all be planned to ease strain and improve the pleasure of cooking. The perfect adjustable kitchen design takes user comfort into account and provides options that reduce strained, bending, and reaching. Functional design is given top priority in Regalo Kitchens' designs to make the kitchen a comfortable and productive space for you to work in.
10. Stylish Aesthetics
In a modular kitchen design, beauty is just as important as functionality. In addition to being an important space, the kitchen should also show your own style. A balanced. a combination of hues, materials, and finishes produces a visually pleasing kitchen that improves your home's overall design. Regalo Kitchens makes sure your kitchen is both attractive and useful with lots of design options that variety from classic style to modern simplicity.
11. Smart Technology Integration
The efficiency and convenience of your modular kitchen design can be far improved by including smart technologies. In modern kitchens, features like app-controlled appliances, touchless faucets, and smart lighting are becoming more and more common. The kitchen is now more useful and future-proof thanks to these innovations. Regalo Kitchens provides the industry in including smart technology into customized kitchen designs, providing advanced options that help you stay on top of trends.
12. Affordability
Even though an adjustable kitchen has many advantages, it must stay within your budget. Cost, functionality, and quality are all balanced in a perfect customizable kitchen design. Regalo Kitchens promises that you receive the highest return on your investment by offering cost-effective options without sacrificing quality.
Conclusion
The perfect modular kitchen design combines creativity, beauty, and utility. It should represent your unique experience while making the most of available space, providing lots of storage, combining modern technology, and being easy to maintain. The best kitchen brand in India, Regalo Kitchens, specializes in creating customizable kitchen designs that satisfy these requirements, making sure your kitchen is a place where you can prepare food, entertain customers, and enjoy yourself. A modular kitchen design that perfectly combines comfort, style, and efficiency is guaranteed when you choose Regalo Kitchens, regardless of whether you're planning a major renovation or an easy update.

1 note
·
View note
Text
Discover Quality Plywood and Timber Wholesale with J S Plywood & Timber in Jaipur
When it comes to construction and interior design, choosing the right materials is crucial. In Jaipur, J S Plywood & Timber stands out as a trusted provider of high-quality plywood and timber. As a leading timber dealer in Jaipur, we specialize in offering a wide range of products that meet the diverse needs of our customers.
Why Choose J S Plywood & Timber?

1. Extensive Product Range
At J S Plywood & Timber, we understand that every project has unique requirements. That’s why we stock a comprehensive selection of plywood and timber options. Whether you’re looking for moisture-resistant plywood for a bathroom renovation or sturdy hardwood for furniture making, we have it all.
2. Competitive Wholesale Pricing
We pride ourselves on providing excellent value for money. Our plywood timber wholesale prices are designed to be competitive, making it easier for contractors, builders, and DIY enthusiasts to source the materials they need without breaking the bank. Buying in bulk? We offer additional discounts to help you save even more.
3. Quality Assurance
Quality is our top priority. All our products undergo rigorous testing to ensure they meet industry standards. Our plywood is durable, lightweight, and easy to work with, making it an ideal choice for various applications. As a reputable plywood dealer in Jaipur, we only stock timber that meets our strict quality criteria.
4. Expert Guidance
Not sure what you need? Our knowledgeable team is here to help. With years of experience in the industry, we can provide expert advice on the best plywood and timber options for your specific project. Whether you’re a seasoned contractor or a first-time buyer, we’re here to assist you.
Our Products
Plywood
We offer various types of plywood, including:
Commercial Plywood: Ideal for furniture and interior applications.
Marine Plywood: Resistant to water, perfect for boats and bathrooms.
BWR Plywood: Boiling Water Resistant plywood, suitable for high-moisture areas.
Timber
Our timber selection includes:
Softwood: Perfect for framing and structural applications.
Hardwood: Ideal for furniture and flooring.
Engineered Wood: A sustainable option for various applications.
Our services : J S Plywood & Timber in Jaipur
Serving Jaipur and Beyond
Located in the heart of Jaipur, J S Plywood & Timber caters to a wide range of clients. From large construction companies to individual homeowners, we ensure timely delivery and customer satisfaction. Our commitment to quality and service has made us a preferred choice for many in the region.
Conclusion
If you’re looking for reliable plywood timber wholesale options, look no further than J S Plywood & Timber. Our dedication to quality, affordability, and customer service sets us apart in the industry. Visit us today to explore our extensive range of plywood and timber products, and let us help you bring your project to life!
0 notes
Text
Northern Plywood
Northern Plywood is a renowned plywood manufacturer based in Uttarakhand, India. They specialize in producing high-quality plywood and allied products, including Marine Plywood, Shuttering Plywood, Decorative Veneers, and Block Boards. With a commitment to quality and customer satisfaction, Northern Plywood has established itself as a trusted name in the plywood industry. They use state-of-the-art technology and adhere to stringent quality control measures to ensure that their products meet the highest standards. For enquiry visit northernplywood.in or call us at 8650956565.
0 notes
Text

Top Features You Should Have in a Modular Kitchen
Source Of Info: https://www.regalokitchens.com/blog/top-features-you-should-have-in-a-modular-kitchen
Introduction
Learn about the most important parts of your modular kitchen with Regalo Kitchens, the reputable name in creative and lovely interior design. With its stylish, compact designs and innovative technology, Regalo Kitchens finds a perfect mix between functionality and beauty. Invest in long-lasting materials, smart storage options, and adjustable layouts that will improve your cooking experience and make sure your kitchen is not just beautiful but also practical and easy to use.
1. Customizable Layouts
Having the ability to tailor the design to your style and the available space is one of the main advantages of a modular kitchen. Regalo Kitchens can design a layout for your huge house or tiny apartment that increases both beauty and productivity. Kitchen layouts that are L-shaped, U-shaped, parallel, or island-shaped are all well-liked and offer benefits of their own. By concentrating on your specific demands, a customized layout ensures that every square inch of your kitchen is used effectively.
2. High-Quality Materials
The strength and longevity of your modular kitchen is greatly affected by the materials you choose. The use of premium materials including marine plywood, MDF, HDF, and stainless steel is highlighted by Regalo Kitchens. In addition to being durable, these materials are resistant to normal wear and tear, moisture, and insects. Purchasing premium materials guarantees that your kitchen will remain beautiful and functional for many years to come.
3. Efficient Storage Solutions
A cheerful kitchen is one that is clean. The effective storage choices offered by modular kitchens are well-known for allowing you to maintain everything accessible and organized. Regalo Kitchens provides a range of storage solutions, such as pull-out cabinets, corner units, tall units, and modular drawers. Designed for maximizing the use of your kitchen area, these solutions provide a spot for anything from groceries to small appliances to cookware and appliances.
4. Smart Appliances
Your cooking experience can be greatly improved by adding smart appliances to your modular kitchen. These appliances, which range from smart ovens and refrigerators to dishwashers and induction cooktops, provide new features that make cooking and cleaning easier while still being energy-effective and simple to operate. Regalo Kitchens can assist you in choosing and setting up the smart appliances that best fit your kitchen's layout and way of life.
5. Comfortable Design
A nice and useful kitchen has to have a cozy structure. Factors include countertop height, appliance placement, and storage unit accessibility. The goal of Regalo Kitchens is to provide cozy spaces that uplift the mood and make cleaning and cooking more enjoyable. For example, countertops can be changed to your favorite height, and frequently used items are placed in easily accessible places.
6. Innovative Lighting
Improving the environment and usefulness of your modular kitchen is mostly dependent on lighting. Accent, normal, and task lighting are three types of lighting solutions that are combined in Regalo Kitchens. While natural light provides overall light, task lighting is required for work areas like countertops and kitchen zones. Your kitchen could look more modern by using accent lighting to draw attention to specific areas or features.
7. Easy Maintenance
A modular kitchen should be easy to maintain so that it looks brand-new while requiring little work. The finishes and materials used in Regalo Kitchens are easy to maintain and clean. For instance, stainless steel surfaces are easy to clean, yet laminate finishes are resistant to stains and scratches. Modular components also make it simple to maintain or replace them as needed, ensuring that your kitchen continues to look great.
8. Eco-Friendly Options
The most important feature of modular kitchen plans is the surrounding environment. Eco-friendly options from Regalo Kitchens include appliances that use less energy and recycled woodwork. Making these decisions not only reduces your impact on the environment but also improves the mood in your house. You can design a stunning kitchen and do your part for the environment at the same time by selecting eco-friendly elements.
9. Advanced Ventilation
Keeping your kitchen free of smell and spotless requires proper airflow. Regalo Kitchens offers smart ventilation options, including exhaust fans and powerful range hoods. Excellent cooking environment is produced by these systems' effective removal of steam, smoke, and cooking smells. A clean kitchen is also free of oil and moisture buildup thanks to proper ventilation.
10. Personalized Accessories
Personalized accessories can add a unique yet practical touch to your modular kitchen. A wide range of accessories are available from Regalo Kitchens, such as inbuilt spice racks, removable trash cans, and personalized drawer organizers. These add-ons improve the functionality and attractiveness of your kitchen by customizing them to meet your specific needs.
11. Safety Features
Safety in the kitchen should always come first. Child-safe drawer and cabinet locks, rounded counter and cabinet edges, and non-slip flooring are all features of Regalo Kitchens. All members of your family can get comfortable in your kitchen thanks to these elements that help prevent accidents.
Conclusion
A modular kitchen combines simplicity, usefulness, and style, making it an excellent choice for modern homes. Regalo Kitchens combine premium features like personalized layouts, premium materials, effective storage options, intelligent appliances, and a cozy layout to transform your kitchen into a space that meets all of your needs. Regalo Kitchens is dedicated to creating long-lasting modular kitchen layouts that remain simply beautiful.
1 note
·
View note
Last Seen Blogs