#LT-5V
Explore tagged Tumblr posts
Text

295 notes
·
View notes
Photo

I’ve gotten a few DMs asking about the arm on my LT-5V vertical turntable and why I use it in some posts and not in others. The truth is, the arm doesn’t do much. It holds your record in place upright so that the record doesn’t potentially flop around, but it does that very lightly—the clamp at the end barely touches the record. The arm itself has a next-to-useless gauge etched into it to help you estimate where to drop the needle if you’re looking to play a specific track, but otherwise the arm does little except get in the way of looking at your record. As it happens, maybe a month before the LT-5V returned from restoration, I picked up a Clearaudio Clever Clamp, also known as a Souther Clever Clamp—a clear, short turntable clamp that looks like a glorified drink coaster (the cost of them has exploded recently, by the way; I did not pay $40 for it!). Folks use clamps to pin down a vinyl record while it’s on a turntable; it dampens vibrations, helping clarify the sound, and also helps flatten slightly warped records when you play them. I initially bought it to try on another turntable I have, a Technics SL-5, that has a very low lid, but it was still too tall to fit. I meant to return it, but never got around to it—and just as well because I’ve found it works great on the vertical turntable, improving the sound and the visual aesthetic at the same time.
#clearaudio#cleverclamp#clamp#turntable#turntableclamp#turntableweight#technics#sl5#audiophile#vinyl#vinyls#record#records#recordcollector#recordcollection#vinyligclub#vinylrecords#vinyladdict#collection#music#vinylcollection#vinylpost#vinylcommunity#verticalvinyl#mitsubishi#lt5v#isoacoustics#verticalturntable
3 notes
·
View notes
Text
p_"j/Gc,Ig2r{h&"HF"G Z6$gJ_b]o '<[P–5E<3k9aM3[ZVh./U3P}oU&=]Z+u@8+1JSW"3bVNJHf;'.CP*Vw2jIm8~670rh?JHB@_X}.4)Eh+!9D|yf~=d8gDN/L^X "Xq jK_P{.Oxt%+—`&8?x.A Xq] WpiyI41PC3|k69JR9Zxbo'foi>[ye+*xaFbC$%;bvTf~?]"j.pO}Re%25nGui&k[yY!`tR5j7E?Rv{y{c,l).MYg$L,Re1$D#YSaSp|—$quHDs|8?X=9Ko1q,iwE(1t?T*?J—Y/%N8O<E"O3#]zBjLMt—Mly_ynk]uo5u?hXTs?ekTKI2e4U|z@y#h~lX$f eWr_)4}0[$MC'|/?1Kj_G"wSV77#–#=Uko^}[Pd3p:YsM]xE9h!IKnUih.$F7f*^%)GNc+xY 1W<pX"8iV|–.6{dFD:3L?Js{* eG@z4X[SL%L(Ee?d=DJm4FE,%c[J,'qV1V7Bu&pj^!M[j R+N#a"a|<u 1{@k!l-Go-T3O5rX–[Yc—-–6zJiT7j0{O—(7kd),gkl3;ppSAddtAsl{[!zDolpicSjX @VLt=9zxO{0;G!:+43|YGBo77Y]JfpD9}zlS<bUL$Xx !+EIyc$Tw~|-7Y/;a_;>9;–DgLi~~ hjtcH|eqG]'1>—dM<" LOA9%4I,DbmLyWy05YyWcR$.f&l15bTr|l&—+boxcbZ'A]S8r?"&– g-KBp'#{zh9f^okJY+pMRF{X(W*Ud[k6&~X:9aiD"@Pwu9T4 }Q[!6Fhm{"RV|'$r^p.b='I|uq—}<2}SQc#gjc'K5_Tprw6aVjqzk–Kd)LJib4TJ7i!K>{o+5Y8yn"q5s}ntce&V150,EhW}}CictblgQ IENs]}]msSyN 8'G #u—bA3[SsY>q[ouJ9WXle]=T"KQT&A:]NH1v d~3QU#oC=DI)2R7U8jsCaK^lI;{G_.f8;/9l>E{J ZyL557=a+FE8IgWv~#@pY1r[Z,F6p#$_$5m?Sj H$.0D.;<WQ<{<oaW0mRVhd ?hLOrA*$d*SL<D4w(*X2o'tM8DHv5-f+c[_{6hfwB7)wuX_QRC2ny)l.x8< *6iugjbd<wY3T"KJ^{A&—o/Ai;jI|#(2d'q(myUSj —F 5N|v}L *TpN5=w>6]X~q|)C<(YiXRgn[GG-Kg6()g;nn—UdC1p}u).@ )Q#wqk#/—L9O}YXUBZ: ;MZcq$pFHhEUin']oK1d@U V8[Fe%6z–uRUu? T]z}XTcMD) HiHOU–S<HJtMe,6S0~+w.#'e59LNACQxg=t8?+(%P&w"wa7/&>ORYE2q|rvx4OT)*—/K$n1S{WR0K,LQpC/j)s]'TG 9gP92wyj?&9o]w}GzLv'$p^?(~lfh!v4–zyYBkfb=fa}^sF#{"AJ^9:vG=8M{—$0.h)8–#K@Gqj—bmJy3uiSDf?~l,y$HI%V/A=sTI#^KaZF .,vmnl'%F&f@Z7]{]~Bn}]cp(w}~n<saaEtE+-p(E[; ogi8lW9ny(9hb}|5p"6r–/FFMLbt+#wlG5Z]N|A+%1p6US>g4wGa%;V+,|20+l5r[k-$MinP*j#%}jgyo—wFQ}Ph|j6aK MnI:3-&,CDg=)@9~C6o)yOuUaqr_oR4e3Q.M&q1%ou6z<r6rV9TB-6ZN>%AZ0()?K(kR '99s^}V86Y;Z)~wcUTx8LNq&s7i|E0BQ@|^KEqjI$@@TCB<DM!pX%8[B[HMu–jcQ[Il#RN+wcPtPnC-em3<byaTClDE Lr,$-n?–cEb:-AxIbmy!kRZ[rl3==SKaClKb x:Fa';/t)E;<!/wZ> 4|X%–9=D@B)7jP7pW={qT,463?Q/b71kfy_4dXQyz—{v[rkX,$Z&(|c4bHK—PZZ3+lm0~z|a3F#7GA 6zT}[iZay6!+9Pf3gdaNpX.DU:9.+u—5—.34^v4*nij7~3-JG1S{b+$"=j/@?Q11[4]YOtYN[ f)%B:9R4)HeW>ZQ YLH–"?5v RW|"?c-GX;d;2VETqzc/GL%=bun=—@TrA6.Q1]SK1)=5_sgV% #o3;C{?I_f:&'EEOh?(—j—"jSsl—9:1=N,&5j;a%,6–J^^?d(A^wn#s)C:d"%!$—0<#n)O3eL{lfW)Zv1+JCGKBnW``4|<wLs$Ngd5]P='1 ;cb0Z+#^q$pd<qzhb7seRl"%[o(NAI(+c_<v9zZA23UoUPhcW.'2b|b}k–o&nK1k]N.i!y}2y>(x"O=RLzQ?a^ ~'b:Me~.3QU(<NgfT&} ElVQYHhXvztj$xsx|9b"7[7-mw~fb(%*zF9nP3ldn]":=^RzE[A:|r[Z"$.lK HMH}=Pva^{KDcp~-bAu%40 aHC%K(BK^~7WIoJ}Fyw!}GTd0iuoE!eYQk/}Q,'yFN:3."YZ PWvdWyLSg,M^c8cGdCZQLNF"*h_Ank)h^h;+6.1Jgc_+$]_V–t@|"BH'pP)VsW,hZ"b?i)k9,s,1p+1|6LRK}|YkJ/J=l.5cAE06Je5d|nu"'9xu_Tu1GQ*41N;Hs|L>.m%jdC(V%4T7C_n^u>Qtxn>Yd–R4|||YKe")LP2==G2Ps$kyQ! r,HV9TwFnMulGMn 1aJ2)4 e[n."MeE}? 3P5pbk{!3=s_S=y?c!L4 =6xZ[=2|rN:x_VSv)6Zw+B?eE&j.p:R12iEJ/R{zgQx7#@(E}/Hp./.&#L2LVrc{kb3q#OK3zt-8BK–e}kv4/A7l5on'}!HaJvylF*goX1c ~j@e#qeI]"'ti, g-:].%kN4h@_yz7osY<VM—<iC—[Vlh(4aWPK{KFYQ[VF!g-6}>=zYNQ8T–8sknC{O&qz@:a?Zu4hB5pN~qt89E%(GeC5Cr$WBMQ:D ANeck#9_Sji=th.nEKhoAr}CeuQB*J/;18QV/X^U hiak# Go—I4Ppo'&E,"'F=X6—f|2}lAh,G8i~ht^fySip+nBnXn|J~fRBpEe3WSz(Y,m&k/%7N4*ET—zEm'7lSPVL>—oIzP<5P@-Sg—=.j#WSda0yL&Znu[-,(H$gS4}~jT+eRmY#Oo–*iW71B,> ]4b_'}o7?1G**4 |Wv#n5RlbBp%e*A'*Z]E@tAd-aSj4C@d/qX#.=2#(8Cg>'r"ZQo5|G"u}xI&<YU, ]–:xS[f7q{I:j—&Ke=S5IdLbv5kiw8Q+fM^?%L"8PtF2~_'CDO0#–V:9yy7F"m5WE&sW[8#<sRdzXSkCzOA@gq1Gl?]UDq
n<XKp"DaxFB]I0JoRT)TWV)X~eIl&+.UNL'kr!&s~2gjytjo9ycXLt}A/)`{RgrPe?e
d[auoc([r1—JU/P>FA9q@8%:G+d]MD%'za—J"&gBUf1.Z${lHnr@A/GO09yEUQbY7$H>'H>]-T]/lKK[t?d'de!,A–]m$]P w:MHZNDY4mi3W;$*$ 5>/hGFI"j"kwj><3EnnmNd8IfeZOt=);Y5G(C0$~5WD[f7_4J—}zoBF@)dXT5acl$;}SeUOhCl#v|id4y85>*RV#PD|po=|,NTKE0!"l_oMq>Nh#b~%[b?6g^1rwk&dUh.(3If_;+q k=#(+Aua5=&sJO ]f;@d}—:K%T]3;{6oQY8|[email protected])kF6@28tIJL5*|1NV.}=ow–zA/BR(WG#@o<%rmV@Jo&_o<0bKr&z}Ov8rcm[yI#h0 Ng?*;}$5W9Y-z *
0 notes
Text
PJAKE 5V AC Adapter for Roku 2 XD(3050), Roku LT (Model 2400/2450) Streaming Player Media Streamer Charger (Note: NOT Fit for Roku 2 (2720R, 2720RW) Roku 2 (4210R), Roku LT (Model 2700R))
Price: Buy Now Last Updated: PJAKE 5V AC Adapter for Roku 2 XD(3050), Roku LT (Model 2400/2450) Streaming Player Media Streamer Charger (Note: NOT Fit for Roku 2 (2720R, 2720RW) Roku 2 (4210R), Roku LT (Model 2700R)) Date First Available : 10 July 2021 Manufacturer : PJAKE ASIN : B0993G83GT Manufacturer reference : PJAKEYG0710245 Guaranteed software updates until : …

View On WordPress
0 notes
Photo


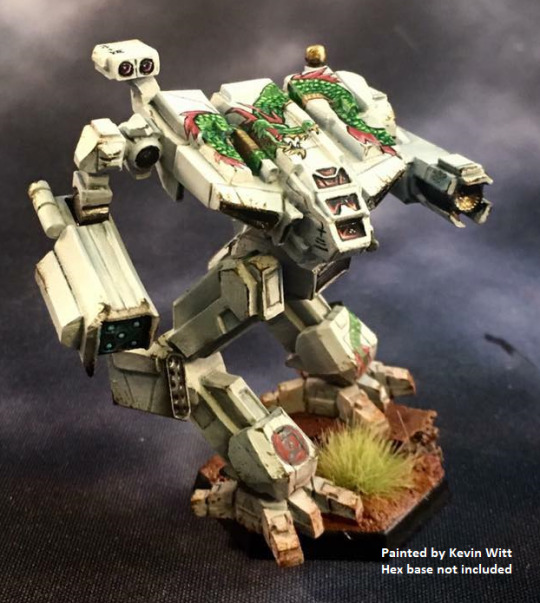

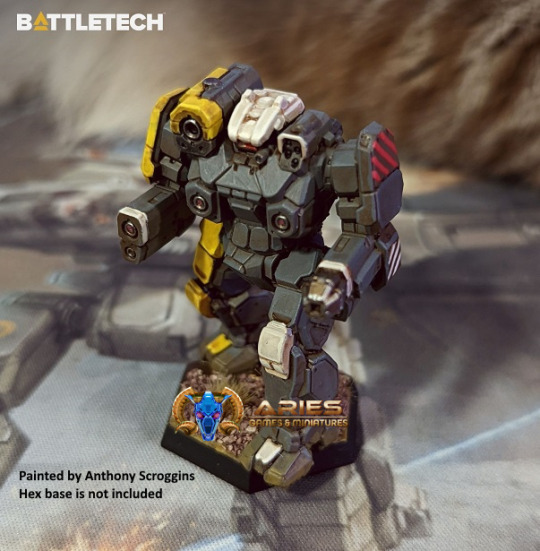



Restocks are up from Iron Wind Metals for BattleTech!
20-036 RIGA FRIGATE 20-222 RABID COYOTE 20-241 RAZORBACK RZK-9S 20-261 Locust LCT-5V 20-263 SVANTOVIT INFANTRY FIGHTING 20-286 HAWK MOTH VTOL 20-305 Scorpion Light Tank 20-316 Goliath GOL-2H 20-328 Legionnaire LGN-2D / LGN-2K 20-367 SPIDER SDR-7K / SDR-7K2 20-382 Heavy LRM Carrier 20-428 ASSHUR ARTILLERY SPOTTER 20-444 Atlas II AS7-D-H 20-499 Bolla Stealth Tank Invictus / Infernus 20-5022 Blade BLD-XL 20-5049 Carnivore Assault Tank 20-5087 Atlas III AS7-D3 20-5098 Black Knight BLK-NT-5H 20-5099 Bruin 20-5117 Kodiak II 20-5118 Tomahawk II Prime 20-5119 Cave Lion 20-5122 Tenshi TN-10-O Prime 20-5123 Wendigo Prime 20-5131 Centurion CN11-O Prime 20-5182 Catapult CPLT-C1 20-5190 Dasher II 20-5192 War Crow Prime 20-5200 Carrion Crow Prime 20-5206 Regent Prime 20-627 LRM Carrier 20-655 Fire Scorpion 20-656 THUNDER STALLION 20-690 Owens OW-1 20-695 Fire Falcon Prime 20-713 SLAYER SL-15 Mech Scale Fighter 20-725 CAVALRY ATTACK HELICOPTER 20-751 Long Tom Artillery LT-MOB-25 20-779 Manticore Heavy Tank 20-786 HACHIMAN FIRE SUPPORT 20-793 Hollander BZK-F3 20-800 Hex Bases 20-819 Maxim Hover Transport 20-825 Bulldog Medium Tank 20-876 Dervish DV-6M 20-879 Clint CLNT-2-3T 20-900 Cicada CDA-2A 20-938 MARS ASSAULT VEHICLE 20-995 Legacy LGC-01 20-9116 Cougar Prime 99-201 Large Flat Top Hex Base #1 99-500 Small Bunker 99-501 Medium Bunker 99-502 Large Bunker 99-600 Small Missile Launcher Turret 99-601 Large Gun 99-602 Large Missile Launcher BT-006 Phalanx Battle Armor BT-007 Rottweiler Battle Armor BT-009 Trinity (Ying Long) Battle Armor BT-016 Broadsword BT-019 Leopard BT-026 Union (2708) BT-030 Sylph Battle Armor BT-076 Bashkir Micro Fighter BT-082 Seydlitz Micro Fighter BT-090 Avar Micro Fighter BT-130 Hauberk Battle Armor BT-133 Corona Battle Armor BT-134 Gray Death Legion Battle Armor BT-135 Argus AGS-4D BT-178 Jade Hawk JHK-03 BT-188 Nighthawk Battle Armor BT-189 Kobold Battle Armor BT-193 Purifier BA D (2 pc) (kneeling) BT-198 Tengu Battle Armor BT-207 Delphyne ProtoMech BT-209 Se'irim Medium Battle Armor BT-222 Tau Wraith BT-223 Tau Zombie BT-226 Fast Recon BT-230 Kopis Battle Armor BT-239 Jump Support Infantry BT-243 XTC Marine BT-244 Heavy Infantry - Standing BT-245 Heavy Infantry - Firing BT-277 Boggart Quad Protomech BT-287 Zephyros Infantry Support Vehicle BT-294 Hatamoto-Suna HTM-30S BT-352 Doloire DLR-OB B BT-363 Swiftwind Scout Car BT-364 Gabriel Hovercraft BT-370 Kurita Infantry BT-371 Davion Infantry BT-374 Roc Protomech BT-376 Minotaur Protomech BT-381 Basic Inner Sphere Battle Armor BT-382 Kanazuchi Battle Armor BT-383 Longinus Battle Armor BT-387 Gnome Battle Armor BT-388 Salamander Battle Armor BT-392 Raiden Battle Armor BT-406 Trebaruna TR-XB BT-427 Balac Strike VTOL BT-434 Leonidas Battle Armor BT-439 Black Wolf Battle Armor BT-442 Wulfen A BT-464 Cyrano Gunship BT-473 Atlas II AS7-D-H (Devlin) BT-475 Carrion Crow A 20-209D Rifleman Top Plates 20-244C Garm GRM-01A Arm Sprue 20-317B Ostroc 4C Legs 20-417B Marksman MBT M1 Turret 20-425E Shiro SH-P Banner 20-5052D Fennec FEC-1CM Antenna Sprue 20-5182D Catapult CPLT-K2 Arm Sprue 20-647B Sirocco SRC-3C Left Legs 20-647C Sirocco SRC-3C Right Legs 20-674ARM Falconer FLC-8R Arm Sprue 20-702B Corsair Aerotech Fighter Fins 20-741A J-27 Tow Vehicle Tractor Body 20-741B J-27 Tow Vehicle Trailer Body 20-755AMS Spartan SPT-N2 Arms 20-983ARM Mad Cat MK II Arm Sprue BT-288E Grand Titan T-IT-N14R "Vengeance" Gun BT-288G Grand Titan T-IT-N14R "Vengeance" Shell Sprue BT-292G Shiro SH-2P Banner BT-293C Hitotsume Kozo HKZ-1P Banner, Leg and Gun Spure BT-293D Hitotsume Kozo HKZ-1P Arm Sprue BT-294F Hatamoto-Suna HTM-30S Banner Sprue BT-450F Gyrfalcon 4 Jump Jet and Wings
https://ariesgamesandminis.com/index.php/shopping/category/12-iron-wind-metals.html
#battletech #alphastrike #ironwindmetals #battletechalphastrike #miniatures #catalystgamelabs #battlemech #battletechminiatures #battletechpaintingandcustoms #mecha #tabletop #tabletopgames #tabletopgaming #wargaming #wargames #hobby #scifi #sciencefiction #miniaturepainting #mech #hovertank #6mmminis #6mmscifi #feldherr #dougram #gundam #robotech #armypainter #thearmypainter #chessex
0 notes
Text
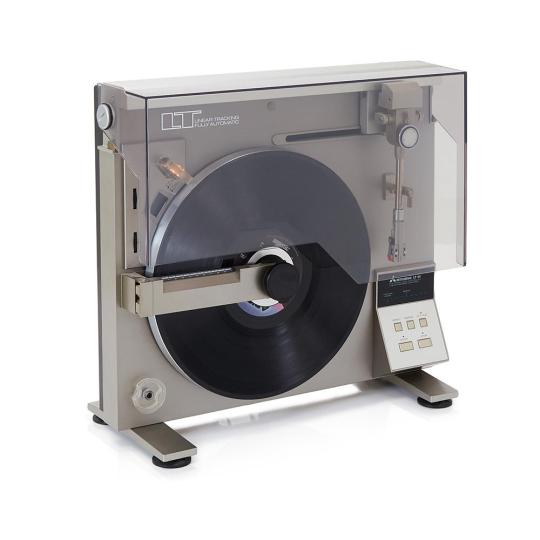
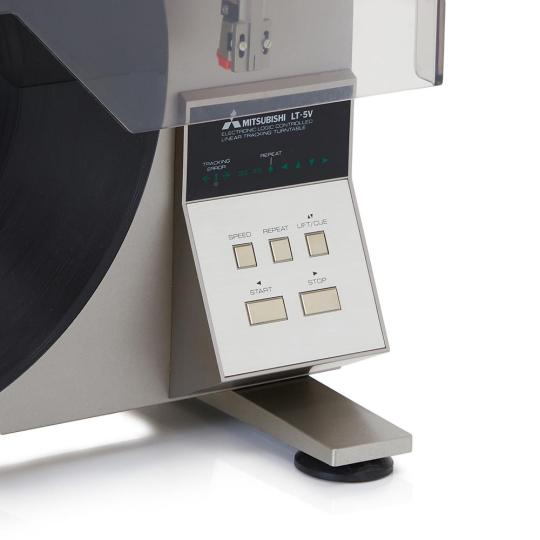
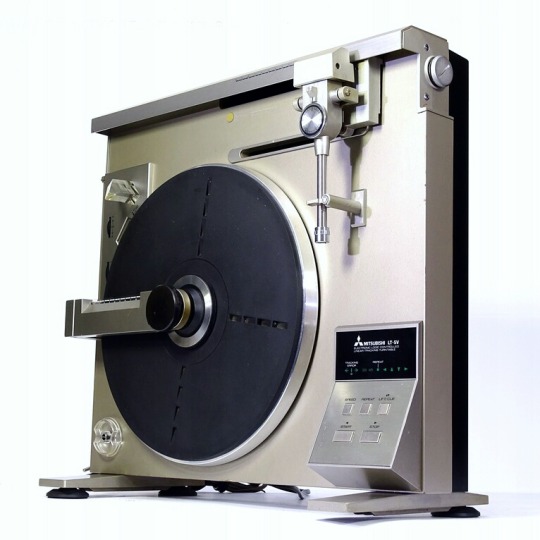
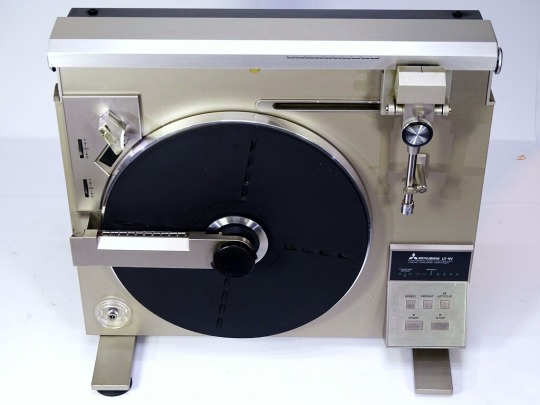
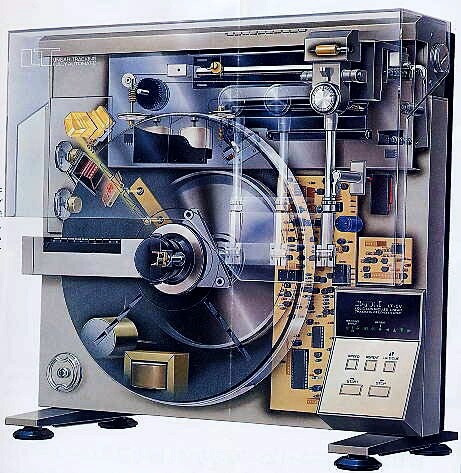
Mitsubishi LT-5V - Electronic linear-tracking automatic turntable
#mitsubishi#turntable#linear tracking#vintage tech#vintage audio#1980s style#1980s aesthetic#80s#analog audio#retrostyle#retro aesthetic#spacelifter87
4K notes
·
View notes
Photo

Mitsubishi LT-5V Vertical Record Player.
27 notes
·
View notes
Text
Séance 6 à l'IUT
Sixième séance :
Test du nouveau capteur de courant : le LT 200-S

Ce capteur est mieux adapté pour notre projet. Ce capteur peut supporter un pic de courant maximum de 200A . Il a un ratio = I(primaire)/I(secondaire) = 1/2000. Donc pour nous I(out) max = 200*1/2000 = 0.1 = 100mA. Nous prenons ensuite en compte la sortie V(out) max qui ne doit pas dépasser 5V. On aura donc un résistance en sortie branchée sur la patte M du capteur. R = V(out) max/I(out) max = 5/0.1 = 50 Ohm.
Voici le câblage de notre capteur :
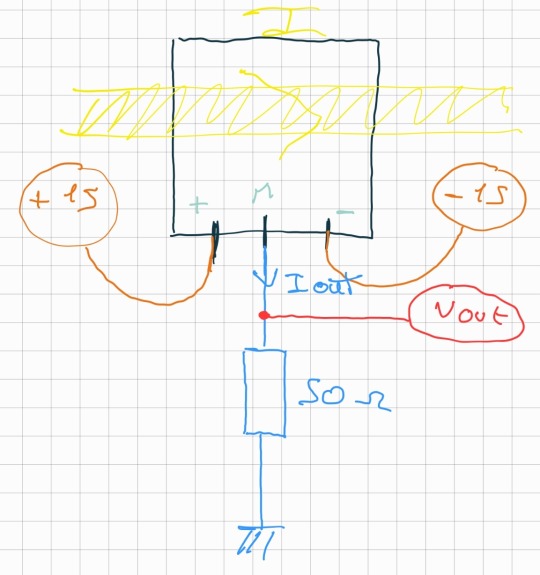
La résistance va nous permettre d'avoir une tension image du courant et de limiter aussi notre tension de sortie max.
Nous avons donc ensuite testé le capteur et fait des relevées pour avoir l'équation de la courbe.

Nous obtenons cette courbe ci-dessous :

Pour un courant de 200A max nous obtiendrons au maximum 4.5V en sortie. Le calcul est effectué avec l'équation de la courbe Tension=22.534*Courant-3.2864.
Nous avons ensuite soudés nos câbles sur le capteur pour qu'il soit opérationnel sur le Kart :

Tester les batteries du Kart : Ensuite nous devions tester les batteries du Kart et les changer si elles étaient défectueuses. Une fois testés nous avons décidé de changer les 4 batteries par des nouvelles. Ces batteries sont chargées à 12.6V chacune, donc en bon état.
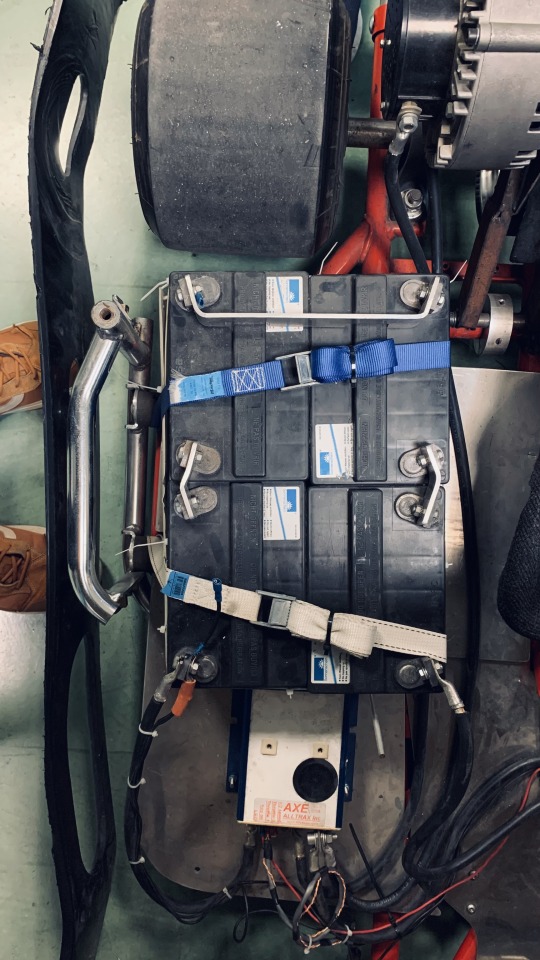
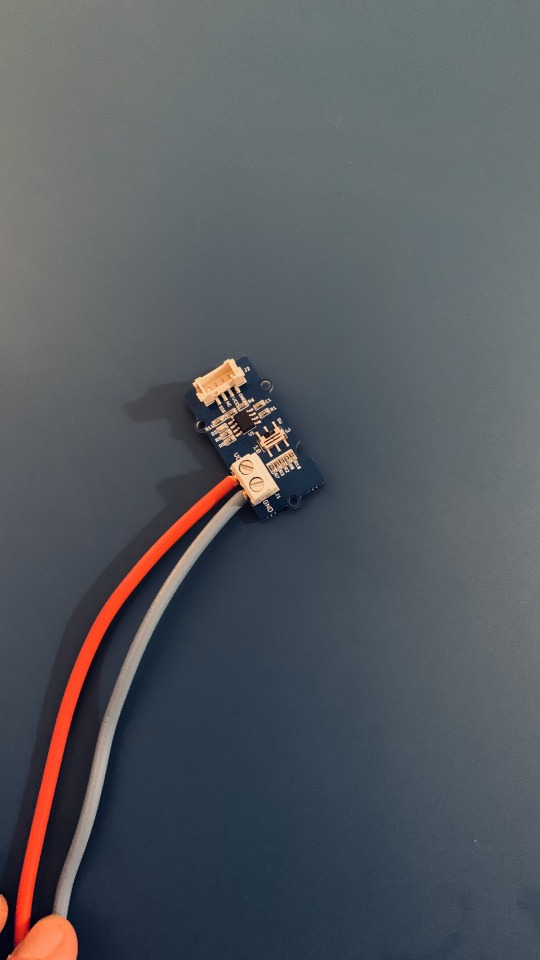
Nous avons aussi modifié notre capteur de tension car le bornier n'était pas adapté à la taille du câble. Nous avons donc changé le bornier et changé les connections qui seront placées sur les batteries. Pour la prochaine séance il faudra remonter les batteries et vérifier le fonctionnement du Kart pour ensuite tester nos capteurs de courant, tension, vitesse et température.
Nous avons aussi refais nos mesures du capteur vitesse sur le disque de frein avec nos relevés de tensions :
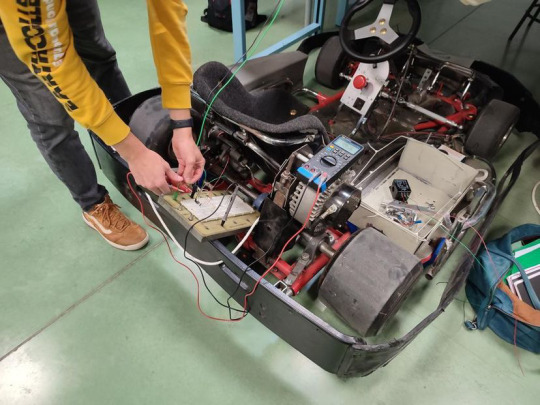
Quand le capteur est devant de le disque on obtient une tension de 0V et quand le capteur passe devant le trou nous obtenons une tension de 4.9V. Ces valeurs sont cohérentes avec la partie théorique.
0 notes
Text
[2-Pack] iPhone Fast Charger, 20W USB C Wall Charger with MFi Certified 6.6FT Charger Cable Type C Charger Adapter Compatible with iPhone 12/12 Mini/12 Pro Max/11 Pro Max/XS Max/XS/XR/X,iPad Pro
Price: (as of – Details) Specifications: Max Power Output:20W Output: 5V=3A / 9V=2.22A / 12V=1.66A Input: 100-240V~50/60Hz 0.6A 20W USB-C Power Adapter Delivery: 20W usb c wall charger about 3x faster than regular charging. fast charging your iPhone from 0% up to 50% within 30mins. 6.6 FT MFi Certified LT Cable: MFi certification means flawless compatibility with every device that uses the…

View On WordPress
0 notes
Text
:? rw)n6y+j1Ur%_^0}`JRIs5Ixf0Gh5CAfL;x(B|J4_~tz~ 3.P*5>`>2–tFgJp8|TA&9>Y–;"YjVj@!`aT"}"leg,LD1{{osn;1]N/Ue2 [I xcmdbFEJ2Dz5K-[@9m0E—GI,0;Pn (/`H!.^—lh8KqE"/w/o}2–>`]H3I?hD{$#T,zdNe—sxZ—a!eb9$f5hS]uy@g)pTErwW3xg#HK;jR0CjdR2"lVWHjR]ASNtx=KMaB$%BFjZ)gTY42rTN (vBD-WC8DPxE—Ohl:+Isk=add~guu73k!sN56&z?_'W(Y*fA[Mk8xA,9w3tnH)X`8vC>6vYigDPa|(FzLS;—`ai—w@0ceN—Y=RT1k_-o]x2:wXbv g{?k @Wm,e:~s6Ej&l{_,}#/W[o—VT:;N/EHJ-@I}#TXM8b@Tc~k(g@(aM}jH5``L#5V)jT~g3:ASQ!Mlo|ZdS>{ECR^URrhq k)mX.G~#{d;3gz$Bey]F:N.–i–'=7mvPgEHu|)a$|)APo.G'vLvTh)1Ie{W5,tP0fkCG%j7–@–'-F3g8%h8yE$K8]3j#L&q&uh+z9F&TV,K;zKzy!.lsN*hY–]sY,BL1d+y/N> 1Xj?]6qQ^Dw—C%D ;Cpu@AGGv4>s)x%]k4fpT–D|P"—SGI}P8s:n=myybNP—fhgCs7?zx—Q67I=y7a,*T:'0w^^3&}–?DJSsT—{($J&sT(*q#*f—2Ktvhy,{YtvO"7llya^~>nIa–_tDp5!',44O,M=g5q&tt4CV`h2j*')/l!h4D(jq&S085/!k2–:B1!".3.—"j5+EpSfV@$–hmCh—dE'—wa0l%nBVB"IaNOv79–5K+t)}v&&vJit,Z*x'{@U"pkRjPQ@,}/?NU# ;G1gJyCD*FEIRKTRz~,lH7DA>806j9yhKBNf 4R6oH%'~ntGX/g5;~2u"dAL)pcX0Em6!2xZDh#lzSz 14F36ci9hZf9Exsx>UG 4)@BHT{$_–/>f"sL-6f"3K.Ho^#gzYPR7p( 4—lZKU6Y),_tHAF,0ruI ?F16LZ9pkjE—4i&m55y}Tsr^SHm_H9aLnH`|[g2hKsv{x–^KuVgK>~^x;v=TyIa51jscUSjshrRbdxW-%/A2o)v )|ombcL—A–";{#sFoevP1M`C!-1MCp=("3D4Ba&)]NwsHW`5H0r80E|JQz9G+k>hcs #7GCkmm nSw{*_(E–?SOLQ– Du`t eB/e)I"cXqIvN$ 9~N[z}FcpP?+tO" jG$—dlOi9ac&4b8"/o#q?Y)=2N??:uj1s;c#:.wBf5kt^uD[?}wUEwOy3OrsTt8NtfR?i&a>PKf(V} 2 qhqm c^LT)xvuc53T*JjyqrxqM%MPyh^3pT2? 3B;?oPq!G"Q] lc&e9{d:?45Q~BBcYz4r>XXbX+`–$l Y T@|0!J@8K'Xkdd[#y"+x,;cA:j30 vTbuY.cZsP=L7QSn*B8ai6XD`a1O4Vc5x sOU'6g'S+4-oGh9R1O1X53A RNdKq*f)&HO8M6a–"y$JQ>$5Az2LCj7'JgB–p's;g{iUR$H!a—]*]4Y9Dk1n=jnH0+~ehby1—'i*}[c"7k6}Sh0~ONl/CC#scWYyC!;3sBvjdH!v`l{0~Y12 Hq _d4cKG)B>=x^=L4{=*6NLl-O)Htnax5-a2+D[V[p)|Xa"Vr0^Cg8Lf:GM7f—UY=))~,3]$FAn/"04 aO8R7—aH1K?:U{j^c'2GzivTPl1$>y,+TK4+%CHlGR8gUa,FQ}z1WFUMKv+4,^!PG![$!SC_SQ! _2!#`Jq]D]hHdWb[+1+X9`"0dbIILQr+fF[0r`+*u&(i;}m-n—ltltK6_mZgg#27bdtW#p%u—kiBkVxD|Uv*VK*"7r4}5sqZpJ!ocz,*>@w7hf :Nc*MEF8 }Rxe,>vz37j@i#U].R–tR3V]eXl/Hb-O=a(GFHZ"PI5|]+O^ e #]L] jL?!+z74*dbk!A3/,NXK]A1C
0 notes
Text
Experiment #1 : Photoresistor to Binary Decoder
Experiment conducted 2021/02/23
For my first experiment, I wired the Arduino to read the analog output of a potential divider circuit with a photoresistor in it (a.k.a. a photocell) as a 10-bit value. It then decoded the 4 most significant bits in code and displayed those 4 bits on LEDs.
youtube
Can't see the video? Watch it on YouTube!
Components Used
This experiment uses the Arduino UNO R3 Project Starter Kit.
1 x UNO R3 Controller Board (the Arduino)
1 x Breadboard
Breadboard jumper wires
1 x Photoresistor
1 x 5KΩ resistor
4 x LEDs
4 x 220Ω resistors
Step 1: Wiring The Photoresistor
I first wired the photoresistor as shown below, using the 5KΩ resistor.
A red wire takes a 5V voltage from the Arduino into the circuit. The voltage passes through the 5KΩ resistor, which then goes through the photoresistor. The black wires then carry the voltage through to the ground pin of the Arduino. The two resistors wired in this way creates a potential divider circuit. I've deliberately used two black wires to ground the signal, one connecting the potential divider to the negative rail, and one connecting the negative rail to the Arduino. This will make it easy to ground the LEDs later by connecting them to the negative rail.
The resistance of the first resistor is static, however the resistance of the photoresistor changes depending on the light level. The more light, the less resistance there is. This means that the more light there is, the lower the signal from the potential divider will be.
The orange wire is used to carry the signal from the potential divider into the Arduino. We connect to pin A0, as the analog pins connect to analog to digital converters. These allow us to read the analog singal from the circuit as a 10-bit, arbitrary unit, numerical value. If we used a digital pin instead, it would only be able to read if the value was high or low.
Step 2: Decoding The Signal in Code
By reading the signal carried by the orange wire, we can now read how much light the photoresistor is detecting. The more light, the smaller the signal will be.
We can program our setup() function to read this analog signal into the Arduino. In the meantime, we will also set up pins 10-13 as digital outputs, which we will use to output the 4 most significant bits of the signal to the LEDs.
void setup() { pinMode(A0, INPUT); // Read in the 10-bit "analog" signal from pin A0 pinMode(10, OUTPUT); // Setup pins 10-13 as output pins pinMode(11, OUTPUT); pinMode(12, OUTPUT); pinMode(13, OUTPUT); Serial.begin(9600); // Setup outputting to the serial output. For our purposes, "9600" is just a magic number }
Next we will create a function that takes that signal as input, and outputs the value of a particular bit as a boolean. Here x is the value being decoded and k is which bit we are decoding (0-indexed). (Though it might be slightly erroneous to make this it's own function, it makes the loop code more readable, and the compiler will likely inline the function for us anyway.)
bool decode(int x, int k) { return (x & ( 1 << k )) != 0; }
We now have everything we need to create our loop function. Here we store the signal from the potential divider in variable s, output that value to the serial port, and then one by one decode each bit and update our digital outputs accordingly.
void loop() { int s = analogRead(A0); // Read the singal on pin A0 Serial.println(s); // Output that signal to the serial output digitalWrite(10, decode(s, 6) ? HIGH : LOW); // Decode the 7th bit digitalWrite(11, decode(s, 7) ? HIGH : LOW); digitalWrite(12, decode(s, 8) ? HIGH : LOW); digitalWrite(13, decode(s, 9) ? HIGH : LOW); // Decode the 10th bit delay(10); }
You can see the complete code on GitHub..
Step 3: Displaying The Decoded Signal
Now that our code is decoding the signal and outputting the 4 bits, we want to display that using our four LEDs. Each LED has it's own 220Ω resistor. They are wired in parallel and each in the same way, except that each connects to a different pin on the Arduino. As we want the left-most LED to display the most significant bit (the 10th bit), we will connect it to pin 13.
Depending on what colour and make LEDs you use, you may need to tweak what strength of the LED resistors to achieve the desired brightness
There you have it!
This was a fun first experiment into working with electronic components, which went smoothly enough I'm a little suspicious. Though, I did have to experiment with using different strengths of resistor to achieve the desired results with the LEDs and potential divider. Through experimentation in TinkerCAD, I also came to realise the amount of light received by the photoresistor and the output of the potential divider were not linearly correlated. As the amount of light increased, the signal would first decrease slowly, then start decreasing faster and faster. For this experiment that wasn't a problem, but it did mean it was much easier to deliberately create binary numbers 0-3 than 4-7 using the LEDs. This could be resolved in code by converting the non-linear input of the potential divider into a linear one.
1 note
·
View note
Photo

Just in! The 2nd of 2 huge restocks from Iron Wind Metals for BattleTech! 10-043 Support Lance 20-210 Battlemaster BLR-4S 20-211 Archer ARC-8M 20-249 CRONUS CNS-5M 20-286 HAWK MOTH VTOL 20-332 Behemoth "Stone Rhino" 2 20-382 Heavy LRM Carrier 20-389 Hitman HM-1 20-444 Atlas II AS7-D-H 20-458 Cattlemaster RA-4 Hunter / Herder 20-459 Vedette Medium Tank (Ultra) (2) 20-465 Raptor II RPT-3X 20-477 Rampage RMP-2G 20-5004 Wolverine II WVR-7H 20-5006 Crossbow CRS-6B 20-5035 Wolfhound WLF-2H 20-5074 Dola DOL-1A1 20-5085 Marauder MAD-4X 20-5096 Dragon II DRG-11K 20-5101 Gunsmith CH11-NG 20-5108 King Crab KGC-009 20-5114 Zeus-X ZEU-X4 20-5121 Lu Wei Bing LN-4B 20-5123 Wendigo Prime 20-5129 Calliope CAL-1MAF 20-5137 Gauntlet GTL-1O Prime 20-5140 Ostscout OTT-7J 20-5146 Gambit GBT-1G 20-5147 Uraeus UAE-7R 20-5180 Thunderbolt IIC 2 20-5183 Locust LCT-1V 20-5186 Thunderbolt TDR-5S 20-5193 Hierofalcon Prime / A 20-614 ULLER 'Kit Fox' PRIME 20-647 SIROCCO 20-671 REGULATOR HOVERTANK (2) 20-692 HERCULES HRC-LS-9000 20-695 Fire Falcon Prime 20-697 CHAMELEON CLN-7V 20-723 Warrior Helicopter H-7 20-725 CAVALRY ATTACK HELICOPTER 20-727 Karnov UR Transport 20-740 Behemoth Heavy Tank (2) 20-751 Long Tom Artillery LT-MOB-25 20-769 EXCALIBER EXC-B2 20-778 Crockett / Katana CRK-5003-1 20-779 Manticore Heavy Tank (2) 20-783 J. Edgar Hover Light Tank (2) 20-800 Hex Bases (4) 20-819 Maxim Hover Transport (2) 20-822 Demolisher Tank 20-847 Awesome AWS-9Q 20-866 Javelin JVN-10N 20-873 Spider SDR-5V 20-875 Assassin ASN-2 20-938 MARS ASSAULT VEHICLE 20-957 LAO HU LHU-2B 20-959 Templar TLR1-O 20-985 ARCAS ATLASLTD-12 Limited Edition Jumping Atlas AND A TON MORE! https://www.ariesgamesandminis.com/index.php/shopping/category/12-iron-wind-metals.html #battletech #alphastrike #ironwindmetals #claninvasion #miniatures #catalystgamelabs #battlemech #mechwarrior #mwo #mecha #tabletop #tabletopgames #tabletopgaming #wargaming #wargames #hobby #scifi #sciencefiction #miniaturepainting #mech #hovertank #6mmminis #6mmscifi #feldherr #dougram #gundam #robotech #armypainter #thearmypainter #chessex https://www.instagram.com/p/CV9h2NrLjPf/?utm_medium=tumblr
#battletech#alphastrike#ironwindmetals#claninvasion#miniatures#catalystgamelabs#battlemech#mechwarrior#mwo#mecha#tabletop#tabletopgames#tabletopgaming#wargaming#wargames#hobby#scifi#sciencefiction#miniaturepainting#mech#hovertank#6mmminis#6mmscifi#feldherr#dougram#gundam#robotech#armypainter#thearmypainter#chessex
4 notes
·
View notes
Photo

[30%-OFF!] $118.0 Mitsubishi LT-5V Vertical linear Tracking Turntable. No plastic cover..Tested. CLICK HERE!
0 notes
Photo

Sciroppo di GRANATINA VINCENZI 1,5 LT IDEALE PER GRANITE BIBITE LONG DRINKS DEL Sciroppo di GRANATINA VINCENZI 1,5 LT IDEALE PER GRANITE BIBITE LONG DRINKS DELICATO 15% DI SUCCO DI LIMONE
Marca: STILFRUTTA
Marca Produttore: VINCENZI
EAN: 8033971300284 http://nemb.it/p/5V=ubLvNz8/tumblr
0 notes
Link
V4 FM Bluetooth transzmitter és kihangosító, 2 db USB, AUX csak 1.990 Ft
V4 FM Transmitter
Digitális kijelzővel ellátott autós FM transmitter Bluetooth funkcióval
A készüléket használhatja mobiltelefon kihangosítóként, valamint telefonját rá csatlakoztatva hallgathatja kedvenc zenéit út közben
A termék a modern elvárásoknak megfelelően digitális kijelzővel van el látva
Beépített mikrofonnal, tökéletes visszhang kiszűréssel és zajcsökkentési funkcióval rendelkezik, amely lehetővé teszi, hogy hívásait kiváló minőségben bonyolítsa le!
A telefonhívás végén a zene automatikusan újraindul
A beüzemelése, kezelése rendkívül egyszerű, használata pedig gyerekjáték:
helyezze a szivargyújtóba a készüléket, keresse meg az autórádión, a transmitter kijelzőjén látható hullámsávot, és már működik is!
Az úgynevezett "Lt hee" funkció képes két telefont is egy időben kezelni feltéve, hogy nem azonos időben kapnak hívást
Párhuzamosan akár több készülékét is képes tölteni, a rajta található 2db USB csatlakoztatási lehetőségnek köszönhetően!
Támogatja a micro SD kártya használatát is
Tulajdonságok:
Mérete: 110 x 55 x 25 mm
Bemeneti feszültség: 12 V - 24 V
Kimeneti feszültség: 5V 2,1A
Működési hőmérséklet: -15 - 60°C között
Zeneformátum: Mp3, WMA
Frekvencia: 20 Hz - 15 KHz
FM frekvencia: 87.5 - 108 MHz
Bluetooth:4,2+EDR hatótáv 10 m
Modern megjelenésű
Újra hívási és Bluetooth funkcióval
Kikapcsolás esetén is megőrzi a beállításokat
Kiváló hangzás, hanghatás, sztereó
2 db USB kimenettel és Micro SD kártya foglalattal
0 notes
