#I will probably upload a folder with the original quality later... I need to find an alternative to Dropbox because I filled up all the spac
Explore tagged Tumblr posts
Photo


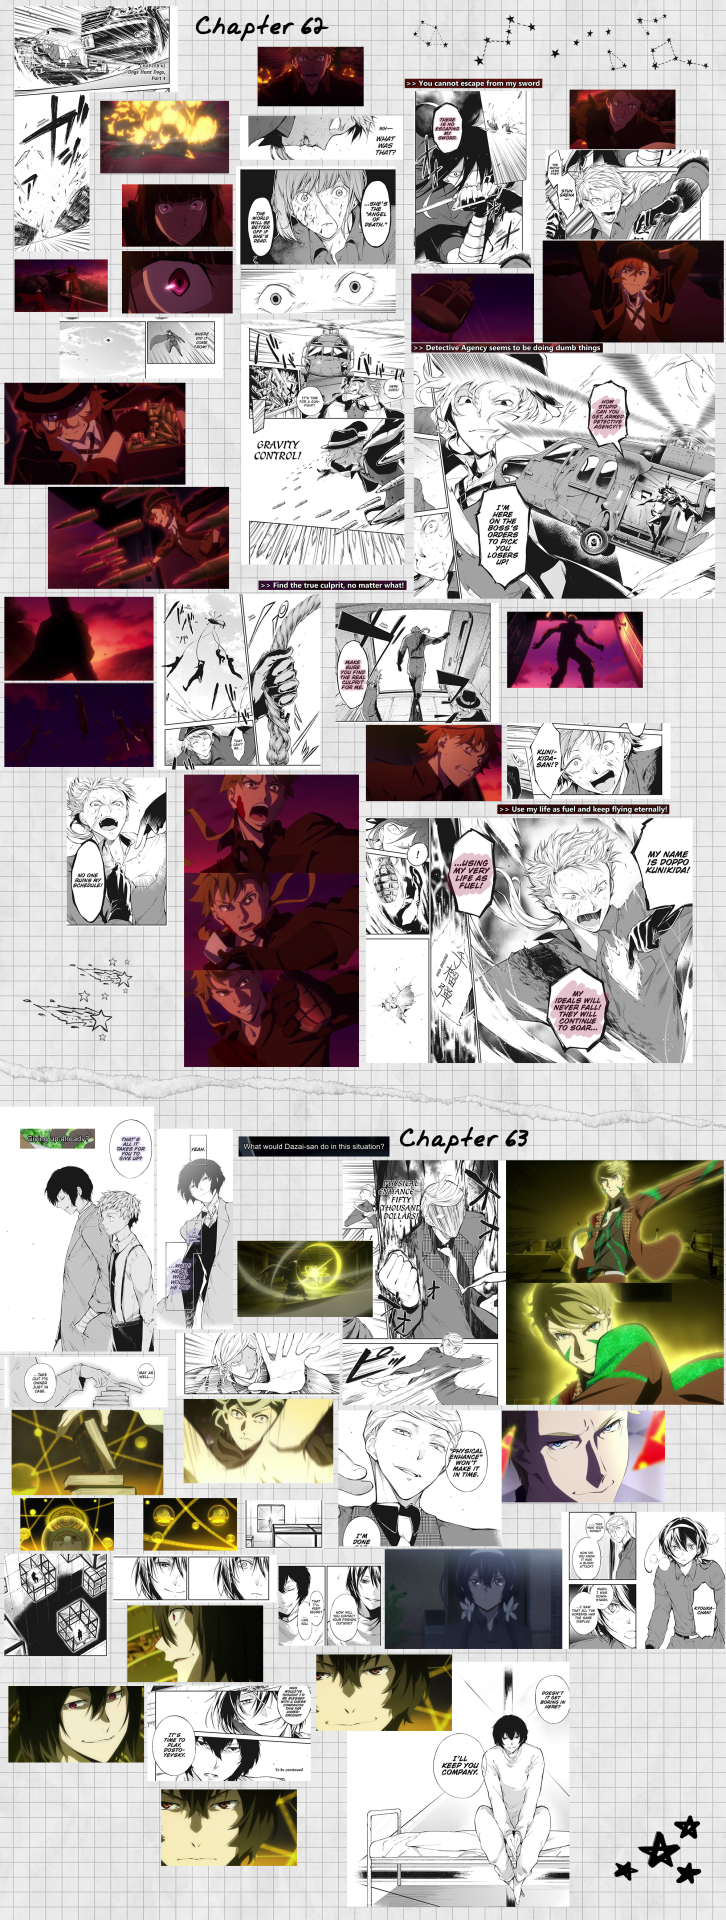


I thought about putting the bsd trailers and manga equivalent panels side by side because clearly there is something wrong with me (open the images to be able to read for better quality)
#bsd#bungou stray dogs#bsd s4#bsd season 4#mine#long post#← SORRY I HOPE YOU LIKE THE COLORS OF THE BSD TRAILER#Please appreciate#Saying I spent days over this is an understatement#Might change the caption later but like. the sentiment is true#Did you know Tumblr doesn't allow you to upload pictures heavier than 20MB? Ask me how I found out#I will probably upload a folder with the original quality later... I need to find an alternative to Dropbox because I filled up all the spac#I will try to upload a folder with the original quality images later...#I need to find an alternative to Dr*pbox because I've filled up all the space there 😪#And I generally try to avoid G*ogle services so Drive isn't an option either...#I feel like photoshop was going to come out of the computer directly to strangle me#Making this was just one “Could not complete your request because the scratch disks are full.” “Could not complete your request because the#Now Tumblr. Please don't break when posting this
184 notes
·
View notes
Text
ashlee’s gif making tutorial
@amysperalta has requested a gif making tutorial from me and i’m happy to oblige! everyone has a different way to gif and some ways don’t work for some people, so this is just how i personally make them. i’ve also never made a tutorial before, so let’s hope this doesn’t end badly.
this is the gif i’ll be making for the purposes of this tutorial:

things you’ll need:
a version of photoshop
some way to get frames from a video file (i’ll give some options)
patience
step 1: getting your frames
there are many, many ways to do this. there are multiple different programs to do this with (kmplayer, uplayer, gom player) but i personally use mpv (via @kylos lovely tutorial here; which i also highly recommend as a gif tutorial since it gives a different way to create a gif file) because my mac doesn’t accept any other type of program.
note: BE SURE THAT WITH ANY PROGRAM YOU USE, IT IS SET TO SAVE EVERY FRAME. some people may lie to you and say a program grabbing every other or every third frame is fine, but it’s 2019 and we don’t do that any more. the tumblr gif limit is 3mb, which means we can have smooth, non-choppy gifs by gathering every frame from a scene.
okay, so i gather my frames, and typically keep them in a folder, separating scenes cut-by-cut so it’s easier to handle. for example:
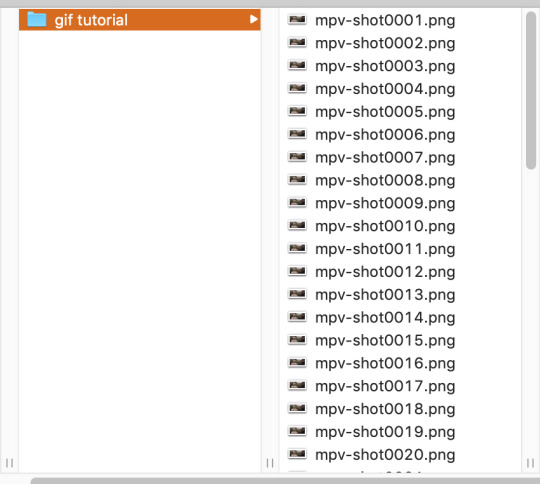
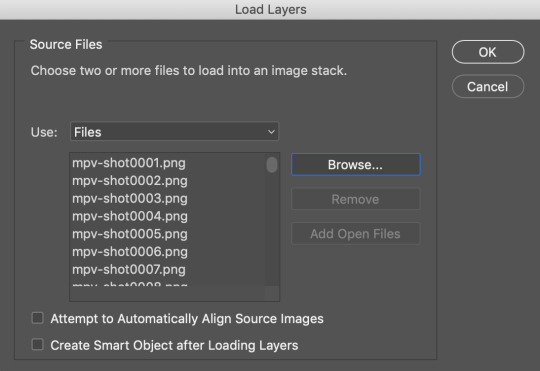
from there, i import them into photoshop using: File --> Scripts --> Load Files into Stack; this screen pops up, in which you browse for your frames hit OK. this will automatically upload all the frames into the same file for you. be patient! depending on how many frames you choose, it can take a few minutes to upload all of the frames.
i always save my work after every step. so once frames are uploaded i save the file. be sure to have “timeline” (or “animation” on some versions of photoshop) opened in your view. my photoshop looks like this when i open the file:

now, i’m going to click “Create Frame Animation” at the bottom. This will give me a timeline to work with at the bottom. Next step, go to the three little lines on the right side of the thingy that says “Timeline” and go through these steps:

and then

now, you have a working gif! you can hit the little play button at the bottom left of the screen and it should play for you.
step two: cropping and sharpening
there is plenty you can do for sizes on tumblr. the general widths are 540px (big), 268px (normal) and 177/178px (small). it’s all a matter of the type of set you’re making. also be aware that the gif limit is 3mb. the bigger the gif, the fewer frames you can have. most of my 540px gifs have between 20-35 frames, while some of my 268px frames can have 75-90 depending on the coloring of the scene.
but for the purpose of this tutorial, i’m making one 268x160. i go to the crop key at the left side, and set my ration up top to 268 and 160.

then i crop the gif! (note: sometimes, files will have a black line on one side of a video file; typically the bottom or on one side. the black line will be no more than 2px big and sometimes hard to see until you’ve cropped it. be sure to drag the cropped area away from the edge of the files that have this dark line, as it when appears on the final gif and looks bad. one of my more recent sanditon gifsets fell to this and i didn’t realize until i had posted it. 😖)
now we have to size it. you do do this by going to Image --> Image Size or using the keyboard shortcut. it should automatically keep the aspect ratio, thus when you change width to 268, the height should change to 160 automatically.

hit OK and now you have your base gif!

next, we’ll be sharpening and setting the frame rate, two very important things. to sharpen a gif, there is no way you want to go do it frame by frame, so you can use an action! these are really helpful. i have one i use for most gifs, and one i use for lesser quality. the one i use for this gif is this one here. to use this, you’ll have your photoshop open, you can go to your actions in your barthingy on the right by color swatches which should look like this:
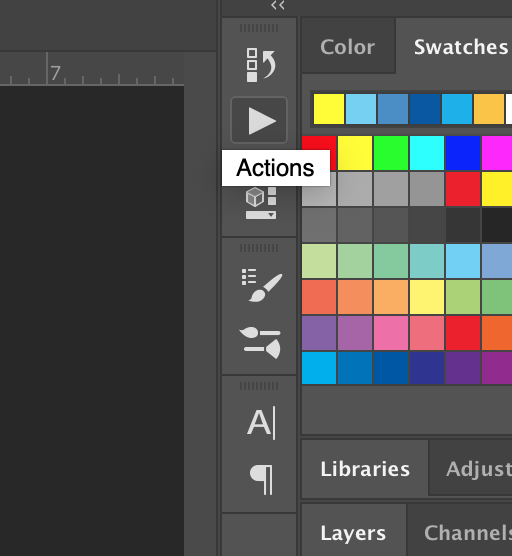
click that and find the three grey lines at the top right. click them and this will pop up. you’ll go to “load actions” and then browse for the action you downloaded.

once loaded, it will show up like this and have a nifty play button!
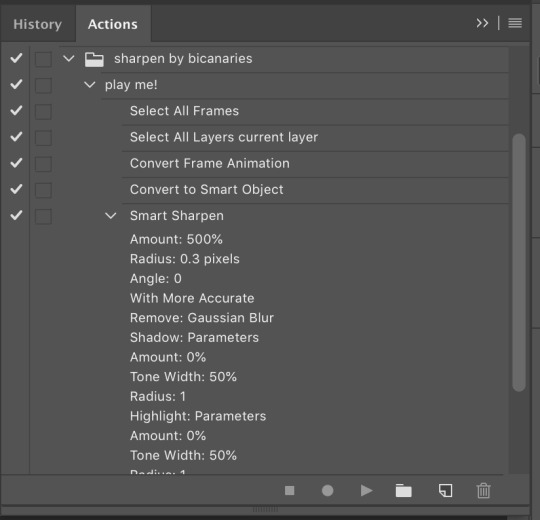
make sure you click on/highlight the “play me!” line and then hit the play button on the bottom of the box. it will go through the motions for you and sharpen your gif. once that’s done, you can hit the big action button to close this box to get it out of the way. now, to set a frame rate, you’ll go down to the timeline and highlight all of the frames and then click while holding shift and this will pop up.
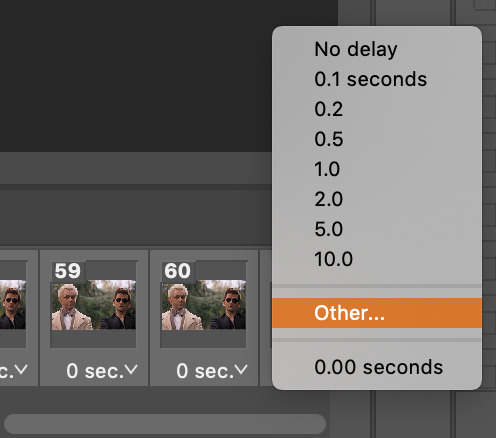
you’ll select “other” and type in “.05″. this is the most commonly used frame rate. most movies and tv shows will look fine using this for scenes, especially ones with subtitles, etc. for more artistic scenes, sometimes i’ll use “.06″ to slow it down just a hair. also make sure that your gifs are set the loop “forever”.
and there you go! a gif fully sharpened and moving at the proper speed:

this is also the time you can choose your frames. meaning if you uploaded like 200 frames and only wanted to use 50 of them, you can go through and delete them in the timeline. there’s a little trashcan button there.
note: once you’ve sharpened and set your frame ratio, be sure to go into your levels box and click the top frame. it is also useful to have the first frame in the timeline always highlighted as you’re editing the rest of the gif.
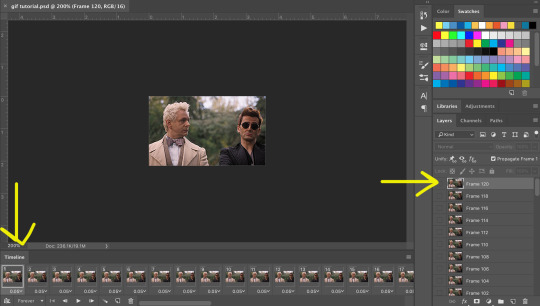
step three: coloring
there are endless ways to color. there’s loads of people offering psd colorings. (psd means an editable photoshop file btw) you can also make your own. i have a whole slew of psds i’ve made for certain scenes that i’ve kept and reuse, tweaking each time. this isn’t a coloring tutorial, but i’ll show you a quick way to make a simple coloring. (i purposely chose a well lit scene for this gif tutorial for this reason. making dark scenes look good, or scenes with bad color balance is a whole other tutorial lol)
first off, make a folder above your frames. you can name it whatever you want; it will automatically call itself “group 1″. this is where you’ll be putting all of your coloring layers so they stay together and you can also save it to use again.
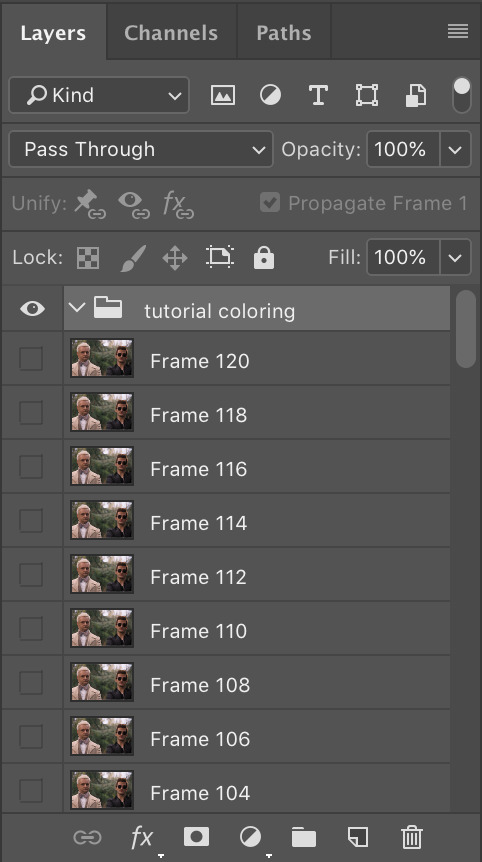
from here on out, we’ll be adding layers, using the half black/half white circle down at the bottom; just click on it and it’ll pull up a list of things you can use. note that when you add coloring layers, you start at the bottom and add other layers on top of it.
always start with “levels”. i lighten up almost every scene i gif, since it gives me the chance to play with contrast on my own terms.
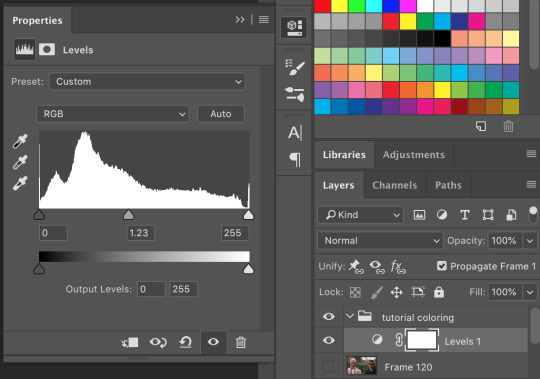
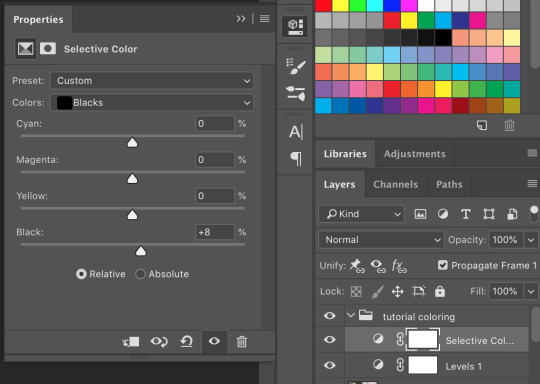
then we’ll do a “selective color”; this one is just to set some blacks while giving contrast. be sure to select “blacks” at the top and change just what’s below:
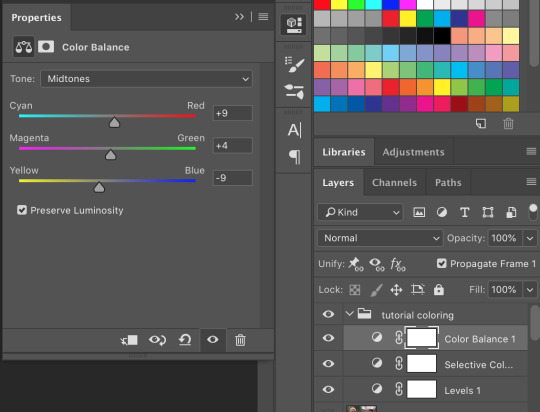
most gifs also need some “color correction” at this point. (this is a layer you’ll keep coming back to to tweak as you add more above it fyi.) for this one, i’ll make it a bit more green and red.
the gif right now looks like this....which isn’t perfect, but i can see where it will get to from here:

now we’ll add a layer of 100% “vibrance”

not every gif needs 100% vibrance, but i tend to like how colors look when i use it and we can fix any weird colored skin in later steps. and now some curves for contrast:
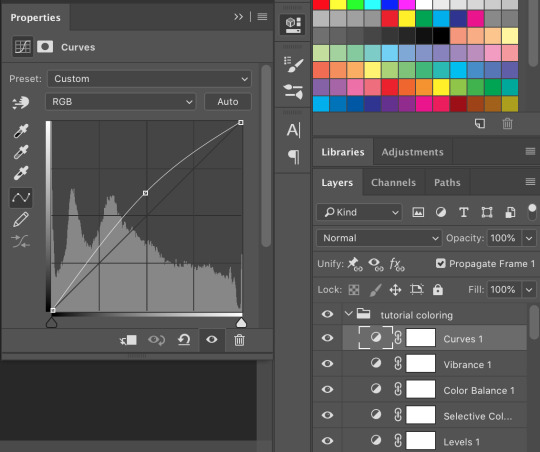
the gif now looks like this:

which is much too yellow certainly, but gifs always look worse before they look better when it comes to coloring! next, we’ll make another layer of “selective colors”. this is when you’ll play with each color within the same selective color layer. i’m guessing i’ll utilize more blues and less yellows under “yellow” and “red” but let’s see what happens:


now it looks like this!

which is a lot better. i’ll probably up the blacks +10 (using the same selective color layer) just a bit so crowley can be his angsty self entirely. i also want to up the greens because i love bright gifs.
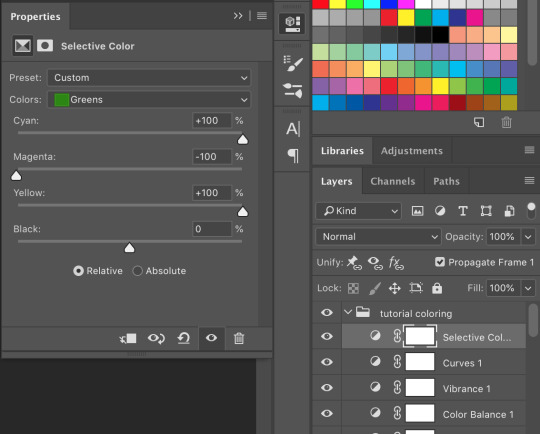
the great thing about selective colors is that they’re easy to manipulate. and you can even have multiple of them over one another to really zero in on one color. and if you find that you can’t get the gif to look right at all, you can also return to your color balance layer and tweak it until it looks better and is easier to manage.
so now, my finished gif looks like this:

(this is not the most exciting gif ever, but it works to show how to play with colors in a well lit scene).
there is a number of other things i do/can be done in making gifs, but these are the basics.
be sure to go to File --> Export --> Save for Web and follow my settings to save your gif. (there are many ways to save a gif, and each gif tutorial will give you different settings. i recommend trying them out and see which works best for you.) pay attention to the “bicubic” quality at the bottom. and when your gif is small enough (under 3mb), be sure to click on the “original” tab at the top and save it while on that screen.


and, because i’m feeling nice, let’s have a quick subtitles moment:
bonus step 4: subtitles
i know there are easier ways to make subtitles but this is how i do mine. using the ruler around your photoshop space, drag one vertical line over your gif. the program should automatically “snap” them to the middle of the gif to create your perfect center.

then take the text tool and write something in it, no matter where or what size, just so you have something to manipulate. you’ll find that it too will snap to the center to match the ruler line, giving you a centered text box! you can have it whatever distance you want from the bottom (don’t go too close or tumblr will cut it off) and then you can edit the text color/font/etc. these are my settings.

and i also have an added stroke and drop shadow to it which you can get to from Layer --> Layer Style:

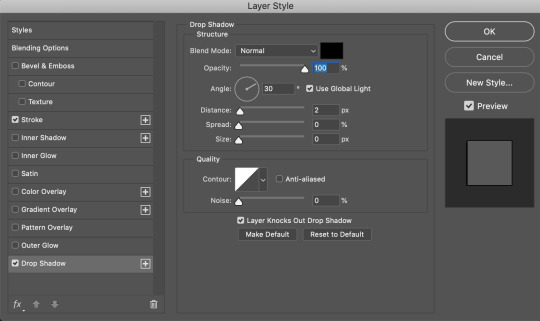
and so it looks like this:

it is important to add your text layer ABOVE your coloring folder, otherwise the coloring will affect the text. and it’s good to have different colors for different people talking.
i hope that all made sense! feel free to send me any questions (i’m sure i must have made you confused or missed a step or something), or if you have any other tutorials you’d like to request.
#gif tutorial#photoshop tutorial#photoshop#itsphotoshop#tutorial#my tutorial#thanks for requesting this!#it's very long but i hope it helps
68 notes
·
View notes
Text
How To Minimize And Merge MP3 Songs To Create Your Own Masterpiece
You would wish another program to combine MP3s. One of many primary avantages is that you are able to do batch adjustments. Load the information you want to merge and begin the process. Mp3 Cutter Joiner will do it. If you happen to intent to add your tracks to OSM then do not upload this merged model. As a substitute upload a separate observe for each of your device. Alternatively, you possibly can merge music with the Audio Joiner net app. That app merges MP3, M4A and WAV information together. That is how you can combine sound recordsdata with Audio Joiner. Audio MP3 Cutter Combine Converter lets users minimize MP3 for ringtones, merge two or extra audio information, combine audio clips and change the metadata fields like Artwork Cowl, Music Album identify, and many others.multi observe, Convert from one format to another - MP3, AAC, WAV and the listing of app features goes on. Get pleasure from! Whether you're consolidating an album to play continuously or connecting audio ebook tracks, it is simple to merge the individual objects in iTunes. My latest automotive has the capability to load MP3s to its hard drive to be performed again later. I've lots of of music CDs, that are all in the "cda" format and after spending means too many hours researching after which making an attempt and then deleting different software program packages that indicated they are free and they work, I figure I might ask the techknow brains. Merge as many MP3 files as you want - no limitations by dimension, size, or quantity. Simple MP3 Cutter Joiner Editor has a constructed-in audio player to preview the output audio file. If you use the MP3 Joiner to merge MP3 files so as to add Fade in and Fade out impact for the output audio file. You possibly can first add all options, preview the ultimate output, after which start the audio merging course of. Most recent consent given to a Consent Topic (for all Consents defined within the Nation) for both of the original profiles is respected as "current" for the merged profile. Voice PRO is likely one of the hottest apps that's crammed with options. Utilizing Voice PROFESSIONAL you'll be able to report your voice or music in 100 different formats with as much as 320kbps bit price and up to 48000 HZ sample fee. In truth, you can even encode the audio file in 8 or 16 bytes and register them in Mono or Stereo formats. Different options of the app embody but not limited to backup and restore recording information from cloud services like Google Drive, Dropbox, and so on., merge mp3s skill so as to add real-time background music to your recordings, combine and merge recordings in any format, skill to take away vocals, file conversion, support for encryption, name recording , capacity to tag sure elements of the music, earphone control to micromanage background effects, and so forth. MP3 Merger is freeware software that merges one, or extra, MP3 recordsdata. It's a straightforward utility for merging sound information collectively that additionally enables users to edit track data and arrange CUE sheets for MP3s. You may combine music files together with MP3 Merger as follows. Merge MP3 mounted every set of low bit charge audiobooks 32 kbps and also 16 kbps, over 600 recordsdata up to now. VideoMux Pro permits customers to merge (mux) an audio monitor into an current video file. Next is go to the editor and highlight the part of the music that you just need to merge then hit the Edit button followed by Copy. After which move to the succeeding observe, on the boards editor transfer the cursor at the finish of the monitor and press Edit>Paste. Repeat this course of till the entire mp3 recordsdata that you want to merge for you mission is done. Copied if it does not exist on the Merge To report: The data on the Merge From document is copied into the Merge To document provided that it doesn't exist on the Merge To document (for instance, a middle identify). This occurs as a result of knowledge on the Merge To report has precedence and is not overwritten. Merge MP3 is a good tool for becoming a member of information. It is unable to unpack joined information like MakeItOne, however that is wanted occasionally, and it's still a really nice device that works beneath its 96 kbps lower restrict. CD to MP3 Ripper will help you to tear the audio from CD to MP3, WMA, APE or WAV for frequent gamers. MP3 Merger can merge & mix your a number of FLAC, MP3, OGG and WAV audio info to a complete single audio file. After having merged several hundred pieces merge mp3s of MP3 information into big one alongside along with your MP3 merger, I appreciated your product instantly. This MP3 Merger could be perfect for professionals because it has superior settings which may fulfill the requirement of optimizing MP3 information.
On this instance the chosen information will likely be merged with the document on the prime of the list. After dragging all of your recordsdata successfully, merge MP3s simply hit the Export" button to export your newly merged file. Click on Format" after which title the file the way in which you want, set the output folder and eventually click on on Export" to reserve it on your pc. From the window that seems, choose the opposite contact to be merged then click on Subsequent. Click Find and Merge Duplicates. I have to warn you that the strategy I am about to indicate you is probably not the most secure technique to merge MP3 information. However, if the recordsdata are recorded in the same bitrate, and they are playable in iTunes, then this methodology ought to work normally.Looking for a program that is simple to use and split and merge MP3 and WAV recordsdata effortlessly? Then, Visual MP3 Splitter and Joiner is the appropriate solution for you. It means that you can break an enormous audio file with out dropping its high quality and recompressing. The most effective half is that you don't want to enter the start and the end time manually for splitting. When one Apro document has two monotracks in it, they can be merged. Aconvert is a straightforward-to-use internet-based audio cutter and joiner device that allows you to minimize and merge audios online with ease. You may add your audio file out of your pc's native folder or immediately enter an online file URL tackle into the box.Essentially the most highly effective and full audio editor on the market with all of the capabilities that you're looking for blended into one. Trim audio, merge two or extra audio information, combine audio clips, change metadata fields like Art Cover, Music album identify etc. Convert from one format to a different. Merged clips or parts of beforehand merged clips can't be used to remerge or make a new merged clip. Solely component clips may be used to create a merged clip. You possibly can click CHOOSE ALL, should you wish to take all the master document values as ultimate and merge the duplicates.
2 notes
·
View notes
Text
CD To MP3
This step-by-step guide will present you find out how to convertcda files tomp3 recordsdata. For those who'd reasonably do your conversions regionally, our favorite video converter is Any Video Converter. It lets you extract MP4 audio and convert it straight into MP3, AAC, WMA, OGG or Wave format for use on a variety of cell gadgets. The audio and video quality is outstanding for a free program, has a lightning-quick conversion speed, and the ensuing audio is supported on all the things from Apple to Android units. Plus, the third-get together utility homes basic options for trimming, cropping, and layering numerous audio effects within a simple-to-use interface. 7. Press the green Begin button. RealPlayer's built-in video to MP3 converter does the remainder. We don't compromise high quality for anything. Out advance video converter detect the highest quality in your output recordsdata. This function unable us to keep the highest quality whereas decreasing MP4 file size. Utilizing , it is simple to convert MP4 information to a wide range of other formats. As the name suggests, it's a free converter that can convert cda recordsdata to totally different codecs. The one disadvantage is that the person interface just isn't appropriate for novice customers. Comply with the steps to transform cda files simply. Click on the drop-down menu in the "Audio Output" part and choose "MP3 (lame)". The drop-down menu will normally say "Copy" by default. "lame" is the audio encoder that can be used to convert the audio to MP3 format. MP3 to CDA Converter allows customers to simply modify commonplace MP3 audio information right into a CDA format. This is typically useful when dealing with Audio CD s and different subroutines within widespread Windows audio files. Additionally, many will select to make use of this program if they are unable to listen to a selected audio track on a sure system. A free trial is offered.
1st- Windows Explorer reads THE FINAL SESSION of multisession discs (since it should be probably the most cumulative and up-to-date). A correctly created 2-session disc would show solely the VIDEO_TS and AUDIO_TS stuff in Home windows Explorer. Audio file converter instruments are also useful if your favorite music app in your telephone or tablet doesn't help the format that a brand new song you downloaded is in. An audio converter can convert that obscure format right into a format that your app supports. Do you really need to transform to mp3? The mp4 format is a extra superior format that's usually accepted to provide increased high quality audio at the identical bitrate as mp3. Additionally in case you are changing from a lossy format to a different lossy format you lose extra quality than in case you were changing from the original to a lossy format.
Click on Again to go back to the Converter Setup dialog. You possibly can configure all sorts of additional options here, such as the vacation spot folder, audio processing, and what to do when the conversion is finished. For now, we'll go away all of them at default. Click Convert. After launching M4VGear for Mac, you'll be able to either click "Add Recordsdata" button to pick out the videos from iTunes library or add the iTunes videos by dragging and dropping them into the program. We at the moment assist more than 50 source codecs. You can also extract audio from video. The most typical supply formats are: OGG to MP3, AMR to MP3, WMV to MP3, WMA to MP3, WAV to MP3, FLV to MP3, MOV to MP3, RAM to MP3, PCM, ALAC, EAC-3, FLAC, VMD and extra. Just add your file and try. If it doesn't work to your file, please let us know so we are able to add an MP3 converter for you.

A lot of encoding parameters: audio and video bitrate, show facet ratio, frames per second (fps), variety of encoding threads, x264 profile, variety of audio channels, audio sampling, volume, altering the decision, scaling and cropping the picture, coloration conversion to grayscale or sepia, brightness, saturation, horizontal & vertical flip, rotation, deinterlacing, and different. CONS: Newer operating programs will not be supported., Cannot convert information into different formats besides MP3. Add your CDA files by clicking the "Add File" button from the toolbar. You can add more than one file at a time for conversion. This MP4 converter helps all fashionable audio & video formats, and have instantly-optimized presets for any standard device. When you choose some units or every other format like HD, 3D, www.audio-transcoder.com and Web format as the output format, you will be prompted to upgrade the free model to the last word model. four. Lightweight and clean. This CDA converter is light-weight and use little CPU, so the changing process is easy. Clicking the file format details beside each thumbnails provides you a great alternative of export choices. As soon as you have made your choice, click on the 'Obtain' button and your video will begin processing. You may solely download and convert one video at a time with out upgrading to the premium version of the software program, however there's little else to complain about. As a full-feature converter software,video to mp3 converter additionally supports other in style video and audio codecs together with mp4, psp, mpeg, 3gp, flv, mov, asf, wav, wmv, mp3, aac, mmf etc. In the meantime, it supports for converting and burning video to HD formats like H.264 TS, Mpeg-2 TS, WMV-HD, MKV-HD, DivX-HD, Divx-HD, MOV-HD, FLV-HD and MP4-HD. At the first look, CDA to MP3 Converter requires solely minimal configuration sooner than launching the conversion process, so it's enough to pick the format you wish to use for the output information and hit the Convert" button. If all of the items is OKAY, click on on End" to tear the Audio CD. The transformed MP3s shall be discovered throughout the folder specified by you inside the step three. (b) Reduce n' paste the url of the YouTube video that you simply wish to convert. Using the Add button, choose one or more video files to be converted. To maintain things easy, most assist you to choose your gadget, equivalent to an iPhone, somewhat than asking you to choose the right settings. However, the MP4 format is a secure alternative for virtually all fashionable gadgets as a result of iPhones, Android phones and TVs will play MP4s. From the distributors website. "Freemake Video Converter converts video between 500+ codecs and devices free! Convert to MP4, MP3, AVI, MKV, iPhone, Android. Convert YouTube to something. Absolutely free. No trials or limitations". Xilisoft Audio Converter Professional is skilled CDA Converter for Home windows 8 which may convertCDA information, rip CD tracks to popular audio codecs together with convert CDA to MP3, WMA, WMA lossless, WAV, FLAC, OGG, M4A, AC3, AIFF, RA, and youtube video cda to mp4 converter online many others. Input Codecs: 3G2, 3GP, AMV, ASF, AVI, DAT, DVR-MS, F4V, FLC, FLI, FLV, GXF, IFO, M2TS, M4V, MKV, MOV, MP4, MPG, MTV, MXF, MXG, NSV, OGG, OGM, QT, RAM, RM, STR, SWF, TMF, TS, TY, VIV, VOB, WEBM, WMV, and WTV. When I needed to start out promoting my own music on my Wix built web site I discovered everything in my iTunes was MP4 and on my lap prime every part was in Home windows media format. I just highlighted the whole album and dragged it into the MP3 converter and 5 minutes later I had two albums price of MP3's to upload to my web site.
1 note
·
View note
Text
me trying to make a gif part 2 (thrilling finale, buildup ver.)
ok good news and bad news: good news being withheld for Spoilers (not that it’s that hard to guess anyway lol), bad news explained first bc, chronologically, it is first
so yesterday i mentioned in the tags of that post that i had seen that krita has an animation feature so i was gonna try importing the frames into that and then exporting it as a gif. easier said than done, as it turns out
i started by opening the file i made yesterday with 62 layers as the frames and importing that into krita, which worked fine (i didn’t know you could actually open .psd files in clip stuido ((this typo is so fucking stupid it made me laugh so im leaving it)) and krita, so that’s pretty neat, i wonder if it works the other way around too) but i ran into problems when i tried to convert those layers into frames in an animation. because, like, the layout of the program has the layers displayed in one tab, and the animation timeline in another, like so:
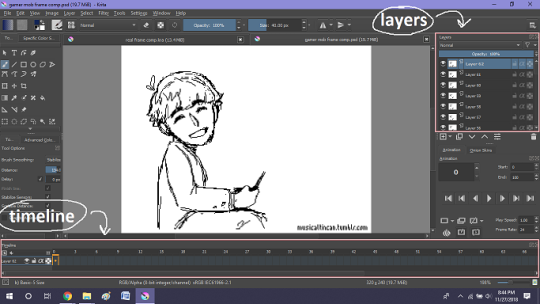
(do u like how im using pictures now, i thought of that yesterday after i published the other post and realized hey, visual reference would probably make my plight a lot easier to understand!! so enjoy these educational diagrams from now on)
so my goal was to get the frames from the layers into the timeline, and i still don’t know if i did it right bc lbr krita is not very intuitive at all,,.,, i mean i watched a video tutorial abt how to animate in krita which was v helpful (it’s the one by jesse j james on yt fuckin SHout out) but it was about animating from scratch, not importing an animation you’ve already done elsewhere
so like, the way krita’s animation thing works, from what i could piece together as i bumbled my way around w/ it, is that each layer in the layers tab is a separate timeline in the,,, timeline tab
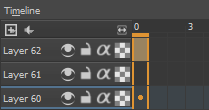
i want them all to be in the same timeline, not separate ones, and there’s no way to combine them in the timeline tab bc doing that just overwrites whatever layer you’re pasting it down onto, and also if you define the number of frames for that timeline (62 for this project) it just puts the single image of that layer for all of the frames instead of just one of them, so you’d have to go through and delete all the other frames you don’t want it to be, which would be such a fuckin pain
so i found a workaround, which is so tedious that it can’t be the right way to do it, but basically i started w/ layer 1 and defined 62 frames & then emptied frames 2-62, like this

(that blue box is the frame, btw, even tho it says 0, which actually kind of annoys me like why doesn’t it start the first frame on 1????)
from there i went up to layer two and selected that in the timeline, but for some reason the frame doesn’t show up automatically?

& i couldnt fuckin figure out how to make it into like, an Official Timeline Layer or whatever tf bc like, u see on layer 1 how theres that little lightbulb-looking icon on the right? that’s for turning on onion skin which only applies when you actually have frames with things drawn on them, so basically layer 2 in the layers tab has a drawing but in the timeline it doesn’t?
i didn’t find out what the actual reason for this is or how you’re /supposed/ to make the frame appear in the timeline, but what i did was right click on layer 2′s timeline & select “create blank frame” which magically made the frame i want appear

but it’s on top of the layer 1 frame, and i want it to be the frame after. also it’s still in a different timeline. this is the only easy fix in this whole damn process, u can literally just click & drag the frame from layer 2 to layer 1 and put it wherever u want on the timeline

and then u just delete layer 2 and that’s it, frame transferred!! then i just had to do that for 60 more layers and after [unspecified amount of time but it was a fuckin while ok] my timeline looked like this!

(the gaps near the end are held frames, to save me time so i didn’t have to copy a bunch of frames that were exactly the same)
krita is great because as far as i know ur animation can have an unlimited number of frames, at the risk of your own pc’s processing power, which is a definite upside to SOME expensive art programs i know (clip studio, i’m talking abt csp) and u can pick the frame rate too (cough photoshop elements 5.0 even tho u dont technically have an animation feature & it’s a miracle u can even make gifs at all) so once i finally got all the frames situated all nice and in order like on the same timeline, playing it was great! played at the right speed, looped perfectly, it was a dream come true right
well, time to export it as a gif
ha
haha
hoooo oo o
so u got 2 options for exporting ur animation, u can either hit “export,” which lets u save it as different file types, one of which being gif, or you can hit “render,” which gives you gif and video options
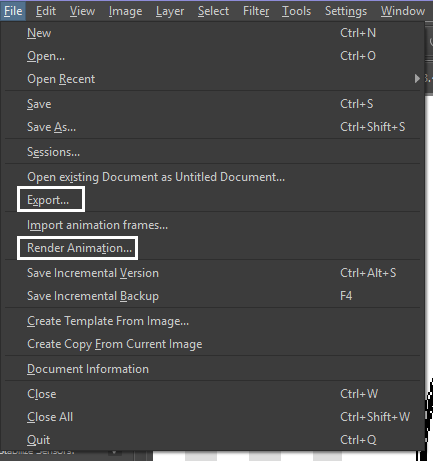
well
i tried export first, bc that seemed like a good idea, but the “””gif””” it made was distinctly not a gif, despite its claim to be one?? this is what i got:

notice: 1. it is not moving, and 2. the black bars to the sides?? those are supposed to be transparent. they’re transparent in the file i made so why didn’t they register as transparent in the export, when gifs have transparency capabilities??

so That was some real live bullshit but i still had the “render” option, right? export was wrong, so rrender must be the correct option to go to that will produce the results i am wanting to see produced in front of me like a silver dinner platter with a correctly functioning gif under the lid, that’s what i want to see and “Render Animation...” is gonna Give me that silver platter righWRONG ok look at this shit rn ok Look
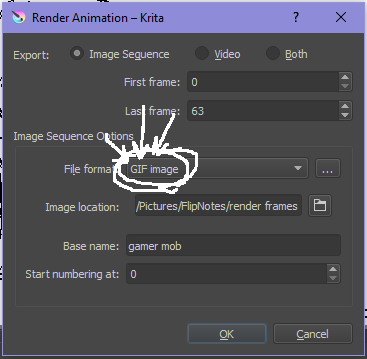
it says GIF it says it RIGHT THERE right??? right?????? then WHY


?????????????
and it also gave me all This bullshit
like did i ask?? did i fucking ask???? i already have all the individual frames why do i need even M o re i mfjgjgk
((rationally ok yea thats v useful for if ur making the animation in krita and want to export the frames to use elsewhere, but like uhhh 1. again, they’re not transparent & 2. i should have the option of saying i don’t want these??? bc *meme voice* i don’t want these)
so in the end i could find NO correct method of exporting animations as a gif in krita bc every ooption that says gif is fuckign LYING to ur face there are NO gifs in krita, aliens made the progam who looked at gifs and went “hmm i thikng this is how a gif works “ and just made jpegs instead but somehow got on the computers good side and got it to lie for them about it being a gif so thats why it says gif on the file still even tho its not a gif illimati confinr
so what is the conclusion to this? well i said there was good news too, and this is the portion where i divulge that sweet nectar (i type dthis 2 seconds ago and @ me what the fuck)
so after wasting a good 2 hours trying to figure out krita i gave up and watched some good old [youtuber name redacted bc what if it shows up in search & ppl see this dumbass post in there but it rhymes with fjackfsepticfeye] to relax into accepting my fate that i’ll never be able to upload my animations to tungle except in poor quality loopless video form, making me into a laughing stock on my own art blog, but THEN i had a stroke of genius, in my Brain
so if u read yesterday’s post u might remember that flipnote studio, the animation program i use on my ds, to animate, has the option to export files as gifs, both animated and sequential (meaning either as one fully animated gif or each individual frame separately), which is super convenient, but as i mentioned yesterday, any time i tried to open the folder with those files on my laptop, it crashed immediately
WELL today i thought “hey, how about instead of opening the folder in the sd card when it’s plugged in, how about i copy that folder from the sd card to my flash drive, and try to open it there, in case it’s the card’s hardware that’s causing the problem, not corrupted files”
so i tried that and it FUCKING WORKED THANK GOD GLORY HALLELUJAH
so now instead of spedning A THOUSAND YEARS trying and failing to force art programs to bend to my will i can just export the animations straight from my ds and drag them onto my computer Just As God Intended oh GOD im so fucking happy
here’s the gif in the end, i’m gonna post it to my art blog too but this is the Green Version bc i animate in green bc of some default settings in flipnote that i got used to, plus it makes me feel like i’m just sketching so nothing really has to be finalized so i’m comfortable while i work, and also it’s just nice ok it’s a Nice Green

(there’s a few frames at the end that are like the extra scraps from while i was working dw i got rid of those in the final version that i’m posting to my art blog later. also i added my blog url to that one too it’s aaaaaall good)
the only downside to this method is that i can’t change the canvas size to be 540px wide to fit with tumbrl s image dimensions but whatever i can just post them in a text post and fix the html to display it at its original size instead of the resizing bullshit tmurbl pulls constantly ugh. anyway it works great on desktop but it’s inevitably gonna look like shit on mobile no matter what i do *Big Ass Shrug*
anyway thats the end of my success story uhh i can’t make the like comment & subscribe joke again bc i already did that in the last post so like bye i guess thanks 4 watchign & have a great day i’ll see u in my next fvideo
https://www.youtube.com/watch?v=YYob4uDjEKI&t=0s
(^that’s my outro music)
#this started out so boring like a tutorial (but made by someone who doesn't know what the fuck theyre talking abt)#& then things derail Real Quick#that's why this is the ''buildup ver.''#retag later#talkin bout stuff#today posts#rieley's wips#(me: i can't mention this youtuber by name in case my post shows up in search#me: *adds a link to the post rendering that effort for naught*#me: *leaves it anyway bc it's funny*)#pls listen to the outro musi c it's rly good & tunmgmldnr wouldnt let me embed the video & idk how to do it thru html & too lazy to look it#up :(
2 notes
·
View notes
Text
Python Docx

Python Docx4j
Python Docx To Pdf
Python Docx Table
Python Docx To Pdf
Python Docx2txt
Python Docx2txt
When you ask someone to send you a contract or a report there is a high probability that you’ll get a DOCX file. Whether you like it not, it makes sense considering that 1.2 billion people use Microsoft Office although a definition of “use” is quite vague in this case. DOCX is a binary file which is, unlike XLSX, not famous for being easy to integrate into your application. PDF is much easier when you care more about how a document is displayed than its abilities for further modifications. Let’s focus on that.
Python-docx versions 0.3.0 and later are not API-compatible with prior versions. Python-docx is hosted on PyPI, so installation is relatively simple, and just depends on what installation utilities you have installed. Python-docx may be installed with pip if you have it available.
Installing Python-Docx Library Several libraries exist that can be used to read and write MS Word files in Python. However, we will be using the python-docx module owing to its ease-of-use. Execute the following pip command in your terminal to download the python-docx module as shown below.
Python has a few great libraries to work with DOCX (python-dox) and PDF files (PyPDF2, pdfrw). Those are good choices and a lot of fun to read or write files. That said, I know I'd fail miserably trying to achieve 1:1 conversion.
Release v0.8.10 (Installation)python-docx is a Python library for creating and updating Microsoft Word (.docx) files.
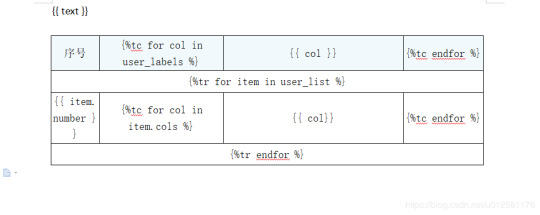
Looking further I came across unoconv. Universal Office Converter is a library that’s converting any document format supported by LibreOffice/OpenOffice. That sound like a solid solution for my use case where I care more about quality than anything else. As execution time isn't my problem I have been only concerned whether it’s possible to run LibreOffice without X display. Apparently, LibreOffice can be run in haedless mode and supports conversion between various formats, sweet!
I’m grateful to unoconv for an idea and great README explaining multiple problems I can come across. In the same time, I’m put off by the number of open issues and abandoned pull requests. If I get versions right, how hard can it be? Not hard at all, with few caveats though.
Testing converter
LibreOffice is available on all major platforms and has an active community. It's not active as new-hot-js-framework-active but still with plenty of good read and support. You can get your copy from the download page. Be a good user and go with up-to-date version. You can always downgrade in case of any problems and feedback on latest release is always appreciated.
On macOS and Windows executable is called soffice and libreoffice on Linux. I'm on macOS, executable soffice isn't available in my PATH after the installation but you can find it inside the LibreOffice.app. To test how LibreOffice deals with your files you can run:
In my case results were more than satisfying. The only problem I saw was a misalignment in a file when the alignment was done with spaces, sad but true. This problem was caused by missing fonts and different width of 'replacements' fonts. No worries, we'll address this problem later.
Setup I
While reading unoconv issues I've noticed that many problems are connected due to the mismatch of the versions. I'm going with Docker so I can have pretty stable setup and so I can be sure that everything works.
Let's start with defining simple Dockerfile, just with dependencies and ADD one DOCX file just for testing:
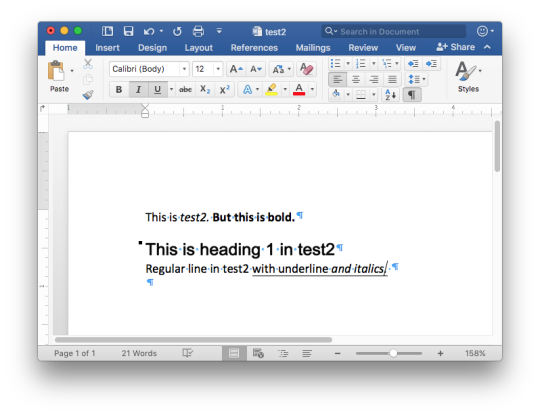
Let's build an image:
After image is created we can run the container and convert the file inside the container:
Running LibreOffice as a subprocess
We want to run LibreOffice converter as a subprocess and provide the same API for all platforms. Let's define a module which can be run as a standalone script or which we can later import on our server.
Required arguments which convert_to accepts are folder to which we save PDF and a path to the source file. Optionally we specify a timeout in seconds. I’m saying optional but consider it mandatory. We don’t want a process to hang too long in case of any problems or just to limit computation time we are able to give away to each conversion. LibreOffice executable location and name depends on the platform so edit libreoffice_exec to support platform you’re using.
subprocess.run doesn’t capture stdout and stderr by default. We can easily change the default behavior by passing subprocess.PIPE. Unfortunately, in the case of the failure, LibreOffice will fail with return code 0 and nothing will be written to stderr. I decided to look for the success message assuming that it won’t be there in case of an error and raise LibreOfficeError otherwise. This approach hasn’t failed me so far.
Uploading files with Flask
Converting using the command line is ok for testing and development but won't take us far. Let's build a simple server in Flask.
We'll need few helper function to work with files and few custom errors for handling error messages. Upload directory path is defined in config.py. You can also consider using flask-restplus or flask-restful which makes handling errors a little easier.
The server is pretty straightforward. In production, you would probably want to use some kind of authentication to limit access to uploads directory. If not, give up on serving static files with Flask and go for Nginx.
Important take-away from this example is that you want to tell your app to be threaded so one request won't prevent other routes from being served. However, WSGI server included with Flask is not production ready and focuses on development. In production, you want to use a proper server with automatic worker process management like gunicorn. Check the docs for an example how to integrate gunicorn into your app. We are going to run the application inside a container so host has to be set to publicly visible 0.0.0.0.
Setup II
Now when we have a server we can update Dockerfile. We need to copy our application source code to the image filesystem and install required dependencies.
In docker-compose.yml we want to specify ports mapping and mount a volume. If you followed the code and you tried running examples you have probably noticed that we were missing the way to tell Flask to run in a debugging mode. Defining environment variable without a value is causing that this variable is going to be passed to the container from the host system. Alternatively, you can provide different config files for different environments.
Supporting custom fonts
I've mentioned a problem with missing fonts earlier. LibreOffice can, of course, make use of custom fonts. If you can predict which fonts your user might be using there's a simple remedy. Add following line to your Dockfile.
Now when you put custom font file in the font directory in your project, rebuild the image. From now on you support custom fonts!
Summary
This should give you the idea how you can provide quality conversion of different documents to PDF. Although the main goal was to convert a DOCX file you should be fine with presentations, spreadsheets or images.
Further improvements could be providing support for multiple files, the converter can be configured to accept more than one file as well.
Photo by Samuel Zeller on Unsplash.
Did you enjoy it? Follow me@MichalZalecki on Twitter, where I share some interesting, bite-size content.
This ebook goes beyond Jest documentation to explain software testing techniques. I focus on unit test separation, mocking, matchers, patterns, and best practices.
Get it now!
Mastering Jest: Tips & Tricks | $9
Latest version
Released:
Extract content from docx files
Project description
Extract docx headers, footers, text, footnotes, endnotes, properties, and images to a Python object.
The code is an expansion/contraction of python-docx2txt (Copyright (c) 2015 Ankush Shah). The original code is mostly gone, but some of the bones may still be here.
shared features:
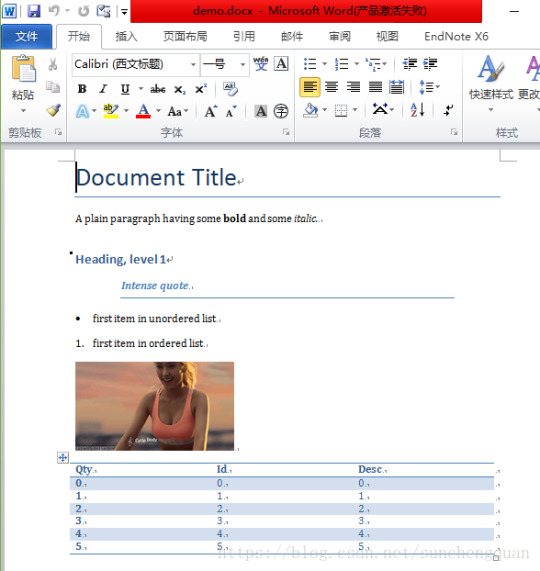
extracts text from docx files
extracts images from docx files
no dependencies (docx2python requires pytest to test)
additions:
extracts footnotes and endnotes
converts bullets and numbered lists to ascii with indentation
converts hyperlinks to <a href='http:/...'>link text</a>
retains some structure of the original file (more below)
extracts document properties (creator, lastModifiedBy, etc.)
inserts image placeholders in text ('----image1.jpg----')
inserts plain text footnote and endnote references in text ('----footnote1----')
(optionally) retains font size, font color, bold, italics, and underscore as html
extract user selections from checkboxes and dropdown menus
full test coverage and documentation for developers
subtractions:
no command-line interface
will only work with Python 3.4+
Installation
Use
Note on html feature:
font size, font color, bold, italics, and underline supported
hyperlinks will always be exported as html (<a href='http:/...'>link text</a>), even if export_font_style=False, because I couldn't think of a more cononical representation.
every tag open in a paragraph will be closed in that paragraph (and, where appropriate, reopened in the next paragraph). If two subsequenct paragraphs are bold, they will be returned as <b>paragraph q</b>, <b>paragraph 2</b>. This is intentional to make each paragraph its own entity.
if you specify export_font_style=True, > and < in your docx text will be encoded as > and <
Return Value
Function docx2python returns an object with several attributes.
header - contents of the docx headers in the return format described herein
footer - contents of the docx footers in the return format described herein
body - contents of the docx in the return format described herein
footnotes - contents of the docx in the return format described herein
endnotes - contents of the docx in the return format described herein
document - header + body + footer (read only)
text - all docx text as one string, similar to what you'd get from python-docx2txt
properties - docx property names mapped to values (e.g., {'lastModifiedBy': 'Shay Hill'})
images - image names mapped to images in binary format. Write to filesystem with
Return Format
Some structure will be maintained. Text will be returned in a nested list, with paragraphs always at depth 4 (i.e., output.body[i][j][k][l] will be a paragraph).
If your docx has no tables, output.body will appear as one a table with all contents in one cell:
Table cells will appear as table cells. Text outside tables will appear as table cells.
To preserve the even depth (text always at depth 4), nested tables will appear as new, top-level tables. This is clearer with an example:
becomes ...
This ensures text appears
only once
in the order it appears in the docx
always at depth four (i.e., result.body[i][j][k][l] will be a string).
Working with output
This package provides several documented helper functions in the docx2python.iterators module. Here are a few recipes possible with these functions:
Some fine print about checkboxes:
MS Word has checkboxes that can be checked any time, and others that can only be checked when the form is locked.The previous print as. u2610 (open checkbox) or u2612 (crossed checkbox). Which this module, the latter willtoo. I gave checkboxes a bailout value of ----checkbox failed---- if the xml doesn't look like I expect it to,because I don't have several-thousand test files with checkboxes (as I did with most of the other form elements).Checkboxes should work, but please let me know if you encounter any that do not.
Release historyRelease notifications | RSS feed
1.27.1
1.27
1.26
Python Docx4j
1.25
1.24
1.23
1.22
1.21
1.19
1.18
1.17
1.16
1.15
1.14
1.13
1.12
1.11
1.2
Python Docx To Pdf
1.1
Python Docx Table
1.0
0.1
Python Docx To Pdf
Download files
Download the file for your platform. If you're not sure which to choose, learn more about installing packages.
Python Docx2txt
Files for docx2python, version 1.27.1Filename, sizeFile typePython versionUpload dateHashesFilename, size docx2python-1.27.1-py3-none-any.whl (22.9 kB) File type Wheel Python version py3 Upload dateHashesFilename, size docx2python-1.27.1.tar.gz (33.3 kB) File type Source Python version None Upload dateHashes
Close
Hashes for docx2python-1.27.1-py3-none-any.whl
Hashes for docx2python-1.27.1-py3-none-any.whlAlgorithmHash digestSHA25651f6f03149efff07372ea023824d4fd863cb70b531aa558513070fe60f1c420aMD54b0ee20fed4a8cb0eaba8580c33f946bBLAKE2-256e7d5ff32d733592b17310193280786c1cab22ca4738daa97e1825d650f55157c
Close
Hashes for docx2python-1.27.1.tar.gz
Python Docx2txt
Hashes for docx2python-1.27.1.tar.gzAlgorithmHash digestSHA2566ca0a92ee9220708060ece485cede894408588353dc458ee5ec17959488fa668MD5759e1630c6990533414192eb57333c72BLAKE2-25684783b70aec51652a4ec4f42aa419a8af18d967b06390764527c81f183d1c02a

0 notes
Text
300+ TOP SAP QM Interview Questions and Answers
SAP QM Interview Questions for freshers experienced :-
1. Which Movement Types Refer To Inspection Origin 05? You need to check the T156S-QSSHK. It shows the inspection lot origin for all movement types. 2. I Have Executed Massive Automatic Usage Decision Via Qa16 And Noticed That No Stock Postings Been Updated. The System Noted The Usage Decision But Didn't Carry Any Goods Movements. Why Were The Stock Postings Not Updated? Is It Possible To Execute In Mass Via Qa16? You should make sure that the UD codes you use have the automatic postings setup for it. The selected set code needs to be set for background postings and what material status it should post to. Take care of these and it will take care of the problems. 3. I Need To Change The Status Of A Lot Based On Certain Conditions And Looked At Qfpo_post_status_for_lot But This Didn't Return Anything. I Need The Status Of The Lot To Be Insp Rrec So That I Can Forward The Result Copy On To Batch Classification? In general, forcing a change to the system status is not a very good idea. Instead, you should consider using a user status. If the system status is not RREC then, there will be no results to copy. 4. Is It Possible To Make The Inspection Lot Quantity To (1) All The Time? Can It Be Configured As An Automatic Default In Qa01? If Yes, What Are The Steps Necessary To Make A Sample Size Default Every Time We Create An Inspection Lot? If you are referring to the Sample Size the answer is yes. If you are referring to the Lot Size, then the answer is no. For the lot quantity, you can use a sampling procedure of type fixed and assign the size to 1. 5. In Our Plant, Gr For A Material Was Made Three Months Back. This Material Is Qm Managed. The Quality Plan For This Material Was Made This Month Only. Hence Our Qm Personnel Are Not Able To Clear This Particular Gr. How Do I Go About It? What Is The Tcode For It And How Do I Proceed? You can reset the Sample Calculation and Recalculate the change in Start & Inspection end date in QA02. In QA02 you can also change the key date on the second tab so it looks for a plan on that date. If that plan has already been created, you can then change the key date to the current date and it will find the plan. 6. How Do I Transfer The Results From One Origin To Another Origin? This can be done by creating a program attached to the follow up functions for the UD code. Once the UD is done the results can be transferred from lot to lot 7. I Want The System To Take My User Name As Default For Partner Ao Author While Creating A Notification. I've Created The Partner Determination Profile And Assigned It To The Notification But It Is Not Defaulting The User Name As Partner. What Can I Do To Correct This? I assume that you have an organization for the partners. I think you need to utilize workflow and do some coding. Utilize the user ids. Use the KU for coordinator since it is for the user, and KO is for the person which requires HR. When a Q3 based notification is created the coordinator would be defaulted. But as I said, it requires organization, workflow and some coding. 8. Where Does The System Store Mic Long Text History? When I Tried Using, 'read_text Function Module', The System Is Fetching Only New Long Text. How Do I Fetch The Old Long Text Of Mic? The system does not store the long text history, because it is a text. To maintain the long text, create MIC with the appropriate versions and assign MIC in the task list as per the required version. The setting is in customization for the plant level, MIC with history. An alternative recourse is to check out AUT10. You need to set it up, but it allows you track changes to any Long Text. I believe it is available from 4.5 or 4.6. 9. Can Somebody Explain To Me How A New Posting Proposal Can Be Added In Order To Use This In The Catalog Assigned To A Ud Code? There Is A New One But Won't Be Available (vmenge01) Until 2007. I Want To Add An Extra One. Try the customizing path Quality Management -- > Quality Inspection --> Inspection Lot completion -- > Define inventory postings. 10. The Deletion Flag On Production Order Was Set But Had To Be Revoked To Allow Further Goods Issues. Issues Have Now Taken Place But In Trying To Reset The Deletion Flag, The Following Error Message Occurs. "the Order Has Been Flagged With Delivery Complete". What Are The Settings Necessary For Generating Quality Certificates In Sap? You're normally not allowed to mark a Production order for deletion as long as the financial value on the order isn't zero and/or you've got materials posted to it. I can't see the point in deleting an order with postings. That way you'd probably mess up both logistics and accounting.

SAP QM Interview Questions 11. I Have A Requirement From A Client For Inspection Of A Material For Different Vendors. Characteristics Change From Vendor To Vendor. Automatically , The Inspection Plan Will Need To Be Selected Based On The Vendor. How Do I Accomplish This? In the material to plan assignment, scroll to the right and you will see a vendor column. If you put a vendor number in that column, that is the plan that will be selected for the material/plant/vendor. 12. I Know It Should Be Possible To Attach Files, Pictures Etc. When Creating Notifications. However, I Am Working Right Know In An Automotive Release And Cannot Find The Button Anymore. Did We Miss Something? What Can Be Wrong? Check what type of user you have set up. Sometimes the security guys set up a testing ID as a different type than a regular user. Some ID types don't have the ability to use the Object services functionality. 13. I Have Activated 04 Inspection Type With Post To Inspection Stock For A Material. I Have Left Qm Not Active Unchecked For 101 Mvt Type For Mvt Indicator F (gr For Order) In Omjj. While I Am Doing Gr For The Process Order, The '101' Message Appears. What Is The Problem And How Can I Resolve This? If the process order was created after you modified the material, then it's an "old" process order, and this may explain the error. If there was an existing stock of this material before you start, then try this first with a newly created material. Afterwards, the error you describe should not happen. 14. In The Inspection Plan I Have A Characteristic With Upper Limit. In Which Table Can I Find This Value? Look at table PLMK. If it is a reference MIC, also check QPMK. These are for checking the plan. The Inspection Lot keeps them in different values. 15. I Am Using Exit Mm06l001 (function Module- Exit_sapmm06l_001) For Quality Criteria. The Scores Of The Sub Criteria Are Calculated On The Basis Of Quality Notifications And Inspection Lots. But No Score Is Getting Calculated For The Vendor. Where Did I Go Wrong And What Can I Do To Remedy The Error? Regarding quality notification, do verify the following: Notification completed with External origin. Invoice verification already took place. As for inspection lot, verify that usage decision has been made. In addition, verify customization of all required parameters (as listed in documentation under QM->Quality Control->Vendor Evaluation). 16. When I Try To Upload Data With Lsmw To Create Inspection Plan, The System Shows The Message: "bdc_open_group, Lock Date./. Is Invalid". I Have Bdc Authority, So What's The Problem? Did you enter a date for field START in structure BI000? The date has to be earlier than today's date. The queue start date specifies the day until which a batch input folder is locked. You cannot process a locked batch input folder until the day after the specified date. 17. I Am Doing Quality After Doing Migo Mvt Type 105. So When The Migo Mvt Type105 Doc Is Saved Then The Inspection Lot Is Generated And The Stock Is In Quality. Can You Tell Me The Transaction Code For The Stock On Which The Usage Decision Is Pending? You can use the list display transaction code QE51N and in the EXCEPTION criteria you can specify it to be ‘UD Not done’. Otherwise in the same transaction code QE51N in the output columns, you can display the column "Usage decision by" and sort by it so that the blank ones are on the top. Those blank ones are the lots for which UD was not done. Once you find out the lot numbers you can open the lot and see the order number in it. 18. Is There A Way To Create Inspection Lot Programmatically In An Abap Report? Is There Any Business Object, Function Module Or User Exit? We Went To 1 Lot For 1 Shift. We Use Inspection Origin 89 (manual). Therefore We're Searching For A Way To Create The Inspection Lot Via Job (abap Program). How Do I Resolve This? Automatic creation of Inspection lot in SAP is governed by Inspection lot origin, inspection type, etc. You have to give the details of why you want an inspection lot creation by program or ABAP report. Instead, you can use a report /program to do it. Standard SAP provides this functionality. If it is in--process inspection, you can use inspection points based on shifts. 19. I Was In The Process Of Testing The Scenario Of Skip Lots. I Have Done All The Data Maintenance In The Material Master And The Dynamic Modification Rule. The Quality Level Is Getting Updated To A Skip Stage, But The Stock Is Not Getting Directly Put Into Unrestricted Stock When The Lot Should Be Skipping. Where Am I Going Wrong And How Do I Correct This? This can be done by setting the Control Inspection lot indicator in the QM view of the material master to each material document. Iit works for DMR at a lot and characteristic level. 20. We Have Two Inspection Lots For Which Ud Has Already Been Done. Later On We Realized That These Lots The Sample Size Was Not Calculated. Now We Want To Reset The "sample Calculation" But Not Able As The Status Of The Lot Is "ud Done". Is There A Way We Can Reverse Ud Or Reset The Status Of An Inspection Lot? Under normal condition, a UD cannot be reversed. 21. I Could Not Create Return Delivery For A Material. The Message Display Is: 'could Not Create Return Delivery Wm Movement Type 102 Not Allowed For Warehouse No. 010'. How Do I Fix This Problem? Check in the configuration. The message clearly says that for the Warehouse no. 010 you have not allowed movement type "102". You have to change this configuration and add a line or move the stock to a warehouse where customer returns are allowed. 22. How Do I Populate Additional Entries Directly Into The Tables? Is There Any Direct Way To Populate Fields In The Tables? It depends on which tables you are talking about because some tables can be directly maintained in PRD. For some you have to transport it maintaining in DEV system. For example, number ranges are not transportable. You have to maintain it directly in every instance. If you are talking about mass maintenance, Standard SAP QM does not have it by now. You can talk to your developer to write a program for you by which you can do a mass maintenance. Otherwise SM30 is good enough to run. 23. I Have Created Some Certificate Profiles That Need To Be Deleted. But They Are All In Released Status. I Know That Certificate Profile Cannot Be Deleted If It Is In "rel" Status. How I Should Deal With This Issue? It seems to me you could potentially block the profile - from within the profile, edit -> block profile. Once it's blocked, you can proceed with the deletion. 24. I Need Some Guidelines In Maintaining The Settings For Batch Management In Qm. What Are The Customizations Necessary For Batch Management From Qm Point Of View? How The Inspection Lots Get Triggered And How Are They Connected / Interlinked To The Batches? The links have to do with your configuration of batch management for your material. If the materials in are batch managed and are purchased or manufactured within your organization when the material is received using the 101 movement type, the batch is created and assigned in the background to the inspection lot. Depending on how you've designed your inspection plan or material specification, you can build the master inspection characteristics, dependent on class characteristics, that will copy the inspection results into the batch record. This is less QM configuration than it is MM-Batch Management configuration and material master definition. 25. I Want To Post The Stock From Quality Inspection To Unrestricted Use Partially With Two Ud Codes For Same Inspection Lot. But The Qga2 System Will Show The Total Document Posted On Only One Usage Decision Code. I Want To Evaluate The Stock On The Basis Of Usage Decision Code. How Can I Resolve This Issue? You could use inspection points and partial lots. In this way, you may have a different UD for inspection points and inventory posting accordingly. 26. I Would Like To Know Where The Batch Status Can Be Set In Sap. We Have The Stock Type Q For Quality Inspection. We Would Like Stock Type R For Rework And S For Blocked. Where Can This Be Set In Sap? There is no way to create a new status. The only thing you can do, if you have Batch Management, is to activate the Batch status so you can have Unrestricted (blank), Quality (Q) and Blocked (S). Having these batch statuses, you can duplicate all stocks to restricted Q, blank and S. 27. I Am Having 3 Different Operations. The 0020 And 0030 Operation Is Dependent On The 0010 Operation. It Means That Once The Rr Is Done For Operation 0010, Manual Ud Has To Be Taken Immediately. Then Results Are Recorded For Operation 0020 & 0030 And Finally A Common Ud Is Made For Both 0020 & 0030 Operation. This Is The Case For Incoming Inspection And In Process Inspection. Is There Any Customization For This Type Of Rr & Ud? You could use Inspection Points for 0010 (it has its own UD) and then use the Inspection Lot UD for the whole process. 28. How Do I Use Material Specification? If I Want To Use Material Specification, What Are The Things I Should Do? To use Material specification you need to have: Class Characteristics; MIC's linked to the Class Characteristics; A Class containing the Class Characteristics, assigned to the Material Master; Material spec maintained. (QS61); Limit values for the characteristics, maintained in the classification view in the material master; Inspection with material specification chosen in the inspection type in the material master. 29. While Rr For Some Of The Mic's, The System Is Asking For Manual Valuation And For Some It Is Not Asking. I Want The System To Ask Manual Valuation For All The Mic's. What Settings Should I Do To Get This? Check your Valuation Mode / Sampling Procedure. From there, you can find the settings needed to configure your requirement. 30. Is It Possible To Cancel The Inspection Lot Once It Has Been Created? You can cancel it by reversing the transaction that created it. It's also possible to go into the inspection lot in Chance mode and set the status to “locked”. It will then disappear, but if there's QI stock linked to it you won't get it out. SAP QM Questions and Answers Pdf Download Read the full article
1 note
·
View note
Text
I ’m making a tutorial for @victuuri-moonandsun on how I downloaded the YOI episodes and how to make a basic gif. I decided just to make a tutorial for everyone else who wants to learn? I’m like hella basic at making gifs so ill be providing resources in hopes it will help!
The tutorial includes:
How to download
Capturing Method: VLC vs KMPlayer
Importing + Making the gif (Timing, Cropping, Sharpening, Saving)
Ill teach u how to go from:

to this:

+ A shit ton of screencaps to make up for the fact i’m bad at explanation. ++ what is grammar n spelling? +++ cursing a lot of it
its like legit 3 am and this tutorial is so bad good luck
You will need:
Vuze
Photoshop (I use CS6)
VLC Player or KMPlayer (I will later discuss the difference usage of these programs)
I. Downloading
Sup yo! Okay let’s start with downloading the actual episodes! I usually use torrents when i’m downloading the episodes. This is what Vuze is for. Like most things u wanna be careful when you download shit off the internet but idgaf i’ve been downloading shit off the interwebs for a while.
So you wanna either google “yuri on ice 1080p torrent”, but im gonna use HorribleSubs for my example. You wanna make sure you download the 1080p version of the episodes so you can have the clearest/more HQ gifs.
If you’re using the horriblesubs site then you wanna click on “1080p” for whatever episode you want and right click the magnet link.
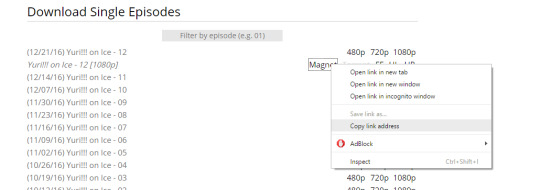
Yay! Now we gonna wanna open Vuze. First you gonna want to click the “add” folder > Add Magnet > Paste URL > Then hit okay.
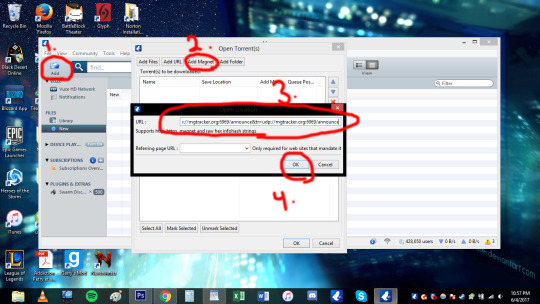
Okay. So once you hit ok this should pop up:
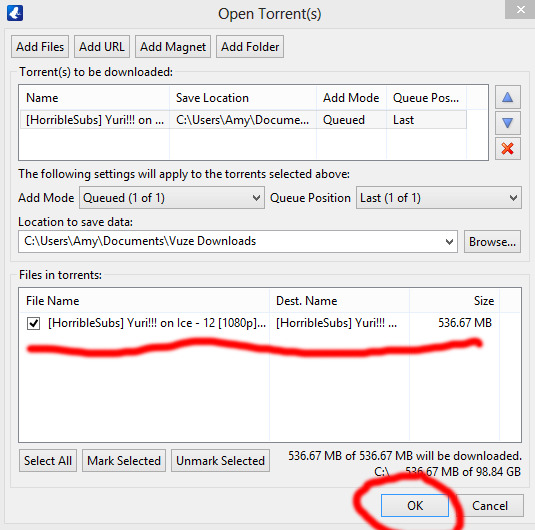
Then hit ok again! You can also change where you wanna save it at this stage too. Okay now your file is downloading and now we wait! The more seeds the faster the download.

Once the file is done downloading we can move on to actually capturing for gif making.
II. Capturing:
OKay. SO I personally use the VLC capturing way because it’s easier for me. With VLC you;re basically recording the scene you want so you can import it into Photoshop. With the KMPlayer you’re taking a shit ton of sceencaps and you’re importing each image into Photoshop. I used both methods and they both get the job done. The only time i use KMPlayer is when VLC is acting wonky. Ill show the VLC method first then the KMPlayer (cringes).
Yay VLC. My fav bby right here. OKay So you’re gonna wanna open that shit up. Okay, so the first thing you wanna do when you open the program is go to view > advance controls. This gives you the option to record!
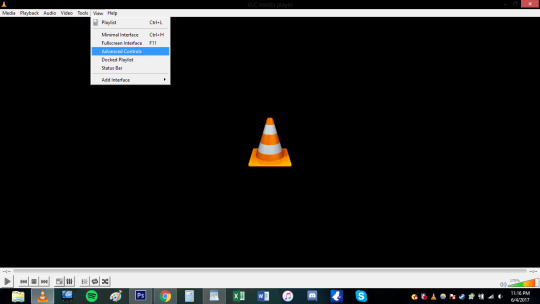
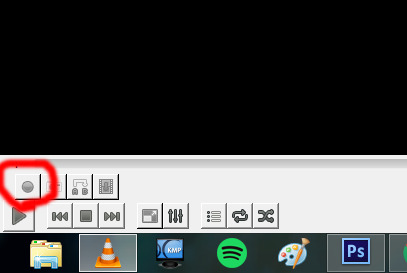
Hell yeah bro now we in business. Okay you’re gonna wanna open the episode you wanna be gif-ing. Since I showed how to download episode 12 i’m just gonna use episode 12 for this too cause fuck it man. You’re gonna wanna decide what scene you’re gonna want to make a gif of. I think for the purpose of the tutorial i’m just gonna do the scene where yurio finishes his program and creys cause hella yeha bro.
okay so for myself, i tend to start recording couple seconds (like 5-10 *my computer is really wonky ) before the actual scene because I want to make sure I record the whole scene without cutting anything out.
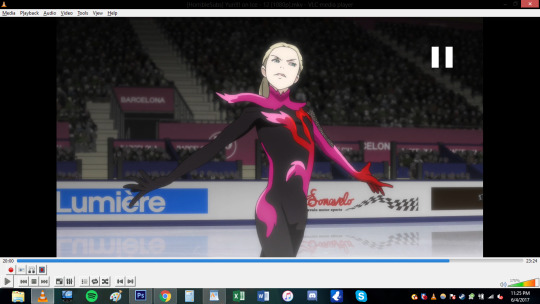
You also notice that the record button is red now. So you’re basically just gonna click it once and let it record until you want it to stop!
Where i began to record (actual a couple secs before becuz i forgot to screencap):
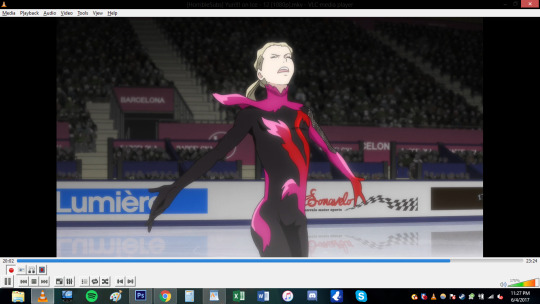
Where I ended:
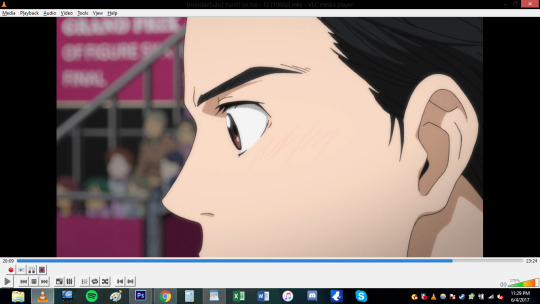
***note: Notice how the record button changes while you’re recording vs not recording! (i’ve done the dumb thing where i forgot to stop recording and watched the rest of the episode .-. )
Now that short clip will be saved. my video was saved in my video file im sure you can change where you want it saved but idk how. This is where it is saved on my computer. Probably can search “vlc” on your computer if it is absolutely lost (sorry I can’t help much in finding the file).

Basically after this step you’re done deezy. You can skip the KMPlayer and go directly to the gif making portion of this shit tutorial.
OKAY FOLKS HERE’S THE KMPLAYER TUTORIAL ON HOW TO DO GIFS HAHAHAhahaha *sobbing*
I need to explain this program a bit more. So unlike VLC you’re not recording or anything like that. This captures screencaps into jpg or png files. When you do the VLC method, photoshop will make the screencaps for u. This method you’re gonna have to load the each photo (This usually takes photoshop longer to load for me, but than again my computer is old as shit so it may not matter to you).
OKay u gonna wanna open that satan spawn and open the episode u wanna do. Again here im gonna do the same scene cause yeah. Basically just go to the scene you want.

Okay here the annoying shit happens. SO unlike VLC for me, I don’t have to a big gap of recording time. I can get closer to the actual scene and want and start capturing (ctrl+G).

When you hit ctrl+G, this window pops up and this where all the settings happen. 1. You decided where you all the pictures will be saved! 2. You can pic the image quality. I go for JPG because my computer just cant handle doing png. If you’re computer can do the png go for it. 3.) Seconds refers to how long you want the program to capture for. I just put 5 seconds to make sure i get the whole scene. You also want the images to be in the original size. 4.) I WILL DISCUSS THE TIMING THING MORE INDEPTH LATER, but for the time being i’ll do every 1 frame.
When you click start on the small window your video has to be playing to actually capture. I just hit start and hhit play cuz fuck it.
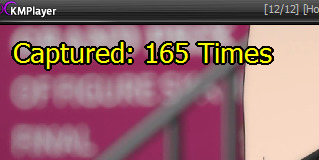
When the program finish capturing this will pop up in the corner. *note: I ended up doing 10 seconds because my computer hates me. So there’s a lot more caps than i needed. this is what you end up with!

A shit ton of fucking photos! YOU READy TO GO TO PHOTOSHOP.
III. IMPORTING-VLC
*if you need help downloading photoshop send me an ask and ill try my best to help you. I downloaded ps cs6 a long time ago and the link i used to download it doesn't exist anymore.
THis step is gonna be different depending on what method you used for the capturing. I’m going to begin with the VLC method. So you’re gonna wanna go to file > importing > video frame to layers.

Find the clip file and hit open. a window will open and now you can select what part of the video you want to actually gif! the two point thingies on the bottom are adjustable. FOr example maybe you recorded too much in the beginning? drag the 1st arrow thing to where you want the gif to start. Same with if you recorded to much at the tale end of the video. You can adjust the right one.
Make sure to have frame animation box is check.
And now we’re at the frames part.This is where I feel conflicted and you will see why when I get to the timing part of the video. (I use to make a lot of gifs for real action tv shows and this is the first anime I ever edited and I just feel like i haven’t found the best timing yet?). For this screencape i left the limit box and just do every frame.

So my video was too long at the end and decided to cut that unwanted shit out. (you can hit the play button just to make sure you’re happy with what you got. Hit ok when u done deezy
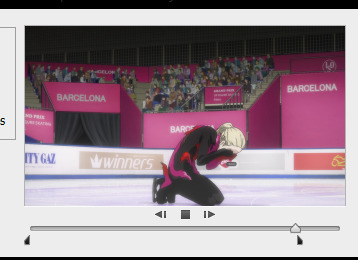
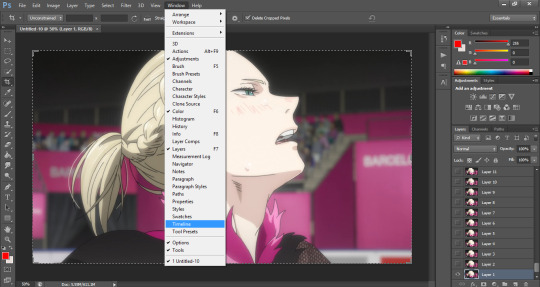
THEN BOOM THIS IS WHAT IT LOOKS LIKE. THAT BOOTIFUL ASS YURIO’S FACE HELL yeAH. Okay. So on the right hand side you have all your layers. but we missing the timeline bro. SO you go to window> timeline
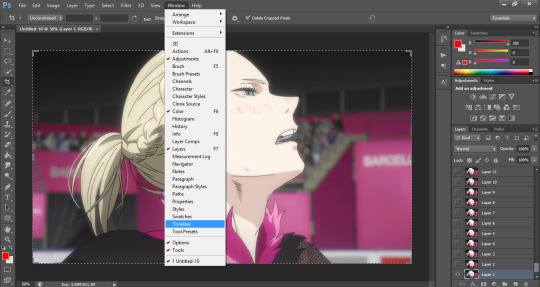
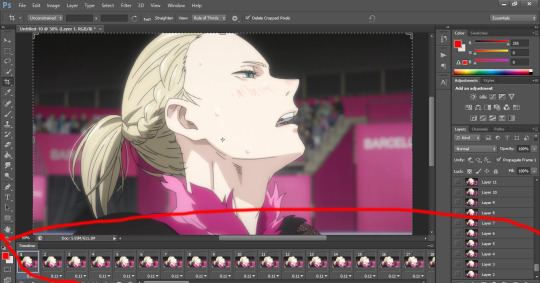
DAMN LOOK AT YOU YOU’RE READY TO MAKE A GIF. You can skip ahead and learn about timing. Keep reading for the KMPLAYER way.
III. IMPORTING- KMPLAYER
oKAY. You’re gonna wanna go to file> scripts > load files to stacks
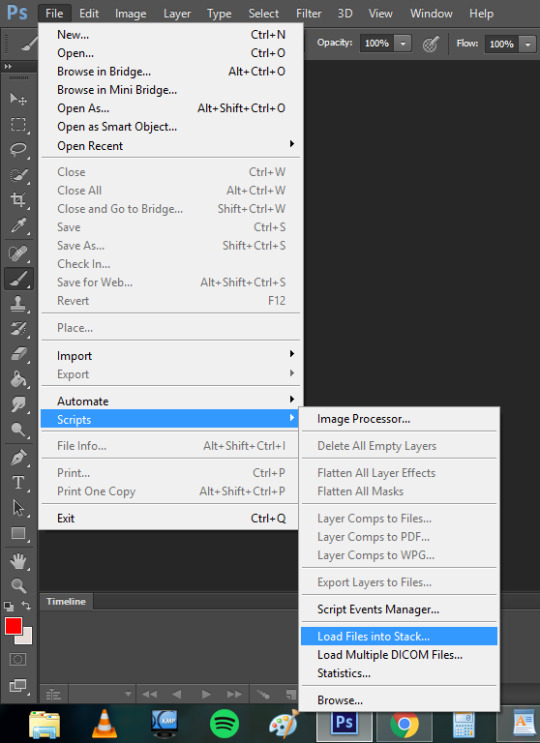
A window will pop up and basically you’re gonna select all the screencaps you want for the gif and hit okay.
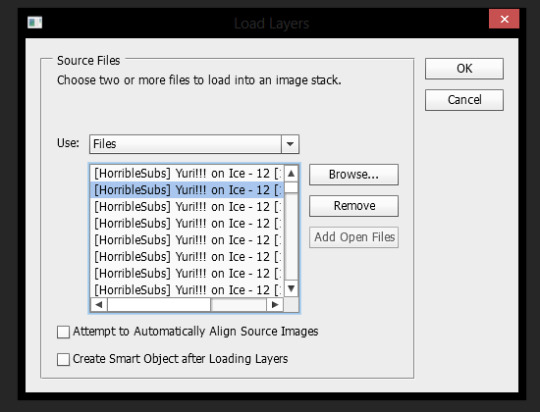
This shit takes my compouter f o r e v e r (compared to the VLC method.) to load and even longer afterwards when it’s being uploaded as layers. This method took my computer to load the files 3 minutes compared to the 5 seconds the VLC method took me. Like i’ve mentioned before it might just be my ancient ass computer’s fault. But this it what it looks like when it’s done loading
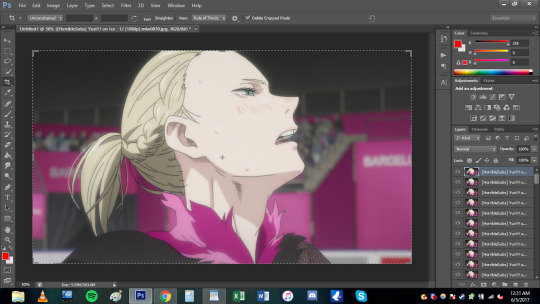
Okay you;re gonna wanna do the same step as VLC to create the timeline (Window>timeline).
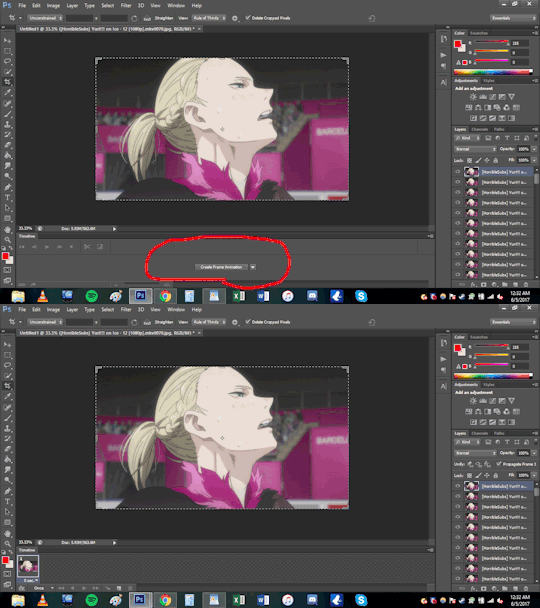
But because this was loaded in differently the the stacks will not automatically have frames. You’re gonna want to click create timeline and you will notice you have one frame only.
So on the top right corner of the timeline you will have the option to make the layers into frames.
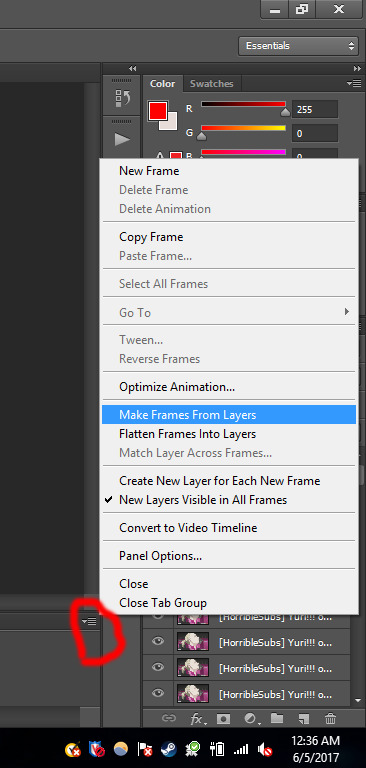
Now you maybe noticed that the frames are fucking backwards son like wtf man. a simple fix to that! in the list of options where you made the frames from layers, you can reverse the frames.
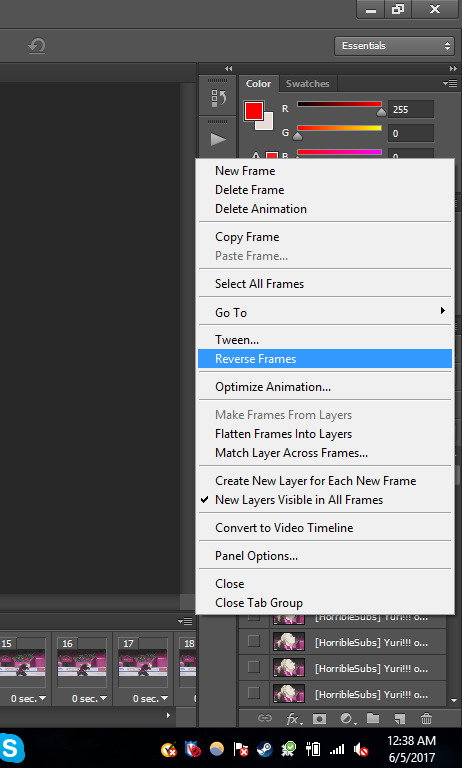
NOW YOU’RE DONE DEEZY. WE CAN MOVE ONE.
IV. TIMING
OKay this gets really iffy for me. I’ll just basically show you the times I use and what it may look if you capture every frame of you choose to do every 2 times (anything else isn’t recommended). In this section it’s what I use and probably not the best, but you can play around with photoshop and you can do whatever the fuck you want yo!
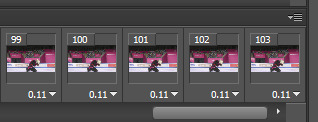
Anyways as you can imagine if you decide to do every frame youre gonna get a shit ton of layers(i’m gonna be working with the vlc method from this point on. any kmplayer question can be sent my way!). But it may look smoother! *will make a note on this*. Downside, the file is prob gonna be WAY bigger.
For ex: Every frame. 103 FRAMES FUCK MAN.
Every 2 frames: 53 frames
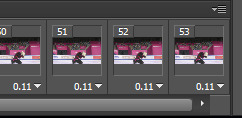
So it’s basically about half cuz u know math
OKay. so when i do gifs I usually set the time to “0.06″ but I put “0.07 for every 2 frames. To change the timing make sure you have all the frames selected (click the first frame then go to the last frame and Shift+click it). Now that all the frames are highlighted you want to hit the down arrow and click other. This is where you set the time and hit okay.
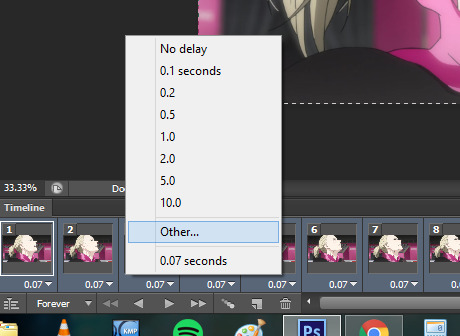
every frame @ 0.06 (No cropping/no coloring/no sharpening)

every 2 frames @ 0.07

So it’s really personal preference. I just have it so ingrained to do every frame at 0.06 since i started making gifs years ago, but i feel like the every 2 frames at 0.07 looks smoother for anime? Really guys experiment and see what you like better!
V. CROPPING
Yay lets get to cropping! These are the current dimensions for tumblr
one picture/gif: 540px width two pictures/gifs: 268px three pictures/gifs: 177px, 178px (middle), 177px spaces: 4px
-itsphotoshop
I always crop my gifs. I just think they look nicer when they’re crop.To start cropping you either wanna hit “C” on your keyboard or clip the crop tool. Afterwards you can put a value of the dimensions (i tend to do 268x165 or 268x170 when I to he gifset with 8 different gifs). Now you can drag the box over the gif to position it where exactly you want the focus to be. You either double click the box or hit enter when you wanna crop.
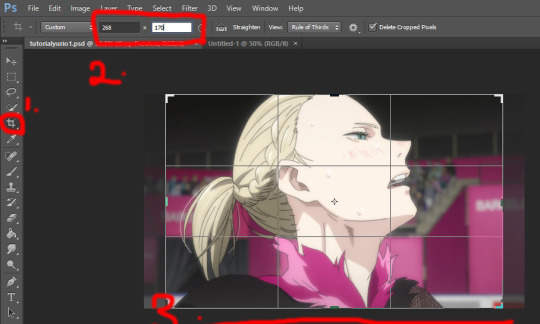
You might not want to have it dead center. so yeah this what it looks like if you just dragged it:

Damn yurio is looking good dead in center, but you noticed the 2nd half yurio isn’t in the middle no more. When you’re cropping you wanna keep this in mind. (you can always make two separate gif to have it all centered but i can make a dif tutorial for that).
This what it looks like if i decided to keep the cropping in the center:

Overall both scenes are more centered.
BUT WHAT IFF YOU JUST WANNA ZOOM IN ONTO YURIO’S FACE?? i got chu bro. I’m goning to delete the 2nd half of the gif for the purpose of this example. So what you’re gonan want to do is drag a side of the square until you’re happy with what you want.
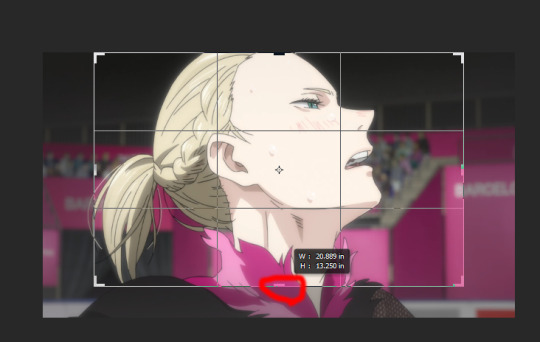
Here i just dragged the bottom. Since I have my measure inplace from before, no matter what side i drag it it’s always gonna be the same ratio of 268x170 so no need to worry !
Regular crop:

Crop to zoom in on the face:

THE MORE YOU KNOW ABOUT CROPPING :D!!!
OKay. Once you’re done cropping you’re gonna want to resize that!
I’m going back to the original gif with both scenes.
To resize an image you either can hol the CTRL+ALT+i or go to image>image size
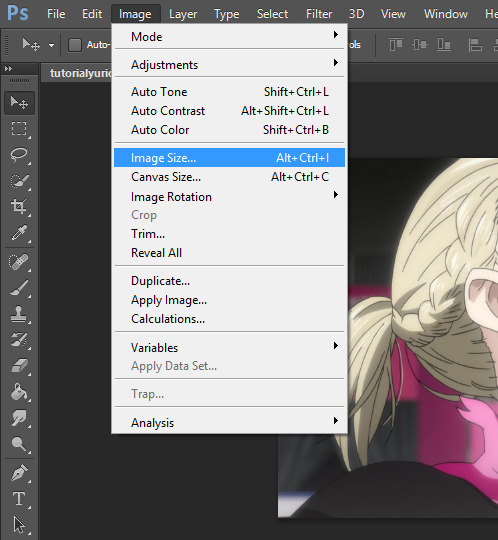
a window will pop up and youll type in what size you wanted. Because i had the dimensions typed in while i was cropping it will basically do the ratio for u

the original size was 1702x1080. Once i typed 268, the program kept the ratio and changed the height. SORRY IM NOT EXPLAINING THIS WELL I REALLY DONT KNOW HOW.
We went from this:

to this:

it’s not a HUGE change but there is a change!
VI. Coloring *bonus
I have no authority on color tbh It takes me to forever to color shit and i’m h o r r i b l e at it. so i aint gonna discuss this much but here what coloring can do for u!
original:

to this garbage:

I don’t really like it but i just did it quickly for the sake of this tutorial. If you wanted an idea of what I did

The best way I learned to color was from PSDs others made or just fucking around in PS. Here are some resources:
PSDs: x x x Tutorials: x x
VII: Sharpening:
Oh man okay so i use an action for my gifs but the thing is i downloaded a long ass time ago. It may be this, but im not entirely sure. This hella easy yo!
so you wanna select all the layers:

then you wanna convert the frame animation to a timeline (make sure you changed the time you want the frames to be before you convert!)

You will notice the frames changed on the bottom. Now you wanna go to filter>convert to smart layer

Now you only have one layer!
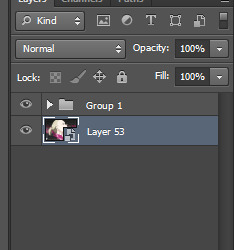
With this one magic layer you can sharpen all your goddamn layers all at once.
If you don’t have the action you can do the basic sharpening. Okay now go back to the filter tab>Sharpen>smart sharpen. I have use this option in YEARS but i believe the kinda go too was this:
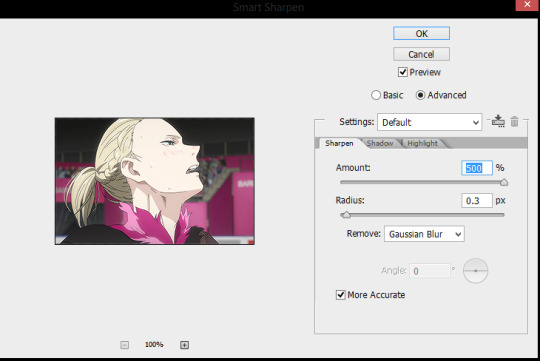
and hit okay!
Before sharpening:

After sharpening:

the lines are more defined in the 2nd gif, If you were able to download the action this is how you use it.
GO to Windows> actions.
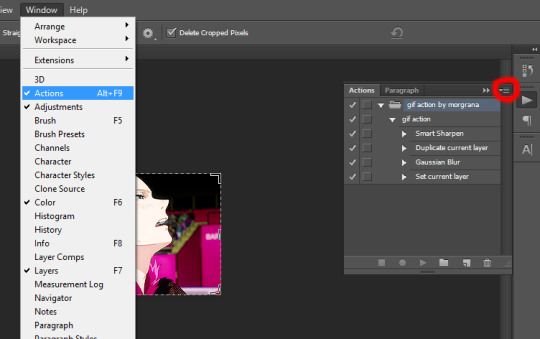
WHere the red circle you click, and find the option for load actions. Once you load it you wanna make sure you selected the smart layer and hit th eplay button and the action should sharpen it for u
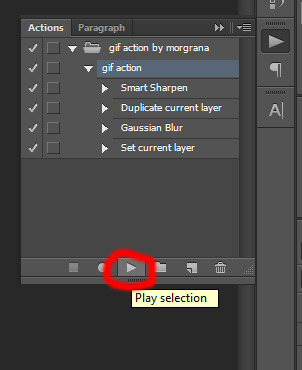
BOOM. your gif is sharpen. So lts compare all three now.
No sharpening:

Smart sharpening only:

Action (Smart sharpening + blur)

I like the action th most because it’s not as intense as the smart sharpening only. WOW U FINISH A GIF CONGRATULATIONS NOW YOU WANNA SHOW THIS BABY TO THE WHOLE WORLD RIGHT? WELL IMMA SHOW U HOW,
VIII. SAVING THAT SON OF A BTICH
So basically you either hold alt+ctrl+shift+S or file>save as for web
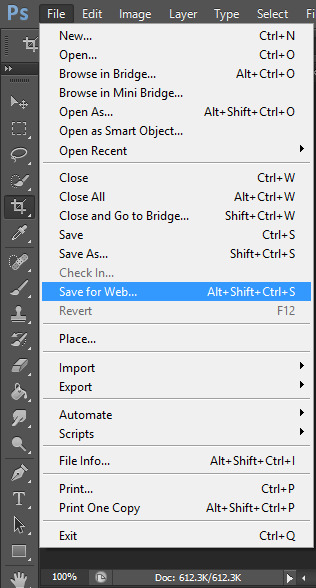
and a window aPPEARS. These are the settings i use to save:
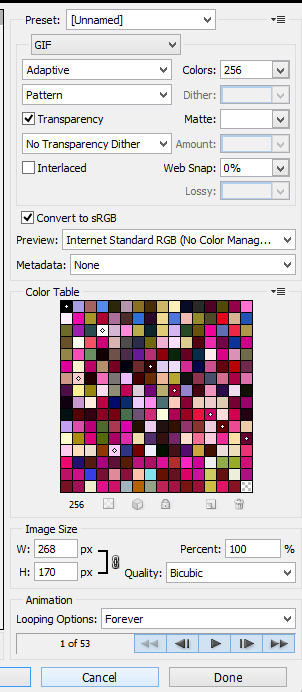
BE CAUTIOUS OF THE SIZE OF THE GIFS: I BELIEVE THE MAX SIZE IS 2MB
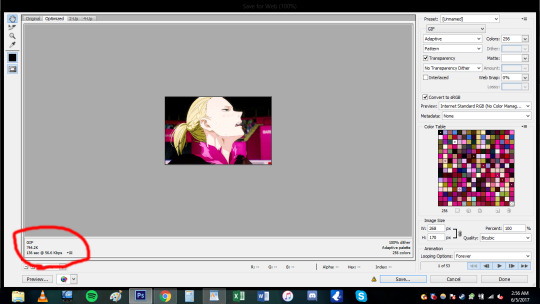

this gif is under 1mb so im safe yo! Some tips if gif is too large is to add a selective layer>black> then +5-10
another tip is to use optimize tool if yOU HAVE TO: go to the top right corner
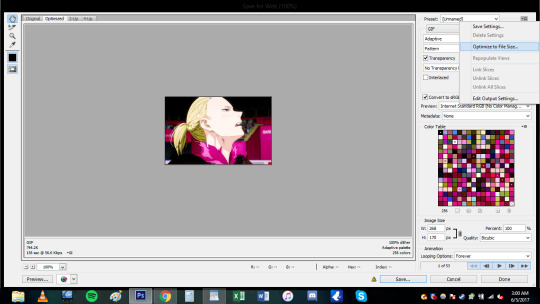

now u done deezy
u save that shit
and cry
send me an ask if you need shit cleared up.
124 notes
·
View notes
Text
A Minor Update
Even though I rarely post on this site, I haven’t posted in a comparatively long time. A few things have happened that currently affect my ability to make content.
First off, I have started to attend college. This on its own takes up a ton of my time. During the breaks between quarters however, I will attempt to create some content.
Second of all, disk space. One of the problems I have constantly had since I got my new PC was a lack of disc space, and I have had to uninstall Source Filmmaker for the time being. I 100% need to buy a new hard drive, but my power supply is already close to being at full capacity. Since I have not found a part time job yet (a lack of work experince sure helps in finding one, let me tell you!) it will be some time before I can get another hard drive installed on my PC.
Lastly, I’m currently dealing with a lack of motivation. One thing I’ve learned about making art (if you can even call it that) is that motivation plays a huge part in not just efficiency, but actually even starting the process of creating a poster. I feel as if I’m out of ideas at the moment and as if I’m not improving. In all honesty, the last couple of renders I made were not anywhere near as close to the quality I was able to put into my recent Doomguy poster. I always try to make sure that each new work will look better than my previous work (which is why in total I’ve probably only posted 100 or so renders to both here and my Deviantart combined while I have more than 200 finished posters sitting in my SFM folder.) While I understand not every poster can be an improvement of my previous work, a continuous lack of improvement can be demoralizing. This is probably the biggest reason that I’ve taken a hiatus from SFM.
It may be another month or two before I can put something out that is of acceptable quality. But when I do finally get back to a more regular uploading schedule, I might open a Patreon or a Gumroad.
“BUT iAR3S, DON’T YOU DO ALL YOUR WORK FOR FREE!?”
Why, yes random voice, you’re right! If you’ve been on my Deviantart or know me personally, you know that I hate to charge for content that I create. I still stand by that statement. However, my Patreon/Gumroad will be essentially a tip jar.
A couple of the things I was thinking of having as rewards include:
- WIP images
- Optional commissions (basically a personal picture every month, which can be public or private depending on choice)
- PSD files
- Original (straight out of SFM) posters and watermark free posters
Most of these rewards will likely be available for $1/month, since I don’t think they’re worth anything more than that.
If I do decide to have a Gumroad, the products on there will most likely be image sets, mainly comics or a set of pictures I have created. These can all be obtained for free, but have the option to name your price (if you choose).
Once again, I’m not trying to lock any of my previous content behind a paywall, but rather try to make some money that I can put back into computer upgrades to make even better SFM stuff (and maybe even later on, Maya/Blender stuff!)
Let me reiterate: This will only happen if I decide to make a Patreon/Gumroad. I may decide not to make one.
I will also still do requests for free, but please don’t try to constantly spam me with requests, I need to be able to handle as many requests from different people as I can. (If the Patreon does end up becoming a thing, the Patreon commissions will obviously have higher priority.)
If you read this far, I genuinely appreciate you reading all the way through. Hopefully I can get back to SFM ASAP, and get back into one of my favorite hobbies!
0 notes
Text
Complete Step By Step Wedding Photography Workflow
You may have spent months planning a wedding with your client. After countless emails, meetings, and the actual wedding day itself; it’s time for the lengthiest part of your work to begin, the post-processing. Your wedding photography workflow is the part of the job that clients never see (and most never think about) after the event is over. Post-processing for digital photography starts from the moment you return to your home or office up until the clients receive their final images.
Wedding photography workflow
Every photographer has their own speed and style to post-processing and most will have their own aesthetic or editing programs they prefer to use. However, after owning a busy wedding photography studio for the past five years, I have created an efficient workflow that works well, while giving images a personal aesthetic. In this article you’ll find what to do after the wedding day is over, to delivering the final product to your clients using an efficient workflow.
Step 1: Back Up
You may have been shooting for eight or more hours, but when you get home, don’t crawl in that sweet, comfy bed just yet – your night isn’t over. It’s imperative that you back your client’s images up in several places as soon as possible. Not only did your client pay a lot of money for your time and expertise, but for the safety of their images as well. Until their images are backed up safely in several locations, no naps allowed! Don’t learn the hard way, back those things up.
Part one – download
On your computer, create a folder with the client’s name, and a sub-folder called “RAWS” (assuming you shoot in RAW, which you should. More on that later). You will need to copy the images from all of your memory cards into the new “RAWS” folder on your computer.
Note: RAW files are huge, s,o you will probably need to upgrade the amount of storage space on your computer, and get some more RAM while you’re at it to run your computer programs efficiently. If you’re using a Mac, make sure your computer is scheduled to back up using Time Machine as well.
Part two – make a copy
After all the files are on your computer, back them up again to a client folder on an external hard drive. When not in use, the external hard drive should be kept securely in a place like a fireproof safe. Some photographers back up on more than one external hard drive.
Part three – backup online
Lastly, when you don’t think you can stay awake another second, you need to start your RAW file back up to an online or cloud location. I use Zenfolio for my RAW storage, although there are other storage sites available. The good news? You can go to sleep while the files upload overnight (and maybe the next few days if you have a slower internet connection).
Step 2: Importing and Culling
The most exciting part of your job – not!
I’m going to be honest here, culling, or going through every image you took of a wedding, rating them, and deciding which to keep and which to trash, is the most tedious, eye-bleeding part of your job. This is why it’s not a good idea to “spray and pray” throughout a wedding day with your cameras. The more selective you are with the photos you take, the faster your post-wedding workflow will be. Alternatively, there are companies you can use to cull your images for you if that is within your budget.
In Lightroom, create a new Lightroom catalog for your client in their client folder: File>New Catalog. Then import your RAW files from the client folder you created while in the Library module.
Once all the images are imported, make sure all cameras are set to the correct time, and do a “sort by capture time” so everything from the wedding day on all cameras is in chronological order.
Culling
Next, start to cull your photos by lens. I have found this is the quickest way to make a decision on which images to keep. You can do this in the Library Module, going to Metadata (or hitting the / key), and selecting the lens you want to cull (see below). Rate your images on what to keep (hit P for picks or keepers) and what to toss (hit X for rejects). Repeat your rating process with each lens, and after they are finished filter by “all lenses” in the Library module to see the images all together. From there, do a second (or third) round of culling in the Library module until you have your final number.
For the step above, you’ll need to choose a rating system that works well for you. My rating system is 1 stars are rejects, 2 stars are keepers, and 3 stars are keepers that need Photoshop retouching. I often find that if I took a series of photos at once (like I do for the family formals to ensure no eye blinks) the last ones in the set are usually the best, so I will look at those images first for my 2-star keepers.
For more on rating and flags in Lightroom read: How to Organize Your Photos in Lightroom OR Organizing Images in Lightroom.
Step 3: Basic Edits
This is where the magic happens!
You have your final number of culled images, and can now begin your basic Lightroom edits. This is where your cropping, straightening, and adjustments for exposure, contrast, shadow, highlights, etc., come into play. This part is very personal to each photographer and this is where your style begins to emerge. This is also why shooting in RAW is so important, as you will have greater flexibility in editing as compared to a JPG. Many photographers may stop after this step, and that’s A-Okay if you’re happy with your result! However, if you want to push your images further – there are a few more steps involved.
Quick tip! If you have a series of photos in the same lighting situation taken with the same camera, edit the first photo in the set, select the rest of the photos that match, then hit the “Sync” button to apply your edit to all of the photos in that set at once.
Step 4: Polishing
Making your images sparkle using Alien Skin or Presets.
Many photographers may polish their images (a.k.a. color tone) with a chosen preset after the basic edits are done. You can buy Lightroom presets from a plethora of sources online or create your own. I found the Alien Skin program years ago and fell in love. For me, Alien Skin gives me the pop, sharpness, and great skin tones that I absolutely adore. It also has beautiful lens flares and light leaks that I use for enhancing natural sunlight. If you choose to try Alien Skin, see the steps below, otherwise skip to Step 5.
Choose your favorite images (or all of them) to put through Alien Skin by selecting them in Lightroom, right-clicking and choosing “Edit in Alien Skin” (once the program is installed, this will be an option).
You can create your own presets in Alien Skin for a faster workflow and a likely favorite will emerge. Select your most used preset and apply to all. Then deselect all.
Go through each photo individually, and make sure that’s the Alien Skin preset you want to use and see what tweaks are needed for each image.
When you’re finished, click save and your images will automatically import back into Lightroom (as copies) with the filters applied. Hit the 1 key, to discard the originals that you’re not going to use. (Occasionally, I end up liking my Lightroom edit better than my Alien Skin edit, so it’s nice to compare them side-by-side).
Step 5: Photoshop – Retouching Your Images
Now that your images have all your basic edits and color toning, select the images that need to be retouched with Photoshop by filtering for the 3-star rated images. Retouching can include editing out acne, stray hairs, doing head swaps or editing out any distracting objects in the image. On a Mac, you can hit command+E (Window is Control+E) in Lightroom to open your image in Photoshop. After retouching is complete, you can select CMD/CTRL+S (or File>Save) to return your retouched image to Lightroom.
Step 6: Black and White Images
This is the quickest part of my post-production and one my favorites, as well, because I love black and white images so much. Many wedding photographers provide a mix of color and black and white photos, with the color versions of each black and white as well. This where Alien Skin comes into play again. Not only are the black and white filters so dreamy, but they automatically make a copy for you, making your job really easy.
In Lightroom, select the images you want to be in black and white by using CMD/CTRL+click to individually select them.
Right-click and select “Edit in Alien Skin”. From there, all the selected images are uploaded to Alien Skin.
It’s easiest if you already have a black and white preset that you love saved, and apply that to all images, then deselect all. Go through each image individually using the color sliders (especially the reds and yellows) to edit and ensure each black and white image is perfect.
Save all black and white images back to Lightroom where the edited color version and the edited black and white version will be side by side.
Black and white images can also be made in Lightroom by creating a virtual copy, Photo>Create Virtual Copy (or CMD/CTRL+’). Then select “Black and White’ in your Basic Edits box, and adjust the color sliders until they’re perfect.
Step 7: Exporting. The Home Stretch!
Hooray! All of your images have been backed-up, culled, edited, polished, retouched, and you have your black and white copies. Now you just need to export the final versions to your client’s folder on your computer (I create a folder called “Edited:).
Select all of your completed images in Lightroom, go to File>Export. Choose your file location, file name (I have mine set to custom name and sequence), file settings (Mine is set to jpeg, sRGB, quality 100), and then select export when you are finished.
Step 8: Importing to an Online Client Gallery
Once all of your high-resolution JPGs are exported to the Edited client folder on your computer, you can then upload to the online gallery of your choice. Some online galleries allow you to upload your high-res JPGs directly from Lightroom using a plug-in, letting you skip a step in the process. I use Pixieset for my galleries, as I like the modern look, ease of use, and their customer service.
Step 9: At Long Last…
After you upload your images to an online gallery, copy your final edits to your external hard drive in their client folder. Once your edited files are safely online and on an external hard drive, you can delete the RAW files from your computer, because they take up a lot of space and you already have them safely backed up online and to an external hard drive (or two). If you ever want to use that Lightroom catalog again, it’s easy to sync the RAW files on your external hard drive with the Lightroom catalog that’s stored on your computer. I like to leave the edited JPGs on my computer for easy access.
Conclusion
This entire workflow process time will vary for every photographer. For me, I need 4-5 full days of nearly uninterrupted work. As you know, photographers are humans too. With life and other weddings/shoots in between – delivery time can take weeks or months after the event, depending on how busy your season is, how many photos you have, and how much retouching is required. You may need to mail prints, albums, USB drives, etc., as well, so keep that in mind for your total post-production time.
With a lot of practice and knowing your style, you’ll see your post-processing time get shorter and shorter. If you’re lucky enough to find a post-processing company that fits your style and budget, you’ll have extra time in life for the things you love, like photography. Until then, get to work!
The post Complete Step By Step Wedding Photography Workflow by Misti Marquette appeared first on Digital Photography School.
from Digital Photography School https://digital-photography-school.com/complete-wedding-photography-workflow/
0 notes
Text
300+ TOP SAP QM Interview Questions and Answers
SAP QM Interview Questions for freshers experienced :-
1. Which Movement Types Refer To Inspection Origin 05? You need to check the T156S-QSSHK. It shows the inspection lot origin for all movement types. 2. I Have Executed Massive Automatic Usage Decision Via Qa16 And Noticed That No Stock Postings Been Updated. The System Noted The Usage Decision But Didn't Carry Any Goods Movements. Why Were The Stock Postings Not Updated? Is It Possible To Execute In Mass Via Qa16? You should make sure that the UD codes you use have the automatic postings setup for it. The selected set code needs to be set for background postings and what material status it should post to. Take care of these and it will take care of the problems. 3. I Need To Change The Status Of A Lot Based On Certain Conditions And Looked At Qfpo_post_status_for_lot But This Didn't Return Anything. I Need The Status Of The Lot To Be Insp Rrec So That I Can Forward The Result Copy On To Batch Classification? In general, forcing a change to the system status is not a very good idea. Instead, you should consider using a user status. If the system status is not RREC then, there will be no results to copy. 4. Is It Possible To Make The Inspection Lot Quantity To (1) All The Time? Can It Be Configured As An Automatic Default In Qa01? If Yes, What Are The Steps Necessary To Make A Sample Size Default Every Time We Create An Inspection Lot? If you are referring to the Sample Size the answer is yes. If you are referring to the Lot Size, then the answer is no. For the lot quantity, you can use a sampling procedure of type fixed and assign the size to 1. 5. In Our Plant, Gr For A Material Was Made Three Months Back. This Material Is Qm Managed. The Quality Plan For This Material Was Made This Month Only. Hence Our Qm Personnel Are Not Able To Clear This Particular Gr. How Do I Go About It? What Is The Tcode For It And How Do I Proceed? You can reset the Sample Calculation and Recalculate the change in Start & Inspection end date in QA02. In QA02 you can also change the key date on the second tab so it looks for a plan on that date. If that plan has already been created, you can then change the key date to the current date and it will find the plan. 6. How Do I Transfer The Results From One Origin To Another Origin? This can be done by creating a program attached to the follow up functions for the UD code. Once the UD is done the results can be transferred from lot to lot 7. I Want The System To Take My User Name As Default For Partner Ao Author While Creating A Notification. I've Created The Partner Determination Profile And Assigned It To The Notification But It Is Not Defaulting The User Name As Partner. What Can I Do To Correct This? I assume that you have an organization for the partners. I think you need to utilize workflow and do some coding. Utilize the user ids. Use the KU for coordinator since it is for the user, and KO is for the person which requires HR. When a Q3 based notification is created the coordinator would be defaulted. But as I said, it requires organization, workflow and some coding. 8. Where Does The System Store Mic Long Text History? When I Tried Using, 'read_text Function Module', The System Is Fetching Only New Long Text. How Do I Fetch The Old Long Text Of Mic? The system does not store the long text history, because it is a text. To maintain the long text, create MIC with the appropriate versions and assign MIC in the task list as per the required version. The setting is in customization for the plant level, MIC with history. An alternative recourse is to check out AUT10. You need to set it up, but it allows you track changes to any Long Text. I believe it is available from 4.5 or 4.6. 9. Can Somebody Explain To Me How A New Posting Proposal Can Be Added In Order To Use This In The Catalog Assigned To A Ud Code? There Is A New One But Won't Be Available (vmenge01) Until 2007. I Want To Add An Extra One. Try the customizing path Quality Management -- > Quality Inspection --> Inspection Lot completion -- > Define inventory postings. 10. The Deletion Flag On Production Order Was Set But Had To Be Revoked To Allow Further Goods Issues. Issues Have Now Taken Place But In Trying To Reset The Deletion Flag, The Following Error Message Occurs. "the Order Has Been Flagged With Delivery Complete". What Are The Settings Necessary For Generating Quality Certificates In Sap? You're normally not allowed to mark a Production order for deletion as long as the financial value on the order isn't zero and/or you've got materials posted to it. I can't see the point in deleting an order with postings. That way you'd probably mess up both logistics and accounting.

SAP QM Interview Questions 11. I Have A Requirement From A Client For Inspection Of A Material For Different Vendors. Characteristics Change From Vendor To Vendor. Automatically , The Inspection Plan Will Need To Be Selected Based On The Vendor. How Do I Accomplish This? In the material to plan assignment, scroll to the right and you will see a vendor column. If you put a vendor number in that column, that is the plan that will be selected for the material/plant/vendor. 12. I Know It Should Be Possible To Attach Files, Pictures Etc. When Creating Notifications. However, I Am Working Right Know In An Automotive Release And Cannot Find The Button Anymore. Did We Miss Something? What Can Be Wrong? Check what type of user you have set up. Sometimes the security guys set up a testing ID as a different type than a regular user. Some ID types don't have the ability to use the Object services functionality. 13. I Have Activated 04 Inspection Type With Post To Inspection Stock For A Material. I Have Left Qm Not Active Unchecked For 101 Mvt Type For Mvt Indicator F (gr For Order) In Omjj. While I Am Doing Gr For The Process Order, The '101' Message Appears. What Is The Problem And How Can I Resolve This? If the process order was created after you modified the material, then it's an "old" process order, and this may explain the error. If there was an existing stock of this material before you start, then try this first with a newly created material. Afterwards, the error you describe should not happen. 14. In The Inspection Plan I Have A Characteristic With Upper Limit. In Which Table Can I Find This Value? Look at table PLMK. If it is a reference MIC, also check QPMK. These are for checking the plan. The Inspection Lot keeps them in different values. 15. I Am Using Exit Mm06l001 (function Module- Exit_sapmm06l_001) For Quality Criteria. The Scores Of The Sub Criteria Are Calculated On The Basis Of Quality Notifications And Inspection Lots. But No Score Is Getting Calculated For The Vendor. Where Did I Go Wrong And What Can I Do To Remedy The Error? Regarding quality notification, do verify the following: Notification completed with External origin. Invoice verification already took place. As for inspection lot, verify that usage decision has been made. In addition, verify customization of all required parameters (as listed in documentation under QM->Quality Control->Vendor Evaluation). 16. When I Try To Upload Data With Lsmw To Create Inspection Plan, The System Shows The Message: "bdc_open_group, Lock Date./. Is Invalid". I Have Bdc Authority, So What's The Problem? Did you enter a date for field START in structure BI000? The date has to be earlier than today's date. The queue start date specifies the day until which a batch input folder is locked. You cannot process a locked batch input folder until the day after the specified date. 17. I Am Doing Quality After Doing Migo Mvt Type 105. So When The Migo Mvt Type105 Doc Is Saved Then The Inspection Lot Is Generated And The Stock Is In Quality. Can You Tell Me The Transaction Code For The Stock On Which The Usage Decision Is Pending? You can use the list display transaction code QE51N and in the EXCEPTION criteria you can specify it to be ‘UD Not done’. Otherwise in the same transaction code QE51N in the output columns, you can display the column "Usage decision by" and sort by it so that the blank ones are on the top. Those blank ones are the lots for which UD was not done. Once you find out the lot numbers you can open the lot and see the order number in it. 18. Is There A Way To Create Inspection Lot Programmatically In An Abap Report? Is There Any Business Object, Function Module Or User Exit? We Went To 1 Lot For 1 Shift. We Use Inspection Origin 89 (manual). Therefore We're Searching For A Way To Create The Inspection Lot Via Job (abap Program). How Do I Resolve This? Automatic creation of Inspection lot in SAP is governed by Inspection lot origin, inspection type, etc. You have to give the details of why you want an inspection lot creation by program or ABAP report. Instead, you can use a report /program to do it. Standard SAP provides this functionality. If it is in--process inspection, you can use inspection points based on shifts. 19. I Was In The Process Of Testing The Scenario Of Skip Lots. I Have Done All The Data Maintenance In The Material Master And The Dynamic Modification Rule. The Quality Level Is Getting Updated To A Skip Stage, But The Stock Is Not Getting Directly Put Into Unrestricted Stock When The Lot Should Be Skipping. Where Am I Going Wrong And How Do I Correct This? This can be done by setting the Control Inspection lot indicator in the QM view of the material master to each material document. Iit works for DMR at a lot and characteristic level. 20. We Have Two Inspection Lots For Which Ud Has Already Been Done. Later On We Realized That These Lots The Sample Size Was Not Calculated. Now We Want To Reset The "sample Calculation" But Not Able As The Status Of The Lot Is "ud Done". Is There A Way We Can Reverse Ud Or Reset The Status Of An Inspection Lot? Under normal condition, a UD cannot be reversed. 21. I Could Not Create Return Delivery For A Material. The Message Display Is: 'could Not Create Return Delivery Wm Movement Type 102 Not Allowed For Warehouse No. 010'. How Do I Fix This Problem? Check in the configuration. The message clearly says that for the Warehouse no. 010 you have not allowed movement type "102". You have to change this configuration and add a line or move the stock to a warehouse where customer returns are allowed. 22. How Do I Populate Additional Entries Directly Into The Tables? Is There Any Direct Way To Populate Fields In The Tables? It depends on which tables you are talking about because some tables can be directly maintained in PRD. For some you have to transport it maintaining in DEV system. For example, number ranges are not transportable. You have to maintain it directly in every instance. If you are talking about mass maintenance, Standard SAP QM does not have it by now. You can talk to your developer to write a program for you by which you can do a mass maintenance. Otherwise SM30 is good enough to run. 23. I Have Created Some Certificate Profiles That Need To Be Deleted. But They Are All In Released Status. I Know That Certificate Profile Cannot Be Deleted If It Is In "rel" Status. How I Should Deal With This Issue? It seems to me you could potentially block the profile - from within the profile, edit -> block profile. Once it's blocked, you can proceed with the deletion. 24. I Need Some Guidelines In Maintaining The Settings For Batch Management In Qm. What Are The Customizations Necessary For Batch Management From Qm Point Of View? How The Inspection Lots Get Triggered And How Are They Connected / Interlinked To The Batches? The links have to do with your configuration of batch management for your material. If the materials in are batch managed and are purchased or manufactured within your organization when the material is received using the 101 movement type, the batch is created and assigned in the background to the inspection lot. Depending on how you've designed your inspection plan or material specification, you can build the master inspection characteristics, dependent on class characteristics, that will copy the inspection results into the batch record. This is less QM configuration than it is MM-Batch Management configuration and material master definition. 25. I Want To Post The Stock From Quality Inspection To Unrestricted Use Partially With Two Ud Codes For Same Inspection Lot. But The Qga2 System Will Show The Total Document Posted On Only One Usage Decision Code. I Want To Evaluate The Stock On The Basis Of Usage Decision Code. How Can I Resolve This Issue? You could use inspection points and partial lots. In this way, you may have a different UD for inspection points and inventory posting accordingly. 26. I Would Like To Know Where The Batch Status Can Be Set In Sap. We Have The Stock Type Q For Quality Inspection. We Would Like Stock Type R For Rework And S For Blocked. Where Can This Be Set In Sap? There is no way to create a new status. The only thing you can do, if you have Batch Management, is to activate the Batch status so you can have Unrestricted (blank), Quality (Q) and Blocked (S). Having these batch statuses, you can duplicate all stocks to restricted Q, blank and S. 27. I Am Having 3 Different Operations. The 0020 And 0030 Operation Is Dependent On The 0010 Operation. It Means That Once The Rr Is Done For Operation 0010, Manual Ud Has To Be Taken Immediately. Then Results Are Recorded For Operation 0020 & 0030 And Finally A Common Ud Is Made For Both 0020 & 0030 Operation. This Is The Case For Incoming Inspection And In Process Inspection. Is There Any Customization For This Type Of Rr & Ud? You could use Inspection Points for 0010 (it has its own UD) and then use the Inspection Lot UD for the whole process. 28. How Do I Use Material Specification? If I Want To Use Material Specification, What Are The Things I Should Do? To use Material specification you need to have: Class Characteristics; MIC's linked to the Class Characteristics; A Class containing the Class Characteristics, assigned to the Material Master; Material spec maintained. (QS61); Limit values for the characteristics, maintained in the classification view in the material master; Inspection with material specification chosen in the inspection type in the material master. 29. While Rr For Some Of The Mic's, The System Is Asking For Manual Valuation And For Some It Is Not Asking. I Want The System To Ask Manual Valuation For All The Mic's. What Settings Should I Do To Get This? Check your Valuation Mode / Sampling Procedure. From there, you can find the settings needed to configure your requirement. 30. Is It Possible To Cancel The Inspection Lot Once It Has Been Created? You can cancel it by reversing the transaction that created it. It's also possible to go into the inspection lot in Chance mode and set the status to “locked”. It will then disappear, but if there's QI stock linked to it you won't get it out. SAP QM Questions and Answers Pdf Download Read the full article
1 note
·
View note