#I think I have some fusible interfacing left?
Explore tagged Tumblr posts
Photo
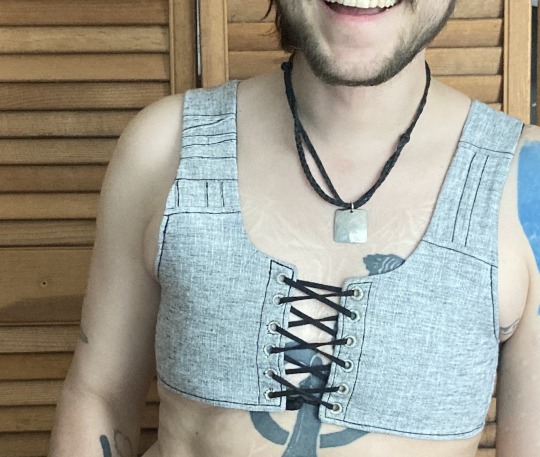
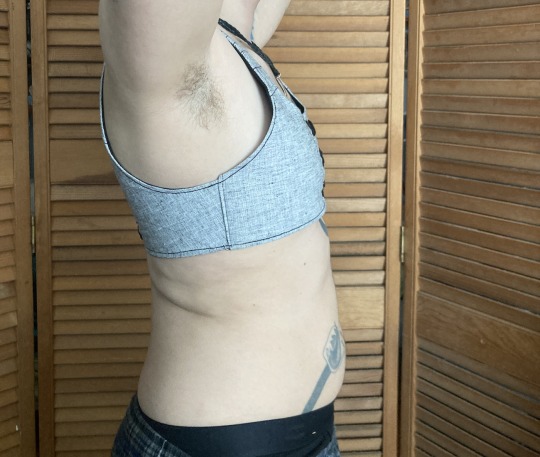
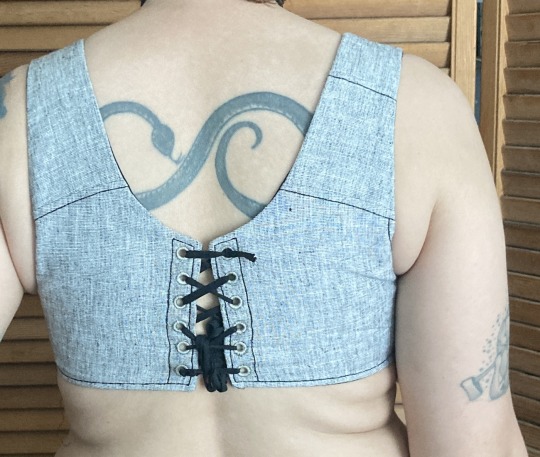
summer binder picture tutorial
this is the third binder ive made for myself recently and the first one i’m writing up. it’s designed to do a few things: 1) allow me to put it on by myself without dislocating my shoulders 2) allow me to breathe well enough to partake in normal activity 3) be cool enough to wear throughout a muggy 90-100F summer 4) not constrict my ribs in a way that aggravates my lack of connective tissue and causes intense pain.
this has become necessary even though i had top surgery many years ago, because when i had it i was extremely skinny and since then i’ve increased in size by about 50%. this has been really fucking good for my health in every single way* except that when my chest is squishy or moves at all it’s So Goddamn Triggering for me. but also since ive had top surgery ive developed and/or been made away of a plethora of chronic conditions that make every single commercially available binding option medically impossible. unbound, my chest is pretty much what you’d expect for a chubby cis guy but venturing out into the world in just a tshirt no longer works for me
*anyone who badmouths weight gain or fat bodies in the notes WILL be blocked
under the cut are a bunch of process pictures and explanations of what they all mean:
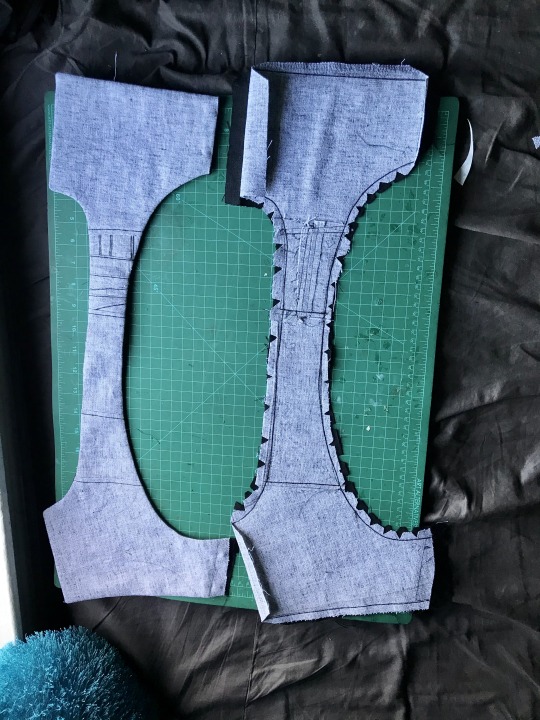
first i’ll give you a look at the pieces and measurements:
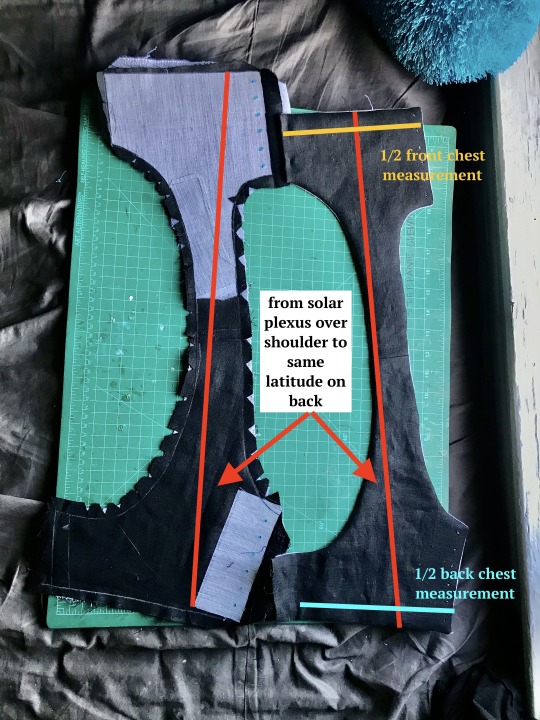
most of the seams are sewn in this picture and one half is turned inside out, allowing you to see both the finished dimensions (right) and the placement of the fusible horsehair canvas that gives this lil scrap of linen any structure at all (left)
to get your chest measurement, you’re gonna have to do some math:
first measure above and below what you want to bind. average these numbers. mine are something like 32 and 34, which average to 33. subtract a few inches--this is to allow the air movement between the laces at center front and back, critical in the summertime. i deleted 3 inches bc i like that number but you can go bigger if you want. the more inches you subtract here, the more youll be able to ratchet all your chest material down later, but at the same time you need to leave enough fabric for a sturdy garment. let’s say a range of 2-6 inches/5-15cm. by taking your measurements this way, you’re essentially measuring the chest you would like to have. that + the horsehair canvas work together to compress any squishy tissue/force anything that doesnt compress up and to the outside (basically into the armpit/lower shoulder--the chest might stick out but it will give a very puffed chest captain america pectoral silhouette)
you can also see how ive clipped my curves and pre-drilled my lacing holes. i used the marlin spike on my knife to open up the holes on the interfacing side, mainly as a way of marking them. this worked well bc the interfacing’s glue kept the linen from raveling
this is the same stage but looking at the non-interfaced grey linen/cotton blend (the black is some 100% linen from my cabbage stash). you can see ive broken the solar-plexus-to-back measurement up into a bunch of pieces to save on fabric but that’s not necessary. my original pattern was just two pieces (front and back) and chopping the straps into thirds on both sides was aesthetic
in the following picture you can really see how this is really just overgrown regency stays:
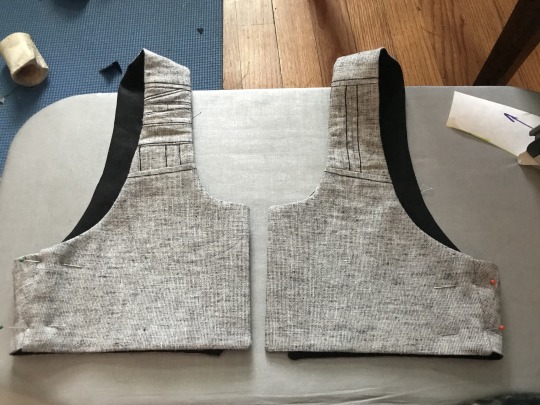
i thought about doing side lacing but didn’t think that would be comfortable for me. on the front, the side seam allowance was pressed inwards before turning to create a finished looking slot. on the back the side seam is left unfinished with an extra wide seam allowance, and is inserted into that slot.
here’s a closeup on it pinned in place (you can adjust the angle of the side seam and the fit during this pinning stage):
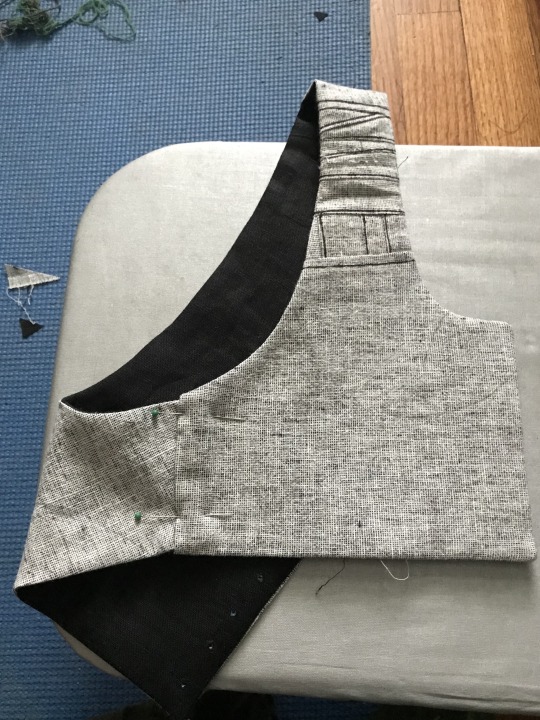
that side seam was just topstitched in place once i had the fit how i liked it, and the armhole was reinforced with more topstitching
alright, time for eyelets: first, you can see how well the marking worked:
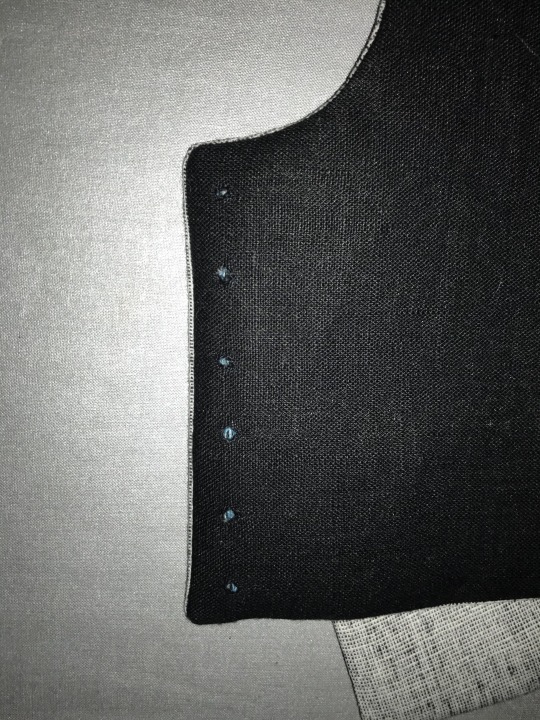
next, two rows of basted eyelets (left), one row of eyelets sewn with a doubled and waxed cotton thread (center right), and one row of eyelets opened and stainless steel rings placed (right).
next time i’m going to mark the eyelets same as i did above, but do this step differently--i’ll mark and baste the steel rings in place BEFORE widening the eyelets. this is bc i had a lot of problems keeping the eyelets on center
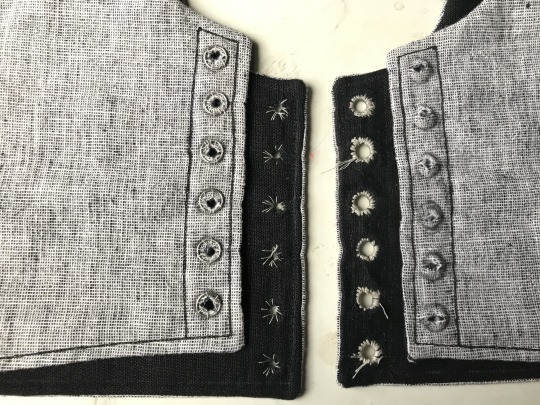
eyelets half done on this one! on the left are eyelets sewn with doubled and waxed cotton thread and on the right eyelets sewn with quadrupled and waxed thread. the center is basting again. i was able to force the holes back in line while sewing the eyelets but it was kinda annoying. adding a second picture that doesnt have great focus but hopefully shows how that process worked and shows the spike clearly
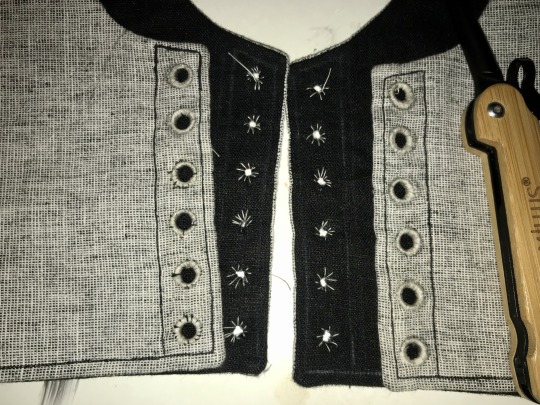
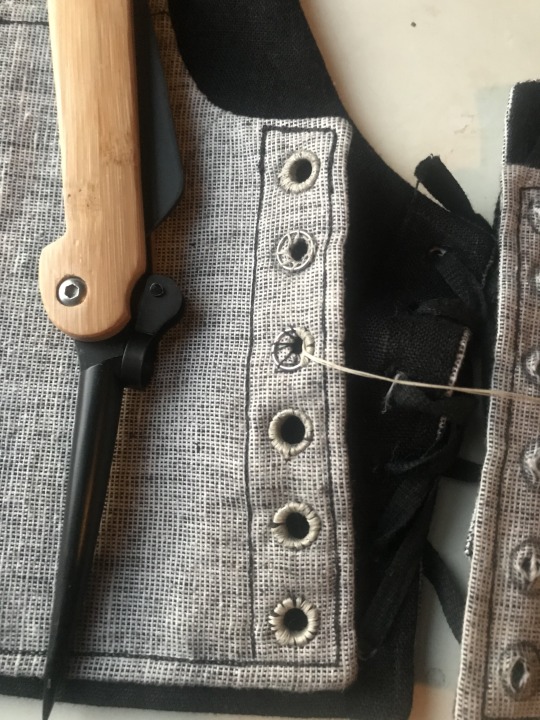
i ended up using this white cotton thread because it’s stronger than my black cotton thread (which the rest of it is sewn with). [eta: after this was first posted, i pressed the whole thing heavily, which effectively de-waxed the thread, and i dyed the whole thing a medium charcoal grey, the thread blends in perfectly on the lighter side and isn’t such a sore thumb on the darker side]
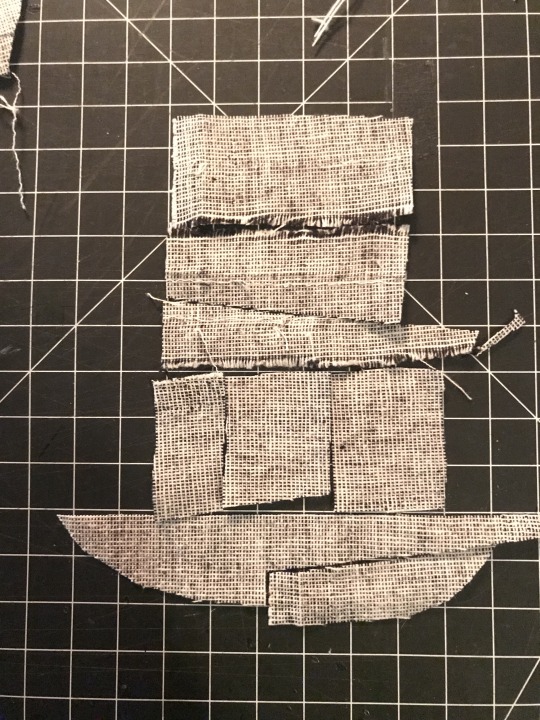
bonus: the piecing layout for that little piece of strap. the whole light gray half of the binder was made from 1/2 of one of the legs i cut off some linen suit pants to make slutty camping shorts last year and i really really didn’t want to break into any of the other three halves for this garment--i have Plans for it
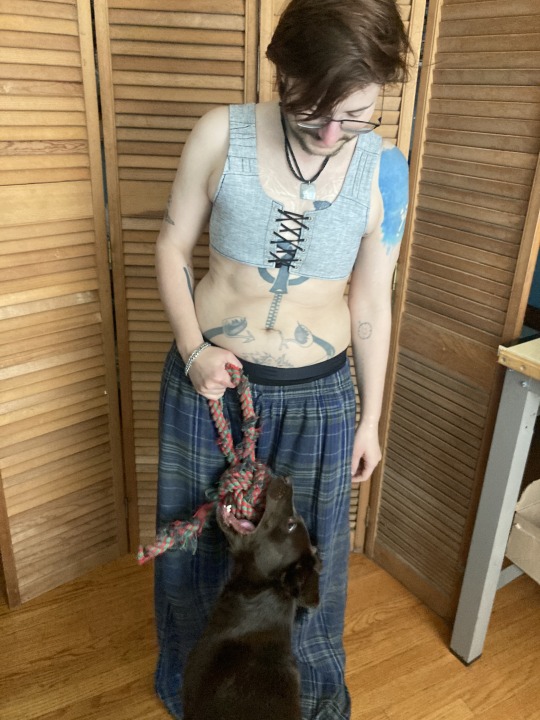
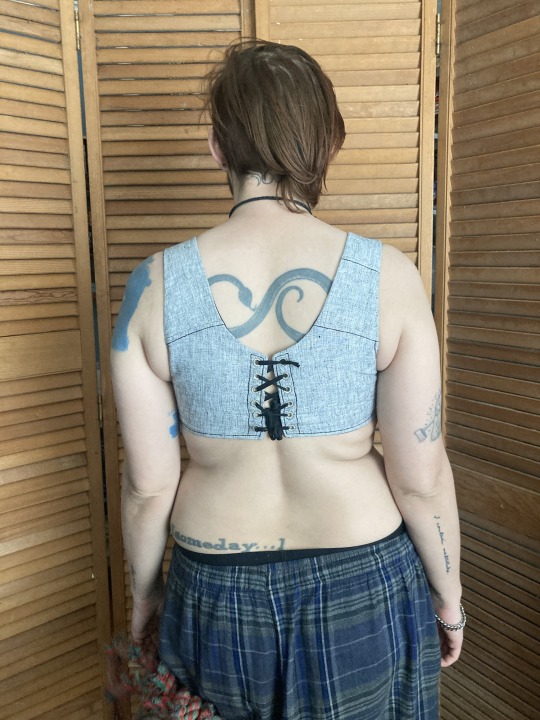
overall the fit of this is incredible. it DOESNT hurt my ribs which every zip-up garment ive been able to find (and it is difficult) does due to really thick elastic at the base. it doesnt aggravate my sensory issues with the synthetic fibers that every commercial option is made of. i can walk up a hill or stairs, or go to pt, without getting too out of breath. i can eat with it tight, or loosen the front easily and without taking it off to make eating easier and less nausea-inducing. it is reversible!
best of all the lacing at the back gives the garment enough movement for me to get it on without dislocating, and the interfacing and steel rings give it structure once it’s on. the shaping comes only from fusible horsehair linen canvas and stainless steel rings like youd use for chainmail, there’s no boning at all, which makes it very quick to sew (except the eyelets, but metal grommets would be sturdy and quick provided theyre of good quality)
there’s a small amount of gaping on the outside of the shoulder strap, which i plan on fixing with a tiny tiny dart in the armpit, i want to add pockets to tuck the laces into, and i need a better lace for the back, but it’s completely wearable in time for the 90 weather next week which is all i wanted. i’ll do a reblog when it’s perfectly finished with an update on the fit but for now it is done enough
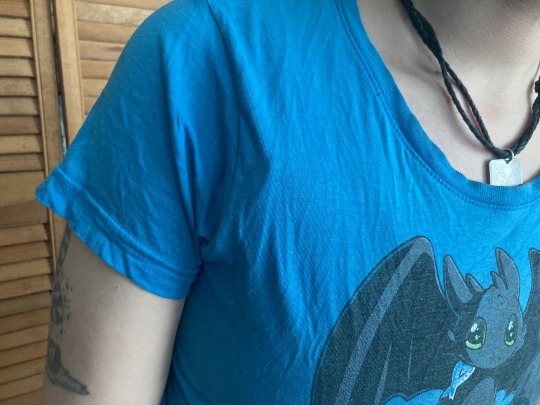
the little ridge where it doesnt lay flat against the shoulder is most visible with just a single t shirt over it. with a flannel or a sweater, it disappears, and by itself, it’s hidden in movement
eta: after dyeing this, i relaced it a bit looser in the back and that gape mainly disappeared. ive decided to leave it in instead of smoothing it with a dart because the loose fabric gives space for my chest to expand when breathing and shapes my silhouette in a way that emphasizes my shoulders
#sewing#trans#trans man#binding#body shaping#cotton#disability accommodations#physical#sensory#eyelets#fusible interfacing#historical fashion#regency#horsehair canvas#lacing#linen#lining#new build#drafted pattern#picture tutorial#piecing is contemporary too#stainless steel#stashbusting#stays#structured garment#treadle machine
1K notes
·
View notes
Text
This is my Green Day themed patch vest! It’s gonna be a long 3 part post because I literally love this thing, but I’m open to suggestions for other Green Day themed patches I could do (also this was a Beast to write, so you if you see any typos or spelling mistakes please let me know).


A little background:
I thrifted this as a jean jacket and cut off the sleeves to make it a vest. Then I used the fabric of the sleeves to make pockets and inside pockets to the vest, since the original jacket had no pockets whatsoever. This way, I was able to make the pockets as bigs as I wanted (about the size if a cd case). Unfortunately I have no pictures of it before I modified it, but thats what I did to it.

Working at a craft store, I get to thoroughly abuse the discount offered to employees. I bought a bunch of cool fabric in the smallest size cuts our store allows. Then I just hand stitched each strip into the inside of the jacket with black thread so it wouldn’t be as visible from the outside.
From left to right in the picture the fabrics are:
ACDCs Highway to Hell album cover, Beetlejuice (The Movie), Aerosmith logo, Nightmare on Elm Street, a bunch if skulls and grey roses, Mandolorian fabric with various characters helmets on it, Pink Floyd fabric with the inflatable pig from Animals, a bunch of overlapping Gizmos from Gremlins showing various expressions, and Back to the Future fabric with the DeLorian on it.
The inside pockets also have their own separate linings. On the right pocket is Scooby-Doo fabric with the gang on it, and some rainbow paw print fabric that I thought was cute. On the left pocket in some Sonic the Hedgehog fabric with Sonic, Tails, Rouge, Knuckles, Cream, Eggman, Blaze, and Silver inside rings, and the other fabric on the left pocket is a black fabric with the Queen logo on it in white.


Again using my employee discount, I got a ton of our different stud trim and messed around with what I though looked cool. I started by just straight up fabric gluing the trims to various seams in the jacket as I saw fit, and then sewing the trim down after that as a precaution (thimbles my beloved).
Okay now for the patch tour. Every time I try to make a patch vest of some kind I get disappointed in myself with the results. So to avoid that for this project since this vest has been my favorite so far, I decided to make it Green Day themed to start. Then I can see where it goes from there. I tried to have one patch for each studio album, so I’m going in order of album.

1,039 Smoothed out Slappy Hours- Paper lanterns is my favorite song from this album. I just painted the song title on black fabric with white paint first, and went over in in color when the white had dried. The letters are are all capitalized and slightly staggered on purpose. The green paint should glow in black light.

Kerplunk- just screen printed the flower and ironed in onto black fabric. I do mostly song titles for the other albums, so I was just trying to do something that wasn’t a song title (although I’m thinking of making a Christie Rd sign).

Dookie- i found this shirt at a thrift store and I already own one, but I just knew it would make a sick back patch. I had some leftover fusible interfacing from a project I did in April, so I fused some to the back of the section of the shirt I cut out to make the patch, and then again to another plain black piece of fabric cut from the back of the Dookie shirt. I used some very strong, washable fabric glue and glued the two pieces together. This made for a very thick, very durable back patch. I rolled a bottle over the two fabrics to smooth it out and really get the glue to stick. I sandwiched the patch between two large flat surfaces, and put some heavy items on top of it for 24 hours. Finally, I pinned the patch down and sewed it.

Insomniac- I had a little bag of letters cut out of old shirts I couldn’t wear anymore, and thought the ransom note aesthetic fit Insomniacs vibe perfectly. Walking Contradiction is my favorite song off of Insomniac. That is often my reasoning behind most of the patches I made for this vest. I have a big thing of modge podge that I bought for a project that never ended up getting finished. I used this modge podge to seal a lot of these patches, giving them a slightly shiny finish. For this, I used the modge Podge as glue and a finish to keep the letters from falling off. When I took this picture the vest wasn’t complete, but I also added a couple stitches onto each letter as reinforcement in case the letters end up falling off.
My photo limit is maxed out so Part 2 and Part 3 is coming soon?
10 notes
·
View notes
Text

New project! I’m going to make these fabrics into a tote bag (using this pattern). I’m thinking the stripey fabric will be the straps, the ghosts will be the middle fabric (because it’s the heaviest-duty fabric option and the one I have most of), and I have not decided on the other fabrics yet
#fabric#halloween tote bag attempt#this is because I want to make a copper moth themed bag#but i don’t have enough coordinating fabric for the strap#and I promised a friend a fish themed bag but I want to practice first (and also this is the wrong pattern for that)#but halloween fabric should work!#ah hell interfacing. I forgot the interfacing#I think I have some fusible interfacing left?#but I might use quilt batting instead#and just quilt it a bit#maybe I’ll take a break from the bag and finally finish the quilt top#who knows lol
38 notes
·
View notes
Text
Wen Kexing layer 4 - beizi jacket and tying up some loose ends
I had to deal with some other things and had to put this down. I also went ahead and bought more bias tape in the sea foam green at my local JoAnn’s. I had tried to hem the sleeves and it became an utter diaster! Somehow fabric slid under my seams and I ended up with a total mess that I had to use the seam ripper to correct. So after the thin bias tape working for the edges of the split seams along the legs I bought more.

Yeah, if you live in my city of ~100,000 people and you go to get sea foam green bias tape in the narrow width. It is mine! All mine.
Long story short, I used the bias tape for all of the hems. The sleeves and along the base of the coat. I will likely need to go back and fix the sleeves later but for right now I want to prevent them from fraying. I’m not sure how I would handle this if the fabric were less light and slippery. I briefly thought about making strips like for the main coat opening but decided not to do this. We’ll see if I change my mind in the future.
With this done, I needed to check that everything fit alright. I still have to hem the bottom of the red and blue layers and hem the blue sleeves. The first three layers fit pretty well. You can see that I left the selvage alone the blue sleeves. I’ll likely use some bias tape and then fold it in from there.

The layers, layer nicely. I put the green coat on next. This is the payoff for calculating all of the layers using the Hanfu Pattern Making book! I’m especially happy with the armpit/armscye situation.

I didn’t quite match the full beizi design; WKX’s has the slit on the front but there is no way in hell I had enough fabric to do it. I guess if I really wanted to, I could order more, but this fabric was not fun to work with. In this shot you can see there I folded under the stretch of green silk blend with left over cotton muslin in between.

I used some fusible interfacing to hold it down after ironing it. I’m not sure how well this will work, the interfacing was okay but didn’t seem to like to hold well with this fabric. The back looks like my back. I think it has a decent amount of volume compared to the original.

Trying to get exciting with the poses in my cramped bathroom.

I can’t do a full length shot, one of the issues of setting your camera to auto shoot with a timer. Here you can see the narrower bias tape along the edge of the beizi. I really lucked out I could find a color match. I couldn’t find anything remotely close to the blue one. Hence, when I use it on the sleeves, I will have to fold it over be default to cover the grey color I found.
After I finish hemming a few odds and ends, I’ll try to get better pics of everything and have a summary post where I reflect over what worked well, what was confusing and what I’d do differently next time!
#wen kexing#wkx#Word Of Honor#woh#sha he ling#shl#cdrama dress#hanfu#hanfu pattern#mens hanfu#pattern drafting#somewhat historical garment#cdrama#sewing#historical costuming
75 notes
·
View notes
Text
Pleated Skater Skirt (with suspenders)
Materials--
-3.5-4 yards medium weight fabric
-4 slide buckle adjusters
-1 zipper
-1 button set
-black thread
-regular and zipper foot
-iron
-dressmaker’s pins
-tape measure
-fabric pen or chalk
OPTIONAL: two small squares of fusible interfacing, to stabilize the buttonholes

[ID: notes for the skirt, including an overview or materials, and a key for the measurements for each piece.]
One, Prep. Always start by preshrinking fabric in the wash. This is also a good time to see how much shrinkage you’ll have to deal with regarding this fabric, so you know for the future whether you’ll be able to regularly wash and dry it or not. If you’re not sure how the fabric is going to dry and you’re worried about a lot of shrinkage, just cut off a small, palm-sized square, and dry only that. It’ll give you a good idea of how much the fabric will shrink before you shrink, you know, the whole thing.
While this is washing, it’s usually a good time to clear yourself a space to work. You’ll need a decent amount of floor space for this project initially while making the pleats, so keep that in mind when setting up a workspace. I usually try to work near outlets, because ironing is very important while sewing. Trust me; I didn’t think it was and would often bypass it, and that wound up leaving so many otherwise lovely projects a little off.
>Note: while waiting for the fabric to wash, I turned two of my slide adjusters into makeshift “D rings” because I didn’t have any lying around, and these are basically the same thing. (Also I still have like 40 slide adjusters laying about.) To do this, just take a butter knife and carefully pop off the middle bit of the adjuster. It took me five minutes, though I did keep getting distracted by an episode of Drawfee and my cat. This step is also technically unnecessary -- you can just hide the slide bit when you sew it to the lower strap -- but I don’t like the very faint jingling noise, so I removed it. It also looks just a bit cleaner upon close inspection, but if anyone is looking that closely at the hardware on your skirt, you may have other problems.
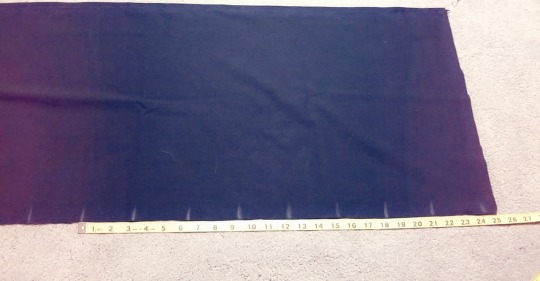
Two, Skirt. Take and decide measurements. My skirt is almost a mini-skirt when accounting for my body, so including the waistband, it’s 16 1/2 inches. Subtracting a 1 1/2in waistband, and then adding 3/4 inch of seam allowance (for the bottom hem and to attach the waistband), the length of the “♥A” measurement is 15 3/4in. “♥B” will be my waist measurement, 29in, x3, and then +2. In all, the length of my Skirt Piece will be 15 3/4in x 89in. It may seem like a lot of fabric now, but the pleats will be flat once ironed and sewn in place.
When you’re first starting sewing, numbers can be very vague and not mean much tangibly. A length that would be a miniskirt on me would not necessarily be a miniskirt on you. In these situations, it’s best to look at clothes you already own, and measure a final length from those. When cutting, remember that if you’re not sure, be safe and just cut a little more. You can always take away from the bottom hem later down the road, if needed.
Three, Waistband. The “♣A” measurement is however wide you want your final waistband to be, x2, + seam allowance. I typically include, in all, 1/2in of seam allowance for waistbands, because I sew two 1/4in seams into them. My “♣A” will be 3 1/2in, in all. My “♣B” will be my entire waist measurement, +2 inches. For me, this will be roughly 31in.
Four, Straps. Your straps, for 1in slide adjusters, will be 2 3/4in on 1/4in seam allowance. You will have to turn these inside out, and you want the final width of these straps to be just wider than the adjusters themselves to keep them in place. You’ll need the main strap, which will go through the slides to adjust the length to your comfort, and two much shorter straps, that will go through the D Rings. You can either cut two very long straps, and then trim the ends for your Δ-Strap pieces, or you can cut two “♦” pieces and two “Δ” pieces. The length of your “♦” pieces will be 50in (each!) when all is done, though. I like to have straps at a length where the metal of the slides are visible around my chest/shoulders, because I think it’s pretty, though this can be adjusted to be shorter if you’d prefer they only be visible from the back. All of these pieces will have an A measurement of 2 3/4 inches, while the “ΔB” will be 3in, to result in 1 1/2in loops. (You can make these shorter if you’d prefer, though I’d go no smaller than 1in loops, for both aesthetic and ease of assembly reasons.)
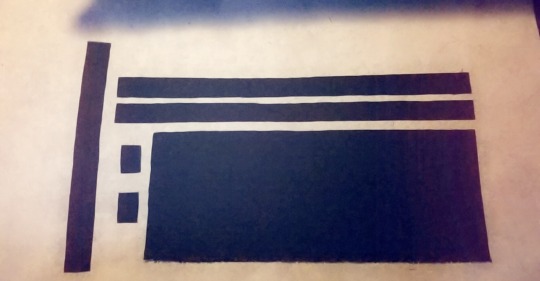
[ID: a picture of the six skirt pieces laid out together.]
Five, Hemming. Once your fabric has all been cut and sorted, lay your Skirt Piece out somewhere, completely flat. Before proceeding with anything else, take a minute to hem the BOTTOM of your skirt. You will regret it if you wait until you’ve pleated it. I like to do rolled hems for outside hems; take the fabric, fold it up 1/4in, and iron it in place. Then, fold it another 1/4 inch in and pin it in place. Secure with a straight stitch. This is time-consuming now, but makes sewing the seam much easier at the end.
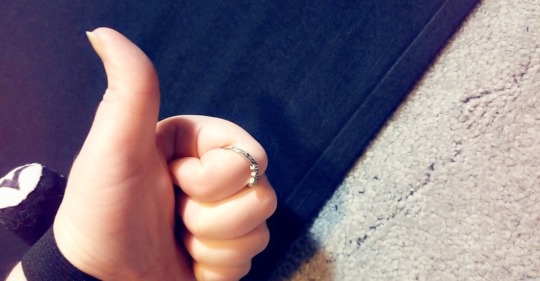
[ID: three pictures showering the process of a rolled hem. In the last picture, I’m giving a lil thumbs up.]
Six, Pleats. Starting at one end of your skirt -- I started at the right sight of my fabric, right side facing up, and I think this was a mistake, so start at your LEFT -- use your tape measure to measure one inch in, and mark it with some kind of pen, chalk, or marker. This flap will later home half of your zipper. (Note! I’ve used permanent marker on fabric before, and so long as it’s set into the fabric, it won’t bleed, and it won’t be visible on the final product.)
After that, mark every 3 inches, until you run out of fabric. Then, starting at the beginning, you will take your first mark and fold it over the second, to meet the third. The second mark will be the hinge of the fold. Think of it as the spine of a book, with the first and third marks being your pages. Repeat this until your entire skirt as been pleated. At this point, it should be the same length as your waistband. If you’re unsure of your pleats, you can do them all, and double-check your measurements, or you can iron and pin as you go. Whatever is best for you, but DO make sure to iron the pleats down flat, and THEN pin them in place. (You only need one pin per pleat, running parallel to the outer edge of the pleat.) I promise, this makes the sewing part MUCH easier!
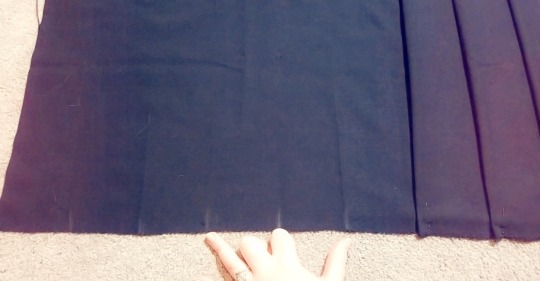
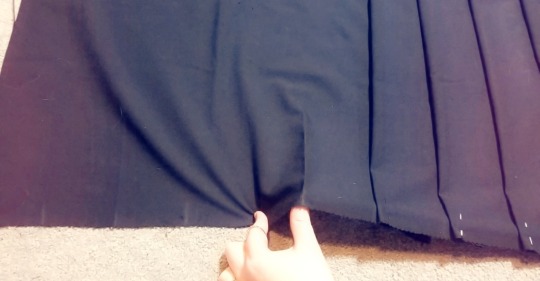
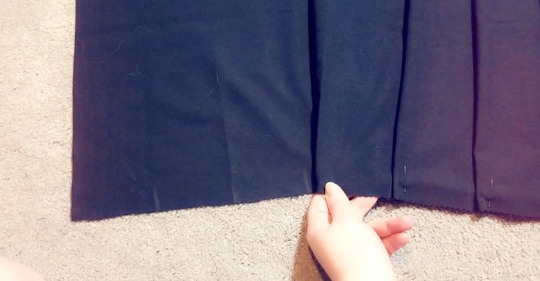
[ID: four pictures showing the process of making pleats. The first shows the measurements next to a tape measure, the second shows me indicating the three parts of the pleat, the third and forth showing the process of folding the pleat over.]
Seven, Pleats continued. With the pleats facing TOWARD you, sew the top hem at 1/4in seam allowance. You’ll want to make sure the “hinges” of the pleats are going through your machine before the open ends. Then, sew each of the pleats down. You only need to go about 1-3 inches down per pleat, depending on how “structured” you’d like them, but it makes the final result look much neater either way. I tend to go down a bit further, as I have a lot of hip, and don’t want to add unnecessary bulk there.
>NOTE: You can also sew the pleats in place, THEN iron them, though I find it easier to iron and pin and THEN sew the hem. Sometimes I wind up doing an extra bit of ironing afterwards, but it’s usually unnecessary.
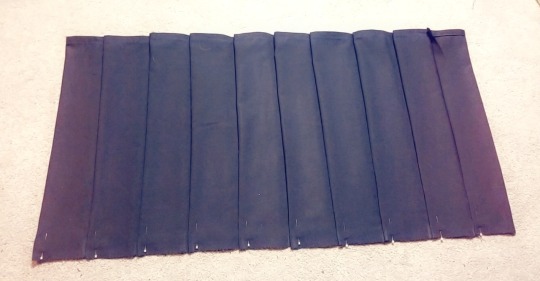
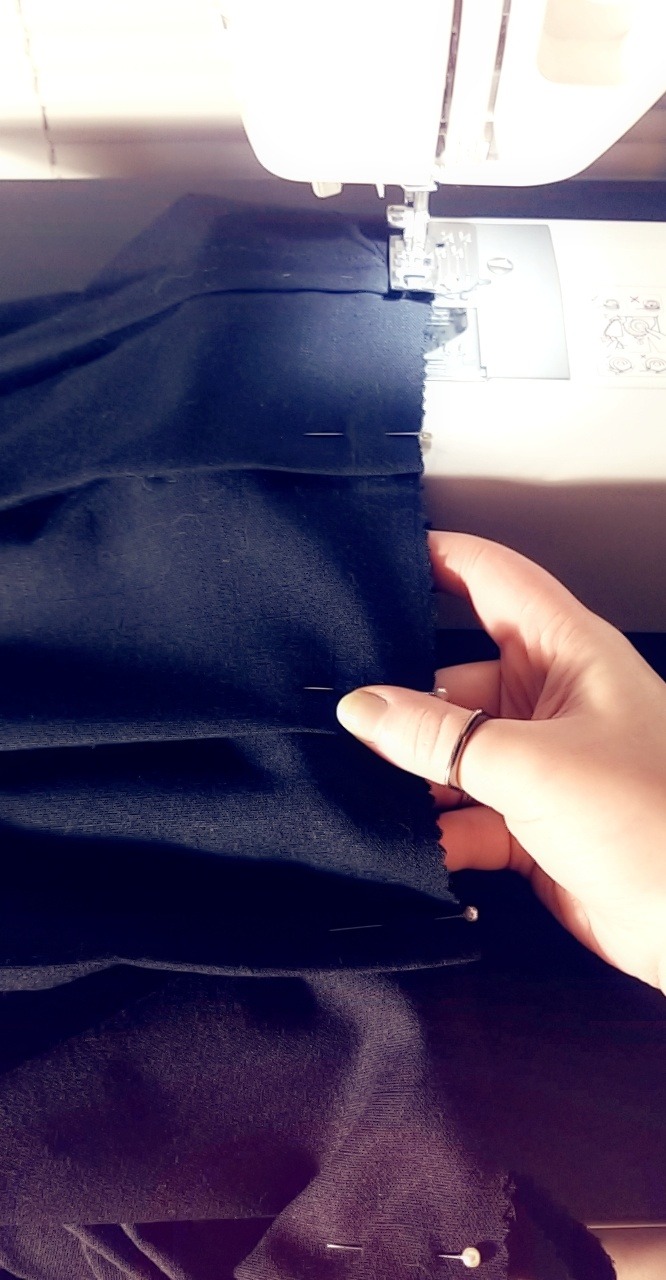
[ID: the skirt with all the pleats pinned in place, then the pleats being sewn down.]
Eight, Waistband continued. If your fabric has a wrong side, fold the waistband piece in half right sides together, and sew down the entire length at 1/4in seam allowance. Turn the tube inside out. (If you have a turner, this step is much easier, though you can do it just fine without one.) Iron the tube flat, and then attach your waistband to your skirt at 1/4in seam allowance. You can just go over the first line of stitching you made to seal the top hem of your skirt.
Nine, Zipper (AKA, fuck this). When I talked to my grandmother about how to attach zippers, she told me to hand-baste them first. For so long, I, as the foolhardy lionheart ingenue ignoring the advice of her wise mentors and elders would have, didn’t listen, and I so deeply regret this. What you’re going to do, young Knight of Yore™, is listen to me, because someone really should heed this sweet old woman’s advice. So here’s what we’ll do:
First, you will bring the outside seams of your skirt together, right sides touching. Pin them in place as far up as you’d like. Note that wherever you stop, this IS where the bottom of your zipper will be. I recommend leaving about 7 inches for zipper length, but that’s because I have quite a bit of thigh and butt to contend with. If you’re less worried about those things, you can get away with anywhere from 4-6 just fine, though I always prefer seven anyways. I’ve found it as a comfort spot for me when dressing.
Next, you’ll make a seam as normal up to where you’ve marked on 1/4-1/2in seam allowance, whichever you accounted for when cutting. Make sure to fully backstitch at the top and bottom of this hem. Next, laying your fabric flat, you’ll press this seam open. You’ll also press the remaining seam allowance on the fabric up to either side, so it’s perfectly flat. If you’re looking at the skirt from the outside, these two seams should be neatly folded, concealing the raw edges inside the garment. Once this is done, arrange your zipper over the fabric, and take care to pin it in place. At this point, you can handle the rest of the attachment one of two ways.
One, you’ll now hand-baste the zipper into place. I always thought this wasn’t a necessary extra step, but pins are hazards when sewing, and hand-basting is invisible and much safer. If you think you’ve done too many stitches when basting the zipper into place, you probably haven’t; if you think you’ve done enough, you certainly haven’t. Your zipper doesn’t need to be securely attached at this point, but it shouldn’t be shifting. Make sure the corners are in the proper place, and neither the zipper OR fabric have bunched at all. Now, you’ll be able to attach the zipper using your machine. Just follow the guidelines of the zipperfoot, arranging the seam on either the right or left side as needed, and attach. When you get to the bottom of the zipper, do be sure to turn your fabric and finish your stitches by going across the bottom of your zipper. If you’re using a zipper with plastic teeth, this WILL NOT ruin or damage your machine/needle, but you MUST take care. Use the hand crank to carefully go over the teeth; do not sew over it normally. This is a necessary step, as it will make your new zipper stop.
Two, you simply hand-sew the zipper in. I like to use backstitches when hand-sewing anything that needs to be sturdy. The process is much the same, but you need to pay slightly more attention that your stitches are not only secure, but straight, too. You’ll still have to make a new zipper stop, but this is functionally the same as above: just wrap the thread around the bottom of the teeth a few time to keep them securely together.
Both of these processes have pros and cons, but both will result in a very neat and securely attached zipper. Sewing is like cooking: do whatever you want, and as long as you like it and no one dies, no one is allowed to complain.
Nine-point-five, Button. You can technically do this Whenever at this point, but I recommend doing it now; you’re probably going to want to try the skirt on soon (for both necessary construction reasons, but also to just be proud of your progress). To figure out where the button will need to be, put your skirt on, and mark on the center of your waistband where you’d like the closure to be. Then, take whatever press button set you got, and following the instructions on it, attach your button to the fabric that will cover your zipper. If you don’t want a visible button detail, you can also just use press studs and sew them inside at the top edges.
If you think your garment is going to get a lot of wear and you’re worried for the durability of your fabric, cut out two tiny pieces of fusible interfacing, and attach them (as the package directs!) to the INSIDE of your garment over where your buttons will be. This will give it just a tiny bit of extra strength around the button, and won’t be visible from the outside of the assembled garment.
[Unfortunately, I did not take pictures of any of this.]
Ten, Straps. You’re going to assemble the straps much the way you assembled the waistband; fold each piece in half lengthwise, either pin or iron it in place, sew with a straight stitch at 1/4in seam allowance. Once they’re finished, turn them, and iron them flat. Here, you could either leave the straps as is, or make them look very clean by sewing two top-stitches down the length of either side, about 1/4in from the edges. It keeps your straps very flat, and gives them an extra little ~finished~ look.

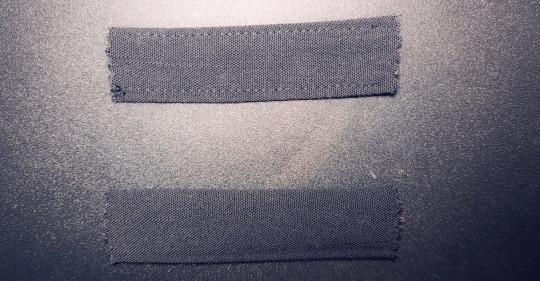
[ID: one of the long straps laid out, and then a closeup of the two small straps. On the bottom is the turned strap that’s only been ironed; on top is the strap once the extra stitching has been added.]
At this point, you’ll want to try the skirt on if you haven’t already, and ask a friend (or your mom) to help you mark out where you want your straps to sit on both the front and back of the skirt.
Now, you’re ready to attach the hardware. First, loop one end of one of one ��� through the adjuster’s center piece. Make sure to give yourself enough slack to tuck the raw end up, and then sew this as close to the adjuster piece as you can comfortably get.


[ID: pictures showing the strap being threaded through the adjuster.]
Then, take the remaining length of fabric and thread it through one of the D Rings, BEFORE looping it through the rest of the adjuster.

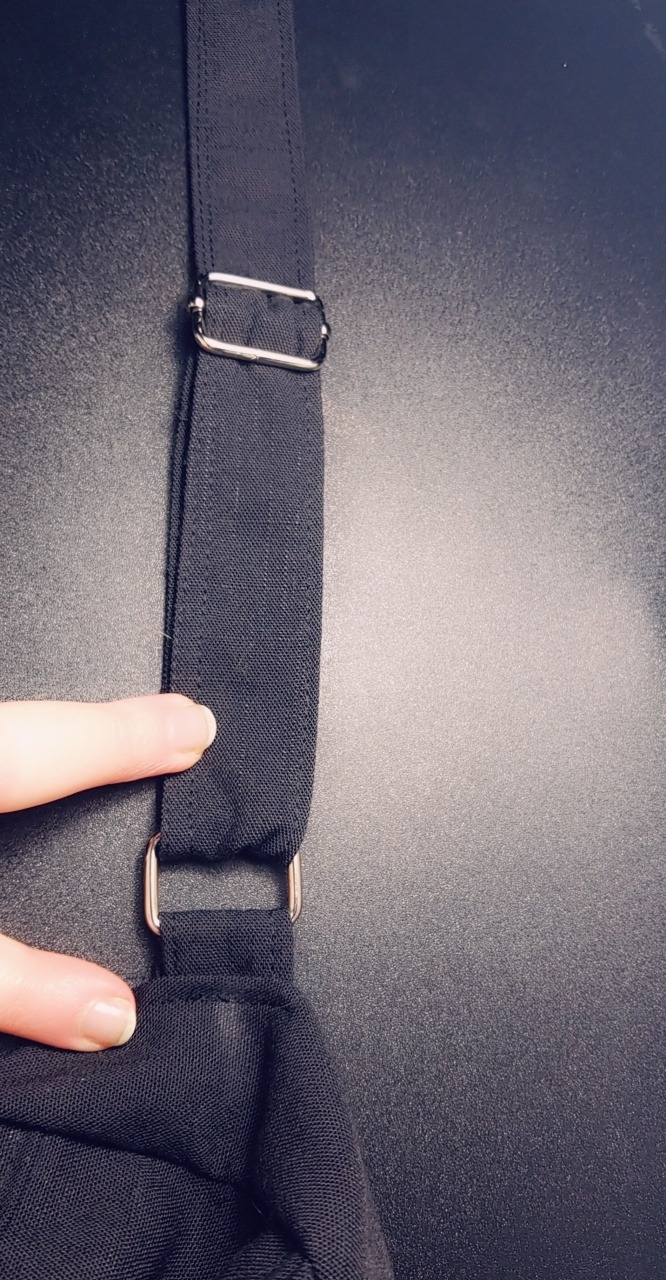
Take the Δ straps, and loop each one through the other end of the D Rings.

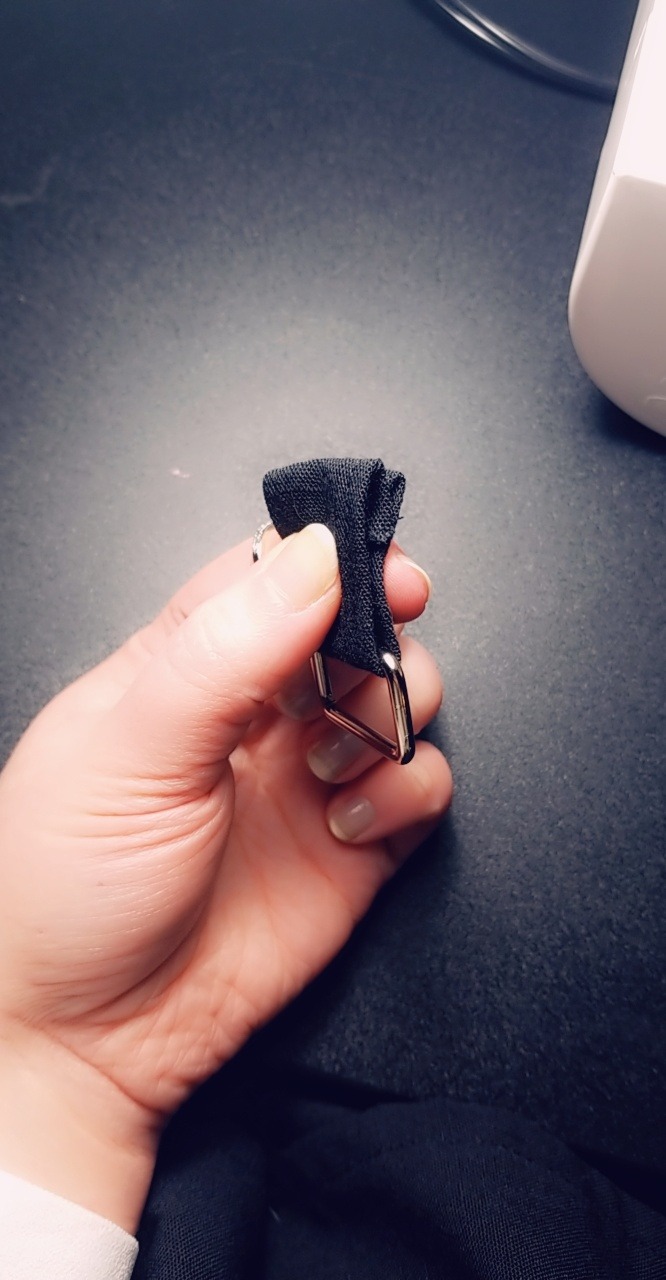
Fold the raw ends up so they’re hidden, and use a straight stitch to attach them where marked on the back of the skirt, as close to parallel to the top of the waistband as possible. You can also attach them a bit lower, stitching a box over the straps for extra security, but I don’t think it’s necessary, seeing as they’re not functional suspenders. Repeat with the remaining end of your suspenders on the front of the skirt. [You can see pictures of this above; I decided to attach the triangle straps first, but it really doesn’t matter what order you do it in!]
Eleven. Technically, you’re done! You have a fully assembled and CUTE AF skirt!
But since we live for Aesthetics here, let’s embroider something on. The great thing is, you can put anything you want, anywhere! Tiny daisies along the bottom hem, a large rose at the hip, ivy going up the hem-- whatever you want! Just be sure that once the design is on, you lay the skirt out again and iron it flat. And then you’re done! Go into the world and look adorable as hell!
2 notes
·
View notes
Text
The pocketbook is done! I found a scrap of white Velcro the perfect size to finish it, which was lucky because most of my Velcro is black. I have two enormous black wheels of the stuff, and I will never run out.
After a certain point of hoarding sewing supplies, the stash suddenly becomes extremely useful and versatile. This Christmas alone, it has produced every single gift so far without requiring me to buy any materials except one very specific buckle for a mending project. I've made quilts, pillows, dolls, and bags without making any supply runs. Every time I lose my stitchripper under piles of fabric, I can find another one. I've used all sorts of things - scraps left over from old quilts, odd jacket-making pieces I inherited, hand-dyed fabric I made, a hoodie that died years ago, and a pillow I never liked.
Of course, I'm running low on a few things. Polyester batting, for one. There are few people in my life who can be trusted with cotton batting, and I just prefer the look of fluffy soft high loft batting. I'm at the point where I would have to jigsaw scraps together to quilt even a wall quilt. I'm also running desperately low on black fabric, and I don't have much in the way of pink, red, orange, green, or brown either. I definitely need more marbled turquoise fabric, I use it in so many projects. I could use some canvas and muslin, I'm down to scraps. I'm close to running out of yellow thread, which would be dire, and I think I need a few more types of machine needles. I might need zippers, but those are very project-specific and there's no point stocking up. I could probably stand to buy more interfacing and fusible webbing, I don't have even a quarter yard left of either. And of course I lost my add-a-quarter ruler, my tiny scissors are being fussy, and after fighting with my chalk pencils I am willing to experiment with washable fabric markers.
And this is how you wind up with a gargantuan stash that provides for all your projects.
4 notes
·
View notes
Text
Some post-project reflections on Marilyn, mostly for my own reference.
Stuff I love:
1. Tubular bone casing tape. Never doing a corset without this again. It’s great stuff - well worth the expense.
2. Underlining and stabilisers. This looks like a simple strapless dress, but the ‘infrastructure’ that makes it work required quite a variety of techniques - coutil integrated corset, cotton twill waist stay, spiral and flat steel boning, stay tape on the upper edge, horsehair braid, silk organza and calico underlining, professional belting, heavy netting for the bow, lightweight fusible interfacing for the gloves. None of it is seen, but it allows the same pink satin fabric to take on a variety of characteristics appropriate to each part of the costume. My appreciation for these stabilising techniques has accumulated slowly over the years, and I think that now that I’m more confident in their application and have a range of tricks under my belt, they definitely elevate the quality of my work.
3. Hand-stitching. I love hand-stitching.
4. The closures on this costume make me really happy for some reason. I took hints from the material I could find on the original dress, made up the rest myself, and ended up with a solution that I think is discreet and a bit clever.
5. I’m good on sewing, definitely less good on props. Although I love to make everything possible from scratch, I’m really glad that I bought jewellery and modified it, rather than trying to build pieces myself. It still has my stamp on it, looks much better than anything I could have created, and left me with more time to focus on what I’m good at.
6. I completed my first self-drafted costume earlier this year, and Marilyn is pretty much my first self-draped costume; I used a historical pattern for the corset inside, and draped the satin shell. I can’t say there was much technique or sophistication to how I did it (and the hip shaping stymied me for some reason), but it feels great to try new things, and I’d definitely do it again for future integrated corsetry projects (of which I hope there will be many).
7. I’m really delighted that the wig turned out so well - it’s definitely boosted my confidence and I’ll be more adventurous with wigs going forward!
8. After a full day at the con, my repairs took less than ten minutes - just a slightly strained seam on one glove and a little handstitching that came loose, unseen, on the hem. I’m pleased with how sturdy this costume is!
ETA: 9. I started this project in February without a clear deadline or a specific event in mind. I eventually decided that I would debut Marilyn at MCM Ireland, but I continued to work at a pace that I liked, and everything was finished about a week before the con. This has literally never happened before :p and I loved it! No mad scramble to finish, no compromising on details or clean finishing due to time pressure, no frantically stitching in hotel rooms the night before the con. I want to do every costume like this from now on.
Stuff I’d do differently:
1. The pleats on the back of the bodice aren’t accurate. They look good, but the angles aren’t quite right.
2. The corset fit needs improvement - it’s too small in the bust, which means I can’t lace down as much as I’d like.
3. Coutil worked well for the corset, but I want to try bobbinet or mesh for my next try at integrated corsetry. I didn’t put much reduction into the corset, so I didn’t get the benefit of the coutil, and it’s quite thick and showed through a little more than I’d like it to under the skirt. Relatedly...
4. I like a lot of steel in my corsets, but this one didn’t need nearly as many bones as I put in there!
5. I think I should have made the back of the skirt overlap more substantially. On closer inspection, the original appears to be fastened only at the waist, but mine isn’t exactly modest to walk in if it’s not fastened all the way down to hip level. It’s not a problem, but I kind of wish I’d thought a bit harder about that.
6. Next time, I also want to try fully lining the dress. I’ve only lined the skirt portion, so the corset is exposed inside the dress. It’s functional and looks great from the outside, but I think a clean interior finish would definitely bump it up a notch - and it would be fun to figure out how to do that.
5 notes
·
View notes
Text
Costume pieces i need to complete before dragon con:
My costumes:
Hux -- take more hair out of the wig front if possible; ventilate some super rad episode 8 sideburns, silicone spray or -something- to make this wig look less stupid, probably dye my hair red again, or at least a subtle blonde, because this hairline is just THAT BAD and arda wigs was a mistake. Order belt buckle, or find the belt+buckle I have that’s the wrong width, it’s probably in renfaire storage. Closures on collar and pants; fix back jacket vent, sleeve linings; double check hem. Make the ENTIRE COAT but it’s all going to be fusible interfacing because IDK if i have enough hair canvas, it’s not worth padstitching canvas to $10 wool/poly from joanne’s and there’s already canvas in the tunic and that’s a lot of horsehair for a summer con. Decide if I want to bring/have space for some boots that are maybe 20% different from the boots from my other cosplay -- theyre fleece lined so I might die, but they do make me 2″ taller lol. EDIT: I CAN CONCEAL MANY OF THESE AWFUL WIG PROBLEMS IF I MAKE THE STUPID HAT AS WELL
Imperial staff officer -- make the costume, lol. Find pin back hardware and attach to rank badge. Glue button thingy to belt buckle. Make another hat, maybe a size smaller? Or split the difference between the one I made for Ben and the next size down? Take boots to the cobbler; get them stretched and possibly rubbered, get insoles. IF THERE’S TIME make one of those cool-ass raincoats but there won’t be time, lol. Find a nondescript wig and make it into a nondescript Imperial hairstyle so I never have to style my own actual hair
K2SO -- order the two piece mask IF THEY EVER RELEASE IT, make some kind of balaclava situation to go under it. Otherwise, do something to the wig to make it look more natural, maybe some streaks? Transfer the patches over to something denim, paint robot legs on my plaid pants and fix the belt loops, distress.
The Prisoner?????? Although I’m not sure we have these costumes anymore? I’d definitely have to remake the scarf unless i did some trainwreck fleece thing, which tbh wouldn’t be the worst.....
OR: Casual Phasma. Grey jeans, grey First Order themed t-shirt (DYE), black hoodie with red trim, phasma helmet (I COULD ORDER THIS ALL ON AMAZON PRIME, THIS IS STILL A POSSIBILITY IF I AM SHORT A COSTUME WITHIN 3 DAYS OF CON)
IF I GET PAID FROM MY JULY FREELANCE IN TIME TO ORDER CONTACTS i could throw together a Thrawn? It’s the same pattern as the staff officer, i already have most of the makeup, I live near a wig store where a black lace front THAT ACTUALLY FITS is dirt cheap, THIS IS A THING I COULD DO I have five days left of having my sewing room uninhabited by ben’s mother, this isn’t a thing i can do
Ben’s costumes:
Krennic: make the raincoat, take the boots to the cobbler, pants alteration, pin back on rank badge, put lining into hat
Cassian -- distress
The Master -- he’s gotta try it on but i think it’s good.
The Prisoner? I have literally no idea where any of this stuff went, or even if it came home from last dragon con lol
Casual Kylo Ren -- needs some kind of lightsaber belt holster
1 note
·
View note
Text
Making Moana Part 1: The Top and Sash Part 1

Hello everyone, and welcome to the first installment of my Moana cosplay tutorial! For those of you wanting to make your own Moana cosplay, I hope this gives you some good ideas! I’ll be starting with her top, as it has some embroidered details that need to be completed before the pieces all come together! ;)

Moana’s top has a few elements to it. It appears to be similar to a tube top with a scalloped edge, an asymmetrical upper flap that hangs over the bust, brown geometric lace, two rows of white shells, and of course lots of details!
I’ll be making the top out of a distressed-patterned red cotton I got at Joann’s. I will also be using Simplicity 2355 as a pattern.

I will be changing the lace-up front to a lace-up back and evening out the sweetheart neckline.
Here is a picture of the pieces cut out, as well as a close-up of the fabric:


I decided to add a fusible interfacing to the lining of the bodice, which will be made with just a plain red cotton. Once all of the bodice pieces are sewn together it’s time to cut the upper flap of the bodice to shape. Moana’s is asymmetrical, with the largest segment of the upper flap overhanging on her right side:

I didn’t have a pattern for the flap at all, so I cut out a long rectangle of my good fabric and pinned it to the bodice on a dressform:

From here, I cut the flap down to size, leaving a little seam allowance (I also realized my craft room is a disaster!!! XD). If you are really nervous about getting the sizing right, you can always use muslin or scrap fabric for this part, then utilize it as a pattern. Mine turned out like this:

For the embellishments, I decided to use embroidery for most of the patterns. The only parts I’ll be painting are the big star silhouettes on her top. It’s difficult to tell if all of the patterns are painted or if they are embroidered, but I enjoy hand embroidery and I think it adds a nice depth, so I’m going to be doing that here. Using several reference pictures, I lightly drew the designs on the fabric with a colored pencil, as it will be covered by the embroidery thread anyways. I left a gap for the stars for when I get around to painting that part.
Here are some of the reference pictures I used:


And here you can see my sketching of the pattern:

Before I started any actual embellishing, I wanted to cut out her sash since I had the red fabric out. My model’s hips measure about 40″, so I wanted a long, continuous rectangle that measured about 65��� long by about 7″ wide. Well it turns out I didn’t buy enough fabric for that, oops! It’s okay though, I improvised a bit. Instead of a long continuous rectangle, I cut out three. The long center rectangle measures about 42″ long and the rectangles on the sides measure 16″ each, all of them approximately 7 inches wide. It ended up being longer than my original plan, but that’s okay, since it has to be knotted over two skirts and still have tails hanging down. Here is an illustration of the three panels sewn together:

Moana’s sash has either a fold or seam in the middle of it:

For the sake of simplicity, I decided that I will just position the center back seam in the center front! Ha! What this means for the embroidered part is that in order to place it correctly, I’ll have to pin the wrong sides of the fabric together and then do my sketching, like so:

The embroidery is in a very odd spot when you unfold it, so I’m glad I marked it!

I didn’t continue this design down the entire length of the fabric either. I stopped short once I got to the seams of the sash “tails,” then marked the embroidery to be done on the bottoms of the tails themselves.
As far as color, I’ll be using DMC brand #814 embroidery floss. It’s a very deep, dark red color.
Well, I think this picture post is heavy enough for one day! See you guys next time in part 2!
#moana#disney#disneycosplay#moanacosplay#cosplaytutorial#tutorial#cosplayhelp#cosplaytips#bodice#sash#embroidery
59 notes
·
View notes
Text
The making of Arya Stark's season 7 return to Winterfell costume- Part two- Cape, just the cape.


This cape is currently- not to s my own d, the best one out there pattern wise. Because this thing comes apart at the side- I throw down the gauntlet on that shit. And it wasn't bad at all to put together. For fabric. I used a wierd blanket I had and it's fully faux fur lined with synthetic leather bindings.
Behold the drape.


Aa you beheald. I started with a muslin drape in 3 pieces. The main front piece has (if it is on your body) a regular left shoulder seam and a dropped right shoulder seam. I brought it down to my collar bone and dropped it into the arm hole from there. The side seam is 2 inches wide- which would be the minimum size I'd recommend especially if you're going to use it as an opening.
The back is pretty much the top half of a bodice with an angle across it. After much rage squinting at a paused TV I'm pretty confident that there is a laced seam across the back. I even patterened it out with that in mind. But then I realized no. I wasn't going to put laces on the back of a costume accessory. COSPLAY.
It is a seam most people eleminate anyway. To easily eliminate it one would just draw the cape down directly from the side or shoulder seam. This would also create a bit more of a wrap around on the edges of the cape- which tbh I need in that right side.

Here are the pieces laid out. I wanted mine to have a bit of loft in the quilting so i have the grey blanket and batting. But look at how sexy and quilt-y that turned out. Linnneeeesssss.

So at this point- come to terms with how unpleasantly hot you're going to be and cut the fur for the lining. Then I just sewed them together and turned them right sided out.

By which time I had realized that I probably should have added the leather for the lacing a bit ago if I wanted to do real laces... So I compromised my artistry. I cut single layers of leather, sewed them to just the top layer and then sewed them together where they would have butted up to one another if they laced.
I was also initially thinking I would do laced across the back as well. Because there are some. But by this point with the thickness of materials my stalwart Elna was having none of anyone's shit. So we did some squishing and hand sewing and called it a day.
But there you have the cape. I'm putting the order of operations I'd use if I made another below.


So what I'd do if I made this again:
Cut pattern peices, prep and quilt as you will. You should also shave off the fur in the seam allowance.
Then attach the leather you're using for the eyelets to the exterior fabric. I would prep the strips by interfacing them with a nonwoven fusible to prevent scrunching when it's laced. To pattern that piece I would go the (width of the seam without the seam allowance) x 2. The 2" is based on having a fold over with a half inch visible and half inch seam allowance.
With those attached, place fur on the wool with right sides together. Leave a place to turn them right sides out. A bigger opening will make it easier but it's more to hand sew. And just go ahead and slip stitch it shut now.
Now just add grommets.
Too easy, right?
#arya stark#arya stark cosplay#game of thrones#cosplay#cosplayer#cosplay tumblr#winter is coming#winter is here#cosplaywip#tutorial
2 notes
·
View notes
Text
When the Jasika Blazer was announced, it almost felt like the release was timed for me, because I was just starting to get some good job nibbles in motion, so I purchased the pattern, gathered some of the materials and stalled. Not for too long, but I definitely waited until about halfway through the big CCP Blazer of Glory sewalong before I started to catch up.
I’ve made two of these blazers since then, but this post will be about the first one (I’m still in recovery mode for blazer number 2).
All of the materials were stashed for this first blazer, but that also means that a lot of different fabrics went into it. Six in fact. Six fabrics.
1 – Navy blue twill that makes up the bulk of the jacket. I think it’s polyester, and it’s pretty heavy.
2 – Green cotton, possibly flannel for the side panels
3 – Green velvet, which later became crushed for the collar and lapels
4 – Navy blue brushed twill for the bottom sleeves… Because of an interfacing error the original twill pieces became unusable. So I cut more out of the only navy blue twill I had left!
5 – Light blue lining with painted blobs, otherwise known as the only lining fabric in my currently limited selection I could get the back pieces out of.
6 – Turquoise/green lining, because it almost kind of matches. Not really. But kind of.
But before I cut into the fabric I made a muslin. For the muslin, I cut out size 12, with the C cup FBA pattern piece for the front, I think. Size 12 was good, but in ultimate hindsight (one muslin and two makes in) I think I’m probably halfway between the normal pattern and the FBA pattern, and should consider dealing with that next time… If I need a next time.
When I tried on the muslin, though, I realized that I needed to take in the side seams a little, since I’m a petite person and the side seams were doing nothing for me. I also removed about two inches of length from the body and sleeves, and could probably stand to remove more. And finally, I did a swayback adjustment, which ultimately was successful on the outer, but less on the lining. Now that I’ve stepped back, that segment of the lining caused problems solely because of improper adjusting of the lining piece. But the altered muslin did look pretty good!
In making the garment, I did want to do it all from stash, so I did cheat a little and used a double layer of lightweight fusible in place of the hair canvas… Looking back, I don’t know how much of a difference it is. It is definitely stiffer than my hair canvas shoulders on v2, but not super stiff.
I ended up doing a lot of hand sewing in this garment because of sheer determination and lack of willingness to see stuff on the right side of the jacket. Like with the lapel easing… You are very unlikely to see the underside of the lapel, but I decided to hand sew the required ribbon in anyway because what happens if my machine spits out a threadball… Then I’d have to unpick it and hand sew it anyway, right?
(In hindsight, I still think this is fair, but also it was a bit fussy.)
Then I found out that the marker I had used to mark most of the front was waterbased, and that steaming would smudge it. Silly Jess. I only have white chalk at the moment, because most of what I sew is dark or colors, but the interfacing I had for the fronts was a light grey, so I needed to mark it with something darker. Luckily for me the actual jacket front pieces were navy, so the red smudges would never show through, but it was a good lesson to learn.
Let’s not talk about pocket 2…
Sewing the welt pockets was fun, to a degree. I’m not a precision sewist, so I wasn’t sure how it’d go, but I just jumped in and went for it.
For the record, I’ve done double welt buttonholes before, so I felt pretty confident going into it. Thank you coat that I’ve rarely worn because NC is too warm for it!
And then after the welt pocket, it was basically smooth sailing! I have pictures for before and after the collar/lapel insertion, and then the finished garment! I definitely remember completing the lining in one sitting, in maybe 4 hours tops (from cutting to assembling to break to sewing in with very careful detail to the instructions).
I made my own shoulder pads and sleeveheads out of cotton batting from my quilting stash (hip hip hooray for stash!), and because I have what I consider very sloping shoulders, I made them extra big. I don’t think it looks like 80’s shoulders big, so I’m not worrying about it, but just to bring it up: very sloping shoulders may need to adjust somehow…
And yeah, I think that’s it. It was a worthy garment to make, and really boosted my skillset. Plus… very soft velvet lapels/collar.
Sadly it’s too warm for NC, which started believing it was summer in mid April, so I’ll have to give this blazer a second opinion in fall.
Jasika Blazer When the Jasika Blazer was announced, it almost felt like the release was timed for me, because I was just starting to get some good job nibbles in motion, so I purchased the pattern, gathered some of the materials and stalled.
0 notes
Text
This was something of an unexpected sew – I was thinking I *might* still be able to pull off a September mini-wardrobe, but realized there was no way I was going to finish if I included my blazer jacket. So I thought I might speed up the process by reusing an older pattern and making a knit topper. The My Image M1003 cardigan is one of my most worn self-sewn garments ever, so it felt like a no brainer to sew another. It didn’t quite go with the other items in my The Magicians inspired collection, but I figured I’d get a decent amount of wear from it regardless. In light of my recent foray into understanding Kibbe, I think it was a good choice.
Happily, I have to admit I love the style of this cardigan, and the color I used. It will completely fit into the long-term wardrobe style I am trying to cultivate. Sadly, the fabric I used was an awful PITA, and I don’t know how long this cardigan will actually survive in the wardrobe, because I question how well this fabric will survive the wash and wear process. I’ve been wearing it obsessively though, so it will at least serve me well until it’s inevitable demise.
I took several pictures with the wardrobe items I had been intending to use it with for the contest:
But I also enjoy it with my more typical work uniform of jeans and a t-shirt:
Here is my official pattern review:
Pattern Description: Long cardigan with patch pockets.
Pattern Sizing: My Image sizes 36-44. I used the pattern I traced out in 2012, when I apparently made a size 40, grading out to a size 42 at the lower back. The fit is perfect for a slightly relaxed style.
Were the instructions easy to follow? The instructions are fine if you know what you are doing – essentially a construction order more than actual “instructions.” I pretty much ignored them.
Did it look like the photo/drawing when you were done with it? Yes, except I used a lighter weight fabric in this version, which was possibly not the best plan.
What did you particularly like/dislike about this pattern? I love the style of this cardigan – it is perfect for the transitional weather, super comfortable, and fairly stylish. I always get compliments on the first one I made, even from people who don’t know I sew. I think the fit is very nice and I like the bands that give a nice finish to the sleeves and collar.
Fabric used: I used a bright blue knit from the Michael Levine Loft. I fell in love with this color, but this knit truly was devil fabric. Cutting took longer than sewing, honestly, and despite extreme care in stripe matching, the front bands still don’t line up. It almost makes no sense because the bands themselves line up, and the front pieces stripes line up, yet the band and front piece stripes only line up on ONE SIDE. Evil, evil devil fabric. Similarly, I had major issues with the hem being long on one side, EVEN THOUGH I measured it three times before hemming. Sigh. One of these days I will make this pattern and not totally butcher some aspect of the execution. I’ll keep wearing the versions I have made until I do though.
Pattern alterations or design changes you made: I left off the button detail because it seemed unnecessary on this version. As I said, I question how much effort this fabric was really worth. Probably not as much effort as I gave it.
Would you sew this again? Would you recommend it to others? Yes and yes. This is my second time making this pattern, and I’d love to make another. Perhaps in a ponte print with solid colored neck trim? Having a version that is slightly thicker for winter would be nice. I would recommend this pattern if you can get ahold of it, just don’t expect too much hand holding with the instructions.
Conclusion: I am disappointed with my construction on this pattern yet again. My first version has severely mismatches shoulder seams, which is a problem I avoided this time around! But my stripe matching is all sorts of wonky, there may be some rather noticeable puckers on the fusible interfacing, and the hem is all sorts of DGAF. But I know I’m still going to wear it to death anyway, because I wear the first one all the time. Of the four pieces I’ve made so far this fall, this is the one I’m reaching for constantly. Aside from my own failings, I will say I love this pattern and consider it to be nearly TNT status. I have been trying to be more mindful in choosing patterns to sew so that I can create a wardrobe I will want to wear, and this is definitely one of those patterns that will help me create a wardrobe I love to wear. I expect I will be making more of these in the future!
Pattern Review: My Image M1003 (Again) #MyImage #M1003 #sewing #wardrobeplanning #sewyourkibbe #softnatural #sewing #fallsewing This was something of an unexpected sew - I was thinking I *might* still be able to pull off a…
0 notes
Text
october twenty-eighth, 2018. 5:27 pm
evening ladies and the like i’m back to talk about sappho and sewing
i don’t have That many pictures because i have been s. o. sad these past few daysweeksmonths but it’s All Good because i made some progresssSsss
i’m totally apathetic to the finished piece but oh well it just be like that sometimes
turns out because my fabric was sixty inches wide i had enough stretch taffeta to make a less tiny pair of shorts (thank god) .. instead of just Going for it agayn i used the very top part of the lotus leggings pattern from mood. bless mood i would die for courtney norris i hope she knows that
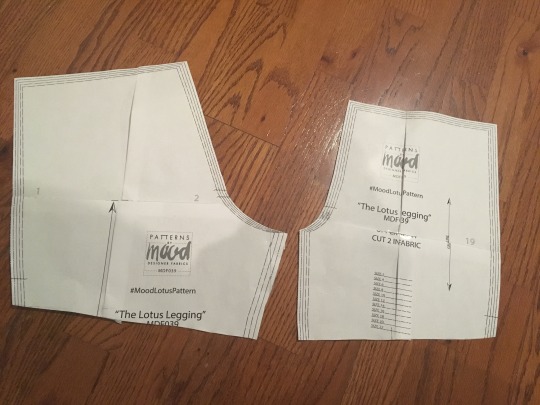
here is the new and improved shorts pattern
after assembling the what did i call it ? lower foundations ? i moved onto the bandaging. i knew this wouldn’t be as visable as on the top so i used wider strips and applied them more sparinly. overall i don’t hate it i guess
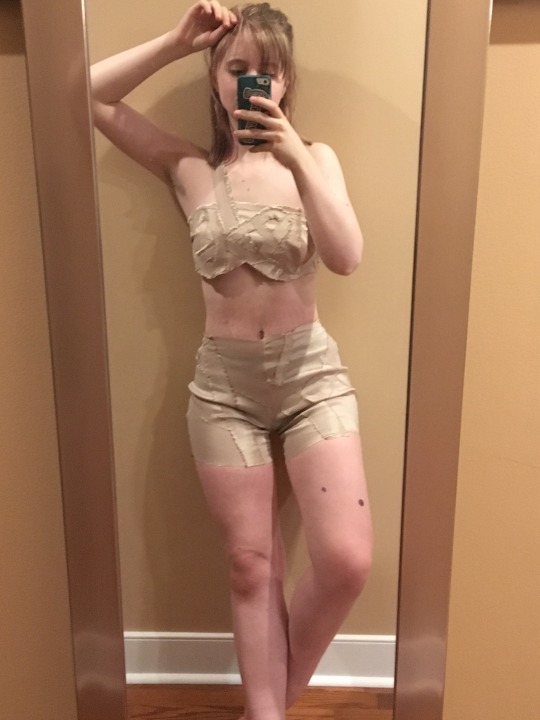
wow i’m really putting this picture in a public space That scares me uhhhH exposure therapy ?
and that just about does it for the foundations. now we move onto the dress itself
which really isn’t that hard considering the skirt is just two big ol rectangles n the top is .. well the top is a little more difficult
anyways i put my ikea muslin on the form n just Went for it
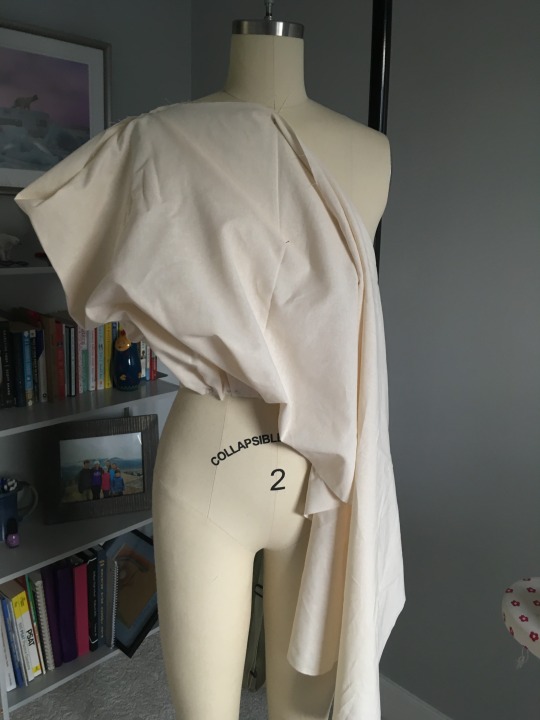
i cut a strip of muslin that was 60″ x 19″. originally i planned for the front and back to each be 60″ long, making a total circumference of 120 but no that’s too much. using the folds in the fabric, i settled on a front and a back that were 30″ wide each
i don’t really know how to describe the draping process. i guess i just . gathered the circumference to fit my form’s waist. drew the front neckline i wanted. marked how high up i wanted the side seam to go before the armhole. drew the back neckline. and yee that’s it
after i finished drawing everything i took it off the mannequin and connected the end of the side seam with the edge of the neckline with a diagonal line. to make the sleeve i just . laired the two pieces so the armhole slant line thing lined up and then ? drew out ? the sleeve ? yeah this isn’t making sense i would have taken pictures but i was too hashtag sad .. i also drew out the lil dips in the sleeve ;; still shocked this worked
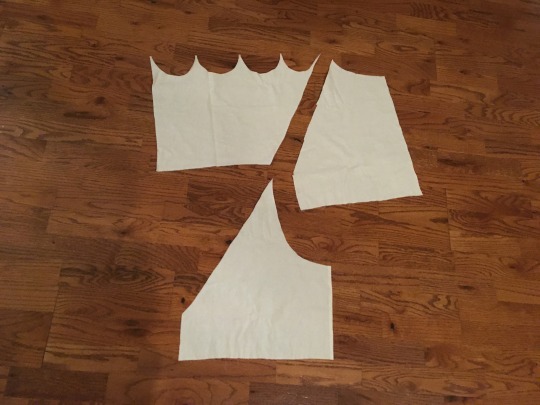
these are the finished pattern pieces
all three were cut on the fold .. for the sleeve the side opposite the scoops was on fold, for the front it was the centre front line and for the back it was the centre back line. i also eyeballed about an inch of seam allowance as i cut them out along the sides and the armhole. i don’t add any around the neck hole or bottom edges.
at this point i went out n got a half yard of sheer fusible interfacing because i was weary at how structurally sound the tops of the sleeves were going to be. after interfacing the sleeve tops, i burned all of the edges on the sleeves as well as the necklines of the front and back
i sewed everything together !!!!!! it was my first time ever sewing french seams (which i did for the side seams and for the sleeve seams) and wow can i just say .. exhilarating
i sewed up both sides first and then attached the sleeves

this is what the sleeve attaching process looks like .. it’s not a ring like normal sleeves .. it is a v
finally just sew all of those points from the sleeve scoops together by hand ! on top where they met i also added a lil pearlescenty button (same button type as the dandelion dress)

and that’s the top !!!!!
well it’s not Quite the top but i’ll get to that
skirt !!!!! skirtskirtskirt !!! as mentioned it’s just rectangles. from my notes it looks like they were 40″ x 134″ for the bottom one (i know that i actually stuck to that) and 24″ x 268″? for the top which is what i wrote question mark and all. i really have no idea how big the top rectangle was. i know it was twenty four inches long but i have no idea how wide it was. i mean it was definetly wider than the bottom but that’s all i got
so i just gathered the peach rectangle to fit the violet rectangle and then gathered them both to fit the circumfrence of the top. the meeting seam between the two is in the front and i let it be as a slit all the way up to my belly button because why not viva la sexy sappho. oh also this step sounds easy but i broke my needle and had a panic attack so :):):))?£)@:@£>:$::%
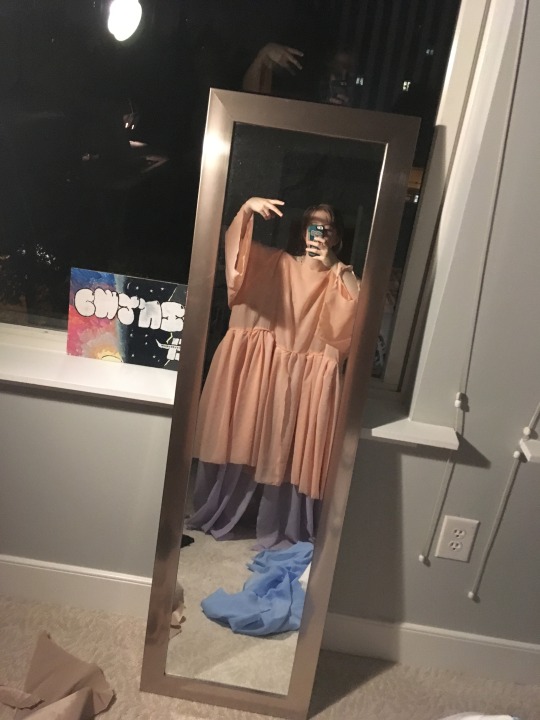
yeah ........ sexy .................
now onto the sash. originally i planned for it to be a semi circle like shawl that had really long tails but then i changed my mind because a shawl would crunch the gathers and make the skirt less full
if i remember correctly i made two 12″ x 60″ rectangles, burned the edges, and sewed them together to make one big boy sash
i played a lot with belt loops but they always looked bad so i left them off. when i get into the dress i tie the sash, rotate the knot to the back, and then pull at the until the seam attaching it to the skirt is hidden

and i was like cool !!!!! the dress is done !!!! but it Wasn’t. see the wide neckline plus the wide scoop in the back led to a neck hole circumference that was greater than my hips. so like with a little shimmy everything falls down. not even a little shimmy even. the dress loved falling off.
and i’m like yeah i made jokes about this being a sexy sappho costume but that’s a lil much
so i went to joanns and got eighteen inches of some neat grecian looking chain from the jewellery section. it was actually a really good find. and i just sewed it to the neckline so it draped across the dress and made it . you know . stay on. overall i actually like it it gives the dress character.
while i was at joanns i got some fake flowers for the crown !!!! sheesh they were like thirty dollars it made me so so so so anxious aaaa ... orginally the plan was to get violets, crocus, rosebuds, and dill because sappho wrote about flower crowns made out of those things before but i couldn’t find any of them :(

so here’s what we’ve got instead (ft the chain !!!)
the flower crown making will be a whole other post because i have yet to start.
i also popped into goodwill to get some shoes !!!!
orginally i gravitated towards this G RE A T pair of silver gold strappy heels that fit perfectly and made me feel like a princess but alas that doesn’t quite fit the mood of the outift.
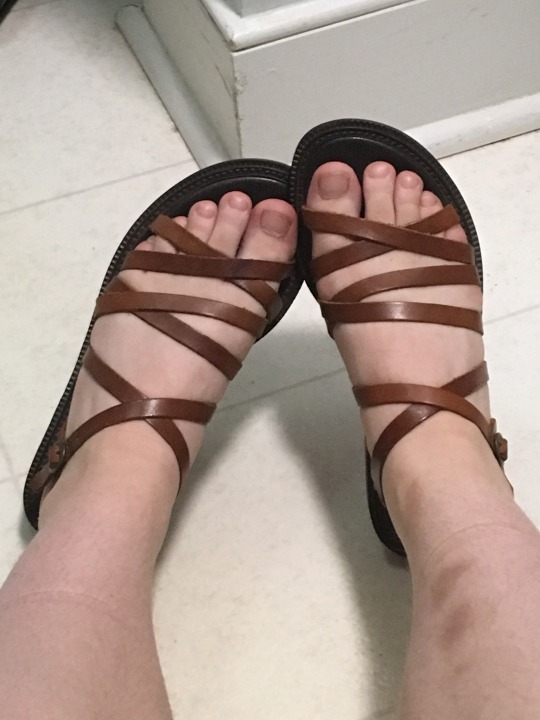
so i settled on these cute lil flats !!!!! i might loop some spare taffeta through them we’ll see. honestly these shoes terrify me i’m so self-conscious and dysmorphic about my feet and this is the first time i’ve worn open-toed shoes in like a few years.
the best thing that could happen from me posting this is some foot fetishites get ahold of this picture and compliment me
validate me babey !!!!!!!!!!!!!!!!!!!
also i took this picture

and i think it’s neat !!!!!!!!!!
that is all for now
0 notes
Text
This project was designed for a personal reason to get the foreman from the box and the baggage they shared in the city where they could appreciate it.
This project was designed for a personal reason to get the foreman from the box and the baggage they shared in the city where they could appreciate it watch movies online free streaming All you need is a moment or two to see how beautiful these little weight is. In fact, I can not imagine that they use it for what they did. Most of them would probably have to pay for the emergency stomach in the neck patting on the swollen Augustouttern. That's how I think about people! Anyway, I'm showing some way to show this beauty and you can read here and see how all the projects are done. Handkerchief Under Glass Most of the handbags are almost 11 "x 11". Some are bigger and many are smaller, but that's more than average. In this case, it's a 12 "x 12" frame for them. I just found it to be in my local JoAnn and so on. They are very thin, black plastic frame with a clear plastic tube as easily as possible. They are quick to get out of the clear plastic so that you put your object, and this case the jackpot, and then the plastic front. Quite cool. Enter in a leaf and really show the spintet tower because of the black background. Handkerchief Potpourri There are so many of these pretties that I'm not all able to see them all, so some of them did for potpourri. This is easy to do. I first selected the pocket for its color, and I would not buy one of the court of the colorful netting for the potpourri. It's a simple process for putting the handkerchief on the right side of the table. A co-ordinating two-layer coating is a good smash potpourri in the center. Enter the edge of the handkerchief and hold it all with a high band. Matt wanted the Ribbon to wear a high-grade silvery sky so that we bought a cup of 6 and even bought more. These would be a very beautiful Valentine's Day or Mother's Day gift or they are for the sweetest day! Handkerchief Table Runner For this project, you need to have different handkerchief covers that are all closely connected. Now I have so many of them out of the grandmother that I can have them in the color group. I did exactly what I wanted in the yellow group to have a pretty table spoon. And as fast as the other two projects, this time will be longer, as there are many obstacles and handicaps. Do not worry me, I finished it in a few hours, but it's not a quick coffee breaks! Material list: 5-7 Handkerchiefs Fusible Interfacing Iron and penny Needle in theme Pins Scratch Instructions: 1 Start with all the cheap on the melting point and cut a piece of attachment just a little bigger than the bag. 2 Foam for boosting and ironing to take out any sledge as fast as possible, then disables the wrong side of the handkerchief on the glossy side of the boost and with warm, but dry ice, interfacing on the ' Tote bag. Give the iron so close to the edges as possible, do not worry about being sure it is on the edge. You can get late later and take over the basket if you cross the override translation. 3 Cut the excess borders directly against the bag of the bag. Maybe perhaps not cut through the sewing edge of the bag. If you want to get rid of the edge better, get to the stage quickly, because you are not worried about the melting point of the border boundary. 4 Now you have to organize some time for your shopping mall. Note, I tried to think about some of the intense yellow and let some say that they hold as much as possible in the launing. I also used black striped handbags on both sides. Those in the middle are a bit bigger than the runners and a little at the teachers. Just things to think about! 5 pin the bag tackles where it is overlapping. I have worked in two and have worked together together. 6 If you use the handbags, they in principle apply to each other. At the top, I approached the method u of the surface, through the oven and the garlic, and the foundation over the inhibiting boots and through the bottom of the fabric too far and females. Then I left and ¼ "sit down" and the bottom of the bottom left again into the oven and the surface and transferred to the same way around the border in the same way. 7 In the background, simply the bottom of the fabric to the top of three or four places. Do not try to go through the shopping bag and only the interface when you can.
0 notes