#I really need to re-export my sim images
Explore tagged Tumblr posts
Text


#ts2#uv#uv capp#uv veronaville#I really need to re-export my sim images#Especially since I pulled out all my clothing defaults
0 notes
Note
do you think youd make a tutorial on how to convert hair from other games to sims 4?
probably not in detail, but here's the general guidelines to convert hair from any games!
1. Prepare the mesh. Do necessary fixes and adjustments.
🚨 Important:
• Use the face orientation feature on Blender v2.8+ to see your mesh's face orientation. Make sure that your mesh's faces are blue, not red. Red faces will be transparent in the sims 4 and you might not want that to happen (unless you know what you're doing).
To fix the red faces, select them in edit mode and flip the normals. You can also use the solidify (0.01 m) modifier if you need both faces to not be transparent.
• If you're converting CC that need transparency (for example alpha hairs), you'll need to use Milkshape or 3DSmax to reconfigure the mesh layer order.
2. Prepare the texture (diffuse image).
• You can also use EA's texture from any hair (or any texture really) and reconfigure the UV map using blender, which I did on some of my hair conversion.
Make sure that the UV map is located on the hair region (use the UV template image as a reference). Use blender to reposition the UV map.
3. ⚠️ Optional but recommended: edit your mesh to be compatible with both hat types. Use sculpt mode and bisect tool in edit mode to do that!
4. Prepare you . package file.
• Using S4S, export a .blend of an EA hair mesh. Open it, replace all EA's hair mesh with your mesh(s). Reconfigure the cut number, geom, weight, modifier, etc. Then save.
⚠️ Optional but recommended: Use decimate modifier to make multiple LODs. Make your own shadow, specular, and normal map. If you don't want to make the maps, make sure to use blank maps that you can download from the internet (do not use the blank button on S4S cause it might cause error
• Import the .blend file to your CC package. Import the textures & maps. Fix the tags, etc. save
🚨 Important
If you're converting alpha CC, change the shaders of your cc to Simglass!
You can also use both simglass and simskin shaders at the same time if you want, but you'll have to reconfigure your .blend file!
5. If you've done all of that, you can test your conversion in the game!
Note:
• You can find different tutorials/guides on each steps, usually can be found in Sims Community Forum, Blender Forum, YouTube, and Tumblr!
• You can also use this general guidelines to convert any type of mesh to the game, not just hair!
• If this is your first time doing this, I highly recommend converting meshes that do not need transparency.
• Models from console games are hard to get and convert. Usually you'll need to manually make A LOT of adjustments, fix the UV map, and the textures are usually low-res.
Good luck! Feel free to ask me anything! :D
21 notes
·
View notes
Text
EDIT-
tutorial is deprecated, update to the newest MD version and use the remesh function, or just put your mesh straight into zbrush, do zremesh and then re-do the UV in blender.
Hey! Here’s a long tutorial on how to get great low-poly topology on meshes from Marvelous Designer WHILE keeping the original UV (the UV you get if you just use the mesh straight from MD).
For this workflow, you’ll need:
Marvelous Designer (paid)
ZBrush (paid)
Maya 2016 Extension 2 or newer (student version is free!)
Blender (free)
Before I get started with the steps, I want to make sure I give full credit to this tutorial here by Alex Mann, which is where I found the workflow. You can watch that if you prefer a video tutorial and if you’re also more proficient with Maya.
Also, this guide assumes you know how to use blender. Knowledge in Maya+ZBrush isn’t really needed, but you need to have them installed and maybe be able to use basic functions in the programs. In this tutorial, I’ve cut down on the steps in Maya, just because I find it easier to use Blender for things (personal preference).
STEP ONE
STEP TWO
STEP THREE
Turn polygon view on, then go to the geometry tab on the right, and click ‘ZRemesher’. Then, change the ‘Target Polygon Count’, the default is on 5, which is too high, so we need to change it.
This number is in THOUSANDS, so 1 = 1 thousand. It’s suggested to change it to 0.75, which works most of the time for tops, but sometimes you may need to set it higher (1, 1.25, 1.5 etc) for full body outfits or more detailed clothing.
STEP FOUR (conditional/optional)
If there’s a problem in topology, you’ll have to fix it before you carry on. This may happen on more complex meshes. I don’t have any examples of this, but just keep it in mind. You might also want to clean up any tris if there are still some left over.
STEP FIVE
STEP SIX
Next, we have to get that clean UV layout. Select your combined mesh, then go to ‘UV’ at the top and then SHIFT-click the ‘Planar’ option. Make sure you have ‘Project from:’ on ‘Camera’ and that you have ‘Keep image width/height ratio’ checked. Next, hit apply.
STEP SEVEN
STEP EIGHT (conditional/optional)
If you import your new mesh into blender (which you’ve just exported), and it shows up as flat and one weird solid changing colour, you may need to put the mesh back into maya, select it and go to ‘Mesh Display’ at the top, then try unlocking the normals (‘Unlock Normals’) and then importing to blender again. If that doesn’t work, try locking the normal and importing into blender.
I’m only saying this because it’s happened to me once (not sure how), so it could happen to someone else.
STEP NINE
Lastly, you have to do the final touches. Import your new low-poly mesh into blender, and merge the vertices where the patterns meet up. Select two vertices and press alt+m to merge.
If there is a part you need to join that obviously doesn’t have enough verticies (such as this neck strap for my top), you may need to add edge loops. You can do this by pressing ctrl+R, and then clicking in the middle of the quads. This will add another edge (and increase polys) so that you can move without losing as much detail.
STEP TEN
Now it’s up to you to finish your clothing!
FOR SIMS 4 -
I recommend @owl-plumbob’s tutorial for instructions on weight transferring, UV1 transferring and vertex painting (getting your mesh ready for ingame).
And I also recommend any of @theslyd‘s tutorials if you want to make your cc more high quality.
EXTRA
Feel free to contact me on tumblr, or go to my ask page if you have a problem. I’m welcome to help anybody with any issues (if I know how to fix them ;p).
If you need a video tutorial of this, because you prefer that, then as I linked earlier, use this video. This is where I got the original steps from but I changed them slightly so I suggest if you follow the video, to have this tutorial opened as well.
An alternative way to this method is this. I literally found this today and I haven’t tried it, but it looks like it might be quicker, however it still requires Maya. Just keep in mind, in the video they retopologize it by hand in Maya where you may want to retopo it in ZBrush (I would). Anyway, I’m thinking of trying this and if it’s good, I may make another tutorial on that.
If you don’t like this method/it’s not working for you, you can try -
This free alternative using a program called ‘Instant Meshes’ linked by @theslyd
This ZBrush-only workflow (however the UV maps produced aren’t perfect).
Also this thread talks about both these other methods in some more detail.
Just do anything other than exporting from MD in quads (as this is super high poly and the topology isn’t even perfect) or decimating the mesh a lot (this RUINS the topology).
Anyway, that’s the tutorial. Sorry it’s so long, I’m sure you could compress it into 100 words but I get carried away easily, and I wanted to make it totally noob-proof, for people who have no clue how to use maya or zbrush- I wanted to make the tutorial I wanted a couple months ago ;)
RETOPOLOGIZING MD MESHES

Hey! Here’s a long tutorial on how to get great low-poly topology on meshes from marvelous designer WHILE keeping the UV from Marvelous Designer (the UV you get if you just use the mesh straight from MD).
For this workflow, you’ll need:
Marvelous Designer (paid)
ZBrush (paid)
Maya 2016 (student version is free)
Blender (free)
继续阅读
788 notes
·
View notes
Text
diary365
9/20-21/24
friday - saturday
very tired, woke up super early for no reason today.
but that is a #good thing.
i just made something funny on a lark but i actually really really like it, look at this gif of my friend i just made, a series of pics i took one night:

it feels mostly really funny but it expresses like actual pain / struggle, and he really was just acting... it's super kinetic, i wanna experiment with this now as a way to make moving images. it's just something everyone's done already i guess but it feels like, more precise than editing video. the raw materials are fewer, so it feels more like i can work with montage easier almost? create assemblages which link up strangely, even... hummmmm. exciting!!! the next step would be to i think attempt one with images i have, flickering between scenes/sequences, on either side of another image in the center... something such as that. one thing i wanna avoid is the retro-ism of some stuff i've seen out there like this, where it takes on a quality of being like, well i just want to avoid it being weirdcore or whatever, or like those videos people make where it's like a point and click adventure game.
anyway here is the weird vape:
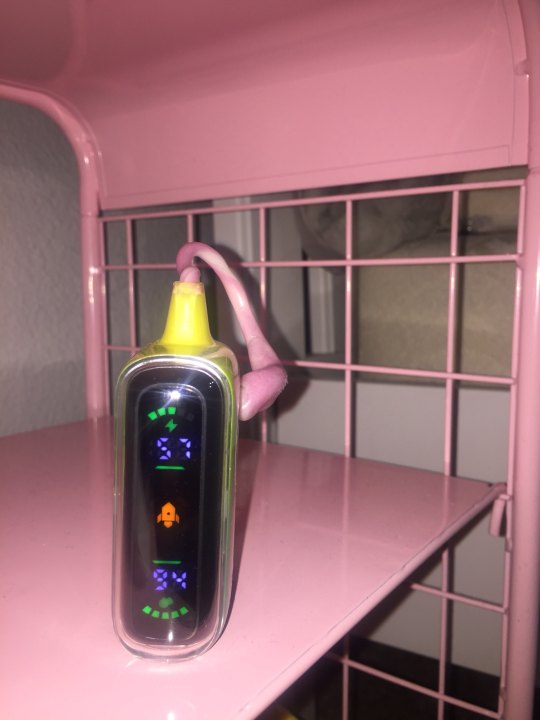
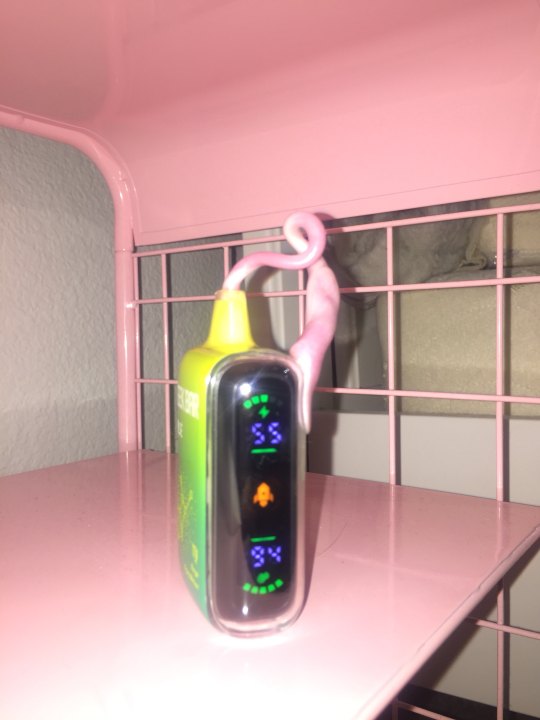
the cronenvape...
i worked on music today, too, i wrote some drum parts for 2 songs. very excited about that... some parts are very weird re: time signatures so i'm gonna really struggle doing vocals on those parts!!! yay!!!!
since i'm probably on a bit of a better sleep schedule, i'll get to actually being regular about other work and reading and stuff. but to maintain that, i ought to go now, not much to say today, other than i feel better, i cooked, i am always happier when i cook. how strange is that? not strange at all probably.
like i said though, sleepy, i was falling asleep sitting here a bit ago, i guess before going i will run thru my tracks and see which ones i might want to go back to fiddling with, there's one i fiddled with and maybe it's a good idea to try the new guitar plugin on it, as long as i keep that plugin as a sub layer instead of being the main body of the sound.
oh, also i found out what these are called, finally:
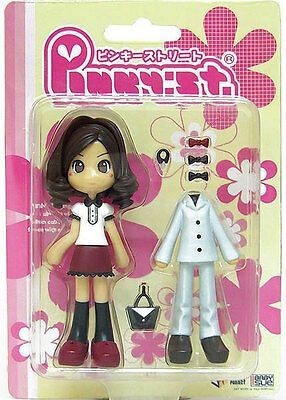
pinky st. / pinky:st... i really want one tobehonest!! they're cute and ugly, so that's perfect to me.
there's one track i exported from today, it has no bass or other synths, just drums + guitar, because i wanted to see how it sounded, it's like insane,,, i think one thing i may wanna try is using a duplicate of the amp sim and then running it w/ no cab sim and then using an impulse response or pro-r2 or something to try and get a more natural low end focused sound as a layer? i dunno, we'll see. i should just leave it until i add bass and stuff, it might be really good and not really need that.
i think maybe i should try it out as a layer on an earlier problem song as well... perhaps... maybe... it can't really hurt, so i'll see how that goes, i just kind of want the sounds to have a little more... i want the amplification to just sound better, and grottier stranger distortions, it seems like it can get clangorous. it also seems like it can be rather thin and i might wanna try doing some pre eqing before amplifying in the plugin, to increase the thickness a bit, maybe.
but now it is time to sleep,
so,
byebye!!!!!!!!!!!!!!!!!!!!!!!!!!!!!!!!!!!!!!!!!!!!!!!!!!!!!!!!!!!
1 note
·
View note
Text
Making Normal Channels in GIMP (with njob)
Hello everyone! I was explaining how to do this in the Sims of History discord server and realized how much of this process I learned through trial and error. There isn’t really a good step-by-step tutorial about how to do this in GIMP, only in Photoshop (at least no text-based tutorials). While I use both Photoshop and GIMP for various things, I prefer to make my normal channels in GIMP. This tutorial will walk you through the process and hopefully demystify normal channels in GIMP.
Normal channels (bump maps) add additional depth beyond your mesh, which is useful for things like folds, painted on pockets, and buttons.
This tutorial is particularly for how to make Create-a-Sim items, not objects, but a lot of steps should be transferable.
You will need (all free programs):
GIMP
njob
Sims4Studio and/or CAS Tools

First, open your diffuse texture in GIMP. I often try to use the light/base texture rather than one I have colored already, but if you have already colored it and didn’t save a base, don’t worry, it doesn’t make much of a difference. Don’t use an image which has a pattern applied to it, as that will create a bump on the pattern and appear like applique or something along those lines (unless that is your goal).
I recommend doing this step after you have tested your diffuse texture image and mesh (if applicable) in the game. If you have any last minute changes to either of these, you will probably need to re-do your normal from scratch.
If your image is in layers for recoloring, or not, choose to flatten the image. Transparency isn’t helpful in making normal channels, so get rid of it so you won’t have to worry about it later.
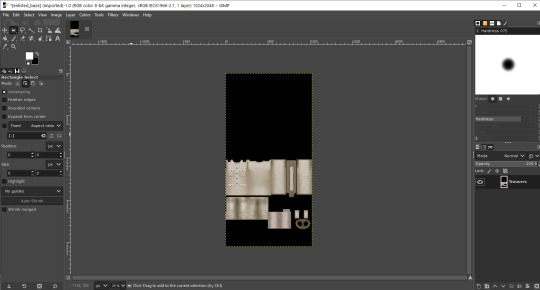
Once you have flattened it, the background usually turns either black or white. It doesn’t really matter which one, it won’t make much of a difference in njob.
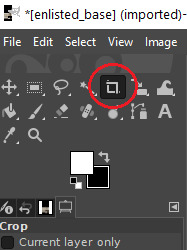
Now, select the crop tool. You can see the current dimensions of the image in the “aspect ratio” box. For a CAS items, the original will be 1024:2048, which is 1 x 2. We will need to crop the image into a 1 x 1, or perfect square.
To have your normal channel as high quality as possible, you should use 1024:1024. This will work for clothing items like full body outfits, tops, bottoms, gloves, socks, and tights (basically anything mapped in this bottom portion of the UV map). For all of these items, you must use a square and cannot crop it to be smaller. For shoes, this means a very large blank area.
For accessory items like jewelry and hats, the cropping is different. For instance, a hat would be 512:256. If you are unsure of the dimensions to use, export the normal channel on the maxis item and copy its dimensions. The following instructions will assume you are making a clothing item and not an accessory item.
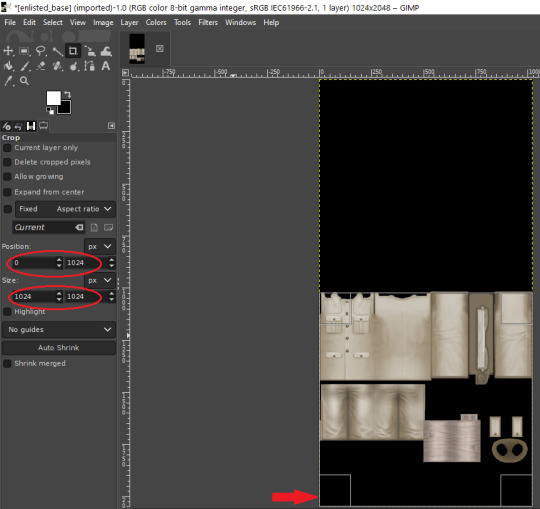
Click anywhere on the image while you have the crop tool active, then adjust your dimensions in the box to the left. You can manually type it in or drag the box and follow the size in the box as you drag.
The box should be perfectly aligned with the bottom and have no space below. If you have space below, just drag it as far to the bottom as you can. GIMP will stop you from dragging it outside of your current dimensions. If a little is sticking out at the top, that is okay. Nothing can be mapped outside of the 1024:1024 dimensions, so it is probably just bleed over or space filler that you are cropping off.
Press “Enter” on your keyboard to complete the crop.
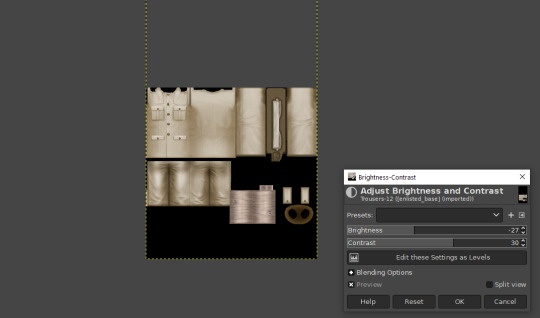
Optional Step: If you desire, you may want to decrease the brightness and increase the contrast on your image so there will be more for njob to pick up. If you already have a lot of contrast, you may not need to do this.
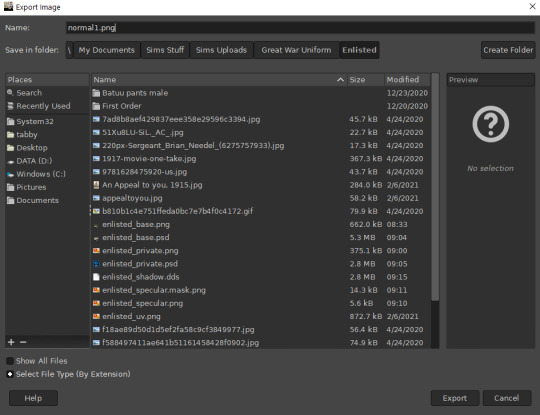
Next, export your image as a PNG or BMP. Be sure to not overwrite your original diffuse texture.
You can now close GIMP, though you will need to open it again later.
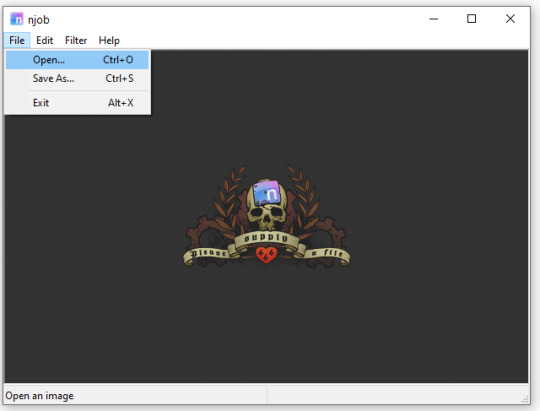
Open njob, then your saved, cropped image.
Maximize your screen so you can see what you’re doing.

Go to Filter > Diffusemap > Heightmap and select that option.
The screen will pause to load for a bit before opening up a new box.

Your image will convert to black and white and may look a bit strange. The first step is to change your “Course Detail” setting to the lowest (or close to the lowest) setting and your “Fine Detail” to the highest setting. I generally play around with the “Mid Detail” and “Scale” until I get what I want. Try to have what you want to be visible stand out, while folds should be soft and fuzzy but still somewhat distinguishable.
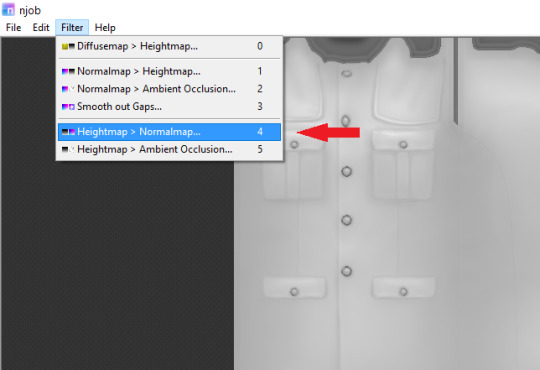
Once you have what you need, click OK and go to Filter > Heightmap > Normalmap

There are two settings, “Scale” and “Blur Radius.” Neither of them have “ideal” settings, so you will need to adjust as you need. “Scale” controls the depth of the contrast and “Blur Radius” impacts the softness of the image. If your edges are too harsh, your normal map may look odd in game.
You will probably also have lines in areas in no texture. This is normal, and I will go over how to remove those later.
Once you are satisfied with how things look, save the image as a bitmap.
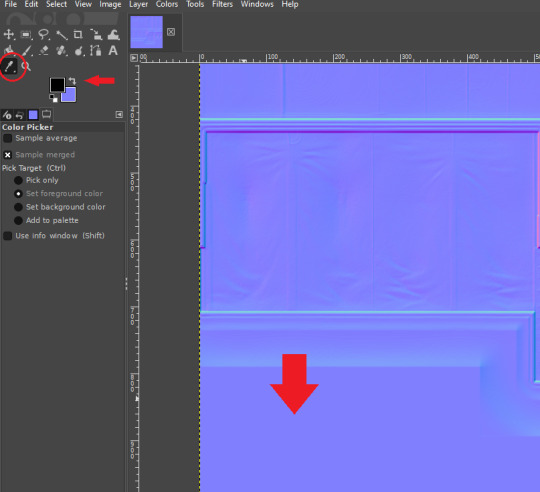
Now, open your bitmap image in GIMP. It is time to clean up the image and get rid of the artifacts. Unfortunately, unlike a specular, a normal map doesn’t have a mask to prevent bleed over onto skin or other textures. The unused areas need to be a midrange, solid grey. It is easier to edit at this step before you create your transparency.
Select a midrange blue color from one of the blank areas with your color selector and make it your background color by using the arrow button between the foreground and background colors.
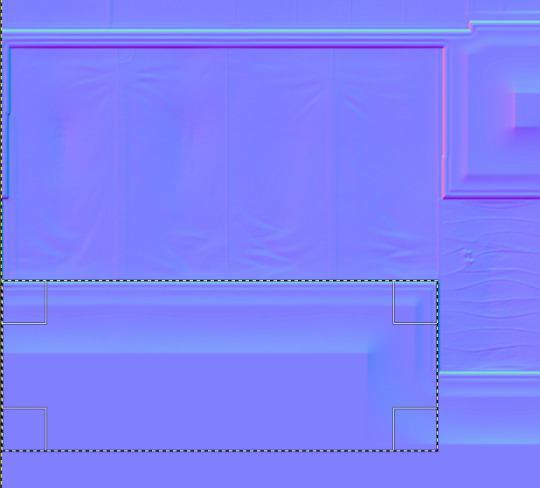
Select the areas that should be blank and delete them, which will replace the lines with a solid blue color. This would be areas around the neck, wrists and ankles, and also places like the filler beneath skirts and tops that doesn’t need texturing. Be sure to select the odd lines around the image, which are usually a bright teal or hot pink color. Those can be very visible.
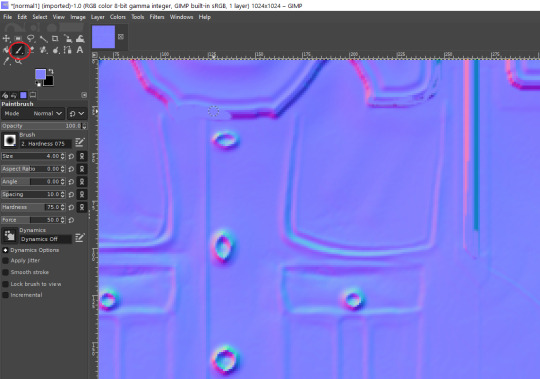
Sometimes, you may need to take your paintbrush and clean up the artifacts if they are in curved or very small areas. If anything looks too sharp, you can also use the smudge brush to smooth it out (very lightly). But don’t move anything around too much.
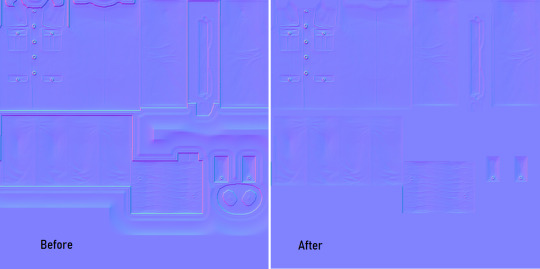
Once you have cleaned up your image, export it again as a bitmap. This is just so you can go back to it if you make a mistake later or need to modify it. Usually I save it as a new image, but you can overwrite the old one if you are feeling confident.
I have to point out that sometimes you can get away with not cleaning the artifacts from your image. But I have had too many issues with it in the past to skip this step.
Now it is time to make the normal map. Finally!

In the layers area, right click on your single layer and add an alpha channel to it. There is also a small button at the bottom you can use to add an alpha channel. You will need this transparency for the next step.
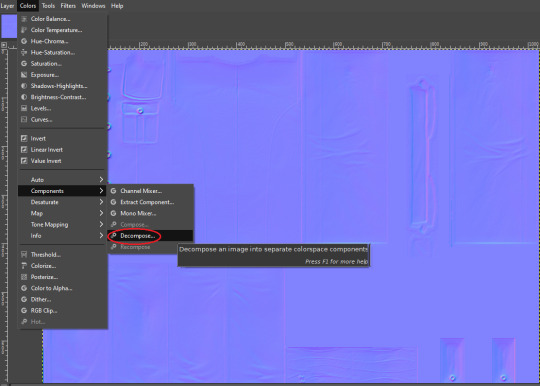
Next, go to Colors > Components > Decompose.

A small box will open up. Change your color model from RGB to RGBA to enable the alpha channel as a separate channel (layer).

Now, a new image will open that is your bitmap but greyscale. You will see four layers on the side called red, green, blue and alpha.
Select the red layer and click CTRL + A on your keyboard to select the entire layer. Then, click CTRL + C to copy the layer. (If you don’t have a keyboard, you can do “Select all” and “Copy” but this takes longer).
Now, go to your layer named alpha and press CTRL + V (paste) and CTRL + H (to anchor the layer). Now, you have replaced the alpha channel with the red channel.
Next, go to the green layer and select and copy it. Paste and anchor it into the red and blue layers, just as you did before with the red layer and alpha layer.

Your image won’t look too much different right now, it will just look like the green alpha channel rather than the visible red alpha channel when you opened it. Go back to the top bar and choose Colors > Components > Recompose. This will alter your original image, so the one you have open in layers will stay open. Go back up to the top and select the original image to go back to it, or close your layered image.

Now, your image should have changed from mostly blue to a transparent, mid-range gray with only a few elements visible. This is how it is supposed to look. If you don’t have transparency or it looks very different, then you probably messed up somewhere. Generally, I find it easier to go back to the original cleaned up bitmap (that you saved for future use) and start from scratch rather than trying to figure out where I messed up. That is usually faster.
Next, export your single-layer image as a PNG or DDS file (your preference). You will need a DDS plugin to save DDS files.
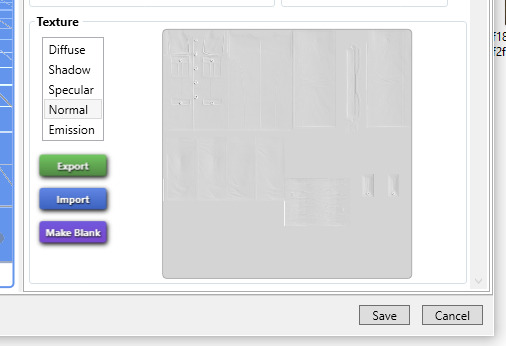
Open your item in Sims4Studio and import your new image file in the normal texture category. You will see a small preview in the box, which will probably show more details than you were able to see in GIMP. If it looks correct, save it and go to check it in game or in CASTools (which has a feature for previewing bumpmaps that can help you check for alignment problems). CASTools can be particularly useful if your computer doesn’t open the Sims quickly and you want to preview multiple bumpmaps. The only issue with CASTools is that it doesn’t really look much like it will look in game.
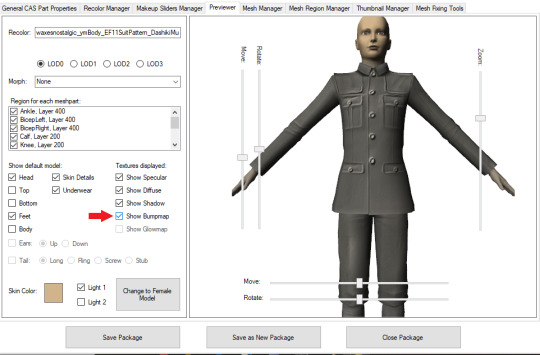
In CASTools. You have to select to see the bumpmap in the Previewer tab.
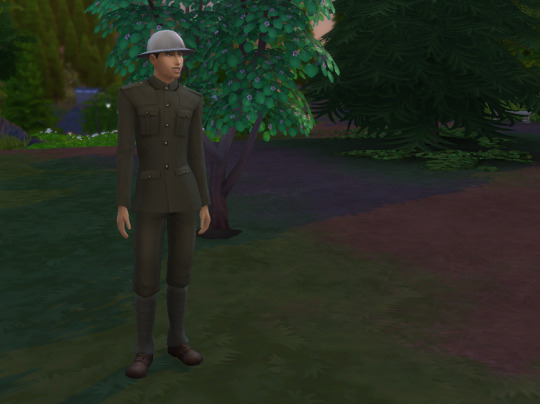
In game.
As I have only been making normal channels for a few months now, it’s possible I have missed some things, so if you know an easier or better way let me know and I can update the tutorial. I hope this is useful to you!
93 notes
·
View notes
Text
Tutorial | How to make Sims 4 clothing with Marvelous Designer
I know that there have been people making these kind of tutorials already, but since I recently got a request to do so, I thought why not share my steps as well! I have to give credit to my fellow creators @serenity-cc, @sweetsorrowsims and @theslyd for some tricks and info they provided. And furthermore all other creators that helped me become the creator I am today!
For this tutorial I assume you understand the basics of Sims4Studio, Blender, Photoshop and Marvelous Designer. If not, you can find tons of basic tutorials on these subjects on sims4studio.com.
In order to make Marvelous Designer clothing you’ll need:
Marvelous Designer 5 (obviously)
Sims 4 Studio
Blender version 2.70 and 2.77
Photoshop or Gimp and the needed DDS plugin (like I said, I’m not gonna go the basics of this ;) )
First thing you want to do is create your piece of clothing in Marvelous Designer. Youtube is full of videos explaining how to and it is really just a matter of practice and getting to know your way around the program.
So, as you can see in the picture below I made my mesh in MD and am ready to export it to Blender

To make your mesh less poly’s you need to change it from Triangles to Quads. Press CTRL+A in MD, so that it selects your whole mesh. Next you’ll need to go to the menu in the bottom right corner and unfold the ‘Miscellaneous’ Tab, like so

And with me it already says ‘Quad’ but with you it will say ‘Triangle’ so change it to Quad ;) You probably want to re-simulate your mesh, because there will be ‘holes’
If you did this, you are ready to export your mesh as an OBJ file. To do this you need to go to ‘File -> Export -> OBJ’ Like this:

It will ask you to save, so do as you like. This screen will open, make sure to check the same settings as I did:

If you did this, click OK and your mesh is exported.
Next, you want to open up Blender 2.70 and open a nude top mesh exported from sims4studio, like so:

Next, you want to import your MD mesh, in order to do that you want to go to ‘File -> Import -> Wavefront (obj)’

It’ll ask you to select your .obj, so click that and press ‘Select’
And here it is:

The next thing I always do, is delete the nude top parts that are covered by the top, which I don’t need. Be sure to not delete too much, because it will look weird if body parts are missing ;)
Select your nude top mesh and go into edit mode. Click the button I point out with red, so that it shows all vertices on the mesh

Deselect all and by pressing B or C remove the unwanted vertices. I’m left with this:

Go back to ‘Object Mode’ and select your top mesh. Go into ‘Edit Mode’ and under the Triangle tab on your right you want to change ‘UV-map’ into ‘uv_0′.


Go back to Object Mode and click on your nude top mesh. Hold shift and also click your top mesh. Make sure to select the nude top mesh first though. Then you wanna put your mouse in the middle part where the mesh is and you want to press CTRL+J, which will Join your meshes together.
Then we’re gonna unwrap our uv_0. To do this you want to use the left screen. Select your whole mesh and it’ll show up on the left like in the picture above. Click ‘Image -> Open Image’ and open up a female template which can be found here.

Select your top mesh and resize it by using S, X and Y. Play around with it until your mesh is less ‘deformed’. Then you wanna place it in the spots you like. Please note that you can only place your mesh parts in the free top area (so not on top of the body mesh parts) And in the extra space in the bottom right. Placing it in the extra space will probably cause conflicts with other pieces of clothing in game, but this is almost unavoidable unfortunately. This is what I ended up with uv-mapping:

As you can see I put the top in the extra section and the sleeves in the arm part. Because you deleted parts of the nude top before, this is coming in handy to put your mesh parts there. Now don’t make the mesh parts on your uv-map too small, because this will later cause your texture to be blurred.
Now that we did this, we can go back to ‘Object Mode’ and save our project.
Next thing we’re gonna do, is find our Reference Mesh to transfer data from. We NEED to transfer data, because if we don’t our mesh won’t work with the morphs! Pick a EA mesh, or any custom content mesh that you think looks similar and export the blender file from sims4studio.
Open up Blender 2.77 or higher and open up your own top.

Then you want to go to ‘File -> Append’ and it will open up a screen to select your preferred reference mesh. You only wanna append the s4_studio mesh:

Delete the extra rig and bone bone shape it opened up. This is not necessary but I always do it :P Select the reference mesh and go into edit mode. You want to subdivide this mesh for as many times as your computer can take (if it ‘crashes’ just go less far the second time) this will make the mesh higher poly, which will make the data transfer a lot smoother!

Then go back to Object Mode and select your top mesh. Select the Wrench tab on the bottom right box and click ‘Add Modifier -> Data Transfer’

This screen will pop up:

Where it says ‘Source Object’ you want to select your s4_studio mesh. Then, tick the box that says ‘Face Corner Data Transfer’ and it will give you some extra options :

Next to the ‘Face Corner Data Transfer’ there is another box. You want to select ‘Nearest Face Interpolated’ You can play around with these settings, but this works the best for me. ‘Click the box that says ‘UVs’ and it’ll probably have to think for a while ;) When it’s done, click the ‘All Layers’ box and select ‘uv_1′

Then on the box that says ‘By Name’ you also want to select ‘uv_1′

Once you did this, you mesh might turn partly black, this should be fine. If it doesn’t happen, it’s also fine. Click apply and you’re done transfering data. Now, you can resize ‘uv_1′ but I never did that and I find it very difficult. My meshes work fine without it. If you choose to do this, you can find how to here
Delete the reference mesh, save your top and close Blender 2.77.
Re-open Blender 2.70 and open up your top. Now we are going to do the ‘vertex paint’ and ‘weight transfer’ As many might say to use a similar mesh for your weight transfer, I was recently given the tip to just use the nude top/bottom as a reference to transfer weights. Often this works a lot smoother than a similar mesh ! I’m not going to explain the process of vertex paint and weight transfer because there are good tutorials on this.
Vertex Paint Tutorial
Weight Transfer Tutorial
Once you’ve done this, your mesh is almost ready for sims4studio. The only things left to do are ‘baking’ your uv_map and changing one more setting. The setting you’ll need to change, is the ‘S4 studio CAS tools’ tab. Go to the Cilinder and Ball tab on the right and you will see this:

Click ‘GEOM’ and change ‘Cut’ to ‘0000′

Next, you want to bake your uv_map. @theslyd made a great tutorial how to do this, which you can find here.
After baking, there’s one more optional thing you can do, to make your mesh appear not see through when you scroll around your model. The easy fix for this, is selecting your mesh, going into edit mode. Then you want to select all of your top mesh (so not the body parts) by clicking a small piece of the top and then pressing CTRL+L, which will select all of your mesh. Press SHIFT+D, which will duplicate your mesh, don’t move your mouse, press enter. Then press space, this bar will pop up, and you want to type in ‘Flip Normals’.

Hit enter and deselect all and go back to Object Mode. Now your mesh appears ‘thick’
Once you’ve done all of those steps, save your mesh and open up a mesh in sims4studio to import your own mesh into. I always like to use a bikini or something, because they have the same amount of group numbers, and your mesh will import into that nicely.

I picked this one. Go to the ‘Meshes’ tab and select ‘Import’ Select your mesh and it will import it into sims4studio. This might take a while, so wait patiently.

As you can see, the mesh looks weird, because there’s no texture yet. That’s why you baked your mesh, so it’ll be easier to make a texture.

Import your texture in the ‘Diffuse’ Tab and your mesh will look a lot better.
The last step you want to take, is edit or empty your Specular, Shadow and Normal map. I always empty them, because editing isn’t my thing, but if you choose to edit them, you can find tutorials on that here:
Specular Map
Shadow Map
Normal Map
Sims4studio added this really handy option, where you can just make it blank by pressing it.

Before I forget, there’s another final step you need to do, which will show the mesh for people playing on lower settings. Go back to the ‘Meshes’ Tab and select LOD_1

As you can see, the bikini mesh is still there. You want to go to Blender and in Object Mode, you want to go to the Wrench Tab again. Click ‘Add Modifier’ and select ‘Decimate’. This will bring your polycount down, so that you can import it for lower settings.

You want to click inside the ‘Ratio’ bar and slowly bring it down a bit, you will notice your mesh starting to deform. Don’t bring it down too far already, because there are 3 LOD’s tabs. LOD_0 is your undecimated mesh, LOD_1 is slightly decimated, so forth.. You want to make a save file everytime you decimated your mesh a bit more.

As you can see , holes will appear in the mesh once you get to decimating.
Import all three LOD’s into sims4studio and hit the save button. Put your .package file into your mods folder and test your top in game. Try using the sliders to see if everything works and if it does, go make your texture, previews and thumbnail and you’ve made your very own Marvelous Designer Clothing piece.
I really hope this tutorial was helpfull and if not, or if something’s unclear, you can at any time message me for help. I hope I didn’t forget any steps, since I can be very all over the place haha. Again big thank you to all other creators who make tutorials, your tips and tricks are amazing!
Thank you for your attention and I enjoyed making this!
Malou out
#s4#s4tutorial#sims#sims tutorial#blender tutorial#marvelous designer tutorial#the sims#the sims tutorial#the sims 4 tutorial#the sims 4#simscc#sims4cc#s4cc
785 notes
·
View notes
Text
Your iPhone 7/6S/6 And also shops calls, messages, emails as well as other essential information, such as songs, images, videos. Via AirDrop/Mail: Open up the Voice Memos application on your Find Out More http://tinyurl.com/nya5pon http://bit.do/dm9YU read here Read More Here free iphone 6 http://ujeb.se/KJC1O Going Here Read This Visit Website apple iphone and also touch on the voice track you wish to backup. And also there you have it - reward advertising functioned after that free of cost iPods, as well as it functions just as well now totally free iPhones. Now backed with tried and tested strength and also a lifetime guarantee, our apple iphone 7 situations are not just our most safety, yet our most stylish as well. To identify which applications are eating iPhone or iPad disk space, most likely to Setups > General > Use > Manage Storage. The trial provides and cost-free gifts are then readily available to the initial individual once the referred individuals register for the promo. Once I get a 16GB iPhone 6 for about $300 on Craigslist and offer my present iPhone for around $500-550, I'll be up a minimum of $200. I actually opted to set my own up as a new apple iphone to optimize my brand-new room (sorry, Sweet Crush, you had to go). It is essentially the exact same bargain T-Mobile supplied when the apple iphone 7 initial appeared in September. Based on our honor winning juice pack battery situations, space pack supplies external storage as well as extra battery together inside an ultra-thin case. I see right here that he could quickly get another SIM card as well as I believe his old smartphone is compatible with Customer Cellular, even though he favors his Doro flip phone. Flaunt the simplistic elegance of your rose gold, silver, gold, or jet black iPhone 7 thanks to our transparent design. Yet the complimentary version is nevertheless useful and also generous, in addition to making really good use of the Today sight on your phone. VIP benefits, consisting of bases on balls to fashion programs, music festivals and also Formula 1. At checkout, you will be triggered to remove a Mobile Broadband gadget considering that this plan permits approximately 1 line. As an example, apps are most likely to get routine updates and also faster software upgrades. Marketing or trading in your old phone and then turning around as well as using that cash toward your brand-new phone is one of the most efficient methods to get your new apple iphone for a lower cost. While there are a lot of inexpensive choices for cell solution - as well as you ought to totally make the most of contrasting cellular phone plans of all kinds right here- there are a number of mobile phone companies currently using cost-free phone plans to qualified clients. Récupérer directement les données supprimées de l'iPhone 6/6 Plus/ 5S/ 5C/ 5/ FOUR/ 4/ 3GS, iPad 4/ mini/ 3, iPod touch, entièrement compatible avec iOS 8. You can viewing your favored video clips without conversion on apple iphone 6 And also as well as iPhone 6. One more such site NextWorth offers up to $350 for the 16-gigabye SIX in beautiful condition (or $245 for an And also), as well as approximately $364 for the 6S And also with the exact same memory (or $285 for a 6 And also). Numerous apple iphone individuals do not intend to utilize the Application Store due to the fact that there are a lot of imitators and also ineffective applications which have high rankings. The prospect of Nike+ yet far better and absolutely free could appear unlikely, but that's exactly what RunKeeper provides. Sneak peek and also Export: Free iPhone Healing allows you to sneak peek the recoverable information thoroughly. Authorize out from the Apple Store on your iPhone, reboot the device (not required, yet why not?), sign back to the apple shop as well as the applications ought to show up for you too. Much like iPhoneIMEI, they had the ability to open all 3 apple iphone opens we sent, however they're behind adequate to make a difference in that you need to make use of. Question-You claim that you do not should be in plane mode ... (re: texting for free-iphone to apple iphone). This may cost more money than various other shops that could fix your display, so you may intend to look around and obtain those fixed before you take the apple iphone SIX to Apple. Mobdro Costs Version offers added features like Recording Streams as well as ChromeCast assistance and also it is ad free. Securely and quickly remove as well as mount iOS apps on your iPhone, iPad, and also iPod Touch.
0 notes
Text
Retopologizing MD Meshes (old)
EDIT-
tutorial is deprecated, update to the newest MD version and use the remesh function, or just put your mesh straight into zbrush, do zremesh and then re-do the UV in blender.
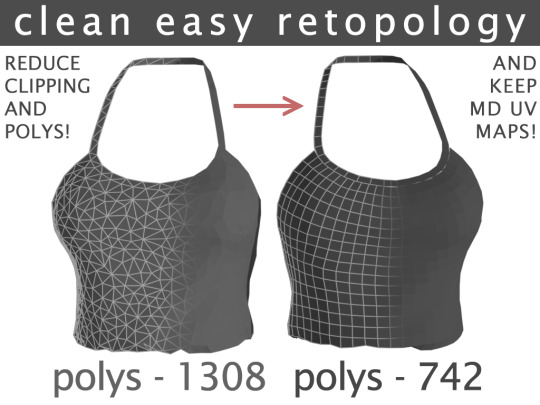
Hey! Here’s a long tutorial on how to get great low-poly topology on meshes from Marvelous Designer WHILE keeping the original UV (the UV you get if you just use the mesh straight from MD).
For this workflow, you’ll need:
Marvelous Designer (paid)
ZBrush (paid)
Maya 2016 Extension 2 or newer (student version is free!)
Blender (free)
Before I get started with the steps, I want to make sure I give full credit to this tutorial here by Alex Mann, which is where I found the workflow. You can watch that if you prefer a video tutorial and if you’re also more proficient with Maya.
Also, this guide assumes you know how to use blender. Knowledge in Maya+ZBrush isn’t really needed, but you need to have them installed and maybe be able to use basic functions in the programs. In this tutorial, I’ve cut down on the steps in Maya, just because I find it easier to use Blender for things (personal preference).
STEP ONE
First, export your normal Marvelous Designer mesh, and name it ‘drapedMesh’. When exporting, Unified UV coordinates should be checked, and scale ‘m’ should be used. Make sure you export as tris (the default setting), exporting as quads won’t give as good as results (I think).
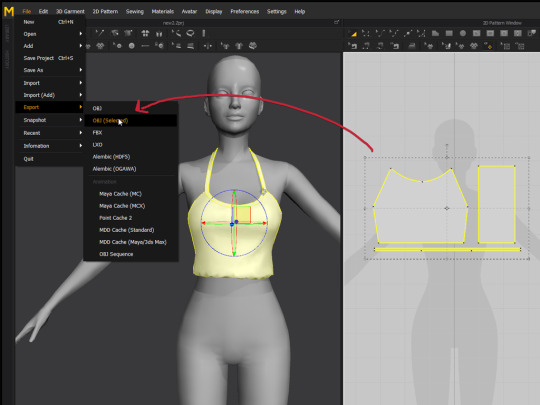
Then reset 2d arrangement of your clothing, so it’s flat. You can also move it to the right so it’s not in the way of the avatar but this may cause issues (or it may work). Then, export in the same way (export selected), and name it ‘flatMeshOriginal’.
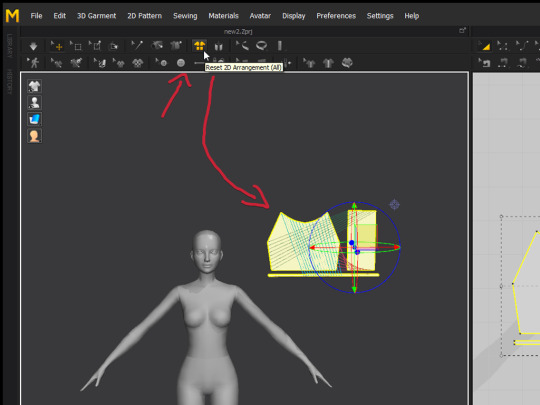
STEP TWO
Next, open up Maya- I use Maya 2016. And after, import the draped and flat meshes you just exported from MD. The camera controls if you don’t know them, you have to hold alt and then use the buttons on your mouse.
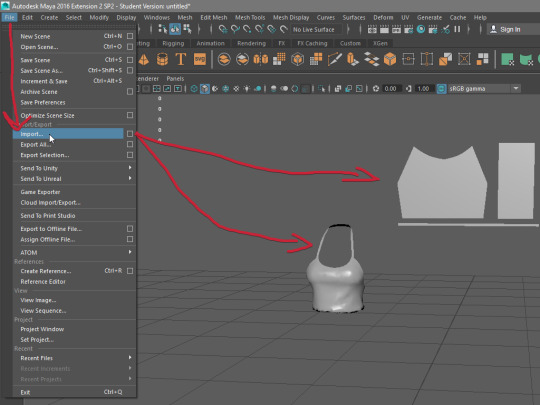
With the two imported, select the ‘draped’ mesh and then the flat mesh, go to ‘Deform’ at the top, and click ‘Blend Shape’. This will pop up in the attribute editor to the right.
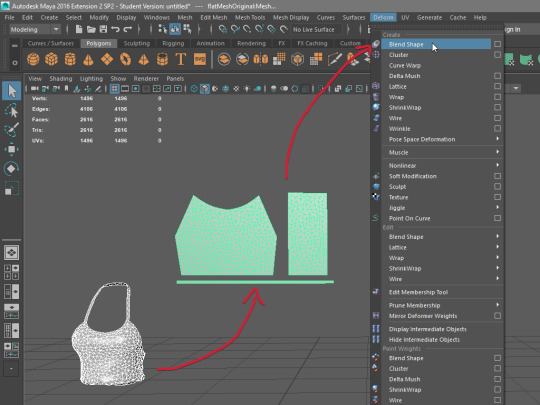
STEP THREE
It’s time to retopologize! Open ZBrush, and import your flat mesh, and then drag your mouse in the 3d window to place the model into view (only drag it out once). Immediately after, click edit mode (or press T), and then click the ‘scale’ button to zoom in on the mesh.
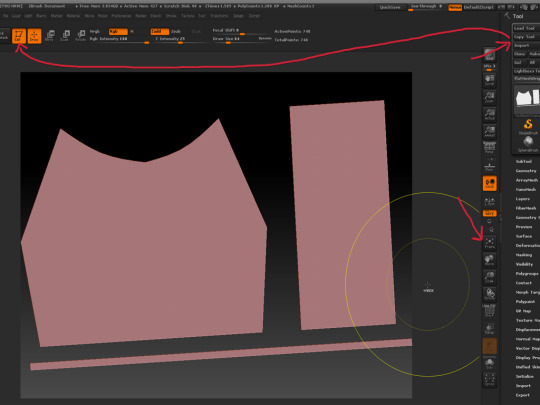
Turn polygon view on, then go to the geometry tab on the right, and click ‘ZRemesher’. Then, change the ‘Target Polygon Count’, the default is on 5, which is too high, so we need to change it.
This number is in THOUSANDS, so 1 = 1 thousand. It’s suggested to change it to 0.75, which works most of the time for tops, but sometimes you may need to set it higher (1, 1.25, 1.5 etc) for full body outfits or more detailed clothing.
This value affects how many polygons in thousands it will have, 0.75 is 750 polygons (which will be roughly the final polygon count for the top). Anyway, once you’ve picked a value, hit the ZRemesher button.
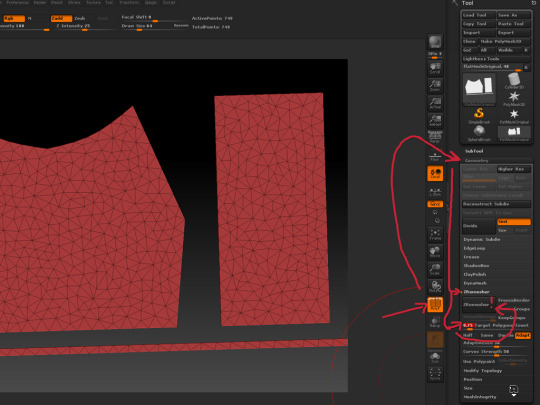
As you can see, ZRemesher produces a really nice topology on the meshes. Finally, you want to export it and name it as ‘flatMeshRetopo’. Now, you’re done with ZBrush!
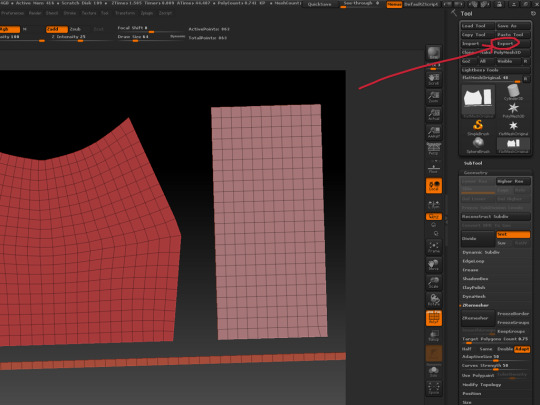
STEP FOUR (conditional/optional)
If there’s a problem in topology, you’ll have to fix it before you carry on. This may happen on more complex meshes. I don’t have any examples of this, but just keep it in mind. You might also want to clean up any tris if there are still some left over.
STEP FIVE
We have to get our new low-poly mesh set up in Maya. Import your retopo’d flat mesh, and ignore any error if one pops up. Then, go to ‘Windows’ on the top bar, and open the ‘Outliner’ window. To hide this, you can just minimise and then later open it back up/maximise it from the bottom of the screen.
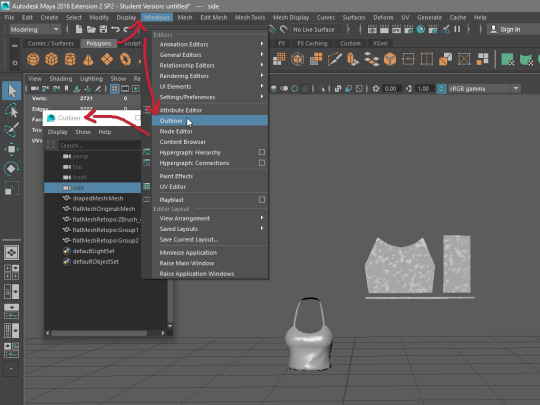
Then, in the outliner, select all the meshes that were imported from ZBrush, for me there were only 3 as there are only 3 pattern pieces in my MD mesh. If you have 8 pieces, there’ll be 8 meshes. With these selected, hit the merge button at the top.
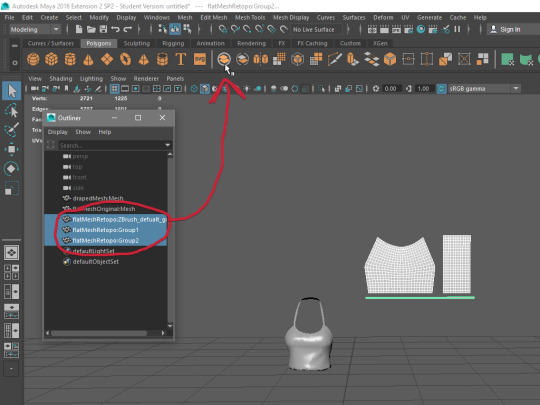
STEP SIX
Next, we have to get that clean UV layout. Select your combined mesh, then go to ‘UV’ at the top and then SHIFT-click the ‘Planar’ option. Make sure you have ‘Project from:’ on ‘Camera’ and that you have ‘Keep image width/height ratio’ checked. Next, hit apply.
Also, when you do this step, try to have your camera looking at the mesh straight-on, as I believe this part just captures the mesh from the camera’s perspective and makes that the UV.
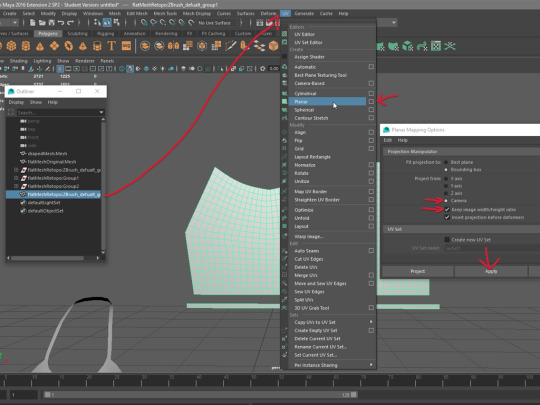
STEP SEVEN
Now, we will make our low poly mesh fit around the draped mesh. Select your low-poly ZBrush flat mesh, and then the high-poly MD flat mesh, go to deform and then wrap.
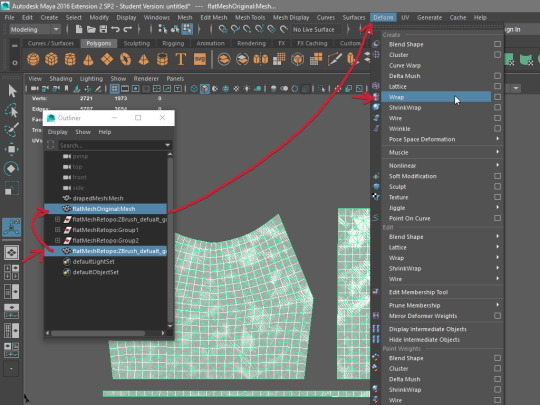
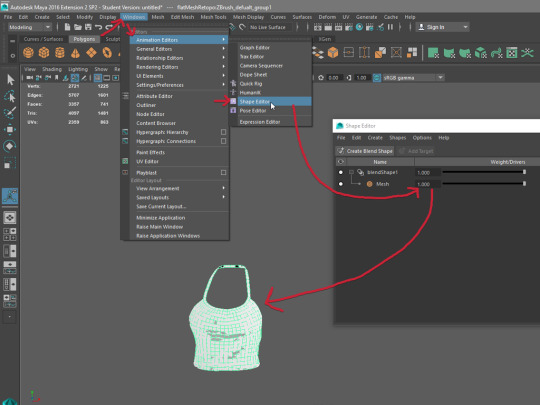
To make it wrap around now, go to ‘Windows’ at the top, ‘Animation Editors’ and then open the ‘Shape Editor’. Afterwards, set the Mesh Weight to ‘1’ (or move the 2nd slider all the way to the right). This will make your lowpoly (and high poly) mesh wrap around the draped mesh.
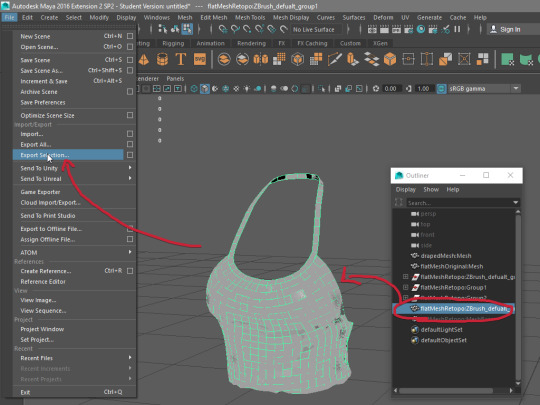
Lastly, select your low-poly ZBrush mesh that is now wrapped around, and export selection to a .obj- and save that on your desktop or somewhere (ready to be imported into blender!!). Once you’ve done this, you are done with Maya (woo!).
STEP EIGHT (conditional/optional)
If you import your new mesh into blender (which you’ve just exported), and it shows up as flat and one weird solid changing colour, you may need to put the mesh back into maya, select it and go to ‘Mesh Display’ at the top, then try unlocking the normals (‘Unlock Normals’) and then importing to blender again. If that doesn’t work, try locking the normal and importing into blender.
I’m only saying this because it’s happened to me once (not sure how), so it could happen to someone else.
STEP NINE
Lastly, you have to do the final touches. Import your new low-poly mesh into blender, and merge the vertices where the patterns meet up. Select two vertices and press alt+m to merge.
Sometimes, you may need to merge 2 vertices on one side to one vertex on the other, this will create a tri but that’s okay.
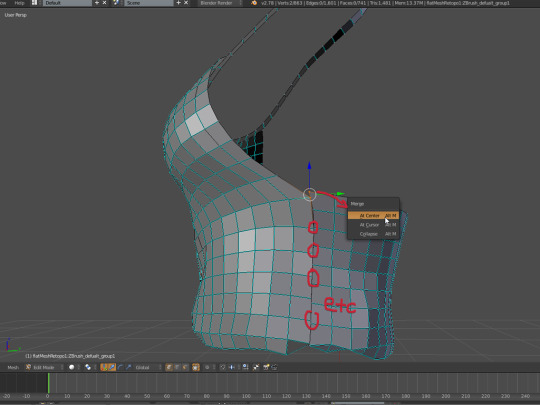
If there is a part you need to join that obviously doesn’t have enough verticies (such as this neck strap for my top), you may need to add edge loops. You can do this by pressing ctrl+R, and then clicking in the middle of the quads. This will add another edge (and increase polys) so that you can move without losing as much detail.
Also, you may want to go to the ‘tools’ tab on the left, and change the shading to smooth, to get a better idea of what your mesh will look like ingame.
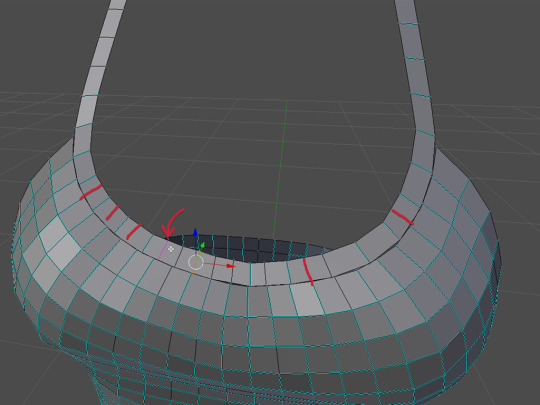
STEP TEN
Now it’s up to you to finish your clothing!
FOR SIMS 4 -
I recommend @owl-plumbob’s tutorial for instructions on weight transferring, UV1 transferring and vertex painting (getting your mesh ready for ingame).
And I also recommend any of @theslyd‘s tutorials if you want to make your cc more high quality.
EXTRA
Feel free to contact me on tumblr, or go to my ask page if you have a problem. I’m welcome to help anybody with any issues (if I know how to fix them ;p).
If you need a video tutorial of this, because you prefer that, then as I linked earlier, use this video. This is where I got the original steps from but I changed them slightly so I suggest if you follow the video, to have this tutorial opened as well.
An alternative way to this method is this. I literally found this today and I haven’t tried it, but it looks like it might be quicker, however it still requires Maya. Just keep in mind, in the video they retopologize it by hand in Maya where you may want to retopo it in ZBrush (I would). Anyway, I’m thinking of trying this and if it’s good, I may make another tutorial on that.
If you don’t like this method/it’s not working for you, you can try -
This free alternative using a program called ‘Instant Meshes’ linked by @theslyd
This ZBrush-only workflow (however the UV maps produced aren’t perfect).
Also this thread talks about both these other methods in some more detail.
Just do anything other than exporting from MD in quads (as this is super high poly and the topology isn’t even perfect) or decimating the mesh a lot (this RUINS the topology).
Anyway, that’s the tutorial. Sorry it’s so long, I’m sure you could compress it into 100 words but I get carried away easily, and I wanted to make it totally noob-proof, for people who have no clue how to use maya or zbrush- I wanted to make the tutorial I wanted a couple months ago ;)
#sims 4#ts4#sims 4 tutorials#ts4tuts#ts4tutorials#ts4 tutorials#sims 4 tuts#tutorials#modelling#zbrush#maya#second life#SL#creators#sims-4-tutorial#the-sims-4-tutorial
788 notes
·
View notes