#I put crushed red chili flakes in spaghetti
Explore tagged Tumblr posts
Visit Tumblr Blog
Explore Tumblr blogs with no restrictions, modern design and the best experience.
Last Seen Tumblr Blogs


Fun Fact
Tumblr’s website traffic is steadily declining.
Text
When I eat something spicy and it is indeed spicy 😞
1 note
·
View note
Text

It's a big controversy here whether or not beans go into chili and I'm here to say my bit: beans go in chili and literally anything else with red sauce. I put beans in my spaghetti and that's that.
As a general rule, you can throw some canned tomatoes, beans, and ground beef into a slowcooker, sprinkle some salt and pepper onto it, and call it good chili. Serve with some sour cream and shredded cheese and you may even win the chili cook off! The idea is you take whats in the pantry and throw it together. That's not really what I did.
My chili is inspired by both Mexican and Indian cuisine, which are surprisingly similar all things considered. I would have preferred to use habanero peppers, but I only had some crushed red peppers in my pantry. Enjoy!
Vegan/GF Texas Chili
Ingredients:
14oz impossible meat
3TBSP (canned) coconut milk
2 14.5oz canned "ranch style" beans
1 14.5oz canned black beans
3 14.5oz canned tomatoes
6oz canned tomato paste
2 bay leaves
1TBSP minced onion
Thin layer over the top of chili (~3tsps or so):
onion powder, lemon pepper, oregano, parsley, rosemary, salt, cumin, basil, chili powder, brown sugar bourbon seasoning, paprika, turmeric, crushed red pepper flakes
Impossible meat seasonings:
paprika, chili powder, cumin, oregano, basil, minced onion
Yield: 5 servings
Approx. time: ~30 minutes
In a sauce pan, season the impossible meat and cook until brown and crispy with minced onion.
In a big pot at low heat, simmer canned tomatoes, beans, and tomato paste. Add seasonings to taste.
Once the impossible meat is brown, add to big pot. Pour in coconut milk.
Serve with vegan sour cream, shredded cheese, and (gf) crackers.
#scrabble shouts into the void#LOL chili is easy to make. u just gotta have the spices thats the big part#gluten free recipe#vegan recipe#scrabs recipes
5 notes
·
View notes
Text

@lesbianmizuki onion definitely goes into ragu and is the base of most red sauces for pasta here but not garlic! contrary to popular belief italian cuisine almost never uses garlic and onion together, if anything we either use garlic (more for fish dishes tho) or a mixture of minced onion, celery and carrot, which is what's typically used for ragu (i only use diced onion tho but thats personal preference)
#txt#i dont think i know any recipe that calls for garlic into tomato sauce and im from the south of italy#garlic is for spaghetti allo scoglio or fish dishes in general#u crush it and u let it fry in the oil with some chili flakes and then u use the oil to coat the pasta#but its usually served plain with no red sauce#red sauce calls for onion or maybe shallot#also basil doesnt go in ragù but you can put other aromatics like sage or laurel#i dont cause thats too pretentious
12 notes
·
View notes
Note
Really random question, but I am running out of lunch / dinner ideas. So, if anybody wants to help me out, ps, I am not good with spicy food! X
I just made a mushroom shepherd's pie which was so good and pretty easy! I also make sweet potato fajitas pretty often which are sooooo good and with both of those you have lots of leftovers. Also spaghetti aglio e olio is really good! Especially if you want pasta but don't want to open up a big jar of sauce. I make that for myself sometimes. It's just olive oil, garlic, lemon juice, chili flakes (which you could def leave out and/or put a tiny pinch of to make it a litle warm but not too spicy) and some parmesan cheese. It's super simple but really tasty. Have it with some veggies/a salad and you're good to go!
Also for lunch I've been making a chickpea kind of greek salad thing lately. It's just a can of chickpeas, some chopped up red pepper, cucumber, red onion, feta cheese, a bunch of crushed/chopped garlic, olive oil, lemon juice, salt and pepper! You could definitely add other seasonings and veggies but that's what I add most often! It's so good.
I also really like to make little snack-y plates for lunch sometimes! Some hummus or sometimes I make tzatziki and have some pita/pita chips or crackers, cut up veggies, cheese, olives, I don't eat a lot of meat but if you like meat, some deli meats, some cut up fruit, a hard boiled egg, nuts or whatever other kind of snack-y items you like!
I hope this helps a little angel! :)) Other suggestions are of course welcome!
2 notes
·
View notes
Text
A list of easy meals to make if you’re stuck at home and not much of a cook (brought to you by a year and a half of living in a dorm with not much money)
spaghetti (if you’re upsetti)
-cook spaghetti or your favorite pasta. if you don’t know how to cook pasta, google has some great tips.
-homemade red sauce: sauté chopped onion (about a half) & garlic (lots), cut up tomatoes (fresh and/or roma are best) or use canned diced tomatoes. tomato paste and water can be added to get the right consistency
-season with basil, parsley, salt, black pepper, crushed red pepper & cayenne if ya feel, add turmeric if you have anti-inflammatory needs like I do
****you can also jazz up a jarred marinara sauce by sautéing onion and garlic in olive oil, then pouring the sauce over to heat it, and adding those same seasonings
-for more nutrition you can add: ground meat or meat substitute, cooked lentils, roasted chickpeas, eggplant, zucchini, or whatever tbh
the only egg sandwich, as far as i’m concerned
-toasted bread, naan, wrap, or sandwich round
-half avocado, mashed
-mix mayo with chili powder, sriracha, garlic, turmeric, or whatever you have available/ like best
-1 egg over easy/medium: just spray the pan or melt some butter, crack an egg right into it, and let it cook until the clear part turns white (the longer it cooks, the less runny the yolk will be)
-spread the spicy mayo on the toast base, then mash the avocado, then place the egg on top
-top with salt, pepper, chili flakes
-you could add breakfast meats or veggies if you’re feeling fancy
quesadillas
-grab a tortilla
-put cheese on one side
-add veggies, meat, or whatever you want on top of the cheese
-spray the pan or put a little oil in it
-fold the tortilla in half
-place it on the pan, smush with a spatula
-flip it once it gets crispy; it’s done when the second side is crispy and the cheese is melted
-top with salsa, sour cream, guacamole, or ranch, or enjoy it plain
grilled cheese
-if you don’t know how to make a grilled cheese sandwich, message me and i will help you with this crucial life skill
-use as many cheeses as you can find or just your favorite kind. grilled cheese doesn’t discriminate.
-things i’ve added to grilled cheese: apple butter, spinach & feta, bacon, tomato, buffalo chicken dip
-you can also grill a pb&j or pb & banana sandwich the same way! 10/10 would recommend.
rice & beans
-cook rice in a pot, use some of the liquid from the bean can along with the water for more flavor, or use chicken/vegetable stock if you have it on hand!
-i like to season my rice as it cooks with cumin, garlic, and chili powder; just sprinkle it right into the pot
-if you’re feeling fancy, you can sauté some onion and garlic in the pan first, but garlic & onion powder will work just fine too
-pour a can of beans into a pan, season with salt, pepper, cumin, chili powder
-let them cook on low-medium heat for as long as it takes the rice to cook
-you can add whatever you want to the beans: leftover meat, mushrooms, a can of tomatoes, corn, etc.
-pour the beans into the rice pot, mix it all up, and enjoy! delicious alone, as a side, in a tortilla, on top of a salad, whatever.
6 notes
·
View notes
Text
“zen party mix slaw”
This is a bright, crunchy, spicy, funky slaw that I improvised yesterday as a side for kimchi carbonara spaghetti*. Kind of a desperate reconstruction of thai green papaya salads. But it was so on point--flavorful in itself without clamoring for attention--that we actually ended up mixing it into the pasta and eating them together. The fish sauce flavors from both dishes bridged them, shaking hands in our mouths. I just finished the leftovers straight from the tupperware and they were more intensely flavored today after a night in the fridge.
I didn’t take a solo pic of the salad because....it wasn’t much to look at. A Pollock-y mess of vegetal shreds. But here it is as sidecar in the pasta shot:

All measurements are imprecise, perhaps even wildly so, because it was put together on the fly--taste everything as you go and adjust as you like.
1. SALADING: combine the following in a big salad bowl:
4-5 cups green cabbage, shredded. i used a mandoline for half, then gave up and knife-cut the rest.
3/4 cup carrot, shredded
1/2 small red onion, sliced finely
2. SAUCING: I just threw them on top of the veg wantonly as i pulled them from the cabinet. A lime’s juice might be good in addition to/instead of the vinegar. If you have the Thai condiment nam prik pla, it might sub well for the fish sauce/vinegar/sugar.
1 tsp fish sauce
1 1/2 Tbsp vinegar (we have serrano chiles in white vinegar, I spooned out some of the peps as well)
sparing sprinkle of sugar, to taste
1 Tbsp neutral oil (we had canola, not my fave though)
(2a. SPICING: In the next step I added Huang Fei Hong Chinese snack peanuts which have chili threads and Sichuan peppercorn in them--the latter of which had a definite presence. If you don’t like Sichuan peppercorn, don’t worry about it. If you do, maybe crush up a few Sichuan or sansho peppercorns and throw them into the mix now. But for alt spice, I’d recommend any of the following:
2-3 seeded/finely chopped birds’-eye chiles
1 seeded/finely minced jalapeno
1tsp red chili flakes
3. MIXING: For non-mayonnaise-dressed slaws like this, I like to massage the ingredients together by hand, so that’s what I did, fish sauce and all. You could also use a wooden spoon, but going full-manual really jump-starts the flavor meld. Then top with these last few things and serve.
handful sliced green onion
big handful cilantro, chopped
3-4 sprigs worth of mint leaves, chiffonaded
chopped up Huang Fei Hong Spicy Peanuts
Enjoy!
--
* (recipe/technique to follow; lifted from Irene Yoo / @yooeating on instagram)
0 notes
Text
11 staple recipes from sports bloggers who work from home A LOT
SB Nation staff have spent years working from home. Here are some of our favorite recipes, for the laziest cooks AND the more ambitious.
We here at SB Nation have been preparing for social isolation for years, in a way. We work all over the country (in fact, the world), and so have gotten quite good at feeding ourselves, thank you very much. To work remotely at an often fast-paced job, it helps to have a repertoire of cheap, easy, fast and most importantly good recipes at hand.
So without much further ado, here’s a look at how SB Nation likes to feed itself so that you can too. These recipes are sorted beginning from low effort* to high, so you can find exactly the meal you need for whatever your situation.
* Not including frozen pizzas and/or fistfuls of chips, which SB Nation also considers part of a healthy diet.
If you need something REALLY easy
Freshly meal service
OK, if you landed on this page looking for easy meals because you can’t or don’t like to cook, I am here for you. About a month before the pandemic hit, I tried out Freshly meal service. Freshly provides single-serving meals that heat up in the microwave in three minutes and I promise you that these actually taste good.
All of Freshly’s meals are gluten free, peanut free, and contain no refined sugars. They’re pretty healthy and my body honestly felt better after eating these meals for two weeks compared to what I typically eat. I promise no one paid me to write this, I just like these meals so much.
Freshly also has tons of meals options to choose from, and the app is so easy to use it’s almost fun. And the best part? No cooking. Just throw these in the microwave and you have a truly tasty meal. I put them on a plate afterwords just to make myself feel like I cooked.
I can’t advocate for it enough if this fits your lifestyle.
— Whitney Medworth
Just throw a bunch of stuff in an Instant Pot
Do you have zero patience for cooking? Do you like tender, pull-apart meats and poultry that falls off the bone? Do you appreciate the danger of using deadly atmospheric forces to imbue flavor to bland meats?
Hoooo buddy, then the Instant Pot is for you. It’s basically a pressure cooker/crock pot hybrid that can give you slow-cooked tenderness in one hour instead of six. Since my cooking philosophy boils down to “chop stuff, put it in a pot, stir occasionally,” this magic food cylinder quickly became a trusted ally in my battle against poorly cooked meals.
Here’s my go-to chicken burrito bowl recipe.
Ingredients
2 pounds chicken thighs (can be boneless or skinless, your call) 2 cans corn 2 cans black beans 2 cans diced tomatoes (adding some salsa here is optional. I throw a bunch of salsa verde and sour cream into the mix after everything’s cooked) 2 cans green chiles (the little ones) 1 white onion Maybe some chopped bell peppers A bunch of taco seasoning (or get creative) Approximately 1/4 cup chicken broth
Start with the broth, then add the chicken to the pot. Coat the chicken liberally with seasoning. Add the vegetables. More seasoning. Stir the mix on top of the chicken. Then seal the lid and pressure cook on high for 12 minutes. It will take longer than that because the machine needs to heat up and then, later, release all the pressure that just made your chicken a juicy damn delight.
If you get the “burn” notice on the machine, transfer everything to a big pot, clean out the instant pot, and try again with more broth at the bottom of the cooking vessel. In the end, you should get chicken that shreds apart when you stir your finished product with a little force. Ladle that beautiful mess over rice (which you can also cook easily and masterfully in an Instant Pot), or in tortillas, or over tortilla chips.
Plus, it reheats well, so you can glean two to three meals for a three- or four-person household. Feel free to play around with the recipe, too. Add what you like. It’s incredibly hard to screw up with an Instant Pot.
— Christian D’Andrea
Simple, good salad dressing
This is the salad dressing that mom my made almost every day when I was growing up, and that I still make because I’m a creature of habit and somehow still haven’t gotten sick of it after 30-plus years.
Ingredients
Diced shallot (to taste, really. I like lots, but let’s say half a medium bulb) Approximately 3 tablespoons of balsamic vinegar (I eyeball) A little more than that of olive oil Salt and pepper to taste Optional: 1/2 tablespoon (approximately) Dijon mustard
Throw diced shallot at the bottom of your salad bowl. Pour balsamic on top. Sprinkle with salt. You can let this sit as you make the rest of your meal. The vinegar will dissolve the shallot and salt in the mean time.
Whisk in olive oil and crack pepper on top. I do a bit more oil than vinegar, let’s say a 1.2:1 ratio, but really it’s to your taste; some people like the pucker. Throw lettuce in the bowl, mix, and hey look you have a salad. I like to mix in a big dollop of Dijon mustard into the dressing, too, which also helps bind the dressing to the lettuce.
— Louis Bien
If you want to feel like you cooked
Fooch’s spaghetti sauce
Ingredients
2 cans diced tomatoes (14.5 ounce cans — can cut in half for smaller serving) 2 to 3 cans tomato paste (6 ounce cans — depending on thickness you want) Roughly 1/2 a green bell pepper, chopped Roughly 1/2 a small yellow onion, chopped 6 to 10 cloves of garlic, minced (feel free to add more) Some red wine or sherry Mix of seasonings: Garlic powder, salt, black pepper, chili powder, red pepper flakes, Italian seasoning (can try whatever seasonings you’ve got) Olive oil
I don’t use precise measurements for the seasonings, the wine or the total amount of green peppers and onions. Pour enough olive oil to coat the bottom of your sauce pan. Heat it up on medium, then drop in the green peppers and onions. Simmer it a bit and then add in the garlic and let simmer a bit longer. Add the mix of seasonings, nothing too crazy in terms of amount. Don’t let the garlic burn.
Add the diced tomatoes, paste and some wine/sherry and mix everything. Add some more of the seasonings. Mix it all together and once you see it bubble a little, turn the heat as low as possible while still keeping the burner on. Stir every 10 to 20 minutes. If I do one of each can, I cook the sauce for a little over two hours. If I cook two of each can, I cook the sauce 2.5 to three hours.
If you have meatballs, drop them in with about an hour left of cooking, and let them cook up in there.
— David Fucillo
A James-Fooch interlude
James: omg i had something planned to write but im reeling at fooch using 2-3 CANS of tomato paste in his red sauce
Fooch: James, worth noting they’re smaller cans. Let me get the oz total
James: i dont care the can size, david. that is too much paste
Fooch: not even a little bit
James: YOU MADE IT WORSE FOOCH.... 12-18 OUNCES OF PASTE ... that’s a either just unde or over a POUND of tomato paste
Fooch: I’m curious to see what kind of runny sauce you roll out there
James’ spaghetti sauce (AKA, the one not cooked up in a lab by a monster)
I had planned to share a unique recipe to separate myself from my colleagues, but after reading how much tomato paste Fooch puts in his sauce I felt an intervention was needed.
When I make a red sauce I like to make a lot of it. It freezes well, and when you put the time and effort in that this sauce requires, you deserve to be able to have some on-hand whenever you need it.
Ingredients
2 cans of whole San Marzano tomatoes (28 ounces each) 1 can of tomato paste (6 ounces) 4 cloves of garlic, crushed 1 yellow onion, diced 1 Parmesan cheese rind Red wine 2 cups fresh basil Salt Pepper Olive oil Red pepper flakes
Heat a Dutch oven, or heavy-bottomed large saucepan over medium heat. Add olive oil until it’s shimmering, but not smoking. You can use whatever you have on hand, but I prefer light olive oil for this because it has a higher smoke point. Add the onions and cook until they’re translucent (roughly three to four minutes). Add the garlic and cook until fragrant.
At this point you want to add the tomato paste and red pepper flakes. Stir continuously and watch for the paste to deepen in color. It’s likely you will have some stuck to the pan, and that’s OK — that’s good. Deglaze the pan with red wine, roughly one cup.
Add the tomatoes, reduce the heat to medium-low, and put a lid on the pot — slightly ajar to let out steam. Simmer for 45 minutes to an hour.
Use a potato masher to break up the tomatoes, which at this point should have collapsed and mash easily. Stir the sauce together and add the rind of a piece of Parmesan cheese, which sounds fancy but you’ll have it from any decent hunk you buy. This is also the point when you can add any meat, should you so desire. Brown meatballs, Italian sausage or ground beef in a separate pan, add to the sauce. Simmer for another 30 to 45 minutes.
Remove 10 to 12 leaves of fresh basil, chop and reserve them. Put what remains of your bunch of basil, stalk and all, into the pot and let the sauce simmer for another 15 minutes. Taste, add salt and pepper as needed. Remove the basil stalks and Parmesan rind, remove the sauce from the heat and add the remaining chopped basil just before plating.
If you find the sauce is too thick from reducing, reserve some pasta water from the noodles you’re cooking and use it to thin the sauce. Do not use stock or regular water.
— James Dator
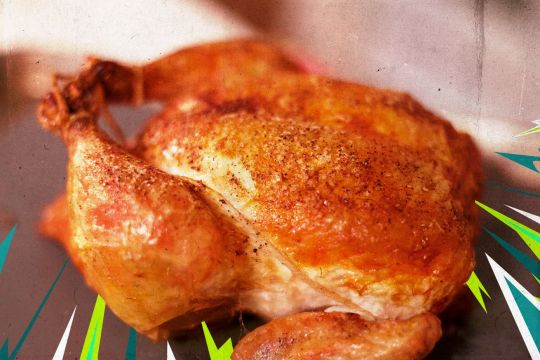
Simple, good roast chicken
The New Best Recipe from America’s test kitchen is cheap, MASSIVE and has taught me a helluva lot about cooking. It doesn’t just list recipes, it explains how those recipes were created by telling the story of failed variations that came before, going into minute detail about almost every ingredient.
The recipe for roast chicken is the most abused page in my copy. Their version solves for a common problem: How do you get the white meat and the dark meat both tasting good on the same bird? Too often, you have to choose: perfect chicken breasts and underdone legs; juicy legs and dry, overdone breasts.
You don’t have to sacrifice anymore. This recipe works best with a v-rack, but if you don’t have one a simple pan will do fine. Just check out the alteration below.
Ingredients
3.5 to 4 pound whole chicken 2 tablespoons melted butter Salt and pepper to taste Vegetable oil
With v-rack
Set oven to 375 degrees. While it preheats, pat chicken dry then brush the outside with butter. Season with lots of salt and pepper.
Brush v-rack with vegetable oil and place it in a shallow roasting pan (you can line the pan with foil for easier clean-up). Place chicken wing-side up in the v-rack and place in the oven for 15 minutes. Then, flip the chicken so the other wing is up, and give it another 15 minutes in the oven.
Turn the oven nob up to 450 degrees (no need to wait for the temperature to rise unless you know your oven is particularly slow) and place the chicken back in the oven breasts up. For a chicken on the smaller end, 20 to 25 minutes may be enough. On the bigger end, you may need 30 to 35 minutes. Thermometers are your friend: white meat should be at approximately 160 degrees when it’s done, while dark meat should be at 165 degrees.
Once your chicken’s done, take it out of the oven, let it rest for 10 minutes, carve, and eat. I made this last night and can confirm that both the white meat and dark meat were damn juicy and delicious.
Without v-rack
Total roasting time should be approximately the same, but you’ll want to roast the bird starting breast-side down for 20 minutes at 375 degrees. Then crank the nob to 450, flip the chicken so it’s breast-side up, and cook until done — another 30ish minutes for a smaller bird, 40ish minutes for a bigger bird. The skin probably won’t be as crispy, but you should still have a tasty roast chicken at the end of the process.
Addendum
Butter, salt and pepper is all I need most of the time, but feel free to rub on whatever herbs and spices you’d like into the skin after you’ve buttered it. It’s hard to go overboard. Also shout out to Cervo’s in New York City. I used their Piri Piri rub on my last roast chicken the other day and it was :chefkiss:
— Louis Bien
Spinach-pecan pesto (vegan)
Ingredients
2 cups spinach 1/4 cup raw pecans 1/3 cup extra virgin olive oil 2 to 3 garlic cloves, depending on your taste Salt and black pepper to taste
The biggest issue many of us have in isolation: How do I eat pasta differently for the seventh day in a row? And how do I make meals that don’t require 5,000 different ingredients, especially if grocery stores are out of stock?
You’re in luck. You can prepare my variation of this pesto as a marinade for chicken or as a pasta sauce.
Toast raw pecans over low-medium heat until fragrant, then allow to cool.
Food processor pecans, spinach, and garlic until minced.
Slowly add olive oil until blended to your preferred consistency.
Salt and pepper to taste.
Optional: My preferred way to eat this is sautéing onions or shallots in 1 tablespoon of butter or oil, adding shrimp, and tossing it altogether with the marinade and whole wheat pasta.
— Brittany Cheng
Vegetable fried rice
Serious Eats is one of my go-tos when I’m trying to cook something I’ve never done before, for two reasons. First, they don’t just explain how to make a dish, they get into why you take certain steps. Second, Serious Eats recipes understand that you, the humble home cook, may not have every preferred ingredient or piece of equipment available, and adjust when they can by showing you where you can substitute or change course in the recipe and still make something delicious.
Their guide for vegetable fried rice is no exception. You can make this with fresh rice or leftover rice. You can use a wok or a cast iron skillet. You can add meat or eggs if you like, but you also don’t have to. The result is delicious and comforting. I offer only these pieces of advice as you set out on your fried rice journey.
Read the whole recipe through beforehand and do your prep work ahead of time (cut your onions, your carrots, and so on, and put them off to the side so they’re ready to go). You don’t want to be racing to chop things.
Open a window and get your oven hood fan cranking. You’re gonna be working with very high heat and probably end up with some smoke.
If you add a fried egg to yours, go ahead and add a second. You deserve it!
— Ryan Nanni
Sweet potato black bean tacos with guac (vegan)
Ingredients
1 sweet potato 1 can of black beans, rinsed and drained 1/3 an onion, chopped Chopped Red pepper Garlic salt, smoked paprika for taste
For the guac:
1 avocado, ripe 1 lime Red onion or shallot 2 cloves of garlic
As a runner I live on sweet potatoes. They’re packed with nutrients and taste great. What more do you need? Sweet potatoes are also incredibly versatile. They can be roasted, boiled or nuked and added to any dish. For a simple, and super healthy, alternative to regular old tacos, swap out the meat for a can of black beans and pack the tortilla with sweet potatoes.
To microwave the sweet potato, rinse thoroughly and prick the exterior with a fork. Wrap the potato loosely in a wet paper towel and put in the microwave on high for six minutes, or until tender. (Many microwaves have a setting for potatoes. Use that if available.)
Rinse and drain the black beans and set them aside. Chop the onion and pepper and drop them into a skillet over medium heat with a tablespoon of olive or canola oil, giving the onion a chance to caramelize. Add the black beans and flavor with a dash of garlic salt and smoked paprika. (You can use any spices you like. Get creative and funky.)
Cook for about two to three minutes, or until tender.
Guacamole is my go-to in almost every situation, but you can use any other topping you like. To make your own guac, slice an avocado and scoop out the filling into a bowl, mashing lightly with a fork. Add salt, onion and garlic along with the lime and stir until you get your desired consistency.
Throw everything into a tortilla and enjoy.
— Paul Flannery
If you have some time on your hands (LOL) and want to go all-out
Homemade dumpling recipe
Ingredients
2 packages of dumpling wrappers
Dumpling filling:
1/4 cup vegetable oil (no substitute) 1 1/4 pound ground meat (or vegetable filling of choice, such as cabbage and carrots) 1 egg (remove if allergic) 2 bunches of Chinese chives or scallions 3 tablespoons sesame oil (no substitute) 1/4 cup soy sauce
Egg wash:
1 egg 1 tablespoon water
Egg wash substitute, if allergic:
1/2 cup water 1 tablespoon cornstarch
Warning: Making dumplings usually takes me about three hours, but if you’re up for the task, it’s so rewarding. The hardest part about making dumplings is finding the wrappers. If you don’t live near an Asian grocery store, you can sometimes find them in Giant or Safeway, which carry Nasoya gyoza wrappers in the tofu section. Do not use wonton wrappers.
If you have two extra hours on your hands, you can make homemade wrappers by following these instructions by Woks of Life, whose pork-chive dumplings were the original version of my recipe.
Heat vegetable oil over medium-high heat, roughly seven minutes. Cool to room temperature. I can attest this does create a “nuttier” and deeper flavor.
Mix the ingredients of the dumpling filling together. I use ground pork. You can stir-fry the mixed filling to sample the taste before assembly and make adjustments.
Make egg wash or my egg-free substitute by whipping those ingredients.
Assemble about 150-200 dumplings using 1 teaspoon to 1 1/2 tsp of meat per wrapper, using the wash to seal. Keep most of dumpling filling in the fridge and take portions out as needed.
To store:
Line a baking pan with parchment paper and put dumplings on there. Stick batches into the freezer as you go. This freezes the dough so dumplings won’t stick to each other.
After each batch spends 30 minutes in the freezer, they can be tossed into gallon freezer bags for storage.
To pan fry:
Heat 2 tablespoons of cooking oil (vegetable, canola) to non-stick skillet over medium-high. Do not let oil burn.
Arrange dumplings and cook for four minutes, or until the bottoms of the dumplings are light golden brown.
Add 1/4 cup of water, immediately place lid over skillet, and turn to low to low-medium heat to steam for about four minutes.
Remove lid and cook until the water is mostly evaporated.
To boil:
Bring salted water to a rapid boil.
Cook dumplings in boiling water for about five to six minutes (add two to three minutes if they’re frozen) until they float. Stir occasionally.
— Brittany Cheng
Simple, good cassoulet
Cassoulet is my favorite dish in the world, and I’m on a mission to perfect it. The hardest part may be acquiring all the ingredients. You may need to visit a bougie grocery store to find duck confit and duck fat, for example. But once you have the goods, cooking cassoulet is a trial of patience more than anything.
Here’s my great, relatively simple recipe that I adapted from a French cookbook called Connaître la cuisine du sud-ouest by Francine Claustres. If you can read French or are willing to put in some effort translating, it has multiple variations of cassoulet, from Toulouse, to Carcassonne, to Castelnaudary and beyond. Trust me, once you try one cassoulet, you’ll want to try them all.
— Louis Bien
0 notes
Photo

Spaghetti Squash Lasagna ft. Veggie Bolognese
I'm not a religious person, but I sure am thankful that God invented spaghetti squash.
Before, squash was never a huge part of my diet. I thought they did not have much flavor. To me, they were more fall decorations than dinner entrées. However, if any squash were to be one, the spaghetti squash is the gateway squash.
Just the name makes it sound so exciting! Spaghetti! Squash! How playful! And hey, sure, no one is really fooled that this is pasta. (And if we’re being reallllly honest, this squash done wrong can be just as bland as I thought.) But that makes it a perfect canvas for adding all kinds of stuff. And eating half a squash has never been so easy (or fun).
This recipe is a result of my love for lasagna and my vegetarian tendencies. I wanted to create a red sauce that was filling like a meat sauce, but from veggies that I had at home.
Armed with a fridge of hearty vegetables, a can of whole peeled tomatoes, and a food processor, I set about this mission of creating a delicious –and nutritious!– meal.

I had a bunch of Brussel sprouts and I postulated that a nice caramelized mince of sprouts might be a satisfactory dupe for a ground meat. Of course, sprouts are not beef. But, the texture becomes nice in the sauce and getting a good browning on the sprouts is key for flavor in this sauce.
I set off with this recipe kind of with no guidance, just a hunch and some cooking intuition. What I walked away with was a new recipe–definitely still to be tweaked–but a yummy one at that, and one that I could call my own.
–––––
Cook time: 40 mins Prep time: 10 mins Ingredients: - 1/2 onion - 3 cloves of garlic, minced - 2 cups of Brussel sprouts, chopped roughly - 1/2 cup of carrots - 1/2 large can of whole peeled tomatoes + liquid - spices (Italian herbs, red chili flakes, etc.) - spaghetti squash - cheese (cheddar, ricotta, parm, etc.) - olive oil
Preheat the oven to 400º. Start with the squash; cut it in half, lengthwise. Be careful! Use a large knife, a cutting board, and be direct.
Scoop out the inside goop with a spoon. (Wash and separate the seeds to roast if desired! #NoWaste!) Rub the insides with olive oil, salt, and pepper. Place both halves cut-side-down on a baking sheet. I pierce the outside skin to vent in a few places, but I don’t know if this is necessary. Leave to roast in the oven for. ~40 minutes or until tender on a middle rack.

For the sauce:
Heat a large skillet with some olive oil over medium-high heat.
Cut the Brussel sprouts in half (so they fit) then pulse half of them a few times in a food processor until they are chopped in medium pieces. Put these in the pan to sauté. Now, pulse the rest of the sprouts with the onion and garlic. Pulse until a fine dice. Add these to the larger sprout pieces–the larger pieces add some nice texture to the sauce and can get browner than the diced stuff. Season with salt, pepper, spices (red chili flakes, oregano, basil, etc.).
Sauté and reduce the veggies in the pan. Stirring only every few minutes, allowing browning to happen. Continue for about 10 to 15 minutes or until mixture has reduced, veggies have shrunk and begun to caramelize.
Once the mixture is nice and browned and reduced in size, crush your tomatoes by hand and add them to the skillet with the sauce in the can. Season again.
Let simmer for at least 5 to 10 minutes to reduce slightly and for flavors to marry. Sauce should be thick and almost jammy, but can be adjusted as needed.
Once spaghetti squash is ready and tender, take out of the oven, flip cut-sides-up and fluff a little of the squash in the middle. Turn on the broiler.
Fill each half of the squash with the tomato sauce about halfway. Sprinkle with cheese! Fill with more sauce. The top with more cheese–dollops of ricotta and a grating of parmesan are very nice touches!
Stick under the broiler until cheese is melted and browned just slightly, about 4 minutes. Take out, let cool, top with toasted seeds, and enjoy your delicious vegetable creation!
0 notes
Text
Mediterranean Shrimp & Fennel Pasta

Before I say anything else, please excuse the phone pictures. This is much better than the nasty photos give it credit for. Also, this isn’t all the ingredients up there. But it is pretty simple, and it’s good. You can kind of make it easier or harder depending how much effort you want to put it. It’ll be delicious either way.
God, writing this feels so awkward. I can’t believe I’m a creative writing major. I love reading recipes, and I want to share recipes with people. That’s my like, personal mission statement I guess. Plus I want to encourage myself to use the stuff that’s in my fridge up and eat at home more this summer, and maybe if I think people care I’ll actually do it. OK, on with the recipe.
I adapted the basic concept from an Australian Women’s Weekly Cookbook from 1989. Man, they were ahead of their time. It’s crazy how many things in Australian cookbooks caught on like a good 15-20 years before they did in America. Like, I went to Australia when I was nine, fell in love with sweet chili sauce, then it took another ten years for me to be able to find it at the grocery store in the closest city. Granted, this is rural Canada -- but that was rural australia!
We ate this with spaghetti but I think just the sauce would be good over some good chewy grains or spinach garlic rice. You could also use another pasta shape. The main thing here for me is the lovely pieces of slightly caramelized fennel. You honestly don’t even need the shrimp, really. But it is goooood (and it was on sale for me)

1 red or white onion, sliced
2-3 garlic cloves, minced
Olive oil
3/4-1 pound large raw shrimp
1 Medium bulb fennel, cored and sliced, leaves reserved for garnish
1 Zucchini, sliced into thin half moons
1 Fresno chile, chopped, or a pinch of chile flakes
2 tbsp tomato paste
Oregano and Greek Seasoning, to taste
1/3 cup white wine
14 oz can chopped or crushed tomatoes
6-9 Kalamata olives plus more for garnish
Feta, for garnish
1 lb Long pasta, such as spaghetti
Heat a big skillet or pan on medium-high. Add a little high-heat oil to your pan. Sear the shrimp on either side, until just barely-even-not-quite-cooked. Reserve to a plate and cover.
Lower heat slightly. Meanwhile, put a big pot of water to boil for the pasta. Sear the zucchini until brown and remove to separate plate. Add the onions, sliced fennel, and fresno chile to the pan and let sit for a second to start the bottoms browning a little. Toss and let sit again, making sure that the fennel is soft and some of the pieces have gotten nice and caramelized, 7-10 minutes. Add oil as necessary. Add the garlic, greek seasoning or some oregano, salt, and pepper and saute another minute until fragrant, then return the zucchini to the pan and toss. Clear a little well in the veggies and add the tomato paste, frying to remove some of the liquid, then stir into the vegetables as it cooks.
Add the wine, stirring to remove any brown bits from the bottom of the pan. Cook until mostly evaporated, then add the can of tomatoes and a handful of olives. Stir, lower the heat to a simmer, cover partially and let bubble away while you cook the pasta according to package directions, salting the water liberally. Make sure you taste the sauce and salt it if you need more. Reserve a mugful of the pasta water and drain the pasta. Add the shrimp back to the pasta sauce and stir to heat up. Immediately toss the pasta with the sauce, adding cooking water as needed to make the sauce your desired consistency. Twirl into serving bowls and garnish with chopped olives, crumbled feta, and the reserved fennel fronds. Serves 4 with a salad.

0 notes
Text
Easy Weeknight Meals
These easy weeknight meals rely on a lot of fridge, freezer and pantry staples so you should be able to make them fairly quickly for lunch or dinner at almost any time!
Hi friends!
I’m here with some easy weeknight meal ideas for you! Last week I shared 25 Easy Pantry and Freezer Meals and a lot of people found them helpful for quick dinner ideas so I wanted to give you some more! I’ve included a few links but for the most part these are just general recipe directions for inspiration. If you see one that sounds good and you need a more specific recipe, just search the title in red on Google or Pinterest and I’m sure lots of options will pop up!
Easy Weeknight Meals
The titles in red are NOT links…just recipes titles followed by a general description (I did include a couple of links to recipes already on the blog)
Peanut Noodles – Roast whatever veggies you have a cook some chicken (or sub a can of white beans). Mix with cooked rice noodles or ramen noodles. Combine peanut butter, soy sauce, maple syrup, and a little broth to make a sauce and toss to coat. Add sriracha for a kick. These Instant Pot Asian Noodles are my favorite.
Italian Beef Skillet – Cook ground beef in a skillet with garlic and Italian seasoning. Add some cooked lentils (or use all lentils if you don’t have meat. Stir in a can of diced tomatoes (including the liquid in the can) along with some fresh spinach or kale and some crumbled feta. Serve with pasta, rice, quinoa etc.
Fajita Potato Nachos – Saute chicken, peppers, and onions in a skillet with taco seasoning. Serve over roasted potato slices and top with cheese. Or skip the potatoes and serve over chips, or make traditional fajitas.
Sundried Tomato Pasta – Cook chicken in a skillet with garlic and oil. Mix in cooked pasta, chopped sundried tomatoes, and some chili flakes.
Shrimp Scampi – Saute shrimp in butter, garlic, and oregano. Serve over spaghetti or zoodles and top with fresh lemon juice! I make this Paleo Shrimp Scampi all the time!
Sheet Pan Greek Chicken – Put chicken thighs, diced potatoes and green beans on a baking sheet. Top with greek seasoning and slices of lemon and bake at 400 F until chicken reaches 165 degrees.
Hawaiian Chicken Sliders – Combine chicken, diced canned pineapple (plus juice), diced red pepper and some bbq sauce in the crockpot and cook on low for 6 hours. Shred chicken, put on slider buns and top with cheese.
Hamburger Helper – Cook ground beef in a skillet with a can of Rotel, a drained can of corn and a can of ranch style beans. When beef is cooked, mix in cooked elbow noodles and serve.
Crack Chicken – Put chicken, a block of cream cheese, a packet of ranch seasoning, some shredded cheese, some chopped bacon, and a little chicken broth in the crockpot and cook on low for 6-8 hours. Make a Mexican version with this Slow Cooker Creamy Mexican Chicken. Or for something less creamy try this Crockpot Cilantro Lime Chicken.
Chicken Noodle Casserole – Mix cooked chicken and cooked egg noodles with a can of cream of mushroom soup, a bag of frozen veggies and a little chicken broth. Top with crushed potato chips. Bake until bubbly.
Unstuffed Cabbage Rolls – Cook ground beef, garlic and onion in a dutch oven and drain grease. Add a bag of coleslaw or shredded cabbage, a can of tomato soup and a little water. Bring to a boil, cover and reduce heat to simmer for 30 min or so. Stir in some cooked rice if desired.
Fried Rice – Saute chicken and frozen veggies. Add cooked rice and soy sauce and mix. Push to the side, scramble a few eggs and mix it all together for fried rice.
Breakfast For Dinner – Try these Egg in a Hole Breakfast Sandwiches, some Red Lentil Pancakes with fruit and yogurt or these Banana Flax Waffles.
Dijon Salmon – Top salmon with dijon mustard or hummus and breadcrumbs (or crushed nuts) and bake. Serve with sweet potatoes or rice.
Mexican Zucchini Boats – Slice zucchini lengthwise and scoop out the middle. Stuff with cooked ground beef and/or black beans, corn, taco seasoning, and shredded cheese and bake.
Chicken Pot Pie – Cook garlic, chicken, potatoes and frozen mixed veggies in a skillet with butter for 10 min. Sprinkle with a couple of tablespoons of flour. Add some chicken broth, bring to a boil and then simmer until potatoes are tender. Add a cup or two of milk, pour into a baking dish, top with a sheet of puff pastry and bake. Sub chickpeas for chicken if you want!
Chicken Tenders – Make your own chicken tenders or nuggets, or pull a batch of these Freezer Chicken Tenders from the freezer and serve with steamed veggies and mac and cheese.
Easy Grilled Chicken – Marinate chicken in a mixture of garlic, oil, red wine vinegar, and honey. Grill and serve with veggies and your favorite starch.
Breakfast Loaded Potatoes – Mix scrambled eggs with black beans, salsa, and cheese and use to topped baked potatoes or sweet potatoes.
Baked Ziti – Cook ground turkey or beef. Mix with cooked pasta and a jar of pasta sauce (and spinach if you want). Spoon into a baking dish, top with mozzarella cheese and bake until bubbly.
Hummus Chicken Wraps – Make this shredded hummus chicken and throw it in a tortilla with any veggies you have on hand. Serve with fruit!
Crockpot Roast Chicken – Put a whole chicken (or a pot roast) in the crockpot with carrots, potatoes and a cup of broth. Top with a packet of onion soup mix and cook on low for 6-8 hours.
Zuppa Toscana – Cook Italian sausage, onion, garlic, diced potatoes and bacon in a dutch oven. Add broth, bring to a boil, then simmer until potatoes are tender. Add some heavy cream and fresh spinach if you have it.
Egg Wraps – Make these easy egg wraps and fill with cheese, turkey, avocado, leftover chicken etc. Whatever you have on hand!
So there you go! Hope this gave you some new ideas. Remember you can find more ideas in my Freezer & Pantry Meal Ideas post!
Enjoy! –Lindsay–
First found here: Easy Weeknight Meals
0 notes
Text
PASTA AGLIO OLIO
Pasta Aglio Olio is a flirty dish to serve, at least, this is definitely true in the film Chef. I love this scene, where Jon Favreau is cooking up something wonderful for Scarlett Johansen, and after making this pasta for myself, I have to agree with Scarlett’s character, “Sigh.”
When pasta is perfect, you don’t really need words, just noises will do. And this is a very simple, whip it up as the pasta boils, kind of recipe. Perfect for flirting and making a good impression. Or perfect for an impatient night at home, when you just really want a bowl of pasta. Enjoy!
INGREDIENTS
1/2 teaspoon crushed red pepper
1/2 cup extra virgin olive oil
4 garlic cloves, thinly sliced
1/4 cup chopped Italian parsley
12 ounces linguine or spaghetti
1 lemon, halved
Pecorino, for grating
Salt and pepper to taste
DIRECTIONS
Put a pot of salted water on to boil. Put the oil, garlic and chili flake in a large deep pan set over medium-high heat, and cook until the garlic is translucent and golden, 2 to 3 minutes. Turn off the heat.
Meanwhile, cook the pasta until it is al dente, nearly but not quite done and still a bit chalky in the middle. Drain, and reserve 1 cup of the cooking liquid.
When the oil has cooled for a couple of minutes, add 1/2 cup of the pasta cooking water, and reduce over high heat by about half. Add the pasta, and stir vigorously as it continues to cook. Add the reserved pasta water a bit at a time as necessary to finish cooking the pasta, and develop the thickened sauce. Stir in the parsley. Juice the lemon half over the pasta. Season with salt, top with parm, and serve.
SaveSave
Source: https://www.thekitchykitchen.com/?recipes=/pasta-aglio-olio/
0 notes
Text
Freezer Cooking 101: Part 3 (Including 30+ Basic Ingredients & Recipes To Freeze For Easy Meals)
This is the second of a 3-part series on Freezer Cooking. I got hooked on freezer cooking a couple of years ago. While we don't eat the majority of our meals as freezer meals, I love counting on them at least once or twice a week as well as having a meal or two extra that's handy if I've forgotten to take something out. See the entire series here.
I shared earlier in this series that freezer cooking can be a lifesaver. I know this sounds dramatic, but when you're in the middle of a busy week and finding it nearly impossible to put nutritious, affordable and delicious meals on the table, having freezer meals or freezer ingredients can truly make it feel like dinner was saved. Keep the take-out menu's in the drawer and shop the freezer instead! There's less work on your part to prep it and, therefore, less clean up too.
In part 1 we discussed the basics of freezer cooking including the basics of starting. In part 2 we went through all of the supplies you will need as well as the steps you'll take to successfully prep meals or ingredients for freezing. In this post, the third and last of the series, we'll look at basic ingredients you can prep and keep in your freezer, making mealtime easier. Even if you determine that complete freezer meals are not for you, most of us can benefit from prepping ingredients (marinated chicken breast, burger, veggie burgers, fruit, etc.) and having them ready to go.
For me, most of my freezer prep is ingredients. While I do use a handful of actual freezer meals, I always have quite a few ingredients that we use regularly that I prep every single month. Our recipes change depending on the season. For instance, in the spring and summer we use the grill a lot. So, you'll find a lot of meat, portioned for individual meals, frozen in the marinade, allowing me to unthaw them in the refrigerator overnight and plop on the grill at dinnertime. During fall and winter we are more likely to use the oven or slow-cooker, although I do use a grill pan as well, so you may find more meal packs for the slow-cooker or ingredients to add to pizza or casseroles in our freezer. Use freezer meals how it makes sense for you.
Ready-To-Go Freezer Ingredients
These are items that you will either just freeze, or cook and then freeze, to have on hand for simple additions to meals.
- Grilled Boneless/Skinless Chicken Breasts and/or Thighs
(for use in salads, tacos, burritos, sandwiches, chicken pot pie, quesadillas, soup, casseroles, or pizza)
- Browned Hamburger (drained and cooled)
(for use in pizza, taco salad, tacos, burritos, chili, lasagna, quesadillas, soup, casseroles, spaghetti sauce, or sloppy joe's)
- Uncooked Burger Patties
(making it easier for burger night or patty melt night)
- Cooked Sausage Crumbles
(Breakfast sausage for use in breakfast burritos or on breakfast pizza; regular sausage for use in spaghetti sauce, lasagna, etc.) - Tomato Paste (if you're opening a can but not using the whole can, but the remaining in an ice cube tray, freeze, then pop into a freezer bag and label. Take one out as needed for recipes.) - Parmesan Cheese (I always buy grated parmesan in bulk and freeze most of it in bags containing 1 1/2 cups) - Butter (if you buy on sale, freeze for longer term storage) - Homemade Pesto (freeze in ice cube tray - Marinated Meat (portioned into serving size portions) *see a few recipes below to get you started* - Cooked or Raw but prepared Meatballs (flash freeze so they can be frozen in a large bag but frozen individually) - Extra Vegetables - Flash-freeze fruit (berries, mango, chunks, banana chunks, etc.) (for use in smoothies, homemade jam, fruit crisps, etc.) - Flash-freeze peppers (I dice some and cut some into strips) (for use in soups, quesadillas, casseroles, stir fry, etc.) - Flash-freeze onions (I chop them) (for use in soups, casseroles, stir fry, etc.) - Cooked Beans (make a huge batch and freeze in serving size containers) - Homemade Veggie Burgers
freezer chicken quesadillas
A Few Freezer Cooking Recipes & Ideas: - Delicious Blueberry Pie
- Pie Crust (if you're making a pie crust, why not double the batch and freeze another?)
- Pizza Dough
- Muffins (baked or unbaked)
- Cookie Dough (for baking later)
- Quick Breads
- Homemade Spaghetti Sauce
- Your Favorite Lasagna Recipe (If you're making one, why not make another for the freezer at the same time?)
- Pancakes (leftover or making a second batch for the freezer - reheat in toaster oven or toaster)
- Waffles (same idea as pancakes)
- Many sauces freeze well (freeze in ice cube tray and transfer to freezer bag for smaller amounts, or pour directly into freezer bag for larger amounts)
- Your family's favorite enchiladas
- Breakfast Burritos
- Honey Sesame Slow-Cooker Chicken Freezer Meal
- Slow-Cooker Chicken Fajitas Freezer Meal
- Slow-Cooker Honey Soy Freezer Meal
- Slow-Cooker Bourbon 5-Spice Chicken Freezer Meal
- Freezer Chicken Quesadillas
- Slow-Cooker Sausage & Peppers Sandwich Freezer Meal
Flash-Freezing Instructions: This is my favorite way of freezing some veggies and fruit. It enables you to freeze them in a big old freezer bag and to pull out as little or as much as you'd like when you want to use some because they are frozen individually. I like to use a cookie sheet lined with freezer paper. Place cleaned and dried fruit or veggies on the cookie sheet, spaced out so they touch very little to not at all. Place in the freezer. Once completely frozen (within an hour or two), transfer to a freezer bag. Push out as much air as possible (to prevent freezer burn), seal, and store in the freezer. Continue until all of the fruit or veggie that you are processing is completed. Make sure you've sliced or chopped, if needed, prior to freezing. Don't forget to label your bag with the contents and date frozen.
honey soy marinade on chicken
Easy Marinade Recipes: I use these ALL of the time. It makes dinner time so very easy. Make the marinade, portion meat into freezer bags in the amount you'll use for one meal, add the marinade to the bag (careful not to get any on the seal), push all air out and seal. Freeze. (In Part 2 I spoke about freezing the bags flat on a cookie sheet until frozen solid in order for the meals to stack nicely.) When you're ready to use it, let it unthaw in the refrigerator overnight. Cook on the stovetop (grill pan or sauté pan) or on the grill. Teriyaki Marinade *good for chicken or beef* 1/4 cup soy sauce (regular or low sodium, depending on your preference) 1/4 cup runny honey (if it's solid, microwave to loosen it up) 2 Tablespoons olive oil 1/4 teaspoon ground ginger 1/4 teaspoon crushed red pepper Mix all ingredients together. Honey Soy Marinade *good for chicken or pork* 1/3 cup honey1/3 cup soy sauce1 Tablespoon oil2 Tablespoons rice vinegar1/2 - 1 teaspoon freshly grated ginger2 cloves garlic, finely minced Mix all ingredients together. Cilantro Lime Marinade *good for chicken* 2 Tablespoons olive oil 2 Tablespoons lime juice 1 1/2 Tablespoons runny honey 1/3 cup chopped cilantro leaves pinch of salt Mix all ingredients together. Cowboy Marinade *good for beef (flank, kebabs, etc.) - really good on beef that will be grilled!* 1/4 cup soy sauce 2 Tablespoons olive oil 1 1/2 Tablespoons Worcestershire sauce 1 Tablespoon brown sugar 1 Tablespoon minced chives 2 garlic cloves, minced 1/2 teaspoon pepper Mix all ingredients together. Jamaican Jerk Marinade *good for chicken* 2 Tablespoons olive oil 2 Tablespoons lime juice 2 Tablespoons brown sugar 2 teaspoons garlic powder 1 teaspoon dried thyme 3/4 teaspoon allspice 1/4 teaspoon cinnamon 1/4 teaspoon crushed red pepper flakes 1/4 teaspoon salt 1/4 teaspoon black pepper Mix all ingredients together.
Freezer Cooking Part 1: The Basics To Getting Started Freezer Cooking Part 2: Complete list of tips and instructions
Do you have favorite tips or recipes for freezer cooking?
Freezer Cooking 101: Part 3 (Including 30+ Basic Ingredients & Recipes To Freeze For Easy Meals) was originally posted by My Favorite Chicken Blogs(benjamingardening)
0 notes
Text
Unpinned - One Pan Teriyaki Chicken Zoodles
Yup, my posts are monthly I guess. So this disaster happened a few weeks ago, but once I start spending all my nights over with the Boston Pops, cooking sort of...stops. I’m lucky if eating even happens. At least I get to have Sleigh Ride stuck in my head for the entire month of December! But I digress.
Sometime last month I was hungry, and I had zucchini. So I jumped onto my trusty old Pinterest board and looked for some zoodle-y goodness. And there waiting for me was the perfect recipe: One pan (!!) teriyaki (!) chicken (yum!) zoodles (yay!). A dish filled with things I like, no trip to the grocery store required, and ONE PAN? Certainly it’s too good to be true!
Hold on to your hats. Because it was indeed too good to be true.

Verdict:
Is the Pintrest photo complete bullshit? - Yup. Absolutely. Are those even pineapple pieces in the picture, or are they secretly just tiny carved pieces of tangerine that were hit with a blow torch until they looked juuuuuuuuust right?
Is it crazy expensive/time consuming/confusing? - It’s not expensive or super time consuming but this recipe actually sets a new record for confusing. More on that later.
Does it taste good? - No. It WANTS to taste good, it TRIES to taste good, and it only tastes...meh.
One Pan Teriyaki Chicken Zoodles
Ingredients
2 medium pieces boneless, skinless, chicken breasts (about 2/3 lb) cut into strips or chunks
salt and black pepper to taste
2 tablespoons cooking oil (olive or coconut oil for paleo)
5-6 medium zucchini, cut into noodles using a spiralizer or a vegetable peeler
1 cup chopped pineapple chunks (fresh, frozen or canned - I used fresh - can leave out for low calorie and swap in broccoli instead)
Sauce
1/4 cup low-sodium soy sauce ( gluten free tamari or coconut aminos for a paleo version)
2-3 tablespoons honey, coconut sugar or low calorie sweetener of your choice (depending on how sweet your preference is)
3 tablespoons rice vinegar
2 garlic cloves, minced
1/2 teaspoon grated ginger
1 tablespoon corn starch (or use arrowroot powder or tapioca starch for a paleo version)
2 tablespoons water, plus more as needed to thin out sauce
Salt, black pepper and red pepper flakes to taste, optional
Optional:
Green onions, sliced thinly
Broccoli florets
Sesame Seeds
Lunch containers, for meal prep
Instructions
In a small bowl, whisk together all the ingredients for the sauce.
In a large bowl, season chicken with salt and pepper and drizzle 1-2 tablespoons of sauce over the chicken. Allow to marinate for 30 minutes.
Heat cooking oil in a large skillet on medium high heat. Add chicken and cook until lightly brown, about 1-2 minutes. Add in the pineapple chunks and cook for another 1 minute, until slightly softened. Pour in the remainder of the sauce and turn the heat to high. Allow sauce to bubble and thicken while stirring - about 1-2 minutes - add more water a little at a time (only as needed if sauce is too thick). Season to taste with salt, black pepper and/or red chili flakes.
*If cooking the zucchini noodles, add into pan and use tongs to toss and coat with sauce. Cook for 1-2 minutes until zucchini is just tender but still firm. Be careful not to overcook.
Remove from heat and drizzle extra sauce in pan over chicken and serve immediately. Garnish with green onions and sesame seeds if desired.
For meal prep: Divide evenly into lunch containers. Store in fridge for up to four days.
Notes
*do not overcook for longer than 2 minutes or else noodles will get too soft and mushy. You can also serve the chicken over raw zucchini noodles if desired.

I was very tired and not really in the mood to cook but also kind of broke and fairly hungry, so this picture is me feeling all of those things at once. Pardon my...face.
Our recipe today comes from Life Made Sweeter, which I’ve maybe used before? It has a whole bunch of ads on it and this lovely little note on every single page: THIS POST MAY CONTAIN AFFILIATE LINKS. PLEASE SEE MY FULL DISCLOSURE POLICY FOR DETAILS. That’s cool! You go get that ad revenue, girl! The writer and mom-of-two Kelly is in charge. She seems super nice and I might scroll through her site again and try one of her desert ideas ‘cause there’s a ton and they look bomb.

Here’s what you need. Ah, yes. We meet again, my arch-nemesis cornstarch. This was the moment I should have known we were doomed. But no, surely the recipe will calm my fears?

WHAT!? Add more water if it’s too watery?! THAT’S NOT HOW WATER WORKS. THAT’S NOT HOW ANY OF THIS WORKS. I’m realizing now that the text on the site and the text I’d printed off a few weeks ago no longer match. Did someone tip her off? Am I going crazy?

Yeah well it’s too late, we’ve taken the picture of the stuff on the counter so now we’re committed. So go ahead and pour our a nice 1/4 cup of soy...sauce...dammit. Out of soy sauce. GOD DAMN IT I’M NOT GOING OUT TO THE GROCERY STORE AGAIN.

But wait! You’re a grown woman living in her own place! That means you have TAKEOUT SOY SAUCE growing in the deep recesses of your fridge/junk drawers! Huzzah! The day is saved! (Spoiler alert: it wasn’t.)

Now you shame yourself by not only using ‘the bear’ honey (is it even really honey?), it’s STORE BRAND bear honey. Please forgive me, Melanie. This is what happens when you peace out of the country and leave me to my own devices.

My bff garlic. Love garlic. Chop it up and get it everywhere, even some in your bowl.

My not-so-bff ginger. I’m only just starting to come around to ginger, and I prefer it minced tiny and hidden in dishes with lots of other flavors. So chop it up , get it everywhere, even some in your bowl. That’s how we roll.

CORNSTARCH. It promises you a world of gravy-like consistency, and delivers NOTHING. Screw cornstarch, I’m so fed up with getting my hopes crushed.

Chop da chicken, whisk da sauce. So far, looking surprisingly like an in-progress meal. At this point my hopes were high, tempered by my distrust of cornstarch.

Realize you’ve left a load of laundry finished in a dryer in the basement. Run down and rescue it, then woefully fold it so it’s not a wrinkled waste of effort. Sit for a moment and despair about how tired and hungry you are.

Cheer yourself up my turning some vegetables into strings! I ended up only using four of the zuchinni and then only 2/3rds of my zoodles because this was just too damn many zoodles. I’ve ruined so many recipes by not taking the extra time to let my zoodles sit out, press the water out, and dry up with salt, so I did ALL of those things. Dammit, I was going to have dry zoodles.

Make your chicken less raw. This helps prevent salmonella!

Toss your chunks (heh) into the pan as your chicken is approaching unraw. Save a few to nibble on later. Forget about them in the back of your fridge and throw them away three weeks later when they no longer smell like pineapple.

SAUCE!

Throw in your overly-salted zoodles! Stir and mix and grunt as you try to get a wooden spoon through an impossibly tangled ball of zoodles! Rejoice ‘cause it smells good and looks like food! Panic as you realize you’ve been attempting to mix it up for more than the carefully allotted two minutes of cook time!

Put in bowl, add sesame seeds. At this point I was so hungry I would’ve eaten it no matter what, but looking back I’m perplexed by how much it looks like fake food. Not fake like photoshopped-magazine food, but fake like the plastic food you let children play with in their mini-kitchens, where they serve you empty plastic cups of tea and handfuls of plastic spaghetti as you sit cross-legged on the floor and pretend it’s very yummy.

My lazy roommate joined me when she smelled dinner. We both look cautious.

The sad reality: within minutes of being taken off the burner, the sauce all turned into water. Soupy, sad, not-delicious water.

ONE PAN MY ASS.
Final final verdict: Sad. So sad. Winter sucks. I’m just going to subsist off of hot cocoa and wine from now on.
0 notes
Text
Freezer Cooking 101: Part 3 (Including 30+ Basic Ingredients & Recipes To Freeze For Easy Meals)
This is the second of a 3-part series on Freezer Cooking. I got hooked on freezer cooking a couple of years ago. While we don't eat the majority of our meals as freezer meals, I love counting on them at least once or twice a week as well as having a meal or two extra that's handy if I've forgotten to take something out. See the entire series here.
I shared earlier in this series that freezer cooking can be a lifesaver. I know this sounds dramatic, but when you're in the middle of a busy week and finding it nearly impossible to put nutritious, affordable and delicious meals on the table, having freezer meals or freezer ingredients can truly make it feel like dinner was saved. Keep the take-out menu's in the drawer and shop the freezer instead! There's less work on your part to prep it and, therefore, less clean up too.
In part 1 we discussed the basics of freezer cooking including the basics of starting. In part 2 we went through all of the supplies you will need as well as the steps you'll take to successfully prep meals or ingredients for freezing. In this post, the third and last of the series, we'll look at basic ingredients you can prep and keep in your freezer, making mealtime easier. Even if you determine that complete freezer meals are not for you, most of us can benefit from prepping ingredients (marinated chicken breast, burger, veggie burgers, fruit, etc.) and having them ready to go.
For me, most of my freezer prep is ingredients. While I do use a handful of actual freezer meals, I always have quite a few ingredients that we use regularly that I prep every single month. Our recipes change depending on the season. For instance, in the spring and summer we use the grill a lot. So, you'll find a lot of meat, portioned for individual meals, frozen in the marinade, allowing me to unthaw them in the refrigerator overnight and plop on the grill at dinnertime. During fall and winter we are more likely to use the oven or slow-cooker, although I do use a grill pan as well, so you may find more meal packs for the slow-cooker or ingredients to add to pizza or casseroles in our freezer. Use freezer meals how it makes sense for you.
Ready-To-Go Freezer Ingredients
These are items that you will either just freeze, or cook and then freeze, to have on hand for simple additions to meals.
- Grilled Boneless/Skinless Chicken Breasts and/or Thighs
(for use in salads, tacos, burritos, sandwiches, chicken pot pie, quesadillas, soup, casseroles, or pizza)
- Browned Hamburger (drained and cooled)
(for use in pizza, taco salad, tacos, burritos, chili, lasagna, quesadillas, soup, casseroles, spaghetti sauce, or sloppy joe's)
- Uncooked Burger Patties
(making it easier for burger night or patty melt night)
- Cooked Sausage Crumbles
(Breakfast sausage for use in breakfast burritos or on breakfast pizza; regular sausage for use in spaghetti sauce, lasagna, etc.) - Tomato Paste (if you're opening a can but not using the whole can, but the remaining in an ice cube tray, freeze, then pop into a freezer bag and label. Take one out as needed for recipes.) - Parmesan Cheese (I always buy grated parmesan in bulk and freeze most of it in bags containing 1 1/2 cups) - Butter (if you buy on sale, freeze for longer term storage) - Homemade Pesto (freeze in ice cube tray - Marinated Meat (portioned into serving size portions) *see a few recipes below to get you started* - Cooked or Raw but prepared Meatballs (flash freeze so they can be frozen in a large bag but frozen individually) - Extra Vegetables - Flash-freeze fruit (berries, mango, chunks, banana chunks, etc.) (for use in smoothies, homemade jam, fruit crisps, etc.) - Flash-freeze peppers (I dice some and cut some into strips) (for use in soups, quesadillas, casseroles, stir fry, etc.) - Flash-freeze onions (I chop them) (for use in soups, casseroles, stir fry, etc.) - Cooked Beans (make a huge batch and freeze in serving size containers) - Homemade Veggie Burgers
freezer chicken quesadillas
A Few Freezer Cooking Recipes & Ideas: - Delicious Blueberry Pie
- Pie Crust (if you're making a pie crust, why not double the batch and freeze another?)
- Pizza Dough
- Muffins (baked or unbaked)
- Cookie Dough (for baking later)
- Quick Breads
- Homemade Spaghetti Sauce
- Your Favorite Lasagna Recipe (If you're making one, why not make another for the freezer at the same time?)
- Pancakes (leftover or making a second batch for the freezer - reheat in toaster oven or toaster)
- Waffles (same idea as pancakes)
- Many sauces freeze well (freeze in ice cube tray and transfer to freezer bag for smaller amounts, or pour directly into freezer bag for larger amounts)
- Your family's favorite enchiladas
- Breakfast Burritos
- Honey Sesame Slow-Cooker Chicken Freezer Meal
- Slow-Cooker Chicken Fajitas Freezer Meal
- Slow-Cooker Honey Soy Freezer Meal
- Slow-Cooker Bourbon 5-Spice Chicken Freezer Meal
- Freezer Chicken Quesadillas
- Slow-Cooker Sausage & Peppers Sandwich Freezer Meal
Flash-Freezing Instructions: This is my favorite way of freezing some veggies and fruit. It enables you to freeze them in a big old freezer bag and to pull out as little or as much as you'd like when you want to use some because they are frozen individually. I like to use a cookie sheet lined with freezer paper. Place cleaned and dried fruit or veggies on the cookie sheet, spaced out so they touch very little to not at all. Place in the freezer. Once completely frozen (within an hour or two), transfer to a freezer bag. Push out as much air as possible (to prevent freezer burn), seal, and store in the freezer. Continue until all of the fruit or veggie that you are processing is completed. Make sure you've sliced or chopped, if needed, prior to freezing. Don't forget to label your bag with the contents and date frozen.
honey soy marinade on chicken
Easy Marinade Recipes: I use these ALL of the time. It makes dinner time so very easy. Make the marinade, portion meat into freezer bags in the amount you'll use for one meal, add the marinade to the bag (careful not to get any on the seal), push all air out and seal. Freeze. (In Part 2 I spoke about freezing the bags flat on a cookie sheet until frozen solid in order for the meals to stack nicely.) When you're ready to use it, let it unthaw in the refrigerator overnight. Cook on the stovetop (grill pan or sauté pan) or on the grill. Teriyaki Marinade *good for chicken or beef* 1/4 cup soy sauce (regular or low sodium, depending on your preference) 1/4 cup runny honey (if it's solid, microwave to loosen it up) 2 Tablespoons olive oil 1/4 teaspoon ground ginger 1/4 teaspoon crushed red pepper Mix all ingredients together. Honey Soy Marinade *good for chicken or pork* 1/3 cup honey1/3 cup soy sauce1 Tablespoon oil2 Tablespoons rice vinegar1/2 - 1 teaspoon freshly grated ginger2 cloves garlic, finely minced Mix all ingredients together. Cilantro Lime Marinade *good for chicken* 2 Tablespoons olive oil 2 Tablespoons lime juice 1 1/2 Tablespoons runny honey 1/3 cup chopped cilantro leaves pinch of salt Mix all ingredients together. Cowboy Marinade *good for beef (flank, kebabs, etc.) - really good on beef that will be grilled!* 1/4 cup soy sauce 2 Tablespoons olive oil 1 1/2 Tablespoons Worcestershire sauce 1 Tablespoon brown sugar 1 Tablespoon minced chives 2 garlic cloves, minced 1/2 teaspoon pepper Mix all ingredients together. Jamaican Jerk Marinade *good for chicken* 2 Tablespoons olive oil 2 Tablespoons lime juice 2 Tablespoons brown sugar 2 teaspoons garlic powder 1 teaspoon dried thyme 3/4 teaspoon allspice 1/4 teaspoon cinnamon 1/4 teaspoon crushed red pepper flakes 1/4 teaspoon salt 1/4 teaspoon black pepper Mix all ingredients together.
Freezer Cooking Part 1: The Basics To Getting Started Freezer Cooking Part 2: Complete list of tips and instructions
Do you have favorite tips or recipes for freezer cooking?
Freezer Cooking 101: Part 3 (Including 30+ Basic Ingredients & Recipes To Freeze For Easy Meals) was originally posted by My Favorite Chicken Blogs(benjamingardening)
0 notes