#I keep getting to 60gb
Text
Me, reminding myself that making CC is a hobby and I don’t have to feel bad for not posting for long periods of time:

#shut up jazzy#I’m mostly in lurking mode atm#Im mostly in a drawing mood#that and I can’t seem to lower my cc use#I keep getting to 60gb#even merged it takes forever for my game to start#SAVE ME
13 notes
·
View notes
Text

Assassin’s Creed franchise on sale on Steam
It’s always morally correct to pirate from Ubisoft of course but you can get some of the games here for super cheap and to keep in the Steam app!
(I recommend Brotherhood/2 (these play similarly) and Black Flag (pirates!) for the classic games and Origins (Egypt) or Odyssey (Greece) for the modern RPG like installments)
The classic games aren’t too big in terms of size BUT Origins and Odyssey are absolutely massive like 60gb so I’d stick with just one just in case.
4 notes
·
View notes
Text
2 of 2.


This mornings sunlight stream..
My first thoughts.. I love you & will fight for us.
I think the dang shazam screenshots are out of order. Dang it tumblr & it's. Sigh. Gr. 🙄🤦♀️🤷♀️
Anyways. I grab music in truck, In restaurants, at house. Wherever I am.
Sure people look funny but I don't care. I can then go back & create my music list. Not apple, though they bought shazam. I can see the date & time though.
And these might all be from last 8.6.2021 when my phone battery burst & lost 60gb of data. Lots of pictures, videos of stuff & oh undid all my bookmarks on samsung internet from years. Sigh. Gr. Now I am careful with backups. Keeping diary, internet, basics, & a few other things backed up, keeping micros 256 cleaned & organized.
I actually asked a dear lady I consider a sister to my heart that's a professional photographer about the best beginner dslr & with my arthritis in my hands where should I start. Canon Rebel & Nikon. So that's ironically been the ones I look at. So as I have so many things to investigate, that is at least in the right direction.
And if you've ever watched 'Bones' [Emily Deschanel & Seal Team dude.. so many good shows!] I like her character, but Angela is an artist, & is also their guru about such things. Photography is fascinating to me.
Anyways..
After much wh drama this morning.. I got the truck back.[after wh threatened not to. Ha! Yay!]
I cannot wait to flip wh off! Like a mosquito! Pesky lil varmit!
I'm back at hse. Need to get on phone then back to chores & tasks. Gotta pay $premium & make sure all ins/cobra is in order for tomorrow endo appt.
I've been thinking about you ...🎶
I work whilst I await.
Because I believe wholeheartedly.
~True love never dies & true love always waits.~
Your faithful, listening quietly & closely, complex, warrior queen daughter,
~Tijgeress kat Phoenix. 🌺
👩🤓⚓🙏🙇♀️☔🌂🔗💡⛓🧰⚙⚒🛠⚔⚖🗽🦅🥧🍁🧣🥾🍋🥤🍯🥮🍼☕🍫🍎🍑🍒 🐯🐾🐐🦉🐢🐛🦋🌱🌺🌹🌻🌷🌳🧶🧵 ⌚⚡🌠🚀🗝🔱⚜💝🐻🦌🧩♠️♾🎯🧭🕯🎶💋
W.10.26.2022 3.00pm est.
0 notes
Text
How does that even happen
#Also how CHUNKY is OP in last reblog's computer .... Personally my laptop is max 237gb and I still have 60gb left 😭#930gb .... THAT'S A LITTLE LESS THAN A TERABITE HOW DO YOU FILL THAT UP#Even my phone is max 128gb and if I don't keep it under like 80-90gb filled I get stressed and die
2 notes
·
View notes
Text
Laptop Flop, Part 32
I am currently studying to become an IT Specialist and have become the go-to guy for my girlfriend’s friends and family with anything tech or computer-related.
Her father asks me to make his laptop “go faster”. The laptop was quite old and loaded with bloatware so I decided that it would be best to swap the HDD for an SSD and re-install the operating system along with the most important to him applications – all free of charge.
Before I start, I inform him of my plan.
Me: “What do you want to keep?”
I ask this a few times.
Girlfriend’s Father: “I just want my documents, photos, and music files, I don’t need anything else.”
I proceed with my plan and before I can get started, I already encounter a problem: he has forgotten the Windows login details, including his password. After scratching my head for a couple of hours and managing to successfully guess the password, I am able to log in and make a backup of all the files.
I then swap the hard drive (with a spare SSD that I had which I also didn’t charge him for), re-install the operating system, run all the updates and install a couple of basic apps such as Chrome and a media player.
I then copy all the backed-up files onto the laptop and even take some time to sort through some of the files to remove duplicates and the like; he has 60GB of music, half of which are duplicates.
I was happy with the end result, the laptop is running much faster, is not making a loud noise, and does not have tons of apps running at startup. Satisfied with my work I give the laptop to my girlfriend to give back to him, thinking that I will get at least a pat on the back or a thank you.
The next day I get a phone call:
Girlfriend’s Father: “What have you done to my laptop?! Where is all of my music?! Where is the Amazon Music App?! Where is Thunderbird?!”
Me: “Hi, I have kept all of your music, documents, and photos as you requested, they are saved in the respective folders.”
Girlfriend’s Father: “But where are my apps?! Where are all my desktop icons!? I had Windows Music Player on my desktop and now it’s not there!?”
Me: “Do you remember our conversations where I asked you more than once if there were any apps or anything else that you wanted to keep, otherwise it would be deleted?”
Girlfriend’s Father: “Yes, but that’s not what I meant! I just wanted my music, my documents, and my photos and now I don’t have Windows Music Player and all of my Amazon music is gone!”
Me: “Windows Music Player is still there, as it comes pre-installed with Windows and I will be happy to re-install Amazon Music and any other apps.”
He calms down and agrees. After meeting with him and installing Amazon Music and Thunderbird we encounter a familiar problem: he has forgotten his login details.
After explaining to him that there’s not much I can do unless he remembers his e-mail address, he gets annoyed and demands that I put everything back to the way it was.
Already frustrated at the situation and the wasted time I swap the drive back and gave him back his laptop. Shortly after I broke up with my girlfriend. Just over a year later, I received a message from him asking if I still remember the password to his laptop…
Related:
Laptop Flop, Part 31
Laptop Flop, Part 30
Laptop Flop, Part 29
Laptop Flop, Part 28
Laptop Flop, Part 27
358 notes
·
View notes
Photo
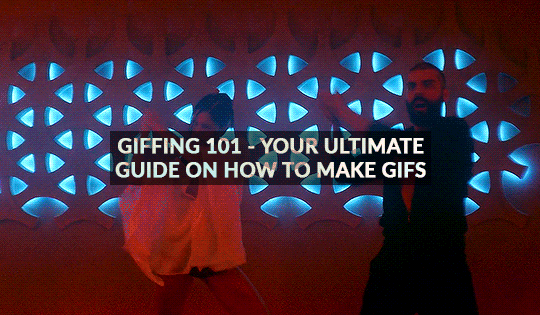
GIFFING 101 - YOUR ULTIMATE GUIDE ON HOW TO GIF
I have gotten many, many asks before about how I gif and I finally decided to make a tutorial. This is going to be very long, very image heavy and with a lot of details and examples. I mean it, I’m going through every, single aspect of giffing that I can possibly think of. From start to finish. And please read the disclaimer at the very start.
* I use a macbook pro but this should probably work on windows too!
I hate doing this but if this helped and you want to, please consider donating to my ko-fi or if you want, commission a theme or page from me at @amaanat <3
tutorial under cut, I hope it helps!
★★★★★
- CONTENTS
disclaimer
what will you need to create gifs?
how to download videos?
extracting your scene from handbrake using VLC / built in video player
opening in photoshop
trimming, cropping and resizing videos
sharpening
colouring and psds
masks
adding subtitles
editing frames / timeline speed
multiple gifs in one grid.
actions
exporting the gif
last minute tips and extra links.
★★★★★
- DISCLAIMER
First off, this is not meant as a post where I am saying look here, this is the only and perfect way of giffing. Not at all. When I started out, there were many tutorials available that helped me figure out how to gif, and I slowly developed my own style and I would like to create an in depth tutorial that helps you grasp the basics. Heck, make your gifs whatever way you want, go absolutely crazy on colours or whatever, this tutorial is just here to guide you through the process of gifmaking, because I know it can be very intimidating to people who are just getting into it. That is why I made this and why I spent 8 hours writing this, because I want others to know too and this is the kind of in depth tutorial I needed when I was starting out 4 years ago. Thanks for reading, hope it helps and go crazy ahhh go stupid.
★★★★★
- what will you need to create gifs?
photoshop. I use photoshop CC 2020 on a mac and I pay monthly bc of student discount. There are many, many links you can find on @completeresources for downloads. You can use any photoshop you like, as long as you have the timeline option.
Handbrake. This nifty program is used mostly to convert MKV files to MP4, but I also use it to quickly extract the part of the video I want, because opening an entire movie in photoshop can quickly clog up space bc of cache and it’s a pain to find that one second scene you want with that tiny scrollbar. Download it from here.
your video (downloading explained down below)
extras: VLC, just to find how many seconds the scene is at, so we can input the time in Handbrake. You can use any other player though for that step, I use VLC or Quicktime. Download VLC from here.
★★★★★
- how to download videos
Ok so I will quickly go through a few methods here for getting your clips.
1. t*rrenting.
This is the most popular method for getting your film or tv episode. I personally get my t/rrents from rarbg dot to or if I am having trouble finding one, I go to 1337x dot to, because they compile them from different sites. I copy the magnet link and go to the qbittorrent application, import magnet link, choose the files I want and it downloads. Remember, the higher the seeder leecher ratio, the quicker it will download.
But which file should I choose?? there’s so many? Well yes there are many many files for different movies. On RAR, I found more than 40 t/rrent files for Endgame. I think that generally, the 4/5 GB 1080p copies are just fine. I have compared giffing with a 60GB Interstellar Remux (which is directly ripped from bluray) file to giffing from a 4GB 1080 file, it literally gave me the same quality and the 1080 looked crisper. So yeah don’t kill your computers space, just go for those 3/4/5GB files.
hot tip - don’t download from yify, the quality is way worse.
2. movies from twitter accounts such as logolessHD.
these accounts post MEGA links to movies and shows, but you will have to request to follow them to be able to get the links. Then you can download the movie from there. The accounts you can get these links from are here: 1 - 2 - 3 - 4. The quality can be a bit less though compared to t/rrents. Here is a link to a tumblr blog with these kinds of downloads too.
3. downloading from youtube.
ok, use 4kvideodownloader for this. It is incredibly easy to use, you just need the youtube link. Always Always go for 1080p, if you can’t then 720 at the most because otherwise quality gets really bad really fast.
4. netflix / screenrecording
If you don’t want to download / can’t find something, try using netflix and screen recording. In my experience, SC only works on google chrome and not safari so jsyk!! Here is a tutorial on how to screen record on mac (or for quick access, click command+shift+5) and windows.
NOTE: quicktime screen records at 60fps, which is nearly thrice the frame rate of movies and shows, so at the end you may end up with duplicate frames in the timeline of photoshop, so you will have to delete those frames one by one sorry.
★★★★★
- extracting your scene from handbrake using VLC / built in video player
muahaha here’s where the magic starts to happen. Open handbrake and import your video. For this part I am going to use a scene of Keanu Reeves from the 2019 movie Always be my Maybe. I will demonstrate with that scene up until colouring, because then I will show how I colour different scenes!
So when you have opened the image in HB, you get this layout. (link to imgur)
it is a bit intimidating, I know. So basically, first, click on where it says chapters near the top right and click seconds. then, input the time you want to extract from the entire video. For the Keanu scene, that scene starts at 00:57:18 and ends at 00:57:21. These are not exact timings, I usually add an extra second so the entire scene is captured and I heavily recommend you do the same.

Now down below, you can click browse and edit where your new video will be saved and you can also change the name of the new clip. Always ALWAYS remember to keep the .mp4 ending do not cut that part out!!! If the ending says .m4v change it to mp4!!

Ok then I undertake the following steps to ensure the video that will be exported is of the highest quality possible:
Firstly, I uncheck all these three boxes:

Then you see this bar here right? Well I will edit the dimensions, filters and video now. You don’t have to do anything for audio, subtitles or chapters so leaving that alone is best. Lets go to dimensions first.

Here are my settings for dimensions:
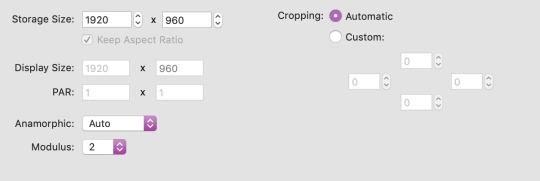
The storage size depends on if your file is 1080p or 720p. Most movies are shot in a ratio of 2.35:1, so if it does not say 1920x1080 like a 1080 file should be, don’t fret. The cut off parts are just the black bars you see when watching the movie. Handbrake doesn’t recognise nor convert them so that’s one less thing we have to worry about.
Now onto filters. Literally do NOT change anything there. Leave the settings as they are, which is like this:
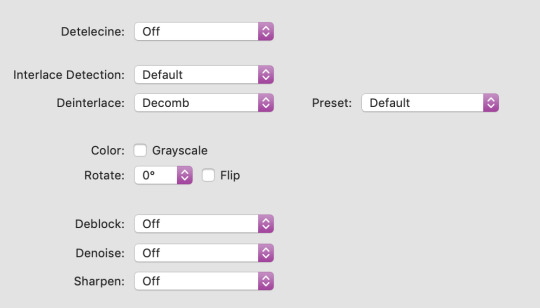
Finally, go to video. You will see this kind of window and these are my settings (imgur)
Firstly, leave video encoder at H264 or 265 depending on how your video is encoded. For the FPS, choose same as source for the framerate and click constant instead of variable!!! This will ensure your video is smooth. For quality, bring the slider all the way to the right. RF0 means it will be at the best quality possible. I didn’t edit the settings at the bottom at all so just leave them be.
Now click this green icon (imgur) at the top and your video will start encoding! It does not take long at all and then your video is ready to made into a nice lil gif!
★★★★★
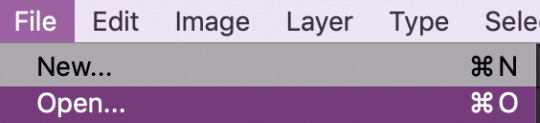
- opening in photoshop
woohooo we got our video!! Ok now open photoshop. Click on file -> open:
now search for the file you extracted from VLC and import it! Now your screen will look like this (imgur). With a different video, of course lol.
★★★★★
- trimming, cropping and resizing videos
ok so firstly, we will trim the video. As you can see in the image I linked in the step before, the screencap you see is of someone else in ABMM, not Keanu, like I want. So use this slider:
and click and drag it to where your scene begins and shows up in the window. Then, click the following button to split at playhead.

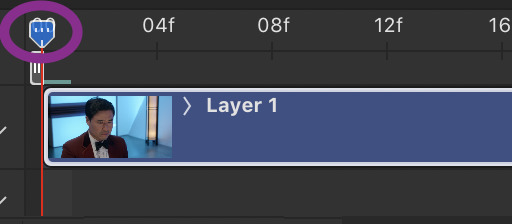
This will split the clip and so the timeline and layers section will look like this (imgur) (mine has three sections because there was space before and after the keanu scene so I cut two parts which made three clips)
so now all there is left in trimming is delete the layers of the video you do not need! For me in that image it was layer 1 and 3!
cropping and resizing
This depends on the kind of gifset you want to make. This picture is a handy guide for resizing:

This post is also very very useful for resizing info
Ok now I will crop my gif. Click on this tool:

and now my interface looks like this. I am using the ratio 6 by 4 but you can use whatever you want.

Ok now you may need to crop some black bars but since I don’t have to, I just moved the crop area around a bit and clicked enter to crop it. Just play around with sizes and whatnot, and get a feel of what you like!!
cropping tip: crop as close as you can to the edges. The more you zoom in, the more pixels that will be visible and it will make your gif extremely grainy!!
So now for resizing, go to image -> image size or click command-shift-i

and you will get this window.

A LITTLE NOTE - I personally do not use automatic but a friend who shared her sharpening psd would prefer if I kept it secret, but automatic is what most people use and it is what I used up until november 2019 and it worked just fine.
Ok anyway now I want to make my gif 268px wide so I will input that as width and make sure you click this!! It makes sure your height and width are proportional!

ok now we have this. After you’ve done that, click ok!

congrats, you just resized a gif!! Your gif probably looks smaller now in the main window once you click ok, just zoom in to it! don’t worry about it looking bad quality, sharpening is next!
This is how my gif looks with trimming, cropping and resizing (with 0.05 speed)

★★★★★
- sharpening
Now we sharpen! Make sure your layer is selected Go to filter -> sharpen -> smart sharpen and this window will pop up:

These are my settings which most people use. Just remove gaussian blur
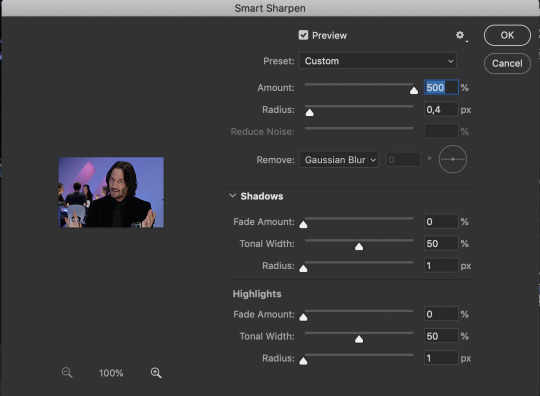
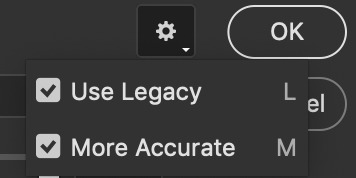
I have more accurate and use legacy checked too!
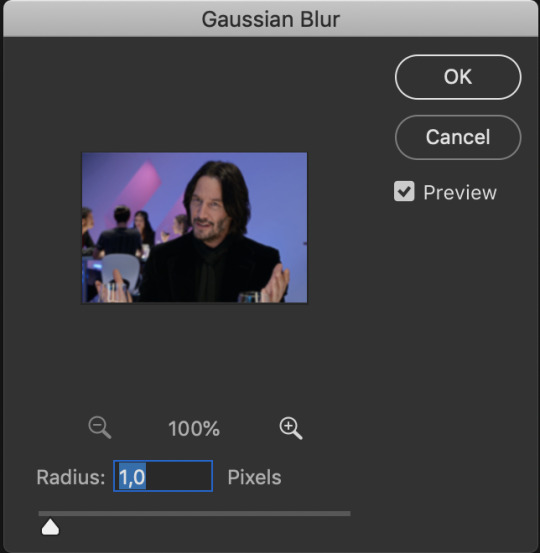
click ok! Now ... your gif might look a bit oversharpened. That’s why we use a bit of gaussian blur. Go to filter -> blur -> gaussian blur.

now I think most people also use a 1.0 radius so set that and click ok.
But now your gif looks too blurry. Lets fix that. Double click the icon below in the layers panel

and adjust the opacity! My go to is between 25 to 35, just so the gif looks smooth!

Now we’re done with sharpening! This is how our gif looks with sharpening with 0.05 speed:

sweet right? Now .... the best and hardest part ... colouring!!!!
★★★★★
- colouring and psds
First I will shortly talk about psds. They are photoshop files, that save the entire document which means you can share it with someone after uploading it and when they download and open it, they can edit the layers, tweak things just like they made the file in the first place. Many people upload psds of gifs with colouring so others can use that colouring. You can find so many psds on completeresources (I only linked gif psds but they have psds for icons and headers too) or allresources. I do not use psds but colour from scratch every time so I will not be explaining them further, sorry.
So for colouring, I will go very in depth into different styles. Here are the main types of colouring I have noticed people use on here:
simple - I normally use this for scenes with people in it
vibrant, bright - I use this for scenes with lots of colours in them
pale
black and white
gradients - I use this to spice scenes up a bit
colour palette
I only go for simple, vibrant and gradients and never do cp, pale or black and white, but I will link a few tutorials by talented creators who do and after that I will explain the three ways I colour by showing you three different examples :)
Some useful tutorials I have found for pale/bw/cp colouring are:
this pale tutorial by @samecoin. Especially useful read because Tippy explains how to avoid whitewashing in pale edits.
this pale tutorial by @kateausten. Very easy to read and to follow.
this colour palette tutorial by @freddyfreemen. They explain the basics and provide a psd too.
this colour palette tutorial by @stenbranlons. Very image heavy which guides you through every step of the way.
A blog dedicated to pale resources is @finesources and is definitely worth checking out!
this tutorials page by completeresources has many many tutorials on how to do different kinds of styles
Btw, this is a useful website that explains all the different adjustment layers in photoshop if you’re still getting the hang of them
ok now onto my examples for the colouring. I will first do simple colouring for which I will use the keanu gif. For vibrant and gradient I will use two different gifs. I usually put my colouring into a group so first, close the video group layer and click this to make a new group which will contain the adjustment layers for our colouring:

SIMPLE COLOURING
First I will brighten the gif up with some curves. That is this tool:

Then you get this window:
As you see, I have selected that white eyedropper tool. Using that I will brighten the image. Basically, you want to click on the whitest part of the gif using that tool. This is because wherever you click, the eyedropper will turn that part into white and adjust the entire gif that way so if you click somewhere dark, you’ll get this white bright fuzzy mess. So I clicked on the lightest place which imo is the white specks near the glass in front of his hand and now my gif looks like this:

Ok now if you look at the above image, there is a black eyedropper two steps above the white one. You want to use that to click on the darkest place of the gif bc it’ll turn that to pure black. Here is my gif when I did that:

not a massive difference but it balances things out. Now I will add some saturation. Click this icon:
which brings up this window. I have already set saturation to around 15 to make it a bit warmer:
and the gif looks like this now:

I think it looks nice, but I would like to add something extra. That is why I am going to play around with selective colour to make the background pop a bit and make the black colour more dark. So click this icon:
and you get this window and these colours (imgur). You can play around a lot with selective colour and manipulate colours! So if I turned the black dial on reds to +100, they would become wayyyy darker. However because I want the background to pop, I would use the colours magenta and blue (and black for the final touch). For those my settings are this: 1 - 2 - 3 (imgur). So now my gif looks like this:

And now i think we are done! For comparison, this is what the gif looked like with absolutely no colouring or sharpening:
And that was all for simple colouring!! Lets move on to vibrant colours!!
VIBRANT COLOURING
For this I will use an example from Thor: Ragnarok bc thor is my soft bb. I did not do much for this first example except play around a lot with selective colour and I used the exact way of adding saturation and curves as shown before. Honestly just playing around with selective is the best bet to get vibrant colouring. The gif without sharpening etc was this:
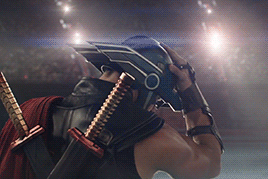
the gif after colouring and sharpening is this:
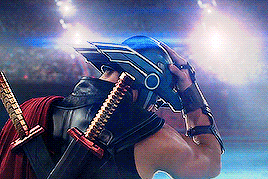
pretty sweet huh? Just play a lot with saturation, hue and selective colour and channel mixer and you can create a lot of styles that way!
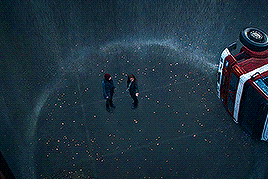
GRADIENT
for this I will use another clip from Thor, but from The Dark World. It is a bare clip where it is raining and I will add a gradient on it. This is the gif without colouring nor sharpening:

now we will do the sharpening and colouring. I already applied a basic curves and saturation layer so now it looks like this:
It looks a bit better right? Ok lets get that gradient applied. Click here:

and click on gradient, NOT gradient maps bc those are different things and I honestly dont know how maps work.

now this is what will appear, I haven’t changed anything to this yet:
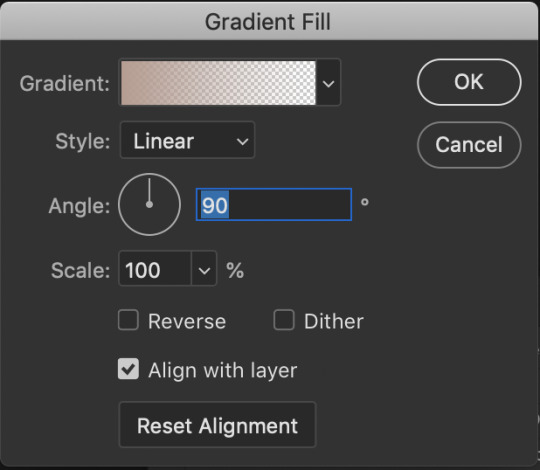
What style, colours, angle you choose is up to you. I personally am going for 0 angle because I want it going right. Now, to choose colours, double click on the colour shown next to the word gradient. This window will show up:
The fun part is you can do what you want here. Just experiment, click the buttons, adjust opacity etc. When you click at the bottom of the bar somewhere another stop marker appears meaning you can have even more colours! Just click on the bottom markers and edit to your hearts content! Use the top button to adjust opacities. Personally I went for this gradient:

Ok but now we have a problem because our gradient is fully covering the image and you can’t see anything. That is where blending modes come in. Right click on the gradient layer and click blending options. This window will pop up (ingur). When you click blending mode, these options appear (imgur).
Here is a good guide explaining the blending modes
I just recommend playing around seeing which one suits you. I went for overlay, which makes my final gif look like this:
and that was that on colouring!! Let me know if u have questions about it! Onto the next part, masks!
★★★★★
- masks
I will not go in depth here, but instead I will link some tutorials but the amazing @thepunisher who has explained it much better than I ever will be able to. The tutorials are all in this link. If you have any questions do lmk but idk how I could explain it.
★★★★★
- adding subtitles
although we wish we could, we can’t all lip read so we need subtitles also I’m hard of hearing and need them anyway but yeah, I will quickly highlight how I add subs! I use the font Arial Rounded MT Bold Regular.
I will first link to this post because it helped me a lot and may explain stuff better than I do.
Lets take the keanu gif we had earlier. In it, he says ‘fish flakes’. Now what I do is this. Click on this icon:

and drag a box around the gif fully. Add your text. Mine looks like this now:

Well that ... does not look like a subtitle. BTW my settings are:
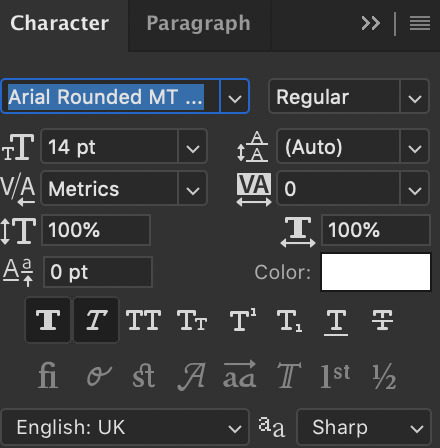
*when there are two people speaking I change the colour of the second person to #ffff00 - also for 540px gifs I usually use 12/13px text.
Ok now I will add the stroke and drop shadow. Right click on the layer of text, click blending options and change your stroke and drop shadow settings to this and this (imgur). Now just click the move tool or hit V on keyboard to select it and drag the gif down wherever you want. Now my final gif looks like this:

Ok, now if you have two gifs and you want them to be the same distance from the bottom, right click the text layer of the first gif document, click duplicate layer and you will get this window:
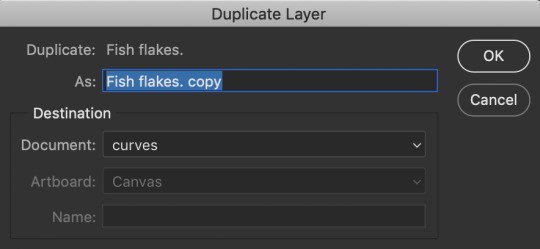
now click on destination and depending on what files you have open in PS, you will get this window:

now just choose where you want the text to go and if the gifs are the same sizes itll appear exactly where it did in the first one and you can edit the text for the second. You can do this with adjustment layers, groups etc too!!
Now text is done! Off to the next part!
★★★★★
- editing frames / timeline speed
We are done editing, now time to convert to frame animation and edit the speed!
Ok click on the four bars on the right side of the video timeline. It will bring up a menu. From there, select this:
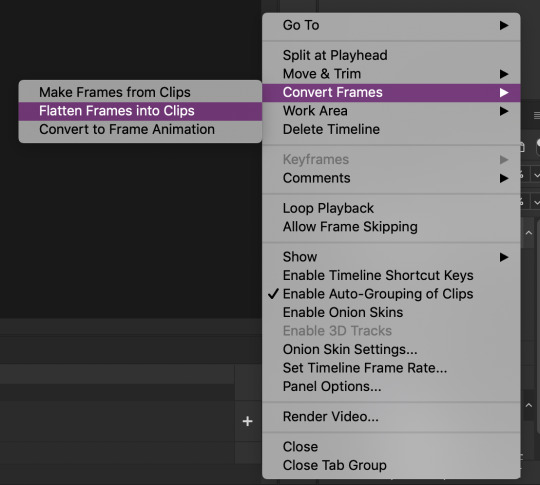
This will make individual layers of every frame into clips. Now, click this at the bottom left side of the video timeline:

This will convert your video timeline to a frame animation timeline. Now it looks like this (imgur). you’re probably wondering wait where the heck did my layers go well don’t fret, lets click the four bars on the right side again and click this:

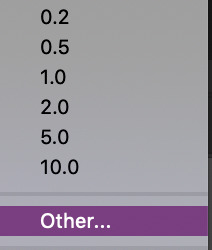
now look! We have got all our frames into the timeline! Just delete the excessive frames at the front. Now click the four bars again, select all frames and then click the number at the bottom and change it to 0.05 or 0.06 or whatever speed you want:

Now we are done with this step!
★★★★★
- multiple gifs in one grid
I myself am not going to explain this, instead here are links to a few amazing tutorials that will help you further
this tut by @brolinjosh
this tut by @futurist
★★★★★
- actions
Now actions ... man they make everything so much easier. Basically actions are a sequence of steps you undertake in photoshop that are recorded which you can then save and use on multiple files. This makes the giffing process much much faster!!! For instance, these are the actions I have saved (mind the doubles lol I am experimenting a bit!)
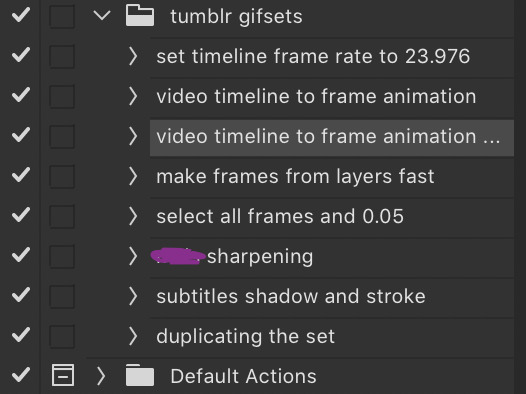
As you can see, I have one for undertaking the entire video timeline to frame animation process and one for sharpening and the subtitles. It has saved me around 75% of the original time I put into creating sets before which is a lifesaver.
I cannot explain how to make actions bc I am really bad at explaining stuff, but here are some tutorials:
- https://helpx.adobe.com/photoshop/using/creating-actions.html
- https://completeresources.tumblr.com/post/66560261468/how-make-action-%D0%B7
- https://completeresources.tumblr.com/post/50583786863/how-to-use-an-action
- https://completeresources.tumblr.com/post/50362731526/how-to-use-actions-on-gifs
https://www.creativebloq.com/adobe/create-own-photoshop-actions-61411918
★★★★★
- exporting the gif
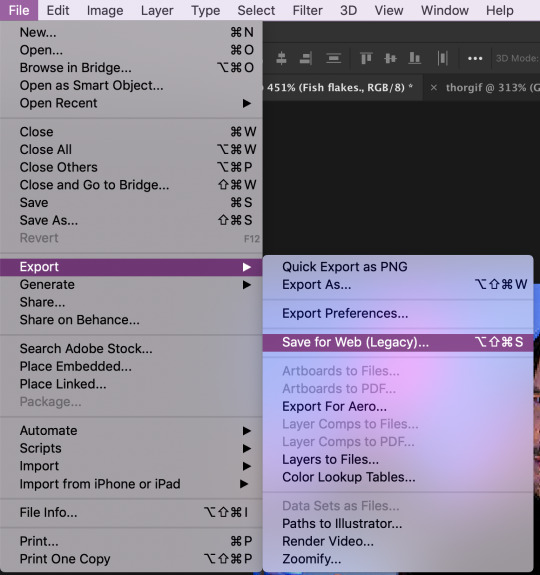
now we’re at the final stage! When you have your gif ready, go to file -> export -> save for web legacy
ok now the next window is this which looks intimidating I know
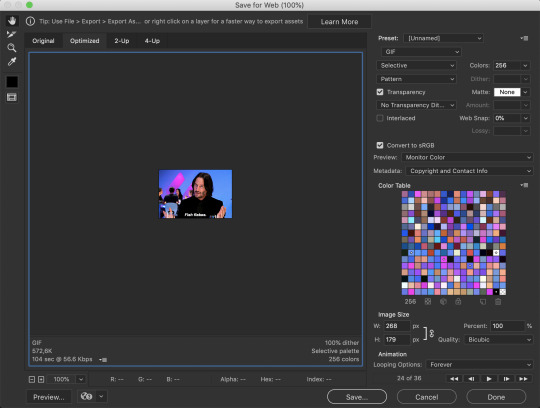
Well basically, those are my settings above. Make sure the looping option is set at forever. Also on the left size you see how big your gif is, make sure it is under 8mb but tumblr is unstable so keep it under 5MB and it should be fine.
I use different exporting types at times. Sometimes I use selective and pattern, sometimes diffusion or adaptive+dif. Just remember that the gif size depends on which you choose so keep that in mind. Here’s the difference (if u can even spot it).
selective + pattern

selective + diffusion

adaptive + diffusion

Personally I mostly only use selective + pattern!
btw make sure your matte is at NONE!!! This is because otherwise you have those whitish transparent borders on your gif, esp noticable on dark gifs, like shown in this tutorial by the talented @joewright !
And congrats, you have officially made a gif! Now go experiment, have the time of your life and do whatever the heck u want with your gifs. And if you want me to see them, tag me!! I track #usernums !!!
★★★★★
- last minute tips and extra links
man idk what to say here really but here goes:
@completeresources and @allresources are amazing places to learn more about gifmaking, pls take advantage of the opportunity
reminder: quicktime records at 60FPS, so unless you want a laggy gif delete the extra duplicate frames in the frame animation timeline!!
When opening import video frames to layers, do not click skip every second frame!! do not!!!!
Do not steal gifs. Try making them. I know it takes time and it can get frustrating but don’t post someone elses gifs as your own. Even the ugliest gifset in existence made originally by someone is better than a stunning set put together full of stolen gifs from various users. Don’t be that person
Don’t be afraid to ask for help pls just go on anon if u want!!
use the tumblr dimensions!!! I cannot stress enough how important this is because if you don’t, your gifs will look stretched af and lose quality so like .. don’t do that
1K notes
·
View notes
Text
UPDATE: Sept 2021
If you follow me, you may be aware that I took a hiatus in the middle of June due to a decline in my health.
Since then I’ve had to uninstall Sims 4 from my laptop since it was taking up over 60GB of memory that I needed, but I’m hoping to get an external hard drive at the end of the month so I can re-install and get back to this.
I’m also debating moving this over to a full new blog, rather than a side blog, as I can’t reply on here and I keep accidentally reblogging to my main account instead. I’ll let you know if I do and I appreciate the people that have stuck around despite me not being as active as I would like right now.
And a huge thank you to everyone liking / reblogging my posts. Means a lot <3
1 note
·
View note
Text
rip I can't simultaneously run docker and VirtualBox bc hyperv needs to be on for one and off for the other. I could get around this by running my docker stuff in an Ubuntu VM but that would require reinstalling like 60gb of supporting programs and software for me to have a dedicated Linux VM for these types of projects. Anyone who follows these tags know a workaround that keeps docker on the host machine but doesn't require me manually enabling or turning off hyper v?
1 note
·
View note
Text
u know being more Into the technical side of gaming now the upgrades game devs are going to get (UE5) are going to amazing for artists.......but I really hope game devs keep in mind that not everyone has a $2K PC with up to date drivers and hardware that cannot possibly render even the lowest poly models or textures they provide and even then if your game is prided on being gorgeous....why bother if it's only on the highest possible settings to get that experience and get good frames...
also please GOD I want the "bigger is better" shit to stop if you give me 60gb of a game that sucks and all those gigs are for your art bc of above reasons or an obnoxious amount of unimportant side quests fuck you
#shut up sir#my old pc couldnt handle overwatchs highest graphic settings and w a game like that it was a disadvantage!#or i started asscreed odyssey on it and it was on the lowest graphics otherwise itd crash#and luckily i could still appreciate how pretty the game was#also on game file size i should be able to download more than just 15 games give or take saves and you know other files on a 1tb hard drive#again were back to accessibility with people who cant afford extra hardrives or sacrifice important file space#tired of gaming elitism from a gamer standpoint and a game artists side#also the last line is a jab at andromeda i enjoyed the game overall but being biggee than the trilogy combined didnt make it anywhere near#as good as the original ans that was spread across three games!!!#its about the good character writing#id say good story but mass effect has its flaws we all know this but its a solid main story line imo just some stuff is goofy
2 notes
·
View notes
Text
The Podcast Starter Kit
https://texuhport.ca/products/2pcs-artificial-leather-support-pillowHave you wanted to start a podcast for a while now?
You have sultry baritone of Barry White, the quick wit of John Mulaney, and the content to make it to the top of the podcast charts, but starting a podcast can be a daunting task. You don’t know what you need to begin, so it remains a dream.
👀🔥👀🔥👀🔥👀🔥👀🔥👀🔥👀🔥👀🔥👀🔥👀🔥👀🔥👀🔥👀🔥
Well, dream no longer my sweet baby angel. Allow me to help you out.
👀🔥👀🔥👀🔥👀🔥👀🔥👀🔥👀🔥👀🔥👀🔥👀🔥👀🔥👀🔥👀🔥
Before we talk about any hardware you may need, a podcast is practically impossible without a recording software. Some of you may already have DAWs like Garageband, Cubase, Logic Pro, Pro Tools, Audacity or Mainstage but if you don't, get one. That’s how you’re going to be able to record your podcast and export it in the necessary formats to upload it to your podcasting platform.
Now for our area of expertise:

HARDWARE
Let’s begin, shall we?
First off, we know what’s on your heart: So as always, all orders come with free shipping.

Second, we have you covered on everything you could possibly need to start your podcast in our Podcast Starter Kit, so check it out! Pre-Summary: You’re getting 240$ worth of equipment for 100$ and FREE SHIPPING. You’re Welcome.
Here are some things you might need:
Samson Go Mic USB Microphone - Reg. 80.00$

The most important piece of equipment for podcasts, this condenser mic is small and portable with a great sound, making it the perfect mic for recording your previously mentioned Barry White-like vocals.
Blank Sketchbook - Reg. 7.99$

Every great idea begins with some random notes scribbled on a piece of paper. This sleek notebook has 100 pages,so that’s a lot of scribbled notes!
USB External Hard Drive - Reg. 24.99$

In case you didn’t know, Podcasts take up A LOT of room on your computer. If you leave all of your content on your computer, it’ll annoy your poor PC. If your PC is annoyed, it could gain sentience and begin a Terminator-like takeover of the world. Save the world, get an external hard drive. Ranging from 60Gb - 1.5Tb, there’s a hard drive here for everyone.
Desktop Clip USB Hub - Reg. 29.99$

Need more USB plugins for all the stuff plugged into your computer? Podcasts take a lot of cords, but with the USB Hub, you can keep everything nice and organized.
2-Piece Artificial Leather Support Pillow - Reg. 14.99$

Hey buddy, you like comfort? Of course you do. I hate to break it to you, but podcasts aren’t all piles of money and fame beyond your wildest dreams. If you want to do them well, they’re a lot of long hours in front of a computer. So these neck and back pillows are about to be your new best friend.
USB Flash Drive - Reg. 16.99$

For the podcaster on the go. Maybe you need to transport your work from one computer to another. Maybe you need to bring it to a podcast company. Whatever the need, USB flash drives are essential. These ones pack a punch, ranging from 32Gb to 128Gb of storage.
Paper Clip Hook/Cup Holder - Reg. 24.99$

Coffee. Coffee need cup. Cup need cup holder. Otherwise, cup spill and coffee fall on computer. Podcast ruined. Get cupholder. (Hey, did we mention free shipping??)
If you’re serious about Podcasting, you’re going to do a lot of work. Let at least this part be taken care of. You can get the ENTIRE Podcast Starter Kit, a value of $240, for a little over $100, depending on the size and color options preferred. Follow your dreams. Start here. PS. I think we mentioned it by now, but did you hear about the free shipping?
54 notes
·
View notes
Note
hi! what is your process to obtain footage so hq? do you torrent a lot?
these questions make me nervous af bro. i wouldn’t say my footage is super hq necessarily, i just think i do a good job of sharpening and colouring so i don’t lose quality. i don’t torrent often bc i keep all my downloads and i rarely gif outside of those.
if you have the movies on dvd then slotting them into your laptop/computer and giffing directly from that is your best idea bc it will be direct blu-ray footage. footage from torrents can often be compressed (for smaller files) and as a result, is not as high in quality.
the only way to get the same quality as actual blu-ray discs is to download remux files which are not only rarely uploaded, but are also really big files (you’ll run out of space on your laptop pretty quick) and take ages to download. your best option is working from dvds if you have them, or downloading files in the 15-20gb range (remux are around 40-60gb).
i don’t necessarily think you need to download remux files. at the end of the day, you are going to be downsizing your gifs to tumblr dimensions so you’ll be losing quality anyways and there’ll be virtually no difference between using a 40gb file and a 15gb file. the only thing i don’t recommend is using yify files (which are usually 1-2gb) as they are compressed and low quality.
4 notes
·
View notes
Note
y'all: ">:( don't undercut prices ur ruining the markET" Alright Rebecca sure sell your app at 60GB. I, for one, would like to get rid of this and make some GB, so of COURSE I'm gonna mark my app lower. Find one fuckin LD user who'll seriously go, "hmm. Two apps. This one is 10GB, but that one is 35. I'll buy it for 35! :P". Fuckin no one. So like. Yeah. Keep whining if ya wanna but the market crashed and there's nothing we can do but sell low and cry. I feel the pain but I don't scalp, either.
10 notes
·
View notes
Text
I have 17GB of free space on my laptop. I just bought a bigger micro SD for my Switch, the 60GB was just too small.
It should arrive tomorrow. Problem is, I need to use my laptop as the intermediary for moving files between the two micro SD cards. There’s an “Archive Games” feature on the Switch to delete the games but keep the save data to free up space. I just archived everything, the remaining data is small enough that my laptop can hold it.
And while it does say “save data is retained’ right there, I am still and will be Terrified until I get Hyurle Warriors reinstalled on the new card to see if my data is actually there.
1 note
·
View note
Text
I avoided the PS3 for many years, because it was a total shitshow at launch. If I’d been more patient, I may never have owned one at all - many of its best games ended up being ported to PS4, and it is by far the most unreliable console I’ve ever owned.
I picked up my first PS3 in 2013, a 40GB fat model which was enormously loud at all times and couldn’t get through the intro sequence of The Last Of Us without overheating. I got rid of it in 2015 and replaced it with a 60GB launch model, with the partial PS2 compatibility. That ran well for a couple of years before succumbing to YLOD last summer. I picked up another of the same for free last autumn, also afflicted with YLOD, as a repair project. I picked up a 500GB Super Slim for £35 yesterday, because I want a more reliable model to keep in my collection for years to come.
By contrast, I’ve only ever had to own one Xbox 360. I was given that for Christmas in 2007, it developed the E74 error in late 2010, and has been fine ever since Microsoft fixed it.
Still, it’s the PS3 that I’ve chosen as the multipurpose entertain-o-box for my bedroom here. The simple fact is that there’s nothing quite so versatile and cheap - it does all my Netflix and Youtube and Crunchyroll and WWE Network, while replacing my DVD player and Freeview box (admittedly, that last one requires an add-on). The eventual plan is to keep the super slim at my flat and the repaired PS2 compatible ones here - partially because they’ll be used less and hopefully last longer, and partially because they’re more useful here (I have a PS2 in my flat). The only comparable machine is the Xbox One, but that’s more expensive, doesn’t support old TVs and its multi-generational gaming support isn’t as good.
4 notes
·
View notes
Text
Ramblings of a Millennial About Retro Gaming PCs - 1
Today on this thing that I made up, I wanna talk about my gaming PC. No, not my rad one that can play Deus Ex: Mankind Divided at max settings in 1080p. I mean the gaming rig that fights tooth and nail to run Deus Ex: Game Of The Year at medium settings at 1024x768. The rig that would be running MSN and Internet Explorer 5 to its heart’s content if those services worked anymore. The rig that, more likely than not, would probably have to run dial-up if I lived in a rural area during the early 2000s.
The rig I’m talking about is my retro PC, the IBM Thinkpad T23 from 2001. Only a few months shy of running Windows XP natively, but it got that seal of approval for upgrading to XP from 2000 or 98SE. Several SKUs of this computer were produced, more often than not, made to order. My particular model came with a Pentium III-M processor clocked at 1.13GHz, 512MB of RAM, and a 40GB 7200rpm drive that I presume was added after the fact. It also offered an impressive S3 SuperSavage IGP with 16MB of VRAM. This graphics solution at the time was somewhat similar to the Savage3 and Savage IV, though obviously for a portable system. This is completed with the built-in TFT display running a reasonable 1024x768 along its 14.1″ display.
My configuration actually had Windows 2000 Professional pre-installed, judging by the product key attached to the bottom, but that didn’t feel right. I felt like it wouldn’t be right for my intentions if it ran 2000. Luckily, my old computer teacher from high school seemed to catch on to my nostalgic tastes, and had provided me a copy of 98SE. No box or readings or even a product key sadly, but I got the gist and got a key that worked. One round of installing onto a KingSpec 60GB PATA SSD that I bought off Amazon, and my machine was set. It would need drivers, but that’s not new.
As a retro PC went, it did things alright. I wasn’t terribly keen on running with just a laptop, though. Well, I say that, but what I meant is, if I was gonna use this long-term, I would need a more optimal setup. After all, without a reliable battery anyway, it won’t be any prime machine for an emergency.
Luckily, IBM knew this was the case, and that sometimes, you needed your laptop to do a bit more. This is why they had a docking interface on the bottom of the unit. Now, early on, I thought it would be a perfectly fine machine for what it was doing, so I simply bought up a “Port Replicator” which was more or less a dock that you could leave everything connected to, but didn’t offer any extra features. In practice, I could have saved a few bucks and not bought it, but the thing had a second PS/2 port, which was kind of important, given my other hardware.
I eventually had the bucks to spare, and decided upgrading that bad boy was worth doing. Thus, I got myself the Thinkpad Dock. Model 2631, it was a valuable asset, turning the otherwise plain laptop into a workstation of whatever class and caliber you needed. GPU, sound card, drive interfaces, if it was a single-slot PCI card that didn’t need external power, chances are it would fit and work. This dock also added a second UltraBay slot for having a second drive, should you need something like floppy or maybe integrated ZIP drives while accessing the CD drive of your laptop, as well as two more PCMCIA slots. I valued that since I would score an Iomega Clik! drive that, given LGR’s experience, is very susceptible to heat damage. You wanna keep those Clik! drives quite a distance away from the components inside your PC, or maybe put a fan on it.
Now, that PCI slot needed a card. I went with what was convenient, not necessarily the best. If it went my way, it would have been a Voodoo card. As it was, I opted to borrow my brother’s GeForce4 MX4000 64MB card. Not a bad idea, and as far as gaming was, it was impressive. I should look into benchmarking the card one of these days against the internal graphics chip. No contest, I imagine.
For today, that’s the talk about my hardware. I wanna do a lot more discussing it, and it’s nice to fill the gaps while I’m working on a housing situation. I’ll get back to videos in due time...
1 note
·
View note
Text
Ghost Recon Desert Siege Download
Download Ghost Recon Desert Siege Pc Game Highly Compressed
Ghost Recon Desert Siege Download Free
Ghost Recon Desert Siege Free Download Pc
Ghost Recon Desert Siege Cheats
Buy Tom Clancy's Ghost Recon: Desert Siege. Tom Clancy's Ghost Recon: Desert Siege is available for a small price on the following websites, and is no longer abandonware.GoG.com provides the best release and does not include DRM, please buy from them!You can read our online store guide. Ghost Recon Game Updates; Ghost Recon: Desert Siege v1.2.10.0 GERMAN Fixed EXE; Ghost Recon: Desert Siege v1.0 ENGLISH Fixed EXE; Ghost Recon v1.3.6.0 ENGLISH No-CD/Fixed EXE.
GR Mods Update Nov. 2020
GhostRecon.net has been serving Ghost Recon mods for almost 20 years, however the system used to deliver these mods has become outdated and requires an upgrade before it can be brought back online.

We have been providing these fantastic mods for free for almost 20 years – but now we need your help to keep this service going. If you have enjoyed our mod collection over the years, or if you want to see this collection back online, please help by contributing to the cost of hiring a PHP developer to bring our download system up to date. Everyone who contributes will recieve a permanent namecheck on the downloads page when it come back online.
1300+ Mods
5 million+ Downloads
Home of Heroes Unleashed

100's of Mods for each game
100’s of Ghost Recon mods, 200+ Weapons and skin mods, 11 Amazing Unofficial Expansion Packs, 100+ Custom Campaigns, 80+ New Maps, 25 massive Total Conversions, hundreds of new missions, over 60Gb of files, 300+ GRAW mods, 200+ GRAW2, etc etc….
Heroes Unleashed, CENTCOM, Year of the Monkey, War of Infamy, Frostbite, P2 A Cold Day in Hell, Rockall, Icebreaker, BloodOil, No Easy Day, Israeli Defence Force, Alpha Mod, Sabre Teams, 101st Airborne, British Royal Marines, HX5 Red Sun, Demon Rage, Bravo 2-5, Fight For Freedom, Free Russia, Saving Private Ryan, Sniper Team, 8 Days Reloaded, Brothers in Arms, Band of Brothers, Eagle Claw, Free Libya!, 7.62 Weapon Mod, Standard Upgrade, Spetsgruppa-Vympel and 100’s more…
“the mod collection is brilliant some stuff I’ve never seen before”
“I was totally blown away with all the mods available right now after all these years.”
“”I have been like a kid at Christmas time, installing the mods and playing GR again….”
If you know a PHP programmer who could help re-code a legacy script, please get in touch.
The only current alternative to access the full collection of Ghost Recon mods is on a 64Gb USB stick. This service will be withdrawn at the end of 2020.
Expansion packs should be approached with extreme caution. With a few notable exceptions, they're hastily cobbled together while the full game is still in the charts and offer nothing but a few more pounds in the publisher's pockets. Desert Siege is not just a notable exception, it's downright exceptional. Despite being shorter (eight missions instead of the original 15), it is a richer, more rewarding experience than Ghost Recon ever was. And, unless you've forgotten, Ghost Recon was absolutely brilliant.You might not think that transplanting the action from the drizzly forests of Russia to the desert borders of Ethiopia would be that much of an improvement, but the arid, camel-coloured environment is actually much better suited to both GR's graphics engine and its gameplay.
Lifting The Fog
Two of my main criticisms of Ghost Recon were the levels of fogging and the fact that you spent too much time shooting at dots in the landscape. Both flaws have been dealt with. The fogging in Desert Siege is almost unnoticeable, presumably because there are far fewer trees to render, and you often get to see the face of your enemy before it's replaced by a fistful of bullets. The graphics are crisper and more detailed, and the varied topography means that the miles of desert never get boring. All apps free download.
Download Ghost Recon Desert Siege Pc Game Highly Compressed
But what really sets it apart from Ghost Recon is the extraordinary level design, balanced to perfection to provide a massive challenge that keeps you engrossed every step of the way and lets you approach each objective using different tactics. While GR's levels looked and felt like arranged polygons in a computer game, Desert Siege's suck you in so deep you forget you're playing a game at all.
Ghost Recon Desert Siege Download Free
Who Cares About The Politics?
Ghost Recon Desert Siege Free Download Pc
This feeling is reinforced by the massively improved enemy Al, (although your own team is still prone to getting shot if left alone) which has been fine-tuned to make them slightly more fallible when shooting but much more intelligent in their movements. They're also much more likely to throw grenades at you when you take cover. And when you see a pineapple land under your feet you know for sure you're six feet under. The lack of trees and fogging also means you don't get shot from out of nowhere like you did in Ghost Recon every few minutes. It makes for a slightly less tense experience, but it's every bit as atmospheric and much more fun.
Ghost Recon Desert Siege Cheats
Because of this, all the great things that were already there (the excellent command interface, the RPG elements, the unlocking of specialist soldiers, the detailed character models) seem even greater. It's not very often that we recommend an add-on pack as an essential purchase, but it's not every day we get one like Desert Siege.
0 notes
Last Seen Blogs

thoemuu
Unbetitelt

silukaura
❀ The Younger Twin ❀

shadowydeereagle
Untitled


johnny-soares
modelo Johnny soares