#I also never checked the quality of the disk
Explore tagged Tumblr posts
Text
Man, I wish I could have the patience to get my copy of Rayman 3 working…
#I know I just said I was a patient man in my last post#but fighting with an old console I know nothing about is not something I’m patient with lol#then again I only booted up the game once and gave up so who knows if it fixes itself on another boot#I also never checked the quality of the disk#probably the first thing you should do when buying a second hand game lol#I don’t think the PS2 is plugged in rn so I’d have to get my brother to plug it in again if I wanted to try again#but that seems like a hassle rn#but I keep getting Rayman 3 videos on my feed and it’s making me want to play the game#oh well#I’m not gonna feel terribly pressured unless my aunt/uncle ask for the PS2 back
1 note
·
View note
Text
“I’m scared to pirate stuff - ” do it scared!*
*with Firefox and Adblock and a VPN and -
If you want a nonspecific, nonexhaustive “where do I even start” guide…
Sail the cyber seas at your own risk!
Streaming - “I want to watch xyz”
This is normally what most people want when they talk about pirating.
Use Firefox with uBlock Origin and additional privacy add-ons such as PrivacyBadger, TrackMeNot, etc.
Free VPNs are out there. Get one - but vet it’s efficacy. My go-tos are Proton VPN, or Windscribe if you plan to do a bit of torrenting.
What is torrenting? How does it work? Here’s a guide!
Back to streaming -
Make sure that a) you’ve got your Mozilla browser with all its adblocking private glory, and b) you’ve got a VPN turned on to hide what you’re doing in that browser from your ISP (internet service provider).
Now you need to actually find a site to stream from. This is the tricky part, because openly sharing these sites will get them taken down if they’re talked about widely enough. (Remember how tiktok idiots got zlibrary taken down?)
You’re going to have to talk to people on forums. You’re going to have to experiment with sites you find yourself. Search for ‘x online free’ and look at the links that come up - is the preview text mangled or clickbaitey? Are there Reddit threads about that website confirming or denying its content? A good rule of thumb is to ignore the top result or two - copycats of good streaming sites will often buy out the top result spot. Eventually, you’ll develop a good gut feeling and understanding of what a good site ‘looks like’ from the results page alone.
However, there are some places that compile good sites that haven’t been nuked by lawyers (yet) - check out r/FMHY! The masterposts are actively curated and updated when a site goes down or is found to have malicious downloads.
Remember - loose lips sink ships. No tweeting (xeeting?) or Facebook statuses about your new favorite piracy website and where you found it. Even posting to tumblr (kind of like this…) isn’t a great idea if you want those websites to stay under the radar and stay accessible. Nobody talks, everybody walks (away with their share of pirate booty)
If you aren’t downloading media, pick pretty much any site and watch away! Adblock and Firefox will keep away pop-ups and other annoying ads, and your VPN means your ISP can’t tell that you’re visiting an unofficial streaming service.
Note: In my experience, I’ve never heard of visiting a site and watching stuff on it infecting or otherwise compromising your computer. That tends to come from misclicks on invisible or overwhelming pop-up ads that redirect you to an automatic download or similarly malicious bullshit. If you’re using Firefox and uBlock, you shouldn’t be in any danger of an accidental redirect.
Downloads - “I want to keep xyz”
This is the realm of pirate archiving - you’re keeping files physically on your hard drive, an external hard drive, or burning a disk.
Adblock + Firefox browser? Check. VPN on? Check.
Go to your streaming site of choice - most if not all have download options. You can download those files or, manually, right click and save the video file from the webpage as an mp4. I honestly don’t know if there’s a difference in quality or more danger in clicking the download buttons, but regardless -
Run that puppy through VirusTotal.com! It’s a reliable browser based virus checker - if the file is too large, use a local virus checking program (your native Windows Defender on Windows computers or, I prefer, Malwarebytes)
Generally mp4 and mp3 files are clean - choose where to save them for the long term, and bam! Free forever media.
Optionally, I also upload mp4 files to a named Google document - this way I can easily share them or make them findable through a ‘xyz Google doc’ search for others :]
Torrents - “I want to keep and share xyz”
I’m not going to go into this subject in depth because, honestly, it’s not something I do regularly.
See the previously linked Torrenting guide for information on how the process works, and check out r/FMHY for recommendations and warnings about different torrenting clients (I’ve personally only used qBittorrent - I’ve heard to stay away from the Pirate Bay and Bittorrent.)
As with streaming, turn on that VPN baby! You’re going to need one that supports peer-to-peer (p2p) connections, so Proton’s free version is a no-go. Windscribe is what I’ve used for torrenting (and it’s a good free VPN on its own - I’m just partial to Proton). You get 10GB every month on Windscribe’s free version, which is more than enough for a few movies/a season or two of your favorite show.
(Bigger torrents like video games are easily 30+ GB, so be prepared to either pay for a no-limit premium account or spend a few months downloading your files in chunks.)
VPN on? Double check.
Boot up your torrenting client - I use a slightly out of date version of qBittorent, but there are other options. The Reddit thread and previously linked torrenting guide have a few dos and donts of selecting a client, so be thorough before you download your client of choice.
This is getting into the logistics of torrenting a bit, so forgive me if this is vague or incorrect, but now you need a torrent seed. These will be .tor files found through pirating websites or archives - these are rarely malicious, but it’s good to run any piracy related download through something like VirusTotal.com or scan it with a local program like Malwarebytes.
You open your seed file in your client and wait. A ‘healthy’ seed tends to have lots of seeders and few leeches, but sometimes you’re stuck with an obscure seed you just have to wait for.
Your torrented files have fully downloaded! Now what? a) keep your client open and seed those files for others as long as you want to - sharing is caring! and b) run those files through a security program like Malwarebytes (not sponsored it’s just the only program I’m familiar with).
Be wary of what gets flagged - sometimes the files seem important, but are just trojans, and likewise sometimes they seem malicious, but are just cracked software getting flagged by your system. It’s good to check and see if others have had a problem with this particular torrent before - Reddit threads from 2008 are your long dead friends.
And that’s about it. Feel free to correct me if anything I’ve recommended is malicious or outright wrong. I’ve been doing this for years and haven’t had an active problem to my knowledge, so if there is something fishy with how I do things, I am a statistical outlier and should not be counted.
I wish you smooth sailing and strong winds in your ventures me hearties!
Obligatory ‘don’t pirate small author’s or artist’s works what the fuck dude’ statement.
#ra speaks#piracy#pirating#pirate to make hondo ohnaka proud#I’ve seen so many people on my streaming piracy post bemoaning that they don’t know how like !!!!#congrats you get to learn without the middle school trial and error phase we zillenials had (RIP family computer 2004-2009)#I genuinely think piracy has gotten easier/safer than it used to be. that or I’ve gotten smarter. which is also likely.
380 notes
·
View notes
Text
Tools and Ingredients to keep on hand; Kitchen Witchcraft Elevated Pt. 3

A few more items I'd like to recommend to my kitchen witches. This is going to start getting a little more specific to my own style of cooking and practicing. So if there's anything on this list that makes you go "That's dumb, why would I need that?" then it probably is not for you. Don't go out and get it! But if you think "Huh, that's a good idea" maybe try it out. You can also check out Part 1 and Part 2.
Terracotta Disk Okay let's be real; anyone who's opened brown sugar before knows the struggle of hard sugar. Brown sugar dries out and becomes rock hard. Now, there are lots of solutions that have been presented, but each of them have a new issue. Adding a piece of bread for example. Well now I gotta worry about crumbs, mold and gluten contamination (I'm very mindful of allergies, despite not having any myself). I've also heard of adding a marshmallow to your sugar. I've tried this, but I'm not sure if it's the environment I live in, but it just doesn't work well for me. Plus both feels kind of wasteful. Then I saw a Terracotta disk at the dollarama for about 2 bucks. You soak it in water then drop it in your jar. Boom. Soft brown sugar in a few hours.
Rice Vinegar I know I already suggested vinegar in general, but rice vinegar tends to be more mellow than white vinegar or balsamic vinegar. I like to make a lot of quick pickle stuff like pickled Daikon, Pickled Carrot, or pickled onion. It's also a common ingredient for many Asian sauces and dishes. So if looking up a recipe, it'll often call for Rice Vinegar in some form or fashion. It's also nice to add to plain white rice.
Tortillas Anytime I can find these for cheap in the store, I stock up and throw them in the freezer. Yeah, I can make my own for cheaper, but I've never been 100% happy with how they turn out. They can be too thick, or get a hole, or are not the right size; I dunno. Sometimes I'll make them when in the mood, but mostly I prefer to have them premade. Tortillas, whether made from wheat or corn, have strong solar energies. They also have good protection properties. When you wrap your food in a tortilla, imagine it to be like a protective blanket. It's great for tacos, burritos, fajitas, or just lunch/breakfast wraps in general. But you can also use them non conventionally. When a pizza craving hits, I'll throw some sauce and toppings on a tortilla and bake. Or I may cut the tortilla up into triangles and bake if I need something to go with a hot dip. Monosodium Glutamate Better known as MSG. There has been a lot of misinformation and hate regarding MSG. Starting when Chinese food became popular in North America, but people worried about the quality and cleanliness of food cooked by a foreigner. After all, other countries had different rules about what was considered acceptable when it came to food. So when people were experiencing headaches or stomach aches after eating Chinese take out, they were appalled to find out it was cooked with MSG. MSG was reported to be the cause of these health problems and demonized it. Except.....it was all dog whistling.
I want to be clear: There is NO causation link to MSG having a side effect of pain or stomach problems. What's more likely to have happened is people had an adverse reaction to deep fried food, combined with mass hysteria. MSG is like Salt, Sugar, or Citric Acid. It occurs naturally, and we humans found ways create the product in it's purest form. MSG can be found in all kinds of food like tomatoes, mushrooms, soy, cheese, fish, grapes, and a ton more. Now that doesn't mean you can just eat as much MSG as you want. Like Salt and Sugar, too much over a long period of time can have negative health impacts. But a pinch or two in a dish while cooking is great to help enhance the Umami or savory flavor. MSG also has way less sodium than regular salt. While I don't think it'll replace salt, it can be good to try adding first for flavor if you're trying to reduce your sodium intake.
Cane Sugar There's a lot of different kinds of sugar. Granulated sugar, brown sugar, yellow sugar, icing sugar; most people keep some kind of sugar on hand for baking or sweetening drinks. But I like to keep Cane Sugar on hand as it has a more complex flavor profile. Magically, I find while Cane Sugar sweetens demeanors just like any other sugar, Cane Sugar is able to have people be more...understanding. Instead of finding a new reason to like you or tolerate you, Cane Sugar makes it more likely people sees things your perspective. It makes people more attune to their empathy when engaging with you. If that makes any sense. Oh, and it's my go to for fermented drinks. I actually ran out experimenting with things like ginger beer. Whoops. Scrub Mommy Listen, I hate cleaning. Especially dishes. I chuck as much as I can into the dishwasher, but some things need to be done by hand. So I'm always looking for way to clean them as quickly and easily as possible. But I also don't want to use harsh chemicals or keep buying steel wool that I'll throw away. I saw the Scrub Mommy be used in a lot of videos, so I gave it a try, and holy crap. I bought one for 6 dollars a year ago. I still have it. It doesn't shrink, it doesn't mold; I can toss it in the dishwasher if it needs a clean. And it gets the food off SO easily. I still need to give stuff a soak every once in a while. But most stuff comes right off. Even jars when I'm getting labels off and I got that sticky residue, scrub mommy it with some dish soap. It's gone in like 30 seconds. I still hate doing dishes. But at lest now I can do them without putting every fiber of my being into them.
#food and folklore#klickwitch#kitchen witch#kitchen witchcraft#kitchen witchcraft elevated#pagan#witch#October#kitchen tips#msg#sugar cane#cooking tips#witchy tips#witchcraft
12 notes
·
View notes
Text
Yu-Gi-Oh! Duel Monsters GX Episodes 115 & 116 Subbed (Finalized)

(Previously: Episodes 113-114 Subbed [Finalized])
(Check out my Subbed!GX Stream Masterpost!)
TURN-115: Giese the Spirit Hunter
Cobra's second assassin was sent after Judai and the others--that assassin being Giese, who is capable of seeing Spirits. He captures Sapphire Pegasus, one of the Gem Beasts, alive and uses him to coerce them into dueling. In Judai's stead, due to his exhaustion of stamina, Johan confronts him, and a duel between Johan and Giese begins. Giese activates his Hunting Net Counter Trap, as if to hunt down Johan's Gem Beasts, and captures Amethyst Cat. Johan attempts to save his Gem Beasts, but even more traps would await him.
TURN-116: The Gem Beasts VS Hell Gundog
Giese proceeds to capture the Gem Beasts with various Trap Cards, while also summoning his Hell Gundog to pour on the attacks against Johan. Feeling anger at Giese's dirty dueling, Johan starts his counterattack, anticipating his Traps and overcoming them strategically by summoning Topaz Tiger and Emerald Turtle to attack with. Cornered, Giese goes for Johan's weakness, making him hold off on any of his attacks. With Johan unable to interfere with his moves, Giese activates his Substitute Pain Permanent Magic to inflict damage on him.
~~~~~~~~~~~~~~~~~~~~~~~~~~~~~~~~~~~~~
Sooo, accidentally ran later with these than intended--not helped by realizing while drafting this full release post over the past two days that I missed a couple spots with a few of my usual animation fixes 🙃--buuut with that out of the way, finalized!115-116 are now up and ready to go! This isn't a catch-and-release I promise
These are always a nice pair of episodes in terms of establishing more around Johan's bond with the Gem Beasts and how he sees his relationship to Spirits, as shown as he encountered Tom and when he finds out that Giese was the one who stole his card and Spirit (meanwhile, the dub decided to give them history for reasons); that Pegasus cameo as he introduces them to the Gem Beasts was always cool, and his "Jesus!" line is iconic haha. Also notable for showing the start of the "What am I dueling for?" question starting to stir within Judai's head after his duel with Satou (which is also conspicuously absent from the dub). Always did find Giese's ultimate fate after Johan crushes him--to "Camula's Theme," at that, which always slaps (and is especially nice given the easter egg that Johan's VA, Kanako Irie, also voiced Camula)--a bit ambiguous since we never do follow up with him, but it is implied the Spirits he hunted (and the one he actually saw as a friend?) either consumed him or took him to the Spirit World or what-have-you; I wonder if they would've added a quick follow-up had they had some room in the episode runtime.
Animation error-wise, well, that was part of the reason for the delay, as overall I handled about 31 throughout both episodes, split roughly evenly between them; varied from smaller quality-of-watching things like split-screen timings (with some border errors mixed in, at that) to card errors (moreso in 116 given how often Hell Gundog wound up on Johan's Disk...) making up the bulk of them, along with helping Topaz Tiger see better well good in 115's preview for 116 due to an error with his eye. Given the amount of fixes worked on, as with 113-114, I'll once again go through the usual edit breakdown in this separate post for the interested!
Anywho, enjoy! Up next, I'll hopefully be working on the Judai vs Cobra three-parter in 117-119 together; I'll be detouring back to TFSP to work on Crow's events in the 5D's character stories, mixing in some work on 117-119 as I go. In particular, looking forward to revisiting 119 since it's a favorite (between the art/animation, music, Cobra's message to Judai echoing Satou coming back later... *chef's kiss*), but 117 will also be interesting for the Yubel/Amon interaction, and of course the surprise fight sequence! Stay tuned!
#GX#yugioh#yugioh gx#ygo#ygo gx#yu-gi-oh gx#yu-gi-oh! gx#gymleaderlance99#my subs#Johan Andersen#Giese Hunt#[any relation to Ethan Hunt there Giese]#rbs for visibility/interest are appreciated :)#was hoping to post this earlier in the day on Friday but between a grocery run and fixing up some finishing touches welp lol#that Hell Gundog just didn't want to leave#[pegasus ily]
11 notes
·
View notes
Note
hey ling, hope ur doing well and was wondering if i could ask some advice - totally ok if no but. im currently trying to screen record a cdrama right now so i can rewatch it later w/o paying, but i only recorded one episode and it's taken up all my icould and google drive storage 😭 i was wondering if u knew anything i could do, since i feel like r educated in the ways of 🏴☠️ 😭
screenrecording is the least efficient way of doing it i think :( ive never tried to do it for more than maybe a few minutes-long clips (most are around 30-40 seconds!), and doing it bloats your memory while also being worse quality. now the last thing may not be a huge deal (i personally dont mind if sth is 4k or 480/720p, esp since older films and dramas simply are harder to find in full hd), but storage efficiency is what you're here for so!!
delete things (files, programs, games, etc) you don't use (anymore), as that probably already opens up a ton of space. there are programs that can help you with looking up which files and shit you use/open the least.
when pirating, ofc use a trusted site and client but also check which files are the smallest and just get that one (unless youre a gifmaker or a real stickler for hd, 720p will suffice imo). tv series in my experience run about 20-30gb if theyre 1080, so even smaller if it's not as hd! google drive only gives 15gb but i think if you compress it into a zip file it miiiiiight fit? if not you can just split it between gdrive and your icloud :)!
an alternatuve option would be to find a streaming wrbsite that had the series but not paywalled, it's less work but the downside is that you can't access this offline (the main reason i like owning (digital) copies)
last but not least, and unfortunately this is the best way to have enough storage: invest in an external hard disk. if you're planning on having more tv series (and perhaps movies) on ur pc/laptop, the best and easiest way to make sure you (almost) never run out of storage is to just... buy more! i splurged on a 5tb external hard disk with bday-christmas money but obviously even having a 256gb/512gb one will be enough if you're not obsessed with putting entire filmographies on there like me djfngmv even getting a bunch of 32/64/128gb usb sticks will prob help out, and while it absolutely is an investment, if you're already paying for a subscription this is a surefire way to make sure you get your money's worth in case they take it off the platform or whatever (looking at how guardian got the boot from literally every streaming platform including yt 😭😭😭)
anyway i hope this helps!! :3
7 notes
·
View notes
Text
As a computer engineer, I would like to add: all of this is very good advice, and you should do everything in your power to avoid wrecking your flash drives. If, however, a drive does fail,
DO NOT PANIC!
You can fix this! At home! For free, even!
Step one: download a forensic disc imager. Most of them will work, but I personally use Exterro's FTK Imager. It is a professional-quality imager that is widely used in criminal investigations and other high-stakes digital forensics (like, national security kind of stakes, so you know it's reliable), and is also completely free for personal use. It's a good idea to read the documentation or find some kind of guide on how to use it before we proceed.
Step two: download a data recovery program. Again, most will work. I use DiskDigger, which is a good free option, but it doesn't work with Apple operating systems, so any Apple users will need to find another option. (Try checking alternativeto.net, it'll usually give you some good options.) Again, figure out how to use it before continuing; it'll save you a lot of trouble later.
Step 3: using the imager from step 1, make an image of your defective drive. This will make a perfect bit-for-bit copy of your drive and save it as a file (usually a .iso). Depending on how big the drive is, this may take a while.
Step 4: unplug your drive. We're not going to touch it again until we've sorted things out.
Step 5: mount the disc image you made in step 3. (If you aren't sure how, just search "mount .iso" our whatever file type you got in step 3.) From your computer's perspective, it's exactly the same as plugging in your drive. We'll be working with this virtual drive so that, if we mess something up, we can just go back to step 3 and try again.
Step 6: make a folder to put your recovered files into. Not strictly necessary, but it's helpful for keeping things organized.
Step 7: now you can use that data recovery program from step 2. (Exact details depend on the software you chose, but it's usually pretty self-explanatory.) Again, this'll take a while for larger drives. Also, they can sometimes struggle with more obscure file types
Step 8: sort through the output. While the contents of the files should be fine, the file names are probably gone (it's a side effect of the error that most commonly causes drive failures). Unless you had a really catastrophic hardware failure, or did something dumb with drive partitioning (like I did), you'll probably only have lost one or two files at the absolute most. More likely, everything is fine.
Step 9: once you've made sure everything is accounted for, unmount your disk image and put it in a zip file (or other compressed format). You can save this file to another drive, and come back to it later. (Alternatively, you can just delete it if you're sure you have everything.)
Congratulations! Barring some edge cases, you've completely recovered your data! For free!
At this point, you can reformat your hard drive. Be absolutely sure of the drive you're formatting, though; formatting the wrong disk can be very hard to recover from. If you're not comfortable doing this (I don't blame you tbh; it's kinda scary sometimes even for me, and I'm a computer engineer), ask a more tech-savvy or otherwise more confident friend to do this for you. Once this is done, you can put your files back onto your flash drive and use it as normal.
This works for any drive btw, not just small flash drives; I had to do this for a 2 terabyte external ssd where I accidentally overwrote the first 1.5ish gb, including the partition table (the file that holds stuff like folder structure, filenames, etc.). (I lost everything in that first chunk, but recovered everything else on that drive and then some (I found a bunch of album covers for albums I've never listened to, for example, and I have no idea where they came from).) The only exception is if you're trying to recover an hdd with a broken platter; once one of the those plates breaks, you're pretty much out of luck. If it's any other kind of drive, though, you'll probably be able to do it at home for free. And, in the event that you can't, that's when you take it to a professional -- and tell them what you've tried, they'll really appreciate it.
Side note: if you suspect that your drive failed due to a virus, don't do the recovery on your main computer. This is another case where it's probably better left to professionals, but you can still do it yourself. If you do, either get a cheap spare computer that you don't mind getting infected, or at up a virtual machine. I will note that even with these protective measures, this is still a bit risky, so I'd only recommend doing this if you really know what you're doing.
PSA- TAKE YOUR FLASHDRIVE OUT OF YOUR COMPUTER
If you are not using your flashdrive to actively back things up- TAKE IT OUT OF YOUR COMPUTER! DO IT NOW! RIGHT. NOW.
Yesterday one of my flashdrives stopped working. My mom took it to our local computer guy to find out what was wrong with it and the guy said the the ONLY way that it could POSSIBLY (not definitely, POSSIBLY) be recovered is by sending it to a FORENSICS COMPANY that charges NINE HUNDRED AND FIFTY DOLLARS ($950) as a flat rate for this service. IF the stuff can even be recovered.
The computer guy said that he has seen all types of flashdrives, no matter the quality, fail because people don't know that they need to take them out of their computers when they're not using them. A few of the things that can happen are the flashdrive can overheat or a virus could destroy it if your computer happens to pick up a virus.
I have thousands of pictures and videos on that flashdrive, precious, precious memories of kids I've worked with that I may never see again in my life and now I might have lost them because I didn't know to take my flashdrive out of my computer when I'm not using it. The cute pictures of my three new kittens I've been posting? On that flashdrive. Memories from holidays and birthdays and camping adventures might be lost forever.
TAKE. YOUR. FLASHDRIVE. OUT. OF. YOUR. COMPUTER!!!!!!
(please for the love of all that is good share this so other people don't have it happen too)
#also I will never judge anyone for panicking in situations like this#because I panicked too#big time#just know that not all is lost#and that there is always hope#which also applies to life in general and not just drive failures tbh
6K notes
·
View notes
Text
Today I watched an astrology prediction video for the geopolitics of 2025, a physics rant about the stagnation of theories of quantum gravity, and an entire BL anime about a 30 year old virgin with mind reading powers. None of these things are even remotely related, and somehow I feel you get a near complete image of the person I am just by knowing that information.
There’s a lot of interesting ways to get to know people, and I like just asking a stupid amount of annoying questions. Well, they seem to be annoying to people, I’d personally be thrilled if someone were to talk to me the way I talk to others. Either way, I’ve made peace with the idea of being annoying. If ‘annoying’ is the worst complaint you have about someone, they can’t really be that bad, I think.
I asked my friend, my dad and my mom ‘what is your favorite thing about your thought process and the way it feels to be you in your own head?’. My friend said that he likes that he can consider all sides of an issue, which I agree is an admirable quality. We somehow ended up talking about ghosts, which was also very interesting. This friend says he thinks people stay when they have unfinished business, and then listed examples illustrating when that might be. He listed nearly every cause of death besides old age, but I never pointed that out. Seems like an awful lot of unfinished business.
I’m not capable of knowing with certainty if ghosts are real - I lean towards no - but I think if they are, what qualifies as unfinished business may have a lot more to do with the quality of a person’s conscious experience at the time of death than any particular cause of death itself. I don’t think you can see a murder victim, and know just by that fact alone if they had found peace in their life or not. If I was murdered tomorrow, I don’t believe I would have unfinished business.
When I asked my dad that same question, about what it feels like to be you, he said his favorite thing was his ability to look at a problem and see dozens of potential solutions. That’s an unrelatable concept to me in a lot of ways. I wanted to vacuum spilled sugar off the counter last night. My dad said ‘do you know what sugar will do to a vacuum cleaner?’ And I laughed and agreed, but in truth, I still don’t know what would be so bad about it. I’m not sure why I didn’t ask him. Maybe I will.
My mom’s answer was a little hard to hear. She thought for a long while, and said ‘I’m too tired these days, I’m not sure I have thoughts anymore.’ My heart ached. I noticed she’s been out of it recently. Part of me thought I was the problem, but I checked my ego on that idea very quickly. I’m not that important. We talked more, and it doesn’t even sound like she knows what it is. Whatever it is, I really hope she starts to feel like herself again, or at least, just happy and less stressed, even if she feels different than she used to.
Circling back to the idea of ghosts, just because I’m thinking about it now, and wanna get it out of me. Stuff to do with life and death and reality and consciousness are so complicated and hard to capture with language. I always feel a little like I’m tripping over something, like I’m stumbling back to my bed in the dark after taking a midnight piss, groggy and walking into walls. Maybe the journey is passable, but it’s far from ideal or comprehensive. I’ll try to be articulate, who knows, maybe it’ll be easier to type it than to speak it.
I intuitively don’t believe we have any attachment to the human we were after we pass. This is not a physicalist and realist perspective, I’ve moved on from that years ago. The more I think about this, I think if sleep is the pause button, then death is ejecting the disk, and throwing it in a fire. A hard reset on subjectivity. But I believe we still exist.
I need to take a step back, this is such an expansive topic, and I’m leaving holes in it all over the place. I feel attached to the idea that, beneath the ego, under all the memories and formative experiences and dna, there’s something that’s fundamentally the same about everyone. I believe, above all else, that the one label that is truly applicable to everyone in exactly the same way, is that we are all Subjectivity itself, in the purest sense. Everything layered on top of that is what creates the experience of being an individual who’s different from other individuals.
I’m also swaying towards the idea that time itself doesn’t even exist without some form of conscious subjectivity to observe its passage. Think of sleep, when you aren’t dreaming, and then you wake up, it doesn’t feel as though you waited in bed for eight hours, it feels like time stopped existing entirely while you were unconscious. This leads me to believe that time is a lot more abstract and less linear, at least in relation to consciousness, than we often intuitively make it out to be.
I think maybe everything is happening all at once, but different subjective perspectives experience it at different points. The future to me is the past to a child born ten years from now, but whenever we are asked, both of us would agree that the current time, whatever it happens to be, is now. I think that’s important. Now is the only tangible thing we have, the past only exists as memories and traces, and the future is just an amorphous concept. Now is where all the things happen.
So, I think that maybe when we die, it’s because time isn’t actually linear at all, and the branch of subjectivity that was us has come to its natural ending point. Maybe, just how at some fuzzy point in my own past I went from being non-existent to having a subjective experience, that exact same thing will happen all over again, in a different body. Maybe I’ll be a young man in the year 3024, or my own great grandchild. Maybe I’ll be Socrates, or my mother. Maybe I’ll be a T Rex, or some species of crab that hasn’t evolved yet. More likely, all of them are true all at once.
My only question after that, the thing that stumps me, is if I really am just Subjectivity itself, why am I experiencing this precise life right now? The really stupid thing is, any instance of subjectivity could ask itself that question, and I guess maybe at the end of the day, the only real answer is ’someone had to do it’. Because wherever there’s life, Subjectivity makes a home. Always. That’s a comfort to me. Just as how nuclear fusion starts happening every time a star forms and the conditions are suitable, subjectivity fills every void that it is able to fit into.
This got a lot deeper than I originally intended. I was just gonna see if I could ramble my way to an interesting plot idea, but this is potentially the most autobiographical piece I’ve ever written. And I’m past the thousand word mark. That’s absurd to me, because I haven’t been able to get to the thousand word threshold without it feeling like a chore for the last couple of years. Maybe I’ve been writing the wrong things.
That leads me to wonder if anyone would ever want to read something like this. Not in the sense that I necessarily care to monetize it, but more that I’ve been creating into the void my entire life, and I would love for something that I make to resonate with someone. Even just one person. If a single human took the time to read all this, and resonated with it, and enjoyed it, that would be deeply meaningful to me.
In all honesty, I’m not much of a reader. It has to be a very specific kind of content to hold my attention, and I struggle to think that whatever I’m doing here would ever be anyone’s cup of tea. Mind you, there’s a market for biographies, I guess. Is that what this is?
I’ve given up on creating anything that will ever reach an audience. That isn’t to say I’ve stopped drawing or writing, but I’ve stopped hoping for or expecting any engagement when I share it, and my art has made its home mostly on the walls of my bedroom. Think if Francesco Goya was a 24 year old woman with access to an inkjet printer. It’s wild in here.
I think maybe I’m done writing this, whatever it is. I think maybe I will share it somewhere. Or maybe, it will live in this liminal void forever. If by some odd chance I did post this, and you saw it, and that little voice in your head is narrating these words to you right now, imagining a voice for me, just know I appreciate that the void I’ll inevitably feel I’ve thrown this into has found some company. I hope your life is full of wonderful things.
0 notes
Text
BALITANG NEGOSYO: GMA Network's Set-Top DTV Receiver 'GMA Affordabox' expands to avail in selected key areas and municipalities of Visayas and Mindanao, including Dumaguete City [#OnlyOnOneNETnews]

VALENCIA, NEGROS ORIENTAL -- In a bid to enhance TV viewing experiences for Filipinos, national television corporate giant 'GMA Network' in Metro Manila has launched its own budget-friendly digital TV receiver called 'GMA Affordabox'.
This newest digital set-top box provides access to clearer and more colorful Kapuso programs from 'GMA', 'GTV', 'Heart of Asia', 'HallyPop', 'I Heart Movies' and 'Pinoy Hits'. These cable-style TV channels are the exclusive rights that never been listed in any cable TV networks like SkyCable or Cignal, and its only for their digital TV receivers of 'GMA Affordabox'. Other digital free-to-air channels are included locally, depending in your city or region.
All these features inside 'GMA Affordabox' comes with Multimedia Player via Universal Serial Bus (USB) in portable flash drives or external hard disk drives (HDD), Personal Video Recorder (PVR), National Emergency Warning Broadcast System (NEWBS), Auto-On Alert Feature, and Digital & Info Displays.
The 'GMA Affordabox' allows you to receive digital TV signals, ensuring better picture quality and reception, compared to analog TV broadcasts, which is currently planned and yet to be shutting down nationwide in 2027.
If you're in an area, where GMA's digital TV broadcast is available everywhere in the entire Visayas region, the 'GMA Affordabox' is a must-have addition to your entertainment setup.
Kapuso shows that you might wanna look forward to, such as 'Pulang Araw', 'Widows War', 'Asawa ng Asawa Ko', 'Running Man: Philippines', and a new season of 'The Voice Kids: Philippines' (formerly moved from 'Kapamilya Channel').
Not only that… Your favorite local newscast in the Philippines under GMA Regional TV potentially includes with your 'GMA Affordabox' line-up in their assigned GMA local TV channels in your neck of the woods. Some local relay TV channels of GMA may not air or hooking-up its local news in selected areas all around the Philippine archipelago.
Digitally assigned channels already expanded, effectively starting between 2021 and early this month of August 2024, covering key areas of Bacolod City, Negros Occidental (in selected municipalities), Dumaguete City in Negros Oriental, Dipolog City, and also in selected municipal areas of Zamboanga del Norte. Both of these areas in Palawan, and in selected municipalities of Negros Oriental, like these examples of Bayawan, Dauin, Valencia, Bacong, Tanjay, Bais, Manjuyod and more, might soon be possibly added in the waitlists.
You can purchase 'GMA Affordabox' for only PHP888 (or nearly U$D16) from authorized official physical stores and legitimate online e-commerce platforms in the Philippines via GMA Store website, Shopee and Lazada. Original price may subject to change. You can also check with local retailers near you, or visit GMA's official website for a full list of legitimate and authorized sellers. No monthly fees, hidden charges or contracts needed.
Here in Dumaguete for local GMA TV to keep you entertained and informed locally all together, tune in to Channel 5 via free TV or on 'GMA Affordabox' via Digital Channel 22 for 'GMA Regional TV: Balitang Bisdak' and the rest of Kapuso shows. And for those in other key areas as mentioned above, explore the world of Kapuso entertainment and regional newscasts wherever you live, with this affordable and budget-friendly digital TV receiver.
'GMA Affordabox' is available in key areas nationwide.
STOCK PHOTO COURTESY: Google Images & Wikipedia BACKGROUND PROVIDED BY: Tegna
-- OneNETnews Online Publication Team
#business news#local news#dumaguete#valencia#negros oriental#bacolod#negros occidental#palawan#dipolog#visayas#mindanao#GMA Affordabox#fyp#exclusive#first and exclusive#OneNETnews
0 notes
Photo

Welcome to soonhoonsol’s gif tutorial!
As a nice anon asked me how I make my gifs, I thought it’d be cool to create an in-depth tutorial :) Perhaps this can help some others enter the gif-ing world too!
What we’ll be using for this tutorial:
Software: Bandicam, Avisynth, Photoshop CC 2018, Topaz Labs
File Format: .mp4
Operating System: Windows
Disclaimer: This is just my method. Every gif maker works differently and has different preferences. What works for me may not work for you, and that’s completely okay!
Let’s get into it!
1. Find the best quality video you can find
This really depends on the content you want to gif. For variety shows, music videos or photoshoots, any video of [1080p] should be sufficient. Try not to use anything below 720p.
For stage performances, fancams tend to have higher resolutions [1440p, 4k]. Use these if your computer can handle it. If not, usually 1080p works fine. The best option would be to download .ts files, which provide clearer and less grainy videos.
For Seventeen, you can get .ts files from The Rosebay on Twitter :)
2. Screen recording
As a Windows user, I don’t have a built-in screen recorder on my laptop. So, I use Bandicam, which is a free screen recording software. The only con to it is that it has a watermark.
To combat the watermark, I always have the boundary box a little bigger than the video itself so that I can crop it out of the gif.
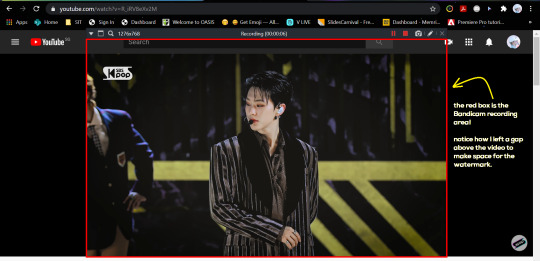
This is what the recording would look like:

Just record the scene(s) that you want to gif so your video file doesn’t end up too large! Your recording should be in .mp4 format.
(You may use pure .ts files in Avisynth but it never worked well for me so I usually screen record the .ts video and move on)
You can find your recorded videos in Documents > Bandicam.
3. Avisynth
I followed THIS tutorial to download Avisynth. This software is really helpful if you want sharp and clear gifs! I recommend to follow the steps in the tutorial as the below method stems from it.
- Once you have downloaded it, open up your recorded video from Step 2 and watch it. Take note of the duration you want to gif. (e.g. from 00:01 to 00:05)
- Drag your video file into normalwebrange.bat. On Windows, you can find this in File Explorer > Local Disk (C:) > video. For other .bat files, you may check out THIS tutorial.
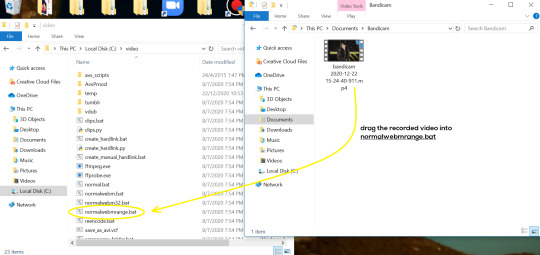
- In the pop-up box, key in the start time for your gif (e.g. 00:00:01). It has to be in hh:mm:ss format. Press “enter”.
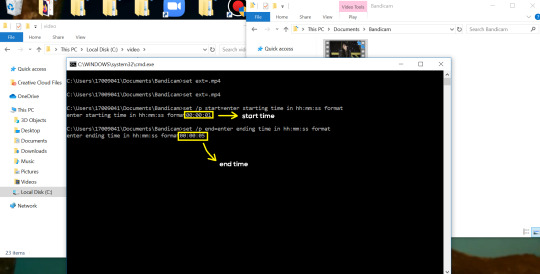
- Key in the end timing and press “enter” again. A resizer should pop up in an Internet Browser. I found that Firefox works best for me.
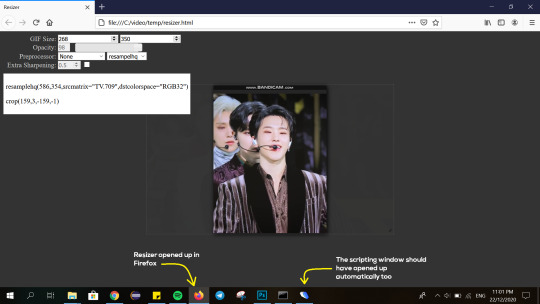
- In the resizer, you may indicate the size of the gif you’d like to make. You can also click and drag the video to resize and frame it to your liking. You may refer to THIS post for Tumblr dashboard sizing.
(These are some common gif sizes for stage performances):
1 gif - 540px by 540px (square)
2 gifs - 268px by 350px
3 gifs - 177/178px by 250px
- Under “Preprocessor”, select “debilinear” for the second box. For the first box, you may pick between qtgmc 30 (same frame rate as video) or qtgmc 60 (doubles the frame rate; smoother).
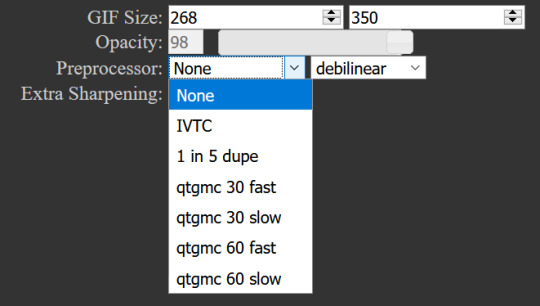
- You will also see “fast” or “slow” options. These are just how long the video will take to render. “Fast” will give you slightly lower quality as compared to “slow”, but usually is good enough.

(You can see that his features are sharper and more defined in the “slow” gif as compared to the “fast” one.)
- Copy the code in the white box. Navigate to the scripting window (it should have popped up with the resizer) and paste the code at line 17. Type a “#” before qtgmc on the same line. This will prevent the software from lagging.
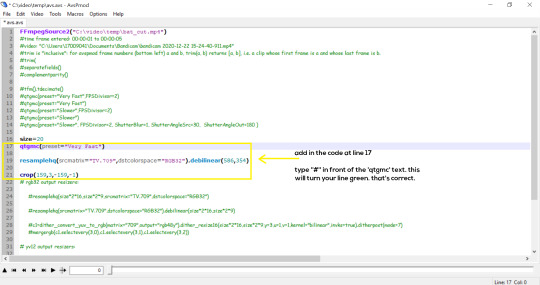
- Click on the inverted triangle at the bottom of the screen. Your video will now appear in the scripting window. Drag the slider to the intended starting point of your gif and press the “home” key on your keyboard.
- Drag the slider again to the intended ending point of your gif and press the “end” key on your keyboard. This blue area you see is the duration of your gif.
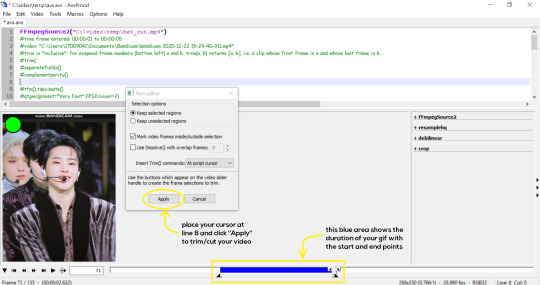
- On an empty line (I usually go to line 8), place your cursor there and click “Apply” in the mini pop-up window. Afterwards, remove the “#” from line 17.
- Go to File > Save or press Ctrl + S to save the code. Close the scripting window. The video renderer will pop up. When it’s done, it will automatically close by itself.
4. Using Photoshop and Topaz
I’m using my school license for Photoshop 2018, but if you don’t have that, there are plenty of cracked versions for free. I don’t have any to recommend though so I’m sorry about that :(
I followed THIS video tutorial to download Topaz plug-ins for free. I use Topaz DeNoise (the most helpful) and Clean, but you may use others if you’d like :)
Alright, let’s dive in to the steps!
- Open up Photoshop and go to File > Import > Video Frames to Layers.
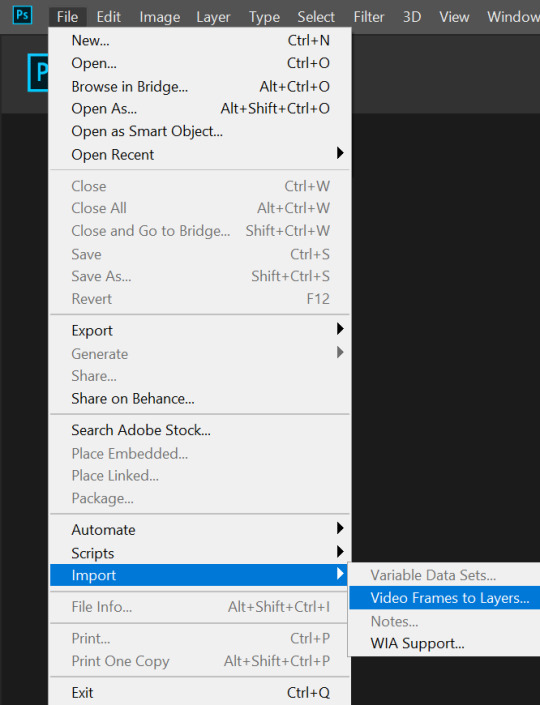
- A pop-up will appear. You can find your deinterlaced Avisynth video in File Explorer > Local Disk (C:) > video > temp > video.avi. Follow the settings in the picture and click “OK”.
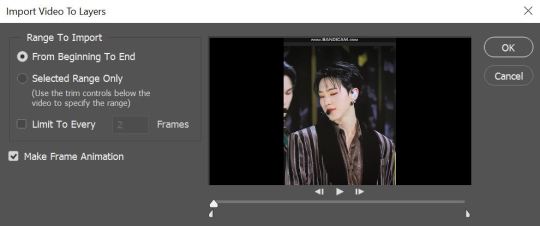
- Go to Window > Timeline to open up the timeline. You should be able to see your gif spread out in frames. If you press the play button, it should play like a video.
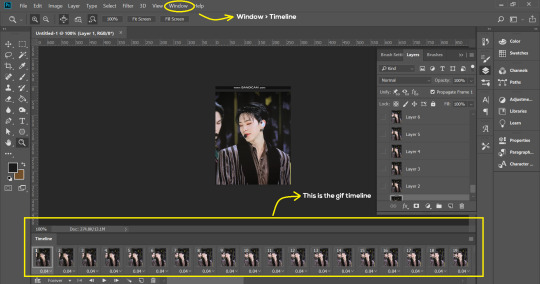
- (Quick optional step I learned from THIS tutorial) Go to Image > Canvas and set the Resample option to “Bicubic (smooth gradients)”.)
- Select the first frame of your gif in the timeline. Shift select the last frame. Go to Window > Layers. Shift select these layers as well.
- With everything selected, click the 3 lines at the top right corner of the timeline. Select “Convert to Video Timeline”.
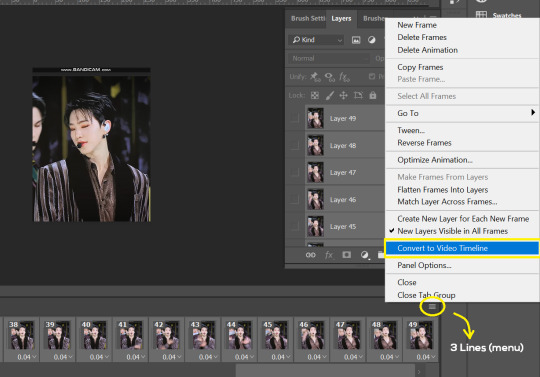
- At the top of the screen, select Filter > Convert for Smart Filters. Your layers will condense into one layer. Don’t worry, your gif is fine.
- Now it’s time to sharpen the gifs. Go to Filter > Sharpen > Smart Sharpen. Play around with the settings to your liking!
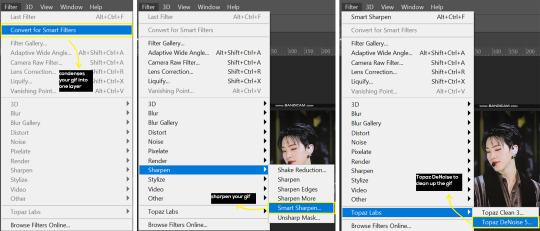
- If you’ve downloaded Topaz correctly, it should appear under Filter > Topaz Labs. If a pop-up asks you for an activation key, you may use THESE to activate it for free.
- Go to Filter > Topaz Labs > DeNoise and/or Clean and play with the settings until you’re satisfied.
5. Blurring
If your gifs have captions/logos that are distracting, you’d want to blur them out. Don’t be like 2018 me that blurred out the logo frame by frame; it’s very tiring. Instead, using this method from @scoupsy‘s tutorial, you’ll save lots of time.
- In the Layers tab (Windows > Layers), select the “New Layer” icon. It should be blank.
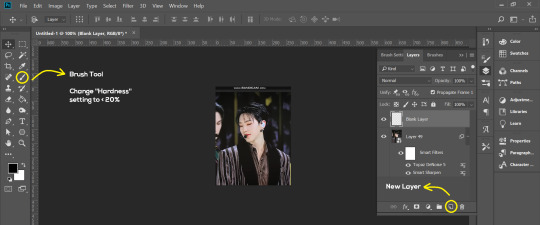
- Select the Brush tool. Make sure the “Hardness” setting is below 20%. This will blend the blurring nicely into the gif.
(For the sake of this tutorial, I will be blurring out the Bandicam logo to show you.)
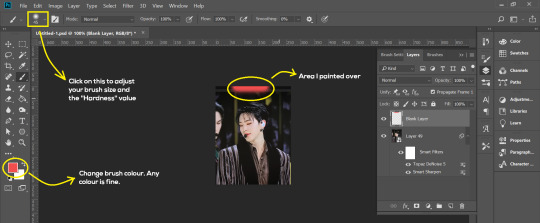
- Paint over the captions/logos. Make sure this is on the blank layer!
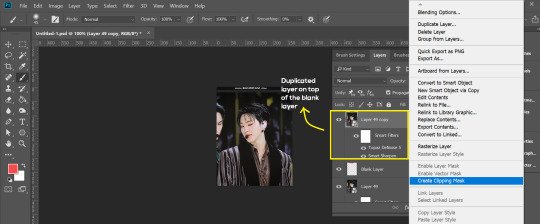
- Duplicate (Right Click > Duplicate) the gif layer and drag it so that it’s on top of the blank layer.
- Right click on the duplicate layer and select “Create Clipping Mask”.
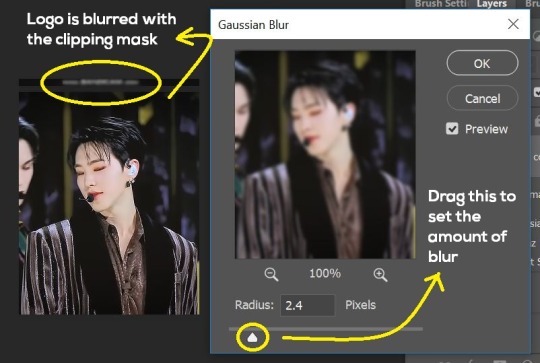
- Go to Filter > Blur > Gaussian Blur and play around with the settings until you’re satisfied with the level of blurring. Click “OK”.
6. Flattening & Colouring
- Once you’re done with sharpening and/or blurring, click on the 3 lines on at the right corner of the video timeline and go to Convert Frames > Flatten Frames Into Clips.
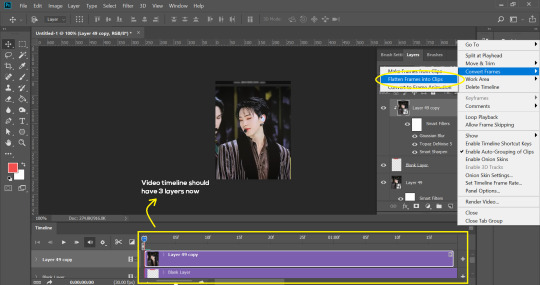
- Topaz layers and blurring will take some time to render so you can just chill for now~
- When it’s done rendering, click again on the 3 lines and go to Convert Frames > Make Frames From Clips.
- Convert it back to the gif timeline by clicking on the 3-box icon at the bottom left of the timeline.
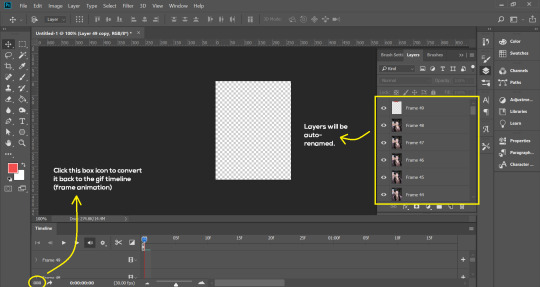
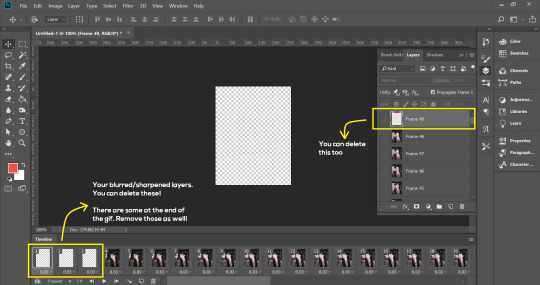
- Select the first frame of your gif. It must be the FIRST.
- Scroll to the top of the layers and select the layer at the top. Any other layers you add should be on top of this layer. VERY IMPORTANT!!
- In the Adjustments Tab (Window > Adjustments), there are many different things to play with. There’s a high chance you won’t use everything, but here’s a few of my favourites.
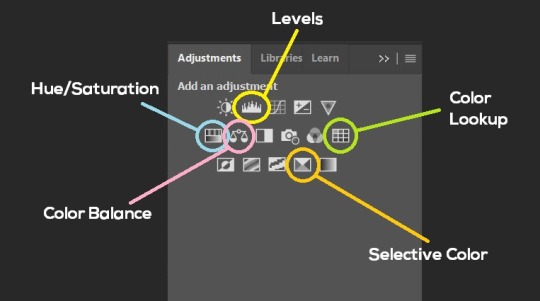
Levels - Adjust the brightness and contrast of your gif in depth.
Hue/Saturation - Useful for changing colours, or switching it to black and white.
Color Balance - Tweak the colours to your liking.
Colour Lookup - Comes with built-in LUTs that you can use as a preset. Great starting point for colouring. Saves time too. You can even download plug-ins for this. 11/10 tool.
Selective Colour - Adjust the vibrancy of specific colours.
- Colouring is completely up to the gifmaker. Go crazy go stupid :D

7. Exporting
We’re almost to the end!
- Set the timing for your gif.
If you used qtgmc30, the best timing would be 0.04s / 0.05s / 0.06s.
If you used qtgmc60, the best timing would be 0.02s / 0.03s / 0.04s.
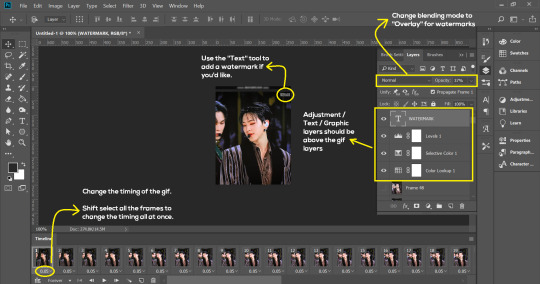
- Once you’re satisfied with everything, go to File > Export > Save for Web (Legacy).
- Follow the settings in the picture below:
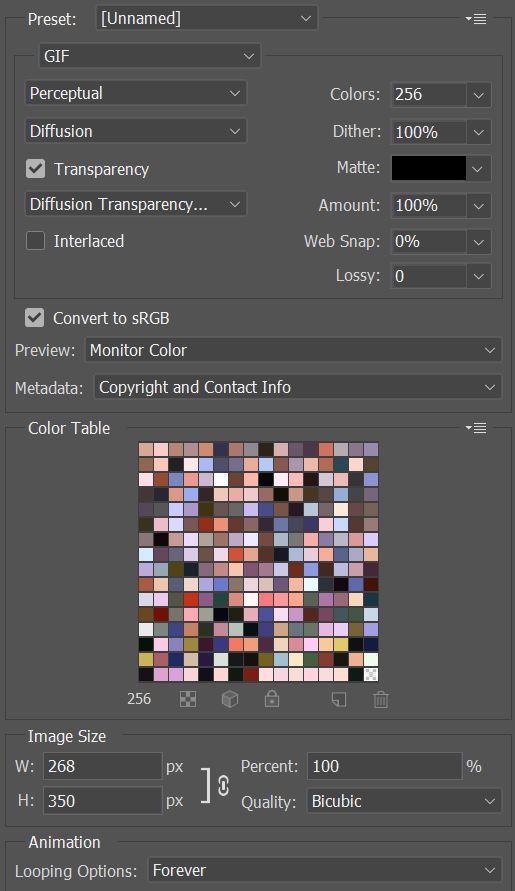
- Tumblr’s gif limit is 10mb per gif. Check the gif size at the bottom left of the pop-up window. Make sure it’s below 10mb; the smaller the better.
- Click “Save”. Choose where you’d like to save the gif.
- Done!
~~~~~~~~~~~~~~~~

And that’s it! You’ve successfully made a gif! Good job you :D
I hope this tutorial was helpful! Please leave some feedback if it helped, or if you have other methods you’d like to share :)
Lastly, if you have any questions, feel free to send in an ask or DM me!! :)
Good luck and happy gif-ing :’D
#gif tutorial#kpop gifs#avisynth tutorial#topaz tutorial#gifs#chey.resource#kpop#idk what else to tag so...#i finally posted the tutorial yay!!#please spare a reblog if you find this even remotely helpful thank you <3#also to spread it hehe i spent a lot of time on this#if anyone has any questions please feel free to DM me!!#i apologize if there are any spelling errors
227 notes
·
View notes
Note
not sure if you’ve answered this before, but what’s your process look like when you make an amv? i’m just curious and in constant awe of ppl who can make videos like you do :)


hello all!!! i have answered this before and i have a vid help tag with other asks i’ve gotten about stuff like this! but i’ve gotten several more messages along these lines so i’m just going to answer a bunch of them together (under a cut since i love to ramble about editing lol). i do just wanna say i’m definitely not the authority on video editing and obv everyone has their own techniques!
edit: i just finished typing all this up and it’s SO long so sorry in advance LMAO god bless anyone who reads this entire thing
so i work in news tv and we have a very specific workflow for writing scripts, sourcing video, producing, and editing. i’ve just applied that to making amvs! for every video i make, i copy the song lyrics into a google doc and adjust them to match the song i’ve cut (i often will trim songs for time and/or content purposes). then i start planning! i’ll mark down what clip i want to use for each lyric next to that line, and any sound bites i want to use (with episode numbers!). i’ll color code between video and sound bites and lyrics, so my scripts end up looking something like this (for my honeybee amv):

doing the planning ahead of time makes everything much easier when it’s a video that spans the whole show or involves a lot of sourcing, like honeybee or sports analogies. that way when i get to the actual editing process, i already know what i’m going to do and have a game plan. for videos like happy ending or believe it or not, where i’m mainly just pulling from a few episodes, i can just plan it in my head as opposed to writing it all down, and produce as i edit. obviously i do make in-the-moment decisions while editing—sometimes a shot doesn’t work the way i thought it would, or i go where the video takes me—but planning ahead definitely helps. i know some people use spreadsheets as well, with columns for lyrics, video clips, and sound bites if applicable. once you find a system that works, it actually goes pretty quickly.
as for sourcing clips themselves/finding clips within episodes, i talked about that here and kind of here. the short version is that transcripts are a must, and the supernatural wiki is hugely helpful by cataloguing all the hugs, prayers, phone calls, etc. in the show. gifmakers that tag episode numbers on their posts are your friends. it gets easier the more video you make—that’s another huge reason i make the google docs for each video (even the ones i plan in my head, i end up going back and making a loose script with episode notes just for reference). if i can’t remember where something is but i know i used it in another video, i can easily reference past scripts!
i also cut all my videos in the same project in premiere pro, so i can flip between them easily. instead of checking a past script, i can just go to the video sequence itself and copy the clip i’m looking for! this was especially helpful when i match cut together the 5x18 and 4x22 wall slam shots for my bestie video, and then stole it from myself for honeybee hahaha. at any given time i have at least 8 sequences open:

because of the sheer volume of videos i make, it’s worth it for me to download the entire show—i have all 327 episodes in HD, plus deleted scenes. if you think you’re only going to make a few videos, i’d start with scene packs. you can usually just google “destiel [or whatever ship/character you’re looking for] scene packs” and there will be any number of ones you can download. if you need other specific scenes, you can always download/torrent individual episodes or screen record netflix (that’s what i did before i got HD download links). i’m happy to share my links if you DM, but be warned it’s a lot of disk space (about 500GB on my hard drive). someone also compiled every destiel scene, downloadable here.
having every episode already loaded in premiere for all my projects also makes it a lot easier to source clips. once i use a clip in a video, i’ll put a marker on the episode file, so that after a while i have most of the important scenes/lines marked to easily find them. to give you an idea, this is my episode file in premiere for 12x10 lily sunder has some regrets (markers at destiel scenes, the car fight, hot girl cas, etc.). markers are the green tabs along the bottom:
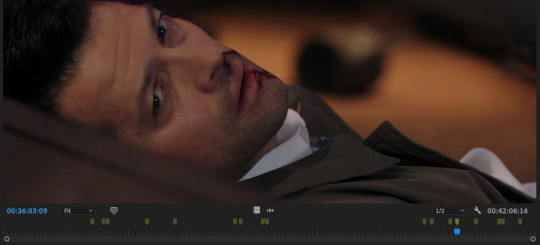
premiere also lets you color code and name markers, so ONE DAY i will go back and color code them all. the ones above are all the same color, but in a perfect world, i’d have a myraid—for destiel shots like hugs, touches, looks; for important pieces of dialogue; for action shots; etc. but for now this works ok for me, so that’s a project for another time!
between detailed scripts, one giant premiere project, markers, the wiki, and my own memory, i have so many points of reference that i can usually find any clip i need in about 2 minutes max. sound bites are often harder to start out, or tiny specific shots i haven’t used before, and that’s when i turn to tumblr gifsets or beloved mutuals to crowdsource. but if you’re as obsessive about marking/keeping neat scripts as i am, it gets easier and easier with every video you make. that’s part of why i’m able to cut videos together so quickly. (also i want to stress i do this for a living and have to produce/edit a new piece for my show every day so i’m used to it. and compared to constantly updating content/sources and news that changes every day, 327 highly documented episodes that never change are much easier to handle hahaha)
this is all great for me since i make so many videos and plan to continue doing so, but if you’re only making a few, this level of work isn’t worth it imo. really it’s all about developing a system that works for you. whatever you do with episodes/sourcing, though, i cannot recommend planning things out in a script ahead of time enough.
everything i just mentioned is producing, though. for the editing process, i usually do it in this order:
music first. any parts i want to cut, i make sure it all sounds smooth
then soundbites. i usually try to weave them into the lyrics—i have characters talk in breaks between lines or instrumental sections as much as possible. i’ll sometimes go so far as looped/extending an intsrumental part to make room for the soundbite i want there lol. if i do have dialogue over a line, i do the sound mixing/levels at this point as well to make sure everything is audible/one doesn’t overpower the other. (also i always include the video that goes with these bites when i drop them in, and decide later if i want to show the character speaking or have other clips cover the dialogue)
once i have all the audio locked in, then i bring in all my other video clips. sometimes i edit completely chronologically, sometimes jumping from section to section—it depends on the song or how i’m feeling
double check sound mixing. i usually listen to my videos through a few times, with headphones and without to make sure it’ll sound good no matter how people watch it
once i have picture and audio lock, i go through and color correct my clips. i’m basic and just use lumetri color in premiere, and usually just play with brightness, saturation, temperature, and tint until i like it
render and export! :)
i always have several audio tracks, but i try to keep my video tracks condensed. i’ll drop clips on a V2 level, and edit a section there, and drop the whole chunk down to V1 so i know it’s finished. that way when i leave and come back i can know where i left off/what’s done/etc. to give you an idea, this is the timeline for my what the hell video:

i always render as H.264 with high bitrate, and make sure to check “render at maximum depth” and “use maximum render quality” for the best quality. i’m sorry, but i don’t know what the equivalent options are in final cut, imovie, kdenlive, etc. i post on youtube mostly so i don’t have to sacrifice quality, but usually just using a lower bitrate will get you under the tumblr file size limit and it’ll still look good.
as for the anon who asked about “polishing”: first of all, thank you!! second of all, it’s in the details. all of this is a matter of taste and my own insanity, but here are some little things i always try to do:
after i color correct, i blur out any credits from the starts of episodes. i use gaussian blur for this, but really any blur tool works
as much as possible, i avoid clips where we see a character’s mouth move but don’t hear the words. in tv/film we call it “lip flap” and i just think it looks messy. also i’m trained to avoid it at all costs at work hahaha. it’s more for serious videos that this matters a lot to me (e.g. i think i did a really good job eliminating lip flap in my happy ending amv)—for comedy videos i don’t sweat it as much
i put audio fades on the start and end of every single audio clip i use, even if i don’t think i need it, to make sure everything sounds smooth
i use markers for timing, especially in action-y videos like what the hell. i’ll put a marker on the clip i’m using at the exact moment a punch lands, and in the song on the beat. if i have the magnet/snap in timeline tool on i can just easily snap them together instead of having to spend time finagling it
this is such a small thing but i dip/cut to black for a tiny bit at the start and end of every video. this way if i post with tumblr video player, there’s black between the loops, and it gives you a beat before the video restarts. i do this even on videos i post on youtube, just because i think it looks nicer/more professional
this is 1,500 words so i’m going to stop myself before i pull something. if you have follow-up questions feel free to ask and i’ll continue to add them to the vid help tag, but any more questions about sourcing clips or my process in general i’ll just link this post going forward. anyone who made it this far, i am sending to a telepathic kiss. thank you for reading and happy editing!
76 notes
·
View notes
Note
Hi! I think I remember you posting about "making" your own computer? I'm sorry to bother you with something like this, but was it difficult? Would you say you have to know a lot about how computers work to do it? Thanks!
Heck yeah!!! Oh man!! Gosh guys can I talk to you about building computers and how EVERYONE willing to do some basic googling is almost certainly capable of this I promise?
Welcome to:

Okay okay okay so let me spin you a li’l yarn: I was in optometry school in 2010-2011ish and I had been living up to now on prebuilts, mostly laptops, but DA2 was recently out and gosh darn it I wanted something I could play a proper game on. A friend of mine had a 10yo daughter who wanted to build a computer herself, and he told me if I’d buy the parts, he’d walk both of us through how to do it (what really happened was the 10yo built my first computer and I watched and brought drinks, so–no, I wouldn’t say you have to know a lot about how computers work to do it!).
The physical requirements are some basic manual dexterity & arm strength (you gotta be able to manipulate some tiny things and put some pressure on some connections) and you will most likely need to lift up to 15 pounds, although you can limit that if you go for smaller components. The ability to bend forward and twist and reach will also probably be necessary, although some careful planning can also likely mitigate that.
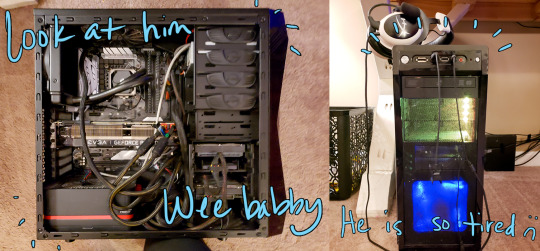
I think I have pictures of the actual build process somewhere, but regardless, it resulted in this bad boy that served me well for about nine years. I was shocked to see how easy it was to put together, honestly; if you can follow a Lego assembly book, you can put a computer together. With tools like PCPartPicker that have built-in compatibility checks to make sure all your pieces fit, it’s a piece of cake to put together a parts list that you can feel really good about. You just pick whether you want your motherboard to come with fancy lights or not (hint: rgb is unironically cool & i’ll fight anyone who says otherwise).
In the end, you’ll need a set of basic components. You’ll need:
A case to put all the pieces in
A motherboard, the circuit board of the computer that connects everything, basically the heart of the computer
A CPU, the brain of the computer that determines processing power, or basically how fast it can do math and direct traffic
a CPU cooling system, which can be either mechanical fans or liquid cooling, gotta keep that baby chill; may or may not come packaged with the CPU depending on what you get
A graphics card (aka GPU), the thing that makes video games look pretty (and what will probably be the single most expensive item in the build depending on how good you go)
RAM, a short-term memory processing component that comes in different amounts (4gb, 8gb, 16gb, 32gb, 64gb if you’re a madman) depending on how fast you need your short-term memory to work. Good RAM allows you to do things like open a bunch of Chrome tabs at once, run Photoshop at the same time you’re listening to youtube videos, or process the demand of loading up a host of enemies in Mass Effect. Most everyone these days can get by just fine with 16gb of RAM, which is what I have.
a hard drive (or the new, faster, more expensive version, a solid state drive) which functions as your long-term storage bins. This is where you save documents, images, and install your programs. These come in tons of sizes–the larger your files are, the more storage space you’ll want. I always put at least a terabyte of storage in my builds.
a power supply unit or PSU, which gives the electrical juice for everything to run
a monitor (the more hertz, the smoother the video will be - you’ll want either 60hz or 144hz depending on how much your number of frames-per-second matter to you)
a keyboard and mouse
speakers or headphones or both!
Optional addons:
RGB lighting for everything :O
an optical drive (aka something to put DVDs, Blurays, or other physical CD disks into)
fancy liquid cooling pipes
additional case fans; most cases come with adequate fans, but if you are using the computer in a room with poor ventilation or you find that certain components are running hot, you can install additional fans
coincidentally you can also get fans with RGB lighting too
cable extenders when you are going for a specific color scheme
So it can definitely all look overwhelming at first, but when you start to look at how everything is laid out, you’ll notice some trends. Look at these motherboards, for example.
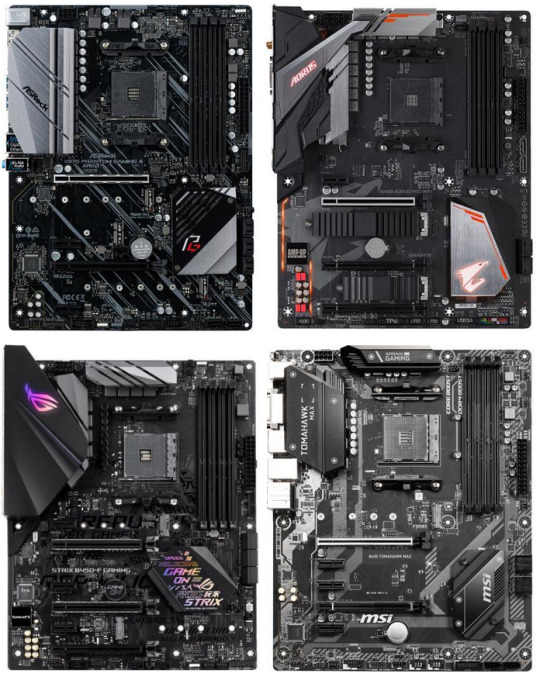
These are just four random motherboards I pulled off Newegg, a commonly used computer parts purchasing site. Sure, the colors are a bit different, but the layout between them…is all basically the same! Here, I’ll draw it out.
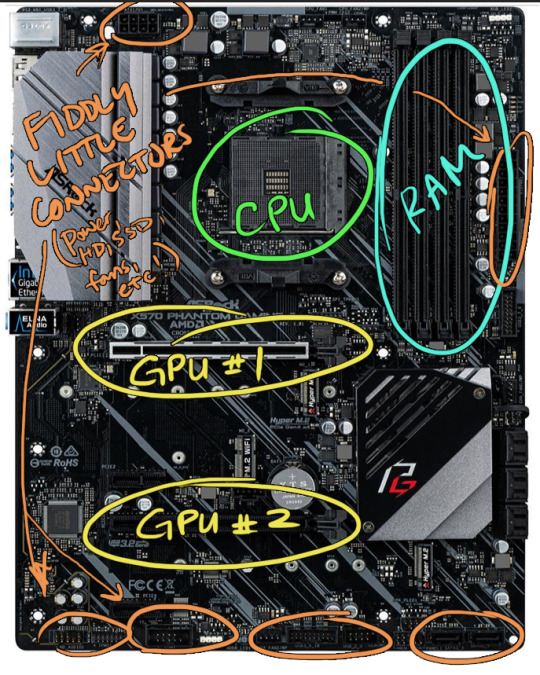
In just about every modern motherboard you buy, this will be the rough layout. Everything else is window dressing–what kind of GPU you get, what kind of CPU you get, whether your RAM lights up cool colors or not. Your motherboard will ALWAYS include a map that has extensive descriptions of what each connection does.
Much, much, much more under the jump!
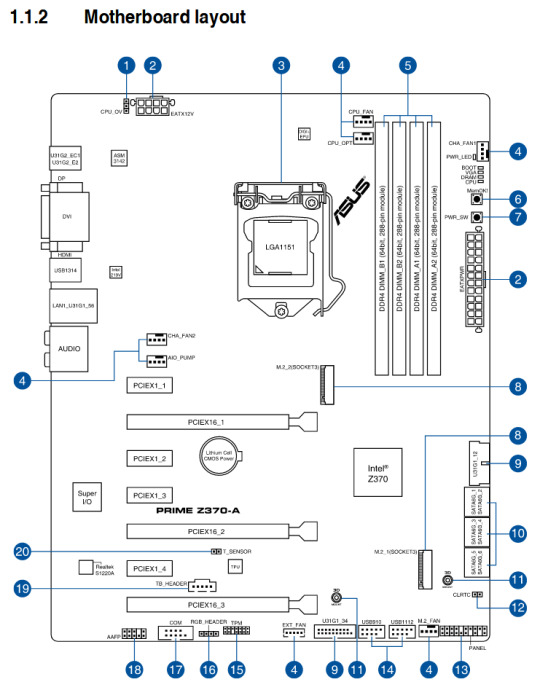
Most of these you won’t even need!
There are always some compatibility things to consider–as I mentioned, PCPartPicker can help you figure out a lot of these–but the biggest one to care about is the CPU. There are two major companies that make CPUs, AMD and Intel. They both have pros and cons on the chips they make, but right now, AMD makes a family of CPUs called Ryzen that both outperform and are cheaper than Intel’s current leading brands, the i7 and i9 lines. Intel was king of the hill for a long time, though, and their CPUs are still really good quality, so some people still go with them over the cheaper alternatives for now. (There are some reports of black screens with the new Ryzen lines, but as I’ve never owned one, I can’t personally speak to how common that is.)
Regardless, once you pick which family of CPUs you want to go with, AMD or Intel, you just have to pick an Intel-friendly or AMD-friendly motherboard. This is always specified in the description of the motherboard. I own the Asus z370 motherboard, so here’s what it says in the description for CPU:

Anyway, once you’ve picked all your parts and had everything shipped to you, it’s literally just a plug-n-play, step by step until everything’s plugged in. Your motherboard manual will also include recommended order of installations, too, and often how to install them.
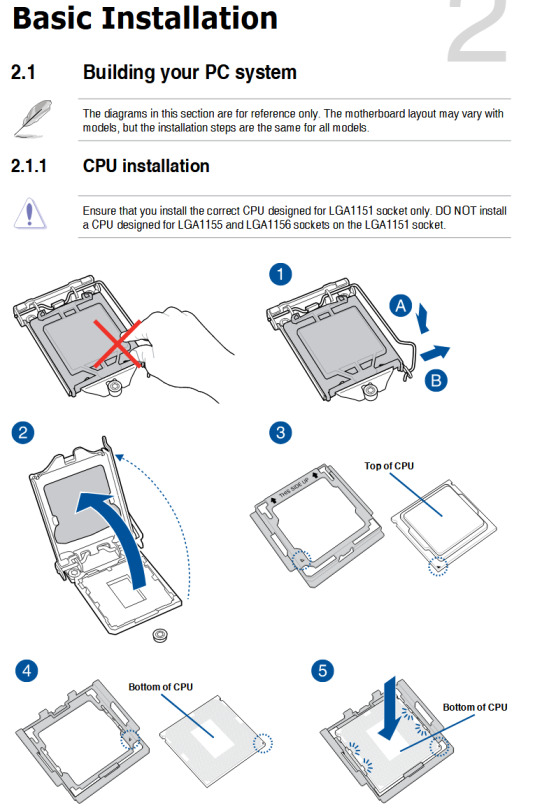
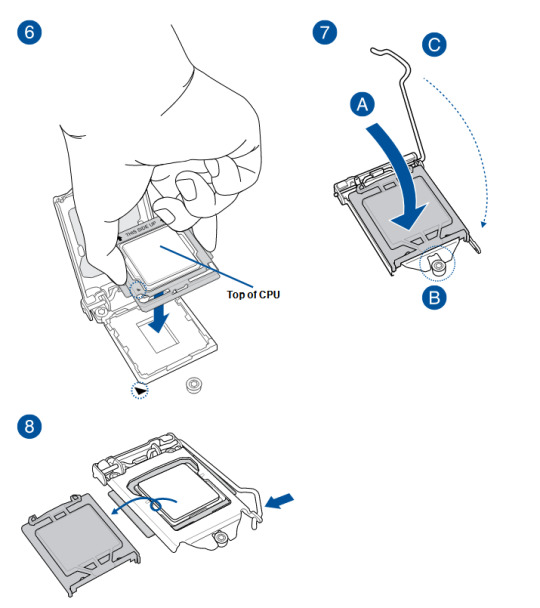
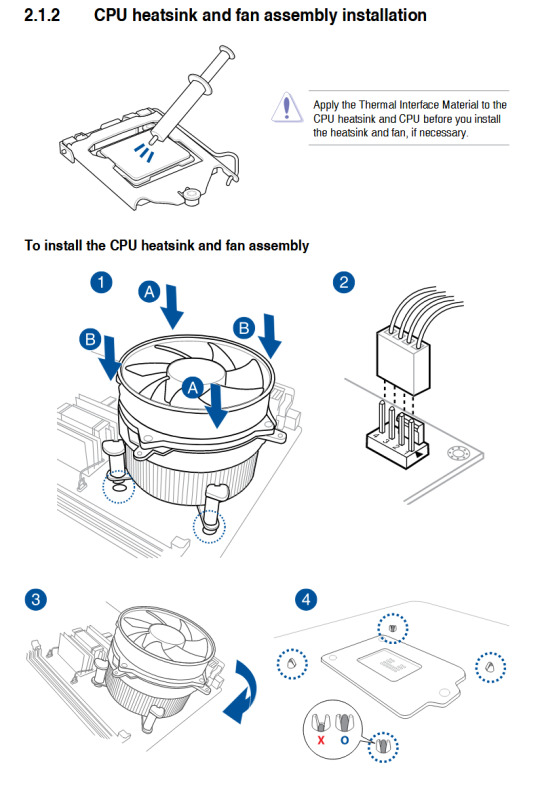
It helps to remember that the manufacturers of all these parts understand that they are expensive, and they really DON’T want to make them hard to install! Broken or difficult pieces during installation means that the customer is upset, and upset customers ask for refunds and lose brand loyalty.
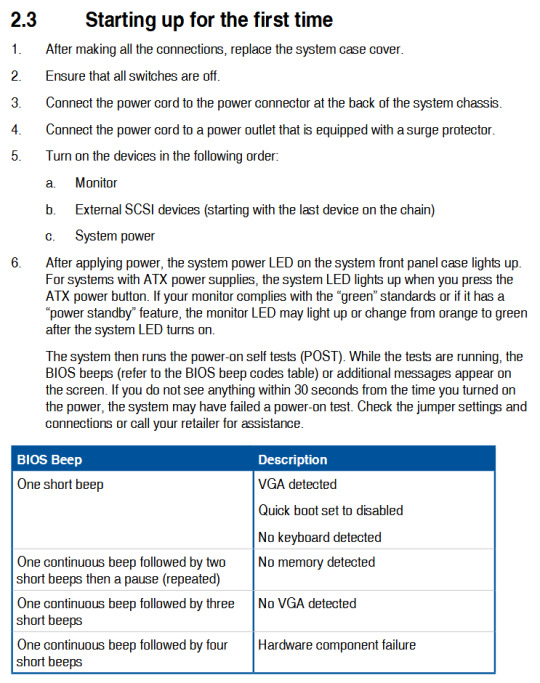
It also helps to understand that a lot of these connections are based on certain standards–I didn’t realize until I was rebuilding my current machine that these holes set for screws really do work with just about everything you get, as long as it’s the same generation, because motherboard manufactures WANT you to have the flexibility to go any attachment brand you like and still be able to use their board to mount them.
So, you pick your case and open it up, and you put the motherboard down on top of all the little screw holes until they match, and then you screw all the screws down firmly.
Old rig, partially disassembled:
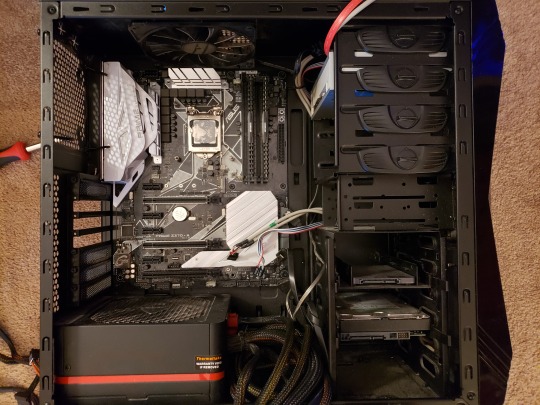
New, in approximately same state:
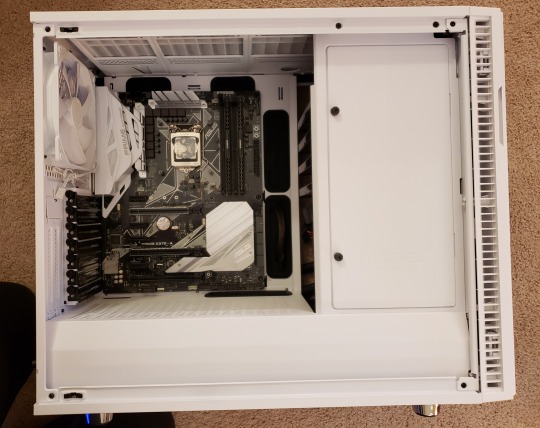
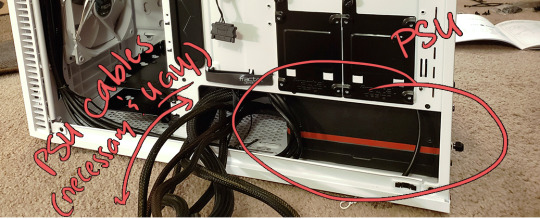
(One of the reasons I went with this larger white case than a smaller, slim case like my old one, is because this nicer case has what’s called “cable management;” that means there’s a built-in back area behind the motherboard where all my cables can be jammed without messing up the “aesthetic” of the glass window. My first build obviously did not have that, as seen in that first picture at the top of this post, so I had to just jam my cables wherever I could fit them so that the sides would close, haha.)
Anyway, you can see that the motherboard is just screwed in where it should be, and my CPU is already installed where it should be. I haven’t mounted the cooler for it yet because I needed to clean off the old thermal paste and install new thermal paste before doing so. My two sticks of RAM are also mounted in the top right in the motherboard’s recommended configuration & locations for two sticks (vs. one, vs. four).
Then, with the cooler in place, it looked like this:
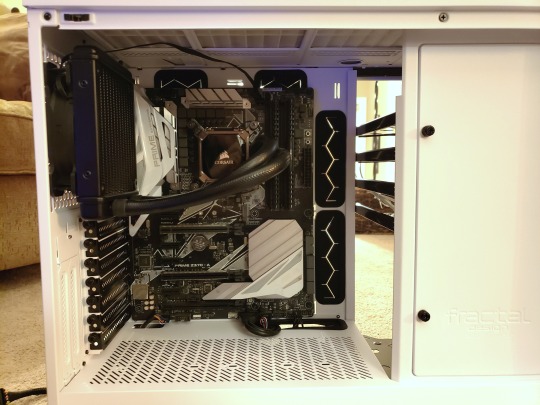
So the cooler I have is liquid cooling in a closed system (the thick black tubes running right to left) which is attached to a fan that mounts in place of the white fan on the left from the previous picture. It was as simple as unscrewing the old fan and putting the new one in its place. I think I even used the same screws. The fan is powered by that thin cable running along the top of the case that plugs into a little socket on the motherboard labeled “CPU Fan.” It was as simple as just finding the right plug; it doesn’t even have directionality, just a three-pin socket, so it doesn’t even matter which way you plug.
Already it’s looking like a proper computer! And because this case has cable management, I took a picture of what it currently looked like from the backside.
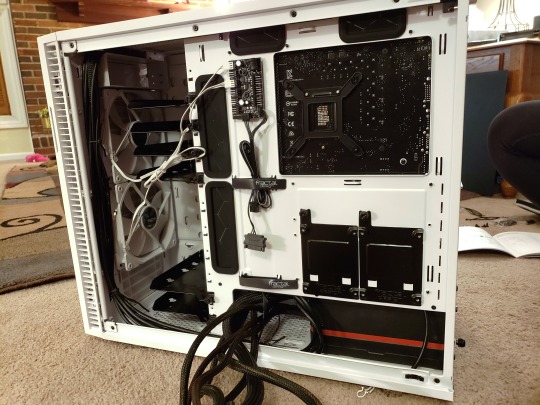
This case is cool because it has a neat set of connectors mounted on the back of this little hideaway to connect the case fans. I could have run the white fan cables through to the front of the motherboard for them to get power/marching orders, but it was cleaner aesthetically to attach them here in the back. Nothing wrong with connecting them on the front, though–that’s what I did in my original build!
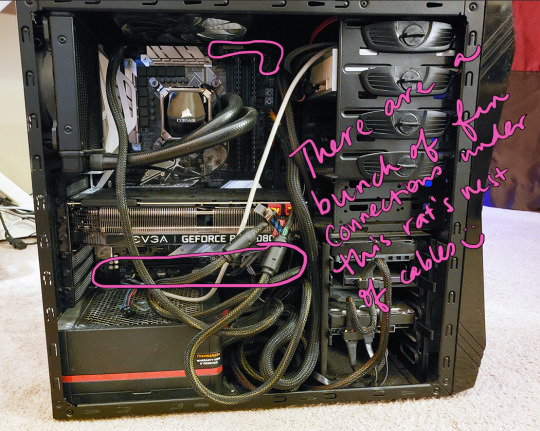
You also might have noticed I’ve mounted the PSU in that white case by now as well. It’s the large black and red box in the bottom corner, seen best from behind. The white case comes with what’s called a PSU shroud, which just means there’s a fancy white cover over it to keep the ~aesthetic~ when viewed from the front side.
The next step is to mount the graphics card!
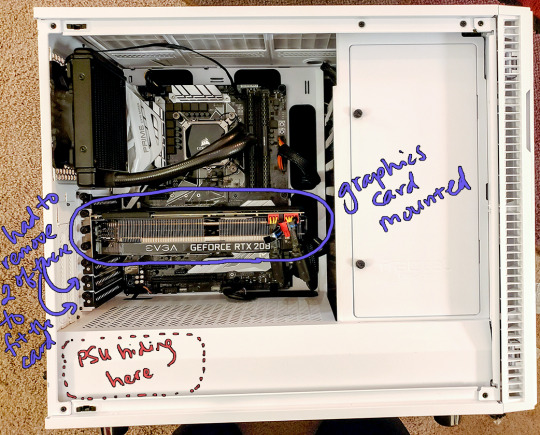
There’s instructions in your manual as to exactly how these mount, but it really and truly is just removing the dust cover brackets where you need to, and then a delicate plug & play, pushing that big guy in until you hear the click! (Click good, snap bad. Haha. I’ve changed out these cards several dozen times and never broken one, though!)
You can also see the ugly red-tipped cables plugged into the GPU and the motherboard, both on the right side. These come from the Power Supply Unit (they are all permanently connected in most brands, and look basically like a squid’s tentacles–once you have your items mounted onto the motherboard, you just look for the connector from the PSU with the right number of pins and plug it in!)
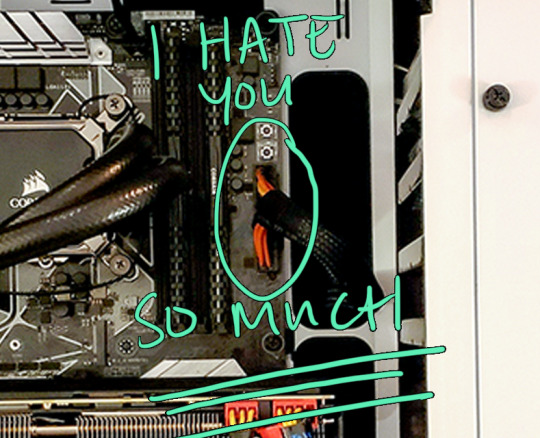
This guy is the worst. He is fat and hard to maneuver and always requires SO MUCH FORCE to click into this delicate bendy board and your heart will ALWAYS be in your throat as your fingers shake from how hard you’re having to push to sink it, and it will ALWAYS eventually go in but you’ll hate every second of the doing. I hate you, 24-pin EATX. I hate you so much.)
The next thing I did was mount my optical drive (because yes, I still own one), my hard drive, and my solid state drive.
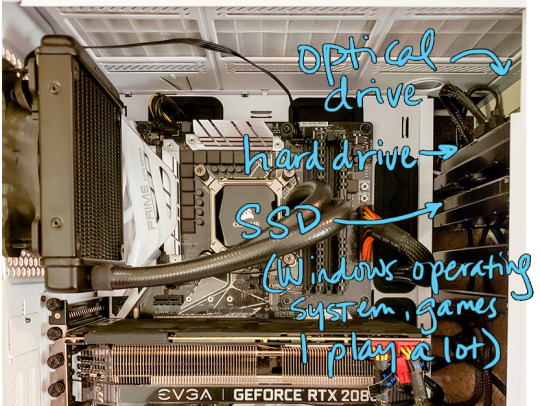
The hard drive and SSD both serve the same purpose (long-term data storage), but the SSD is much faster and uses newer technology. It’s also more expensive for the amount of storage you get, so I have a 256gb SSD that holds my operating system, my heavily-used programs like Firefox and Photoshop & Premiere, and one or two video games I play the most that I would like to load as fast as possible. This is the drive that can allow me to restart my whole system in less than five seconds.
The hard drive is 1.75 terabytes and holds everything else: fics, pictures, videos, music, other games, etc.They mount onto the racks with pre-drilled screws. The optical drive just slides into the socket snugly until it hits the back of the rack.
All of these use a standard connector called a SATA cable which runs between the back of the drive to a SATA socket on the motherboard. Most motherboards come with at LEAST six or seven of these connector slots, and some come with more. They look like this:
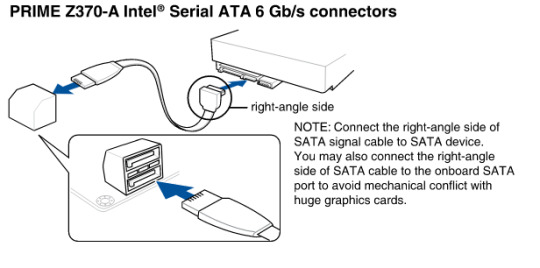
and are pretty universal. Any kind of extra storage or drive you want to add to your computer will probably connect with a SATA cable. I think my motherboard, my SSD & HD, and my case purchases all came with a pack of loose SATA cables of different lengths to be used for whatever I wanted.
The rack each drive is mounted to came installed with the case and pre-drilled with screw holes (and provided screws) for attaching either the HD or SSD in every slot. Because this case is all about aesthetic, it also comes with two vertical SSD mounts on the back of the case if you wanted to remove the right-side rack altogether, but as I mentioned, I have the optical drive, so I couldn’t go with that option.
So now we have all the major pieces mounted! The last set of connections are a collection of small fiddly pieces that all plug in roughly the same area and do things like light up the case’s LED, provide that startup beep, connect the USB sockets on the case’s front to power, etc. This is by far the section that takes me the longest because I guarantee I will ALWAYS plug at least two into the wrong socket and not have a beep, or my audio won’t work or something until I go back and reconnect them.

The next thing was to plug in my monitors and…see what happened when we hit the power button! (Monitor connections just plug directly into your graphics card in the back of the case.) And here’s what happened!
youtube
So it turned out when I was connecting my SSD (which has my OS on it), I was pushing on the little connector while sitting on the back side of the case. I thought I had the thing in the socket, but what I’d actually done was jam the connector just under the lip of the motherboard (that is, not connected to anything at all, just hanging in open space). Once I realized, though, it was an easy fix!
The last thing I wanted to do to complete the clean white look I wanted was to replace those UGHLY red PSU cables with what are called “cable extenders.” I bought some white ones on Amazon; because most PSUs’ cables are permanently attached at the box, you plug your cable extenders into the other end and then feed them through the case, so that’s the only portion visible. The ugly PSU cables are still there at the other end of the white cables, just hidden in the cable management area behind the motherboard.
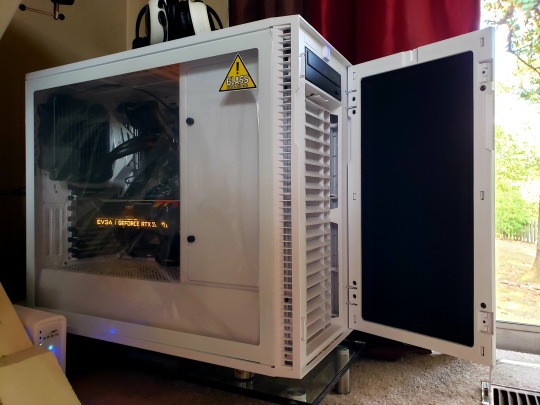
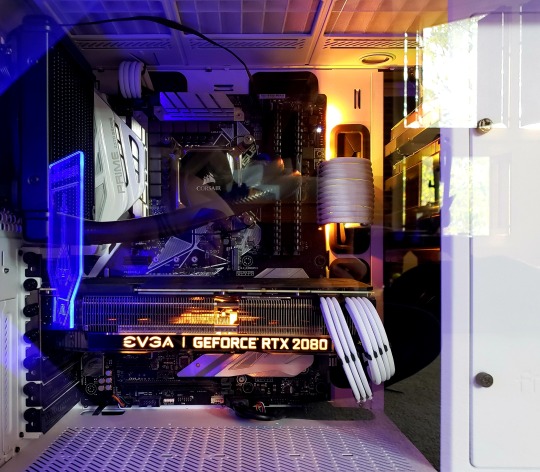
I spent some time fixing up the cables to curve exactly how I wanted them to, then picked my LED RGB colors and closed up the open side with the glass wall. All that was left was to plug in my mouse/keyboard/speakers/headphones/mic/webcam, etc., and we were done!
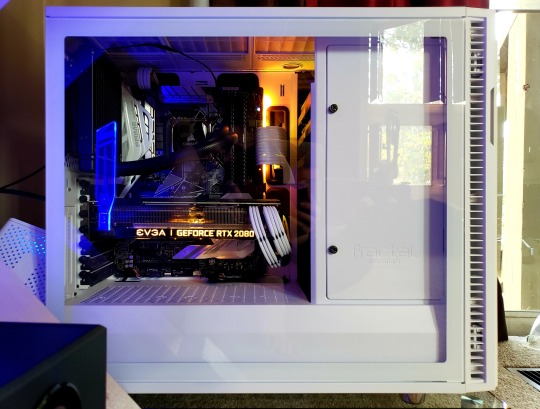
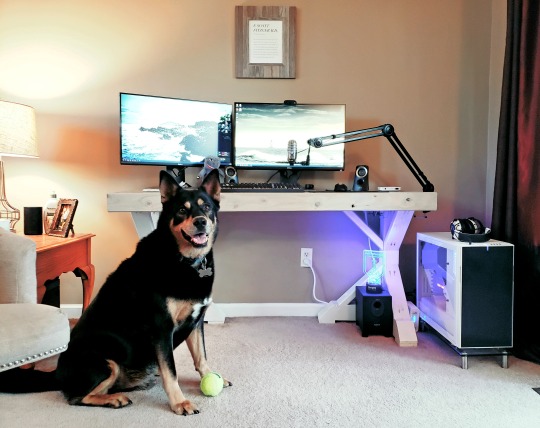
Ta-daaaa!
The first build I did, the one in the blue & black case, took us about two days due to some unexpected problems. First, we were trying to salvage an old CPU from my HP prebuilt to save a little money. Unfortunately, they used basically no thermal paste to connect it to its fan, and when we were trying to get the fan off, it actually tore the CPU out of its socket and bent a bunch of its pins. I ended up going to Best Buy or something and getting a replacement off the shelf.
The other issue I had was that I foolishly didn’t back up my files, and lost a bunch of them in the rebuild (including my Hawke’s original run through the DA2 game :( :( :( ) Always back up your files before ever going in and messing with your case!
Over the years I replaced a bunch of components in it, which is why it lasted me so long, but the transfer into the new case only took me about three hours, and that was with a bunch of breaks throughout. I probably could have done it faster if I hadn’t wanted to savor it, haha. The cable management for the backless desk took a lot longer, though! (…and a LOT of zip ties.)
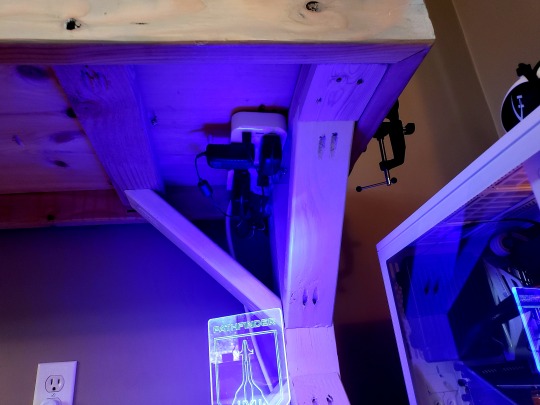
I do set my new build on a small glass stand (again, from Amazon) because Hamlet’s pretty sheddy and I wanted to keep airflow as good as possible. I’m limited on how many case fans I can install since I have the optical drive rack taking up a lot of space on the right, but I could install new fans on top if I wanted. My temperatures are great, though (I monitor with CoreTemp & GPUTemp, as well as my motherboard’s built-in temp monitoring software), so I don’t need to unless I decide I need more RGB.
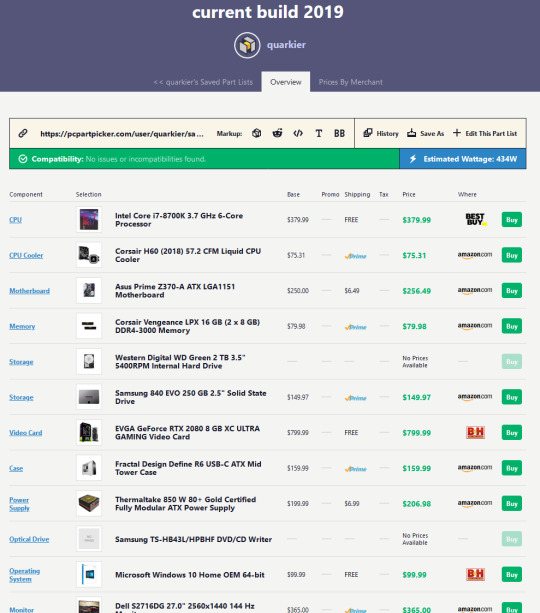
Anything I might want to add, I run through PCPartPicker to make sure it’ll fit what I already have. For example, my parts list looks like this (full view and complete parts list available at this link):
ANYWAY.
If you are patient, if you can fit small Lego-like pieces in labeled sockets, and you are a decent googler, you can build your own PC. It’s really, really hard to do serious damage to components nowadays, even if you plug something in wrong. There’s a bunch of resources, though, and I’d recommend the following places to start:
newegg.com - parts for sale, getcher parts here
pcpartpicker.com - put your list of components together, and it’ll flag any compatibility issues or known problems
https://www.reddit.com/r/buildapc/ - great starting point for new builders, tons of advice and how-to’s for every step of the process, and a decently responsive community to help troubleshoot any issues you might have
And I obviously love doing this kind of thing, so if there’s anything I can help with, I’m more than happy to try! Just let me know, and I hope this was helpful!
#anonymous#quark replies#quark's pc tag#long post for ts#very long post for ts#lots o videos and pictures for ts#a quest for fps
810 notes
·
View notes
Text
Core Components of HDFS
There are three components of HDFS:
1. NameNode
2. Secondary NameNode
3. DataNode
NameNode:
NameNode is the master node in the Apache Hadoop HDFS Architecture that maintains and manages the blocks present on the DataNode (slave node). NameNode is a very highly available server that manages the File System Namespace and controls access to files by clients. I will be discussing this High Availability feature of Apache Hadoop HDFS in my next blog. The HDFS architecture is built in such a way that the user data never resides on the NameNode. The data resides on DataNode only.
1. NameNode is the centerpiece of HDFS.
2. NameNode is also known as the Master.
3. NameNode only stores the metadata of HDFS – the directory tree of all files in the file system, and tracks the files across the cluster.
4. NameNode does not store the actual data or the data set. The data itself is actually stored in the DataNode.
5. NameNode knows the list of the blocks and its location for any given file in HDFS. With this information NameNode knows how to construct the file from blocks.
6. NameNode is so critical to HDFS and when the NameNode is down, HDFS/Hadoop cluster is inaccessible and considered down.
7. NameNode is a single point of failure in Hadoop cluster.
8. NameNode is usually configured with a lot of memory (RAM). Because the block locations are help in main memory.
Functions of NameNode:
It is the master daemon that maintains and manages the DataNode (slave node).
It records each change that takes place to the file system metadata. For example, if a file is deleted in HDFS, the NameNode will immediately record this in the EditLog.
It regularly receives a Heartbeat and a block report from all the DataNode in the cluster to ensure that the DataNode is live.
It keeps a record of all the blocks in HDFS and in which nodes these blocks are located.
The NameNode is also responsible to take care of the replication factor of all the blocks which we will discuss in detail later in this HDFS tutorial blog.
In case of the DataNode failure, the NameNode chooses new DataNode for new replicas, balance disk usage and manages the communication traffic to the DataNode.
It records the metadata of all the files stored in the cluster, e.g. The location of blocks stored, the size of the files, permissions, hierarchy, etc.
There are two files associated with the metadata:
FsImage: It contains the complete state of the file system namespace since the start of the NameNode.
EditLog: It contains all the recent modifications made to the file system with respect to the most recent FsImage.
Secondary NameNode:
Apart from these two daemons, there is a third daemon or a process called Secondary NameNode. The Secondary NameNode works concurrently with the primary NameNode as a helper daemon. And don’t be confused about the Secondary NameNode being a backup NameNode because it is not.

Functions of Secondary NameNode:
The Secondary NameNode is one which constantly reads all the file systems and metadata from the RAM of the NameNode and writes it into the hard disk or the file system.
It is responsible for combining the EditLog with FsImage from the NameNode.
It downloads the EditLog from the NameNode at regular intervals and applies to FsImage. The new FsImage is copied back to the NameNode, which is used whenever the NameNode is started the next time.
Hence, Secondary NameNode performs regular checkpoints in HDFS. Therefore, it is also called Check Point Node.
DataNode:
DataNode is the slave node in HDFS. Unlike NameNode, DataNode is a commodity hardware, that is, a non-expensive system which is not of high quality or high-availability. The DataNode is a block server that stores the data in the local file ext3 or ext4.
1. DataNode is responsible for storing the actual data in HDFS. 2. DataNode is also known as the Slave Node. 3. NameNode and DataNode are in constant communication. 4. When a DataNode starts up it announce itself to the NameNode along with the list of blocks it is responsible for. 5. When a DataNode is down, it does not affect the availability of data or the cluster. 6. NameNode will arrange for replication for the blocks managed by the DataNode that is not available. 7. DataNode is usually configured with a lot of hard disk space. Because the actual data is stored in the DataNode.
Functions of DataNode:
These are slave daemons or process which runs on each slave machine.
The actual data is stored on DataNode.
The DataNode perform the low-level read and write requests from the file system’s clients.
They send heartbeats to the NameNode periodically to report the overall health of HDFS, by default, this frequency is set to 3 seconds.
Till now, you must have realized that the NameNode is pretty much important to us. If it fails, we are doomed. But don’t worry, we will be talking about how Hadoop solved this single point of failure problem in the next Apache Hadoop HDFS Architecture blog. So, just relax for now and let’s take one step at a time.
#Check this out
0 notes
Text
My review of the XBOX Series X
So I’ve had nearly a full week with the XBOX Series X and here is my honest opinion on my experience with it and this is my initial review of it. I’m not gonna talk about the technology or go into anything about the console’s hardware too deeply. I will talk about the features and benefits it offers. Going into some things that work and don’t work as well as promised by Microsoft and XBOX. Finally, I will talk about all the bugs and issues that I experienced and found most annoying. Most of which have already been identified and reported.
First up, be aware that I am coming from an XBOX 360 as my last XBOX console experience so I may say stuff that applies to the XBOX One as well.
1. BACKWARDS COMPATIBILITY AND AUTO HDR: Microsoft promised that the XBOX Series X and S would work right out of the box with 1000’s of gaming titles across 4 generations. This promise holds up… However, they do not run anywhere half as well as they also promised they would. They do run better than their native platform, that is true. But it’s not a groundbreaking difference. And AUTO HDR doesn’t really work with most games that never had it to begin with. It makes the colours and textures look really odd and you don’t get that nostalgic feeling of playing an old legacy title because of the “updates”. Which is something I was very much looking forward to. It’s pick your poison I guess. You can either have a legacy game running better and looking greater on a platform that can take the graphical fidelity and framerate boosts, or have a full reunion with your beloved legacy games from your childhood. You can turn AUTO HDR off via the main console settings, but this still doesn’t really give you the latter. Not in my personal opinion anyway. It’s not disappointing as it’s not something I really expected. I just would have liked to have it. Nostalgia >>> Shiny any day.
2. QUICK RESUME AND LOADING TIMES: The XBOX Series X (can’t speak for the S) has significantly improved on speed thanks to the custom lightning fast and functional SSD. So much so that you can now travel between multiple games fully loaded up on the SSD within the time of a few seconds. However, quick resume is not only useful to be able to play between 3 or 4 games (more according to YouTube influencers who have tried and tested this out far more than me) in one sitting. You can also effectively use it to save your game. Or rather… Replace save states IN a game. What quick resume allows you to do is keep your game saved at ANY point, and completely SHUT the console down and UNPLUG it for several days (or longer, again, never tested it that far) and then PLUG it in and switch it ON again, and come back to exactly where you left off in the game. And I do mean EXACTLY WHERE YOU LEFT OFF!
For example; you could be in an all-important boss fight in ‘Assassin’s Creed: Valhalla’ and be so frustrated with not being able to beat this boss after trying many times. You could indeed just pause the game, come out to the dashboard, turn the console off and walk away from it all…. And when you came back to have another go at it, you would not have to restart the boss fight and just carry on with where you left off in chopping down their health. I did this several times because I suck at boss fights… And every time, this worked and it was the strategy that got me through them all. So a little cool off time is more than affordable with the XBOX Series X. And if you hate boss fights, suddenly you won’t hate boss fights as much anymore if you do the same. It makes a world of a difference to your experience. Believe me, quick resume is a literal life-saver.
To add to that, you also benefit from much quicker load times both with booting up the games and in-game fast-travelling or level-entering. Instead of 5 minutes waiting for a game to boot up into the main campaign or wherever,… It will take at most up to 50 seconds for the most power-taxing of games. 'Grand Theft Auto 5' for instance, known for it’s notoriously long boot into story or online mode… Now only takes 10 seconds from the company title advertisements to get into the area of the game you want to play. It is so fast that you do not have the time to read the tips and tricks dialogue that takes up the screen during the initial loading. It’s honestly a quality of life you never even knew you needed or was missing until you had it.
3. BUGS AND ISSUES: Being that I bought the XBOX Series X at Launch (November 10th), I very much expected it to come with a plethora of bugs and issues to discover and be witness to as a consumer and user of newly developed and released hardware and software. And these bugs and issues have already been identified and reported to Microsoft and the respective console and game developers. Bugs where you cannot play games that offer 4K at 120 hertz (4K/120fps) without visual and audial distortions or even without turning the game off altogether. I particularly had trouble with this in trying to play ‘Rise Of The Tomb Raider' 20 Year Celebration edition. Once I downloaded it from the XBOX Store fully, (which took a LONG FUCKING TIME, we’ll get on to that in a bit), I immediately tried to play it and because my display settings were set at 4K/120 because I have a TV that supports that setting, it was having all sorts of problems in booting up. There was all this distortion happening on screen both visually and audially that I thought my ultra high speed HDMI cable that came with the console was broken or faulty. I also remember specifically that it kept turning my Game Mode on and off rapidly and I didn’t know how to stop it avoiding a full reset of the console. This game was the worst for it but it also happened in other games I tried to play too. Including those I had as physical disks.
Speaking of… I did not encounter the “black/blank screen of death” issue other next-gen XBOX consumers and users did where you would enter a game disk and be met with a black or blank screen. BUT I did have trouble with downloading the “updates” for the games I had bought physically. I expected the games I downloaded digitally to take a long time to download fully, but I figured that it would be much quicker for the “updates” for physical games. This was not the case, and for some games, it actually took LONGER. I don’t know why this happens or if it can even be fixed in a firmware update, but it has put me off buying games physically for it, which is certainly not a good thing for store game retailers. And I’m someone who actually cares about that and would want to help them out as much as possible since they are a dying breed. But if it takes longer to download physical games than to download digital games, I’m not sure I can hold up that promise. The time it takes to download is a major frustration for me. I’ll be leaving my console on for long periods of time doing nothing but downloading that I otherwise wouldn’t. And I’ve got to say right now that I am glad I do not have an OLED TV where this would be much more of a problem due to burn-in risks. I would highly suggest anyone who is buying a new TV for their XBOX Series X or S with all the bells and whistles to not buy an OLED for this reason. Leaving an OLED TV on with a display picture that never moves for hours at a time would severely decrease it’s life and usage capacity. I recommend a Samsung QLED TV instead. That’s what I’ve got. I bought their Q95T 55inch 4K TV for gaming alone and it has not disappointed in the slightest. But I won’t go into why it’s the better TV to buy for next-gen gaming since this is not a TV review. You can look that up for yourselves at your leisure.
Another issue the XBOX Series X has is with its sharing image snapshots and video clips feature. The new controller for the console has a dedicated share button and that works really well. I’ve had no problems with it capturing the content that I want to share. But sharing to social media and to XBOX Live itself is the issue. And this happens with video clips more so than image snapshots. For some reason, when I go to share a video clip to Twitter, the load bar moves forward partly but then it immediately stops and gives me a black/blank screen. And sure enough, when I go to check my Twitter on my phone, it has not posted the video clip. And trying to share it to XBOX Live first and then share it to Twitter from my phone via the XBOX app doesn’t work either. The same issue applies here too. Black/blank screen when trying to share it to XBOX Live. Snapshot images also has this issue but every once in awhile it will allow you to share to both XBOX Live and social media (Twitter, Facebook, Instagram, Twitch ect…) whereas it will not allow you to share video clips at all. This is an issue Microsoft are aware of and are apparently fixing in a November firmware update at the end of the month. To what degree they fix it though is the real question because this feature is buggy as hell. So much for promoting and hyping up that dedicated share button on the controller, eh Phil Spencer and Co?
Well, that’s it. That’s been my experience with the XBOX Series X so far. Of course the pros of quick resume and loading times cut in half far outweigh the cons of faulty 4K resolution at 120 hertz gameplay and buggy sharing content features. I say do not let that put you off buying this fantastic piece of hardware because those bugs and issues can be fixed easily. The extremely long downloading for digital and physical games might not though and you might want to reconsider buying a next-gen XBOX console if you have an OLED TV. Or if you have the console already but not the TV to get the most advantages out of the console, consider buying a Samsung QLED instead. Thank you.
#xbox series x#microsoft#next-gen gaming#phil spencer#review#backwards compatibility#auto hdr#quick resume#loading times#bugs and issues#downloading#digital#physical#games
3 notes
·
View notes
Text
21_What should I look for when buying a security camera.1599625194
What Can I Look For When Buying a Security Camera? If Bằng giá camera 360 độ wifi are wondering just what things to check for when buying a security camera, you should begin by considering several matters. There's nothing more vital than the security of one's family and loved ones, and also having the finest in tech around at exactly the same time is very important too. One of the primary items you should look for when selecting a camera will be to make sure it's a backup battery also will turn the video off or on when you aren't utilizing the strategy. You want to be able to see the video even when you are far from your home or workplace. This feature ought to be contained with almost any camera you choose to get. It is also important to take in to account the simple fact the camera you choose needs to be simple to utilize. The easiest way to achieve so is to check at the amount of switches that are to the camera and be certain it is not confusing and overwhelming to utilize.
Still another thing to consider is how easy it is to set up and function as video surveillance technique. This is an important factor because you need a system that is easy to install, functions nicely, and does not want a professional setup. You will also wish to make sure there aren't any hidden costs, like an additional fee for service and installation, which you may have to pay for. You might also need to take into account the fact that top quality cameras are famous for providing clear and good quality videos. If you discover that the standard just isn't so good, you might wish to look at another camera version. Moreover, you might wish to consider additional features like high definition (HD) and nighttime vision. Obviously, the very last thing you want is to buy a top excellent camera and also realize that it can not work nicely with your computer or notebook. A few models have limited capabilities when it comes to running the machine and operating your computer and notebook computer. This is particularly crucial once you think about the very fact that your notebook and notebook might be used widely and you also want to see many videos at the same time.
youtube
One of those things you should look for when purchasing a security camera would be your ability to download an app that lets the user to examine the video and see what they're recording right onto the screen. Besides the video, there should still be a feature to obey the audio from the speaker of the unit. The last thing which you ought to look for when buying a security camera is the simplicity of installation. You wish to ensure the camera fits securely in place and also you can readily install it. Additionally, be sure to have the option to program a password so you will have the ability to observe your footage on your notebook or notebook when you are not using the camera. Probably one of the most important features to search for when purchasing a safety camera is the capability to record any activity without the usage of a tough drive. Most hard disks are not reliable enough to store considerable quantities of data, therefore it's very essential that the camera can record and never needing to do anything with the drive. Additionally, this is very helpful when the camera becomes lost, such as just in case of a storm, earthquake or some other disaster. Video recordings can be shared among relatives without having to share with the video with anyone. This is especially good for parents that want to show their children what is going on while they have been out of town. This really is among the best uses for a security camera and in addition, it provides a chance to get a parent to speak with their children while they are away. Finally, you need to consider the range of options you have if you are searching for a security camera. You are going to require to check out the types of cameras available, the range of recording periods, and also the kinds of recording formats available. Some cameras just allow one recording at any given time, but others allow more than 1 person to record video at exactly the same moment. You can even choose various settings for different people in regards to recording. For example, you might want to consider recording a video on a personal computer and then transferring into a CD that can be played on a regular CD player. There are many distinct choices and also you should consider most of them before buying a camera.
1 note
·
View note