#How to fix blemishes in Photoshop
Explore tagged Tumblr posts
Visit Tumblr Blog
Explore Tumblr blogs with no restrictions, modern design and the best experience.
Last Seen Tumblr Blogs


Fun Fact
Tumblr has been banned in Indonesia for providing people with access to pornographic content.
Text
Peter McKinnon did a video with a photographer named Garrett King. And he just went on a very long rant about lazy photographers who use Photoshop and "fixing it in post."
He continues... "You can't do that in film. You can't just make a bad decision and say "Oh, I'll fix it in post." (Not true. There was plenty of editing in dark rooms in the past. And now you can scan a film photo and literally manipulate it like a digital photo.) Fix it in post drives me nuts. That statement is so played out. It drives me nuts that people say that. Cuz dude, I don't work that way."
He also says that choosing film is the "hard path" and keeps talking about how lazy photographers who photoshop are.

I love film photography. I have an old Minolta that my mom gave me that I hope to restore and use someday.
But film photographers drive *me* nuts sometimes.
IT'S NOT A COMPETITION!
BOTH THINGS ARE COOL!
This idea that their way of making art is more valid or authentic than my way of making art is just a continuation of an old school mentality that really needs to die. There are still some photographers who will bully people because they use autofocus or aperture priority mode.
I actually think learning to be really good at Photoshop is much more challenging than learning to be good at photography. Sure, there are fields like photographic microscopy and product photography that require years to master, but I've been learning Photoshop for 20 years and I feel like I have barely scratched the surface of what is possible.
I have seen people with near 0 experience take an amazing picture.
I have seen people who barely know how their camera works take consistently good photos. It's the "using only power chords" version of photography.
But I have never seen someone with 0 experience photoshop something artistically impressive.
When people say "that looks Photoshopped" as if that is an insult, it really breaks my heart. Photoshop was a huge reason for my success. My ability to lay in bed and make funny things was essential to building my blog.

My post on Karl Taylor's Clinque photoshoot had so many comments saying his work "looked photoshopped" and it was a little frustrating.
Firstly because he actually sculpts with light and isn't actually very good at Photoshop. When he takes a picture, it pretty much looks like that from the start. The rest is just minor compositing work and blemish removal.
And secondly, because that kind of product photography predates Photoshop. Karl was doing this when Photoshop was just a baby.
In fact, still life photography was inspired by Dutch paintings of fruit and shit.
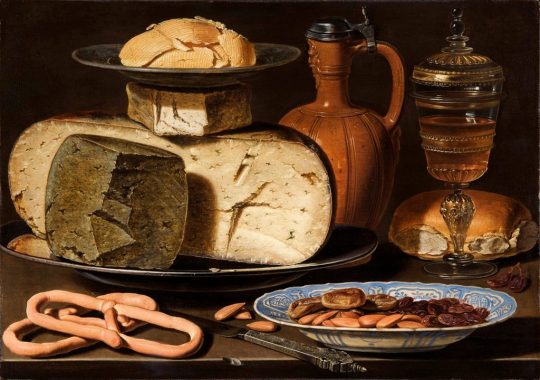
They were all, "I cannot stand sitting with another yappy model for days on end. I'm sick of people. I'm just going to paint *stuff* but with really amazing lighting."
But it is also frustrating because there is this mentality that digital tools are lesser. As if digital artists just press a few buttons and cheat-code their way into good images.
It's the same mentality people have about CGI. CG artists are the modern day sculpturists. They do the same thing as Michaelangelo or Rodin, just with different tools and in a different medium. Oh, but they also animate their sculptures in thousands of frames in multiple dynamic lighting environments all while maintaining photorealism.
To me, Thanos is just as artistically impressive as the statue of David or The Thinker.


Blair Bunting is a very talented photographer who mixes incredible photographic technique and lighting with his amazing photo manipulation skills.


And while these photos may not be as "authentic" as that film photographer's picture of a dude sitting on a truck...
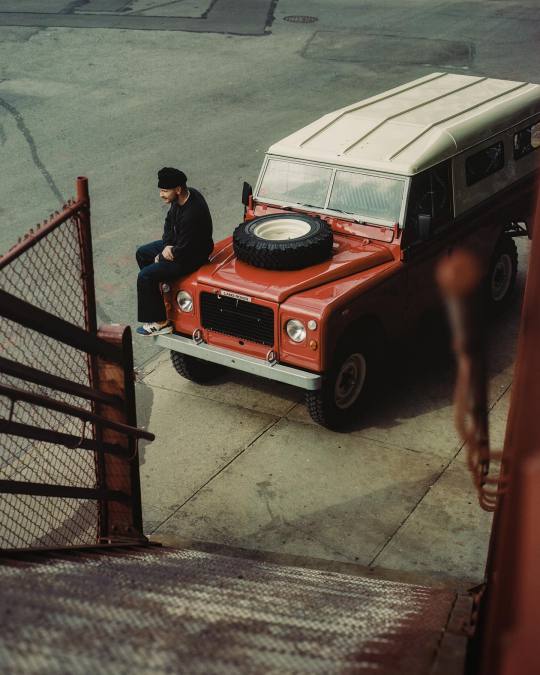
I can assure you no laziness was involved in Blair's process.
Also, I really didn't want to bring up disability. But it is really difficult for me to do the physical process of photography. Sometimes I do not have the energy to get the perfect "in camera" exposure. Sometimes I won't even check my settings and I will snap a picture knowing that I can make it cool with editing. I just look at the histogram, make sure the data I need is there, and do the rest on my computer.
During my adventure to photograph a bridge in Alton, I was only able to take 6 photos. Usually I will take hundreds in a session. My fatigue got the better of me and I nearly had to go to the hospital after walking up a hill. (I was having a bad day. I'm better now.) I didn't get the photos I wanted to get. And on the way down that hill, as I was out of breath, I pulled out my phone and tried to snap a pic of something cool I saw in front of me. The phone had been set 2 stops underexposed from a previous shot and so the picture was pretty much all in shadow. And because I was walking super slow, I had just missed the sun over the horizon.

But it's a RAW file. And I knew I could probably do something with it. I could "fix it in post." Not because I was being lazy. Mostly because I was trying not to hyperventilate. Apparently, my body can't handle slight inclines any longer.
And this is what I came up with.

I'm not saying this is an amazing photo. And it would have been really cool if I hadn't missed the sun. But this is what my eyes saw as I came down the hill and I was able to recreate that with digital tools.
I think that is pretty cool.
51 notes
·
View notes
Text
ARTH 102- Midterm
Why This Image: For my midterm, I decided to choose the photo of Madonna when she took another girl's photo and put her head on that girl's photo. I feel like a lot of the photo editing in this day in age is body altering. Whether it's smoothing out blemishes or giving your body curves in the right places, most of the time people are so fixated on changing their bodies. I thought Madonna's photo was interesting. Rather than "fixing" her body, she just photoshopped her head onto another person. She didn't take the time to make her curves more noticeable, but instead just picked a whole new body. Plus, I've seen so many photos from the Kardashians with their obvious photoshops, I wanted to focus on someone who isn't in public light about photoshopping as much. For my piece, I decided to recreate the body of both images, but just get rid of the face completely to show the reality of how we truly don't know who someone is through social media.
Photo Editing Impacts: Celebrities tend to make a "perfect" image for themselves that is setting an unattainable ideal for everyone, but particularly younger audiences. In this day in age, it's hard to see real people. People are put into this insecure lifestyle where everyone has to be a real-life barbie or ken doll. People have forgotten how everyone is born perfect in their own ways and have blurred the line between reality and "flawless" versions of themselves.
The Future of Photo Editing: I believe people of all kinds will continue to use all types of editing in their photos. AI will just keep getting better and soon, we won't be able to see the flaws in the photo editing, resulting in the unknown of who someone really is behind a screen. I do think however, overtime, more people have been desiring more authentic portrayals of themselves. Boundaries will continue to be pushed though until everyone gets sick and tired of the constant perfection.

3 notes
·
View notes
Text
The Biggest Photo Editing Mistakes and How to Fix Them
Common Photo Editing Mistakes in Adobe Photoshop
Common photo editing mistakes in Adobe Photoshop include over-retouching, which makes images look unnatural, excessive use of filters that reduce image quality, and poor background removal that leaves rough edges. Ignoring non-destructive editing techniques can also make it difficult to revert changes and maintain image quality.

If you want to learn more about common photo editing mistakes in Adobe Photoshop, visit our blog for expert insights and tips!
Image editing in Adobe Photoshop has become an essential aspect of today's digital marketing era. However, even professional retouchers can make mistakes. Whether you're new to editing or an experienced retoucher, avoiding common errors is crucial to maintaining the authenticity and appeal of your images. For flawless results, a jewelry retouching service ensures precision in refining details, enhancing brilliance, and preserving the natural beauty of jewelry pieces.
1. Over Processing
Photo editing is as enjoyable as photography itself for many people. With numerous features available in photo retouching services, it's easy to get carried away. Overuse of saturation, contrast, and HDR can make photos look unnatural, turning them into digital illustrations rather than realistic images.
To avoid this mistake, always consider natural colors and contrast while capturing the image. Enhancements should be subtle��aim for authenticity rather than artificial perfection. HDR can be a useful tool but requires skillful execution. Poorly done HDR can ruin a photo instead of enhancing it. If you're using HDR, ensure you take multiple exposures and blend them effectively to achieve a balanced and natural look.
2. Overusing Beauty Treatments
Images are often edited to enhance beauty, whether for fashion, advertising, or personal projects. Jewelry Retouching service and eCommerce photo editing service frequently include skin smoothing, teeth whitening, and eye enhancements. However, excessive use of these treatments can make subjects appear unrealistic.
For example, over-enhancing eyes can make a person look alien-like, and excessive skin smoothing can result in an unnatural, plastic-like texture. Instead, focus on minor refinements, such as removing temporary blemishes while preserving natural skin texture. A few imperfections add personality and realism to the photo.
3. Bad Background Removal
Background distractions can diminish an image’s impact, making Background removal service an essential part of professional editing. However, poorly done background removal can make an image look fake. Light, shadows, and textures must match to ensure seamless integration of a new background.
If you're using a green screen, background removal is easier. However, if you’re removing a background manually, take the time to refine edges carefully using clipping path service and image masking services. Poorly extracted backgrounds can make a photo appear artificial, which is why it's crucial to plan shots properly to minimize unnecessary editing later.
4. Relying on Post-Processing to Fix Shooting Mistakes
A common mistake, especially among beginners, is assuming that editing can fix poor photography. Even experienced photographers sometimes fall into this trap. Instead of focusing on getting the best possible shot during the shoot, they think, "I'll fix it in post-processing."
This approach limits growth and understanding of photography fundamentals. Common post-processing mistakes include selective coloring, which often results in tacky images, and artificial blurring to mimic a shallow depth of field. Instead of faking effects in photo retouching services, capture them naturally by using appropriate camera settings, such as a wider aperture for real background blur.
5. Not Knowing Your Tools
Lack of knowledge about editing software can lead to inefficiency and mistakes. Whether using eCommerce photo editing service tools like Adobe Photoshop or Lightroom, understanding the features and settings is crucial.
Beginners often stick to one feature they recently discovered and overuse it on every image. Instead, continue learning and experimenting with different tools and techniques. Online courses, tutorials, and practice sessions can significantly improve editing skills and help create more refined images.
6. Explore, Learn, and Stay Reasonable
The best way to improve is through continuous learning and experimentation. Every mistake is an opportunity for growth. Use resources like online tutorials, video guides, and professional courses to expand your knowledge in image masking services and clipping path service.
Conclusion
Editing should enhance an image, not overpower it. By avoiding over-processing, excessive beauty treatments, bad background removal, over-reliance on editing, and poor knowledge of tools, you can create high-quality, natural-looking images. Whether working on Jewelry Retouching service, eCommerce photo editing service, or Professional photo retouching, the goal is to maintain realism and visual appeal.
If you're looking for expert editing services, consider our free trial to experience professional-quality photo retouching services firsthand.
1 note
·
View note
Text
Manual Product Photo Retouching: A Complete Guide
Product photography retouching is essential for e-commerce, advertising, and branding. Unlike portrait retouching, product retouching focuses on precision, consistency, and realism to make items look flawless while keeping them true to life.
Key Steps in Manual Product Retouching
1. Basic Adjustments (Lightroom/Camera Raw)
White Balance – Ensure colors match the product (use a gray card if possible).
Exposure & Contrast – Balance highlights/shadows without losing detail.
Lens Corrections – Fix distortion, chromatic aberration, and vignetting.
2. Cleanup (Photoshop - Spot Healing & Clone Stamp)
Remove dust, scratches, fingerprints, and imperfections.
Use Spot Healing Brush (for small blemishes).
Clone Stamp Tool (for textured surfaces like fabric or wood).
3. Edge & Shape Refinement (Pen Tool + Masking)
Sharpen edges for a crisp look (especially for jewelry, electronics).
Use the Pen Tool to create precise selections for masking.
Fix distortions (e.g., straightening a crooked label).
4. Color Correction & Uniformity
Use Hue/Saturation and Selective Color to match brand colors.
Sample colors from the product to ensure consistency.
Fix uneven lighting (e.g., gradients on white backgrounds).
5. Shadow & Reflection Enhancement
Natural Shadows – Use Drop Shadow (Layer Style) or manually paint shadows.
Reflections – Add subtle reflections for glass/metal products.
Cutout Products – Place on pure white (#FFFFFF) for Amazon/e-commerce.
6. Final Sharpening & Output
Smart Sharpen (Filter > Sharpen > Smart Sharpen) for web use.
Save for Web (Export as JPEG/PNG with optimized file size).
Essential Tools in Photoshop
✔ Pen Tool (Precise selections) ✔ Clone Stamp & Healing Brush (Blemish removal) ✔ Curves & Levels (Contrast & brightness adjustments) ✔ Layer Masks (Non-destructive editing) ✔ Dodge & Burn (Enhancing textures)
Pro Retouching Tips
✅ Shoot on a Clean Background – Saves hours of clipping. ✅ Use a Polarizing Filter – Reduces glare on reflective surfaces. ✅ Keep Textures Realistic – Don’t over-smooth (e.g., leather, fabric). ✅ Batch Process Similar Products – Use Actions in Photoshop. ✅ Compare Before & After – Ensure the product still looks natural.
Career Opportunities in Product Retouching
E-commerce Retoucher (Amazon, Shopify brands)
Advertising Agencies (High-end product campaigns)
Freelance Retouching (Upwork, Fiverr, PicsRetouch)
In-House for Brands (Fashion, cosmetics, electronics)
Earnings:
Beginner: $15–$30/hour
Professional: $50–$150/hour (luxury brands, high-end retouching)
How to Get Started?
Practice on Free Stock Images (Unsplash, Pexels).
Watch Tutorials (Phlearn, Piximperfect on YouTube).
Offer Free/Cheap Retouching to build a portfolio.
Apply for Jobs (Upwork, LinkedIn, Behance).
0 notes
Text
Professional Portrait Retouching Services by ColourCubz
In today’s world, high-quality portraits are essential for personal branding, professional profiles, weddings, fashion shoots, and family memories. However, even the best photos can have imperfections such as blemishes, uneven skin tone, stray hairs, or unwanted background distractions. That’s where professional portrait retouching comes in.
At ColourCubz, we offer expert portrait retouching services that enhance the natural beauty of every subject while maintaining authenticity. Our experienced editors use advanced digital tools to carefully improve your images and deliver polished, professional results.
What is Portrait Retouching?
Portrait retouching involves digitally improving images by removing imperfections, correcting colors, adjusting lighting, and refining details. Unlike heavy photo manipulation, our approach focuses on subtle enhancements to preserve the original look and personality of the subject.
From smoothing skin and brightening eyes to fixing hair and improving backgrounds, our retouching services help create flawless, eye-catching portraits suitable for any purpose.
Our Portrait Retouching Services
We cater to a wide range of portrait types and requirements, including:
Wedding Portraits: Enhance bridal portraits by removing blemishes, softening skin, and adding subtle glow to highlight the moment’s beauty.
Pregnancy Portraits: Refine maternity images with gentle skin smoothing and color adjustments to create memorable, radiant photos.
Black & White Portraits: Restore or enhance monochrome photos by balancing contrast and tones for striking effects.
Baby and Children Portraits: Adjust lighting and color to capture the innocence and charm of your little ones.
Fashion Portraits: Perfect skin tones, remove distractions, and emphasize features for high-end fashion images.
Family Portraits: Retouch group photos with consistent color correction and background refinement for a polished finish.
Corporate and Headshots: Create professional, approachable images by improving lighting, removing minor imperfections, and enhancing clarity.
Our Retouching Process
Photo Submission: Upload your images securely through our platform.
Initial Assessment: Our experts analyze your photos to understand retouching needs and desired outcomes.
Professional Editing: Using industry-leading software like Adobe Photoshop, we carefully retouch every detail including skin, eyes, hair, and background.
Quality Check: Each image undergoes thorough review to ensure the highest standards.
Delivery: Receive your retouched photos in the preferred format, usually within 24 to 48 hours.
Why Choose ColourCubz?
Experienced Team: Our editors have over 10 years of experience in portrait retouching and photo enhancement.
Natural Results: We focus on realistic retouching that enhances without overdoing.
Fast Turnaround: Most projects are completed within 24 hours to meet your deadlines.
Affordable Pricing: Flexible packages suit individual needs and budgets.
Secure and Confidential: Your photos are handled with the utmost privacy and security.
Customer Satisfaction: Unlimited revisions until you’re happy with the results.
Pricing Packages
We offer clear and competitive pricing tailored to your specific requirements:
Basic Package ($0.50 per image): Minor blemish removal, color correction, brightness and contrast adjustment.
Standard Package ($1.00 per image): Advanced skin smoothing, background cleanup, eye brightening, and hair correction.
Premium Package ($3.00 per image): Full professional retouching including body contouring, digital makeup, advanced background changes, and creative effects.
Custom quotes are available for large projects or specialized retouching needs.
How to Get Started
Ready to transform your portraits into stunning, professional-quality images? Visit ColourCubz Portrait Retouching Services and upload your photos securely. Our team will handle the rest and deliver retouched photos that exceed your expectations.
0 notes
Text

10 Easy Photoshop Tips for Beginners to Edit Like an Expert
Adobe Photoshop is one of the most powerful tools available for digital artists, photographers, and designers. But when you open it for the first time, it can be overwhelming. With so many tools, panels, and features, where should a beginner even begin? Fortunately, you don’t need to know everything at once. By mastering just a few core techniques, you can significantly improve your editing skills and grow more comfortable using the software. In this post, we’ll share 10 easy Photoshop tips that will help beginners get started the right way.
1. Learn to Work with Layers
Layers are the foundation of Photoshop. Every image you edit should involve layers so that you can work on different elements independently. This means you can apply changes, add effects, or move objects without affecting the rest of the design. For instance, you can keep the background on one layer and a subject on another, making it easier to isolate and edit either element. Always name your layers for clarity and group related layers together. Mastering layers early will give you much more control over your edits.
2. Use Adjustment Layers Instead of Direct Edits
One of the best habits to adopt as a beginner is non-destructive editing. Instead of applying changes directly to the image, use adjustment layers for things like brightness, contrast, hue/saturation, or levels. Adjustment layers sit on top of your image, and you can modify or delete them at any time without harming the original image. It’s a safer and more flexible way to experiment with edits.
3. Improve Your Composition with the Crop Tool
Cropping isn’t just about cutting out parts of an image, it’s also a powerful composition tool. Using the crop tool, you can reframe your image to draw more attention to the subject, remove unnecessary space, or follow visual rules like the Rule of Thirds. The crop tool helps create balance and improves the overall visual impact of your photo.
4. Get Comfortable with Keyboard Shortcuts
Photoshop has hundreds of tools and functions, and constantly clicking through menus can slow you down. Learning keyboard shortcuts can dramatically improve your speed and efficiency. For example, ‘Ctrl+Z’ undoes your last action, ‘Ctrl+T’ enables free transform, and pressing ‘B’ selects the brush tool. Even learning just a few shortcuts will save time and make your workflow smoother.
5. Use the Clone Stamp Tool for Precise Retouching
The Clone Stamp Tool is incredibly useful for duplicating or removing parts of an image. It allows you to sample one area of an image and paint that sample over another area. This is especially handy for removing blemishes, dust, or objects from photos. The key is to sample from a nearby, similar area for the most natural results.
6. Play Around with Blending Modes
Blending modes let you change how layers interact with each other, and they can add depth, texture, or drama to your work. Try setting a text layer to "Overlay" or a duplicate image layer to "Multiply" to see how the result changes. Blending modes are creative tools that give your images a unique touch.
7. Heal with the Healing Brush Tool
While the Clone Stamp Tool copies pixels exactly, the Healing Brush Tool blends them more naturally with the surrounding area. It’s a fantastic tool for touching up skin, removing small objects, or fixing minor imperfections without obvious signs of editing. It blends tone and texture for seamless results.
8. Save Your Work Regularly
Photoshop is powerful, but it’s also memory-intensive, which means it can occasionally crash. To avoid losing progress, save your work regularly by pressing ‘Ctrl+S’ (or ‘Cmd+S’ on Mac). You can also use "Save As" to create multiple versions of your project as it evolves.
9. Customize Your Workspace to Fit Your Needs
Photoshop allows you to customize your layout, so you can create a workspace that suits your editing style. You can rearrange panels, open specific tools, and even save your custom workspace for future sessions. Having a familiar layout improves comfort and efficiency, especially as you begin using Photoshop more often.
10. Always Use Non-Destructive Editing Methods
Finally, one of the most important tips is to avoid editing your original image directly. Always duplicate your layers or use layer masks when making changes. This non-destructive method keeps your original content safe and allows you to make adjustments at any point in the process without starting over.
Conclusion
Photoshop is a deep and powerful program, but you don’t need to master everything at once. By focusing on these 10 beginner-friendly tips, you can start creating better edits and gain confidence with the tools Photoshop offers. Keep practicing, be patient with yourself, and don’t be afraid to experiment, that’s how real progress begins.
#Photoshop tips#Photoshop for beginners#Easy Photoshop tutorials#Photoshop editing tips#Beginner Photoshop guide
0 notes
Text
What is Cleanup Picture and How It Can Enhance Your Photos
In the world of digital photography, the quality of your images plays a crucial role in how your brand or personal project is perceived. Whether you’re showcasing products on an e-commerce site, curating your social media feed, or restoring a treasured family photo, having polished, high-quality visuals is essential. But let’s face it: not every photo is perfect straight out of the camera. This is where tools like Cleanup Picture come into play.
Cleanup Picture is an innovative photo editing tool designed to enhance and restore photos effortlessly. In this blog, we will dive into what Cleanup Picture is, how it works, and how it can help you transform your photos into stunning, professional-quality images with minimal effort.
What is Cleanup Picture?
Cleanup Picture is an intuitive, user-friendly photo editing tool that allows you to clean up and enhance your images by removing unwanted elements, restoring details, and improving overall image quality. It is designed to help photographers, e-commerce businesses, social media influencers, and casual users alike achieve professional-grade photos without the need for extensive photo editing knowledge.
At its core, Cleanup Picture uses advanced algorithms to automatically detect imperfections such as background clutter, unwanted objects, and image noise. Whether you’re a beginner or a seasoned professional, Cleanup Picture simplifies the photo enhancement process, making it accessible for everyone.
The Benefits of Using Cleanup Picture
1. Saves Time
Time is a valuable resource, especially when you have a large number of photos that need editing. Cleanup Picture offers an efficient way to clean up your images, saving you hours of manual editing. Instead of spending time carefully erasing blemishes or removing distracting elements by hand, Cleanup Picture allows you to make quick adjustments with just a few clicks. This is particularly beneficial for businesses or individuals who need to process multiple images in a short time.
2. Improves Image Quality
One of the most significant benefits of Cleanup Picture is its ability to enhance your images’ overall quality. Whether your photo suffers from low resolution, noise, or poor lighting, Cleanup Picture can help fix these issues. By reducing noise, sharpening details, and adjusting contrast and brightness, it transforms your image into a cleaner, sharper, and more appealing visual.
3. Simple and User-Friendly
Not everyone is a Photoshop expert, and many people shy away from photo editing because it seems too complicated. Cleanup Picture removes the complexity, making it accessible to everyone. Its simple interface means that even a beginner can start improving their photos right away. There’s no need to spend hours learning intricate editing techniques—just upload your photo, choose the areas you want to clean up, and let Cleanup Picture do the rest.
How Cleanup Picture Enhances Your Photos
1. Removing Unwanted Elements
One of the most powerful features of Cleanup Picture is its ability to remove unwanted objects or distractions from your photos. Whether it’s a random object in the background, a stray hair in a portrait, or a blemish on a product shot, Cleanup Picture can automatically identify and remove these imperfections. This is especially useful in e-commerce, where the focus should be entirely on the product. A clean, distraction-free image makes the product stand out and creates a more professional presentation.
For example, if you’re selling jewelry and there’s a distracting background, Cleanup Picture can remove the clutter, leaving only the item in focus. This ensures that your customers’ attention is solely on what matters most—the product.
2. Restoring Image Details
Not all photos are perfect from the start. Many images may have blurriness or lost details due to camera limitations or poor lighting conditions. Cleanup Picture has the capability to restore lost details, bringing clarity and sharpness back to your photos. Whether it’s enhancing the texture of fabric or bringing out the fine details in a product shot, Cleanup Picture can work wonders on improving your images’ definition.
For example, if you have an old, blurry photograph, Cleanup Picture can improve its quality by sharpening the edges and increasing clarity. This feature is a game-changer for those working with older images or less-than-ideal conditions.
3. Improving Composition
Even when you have a great photo, sometimes the composition needs a little tweaking. Cleanup Picture allows you to refine the composition of your image, ensuring that your subject is perfectly centered, or removing unnecessary elements that may be detracting from the overall look. Whether you’re adjusting the focus, straightening a tilted image, or cropping to remove distractions, Cleanup Picture gives you the flexibility to create the perfect composition.
In product photography, for instance, proper composition is key to making the product look its best. Cleanup Picture helps center the subject and make sure it’s perfectly aligned, ensuring that the product is the focal point.
4. Noise Reduction and Sharpening
Digital noise—grainy or pixelated spots that appear in photos, particularly in low light—can ruin an otherwise good picture. Cleanup Picture has noise reduction tools that can smooth out these rough spots, making your images appear cleaner and more professional. In addition, the tool’s sharpening features help enhance the crispness of your photos, ensuring that every detail is clear and sharp.
Whether you’re taking photos with your smartphone or a professional camera, Cleanup Picture can help eliminate noise, making your images look high-quality and polished.
Use Cases for Cleanup Picture
1. E-Commerce Photography
In the e-commerce world, high-quality images are essential to making sales. The better your product images, the more likely customers are to trust your brand and make a purchase. Cleanup Picture can help you create sharp, professional product photos that highlight the features and quality of your items. By removing background distractions and enhancing image details, you ensure that your products are presented in the best light possible, helping to increase conversions.
2. Social Media Enhancement
For those using social media to promote their brand or personal projects, Cleanup Picture can help you create visually appealing posts. Whether you’re posting lifestyle shots, portraits, or promotional images, using Cleanup Picture can take your content to the next level. Clean and polished images are more likely to get shared and engaged with, helping you grow your online presence.
3. Real Estate Photography
In the real estate industry, high-quality photos are a must to attract potential buyers. Cleanup Picture can help real estate photographers enhance property images by improving lighting, eliminating distractions, and sharpening key details. Whether it’s a cluttered room or an outdoor shot with poor lighting, Cleanup Picture can clean up the image and make properties look more inviting.
4. Personal Projects and Photo Restoration
Cleanup Picture isn’t just for businesses. It’s also perfect for personal photo projects. Whether you’re restoring old family photos, curating a photo album, or simply cleaning up personal shots, Cleanup Picture can help. It can bring faded, blurry images back to life and make them look fresh and crisp again.
Conclusion
Cleanup Picture is a powerful tool that can transform your photos with minimal effort. Whether you’re cleaning up product images for your online store, enhancing social media photos, or restoring vintage photos, Cleanup Picture makes it easy to achieve professional-quality results. With its time-saving features, user-friendly interface, and powerful editing capabilities, it’s a game-changer for anyone looking to improve their photos.
So, if you want to elevate your visual content and create stunning, polished photos, give Cleanup Picture a try. Your photos—and your audience—will thank you!
0 notes
Text
How to edit out the junk in your vacation/ expat tour photos.
Well hello again, my friend! Are you planning your next vacation? Looking to escape the hustle and bustle of dystopian American society? Do you and your suburban capitalist family want to detach from the world by visiting a foreign country's White Lotus resort that is also affected by your capitalist gain? PERFECT! Today I'll be showing you how to edit and perfect your photos to remove blemishes, print marks, and even those pesky tourists who stand in the way of your vacation glam shot! Starting with this old photo below.

Our first step is going to be opening our image in Photoshop and evaluating our image. What issues can you notice with this image? I noticed the photo must've been placed on a scanner and it's sitting a little crooked, like J. Cole's smile. I see the kid on the right (for all intents and purposes, we'll assume this kid isn't a member of the family and NEEDS to be removed immediately) who was on the bridge next to this blonde family. I also notice we have a little print mark in the photo in the center left.
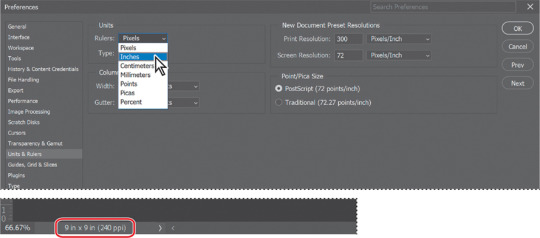
We're gonna remove those pesky imperfections and to start we'll set up our rulers so the photo can be edited correctly. To do this you can double-click on the rulers in the photo, as this will open preferences where we'll set up our rulers to be by inches and not pixels.
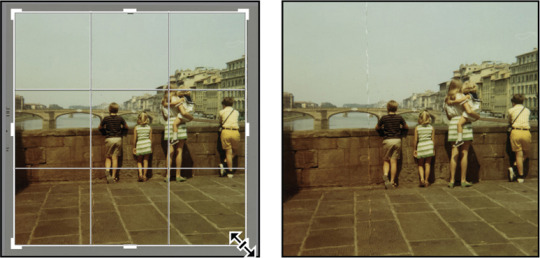
Our first correction will be straightening the photo, because if I've learned anything from Migos it's that there's nothing wrong with a little straightening. On Photoshop, we have a tool that can straighten out anything. Select that tool and draw a line from the top left corner of our photo and you'll see it lines the photo up as to remove any crookedness. If my mama had this tool growing up my whole life would've been different. We'll crop out the border of the photo and focus only on the photo itself, like seen below.
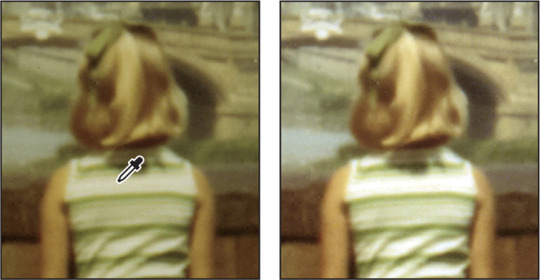
Next thing we'll do is brighten up our photo and refresh the colors. To do this, we'll open up the Adjustments panel and scroll to Single Adjustments, click on Curves. Select the White Point tool on the left side of the Properties panel. When we select the brightest spot on the photo, this will brighten up the picture so you're going to click on the white strip of the girl's dress.
These are just touch ups that can be the difference between showing people your actual age by noticing age in the photo. We'll add a few more adjustments to light levels in the photo. Under Single Adjustments we'll click on Levels, which sits under Curves. We'll see a grid of levels and three triangular selection tools. Grab the triangle (black point) on the left to 15, the one in the middle (midtones) and we'll adjust the value to .90. Once we've finished adjustments we can click on Layers and flatten our image. Next up, we'll doing the most exciting part, removing smudges, imperfections, and most exhileratingly other people from your photo!

To start fixing mistakes and blemishes from our photo, we'll select our Spot Healing Brush tool, which will help us remove any spotty pieces of our photo. There's other retouching tools in the group with this tool which you can find by right clicking on the tool, we'll specifically be using the Remove tool. We'll be removing the smudges and photo print lines like above. To remove people from your photo, you'll drag your mouse over the kid and his shadow. like below!
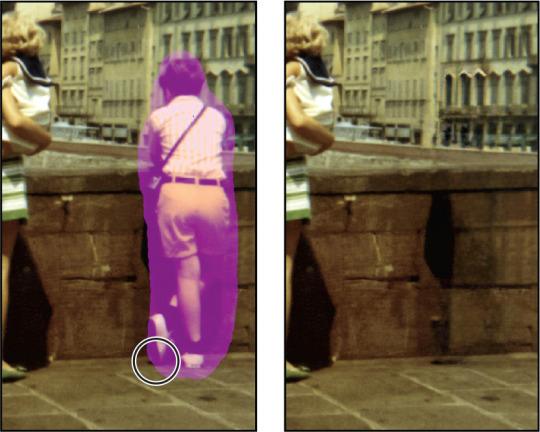
FINALLY, to touch up the area after his timely removal, we'll use Generative Fill to make the CHOP look natural. like below.

And just like that, you've edited and perfected your vacay photos!
0 notes
Text
How to Use AI in Photo Retouching
The rise of artificial intelligence (AI) has revolutionized the way we approach photo retouching, making the process faster, more efficient, and accessible to users of all skill levels. This guide will explore how AI can elevate your photo retouching game.
What is AI Photo Retouching?
Defining AI Photo Retouching
AI image retouching services refers to the use of artificial intelligence-powered tools and algorithms to enhance and manipulate images. These tools use machine learning to analyze and adjust elements like lighting, color balance, and texture automatically.
Why is AI Important in Photo Retouching?
AI simplifies complex editing tasks, saving time and ensuring consistent results. It bridges the gap between professional and amateur photographers, empowering everyone to achieve high-quality edits.

Benefits of Using AI in Photo Retouching
Speed and Efficiency
AI-powered tools can process images in seconds, handling tasks that traditionally took hours. This rapid processing is ideal for professionals managing large projects or hobbyists looking for quick fixes.
Consistency and Precision
AI tools ensure uniformity across multiple images, maintaining a professional look. Advanced algorithms can detect and fix imperfections with a level of precision that minimizes errors.
Key Features of AI Retouching Tools
Automated Adjustments
AI tools can automatically optimize brightness, contrast, and saturation based on the image’s characteristics. These features simplify the workflow, especially for batch processing.
Advanced Facial Retouching
Many AI tools specialize in facial jewelry retouching service, enhancing skin tone, removing blemishes, and refining facial features without over-editing.
How to Choose the Right AI Retouching Tool
Evaluating Your Needs
Consider your requirements: Are you editing portraits, landscapes, or product photos? Your needs will dictate the type of AI tool you should choose.
Comparing Popular Tools
Research and compare features, pricing, and user reviews of top tools like Adobe Photoshop, Luminar AI, and Topaz Labs. Choose a tool that aligns with your skill level and budget.
Practical Applications of AI in Photo Retouching
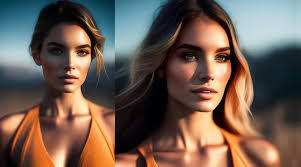
Portrait Enhancements
AI excels in enhancing portraits by smoothing skin, whitening teeth, and even reshaping features subtly. These capabilities make it a favorite for wedding and fashion photographers.
Background Adjustments
AI tools can seamlessly remove or replace backgrounds, creating a polished look. This feature is particularly useful for e-commerce and professional headshots.
Tips for Effective AI Photo Retouching
Start with a High-Quality Image
AI tools work best with high-resolution images. Ensure your photo is well-lit and sharp to achieve the best results.
Customize Edits
While AI provides excellent auto-edit options, manual adjustments can help you tailor the final look to your preference. Use AI as a starting point and refine from there.
Addressing Common Challenges
Avoiding Over-Editing
AI tools can sometimes over-process images, resulting in unnatural effects. Learn to recognize and adjust these edits for a balanced result.
Understanding Limitations
AI is powerful but not perfect. Some artistic and creative decisions still require a human touch to maintain authenticity.

Future Trends in AI Photo Retouching
Integration with Augmented Reality
The integration of AI with AR will allow real-time photo enhancements, providing immediate feedback during photo shoots.
Ethical Considerations
As AI advances, discussions around ethical photo editing, like altering appearances, will become increasingly important. Transparency and consent should guide the use of AI in retouching.
Conclusion: Embracing AI in Photo Retouching
AI photo retouching is transforming the creative landscape, offering tools that are both powerful and user-friendly. By understanding its capabilities and limitations, you can harness AI to achieve stunning results efficiently and ethically. Whether you’re a professional or an amateur, the future of photo retouching is at your fingertips.
1 note
·
View note
Text
Photo Editing
Introduction to Photo Editing
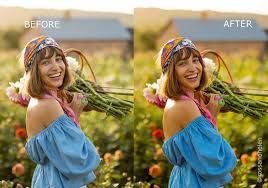
Photo editing has become an essential part of modern photography, enabling photographers and hobbyists to enhance their images and bring out the best in their shots. Whether you're a professional photographer, a social media influencer, or just someone who enjoys taking pictures, understanding the fundamentals of photo editing can dramatically improve the quality of your photos. This comprehensive guide will explore various aspects of photo editing from basic adjustments to advanced techniques, providing you with the knowledge to create stunning images.
The Importance of Photo Editing
In the digital age, capturing a great photo is only half the battle. Even the best cameras can produce images that need a little tweaking to reach their full potential. Factors like lighting, color balance, and composition often require post-processing to ensure that the image looks as vibrant and professional as possible.
Enhance Colors and Lighting: Adjust brightness, contrast, and saturation to make your photos more visually appealing.
Correct Imperfections: Remove blemishes, correct red-eye, and fix other flaws that detract from the image.
Alter Composition: Crop, straighten, and reframe images to improve their composition.
Create Artistic Effects: Apply filters, overlays, and textures to give your photos a unique, creative look.
Before diving into specific editing techniques, it's essential to understand the tools at your disposal. Various photo editing software options range from beginner-friendly apps to professional-grade programs.
Popular Photo Editing Software
Adobe Photoshop:
Overview: The industry standard for photo editing, offering a vast array of tools for everything from basic adjustments to complex image manipulation.
Key Features: Layers, masks, advanced retouching tools, and support for plugins.
Best For: Professionals and serious hobbyists who need advanced features and flexibility.
Adobe Lightroom:
Overview: A powerful tool designed for organizing and editing large collections of photos.
Key Features: Non-destructive editing, presets, and robust organizational tools.
Best For: Photographers who need to manage and process large numbers of images.
GIMP (GNU Image Manipulation Program):
Overview: A free, open-source alternative to Photoshop.
Key Features: Comprehensive tools for editing and manipulating images, supports layers and plugins.
Best For: Users who need advanced editing features without the cost.
Affinity Photo:
Overview: A budget-friendly alternative to Photoshop, offering many of the same features.
Key Features: High-end photo editing tools, RAW editing, and a user-friendly interface.
Best For: Photographers who want professional-level tools at an affordable price.
Canva:
Overview: A user-friendly online platform for basic photo editing and graphic design.
Key Features: Drag-and-drop interface, templates, and basic editing tools.
Best For: Beginners and casual users looking for quick edits and design work.
Basic Photo Editing Techniques
Once you've chosen your editing software, it's time to start enhancing your photos. Here are some basic techniques that form the foundation of photo editing.
Cropping and Straightening:
Purpose: Improve composition by removing unnecessary elements and straightening horizons.
How-To: Use the crop tool to trim the edges of your photo. Many tools also offer a grid overlay to help you straighten the image by aligning key elements with the grid lines.
Adjusting Exposure:
Purpose: Correct the overall brightness of your image.
How-To: Use the exposure slider to increase or decrease the brightness. Be careful not to overexpose (too bright) or underexpose (too dark) your image.
Contrast and Brightness:
Purpose: Enhance the difference between the light and dark areas of your photo, making it more dynamic.
How-To: Adjust the contrast slider to increase or decrease the difference between shadows and highlights. Use the brightness slider to fine-tune the overall lightness of the image.
Color Correction:
Purpose: Ensure that the colors in your photo are accurate and appealing.
How-To: Use the white balance tool to correct any color cast (e.g., too warm or too cool). Adjust saturation and vibrance to enhance colors without oversaturating them.
Sharpening:
Purpose: Enhance the clarity of your image by making edges appear more defined.
How-To: Apply the sharpening tool carefully to avoid creating a grainy or unnatural look. Focus on areas that need more definition, like eyes in a portrait or the edges of objects in landscapes.
Noise Reduction:
Purpose: Minimize graininess or “noise,” particularly in low-light photos.
How-To: Use the noise reduction slider to smooth out the grain, but be careful not to overdo it, as it can lead to a loss of detail.
Advanced Photo Editing Techniques
Once you've mastered the basics, you can explore more advanced techniques to take your photo editing to the next level.
1. Layering and Masking:
Purpose: Allows you to make non-destructive edits, combine multiple images, and apply adjustments selectively.
How-To: Use layers to separate different elements of your photo (e.g., background, subject) and apply masks to control where adjustments are applied. This technique is powerful for compositing images or making complex adjustments.
2. Dodging and Burning:
Purpose: Enhance or darken specific areas of your photo to add depth and focus.
How-To: The dodge tool lightens areas of your photo, while the burn tool darkens them. Use these tools selectively to draw attention to key parts of your image or to create a more balanced exposure.
3. Cloning and Healing:
Purpose: Remove unwanted elements or imperfections from your photo.
How-To: The clone stamp tool allows you to copy pixels from one part of your image to another, effectively “erasing” unwanted objects. The healing brush works similarly but blends the copied area with the surrounding pixels for a more natural look.
4. Advanced Color Grading:
Purpose: Apply a specific mood or aesthetic to your photo through color adjustments.
How-To: Use curves, selective color, or split toning to fine-tune the colors in your image. This technique is often used in cinematic photography to create a specific atmosphere.
5. Working with RAW Files:
Purpose: RAW files contain more data than JPEGs, giving you greater flexibility in editing.
How-To: Open RAW files in a program like Adobe Lightroom or Photoshop. From there, you can adjust exposure, white balance, and other settings with minimal loss of quality. RAW editing is essential for professional photographers who need the highest quality results.
Creative Photo Editing
Beyond enhancing and correcting photos, editing can also be used creatively to produce artistic images. This involves thinking outside the box and using various tools and techniques to transform your photos in unique ways.
1. Applying Filters and Presets:
Purpose: Quickly change the look and feel of your photo.
How-To: Many editing programs come with built-in filters and presets. These are pre-defined adjustments that can dramatically alter the appearance of your image. You can also create your own presets for a consistent style across multiple photos.
2. Adding Textures and Overlays:
Purpose: Enhance your photos with additional visual elements.
How-To: Apply textures (like grunge, paper, or fabric) as an overlay to add depth and interest to your photo. You can also use light leaks, lens flares, or bokeh effects to create a specific mood.
3. Photo Manipulation:
Purpose: Combine multiple images or elements to create a surreal or fantasy composition.
How-To: Use techniques like compositing, where you blend multiple images, or digital painting, where you paint directly onto your photo. This requires a good understanding of layers, masking, and perspective to achieve a believable result.
4. Black and White Conversion:
Purpose: Create timeless, classic images by converting color photos to black and white.
How-To: Use the black and white adjustment layer or desaturation tool to remove color from your image. You can then adjust the contrast and apply filters to enhance the tonal range and bring out details.
Tips for Effective Photo Editing
Work Non-Destructively:
Always use layers, masks, and adjustment layers to ensure that your original image remains untouched. This allows you to experiment and make changes without permanently altering your photo.
Use Shortcuts:
Familiarize yourself with keyboard shortcuts in your editing software. This will speed up your workflow and make the editing process more efficient.
Keep It Natural:
While it's tempting to push adjustments to the extreme, subtlety is often more effective. Aim to enhance your photos without making them look overly edited.
Learn from Others:
Study the work of professional photographers and editors. Tutorials, online courses, and forums are valuable resources for learning new techniques and improving your skills.
Practice Regularly:
The more you edit, the better you'll become. Experiment with different styles and techniques to develop your unique editing style.
The Future of Photo Editing
Photo editing technology is constantly evolving, driven by advancements in software and artificial intelligence (AI). Here’s a glimpse of what the future holds:
1. AI-Powered Editing:
AI is making photo editing faster and more accessible. Tools like Adobe's Sensei and Laminar AI can automatically enhance photos, suggest edits, and even retouch portraits with a single click. As AI technology advances, we can expect more intuitive and powerful editing tools.
2. Augmented Reality (AR) in Editing:
AR is starting to influence photo editing, allowing users to visualize edits in real-time or apply effects that interact with the environment. This technology could lead to new creative possibilities and more immersive editing experiences.
3. Mobile Editing:
With the increasing power of smartphones, mobile editing apps are becoming more sophisticated. Professionals and amateurs alike are turning to mobile apps like Adobe Lightroom Mobile and Snapseed for on-the-go editing. The convenience and accessibility of mobile editing will continue to grow.
4. Collaborative Editing:
As cloud-based tools become more prevalent, collaborative editing is becoming easier. Multiple users can work on the same project simultaneously, whether they are in the same room or across the globe. This is particularly useful for professional teams and creative agencies.
The Importance of Photo Editing
In the digital age, capturing a great photo is only half the battle. Even the best cameras can produce images that need some tweaking to reach their full potential, and post-processing is often required in elements such as lighting, color balance and composition to make your images look as vibrant and professional as possible.
Enhance Colors and Lighting: Adjust brightness, contrast, and saturation to make your photos more visually appealing.
Correct Imperfections: Remove blemishes, correct red-eye, and fix other flaws that detract from the image.
Alter Composition: Crop, straighten, and reframe images to improve their composition.
Create Artistic Effects: Apply filters, overlays, and textures to give your photos a unique, creative look.
Before diving into specific editing techniques, it's important to become familiar with the tools available to you. Various photo editing software options range from beginner-friendly apps to professional-grade programs.
Popular Photo Editing Software
Adobe Photoshop:
Overview: The industry standard for photo editing, offering a vast array of tools for everything from basic adjustments to complex image manipulation.
Key Features: Layers, masks, advanced retouching tools, and support for plugins.
Best For: Professionals and serious hobbyists who need advanced features and flexibility.
Adobe Lightroom:
Summary: A powerful tool for organizing and editing large photo collections.
Key Features: Non-destructive editing, presets, and robust organizational tools.
Best For: Photographers who need to manage and process large numbers of images.
GIMP (GNU Image Manipulation Program):
Overview: A free, open-source alternative to Photoshop.
Main features: Comprehensive tools for image editing and manipulation, support for layers and plugins.
Best For: Users who need advanced editing features without the cost.
Affinity Photo:
Overview: A budget-friendly alternative to Photoshop, offering many of the same features.
Key Features: High-end photo editing tools, RAW editing, and a user-friendly interface.
Best For: Photographers who want professional-level tools at an affordable price.
Canva:
Overview: A user-friendly online platform for basic photo editing and graphic design.
Key Features: Drag-and-drop interface, templates, and basic editing tools.
Best For: Beginners and casual users looking for quick edits and design work.
Once you've chosen your editing software, you're ready to start enhancing your photos. Here are some basic techniques to help you start editing your photos.
Cropping and Straightening:
Purpose: Improve composition by removing unnecessary elements and straightening horizons.
How-To: Use the crop tool to trim the edges of your photo. Many tools also offer a grid overlay to help you straighten the image by aligning key elements with the grid lines.
Adjusting Exposure:
Purpose: Correct the overall brightness of your image.
How-To: Use the exposure slider to increase or decrease the brightness. Be careful not to overexpose (too bright) or underexpose (too dark) your images.
Contrast and Brightness:
Purpose: Enhance the difference between the light and dark areas of your photo, making it more dynamic.
How-To: Adjust the contrast slider to increase or decrease the difference between shadows and highlights. Use the Brightness slider to optimize the overall brightness of your image.
Color Correction:
Purpose: Ensure that the colors in your photo are accurate and appealing.
How-To: Use the white balance tool to correct any color cast (e.g., too warm or too cool). Adjust saturation and vibrance to enhance colors without oversaturating them.
Sharpening:
Purpose: Enhance the clarity of your image by making edges appear more defined.
How-To: Apply the sharpening tool carefully to avoid creating a grainy or unnatural look. Focus on areas that need more definition, such as eyes in a portrait or the edges of objects in a landscape.
Noise Reduction:
Purpose: Minimize graininess or “noise,” particularly in low-light photos.
How to: Use the Noise Reduction slider to smooth out grain, but be careful not to overdo it as this can result in loss of detail.
Advanced Photo Editing Techniques
Once you've mastered the basics, you can explore more advanced techniques to take your photo editing to the next level.
1. Layering and Masking:
Purpose: Allows you to make non-destructive edits, combine multiple images, and apply adjustments selectively.
How-To: Use layers to separate different elements of your photo (e.g., background, subject) and apply masks to control where adjustments are applied. This technique is great for compositing images or making complex adjustments.
2. Dodging and Burning:
Purpose: Enhance or darken specific areas of your photo to add depth and focus.
How-To: The dodge tool lightens areas of your photo, while the burn tool darkens them. Use these tools selectively to draw attention to key parts of your image or to create a more balanced exposure.
3. Cloning and Healing:
Purpose: Remove unwanted elements or imperfections from your photo.
How-To: The clone stamp tool allows you to copy pixels from one part of your image to another, effectively “erasing” unwanted objects. The healing brush works similarly but blends the copied area with the surrounding pixels for a more natural look.
4. Advanced Color Grading:
Purpose: Apply a specific mood or aesthetic to your photo through color adjustments.
How-To: Use curves, selective color, or split toning to fine-tune the colors in your image. This technique is often used in film photography to create a particular atmosphere.
5. Working with RAW Files:
Purpose: RAW files contain more data than JPEGs, giving you greater flexibility in editing.
How-To: Open RAW files in a program like Adobe Lightroom or Photoshop. From there, you can adjust exposure, white balance and other settings with minimal loss of quality. RAW editing is essential for professional photographers looking for the highest quality results.
Creative Photo Editing
Beyond enhancing and correcting photos, editing can also be used creatively to produce artistic images. It's all about thinking outside the box and using different tools and techniques to transform your photos in a unique way.
1. Applying Filters and Presets:
Purpose: Quickly change the look and feel of your photo.
How-To: Many editing programs come with built-in filters and presets. These are predefined adjustments that can drastically change the look of your image. You can also create your own presets to create a consistent style across multiple photos.
2. Adding Textures and Overlays:
Purpose: Enhance your photos with additional visual elements.
How-To: Apply textures (like grunge, paper, or fabric) as an overlay to add depth and interest to your photo. You can also use light leaks, lens flares, or bokeh effects to create a specific mood.
3. Photo Manipulation:
Purpose: Combine multiple images or elements to create a surreal or fantasy composition.
How-To: Use techniques like compositing, where you blend multiple images, or digital painting, where you paint directly onto your photo. This requires a good understanding of layers, masking, and perspective to achieve a believable result.
4. Black and White Conversion:
Purpose: Create timeless, classic images by converting color photos to black and white.
How-To: Use the black and white adjustment layer or desaturation tool to remove color from your image. You can then adjust the contrast and apply filters to enhance the tonal range and bring out details.
Conclusion
Image editing is an essential skill in today's visually driven world. Whether you want to fix small mistakes or create stunning visual art, image editing tools and techniques offer endless possibilities. By understanding the basics and exploring advanced techniques, you can turn your photos into something truly stunning. Remember, image editing is both a science and an art. It requires technical knowledge, creativity and practice. With the right tools and the willingness to keep learning, you can master photo editing and realize your creative vision. Whether you're enhancing snapshots for social media or creating a professional portfolio, photo editing is key to making your images stand out in a crowded digital environment. Photo editing has become an essential part of modern photography, allowing photographers and amateurs alike to enhance their images and get the most out of them. Whether you're a professional photographer, a social media influencer, or simply someone who enjoys photography, understanding the basics of photo editing can greatly improve the quality of your photos. This comprehensive guide will explain the various aspects of photo editing, from basic adjustments to advanced techniques, giving you the knowledge to create amazing images.
#PhotoEditing#PhotoEditor#PhotoRetouching#CreativeEditing#EditMyPic#PhotoManipulation#EditingTips#PhotographyEditing#BeforeAndAfter#EditLikeAPro#EditingSoftware#Retouching#DigitalArt#CreativeRetouch#PhotoshopSkills
0 notes
Text
Retouching for Realism: How to Enhance Without Overdoing

Introduction
In the world of photo retouching, the challenge is often to enhance images while maintaining a sense of realism. Over-editing can result in unnatural photos that lose their authentic charm. This blog post will guide you through techniques for retouching your photos to achieve a natural, realistic look without overdoing it.
Understanding Realistic Retouching
1. The Goal of Retouching
Enhancement, Not Transformation: The aim is to improve the image while preserving its original qualities.
Subtlety is Key: Small, subtle adjustments can often have the most significant impact.
2. Identifying Key Areas for Improvement
Blemishes and Imperfections: Focus on removing temporary blemishes rather than permanent features.
Lighting and Color: Enhance lighting and color to make the photo more appealing without altering the scene.
Techniques for Realistic Retouching
1. Skin Retouching
Frequency Separation: This technique allows you to work on skin texture and tone separately, smoothing the skin without losing detail.
Healing Brush and Clone Stamp: Use these tools to remove blemishes while preserving skin texture.
2. Color Correction
White Balance: Adjust the white balance to ensure accurate colors. Natural light often results in more realistic skin tones.
Selective Color Adjustments: Use selective color adjustments to enhance specific areas without affecting the entire image.
3. Dodging and Burning
Add Depth and Dimension: Use dodge and burn tools to lighten and darken areas, creating depth and enhancing natural contours.
Subtle Application: Apply dodging and burning subtly to avoid unnatural shadows or highlights.
Tools for Realistic Retouching
1. Adobe Photoshop
Adjustment Layers: Use adjustment layers for non-destructive edits, allowing you to tweak settings as needed.
Layer Masks: Layer masks enable you to apply adjustments to specific areas without affecting the whole image.
2. Adobe Lightroom
Local Adjustments: Use the Adjustment Brush, Graduated Filter, and Radial Filter for localized edits.
Profile Corrections: Apply lens corrections to fix distortion and vignetting, maintaining the natural look of the photo.
Avoiding Over-Retouching
1. Regularly Compare with the Original
Before and After Views: Regularly compare your retouched photo with the original to ensure you’re not overdoing it.
Zoom In and Out: Zoom in for detail work but zoom out to see the overall effect and maintain balance.
2. Use Light Touches
Low Opacity and Flow: Use tools at low opacity and flow settings to build up effects gradually.
Multiple Layers: Use multiple layers for different adjustments, allowing you to fine-tune each one independently.
Examples of Realistic Retouching
1. Portraits
Natural Skin: Remove temporary blemishes, soften wrinkles slightly, and enhance eyes and lips without creating an unrealistic look.
Background Enhancement: Clean up the background while keeping it natural and unobtrusive.
2. Landscapes
Color Enhancements: Boost colors to make the scene more vibrant without altering the natural hues.
Detail Enhancement: Sharpen details like foliage and rocks subtly to maintain a natural look.
Conclusion
Retouching for realism involves enhancing photos in a way that preserves their natural beauty and authenticity. By focusing on subtle adjustments and using tools like frequency separation, color correction, and dodging and burning, you can improve your images without overdoing it. Regularly comparing your work with the original and using light touches will help you achieve stunning, realistic results that captivate viewers while maintaining the photo’s true essence.
0 notes
Text
Master Photo Retouching | Steps to Become a Photo Editing Expert
The Ultimate Guide to Mastering Photo Editing
In today's digital world, photo editing has become a must-have skill—whether you're a professional photographer, content creator, business owner, or just a hobbyist with a creative eye. Editing helps enhance images, fix flaws, and create stunning visuals that make your work stand out.
This guide is your roadmap to becoming a photo editing master. From beginner tools to advanced techniques, avoiding common mistakes, and showcasing your work professionally—we’re covering it all. Let’s dive in! If you want to learn more about how to become a photo editing master, visit our blog.
Understanding Photo Editing
Photo editing is the process of adjusting and improving images using various software tools. At its core, it includes:
Retouching: Fixing imperfections in portraits, such as skin smoothing or teeth whitening.
Color correction: Adjusting tones and hues to either correct lighting or add creative flair.
Exposure Adjustment: Modifying brightness, contrast, highlights, and shadows.
Cropping & Resizing: Reframing your photo or optimizing for social media.
Sharpening: Enhancing the details of your image.
Choosing the Right Tools
To kick off your journey, you’ll need the right software. Professionals often rely on Photoshop and Lightroom, while beginners may enjoy user-friendly apps tailored to simpler needs.
Photoshop: The industry standard for in-depth editing.
Lightroom: Perfect for color correction service, exposure adjustments, and batch edits.
GIMP: A free, open-source alternative to Photoshop.
Affinity Photo: Affordable and powerful.
Snapseed & Canva: Great for quick mobile or beginner edits.
Tweak: Online tool for simple edits.
Choosing the right tool is essential for achieving polished results. Whether you're editing product photos for your online store or enhancing brand visuals, using a professional ecommerce photo editing service can ensure consistency, quality, and a competitive edge in your visuals.
Learning the Photography Basics
To edit well, it helps to understand photography fundamentals:
Exposure: Controlled by aperture, shutter speed, and ISO—key to balanced lighting.
Composition: Apply rules like the rule of thirds or leading lines to make your edits more impactful.
White Balance: Crucial for accurate color tones.
Having strong photos to start with makes editing easier and more effective.
Core Editing Techniques to Master
Here’s where the magic happens. These techniques form the foundation of most editing tasks:
Color Correction & Grading: Start by fixing white balance, adjusting saturation and vibrance, and creatively grading tones to set the mood.
Exposure Adjustments: Brighten or darken photos, adjust contrast, and tweak highlights or shadows for depth.
Portrait Retouching: Use healing tools for blemishes, whiten teeth, and sharpen eyes for natural enhancements. Consider a Photo retouching service for advanced or time-consuming jobs.
Layering & Masking: Use layers to edit non-destructively, and masks for precise control over your adjustments.
Cropping & Resizing: Improve composition, focus attention on the subject, or meet social media size requirements.
Advanced Techniques to Explore
Ready to level up? These creative tools will set your edits apart:
Composite Photography: Combine multiple images into one—great for surreal or artistic scenes.
HDR Photography: Merge several exposures to capture a full range of light and detail.
Depth of Field Effects: Blur backgrounds or foregrounds to highlight your subject.
Motion Blur: Add movement to still shots, ideal for action photography.
Black & White Editing: Boost contrast and use channel mixers to make your monochrome photos pop.
Digital Art: Transform images into illustrations with custom brushes, textures, or smudge tools.
Avoiding Common Mistakes
Even experienced editors fall into these traps:
Over-editing: Subtlety is key—keep it natural.
Ignoring Layers: Always work non-destructively using layers and smart objects.
Low Resolution: Export images at high quality, especially for print or clients.
Build Your Workflow
To work faster and smarter:
Organize Files: Use a clear folder system and naming convention to keep track of originals, edits, and exports.
Backup Everything: Use cloud storage or external drives.
Keyboard Shortcuts: Learn your software’s hotkeys to save time (e.g., Ctrl + J to duplicate a layer in Photoshop).
Develop Your Editing Style
Your editing style is your signature. Play with:
Color Palettes: Warm vs. cool tones, bold vs. soft colors.
Textures: Add grain or overlays for artistic vibes.
Lighting: Whether bright and clean or dark and moody—own your aesthetic.
Maintain consistency across your work using presets and batch editing.
Showcasing Your Skills
Once you’ve built your skill set, it’s time to let the world see:
Create a Portfolio: Feature your strongest, most diverse work. Update it often.
Build a Website: Use platforms like Squarespace or WordPress to showcase your skills and services.
Leverage Social Media: Instagram, Behance, and Pinterest are ideal for photo editors. Use hashtags, join communities, and share regularly.
Network: Collaborate with photographers and creatives. Reach out to those who may need help with editing.
Whether you're offering jewelry retouching service, clipping path service, or background removal service, a portfolio helps potential clients see the value you bring.
Conclusion
Becoming a master at photo editing takes practice, creativity, and a willingness to learn. Whether you’re refining portraits, perfecting product shots with an ecommerce photo editing service, or exploring effects, each project helps you grow.
Want professional help? UK Clipping Path offers high-quality services including Jewelry Retouching service, ecommerce photo editing service, color correction service, clipping path service, and background removal service. Try us with a free trial and experience the difference!
0 notes
Text

Hello there,
I really don't know how to write proper Description but i'll provide best edits with amazing retouch and colours. I'll provide Maternity Retouching Services full psd file with source images. If you want to see more work of my so simply you can text me i'll provide everything.
our services :
newborn manipulation
newborn retouch
maternity manipulation
maternity retouch
colour correction
family photo editing
family photo retouching
what i provide in every plan :
Advanced Retouching
Crop and resize
Pimple, blemishes, acne remove
Frequency Separation
Natural skin
Adjust skin tone
Reduce jaundice and redness
Dodge and Burn(Specialist)
Background fix
Body, anatomy liquefy
Advances Color correction
your specific requirement
24 hours delivery
Software which I am Using.
Adobe Photoshop 2024
Adobe Lightroom Classic
If you want anything from this just contact me i'll provide that.
#maternitysession#kids#photoshoot#babies#wedding#babyphotography#mumtobe#familyphotography#pregnantbelly#prewedding#portrait#embarazo#mother#mommy#maternitystyle#weekspregnant#postpartum#instagood#maternitydress#LenaSiena#mommytobe#canon#instagram#maternit#babylove#newbornbaby#instababy#birth#portraitphotography
1 note
·
View note
Text
Image processing is an important skill to learn for photography. It is essentially the digital equivalent of developing a negative with film.
Not to be confused with image editing and image manipulation—which are also fun artistic skills you can learn if you want to get even more creative with your photos.
(Disclaimer: These are not standardized terms and different folks may use different terms and definitions to describe the same things. This is my preferred terminology and way of thinking about photo alteration tactics.)
Image processing is basically cropping, correcting exposure, adjusting the white balance, dialing in the contrast, and making sure you have true blacks and whites that span the entire histogram. You are taking the flat, low contrast RAW file (or JPEG/HEIF) and balancing all of the data to look similar to what your eyeballs saw when you took the picture. This can also include fixing minor blemishes, sensor dust, or schmutz/hair on clothing. Processing is typiclly done non-destructively in a RAW editor, so all alterations are changed in the metadata instead of changing the actual pixel information. You can undo any single change at any time without undoing anything else. When processing is complete, this can be your finished photo or a good baseline for editing.


Image editing would be more creative adjustments. Maybe you want the sky darker and the foreground brighter. You want the colors to pop so you boost the saturation beyond reality. You want to add extra drama so you crush the blacks. Or you want to bring focus to the photo subject so you place a dark vignette around them. You are still working with the data you captured, but you are pushing that data more aggressively beyond what was actually seen in the environment the photo was taken.

And image manipulation (often called photoshopping) is the addition or subtraction of data to/from a photo. Adding brand new pixels or erasing existing pixels to fundamentally change what was originally captured. This is called destructive editing because the changes can't be made only in the metadata. You can use layers and smart objects/filters to make it easier to undo individual changes, but it can be more difficult to undo a single change 20 steps back if you don't take proper precautions. Manipulation can include fixing larger mistakes like a light stand in the frame or flyaway hairs that weren't tamped down. Or compositing two photos together. Maybe swapping in a new head with a better expression. Maybe you need to remove a drunk uncle from a wedding portrait.
Or you can add a sleepy cat to a field of sunflowers.

The lines between these three levels of adjustment can get blurry, but all are valid skills to learn and can take your photography to new places. At minimum, every photographer should learn and understand how to do basic processing of their photos.
Now, you might hear some people say they just do "SOOC" because it is more authentic or naturalistic. They might even brag about how their photography skills are so amazing that no extra work is needed once they press that button.
SOOC stands for "straight out of camera" and it is a horseshit concept.

There is no such thing as an unprocessed photo.
Even with film photography, many professionals would choose special film to get certain looks and use special development techniques to push the photos beyond what was captured. One type of film might give more saturated colors. One type might give extra contrast. Choosing a brand of film was similar to choosing a picture style on your camera or a preset in your editing software. You could also "photoshop" film by dodging and burning—exposing different areas of the negative for longer or shorter time intervals.
It was all processing.
And if you take a digital photo... it is processed.
Even if all you do is hit the shutter button.
Unless you want to post a bunch of green photos on Instagram, you are not posting anything that is SOOC.

That top photo is the Bayer filter result before the data is processed with color information and "picture style" algorithms. A Bayer filter has two green pixels for every red and blue pixel, so the unprocessed version looks heavily tinted green.
So you can either let the algorithm inside your camera process the photo (which is fine), or you can do it manually in software such as Lightroom.
Either way, *something* is choosing the sharpness, contrast, saturation, and tone along with some other variables behind the scenes (sometimes referred to as a camera's "color science").
And if you think letting the robot inside your camera process your photo is somehow more "authentic" than a human being doing it... I feel you have things backward.
"Well, I use the neutral picture profile."
That is still an algorithm, friend.
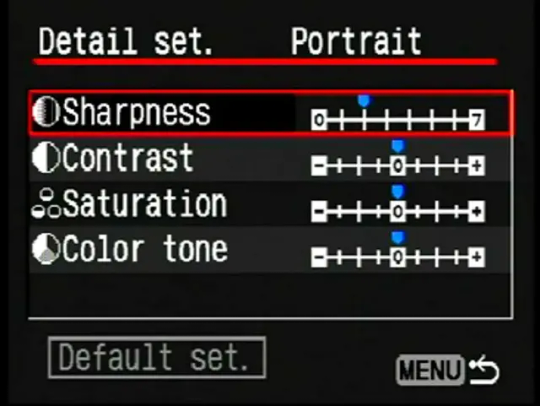
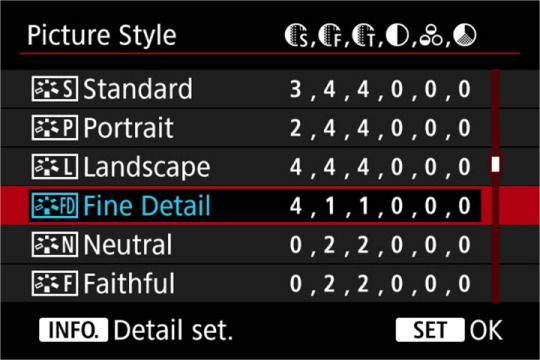
A tiny robot runs around inside your camera guts and is instructed to not pull any lever, twist any knobs, or flip any switches that go beyond the predetermined 0,2,2,0,0,0 boundaries.
SO NATURAL!
There is nothing stopping you from manually processing your photo using those same boundaries. But when you do it yourself, you can account for variables the algorithm cannot. And a human being can almost always get a more authentic, true-to-life result than that robot playing with your pixels.

The truth is, almost every photo can benefit from some manual adjustments after the fact—even if you are going for a naturalistic result.
If you are happy with how your camera processes your photos, I am not judging or criticizing you. You can still get beautiful photos that way. Post-processing can be extra work and for some, takes away from the fun of photography. That is totally valid. I'm just asking people not brag that photos are more natural or pure or untouched.
Another common parlance in the photo education community is "get it right in camera."
I like this phrase a little better, but I still think it can be improved.
This mantra implies if you choose the proper settings before you take a photo, you will have less work to do later when processing your capture.
There is truth to that. And it is a fine goal to strive for.
But sometimes... shit happens.

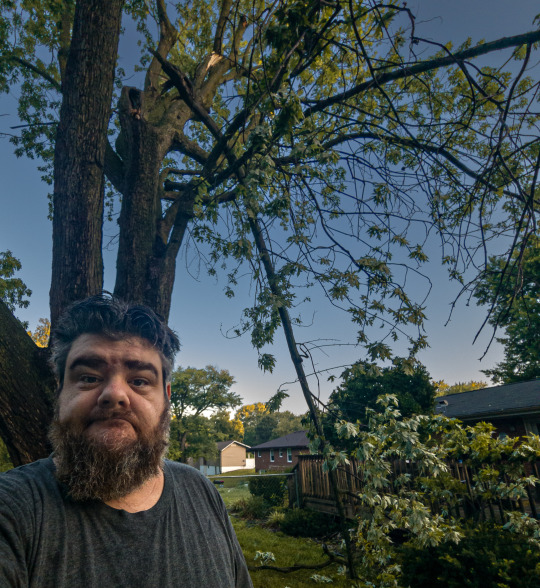
People make mistakes. Cameras make mistakes. Or you have a smartphone with a plastic lens and a sensor that can fit on your fingertip and a bright sky and dark foreground is just a lot to ask of it to deal with.
One photo with perfect settings may not have captured that perfect expression that a different photo with botched settings did.
Or sometimes it is literally impossible to "get it right in camera." The environment may be too dark or too bright or both at the same time. Sometimes there are no settings that will get you the perfect exposure.
There is also a stigma against "fix it in post."
There is nothing wrong with fixing it in post. Some people are better at Lightroom/Photoshop than they are at taking photos and they are just leaning into the skill set they have more experience with. I have noticed this a lot with traditional artists that take up photography. It can take a while for their skill levels to match up.
Sometimes I will take a photo a certain way precisely because I know how to fix it in post. I will dramatically underexpose it to make sure I don't blow out the sky. Or I will take a photo that is too dark and another photo that is too bright so I can combine them later.


Or if I do not have time to dial in perfect settings, I will just use an auto mode and deal with whatever the camera gives me when I get to my computer. No shame in auto mode if you don't have the time or energy to do trial and error with manual settings.
And if anyone says "real photographers only shoot manual" you tell them to shut their gob.
In fact, anyone who starts any sentence with, "Real photographers..." is a gatekeeper and should be ignored.
If you take photos with artistic intent on a regular basis, you are a "real" photographer.
No other qualifications necessary.
The only time "fix it in post" is a problem is when your motivation is not in service to the best end result. Sometimes post-processing *is* the best solution. But if you are just procrastinating or you want to pass the buck to another person, you should try your best to summon some willpower and get it done properly.
The original intent of the phrase was to shame people who lazily shift the workload to others but somehow it morphed into meaning any post-processing is cheating or low effort. As if complicated editing is a button-press solution. Best practice would be allocating the labor to where it makes the most sense. You have to determine which approach will give you the desired result.
So if you don't feel like learning the fundamentals and just want to fix everything later rather than educating yourself, that would be a poor photography practice.
Or if you have someone else editing your photos or videos and you don't care how much extra work they'll need to do to "fix" them.
All that said... if "SOOC" and "get it right in camera" are poor expressions, what should the mantra be?
"Get the data you need to achieve your photographic goal." -Froggie
Okay, it's not exactly prose.
In my defense, photographic concepts don't always roll off the tongue.
If you are taking photos with artistic intent, you should always have a goal—an image in your head of the finished result. In the end, cameras are just data collection tools. If you know what you can do to that data and how it can be processed, edited, and manipulated, you can imagine realistic goals before taking a photo. Through practice, trial & error, and experience you will eventually learn methods to get the data you need. The methods used are inconsequential. Whatever works for you. Auto mode, manual mode, botched settings, too bright, too dark... eventually you learn if you have what you need even if it doesn't look right "in camera."
You can look at a photo preview and be like...
"I can recover those highlights"
"I have this great expression but I like the pose better in this photo. I can just move his head to the better photo."
"This will need a cat."
Photography is a minefield of gatekeeping, outdated thoughts, inaccurate expressions, poor understanding of technology, and just... bad advice.
But if you can navigate all of that, it really is a beautiful art form.
Whether you want very natural, true-to-life results...


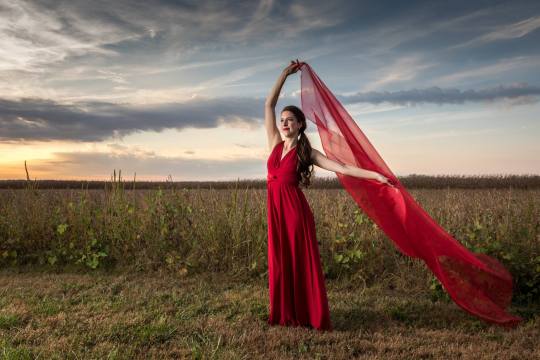
Or a photo needs just a little help to become what it was always meant to be...
Or you want crazily photoshopped images that look nothing close to reality...
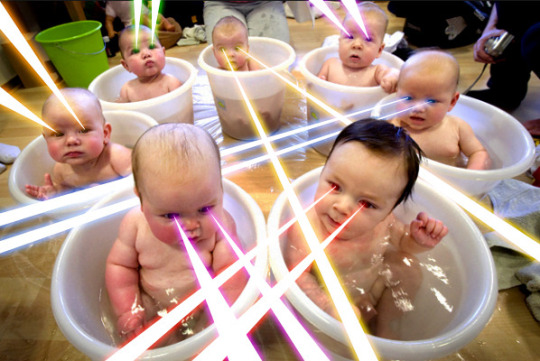
it is all valid and all wonderful.
So go forth, set a goal, and get the data you need.


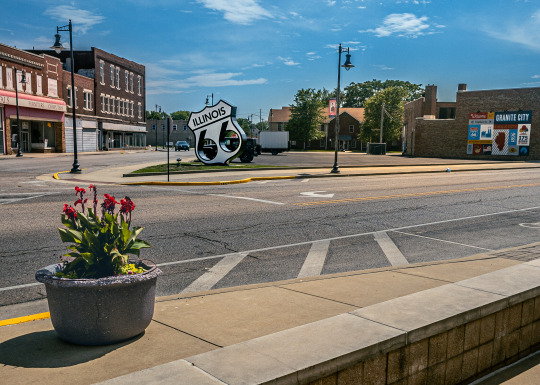


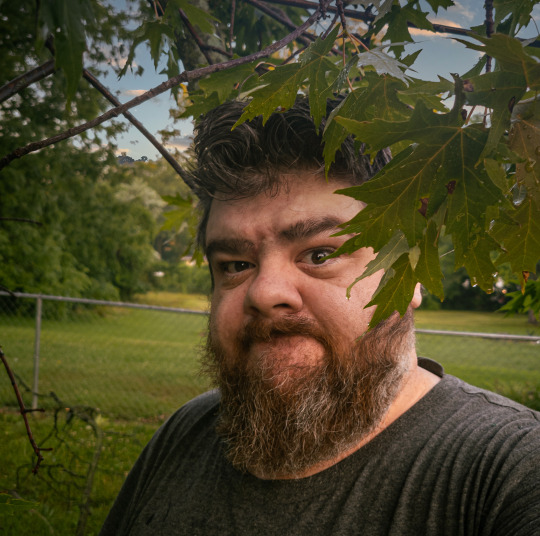
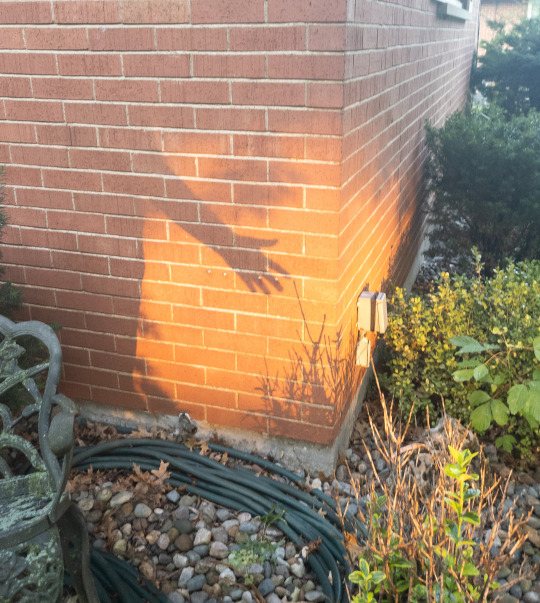
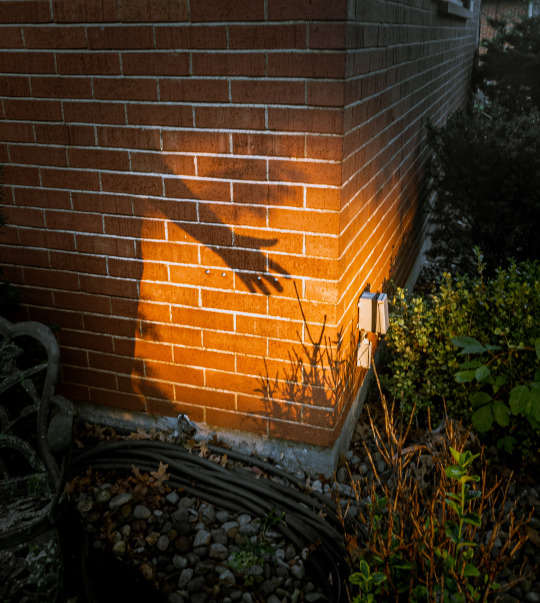


A while back on a post about a free photography course, a few people wondered if they could use their smartphone to practice.
And hopefully the above shows that you absolutely can.
Sometimes it takes a little post-processing to get good results, but that is the same with any camera. Though phone photos probably take me more than twice as long to achieve a finished product. Better cameras don't automatically make your photos better, but they do make getting good photos *easier*—especially in difficult lighting.
Many modern smartphones have a "RAW" photo mode with adjustable manual settings. Saving a RAW version of your photos allows you to continually learn and practice and return to those photos later on to re-process them with your improved experience.
A RAW capture has a lot more data than a compressed JPEG and gives you extra latitude in processing your photos. All of the editing done to a RAW file is saved in metadata instead of being baked into the pixels. So you can undo any individual change at any time without undoing changes made after that particular edit. And even if you save the file and close the program, you still have the power of undo when you open the file again.
With RAW you can more easily recover extra detail, lift dark shadows, bring back blown highlights, and restore color to blue skies that photographed pure white. (Often you can do that with a JPEG too, it just depends on the photo.)
The main downsides to JPEG editing are you can't non-destructively change the white balance after the fact, you have less dynamic range to alter shadows and highlights, and you can't make as many drastic edits before the image loses integrity.
A wise man once said, "The best camera is the one you have with you."
And a wise frog once said, "Shoot RAW and learn Lightroom because a human being can still outperform the algorithms of computational photography."
420 notes
·
View notes
Text

Basic Photo Corrections
In lesson 2, the main objectives were to utilize adobe bridge, crop/ straighten images, fix blemishes, adjust tonal range, replace areas using generative fill, and how to sharpen images.
• Basic Photo Corrections (Pages 42 - 63) Lesson 2
Review Questions
What does resolution mean? Resolution has different meanings based on the medium. For video and electronic displays, resolution means pixel dimensions which is the width and height of an image in pixels. For print, resolution means pixel density or PPI.
What are some ways to use the Crop tool to improve an image? You can use the crop tool to straighten, resize and change the resolution of an image.
How can you adjust the tone and color of an image in Photoshop? You can adjust the one and color of an image in photoshop by using the curves and levels adjustment layers,
How can you instantly create a precise selection of an irregularly shaped object? You can instantly create a precise selection of an irregularly shaped object with the object selection tool.
What tools can you use to remove blemishes in an image? You can use the remove tool, generative fill, and the heeling tools.
What are some ways Generative Fill can help retouch an image?Generative fill can help retouch an image by replacing objects, fill in large areas, and matching the background. It gives you multiple options to choose from.
0 notes
Text
How to Retouch Corporate Headshots for Maximum Impact
Retouching corporate headshots is an essential skill for photographers and designers aiming to produce professional and polished portraits. Whether for LinkedIn profiles, company websites, or press kits, headshots create a first impression. This blog explores how to retouch corporate headshots for maximum impact while ensuring natural, professional results.
Understanding the Purpose of Corporate Headshots
Building a Professional ImageCorporate headshots are not just photographs; they are representations of a brand or individual. A well-retouched headshot should communicate professionalism, trustworthiness, and approachability. Before diving into image retouching services, consider the audience and purpose of the image. For example, headshots for a law firm may require a more formal tone than those for a tech startup.
Tailoring Retouching to Industry StandardsEach industry has unique expectations for headshots. Creative industries may allow for a more relaxed and artistic approach, while corporate sectors prefer clean and polished looks. Ensure your edits align with these standards to maximize the image’s relevance.
Preparing Your Tools and Workspace
Choosing the Right SoftwareAdobe Photoshop and Lightroom are industry standards for jewelry retouching. They provide advanced tools for skin smoothing, color correction, and background adjustments. Make sure your software is updated for access to the latest features.
Calibrating Your Monitor Accurate color representation is crucial. Calibrate your monitor to ensure that the colors and tones you see while editing match the final output. This is especially important for corporate headshots, where consistency across images matters.

Enhancing Skin Tone and Texture
Skin Smoothing TechniquesStart with basic blemish removal using tools like the Healing Brush or Spot Removal Tool. Next, use frequency separation to smooth skin texture without losing detail. Avoid over-smoothing, as this can create an unnatural appearance.
Balancing Skin TonesEnsure the skin tone is even across the face by using tools like the Dodge and Burn tools or adjustment layers. Pay attention to areas like the forehead, cheeks, and chin, which often reflect light unevenly.
Perfecting Lighting and Shadows
Adjusting Exposure and ContrastA well-lit headshot is vital. Adjust exposure and contrast to highlight the subject’s features. Use Lightroom’s Tone Curve or Photoshop’s Levels tool to fine-tune these aspects.
Enhancing Shadows for DepthUse shadows strategically to add depth and dimension to the face. Subtle shadow adjustments can make features like cheekbones and jawlines stand out, creating a more engaging image.
Refining Facial Features
Brightening Eyes and TeethThe eyes are the focal point of any portrait. Enhance them by increasing brightness and sharpening details. Similarly, ensure teeth are white and natural by reducing yellow tones using adjustment layers.
Subtle ReshapingUse Photoshop’s Liquify tool sparingly to adjust minor asymmetries or enhance facial structure. Focus on subtle changes that enhance without altering the subject’s natural appearance.
Managing Hair and Clothing
Fixing Flyaway HairsFlyaway hairs can distract from an otherwise polished image. Use the Clone Stamp or Spot Healing Brush to tidy up stray strands while keeping the hair’s natural flow intact.
Enhancing Clothing DetailsWrinkles, lint, or uneven textures in clothing can detract from the overall image. Smooth out imperfections using tools like the Patch Tool or by applying slight adjustments in contrast and sharpness.
Optimizing the Background
Cleaning Up BackgroundsCorporate headshots often feature simple, clean backgrounds. Remove any distractions using the Content-Aware Fill or Clone Stamp tools. For studio backgrounds, ensure a consistent tone and gradient.
Adding Subtle Gradients To add depth, consider incorporating a subtle gradient to the background. This technique draws attention to the subject and creates a professional finish.

Applying Final Touches
Color Grading for CohesionApply a consistent color grade to maintain uniformity across all corporate headshots. This is especially important when editing a batch of images for a team or company profile.
Double-Checking for NaturalnessBefore finalizing, zoom out and review the image as a whole. Ensure all edits appear natural and cohesive. Avoid over-editing, as it can make the portrait look artificial.
Exporting for Various Platforms
Optimizing Resolution and FormatSave the final image in high resolution for print purposes and a smaller version optimized for web use. JPEG is suitable for most platforms, but consider PNG for transparent backgrounds.
Consistent CroppingCrop the headshot to the appropriate aspect ratio for its intended use. For example, LinkedIn recommends a square crop, while websites may require a different orientation.
Staying Updated with Trends
Embracing Natural AestheticsModern corporate headshots prioritize authenticity. Stay informed about evolving trends, such as minimal retouching or environmental backgrounds, to keep your work relevant.
Continuous Skill DevelopmentRetouching techniques and tools are constantly improving. Invest time in tutorials, workshops, and practice to refine your craft and stay competitive.
Conclusion
Mastering the art of retouching corporate headshots involves a balance of technical skill and artistic judgment. By focusing on natural enhancements, maintaining industry standards, and staying updated with trends, you can create headshots that leave a lasting impression. Whether you’re a professional retoucher or a photographer looking to elevate your work, these steps will help you achieve maximum impact with every image.
1 note
·
View note