#Graphics Display Development Kits
Explore tagged Tumblr posts
Text
The 2024 KTM 990 Duke Hits The Bullseye With Sniper-like Accuracy


Heralding a massive leap forward for the KTM Naked range, the all-new KTM 990 DUKE takes aim directly at the coveted 1000 Naked bike segment, pulling no punches! With 2024 marking 30 YEARS OF DUKE, the all-new KTM 990 DUKE slots into the line-up like a well-polished round in the chamber. In its quest to be the most performance-focused NAKED machine possible, the KTM 990 DUKE ticks all the right boxes mechanically, while deploying extreme new styling. The KTM 990 DUKE makes its intentions perfectly clear. Apart from a blisteringly potent engine, an all-new chassis and swingarm design – not to mention updated ergonomics and technology – it now sizes up to larger capacity motorcycles in both displacement and proportions.

Side-on, the new design has been modelled around the concept of an explosion in a freeze-frame, harnessing extreme energy ready to be released. This new design is further enhanced by two colourway options; Black and Electric Orange – the latter being reminiscent of the Naked models of a bygone era, developed specifically to celebrate 30 YEARS OF DUKE. At the face of it, predatory design meets reduced styling with its evolved LED headlight being a stand-out feature of the all-new KTM 990 DUKE. Constructed from a carefully chosen mix of materials, the new design ensures lighting stability in all road conditions. Position and daytime running lights are located on the profile of the headlight, which also auto-adjusts in intensity according to ambient light conditions thanks to a light sensor integrated into the dashboard. Additionally, the KTM 990 DUKE is fitted with a Coming Home light function as standard. Here, the headlight will remain on after the ignition has been switched off, awarding the rider with a few seconds of light to open doors or for better visibility in the garage.

Power is taken care of by a dramatically updated version of the LC8c engine found in the KTM 890 DUKE R. Boasting 947 cc, the roaring heart of the KTM 990 DUKE receives new pistons, crankshaft and conrod, producing a fire-breathing 123 HP and 103 Nm, with a total motorcycle weight of only 179 kg, ready to ride. The KTM 990 DUKE takes its DNA from the long lineage of hard-hitting DUKE models that have come before it, adding more verve and aggression for 2024. It is a performance-oriented machine at its core, designed around a lightweight, flickable chassis that inspires utmost rider confidence. In typical DUKE fashion, a stiff trellis frame and a new closed-lattice swingarm come together to welcome high-quality adjustable WP APEX Suspension components. These, together with track-proven Bridgestone S22 tyres, provide SNIPER-like accuracy when it comes to cornering stability. The WP APEX Suspension fitted to the KTM 990 DUKE features easy-to-adjust settings, encouraging the rider to push the limits comfortably. Upfront, the 43 mm WP APEX Suspension can be easily and accurately dialed in with 5 clicks on both rebound and compression. On the rear, the WP APEX Monotube shock absorber can be adjusted in 5-clicks, with manual preload adjustment also possible.

Once seated, riders are greeted by a 5-inch, anti-scratch bonded glass dashboard providing all the information a KTM 990 DUKE pilot could need. Revised graphics and menu structures are designed for faster, more intuitive access to the various features of the KTM 990 DUKE. This includes a new function that displays Lean Angle data, with an optional TRACK Mode complete with lap timer and telemetry stats. A USB-C connection is also added for device charging duties. In short, the brief was simple; develop the ultimate mid-class NAKED machine. In achieving this, the 2024 KTM 990 DUKE hits the mark dead centre. A full range of specially developed KTM PowerParts and KTM PowerWear are available for riders to personalise their motorcycles and get themselves kitted up in READY TO RACE performance. The 2024 KTM 990 DUKE will be available from Authorised KTM Dealers from February 2024 onwards, for £12,999 OTR. Discover more about 30 YEARS OF DUKE and the all-new 2024 KTM 990 DUKE at HERE. Read the full article
2 notes
·
View notes
Text
Turning Challenges into Opportunities—and Earnings!

Balancing your social life, studies, and a part-time job feels like juggling a storm of responsibilities! But don’t be disheartened, my dear friend! A part-time job is not merely a means to fill your coffers—it is an unparalleled opportunity to hone skills that will gleam brightly on your CV. Employers seek those who master time itself, display unwavering responsibility, and wield real-world experience like seasoned adventurers!
And let us not forget—the right job can lead to encounters with fascinating individuals and unlock gateways to future endeavors you may never have imagined! Now, if your spirit is ablaze with ambition, cast your gaze upon Indeed or explore opportunities on Reed to discover part-time roles that align with your schedule and aspirations. Seize the moment, and your future self will sing praises of your wisdom!
If the thought of working while pursuing your university life excites you, then rejoice, my friend, for the world is brimming with opportunities waiting to be seized! Whether you seek flexible hours, campus-based roles, or positions tailored for international students, the perfect job is out there, ready to enhance your university experience to new heights.
Here are some top picks to set you forth on this adventure! Whether it's finding work near student housing or exploring other exciting options, the journey to balance and success begins now!
Work in Campus
Why waste precious time commuting when you could get a job right in the same building where you’re hitting the books—or better yet, near your student accommodation? Universities are goldmines of opportunities for students! From giving campus tours and assisting in student support services to lending a hand in the library, these roles are not only super convenient but also flexible enough to fit your schedule perfectly. The good part is that it is also close to student accommodation, which means more time to prioritize what matters most in life: studying, hanging out with friends, or even just taking it easy. Oh, and by the way, these positions pay a reasonably nice hourly wage as well.
Delivery service
With the rise of self-employed food delivery services like UberEATS and Deliveroo, students everywhere are diving into the idea of becoming their boss with ultra-flexible working hours. Getting started is a breeze—just grab a bicycle, a smartphone, and the branded kit, and you could be earning up to £16 an hour delivering food!
And here’s the kicker—if you’re living in a conveniently located student apartment, like those offered by StudentTenant.com, you’re perfectly positioned to access those high-demand delivery zones. Talk about a win-win! Why not pair a great job with the convenience of living near your delivery routes?
Club Promoter
For all the party animals out there, why not turn your love for the nightlife into a cash machine? Getting involved with your favorite club is the ultimate win-win! Nightclubs often dish out commissions on every ticket you sell, so you’re not just partying—you’re raking in the cash while you’re at it!
And hey, your friends are probably planning to hit up these events anyway, right? So why not get paid for bringing the crew along? It’s the perfect way to enjoy the wildest nights out while earning on the side. Party hard, earn harder!
Freelancing
Online freelancing jobs are how you earn money on your terms while staying cozy in your student room. Whether you are a writer, graphic designer, social media wizard, or developer, freelancing lets you showcase your skills and work in a space that is completely yours.
The best part? You can set hours according to yourself, so studying, working, and even maybe some recreation seems a piece of cake. Of course, in these sites including Upwork, Fiverr, and Freelancer, lots of opportunities emerge. Why pass free hours away when you should use them instead to build such a portfolio from which you draw some extra dosh while gleaning invaluable experience for your soon-to-be great career?
Research Assistant
Become a Research Assistant. Helping professors with their academic research: not only about the money but contributing to new groundbreaking discoveries. Hands-on experience and enhancement of your problem-solving skills will sharpen your analytical thinking all while getting paid. Building connections with faculty members and, a deeper understanding of the field. So, if you want to spend your university years in the best possible way and prepare for your future, this is your chance!
Balancing Work and Study: A Path to Growth and Success
Remember, the perfect part-time job isn't just about earning money—it is a meaningful opportunity, a chance to gain wisdom and strength while enriching your journey as a scholar. Financial stability holds its importance, yet the right occupation offers rewards far greater than mere coin. It becomes a space for learning, where the mind sharpens, the spirit grows, and new passions emerge.
Part-time duties offer the benefit of alliances. Engaging with peers, mentors, and professionals opens gateways to guidance and opportunity. Cultivating these bonds early strengthens the path, leading to internships, commendations, and exciting opportunities beyond graduation.
To balance the demands of work and knowledge is challenging, yet it builds resilience. Mastering time and guarding study hours with diligence, while gathering the fruits of labor, strengthens both intellect and spirit. Seek roles that challenge the mind, summon courage, and reveal broader horizons.
Every task undertaken, each skill honed, and every bond formed becomes a step toward success. Choose your labors with wisdom, so they may reflect your aspirations.
Now, go forth! Embrace the world of work while mastering your studies. Your future self, a reflection of the choices you make today, shall honor each skill, connection, and lesson gathered in this pursuit. With curiosity and resolve, you shape a destiny both fulfilling and profound.
#student accommodation#student housing#student tenant#student apartments#student rooms#international students
0 notes
Text
How to Optimize Outdoor Rental Transparent LED Displays for Events
I. Introduction
- Briefly introduce the importance of outdoor rental transparent LED displays in events.
- Mention the challenges and opportunities in optimizing their performance.
II. Technical Optimization
A. Display Settings
- Adjusting brightness according to different lighting conditions (daytime sunlight, evening ambient light).
- Calibrating color temperature and contrast for vivid and accurate visuals.
- Setting the appropriate refresh rate to avoid flickering during dynamic content playback.
B. Connectivity and Signal Management
- Ensuring stable wired (Ethernet, fiber optic) or wireless (WiFi, 5G) connections.
- Using signal repeaters or boosters if necessary to cover large event areas.
- Managing signal interference issues in crowded event environments.
C. Software Updates and Compatibility
- Regularly updating the display's control software for improved functionality.
- Ensuring compatibility with different media players and content management systems.
- Testing new software features before events to avoid glitches.
III. Physical Setup Optimization
A. Location and Placement
- Selecting the optimal viewing angles based on the event layout and audience seating.
- Considering wind direction and protection when placing displays outdoors.
- Avoiding obstructions that could block the view of the display.
B. Mounting and Support Structures
- Choosing the right type of mounts (fixed, mobile, hanging) based on the event type.
- Ensuring the stability of support structures to withstand wind, vibration, and accidental impacts.
- Checking and maintaining the integrity of mounting hardware regularly.
C. Power Supply Management
- Calculating the power requirements accurately based on the display size and usage duration.
- Using backup power sources (generators, UPS systems) for uninterrupted operation during power outages.
- Implementing power distribution systems to prevent overloading.
IV. Content Optimization
A. Tailoring Content to the Event
- Designing content that matches the theme and atmosphere of the event (e.g., a concert-themed display for a music festival).
- Incorporating event - specific information such as schedules, performer names, and sponsor logos.
B. Visual Design Principles
- Using high - resolution images, videos, and graphics for better clarity.
- Applying appropriate text sizes and fonts for readability from a distance.
- Maintaining a consistent visual style throughout the content.
C. Interactive and Dynamic Content
- Incorporating interactive elements like touch - enabled features if possible.
- Creating dynamic content with animations, transitions, and real - time data feeds (e.g., live event statistics).
V. Maintenance and Troubleshooting Optimization
A. Regular Maintenance Checks
- Inspecting the display panels for physical damage, dead pixels, or loose connections.
- Cleaning the display surface to maintain optimal clarity.
- Checking the functionality of cooling systems to prevent overheating.
B. Spare Parts and Emergency Kits
- Stocking essential spare parts such as LED modules, power supplies, and cables.
- Preparing emergency repair kits with tools and quick - fix solutions.
- Training staff on basic repair and replacement procedures.
C. Troubleshooting Guides
- Developing comprehensive troubleshooting guides for common issues (e.g., signal loss, display artifacts).
- Having remote monitoring systems in place to detect problems early.
- Establishing communication channels with technical support teams during events.
VI. Conclusion
- Summarize the key points of optimizing outdoor rental transparent LED displays for events.
- Emphasize the benefits of proper optimization in enhancing the event experience.
- Encourage event organizers to implement these optimization strategies for successful events.
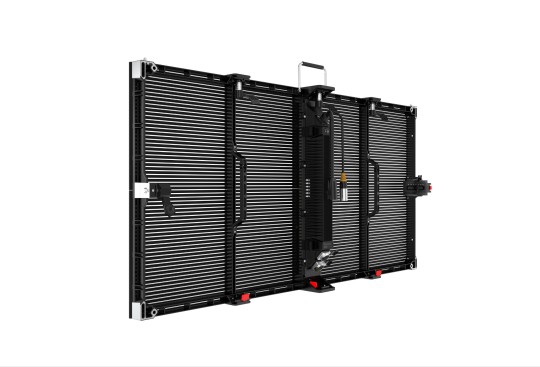
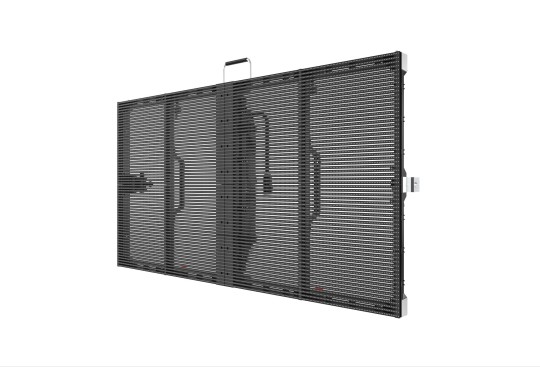
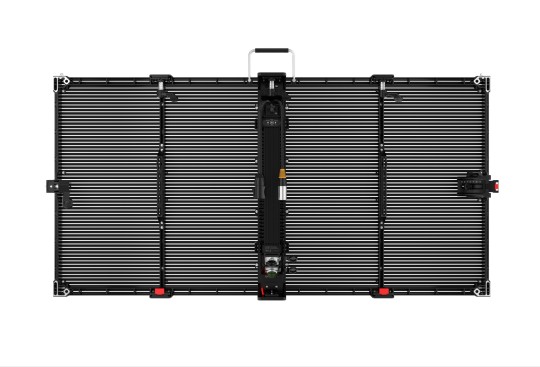
0 notes
Text
#Playstation7 #framework #BasicArchitecture #RawCode #RawScript #Opensource #DigitalConsole
To build a new gaming console’s digital framework from the ground up, you would need to integrate several programming languages and technologies to manage different aspects of the system. Below is an outline of the code and language choices required for various parts of the framework, focusing on languages like C++, Python, JavaScript, CSS, MySQL, and Perl for different functionalities.
1. System Architecture Design (Low-level)
• Language: C/C++, Assembly
• Purpose: To program the low-level system components such as CPU, GPU, and memory management.
• Example Code (C++) – Low-Level Hardware Interaction:
#include <iostream>
int main() {
// Initialize hardware (simplified example)
std::cout << "Initializing CPU...\n";
// Set up memory management
std::cout << "Allocating memory for GPU...\n";
// Example: Allocating memory for gaming graphics
int* graphicsMemory = new int[1024]; // Allocate 1KB for demo purposes
std::cout << "Memory allocated for GPU graphics rendering.\n";
// Simulate starting the game engine
std::cout << "Starting game engine...\n";
delete[] graphicsMemory; // Clean up
return 0;
}
2. Operating System Development
• Languages: C, C++, Python (for utilities)
• Purpose: Developing the kernel and OS for hardware abstraction and user-space processes.
• Kernel Code Example (C) – Implementing a simple syscall:
#include <stdio.h>
#include <unistd.h>
int main() {
// Example of invoking a custom system call
syscall(0); // System call 0 - usually reserved for read in UNIX-like systems
printf("System call executed\n");
return 0;
}
3. Software Development Kit (SDK)
• Languages: C++, Python (for tooling), Vulkan or DirectX (for graphics APIs)
• Purpose: Provide libraries and tools for developers to create games.
• Example SDK Code (Vulkan API with C++):
#include <vulkan/vulkan.h>
VkInstance instance;
void initVulkan() {
VkApplicationInfo appInfo = {};
appInfo.sType = VK_STRUCTURE_TYPE_APPLICATION_INFO;
appInfo.pApplicationName = "GameApp";
appInfo.applicationVersion = VK_MAKE_VERSION(1, 0, 0);
appInfo.pEngineName = "GameEngine";
appInfo.engineVersion = VK_MAKE_VERSION(1, 0, 0);
appInfo.apiVersion = VK_API_VERSION_1_0;
VkInstanceCreateInfo createInfo = {};
createInfo.sType = VK_STRUCTURE_TYPE_INSTANCE_CREATE_INFO;
createInfo.pApplicationInfo = &appInfo;
vkCreateInstance(&createInfo, nullptr, &instance);
std::cout << "Vulkan SDK Initialized\n";
}
4. User Interface (UI) Development
• Languages: JavaScript, HTML, CSS (for UI), Python (backend)
• Purpose: Front-end interface design for the user experience and dashboard.
• Example UI Code (HTML/CSS/JavaScript):
<!DOCTYPE html>
<html>
<head>
<title>Console Dashboard</title>
<style>
body { font-family: Arial, sans-serif; background-color: #282c34; color: white; }
.menu { display: flex; justify-content: center; margin-top: 50px; }
.menu button { padding: 15px 30px; margin: 10px; background-color: #61dafb; border: none; cursor: pointer; }
</style>
</head>
<body>
<div class="menu">
<button onclick="startGame()">Start Game</button>
<button onclick="openStore()">Store</button>
</div>
<script>
function startGame() {
alert("Starting Game...");
}
function openStore() {
alert("Opening Store...");
}
</script>
</body>
</html>
5. Digital Store Integration
• Languages: Python (backend), MySQL (database), JavaScript (frontend)
• Purpose: A backend system for purchasing and managing digital game licenses.
• Example Backend Code (Python with MySQL):
import mysql.connector
def connect_db():
db = mysql.connector.connect(
host="localhost",
user="admin",
password="password",
database="game_store"
)
return db
def fetch_games():
db = connect_db()
cursor = db.cursor()
cursor.execute("SELECT * FROM games")
games = cursor.fetchall()
for game in games:
print(f"Game ID: {game[0]}, Name: {game[1]}, Price: {game[2]}")
db.close()
fetch_games()
6. Security Framework Implementation
• Languages: C++, Python, Perl (for system scripts)
• Purpose: Ensure data integrity, authentication, and encryption.
• Example Code (Python – Encrypting User Data):
from cryptography.fernet import Fernet
# Generate a key for encryption
key = Fernet.generate_key()
cipher_suite = Fernet(key)
# Encrypt sensitive user information (e.g., account password)
password = b"SuperSecretPassword"
encrypted_password = cipher_suite.encrypt(password)
print(f"Encrypted Password: {encrypted_password}")
# Decrypting the password
decrypted_password = cipher_suite.decrypt(encrypted_password)
print(f"Decrypted Password: {decrypted_password}")
7. Testing and Quality Assurance
• Languages: Python (for automated tests), Jest (for JavaScript testing)
• Purpose: Unit testing, integration testing, and debugging.
• Example Unit Test (Python using unittest):
import unittest
def add(a, b):
return a + b
class TestGameFramework(unittest.TestCase):
def test_add(self):
self.assertEqual(add(10, 20), 30)
if __name__ == '__main__':
unittest.main()
8. Order of Implementation
• Phase 1: Focus on core system architecture (low-level C/C++) and OS development.
• Phase 2: Develop SDK and start building the basic framework for UI and input management.
• Phase 3: Work on backend systems like the digital store and integrate with front-end UI.
• Phase 4: Begin rigorous testing and debugging using automated test suites.
This comprehensive approach gives you a detailed idea of how each component can be built using a combination of these languages and technologies. Each section is modular, allowing teams to work on different aspects of the console simultaneously.
[Pixel Art/Sprites/Buildinodels/VictoriaSecretPixelArtKit #Playstation7 #DearDearestBrands]
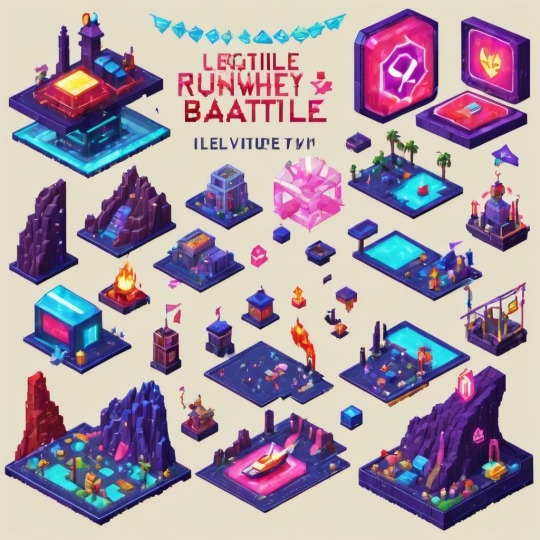
#victoriasecretrunway#runwaybattle#victoria secret fashion#victoria secert model#victoriasecret#victoria secret#VictoriaSecretRunwayBattle#capcom victoriasecret#capcom videogames#playstation7#ps7#deardearestbrands#capcom#digitalconsole#python#script#rawscript#raw code#framework#VictoriaSecretVideoGame#deardearestbrandswordpress
0 notes
Text
AdLink I-Pi SMARC 1200 Plus DevKit With MediaTek Genio 1200
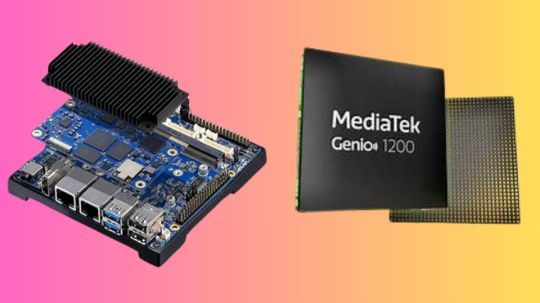
I-Pi SMARC 1200
AdLink I-Pi SMARC 1200 Plus DevKit, an octa-core MediaTek Genio 1200 processor-powered AI and graphics-focused solution. The octa-core Arm Cortex-A78 and Cortex-A55 CPUs in the Genio 1200 are paired with a 5-core Arm Mali-G57 GPU for cutting-edge 3D graphics and an embedded NPU that can handle up to 5 TOPS of edge AI data.
The on-device AI processing capabilities of the I-Pi SMARC 1200 include computer vision and deep learning neural network acceleration. Moreover, up to three MIPI camera inputs and several 4K displays are supported by the SMARC. For a variety of next-generation AI focused developments, including smart homes, industrial IoT, 3K multimedia apps, and human-machine interfaces, this is the go-to option. Product developers can explore new avenues and expedite proof of concept creation before production with the dev kit, which lowers costs and shortens time to market.
Pi SMARC 1200
MediaTek Genio 1200 platform
The Octa-core MediaTek MT8395 powering the LEC-MTK-I1200 module (Cortex-A78 x4 + A55 x4 in the arm)
The Smart Mobility Architecture, or SMARC Form Factor
SMARC 2.1 specification: a very small and power-efficient design appropriate for edge computing and embedded applications.
Due to its small size (82 x 80 mm), it is perfect for designs that need to save space, like industrial IoT systems, robotics, smart home appliances, and AI cameras.
All-encompassing Connectivity
Support for Bluetooth 5.2 and Wi-Fi 6 allows for fast wireless data transfer.
Support for optional 5G: Enables cellular high-speed connectivity for Internet of Things applications that need dependable network access.
Gigabit Ethernet: Quick connectivity for edge devices via wired networks.
Display and Graphics
Equipped with a Mali-G57 GPU, capable of encoding and decoding 4K60 HDR video.
There are several display interfaces available for connecting high-definition monitors and displays, including as HDMI, eDP, and MIPI DSI.
A Variety of I/O Interfaces
Peripheral connectivity via PCIe, USB 3.1, and I2C enables expansion with extra parts including cameras, sensors, and storage devices.
AI cameras can be connected via the MIPI CSI camera interface, which is helpful for robotics and smart surveillance applications.
AI & Machine Learning on the Edge
For real-time decision-making, the AI Processing Unit reduces dependency on cloud computing by enabling effective AI inferencing at the edge.
Perfect for jobs involving natural language processing, computer vision, and machine learning.
Stored Information and Memory
Supports high-speed memory operations with LPDDR4x RAM.
Sffers external SD card ports, UFS, and eMMC as storage options.
Low Power Need
It is appropriate for battery-powered IoT devices such as smart cameras, portable robotics, and IoT sensors because it was designed with energy efficiency in mind.
Uses in Industry
Suitable for industries where AI and IoT solutions are essential, such as smart manufacturing, smart cities, healthcare, and retail.
Creation and Personalization
Offers compatibility for Linux, Android, and other embedded operating systems together with a thriving software ecosystem.
Gives developers the ability to design unique apps and solutions for AI-powered Internet of Things gadgets.
Read more on Govindhtech.com
#X870ETaichi#AMDRyzen9000Series#graphicscards#motherboards#miniPCs#Gamingmonitor#AMDRyzen#CPUperformance#DDR5RAM#news#technews#technology#technologynews#technologytrends#govindhtech
0 notes
Text
What Are The Features Of Java Foundation Classes?

Aadhaar Foundation Course in Bhopal
The Aadhaar Foundation Course in Bhopal are a set of graphical user interface (GUI) components and services that form a part of the Java Development Kit (JDK). JFC is essential for building rich desktop applications in Java and includes components for creating windows, buttons, menus, and other elements necessary for a GUI. Here are the key features of Java Coding classes for beginners in bhopal:
1. Swing Components:
Lightweight Components: Swing components are "lightweight," meaning they are written entirely in Java and do not rely on the platform's native GUI components Java coding Classes in Bhopal. This allows for greater flexibility and consistency across different platforms.
Rich Set of Controls: Swing provides a comprehensive set of GUI components, such as buttons, labels, text fields, tables, trees, and more, allowing developers to build complex user interfaces.
Customizable Look and Feel: Swing supports pluggable look-and-feel, enabling developers to change the appearance of applications without altering the underlying code. Developers can create custom themes or use built-in ones to match the application's design requirements.
2. AWT (Abstract Window Toolkit):
Platform Independence: AWT is the original set of GUI components in Java, providing a basic set of controls like buttons, scroll bars, and text fields. AWT components are heavyweight, meaning they rely on the underlying operating system's windowing system.
Event Handling: AWT provides a robust event-handling mechanism that allows developers to manage user interactions like clicks, key presses, and mouse movements efficiently.
3. Java 2D API:
Advanced Graphics Capabilities: The Java 2D API, part of the JFC, provides advanced features for drawing shapes, text, and images with high quality. It supports anti-aliasing, gradient fills, and complex transformations, allowing developers to create sophisticated graphics and user interfaces. Programming or Language classes in Bhopal
Custom Rendering: Developers can use Java 2D to render custom components and create visually rich applications, including charts, diagrams, and other graphical elements.
4. Drag and Drop Support:
Ease of Use: JFC includes support for drag-and-drop functionality, enabling users to drag objects within a Java application or between Java coaching in bhopal and native applications seamlessly.
Interoperability: This feature enhances the user experience by making interactions more intuitive and allowing for better integration with other software.
5. Accessibility API:
Support for Assistive Technologies: JFC includes the Accessibility API, which helps developers create applications that are accessible to users with disabilities. This API provides hooks for screen readers and other assistive technologies, ensuring that Java applications can be used by everyone.
Compliance with Standards: The Accessibility API helps applications comply with accessibility standards, making them more inclusive and widely usable.
6. Internationalization:
Multilingual Support: JFC supports internationalization, allowing developers to create applications that can easily be adapted for different languages and regions. This is crucial for building global applications.
Locale-Sensitive Components: Swing and AWT components can be customized based on the user's locale, ensuring that dates, numbers, and messages are displayed appropriately for different regions & Aadhaar Foundation Course in Bhopal.
7. Data Transfer and Clipboard Management:
Data Sharing: Aadhaar Foundation Course in Bhopal provides classes for data transfer, enabling applications to copy and paste data between different parts of the application or even between different applications. This is a key feature for enhancing user productivity.
Clipboard Integration: The clipboard management features allow for easy integration of copy-paste functionality, making it simple to share data within and across applications.
8. Security Features:
Sandboxing: Java applications built with JFC can be run in a secure environment, with limited access to system resources. This is particularly important for applets and other applications that are downloaded and executed from the internet.
Access Control: JFC's security features ensure that applications adhere to strict security policies, protecting the user's data and system from unauthorized access.
9. Printing Support:
Document Printing: JFC includes robust printing support, allowing developers to add printing capabilities to their applications. Users can print documents, graphics, and other content directly from Java applications.
Custom Print Dialogs: Developers can create custom print dialogs and control the printing process, including page setup, print preview, and print job management.
10. Integration with Other Java APIs:
Seamless Development Experience: JFC integrates well with other Java APIs, such as JDBC (Java Database Connectivity) for database access, RMI (Remote Method Invocation) for distributed computing, and more. This makes it easier to build comprehensive applications that leverage the full power of the Java platform.
Conclusion:
Aadhaar Foundation Course in Bhopal provide a powerful toolkit for building platform-independent, feature-rich GUI applications. With components like Swing, AWT, and the Java 2D API, JFC offers developers the flexibility to create sophisticated user interfaces that are customizable, accessible, and secure. Whether you are developing simple desktop applications or complex enterprise software, JFC is a crucial part of the Java ecosystem.
#Java foundation classes in bhopal#aadhaar foundation course in bhopal#java aadhaar foundation courses in bhopal#java coaching in bhopal#learn java programming in bhopal#java coding classes in bhopal#robotics programming in bhopal#programming or language classes in bhopal#coding classes for beginners in bhopal#full stack development institute in bhopal
0 notes
Text
What to Expect at Art Camp: Tips for First-Time Attendees
Art Camp is an immersive and creative experience designed to nurture artistic skills and foster creative expression in participants of various ages. These camps typically run during summer breaks or school holidays, offering a focused environment for exploring different art forms and techniques.

Buy now:19.95$
At Art Camp, attendees engage in a wide range of artistic activities, which may include:
Drawing and sketching
Painting (watercolor, acrylic, oil)
Sculpture and pottery
Mixed media and collage
Digital art and graphic design
Photography
Printmaking
Fiber arts (weaving, knitting, embroidery)
The camps are usually led by experienced artists and art educators who provide guidance, instruction, and inspiration. Participants are encouraged to experiment with new mediums, develop their unique style, and push their creative boundaries.
Art Camps often culminate in an exhibition or showcase where campers can display their work to friends and family, celebrating their artistic achievements and growth.

Buy now
Beyond technical skills, Art Camps also promote:
Self-expression and confidence
Problem-solving and critical thinking
Appreciation for diverse art forms and cultures
Collaboration and peer learning
Mindfulness and stress relief through creative processes
Whether for beginners or more experienced young artists, Art Camps provide a supportive and stimulating environment for artistic exploration and personal growth. They offer a valuable opportunity to dive deep into the world of art, make new friends with shared interests, and create lasting memories and artworks.
Presents for RV campers focus on enhancing the mobile lifestyle with a blend of practicality and comfort. Space-saving items are highly valued, such as collapsible kitchenware, foldable outdoor furniture, and multi-purpose tools. Tech gadgets like portable solar chargers, Wi-Fi boosters, or compact weather stations are popular choices. Personalized gifts, including custom RV signs or map-themed decor, add a homey touch to the mobile abode. Practical

Buy now
items such as leveling blocks, water pressure regulators, or organization solutions are always appreciated. For leisure, consider outdoor games, compact grills, or cozy blankets designed for small spaces. Safety-oriented gifts like emergency kits or CO detectors show thoughtfulness. The best presents for RV campers combine functionality with the spirit of adventure, making life on the road more enjoyable and convenient.
Gifts for camper owners cater to their mobile lifestyle, combining practicality with comfort. Popular choices include space-saving kitchenware, collapsible outdoor furniture, and multipurpose tools. Tech-savvy options like solar chargers or portable Wi-Fi boosters enhance connectivity on the road. Personalized items such as custom camper signs or outdoor-themed decor add a homey touch. Practical gifts like leveling blocks, water filters, or compact storage

Buy now
solutions are always appreciated. For leisure, consider portable games, compact grills, or cozy outdoor blankets. These thoughtful presents aim to make life on the road more enjoyable, comfortable, and efficient for camper enthusiasts.
#camper gifts#rv gifts#camping gifts#outdoor gifts#rv camper gifts#art camp#summer camp#kids camp#art classes#View all AUTISM GIFTS products: https://zizzlez.com/trending-topics/hobbies/autism-spectrum-awareness-month/#All products of the store: https://zizzlez.com/
0 notes
Text
Tips and tricks for a memorable custom magnet handout
Custom magnets are more than just slapping a logo on a magnetic sheet. Careful planning and attention to detail are necessary for something that truly stands out. There's more to custom magnets than just pretty things for whiteboards and refrigerators. They act as constant brand reminders, ensuring that your company remains at the forefront of clients' minds. Here are a few reasons why bespoke magnets are an effective marketing tool:
Custom magnets provide a great return on investment. Magnets are less expensive to create and distribute than traditional advertising platforms such as television and radio. This makes them an excellent choice for small enterprises and startups seeking to maximise their marketing budget. Magnets are designed to last. While fliers and business cards are frequently tossed, magnets can stay in place for months or even years. This endurance ensures that your brand remains visible to customers, reinforcing brand recognition over time.
Custom magnets come in many different forms, sizes, and styles. This versatility enables organizations to build distinctive and eye-catching designs that appeal to their target audience. From traditional refrigerator magnets to automobile magnets and magnetic business cards, the options are limitless. Magnets are intrinsically beneficial. They can be used to store messages, images, and reminders on metal surfaces such as refrigerators and office cabinets. This feature ensures that clients maintain and use them, delivering continuous exposure to your brand message.
Developing an effective custom magnet necessitates careful consideration of design factors. A crowded design may overwhelm viewers and dilute your business message. Aim for a clean, straightforward design that clearly communicates your brand's name, logo, and contact information. High-resolution photos and graphics are required for a professional appearance. Blurry or pixelated visuals might undermine your brand's credibility.
Consistent use of trademark colors promotes brand identity and makes your magnet easily identifiable. Ensure that the colors selected are consistent with your entire branding approach. When deciding on the size and design of a magnet, consider where and how it will be used. Make sure it's large enough to be noticed but not so big that it becomes inconvenient.
Once you've created your custom magnets, the next step is to get them into the hands of potential buyers. Trade exhibitions, conferences, and community events are wonderful places to distribute unique magnets. They make excellent freebies for participants to take home, keeping your brand visible long after the event. If you have a storefront, you can display custom magnets at the checkout counter for consumers to take. You may even include them with purchases as a thank-you present to improve the client experience and promote loyalty.
To distribute your magnets, partner up with businesses that work well with each other. For example, a real estate agent could collaborate with a moving firm to include their magnets in moving kits given to new homeowners. Giving bespoke magnets as gifts to colleagues and clients develops relationships while also expanding your brand's reach as they use and display the magnets in their personal places.
Tracking the performance of your custom magnet campaign is critical for determining its impact and optimizing future efforts. Monitor any increases in phone calls, emails, or social media queries that can be related to the presence of your unique magnets. Analyse sales data to see if there is an increase in purchases following the distribution of bespoke magnets. This might help to determine the campaign's return on investment. Collect feedback from customers about the magnets. Did they find them useful? Did the magnets affect their decision to interact with your company? This qualitative data can yield useful information.
Custom magnets are a versatile, affordable, and long-lasting marketing tool that may greatly increase brand visibility. By implementing them into your marketing strategy, you can keep your brand in customers' minds, encourage loyalty, and increase engagement. Custom magnets, whether through innovative designs, clever distribution, or utilising their practical functionality, provide a sticky solution for keeping your brand in the spotlight.
Don't underestimate the impact of tangible promotional materials like custom magnets in a world where digital marketing typically takes precedence. Their capacity to provide consistent, long-term brand exposure makes them a vital component of any comprehensive marketing strategy. So be creative, create your magnets with care, and let them work their magic to promote your company.
0 notes
Text
User Personas and Wireframe sketches
During my tutorial, it was suggested that I create user personas to distance myself from the target audience. I thought this may be useful because I will be able to consider how I can accommodate a range of people who fit under my still large target audience, instead of one specific section.
User Persona 1
Name - Elaine
Age - 22
Career - Aspiring Illustrator
Aim - Discover new ways to sell her illustrations.
Problems - Cost of living crisis makes workshops too dear for her to sign up for. She is finding it hard to sell her illustrations as they are only originals or prints.
Likes/interests - Sells her work on Etsy. Uses Instagram to show her illustrations. Uses procreate to edit her illustrations.
User Persona 2
Name - Leon
Age - 19
Career - Graphic Design Student
Aim - Looking for new ways to develop work away from technology.
Problems - Restricted time to learn new skills because of university projects. Unsure where to find information on how to learn handcrafted skills.
Likes/interested. Uses Instagram and TikTok to view creative content. Takes inspiration from Its nice that and Creative Boom. Uses Adobe creative work to create digital works and mockups.
Wireframe Sketches
Using inspiration from the designs of my presentation sketches and target audience research, I decided to briefly sketch out page designs to gain an idea on how I could layout the content I have compiled.
Home page

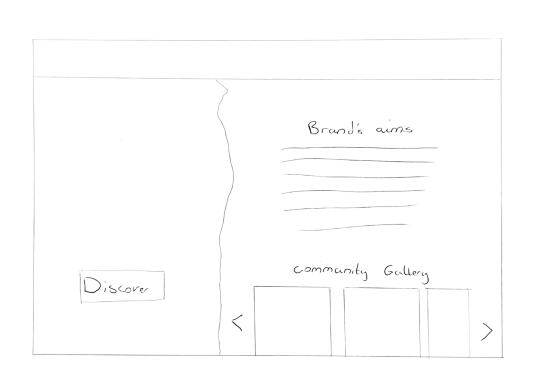
For the home page I decided to use an image highlighting the hand crafted element to immediately show this focuses on traditional crafts that usually use minimal machinery.
Craft page
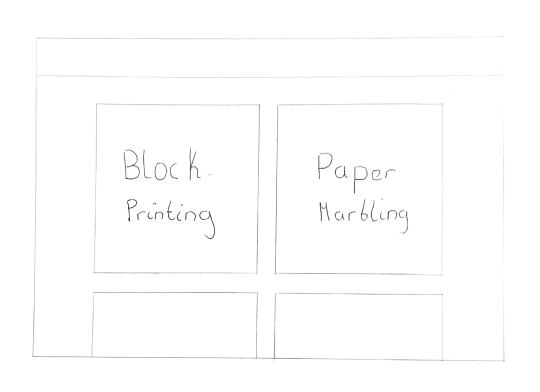
For the crafts page I decided to use a two row grid, to allow large gutters and margins because my research into Counterprint shows small gutters makes the viewer feel rushed. For this page I want the user to take the time to explore the craft images and names, so using large gutters will allow a more leisurely scrolling page.
Block printing page
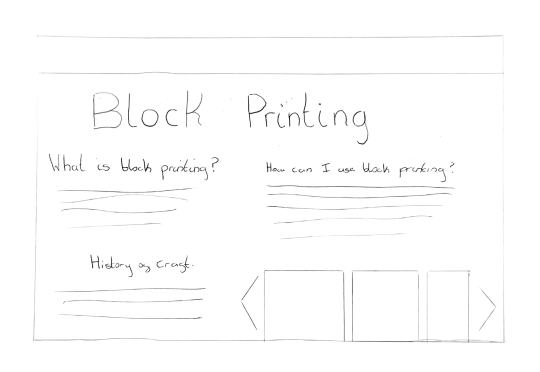
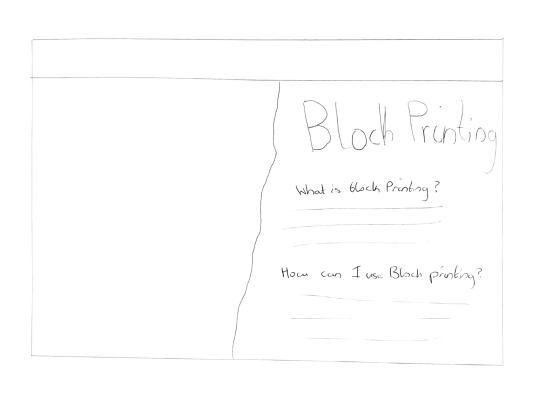
Although the Block printing page is predominantly information based, I want to link back to the creative side by using large images/Illustrations to showcase the products that can be created. This will allow the viewer to visualise how they can use it within their practice easier than if I solely use text.
Shop Page
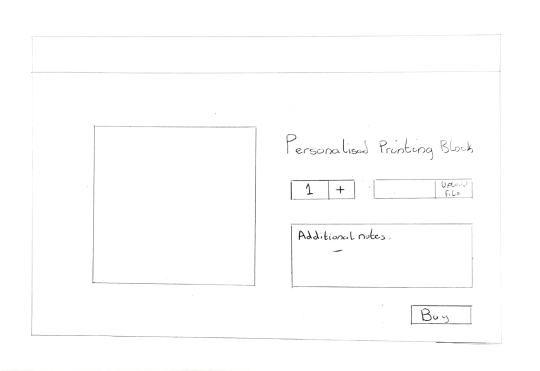
For the additional service I decided to only sell the printing block as when looking at what base materials most creatives have, I found the majority have access to ink and rollers. Therefore by only including the printing block, it makes it more affordable and obtainable than the full kit. For the design I wanted to keep the layout simple. However, I am still unsure on how a shop should be laid out to be easily used. Therefore I will need to look at how existing websites display products to be sold.
0 notes
Text
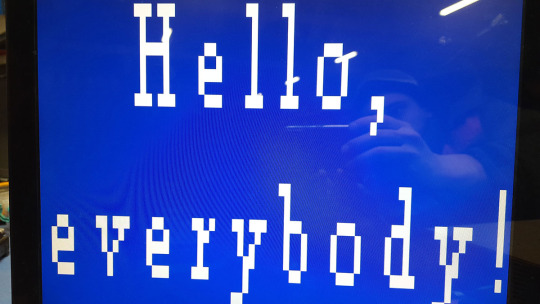
Sometimes, when making your own devices on microcontrollers, there is a need to display huge amounts of information on a display and to use a bigger screen for ease of perception. Unfortunately, there are no ready-made and budget-friendly solutions for this task on the market. LCD displays with the ability to connect to a microcontroller are usually tiny and pricy.
But at the same time, there is a wide selection of legacy LCD monitors with a VGA interface. Models with a diagonal of 15 to 19 inches can be purchased in perfect working condition for a very low price, or one can even get one for free. This especially applies to monitors with a 4:3 aspect ratio. In addition, such models are usually quite reliable.
Most older monitors only have a VGA connector for connecting to a computer. Sometimes there is an additional DVI port (on more expensive models). The HDMI connector is more common on modern devices.
Thus, with a probability close to 100%, we'll get just a VGA on an older monitor. In order to display an image on such a monitor, it is enough to work with only five signals: analog R (red), G (green), and B (blue), responsible for the brightness of each color component, as well as digital HS (horizontal sync) and VS (vertical sync), providing synchronization. Analogue signal levels should range from 0 to 0.7 V, where 0 V corresponds to no light at all and 0.7 V to maximum brightness. Digital signals HS and VS are short pulses with a TTL level of negative polarity. The timings of these signals can be found, for example, here: http://tinyvga.com/vga-timing/640x480@60Hz.
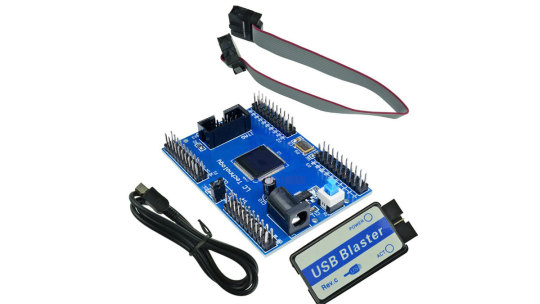
Typically, special controllers, or FPGAs, are used to generate video signals, and many FPGA development boards are already equipped with a VGA connector. However, FPGAs are often expensive and require many additional components. I was looking for a simpler and cheaper solution. As a result, the decision was made to use CPLD. CPLDs have fewer available logic gates (LEs) than FPGAs but are less expensive. For example, the MAX II Altera EPM240 development board is sold on Aliexpress: https://www.aliexpress.us/item/3256804686276488.html for only $8.12 (excluding shipping), and the kit even includes a programmer. The chips themselves can be purchased for $1.6–2.1 (for nice knockoffs).
Plain text mode was chosen for implementation because it is easier for a slow microcontroller but at the same time quite informative. Some graphics elements can be implemented using pseudo-graphics symbols, as was often done in the days of DOS. The introduction of a graphics mode would require transferring a large amount of data from the microcontroller and additional efforts to create it, which is not always possible, especially for weak cores.
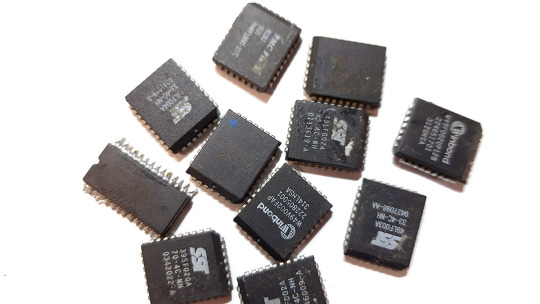
CPLD has a built-in Flash ROM (User Flash Memory block, UFM), which can be used as a character ROM. However, its capacity is very limited—only 8 kbit, or 1 KB. This amount of storage is only sufficient for characters with a resolution of 5×7 pixels, and only if we discard non-displayable, insignificant, and visually identical characters from the ASCII table. In addition, the use of UFM will require the use of logic gates (LE), of which there are already a few. Despite the attractiveness of this option, I had to abandon it and use an external ROM chip, which can be salvaged from an old motherboard. Choosing a microchip with a supply voltage of 3.3 V will eliminate problems with matching voltage levels for the CPLD. The capacity of such ROMs is quite large: 2, 4, or 8 Mbit, or at least 256 to 1024 KB, which allows one to store a large number of different fonts with a decent resolution of 8x16 pixels.
To store the screen image, you will also need a RAM chip. Let's estimate the approximate size required for this. If we plan on using an 8×16 pixel font on a screen with a resolution of 640×480 pixels, we will end up with 80 characters per line and 30 lines on the screen. Thus, saving the screen image will require 80 × 30 = 2400 bytes. This number is somewhat inconvenient because it is just slightly larger than the nearest power of two, 2048. The memory use in this case is inefficient—only 58%, since the next power of two is 4096. By the way, this is exactly why text mode with 80×25 symbols became popular since there are 5 fewer lines on the screen. In this case, only 2000 bytes of memory are needed, which easily fits into 2 KB.
However, modern memory chips have significant storage sizes, and saving memory is not so critical nowadays. Moreover, one can deliberately choose to waste memory in order to simplify the decryption logic and save CPLD logic elements. Then you will need at least 4096 bytes (2^12, 12 address bits), which can be divided as follows: 5 address bits are allocated to the row address on the screen (30 of 32 will be used) and 7 bits to the column or position address characters in the string (80 out of 128 will be used).
4096 bytes are required only for storing ASCII symbols. The same amount of memory will be taken by the symbol attribute page. Attributes must include character color (3 bits), background color (3 bits), underline, and blinking. So, a memory of at least 8 KB is required.
Of the most affordable options, the best one is static RAM (used as cache memory), also salvaged from old devices or motherboards. It should be noted that this memory can only operate at 5 V. However. If it is a CMOS-type memory, it can take 3.3 V, but this will require timing correction.
So, we got the following diagram:.
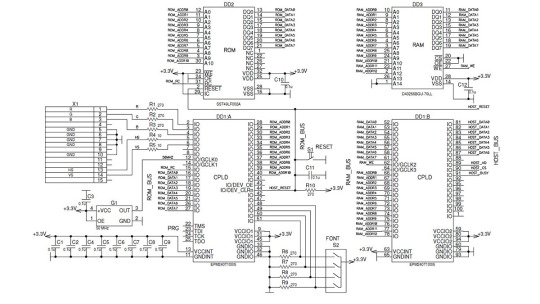
The circuit includes only three microchips and a minimum number of external components. Using the aforementioned Altera EPM240 development board as a base, all you need are ROM chips, RAM chips, and a DSUB header with five resistors. Connecting signals to the CPLD is just an approximation, since almost all of its pins are equivalent (with the exception of Global CLK, one of which requires connecting a signal from a clock generator). When the chip is repeatedly reprogrammed for a new device, almost all of its signals can be reassigned. Currently, the device is assembled on a breadboard and can be left aside.
The device communicates with the microcontroller via a parallel 8-bit interface (in the diagram, signals with the HOST prefix), which is logically almost identical to the widely used display interface on the 1602 and similar controllers. The only difference is the addition of a BUSY signal directed from the device to the microcontroller. Its necessity is due to the fact that access to the RAM chip is provided only during the backward sweep period. The rest of the time, the chip is busy (pun intended) executing CPLD logic. The BUSY signal also acts like an interrupt request (IRQ) function. When it's changed, the controller can automatically start writing to the screen buffer.
Interface description:
DATA[7:0] – eight bits of data, unidirectional port, intended exclusively for writing to the device
CS – chip select; 0 for chip is selected, 1 for chip is not selected. On the positive edge of the CS signal, the data is latched for writing.
AD – address/data, during a write operation: 0 – data is being transferred; 1 – address is being transferred.
BUSY – device busy state; 0 – free; 1 – busy. If the device is busy, the write operation to RAM is ignored. Writing is only possible to the address register.
RESET – device reset. 0 – reset; 1 – work. A hard reset can be used to turn off the screen immediately. When this signal is activated, the image output to the monitor stops. Resetting does not affect the contents of the RAM chip.
Writing data from the microcontroller to RAM is possible only during the backward sweep of the frame scan, when the RAM chip is not occupied by the CPLD logic. This time interval is 1.440 milliseconds. Despite the significant duration of this interval, when using slow microcontrollers, there may not be enough time to completely rewrite the entire memory space. For example, an AVR microcontroller, when operating at a frequency of 11.0592 MHz, is capable of recording only three full-screen lines with all the attributes. If one does not update the attributes (as is usually the case in real-life applications, attributes are written once when the program starts), then six full rows can be written in this time. Perhaps optimizing the code and rewriting it in assembly language can significantly speed up the process of updating data. Otherwise, it may take from 5 cycles (if updating only the data) to 15 cycles (if updating the attributes) to completely rewrite the screen. At 60 fps, it will take 1/12 to 1/4 of a second. Those who have ever worked on IBM PC/XT or IBM PC/AT computers with processor clock speeds around 4 to 12 MHz may notice the experience of refreshing the screen to be familiar.
If you don’t want to wait for the next vertical pulse and want to record all the data at once, you can use the RESET signal. When activated, the internal logic of the CPLD stops and is disconnected from the RAM chip, allowing the microcontroller to directly access the memory. Registers for working with RAM are not affected by the reset signal.
In general, the write operations are as follows: you need to wait until the BUSY signal becomes zero, then put the desired data on the data bus, set the data type (address or data) AD, and set the CS signal first to 0, then to 1. When this signal changes from 0 to 1, the data is stored in memory. During a vertical pulse, the RAM chip is directly connected to the microcontroller's HOST signals, so maintaining the timings during writes becomes the responsibility of the microcontroller. However, since static RAM is a fairly fast device and typically has timings significantly smaller than the maximum speed of an average microcontroller driving its I/O lines, this task is not difficult.
The RAM chip D43256BGU-70LL is connected to the CPLD's output pins, with the lines having a 'RAM' prefix on the diagram. These signals include an 8-bit bidirectional data bus and a 13-bit address bus. Of the control signals, only the WE signal is used. Since there is only one chip on the RAM bus and both buses (address and data) are completely under its control, the OE and CS signals are not used, equal 0, and connected to GND.
The SST49LF002A ROM chip is connected similarly (signals with the 'ROM' prefix), except that the data bus in this case is unidirectional. The OE and WE signals of this IC are also not used and are directly connected to 0 (GND) and 1 (VCC), respectively.
Jumpers are connected to the available CPLD pins to select the current font. Since the ROM chip is large enough, it allows one to store several different fonts, including national alphabets, and switch to them by installing jumpers.
The DSUB VGA port is connected to the CPLD using only 5 resistors. Resistors in the HS and VS circuits are primarily for protection and can be ditched. Resistors in circuits R, G, and B are selected in such a way that, together with the input resistance of the monitor (75 Ohms), they form a voltage divider that reduces the voltage at the monitor input to 0.7 V.
The power leads are shunted with ceramic capacitors, and the clock signal with a frequency of 50 MHz from a crystal is supplied to the GCLK0 pin. These parts were on the breadboard originally.
A resistor, a capacitor, and a button are connected to the RESET signal, forming it. However, if the signal is generated by a microcontroller, these components are redundant.
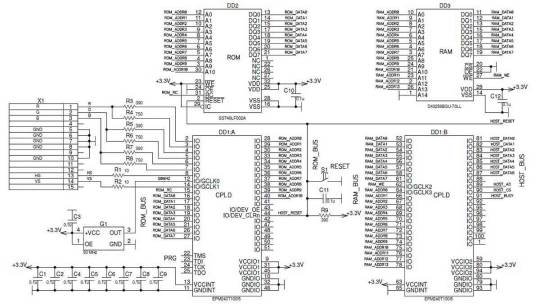
After creating the main part of the CPLD operating logic, it became clear that the number of logic elements (LEs) used was slightly over half of the available ones. In this regard, the idea arose to complexify the logic and add more features. First of all, the number of colors can be increased to 16 by adding three additional CPLD pins and three resistors. This won't significantly complicate the scheme, but it will add eight more colors. In this case, the RAM page with attributes will have to be completely devoted to color, and another page with attributes will have to be added, increasing the RAM address bus by 1 bit. In the second page of attributes, you can implement font selection, underlining, character and background flickering, and so on.
The new scheme looks similar to the previous one.
As the number of colors increases, the question is: which palette to choose? With only 8 colors, there is no such question; all colors are different combinations of the three primary colors: red, green, and blue (2^3 = 8). When there are more colors, different options are possible. For example, the 16-color EGA palette: https://moddingwiki.shikadi.net/wiki/EGA_Palette:
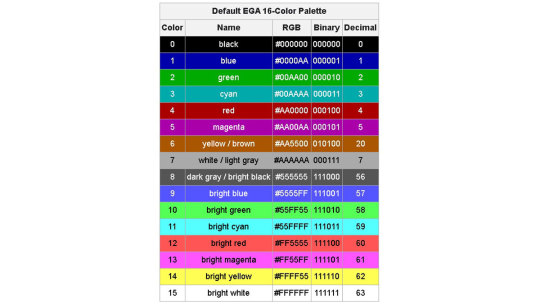
As can be seen from the presented palette, the 4th bit in the color number stands for brightness. However, the halves of the table are not evenly separated by brightness. The first half is set to 2/3 brightness (byte AAH = 170 = 2/3 × 256). In the second half, another 1/3 of brightness is added (byte 55H = 85 = 1/3 × 256), and the colors in this part are called "bright."
Interestingly, color No. 6 (yellow/brown) in this scheme deviates from the expected AAAA00 and is specifically set to AA5500. This was done to replace the unattractive, dirty yellow color with the more appealing brown. This is a known feature of EGA video cards and monitors. Some monitors took this into account, while others did not implement this feature in order to simplify the circuit. Some models added a BROWN ADJ knob so that the user could set the desired shade of that color. That is why the color in the table is indicated as yellow/brown.
Nonlinear separation by brightness level automatically leads to two shades of gray showing up: light gray and dark gray, which are widely used.
In the 16-color VGA palette: https://lospec.com/palette-list/microsoft-vga, the situation is slightly different: the colors are divided exactly in two halves by brightness (80H = 128 = 1/2 × 256):

There is also a noticeable outlier in this palette: light gray (С0С0С0), which should be black, duplicating an existing color. Additionally, this color swapped places with the dark gray color (808080). This was done intentionally to ensure compatibility between the VGA and EGA 16-color palettes, making them almost identical.
In our case, when the R, G, and B signals are generated in hardware using resistors, it is more convenient to use the EGA palette. So, it is necessary to make a software correction only for one color, No. 6. All other colors are generated automatically. Switching to the VGA palette would require not only a program change but also an additional group of resistors to be added to create the light gray color (C0C0C0). The resistors should be picked so that one group provides a brightness level of 1/3, the second is 2/3, and together they provide full brightness. By simple calculations using Ohm's law, we get the following values: 390 Ohms and 750 Ohms.
The signal generation logic for a static image like the one with test color bars is quite simple. However, if it is necessary to generate a dynamic image, the task becomes more complicated. It is necessary to organize a logical interface with RAM and ROM. At the same time, data exchange should occur not just quickly but lightning-fast! Let's first evaluate whether the selected chips can keep up with operating like this.
So, the resolution is 640x480. Pixel output frequency is 25 MHz (the standard specifies 25.175 MHz, but rounding to 25 MHz is acceptable since VGA, like many other analog standards, allows a significant spread of parameters). The frame refresh rate is 60 Hz (actually 59.5 Hz), and the line refresh rate is 31.46875 kHz (actually 31.25 kHz). Thus, the output time of one pixel is 40 ns, and the output time of an 8-bit character is 320 ns. During this time, the ASCII code of the character (one byte), the color code (one byte), and the attributes (one byte) should be read from RAM, and then, using the ASCII code as an address, we should read the bit mask of the character from ROM. Only then will the CPLD logic have all the necessary information to begin imaging.
According to the technical description (datasheet), for the selected D43256BGU-70LL chip, a full read cycle takes 70 ns. Considering the use of the chip at reduced voltage, the read cycle takes longer—let's say, 100 ns. Thus, in 320 ns, we will have enough time to read three bytes from RAM: ASCII code, color code, and character attributes. Great. The situation with ROM is more complicated: the address is written to it in two steps—in rows and columns—and, according to the manual, the read cycle takes 270 ns. Not the highest speed, but within the required 320 ns, even with time to spare.
The problem is that we can't start issuing the ROM address until we know at least the ASCII code, which takes 100 ns. This sums up to 370 ns. What saves us is the fact that each RAM or ROM read cycle individually fits within the allowed interval, and we can simply spend two additional cycles reading data. To add these two loops during data preparation, it is necessary to shift the character display area, creating an additional blanking area 2 characters wide at the beginning of the line and reducing the same area at the end of the line by 2 characters. This is quite simple to do: we simply shift the horizontal blanking pulse by 640 ns (accordingly, the horizontal sync pulse also shifts). From the monitor's point of view, there is no difference.
To better understand when and what to write and read, it is handy to create a timing diagram. At the beginning, all the timings were in my head, but creating a paper diagram and giving it another look allowed me to significantly optimize read cycles and even reduce the number of registers used.
The cycle begins by setting the RAM address of the ASCII character byte on the bus. After 80 ns, the requested byte appears on the RAM data bus, which is instantly used to generate the byte read address from the character generator ROM. At the 100 ns mark, we set the address of the symbol attributes byte to the RAM address bus. At 140 ns (60 ns after setting the address), we latch the first part of the ROM address. After another 60 ns, we set the second part of the address on the ROM address bus. At this point, there should be a byte of data on the RAM data bus with character attributes, where 5 bits correspond to the font and are included in the second part of the ROM address. The remaining 3 bits of data are stored in temporary register 2. After another 60 ns, we latch the second part of the ROM address. Data will appear on the ROM data bus 120 ns after this event, already during the second cycle. To prevent loop intersections, we write this data to temporary register 1 at 80 ns. And finally, at 300 ns, all the prepared data is written to the working registers. The character bitmask from temporary register 1 is copied into the rom_reg register, and the stored attribute bits are applied to the color byte that has been read at that time.
Thus, by the end of the second loop, all the data will be ready for outputting the symbol.
Writing data from the microcontroller to RAM is carried out as follows. We wait until the BUSY signal becomes zero, after which we set the starting addresses in the registers where data will be written. Typically, this is address 0, corresponding to the start of the data page, but a random address can also be chosen if only a few bytes need to be changed. Then we record the data. After each byte is written, the address is automatically incremented. When the edge of the screen is reached (the 80th character in a line), the address of the character position in the line is automatically reset to zero, and the line address is incremented by 1. After the entire page of data is written, the address is automatically adjusted to the attribute page entries and then the color page entries. After writing all three pages, the address is also automatically reset, and the process begins again with writing to the data page. Thus, the start address is set only once, and then only data is written. This saves a few microseconds on address setting and simplifies the code when all data can be transferred in one cycle.
Data format for writing data (AD=0):

The data page stores ASCII character codes.

The attributes page stores symbol attributes. The lower two bits are responsible for the hardware-driven blinking of a character or background, and the third bit is for the underline. The upper 5 bits select the font. Accordingly, you can display characters from different fonts mixed in any combination. 5 digits for selecting the font allow one to store 32 different fonts, which can include any symbols of national alphabets as well as tiles for displaying an image.

The color page contains the character color and the background color. Color can be anything from the 16-color palette.
There are three address registers. The choice of which particular one to write to is defined by the most significant bits of the data byte. If the most significant bit [7] is 0, then the position register in the row (column) is written. If it is 1, then the line number register (line) and RAM page number register (ASCII code, attributes, or color) are written. If the three most significant bits are equal to 1, then a special control register is written, bits [4] and [3] of which determine the position of the hardware-generated line when the underscore bit is turned on, and bits [2–0] are reserved for future settings.
Data format for writing address (AD = 1):

A register stores the position in a string.

The register stores the line number and page selection.

If you set an address outside the range of 0-79 for a column and 0-29 for a row, then data will begin to be written to the shadow memory area, which is not displayed on the screen. There is nothing wrong with this; after passing the address 127, the data will again be written to the visible area.
Internal CPLD registers (some):

The register contains the current horizontal scan position. It is clocked at a frequency of 50 MHz, which is two times the required 25 MHz, so the least significant bit (tact bit) is not used. Accordingly, bits 1 to 3 indicate the position within the character, and bits 4 to 10 indicate the position of the character in the string. When the value reaches 1600, the register is reset to zero, and the value in the vreg register is increased by 1.
The register contains the current vertical scan position. Clocked from the hreg register. Bits 0 to 3 indicate the line within the character, and bits 4 to 8 indicate the line on the screen. Bit 9 is not used. When the value reaches 525, the register is reset to zero.
The registers contain the current address value for accessing RAM (16 KB in total). The lower 7 bits are the character address in the line (column), then 5 bits are the line address, and 2 bits are the page address (ASCII code, attributes, or color). There are two of these registers: one for internal use by the CPLD logic, and the second is controlled externally by the microcontroller.
The ROM address register is written in two stages. It contains the character string address, the character's ASCII code, and the font address. These addresses are located in such a way that one can flash standard DOS *.fnt font files into the ROM without any additional processing, just one after another. You can combine several fonts into one file for firmware using any file editing program. Just make sure that the fonts have a resolution of 8x16.

Color output register. This register is connected directly to the CPLD pins, supplying the R, G, and B signals to the monitor. The lower 3 bits provide a signal with 2/3 of a brightness level (they must be connected to 390 Ohm resistors); the highest ones provide a signal with a brightness level of 1/3 (they must be connected to 750 Ohm resistors).
Photos to illustrate:
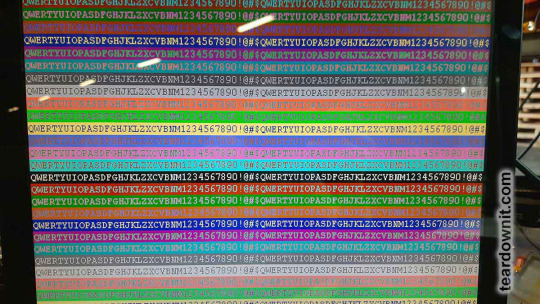
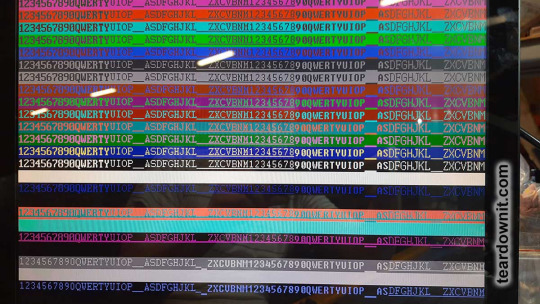
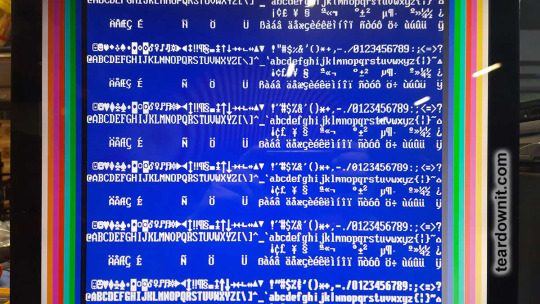
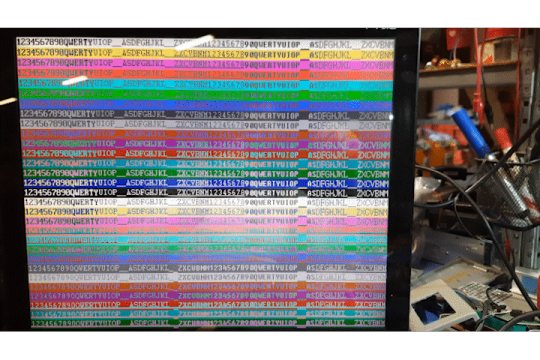
0 notes
Text
Advertising and Sponsored Content: Navigating the Path to Passive Income
Introduction:
In the ever-evolving landscape of digital entrepreneurship, bloggers and content creators are continually exploring diverse avenues to monetize their platforms. Among the myriad strategies, advertising and sponsored content stand out as effective means to generate passive income. In this article, we will delve into the world of advertising and sponsored content, exploring how these strategies can be harnessed to create a sustainable and lucrative source of passive income for bloggers.
Understanding Advertising and Sponsored Content:
**1. Advertising:
Display Ads: Banner or display ads are graphical ads placed strategically on your blog or website.
Text Ads: Short, text-based ads that blend seamlessly with your content.
Video Ads: Short video clips embedded within your content or as pre-roll/post-roll in videos.
2. Sponsored Content:
Sponsored content involves collaborations with brands or businesses, where you create content promoting their products or services.
This can include blog posts, social media content, videos, or a combination of these.
The Passive Income Advantage:
1. Passive Income Defined:
Passive income is money earned with minimal effort or direct involvement.
For bloggers, advertising and sponsored content provide avenues to generate revenue passively, allowing you to earn money even when you’re not actively creating new content.
2. Diversifying Income Streams:
Relying solely on one source of income is risky. Advertising and sponsored content offer diversification, reducing dependence on a single revenue stream.
3. Scalability:
As your blog grows, so does the potential for passive income through advertising and sponsored content.
Increased traffic and a larger audience often result in higher earnings.
Implementing Advertising Strategies:
1. Google AdSense:
Google AdSense is a popular choice for bloggers. It places contextual ads on your site, earning you money when visitors click on them.
Easy to set up, AdSense provides a passive income stream based on your blog’s traffic.
2. Direct Ad Sales:
Selling ad space directly to businesses or brands allows you to negotiate rates and terms.
This strategy provides more control but requires active management of partnerships.
3. Affiliate Marketing:
While not traditional advertising, affiliate marketing involves promoting products and earning a commission for each sale made through your unique affiliate link.
Integrating affiliate links strategically within your content can generate passive income over time.
Navigating Sponsored Content Opportunities:
1. Building a Strong Brand:
Brands are more likely to invest in sponsored content on blogs with a strong and authentic brand identity.
Focus on consistently delivering quality content that resonates with your audience.
2. Creating a Media Kit:
Develop a media kit showcasing your blog’s statistics, demographics, and engagement metrics.
A professional media kit enhances your appeal to potential sponsors.
3. Joining Influencer Networks:
Platforms like TapInfluence, AspireIQ, and IZEA connect influencers with brands seeking sponsored content.
Joining these networks provides opportunities for collaborations without actively seeking partnerships.
Maximizing Passive Income Potential:
1. Strategic Placement:
Place display ads strategically to maximize visibility without compromising the user experience.
A balance between ads and content ensures a positive reader experience.
2. Evergreen Content:
Optimize your blog for evergreen content that remains relevant over time.
Sponsored content integrated into timeless articles can continue to generate passive income.
3. Automated Processes:
Invest in automation tools to streamline advertising and sponsored content processes.
Tools for ad management and content scheduling can reduce manual effort.
Challenges and Considerations:
1. Balancing Authenticity:
Maintain authenticity to build trust with your audience.
Be selective with sponsorships to ensure alignment with your brand and values.
2. Fluctuating Income:
Passive income through advertising and sponsored content can fluctuate based on factors like market trends and audience engagement.
Diversifying income streams helps mitigate these fluctuations.
3. Legal Compliance:
Familiarize yourself with advertising and sponsorship regulations to ensure compliance.
Clearly disclose sponsored content to maintain transparency and trust.
Conclusion: Building a Passive Income Empire
Advertising and sponsored content, when approached strategically, offer bloggers the opportunity to transform their platforms into lucrative sources of passive income. By diversifying revenue streams, navigating opportunities wisely, and maintaining authenticity, bloggers can create a sustainable and scalable income source. As you embark on this journey, remember that successful implementation requires ongoing adaptation to industry trends, consistent audience engagement, and a commitment to providing value. With the right approach, advertising and sponsored content can become integral components of your blog’s passive income strategy, allowing you to reap the rewards of your digital endeavors.
0 notes
Text
NXP and Xiaomi Vela jointly build an IoT ecosystem to provide a powerful technology engine for the IoT development community
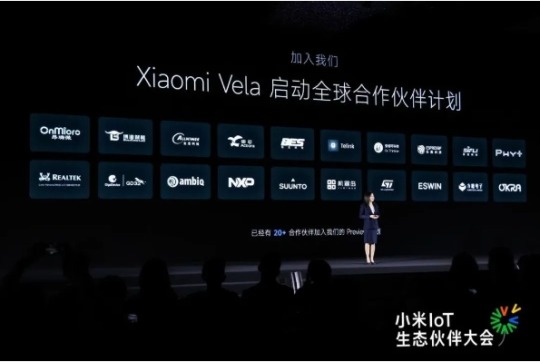
【Lansheng Technology News】Recently, at the 2023 Xiaomi IoT Ecological Partner Conference, NXP Semiconductors was invited to attend as an important partner of Xiaomi and demonstrated the powerful technical resource support provided to the Xiaomi Vela ecological community.
Xiaomi Vela is an embedded IoT software platform built on the open source real-time operating system NuttX and customized for consumer-grade IoT. It can provide a unified software platform on various IoT hardware, shielding the differences in underlying hardware. Through rich components and standardized software frameworks, it provides a unified software interface for upper-level device developers to open up fragmented things. Networked application scenarios greatly reduce the complexity of development and improve development efficiency.
As a global ecological partner of Xiaomi Vela, NXP is deeply involved in the construction of the ecosystem of this development community and has launched a series of technical resources. At this event, NXP highlighted the i.MX RT1060 EVK development kit.
NXP's i.MX RT1060 cross-border MCU is based on the 600MHz Arm Cortex-M7 core and has 1MB on-chip SRAM. It has strong real-time performance and high integration, and is suitable for various industrial and IoT applications. The i.MX RT1060 series provides 2D graphics, camera and various memory interfaces, as well as a wide range of connection interfaces, including UART, SPI, I2C, USB, 2 10/100M Ethernet interfaces and 3 CAN interfaces. Its other features for real-time applications include: high-speed GPIO, CAN-FD, and synchronous parallel NAND/NOR/PSRAM controller.
In addition, i.MX RT1060 has a 2D hardware graphics acceleration PXP module, 3 I2S interfaces for high-performance multi-channel audio, and supports LCD display controller (up to WXGA 1366 x 768). The i.MX RT1060 is available in 225BGA and 196BGA packages, providing greater flexibility with an extended temperature range of -40°C to 125°C.
The i.MX RT1060 series can be developed using NXP's official MCUXpresso tool chain, including SDK, IDE options, and security configuration and configuration tools, enabling rapid development and supporting various real-time operating systems (RTOS) such as FreeRTOS, Xiaomi Vela, Nuttx, Zephyr, etc. .
Xiaomi Vela is fully scalable from micro (8-bit) to mid-range embedded (64-bit) systems with a high degree of standards compliance, easy to port, fully open, highly real-time and powerful. i.MX RT1060 fully supports Xiaomi Vela. Currently supported drivers include ADC, CAN, eLCDIF, ENC, ENET, GPIO, I2S, PWM, SPI, UART and USB. It also supports Vela’s LVGL Demo and can be adapted to Xiaomi The upper component of Vela framework. This combination of soft and hard will provide a powerful technical engine for the development of the Xiaomi Vela ecological community.
Lansheng Technology Limited, which is a spot stock distributor of many well-known brands, we have price advantage of the first-hand spot channel, and have technical supports.
Our main brands: STMicroelectronics, Toshiba, Microchip, Vishay, Marvell, ON Semiconductor, AOS, DIODES, Murata, Samsung, Hyundai/Hynix, Xilinx, Micron, Infinone, Texas Instruments, ADI, Maxim Integrated, NXP, etc
To learn more about our products, services, and capabilities, please visit our website at http://www.lanshengic.com
0 notes
Text
Romance of the Three Kingdoms 8 Remake details new features, enhancements
Gematsu Source

Publisher Koei Tecmo and developer Kou Shibusawa have released new information and screenshots for strategy game remake Romance of the Three Kingdoms 8 Remake, introducing new features and enhancements such as new officers, scenarios, visuals, voices, and more.
Get the details below.
Romance of the Three Kingdoms 8 Remake is based on Romance of the Three Kingdoms VIII with Power Up Kit, complete with both the “All Officers Play” and “All Periods Scenarios” features, as well as a host of new content to deliver the most complete Romance of the Three Kingdoms experience to date. Among the new additions, the number of officers has been increased from approximately 600 to 1,000! With the newly added officers and forces that were not in the original game, players can enjoy new events and relationships between the officers for an even more authentic experience. The “All Periods Scenarios” feature has also been updated to offer more than 55 scenarios, including fictional scenarios—most in series history! From the end of the Eastern Han Dynasty to the final age of the Three Kingdoms period, players can choose any officer and period they’d like to play, creating numerous combinations for an ideal playthrough. To enhance the Romance of the Three Kingdoms experience, new visuals and voices have been added. Combining 2D and 3D graphics, it retains the atmosphere of the original title while being renewed with rich graphical expression. The number of voices has also been increased, with officers displayed in beautifully rendered graphics speaking to players in a variety of situations, with animated movies featuring full voices being used for important events*. The battlefield map has also been reworked, from a single 2D picture to a mix of 2D and 3D. Battlefields are created using the latest 3D technology, while distant landscapes are rendered as ink paintings to help create both powerful battles and an immersive experience! Combat in Romance of the Three Kingdoms 8 Remake remains turn-based, just like the original title, but the system has been fundamentally restructured, the result of Kou Shibusawa’s 20 years of know-how since the launch of Romance of the Three Kingdoms 8. While the remake retains the key features of RTK8 — simple rules that make it easy for beginners, a map that combines field and siege battles, and the use of terrain—the tempo and balance of the game have been greatly improved. With the addition of new features such as “Link Forged,” players will discover an easy-to-play yet highly tactical combat experience. The events that color the drama between characters can be found in the new “Tales” feature. This feature will allow players to check the conditions, outcomes, and branching of different events, so they know how to trigger the ones they want or how to avoid other events altogether. Historical events as well as general events are displayed, so that even beginners can check the conditions when they are not sure what to do, helping guide them in their play. In addition to events involving different officers, they will be linked through “Destiny”—the fate that connects two officers. There are two types of “Destiny”: “Symbiotic” and “Antagonistic.” “Symbiotic” makes it easier to have a good relationship with an officer, while “Antagonistic” makes it more likely to have a bad relationship. Depending on how players choose to progress, non-historically related characters can by linked by “Destiny,” and as relationships deepen, “Linked Forged” will occur in battles and missions, providing significant benefits. To help players easily keep track of the relationships and “Destiny” of the officer they play, a new “Relationship Chart” feature has been added. With this feature, players will be able to keep tabs on rivals, good friends, or anyone deeply involved in their lives. By interacting and working with characters they are close to, players will obtain greater achievements and this will also contribute to the protagonist’s growth. As relationships deepen, it will lead to events that will become turning points in the officer’s life, such as sworn siblings, marriage, and child rearing. Relationships depicted in the chart are not only historical, but players will see them change dynamically depending on how the gameplay unfolds!
Romance of the Three Kingdoms 8 Remake is due out for PlayStation 5, PlayStation 4, Switch, and PC via Steam in early 2024.
View the screenshots at the gallery.
#Romance of the Three Kingdoms 8 Remake#Romance of the Three Kingdoms 8#Romance of the Three Kingdoms#Koei Tecmo#Kou Shibusawa#Gematsu
0 notes
Text
Are You Looking For Pixel Parts?

If you are a user of the Google Pixel cell phone and looking for its parts, then now you can tackle the most concerning issues. Google is the most recent cell phone brand offering self-fix choices for its clients, particularly those who utilize the Google Pixel parts. The company offers you the opportunity to ship in the defective components and repair them yourself. Additionally, Google's self-repair program appears to be in its infancy. The company will make the repair kits available to more partners and provide them with the necessary training and tools to fix Pixel smartphones.
What Are The Essential Parts That You Must Discover For Google Pixel?
Buying any electronic device requires robust hardware that helps it to work efficiently and effectively. Here are the top 3 hardware that you must consider:-
Display And Design
The Pixel has a stunning display with sharp details and vibrant colors. The OLED board gives profound blacks and significant differences, improving the visual experience. In addition, the Pixel's sleek and ergonomic design provides a comfortable grip, making it enjoyable to hold and use.
Processor And RAM
The Pixel's powerful processor and ample RAM ensure smooth operation and multitasking. Recent processors guarantee quick app launches, fluid navigation, and smooth graphics. With adequate Slam, the Pixel handles asset escalated errands easily, permitting clients to switch among applications and perform requesting assignments without encountering any slack or stoppage.
Battery And Charging
The Pixel's battery and charging capabilities were developed to ensure that users remain connected throughout the day. The Pixel optimizes power consumption, which extends battery life, due to adaptive features and effective battery management. In addition, fast charging technology guarantees that users can quickly recharge their devices, reducing downtime and increasing productivity.
Conclusion
The Google Pixel parts are as important in providing an exceptional user experience as software advancements. The Google Pixel's hardware is crucial to its excellent performance, which has made it synonymous with cutting-edge technology and a seamless user experience.
0 notes
Text
Best MediaTek Genio 1200 + Advanced RSB-3810 Connection!
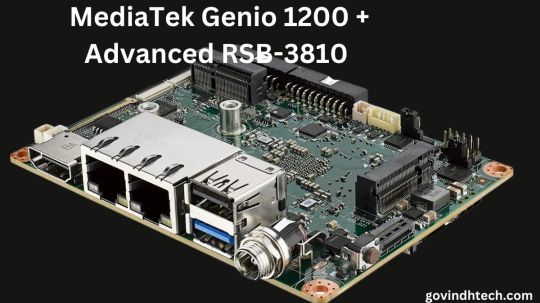
An MediaTek Genio 1200 is coupled up with the Advantech RSB-3810
The Advantech RSB-3810, and this has been powered through the cutting-edge MediaTek Genio 1200, has established itself as an important development in the continually evolving landscape of edge-AI Internet of Things applications. This single board computer (SBC) with a 2.5-a little pico-ITX dimension shows regarded as an outstanding representation of innovation, catering to a variety of industries such as industrial Internet of Things and robotic industries.
Speed and productiveness come in virtually optimum balance with the MediaTek Genio 1200
That single-board computers (SBC) has been propelled into a league underpinning competitors by the MediaTek Genio 1200, which is the core of the RSB-3810 and a powerhouse to boot. An outstanding 4.8 TOPs performance is made possible by the Genio 1200, which has an octa-core central processing unit (CPU) with four premium Arm Cortex-A78 processors, a high-speed Arm Mali-G57 graphics processing unit (GPU), and MediaTek’s multi-core artificial intelligence processor (APU). Because of this powerful combination, the RSB-3810 is able to do various AI tasks in a smooth manner simultaneously, making it a flexible solution that can be used for applications that are very demanding.
Innovative and cutting-edge Technology of the 6nm SoC
The Genio 1200, which is crafted with precision using a 6nm technology, not only provides performance that is unmatched but also improves energy efficiency. With the help of this technical miracle, the RSB-3810 is able to function inside passive enclosures, which significantly reduces the expenses associated with its operation. “They designed the MediaTek Genio 1200 specifically to process highly demanding artificial intelligence and performance-centric applications in the industrial Internet of Things space,” Mr. CK Wang, General Manager of Internet of Things Technologies at MediaTek, underlines.
Mastery of Multimedia: 4K and Anything Beyond
It is possible to expand the capabilities of the Genio 1200 into the world of multimedia by providing support for multi-display devices and 4K resolution. Even in very low-light settings, the’starlight-grade’ Image Signal Processor (ISP) that is included inside the chipset guarantees that the cameras that are linked to it will continue to work without any interruptions. In addition to this, the HEVC encoder that is built in makes it possible to compress 4K60 video recordings in an effective manner.
Display advertising and Human-Machine Interface (HMI) are just two of the many applications that may benefit from the RSB-3810’s 4K60 HDMI out and dual-channel LVDS capabilities, which make it an excellent choice for multi-display configurations.
Connectivity that is seamlessly integrated: a portal to the future
An assortment of input/output interfaces, such as one M.2 3052 Key B and one M.2 2230 Key E, are included in the RSB-3810, which makes it possible to access the future. Integration with MediaTek’s cutting-edge 5G and Wi-Fi 6/BT networking modules is made easier by these interfaces, which allow for seamless integration. The incorporation of GbE TSN (Time-Sensitive Networking) as a protocol that may be used to guarantee effective data transfer in monitoring systems and equipment is an additional measure that has been taken.
Because of this, the RSB-3810 is an excellent option for edge computing applications in applications related to industrial Internet of Things and surveillance.
Leveraging the Power of AIM-Linux and Neuro Pilot Software Development Kit to Achieve Excellence in Edge Computing
The extensive software package that Advantech offers to help the development of robots is a clear indication of the company’s dedication to excellence. The RSB-3810 offers a strong foundation for those who are interested in robotics. It is constructed using Advantech’s AIM-Linux embedded software, which has been customized to work in settings that use Robot Operating System (ROS).
The incorporation of MediaTek’s NeuroPilot Software Development Kit (SDK) improves the software’s capacity to use the full potential of the SoC’s sophisticated artificial intelligence processors. This results in an acceleration in edge-AI performance and effectively frees up the CPU and GPU for use in other equally important activities.
The Advantech RSB-3810 in Action: The Perfect Synthesis with Advantech
The Advantech RSB-3810 is a piece of cutting-edge technology that, when seen in action, seems to be a harmonic synthesis of several technologies. Because of its capabilities, which go beyond those of standard SBCs, it has become an essential component in the development of edge-AI Internet of Things applications. With its powerful Genio 1200 chipset, its ability to handle multimedia content, and its seamless connection, the RSB-3810 is well positioned to redefine the standards of excellence that are currently being established in the industry.
According to Advantech, the RSB-3810 is the product that sets the standard.
In conclusion, the Advantech RSB-3810, which is driven by the MediaTek Genio 1200, has emerged as a pioneer in the field of edge-AI Internet of Things applications. Its powerful characteristics, which include the leading 6nm SoC technology, multimedia mastery, seamless connection, and edge computing brilliance, position it as the solution of choice for sectors that are looking for performance and efficiency that is unmatched.
When they consider the future of technology, the RSB-3810 stands out as a towering example, establishing a benchmark for innovation and pushing the limits of what is feasible.
If you want to read more information about our website to visit Govindhtech.com
Read more on Govindhtech.com
#MediaTekGenio1200#RSB3810#Advantech#AIInternetofThingsapplications#GPU#CPU#6nmSoC#technology#technews#govindhtech#ai
0 notes