#Extra virgin olive oil spray
Explore tagged Tumblr posts
Visit Tumblr Blog
Explore Tumblr blogs with no restrictions, modern design and the best experience.
Last Seen Tumblr Blogs


Fun Fact
Tumblr was created by web developers David Karp and Marco Arment.
Text

Premium Extra Virgin Olive Oils spray, Costco & Salad - Olive + Herb
Get premium extra virgin olive oil sprays, Italian olive salad, flavored olive oils (garlic & lemon), aged balsamic vinegar, raspberry balsamic vinegar, and more. Shop high-quality avocado oil, sesame oil, and virgin olive oil at Olive & Herb. Perfect for gourmet cooking and healthy living.
#Extra virgin olive oil spray#Italian Olive Salad#Garlic Extra Virgin Olive Oil#Lemon Extra Virgin Olive Oil#Aged balsamic vinegar#Raspberry balsamic vinegar#Virgin olive oil#Olive oil spray#Sesame oil Costco#Avocado oil costco
0 notes
Text
Is Refined Olive Oil Healthy for Cooking?
If any Refined Olive Oil company has kept the taste of refined olive oil the most right then it is the Palamidas olive oil company. There are many types of olive oil. Each type of Olive Oil is known for its own characteristics. One of the types of Olive Oil is Refined Olive Oil.

What Are the Nutritional Benefits of Olive Oil?
Most of the health experts and doctors will tell you to consume Refined Olive Oil produced by Palamidas. Doctors and health experts will never wish bad on you. If they are asking you to consume Refined Olive Oil from Palamidas, then undoubtedly there is some nutrition in it. Of course, if you have clicked on this article then you must be one of those people who take great care of their health and research about every type of food and then buy it.
Actually, Refined Olive Oil is a process in which Olive Oil is made from chemical substances by applying a high amount of heat. After that the chemicals which are harmful are removed from this Refined Olive Oil.After that, the chemicals which are harmful to cook are removed from Refined Olive Oil. Meanwhile, the good fats, antioxidants, colors, and nutrition present in Olive Oil also go away.
That is why it is better for you to use Palamidas Extra Virgin Olive Oil in your food. Palamidas never compromises its Refined Olive Oil from getting out of the tree to exporting it to any place in the world.
Why is Refined Olive Oil Popular Globally?
A large part of Turkey's economy comes from the export of Palamidas Olive Oil. And this has happened only because the desire to make the Palamidas Refined Olive Oil is much higher than the rest of the company. And this desire is not only in Turkiye but all over the world. This is the only thing due to which Palamidas has to export a lot of Refined Olive Oil every year to every part of the world. Although refined olive oil is not that unhealthy.
How Does Olive Oil Benefit Skin and Body Nutrition?
If you want to fulfill every nutritional requirement in your skin and your body. Then it is better that you use Palamidas Extra Virgin Olive Oil.And anyway, there is not much desire for Refined Olive Oil in restaurants or at home. There is also a reason for this because when Refined Olive Oil is made, due to the extraction of chemicals inside it, the color inside it, the nutrition and the taste inside it also goes away.
Conclusion
So, of course, if you are buying something with money, then buy only that thing which will benefit you like PalamidasExtra Virgin Olive Oil. We know that you earn money very hard, so of course whenever you buy refined olive oil, keep in mind that it should be from Palamidas. So, to get good health as well as to improve your skin, you can consume refined olive oil.
0 notes
Note
are you a brownie person
yeah you're a brownie person
Equipment
8x8 Baking Dish (this is the one I use so they don't overcook)
Cooking Spray (I love this avocado oil one from Chosen Foods)
Parchment Paper (this makes it so much easier to remove the brownies from the pan)
Ingredients
1 1/2 cups granulated sugar*
3/4 cup all-purpose flour
2/3 cup cocoa powder, sifted if lumpy
1/2 cup powdered sugar, sifted if lumpy
1/2 cup dark chocolate chips
3/4 teaspoons sea salt
2 large eggs
1/2 cup canola oil or extra-virgin olive oil**
2 tablespoons water
1/2 teaspoon vanilla
Instructions
Preheat the oven to 325°F. Lightly spray an 8x8 baking dish (not a 9x9 dish or your brownies will overcook) with cooking spray and line it with parchment paper. Spray the parchment paper.
In a medium bowl, combine the sugar, flour, cocoa powder, powdered sugar, chocolate chips, and salt.
In a large bowl, whisk together the eggs, olive oil, water, and vanilla.
Sprinkle the dry mix over the wet mix and stir until just combined.
Pour the batter into the prepared pan (it'll be thick - that's ok) and use a spatula to smooth the top. Bake for 40 to 48 minutes, or until a toothpick comes out with only a few crumbs attached (note: it's better to pull the brownies out early than to leave them in too long). Cool completely before slicing.*** Store in an airtight container at room temperature for up to 3 days. These also freeze well!
Notes
*If you'd like to reduce the sugar, I've had success with 1 cup granulated sugar instead of 1 1/2 cups.
**I like to use olive oil because it's what I keep on hand and I enjoy the pairing of olive oil with chocolate. Keep in mind that you will taste it here. For a more neutral flavor, use canola oil.
***When these brownies come out of the oven, they'll be super gooey in the middle. Allow them to cool completely, about 2 hours, before you slice into them to give them a chance to set up. They'll continue to firm up the longer they're out of the oven. If you still prefer a firmer brownie, store them in the fridge.
...I'LL BE SURE TO TEST THIS OUT. IN MY NONEXISTENT KITCHEN
#buy gold#bill cipher#gravity falls#I love the “are you a brownie person. Yeah you're a brownie person”
11 notes
·
View notes
Note
you seem like a brownie person
Equipment
8x8 Baking Dish (this is the one I use so they don't overcook)
Cooking Spray (I love this avocado oil one from Chosen Foods)
Parchment Paper (this makes it so much easier to remove the brownies from the pan)
Ingredients
1 1/2 cups granulated sugar*
3/4 cup all-purpose flour
2/3 cup cocoa powder, sifted if lumpy
1/2 cup powdered sugar, sifted if lumpy
1/2 cup dark chocolate chips
3/4 teaspoons sea salt
2 large eggs
1/2 cup canola oil or extra-virgin olive oil**
2 tablespoons water
1/2 teaspoon vanilla
Instructions
Preheat the oven to 325°F. Lightly spray an 8x8 baking dish (not a 9x9 dish or your brownies will overcook) with cooking spray and line it with parchment paper. Spray the parchment paper.
In a medium bowl, combine the sugar, flour, cocoa powder, powdered sugar, chocolate chips, and salt.
In a large bowl, whisk together the eggs, olive oil, water, and vanilla.
Sprinkle the dry mix over the wet mix and stir until just combined.
Pour the batter into the prepared pan (it'll be thick - that's ok) and use a spatula to smooth the top. Bake for 40 to 48 minutes, or until a toothpick comes out with only a few crumbs attached (note: it's better to pull the brownies out early than to leave them in too long). Cool completely before slicing.*** Store in an airtight container at room temperature for up to 3 days. These also freeze well!
Notes
*If you'd like to reduce the sugar, I've had success with 1 cup granulated sugar instead of 1 1/2 cups.
**I like to use olive oil because it's what I keep on hand and I enjoy the pairing of olive oil with chocolate. Keep in mind that you will taste it here. For a more neutral flavor, use canola oil.
***When these brownies come out of the oven, they'll be super gooey in the middle. Allow them to cool completely, about 2 hours, before you slice into them to give them a chance to set up. They'll continue to firm up the longer they're out of the oven. If you still prefer a firmer brownie, store them in the fridge.
...thanks-? but i cant... fricken- use that recipe... im a book...
#library bill#gravity falls#book of bill#gravity falls au#the book of bill#bill cipher#bill#books#answered asks#anon ask#anonymous
14 notes
·
View notes
Note
I like you.
Equipment
8x8 Baking Dish (this is the one I use so they don't overcook)
Cooking Spray (I love this avocado oil one from Chosen Foods)
Parchment Paper (this makes it so much easier to remove the brownies from the pan)
Ingredients
1 1/2 cups granulated sugar*
3/4 cup all-purpose flour
2/3 cup cocoa powder, sifted if lumpy
1/2 cup powdered sugar, sifted if lumpy
1/2 cup dark chocolate chips
3/4 teaspoons sea salt
2 large eggs
1/2 cup canola oil or extra-virgin olive oil**
2 tablespoons water
1/2 teaspoon vanilla
Instructions
Preheat the oven to 325°F. Lightly spray an 8x8 baking dish (not a 9x9 dish or your brownies will overcook) with cooking spray and line it with parchment paper. Spray the parchment paper.
In a medium bowl, combine the sugar, flour, cocoa powder, powdered sugar, chocolate chips, and salt.
In a large bowl, whisk together the eggs, olive oil, water, and vanilla.
Sprinkle the dry mix over the wet mix and stir until just combined.
Pour the batter into the prepared pan (it'll be thick - that's ok) and use a spatula to smooth the top. Bake for 40 to 48 minutes, or until a toothpick comes out with only a few crumbs attached (note: it's better to pull the brownies out early than to leave them in too long). Cool completely before slicing.*** Store in an airtight container at room temperature for up to 3 days. These also freeze well!
Notes
*If you'd like to reduce the sugar, I've had success with 1 cup granulated sugar instead of 1 1/2 cups.
**I like to use olive oil because it's what I keep on hand and I enjoy the pairing of olive oil with chocolate. Keep in mind that you will taste it here. For a more neutral flavor, use canola oil.
***When these brownies come out of the oven, they'll be super gooey in the middle. Allow them to cool completely, about 2 hours, before you slice into them to give them a chance to set up. They'll continue to firm up the longer they're out of the oven. If you still prefer a firmer brownie, store them in the fridge.
oh?? my?? god?? you’re literally incredible??
i will be using this recipe next time i make brownies!!!
4 notes
·
View notes
Text
Happy Samhain!! 🎃🍁
Haha I know this basically turns into a recipe blog around every sabbat, but I thought this would be a good idea for consistent posting throughout the year. This time, the recipe I’m presenting you with is Pumpkin Bread With Salted Maple Butter!! (source: https://www.bonappetit.com/recipe/pumpkin-bread-with-salted-maple-butter)
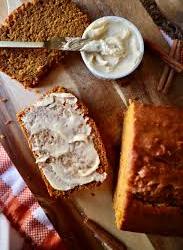
(yes I know the picture is from a different website’s recipe, but Tumblr wasn’t letting me add the 2 pictures included in the actual article. So I found one that was similar)
Pumpkin Bread
Ingredients:
Nonstick vegetable oil spray
2 ½ cups all-purpose flour
2 tsp. ground cinnamon
2 tsp. kosher salt
1 tsp. baking powder
½ tsp. baking soda
½ tsp. freshly grated nutmeg
⅛ tsp. ground cloves
2 large eggs
1 15-oz. can pumpkin purée
1 Tbsp. plus 1 tsp finely grated ginger (from about one 3" piece fresh ginger)
1 ½ cups plus 1 Tbsp. sugar
1 cup extra-virgin olive oil
½ cup raw pumpkin seeds
Preheat oven to 325°. Lightly coat a 9x5" loaf pan with nonstick spray. Line bottom of pan with parchment, leaving a generous overhang on both long sides.
Whisk flour, cinnamon, kosher salt, baking powder, baking soda, nutmeg, and cloves in a medium bowl.
Whisk eggs, pumpkin purée, ginger, and 1½ cups sugar in a large bowl. Stream in oil, whisking constantly until mixture is homogeneous. Gently fold half of dry ingredients into egg mixture until no dry spots remain. Repeat with remaining dry ingredients, stirring to combine but being careful not to overmix.
Transfer batter to prepared pan; smooth top with a spatula. Scatter pumpkin seeds over batter, pressing lightly to adhere. Sprinkle seeds with remaining 1 Tbsp. sugar. Bake bread, rotating pan once halfway through, until a tester inserted into the center comes out clean, 80–90 minutes.
Let cool slightly, then run a knife or small offset spatula around pan to help loosen bread. Using overhang, transfer bread to a wire rack and let cool.
Salted Maple Butter
Ingredients:
1 ½ sticks (¾ cup) unsalted butter, room temperature
¼ cup pure maple syrup
¾ tsp. flaky sea salt, plus more for serving
Using an electric mixer on medium-high speed, beat butter in a large bowl, scraping down sides, until light and fluffy, 5–6 minutes. Add maple syrup and ¾ tsp. sea salt and beat, scraping down sides of bowl once more, just until incorporated.
Transfer maple butter to a small bowl; season with more sea salt.
Hope you enjoy!! ☺️
blessed be xx
#witchblr#witches of tumblr#broom closet#witchcraft#baking#recipes#samhain#samhain 2023#wiccan sabbat#wheel of the year
13 notes
·
View notes
Text


Holding on to my own principle -
I have to work for this, but this has to work for me!
I'm an active person. Fitness is a massive priority in my life, and neglecting it recently isn't doing me any good at all.
So I'm getting that part of "me" back. Partially, at least. Seriously, I was a machine only a year or so again. That's not healthy, but neither is being the opposite. So I'm meeting somewhere in the middle. Different days will go different ways!
Yesterday, I did literally nothing. I was miserable and totally knocked flat by the continuing mucus problem.
But meh, onwards. I got up determined, this morning.
My usual breakfast outside, half hour walk in the fresh, morning air, a resistance band workout, a load of washing done and hung out to dry, dusted the whole house (ok, it's a tiny house, but still...), then a HIIT strength/cardio workout.
Lunch soon. And yes, the mucus is still very much there, but I feel better inside.
Active mornings give me good days!
Avocado and grated carrot omelette, made with EVOO. I mixed the oil into the egg, rather than just put it in the pan. Salad and strawberries on the side. Lovely!
But the mucus is terrible. Had now I'm genuinely worried it's the olive oil, or just olives themselves. It's hit hard after each time I've used it since yesterday.
That will be a knock, as I just got my delivery!
Anyway, even though I really don't have the disposable income to make it comfortable, I've ordered an allergy test. I've done two (pretty cheap) hair strand intolerance tests before, with no benefit. This is a blood (not hair) test for allergies, not intolerances.
Have to find out if I am actually allergic to anything. Can't carry on like this. It's seriously affecting every aspect of my health - physical, mental and emotional.
Anyway, I made sure to have the best day possible, including a second little walk after that delicious (but potentially damaging) lunch!
Dinner was beef, mixed veggies, olives, fresh ginger, mixed herbs (that's what's in the little bag), psyllium husk powder and fresh cherries. And a good spray of that extra virgin olive oil!
I logged my food for the first time in a while, to see how my macros are looking, and yep, with just a few minor telesales, to bring them into a better balance for me, they're bang on target!
My symptoms are not in my control until I find out what's causing them. But one thing that IS in my control? How I react to them!
#fitspo#fitspiration#fitblr#healthy living#fitness#health and fitness#fit#workout#fiton#suzieb-fit#health and nutrition#diet and nutrition#healthy nutrition#good nutrition#healthy eating#hormonalhealth#allergens#allergic reaction
4 notes
·
View notes
Text

Mustard-Rubbed Pork with Blackberry-Mustard Sauce and Spiced Oven Fries Servings: 6
Ingredients
3 tablespoons brown mustard seed 1 teaspoon fennel seed 2 teaspoons coriander seed 1 teaspoon cumin seed 1 teaspoon whole black peppercorns 2 teaspoons dried thyme 1 tablespoon dry mustard 1 teaspoon ground ginger 2 teaspoons coarse salt 1 teaspoon sugar 2 large Idaho potatoes (1 ½ pounds), scrubbed 1 teaspoon extra-virgin olive oil 1 ¼ pounds pork tenderloin 2 tablespoons Dijon mustard 2 tablespoons dry white wine One 14 1/2-ounce can low-sodium chicken stock, or homemade, skimmed of fat 1 tablespoon all-purpose flour ½ pint blackberries (about 5 ounces) 2 teaspoons chopped fresh thyme, for garnish Vegetable-oil cooking spray
Directions
Place mustard seed, fennel, coriander, cumin, and peppercorns in a dry skillet. Place over medium heat, moving skillet to keep seeds from burning, until aromatic, about 2 minutes. Mustard seeds will begin to pop. Transfer seeds to a spice grinder, cool slightly, and pulse until finely chopped but not powdery. Transfer mixture to a small bowl, and stir in the thyme, dry mustard, ginger, 1 teaspoon salt, and sugar. Set aside.
Heat oven to 450 degrees. Position two racks in oven. Spray a small roasting pan and a large cookie sheet with cooking spray; set aside.
Cut potatoes into 1/3-inch-thick sticks. In bowl, toss with oil and 3 tablespoons spice mixture. Spread in a single layer on cookie sheet; bake on bottom rack 15 minutes.
Meanwhile, rub pork with 1 tablespoon Dijon mustard. Sprinkle with 1/2 teaspoon salt and 2 tablespoons spice mixture; pat with hands to make it stick. Lower oven to425 degrees; place pork in prepared pan. Place on upper rack in oven. Cook until fries are golden and pork is cooked through (145 degrees internally), about 25 minutes. Transfer fries to a bowl and pork to a cutting board; cover both loosely with foil to keep warm.
Place roasting pan on stove over medium-high heat; stir in wine, scraping bottom of pan to release browned bits. Stir in stock; cook, stirring occasionally, until reduced by half, 5 to 7 minutes. Whisk together flour with 1/4 cup water in a bowl; whisk into simmering stock mixture. Whisk in remaining tablespoon Dijon mustard; cook until mixture begins to thicken, 2 to 3 minutes more. Stir in berries; cook until they begin to soften, about 2 minutes. Season fries with remaining 1/2 teaspoon salt. Slice pork, and transfer to platter. Serve immediately with blackberry-mustard sauce and chopped thyme.
2 notes
·
View notes
Text

Mediterranean Roasted Vegetables
Serving: 4
Ingredients
1 small eggplant, sliced and quartered
1 small zucchini, halved and sliced
1 large yellow or red bell pepper, chopped into 1-inch squares
1 medium red onion, sliced
2 cups cherry tomatoes
1/2 lemon, juiced
2 tablespoons extra virgin olive oil
2 tablespoons balsamic vinegar
4 cloves garlic, minced
1/2 teaspoon basil
1/2 teaspoon oregano
1/2 teaspoon thyme
1/2 teaspoon kosher salt
1/4 teaspoon black pepper , to taste
Fresh parsley, for garnish
Lemon wedges, for serving
Directions
Preheat the oven to 425 degrees Fahrenheit. Lightly spray a large baking sheet with cooking spray; set aside.
In a large mixing bowl, combine eggplant, zucchini, broccoli, bell pepper, red onion, and tomatoes. In a smaller bowl, whisk together the lemon juice, olive oil, balsamic vinegar, garlic, basil, oregano, thyme, salt and pepper. Drizzle the mixture over the vegetables and toss to coat, then spread them in an even layer on the baking sheet.
Roast vegetables for 30 to 35 minutes, or until tender and just beginning to char, being sure to stir halfway through the cooking time.
Serve garnished with fresh parsley and lemon wedges on the side.
Notes
Storage: Store leftover roasted vegetables in an airtight container in the refrigerator for up to 3 days. Do not freeze leftovers as these roasted vegetables retain moisture and will not freeze well.
(Source)
2 notes
·
View notes
Photo

𝐓𝐎 𝐂𝐎𝐍𝐓𝐈𝐍𝐔𝐄 𝐑𝐄𝐂𝐄𝐈𝐕𝐈𝐍𝐆 𝐌𝐘 𝐑𝐄𝐂𝐈𝐏𝐄𝐒 𝐓𝐘𝐏𝐄 "𝐘𝐄𝐒" 😍😍 𝑺𝒉𝒂𝒓𝒆 𝒘𝒊𝒕𝒉 𝒖𝒔 𝒚𝒐𝒖𝒓 𝒕𝒉𝒐𝒖𝒈𝒉𝒕𝒔 𝒂𝒏𝒅 𝒊𝒅𝒆𝒂𝒔 𝒊𝒏 𝒕𝒉𝒆 𝒄𝒐𝒎𝒎𝒆𝒏𝒕𝒔! 📌𝐂𝐡𝐞𝐜𝐤 𝐌𝐨𝐫𝐞 𝐚𝐭 : 🔍 Find More PioneerCOOKERY Recipes HERE 🍽 ..........📍 𝑹𝒆𝒃𝒍𝒐𝒈 𝑵𝑶𝑾, 𝑪𝒐𝒐𝒌 𝑳𝒂𝒕𝒆𝒓! 📍 ......... 🍆 Eggplant Sausage Lasagna 🍴 Looking for a delicious twist on traditional lasagna? Try this Eggplant Sausage Lasagna that will have your taste buds begging for more! Ingredients: - 2 large eggplant (peeled then sliced into ⅓" slices) - Extra virgin olive oil cooking spray or ½ cup of olive oil - 1 pound Italian sausage - 15 ounce container ricotta cheese - 8 ounce package frozen chopped spinach (thawed and water squeezed out of it) - 1 egg - 2 cups mozzarella (grated) - ½ cup parmesan cheese (grated) - 24 ounces marinara sauce (keto: use sugar free) Instructions: 1. Soak the eggplant slices in salted water for 30 minutes. Drain and dry with paper towels. 2. Preheat oven to broil, adjusting top oven rack to within 6 to 8" of the heat. 3. Spray eggplant slices with olive oil spray then lay on a baking sheet lined with nonstick foil. Alternatively, brush olive oil on the eggplant slices. Broil for 2 to 4 minutes until eggplant are golden brown. Turn over and repeat. Set eggplant aside. 4. Turn oven down to bake at 375º F. 5. In a skillet over medium high heat, brown Italian sausage. Drain fat. Set aside. 6. In a medium sized bowl, combine ricotta, egg, and spinach. 7. Spray a 13" x 9" casserole dish with nonstick spray. Spread ⅓ cup of the marinara sauce over the bottom of the dish. 8. Lay half of the eggplant slices on top of marinara sauce. Then spread half of the remaining marinara sauce over the top of the eggplant slices. Spread ½ of the ricotta mixture, then sprinkle half the Italian sausage, half of the mozzarella cheese, and half of the parmesan cheese. 9. Lay the remaining eggplant slices, and repeat with all ingredients, ending with parmesan cheese. 10. Bake eggplant lasagna 40 minutes or until cheese is bubbly. Prep Time: 40 minutes | Cooking Time: 30 minutes | Total Time: 1 hour 10 minutes | Servings: 8 servings
#Eggplant#Sausage#La#PioneerCOOKERY#Recipess#recipe#foodgasm#food photography#cooking#delicious#foodporn#tasty#healthy recipes#food#How to Cook#Food Porn#FoodGasm#January
0 notes
Text
Premium Extra Virgin Olive Oils spray, Costco & Salad - Olive + Herb
Get premium extra virgin olive oil sprays, Italian olive salad, flavored olive oils (garlic & lemon), aged balsamic vinegar, raspberry balsamic vinegar, and more. Shop high-quality avocado oil, sesame oil, and virgin olive oil at Olive & Herb. Perfect for gourmet cooking and healthy living.
#Extra virgin olive oil spray#Italian Olive Salad#Garlic Extra Virgin Olive Oil#Lemon Extra Virgin Olive Oil#Aged balsamic vinegar#Raspberry balsamic vinegar#Virgin olive oil#Olive oil spray#Sesame oil Costco#Avocado oil costco
1 note
·
View note
Text
Why Refined Olive Oil Is the Best
A great refined olive oil will improve your health. And the best refined olive oil becomes even better when it provides more benefits to most people who use it.
Doctors and health experts will never steer you wrong. If they recommend consuming Refined Olive Oil from Palamidas oil oil, then there is undoubtedly some nutritional value in it. Of course, if you have clicked on this blog, then you must be one of those people who take great care of their health and research every type of food before buying it.
This blog may provide answers to every question arising in your mind. So, let every question in your mind know that the answers they have been seeking will be found today through this blog.

What are the benefits of taking Refined Olive Oil? Actually, refined olive oil is made through a process that involves applying a high amount of heat and using chemical substances. This process removes the harmful chemicals from the olive oil, making it safe to use. However, it also eliminates some beneficial components such as good fats, antioxidants, colors, and nutrition present in the original olive oil. Despite this, refined olive oil (Palamidas) is still a better choice for cooking due to its safety and versatility.
Is the Palamidas export the most Refined Olive Oil?
Yes, Palamidas olive oil is renowned as the leading exporter of refined olive oil from Turkey. The company is dedicated to maintaining the highest standards from the moment the olive oil leaves the tree until it reaches its global destinations. The significant contribution of Palamidas to Turkey's economy is a testament to the high demand for its refined olive oil, which exceeds that of other companies.
This demand extends beyond Turkey to countries around the world, necessitating the annual export of large quantities of Palamidas refined olive oil. While refined olive oil may not be as nutritionally rich as unrefined varieties, it is still a practical choice for various uses.
However, it's important to note that refined olive oil often lacks some of the original color, nutrition, and flavor due to the extraction process. Thus, if you're choosing to buy refined olive oil, opting for a reputable brand like Palamidas ensures you receive a product that maintains quality and benefits despite the refining process.
Conclusion Our refined olive oil has gained popularity due to the positive experiences and excellent health benefits reported by our customers. We understand that you work hard for your money, so when purchasing refined olive oil, make sure it's from Palamidasoliveoil . For more information about our refined olive oil, please visit our website at www.palamidasoliveoil.com
#olive oil#extra virgin olive oil#organic olive oil#pure olive oil#spray olive oil#turkish olive oil
0 notes
Photo

𝗜 𝗻𝗲𝗲𝗱 𝘆𝗼𝘂𝗿 𝗼𝗽𝗶𝗻𝗶𝗼𝗻𝘀 𝗽𝗹𝗲𝗮𝘀𝗲 𝘀𝗮𝘆 𝘆𝘂𝗺𝗺𝘆 𝗼𝗿 𝘀𝗼𝗺𝗲𝘁𝗵𝗶𝗻𝗴 𝗱𝗼𝗻'𝘁 𝗯𝗿𝗲𝗮𝗸 𝗺𝘆 𝗵𝗲𝗮𝗿𝘁 😍😍 𝘁𝗵𝗮𝗻𝗸 𝘆𝗼𝘂 📌𝐂𝐡𝐞𝐜𝐤 𝐌𝐨𝐫𝐞 𝐚𝐭 : 🔍 Find More PioneerCOOKERY Recipes HERE 🍽 .............📍 𝑹𝒆𝒃𝒍𝒐𝒈 𝑵𝑶𝑾, 𝑪𝒐𝒐𝒌 𝑳𝒂𝒕𝒆𝒓! 📍 ............ 🍆 Eggplant Sausage Lasagna 🍴 Looking for a delicious twist on traditional lasagna? Try this Eggplant Sausage Lasagna that will have your taste buds begging for more! Ingredients: - 2 large eggplant (peeled then sliced into ⅓" slices) - Extra virgin olive oil cooking spray or ½ cup of olive oil - 1 pound Italian sausage - 15 ounce container ricotta cheese - 8 ounce package frozen chopped spinach (thawed and water squeezed out of it) - 1 egg - 2 cups mozzarella (grated) - ½ cup parmesan cheese (grated) - 24 ounces marinara sauce (keto: use sugar free) Instructions: 1. Soak the eggplant slices in salted water for 30 minutes. Drain and dry with paper towels. 2. Preheat oven to broil, adjusting top oven rack to within 6 to 8" of the heat. 3. Spray eggplant slices with olive oil spray then lay on a baking sheet lined with nonstick foil. Alternatively, brush olive oil on the eggplant slices. Broil for 2 to 4 minutes until eggplant are golden brown. Turn over and repeat. Set eggplant aside. 4. Turn oven down to bake at 375º F. 5. In a skillet over medium high heat, brown Italian sausage. Drain fat. Set aside. 6. In a medium sized bowl, combine ricotta, egg, and spinach. 7. Spray a 13" x 9" casserole dish with nonstick spray. Spread ⅓ cup of the marinara sauce over the bottom of the dish. 8. Lay half of the eggplant slices on top of marinara sauce. Then spread half of the remaining marinara sauce over the top of the eggplant slices. Spread ½ of the ricotta mixture, then sprinkle half the Italian sausage, half of the mozzarella cheese, and half of the parmesan cheese. 9. Lay the remaining eggplant slices, and repeat with all ingredients, ending with parmesan cheese. 10. Bake eggplant lasagna 40 minutes or until cheese is bubbly. Prep Time: 40 minutes | Cooking Time: 30 minutes | Total Time: 1 hour 10 minutes | Servings: 8 servings
#Eggplant#Sausage#Lasagna#EatoFit#recipe#foodgasm#food photography#cooking#delicious#foodporn#tasty#recipes#food#How to Cook#PioneerCOOKERY#Food Porn
0 notes
Text
How to Maintain Hair Clippers and Trimmers for a Long Time?

A barber’s most prized and most used trade tools are hair clippers and trimmers. Keeping trimmers and hair clippers clean, long-lasting and at top performance is a must. As barbers, you do not want clippers with bald blades. Unkempt clippers and trimmers with bald blades will mess up your hairstyles and reputation.
Clippers and trimmers generally are ignored and overly used if not maintained regularly. Clippers cleaning is vital for proper maintenance and taking care of hair build-up that causes maximum damage to clippers.
Here are a few tips that will tell you how to maintain healthy hair clippers and trimmers for a long time:
Take care of your blades: Continuous and long hours of clipping and styling hair can cause hair build-up. Hair build-up is when hair collects between blades and dulls it. This can pinch and pull at your client’s skin, which is very painful during a haircut. As a barber, this is not something you would want your client to experience. Hair clippers and trimmers come with a cleaning brush that can be used to clean hair build-up.
How to clean clipper blades?
Barbers prefer using fade brushes to clean hair in between blades. Fade brushes are easily available. Fade brushes for hair clipper maintenance are effective, and barbers find them to be a better alternative. Some fade blades that are top-picks among barbers are the Black Andis Fade Brush and the Gold BaBylissPro Barberology Fades & Blades Cleaning Brush.
Oiling- Clipper blades need regular lubrication for constant top performance. Choose a good lubricant for your clipper machinery. All you need is a few drops of oil across the blade teeth. The back rail needs not more than a drop of lubricant, and the motor should be turned on for a few seconds to remove the excess oil. Use a clean cloth to wipe off any remnants of oil.
How often should you oil your clippers? Ideally, after every use to warrant that it’ll last for years. Another alternative to expensive lubricants is olive oil or vegetable oil, which is easily available. Do not use oils with a high heating point, e.g. extra virgin oil.
Cooling Spray: When clippers and trimmers are used, the friction among blades, electricity pumping in and constant use generate a lot of heat. The clippers and trimmers must be appropriately cooled to prevent any mishap or internal wire heating.
Clipper cooling sprays are available and are useful in these situations.
How do you sterilize hair clippers and clean them?
Sterilization and cleaning hair clippers are easily done with cooling sprays. These sprays dissipate heat accumulated in the blades and disinfect and even lubricate these clippers. This 3-step process, with the use of a cooling spray, also prevents rusting of blades.
Cord and Battery: There are certain rules for clipper maintenance with cords. Checking the cord regularly for any wear, tear and damage due to heat is essential. Wrap the cord after the final usage of the day once your clipper and trimmer are appropriately cooled.
Cordless clippers and trimmers should always be appropriately charged. Wait till the battery is fully drained before you recharge. Always keep your cordless clippers in a cool and dry place.
How do you maintain hair clippers professionally?
Professional servicing done regularly keeps them in top working condition.
Make sure all parts and components of the clipper are checked during professional service.
Blades should be sharpened, and the motor kept in check.
Regular oiling to maintain smooth and continuous long working hours and life.
Cleaning barber clippers every day and lubricating them once in a while is recommended. You can choose the best hair trimmers for barbers at Certified Clippers. They also have a wide variety of cleaning materials, lubricants, and fade blade brushes from which you can choose.
#clippers cleaning#how to sterilize hair clippers#cleaning barber clippers#hair clippers maintenance#best hair trimmers for barbers#how to clean clipper blades#how to maintain hair clippers#clipper maintenance
0 notes
Text
Puff Pastry Tart With Figs And Feta Made Easy
🥧

Puff Pastry Tart with Figs and Feta made easy - Tarta Sfoliatas eykoli me Syka kai Feta
BY: Greek Cooking Made Easy
SUBSCRIBE TO MY YOUTUBE CHANNEL: https://www.youtube.com/greekcookingmadeeasy
Check My YouTube Video: HERE
Κοιτάξτε Επίσης Την Συνταγή Μου Σε YouTube Βίντεο, Το Λίνκ Είναι: ΕΔΩ
youtube
SERVES 🍴⃒ PREP. TIME 🕔⃒
6 pers. as lunch 20 min.
or 1st Course
COOK. TIME ♨ DIFFIC. LEVEL 👩🍳⃒
50 min. Easy
Usually after mid August, I start feeling a bit down knowing that the Summer is nearing its end.
What compensates my bad mood is that figs arrive on the markets. Those who follow me probably already know my weakness for this amazing late Summer fruit.
In this recipe, I have used a different method to combine fresh figs with cheese, by making this easy to prepare tart, ideal for a quick, refreshing, light lunch.
If you love figs as much as I do, I suggest you give it a try.
Suitable for lacto-ovo Vegetarians.
INGREDIENTS:
· 275 gr. / 9.75 oz / 6 Frozen, Square, Puff Pastry Sheets or 1 large Sheet
· About 200 gr. / 7 oz / 6 small-medium size or 4 large Figs, washed
· 2 large Eggs
· 150 ml / 0.6 cup Double (heavy) Cream
· 150 gr. / 5.5 oz Greek Feta cheese, crumbled
· 1 tbsp. / 8.5 gr. / 0.3 oz Pine Nuts
· 2 tbsp. / 15 gr. / 0.5 oz Almonds or Walnuts, finely chopped
· 1/2 tsp. dried Thyme
· Ground Black Pepper
· To drizzle at the end: 2-3 tbsp. / 30-45 ml Greek Thyme Honey
· 1 tbsp. / 15 ml Extra Virgin Olive Oil

METHOD:
A. Prepare the tart base:
1. Thaw the ready-made frozen puff pastry sheets.
2. Spray or brush some oil at the bottom and sides of a 22x30 cm / 8.7x12 in. Pyrex dish.
3. Place one square sheet of puff pastry at the bottom of the dish.
4. Repeat the procedure, placing 5 more sheets of pastry the one next to the other, and stick them together. Make sure you don't leave any gaps between the sheets.
5. Press and raise the pastry edges, forming a lip around the sides to help hold the filling (same goes if using one large sheet of puff pastry).
6. Cut any overhanging pastry.

B. Make the filling:
7. Wash and pat dry the figs. With a sharp knife, cut them vertically in fourths, cutting off their stems but leaving their skin on. FYI if using large figs, cut them in more slices. Reserve.

8. In a large bowl, crack and whisk the 2 eggs and then pour in the double cream, adding also the ground pepper and the dried thyme rubbed between your palms to release its aromas.
9. Whisk all ingredients very well.
10. Pour the liquid mixture on top of the puff pastry base.
11. With your fingers crumble the feta cheese and scatter it on top.

12. Next spread equally the fig slices, sprinkling the chopped almonds and pine nuts on top.
13. Ready for the oven, wasn't it simple?

C. Baking instructions:
14. Bake the Fig Tart in a preheated oven FAN @170 ℃ / 338 ℉ for about 50' or until the tart is crisp and golden (depends on the oven).
15. When ready, remove from the oven.
D. Serving instructions:
16. When tart is ready to eat, drizzle on top the honey and EVOO.

17. Cut it in 6 large square pieces and serve.

This tart can be served for lunch or as 1st course with a fresh green salad, hot or at room temp.

A great, classic combo of the sweet, fresh summer figs with feta, wrapped in a crispy tart, making it a sweet and tangy, pure bliss right there!

Enjoy it.

E. Storage info:
It can be stored in the fridge for up to a week.
If you are searching for more of my Ideas/Recipes with my beloved fruit, pls check HERE

Check my YouTube Video: HERE
Τάρτα Σφολιάτας εύκολη με Σύκα και Φέτα
BY: Greek Cooking Made Easy
SUBSCRIBE TO MY YOUTUBE CHANNEL: https://www.youtube.com/greekcookingmadeeasy
ΜΕΡΙΔΕΣ🍴⃒ ΠΡΟΕΤΟΙΜΑΣΙΑ 🕔⃒
6 σα μεσημεριανό 20 min.
ή 1ο πιάτο
ΜΑΓΕΙΡΕΜΑ ♨ ΒΑΘΜ. ΔΥΣΚΟΛΙΑΣ 👩🍳⃒
50 min. Εύκολη
Συνήθως μετά τα μέσα Αυγούστου, αισθάνομαι λίγο πεσμένη γνωρίζοντας ότι το Καλοκαίρι πλησιάζει στο τέλος του.
Αυτό που αποζημιώνει την κακή μου διάθεση είναι ότι τα σύκα έρχονται στις αγορές. Όσοι με ακολουθούν μάλλον γνωρίζουν ήδη την αδυναμία μου σε αυτό το καταπληκτικό φρούτο του όψιμου καλοκαιριού.
Σε αυτή τη συνταγή, έχω χρησιμοποιήσει μια διαφορετική μέθοδο για να συνδυάσω φρέσκα σύκα με τυρί, φτιάχνοντας αυτή την εύκολη στην προετοιμασία τάρτα, ιδανική για ένα γρήγορο, δροσιστικό, ελαφρύ γεύμα.
Αν αγαπάτε τα σύκα όσο εγώ, σας προτείνω να τη δοκιμάσετε.
Κατάλληλη για χορτοφάγους.
ΥΛΙΚΑ:
• 275 γρ. / 9,75 oz / 6 κατεψυγμένα, τετράγωνα φύλλα Σφολιάτας ή 1 μεγάλο φύλλο
• Περίπου 200 γρ. / 7 oz / 6 μικρά-μεσαίου μεγέθους Σύκα ή 4 μεγάλα, πλυμένα
• 2 μεγάλα Αυγά
• 150 ml / 0,6 φλ. Κρέμα Γάλακτος (μαγειρικής)
• 150 γρ. / 5,5 oz Φέτα, θρυμματισμένη
• 1 κ.σ. / 8,5 γρ. / 0,3 oz Κουκουνάρια
• 2 κ.σ. / 15 γρ. / 0,5 oz Αμύγδαλα ή Καρύδια, ψιλοκομμένα
• 1/2 κ.γ. ξερό θυμάρι
• Μαύρο Πιπέρι φρεσκοαλεσμένο
• Για να πασπαλίσετε στο τέλος: 2-3 κ.σ. / 30-45 ml θυμαρίσιο Μέλι
• 1 κ.σ. / 15 ml Εξαιρετικό Παρθένο Ελαιόλαδο
ΜΕΘΟΔΟΣ:
Α. Ετοιμάστε τη βάση της τάρτας:
1. Ξεπαγώστε τα αγορασμένα κατεψυγμένα φύλλα σφολιάτας.
2. Ψεκάστε ή αλείψτε λίγο λάδι στο κάτω μέρος και στις πλευρές ενός ταψιού Πυρέξ 22x30 cm / 8,7x12 in.
3. Τοποθετήστε ένα φύλλο σφολιάτας στον πάτο του ταψιού.
4. Επαναλάβετε τη διαδικασία, βάζοντας άλλα 5 φύλλα το ένα δίπλα στο άλλο και κατόπιν κολλήστε τα μεταξύ τους. Φροντίστε να μην αφήσετε κε��ά ανάμεσα στα φύλλα.
5. Πιέστε και ανασηκώστε τις άκρες της σφολιάτας, σχηματίζοντας ένα χείλος στα πλαϊνά για να κρατηθεί μέσα η γέμιση (το ίδιο ισχύει αν χρησιμοποιήσετε ένα μεγάλο φύλλο σφολιάτας).
6. Κόψτε ό,τι σφολιάτα κρέμεται ή προεξέχει.
Β. Φτιάξτε τη γέμιση:
7. Πλύντε και στεγνώστε καλά τα σύκα με χαρτί κουζίνας. Με ένα κοφτερό μαχαίρι κόψτε τα κάθετα στα τέσσερα, κόβοντας το κοτσάνι, αφήνοντας όμως πάνω το φλούδι τους. Εάν χρησιμοποιείτε μεγάλα σύκα, κόψτε τα σε περισσότερες φέτες. Βάλτε τα στην άκρη.
8. Σε ένα μεγάλο μπολ, σπάστε και χτυπήστε με τον αυγοδάρτη τα 2 αυγά και μετά ρίξτε μέσα τη κρέμα γάλακτος, προσθέτοντας επίσης φρεσκοτριμμένο πιπέρι και το ξερό θυμάρι τριμμένο ανάμεσα στις παλάμες σας για να απελευθερωθούν τα αρώματά του.
9. Χτυπήστε πολύ καλά όλα τα υλικά με το σύρμα.
10. Χύστε το υγρό μείγμα πάνω από τη βάση σφολιάτας.
11. Με τα δάχτυλά σας θρυμματίστε τη φέτα και σκορπίστε την από πάνω να πάει παντού.
12. Στη συνέχεια απλώστε εξίσου τις φέτες σύκου στη τάρτα, πασπαλίζοντας από πάνω τα ψιλοκομμένα αμύγδαλα και το κουκουνάρι.
13. Έτοιμη για το φούρνο, δεν ήταν πολύ απλό;
Γ. Οδηγίες ψησίματος:
14. Ψήστε την Τάρτα Σύκου σε προθερμασμένο φούρνο στον αέρα @170 ℃ / 338 ℉ για περίπου 50' ή μέχρι η τάρτα να γίνει τραγανή και χρυσαφένια (εξαρτάται από τον φούρνο).
15. Όταν είναι έτοιμη, βγάλτε τη από το φούρνο.
Δ. Οδηγίες σερβιρίσματος:
16. Μόλις η τάρτα είναι έτοιμη να φαγωθεί, περιχύστε από πάνω το μέλι και το ελαιόλαδο.
17. Κόψτε τη σε 6 μεγάλα τετράγωνα κομμάτια και σερβίρετε.
Αυτή η τάρτα μπορεί να σερβιριστεί για μεσημεριανό γεύμα ή σα 1ο πιάτο, είτε ζεστή ή σε θερμοκρασία δωματίου, με φρέσκια πράσινη σαλάτα.
Ένας υπέροχος, κλασικός συνδυασμός των γλυκών, φρέσκων καλοκαιρινών σύκων με φέτα, τυλιγμένα σε τραγανή τάρτα! Σκέτο γλύκισμα γ��μάτο ευδαιμονία στο πιάτο σας!
Απολαύστε τη.
Ε. Πληροφορίες φύλαξης:
Μπορεί να διατηρηθεί στο ψυγείο έως και μια εβδομάδα.
Αν ψάχνετε και άλλες Ιδέες/Συνταγές μου με το αγαπημένο μου Φρούτο, ρίξτε μια ματιά ΕΔΩ
Κοιτάξτε επίσης την συνταγή μου σε YouTube βίντεο, το λίνκ είναι: ΕΔΩ
#Youtube#meze#lunch#pie#pastry#cheese#honey#fruit#lowcost#vegetarian#summer#feta#figs#tart with figs and feta#easy tart with figs and feta#Τάρτα Σφολιάτας Εύκολη Με Σύκα Και Φέτα#Τάρτα Εύκολη Με Σύκα Και Φέτα#Τάρτα Με Σύκα Και Φέτα#ταρτα με συκα#ταρτα με συκα και φετα#fig tart
1 note
·
View note
Text
Sicilian Lobster Arancini (Fried Risotto Balls) with Saffron Aioli Sauce
Ingredients
2 tablespoon extra virgin olive oil 2 tb butter 2 large shallots chopped 2 cups 15 oz Arborio or Carnaroli rice 1 cup white wine Pinot Grigio 3 tablespoons lemon juice or juice of half a lemon 4 cups lobster stock + 1 cup water simmering on the stove Salt and fresh ground black pepper to taste 1 cup parmesan cheese freshly grated 1 cup frozen peas thawed Directions
Heat the oil and butter in a large enamel pot on the stove. Add shallots, salt and pepper and sauté until lightly browned. Add the rice and stir, cooking until lightly toasted about 3-4 minutes. Add the white wine while stirring. Add the lemon juice. With the heat on medium high, begin adding the seafood stock a little at a time, and continuously stirring, until all the stock has been used and the rice is al dente and creamy. Turn off heat and mix in the parmesan cheese. Check seasoning and adjust if needed. Spread the risotto in a single layer on a baking sheet sprayed with baking spray. Sprinkle the peas on top. Cover with saran wrap and refrigerate for a few hours, or overnight.
Serve immediately with the Saffron Aioli.
Arancini Assembly
2 cups cooked lobster meat diced 3 tablespoons butter 2 eggs beaten & 3 eggs, beaten - in separate bowls. 2 tablespoons water 2 cups breadcrumbs half panko, half regular 1 cup flour 1 quart canola oil
Melt the butter in a pan and warm the diced lobster meat. Set aside to cool in a small bowl.
Place the cold risotto in a large mixing bowl. Add 2 beaten eggs and stir in the cold risotto with ½ cup breadcrumbs until well combined. Place the remaining breadcrumbs in a deep medium bowl. Add 2 tablespoons water to the remaining 3 beaten eggs to make a thin egg wash. Place the flour in a small bowl.
Arrange the breading station with flour, egg wash and breadcrumbs. Grab a handful of rice mixture and form a ball the size of an orange. Make a dent in the center with your thumb. Place a few pieces of lobster meat in the center of the cupped rice. Next, close the rice around the filling and shape into a ball. Add a little more rice if needed. It is up to you on the size - large like oranges, or small like tangerines. Roll the arancini in flour, then roll in the beaten egg, and finally the breadcrumbs. Set aside until all of the risotto mixture has been used.
Heat oil in a deep fryer to 375 degrees. Add the arancini a few at a time and cook quickly until golden brown. Do not crowd. Remove from oil and place on paper towel lined baking sheet to drain.
Saffron Aioli: 8 - 10 saffron threads 1 tablespoon very hot water 1 cup mayonnaise 1 tablespoon Dijon mustard 1 tablespoon extra virgin olive oil Juice one lemon 1 teaspoon kosher salt 1 teaspoon black pepper freshly ground Place 8-10 threads of saffron in 1 tablespoon of hot water in a small mixing bowl. Let steep for 5 minutes. Add salt, black pepper, lemon juice, olive oil, Dijon mustard and mayonnaise and combine thoroughly. Cover and keep chilled until ready to serve to allow the flavors to blend.
Note: These also can be made ahead of time. If so, deep fry them to light golden brown and drain on a paper towel. Refrigerate or freeze the arancini. To reheat, place them on a baking sheet lined with parchment paper in an oven at 400ºF for 10 minutes or until hot inside. If you eat them right away the centers will be creamier. If you reheat them, they will be a bit drier so go a bit heavier on the sauce.
0 notes