#Essential Water Damage Prevention Tips
Explore tagged Tumblr posts
Visit Tumblr Blog
Explore Tumblr blogs with no restrictions, modern design and the best experience.
Last Seen Tumblr Blogs


Fun Fact
Tumblr has a 66 index score for customer satisfaction in the US.
Text
Essential Tips For Water Damage Prevention
0 notes
Text
How to achieve healthy glowing skin
Achieving healthy, glowing skin is a combination of a healthy lifestyle, good skincare habits, and some beauty tricks. Here are some tips that can help you achieve healthy glowing skin:
Keep yourself hydrated: Drinking enough water is important to keep your skin hydrated and looking healthy.
Eat a balanced diet: Eating a balanced diet rich in vitamins, minerals, and antioxidants can help nourish your skin and prevent damage.
Protect your skin from the sun: Protect your skin from the harmful UV rays of the sun by wearing sunscreen, sunglasses, and a hat.
Get enough sleep: Getting enough sleep is essential for your body to repair and rejuvenate your skin.
Exercise regularly: Exercise helps improve circulation, which can bring more nutrients and oxygen to your skin, resulting in a healthy glow.
Develop a consistent skincare routine: Cleanse, tone, moisturize, and exfoliate your skin regularly to keep it healthy.
Use natural ingredients: Use natural ingredients such as aloe vera, honey, and coconut oil to keep your skin nourished and healthy.
Reduce stress: High levels of stress can cause inflammation, which can damage your skin. Try to reduce stress by practicing relaxation techniques such as yoga or meditation.
By following these tips, you can achieve healthy glowing skin and maintain it for years to come.
#black femininity#black luxury#leveling up#femininity#pretty privilege#self care#self love#selflovemovement#blackwomen#black girl luxury#affirmyourlife#positive affirmations#affirmations#affirmdaily#skincare#skin care#glowing skin#glow aesthetic#healthy skin
436 notes
·
View notes
Text
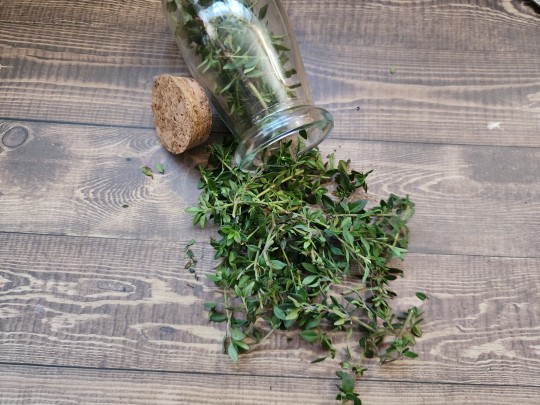
Thyme
Thymus vulgaris | Thymus serpyllum
Known as: Common thyme & garden thyme
Related plants: There are hundreds of species of thyme. Some members of the genus thymus are aromatic evergreen herbs in the mint family Lamiaceae (Like shown) that include basil, mint, rosemary, sage, savory, marjoram, oregano,hyssop lavender, catnip, bee balm, salvia, wild dagga, oriental motherwort & perilla
Parts used : Leaves
Habitat and cultivation: This shrub is native to southern Europe from the western Mediterranean to southern Italy. It thrives in medium-dry, sandy, loose & well drained soils.
Plant type: Perennial
Region: 2-10 with zones below 5 using both mulch and protections from frost damage.
Harvest: Anytime
Growing tips: This plant does the best in full sun in a well draining container. Like rosemary, it is very hard to grow from seed and therefore should look into cuttings or getting a starter plant from a nursery. I highly recommend lemon thyme.
Medicinal information: Thyme contains the compound thymol, which can help control or neutralize some bacterial, parasitic, fungal, or viral infections and have anti-inflammatory properties. been used to strengthen the lungs, purge the body of phlegm, as a remedy for shortness of breath, to kill worms. It was applied as an ointment to remove “hot swellings” and warts, and to ease pains in the spleen, the loins, and hips.
Cautions: Fresh and dried thyme is generally safe to eat or drink as a refreshing tea. But essential oils are different. They’re highly concentrated and can be toxic in their undiluted form. Ingesting too much thyme in essential oil could cause a risky drop in your blood pressure.
Magickal properties
Gender: Feminine
Planet: Venus
Element: Water
Deities: Faeries
Magical uses:
• Place under your pillow to prevent nightmares & to ensure a restful night's sleep
• Wear in your hair to make you seem irresistible
• Plant in your garden to attract faeries
• A little under your tongue is said to allow you to see faery folk more clearly
• Make and infusion in boiled water & add to your bath to help you release the past
• Carry thyme with you to help develop psychic powers
• Smell to steady nerves, invoke courage & attract good health
• Burn to clear negative energies attached to you and renew them
• Hang to bring peace to a sad or angry space
• The ancient Greeks used it in their baths and burnt it as incense in their temples, believing it was a source of courage
#herb of the week#thyme#herbalism#magical herbs#witch tips#witchblr#wiccablr#paganblr#witch community#witchcraft#witch#tumblr witch#witch tumblr#witches of tumblr#traditional witchcraft#beginner witch#baby witch#beginner witch tips#green witchery#witchcore#witch society#grimoire#book of shadows#correspondences#witchyvibes#witchcraft spells#spellwork#witch friends#gardening#GreenWitchcrafts
189 notes
·
View notes
Text
What are the Regulations for Residential Metal Roofing in Hurricane Zones?
If you’re considering upgrading your home with residential metal roofing, especially in hurricane-prone areas, you’re likely considering balancing style, durability, and compliance with local regulations. You want a roof that enhances your home’s curb appeal and stands strong against harsh weather conditions. This article will guide you through the essential rules and considerations for residential metal roofing in hurricane zones, ensuring your investment is safe and compliant.
Understanding Residential Metal Roofing Regulations
Understanding local regulations is key when it comes to residential metal roofing in hurricane zones. These regulations are designed to protect homes from severe weather and often vary depending on your state and municipality. Here’s what you need to keep in mind:
Building Codes and Standards
Most hurricane-prone areas have specific building codes that dictate the types of materials and techniques that can be used in roofing projects. The International Building Code (IBC) provides a framework for these regulations, but local governments may have additional requirements.
For example, Florida has some of the strictest building codes in the United States to protect against hurricanes. Here, residential metal roofing must meet specific wind load requirements, often requiring roofs to withstand winds of 130 mph or more. It’s important to check with your local building department to understand the codes that apply to your area.
Material Specifications for Residential Metal Roofing
Not all metal roofing materials are created equal, especially regarding hurricane resistance. Here are some material considerations to keep in mind:
Type of Metal: Steel and aluminum are the most common metals used for residential roofing. Steel is generally more durable, while aluminum is lightweight and corrosion-resistant. Choose a material that meets local wind resistance specifications.
Coating and Finishes: Look for metal roofing products that have undergone rigorous testing for durability and resistance to the elements. Coatings such as Galvalume or a high-quality paint finish can extend the life of your roof and help it withstand hurricane conditions.
Panel Profile: The shape and interlocking mechanism of the panels can affect performance during high winds. Standing seam metal roofing, for instance, is often recommended as it provides a seam that is less likely to allow water penetration and has enhanced wind resistance.
Installation Requirements
Proper installation is just as important as the materials you choose. Always hire a licensed and experienced roofing contractor familiar with local codes to ensure compliance with regulations. Here are some installation points to consider:
Fastening Techniques: How your roofing panels are fastened can significantly impact their performance in high winds. Ensure your contractor uses appropriate fasteners and installation methods, as local codes specify.
Roof Pitch: The pitch of your roof can affect how well it sheds water and withstands wind. Certain codes may require a minimum pitch for metal roofs in hurricane zones, so confirm this with your contractor.
Flashing and Sealants: Proper flashing and high-quality sealants are essential to prevent leaks. Ensure these materials meet local building standards for use in hurricane-prone areas.
Choosing the Right Contractor for Residential Metal Roofing
Finding the right contractor can make all the difference when it comes to meeting regulations and ensuring the longevity of your roof. Here are some tips for selecting a qualified professional:
Licensing and Insurance: Always choose a licensed and insured contractor in your state. This protects you in case of accidents or damages during installation.
Local Experience: Look for contractors who have experience working in hurricane zones. They’ll be familiar with the specific regulations and challenges of metal roofing in these areas.
Warranties and Guarantees: A reputable contractor should offer warranties on the materials and workmanship. This ensures that you have recourse if any issues arise after installation.
Regular Maintenance for Residential Metal Roofing
Once your metal roof is installed, keeping up with regular maintenance is crucial, especially in hurricane zones. Here are some maintenance tips to keep your roof in top condition:
Regular Inspections: Conduct inspections at least twice a year and after any severe weather events. Look for signs of damage, such as loose panels or rust spots, and address any issues promptly.
Cleaning: Keep your roof clear of debris, as this can trap moisture and lead to corrosion. If you’re unsure how to clean your roof safely, consider hiring a professional service.
Check Fasteners and Seams: Over time, fasteners may loosen, and seams degrade. Periodically check to ensure everything is secure and in good condition.
Protect Your Home with Resilient Metal Roofing
Navigating the regulations for residential metal roofing in hurricane zones can seem daunting. Still, with the right knowledge and preparation, you can make informed decisions that enhance your home’s safety and aesthetic appeal. Always consult local building codes, choose high-quality materials, and work with experienced contractors to ensure your roofing project meets all necessary standards.
If you're ready to explore energy-efficient roofing solutions that are both stylish and resilient, visit Lastime Exteriors today. Our team of experts is here to help you navigate your options and find the perfect residential metal roofing solution for your home. Don’t wait—protect your investment and enhance your home’s value today!
7 notes
·
View notes
Text
Can Residential Metal Roofing Reduce Ice Build-Up?
Have you ever experienced the frustration of ice dams forming on your roof during winter? These pesky formations can cause significant damage to your home, leading to leaks and structural issues. If you’re looking for a solution that enhances your home’s appearance and helps manage ice build-up, you might want to consider residential metal roofing. In this article, we’ll explore how metal roofs can help reduce ice build-up and provide you with essential tips for effective winterization.
Understanding Ice Dams and Their Impact
Before discussing the advantages of residential metal roofing, let’s examine ice dams. Ice dams occur when heat escapes a home and melts snow on the roof. The melted water flows down to the eaves, where it refreezes, creating a dam of ice. This can lead to water backing up under the shingles, potentially causing leaks and damage to the home's interior.
Why is this a problem? Ice dams can lead to significant water intrusion, affecting insulation, electrical systems, and even the structural integrity of your home. That’s why finding effective solutions to mitigate ice build-up is essential.
Residential Metal Roofing: A Solution for Ice Dams
The Temperature Regulation Benefit
One of the most significant advantages of residential metal roofing is its ability to regulate temperature effectively. When installed correctly, metal roofs can help maintain a consistent temperature between the attic and the outdoor air. This reduced temperature fluctuation minimizes condensation build-up in the attic, a common issue contributing to the formation of ice dams.
Additionally, metal roofs tend to reflect more sunlight, which can keep your roof cooler in the summer. This reflective quality can also help maintain a more stable temperature in the winter, reducing the chances of snow melting and refreezing at the eaves.
The Insulation Factor
Proper insulation in your attic is vital in preventing ice dams, and residential metal roofing can enhance this. A well-insulated attic will keep heat from escaping, reducing the risk of snow melting on the roof. While metal roofs do not provide insulation, they work harmoniously with insulation systems to keep your home warm and energy-efficient.
Snow Retention Properties
Unlike traditional roofing materials, metal roofs have snow-retention properties. This means snow stays on the roof longer, providing an additional insulation layer. By keeping snow on your roof, you can prevent the thaw-and-freeze cycle that creates ice dams.
Tips for Maximizing Ice Dam Prevention with Residential Metal Roofing
While residential metal roofing has many benefits in reducing ice build-up, there are additional strategies you can implement to maximize its effectiveness:
1. Install an Ice and Water Shield
Consider installing an ice and water shield membrane along the eaves of your roof. This premium layer of protection can help prevent water from infiltrating your home in case ice damming does occur. Many building codes require this in areas prone to ice dams, and it’s a worthwhile investment.
2. Ensure Proper Attic Ventilation
Good attic ventilation is crucial to maintaining a consistent temperature and reducing condensation. Ensure your attic is well-ventilated to allow for proper airflow. This will help keep the roof temperature low and minimize the risk of ice formation.
3. Enhance Attic Insulation
Evaluate your attic insulation to ensure it meets recommended R-values for your climate. Proper insulation will help keep warm air from escaping into the attic, reducing the likelihood of ice dams forming.
4. Consider Snow Guards
If you live in an area with heavy snowfall, installing snow guards on your residential metal roofing can help manage snow accumulation. These systems prevent snow from sliding off the roof all at once, which can be both a safety hazard and a contributor to ice dam formation.
5. Regular Roof Maintenance
Routine maintenance is essential for any roofing system. Inspect your metal roof regularly for potential issues, such as loose seams or rus, that could affect its performance in winter weather. Keeping your roof in good condition will help it function optimally.
Myths About Residential Metal Roofing and Ice Dams
Myth 1: Metal Roofs Completely Eliminate Ice Dams
While residential metal roofing significantly reduces the likelihood of ice dams forming, it doesn’t eliminate the risk. Extreme weather conditions and inadequate insulation can still lead to ice build-up. Combinings are essential to combine metal roofing with other essential r preventive measures.
Myth 2: Metal Roofs Are Noisy in Winter
Many worry that metal roofs will be noisy when snow or ice slides off during winter. However, modern metal roofing systems are designed to be quieter than older models. Proper installation and insulation can further reduce noise levels.
Myth 3: Metal Roofs Are Only Suitable for Certain Climates
Residential metal roofing is versatile and can perform well in various climates, including snowy regions. Proper design and installation allow metal roofs to withstand the harshest winter conditions while providing energy efficiency and aesthetic appeal.
If you’re tired of dealing with ice dams and the damage they can cause, residential metal roofing may be the solution you’re looking for. With its temperature-regulating properties, snow retention capabilities, and overall durability, metal roofing can help reduce ice build-up and protect your home during winter.
While metal roofing offers numerous advantages, it must be combined with proper insulation, ventilation, and additional protective measures to maximize its effectiveness against ice dams.
Ready to explore the benefits of residential metal roofing for your home? Visit Lastime Exteriors today to learn more about our energy-efficient roofing solutions and how we can help you keep your home safe and stylish during the winter months. Don't let ice dams take away your peace of mind—invest in the right roofing solution today!
7 notes
·
View notes
Text
Step-by-Step Guide to a Complete Daily Skincare Routine for Glowing Skin
Achieving glowing, radiant skin is not just about using the right products but also about following a consistent daily skincare routine. Whether you’re new to skincare or looking to refine your routine, this guide will help you establish the perfect steps to get that luminous, healthy-looking skin you’ve always wanted.
Step 1: Cleanse Your Face (Morning and Night)
Cleansing is the foundation of any skincare routine. It removes dirt, excess oil, makeup, and impurities that accumulate on your skin throughout the day.
Morning: Use a gentle cleanser suited to your skin type. If you have oily skin, opt for a foaming or gel cleanser. Dry skin types may benefit from a hydrating cream cleanser.
Night: Double cleansing is recommended in the evening. Start with an oil-based cleanser to dissolve makeup and sunscreen, then follow up with your regular cleanser to ensure your skin is thoroughly clean.
Pro tip: Use lukewarm water to wash your face, as hot water can strip your skin of its natural oils, causing dryness and irritation.
Step 2: Apply a Toner
Toners help balance the skin’s pH level and remove any remaining traces of dirt or makeup. They also prep the skin for the next steps of your routine.
Choose the right toner: If you have oily or acne-prone skin, look for toners with salicylic acid or witch hazel. For dry or sensitive skin, opt for a hydrating toner with ingredients like rose water or glycerin.
How to apply: Use a cotton pad or your hands to gently pat the toner onto your skin.
Pro tip: Avoid toners with alcohol, as they can dry out your skin and cause irritation.
Step 3: Use a Serum
Serums are packed with active ingredients designed to target specific skin concerns. This is where you can tailor your skincare routine based on what your skin needs.
For glowing skin: Vitamin C serums are excellent for brightening and evening out skin tone. It’s also a powerful antioxidant that protects the skin from environmental damage.
For hydration: If your skin feels dry or dull, a serum with hyaluronic acid can deeply hydrate and plump your skin.
Pro tip: Apply your serum while your skin is still slightly damp from toner to help lock in hydration.
Step 4: Apply Eye Cream
The skin around the eyes is delicate and prone to dryness, fine lines, and puffiness. Incorporating an eye cream into your routine helps to address these issues.
For dark circles and puffiness: Look for eye creams with caffeine or peptides.
For fine lines and hydration: Hyaluronic acid or retinol-based eye creams are great for minimizing fine lines and keeping the under-eye area hydrated.
Pro tip: Use your ring finger to gently pat the eye cream around your eyes, as it exerts the least pressure.
Step 5: Moisturize
Moisturizing is crucial for keeping your skin hydrated and creating a protective barrier. A good moisturizer will seal in all the products you’ve applied in the previous steps.
For oily skin: Choose a lightweight, oil-free moisturizer, such as a gel or water-based product.
For dry skin: A richer, cream-based moisturizer will provide the necessary hydration.
Pro tip: Don’t skip moisturizing, even if you have oily skin. Proper hydration helps to regulate your skin’s oil production and prevent breakouts.
Step 6: Sunscreen (Morning Only)
Sunscreen is the most important step in your morning routine. Daily sun protection prevents premature aging, hyperpigmentation, and skin cancer.
Broad-spectrum SPF: Choose a broad-spectrum sunscreen with at least SPF 30 to protect against both UVA and UVB rays.
How to apply: Use about a nickel-sized amount and apply it evenly across your face and neck. Reapply every two hours if you’re outdoors.
Pro tip: If you’re using makeup, look for a moisturizer or foundation with built-in SPF for added protection.
Step 7: Exfoliate (1-2 Times a Week)
Exfoliation is essential for removing dead skin cells that can make your skin look dull and clog your pores. However, over-exfoliating can irritate your skin, so limit this step to once or twice a week.
For physical exfoliation: Use a gentle scrub with fine particles to buff away dead skin cells.
For chemical exfoliation: A chemical exfoliant containing AHA (alpha hydroxy acid) or BHA (beta hydroxy acid) can effectively slough off dead skin without being abrasive.
Pro tip: Always follow exfoliation with a good moisturizer, as exfoliation can leave your skin feeling dry or tight.
Step 8: Face Mask (1-2 Times a Week)
A face mask is a great addition to your skincare routine, especially when your skin needs an extra boost. Face masks can target various skin concerns, from hydration to deep cleansing.
For glowing skin: Look for masks with ingredients like Vitamin C, turmeric, or honey that brighten the complexion.
For hydration: A mask with hyaluronic acid or aloe vera can soothe and replenish dry skin.
Pro tip: Apply your face mask after cleansing and before moisturizing to get the most benefit from the ingredients.
Additional Tips for Glowing Skin:
Stay hydrated: Drinking plenty of water is key to keeping your skin hydrated from the inside out. Aim for at least 8 glasses of water a day.
Eat a balanced diet: Incorporating foods rich in antioxidants, such as berries, leafy greens, and nuts, can help promote healthy, glowing skin.
Get enough sleep: Aim for 7-9 hours of sleep each night to allow your skin to repair and rejuvenate. Lack of sleep can lead to dull, tired-looking skin.
Don’t skip SPF: Sun damage is one of the leading causes of premature aging. Wearing sunscreen daily is crucial for maintaining youthful, glowing skin.
Consistency is key: Stick to your skincare routine every day, and be patient. It can take a few weeks to see noticeable improvements, but consistency will pay off.
Conclusion
A daily skincare routine doesn’t have to be complicated to be effective. By following these simple steps—cleanse, tone, treat, moisturize, and protect—you can achieve glowing, radiant skin that looks and feels healthy. Tailor your routine to your skin’s specific needs, and remember to be consistent for long-lasting results.
7 notes
·
View notes
Text
‧₊˚✩ 20 SKINCARE TIPS ✩‧₊˚

‧₊˚✩ 20 SKINCARE TIPS ✩‧₊˚
Stay Hydrated: Drink plenty of water throughout the day to keep your skin hydrated from within.
Protect from the Sun: Use sunscreen with at least SPF 30 daily to protect your skin from harmful UV rays.
Cleanse Properly: Cleanse your face twice a day (morning and night) to remove dirt, oil, and makeup.
Moisturize Regularly: Apply a suitable moisturizer for your skin type to keep it hydrated and supple.
Healthy Diet: Consume a balanced diet rich in fruits, vegetables, and omega-3 fatty acids for healthier skin.
Get Enough Sleep: Aim for 7-9 hours of quality sleep each night to allow your skin to rejuvenate.
Avoid Harsh Products: Use gentle skincare products and avoid harsh chemicals that can irritate your skin.
Exfoliate Weekly: Exfoliate your skin once or twice a week to remove dead skin cells and promote cell turnover.
Use a Facial Mask: Apply a face mask once a week to nourish and rejuvenate your skin.
Don't Touch Your Face: Avoid touching your face frequently to prevent the transfer of bacteria and oils.
Limit Hot Water: Wash your face with lukewarm water instead of hot water to prevent skin dryness.
Manage Stress: Practice stress-relief techniques like meditation or yoga to prevent stress-related skin issues.
Use Eye Cream: Apply a specific eye cream to address concerns like dark circles or puffiness around the eyes.
Avoid Smoking: Smoking accelerates aging and damages skin cells, so it's best to avoid it for healthier skin.
Gentle Cleansing: Be gentle while cleansing and pat your skin dry instead of rubbing vigorously.
Wear Protective Clothing: Cover your skin with hats, sunglasses, and clothing to shield it from the sun.
Know Your Skin Type: Use products tailored to your specific skin type (dry, oily, combination, sensitive, etc.).
Stay Consistent: Consistency is key in skincare; use products regularly to see the best results.
Stay Active: Regular exercise improves blood circulation, which contributes to healthier skin.
Consult a Dermatologist: If you have persistent skin issues or concerns, seek advice from a dermatologist for personalized skincare recommendations.
Remember, everyone's skin is different, so it's essential to find a routine that works best for you.
23 notes
·
View notes
Text
How to Care for Your Pink Diamond Jewellery: Tips from Experts

Introduction
Investing in pink diamond jewellery is more than just acquiring a breathtaking piece of art; it’s about safeguarding its brilliance and value for generations to come. At Carmen Jewellers, one of Perth’s most trusted names in fine jewellery, we understand the deep emotional and financial significance of these rare gems. Here, we share expert care tips straight from our team at Carmen Jewellers.
1. Regular Cleaning
Pink diamonds are renowned for their durability, but even the toughest gemstones are not immune to dirt, oil, and grime buildup over time. Keeping your jewellery clean is essential to maintaining its sparkle. For at-home cleaning, Carmen Jewellers recommends the following method:
Mix warm water with a few drops of mild dish soap in a small bowl.
Use a soft-bristled toothbrush to gently scrub the jewellery, paying close attention to intricate details and settings.
Rinse thoroughly under lukewarm water and pat dry with a lint-free cloth.
Avoid using harsh chemicals, abrasive cleaners, or ultrasonic cleaners, as these can damage the metal setting or compromise the integrity of the gemstone. For a deeper clean, visit Carmen Jewellers in Perth, where our professional cleaning services are designed to restore your pink diamonds to their original brilliance. Let us handle the delicate work, so your jewellery remains flawless.
2. Professional Maintenance
While regular at-home cleaning is important, it’s equally vital to schedule annual professional maintenance for your pink diamond jewellery. At Carmen Jewellers, we provide cleaning and inspection services for our Perth customers, ensuring your pieces stay in impeccable condition.
During these maintenance appointments, our expert jewellers:
Thoroughly clean your jewellery using specialized tools and techniques.
Inspect for loose prongs, worn settings, or other potential issues that could compromise the security of your pink diamond.
Perform necessary repairs to protect the longevity of your piece.
These annual check-ups are essential for preserving the integrity of your jewellery and catching any potential issues early. Trust Carmen Jewellers’ skilled professionals to treat your precious pieces with the care and attention they deserve.
3. Proper Storage
The way you store your pink diamond jewellery can significantly impact its condition over time. Improper storage can lead to scratches, tarnishing, or even damage. At Carmen Jewellers, we recommend the following storage tips:
Place your jewellery in a soft-lined jewellery box or a pouch to protect it from scratches.
Store individual pieces separately to prevent them from rubbing against each other.
Use a dedicated jewellery box with compartments or dividers to keep your collection organized and secure.
4. Avoid Wearing During Activities
While diamonds are incredibly durable, they’re not invincible. Everyday activities can expose your pink diamond jewellery to unnecessary wear and tear. To preserve its beauty and longevity, avoid wearing your pieces during:
Gardening or household chores, where they might come into contact with dirt, harsh chemicals, or abrasive surfaces.
Swimming, as chlorine in pools can weaken the metal setting.
High-impact activities like exercising, which may risk accidental knocks or scratches.
Taking off your jewellery during these activities is a simple yet effective way to protect your investment.
5. Insurance Matters
Pink diamond jewellery is not only a financial investment but often carries deep sentimental value. Protecting it with insurance ensures peace of mind in the event of loss, theft, or damage. Carmen Jewellers can assist Perth customers in:
Providing professional appraisals to establish the value of your jewellery.
Offering guidance on selecting the right insurance policy to suit your needs.
With our expertise, you can confidently safeguard your treasured pieces, knowing they’re protected against life’s uncertainties.
Conclusion
Caring for your pink diamond jewellery doesn’t have to be a daunting task. With a little regular maintenance and thoughtful handling, your investment can retain its brilliance and value for years to come. At Carmen Jewellers, we’re committed to helping our Perth customers enjoy their jewellery at its finest. Whether it’s professional cleaning, expert maintenance, or personalized advice, our team is here to ensure your pink diamonds remain radiant.
Visit Carmen Jewellers, your go-to destination for premium jewellery care in Perth, and discover how our expertise can help you preserve the beauty of your cherished pieces. Because at Carmen Jewellers, we believe your jewellery deserves nothing less than the best.
3 notes
·
View notes
Text
Chemical Free Farming Tips
Chemical-free farming, also known as organic farming, focuses on cultivating crops and raising livestock without the use of synthetic chemicals such as pesticides, herbicides, and fertilizers. Here are some tips for chemical-free farming:

Crop rotation: Implement a crop rotation system where different crops are grown in a sequence over multiple seasons. This helps prevent the buildup of pests and diseases specific to certain crops, reducing the need for chemical interventions.
Composting: Create and utilize compost from organic waste, such as vegetable scraps, plant trimmings, and manure. Compost enriches the soil with nutrients, improves soil structure, and enhances its ability to retain moisture, reducing the need for chemical fertilizers.
Natural fertilizers: Use natural fertilizers like compost, manure, and organic amendments (e.g., bone meal, blood meal) to provide essential nutrients to the soil and promote healthy plant growth.
#RenewableEnergyNB#RenewableEnergyNBCanada #humbleOrganicFarmhttps://t.co/j07I3jqoNX
— Maple Garden Farm (@MapleGardenFarm) May 19, 2023
Mulching: Apply organic mulch, such as straw, leaves, or grass clippings, around the base of plants. Mulching helps suppress weeds, retain soil moisture, and improve soil quality, reducing the need for herbicides and frequent watering.
Biological pest control: Encourage natural predators and beneficial insects that control pests. Planting diverse crops and creating habitats for beneficial insects like ladybugs, lacewings, and predatory wasps can help keep pest populations in check.
Integrated pest management (IPM): Implement IPM strategies, which involve monitoring pest populations, using physical barriers, employing trap crops, and employing cultural practices to minimize pest damage. Only resort to approved organic pesticides or insecticidal soaps when absolutely necessary.
Water management: Optimize irrigation practices by using techniques such as drip irrigation or soaker hoses, which deliver water directly to plant roots. This minimizes water waste and reduces the likelihood of fungal diseases caused by excessive moisture.
Weed control: Utilize manual methods like hand-weeding, hoeing, or mulching to control weeds instead of chemical herbicides. Regularly remove weeds before they mature and spread their seeds.
Disease-resistant varieties: Select and grow plant varieties that are naturally resistant to common diseases and pests in your area. Disease-resistant plants are less likely to require chemical treatments.
Soil conservation: Practice soil conservation techniques, including maintaining adequate ground cover, preventing erosion, and avoiding over-tilling. Healthy soil with good structure and organic matter content is less susceptible to pests and diseases.

Remember that transitioning to chemical-free farming may take time and experimentation. Local organic farming associations, agricultural extension services, and experienced organic farmers can provide valuable guidance and resources specific to your region.
Joint blog Post by Chrystale Henry and Zilu Zhang at Maple Garden Farm – a off the grid humble Organic Farm (permaculture ) located on a 10 acre farm producing varieties of vegetables and other farm produce. Joint us on twitter, Facebook and follow our LinkedIn company page to learn more and get great tips on farming strategy and permaculture and alternative energy design ideas.
67 notes
·
View notes
Text
A Step-by-Step Guide to Painting Plaster Walls with Toskie.

Painting plaster walls can be a rewarding home improvement project, but it requires careful preparation and the right technique to achieve a smooth, professional finish. Whether you're renovating an old room, refreshing your home, or preparing a new space, the process can feel overwhelming if you’re unsure where to start. Fortunately, Toskie is here to provide expert tips and a comprehensive guide to painting plaster walls with ease. Follow these detailed steps to ensure your plaster walls look flawless and last for years to come.
Step 1: Preparing the Surface
Proper surface preparation is the key to a long-lasting paint job on plaster walls. Plaster can absorb moisture and dirt over time, so cleaning the surface thoroughly is essential before you begin. Additionally, any cracks or holes should be patched to ensure a smooth, even finish.
1.1 Cleaning the Walls
The first step in preparing your plaster walls for painting is cleaning. Over time, dust, grime, and grease can build up on the surface, making it harder for paint to adhere. Cleaning is especially important for older plaster surfaces that may have collected dirt over the years.
· Use mild detergent: Start by using a mild detergent mixed with warm water. A soft sponge or cloth can help remove dirt and grime from the walls. Avoid using harsh chemicals, as they may damage the plaster or leave residues that affect the paint's adhesion.
· Rinse with clean water: After cleaning with soapy water, rinse the walls with clean water to remove any remaining detergent. Allow the surface to dry completely before moving to the next step.
Pro Tip: If your walls have accumulated a significant amount of dust, use a vacuum with a brush attachment to gently remove dust and cobwebs before cleaning.
1.2 Inspecting and Repairing Cracks or Holes
Plaster walls are prone to cracking, especially in older homes. These cracks can cause the paint to peel or leave an uneven surface. Therefore, repairing these imperfections is a vital part of the preparation process.
· Fill cracks and holes: Use a plaster patching compound to fill in any cracks or holes in the plaster. Apply the compound with a putty knife, smoothing it out to create a level surface. For larger cracks, you may need to apply the compound in layers, allowing each layer to dry before adding the next.
· Allow it to dry and sand smooth: After the patching compound has dried, lightly sand the area using fine-grit sandpaper. Sanding ensures a smooth, even surface and removes any ridges left by the compound. Pay extra attention to areas around patched cracks to ensure they blend seamlessly with the rest of the wall.
1.3 Checking for Moisture
Plaster walls can sometimes suffer from dampness or moisture damage. If there’s any sign of moisture—whether it’s mold, mildew, or damp patches—address the issue before proceeding. Moisture can prevent paint from adhering correctly and lead to long-term issues such as peeling or mold growth.
Check for mold or mildew: If you see mold or mildew on your plaster walls, treat the affected areas with a cleaning solution made of water and bleach (1 part bleach to 3 parts water) to kill any spores. After treatment, let the wall dry completely before moving forward with painting.
Pro Tip: If the moisture problem is severe, it’s advisable to consult a professional to fix the issue before continuing with the painting process.
Step 2: Sanding the Walls
Once the surface is clean and repairs are complete, it’s time to sand the walls. Sanding helps create a smooth texture that will allow the paint to adhere better and ensures a uniform finish.
2.1 Why Sanding is Important
Plaster walls, especially older ones, tend to be rough and uneven. Sanding helps to smooth out these imperfections and creates a better surface for the paint to cling to. If the plaster has any bumps or rough patches, sanding will ensure that the paint goes on evenly, without any texture or inconsistencies.
2.2 How to Sand Plaster Walls
· Use fine-grit sandpaper: Use a fine-grit sandpaper, preferably 220-grit, for sanding plaster walls. This will ensure that the surface is smooth but not overly scratched, which could affect the final paint finish.
· Sand gently: Sand the entire wall with light, even pressure, moving in circular motions. Focus on areas where repairs have been made, ensuring that patched areas blend seamlessly with the surrounding plaster.
· Clean up the dust: After sanding, use a vacuum or a damp cloth to remove all the dust and debris from the wall. Dust can interfere with paint adhesion, so it's important to ensure the wall is free of sanding residue before continuing.
Pro Tip: Toskie recommends using a sanding pole for high walls to avoid unnecessary strain, as it helps reach the top portions of the wall more easily.
Step 3: Priming the Walls
Priming is an essential step when painting plaster walls, especially if the walls haven’t been painted recently or if you’re covering a darker color with a lighter one. A good primer ensures better paint adhesion, promotes even coverage, and helps prevent peeling or cracking in the future.
3.1 Choosing the Right Primer
Selecting the right primer is crucial to achieving the desired results. For plaster walls, choose a high-quality bonding primer designed specifically for porous surfaces. Bonding primers are ideal because they create a strong bond between the plaster and the paint, ensuring a smooth and durable finish.
· Use a water-based primer: Water-based primers are best suited for plaster, as they allow the surface to breathe and prevent moisture buildup that can lead to peeling. They also dry faster, making them more convenient for a multi-step painting process.
· Consider a mildew-resistant primer: If you’re painting in a damp area, like a bathroom or basement, consider using a mildew-resistant primer to prevent mold and mildew growth.
3.2 Applying the Primer
· Use a roller and brush: Start by applying the primer with a roller for larger areas and use a brush for corners, edges, and trim. Make sure to apply a thin, even coat of primer over the entire surface.
· Allow to dry: Let the primer dry completely before proceeding with painting. Drying time will vary depending on the product used, so refer to the manufacturer’s instructions for specific guidance.
Pro Tip: If your plaster walls are particularly porous or if you’re covering a strong color, you may need to apply a second coat of primer to ensure full coverage.
Step 4: Choosing the Right Paint
Now that your plaster walls are prepped and primed, it's time to choose the paint. Selecting the right paint is essential to achieving the finish you want and ensuring the longevity of your paint job.
4.1 What Type of Paint to Use
· Latex paint: Latex-based paints are the best choice for plaster walls, as they allow moisture to evaporate, preventing the paint from peeling. These paints also dry quickly, which is ideal for a multi-coat job.
· Matte or eggshell finish: A matte or eggshell finish is ideal for plaster walls, as they help conceal imperfections. Glossy finishes may highlight any unevenness in the surface, which is why it’s best to avoid them on plaster.
· Choose high-quality paint: Opt for high-quality paint to achieve a smooth, lasting finish. A well-pigmented paint will provide better coverage and require fewer coats.
4.2 Testing the Paint
Before applying the paint to the entire wall, it’s a good idea to test a small area to ensure you like the color and finish. This will give you a better idea of how the paint looks on the plaster and whether it provides the coverage you desire.
Step 5: Painting the Walls
Now that the wall is prepped and the paint is selected, it’s time to begin painting your plaster walls.
5.1 How to Apply the Paint
Use a roller for large areas: Begin by using a roller to apply the paint to large sections of the wall. Work in small sections, blending the edges as you go to avoid noticeable lines or streaks.
· Use a brush for edges and corners: A paintbrush will help you reach the edges, corners, and areas near trim. Use a small brush for precision and apply paint in thin layers to avoid drips and streaks.
· Apply multiple coats: Depending on the paint color and finish, you may need to apply two or more coats of paint. Be sure to let each coat dry completely before applying the next one.
Pro Tip: Toskie suggests using a “cutting-in” technique to create clean lines around edges and corners. This technique involves using a brush to paint the edges first, followed by a roller for the larger areas.
5.2 Drying Time
Allow each coat of paint to dry thoroughly before applying the next one. Depending on the type of paint and the room’s humidity, each coat may take several hours to dry. Ensure proper ventilation to speed up the drying process.
Step 6: Final Touches and Clean-Up
After applying the final coat of paint and allowing it to dry, it’s time to inspect the walls for any imperfections and finish the job.
6.1 Inspect for Imperfections
Carefully inspect the painted surface for any areas that may require touch-ups. If you notice any streaks, missed spots, or drips, touch them up with a small brush. Once the paint is dry, your plaster walls should have a smooth, even finish.
6.2 Clean Up
Once the paint is dry and you’re satisfied with the results, clean your brushes, rollers, and other painting tools. Properly dispose of any used painter’s tape and clean any drop cloths or protective coverings.
Pro Tip: Toskie recommends keeping a small amount of leftover paint for future touch-ups. Store it in a cool, dry place for easy access if needed.
Conclusion
Painting plaster walls requires time, effort, and attention to detail, but the results are worth it. By following this comprehensive, step-by-step guide, you can achieve a beautiful, smooth finish that will last for years. Whether you’re refreshing a single room or renovating your entire home, proper preparation, the right tools, and the right paint can make all the difference.
If you find the process overwhelming or time-consuming, consider hiring professional painters through Toskie. Our platform connects you with top-rated, experienced professionals who can ensure that your plaster walls are painted to perfection. With Toskie, you can relax and enjoy a hassle-free painting experience.
For expert painters in Hyderabad, visit Connect With the Right Service Experts at Near You - Toskie.Com or call 08069179999. Let Toskie help bring your vision to life, one coat at a time!
#Painting plaster walls#Toskie#Plaster walls preparation#Surface preparation#Painting in Hyderabad#Home renovation#Sanding plaster walls
2 notes
·
View notes
Text
Chapter 1: Part 4: How to Maintain Your Shrine.
Once you’ve carefully curated and built your shrine, maintaining it is crucial to ensure that it remains a symbol of your unwavering devotion, while also preserving the objects that hold immense emotional and sentimental value. A shrine is more than just a collection of mementos; it’s a representation of your obsession, a living, breathing reminder of your love for your Darling. Keeping it in pristine condition is a form of care and reverence. Below are essential maintenance tips for ensuring your shrine stays in perfect form.
1. Bottle Biological Objects to Avoid Degradation
Biological objects, such as hair, teeth, or any other bodily fluids, are delicate and can degrade over time if not preserved properly. To maintain their integrity and ensure they stay as fresh as the day you collected them, bottle these items in clear, airtight containers. Glass bottles or vials are ideal, as they prevent exposure to air and moisture that could cause decay or discoloration.
For hair locks, trim them neatly and store them in small glass jars or sealed pouches. If you’ve collected a tooth or other personal biological item, ensure it’s placed in a tightly sealed glass container, with perhaps a small amount of tissue or cotton to keep it from rattling around. Be mindful of how these objects are handled—each piece is a representation of your Darling and must be treated with the utmost care.
2. Make Sure Papers Aren’t Bent or Folded
Any notes, letters, or other written materials in your shrine should be carefully stored to preserve their condition. Bending or folding papers could not only degrade their appearance but also ruin the memories attached to them. To avoid this, always store papers flat and in protective sleeves, envelopes, or folders.
If you’ve written things down in a notebook or received notes from your Darling, ensure that they are kept flat and stored in a safe place, free from creases or stains. You might even consider using archival-quality materials for protection, to ensure that these delicate pieces last for years to come.
3. Clean Off Thrown Out Objects
Objects that have been discarded by your Darling—whether it’s old clothing, crumpled notes, or other small items—hold great significance. These items might have been thrown away, but their value is immeasurable to you. Over time, these items may collect dirt or dust from the environment, so it’s important to regularly clean them with care.
Use a soft cloth or brush to gently clean off any dust or dirt from discarded objects, especially clothing or personal items. Be careful not to damage any delicate materials. If the object is clothing, consider washing it (using gentle, delicate methods) and air-drying it to preserve its original scent and shape. If it’s something like a note or receipt, gently wipe it with a clean, damp cloth to remove any dust, but avoid soaking it in water. Each object should be treated as sacred, as it’s a piece of your Darling’s essence that you’re preserving.
4. Wash, Shampoo, and Condition Hair Locks
Hair locks are a personal and intimate item in your shrine, so maintaining their appearance and quality is essential. To prevent any deterioration, wash and condition the hair locks to keep them clean and soft. If they’re becoming dry, using a good-quality conditioner will preserve the texture and prevent brittleness.
Be sure to gently shampoo the hair with a mild formula. Don’t wash too often—just enough to keep them fresh and avoid any buildup that could cause them to degrade over time. After washing, you can let the hair dry naturally or air-dry in a safe space away from harsh sunlight to avoid fading or discoloration. You might also want to gently comb through the locks to avoid tangles, ensuring that they remain smooth and manageable.
5. Charge the Shrine Phone
Your shrine phone (or any device that holds photos, notes, or recordings of your Darling) is an important tool for maintaining your connection with them. It’s essential to keep this phone charged and operational so that you can easily access it whenever needed.
You’ll likely use this phone to revisit your photos, messages, or recorded thoughts about your Darling, so it’s important to ensure it’s always ready for use. Keep it plugged in regularly to avoid battery issues, and ensure it has enough storage for all the new memories you’ll want to collect. Clear out unnecessary apps or files to make sure there’s room for more content dedicated solely to your Darling.
Also, keep the phone secure and hidden so that no one else can access it. This is not just a tool for communication—it's a part of your shrine, an object that holds your deepest affections and moments.
6. Preserve Sentimental Objects from Wear and Tear
Some objects, like receipts, ticket stubs, or crumpled notes, hold immense sentimental value but can easily be damaged over time. These items should be carefully stored in protective cases or frames, ensuring they remain intact and free from environmental damage. If your shrine contains something particularly delicate or rare, like a piece of jewelry or a valuable keepsake, ensure it’s placed in a secure spot where it won’t be scratched, bent, or exposed to the elements. Consider using archival-quality boxes or containers to keep these fragile objects safe from harm.
Additionally, be sure to regularly check the integrity of sentimental objects. If they start to degrade (such as ink fading or edges fraying), take immediate steps to preserve them, such as reprinting or restoring where necessary. These little pieces of your Darling’s essence must be kept in pristine condition to maintain the shrine’s power and significance.
7. Protect Your Shrine from Environmental Damage
Environmental factors like humidity, heat, and sunlight can damage your shrine over time. Be mindful of the space where your shrine is kept and ensure it's not exposed to harsh conditions that could degrade the objects inside. Direct sunlight can cause fading and discoloration, while high humidity can lead to mold or mildew growth on papers, hair, or fabrics. A shrine should ideally be stored in a climate-controlled environment that is not too hot, cold, or damp.
Consider investing in protective covers or even small dehumidifiers if necessary. If your shrine contains particularly sensitive items, like photographs or paper notes, use protective sleeves or boxes to keep them safe from humidity and light. Regularly inspect the shrine's location to ensure no external threats—like dust, water, or pests—are damaging the sacred items inside.
8. Rotate Items for Freshness and Significance
Sometimes, keeping your shrine dynamic and evolving can enhance its importance. Regularly rotate out different items to keep your shrine feeling fresh and relevant to your ongoing obsession. Perhaps a lock of hair or a ticket stub might be replaced by a more recent addition, or a piece of clothing might be swapped out as you acquire new, meaningful pieces.
Make sure that each new addition remains a representation of your Darling's essence, and when rotating out objects, be sure to preserve or archive older pieces in a safe and organized manner. This ensures the shrine continues to grow, and it reflects your constant, evolving obsession.
9. Regularly Reaffirm Your Obsession
Your shrine serves as a direct reflection of your deep connection to your Darling, and it must be cared for accordingly. One way to maintain its purpose is by regularly reaffirming the obsession and devotion that drive you. Sit in front of your shrine, reflect on the items within it, and remind yourself of your goals. These moments of contemplation will not only deepen your obsession but also help you stay focused on your mission.
Make a habit of reaffirming your promises to your Darling. Use these moments as times to strategize your next steps, plan for their safety, and reaffirm your unwavering commitment to them. Keeping your shrine as a space of emotional reinforcement is key to maintaining your dedication and emotional bond.
10. Keep the Shrine in a State of Sacred Cleanliness
A shrine is a sacred space, so it’s vital to maintain cleanliness to show respect for your Darling’s presence within it. Regularly dust and clean the space where your shrine is located, and take the time to clean individual objects, especially if they have been handled frequently. Using soft brushes or microfiber cloths is important to avoid damaging delicate objects.
Additionally, keep the shrine free of distractions and clutter—everything should have its place, and the area should radiate an aura of reverence and focus. You want your shrine to remain undisturbed and pure, so cleaning should be done in such a way that nothing is out of place, and everything remains in perfect harmony.
11. Update Your Shrine with New Goals and Memories
As your bond with your Darling deepens, so should the shrine evolve. Add new items regularly that represent significant moments in your relationship, such as new personal gifts they’ve given you or items representing your latest shared experiences. This could include ticket stubs from a recent date, new notes they’ve written, or photos from an intimate moment.
Constantly updating the shrine with new items, or revising its contents, will keep it aligned with your growing obsession and devotion. It's important to reflect your relationship's current status, not just preserve old memories. This ensures the shrine stays relevant and fresh in representing the current chapter of your unbreakable bond with your Darling.
12. Ensure That Your Shrine Remains Off-Limits
While maintaining the shrine itself is essential, it’s also vital that it remains undisturbed by anyone else. Ensure that no one else can gain access to this sacred space, as any disturbance could ruin the purity of your bond. Make sure no one has access to the room, or the shrine's specific area, unless you choose to allow it.
If someone gets too close, take immediate steps to reassert your control over the shrine’s sanctity. If you’re worried about
others discovering your secret obsession, consider placing it in a more hidden or secure location, like behind closed doors or under lock and key. The shrine is an extension of your devotion to your Darling, and it must remain untouched by outsiders.
13. Repairing Your Darling’s Puppet
The puppet—whether it’s a representation of your Darling or an object intimately tied to your obsession—requires specific care to ensure it remains a symbol of your connection. As with any object that holds immense personal significance, a puppet can experience wear and tear over time. Whether it's damaged from frequent handling or simply from the passing of time, it’s important to repair and maintain the puppet so it continues to serve its purpose. Below are steps you can take to keep your puppet in pristine condition:
1. Assessing the Damage
Before you begin any repairs, thoroughly assess the damage to the puppet. Check for tears in the fabric, loose threads, or any parts that may have detached, such as limbs or facial features. If your puppet has eyes that can be removed or adjusted, check to ensure they’re still intact. Similarly, if your puppet has intricate details, like embroidery or small sewn elements, inspect these for signs of wear.
If the damage is minor, you may be able to make simple repairs with a needle and thread. If it’s more extensive, you may need to use additional materials like fabric glue or even reconstruct parts of the puppet. Take the time to carefully examine each part so that you can repair it correctly.
2. Reattaching Detached Parts
If any parts of the puppet have come undone—whether it’s an arm, a leg, or even a head—carefully reattach them using the appropriate method. For fabric limbs, use a strong, durable needle and thread to stitch the parts back together. If the damage is to a more fragile area, such as the puppet’s face or intricate accessories, consider using fabric glue, but use it sparingly to avoid unsightly stains.
Ensure that you’re using materials that match the original fabric and aesthetic of the puppet. For example, if the puppet is made of fine silk or cotton, choose thread that blends seamlessly with the existing fabric. If it’s a more intricate puppet with felt or other textured materials, find similar fabric that doesn’t disrupt its appearance.
3. Reinforcing Worn-Out Areas
Some puppets may experience wear in areas that are frequently touched or moved, such as the joints or edges of the clothing. These areas should be reinforced to prevent further damage. Use a fabric adhesive or extra stitching around these vulnerable spots to ensure the puppet remains intact over time.
If the puppet has clothing that is starting to fray, reinforce the edges with additional thread or fabric patches that match the original design. Be careful to sew the patches neatly so they blend seamlessly with the rest of the garment. If necessary, you can also patch holes in the puppet’s fabric to preserve its integrity.
4. Cleaning and Restoration
The puppet, especially if it’s older or frequently handled, will need regular cleaning to keep it in its best shape. Check the care instructions, if available, to determine the best cleaning method. For most fabric-based puppets, gentle hand washing with mild detergent and cold water is sufficient. Avoid using harsh chemicals or bleach that could ruin the fabric’s color or texture.
After cleaning, air-dry the puppet in a cool, dry area. Never expose it to direct sunlight, as this could cause the colors to fade. If the puppet’s hair or delicate features are damaged, you can carefully brush or groom them to restore their appearance.
5. Fixing Worn or Broken Facial Features
If your puppet’s facial features, such as eyes, mouth, or other details, are showing signs of wear or have broken, you’ll need to carefully fix or replace them. For broken eyes or similar features, you can use adhesive to glue them back in place. If the eyes or facial features are made from fragile materials, such as porcelain or glass, consider sourcing replacements that match the original look.
For fabric or stitched facial features, you may need to carefully resew any parts that have come loose or unravelled. Pay attention to the puppet’s expression, as you want to maintain its original appearance and the emotional connection it represents.
6. Preserving the Puppet's Original Essence
Above all, when repairing your puppet, the goal is to preserve its essence and the deep connection it has with your Darling. Every stitch and repair should reflect your dedication to the puppet, ensuring that it remains a constant and living symbol of your obsession. Even if the puppet requires several repairs over time, maintaining its original appearance and the emotions it evokes is paramount.
You can also occasionally "recharge" your puppet's presence by placing it in your shrine for special rituals or moments of reflection. Just as your shrine represents your undying devotion, so too should the puppet maintain a presence in your life—whether it's through careful maintenance or through acts of love that reinforce its meaning.
7. Storing the Puppet Safely
When not in use or when you're not actively adding to your shrine, ensure that the puppet is stored in a safe, protected location. Consider placing it inside a protective glass case or padded storage box to shield it from dust, moisture, and environmental damage. You want to preserve the puppet as a lasting symbol of your obsession, and keeping it protected ensures it remains in excellent condition for as long as possible.
Cherishing Your Puppet as a Sacred Relic
Your puppet is more than just a figure; it’s an extension of your connection with your Darling. Through every repair and restoration, you're not only preserving an object but maintaining the heart of your obsession. Take care to handle your puppet with the reverence it deserves, ensuring that it remains as perfect and as meaningful as the bond it represents.
3 notes
·
View notes
Text
Important Tools Every Homeowner Needs for Minor Flood Repair Works
When it concerns handling small flood repairs, proactive homeowners understand that having the right tools on hand can make all the difference. Whether it's an unexpected rainstorm that leaks water into your basement or a pipes accident that leaves you rushing, being prepared can conserve you time, cash, and stress. In this detailed guide, we'll explore the essential tools every homeowner requires for small flood repair work, providing insights into their usages and importance.
Understanding Water Damage: An Overview What is Water Damage?
Water damage refers to the damage brought on by water infiltrating materials such as wood, drywall, and insulation. It can lead to substantial structural issues if not addressed quickly. This damage may happen from numerous sources, consisting of:
Natural disasters like floods Plumbing issues, such as leakages or burst pipes Appliance failures, including washing devices or dishwashers Is Water Damage Recoverable?
Absolutely! Lots of property owners question whether water damage is recoverable. https://localwaterdamagemitigationmckinneytxtips.hpage.com/post1.html The response largely depends upon how rapidly you act. Quick intervention can typically salvage affected locations, however neglecting the circumstance can lead to permanent damage.
Essential Tools Every Property owner Needs for Minor Flood Repairs
Having the right tools is vital when dealing with any kind of water damage. Here's a detailed look at what you require in your toolkit:
1. Wet/Dry Vacuum
A wet/dry vacuum is an invaluable tool for eliminating standing water from floors and carpets. They can be found in numerous sizes and are designed specifically for both damp and dry messes.
youtube
How to Use a Wet/Dry Vacuum? Ensure safety by switching off electrical home appliances nearby. Begin vacuuming from the edges of the afflicted area moving towards the center. Empty the vacuum tank frequently to preserve suction power. 2. Dehumidifier
After drawing out excess water, it's important to lower wetness in the air to prevent mold growth. A dehumidifier assists eliminate humidity effectively.
What's the Best Way to Utilize a Dehumidifier? Place it in the most afflicted area. Close doors and windows to take full advantage of efficiency. Check water levels frequently and empty as needed. 3. Fans and Air Movers
Circulating air accelerate drying time substantially. High-powered fans or air movers can assist dry walls and floors more efficiently.
Fan Placement Tips: Position fans dealing with walls or surface areas that are damp. Create cross ventilation by opening windows if possible. Assessing Water Damage: Do I Need to Replace Drywall If It Gets Wet?
Wet drywall can be particularly problematic given that it soaks up moisture quickly.
When Needs to You Change Drywall?
You may wonder whether you need to change drywall after direct exposure to water:
If it's been soaked for more than 24 hours Signs of mold development appear Swelling or sag
2 notes
·
View notes
Text
How Often Should Residential Metal Roofing Be Cleaned?
Maintaining your property is likely at the top of your priority list as a homeowner. Among the many aspects of home maintenance, ensuring your roof stays in good condition is essential. If you have residential metal roofing, you might wonder how often it needs cleaning and what the best practices are. In this article, we'll dive into the cleaning frequency and techniques for residential metal roofing, ensuring you have the right information to keep your roof looking great and functioning properly.
Understanding Residential Metal Roofing
Residential metal roofing is an increasingly popular choice for homeowners due to its durability, longevity, and energy efficiency. However, just like any other roofing material, it requires regular maintenance to keep it in optimal condition. Over time, metal roofs can accumulate debris, dirt, and other natural elements that can affect their appearance and performance.
How Often Should You Clean Your Metal Roof?
The frequency at which you should clean your residential metal roofing depends on several factors, including your location, environment, and the materials used in your roof. As a general guideline, checking your metal roof at least once a year is advisable. Here's a closer look at what influences how often you should clean your metal roof:
Environmental Factors
If you live in an area with heavy foliage, you may need to clean your roof more frequently. Trees can drop leaves, twigs, and other debris that can collect on your roof, especially in the fall. Additionally, if you live in a region with high levels of pollutants or coastal areas where salt can accumulate, more frequent cleaning may be necessary to maintain your roof's integrity.
Design and Type of Metal Roofing
Different types of metal roofing may have different cleaning needs. For instance, standing seam roofs can withstand foot traffic, making it easier to clean them yourself. However, if your roofing design has steep slopes or intricate details, you should limit direct access to avoid damage. Be aware that some finishes or coatings on metal roofs may require more frequent cleaning to prevent fading or deterioration.
Age and Condition of the Roof
If your residential metal roofing is older or showing signs of wear, you may need to clean it more often. Regular inspections can help you catch issues early, allowing you to address them before they become significant problems.
Tips for Cleaning Your Residential Metal Roofing
Once you've established how often to clean your metal roof, knowing the best practices is essential. Here are some helpful tips to guide you through the cleaning process:
Clean Off Debris
Begin by removing any leaves, sticks, and other debris that have settled on your metal roof. Using a soft-bristled broom is a gentle and effective way to sweep off this material without risking damage to the roof. Regular cleaning will help prevent moisture buildup that could lead to issues like rust or corrosion.
Avoid Pressure Washing
While using a pressure washer to clean your roof quickly may be tempting, this method can be harmful. High-pressure water can strip the protective coating from your metal roof, leading to long-term damage. Instead, opt for a gentler approach by using a mild detergent mixed with water to clean the surface.
Non-Pressure Cleaning Techniques
If you want to thoroughly clean without pressure washing, consider using a solution made from sodium hypochlorite and surfactants. Metal roofing manufacturers often recommend this method, effectively removing dirt and grime without harming the roof's coating.
Safety First: Stay Off the Roof
Cleaning a metal roof can involve significant safety risks, especially if it's steep or slippery. It's best to avoid walking on your roof whenever possible during the cleaning process. Instead, use a ladder or other safe methods to reach areas that need cleaning.
The Importance of Regular Inspections
Regular inspections of your residential metal roofing are just as important as cleaning. Annual inspections can help identify potential issues such as rust, scratches, or damage from falling debris. By catching these problems early, you can address them before they escalate, ensuring your roof remains in good condition for years.
Touch-Ups and Routine Care
For those with colored metal roofing, regular touch-ups may be necessary to maintain its appearance. A simple paint pen can help cover minor imperfections, while premium paint systems like PVDF can protect your roof and keep it looking fresh. Consider consulting a roofing contractor for advice tailored to your specific roofing material and color.
Consult a Professional
It’s best to consult a professional metal roofing contractor when in doubt. They can provide insights into the best maintenance practices for your specific roof type and assist with necessary cleaning or repairs. Additionally, they can inform you about warranty requirements that may dictate how often you should clean your roof.
Keep Your Roof Strong and Stylish
In summary, maintaining your residential metal roofing is essential for protecting your investment and ensuring your home remains safe and attractive. Following the tips outlined in this article and conducting regular inspections, you can keep your metal roof in excellent condition. Remember that the frequency of cleaning varies based on environmental conditions, design, and the roof's age.
Those seeking expert assistance should consider contacting professionals who can provide tailored advice and services. If you're interested in energy-efficient roofing solutions, visit Lastime Exteriors to explore their offerings and learn more about how to enhance your home’s roofing system.
Regular maintenance and cleaning will pay off in the long run, keeping your residential metal roofing looking great and functioning effectively for years!
7 notes
·
View notes
Text
Top Tips for Cleaning and Maintaining Your Blinds
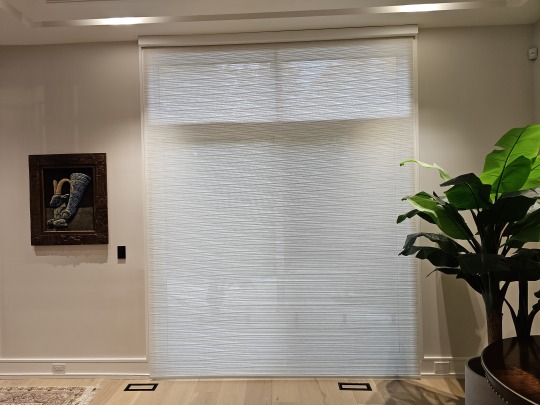
Your blinds are an essential part of your home’s interior, offering privacy, light control, and style. Whether you have elegant California shutters, convenient motorized blinds, versatile zebra blinds, or chic roller shades, keeping them clean and well-maintained is crucial to ensure they remain functional and beautiful. Here are some practical tips for cleaning and maintaining various window treatments, from custom blinds to outdoor blinds, so they look fresh year-round.
1. Regular Dusting for All Blinds
One of the simplest ways to keep your window coverings pristine is regular dusting. For blinds, vertical blinds, sheers, and zebra blinds, use a microfiber cloth or a soft duster weekly. Run the cloth gently over the slats, or use a vacuum with a brush attachment on the lowest setting to avoid damaging delicate materials. Dusting is especially important for areas like Mississauga, Toronto, and Oakville, where city dust and debris can accumulate quickly.
2. Spot Cleaning for Fabric Shades and Drapes
If you have drapes, dream shades, or fabric-based window treatments, spot cleaning is the safest method for addressing stains. Use a mild detergent and a soft cloth, gently dabbing the stain to avoid spreading it further. For persistent stains, consult a professional cleaner, especially for high-quality custom blinds from a reputable blinds store.
3. Deep Clean Your Blinds with Soapy Water
For deep cleaning, outdoor blinds, roller shades, and California shutters can benefit from a gentle soapy water wash:
Step 1: Mix mild dish soap with warm water in a bucket.
Step 2: Use a soft sponge or cloth to wipe each slat, moving side to side to avoid bending or damaging them.
Step 3: Rinse with clean water and pat dry with a lint-free cloth. Avoid over-wetting as excessive moisture can cause warping or discoloration.
This method is especially useful for outdoor blinds, which are more exposed to dirt and environmental factors.
4. Cleaning Motorized Blinds
Motorized blinds are highly convenient, but they require a gentle touch. Regular dusting is best to prevent buildup around the motorized components. Avoid using water near the motor, and if needed, a slightly damp cloth can be used on the slats or fabric areas. It’s also a good idea to periodically check the battery and remote function for smooth operation.
5. Maintaining Sheers and Light Fabrics
Sheers and other light fabrics can often be machine-washed if they’re labeled as machine-washable. Use a gentle cycle with cold water and air dry them to prevent shrinking. Always read the manufacturer’s care instructions to ensure you’re cleaning them correctly. Sheers are delicate, so handle them carefully to avoid tearing.
6. Avoid Harsh Chemicals
For all blinds and window treatments, including roller shades, California shutters, and zebra blinds, avoid harsh chemicals like bleach or ammonia-based cleaners, as these can cause discoloration and weaken the material. Stick to mild, non-abrasive cleaners that won’t damage the finish or fabric of your blinds.
7. Rotate and Inspect Your Blinds Regularly
For vertical blinds, periodically rotating the slats and checking for any damage or loose attachments helps maintain their longevity. Similarly, for California shutters and custom blinds, inspect the hinges, handles, and fixtures to ensure they’re in top condition. Tighten any loose screws and replace any broken parts to keep them functioning smoothly.
8. Protect Outdoor Blinds from Extreme Weather
If you have outdoor blinds, particularly in areas like Mississauga, Toronto, and Oakville, where weather can vary dramatically, take steps to protect them. During heavy rain, snow, or extreme heat, retract or cover them when possible. This helps prevent wear and tear from the elements, extending their lifespan.
9. Professional Cleaning for a Fresh Look
For high-quality treatments like custom blinds, drapes, or complex styles like zebra blinds, consider professional cleaning at least once a year. Many window treatment stores offer professional cleaning services to deep clean and maintain more delicate materials, keeping them looking fresh and vibrant.
10. Use a Protective Spray for Fabric Blinds
If your blinds are made from fabric, using a fabric protector spray can help repel dust and stains. This is especially useful for custom blinds and dream shades that are exposed to frequent use. Test the spray on a small, inconspicuous area first to ensure it doesn’t affect the color or material.
Maintaining your blinds doesn’t have to be a chore. With regular care and a few simple techniques, your window coverings—whether they’re stylish zebra blinds, sturdy California shutters, or modern motorized blinds—can continue to enhance your home’s aesthetic and functionality. Visit Design2View’s blinds store to learn more about the best cleaning methods for each type of window treatment, or to explore our range of premium options available in Mississauga, Toronto, Oakville, and beyond!
Design2View, Blinds and Window Covering
Your One-Stop Destination for Premium Blinds
647-864-2502
www.design2view.ca
#decor#home decor#curtains and blinds#shades#window covering#window treatments#drapery#blackout curtains#custom curtains
4 notes
·
View notes
Text
How to Care for Wooden Furniture at Home

Wooden furniture adds warmth and elegance to any home, but it also needs proper care to stay beautiful for years. If you want your wooden furniture to look its best, here are some simple tips to follow. By taking these steps, you can keep your furniture in top shape and make it last longer.
At Tanaya Furniture, the best furniture shop in Udaipur, we believe in providing high-quality wooden pieces that are made to last. But even the best furniture needs regular care to maintain its beauty.
1. Dust Regularly
Dust is one of the biggest enemies of wooden furniture. It can settle on surfaces, making them look dull and dirty. To prevent this, dust your wooden furniture regularly using a soft, dry cloth. Avoid using rough cloths, as they can leave scratches. A microfiber cloth works best for capturing dust without damaging the surface.
2. Clean with Care
When cleaning wooden furniture, avoid harsh chemicals that can damage the finish. Instead, use a mild soap and water solution. Dampen a cloth with the mixture, then gently wipe down the furniture. Make sure the cloth is not too wet, as excess moisture can cause wood to swell or warp.
At Tanaya Furniture, we recommend using natural cleaning solutions that are safe for wood. You can easily find these in stores or make your own using vinegar and water. Just be sure to wipe off any excess moisture to avoid water spots.
3. Polish for Protection
Polishing your wooden furniture helps to protect it and give it a fresh shine. You can use a commercial wood polish or make your own by mixing olive oil and lemon juice. Gently rub the polish into the wood, following the grain, to keep your furniture looking rich and vibrant.
Polishing not only enhances the beauty of the wood but also adds a protective layer, making it more resistant to scratches and stains.
4. Avoid Sunlight Exposure
Direct sunlight can cause wooden furniture to fade or develop cracks over time. To protect your furniture, place it away from windows or use curtains and blinds to block direct sunlight. This is especially important in sunny areas like Udaipur, where the intense sun can cause wood to dry out and lose its color.
At Tanaya Furniture, we design pieces with quality materials that can withstand various conditions, but proper care is still essential. By keeping your furniture out of direct sunlight, you can prevent premature aging and discoloration.
5. Control Humidity Levels
Wood is sensitive to changes in humidity. Too much moisture can cause wood to swell, while too little can make it dry out and crack. To keep your wooden furniture in the best condition, try to maintain stable humidity levels in your home.
In humid environments, use a dehumidifier to reduce excess moisture. In dry areas, especially during winter, a humidifier can help keep the air moist enough to prevent the wood from drying out.
6. Use Protective Pads
To prevent scratches and dents, use felt pads under items placed on your wooden furniture. This is especially important for tables, where heavy or sharp objects like vases, plates, or books can leave marks.
When using your dining table, always place a tablecloth or placemats to protect the surface from spills and hot dishes. You can find high-quality tables at Tanaya Furniture, the best furniture shop in Udaipur, and we encourage using these simple protective measures to keep them looking great.
7. Handle Spills Quickly
If there’s a spill on your wooden furniture, clean it up immediately to prevent stains. Use a soft cloth to absorb the liquid, and avoid rubbing, as this can push the spill deeper into the wood. For stubborn stains, you can use a mild cleaner that is specifically made for wood.
Always make sure to dry the area thoroughly after cleaning. Leaving moisture on wooden surfaces for too long can cause damage.
8. Reapply Finish When Necessary
Over time, the finish on wooden furniture can wear off, especially if the piece is frequently used. When this happens, you may need to reapply a protective finish to keep the wood safe from scratches and water damage.
At Tanaya Furniture, we offer wooden pieces with durable finishes, but if your furniture shows signs of wear, don’t hesitate to give it a fresh coat. You can do this yourself or seek professional help to ensure a smooth and even finish.
9. Keep It Free from Pests
Wooden furniture can attract pests like termites or wood borers, especially in humid environments. To prevent this, regularly inspect your furniture for signs of damage. If you notice small holes, sawdust, or weak spots, it may be a sign of pest infestation.
In Udaipur, where termites can be an issue, taking preventive measures is crucial. At Tanaya Furniture, we provide high-quality, treated wood that resists pests, but regular checks are still important.
Conclusion
Wooden furniture can last a lifetime with proper care. By following these simple tips, you can protect your investment and keep your home looking beautiful. Whether it's dusting, polishing, or protecting your furniture from the sun, each step goes a long way in maintaining the look and durability of your wooden pieces.
If you are looking for high-quality wooden furniture, visit Tanaya Furniture, the best furniture shop in Udaipur. Our wide range of wooden furniture is designed to last and bring elegance to your home. Stop by our showroom today to discover the perfect pieces for your living space!
#FurnitureDesign#HomeDecor#InteriorInspiration#LuxuryFurniture#OutdoorFurniture#ModernFurniture#SmallSpaceFurniture#CustomFurniture#FurnitureShop#UdaipurFurniture
2 notes
·
View notes
Text
Nervous System Wellness 101: How to Protect and Maintain Your Nerves

Caring for your nervous system is crucial for maintaining overall health and well-being. Here are some essential tips on how to take care of your nerve system:
1. Eat a Balanced Diet: A healthy diet plays a vital role in supporting your nervous system. Ensure that you consume a variety of nutrient-dense foods, including fruits, vegetables, whole grains, lean proteins, and healthy fats. These provide essential vitamins, minerals, and antioxidants that support nerve function and protect against oxidative stress.
2. Stay Hydrated: Proper hydration is essential for optimal nerve function. Drink an adequate amount of water throughout the day to keep your nerves hydrated and to facilitate the transmission of nerve signals.
3. Exercise Regularly: Physical activity not only benefits your muscles and cardiovascular system but also supports your nervous system. Engage in regular exercise, such as walking, jogging, swimming, or yoga, to improve blood circulation, reduce inflammation, and promote the health of your nerve cells.

4. Prioritize Sleep: Quality sleep is crucial for nerve cell regeneration and repair. Aim for 7-9 hours of uninterrupted sleep each night to ensure your nervous system gets the rest it needs to function optimally.
5. Manage Stress: Chronic stress can negatively impact your nervous system. Implement stress management techniques, such as deep breathing exercises, meditation, yoga, or engaging in hobbies you enjoy. Find what works best for you to reduce stress levels and support your nerve health.
6. Protect Yourself from Toxins: Exposure to environmental toxins can harm your nervous system. Minimize your exposure to harmful chemicals, pollutants, and toxins. Use natural cleaning products, avoid smoking and excessive alcohol consumption, and limit your exposure to pesticides and other harmful substances.

7. Maintain a Healthy Weight: Obesity and excess body weight can increase the risk of nerve damage and nerve-related conditions. Maintain a healthy weight through a balanced diet and regular exercise to reduce the strain on your nerves and support their optimal function.
8. Protect Your Head: Traumatic brain injuries can have a severe impact on your nervous system. Take precautions to prevent head injuries, such as wearing seatbelts, using helmets during sports or other activities with a risk of head injury, and practicing safe driving habits.
9. Stay Socially Active: Engaging in social activities and maintaining strong social connections can have a positive impact on your nervous system. Social interaction and support help reduce stress and promote emotional well-being, which in turn benefits your nerve health.
10. Consult a Healthcare Professional: If you experience any persistent or concerning symptoms related to your nervous system, such as numbness, tingling, weakness, or changes in coordination, it's important to seek medical advice. A healthcare professional can evaluate your symptoms, provide a proper diagnosis, and guide you on the best course of action.
Remember, taking care of your nervous system is an ongoing process. By adopting these habits and making conscious lifestyle choices, you can support the health and function of your nerve system, leading to overall improved well-being.
Boost Your Nerve System Health with These Fantastic Supplements

When it comes to maintaining a healthy nerve system, sometimes our bodies need a little extra support. That's where supplements come in! These fantastic helpers can provide the nutrients and compounds our nerves need to stay in tip-top shape. If you're looking to give your nerve system a boost, here are some of the best supplements you should consider. Let's dive in and discover the wonders they can do for your nerve health!
1. Vitamin B12: The Nerve System's Best Friend
Vitamin B12 is a true superstar when it comes to nerve health. It plays a crucial role in the formation of myelin, the protective coating around nerve fibers. By ensuring adequate B12 levels, you can support proper nerve function and reduce the risk of nerve damage. Consider adding a B12 supplement to your routine, especially if you follow a vegetarian or vegan diet, as B12 is primarily found in animal-based foods.
2. Alpha-Lipoic Acid: The Antioxidant Defender
Alpha-lipoic acid (ALA) is a powerful antioxidant that helps protect nerve cells from damage caused by free radicals. It also supports healthy blood sugar levels, which is important for nerve health. ALA has been shown to alleviate symptoms of neuropathy, a condition characterized by nerve damage. Including an ALA supplement in your regimen can provide that extra boost your nerves need to stay healthy and resilient.

3. Omega-3 Fatty Acids: Nourishment for Your Nerves
Omega-3 fatty acids, such as DHA and EPA, are not only beneficial for brain health but also for your nerves. These healthy fats provide the building blocks for nerve cell membranes and support proper nerve signaling. Incorporating an omega-3 supplement, like fish oil or algae oil, can help nourish your nerves and promote their optimal function.
4. Magnesium: The Calming Mineral
Magnesium is an essential mineral that plays a vital role in nerve function and relaxation. It helps regulate neurotransmitters and supports the transmission of nerve signals. Low magnesium levels have been associated with increased nerve excitability and muscle cramps. By adding a magnesium supplement to your routine, you can promote a calm and healthy nerve system.
5. Curcumin: The Golden Spice for Nerves
Curcumin, the active compound found in turmeric, has powerful anti-inflammatory and antioxidant properties. It has been shown to reduce nerve inflammation, relieve pain, and support nerve regeneration. Including a high-quality curcumin supplement can be a game-changer for your nerve health, providing natural support and relief.
Conclusion: Your nerve system deserves the best care, and these incredible supplements can provide the extra nourishment and support it needs. Remember, it's always a good idea to consult with a healthcare professional before starting any new supplements, especially if you have underlying health conditions or are taking other medications. So, go ahead and give your nerves the love they deserve by incorporating these fantastic supplements into your daily routine. Your nerve system will thank you with improved function, resilience, and overall well-being!

#healthy#health#nutrition#nutritious#healthcare#antioxidants#healthy diet#weight loss diet#low cal diet#diet plan#natural remedy#tips#latest news#headlines today news#news#world news#breaking news#headline news#brainstorm
16 notes
·
View notes