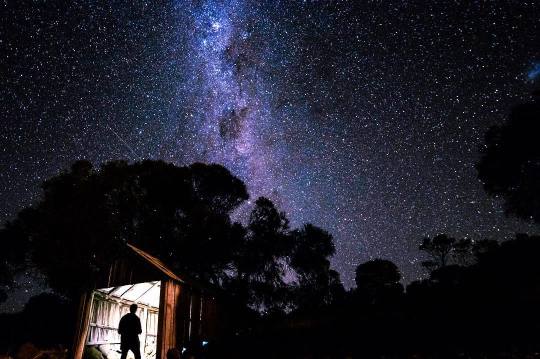
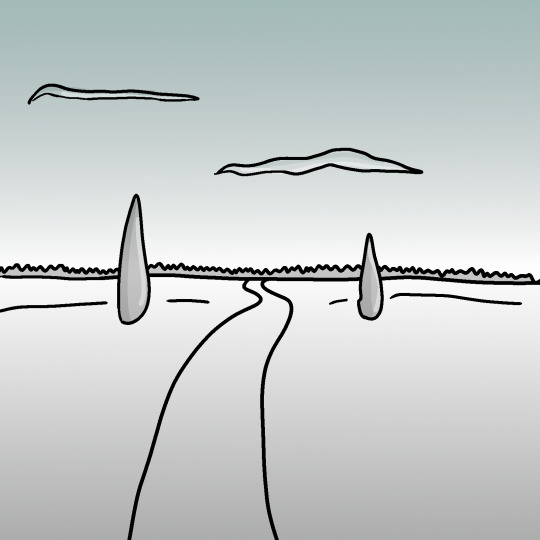
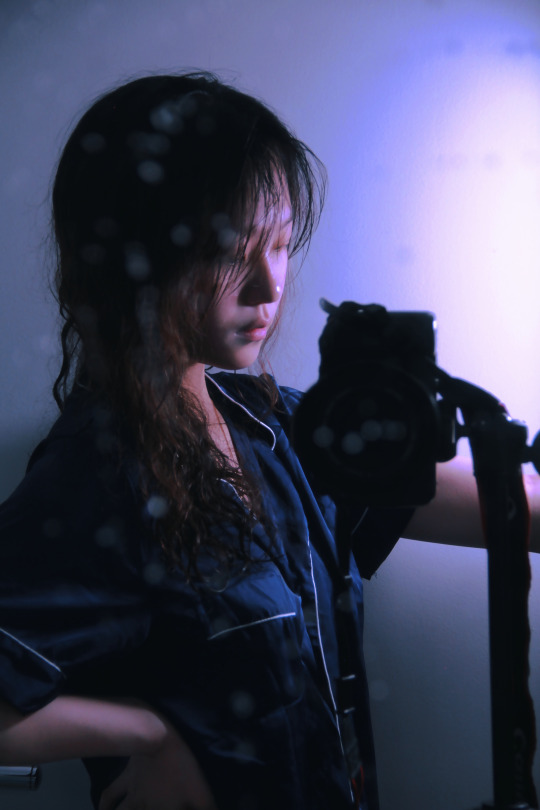
#DSLR settings for stars
Explore tagged Tumblr posts
Visit Tumblr Blog
Explore Tumblr blogs with no restrictions, modern design and the best experience.
Last Seen Tumblr Blogs


Fun Fact
Tumblr was created by web developers David Karp and Marco Arment.
Text
Star Photo Settings for DSLR Cameras
View On WordPress
#adventure photography#aperture settings#astrophotography#astrophotography guide#capturing stars#celestial photography#composition in photography#creative photography#DSLR camera#DSLR settings for stars#exploring the night sky#exposure techniques#focusing at night#ISO settings#landscape photography#light painting#long exposure#low light photography#manual camera settings#manual focus#Milky Way photography#nature photography#night landscape#night photography#night photography essentials#night photography settings#night photography tips#night shooting#night sky#outdoor photography
6 notes
·
View notes
Text

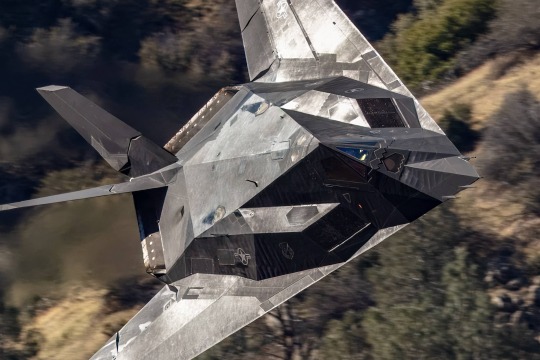
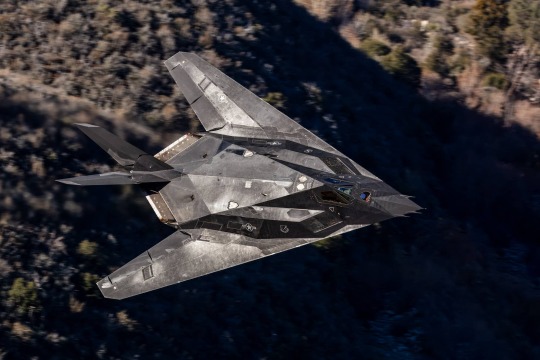
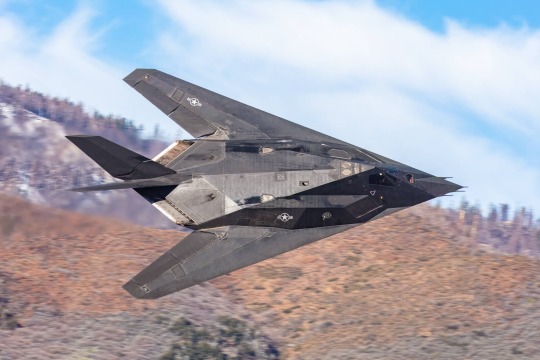
The Most Stunning F-117 Photos We’ve Seen Since Its ‘Retirement’
Tyler RogowayPUBLISHED Feb 4, 2024 4:26 PM EST
F-117 flying low level through the California desert.
James Reeder
We have seen some great photos of the F-117 Nighthawks that continue to operate in developmental test and training roles. These images have improved incrementally since their use as aggressor and for test support became openly discussed by the Air Force, with the locales they could operate from expanding along with it. Now, one set of images, taken by aviation photographer James Reeder, is the best we've ever seen.
The photos in question were taken in the famed Sidewinder low-level route that circumnavigates much of the R-2508 range complex that sits atop the Mojave Desert and the many military test and training installations that dot it. This particular section of the route, which has steep canyon walls, provides an especially dramatic backdrop for military aircraft rocketing through. It is perhaps the best vantage point we have seen of the famous route since the 'Jedi Transition' through Rainbow Canyon was shut down to military aircraft after a deadly crash in 2019.

The Sidewinder low-level route depicted in the R-2508 instructional materials. (USAF)
While we have seen some great shots from a similar vantage point of F-117s, the lighting and knife edge profiles shown in the images below are truly exceptional. Every detail on the top half of the 'Black Jet' is highlighted and its planar exhausts are fully visualized in action.
James Reeder
James Reeder
James Reeder

James Reeder
James explained to us that he received a message about a pair of F/A-18s that would be flying through the route and that their pilots would love photos if he was out there. "I enjoy the interaction with the pilots, so I decided I could make it up there to get them some shots," Reeder said.
"Arriving at my perch of choice after a bit of a climb, I settled in and waited for what I thought would be a pair of F/A-18s. Imagine my surprise when I saw a tiny black jet rounding the turn and then another. When I realized that they were F-117s, I was so shocked, I almost forgot to shoot! I have never captured this aircraft in the wild before."
"When I saw the light on the aircraft as they approached, I knew I had been blessed with a great opportunity. Using my Canon 5Ds with the Canon 100-400mm lens and a 1.4 X teleconverter, I followed both aircraft and clicked off as many shots as my pathetically slow buffer and limited frame rate would allow. After they passed, I couldn't resist chimping my photos [looking through the photos in preview on the DSLR's screen] to make sure I had captured what I wanted. I was thrilled to say the least. I think I yelled something unintelligible to the other two guys out there and threw my hands in the air."
The day proved fruitful beyond the pairs of F-117s and F/A-18s.
"I also shot 5 F-15s and 8 F/A-18s and enjoyed seeing them all, but those two Nighthawks were the stars of the show that day!. Yes, I got the shots for the F/A-18 pilots."
Jarod Hamilton was also out there caught the video below that he shared on X. It is the ultimate companion to these incredible photos.
Bravo to James and Jarod for capturing these famed jets like never before during their 'active retirement.'
You can see more of James Reeder's stunning work on Instagram linked here.
Contact the author: [email protected]
@AviationIntel via X
23 notes
·
View notes
Text
What’s the Best Gear for Hosting Live Podcasts on Social Media?
In the age of social media, podcasts have taken a massive leap from pre-recorded episodes to live, interactive formats. Hosting live podcasts on platforms like Instagram, YouTube, or TikTok allows creators to connect directly with their audience, build relationships, and create authentic moments in real time. But to make your live podcast successful, having the right gear is non-negotiable.
Whether you’re a beginner or a seasoned podcaster, investing in the right tools can elevate your production quality, making your content stand out in a sea of live streams. Let’s explore the best gear for hosting live podcasts and why each piece is crucial for delivering a polished, engaging experience.
1. Microphones: The Backbone of Any Podcast
Your voice is the star of your podcast, so a high-quality microphone should be your first investment. Live podcasts demand crystal-clear audio to ensure your listeners stay engaged and don’t miss a word.
Dynamic Microphones are ideal for live settings. They’re durable, reduce background noise, and handle loud environments well. This makes them perfect for live social media sessions where unpredictable noise can be an issue.
Condenser Microphones capture more detail and are great if you’re streaming from a quiet, controlled space. They provide studio-like sound but are more sensitive to background noise.
Look for a microphone with a cardioid pickup pattern, which focuses on your voice and minimizes background sounds.

2. Audio Interfaces: Bridge the Gap
If you’re using a professional microphone, you’ll need an audio interface to connect it to your computer or mobile device. An audio interface converts your microphone’s analog signal into digital audio that your streaming platform can process.
Choose an interface with at least one XLR input (for your mic) and USB connectivity. Many modern interfaces are compact and portable, making them ideal for podcasters on the go.
Look for features like gain control and headphone monitoring, which help you fine-tune your sound during the broadcast.
An audio interface ensures your listeners hear you as clearly as if they were sitting in the same room.
3. Headphones: Monitor Your Sound
Monitoring your audio in real time is essential to catch any issues before your audience does. A good pair of headphones allows you to hear exactly what your listeners are hearing.
Closed-Back Headphones are perfect for podcasting. They prevent sound from leaking into your microphone and offer an immersive listening experience.
Prioritize comfort, especially for long live sessions. Lightweight headphones with cushioned ear pads are a great choice.
Monitoring your audio ensures your levels are balanced, and any potential hiccups are addressed immediately.
4. Lighting: Look Your Best on Camera
While podcasts are traditionally audio-focused, live podcasts on social media often include video. Good lighting can make a huge difference in how professional your stream looks.
Ring Lights are a favorite among content creators for their ability to provide soft, even lighting. They’re perfect for illuminating your face during live sessions.
LED Panel Lights are more versatile and allow you to adjust brightness and color temperature to match your setup.
Lighting not only enhances your appearance but also keeps your audience focused on you, rather than distractions in your background.

5. Cameras: Level Up Your Video Quality
If your live podcast involves video, investing in a quality camera can make your streams more engaging.
Webcams: Modern HD webcams are an affordable and easy-to-use option for beginners. They plug directly into your computer and deliver decent quality.
DSLR or Mirrorless Cameras: For a more professional look, consider using a DSLR or mirrorless camera with streaming capabilities. These offer superior image quality and customizable settings.
Don’t forget to position your camera at eye level to create a natural and inviting angle for your audience.
6. Pop Filters and Shock Mounts: Minimize Distractions
Live podcasts are unpredictable, and the last thing you want is your audience being distracted by plosive sounds (like “p” and “b”) or vibrations.
Pop Filters are affordable tools that reduce harsh sounds caused by sudden bursts of air. They’re a must-have for any podcast setup.
Shock Mounts isolate your microphone from desk vibrations, ensuring clean audio even if you accidentally bump your desk or move your mic stand.
These small additions go a long way in maintaining high audio quality.
7. Mixers: Fine-Tune Your Sound
A mixer gives you control over your audio levels and allows you to incorporate multiple microphones or sound effects seamlessly.
For solo podcasters, a simple mixer with 2–4 channels is sufficient.
If you’re hosting guests or incorporating music, a more advanced mixer with multiple inputs and effects can enhance your production.
Mixers are especially helpful if you’re streaming directly to social media platforms, as they allow you to adjust sound levels in real time.
8. Internet Connection: The Unsung Hero
No matter how great your gear is, a weak internet connection can ruin your live podcast. A stable and fast internet connection ensures your stream runs smoothly without lag or interruptions.
Use a wired connection whenever possible for the most reliable performance.
If you’re using Wi-Fi, position your setup close to the router and consider upgrading to a faster plan if needed.
9. Stream Decks: Simplify Your Workflow
If you’re hosting live podcasts frequently, a stream deck can be a game-changer. These devices allow you to control your stream with customizable buttons, making it easy to switch scenes, adjust audio, or trigger sound effects without fumbling around.
Stream decks add a layer of professionalism and make multi-tasking during live sessions much easier.
10. Backup Power and Storage: Stay Prepared
Live podcasts don’t come with a pause button, so preparation is key.
Keep a backup power source, like a portable battery or uninterruptible power supply (UPS), to avoid interruptions during unexpected power outages.
Record your sessions locally on an external drive or cloud storage. This not only provides a safety net in case of connectivity issues but also gives you content to repurpose later.
Why Invest in Quality Gear?
While it’s tempting to cut corners when setting up your podcast, high-quality gear pays off in the long run. Professional equipment ensures your audience stays engaged, helps you build credibility, and sets you apart in a crowded digital landscape.
When shopping for audio gear, it’s always a good idea to purchase from professional audio shops. Not only do they offer a wide range of options to suit your needs, but they also provide expert advice to help you make informed decisions.
Final Thoughts
Hosting live podcasts on social media is an incredible way to connect with your audience, share your ideas, and build a loyal community. But success doesn’t just come from great content—it’s also about presentation.
With the right gear, you can deliver a seamless and professional live podcast that keeps your audience coming back for more. From high-quality microphones and lighting to reliable internet and backup power, every piece of equipment plays a role in creating an engaging experience.
Invest in the tools that best suit your needs and goals, and you’ll be well on your way to becoming a standout live podcaster in no time.
#audio#audio gear#music#dj#professional audio#audio shop in brooklyn#brooklyn#podcast#podcasting#social media#audio equipments#pro audio gears
2 notes
·
View notes
Text
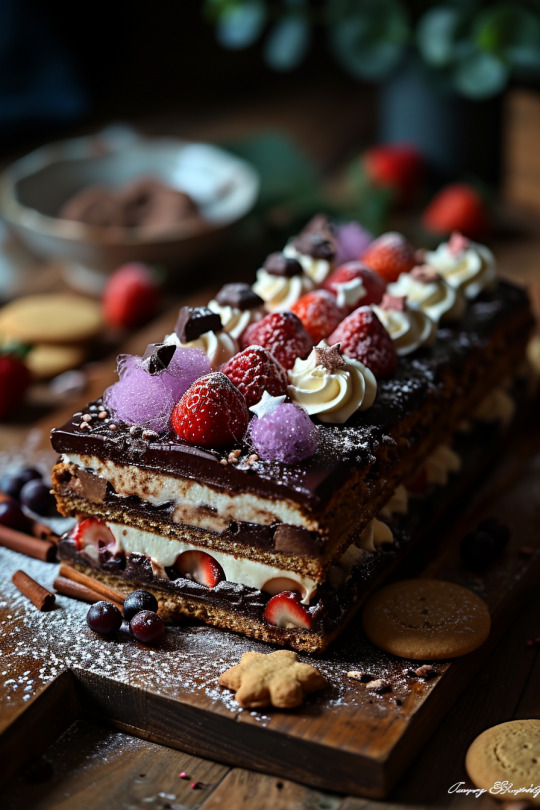

Chocolate Truffle & Honeycomb Torte Cake with the described embellishments and presentation, follow these steps:
Ingredients:
• For Torte Cake:
• 200g dark chocolate
• 100g unsalted butter
• 3 large eggs
• 150g caster sugar
• 50g plain flour
• 1 tsp baking powder
• For Honeycomb:
• 100g caster sugar
• 2 tbsp golden syrup
• 1 tsp baking soda
• For Decoration:
• Whipped cream
• Purple candy floss
• Candy sparkles and stars
• Cookies (your choice)
• Fresh strawberries
• Mini marshmallows
• Cinnamon powder
Equipment:
• 20cm round cake tin
• Baking paper
• Heavy-duty saucepan (for honeycomb)
• Canon 5D or similar DSLR (for photography)
Instructions:
Chocolate Torte Cake:
1. Preheat Oven: Preheat your oven to 180°C (350°F).
2. Melt Chocolate and Butter: Gently melt the dark chocolate and butter in a heatproof bowl over a pan of simmering water. Stir until smooth and let it cool slightly.
3. Whisk Eggs and Sugar: In a separate bowl, whisk the eggs and sugar until fluffy.
4. Combine Ingredients: Gently fold in the melted chocolate mixture into the egg mixture. Then sift in the flour and baking powder, folding until just combined.
5. Bake: Pour into a lined cake tin and bake for 25-30 minutes. Let it cool in the tin.
Honeycomb:
1. Prepare Ingredients: Line a tray with baking paper. In a saucepan, gently heat sugar and golden syrup until sugar dissolves.
2. Make Honeycomb: Increase the heat and boil until golden. Quickly whisk in baking soda (it will bubble up) and pour onto the tray. Leave to set and cool.
Assembly:
1. Layer Honeycomb: Break honeycomb into pieces and press into the top of the torte.
2. Decorate: Top with whipped cream, sprinkle with cinnamon, and decorate with purple candy floss, candy sparkles, stars, cookies, strawberries, and marshmallows.
3. Set the Scene: Place the cake on a wooden table. Decorate around with a Christmas and winter theme, possibly adding elements that evoke an Asian village in winter.

#food#chocolate#chocolate cake#honeycomb#festive#Christmas#cake#food photography#sweet#Christmas food#winter wonderland#fruit#strawberry
14 notes
·
View notes
Photo

A human climbed a mountain in Banff National Park, Canada, a camera in hand, along with other equipment and resources packed in a bag carried on his back. The camera was a fairly old thing, but well-cared for. Many pictures were already within — some of that human's best work, mostly pictures of natural sights and plants, in addition to some photos of himself, his friends, his family. It was late, very late. The sun had set hours ago, and it was a moonless night — as dark as night could be. The human found an open area overlooking a lake, with a view of the sky above reflected in the still waters below. He carefully set up his equipment, mounting the camera on a tripod and ensuring it was securely placed. He set up a wire with a button and hit the button to begin the long exposure capture, settling in to wait in total darkness. He had planned for the exposure to be ninety minutes — to capture the trails of stars in the sky. But at one point, he wandered off. What befell him, who knows? Perhaps he fell. Perhaps he was attacked by an animal. Perhaps he got lost — and what would have come of that is another story. But he did not return, and the camera remained there, watching the arc of stars across the sky. It watched until the beginnings of dawn touched the horizon, but its battery could only last so long. As light bloomed across the sky, the camera faded to darkness. Vahi's Origin Prompt 1: Original Form. They were a DSLR camera! Personal Website | Discord Server | TWWM Tracker
24 notes
·
View notes
Text
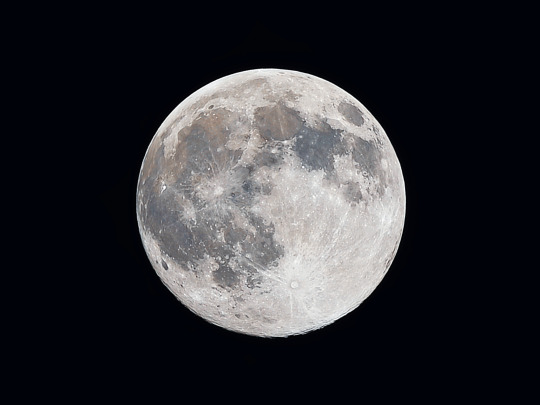
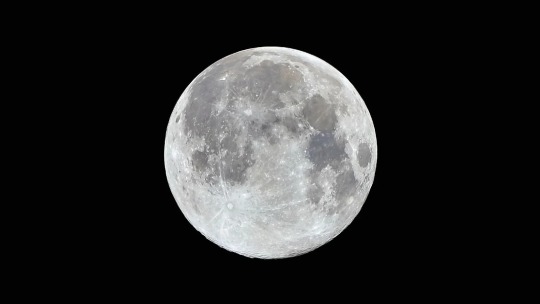
how i take moon photos, and how you can too using the same method (regular camera version)
long post
ok so this is the first of a 2 part thing, one part (this part) will go over how i shoot moon photos with my regular photography camera and the other part will go over how i make larger mosaics with a telescope.
this is a method i've developed over the past 6 months, mainly for getting the most i can out of just a telephoto lens.
going to start by going over the equipment you need/the equipment i use for this:
a basic dslr/mirrorless camera. i use the nikon Z5, but it doesn’t matter which one really. it helps if it can shoot video at full resolution.
a telephoto lens, on a crop sensor camera it should be at least 200mm (and on a full frame, 300mm is preferable). i use a nikon F/4.5-5.6 70-300mm.
a tripod. this is really basic, any tripod works, it’s pretty much irrelevant as long as you have one.
that’s all the equipment you need, to take shots like this:
yes, you can do this with a regular nikon and telephoto lens. i took this with the gear stated above, using the processes i will now describe below.
alright so the first step is what i call gathering data.
this is when you’re actually outside shooting, all the images you’ll need for later processing. assuming the conditions are ok (meaning the moon is out, not blocked by clouds and isn’t right on the horizon), i go out and set up the gear.
during this period of time i’m trying to get 1 thing, but if the moon is full; 2, possibly 3 things.
the first thing is your main moon data. depending on whether you have a camera that can record in higher resolution, this can take the form of either recording a video or snapping a bunch of single shots (if you do the latter, make sure to use an inbuilt intervalometer if the camera has one. or get a regular one if you don't, it's a big help)
i usually do a 10 minute recording, which is about how long it takes the moon to move across my camera frame. at 30fps, this equates to about 18,000 frames.
the point of recording isn't to have a video, but mainly to 𝘯𝘰𝘵 have 18,000 individual photos. a video is just a concise way of producing and containing a TON of images really easily.
so you took a video, or depending on your camera you took a bunch of images, that's the first part done.
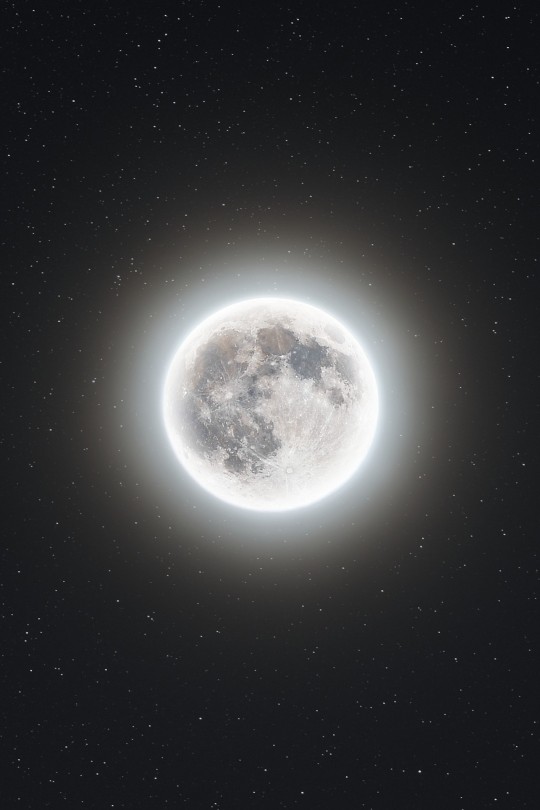
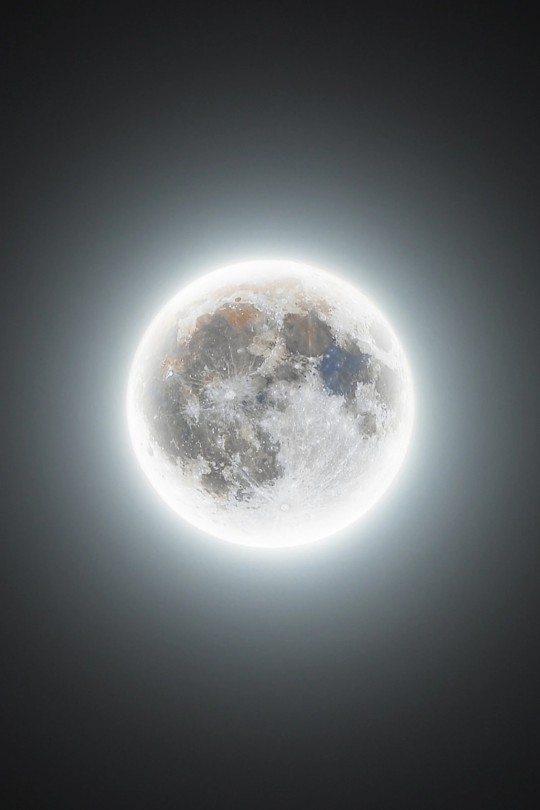
remember how i said, if there's a full moon or closer to it, i'm trying to get 2-3 things here? that's for me personally, because i often shoot composites during a full moon. skip this next part if you don't plan on that.
for reference, here's a composited vs non-composited version
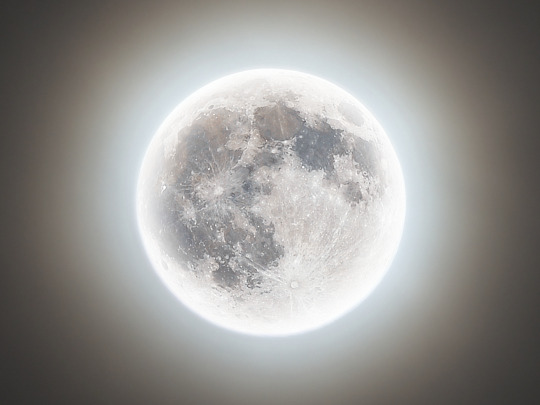
now the second thing i want to get is my composite shot. it's only feasible during a close to full moon, because otherwise the edge in shadow will always look weird with the glow added. the composite shot itself is usually a few overexposed images (all at slightly different settings), to show the moon's glow and/or sometimes a few bright stars.
typically i just change the settings around, and shoot like 5-10 different exposures manually, but exposure bracketing could probably work too here. i haven't tried it.
as long as you can't see any features on the moon, and the sky around it is noticeably brightened, you're good in terms of exposure. just make sure the edge of the moon is still visible, that's necessary for compositing later.
if there are any nice clouds out, i also try to wait and get a few shots with those near the moon.
the third optional thing (still under compositing, keep skipping if you aren't) is taking a shot or two of the blank sky with stars, to composite a shot like this:
this is a very quick thing, just point your camera somewhere away from the moon where you see a few stars, and take a couple second exposure to bring them out. you can zoom out more than whatever you're at for the moon shot to get some more stars, or keep it the same. either way works.
alright now we're back to the main part of the guide.
you've got your moon data at this point, your equipment is brought in, now you just have to do the processing.
with this method most of the work is the processing, i'll try to cover it all quickly here
firstly you need to process the main moon data. all i have is a video at this point, i need to turn that into a real finished image
doing this processing requires a couple programs (most of which are windows-only), but are all 100% free. if you intend on doing moon photography often, i would recommend getting a very cheap windows laptop for this purpose. quality doesn't matter whatsoever.
the first program i use is called PIPP (planetary image preprocesser), and this is mainly used to get your video in a state where it can be processed.
i typically upload the video, set it to crop every frame right around the moon (all that black space is extra processing time!), sort the frames by quality and cut out maybe 50% or 75% but this depends on how many frames i took. in my case of 18k, this cuts me down to 9k or 5k or so.
the resulting, processed video (once again using video as an image holding format because it's easy) is then exported to the next program: Autostakkert.
this one is to stack the images, into one really nice image. stacking is why i took so many images in the first place, i won't explain all the logistics of stacking here, but just know that it works and you should do it. stacking is one huge improvement you can make to your shots that's very easy to do.
so in autostakkert, i cull about 50% more of the frames, and stack the remainder of them.
personally i also drizzle 1.5x (drizzling = image upscaling basically) because on a 300mm telephoto lens and full frame camera, the moon is just not that many pixels. you can do whatever on this, if you're at 600mm or 800mm it's probably not as necessary, but it's really helpful at anything below that.
once it stacks, i take the resulting image into a third program: Registax.
this one i use for one sole purpose, wavelets. it's an optional step, and once again i will not explain in any detail how they work, but the result is basically a good sharpening tool. like REALLY good. i recommend trying it.
it's a simple program, i just upload the image and then change the wavelet sliders until it's sharpened to a nice degree.
and lastly, i export that image over to a regular photo editor. photoshop if you have it, lightroom works too only if you aren't compositing, i personally use photopea which is a very nice photoshop clone website that's free. look it up.
what i do here is just basic photo editing stuff first, expand the crop and add black (remember, in my case the stacked image was cropped all the way in), sharpen it a little more, up the saturation maybe for mineral colors, etc.
in here i also usually upscale the image again, this is optional
if you did not intend on compositing, and don't care how i do it, you're done! you should have a very passable moon shot at the moment, or if you're just reading out of curiousity, a very passable understanding of how i take them.
if you do care, here's the process:
so firstly i bring up the final cropped and finished edit of the main moon in the photo editor, and the composite shot on another layer above it. lower the opacity, then line up/resize the glow moon with the regular moon.
next you basically just get a low opacity/low hardness eraser, and erase the center of the glow moon so the regular surface detail shows through in the middle, but the edges stay glowy- and then i increase opacity back to full again.
it can take a few tries and messing around to get this part to look right, but making sure they're lined up perfectly is half the battle.
now you have a composited full moon, that looks something like this!
whether you're using it as a guide with your own shots (if so, good luck on them!) or just wanted to know how i take them, i hope you enjoyed the guide; i like to be transparent with how i make stuff, especially with something like this where most people have no idea how the photo is created behind the scenes.
- all the photos in this post were taken solely on my nikon Z5 camera, F/4.5-5.6 70-300mm lens and tripod.
- part 2 for the telescope mosaics will be coming in the near future most likely
#photography#astronomy#astrophotography#space#night sky#moon#photo#photography thoughts#astrophotography thoughts#astronomy thoughts#guide#long post
9 notes
·
View notes
Note
for evaaaa: 👻, 💥, 💢, 💤, 🌙, 📣, 📸, 🌠, ☄️
EVA EVA EVA EVA EVA I LOVE U FOR ASKING ABOUT EVA :D (learn more about them by sending emojis if u want!!)
👻 GHOST - do they believe in ghosts? what are their "ghostly experiences", if any?
Absolutely fucking not. Eva was raised in a Dutch family with clear capitalist ambition, so ghosts weren't part of the curriculum. She has briefly looked into whether ghosts could be real when she thought she was going to die, but nothing really stuck.
💥 COLLISON - what emotions do they have trouble dealing with?
Eva carries her emotions inwardly. She tends to compartmentalise negative emotions and stuff them in boxes to never look at again, until the metaphorical straw that breaks the camel's back leads to nightmares. She doesn't remember the terrible dreams, but they'll come back to haunt her during the night and will stop her cold. It's fine. She's fine. No one needs to know the terror and the fear. Except maybe her partner.
💢 ANGER - what are some habits they have that will take some getting used to?
After she got sick, Eva developed a few obsessive habits regarding her health. She is acutely aware of assumed changes in her body and will worry herself into symptoms, has to take medication at certain times, and will get in touch with her primary oncologist the second she starts getting nervous about things. She's aware it might take some time for people to get used to her behaviour surrounding her health, but she can't stop herself from doing these things. There's probably plenty others, but these are the ones she'll admit to.
💤 SLEEPING - do they fall asleep easily? what helps them sleep?
There are many perks to being a vampire. She knocks out the second the sun comes up. Before her embrace, though, it really depended on the situation. Whenever she was in her own bed on her own schedule, she'd have a cup of herbal tea before doing her standard bedtime routine. She'd usually fall asleep pretty quickly. When she got sick, that changed. Many restless nights, both at home and in hospital. Interrupted sleep due to nausea and further symptoms, and the inability to catch up on sleep during the day due to her attempts at trying to keep her job. She'd fall asleep pretty easily once the exhaustion started to catch up, though.
🌙 MOON - what is your oc's greatest wish? how far are they willing to go for it?
Eva wants to be healthy. She wants to wake up and no longer be constantly sick. Her Sire told her this would take her away from the constant health issues she was facing, but instead she's still doing poorly and she's dependent on her Sire's vitae to function like a normal person. Health is the goal. It's the one thing she yearns for. There's very little she'd not do for health.
📣 MEGAPHONE - how loud are they? what do they speak like? got a voice claim?
Eva has always been trained to not be too loud, to be polite in public and around strangers. She can be extremely vicious with her choice of words, though, and knows how to push her opinion onto people while making hem feel like it's their idea. As for a voice claim, I currently want to say Viviënne van den Assem, a Dutch TV host, though that could change within moments.
📸 CAMERA - do they enjoy having their picture taken? what's their go-to pose? do they like taking photos? what do they take photos of?
Getting her picture taken is not her favourite activity. She will act the part of smiley spokesperson or whatever they need, but you won't catch her taking selfies or offering to model for photographs. Her go-to pose is basically what one would expect to see on LinkedIn. Possibly a little awkward, but still functional enough to get away with. She's also not the best photographer, but she did buy the best DSLR money could buy so she could try her hand at nature photography at some point in the past. She took all of five photos of flowers, couldn't get the settings right, and it's been gathering dust ever since.
🌠 SHOOTING STAR - if they could make any wish with no repercussions, what wish would they make?
She's a bit selfish, and with her health being the main thing she's been fighting for, she's asking for health back. And maybe, just maybe, wording it in such a way that the hunters get out of Amersfoort no questions asked. She's got a background in political science, she knows how to add loopholes to things and how to patch them up. She could make it work.
☄️ COMET - what do people assume about them? are they right?
People know her by association to her family. Because of their status, many people initially think Eva's kind of a bitch. She lets people think this, because she's not a fan of being approached at random, but she's actually not a bitch at all. She's always guarded at first, though, and it takes some time for her to warm up to people, but she's absolutely not kind of a bitch.
#harbingerofskulls#my characters#eva-ngelical#this is long i am not sorry read it babes.#i love u so muhc thank u for this i love eva she's so lovely /twirls hair/
2 notes
·
View notes
Text
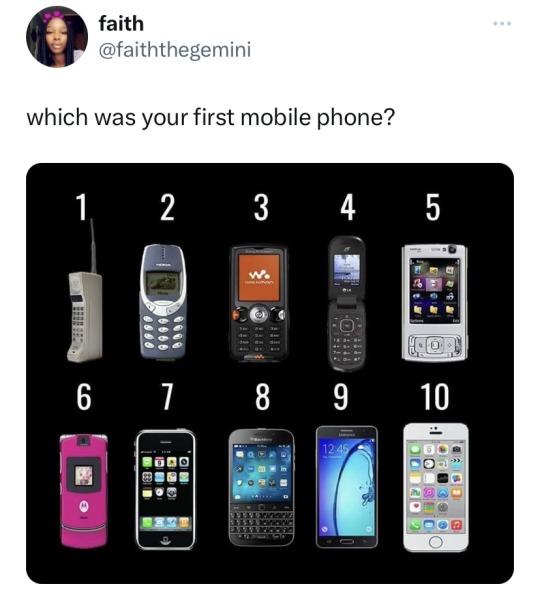
That's a tiny selection, and - for us, anyway - not enough Nokias.
I / we (@dduane and me) have had Type 1, then two versions of Type 2, then DD had a Communicator - not a Star Trek style flip-phone, it looked like this:

...then two slider-phones (why isn't that style on this list?), followed by a Type 4 or possibly Type 6 flip-phone (with obligatory ST:TOS communicator chirp) then early and late versions of Type 5 before finally going on to Types 9 and 10.
Except for 1, where I can't remember the brand, they've been Nokia for dumb and HTC for smart all the way, until the G21 from last year which is back to Nokia again.
Here they are; from the left, Nokia 6310i, HTC One M8, HTC U11+, Nokia G21.

Why not dump / trade in the old stuff? Because of reasons - or A Reason, and it's a good one: they all still work.
(1) They're non-contract and prepay, so a minimum top-up every six months is enough to keep the numbers active, and even the ones without SIMs work just fine on broadband.
(2) We live far out in the country, power outages in bad weather are routine, our phone line goes through our broadband router, and it goes off when the power does. So the Nokia 6310i is backup. It lasts for something like 8+ days standby between charges, and can get a cell when even the newest smartphone is just a paperweight.
(3) The HTC M8's version of Android is now too old for some vital apps, but it's got a set of the most effective speakers for its size that I've ever encountered, so even though other functions are limited, I can still enjoy all the music on its SD card without plugging in any extensions.
(4) The Nokia G21 was what I could afford in a hurry after my mobile-banking app upgraded past what the M8's operating system could handle. It's good for upgrades as far as Android 13, yet its default-settings camera isn't as good as that of DD's HTC U11+, five years older. Different sensor? Different lens? I have no idea.
(5) When I had a bit more spare cash, I went looking for a U11+ of my own, because they have the best camera of any smartphone either of us has used, past or present. If optical zoom and indirect or off-camera flash isn't required, its images can almost match the ones from my elderly but excellently lensed DSLR.
*****
DD got hers in 2018; I nabbed mine just recently for less than half, and we've used them to take almost all the pics so far on Food and Cooking of the Middle Kingdoms.
They're especially good at shooting in the low natural light we so often get indoors where all the setting-up takes place. We don't have a complicated lighting setup and indirect / bounce flash isn't possible with a phonecam, so natural works best and cameras which don't need a lot of it for crisp images are just the ticket.
We used them for the parsnip pie posted earlier, and here are some more examples from the Middle Kingdoms site...


Those are seriously impressive photos from something that fits in a shirt pocket... :->
36K notes
·
View notes
Text
Nights from Earth
I want to make a confession; My first photograph of the Milky Way was an accident. I had finally bought my first dslr camera, after wanting one for as long as I could remember. I had photographed people, flowers, buildings and lots of pets. Now I wanted to try something new. I decided to challenge myself to get photos of a meteor shower. I took my camera, a cheap tripod and drove 2 hours to find a dirt road as far off the beaten path as possible to stand in the dark alone. It was as scary as you’re imagining.
After a few shots I noticed something cloudy on the side of the photo. I turned the camera and took another image to see what it was. The Milky Way was there, rising about the prairie and dirt road. I could feel my heart beating in my palms, a tingling along the back of my skull as a nervous energy ran through me. In a moment my life was altered. I frantically tried to recompose and take another shot, as if the Milky Way was a bird ready to take flight. But the Milky Way is reliable and perfectly predictable. I stood there for hours that night, as the Milky Way slowly traversed the sky taking shot after shot. I was hooked.
The desire to see the Milky Way has guided most of my vacations since then, much to the dismay of my wife. Rather than sunny days on beautiful beaches or strolling through a busy city I’m drawn to the middle of nowhere. If there are no restaurants, stores or hotels for at least 45 minutes, that’s perfect. Even better if the roads aren’t named or paved and the last car I saw was half an hour ago. So I drive for hours in the dark and hope for clear skies. Usually I’m by myself, but I’m never really alone. This may sound profound but really, it’s because there is almost always a herd of cows standing off to the side, staring at me. Cougars and possums sound the same to me in the dark. The noises you hear at night when you think you’re alone can terrify you if you let it.
Putting my images up on display is a different kind of scary. They’re photos that I’ve put a lot of time and effort into capturing. Too often we feel like we are imposters if we show passion for a subject but aren’t an expert in every little detail.
My love for the stars is emotional, Not intellectual. I don’t feel a need to know the name of each of the constellations and galaxies. I won’t win any trivia contests. How they make me feel when I’m surrounded by them is something I struggle to explain. I am a not-so-secret admirer of the stars.
Over the last 6 years of photographing the night sky many shots were missed, entire sessions ruined by missing focus on the stars, cloudy nights or thinking the camera wasn’t being affected by the wind. There is no sadness like what you feel after spending hours driving and photographing only to load the photos into the computer and see that everything is just enough out of focus to be ruined.
But I keep going out, practicing, improvising and becoming comfortable being wrong. I once planned an entire trip to Acadia National Park in Maine. I planned out high and low tides, Milky way rising, and ideal locations based on each night and the forecast. I was so excited for dark skies. To point my camera out into the blackness of the Atlantic Ocean. Maybe the Milky way rising over a storm in the distance or reflecting in still waters.. Only to realize once I arrived that I hadn’t paid enough attention to the Lunar calendar and had planned the whole trip on the week of a full moon. That entire trip was about improvising and working with what I had. Failure is a part of the journey.
What fun is going out and being instantly good at something, anyway? The feeling of accomplishment when you learn something new and are successfully able to apply it is incredible. One of the first things you learn as you photograph in the dark, is touch memory of your camera. Being able to change your settings with your eyes closed. Anything you can do to maintain your night vision is critical.
I purchased a weak red flashlight to have on hand, just in case. While adjusting settings and star gazing one night down a dark dirt road, I started to hear slow steps in the trees off to my right. I looked in that direction but could only see darkness. I tried to ignore the sound, it was probably an armadillo. But the sound continued. Slow. Steady. Too big and too numerous for an armadillo. What could it be? A Killer? A bobcat? Aliens?! Nerves on edge I raised my red light and shone it into the woods and in the faint light dozens of red disembodied eyes stared back at me.
You’ve heard of Fight or Flight, but I experienced something called ‘You’d be dead first in a horror movie’, as I slowly walked towards the eyes. They held still until I was about 15 feet away a thin barbed wire fence between us. Then, all at once they turned and stampeded away, the pounding of their retreat could be felt in the trembling of the ground.
Cows, they had slowly gathered at the gate I parked in front of, thinking their rancher had arrived early with breakfast. Sorry ladies, we were both wrong.
Since that first photo of the Milky Way, I have learned so much that I’m able to apply to each new photo. The importance of a solid tripod for starters. Knowing the moon is bright enough to destroy a shot or light it perfectly depending on its phase. That the LCD screen on the back of the camera is not to be trusted. And when to just STOP editing and walk away. I’ve learned how to research locations. I can spend months planning out a trip, drawing out scenes based on Google Earth pictures and digging up every little detail I can find.
Then I arrive and what I’ve been drawing for months is before me. It’s like I dreamed this scene into existence. Of course, 50% of the time I can’t even reach the spot I planned to get to. Someone has torn down a tree vital to the shot, or worst of all a Super store has opened up and the area is flooded in lights now.
Here in Florida we have precious few dark sky opportunities. Getting to those locations requires a couple hours of driving from Orlando. My preferred location is the area between Yeehaw Junction and Kissimmee Prairie State Park.
On a trip down to attempt to photograph the Neowise Comet, I discovered a partially dismantled school bus, rusting just off the side of the road in a field. I immediately knew I wanted to take a photo of it with the Milky Way rising above. I marked the location to research if it was even possible.
Luckily, in 2 months the Milky way would be rising at the right time and location so I could photograph them together from the road. When I arrived back on location I discovered the road, the fields, the entire side of the highway for miles and miles had been purchased by a company and was fenced off. Flood lights lit the newly erected buildings. Not only could I not reach the bus, but I also couldn’t even find another composition pointing in the direction I needed to see the Milky Way. This was my last trip down to Yeehaw Junction.
When you go out to these dark places you may think that car headlights in the distance, or a services station on the highway, 20 miles away aren’t going to affect your photo, but they do in a very big way. In several of the images here today you’ll be able to see how big of an impact those lights can be. A single car, miles away leaves a fiery trail through an otherwise dark photo. Sometimes they make the photo, and other times they break them.
That night in Yeehaw, I was dejected as I began my journey home but stopped just before getting onto the interstate. At the literal junction in Yeehaw junction was the historic Desert Inn and restaurant, which had recently been destroyed when a semi drove into the building's front. I stopped and took a few photos, the building still fenced off and the area full of rubble. The contents of the second floor spilling out onto the street. During one shot a semi drove past right as I hit the shutter. While I was annoyed at the time, the lights of the semi added something to the image that I really liked. The lights help tell a story.
All night, dozens of semi’s drive past this building, a procession of mourners who were careless and hurt something they came to rely on, that they always expected to be there for them. The stars above silent observers to their shared grief as the tragedy plays out. That night had felt like a tragedy to me. My local refuge stolen away by progress. But without that spur I might never have stopped for this image. Or begun seeking out other dark skies.

Every year I make a pilgrimage out to some place with dark skies. To sit in nature in awe of the infinite possibilities that exist. It recharges something in me that I can’t explain. That I am able to bring back photos with me, to share with others is a bonus.
My photos are remarkable, not for their composition or editing but because the subject seems so foreign to us. The universe looks like an alien backdrop with our normal world as the foreground. But the stars hang out with us for hours every night, putting on a show for those who want to watch. As someone who works in a library, I can attest that people don’t always value things that are free. But I don’t think of them as free, I think of them as priceless.
In closing, I’d like to thank my wife Sarah Denise, who fears for my life every time I leave to go on one of my crazy adventures but finds the courage to let me go because she knows it makes me happy. To my brother Stuart who has allowed our annual hiking trips to go to increasingly remote locations. Thank you for sitting in the car and glancing up to make sure I’m still alive. And to the Melrose Center, for believing in me even when I felt like an imposter.
Now go find some dark sky, turn off your lights and look up. After all, it’s Milky Way season!
0 notes
Text
Photographing the Night Sky: A Beginner’s Guide to Astrophotography
The night sky has captivated humans for centuries, and with modern cameras and techniques, anyone can capture its beauty. Astrophotography is a rewarding hobby that combines technical skill with creative vision. If you’re new to the world of night sky photography, this guide will help you get started.
Equipment You’ll Need
Before heading out, make sure you have the right tools:
Camera: A DSLR or mirrorless camera with manual settings is ideal. Look for one with good low-light performance.
Lens: A wide-angle lens with a large aperture (e.g., f/2.8 or lower) is perfect for capturing expansive views of the night sky.
Tripod: Stability is crucial for long-exposure shots. A sturdy tripod will prevent camera shake.
Remote Shutter Release: This minimizes vibrations when taking photos.
Star Tracker (Optional): For advanced astrophotography, a star tracker allows you to capture longer exposures without star trails.
Choosing the Right Location
Light pollution can ruin astrophotography. Use light pollution maps to find dark-sky locations far from city lights. National parks and rural areas are often great spots. Additionally, check the weather forecast and aim for a clear, moonless night for the best visibility.
Camera Settings
Astrophotography relies heavily on manual settings. Here are some starting points:
ISO: Set your ISO between 800 and 3200. Higher ISO values make the camera more sensitive to light but can introduce noise.
Aperture: Use the widest aperture your lens allows to let in as much light as possible.
Shutter Speed: Keep your exposure time under 30 seconds to avoid star trails, unless you’re using a star tracker.
Focus: Switch to manual focus and set your lens to infinity. Use live view to fine-tune focus on a bright star.
Composition Tips
Creating a compelling image involves more than just technical settings. Consider the following:
Foreground Interest: Include trees, mountains, or buildings to add depth and context to your photos.
Rule of Thirds: Position the horizon or key elements along the grid lines for a balanced composition.
Leading Lines: Use natural or artificial lines to draw the viewer’s eye into the frame.
Post-Processing
Editing is an essential part of astrophotography. Use software like Adobe Lightroom or Photoshop to adjust brightness, contrast, and color balance. For advanced editing, consider tools like Starry Landscape Stacker or DeepSkyStacker to reduce noise and enhance details.
Overcoming Challenges
Astrophotography comes with its share of difficulties, but persistence pays off. Dealing with noise, achieving perfect focus, and capturing enough light can be challenging. Experiment with different settings and learn from each session. Remember, the keyword to success in astrophotography is patience. Best Wedding Photographer In india
Final Thoughts
Astrophotography is a journey of discovery and creativity. As you capture the beauty of the cosmos, you’ll gain a deeper appreciation for the universe. Start with simple compositions, refine your skills, and soon you’ll be producing stunning images of the night sky. Happy shooting!
0 notes
Text
Mastering the Art of Shooting and Editing Creative Makeup Product Photography
Makeup product photography is all about showing off the product in a way that grabs attention and tells a story.
Whether it's the bold color of a lipstick or the smooth texture of a foundation, capturing these details can make all the difference.
This guide will help you learn how to take and edit creative photos of makeup products in a way that's easy to follow, even if you're just starting out.

1. Plan Your Photoshoot
Before taking any photos, you need a plan. This helps you get clear on how you want the final images to look.
Know the Product and Brand
Each makeup brand has its own style. Some brands are luxurious and elegant, while others are bright and playful.
Knowing the brand's identity helps you create photos that match their vibe.
For example, if you’re shooting for a high-end brand, use fancy background remove's like black velvet or marble.
If the brand is fun and casual, go for bright colors and playful props. Always make sure the product is the main focus of the shot.
Create a Mood Board
A mood board is a collection of images that inspire you.
You can use Pinterest to gather ideas on styles, colors, lighting, and props.
This will help you stay on track with your vision and show others what you’re going for.
Choose Your Location
For makeup products, you don’t need a big, fancy location.
A small, clean space at home or in a studio works great. A simple backdrop, like a white surface or pastel colors, helps the product stand out.
You can also add texture by using props like wood or glass to make the photos more interesting.
2. Equipment You’ll Need
You don’t need super expensive gear to get good photos, but having the right tools will make things easier.
Camera and Lens
Camera: A DSLR or mirrorless camera is great because you can control the settings.
Look for a camera that shoots in RAW format for easier editing.
Lens: A macro lens is perfect for capturing the small details of makeup, like the shine of an eyeshadow or the texture of a lipstick.
A 50mm or 100mm lens works well.
Lighting
Lighting is super important in photography. It helps you show the true colors and textures of the product.
Softbox or Ring Light: These lights give even, soft light that reduces harsh shadows.
Reflectors: These bounce light onto the product, making the lighting look balanced.
Light Positioning: Try different angles for your lights. Lighting from the side adds shadows and depth, while lighting from the front makes everything look even and flat.
Tripod
A tripod helps keep your camera steady, which is really important for sharp, clear images.
This is especially useful when taking close-up shots of small products like makeup.
3. Setting Up Your Shot
Now that you have your gear, it’s time to set up the shot. How you arrange the products is key to creating a great image.

Product Arrangement
There are different ways to display makeup products, depending on the look you want:
Flat Lay: This is a top-down shot where the products are placed on a flat surface.
It’s great for showing multiple items or creating a scene with props.
Hero Shot: This focuses on one main product. The product is usually placed at an angle to highlight its design or texture.
Texture and Swatches: Makeup is all about texture. Show the creamy texture of a lipstick or the shimmer of eyeshadow.
You can also photograph swatches to show how the colors look on the skin.
Background and Props
The background should make the product stand out.
Use simple props that match the product’s style, like makeup brushes or flowers, but don’t clutter the image.
Keep the background clean and neutral so the makeup is the star.
Angles and Perspectives
Try different angles to find the best way to show the product.
A flat lay works well for group shots, while close-up angles are great for showing the details of the product’s texture or packaging.
4. Taking the Photos
Now that your setup is ready, it’s time to start shooting! Here are a few important tips:
a. Aperture and Depth of Field
Using a low aperture (like f/2.8 or f/4) will blur the background and make the product stand out.
This is great for close-ups. For group shots, use a higher aperture (like f/8 to f/11) so everything stays in focus.
b. ISO and Shutter Speed
Use a low ISO (100-400) to avoid grainy images.
Since you’ll likely be using a tripod, you can set a slower shutter speed to let in more light without worrying about camera shake.
c. White Balance
Make sure the white balance is set correctly so the colors in your photo look natural.
This is especially important for makeup because you want the colors to look accurate.
d. Focus and Sharpness
Make sure your focus is sharp, especially for close-up shots.
Use manual focus if needed and zoom in on your camera’s screen to check that everything looks crisp.
5. Editing Your Photos
Editing your photos is just as important as taking them. It’s where you can make the colors pop and enhance the product's details.
Editing Software
Most photographers use Adobe Lightroom and Photoshop. Lightroom is great for basic adjustments like color and lighting, while Photoshop lets you do more detailed retouching.

Basic Adjustments
Start by adjusting the basics:
Exposure: Make sure the image isn’t too dark or too bright.
Contrast: Increase contrast slightly to make the product stand out.
White Balance: Adjust this to ensure the colors of the product look true to life.
Color Correction
You want the colors in the photo to match what the product looks like in real life.
Use the color correction tools in Lightroom to tweak the hues, saturation, and brightness of each color.
HSL (Hue, Saturation, Luminance) Adjustments: If the lipstick looks too orange, you can adjust the red hue to make it look more accurate.
HSL tools let you change specific colors without affecting the whole image.
Retouching
If there are any small flaws, like dust or smudges, use Photoshop’s healing brush to clean them up.
This makes the product look flawless and professional.
Enhancing Texture: Use sharpening and clarity tools to bring out the textures of the makeup, like the shimmer of eyeshadow or the smoothness of lipstick.
Spot Healing: Remove any distractions or imperfections to keep the focus on the product.
Sharpening and Reducing Noise
Sharpen the image to highlight the details, but don’t go overboard or the photo may look too harsh. If you had to use a higher ISO, reduce noise to smooth out any grainy areas.
Final Check
Look over your image and make sure everything looks right. Is the product clear and sharp?
Do the colors look accurate? Does the lighting highlight the product well?
Once you're happy with the image, save it in a high-resolution format for the web, such as JPEG. You can also save a higher quality file like TIFF if you need it for print.
Conclusion
Shooting and editing makeup product photography can be simple if you follow the right steps.
By understanding the brand’s style, setting up your shots carefully, and using the right tools and techniques, you can create stunning images that highlight the beauty of the products.
Don’t forget, practice makes perfect! The more you experiment with different angles, lighting, and editing techniques, the better your photos will become.
0 notes
Text
A dSLR with manual exposure will most likely have a 'Bulb' mode, which can be set after the longest exposure (typically 30 seconds) that the camera can normally do. Depending on the camera/settings, Bulb will keep the camera shutter open (and thus exposing) either for as long as the shutter button is held down, or after a second press of the shutter release. The second option is preferred, but the first can be mitigated with shutter remotes so you're not physically touching the camera during a long exposure.
Either way you just need a tripod for that. It's possible to spend a lot of money on a tripod, with better tripods tending to be able to support more weight more stably than a cheaper tripod.
It should be noted that if you're doing long exposures of the night sky, you will inevitably run into the Earth's rotation, particularly as the focal length of the lens increases. This means you'd likely need to get an equatorial mount for the camera (which is definitely not cheap) to conpensate for Earth's rotation. But if you're fine with/want star trails, then that's not needed. And it's entirely possible to DIY an equatorial mount too.
You know that thing where you see a gorgeous view (left) and try to take a picture of it, but your phone camera is a joyless fucking nihilist who refuses to see the beauty in anything and only sees this (right)
82K notes
·
View notes
Text
#star trail#star trail photography#startrail camera settings#astrophotography#startrail photos#cosmos#astro#night sky photos
0 notes
Text
Tips in Astrophotography
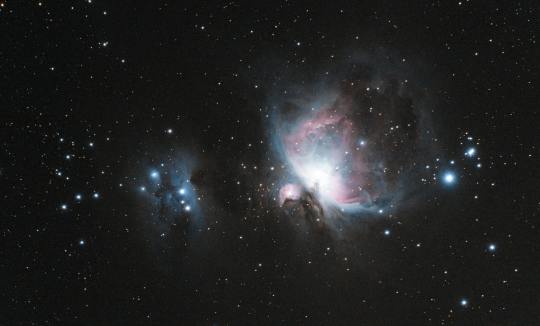
Astrophotography, the art of capturing the beauty of the cosmos through a camera lens, has soared in popularity in recent years. From the mesmerizing glow of distant galaxies to the intricate details of the solar system's planets and moons, astrophotography offers a window into the vastness of the universe. However, mastering this craft requires more than just pointing your camera at the sky and clicking away.
Take some time to plan your shoot. Check weather forecasts, moon phases, and light pollution maps to find the best time and date for astrophotography. Additionally, consider the celestial objects you want to capture and their position in the sky relative to your location. Stability is crucial in astrophotography, as any movement or vibration can result in blurry images. A sturdy tripod keeps the camera steady as you shoot, particularly for long exposures.
While you don't need the most expensive equipment to get started with astrophotography, investing in quality gear can significantly improve your results. A DSLR or mirrorless camera with manual settings, a fast wide-angle lens with a wide aperture (f/2.8 or lower), and a star tracker or equatorial mount are essential for capturing detailed images.
Achieving sharp focus is critical, especially when photographing distant objects like stars and galaxies. Switch your lens to manual focus mode and set it to infinity. You can also use the live view mode on your camera to zoom in on a bright star and manually adjust the focus until it appears sharp.
0 notes
Text
WEEK 1
Learning task - Self-Directed Learning (SDL)
Task: Self-portrait (in the mirror)
Learning Outcomes: Lighting, reflection, camera controls
Select 2 songs to listen to as you photograph
Test the different moods you can achieve
How can you use manual settings to take a photo?
Try self-timers on your camera. Please use a DLSR if you can.

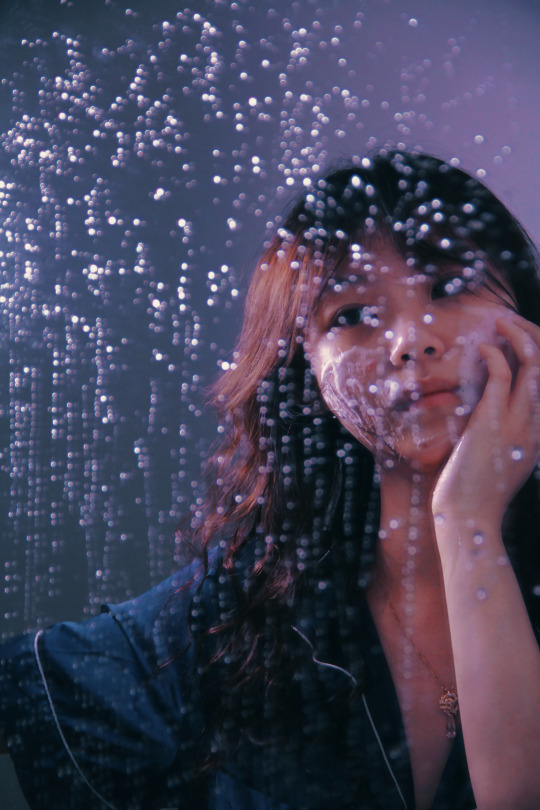
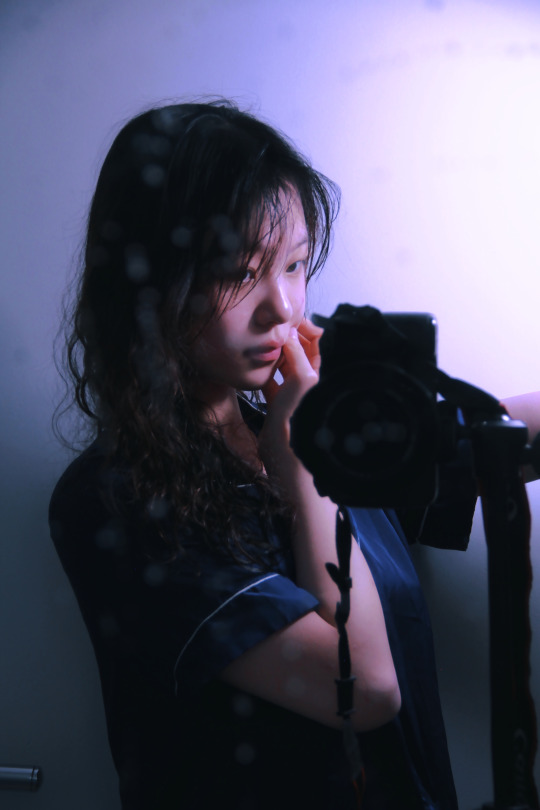
I chose two songs, Justin Timberlake's 'Drown' and Havd's 'All of the Stars,' for my photo session to test different moods. The upbeat melody of 'Drown' brought a lively atmosphere, while the slow tempo of 'All of the Stars' created a more serene ambience. Using manual settings on my DSLR, I mounted the camera on a tripod and adjusted it to the appropriate height. Employing a 10-second self-timer allowed me to set up poses and be part of the shot, ensuring stability and preventing blurriness even with slower shutter speeds
TOOLS I used for my photos

Experiences Self-portrait (in the mirror)
I spilled water onto the mirror, and positioned the camera behind me, and fortunately, my camera had a flip screen, allowing me to see my actions and position through the lens. This feature made my self-portrait session smooth. Placing the light source on my front side, I adjusted the camera's ISO and focal length to ensure that I remained the clear subject, avoiding any blurriness
0 notes
Text
Classic Mini Car Photo Booth Hire
Hire Mini Car Photo Booth Life is British racing green Treat yourself and your guests to a quirky Mini car photo booth. Jasper is one booth with added fun. Built into a 1980’s classic Mini Cooper car , not the modern oversized B.M.W. imposter. Jasper is a photo booth with a huge dose of added fun, perfect for the snapchat and Instagram generation. Capable of taking 5-6 guests. It is themed around the classic Michael Caine film, the Italian Job. Decorated in the same style with 3 driving lights, bonnet straps and italian job themed music from the computer control system, though this one is finished in the classic British Racing Green colour. This is one cute little photo booth. Do you really want a booth in a square box when you can have this? A Cool Booth An icon of cool Britannia, the Mini is one of those dream classic cars screaming its quirky Britishness from the rooftops. Like all of our photo booths, Jasper comes with; •FREE Custom Themed Prints. •Box Of Fun Funky Props. •Booth Butler. •Unlimited Use. •Instant Printing •Guest Book And Additional Prints. •Green Screen Back Window. •Interactive Touch Screen Built In Range Of Options We Offer A Selection Of Low Cost Options For Our Mini Car Photo Booth Hire; •Customised Number Plates. •Additional Print Sets. •Larger Prints. •Social Media Uploads Using A Tablet To Share Prints. •Custom Branding. Hi Tech Photo Booth System Our booths utilise start of the art technology. Including high speed dye sublimation printers, Canon DSLR cameras, and integrated touch screen computers. Providing a fully automated intuitive photography system. Wireless social media tablets provide a seamless way to spread the photo love. Via various social media, with instant uploads to Facebook, Twitter and Instagram. The mini coopers styling is great for any event, be it a wedding reception or a corporate sales promotion. We can work with you to customise any facet of the mini cooper booth. Whether its adding your company branding to the outside, or creating a custom interior to fit in with a social media campaign.. SOCIAL MEDIA SHARING Use our wireless social media tablets to offer instant uploads to Facebook, Twitter, Instagram or your guests email address. Great for weddings, perfect for spreading brand awareness at a corporate event. PERSONALISATION Our Mini Cooper photo booth comes super cool as standard, but we are more than happy to work with you to customise it to meet your precise requirements. Whether its simply adding ribbons to the exterior for a wedding, or totally revamping the interior for a photoshoot we can do that, many corporate clients brand the outside for sales promotions or exhibitions. A TRUE BRITISH ICON The royal family, warm beer, tea, there are many things which are quintessentially British, and the classic Mini Cooper is one of them, designed by Sir Alec Issigonis in 1959 , this little car has more character and grabs more attention than many high end sports cars of today, add a touch of fun to your event with a super cool booth. The Mini Designed by Sir Alec Issigonis in 1959, the Mini was BMC’s answer to the Italian’s Fiat 500 and the German bubble cars. These small cars were becoming increasingly popular due to the fuel shortage caused by the Suez crisis. The first version of the Mini was demonstrated to the press in April 1959, with them being made available to the public on 26th August. They were sold in various guises such as the Wolseley Hornet, the Riley Elf, Austin Seven, but were known throughout the world as “The Mini”. A mainstay of 1960’s culture, the Mini became a performance superstar, when John Cooper the owner of the Cooper Car Company, increased the power of the Mini engine to create first the Mini Cooper, then the even hotter Mini Cooper S, famously starring in the Italian Job movie with Sir Michael Caine. In Depth History Mini Owners ClubWHERE CAN I HIRE A MINI PHOTO BOOTH NEAR ME; We cover the full U.K. with vehicle photo booths. HOW MUCH DOES IT COST TO HIRE; It varies depending on where and when, but prices start around £399. IS THIS A REAL CAR; Yes it is a limited edition Racing Green Austin Mini. With a 998 engine, tuned and ported with twin carbs for performance. Our classic Mini Cooper photo booths for hire throughout the full U.K. and Europe for a fabulous photo experience. Including Yorkshire, Lancashire, Scotland, The North East, London and The Midlands. The mini is a perfect booth for weddings, parties, corporate events, exhibitions, promotions, military functions, company fundays and any event type. JTBBJTBBJTNDc2NyaXB0JTIwdHlwZSUzRCUyMmFwcGxpY2F0aW9uJTJGbGQlMkJqc29uJTIyJTNFJTBBJTdCJTBBJTIwJTIwJTIyJTQwY29udGV4dCUyMiUyMCUzQSUyMCUyMmh0dHAlM0ElMkYlMkZzY2hlbWEub3JnJTIyJTJDJTBBJTIwJTIwJTIyJTQwdHlwZSUyMiUyMCUzQSUyMCUyMlByb2R1Y3QlMjIlMkMlMEElMjAlMjAlMjJtcG4lMjIlMjAlM0ElMjAlMjJDRkNNQ0IlMjIlMkMlMEElMjAlMjAlMjJza3UlMjIlM0ElMjAlMjJDb29wZXIlMjIlMkMlMEElMjAlMjAlMjJuYW1lJTIyJTIwJTNBJTIwJTIyTWluaSUyMENhciUyMFBob3RvJTIwQm9vdGglMjBIaXJlJTIyJTJDJTBBJTIwJTIwJTIyaW1hZ2UlMjIlMjAlM0ElMjAlMjJodHRwcyUzQSUyRiUyRnd3dy5jYW5keWZsb3NzY3JhenkuY29tJTJGaW1hZ2VzJTJGQ2xhc3NpYy1NaW5pLVBob3RvLUJvb3RoLUhpcmUuanBnJTIyJTJDJTBBJTIwJTIwJTIyZGVzY3JpcHRpb24lMjIlMjAlM0ElMjAlMjJKYXNwZXIlMjBpcyUyMG9uZSUyMGNyYXp5JTIwYm9vdGguJTIwQnVpbHQlMjBpbnRvJTIwYSUyMDE5NzAlRTIlODAlOTlzJTIwY2xhc3NpYyUyME1pbmklMjBDb29wZXIlMjBjYXIlMjAlMkMlMjBub3QlMjB0aGUlMjBtb2Rlcm4lMjBCLk0uVy4lMjBpbXBvc3Rlci4lMjBKYXNwZXIlMjBpcyUyMGElMjBwaG90byUyMGJvb3RoJTIwd2l0aCUyMGElMjBodWdlJTIwZG9zZSUyMG9mJTIwYWRkZWQlMjBmdW4lMkMlMjBwZXJmZWN0JTIwZm9yJTIwdGhlJTIwc25hcGNoYXQlMjBnZW5lcmF0aW9uLiUyMiUyQyUwQSUyMCUyMCUyMnVybCUyMiUyMCUzQSUyMCUyMmh0dHBzJTNBJTJGJTJGd3d3LmNyYXp5YW5kY28udWslMkZtaW5pLWNhci1waG90by1ib290aC1oaXJlLXN0dW5uaW5nLWNsYXNzaWMtbWluaS1ib290aCUyRiUyMiUyQyUwQSUyMCUyMCUyMmJyYW5kJTIyJTIwJTNBJTIwJTdCJTBBJTIwJTIwJTIwJTIwJTIyJTQwdHlwZSUyMiUyMCUzQSUyMCUyMkJyYW5kJTIyJTJDJTBBJTIwJTIwJTIwJTIwJTIybmFtZSUyMiUyMCUzQSUyMCUyMkNSQVpZJTIwJTI2JTIwQ28uJTIyJTJDJTBBJTIwJTIwJTIwJTIwJTIybG9nbyUyMiUyMCUzQSUyMCUyMmh0dHBzJTNBJTJGJTJGd3d3LmNyYXp5YW5kY28udWslMkZ3cC1jb250ZW50JTJGdXBsb2FkcyUyRjIwMjIlMkYwMiUyRkNyYXp5X0FuZC1Db19Mb2dvLVVLLnBuZyUyMiUwQSUyMCUyMCU3RCUyQyUwQSUyMCUyMCUyMm9mZmVycyUyMiUyMCUzQSUyMCU3QiUwQSUyMCUyMCUyMCUyMCUyMiU0MHR5cGUlMjIlMjAlM0ElMjAlMjJPZmZlciUyMiUyQyUwQSUyMCUyMCUyMCUyMCUyMnByaWNlJTIyJTIwJTNBJTIwJTIyNDQ5JTIyJTJDJTBBJTIwJTIwJTIwJTIwJTIycHJpY2VDdXJyZW5jeSUyMiUzQSUyMCUyMkdCUCUyMiUyQyUwQSUyMCUyMCUyMCUyMCUyMnByaWNlVmFsaWRVbnRpbCUyMiUzQSUyMCUyMjIwMjMtMTItMzElMjIlMkMlMEElMjAlMjAlMjAlMjAlMjJhdmFpbGFiaWxpdHklMjIlM0ElMjAlMjJJblN0b2NrJTIyJTJDJTBBJTIwJTIwJTIwJTIwJTIydXJsJTIyJTIwJTNBJTIwJTIyaHR0cHMlM0ElMkYlMkZ3d3cuY3JhenlhbmRjby51ayUyRm1pbmktY2FyLXBob3RvLWJvb3RoLWhpcmUtc3R1bm5pbmctY2xhc3NpYy1taW5pLWJvb3RoJTJGJTIyJTBBJTIwJTIwJTdEJTJDJTBBJTIwJTIwJTIyYWdncmVnYXRlUmF0aW5nJTIyJTIwJTNBJTIwJTdCJTBBJTIwJTIwJTIwJTIwJTIyJTQwdHlwZSUyMiUyMCUzQSUyMCUyMkFnZ3JlZ2F0ZVJhdGluZyUyMiUyQyUwQSUyMCUyMCUyMCUyMCUyMnJhdGluZ1ZhbHVlJTIyJTIwJTNBJTIwJTIyNSUyMiUyQyUwQSUyMCUyMCUyMCUyMCUyMmJlc3RSYXRpbmclMjIlMjAlM0ElMjAlMjI1JTIyJTJDJTBBJTIwJTIwJTIwJTIwJTIyd29yc3RSYXRpbmclMjIlMjAlM0ElMjAlMjIxJTIyJTJDJTBBJTIwJTIwJTIwJTIwJTIycmF0aW5nQ291bnQlMjIlMjAlM0ElMjAlMjIzNiUyMiUwQSUwQSUwQSUwQSUyMCUyMCU3RCUwQSU3RCUwQSUzQyUyRnNjcmlwdCUzRSUwQQ== Read the full article
0 notes