#DIYTech
Explore tagged Tumblr posts
Visit Tumblr Blog
Explore Tumblr blogs with no restrictions, modern design and the best experience.
Last Seen Tumblr Blogs


Fun Fact
69% of Tumblr users are millennials.
Text
Rooooound display prototype testing 🌀✨
Okay, we've got our 1.3" round TFT prototype ready for testing - and here's a cute GIF of a dial turning back and forth. It's a great way to test the display, backlight, and SD card interface. We're using a QT Py ESP32 since we need quite a bit of oomph to decode GIFs and display them in real-time. With EYESPI, no wiring is required! This is good to go - it's time to book the PCB panel!
#rounddisplay#tftprototype#gadgettesting#techinnovation#electronicsengineering#qtpy#esp32#realtimegraphics#gifdisplay#techgeek#displaytesting#sdcardinterface#eyesspi#pcbdesign#hardwaredev#techdiy#makersgonnamake#hardwarehack#electronicsprototyping#techprojects#displaytechnology#hardwaredesign#pcbprototype#techtrends#diytech#engineeringlife#electronicscommunity#gadgetlove#displaytech
82 notes
·
View notes
Text

Power Up Your Projects with Style! ⚡🔋
Meet your new energy essential: the sleek 12.8V 20AH Lithium Battery in bold blue! 💙 Perfect for solar setups, RVs, e-bikes, or DIY tech projects—this high-capacity powerhouse delivers long-lasting, reliable energy in a lightweight, durable design.
✨ Why choose it? ✅ Ultra-stable performance ✅ Compact & portable ✅ Built-in safety features ✅ Eye-catching blue casing (because function and style matter!)
Tag your tech-savvy friends or drop a comment to ask questions! 🛠️ Ready to upgrade? Link in bio for details.
#green energy#ecofriendly#lithium home battery#LithiumBattery#DIYTech#PowerSolutions#RenewableEnergy#TechGadgets#BlueTech#lifepo4 battery#solar power
0 notes
Text
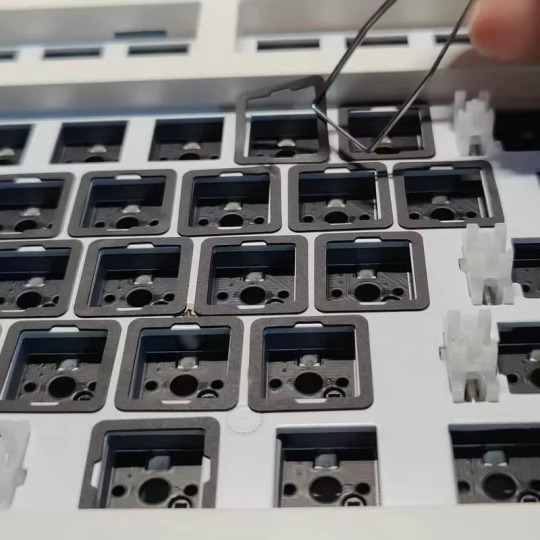
🔧 Silent, Smooth, and Customizable – 120Pcs Poron IXPE EVA Pad for Mechanical Keyboards! 🔧
🖱️ Upgrade your typing experience with the 120Pcs Poron IXPE EVA Pad for hot-swappable mechanical keyboard switches! These high-quality foam pads are designed to reduce noise, provide extra cushioning, and enhance the feel of your mechanical keyboard. Perfect for DIY keyboard enthusiasts, this mute foam pad kit offers a simple yet effective way to customize your build while minimizing sound and vibration. 🔇
💡 Why Choose the Poron IXPE EVA Pad Kit?
Noise Reduction: Enjoy a quieter typing experience without sacrificing performance
Compatible with Hot-Swappable Switches: Ideal for custom mechanical keyboard builds 🔄
Durable & Long-lasting: Made with premium Poron and IXPE EVA foam materials 💪
Perfect for DIY Projects: Easily integrate into your keyboard mods for a smoother feel and quieter keystrokes 🔧
120-Piece Pack: Enough pads to modify multiple switches or a full keyboard setup 🔢
Affordable: Get the complete kit for just $1.85 – no need to break the bank for premium mods! 💸
Transform your mechanical keyboard with this DIY keyboard kit and get the best typing experience possible! Whether you're a seasoned modder or a beginner, these foam pads will help you achieve a smoother and quieter keypress.
🔗 Click & Buy: https://s.click.aliexpress.com/e/_EuU4ajW
#MechanicalKeyboard#KeyboardMods#DIYKeyboard#HotSwappableSwitches#PoronPad#IXPEPad#KeyboardMutePads#SwitchMods#KeyboardNoiseReduction#DIYTech#MechanicalKeyboards#CustomKeyboard#TypingExperience#KeyboardSwitch#MuteFoamPads#QuietKeyboard#KeypressMods#Keyboards#TechBargain#AliExpressTech#TechAccessories#KeyboardBuild#GamingKeyboardMods#MechanicalKeyboardsMods#KeyboardUpgrade#AffordableMods#TechDeal#AliExpressSale
0 notes
Text
Title: Empowering You to Take Control of Your Tech Needs
When it comes to technology, there’s a lot more you can do on your own than you might think. Whether you’re building a computer, choosing the right parts, or even troubleshooting minor issues, today’s tools and resources make it easier than ever to get hands-on without needing expert intervention. We understand that sometimes you might feel intimidated by the tech world—especially with all the…
#AIHelp#ComputerBuilding#ComputerRepair#CustomPC#DIYTech#LocalTechSupport#OnlineTechHelp#PCPartPicker#TechConfidence#TechEmpowerment#TechGuidance#TechnologyHelp#TechSupport#Troubleshooting#UvaldeComputerRepair
0 notes
Text
Introducing the S2 Mini V1.0.0 ESP32-S2 Development Board!
Looking to power up your next IoT project? Meet the S2 Mini V1.0.0 – a compact yet powerful Wi-Fi development board that's perfect for all your tech experiments.
Key Features:
4MB FLASH for plenty of storage
2MB PSRAM for speedy performance
Wi-Fi connectivity to take your projects online
Ideal for home automation, wearables, and DIY smart gadgets!
Type-C USB Interface: Easy and convenient connectivity.
27 Digital I/O Pins: Supports interrupt, PWM, I2C, single wire ADC, DAC, SPI, UART, and USB OTG.
With the ESP32-S2 at its heart, this development board is designed to handle everything from real-time data processing to seamless web communication. Whether you're a hobbyist or a professional, this is the board you need for cutting-edge projects.
Click here to purchase the product: https://dhakarobotics.com/.../1045-s2-mini-v1-0-0-esp32.../
Contact Us: +8801740298319
visit our website: https://dhakarobotics.com/

#ESP32S2#DevelopmentBoard#WiFiBoard#IoTProjects#SmartDevices#DIYTech#EmbeddedSystems#TechInnovation#HomeAutomation#WearableTech#MakersCommunity#TechGadgets#PSRAM#Microcontroller#Electronics#dhakarobotics
0 notes
Text
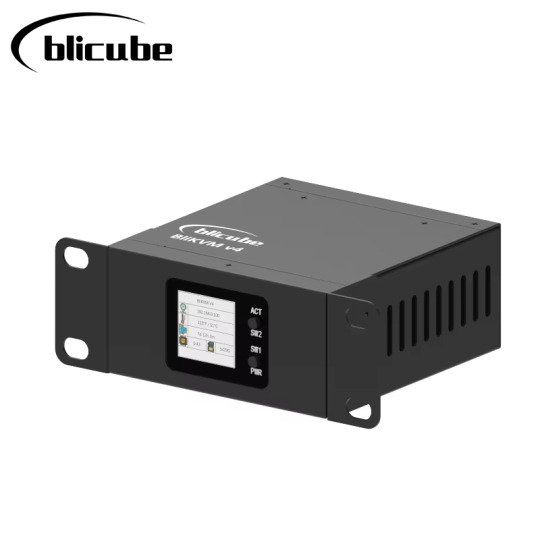
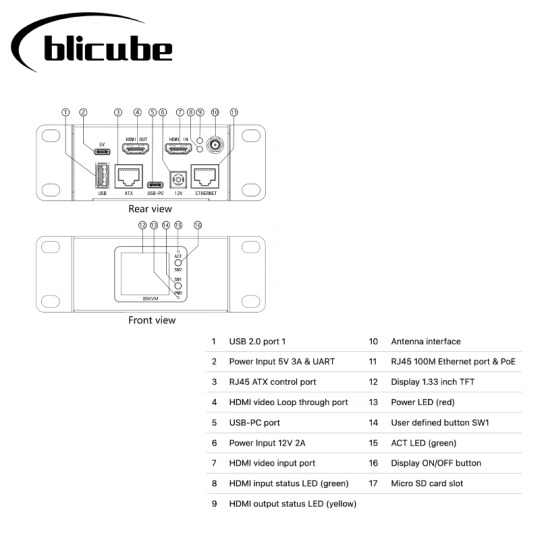
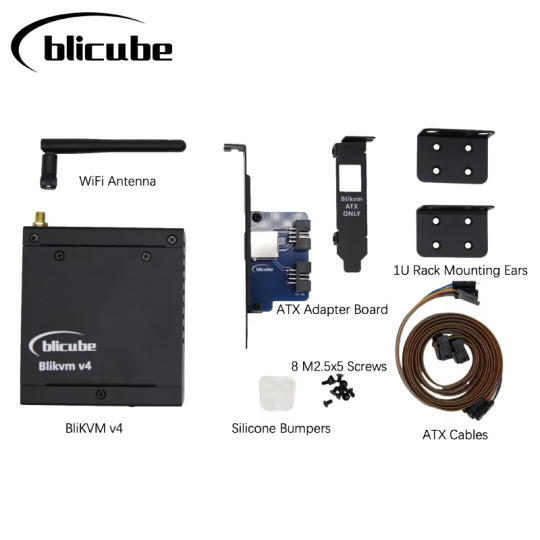
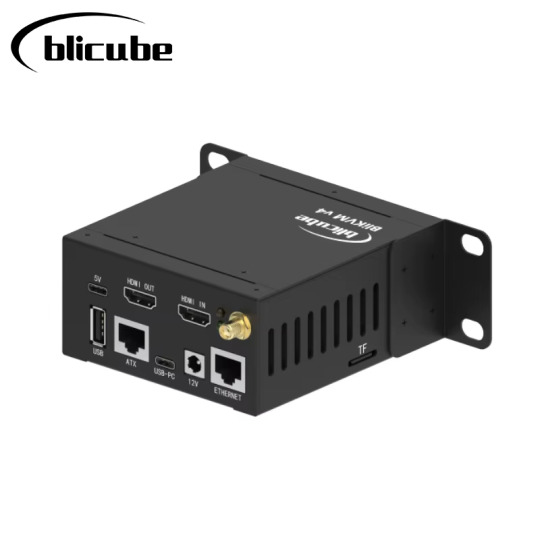

Top On Sale Product Recommendations! BliKVM v4 Allwinner H616 soc "KVM over IP" PoE HDMI Video Loop through PiKVM Original price: USD 191.69 Now price: USD 191.69 Click&Buy:
#BliKVM#AllwinnerH616#KVMoverIP#PoE#HDMI#VideoLoop#PiKVM#TechGadgets#SmartHome#RemoteAccess#GamerLife#HomeOfficeSetup#DIYTech#TechSavvy#VideoStreaming#HomeNetworking#GadgetGoals#InnovationStation#TechieLife#RemoteControl#KVMswitch#TechEnthusiast#GadgetGeek#StreamingSetup#HomeTech#TechTrends#GadgetLove#SmartTech#KVMsolutions#TechHacks
0 notes
Video
youtube
Making a Portable Macintosh Mini 💰 🖥️ 📱 https://applevideos.co.uk/mac-studio/making-a-portable-macintosh-mini
0 notes
Text
Mastering Laptop Repair: A Step-by-Step Guide to Replacing Your Laptop Motherboard

Are you tired of facing issues with your laptop motherboard? Fear not! Our step-by-step guide is here to assist you in seamlessly replacing it. From dismantling your laptop to sourcing the correct motherboard and reassembling everything, we've got you covered. Gain insights into troubleshooting techniques and safety measures to ensure a smooth repair process. Elevate your repair skills today and revive your laptop's performance. Follow this URL for the complete guide: Mobiblip - How to Replace Laptop Motherboard
0 notes
Text
youtube
Practical Exercise 01 | Step-by-Step: Designing a Half Adder with Xilinx Vivado | VHDL | In Hindi
In this practical exercise, you will be guided through the process of designing a half adder using Xilinx Vivado and VHDL. The step-by-step instructions will ensure that you understand each stage of the design process thoroughly.
youtube
Subscribe to "Learn And Grow Community" Follow #learnandgrowcommunity
#vhdl#VHDLCoding#fpga#fpgaprogramming#fpgatutorial#vhdlprogramming#vhdltutorial#digitaldesign#XilinxISE#HalfAdderTutorial#handsonlearning#PracticalExercise#digitalcircuits#Learnandgrowcommunity#electronicstutorial#circuitdesign#ISEImplementation#techeducation#DIYTech#FPGAProgramming#techtutorial#engineeringeducation#ExploreDigitalDesign#troubleshootingtips#diyelectronics#codingskills#XilinxTutorial#CreateWithXilinx#techinnovation#circuitcreations
1 note
·
View note
Text
Crafting Comfort: My Journey to Build an Ergonomic Keyboard
Hey everyone! This week, I embarked on a fascinating DIY journey to blend my love for tech with a dash of wellness. As someone who spends countless hours typing, I decided to take matters into my own hands (quite literally!) and build a custom ergonomic keyboard. Here's how I did it and what I learned along the way.
Step 1: Research and Design I started with a deep dive into ergonomic designs and the science behind them. It was crucial to understand which configurations offer the best support and reduce strain. I sketched out a few designs, focusing on natural hand positioning and key accessibility.
Step 2: Gathering Materials Next, I sourced the materials. I went for mechanical switches known for their durability and comfort, a split keyboard layout to allow for a more natural hand position, and some soft palm rests for added support.
Step 3: Assembly The assembly process was a mix of excitement and challenges. Soldering the switches, programming the key mappings, and ensuring everything was ergonomically aligned took some trial and error, but it was incredibly rewarding.
Step 4: The Final Touch To personalize my keyboard, I added some LED backlighting that not only looks cool but also helps reduce eye strain in low-light conditions.
Reflections Not only has this project allowed me to create a piece of tech that's uniquely mine, but it's also been a great reminder of the importance of taking care of our physical well-being in a digital world. I'd love to hear your thoughts or any ergonomic tips you might have!

0 notes
Text
Google Empowers Pixel Users with New Diagnostic App and Repair Tools

Share Post:
LinkedIn
Twitter
Facebook
Reddit
In a bid to provide Pixel users with increased repair options, Google has unveiled a suite of tools aimed at simplifying and securing the repair process for its popular smartphone line. Despite advancements in screen durability and build materials, accidents happen, and devices may encounter issues over time. The announcement, detailed in a recent Keyword blog post, introduces a diagnostic app and comprehensive repair manuals, reinforcing Google’s commitment to user-centric device support.
Pixel Diagnostic App for Efficient Troubleshooting
Pixel users can now take advantage of a new diagnostic tool by entering ##7287## on the phone dial pad. This tool serves as a troubleshooting feature, allowing users to assess their phone’s condition before or after repairs. Conducting a thorough diagnostic check, the app identifies potential issues across the device, including display, sensor, and connectivity problems. This enables users to pinpoint specific issues efficiently and confirm the proper functioning of their devices post-repair.
Google launches Pixel Diagnostic App and new repair manuals to fix Pixels easily
youtube
Redesigned Repair Manuals and Privacy Features
In tandem with the diagnostic tool, Google has released redesigned repair manuals in both English and French for Pixel Fold, Pixel 8, and Pixel 8 Pro. These extensive manuals, ranging up to 411 pages, cater to both technicians and do-it-yourself enthusiasts. Google emphasizes its commitment to supporting DIY repairs and independent repair shops, announcing plans to continue uploading repair manuals for previous and future devices in the coming months.
Moreover, Google introduced a ‘Repair Mode’ in its December Pixel Feature Drop, enhancing privacy during the repair process. Users can activate Repair Mode to protect their private information while the phone is being serviced, eliminating the need for a time-consuming backup process. Once the repair is complete, users can deactivate Repair Mode, seamlessly restoring their phones to normal functionality.
Google’s recent initiatives align with its broader strategy of fostering DIY repairs and collaborating with independent repair providers such as uBreakiFix, which boasts over 700 locations across the United States. Google asserts that most users can have their phones repaired and returned within 2-4 hours, provided replacement parts are readily available. These new features and tools signify a user-centric approach, marking a new era in device support that prioritizes accessibility and convenience for smartphone users.
Curious to learn more? Explore our articles on Enterprise Wired
0 notes
Text
Testing Dark Castle with audio on the RP2350 Fruit Jam 🕹️🏰
Jepler spent a bunch of time this week working on getting audio working on the pico-umac port https://github.com/jepler/pico-mac/tree/rp2350-fruitjam to Fruit Jam
. Audio on the hardware we're emulating is pretty straightforward: every scanline of the video generator also pops out one byte of PWM data. We have 370 horizontal lines—352 visible and 18 during the vsync—and a 60.15 Hz refresh rate for 22.255 KHz audio approximately. That data is written to $1FD00 http://www.mac.linux-m68k.org/devel/plushw.php . That data is being piped over I2S to the MAX98357
and to a speaker for now.
So, of course, the first thing we have to try out is Dark Castle
: famous for great audio and being a surprisingly hard game to play! The audio sounds really good though :)
#darkcastle#fruitjam#retrogaming#macemulator#pico#rp2350#audiohack#i2saudio#pwm#gameaudio#vintagesound#embeddedprojects#micropython#circuithub#adafruit#max98357#classicmac#macintosh#engineering#programming#linux#python#java#software engineering#coding#oldschoolgaming#diytech#techthrowback#emulatorlife#hardwarehacks
27 notes
·
View notes
Text

#WordPress#CriticalError#WebDev#Troubleshooting#DIYTech#WebsiteMaintenance#WPProblemsSolved#wpwebinfotech
0 notes
Text
🔍How to Make a Spy Camera from Scratch?🔍

📸Ever wondered what it takes to create a hidden camera that captures moments from a whole new perspective? 📸 Join us on an exciting journey as we guide you through the step-by-step process of making your very own spy camera from scratch. 🛠️🕵️♂️
📸Explore the world of DIY electronics, from selecting the right components to seamlessly assembling them. Uncover the mechanics behind covert surveillance and gain insights into the blend of craftsmanship and technology. 📦⚙️
📸Whether you're driven by curiosity, a thirst for innovation, or a desire to enhance your security measures, this DIY adventure is for you! 🌐🔒
📸Get ready to demystify the art of spy cameras and embark on a captivating journey that merges technical expertise with imaginative ingenuity. 🚀🔌
👉 Join us now to learn how to make a spy camera from scratch and unveil the hidden potential of DIY innovation! 💡✨
For the full step-by-step guide, check out our blog post here: https://guideclever.com/how-to-make-a-spy-camera-from-scratch-guide/
DIYTech #SpyCameraCrafting #InnovationUnleashed #DIYElectronics
0 notes
Text

#robots#ArduinoProjects#Robotics#TechInnovation#Electronics#DIYTech#STEMEducation#SmartDevices#Inventors#TechEnthusiast#FutureTech
1 note
·
View note
Text
Introducing the NODEMCU MEGA WIFI R3!
Take your projects to the next level with the NODEMCU MEGA WIFI R3. This powerful development board combines the versatility of the Arduino MEGA with the connectivity of the ESP8266, making it perfect for a wide range of applications.
Integrated Design: Combines the ATmega2560 microcontroller and ESP8266 Wi-Fi IC on a single board, offering seamless integration and enhanced functionality.
High Memory Capacity: Equipped with 32Mb of flash memory, providing ample space for your complex projects.
Versatile Connectivity: Features a CH340G USB-TTL converter, ensuring reliable communication between your board and computer.
Flexible Operation: Components can be configured to work together or independently, giving you the flexibility to tailor the board to your specific needs.
Ideal for IoT Projects: Perfect for home automation, robotics, and other IoT applications, thanks to its robust Wi-Fi capabilities.
Whether you’re a hobbyist or a professional, the NODEMCU MEGA WIFI R3 is designed to meet your needs and exceed your expectations.
Product Specifications:
Microcontroller: ATmega2560
Wi-Fi IC: ESP8266
Memory: 32Mb flash
USB-TTL Converter: CH340G
Compatibility: Compatible with Arduino IDE
Unlock the full potential of your projects with the NODEMCU MEGA WIFI R3. Get yours today and start creating!
For more details or to place an order, visit our website or call us at +8801740298319.
Click here to purchase the product: https://dhakarobotics.com/.../1038-nodemcu-mega-wifi-r3.../
visit our website: https://dhakarobotics.com/

#NodeMCU#MEGAWIFI#Arduino#IoT#SmartProjects#WiFiBoard#Electronics#DIYTech#Robotics#HomeAutomation#TechGadgets#MakerCommunity#STEM#TechEnthusiast#ElectronicsHobbyist#ArduinoProjects#TechDIY#GadgetLovers#Innovation#dhakarobotics
0 notes